Top Ten Data Security Best Practices for a Small Pediatric Practice
As a pediatric practice you deal constantly with Personal Health Information (PHI). This data includes:
- Name, Address, Phone Number
- Social Security Number
- Date of Birth
- Insurance Information
- Medical Records, including test results
This information can be extremely valuable, and therefore a target for hackers. Here are some basic best practices you can implement in order to ensure your PHI remains safe.
-
Keep Your HIPAA Policy Documents Up-to-Date: HIPAA, or the Health Information Portability and Accountability Act, is a set of policies, procedures and guidelines that include rules around health insurance, medical savings accounts, and other aspects of healthcare. When most people talk about HIPAA, they are talking about the HIPAA Title II sections on privacy, rules around information transactions, and security. HIPAA rules around privacy are not just arbitrary requirements, they are also practical measures you can take to secure the PHI and other data at your practice. Read more about HIPAA and security here.
-
Perform a Periodic Security Risk Assessment: Your practice is obligated to perform and record an annual Security Risk Assessment. You can use your Security Risk Assessment to inform and update your practice’s HIPAA Security Policy.
-
Get Social Security Numbers Out Of Your System: One of the best ways to increase data security at your practice is to not store any unnecessary sensitive data. It can be tempting to use Social Security numbers as unique identifiers for patients, but those numbers are a target for identity theft. CMS has already removed SSNs from Medicare cards and replaced them with a Medicare Beneficiary Identifiers (MBI). Maybe you have an old custom field in PCC EHR that you used to store SSNs? Contact PCC for help with removing/re-purposing that field.
-
Maintain Proper Wireless Network Configuration and Passwords: Your practice uses a wireless network that was set up by PCC or by a third party IT consultant. Networks in your office configured by PCC include both an internal network that can access your PCC server but does not have access to the internet, as well as a staff/guest network that has access to the internet but does not have access to PCC. This “network segmentation” isolates your system from outside attacks. The weakest link in network security is generally the human user. With that in mind:
- Never share your clinical network password with anyone.
- Do not share your staff/guest password with patients. If you want to provide network access to your patients and families, contact PCC.
- If you keep your passwords written down, treat them as sensitive information. Secure them, and do not leave them exposed on paper, post-it notes, etc.
- PCC does not know your password and will never ask you for your password.
-
Perform Staff Training on Practice-Wide Procedures for Data Protection: Your staff should be trained on HIPAA privacy guidelines and your practice’s HIPAA policies. The Department of Health & Human Services has a summary of the HIPAA guidelines, and healthIT.gov’s Privacy, Security, and HIPAA page has a number of resources including a Security Risk Assessment tool and various training modules.
-
Make Sure Your Credit Card Processors Are PCI DSS Compliant: The Payment Card Industry Data Security Standard (PCI DSS) is a standard established by the major credit card brands to protect cardholder data. Any business that processes, stores, or transmits credit card information must comply with the standard. You can find more information about PCI DSS compliance, as well as self-assessment tools here.
-
Encrypt Your Data: Any computer that holds PHI should always have encrypted drives. Your practice’s server already has an encrypted drive, and all data backups, both locally and in the cloud, are also encrypted. Your workstations and laptops may contain PHI (maybe a saved e-mail attachment, or an exported report), and so should be encrypted as well. If one of your practices laptops is lost or stolen, it does not need to be treated as a HIPAA breach if its hard drives are encrypted.
-
Periodically Review Your User Lists in PCC EHR and Other Logins Around Your Practice: Employee turnover is a natural part of running a business. When an employee leaves, you should remove (or change the password for) their login to PCC EHR or any other hardware or software you use in your office. Only people who have a reason to log in to your system should be able to do so.
-
Review Your Audit Logs in PCC: PCC’s Audit Log gives you granular details about which users are accessing or changing information in PCC EHR. More information is here.
-
Don't Share User Logins For PCC or Any Other Services: It can be tempting to use the same login or password for multiple services. Never use your PCC login or password for other services or websites.
More detailed information about HIPAA, Security Risk Assessments, and your practice can be found here.
Use PCC Tools to Improve Care for Chronic Disease, Permanent Abnormalities, and Other Special Needs
PCC EHR includes several different tools and features that can help you manage the care you provide for your patients with chronic disease, disabilities, or other special needs.
This article includes an overview of how to use and configure PCC software to create workflows that assist your practice in providing the best care to your chronic and special needs patients. For each topic covered, there are links to the specific feature on learn.pcc.com.
Care Plans
You can use care plans in PCC EHR to manage a patient’s progress with a chronic condition, mental health issue, or anything that a patient regularly sees a specialist for. Pediatric practices with PCC have used care plans to keep track of issues such as asthma, obesity, chronic acne, ADHD, and severe allergies.
Care plans can be reviewed and updated at each well visit, or as labs or reports come in from relevant specialists.

Care plans can be used to record blood work, X-rays, or other labs that the patient may have had done by a specialist, especially if those results do not get sent to you via E-labs. This can save your nurses time when parents call with questions about results or medication instructions that may have come from one of their other providers. In addition, your staff can help parents to remember to schedule specialty appointments that may be due soon.
Care plans may require some duplication within the visit note, but it will save you and your staff from having to search visit and phone notes related to the patient’s outside care.
Keeping information for chronic and special needs patients all in one easy-to-access location is not only beneficial to you, but also meets the PCMH requirement for individualized care plans. Care plans can be printed and given to the family during a visit, or can be made available on the patient portal so that families can review them at any time.
For more information, read the Care Plan article on learn.pcc.com.
Clinical Alerts
You can use Clinical Alerts to notify your staff about a patient’s condition or to remind clinicians about individual needs related to a disability or long-term illness.
PCC’s Clinical Alerts feature can trigger a reminder whenever the patient’s chart is opened, or when scheduling an appointment for the patient.

To learn more about how to set up and use clinical alerts for your practice, read the Clinical Alerts article on learn.pcc.com.
Adjust Growth Charts for Special Needs
Growth charts display plotted growth data such as patient weight, height, and other vitals over time, and indicate percentile averages based on a patient’s age and sex. Percentile averages come from the World Health Organization (WHO) and the Centers for Disease Control (CDC).
But what if your patient doesn’t meet the same threshold as other patients in their age and sex category? What about your Down Syndrome patients? Or children born prematurely?
Down Syndrome Diagnoses
If a patient has a Down syndrome diagnosis (Trisomy 21) on their Problem List, you will see Down syndrome growth charts by default.

Down syndrome percentiles will appear in the chart note, in Flowsheets, in Visit History, and can be used to trigger Clinical Alerts.

Your practice can set which diagnoses cause the Down syndrome charts to appear.
Preterm Patients
If a patient’s recorded gestational age indicates prematurity (less than 37 weeks at birth), PCC EHR will display Fenton Preterm growth charts until the patient reaches a gestational age of 50 weeks.

You can enter a patient’s gestational age at birth in the Birth History section of the Patient Demographics component. You can also add it to chart note protocols.
For help with setting up growth charts in PCC EHR, read the Configure Growth Charts article on learn.pcc.com.
Customize Chart Note Protocols
When a patient has specific needs related to a chronic condition, disability, or illness, use custom chart note protocols to help you manage their care.
You can build a protocol that include services most frequently needed by patients with a specific illness or condition, or in rare cases, you might find it more helpful to create a protocol for a specific patient’s unique needs.
Chart Note Protocols Specific to One Problem
Protocols can be created with any combination of components in PCC EHR. You can create protocols to be used only for patients with specific diagnoses or conditions.
You can also create protocols that are meant to be added to existing protocols. For example, you might have standard well visit protocols that you use for most of your patients, and an “ADHD” or “Asthma” protocol that you can add on, as needed.


You could also create a protocol that could be used with multiple conditions, specific to the coordination of complex services for chronic care.

The above custom protocol is only an example. The important thing to keep in mind is that you can put any combination of components together to make a protocol that will meet your needs, and if you can’t find a component that works, you can create a new one.
For help working with protocols and components in PCC EHR, check out this list of articles related to both tools. You can also get ideas for custom protocols by checking out a library of protocols developed by other PCC EHR clients on protocols.pcc.com.
Chart Note Protocols Specific to One Patient
If you find that none of your protocols (or combinations of protocols) quite work for a particular patient who you see frequently, consider creating a protocol designed specifically for them.
You can name the protocol your patient’s name (or PCC number) so that it’s clear who it is meant to be used for.

This is just an example of one patient who has several complex care needs. Explore the list of components available in PCC EHR to see if there is something that could work for your practice, and remember that you can also create new components as needed.
Additional Resources
- AAP: The American Academy of Pediatrics has a wealth of information about chronic conditions on their website. This includes a list of resources for chronic condition management.
- PCC Protocols: Use the protocols.pcc.com page to explore a library of protocols developed by PCC EHR clients, created to meet specific needs. Feel free to use them as is, or modify them to suit your needs.
Review and Update Patient Insurance Policies
Use the “Policies” component to add, update, and work with a patient’s insurance policies and medicaid plans in PCC EHR.
Watch a Video: You can watch a short video that teaches you how to update insurance policy information for a patient: Review and Update Patient Policies
Review Policy Information
You can review the active policies for any patient at any time by clicking on the Patient Information banner.

Use the Policies component to see more details and make changes. The Policies component appears on the Demographics screen, and your practice can add it to chart notes, phone notes, or other PCC EHR ribbons.

The patient’s primary policy appears at the top, with a “1”, and any secondary or tertiary policies appear as well. By default, you’ll see active policies, but you can also review expired policies using the “Display” feature.

Click the disclosure triangle to see full policy information.

Add a Policy
When mom hands you a new insurance card, click the “Edit” button to enter Edit mode for the chart section, and then click “Add Policy”.


Next, enter policy information. PCC EHR will search for a matching insurance plan as you type.
Autofill Subscriber Information: PCC EHR will attempt to fill in the appropriate account information for the policy, based on the patient’s bill payer account. By default, PCC enters “Child” in the “Patient Relationship to Subscriber” field for a policy. For a Medicaid-type plan, PCC EHR will automatically fill in the patient’s information. You can review and change the policy information, including the Patient Relationship to Subscriber, before you save. If a sibling already has the policy you are entering, you can optionally autofill policy information from their plan.

Remember to enter a Start Date and add an End Date, when appropriate. PCC knows to bill insurance plans based on these dates and the patient’s dates of service.
If your practice bills for home visits, remember to add the complete “Zip +4” Zip Code, as insurance carriers usually require all nine digits.
Click “Save” to save the policy.

After you create a policy, you can click “Edit Policy” to make changes.
More About Patient Relationship to Subscriber: When PCC processes claims, it uses the relationship to subscriber entered for the patient’s specific policy first. If blank, PCC looks at the relationship entered in the patient’s demographics record.
Add Insurance Card Images to a Policy
You can optionally add scanned insurance card images to a patient’s policy in the Policies component.
Select an insurance in the Policies component and click “Edit.”

In the Edit Policy window, click “Add Attachment” to open the attachment tool.

Find your insurance card in Recent Documents or, if you use one, your insurance document category.

Once added, the image and image details appear in the policy window. You can view the document or remove it from the policy by clicking the appropriate button.

If you scan both sides of an insurance card, or have more documents to include, additional documents can be added to each policy by repeating the add attachment process.
Once you’ve added an attachment, an icon will appear in the paperclip column in the Policies component so you can tell at a glance which policies have attached images.

Work With Insurance Policies that Are Not Yet Active
When you add a policy to a patient’s record with a start date in the future, PCC EHR will display the “Not Yet Active” status.

In the patient’s policies list, future policies will appear above active policies. You can filter that list to review All, Active, Expired, and/or Not Yet Active policies.

Insurance Policies Shared Among Siblings
When you add or edit a policy for a patient who has siblings, PCC EHR will prompt you to update their policies as well.

You can deselect any siblings that will not have the policy, optionally enter different Certificate numbers, and click “Save” to add the policy to the sibling(s). Or you can click “Cancel” to skip adding the policy to siblings.
New Insurance Plans: When you add a policy to a patient, you pull from your practice’s official list of insurance plans, kept on your PCC system. That official list of plans is maintained in the Insurance Plans table in the Table Editor in Practice Management. For help making changes to your insurance table, contact your Client Advocate or read The Insurance Plan Tables.
Set Primary, Secondary, Tertiary and Medicaid Plans
When you edit patient policies, you can click and drag to move them to primary, secondary, and so forth.

The numbers by each active policy (1, 2, 3, etc.) will adjust for the new position on the list of policies.
PCC EHR will not allow you to move an expired policy into a primary position. It will also automatically sort Medicaid-type policies to the bottom of active insurance policies. The helpful “M” indicator for Medicaid plans will also help your practice when they need to select VFC status or make other decisions affected by Medicaid coverage.

Edit, Expire or Delete a Policy
While in Edit mode, double-click or select any plan and click “Edit Policy” to make changes.

If you click “Expire”, PCC EHR will pop yesterday’s date into the End Date field.

You can also manually change that date to whenever the plan expired. PCC uses Start and End dates to determine the responsible parties for a date of service.
PCC recommends you keep all old policies on a patient’s record. However, you can click “Delete” to delete a policy that was added to a patient’s record by mistake.

What if the policy has outstanding charges pending? PCC EHR alerts you, and prevents you from deleting that policy.

Check Patient Eligibility for a Policy
You can review patient insurance eligibility for all active policies in PCC EHR. You can do so without an appointment, in which case PCC EHR will request eligibility for today’s date. Or you can check eligibility with every visit, either in the Insurance Eligibility tool, during Patient Check-In, or when charting the encounter.
Use the Insurance Eligibility component to check that the patient is validated for today’s visit.

Optionally, you can click a disclosure triangle to look at the Summary Report or Full Report from the insurance carrier. If you just updated or added a new policy, you may want to click “Request Eligibility” to request a new report from the carrier. You can then set a new Status, based on what you learn.

For more information about the Insurance Eligibility component, read Patient Insurance Eligibility with PCC.
Policies in pocketPCC
On your mobile device, you can review a patient’s policies in the Demographics section of the chart, or wherever the component appears.

Immunization Registry Response Viewer
Use the Immunization Registry Response Viewer to review acknowledgements and other responses from your immunization registry. You can see successful transmissions and also look at warnings and errors that you may need to fix.
Permission to access this tool is role-based.
Configuration and Preparation Required: The Immunization Registry Response Viewer is available for all practices that participate with an immunization registry. It requires additional configuration and activation on your system. To get started, click here for more information, or contact PCC Support.
Open the Viewer and Review an Error
When you want to review registry responses, select the Immunization Registry Response Viewer from the Tools menu.

By default, PCC EHR will present a list of all responses to your system that contain errors or warnings. You can adjust the filters at the bottom of this screen to show all responses, a specific date range, or a specific care center.
Double-click on a message to see the error details.

The window will display all segments of the message that contain errors or warnings. The “Response Message” column will include a description from your immunization registry.
Correct an Error and Mark It As Reviewed
If an error is something simple you can fix in the patient’s chart, click the “Open Chart” button to open the chart and make any necessary corrections.

The Immunization Registry Response Viewer will remain open in a separate window while you work. You can make changes to the chart and then click “Save + Exit”.
Next, you can click “Reviewed: By” to mark the response as reviewed. Click “Save” to return to the list of responses, or click “Save + Next” to move directly to the next unreviewed message with errors or warnings.
When you return to the tool’s main window, you can use the “Reviewed” filter to filter out messages that have already been reviewed, leaving only responses that need attention.

Get Started with Patient Portal Payments
Your patients and families can pay their bills on their mobile device, using PCC’s patient portal (My Kid’s Chart). Once your practice has signed up and enabled account balances and portal payments, you will collect money faster and have fewer bounced checks.
Read the sections below to learn about how portal payments will work for your families, prerequisites for your practice and how to sign up, ideas for how to encourage families to use the new feature, and how your practice can review and work with payments made through the portal.
How Families Review Their Balance and Pay Their Bill in the Patient Portal
Once your practice has enabled portal payments, families with linked billing accounts will be able to see any charges that include an outstanding personal balance.
Portal users will see charges for all patients associated with their portal account, whether the patient is privacy-enabled or not. However, for privacy-enabled patients they will only see the date and charge – not the provider, location, or procedure name.

They will also see a “Make a Payment” button beneath their personal balance information.
If the family has used the mobile payment option previously, they will also see a “Last Payment” listed above the button. Only the most recent portal payment will be shown.

If the user has not previously saved credit card information, then when they press the “Make a Payment” button, the portal will prompt them to enter their basic credit card information, billing address, and e-mail address.

If the family chooses to save the new credit card, it will default to their “preferred” card for future use.
After the payment is made, the portal user will see the result of the transaction. The date and time of payment will appear, and whether the payment was successful or not.

The balance in the patient portal will be adjusted as soon as the payment is posted.
The BluePay service will send receipts to the email address that the portal user entered on the payment screen. Your practice can opt to receive copies of each receipt email.
Families Can Store Multiple Credit Cards
Portal users with more than one credit card stored will choose one card to be the “preferred” card. When a portal user makes a payment, their preferred card will be selected by default.

The user can select a different card for the current payment by clicking the drop-down and choosing another stored card.
Card Data is Secure: Credit card data is never stored on your PCC server, but is managed by our PCI-compliant partner, BluePay.
Families Can Manage Their Stored Cards
The patient portal includes a “Payment Methods” setting, where portal users can add a new card or edit their stored cards outside of the payment screen.

Portals users can select a card to make edits. They can update the expiration date or change their preferred card. If a user no longer wants the card to be stored, they can remove the card.

Expired cards will appear in red.
Configure Your Practice and Get Ready For Portal Payments
Before PCC can add the “Make a Payment” option to your practice’s patient portal (My Kid’s Chart), you need to make sure the following configuration and startup procedures are in place.
Does Your Practice Use the Patient Portal?
First, your practice must be using the patient portal, My Kid’s Chart, and signing up your patients and families. For more information about the portal (My Kid’s Chart), check out our patient portal resources on learn.pcc.com.
Consider Cost and Workflow Impact to Your Practice
Contact Payment Pros with any fee-related questions about accepting payments through your patient portal. Talk to your staff, talk to PCC, and decide if portal payments is affordable and makes sense for your practice’s needs.
Make a Practice-Wide Plan For All Care Centers and Portal Payments
If your practice has multiple locations, separated as Care Centers with PCC, you need to make a practice-wide plan for portal payments.
If you turn on portal payment for your practice, they will be available for all care centers. It is not possible for some care centers to implement portal payments and not others.
Turn On Personal Balances in the Patient Portal
Next, your practice must make sure that the Personal Balance feature is enabled in the patient portal. This it turned on by default, but may be changed in the Configuration tab of the Patient Portal Manager.

Adjust Your Workflow So You Always Link Portal Users to Billing Accounts
When you work with each family, make sure a billing account is assigned to each portal user. Only portal users with associated billing accounts will be able to see the “Make Payment” button in the portal.

For more information on this feature of the portal, review the My Kid’s Chart User Account Administration article.
Here are some recommendations for getting portal users hooked up to accounts:
-
PCC Can Help: PCC can perform a one-time batch migration that will join all portal users with a single billing account that corresponds to the patient(s) in their portal, if a 1:1 direct relationship is available. Talk to your Client Advocate about this option.
-
Manual Assignment: For more complicated situations, when there is more than one billing account associated with the patient(s) in a user’s portal, your office will need to decide which billing account to link to their portal. This is a simple process, but will take some time, depending on how many portal users you have with this scenario.
-
Add Billing Account Assignment to Your Check-In Workflow: Review the Patient Portal Users component during Patient Check-In to see if a family uses the patient portal, and to see if a billing account for personal balances is assigned for the user. You can click “Manage Portal User” if you need to add one.

Review Your Payment Types
In order to track payments separately on your reports, you may want to review and update your practice’s list of payment types.
For example, you may wish to add new payment types for portal payments. You can do so in the Payment Types table in the Tables tool, found in the Configuration menu.
When you configure auto-posting of incoming portal payments, you can select specific payment types and match them to the types sent by your credit card vendor.
Decide Whether to Post Automatically or Manually
Will PCC automatically post incoming portal payments, or will your practice review portal payments and post them manually later? Read the Post Portal Payments to Accounts Automatically or Manually? section below, make a decision and adjust your configuration.
Sign Up with Payment Pros
When you are ready to add mobile payments to your patient portal, follow the procedure below.
Contact PCC Support and/or Payment Pros
Contact PCC Support when your practice is ready to start receiving mobile payments through your patient portal.
Some practices work directly with Payment Pros first, others start by sorting out details in their configuration with PCC Support. Either path works! If you have questions about pricing or other details, PCC can put you in touch with Payment Pros.
Review the Steps Above
If you haven’t already done so, read the section above, “Configure Your Practice and Get Ready For Portal Payments”. PCC Support can help you review and update your practice’s configuration.
Fill Out an Application
You might sign up directly with Payment Pros after you discuss pricing and details with them. Alternatively, a PCC interoperability team member may provide an electronic copy of the Payment Pros Merchant Application.
You will need to enter demographic, business, and tax information.
You will also be required to provide a canceled check from the checking account where you want payments to be directed.
Log In to the BluePay Gateway
A representative from Payment Pros will send you an email verifying that you have been registered.
The email will include your new account name, username, and password, which you can use to log in to the BluePay Gateway.

Set a Go-Live Date
PCC will coordinate a go-live date between your practice and BluePay. On the go-live date, portal users will see the “Make Payment” button in your patient portal, and you will be able to accept mobile payments.
Payment Pros Procedure Flyer: PCC and Payment Pros have worked together to make this process simple. Payment Pros has produced a flyer which explains the process.
Tell Families They Can Pay in the Portal
Your families will be more likely to pay their bills in the portal if you let them know about this option. How can you educate families about this new service and drive them to your portal to make payments?
Here are some suggestions for how to encourage families to use your new portal payment feature:
-
Add a Note to Your Paper Bills: Add a note with your patient portal’s URL address to your paper bills, letting your families know they can save a stamp or a phone call and pay their bill online, 24/7.
-
Post Flyers in Your Office: Print new flyers advertising the new portal feature (and reminding families to use your portal) and post them in conspicuous places around your office, such as in the waiting room, in exam rooms, and at your checkout desk.
-
Splash it on Your Website: Add a link to your portal from your practice’s website. Add a colorful banner with a note encouraging families to check out your portal and its new convenient payment option.
-
Post on Social Media: Use your Facebook or Twitter account to announce that families can now pay their bill through your patient portal.
-
Talk It Up: Sometime the most effective marketing is word of mouth. Educate your staff about how portal payments work, and make sure they are passing on the knowledge to families when they come in for visits.
-
Phone Hold System: Add a message to the “on hold” feature of your phone system, informing families that they can save time by getting forms, reviewing appointment information and paying their bills through the patient portal. This may be particularly effective if you have a separate billing phone number.
Post Portal Payments to Accounts Automatically or Manually?
Once families start paying their bills in the patient portal, how will the money make it to their account on your PCC system?
PCC EHR can automatically receive payments and post them to the appropriate account. Later, you can review portal payments reports to reconcile and review activity.
Alternatively, your practice can take a manual approach: log into the BluePay portal to review the list of payments, optionally download an activity log, and then post the payments into your PCC system yourself.
Option 1: Auto-Post Payments Made Through the Patient Portal
When a family pays their bill in the patient portal, PCC can automatically post that payment to the account. Your PCC system will apply the payment toward the portal user’s associated Billing Account, from oldest to newest charges. If an over-payment is made, the account will receive a credit.
PCC billing reports, as well as the balance that families see in the portal, will be automatically updated to show that the payment has posted.
Working with Portal Payments in PCC: On PCC reports, such as proving out reports, auto-posted portal payments will appear with the username “portalpmt” and location “portal”.
Configure Auto-Posting Portal Payments
If your practice wants to enable auto-posting for payments through your patient portal, use the Configuration tab in the Patient Portal Manager.
Check the box for “Automatically Post Portal Payments”, and select a payment type for each type of card displayed. The payment type you select will be the one that is displayed in reports.

These fields are all required. If you do not already have an appropriate payment type, or you wish to add a new payment type for accounting purposes, you can add one in the Payment Types table in the Tables tool in the Configuration menu or contact PCC Support.
Option 2: Review Payments from Your Portal Users and Manually Post Payments
Instead of auto-posting, your practice can use receipts and reports to review payments and post them manually into PCC.
There are a few different methods you could use to make sure you see all portal payments. Read the next section to learn about each one.
After you have a list of payments, you can manually post them to an account in PCC EHR. (See Post Personal Payments.)
Review and Work With Incoming Portal Payments
Whether you are posting payments manually, or you just want to analyze portal payment activity, there are several methods you can use to make sure you know about every portal payment.
Receive a Copy of Every Portal Payment Receipt
Whenever a family makes a payment, BluePay sends receipts to the email address that the portal user entered on the payment screen. Your practice can opt to receive copies of each receipt email.

Use the Portal Payments Report in PCC EHR
Use the Portal Payments report, in the Report Library in PCC EHR, to find and list incoming portal payments to your practice.
You can find the report in the Billing and Patient Portal reports categories, or search in the All Reports category.
Select a range of dates, and optionally limit your report by portal user, result, card type, transaction type, and autopost status. The resulting report will list all payments made through the portal, including account details for each payment.
Log Into BluePay and Download an Activity Log
Alternatively, your practice can log directly into the payment processing website (the BluePay Gateway) to review and download a log of all portal payment activity.
Do I Ever Need to Do This?: The Portal Payments report in PCC EHR includes all the information your practice should need for reconciling or researching portal payments, or for posting payments manually. However, if something doesn’t add up or you need to do further research, you have the option to log directly into the BluePay Gateway. PCC does not manage this website, so the screens and steps below may change over time.
To access your activity log on the BluePay Gateway, follow the steps below.
Log In to the BluePay Gateway
Go to the BluePay Gateway and enter your account name, username, and password.

Open the Transaction List Screen from the Menu
Open the menu and select PROCESSING, followed by Transactions, and then Trans. List.

Optionally: Download a CSV Export File
If you want a copy for a spreadsheet, or intend to post payments manually (instead of automatically), you may next want to download the payment log.
Select the CSV Export option to download a report of the activity log. Make sure that you choose to include column headers in your report.

The downloaded spreadsheet will include a “Custom ID” field, which displays the portal user’s associated PCC Account ID#. This number will be helpful for you to have if you post payments manually in Practice Management.
Optionally: Reconcile Payments with Deposits, and Post Payments in the Payment Posting Program (pam)
Once you have a payment record in hand, you can compare it with your payment deposits from BluePay, and post appropriate payments in Practice Management. You can use the PCC account number to quickly jump to the correct account and apply the payment to outstanding charges.
To learn more about posting personal payments and adjustments, read Post Personal Payments.
Need More Help?: For additional questions about working with the BluePay Gateway, please contact our portal payment partner, Payment Pros, at (866) 773-3390 or info@paymentpros.net.
PCC eRx Drop-In Sessions
PCC’s Morgan Ellixson-Boyea, CPhT, Dewey Howell, MD, PhD, and the rest of the PCC eRx team host conversations about all things eRx, from solutions to common prescribing dilemmas to new functionality. If you are a PCC client, you can sign up to attend one. At PCC’s eRx drop-in sessions, we discuss your questions and often preview upcoming prescribing functionality in PCC EHR.
Register for the Next PCC eRx Drop-In Session
You can sign up for the next PCC eRx drop-in session by clicking here:
Watch a Previous Web Lab
Click in the table below below to review archived presentation files, video, or accompanying materials for PCC’s eRx drop-in sessions.
| Date | Presentation | Additional Links and Handouts |
|---|---|---|
| 2025 December | 2025-12 PCC eRx Drop-In slides, video |
|
| 2025 September | 2025-09 PCC eRx Drop-In slides |
|
| 2025 August | 2025-08 PCC eRx Drop-In slides, video |
|
| 2025 June | 2025-06 PCC eRx Drop-In slides, video |
|
| 2025 May | 2025-05 PCC eRx Drop-In slides, video |
|
| 2025 April | 2025-04 PCC eRx Drop-In slides, video |
chat transcript |
| 2025 March | 2025-03 PCC eRx Drop-In slides, video |
|
| 2025 February | 2025-02 PCC eRx Drop-In slides, video |
|
| 2025 January | 2025-01 PCC eRx Drop-In slides, video |
chat transcript, hard token reference image |
| 2024 December | 2024-12 PCC eRx Drop-In slides, video |
chat transcript |
| 2024 October | 2024-10 PCC eRx Drop-In slides, video |
|
| 2024 September | 2024-09 PCC eRx Drop-In slides, video |
|
| 2024 August | 2024-08 PCC eRx Drop-In slides, video |
chat transcript, ePA workflow diagram |
| 2024 June | 2024-06 PCC eRx Drop-In slides, video |
chat transcript, ePA workflow diagram |
| 2024 May | 2024-05 PCC eRx Drop-In slides, video |
chat transcript, ePA workflow diagram |
| 2024 April | 2024-04 PCC eRx Drop-In slides, video |
chat transcript, ePA workflow diagram |
| 2024 March | 2024-03 PCC eRx Drop-In slides, video |
chat transcript |
| 2024 February | 2024-02 PCC eRx Drop-In slides, video |
chat transcript |
| 2024 January | 2024-01 PCC eRx Drop-In slides, video |
|
| 2023 December | 2023-12 PCC eRx Drop-In slides, video n/a |
|
| 2023 November | 2023-11 PCC eRx Drop-In slides, video |
chat transcript |
| 2023 October | 2023-10 PCC eRx Drop-In slides, video |
|
| 2023 September | 2023-09 PCC eRx Drop-In slides, video |
chat transcript |
| 2023 August | 2023-08 PCC eRx Drop-In slides, video |
Configure Document Categories, File Sources, and Default Behaviors
PCC EHR enables you to pull in documents from various sources: scanners and coppiers, e-labs, patient portal messages, patient forms, PCC’s built-in patient education resources, and more, and attach them to charts, visits and orders.
Open the Document Administration tool in the Configuration menu to configure defaults and options for how PCC EHR handles documents.

Document Categories
When you edit or import documents into a patient’s chart, you can assign it a category. You can customize document categories in PCC EHR.
To edit your document categories, use the Category Editor tab of the Document Administration tool.

Permissions: If you do not have authorization to edit Document Categories, contact your PCC EHR system administrator.
Add, Delete, or Edit Document Categories
Use the buttons at the bottom of the editor to add, delete, or edit document categories.

If you already have documents assigned to a category, you may not delete it. Use caution when editing the name of a category, as it will appear with the new name, with whatever documents are currently assigned, in all patient charts.
Configure Document File Sources
When a file is scanned into PCC EHR, it goes to a convenient “bucket”, or File Source. Your office might have separate buckets for each role in your office. Or, you could have one for each scanner.
PCC Support will work with you to make sure you have the buckets you need, either matching up 1-for-1 with a scanner, or combining multiple scanners into one bucket. You may also have a bucket for files sent digitally from a third party, or for loading files directly from your e-mail.
After the buckets are configured, you can name and rename those buckets, and give them a default document category using the Import Documents tab of the Document Administration tool.

Give each file source a clear and useful name. You can also set what the default Category should be for documents in that bucket.
Later, your users will select which file sources appear for them on the Import Documents screen. As they import documents into patient charts, they can select a different category, add a note, and attach documents to specific visits and specific orders.
Default Assigned Categories
When you attach or save educational materials and form letters to a patient’s chart, or upload photos or PDF files through pocketPCC, PCC EHR enters a default category for them.
You can configure the default categories in the Assigned Categories tab of the Document Administration tool.

For each document, image or file source, select the category to use as a default.

Documents and files will appear within the selected category wherever documents can be found in PCC EHR.

Like the settings in the Import Documents tab, these are just defaults; the user can always select any category they need when they import or edit a document.

Configure Capitation and Capitated Plans
When your practice has a contract with a “capitated” insurance plan, you will automatically write off the cost of many procedures right when a patient is seen. You will post a monthly capitation check from the payer.
Read the steps below to learn how to create appropriate insurance groups, plans, a fee procedure to offset the monthly payment, a payment type, and a holding account to record and track capitation payments on your system.
PCC Support Completes This Setup: PCC Support will complete the steps in this article for you, or we can walk you through the process. The instructions below are published for users who administer their practice’s tables and wish to make updates or review their configuration.
The example below is for a capitated insurance company called “INSCO INSURANCE”.
Create the Table Entries for Tracking Capitation
Use the Tables tool to create insurance groups, plans, fees, and payment types.
- Create Two New Insurance Groups
For reporting purposes, create two new insurance groups.- Open the Tables tool from the Configuration menu.
- Open the “Insurance Groups” table.
- Add Two New Insurance Groups:
- INSCO INSURANCE
- INSCO INSURANCE Cap Clearing
As you create the new groups, use sequential numbers in the “Reporting Position” field. This will help the two groups appear together on various reports.
- Create New Insurance Plans
- Open the “Insurance Plans” table in the Tables tool.
- Add a new insurance: “INSCO INSURANCE Cap Clearing”. Make sure it uses the INSCO INSURANCE Cap Clearing group. This plan will be used to track capitation payments.
- Next, add new insurance plans to the table that will appear as policies on patient accounts.
- PCC Support’s billing specialists will configure these plans to automatically adjust off procedures in accordance with your contract with the payor.
As you encounter patients with the plan add it to their records as you would any other insurance plan.
- Create the Capitation Fee Procedure and Payment Type
- Open the “Procedures” table in the Tables tool.
- Add a new procedure called “Capitated Fee”. This will be the procedure which offsets the incoming capitation payment from the payor.
- Give the procedure an accounting type of Revenue – Non-service
- Add an appropriate procedure group for reporting purposes. You might decided to create a new procedure group to track capitation income.
- Open the “Payment Types” table
- Add a new payment type called “Capitation Check Payment”
- Give the new payment type a payment class of “Insurance”
- Make it available for personal, insurance, and charge posting payment posting.
Add a New Patient and Account For Tracking Payments
You will use holding accounts to enter capitation payments.
- Create a new patient record. First name: INSCO INSURANCE, Last name: Cap Clearing.
- As you create the patient, add a new parent billing account. First name: INSCO INSURANCE, Last name: Cap Clearing.
- In the patient’s record, add the insurance “INSCO INSURANCE Cap Clearing” to the patient’s policies. Provide a start date that precedes any capitation plan activity you need to record.
Post Capitation Payments
In order to not deflate your A/R with a credit, you will post the Capitated Fee procedure as an offset and then post the Capitation Check payment. The incoming check will pay off the procedure, creating no change in your A/R.
To learn how, read Post Capitation Checks, Incentive Payments, Interest Payments, Overpayments, and Withhold Payments, or watch the tutorial video.
Generate Forms in PCC EHR
Your practice can generate visit forms, excuse letters, camp forms, and other forms in PCC EHR. Whether you print forms on paper, or create electronic copies in the patient’s chart and send them via the patient portal, PCC EHR can create the form you need.
Generate a Patient or Account Form
Use the Forms component to generate forms for a particular patient. The Patient and Account Forms components can be added to any protocol in PCC EHR. The Account Forms component is available when the Forms Configuration tool is enabled. To learn more about enabling the Forms Configuration tool, see Enable the Forms Configuration Tool.
Select a Form
Select a form in the Patient or Account Forms components in the patient’s chart to generate the form.

Enter Free Text if Prompted
If the form contains free text fields, respond to the prompts.

If you always add the same text to your free text prompts, consider creating a snap text entry for this field.
To learn more about Snap Text, read Expand Short Text into Common Phrases.
Select Encounter Data If Prompted
Some forms require additional input. If needed, select the visit, phone note, or portal message that contains the data you want to use to fill out the form. If prompted, select a provider to sign the form, and fill in free text prompt fields when applicable.

Signature Permissions: Your practice can restrict which staff members can generate a provider’s signature on forms. When a user doesn’t have permission to generate a provider’s signature, all variables except the signature image will auto-fill as expected. The signature area will remain blank to accommodate a wet signature. To learn more about configuring provider signatures, read Configure Provider Signatures.
Optionally Preview the Form
If the form was built using the Forms Configuration tool, you can preview it in real time as you fill it out.

If the form was built as a PDF, you must finish generating it in order to see it filled out.
Save the Form
Once fully generated, you can save the form to the patient’s chart, share it through the patient portal, print out a hard copy, add tasks, sign it, and more.

Forms Automatically Populate Information: PCC form letters can include variable placeholders which automatically fill in information about your practice, the patient, or a particular visit. If you generate a form letter from a visit, phone note, or portal message, PCC EHR can fill in the form letter using details from that encounter. If your practice has multiple locations, your forms can fill in practice information based on your working location.
Optionally Edit or Discard the Form
If you need to make changes to the generated form, click the “Back” button. To discard the form without saving it, click the “Discard” button.

Work with Your Saved Document
Once you are happy with the generated form, you can take the same actions with it as you would any other document in PCC EHR. To learn more about how to work with documents, read the article Work with Documents in a Patient’s Chart.
Generate Immunization School Forms in PCC EHR
Click “Print” at the top of a patient’s Immunization record to generate your practice’s customizable school form.


If your office has multiple school form formats, you can select the one you want before printing.


If you don’t see the school form you expect, get in touch with PCC Support at support@pcc.com or 802-846-8177 or 800-722-7708. They can help you customize and configure your school form(s) so they are available and print correctly from PCC EHR.
Families Can Generate an Immunization School Form in the Patient Portal: Families can access their patient’s immunization record and generate a school form from the patient portal. For more information, read the My Kid’s Chart User Guide.
Generate Lab and Radiology Requisitions in PCC EHR
After you create lab or radiology orders and document diagnoses in a patient’s visit protocol, you can generate a requisition form.

To learn more about how to configure and generate lab and radiology requisitions, read Generate Outbound Lab and Radiology Requisitions.
Print a Batch of Visit Forms for the Day
You can use the Print Visit Forms tool to print a batch of visit forms for all of a day’s encounters. For more information on printing visit forms, read Print Visit Forms.
There are several workflow alternatives to printing visit forms, including the Huddle Sheet report, patent pre-check-in, and patient portal documents. Reach out to PCC Support at 802-846-8177 or 800-722-7708 to learn more.
Add and Configure a New Form in PCC EHR
You can add, edit, or remove forms from PCC EHR without assistance with the Forms Configuration tool. Read Configure Forms in PCC EHR to learn more.
If you need assistance, contact PCC Support at support@pcc.com or 802-846-8177 or 800-722-7708.
Review a Patient’s Chart in pocketPCC
Patient charts in pocketPCC include much of the information found in PCC EHR.
You can review a patient’s Medical Summary, Demographics, Immunization History, Visit History and Documents. Most of these sections are read-only in pocketPCC; however, you can enter and edit phone notes and receive and send patient portal messages from the Visit History in pocketPCC.
You can also enter or edit vitals by editing visits in pocketPCC, which will allow the nurse who is recording vitals to move between patient rooms carrying only a mobile phone or tablet.
Review a Patient’s Medical Summary
Whenever you select a patient from your schedule, or search for a patient with the “Find Patient” button, you are taken directly to their Medical Summary.

Scroll up and down to see each component in the Medical Summary. Your practice can customize the Medical Summary to include the patient’s Problem List, Medication History, or Care Plans, for example.
If you are in another section of the patient’s chart and need to get back to the Medical Summary, click the Chart button and select “Medical Summary”.

Clinical Alerts: When you select a patient, a pop-up will display the Clinical Alerts applicable to that patient. You can scroll through the alert(s), and click the continue button to close them.
Configuration: Read the Configure the Medical Summary article to learn how to change the layout and content of your practice’s Medical Summary chart section. The only component that can not appear in PocketPCC is the Growth Charts component.
Review Patient Demographics
When you want to see additional information for the patient whose chart you are reviewing, click the Chart menu and select “Demographics”.

You can review additional information about the patient and their family, including the patient’s PCP, any patient or account flags, communication preferences, and account information including recent billing history and any insurance copay.
Some mobile devices will even allow you to make calls by clicking on the phone numbers listed in the patient’s account information.

Configuration: Read the Configure Demographics article to learn how to change the layout and content of your practice’s Demographics chart section.
Review Visit Chart Notes and Other Encounters
You can use pocketPCC to review patient encounters.
When you want to see a visit chart note, or other type of patient encounter, click on the Chart menu and select “Visit History.”

On the Visit History, pocketPCC displays all visit chart notes, phone notes, portal messages, eRx encounters, follow-up tasks, unattached documents, and unsolicited lab results. If you want to limit the type(s) of encounters displayed, you can filter the history using the gear button.

Click on any encounter in the Visit History to view the chart note.

You can review visit chart note components. For example, you can check up on orders and read their results.

If a visit chart note has more than one protocol, you can scroll down to review each protocol.

Limitations to Chart Notes in pocketPCC: As of PCC 8.5, pocketPCC can display most standard charting components and encounter types. Some specialized components, such as medication reconciliation, growth charts, amendment requests, and some immunization details such as forecasting, VFC, and diseases, can not yet appear. When you need to guarantee a complete, detailed review of a patient’s chart, you should refer to PCC EHR.
Edit Chart Notes in pocketPCC
When you are viewing a visit in pocketPCC, you can enter or edit chart notes by clicking the “Edit” button.

Components will display the same way that they are configured to appear for the visit type in PCC EHR.
For more information specifically about entering vitals in pocketPCC, read Enter Vitals in PocketPCC.
Prescribe in pocketPCC
When you are viewing a visit in pocketPCC, you can tap the “PCC eRx” button in the righthand menu to see the eRx portion of the encounter.

Once within a PCC eRx, you can view and edit the patient’s pharmacies, medication history, allergies, renew past prescriptions, create new prescriptions, and more.
For more information about using PCC eRx within pocketPCC, read Prescribe in pocketPCC.
Review Immunization History
When you want to see a patient’s immunization record, click the Chart menu and select “Immunization History”.

The Immunization History section in pocketPCC displays all immunizations that are recorded in the patient’s chart as administered, refused, or contraindicated. Any outstanding “ordered” vaccines will appear at the bottom, along with any recorded diseases.
Only immunizations that the patient has records for will appear. The name and order of immunizations matches your PCC EHR configuration.
Review All of a Patient’s Documents
You can see all of your patient’s documents when accessing their chart through pocketPCC, including documents that are not attached to a specific visit.
When you want to review a patient’s documents, click on the chart menu and select “Documents”.

You can see all of the documents in the patient’s chart, organized by category. As with PCC EHR, category names only show if there are documents in that category.
When you click on a category, you can see information for each document within that category, including the number of pages in the document, what visit it is attached to (if applicable), if it has been made available in the patient portal, and if it is waiting on a provider’s signature.

Click on any document to view it. You can also view documents from the Visit History section of the chart. If tasks exist for a document, you can access them on the Messaging queue.
Navigate in pocketPCC
You can use pocketPCC to view most of the information you would find in PCC EHR, remotely.
This article will give you an overview of how to get around in pocketPCC. For pointers on navigating a specific patient’s medical record, read Review a Patient’s Chart in pocketPCC.
Review Schedules in pocketPCC
When you log in to pocketPCC, the schedule will display, including all blocks added through PCC EHR’s Appointment Book, defaulting to today’s date.
The schedule will remember which provider you last viewed.
View a Provider’s Schedule
You can select a different provider’s schedule to review, or select one for the first time, if you have not used pocketPCC before.


Navigate to a Different Day or Time
Press the right or left arrow keys to select the next or previous day. To jump to a specific date, tap anywhere on the date or the calendar icon to open the calendar.

Use the arrow buttons to pick a different month.
Pick any day to jump to that day and close the calendar.
View Schedule Button
If you need to get back to the schedule from another window, click the Menu button and select “View Schedule”.

View Messages in pocketPCC
To go to your messaging queue, open pocketPCC and select “Messaging” from the main menu.

Your Messaging queue will display phone notes, portal messages, and tasks, just as they appear in PCC EHR.
You can use the gear button to filter the queue by task, assigned user, date, and status. If your practice uses Care Centers, you can also filter by location.


Click on any message in the queue to read, add a task, or reply to the message.

View and Process Pending Prescriptions in pocketPCC
Select “Rx Queue” from the lefthand menu in pocketPCC to see all pending prescriptions queued up at your practice.

You can edit, process, and delete pending prescriptions right from this page.
The multi-patient Rx Queue in pocketPCC only shows pending prescription tasks and cannot be filtered by patient, provider, or location.
To see just one patient’s pending prescriptions, open their chart in pocketPCC, then select “Rx Queue” from the menu on the right.
Find a Patient in pocketPCC
To view a patient’s chart in pocketPCC, you can either go through the Schedule, or use the Find Patient button.
View a Patient’s Chart From the Schedule
You can open any patient’s chart by selecting their name from your schedule.

Find Patient Button
If you need to review a chart for a patient who is not listed on the schedule, you can use the Find Patient button.
When you click on the “Find Patient” button, a “Recent Patients” list will appear beneath the search box.

Your last 10 patients listed will include the most recent patients whose charts you opened, regardless of which PCC application you used.
Each patient is identified by name, current age and sex.
To search for a patient outside of the last ten, enter a name, birth date, phone number or PCC number in the text field and click Enter.

Results include each patient’s name, birth date, age, PCP, and flags. By default, inactive patients will not appear in search results. To find inactive patients, click the gear icon, and select “Include inactive patients”. Click on the patient to open their chart.

After you find a patient, you can review their Medical Summary, Demographics, Immunization History, Visit History, and Documents. You can also work with medications and prescriptions in PCC eRx, add a new phone note, or send a portal message. To see the components of a patient’s chart, click on the “Chart” button.

For more information on how to navigate a patient’s chart, read Review a Patient’s Chart in pocketPCC.
Use a Barcode Scanner to Manage Immunization Lot Inventory
You can use a barcode scanner to manage your vaccine inventory in PCC EHR. Managing your inventory and administrations using barcode scanners will save time and reduce errors.
Plan and Prepare
How do you get started implementing barcode scanning for immunization inventory at your practice?
Where Are Your Imms? When Do You Enter Your Lots Into Inventory?
First, evaluate how you currently store and load in immunization inventory. Are you using PCC EHR’s Lot Manager to track your lots? Do you have a workstation or laptop that can be easily accessed near your immunization refrigerator?
You can learn more about the Lot Manager in PCC EHR here: Immunization Lots and Vaccine Inventory Management
Purchase Barcode Scanners
Next, you’ll need a 2D barcode scanner.
There are two styles of barcode scanners: bluetooth and corded.
Generally, PCC recommends a corded barcode scanner. A corded or “tethered” barcode scanner doesn’t need to be charged, can easily be swapped between devices, and is less expensive.
If you want to avoid plugging in a corded scanner, a portable, bluetooth scanner may be easier to use. However, it’s important to note that each bluetooth scanner can only be paired with one workstation at a time.
Learn how to pair a Bluetooth scanner with your computer workstation.
How Many Scanners Do You Need?
Scanners are used both for entering new vaccines into inventory and for administering vaccines. So, determine how many people in your practice might be working with vaccines at the same time.
Is there one workstation by the vaccine fridge that everyone uses to track inventory? Then maybe you only need one corded scanner.
Do all your nurses carry their own laptops? Perhaps each one needs their own bluetooth scanner.
Reach out to PCC Support for help determining quantity.
One Bluetooth Scanner for Each Workstation: Because of the way bluetooth works, a scanner can only pair with one computer at a time. Swapping bluetooth scanners from one laptop to another is a complicated and time-consuming process. If you use bluetooth scanners, you will need one scanner per computer.
Figure Out Your Workflow
Finally, get your staff together and play with the scanner in the Lot Manager in PCC EHR.
You’ll notice that if you scan a lot number that is already active, it will open up that lot for you so you can make changes. You may need to adjust your usual workflow for adding lots and how you move/mark boxes to indicate that they’ve been added to your PCC EHR inventory.
Review and Update CVX and MVX Codes and Check for Errors
Barcode scanning identifies immunizations based on the CVX codes on the immunizations that you administer.
If you use a barcode scanner on an immunization that is not recognized by your system, it may mean your system’s CVX codes are not up-to-date, or the expiration date, manufacturer, or other information for that lot was entered incorrectly.
When you first implement barcode scanning, take the time open the Vaccine Lot Manager and scan all your existing lots to catch and fix any errors before they interrupt your work day.
Contact PCC support to help with immunization setup.
Give Us a Call!
Throughout the process, feel free to give us a call. We can help you figure out how to use the Lot Manager, how to use barcodes to track vaccine administrations, and how to integrate scanners into your workflow.
ThinLinc, Virtual PCC EHR Access: Barcode scanners work great on PC and Apple workstations, whether connecting to your server with the PCC EHR client application or via an RDP connection. They do not work as well with some browser-based ThinLinc connections. Contact PCC Support if you wish to perform barcode scanning from a remote location and you use a ThinLinc connection.
How to Scan a New Immunization Lot
To enter a new lot, simply open the Lot Manager, click the “Scan” button, and scan the barcode.

Always Ready: The Lot Manager is always listening for input from a barcode scanner; you can scan without clicking the “Scan” button, saving a step in your workflow.

If the lot scanned is a new lot, the Add Lot window will open and auto-fill all the information it retrieves from the barcode.
You can manually make any adjustments, enter a funding source and the quantity, and then click “Save” to add the lot.
Use the Square Barcode, Not the Lines: Vaccine manufacturers use 2D barcodes on packaging to store information. The 2D barcode will be a square-shaped collection of smaller squares (as opposed to a 1D barcode which is a series of vertical lines, like you would expect to see on food packaging at the grocery store). QR codes that you might scan with your phone are an everyday example of a 2D barcode.
Primary vs. Secondary Packaging: Barcodes can be found on both primary packaging (e.g. the vials that contain the vaccine) and secondary packaging (e.g. the box that contains the vials). The information contained in each is the same, and you can scan either one.
NDC Codes: NDC codes in the Vaccine Lot Manager are not used for billing. NDC codes needed for billing should still be managed through the Procedures Table.
Update Details on an Existing Lot, Scanning a Lot Already In the Manager
If you scan a lot that is already tracked in your system, you will see a list of matching lots at your location. Select the appropriate lot, or click “Add New Lot” if you want to create a new lot.

Expired Lots, Missing CVX Codes, and Other Issues
If you scan a lot that is expired, PCC EHR will give you a warning, and you can not add it automatically. If you wish, you can still enter the new lot manually.

Additionally, if you scan a lot that has a CVX code your system does not recognize, or if you scan a lot that was entered incorrectly by hand (perhaps with an incorrect expiration date or manufacturer), you will see a warning message. Work with PCC Support to adjust your practice’s immunizations. (You can learn more about CVX codes by reading the CVX and MVX Codes.)
Finally, if a barcode is damaged or otherwise unreadable, you will see a “The Barcode Could Not Be Read” error. You can still enter the lot manually in the Lot Manager.
Immunizations with Diluents
If you are tracking immunizations that need to be reconstituted (such as Pentacel), it is likely that both the powder component and the diluent packaging will have barcodes. When entering these immunizations into inventory and when administering them, scan the barcodes on the powder component, not the codes on the diluent.
Track Immunization Administrations with Barcodes
When you administer vaccines, you can select a lot by scanning the barcode on the vial with the Select Vaccine Lots window. You can access the Select Vaccine Lots window anywhere you can edit orders; in a patient’s chart, in the “Edit Orders” window from the schedule screen, and in orders that appear on the Visit Tasks queue.
Once one or more immunization orders have been placed, click “Select Vaccine Lots”.

Then scan the barcode(s) on the immunization packaging. PCC EHR will match it with an active lot in inventory.


Manual Selection: You can use the new Select Vaccine Lots window to manually select lots by clicking on the drop-down arrows if you prefer to, or if you do not have a scanner.
If there are multiple identical lots (perhaps for private and state funds), PCC EHR will prompt you to select the appropriate funding source with a radio button.

Error Protection: If a barcode is invalid, the vaccine has not been ordered, or the lot is expired, depleted or reserved, PCC EHR will alert you and will not let you add the lot to your order.
Pick Lots with Fewer Clicks: Even without a scanner, the Select Vaccine Lots button can be useful, allowing you to select multiple lots from one screen, using fewer clicks.
Scan from Within an Immunization Order
As well as the “Select Vaccine Lots” button, you can use the “Scan” button within each order to scan a vaccine individually.

Troubleshooting: What to Do When a Barcode Won’t Scan
If you use a barcode scanner on an immunization that is not recognized by your system, or otherwise can’t scan a barcode or see an unexpected “Not in the Lot Inventory” message, there are several possible causes. Read below for some tips.
-
Scan the Funny-Looking 2D Barcode, Not the Lines: Look for the black and white square barcode that looks like static or a crossword puzzle (see above). The old fashioned barcode made of lines does not contain full information.
-
Get More Light, Look at Ink Color: If the box or vial you are trying to scan is a dark color, sometimes it won’t scan. Manufacturers are supposed to use a specific contrast ratio to help scanning, but some of them do it incorrectly.
-
Scan the Vial, Not the Box: Even though both should work, PCC recommends you scan the vial for an immunization, and not the box it comes in. The box and the vial typically have different 2D barcodes. PCC’s system accepts both: We can map to the embedded NDC codes for either “Unit of Use (the vial)” or “Unit of Sale (box)”. However, it’s possible that the CDC’s information on a particular manufacturer is not up to date, or that a manufacturer is not compliant with standards, and/or a specific mapping for a vaccine isn’t mapped yet in PCC’s table. Feel free to send a picture of the box (with the 2D barcode) to PCC Support and we can double-check it.
-
Scan Doesn't Match Old Inventory: If the barcode isn’t found even though you know the lot is in your Vaccine Lot Manager, some information may not match. When you first implement barcode scanning, PCC recommends you take the time open the Vaccine Lot Manager and scan all your existing lots. You’ll be able to catch and fix any errors before they interrupt your work day.
-
Review Immunization Details: Also, you can check the expiration date, manufacturer, or other information for that lot in the lot manager and see if something doesn’t match.
-
Update Your CVX Codes: Your PCC system has designated CVX codes for each immunization, which are used to match information in the barcode. Are your codes up-to-date? Read more at MVX and CVX Codes in PCC EHR.
-
Manually Track Delayed Influenza and COVID-19 Codes: CDC release of NDCs for Influenza and COVID-19 immunizations is sometimes delayed. This delay does affect barcode scanning for immunizations. If an NDC is not present in the Vaccine Lot Manager drop-down, it is possible that the CDC has not released the official codes yet. Keep track of any immunizations that you are already administering, and reach out to PCC Support for more information on when to expect the codes to be available in the Vaccine Lot manager.
Contact your PCC Support to help with your practice’s under-the-hood immunization setup.
CDC Training Materials and Videos
When 2D vaccine barcode scanning became a national standard, the U.S. CDC created materials and training videos to help healthcare providers get started.
They talk about the difference between a 2D and traditional barcode, and give helpful scanning tips for clinicians.
You can download the materials and watch their training videos here:
Pair a Bluetooth Immunization Barcode Scanner with your Computer
Read below to learn how to pair a bluetooth 2D barcode scanner to your Windows or Macintosh computer. You can use a barcode scanner to manage your vaccine inventory in PCC EHR.
Pair With A Single Workstation: Because of the way bluetooth works, a scanner can only pair with one computer at a time. Swapping bluetooth scanners from one laptop to another is a complicated and time-consuming process. If you use bluetooth scanners, you will need one scanner per computer.
Instructions for Windows
Learn how to pair a bluetooth 2D barcode scanner with your Windows workstation.
Click the Windows Icon in the Task Bar

Open “Bluetooth and other device settings”

Put the Scanner in Discovery or Pairing Mode
Follow your new scanner’s instructions on enabling discovery or pairing mode to link your scanner to your computer.
Search for Bluetooth Devices with your Computer

Select Your Scanner Model
You will see any number of Bluetooth-enabled devices in this list. Some you may recognize, some you may not. Any device within range will appear, which can include Fitbits, wireless mice and keyboards, phones, and other electronics. Select your scanner. Your computer may recognize it by name, or it may simply recognize it as a “Keyboard”.

Scan or Enter the PIN
Your computer will ask you for a PIN number. Again, check the instructions included with your scanner for a PIN to enter or a barcode to scan. Remember to scan the “Enter” barcode at the end.


Your scanner is now paired with your PC, and will work with PCC EHR.
Instructions for Mac
Learn how to pair a bluetooth 2D barcode scanner with your Macintosh workstation.
Open Bluetooth Settings
Use the Apple menu to open System Preferences, and then click on the Bluetooth icon.

Turn Bluetooth On

Put the Scanner in Discovery or Pairing Mode
Follow your new scanner’s instructions on enabling discovery or pairing mode to link your scanner to your computer.
Pair the Scanner
You will see any number of Bluetooth-enabled devices to pair. Some you may recognize, some you may not. Any device within range will appear, which can include Fitbits, wireless mice and keyboards, phones, and other electronics. Select the barcode scanner. Your computer may recognize it by name, or it may simply recognize it as a “Keyboard”.

Your scanner is now paired with your workstation, and will work with PCC EHR.
Unpairing a Scanner
Bluetooth devices can only be paired with one computer at a time. If you need to pair a scanner with a new computer, you will need to unpair it from the original workstation. Simply go to your list of Bluetooth devices, right click on the barcode scanner, and click “uninstall”.
Meet Ohio Prescription Verification and Indication Requirements in PCC eRx
Ohio requires two-factor identification or signature verification of all prescriptions. As of 2018, Ohio also requires that indications appear on prescriptions for opiates. Later this year, the requirement for indications will extend to all controlled substances.
Read below to learn more about how to meet Ohio’s unique prescription requirements in PCC eRx in PCC EHR.
Two-Factor Authentication and Daily Verification
The State of Ohio Board of Pharmacy requires two-factor or a secondary authorization on all prescriptions. You can meet this requirement in one of two ways in PCC eRx: Use a physical token or mobile-device application token to approve all medications, or use a Daily Prescription Report to review and approve all prescriptions.
Select Your Verification Preference
Every prescriber who prescribes in Ohio must designate whether they will use 2-factor authentication for every prescription or use the Daily Prescription Report method.
Each prescriber should visit the “My Settings” section of PCC eRx and make a selection.

You can return to this screen and change your preferences at any time.
Two-Factor Authentication For All Prescriptions
Two-factor authentication means that each time you prescribe, you will use either a physical token device or a verification app on your mobile device to approve the prescription you are creating.
This process is required for the electronic prescribing of controlled substances, and you can learn more about it on the Prescribe Controlled Substances article.
Once you are set up to prescribe EPCS, you can simply begin using your tokens for all prescriptions.
Daily Prescription Reports
You can avoid using your token for every prescription by relying instead on Daily Prescription Reports, which you can access right from the eRx Tasks Queue.


Each day, PCC eRx will create a new report, and you can review all of your prescriptions and verify them by signing that day’s report electronically or physically. If you miss a day, the reports will appear in a list on your Rx Tasks queue so you can do them later.
Your prescription reports will remain on this screen, in your queue, until you print and sign them or sign them electronically.
Choose a report and click on the lighting bolt or printer option. Next, click “Review & Sign” or “Print & Sign”.
For electronic verification, use your EPCS token or application to generate an “OTP”.

Or, to review a paper copy, click to print the report, sign it, and retain your copy for three years onsite at your practice.

Review Past Daily Prescription Reports
Use the Rx Queue History to review past Daily Prescription Report activity.

Click the “Daily Reports” button to see all past Daily Prescription Reports that have been electronically signed or printed.

You can open any report and see the details. If a report was signed electronically, you can see that indication at the bottom of the report. If it was printed and signed manually with a pen, you can see a copy of the report and will need to refer to your physical copy for verification.

Indications and “Days Supply” Are Required for Opiate and Other Controlled Substances
As of 2018, Ohio requires that a “Days Supply” as well as a medication indication appear on prescriptions for opiate medications. In June of 2018, indications will be required for all controlled substances.
When you create a new prescription, you can enter one or more indications in the Indications field.

You can select from diagnoses that appear in the patient’s chart, on their Problem List, or in a chart note. Alternatively, you can pick from common indications for the selected medication or enter your own. (Be aware that adding an indication to a prescription does not add the diagnosis to the patient’s chart. If appropriate, you should add diagnoses to the patient’s Problem List and/or record them on a chart note.)
The “Days Supply” field must also be filled for any controlled substance prescription, regardless of the drug class, as well as any gabapentin prescriptions.
If you do not enter indications or a days supply on a prescription that requires them, PCC eRx will remind you.

When entered, both Indications and the Days Supply will appear on the final prescription, whether it is printed or sent electronically.

Diagnoses as SNOMED-CT or ICD-10
Ohio prescription rules specify that Indications appear as ICD-10 descriptions. If an ICD-10 code is unavailable, a SNOMED-CT is allowed.
PCC eRx will automatically translate a patient’s SNOMED-CT diagnosis into an ICD-10 code if available, otherwise it will send the SNOMED-CT description.
Renewal Requests
It is possible that a pharmacy may send your practice a renewal request that does not include the required Days Supply or Indications.
In that case, PCC recommends that you speak with the pharmacy, and if appropriate cancel or deny the renewal request and create a new prescription with the required information.
Use Orders to Track Clinical Measures for Reporting, Mandates, and Incentive Programs
Pediatric practices often need to report on clinical and other visit data that is collected over a designated period of time. Whether you are tracking something for PCMH, pay for performance, “Reach Out and Read”, or another incentive program, you can use an order in PCC EHR to record what occurred on the chart note. Your practice can use orders to track medical procedures, screenings, labs, referrals and any other work done on behalf of a patient during an encounter.
How does this work? First you create the right kind of order, add the correct codes and tests, and configure billing behavior for the order. Next, you add the order to chart note protocols. During a visit, clinicians can click “Order” and add and complete tasks to track the activity in the chart. Finally, PCC EHR reports, such as the customizable “Orders By Visit” report, will help you get the data you need for a certain date range.
By configuring orders to track an activity, you can make it easy for your practice to complete tasks, bill for services, as well as meet the requirements of a CQM or other mandate or program guideline.
Examples: In this article, we configure PCC EHR to meet the requirements of NQF 0418: Depression Screening, a Clinical Quality Measure used for PCMH and other mandate programs. (For more details about CQM requirements, read How to Chart for Each Clinical Quality Measure.) We also cover how an office could use an order to implement the “Reach Out and Read” program, which encourages literacy by giving children books during their pediatric visits. You can follow a similar procedure to configure PCC EHR to meet other reporting needs or an initiative of your practice.
Create an Order and Add Tracking Codes
To get started, first create an order or edit an existing order. Follow the steps below to learn how to create (or edit) an order and add required tracking information for a CQM, Meaningful Use Measure, Pay for Performance report, or other program or mandate.
Open the Component Builder
First, open the Protocol Configuration tool and click on “Component Builder”.

Open the Appropriate Orders Component
Find the order component that is the best fit for what you wish to track. Double-click to open it.

Order components all have the term “Orders” at the end of their name. They include Follow-Up Orders, Handout Orders, Lab Orders, Medical Procedure Orders, Medical Test Orders, Radiology Orders, Referral Orders, Screening Orders, Supply Orders, and Surgical Procedure Orders.
Edit or Add an Order
Click “Add” to create a new order, or double-click on an existing order to make changes.
Your practice can have one or more orders that meet the same mandate or workflow need for your practice. For example, for depression screenings you might have different orders for a PHQ-9 and for other types of screening and followup.

Configure Basic Order Details
Review the order name and set any other configurable options. For example, you may want certain orders to be private by default, in which case you would deselect the “Include on Patient Reports” option.

Review or Add SNOMED-CT Procedure Codes for Tracking
Some measures or reporting needs are met by tracking the use of specific SNOMED-CT procedure codes. Search and add the appropriate procedure.


For example, when a patient has a positive result on a depression screening, your practice might perform mental health care education. That order is tracked with SNOMED-CT procedure in order to report on a Clinical Quality Measure.
You would edit the relevant Orders component and order, and then add appropriate SNOMED-CT Procedure codes.

For example, for a mental health care education order, you could add 41022408 “mental health care education” to the order. You could also add codes to followup orders, such as Completion of a Mental Health Crisis Plan, Coping Support Management, or other mental health evaluation or treatment.
Some measures, such as the depression CQM, track referrals. Referrals are also tracked with Referral Orders component orders and a SNOMED-CT Procedure description.
For example, you may have referrals for an initial psychiatric evaluation or a specific depression referral.


For information on which SNOMED-CT descriptions to use for each type of order, refer to your state or officiating agency’s requirements for tracking data for a report. For tips on recording information for each CQM, read How to Chart for Each Clinical Quality Measure.
Review and Add Tests (LOINC codes) for Tracking
Some measures or reporting needs are tracked by the use of a specific, standardized test. Search and add the appropriate test that you perform, and adjust test options.


Tests are identified with a unique LOINC code.
What Tests Should I Add?: The specific test you should add depend on what your practice performs and on the requirements of the mandate you wish to track. For example, for an initial depression screening, you might add 73831-0, “Adolescent depression screening assessment” or 73832-8, “Adult depression screening assessment” for an order for patients 18 years or older. The tests should have a Negative/Positive result. You can also add more than one test to a single order. For example, if you perform a PHQ-9 at each visit, you might first add the “Adolescent depression screening assessment” test, which is used by the clinical quality measure, and then also add the “Patient Health Questionnaire 9 item (PHQ-9) total score” test in order to record the patient’s numerical result.
Repeat for Other Orders that Meet the Same Measure
Your practice may have more than one order that meets the same measure or reporting need! Click “Add” to create new orders, or double-click on existing orders to make changes. Repeat the steps above to configure the order, and add the appropriate LOINC tests or SNOMED-CT description.
Reach Out and Read For Each Age Group: If you are using orders to track the distribution of books for the “Reach Out and Read” program, you may benefit from creating multiple orders. By using orders based on a patient’s age, and adding the correct order to each chart note, you’ll later be able to report in more detail what books were distributed.
Add Orders to Chart Note Protocols
After you configure the orders your practice will use to track activity, add them to chart notes. Your clinicians will then see the “Depression Screening” order, for example, during the visit and be able to track the screening with a single click.
While customizing the chart note is optional, it will make it more likely that the clinician will use the order to track the service they provided.
Open the Protocol Configuration Tool
Click on the Tools menu and select Protocol Configuration.

Open the Protocol Builder
Click Protocol Builder on the Protocol Configuration tool window.

Edit a Chart Note Protocol
From the list of Chart Note Protocols, select the first one that could be used for a patient that a measure intends to track.

For the Depression example, find the first chart note protocol that would be used for a patient aged 12 years or older. Double-click to edit it.
Edit (or Add) the Relevant Orders Component
From the list of components that appear in this chart note protocol, find the orders component (Medical Procedure Orders, Screening Orders, Referral Orders, etc.) and double-click to edit it. If the component does not yet appear on this chart note protocol, click “Add” and select the component to add it.

Add the Specific Orders
Click “Add Items” and select the appropriate orders that you wish to track during that type of visit. For example, select the Depression Screening and any other appropriate screening orders in order to make it easier for your practice to use that order during that type of visit.


Repeat For Referrals or Other Orders
Optionally, add other screenings, referrals, or other orders. You might also want to add orders that could result from a positive screening, for example.


Repeat For Each Chart Note
You should repeat the above steps for every chart note, adding appropriate orders that you wish to track during the related visit.
Configure Billing Codes for Your Screenings, Procedures, and Other Orders
Some performance measures and incentive programs track results by billing codes. And, whenever you add a new order in the component builder, you should consider whether that order needs to trigger procedure codes for billing on the electronic encounter form.
How can you make sure that the correct billing codes show up when a clinician orders a Fluoride Varnish, or uses some other order to track a clinical activity?
Read the procedure below to learn how to use the Billing Configuration tool to set up the correct billing codes for your orders. (You can see more details in the Billing Configuration article.)
Open the Billing Configuration Tool
Open the Billing Configuration Tool in the Tools menu in PCC EHR.

On the “Order Mapping” Tab, Find Your Order
Use the Search field to find the order you wish to configure for billing. Double-click to open the order.

Enter the Billing CPT Code for the Order
Under the CPT Billing Procedures section, enter one or more codes for the order. You can set the codes to be automatically selected on the electronic encounter form, or you can set them to appear as optional codes for the clinician or biller to select later.

What About Billing Diagnoses (ICD-10)?: On this same screen, you can added optional ICD-10 Billing Diagnoses. They will then appear on the Bill screen whenever someone orders this order for the patient. However, this should be rarely used. Diagnoses should be charted on a chart note and not added in Billing Configuration. For example, for a Fluoride Varnish, the appropriate diagnosis code is sometimes the standard well visit code (Z00.129), which the clinician selects on the chart note.
What if I Can't Find a Procedure?: If you are configuring a new procedure that your practice has never billed before, you may need to update your practice’s list of procedures. You can do so in the Procedures table in the Tables tool.
Save Your Changes and Test Your Order(s)
After you’ve reviewed and updated the required billing code for an order, click “Save” and repeat the process for all orders that you need to review in order to meet your reporting needs. Then, create a visit for a sample patient and try them out! Whenever you create an order on the chart note, the correct corresponding codes should appear on the Bill screen.
Chart the Visit, Use the Orders
After you have completed the above configuration, your practice’s clinicians can track the completion of a screening, medical procedure, or other order with a single click. Since you added the order to a chart note protocol, the clinician will see it every time they chart a visit of that type.

Optionally, the clinician can assign the order to another clinician, or complete the screening immediately. If the screening is refused, they can select “Refused”. If the screening is contraindicated, they can select “Contraindicated” and enter an appropriate contraindicated diagnosis in the Diagnoses component on the chart note.
When the screening is complete, they can enter a result in the order.

Unless refused or contraindicated, a positive or negative result is often required to track a measure. The result interpretation, in the Interpretation field, is not required for Clinical Quality Measures, though your practice may configure an order to require it.
If a test result is positive, record whatever additional care follows.
For example, you may prescribe appropriate medication, provide mental health care education, or order a referral.


Enter results and take any other appropriate followup steps.
When you complete your order, you will capture data for your reporting needs.
Achieve One-Click Reporting By Removing the Default Task
By default, orders have a single incomplete task. If you clinicians remove that task, they can trigger the order (and track data for the measure) with a single click.
First, click Order and then click Edit to edit the order.

Next, blank out the default task on the order and click “Save Order”.

For the clinician who removed the task, there will no longer be a task that needs completion for the order to be tracked as complete.
Remember to Bill the Visit and Perform Other Steps
When orders are complete and a visit is ready to be billed, make sure someone at your practice confirms the provider of the encounter. Many mandates or incentive programs require reporting based on a provider.

Next, the provider should click “Bill” and select an appropriate visit encounter code. In addition to billing, the visit encounter code is used to track data for Clinical Quality Measures and many other reporting features in PCC EHR.

Reach Out and Read (ROR) Example
Several pediatric practices have used the procedures above to track data for the “Reach Out and Read” program. ROR provides books for more than 3.8 million children and families in more than 4,500 clinics, health centers, and pediatric practices in the United States. You can use PCC EHR to track your ROR activity on each chart note, and then later produce the information you need for your Reach Out and Read semi-annual progress report.
First, you would create a Reach Out and Read order in your practice’s Handout Orders component in the Component Builder.

Next, you would edit each chart note protocol so that the Handout component and Reach Out and Read order appeared on the chart note.

Then, the clinician could indicate that they provided a book to the child using the order on the chart note… or signal a nurse or other clinician to complete the order with a task.

Run Reports on Collected Data
Once your practice is charting a specific activity using an order, you can use PCC’s customizable reports to produce exactly the output you need for a mandate, program, or other initiative.
The example below shows how you might export data using the Orders by Visit report.
Open the Orders by Visit Report
From the Reports menu, select Report Library, and then click on the Orders by Visit report.

Set Report Criteria
Enter your search criteria and click “Generate.”

Export Your Data
Click the “Export” button and save the data as a CSV file. This will allow you to import it into Excel, or another spreadsheet application, and work with your data so that you can submit it in the required format.

Configure the Appointment Book
Read the sections below to learn how to configure the Appointment Book in PCC EHR.
Update User Roles for Scheduling Functionality
Once the Appointment Book is in use by your practice, you need to indicate which users can schedule, and which providers can be scheduled for appointments.
Assign Scheduling Permissions
Use the Roles tab within the User Administration tool to either create new scheduling roles, or to assign scheduling permissions to existing user roles.

If you add new scheduling roles, make sure that you assign the appropriate roles to your scheduling staff. For more information about working with user roles, read the Set User Roles for Permissions and Security article on PCC Learn.
Indicate the Scheduling Providers at Your Practice
Use the User Administration tool to indicate which users can be scheduled for appointments.

Edit the user’s account and indicate that they are a scheduling provider.
The scheduling provider must have an entry in the Providers table that contains a matching EHR User field. Each user must log all the way out, close and reopen the login window before the new provider will appear on the Appointment book.
To learn how to add a new entry to the Providers table, read Add and Configure a Clinician.
To learn what to do when a provider leaves a practice, read Steps to Take When a Clinician Leaves the Practice.
Configure Visit Reasons, Visit Types, and Defaults
Use Scheduling Configuration to create and work with visit reasons and optionally assign them to color-coded visit types, set visit reason durations by provider, and choose your practice’s default Visit Reason for scheduling, and default Visit Type for searching.

Visit Reasons
Use the Visit Reasons tab to work with your practice’s visit reasons. You can customize the duration for each visit reason, by provider. If your practice uses color coding as guidance for your schedulers, you can also assign a visit type to each visit reason.
Select a visit reason and click “Edit” to make changes.


You can change a visit reason’s name, optionally assign a visit type, choose whether forms will print for the visit (see Print Visit Forms), define its default duration, or set custom durations by provider, in 5-minute increments.
Optional: Visit Types
Visit types are used to color code your schedule so that anyone scheduling can see what type of appointment should be scheduled within each block of time. For example, you may have one visit type named “Well Visits” that includes the visit reasons “infant well visit”, “1 yr well visit”, “2 yr well visit”, etc.
You can decide what color to use for each visit type, and where the colored time slots will appear on the schedule, by provider.
Open the Visit Types tab, and click “Add” to create a new visit type.

Enter a name for your visit type, and click “Save” if you are satisfied with the default color assigned. If you want to change the color, click on the color swatch.

You can choose from the color-blind friendly options provided in the Basic Colors palette, or you can create your own color scheme instead.
When you have finished adding visit types, you will be ready to assign them to visit reasons on the Visit Reasons tab.

Visit Reason and Visit Type Defaults
Use the Preferences tab to set a default Visit Reason for scheduling in the Appointment Book, and default Visit Type for searching with the Availability Finder.

If your practice uses Visit Types with assigned colors, the radio button will default to “Match Visit Type for selected Visit Reason”.
If your practice does not use Visit Types, you can choose to have the Availability Finder ignore the Visit Reason and instead search for availability of “Any” visit type.
Configure Provider Hours and Open Your Calendar
Use the Provider Hours tool to configure and assign templates to each provider’s calendar at your practice. You can optionally add color-coded visit type guidance to let schedulers know what types of appointments to schedule throughout the day.

You can assign templates by month or by week, and you can edit individual days to select a different template, edit the hours for that day, or indicate that the provider is off.
More than one provider can use the same template, if appropriate.
Configure Templates for Provider Hours and Visit Types
Open the Scheduling Templates tab. You will see a list of your practice’s scheduling templates.

A green checkmark in the Assigned column indicates that the template has been applied to at least one provider’s calendar.
You can create a new template by clicking the “Add” button.

You can enter multiple start and end times, at different locations if applicable, to account for breaks or hospital rounds. You can create as complex a daily schedule as needed.
Optionally, you can assign color-coded visit type guidance to a scheduling template to help schedulers know what types of appointments to schedule throughout the day. Select a color from the Visit Type drop-down and then “paint” that color onto blocks of time within the schedule.

If you need to make changes, click on the block of time to edit it. You will see grab handles that will allow you to move the color block, or an ‘x’ to delete it.

When you are finished, click “Save” to complete the new template.
If you prefer to build off of an existing template, you can clone it and save yourself from having to create a new template from scratch.

You can use the new “Clear Hours” button to clear the entire template, with the exception of the template name, or the new “Clear Visit Types” button to keep the same hours for the new template, but change the visit type guidance. You can also just make changes to any part of the schedule.
If you edit a template that has already been assigned to any provider calendars, changes to the template will be reflected in future dates only.
Assign Templates to a Provider’s Calendar
You can assign templates to a provider’s calendar from the Provider Schedule tab, using the “Assign Scheduling Templates” button. You can open up a provider’s calendar for scheduling by assigning templates by month or by week.

If you choose the monthly option, the template will be assigned to all calendar days within the selected month.

If you choose the weekly option, you can set templates for any week that is displayed on the screen.

Edit One Day on the Calendar
Creating a template makes sense for a normal schedule. But what about a doctor’s vacation days? Or when there’s a conference or special meeting? Are you running a flu clinic?
You can edit individual days on a provider’s calendar to select a different template, change the hours for that day, or indicate that the provider is off or on vacation.
Double-click on a single day, or select a day and click the “Edit Day” button.


If you assign templates after creating individual “Custom” or “Off” days, those days will not be changed unless you uncheck the “Preserve off and custom” checkbox.
You can uncheck the box if you want to override previously scheduled “Custom” or “Off” days.

Configure Patient Details Window
What information should you review with a family before you schedule the patient? The Patient Details window includes several components by default: Appointment History, Recent and Upcoming Appointments, Patient Demographics, Account Demographics, and Policies.

You can add any chart-wide components you like, and rearrange the order of the items in the window to suit your office’s needs.
From the Protocol Configuration tool, select “Patient Details Builder (Appt Book)”.

You can click the “Add” button to include any additional chart-wide components, and drag and drop component names to rearrange how they appear on the Patient Details window.
For example, maybe you always ask for insurance information and double-check cell phone numbers. Maybe you manage patient portal users. You can add, remove, and move components around to make sure staff has the details they need when they schedule.
Turn Off Automatic Patient Details Window
The Patient Details window is set by default to open automatically as an appointment is scheduled. If this workflow doesn’t work for your practice, you can turn it off.
Within the Appointment Book section of the Practice Preferences tool, simply uncheck the checkbox next to “Present Patient Details when scheduling appointments”.

The scheduler can still access the Patient Details window by clicking “Patient Details” from the Schedule Appointment panel.
Customize Location Banners in the Appointment Book
Use the Hours tab within the Practice Preferences tool to assign colors to each of your practice’s locations.
You can decide what color to use for each location, by clicking on the new color swatch option to the right of the Location name.

This is the color you will see on the Location banner that displays down the left side of each column on the calendar (if “Display All Locations” is enabled in the Settings tab).
Turn Off Default Location Banners and/or “All Locations” Option
Both location banners and the “All Locations” checkbox are turned on by default for practices with more than one scheduling location.
You can use the Settings tab within the Practice Preferences Configuration tool to turn either of these features off, if you don’t want to use them in your practice.

When “Always display location banners” is checked, a location banner will display on the calendar, even if you are only viewing one location.
When “Display ‘All Locations’ scheduling option” is checked, the “All Locations” checkbox will display in the scheduling panel of the Appointment Book, allowing you to see provider availability across all of your locations.
Choose the Appointment Book Display Unit for Your Practice
Your practice can configure your Appointment Book display grid in time units that work best for your office.
You can choose from time slots of 10, 15, 20 or 30 minutes.

The Appointment Book’s time unit determines the start times of your appointments. For example, if you use a 20 minute unit, all of your appointments in the 9:00 hour would begin at 9:00, 9:20, or 9:40.
Contact PCC Support to configure your Appointment Book scheduling grid.
Short Appointment Lengths
As you design your schedule, remember that short appointments will all begin at the same start time in a single time slot. For example, if you use the default 15-minute Appointment Book time grid, you could schedule up to three separate 5-minute appointments, all set to begin at the same time.

Adjust Safety Checking in PCC eRx
You can adjust safety checking in PCC eRx to meet the needs of your practice.
Overview
As you prescribe, PCC eRx alerts you to safety concerns with the selected medication based on known interactions, the patient, and their history. PCC eRx presents warnings for drug, food, allergy, and disease interactions, duplicate therapies, and inadequate or excessive dosing.
PCC eRx presents safety checking warnings proactively and reactively.
Proactive warnings appear as colorful tags when you search for a medication to prescribe. You can click on a proactive warning to learn more about it.

Reactive warnings appear when you attempt to process a prescription and send it off to the pharmacy.

Safety checking in PCC eRx is very conservative by default, but you can adjust the warning types, their sensitivity, and which prescriber roles see them.
Adjust Safety Checking Settings
Users with PCC eRx administration privileges can adjust the settings for safety checking warnings.
Open eRx Administration
Open the Rx Queue or the PCC eRx section of a patient’s chart, then click “Administration”.

eRx Administrator Access Only: You must be a PCC eRx Administrator to proceed. For help, contact PCC Support.
Open Safety Checking Settings
From the Administration window, click on “Application Administration”, then select “Safety Checking”.

Review and Adjust Settings
Review the list of safety checking warnings that occur in PCC eRx.

You can hover your mouse over any item in the list to see a tool tip showing how it works and what it does, so you can decide whether or not that warning is important to your practice’s workflow and safety while prescribing.

The warnings are sorted into categories, and you can turn any of these warnings on or off for your whole practice, or just for certain prescriber roles at your practice. For some warnings, you can set a severity level for when the warning should trigger.
Turn Off a Safety Checking Warning
If there are certain types of warnings that nobody in your practice finds useful, you can turn them off completely.
For example, when prescribing Schedule II drugs, your staff may not need a pop-up warning letting them know that Methylphenidate and Concerta are in the same drug class. Some practices may find this more distracting than helpful.
To shut off a warning, simply uncheck the checkbox for the warning.

Your users will no longer see these warnings.
Restrict a Safety Checking Warning to Certain Roles
You can specify which PCC eRx roles will be subjected to each category of safety checking.
For example, perhaps your practice’s providers don’t need to see safety checking warnings about drug class cross-sensitivity, but your nurses or clinical staff do.
Click on “[show roles]” and then click on roles to turn them off (or back on again, as needed).

Only roles highlighted in bold green will see warnings for this category of safety checking.
Wait - What Does that Role Do Again?: Remember – when PCC eRx says “Mid-Level Provider” that means someone who can create and send prescriptions, while “Clinical Staff” can’t. To learn more, read the PCC eRx user role reference guide.
Edit Safety Checking Sensitivity
You can adjust the sensitivity of certain safety checking warnings. Sensitivity is represented by a number beneath the warning type. The higher the number, the more sensitive the safety check, and the more frequently prescribers will see that kind of warning.
Click on “[view comment]” next to a warning item with sensitivity to see an explanation for what each number means.

Once you determine the sensitivity your practice needs, select the appropriate number from the drop-down list and click “Update Value”. If you do not click “Update Value”, your new sensitivity setting will not be saved.

You can adjust safety checking sensitivity for food, drug, and disease interactions.
Optimize PCC eRx Searches with Shortcuts and Hiding
You can save time when you search for a drug in PCC eRx by creating search short cuts, hiding unused drugs and dosing statements, and following some best practices when you search.
Watch a Video: You can learn about drug search shortcuts and custom search terms and other topics in this article by watching the PCC eRx Search Optimization video.
Create a Drug Search Short Cut
You can add a search term to any “Quick Rx” medication, making it quick and easy to find the medication you want using the word you want.
For example, you can link a name-brand shortcut to a generic version of a drug, or use your own personal nickname for a medication when you search.
Follow the steps below to create a custom medication search term for your practice.
Visit the Administration Section of PCC eRx
Log into PCC EHR, visit the Rx Queue or the PCC eRx section of any patient’s chart, and click on the Administration link.

Click “Custom Search Terms”
In the panel of options on the right-hand side of the screen, click on “Custom Search Terms”.

Find a Drug
Enter a few letters or a word from a medication name or DME.

Create a Custom Search Term
Enter your new search term in the “New Term” field. Optionally, add an administrative note in the “Admin Comment” field.

Test Your Search Term
Use a test patient to search for the medication using your new custom search term.

Delete an Unused Custom Search Term: You can delete a custom search term at any time by clicking the red “X” symbol next to the term in the Custom Search Term tool.
Link a Short Cut to Multiple Drugs for Chronic Problems
You can use the procedure above to add a shortcut term to multiple drugs and supplies. When your practice searches for a common term, they will see exactly the medications you have selected and can prescribe more quickly. For example, you could create a term “ADHD” and add it to multiple drugs.
When a user searches for the term, all the ADHD drugs with that search term will appear.

You can customize these terms so that your practice can quickly select the drugs they need for any chronic problem or other term.
For an “asthma” shortcut, you could automatically bring up your typical asthma medications, along with a mask.
Hide Drugs and Dosing Statements to Improve Search
When you search for a drug, do you see too many drugs or dosing statements? Common medications have a lot of possible dosing statements, including many that your practice would never use. You can hide those items so they won’t appear on a standard “Quick Rx” search.
By eliminating unused drugs and dosing statements, you can make PCC eRx show only the results that you want for your practice.
Follow the steps below to find and exclude a drug or dosing statement.
Visit the Administration Section of PCC eRx
Log into PCC EHR, visit the Rx Queue or the PCC eRx section of any patient’s chart, and click on the Administration link.

Click “Orderable Exclusions”
In the panel of options on the right-hand side of the screen, click on “Orderable Exclusions”.

Find a Drug and Exclude It
Enter a few letters or a word from a drug or DME.

From the search results, click the green minus (–) symbol to hide the result from future searches in PCC eRx. You can choose to exclude the item from searches when adding Medication History, when prescribing, or both.
OPTIONAL: Select a Drug and Exclude One or More Dosing Statements
In addition to excluding a drug, you can click on a drug and choose to exclude one or more dosing statements from search results.

Restore a Hidden Item: You can add a hidden drug or dosing statement back to your practice’s search results on the same screen as shown above. Instead of a minus sign (–), click the green plus (+).

You can review all of your practice’s exclusions at the bottom of the screen.

Other Search Tips for PCC eRx
You can use the above configuration procedures to make changes to how PCC eRx searches. Below are some best-practices usage recommendations for searching for medications. For more information about these and other tips, review the Prescribe a Medication help article and video.
-
Less is More: When you search for a medication, remember that less is more. Enter a single word or just a few characters first. If you type out more words, PCC eRx may exclude search results for the drug you are looking for.
-
Results are Filtered Out By Age: PCC eRx will exclude certain drugs and dosing statements based on a patient’s age. You can click the “Full Product Search” to see more options.
-
Find Supplies (DME) in Full Product Search: When you wish to find a DME entry, click “Full Product Search”.
-
Pick a Dosing Statement, Then Adjust: When searching for a dosing statement, pick the one that is closest to your desired statement and then make adjustments.
Protect Patient Privacy Overview
PCC includes many different tools and features to help your practice make sure a patient’s medical information is protected.
This article includes an overview of how to use and configure PCC software to ensure that patients’ PHI is only available to those with permission to view it. For each topic covered, there are links to the specific feature article elsewhere on learn.pcc.com.
Watch a Video: You can watch an overview video explaining the features in this article here: Patient Medical Record Privacy.
PCC System-Wide Protections
PCC EHR and the PCC revenue cycle management tools work hard behind the scenes to protect private health information by default.
The most obvious security measure is user logins. Every time anyone at your practice wants to view patient data, they must enter a password, which ensures that only authorized users have access to your files. Obviously this is not possible in the world of paper charting, where anyone could just walk into your office and start reading a patient’s private health information.

Beyond needing a “key” to view your data, whenever a patient’s chart is not actively being looked at, it is encrypted. Your practice’s server has an encrypted hard drive, and all backups of your data (locally and in the cloud) are also encrypted, as are the secure communication standards we use when you send a claim or receive an electronic lab test result.
Chart Audit Log
PCC automatically logs all user access to patient records.
Whenever someone at your practice even opens a chart, PCC EHR logs that activity. PCC keeps track of the date and time a chart was accessed, but also provides details about what type of “event” took place. For example, you can see which sections of the chart were accessed, modified, printed, deleted, etc., and by whom.

You can perform a quick and thorough audit by patient or employee with the PCC EHR Audit Log. You can audit a specific patient’s chart, to see everyone who has looked at that patient’s PHI, and you can audit a particular employee at your practice, to see which charts they have opened. It’s easy to run the report yourself, without outside assistance or configuration, in order to find any unauthorized access into your patient records.
Your practice can decide which users will have access to the PCC EHR Audit Log.
Configure Diagnoses and Orders to Be Private
Sometimes a patient has a sensitive diagnosis, lab, or other order, and you want to make sure that it doesn’t get pushed out to the portal or printed out on reports that mom and dad might see.
Alternatively, your practice may have a policy that specific orders (or all labs) are not released on the patient portal until the provider has spoken with the family.
How can you control whether or not diagnoses or labs appear in the patient portal or on the Patient Visit Summary?
Hide or Show an Individual Item
Every time you add a diagnosis or create any type of order, you can specify whether it will be shared on patient-facing materials.
For example, you can hide sensitive items on the Medical Summary for the patient. Just click the lock icon next to the problem, allergy, or family medical history item.

Similarly, while charting a visit, you can hide a diagnosis or order by unchecking the “Include on Patient Reports” box.
Click Edit to Edit Orders: When you work with orders, you will need to be in “Edit” mode in order to access the lock checkbox.

For more information on this topic, read Hide Sensitive Diagnoses from the Patient Portal and Patient Reports, on learn.pcc.com.
Configure Sensitive Items To Be Hidden By Default
If your practice decides that a certain diagnosis or order should always be hidden (such as STD tests, for example), your practice can configure individual diagnoses or orders to be “locked” by default. Later, clinicians can adjust the order on a case-by-case basis.
Make a Diagnoses Hidden By Default
When you wish to make a diagnosis hidden by default, open the Diagnosis Configuration tool from the Tools menu.
Find the diagnosis, and double-click to edit. Uncheck the “Include on Patient Reports” box to change the default status of this diagnosis to private.

For more detailed instructions on hiding diagnoses, read the Configure Default Hidden Diagnoses section of the Hide Sensitive Diagnoses article.
Configure a Lab Order to Be Hidden By Default
You can use the Lab Configuration tool to set whether or not a lab order will be visible on reports and the Patient Portal by default.
Open the Lab Configuration tool from the Tools menu, and double-click on the lab that you want to make private.
Uncheck the “Include on Patient Reports” box to make this lab “locked” by default.

For more help on configuring lab orders, read the Lab Configuration article on learn.pcc.com.
Hide Lab Orders Until They Are Reviewed: Some practices use the above setting to make all lab orders “hidden” from the Patient Visit Summary and patient portal (My Kid’s Chart) by default. After the clinician reviews the results with the family (for example), the practice edits the lab order and clicks the “Include on Patient Reports” checkbox. That makes the single instance of that lab visible for the family.
Hidden Orders and Diagnoses Appear on Time of Service Receipts: An order or diagnosis that is hidden will still appear on a time of service receipt, if it is generated after the charges have been posted.
Configure Other Orders to Be Hidden By Default
For all other types of orders, such as medical tests or referrals, you will use the Protocol Configuration tool to make them private by default.
Open the Protocol Configuration tool from the Tools menu, and select the Component Builder.

Find the relevant order component, and double-click to open it. Within the component, locate the specific order you want to make private, and double-click on it to edit.

Uncheck the “Include on Patient Reports” box to hide this order on reports and the Patient Portal by default.

For more help with configuring and editing orders, read The Component Builder, on learn.pcc.com.
Teenagers and Privacy
A common privacy issue for pediatric practices is what to do about teenage patients. Depending on your state or region’s regulations, emancipation age can vary. PCC can handle whatever age your patients’ medical records become their own.
Teenagers and the Patient Portal
PCC’s patient portal, MyKidsChart, has an age-based privacy setting that you can configure to whatever age is appropriate for your practice. When a patient turns that age, all users who have not been granted specific permission will no longer have patient portal access to that patient’s records.
Open the Patient Portal Configuration tool, and use the Configuration tab of the Patient Portal Manager to set your practice’s emancipation age.

Portal access is based on an e-mail address that you’ve verified with the parent or patient. You can create a portal account for the patient and grant only them access to their account to review medical records.
Within the parent or guardian’s portal account, you can manually indicate that they should still have access to the patient’s portal account for some reason, even after the patient reaches the emancipation age. Maybe you have a written agreement where they are defined as a patient representative, for example.
To override the emancipation age for a patient, use the Administration tab of the Patient Portal Manager, select “Manage Portal User”, and find the parent or guardian’s account.

Within the column that says “Hide at age < >” click on the “Yes” to turn it to a “No”. This will prohibit the patient’s file from being hidden from this portal user when the patient reaches emancipation age.
Basically, you can set your practice’s default emancipation age, and then your staff can set medical record access on a patient-by-patient basis.
For more information about setting portal account permissions, read the My Kid’s Chart User Account Administration article on learn.pcc.com.
Portal Messages are Private
As detailed above, a practice can designate which portal accounts can review patient medical information, no matter what the age.
Any patient, parent, or other authorized individual can have a portal account and use it to communicate with the practice. Even after a parent can no longer see a patient’s records, they can continue to send and receive portal messages, and a patient can communicate privately with the practice with their own portal account.
All Messages are Private: Portal message conversations are not stored in any email account. Messages between the practice and a portal account holder can not be read by any other My Kid’s Chart user, even those users who have access to the same patient’s records. For example, two parents and a teenage patient, with three separate portal accounts, will not see each others’ communication with the practice. For more information, see the Patient Portal User Guide.
“Parent” Accounts for Patients
If a parent’s insurance company is billed for a patient’s visit, they may see that visit on their EOB from the insurance company, or on their bill.
If a patient’s visit should never be visible to a patient’s parent or guardian, is there anything you can do to prevent them from seeing it?
PCC is a family-based record system. That means that a patient’s medical record and the billing record are separate. When appropriate, you have the option of giving the patient their own account record. Within the Demographics section of their chart, you can create and assign an account for the patient so that they are their own guarantor. When that happens, all future charges will only be visible on their account.

For more detailed instructions on creating an reassigning accounts, read Add New Patients and Accounts on learn.pcc.com.
Some practices instead elect to create a second, private patient chart to track sensitive visits for patients who are not yet adults. It works, but you need to have a practice-wide understanding of the policy, and train your clinicians on the workflow.
Confidential Communication Preference
You can define a patient’s communication preference, recording exactly who in the family should be contacted and how. This is another way to ensure private correspondence with your teenage patients.
The Confidential Communication Preference component is located right on the Demographics screen.

Confidential Notes
PCC EHR has a chart-wide component called Confidential Notes, which can be on the Medical Summary or right on the visit chart note. This is a place that clinicians can use to write notes that are only meant to be seen by certain staff.
Information stored in the Confidential Notes component will not print out on any reports, including the Health Information Summary, Patient Visit Summary, or the Summary of Care Record. It will not appear anywhere in the patient portal.
The Confidential Notes component is collapsed by default, which means that any notes that have been written do not appear visibly on the screen when a chart is opened. The person reviewing the chart will have to click on the arrow to expand the note section, and read whatever has been written.

PCC EHR logs anytime someone opens or edits a patient’s Confidential Notes. Contact PCC Support if you need to audit this log.
For more information on this topic, read Confidential Notes and Other Confidential Fields, on learn.pcc.com.
Clinical Alerts
You can use Clinical Alerts to warn your staff about privacy issues or a patient’s emancipation status.
For a special privacy concern, or if you just want to make sure that staff is aware of the patient’s age when accessing their record, PCC’s Clinical Alerts feature can trigger a reminder whenever the patient’s chart is opened.

To learn more about how to set up and use clinical alerts for your practice, read the Clinical Alerts article on learn.pcc.com.
Office Policy Considerations Around Privacy
- Access Permissions Form on File: It’s a good idea to have a signed “access permissions” form from patients and families that you keep on file, import it and keep it in the Documents section of the patients chart. If you are establishing a patient representative you should have a form for that and have that signed and placed in the patient’s chart as well.
- Emancipation Age: You should have a practice policy on the Emancipation Age for patient portal access, with an explanation of exceptions around special-needs patients and other circumstances.
- Know Your Tools: Your clinicians all need to know how the “Display on Patient Reports” checkbox and lock toggle work. One administrator at your practice can configure the defaults for sensitive labs and diagnoses, but it is important for clinicians to be able to review what’s happening in the moment, and to use these tools when charting, as needed.
- Know Your HIPAA Protections: Have you done a Security Risk Assessment? Who is your practice’s HIPAA officer, and what’s your written policy?
- Your State or Region’s Rules: Finally, your practice needs to know your state or region’s rules, laws and requirements. What are the laws around “patient representatives”? At what age does a parent need permission to access their child’s records? PCC has the tools to help you make it happen.
How to Adjust Computer Workstation Font Sizes
When you set up a computer workstation at your practice, you may wish to change the system-wide font sizes used by your operating system.
PCC’s software and tools automatically adjust font sizes and software interface elements to fit your screen. PCC’s fall 2017 update (PCC 8.1) improved that capability, which means you may want to make changes to your workstation after your update.
Read the sections below to learn how to access and make changes to a computer workstation’s display font.
Change Display Settings in Microsoft Windows
Use the Display controls to adjust your Windows workstation’s system-wide font size.
Windows 10


PCC recommends you start with the 125% or 150% setting. If you used a larger percentage, you may want to reduce the percentage after your PCC 8.1 update.
Windows 7 and Windows 8


PCC recommends you start with the Medium or Larger setting. If you used a larger percentage, you may want to reduce the percentage after your PCC 8.1 update.
Change Display Settings in Apple MacOS
Use the “Displays” settings panel to adjust your MacOS workstation’s system-wide font size.


In most circumstances, the “Default for display” option will produce the best results. You can experiment with the “Scaled” option if you have trouble reading your screen.
Contact PCC Support
If you are experiencing other problems with fonts or graphics in PCC EHR or any of PCC’s products or services, contact PCC Support. PCC has additional tools and options, and they can also help you make hardware purchasing decisions.
Create Custom Medications and Sentences in PCC eRx
Your practice can create custom entries to standardize complex instructions for common medications and simplify the process of prescribing non-standard medications, supplies, equipment, and services.
Trying to create a custom entry for a compound? Jump to this section.
Video Coming Soon!: A soon-to-be published video details how you can create custom medications and sentences in PCC eRx.
Create a Custom Medication
Follow the procedure below to create a new custom medication in PCC eRx.
Search For Your Desired Drug or Item and Click “Full Product Search”
Before you create a custom medication item, double-check that it isn’t available already. You may have already searched, but a few key tips may help you find what you are looking for.
Click 'Full Product Search', Especially For DMEs: PCC eRx drug search results are based on a patient’s age. If you are looking for a drug that does not have age specificity, you may need to use “Full Product Search” to find it. Additionally, DMEs do not have age restrictions. You will always need to click “Full Product Search” to find equipment and most supplies.

Use Fewer Words For a Broader Search: If you type in the full drug name or trade name, you may miss a character or enter a limited search that prevents you from finding what you are looking for. Start searching with a single word or drug name for a broader result.
Open PCC eRx and Click “Administration”
When you are ready to create a new medication item, visit the PCC eRx queue or the PCC eRx section of a patient’s chart and click “Administration”.

You must be a PCC eRx administrator to proceed. For help, contact your PCC Client Advocate.
Click “Custom Medications”
Find and click the “Custom Medications” link on the right-most column.

Enter a Description and Route
What’s the drug or medication that you wish to prescribe? Enter the name in the Description field and select a Route.

What Should Be In the Description?: The description is the name that will appear on the prescription bottle. Typically, it would include both the drug and form, or in some other way specify what is being prescribed. Later on, you will create one or several custom sentences that will define how the drug should be taken.
Select DME or Compound
Check the “DME” checkbox if the custom item is a supply. Check the “Compound” checkbox if the custom item is a medication.

Required: If you do not click one of these options, the prescription cannot be sent to a pharmacy electronically.
Click “Add Custom First Step Item” to Save Your Selections
Click to add your custom item. It will appear in a list.

Click “Administration” then “Custom Medication Sentences”
Now you are ready to create the dosing instructions for your custom medication.
Click on the “Administration” tab to exit the Custom Medications screen, then click the “Custom Medication Sentences” link.

Search For the Medication on the Custom Sentences Screen
Search for your custom medication at the top of the Custom Sentences screen.

Custom Sentences for Existing Medications: You don’t have to search for a custom medication on this screen; you can search for any drug and create a custom sentence for it. However, PCC recommends prescription favorites as a faster, more intuitive way to create custom sentences for existing medications.
Select the Medication and Click “Add Custom Medication Item”
Select the medication, then click the “Add Custom Medication Item…” link.

If this is not your first time setting up custom sentences for this drug, or you are creating a custom sentence for a drug that already exists on your PCC system, you will see a list of other custom sentences already tied to the medication above the link to add a new custom medication item.
Enter Dosing Statement Details
Next, enter any dosing statement details.

For a DME and some unusual compounds, you might choose to check “Instructions Only” to remove fields that are not relevant.
Your Prescriber Can Change Details As You Prescribe: Keep in mind that you are creating a new custom medication listing that will appear in search results. Your prescribers can still select your new item and then make changes to frequency, duration, or any other field as they prescribe.
Click “Save” to See Your New Medication Item
Click “Save” to finish. You will see your new custom medication item(s) listed on the screen.

Test Your New Medication Items
Next, you should test your medication to see if it behaves as you expect. You can open a test patient and create the prescription without sending it.

Delete Custom Medications and Sentences
You can delete erroneous or unneeded custom medications and sentences in the Administration section of PCC eRx.

Delete a Custom Medication
Click the “Custom Medications” link on the PCC eRx Administration page, then click the red “X” next to the item.

Delete a Custom Medication Sentence
Click the “Custom Medication Sentences” link on the PCC eRx Administration page, then search for the medication that is tied to the sentence you want to delete.

Select the medication, then click the “remove custom” link beside the custom sentence you want to delete.

Compounds
While it is possible to create your own custom compound entries, please note that they will be saved as instructions-only prescriptions and will not be subjected to drug safety checking.
Instead, try using the standard entries for Magic Mouthwash and All-Purpose Nipple Ointment (ANPO) already offered in PCC eRx. These entries contain itemized lists of ingredients, their ratios, and are subjected to drug safety checking.
If the “recipes” included in these standard entries aren’t quite right or there are other compounds you wish to have added to the standard medication list, contact PCC Support.
On request, PCC may be able to manually add additional compounds to your practice-wide list of medications that can undergo drug safety checking and streamline communication to pharmacy staff.
How to Respond to Record Requests with PCC EHR
As a pediatric practice, you receive requests for medical information about your patients on a regular basis. Sometimes you are asked to transfer a patient’s chart, or export all known medical information, or in some other way send a patient’s records to a third party.
You know best whether you can satisfy the request with an overview of the patient’s chart, or if it will be necessary to disclose specific notes from some or all of the patient’s visits.
PCC has put together this guide to show the various ways you can satisfy record requests using PCC EHR, and our recommendations for when to use each format.
Send a C-CDA file via Direct Secure Messaging
When you refer or transfer a patient to another provider, PCC recommends sending a C-CDA.
Request coming from the family?: Families who are registered with the Patient Portal can download a Summary of Care whenever they like. They don’t even need to ask you! If you haven’t done so already, considering sharing the My Kid’s Chart User’s Guide with your patients’ families.
A C-CDA is an xml-formatted document, which means that it is machine-readable, and allows for data to be exported from one EHR and imported into another.
You can transmit the Summary of Care as a C-CDA, from PCC EHR to any other clinician or practice via Direct Secure Messaging. The Summary of Care provides an overview of the patient’s medical history.
What Data is Included in the C-CDA?
The following information is included in the C-CDA file, in both human and machine-readable format:
- Allergies
- Allergies component – active, inactive, and resolved allergies
- PCC eRx Allergies component – active allergies
- Medications
- Brand name, strength, route, form, start date, stop date
- Problem List
- Problem Name, SNOMED code, Onset Date, Status
- History of Procedures
- Populated by Orders
- Order Name, SNOMED code, Description, Date ordered, Status
- Canceled orders are not shown
- Relevant Diagnostic Tests and/or Laboratory Data
- Result Type, SNOMED code, Description, Date, Status, Result
- Vital Signs
- Vital Type, Value, Unit, Date Taken
- Vitals types included: Height, Length, Weight, BP (Diastolic and Systolic), Temperature, Heart Rate (Pulse), Respiratory Rate, Head Circumference, O2 Saturation, BMI
- Social History
- Date Recorded, SNOMED code, Status
- Smoking Status taken from most recently documented encounter
- Care Plan
- Date, Status, Goals, Actions, Next Steps, Team Members
- History of Immunizations
- Vaccine, Date, Site, Status
- Canceled immunizations are not shown
- Encounters
- Encounter Type, Performer (Provider), Location, Date, Diagnoses
- Referrals
- Type, Date, Status
- Payers
- Insurance Policy, Certificate, Group, Phone
Additionally, there are several pieces of information that are machine-readable only:
- Billed ICD-10 codes related to visit diagnoses
- Primary care provider tax ID
- Primary care provider taxonomy code
To learn how to generate a Summary of Care Record and transmit it as a C-CDA, read the Summary of Care Report article.
For information about setting up, registering, or using Direct Secure Messaging, read the Direct Secure Messaging article.
Invite Requesters to Retrieve Summary of Care Records Themselves
If you want to reduce the number of record requests made to your office, you can sign up to allow other healthcare providers to electronically request and retrieve records from your PCC system on-demand. This function in PCC EHR is called clinical document exchange.
What Data Gets Shared?
If your practice participates in clinical document exchange, the patient’s most up-to-date Summary of Care Record is made available and contains information such as:
- Demographic data (Name, D.O.B., Address)
- Clinical data
- Diagnoses
- Allergies
- Medications
- History of Procedures
- Diagnostic and Laboratory Test Results
- History of Immunizations
- Insurance Policies
Customize the Summary of Care Record: Your practice can configure which information is included in patients’ Summary of Care Records. Click here to learn how.
To enable clinical document exchange, and to learn more about its benefits and how it works, read Clinical Document Exchange.
Export the Patient’s Whole Chart
If a patient is transferring out of your practice, a specialist needs in-depth notes, or an insurance carrier is requesting a complete chart, you can export the patient’s full chart from PCC EHR.
Stop and Think Before You Export: The patient chart export exposes all of the Protected Health Information (PHI) stored in your system for a particular patient. This information is protected by law and sharing it inappropriately may harm the patient, their caregivers, you, and your practice. Before you export a patient’s whole chart, obtain consent from the patient and share only the minimum amount of information required.
Print or Export Chart Notes and Chart Sections for Specialized Needs
If you need to provide a patient’s chart notes for a particular date range, or if certain records are requested that are not part of the C-CDA (such as growth charts), you can print individual records to a paper file or “print” them as a PDF file.
Print Chart Notes for Specific Dates
You can print or export individual chart notes from the Visit History component of a patient’s chart.
Navigate to the Patient’s Visit History
Open the patient’s chart to the the Visit History component, within the History section.

Select a Visit and Click “Print”
Highlight the visit date of the chart note you want to print, from the Visit History Index table.

Click the “Print” button to print a paper copy of the chart note, or to print a PDF.
Repeat As Needed
Repeat step 2 for each chart note you need to print.
Print Immunization History
You can print a record of the patient’s immunizations from the Patient Visit Summary Report.
Open the Patient Visit Summary Report
With the patient’s chart still open, select “Patient Visit Summary” from the Reports menu. The Visit Summary will default to the most recent encounter.

Select Options and Click “Print”
To print only a record of immunizations, un-check all of the boxes except for the demographic information needed, and “Immunization History”.

Click the “Print” button to print a paper copy of the modified report.
Print Growth Charts
A patient’s Growth Chart(s) can be printed from the Growth Charts component of the chart.
Navigate to the Patient’s Growth Charts
Open the patient’s chart to the the Growth Charts component, within the History section.

Select a Growth Chart and Click “Print”
Select the growth chart to use from the drop-down menu. The default selection will be based on the patient’s sex and age.

Click the “Print” button to print a paper copy of the selected growth chart.
Repeat If Needed
Repeat step 2 if you need to print more than one growth chart for the patient.
Print Documents
Documents can also be printed from the History section of the patient’s chart.
Navigate to the Patient’s Documents
Open the patient’s chart to the the Documents component, within the History section.

Select a Document and Click “Print”
Click on the arrow next to a category to expand and show documents in that category. Highlight the document you want to print.

Click the “Print” button.
Note: You can also print documents with their notes, print only the notes, or print the document by itself. Select a document and click on the File menu to see your printing options.
Repeat As Needed
Repeat step 2 for as many documents as you need to print.
Unsure of How Much Data to Send?
PCC recommends that you always start by sending a C-CDA, unless the request is clearly asking for more.
The “Minimum Necessary” HIPAA standard requires that PHI disclosure should be limited to the minimum amount needed by the receiving party.
If you are not sure whether a C-CDA will suffice, you can send a letter along with the C-CDA, letting the receiving party know that they can request additional information, as they feel is needed.
You can use PCC EHR to create a form letter, so that you don’t have to rewrite the letter every time you send out a C-CDA. Read about form letters here.
Utilize the PCC EHR Audit Log
If you need to see a detailed record of everything that has happened with a patient’s chart (who has viewed it, every component accessed, and by whom), use the PCC EHR Audit Log.
Read The PCC EHR Audit Log to learn more about this report.
PCC eRx Component Reference
PCC eRx provides powerful tools for working with medication-related information and tasks. As in other areas of the chart in PCC EHR, these tools are organized into components. Read this article to learn detailed functions of the different components in PCC eRx.
Article Under Construction: This article is being updated to reflect new functionality in PCC 10.4, which arrived on October 12th, 2025. Some images may not match your PCC system.
Navigation
When you are working in PCC eRx, you can scroll through the components or jump to one in particular by clicking its anchor button.

Read the sections below to learn more about each component in PCC eRx.
Refresh Tip: As you work with a patient’s medication information, you will see vitals, problems, and other information from the patient’s chart. Click on the PCC eRx menu title to refresh the information from the chart. The menu title will appear yellow if PCC eRx detects a refresh is needed.

Patient Information
The Patient Information component shows the patient’s name, date of birth, sex, PCC number, drug allergies, and prescription insurance plans.

The demographic information reflects what is in the Demographics section of the patient’s chart.
The Allergies list reflects the known drug allergies recorded for the patient in the PCC eRx Allergies component.
The prescription insurance plan information comes from Surescripts, the vendor that facilitates digital information exchange between PCC eRx, pharmacies, and pharmacy benefit managers. Surescripts uses demographic information to query the prescription benefit managers on its network for the patient’s prescription insurance plan details.
The green plus (+) or red minus sign (–) beside each plan pharmacy type indicates whether the plan includes drug coverage for retail, mail order, specialty, and/or long term care pharmacies.
Vitals
The patient’s most recent height, weight, and blood pressure measurements appear in the PCC eRx Vitals component.

Vitals measurements could come from a mix of different visits. For example, you could have recorded the patient’s last height and weight at their last physical but taken their blood pressure today. All three measurements would appear in the Vitals component in PCC eRx as the patient’s most recent vitals measurements.
Hover Mouse For More: You can hold your mouse over a specific vital to see recent historical entries.
If your practice uses the Smoking Status component in PCC EHR, the Vitals component in PCC eRx will include smoking status information. For female patients, you will additionally have the option to indicate if the patient is pregnant or lactating.

Your practice can configure the age at which the pregnancy, lactation, and smoking status options appear.
Pharmacies
Use the PCC eRx Pharmacies component to build a list of the patient’s most commonly used pharmacies.

The list grows as you prescribe. You can also manually add and delete pharmacies from the list, and set a default pharmacy for the patient.
For more information, read the Work with Pharmacies article.
Allergies
The Allergies component in PCC eRx displays known medication allergies.

Click “Add New Allergy” to add a new allergy. You can also click “NKDA” to indicate the patient has no known drug allergies.
For more information, read the Allergies article.
Problem List
The Problem List component in PCC eRx displays problems and non-drug allergies recorded in the patient’s chart-wide Problem List and Allergies components.

Update Your Historical ICD-9 Diagnoses: PCC EHR and PCC eRx track Problem List and non-drug allergy diagnoses using the SNOMED-CT coding system. The PCC eRx interface will not display ICD-9 diagnoses listed in the patient’s chart. If you still have historical ICD-9 diagnoses listed in a patient’s Problem List or Allergies components, update those entries to use SNOMED terms instead.
Retail Rx History
Use the Retail Rx History component to look up a patient’s retail prescription history.

PCC eRx will retrieve the past two years of retail prescription history available from insurance companies and partner pharmaceutical systems.
For more information, see the Medication History article.
Prescription History
The Prescription History component displays all of the patient’s prescriptions, whether they are currently active or not.

For each prescription, you can see the Start and Stop Dates (which represent how long the supply was intended to last), Medication, Instructions, Qty/Refills, Prescriber/Agent, and other Rx Details, which include the destination pharmacy.
Use the Prescription History to review, renew, or print copies of past prescriptions.
For more information, read the Medication History article.
Medication History
The Medication History component displays the patient’s active medications, whether prescribed by you or reported by the patient or another provider. Use this component to inform your medication decisions and quickly re-prescribe medications as needed.

As soon as you prescribe a drug, it appears in the Medication History component, and is mirrored in the chart-wide Medication History component in PCC EHR.
For more information, read the Medication History article.
Prescribe
Use the Prescribe component to prescribe a new medication by searching or selecting a favorite.

For more information, read the Prescribe Medications article.
Review and Sign
After you create prescriptions with the Prescribe component, use the Review and Sign component to review sent prescriptions and optionally resend them, or finalize and send pending ones.

For more information, read the Prescribe Medications article.
Reconciliation History
The Reconciliation History component in PCC eRx displays all medication-related activity performed during the encounter. Click “View Reconciliation History Details” to expand the history.

If multiple prescriptions are created, deleted, or adjusted during a visit, you can use the reconciliation history to figure out what occurred.
Manage Immunization Lots and Track Vaccine Inventory
PCC EHR tracks vaccine lot quantities as you add lots and administer vaccines. You can manage immunization lots, track and adjust lot amounts manually, and use reports to manage your vaccine inventory.
Read the sections below to learn about immunization lot and vaccine inventory management.
Vaccine Lot Manager Overview
When you need to add a new immunization lot to your system, change the status of an old lot, or make manual adjustments to lot amounts, open the Vaccine Lot Manager in the Tools menu.

You can also jump directly into the Vaccine Lot Manager from the Lot pull-down menu when you pull immunizations to complete an order.
In the Vaccine Lot Manager, you can add new lots, review existing lots, manually adjust dose quantities, or change the status of a lot. Filters at the bottom help you work with a specific set of lots. If a lot or its diluent has expired, you will see the lot number and expiration date in red.
CVX Codes: Each immunization’s CVX code appears in the Immunization column. Immunization registries require CVX codes. If you do not see the correct code next to an immunization, contact PCC Support to update your configuration.
NDC of Sale or NDC of Use: Individual states, and payers, have different rules about which NDC to use for state immunization registry submissions. NDCs entered into the Vaccine Lot Manager are sent to the state immunization registry along with the units and CVX codes from the Immunizations Table. Typically, the NDC of Use is entered in the Vaccine Lot Manager, except in certain states, such as CTWiz in Connecticut. PCC recommends entering NDC codes in your Vaccine Lot Manager even if your state registry does not use nor accept them, as these codes can help verify that your practice is using the correct MVX and CVX codes for each immunization.
NDCs for Billing: NDC codes in the Vaccine Lot Manager are not used for billing. NDC codes needed for billing should still be managed through the Procedures Table.
To learn more about CVX, NDC and other immunization codes, read MVX, CVX, VIS, and NDC Codes in PCC EHR.
Add a New Immunization Lot
Use the Vaccine Lot Manager to add a new immunization lot record to PCC EHR.
Barcode Scanning: PCC EHR will work with your 2D barcode scanner to scan inventory information directly into the Lot Manager. For an overview of barcode scanner functionality in the Vaccine Lot Manager, click here.
When you are ready to enter a new lot, click “Add”, or scan the 2D barcode on the vial or box.

If you entered the lot manually, enter immunization and a manufacturer. As you enter information in these fields, the CVX and MVX codes will appear next to them. If you scanned the lot, the information will appear automatically.
Next, enter the lot number and expiration date. The expiration date can be either an exact date, or a month and year. Some immunization vials only display a month and year. Again, this information is filled out automatically when a lot is scanned in.
Next, enter one or more of the following optional lot details:
-
-
Funding Source: Use the Funding Source field to specify whether an immunization lot is from your practice’s private stock or from some other funding source, such as VFC immunizations supported by federal funds.
-

The available funding source list is based on the CDC’s recognized list of funding sources. For example, your practice may store and administer VFC immunizations, provided by federal funds, to VFC eligible patients. When you identify that information for an immunization lot, you can see the funding source when you select the lot in an immunization order.
-
Locations: If your practice has more than one location, you can enter the location where that lot should be available. If you leave the field blank, the lot will be available at all locations.
-
Diluents: Immunizations like Pentacel include a diluent. The diluent has its own discrete lot number and expiration date. You can enter the diluent information and it will be stored along with the general lot information when a vaccine is ordered and administered.
Next, you can assign a lot a status of “Available”, “Reserved”, or “Depleted”. If you do not want a new lot to be immediately available in an immunization order, mark it as “Reserved”.
Finally, use the Inventory Management box to enter the quantity of doses within the lot.

You can change the Adjustment Date and Adjustment Reason if you need to. For new lots, the date defaults to the current date and time, and the reason is pre-selected as “Increase – Shipment Received”.
Manually Adjust Dose Quantity
Whenever someone at your practice administers a shot, the vaccine lot quantity will automatically decrease.
You can manually adjust dose quantity in the Vaccine Lot Manager when you receive a shipment, are reconciling inventory, need to record wasted doses, or for any other reason.
When you need to change the quantity, select the lot from the Vaccine Lot Manager and click “Edit”. Alternatively, simply scan the 2D barcode on the box or vial to bring up the exact lot you are working with.

Within the Inventory Management section, edit the Adjustment Date (if needed), pick an Adjustment Reason from the drop-down selection of standardized reasons, and put in an amount.

Bonus Doses: Dose quantity in a vial is often not exact. Your practice may get 11 doses out of a vial that was originally defined with a quantity of 10. Administering more doses than the original dose amount will lead to a negative dose amount in PCC EHR. That’s okay! PCC EHR will allow you to administer a lot until you manually mark it as Depleted. You can fix the negative number by adding an adjustment with an Adjustment Reason of “Increase – Bonus Dose”.
Update Lot Status
The status of a lot affects whether or not you can select that lot to administer. Immunization orders will not offer you lots marked as Depleted or Reserved. Only lots that are Available will appear in immunization orders.
Select “Reserved” if the lot is set aside in the refrigerator and is not yet ready for active use.
Select “Depleted” when a lot is used up or destroyed.

Search and Filter
You can use the Lot # Search field, and the Immunization, Location and Display filters to select which lots appear in the Vaccine Lot Manager window.
For example, if you want to review all available Tdap lots at your practice, you can select “Tdap” from the Immunization filter, and “Available” from the Display filter.

If you type in part of a lot number in the Lot # Search field, the list of lots will show all matching results.

View Administration Records
The Vaccine Lot Manager includes a list of all transactions for each lot, so you can easily reconcile the vaccine inventory.

Vaccine Inventory Transaction Log in the Report Library: Users with Report Library access can use the “Open in Report Library” button to open this report in the Report Library to adjust filters, print a report, and more. See more below.
Use Reports and Worksheets to Manage Inventory
The PCC EHR Report Library includes two reports you can use to manage your vaccine inventory.
Report to Track Vaccine Inventory For a Specific Time
Use the Vaccine Inventory Transaction Log report to monitor additions and subtractions from a specific vaccine lot.


On the report, you can see how many doses were given, and to whom, as well as any adjustments that have been made, such as wasted doses or transferred inventory.
Report-style Worksheet Assists with Vaccine Reconciliation
Use the Vaccine Inventory Reconciliation Worksheet to assist you as you reconcile your vaccine inventory.


The report displays what is expected for your inventory for all vaccines. Print it out, and use the Actual Inventory and Difference columns to record and compare the actual inventory in your vaccine refrigerator with the value recorded in PCC EHR.

Best Practices For Sending Messages to Patients and Families
As a pediatric practice, you might send messages to your patients and families using texts (SMS), emails, patient portal messages, and phone calls. Since families provide you with their contact information for the purposes of providing healthcare, your communication is usually an allowed exception under federal regulations.
This article provides best practices and other recommendations to help you engage with your patients and improve care through communication. PCC recommends that pediatric practices follow communication best practices and abide by guidelines, even when not strictly required by law. Additionally, PCC recommends you include an explicit “consent to contact” in your practice policies.
PCC Does Not Provide Legal Advice: If your practice has concerns about the legal rules around sending communication to your patients and families, or about any other legal matter, you should consult your practice’s attorney. The ideas below are not intended as legal advice.
Understand Consent to Contact and the Healthcare Exception
PCC includes features to send texts (SMS), emails, patient portal messages, and automated calls to patients and families. However, if your practice plans to send messages to several thousand families, you may be worried that you will break a regulation.
Patients and families shared their contact information with you because you are their pediatric practice. You have been given implicit consent to contact them about healthcare matters. There are many laws and regulations that govern communication, and this implicit consent for healthcare communication is often an allowed exception.
Your practice can also collect explicit, written consent for contact with patients and families, which provides an additional layer of certainty and sets communication expectations between the practice and the family. (See below.)
Your practice should discuss these issues with your lawyer. PCC does not provide legal advice.
Follow Best Practices When You Send Messages to Patients and Families
PCC recommends you follow common best practices for communication. Your patients and families may feel spammed, even if your communication is not unsolicited. When it comes to building long-term relationships with your patients and families, feelings can matter more than the rules.
Here are some best practices, based on federal guidelines, to consider as you develop your practice’s plan for outgoing communication:
-
Use Contact Information Provided To You, Use It For Healthcare Reasons: You should only send communications to patients and families who gave you their contact information for healthcare purposes. (Do not import a phone book or a local school directory!) PCC’s communication features are built around contacting your patients and their families and should not be used for other mass communication such as telemarketing or advertising.
-
Narrow Your List of Recipients: Your practice has thousands of patients in your database. How many of them need to receive your message? Maybe only half of them still come to your practice, and you may want to exclude any dismissed families, for example. Even when you are contacting all patients who are behind on an immunization, you should evaluate who is included in that list. Use PCC EHR’s reporting tools to exclude by account and patient flags and use other criteria to limit the number of outgoing messages you are sending.
-
Be Concise: You should limit the length of your outgoing messages. PCC’s text (SMS) tools automatically support this by limiting the total number of characters to 160.
-
Identify Yourself: When your practice crafts your outgoing messages to patients and families, it is a best practice to identify who you are. Some pediatric practices send messages that indicate they are from the patient’s primary care physician, providing an additional personal touch. You can use PCC’s reporting tools to create lists of patients and send out batches based on PCP or other criteria.
-
Do Not Include PHI: Depending on the format of your communication, you might decide to include patient and appointment information in your message. As a general precaution, you should avoid including private health information in your messages as it is easy for a phone to be picked up by someone other than the intended recipient.
-
Limit the Frequency of Your Messages: It is a best practice to send no more than one message a day or three per week.
-
Provide Return Contact Information: Consider adding your return contact information or details on how to reply to your outgoing messages. You could add a note to the footer or end of all messages, such as “Call BF Pediatrics at 555-1082”, or even just “CB: 555-1082” to indicate the Call Back number.
-
Indicate If a Message Can’t Be Replied To: When you send automated messages, replies go to a “no-reply” email address or phone number. Consider indicating that in your message. In PCC EHR, you can review any replies that families sent you, but if you include a “do not reply to this message”, it can help avoid confusion and missed messages.
-
Indicate How to Opt-Out or Unsubscribe: PCC’s communication tools automatically include an unsubscribe link on emails and the ability to receive “stop” or “unsubscribe” text (SMS) responses. You can notify your families about these methods or include a note about them in your message.
Get Explicit Written Permission to Call, Text, and Email Your Patients and Families
Your front desk is already in the habit of regularly updating demographic and contact information provided by families, which constitutes an implicit permission to contact them about healthcare matters. PCC recommends that you also collect an explicit “consent to contact” when a family joins your practice or at a family’s annual paperwork update.
Have a Written Policy for Patients and Families
Click here for a sample of a written communication agreement. You could add this or other text to your existing check-in process, demographic update forms, or office policy forms. You can also use it as a stand-alone consent form.
You might also add a “Preferred Contact Method” note to this agreement, or to your standard new patient intake forms.
Make sure you have a plan for updating patient and family consent to contact at the front desk or when sharing other forms.
Keep Track of Who Has (and Has Not) Given Consent to Contact
When you receive written permission, track it. For example, you can scan the consent form into the patient’s chart and add a “contact consent” or “opt-in” flag to their account.
Conversely, if someone refuses this permission or gives consent but later revokes it, this should be tracked and honored as well. Flags can be used to manage this. For help using flags in PCC’s Notification Center, read this article.
Can a Patient or Family Opt Out Without Contacting You?: If you are using PCC’s Broadcast Messaging or notify features, patients and families have built-in methods for opting out. They can reply “STOP” to text messages, for example. However, it is also great to keep track on the patient’s record so you can exclude them with criteria when you use PCC’s various communication and reporting tools.
Track and Use Each Patient’s Preferred Contact Method
Use the Confidential Communication Preference fields on the patient record to indicate how your patients and families wish to be contacted.

Your office can collect a patient’s preferred phone, e-mail, or text message contact preference during Patient Check-In or at any time in the Demographics section of the patient’s chart. If your practice still uses the Practice Management text-based PCC tools, you can find these fields in checkin or in other tools that edit patient demographics.
PCC’s communication tools use the Confidential Communication Preference in various ways: phone numbers will appear as an option for a direct text message, for example, and this contact method will be preferred for automated reminder notifications.
Send a Message to PCC, Too!
Contact PCC Support with any questions or for help getting started with a patient recall, broadcast messaging, sending single text messages directly to a family in PCC EHR, or other need.
PCC’s support teams are experienced at crafting custom recall reports. They can also configure which users at your practice have access to different communication tools.
PCC’s Contract With You: PCC’s user agreement with your practice includes addendum about communications. If you have any questions, please get in touch with PCC Sales.
Washington State C-CDA Submission for Apple Care Patients
Washington State’s Health Care Authority (HCA) requires providers to submit C-CDAs for patients who are enrolled with Apple Health Managed Care. C-CDAs need to be sent to the Washington Link4Health Clinical Data Repository (CDR) after each visit.
PCC EHR is a Meaningful Use certified EHR using the 2014-edition standards. Therefore, you can create a Summary of Care Record in PCC EHR and send it via direct secure messaging (DSM) in a C-CDA format. The following workflow was developed by one of PCC’s Washington state clients to send C-CDA files to the Link4Health CDR.
First, generate a list of patients in the PCC EHR Report Library. Next, create and send a Summary of Care via DSM for each patient on the list.
First: Use the PCC EHR Report Library to Generate a List of Patients
Every day, someone from your practice should run a Patient List report to get a list of all patients seen that day who are enrolled with Washington Apple Care (Medicaid).
Open the Patient List Report in the PCC EHR Report Library
Open the Report Library from the Reports menu in PCC EHR. Then, open the Patient List report.
Add Insurance and Visit Criteria
Choose criteria that will give you a list of all Apple Care clients who were seen within the time frame for which you are sending C-CDAs. Possible selections are “Include by Insurance Plan” and either “Date of Last Visit” or “Procedure (All Providers)”.
For more information on how to run reports in the PCC EHR Report Library, read Run Reports in the PCC EHR Report Library.
Note: PCC recommends that you work with your Client Advocate to build the right search.
Generate the Report
Click “Generate” to generate the patient list. You can print or export the output, then use it to create and send a Summary of Care Record for each patient to Washington Link4Health CDR.
Optional: Save a Custom Report
You can create a custom report so you will not have to rebuild your search criteria whenever you need to pull a patient list for Apple Care. To learn how, read Create a Custom Report.
Second: Create and Send a Summary of Care for Each Patient
For each patient on the list, you can generate a Summary of Care Record Report and submit it directly to Washington Link4Health CDR with Direct Secure Messaging.
Generate the Summary of Care Record Report
Use the Reports menu in PCC EHR to create a Summary of Care Record.
Open a Patient’s Chart
Before you can create a Summary of Care, you must first have the patient’s chart open in PCC EHR.
Generate the Summary of Care
You can save or export a Summary of Care as a C-CDA file, which is the format required by Washington HCA.
Select “Summary of Care Record” from the Reports menu.

Indicate That the Record is Not a Referral or Transition
Select “Not related to a transition of care” from the drop-down menu.

Transmit a C-CDA Transition of Care Document Using Direct Secure Messaging
If your practice uses Direct Secure Messaging, and you have a Direct Address configured for your user account, you can transmit a Summary of Care Record directly to another Direct Secure Messaging user.
You will need to contact the Washington Link4Health CDR to get the address they want you to use.
Select “Send via Direct Secure Message” and fill out the fields for the message.

Note: If your practice is not currently using Direct Secure Messaging, you will not see this radio button option. Contact your Client Advocate to get set up with DSM.
Bill for Phone Encounters and Portal Messages
Your practice can bill for phone calls and portal messages.
Read the procedure below to learn how to chart and bill for a phone encounter (or portal message thread). Next, you can review the other sections below to learn about configuration and tips for turning phone calls and portal messages into billable telemedicine encounters.
Watch a Video: You can watch an example of how a practice charts and bills for a phone call (or portal message): Bill for Phone Encounters and Portal Messages.
Schedule a Telemedicine Encounter Instead: The article below talks about documenting a phone note or portal thread so you can bill for it. However, PCC recommends that you schedule, chart, and bill a telemedicine appointment instead.
Chart a Phone Note and Then Bill For It
Read the procedure below to learn how your practice can treat every call as though it may be billable, and then how to bill for it.
Follow This Procedure for a Portal Message As Well: The procedure below shows billing for a phone call. Portal Messages follow the same workflow and use the same set of tools.
Create a Phone Note
When your practice takes a call or receives a message, you record information on a new phone note.

You can click “Add Phone Note” from the PCC EHR search results or from inside a patient’s chart. A triage nurse or front desk might take the initial call, create the phone note, and then assign it to a clinician to make a followup call.
Billable Phone Encounters Must Be Initiated by the Patient or Parent: If your practice makes the initial call to schedule or begin a phone encounter, that phone or portal message encounter can not typically be billed.
Document the Phone Encounter on the Phone Note
Next, a clinician at your practice documents the phone encounter with enough detail to cover telemedicine requirements.

For example, use the Subject field to reflect the main topic of the encounter. Include enough clinical information in the phone note to make a diagnosis. Make note of all questions asked during the call, and all clinical information given. Include any reassurances offered. Include all topics covered during the conversation.
Record the Duration of the Call
Record the duration of the call, in minutes, on the phone note.

By entering the exact duration, you chart an important element of the encounter. The duration is used to support the encounter’s billing code(s).
How Do I Code the Duration of a Phone Call?: For help understanding how duration affects the coding level for a phone encounter, check out PCC’s Telemedicine Billing Code Time Table
Select Diagnoses
Chart one or more diagnoses on the phone note. Optionally, you can simultaneously add a diagnosis to the patient’s chart-wide Problem List.

When you select a diagnosis description, PCC EHR automatically adds an appropriate ICD-10 code to the phone note’s Electronic Encounter Form.
Optional: Order Labs, Referrals, Procedures, and Other Orders
During the course of the call (or later when charting), you can create orders. Your practice can add orders components directly to the phone note protocol and make common orders available from a single click.

Can I Bill This Order From a Phone Encounter?: Orders that you create during a phone or portal message are not always billable. When you click “Order”, PCC EHR can automatically add appropriate diagnoses and procedures to your electronic encounter form, and your biller will need to be aware of limitations and make changes when they post charges.
Click “Bill” and Select a Visit Code
Next, click “Bill” to review and select codes on the Electronic Encounter Form.

The Electronic Encounter Form displays all diagnoses and procedure codes from items the clinician selected on the phone note. They will typically select a visit code manually.
Your practice can configure what encounter codes appear on the Bill window. For example, for a telemedicine visit you might select a -95 code for a live audio and video E&M visit. For a phone-only visit, you might use time based codes 99441-99443. PCC does not recommend specific codes, you should check your CPT manual and consult with your payors for billing requirements.
Update Units and Diagnosis Linking and Make the Visit Ready for Billing
After you review and add codes, you can review units and which diagnosis is linked to each procedure. Next, make the visit ready for billing.

Sign the Encounter
Complete your notes and click “Sign” to sign the phone note, just as you would for other encounters.

PCC EHR supports cosigning providers if needed.
Monitor the Messaging Queue for Billable Messages
A biller at your practice can check the Messaging queue to find phone and portal messages that may be billable.

Sort the Messaging queue and use filters to limit the list to appropriate items for the biller to review.
For example, a biller can use the Billing Status filter to limit the list of messages to phone notes and portal messages that are “Ready to Post”, “Posted” and that may have “New Items” to post.
The 'Due' Filter Can Hide Messages: Practices can use due dates on tasks to hide a message until it becomes due–for example, to schedule a call back or a followup about test results. If you use the “Due” filter on the Messaging queue, be aware you could hide message encounters that are ready to bill today.
Click “Ready to Post” to Open a Message Encounter
When you are ready to review an encounter and post charges, click “Ready To Post”.

Assess Whether an Encounter is Related to Another Appointment
Use the patient’s Visit History, Encounter Details, and other chart sections to find out if the encounter is billable.

For example, a phone call might be a followup for a previous E&M visit within 7 days prior, or the call may have resulted in a visit the following day. Whether or not you can bill for an encounter depends upon specific rules for each visit code.
If the patient has an in-office E&M (for example) near the time of the call, you can open the chart note and check the reason. If the visit reason was not related to the phone call, then both that visit and the phone call may be billable.
For precise guidance on the restrictions for each billing code, check your CPT manual. In general, if a phone call is within 7 days of an E&M visit for a related reason, you may not bill the call and should instead incorporate the work performed into the claim for the in-office E&M visit.
Update the Billing Place of Service
If your payer requires a specific telemedicine place of service, you can change it along with other details in the Post Charges protocol.

Update Diagnoses, Procedures, Claim Information, and Payments
Next, the biller can make any required adjustments to diagnoses, procedures, claim information, or payments.

Billing for telemedicine is a rapidly evolving issue. PCC hosts web labs and a COVID-19 Coding Guide which we update regularly.
Click “Save + Post” to Queue Up a Claim
Finally, the biller clicks “Save + Post” to post the charges and queue up a claim.

Later, the biller can come back to Post Charges if they need to add additional items.
Configure PCC EHR for Phone Note Billing
In order to get paid for telemedicine services provided over the phone, you may need to adjust how you chart phone notes. Review the items below to learn more.
Revise the Phone Note Protocol
If you are not already tracking call duration within your phone notes, you can add it to your existing Phone Note Protocol. You can also add the Diagonses component, orders components, and any other component your practice would use for a phone encounter.
Open the Component Builder
Navigate to the Protocol Configuration tool and select the Component Builder.

Create a Duration Component
Add a new custom entry field for “Duration of Call (exact minutes)” to your Component Builder.


Duration vs Start/Stop: If you prefer, create two fields to track the Start Time and Stop Time of the call, rather than one Duration field. You just need a way to track the total minutes spent on the call.
Edit the Phone Note Protocol
Return to the Protocol Configuration and open the Protocol Builder to edit your existing Phone Note Protocol.

Add Components to the Phone Note Protocol
Review the components on your practice’s Phone Note and/or Portal Message protocol. Consider adding your new duration component, the Diagnoses component, and any other component that will help you chart on the phone note or portal message.

Create a Telemedicine Procedure Group and Add Telemedicine Procedures
To learn how to set up procedures, codes, and prices on your PCC system, read Configure PCC EHR for Telemedicine Encounters.
For more help in setting up new procedures, contact PCC Support.
Will Payers Pay for Phone Calls and Portal Message Encounters?
When you care for patients and families over the phone or a portal message, you provide a valuable service. PCC recommends that you treat every phone note as though it could be a billable service, unless it is for scheduling or clearly related to another appointment.
PCC has heard from pediatric practices that the smart move is to submit claims for telephone services to all of your insurance carriers–even if you know they won’t pay. The industry is changing, and the COVID-19 pandemic changed the landscape for telemedicine payment.
As always, check with your insurance providers to review their policies and requirements.
Review and Update Medication History
There are several ways to see what medications your patient is taking, has taken, and how they were prescribed.
Article Under Construction: This article is being updated to reflect new functionality in PCC 10.5, arriving mid-February 2026. Some steps and images may not match your PCC system.
Review Basic Medication History in PCC EHR
Use the Medication History component in PCC EHR to review what medications your patient takes.

By default, the Medication History component appears on the Medical Summary, but your practice may also add it to visit notes, phone notes, and portal messages.
The Medication History component shows all of the patient’s prescribed and reported medications. You can filter the list to display only active medications, if you prefer.
Each medication displays with pertinent details, including the start and stop date. At the top of the component, you can see when the patient’s medication history was last modified. Beneath the component, you can see when the patient’s medication history was last marked as reviewed.

You can mark the Medication History as reviewed if you are viewing the component within your patient’s visit note, phone note, or portal message.
Mark Medications and eRx Allergies as Reviewed in PCC EHR
You can mark a patient’s Medication History and eRx Allergies as reviewed while charting on a visit note, phone note, or portal message in PCC EHR, avoiding the need to open PCC eRx just for this purpose.

The date and attribution for the most recent review appear below each component.

The last reviewed date on the chart note only updates when you mark the Medication History and eRx Allergies components as reviewed within PCC EHR. Marking them as reviewed within PCC eRx does not update the chart note.
If changes are made to the patient’s medications or allergies after you review them, PCC EHR will indicate that there have been changes, prompting a new review.

The final visit note and the visit history will show eRx Allergies and Medication History items that were reviewed in the context of the chart note. Allergies and medications that have not been marked as reviewed from within the chart note will not appear in the visit history.

You can see all historical medications and eRx allergies, regardless of their associated visit, in the Medical Summary. The last reviewed date in the Medical Summary reflects the latest review, whether it occurred in PCC eRx or in the patient’s chart note.

See Additional Details and Update a Patient’s Medications
If you need to see additional details, update the patient’s medication history, or re-prescribe a medication that appears in the list, open PCC eRx.

The Medication History component in PCC eRx displays the patient’s medications in detail, whether prescribed or entered manually based on self-reporting.

As soon as you prescribe something, it appears on the history, and is mirrored in the Medication History component in PCC EHR.
Filters and Groups: By default, the history shows only active medications. Click the “Active & Inactive” filter button to see both active and inactive medications.
Special Filters for Patients On Lots of Medications: If a patient chronically takes multiple medications, you can group them by indication, class, and generic name for easier review and navigation.
Edit a Historical Medication
Use the red edit pencil icon to edit an entry in your patient’s Medication History.

You might want to edit an entry if you verbally instructed a patient to change their dose or learned from a specialist that one of the medications they prescribed has changed in some way.
Add a Historical Medication
If your patient or one of their specialists reports a medication, homeopathic cure, or other remedy that your practice did not prescribe, you can manually add it to their Medication History. Click the “Add Hx Med” button, then enter the details.

You can search for the medication or select a favorite. After you enter the medication details, indicate the source of the information and save.

Record that You Provided a Sample of a Medication: Use this same “Add Hx Med” button to record that you provided a patient with a sample medication. You might also record that you provided a sample in the Plan section of a chart note, or record it with an order on the chart note. For help setting up components or creating custom orders, contact your PCC Client Advocate.
See Active Prescriptions
An “Active Rx” label tells you when a medication in the patient’s history is linked to an active prescription.

Hover over the label to see details about the prescription such as the quantity, number of refills, start date, stop date, and pharmacy.

If you discontinue a medication that is linked to an active prescription, PCC eRx may send an electronic cancellation message to the pharmacy. You can set your electronic cancellation message preference in the Medication History section of the My Settings page. Learn how.
Mark Medication History as Reviewed
Click the “Mark as reviewed” button to indicate that you have reviewed the patient’s medications. The button updates the “Last Reviewed” status everywhere the patient’s medication history displays.

When working with a patient who takes no medications, click the “Patient Takes No Meds” button. This prints “Patient takes no medications” in the Medication History and updates the “Last Reviewed” status in the same manner as the “Mark as reviewed” button.
Discontinue a Single Medication
To discontinue a single medication and remove it from the patient’s active medication list, click the trash can icon beside it, then enter your reason for removing it.

The entry moves to the patient’s inactive medication list with today’s date as the stop date.
You can also discontinue a single medication by clicking the edit pencil icon beside it, then clicking the “Discontinue” button.

You might want to do this if you need to edit the medication details before discontinuing it.
Any medication with an explicit stop date automatically falls off the patient’s active medication list after that date passes. To learn more about stop dates in PCC eRx, read Days Supply, Auto-Calculation, Stop Date, and Duration.
Discontinue Medications in Bulk
To discontinue multiple entries in the patient’s medication history, click the “Clean Up Med Hx” button, then select whichever entries you want to remove from the active medication list.

Click the “Discontinue Medications” button, then enter your reason for removing them.

The entries move the patient’s inactive medication list with today as the stop date. To learn more about stop dates, read Days Supply, Auto-Calculation, Stop Date, and Duration.
Add an Internal Comment
You can add a comment to the Medication History, which may be useful for notes about parental medication allergies and other medication-related information that cannot be recorded using the “Add Hx Med” button.


Renew Historical Medications
Click the “Renew Prescription” icon to renew a historical medication. Or, click the “Create New Prescription” icon to make a new prescription from a historical medication.


When you renew a historical medication, the resulting prescription matches what you prescribed last time, including any customizations you might have made to the days supply or total dispense quantity. By contrast, when you create a new prescription from a historical medication, the days supply and dispense quantity are recalculated based on the dosing instructions specified in the previous prescription.
Your Renewal Workflow setting in on the My Settings page in PCC eRx determines which workflow you experience when you renew a prescription.

First Renew Workflow Option: The renew icon starts a new prescription in an edit window, where you can immediately review, modify, and process it.

Second Renew Workflow Option: The renew icon prepares a new prescription and immediately queues it for sending in the Review & Sign section of the eRx encounter associated with the patient’s visit note, phone note, or portal message.

You can use the red edit pencil to edit pending renewals, then finish processing them by selecting all that are ready and clicking the “Finalize Prescriptions” button.

The ability to renew medications is only available to users with a PCC eRx role of Clinical Staff, Provider Agent, Mid-Level Provider, or Provider.
To learn more about how to renew a medication or prescription, read Renew Prescriptions.
Review Detailed Prescription History for Each Medication
Click the blue plus (+) icon to see a complete list of prescriptions for that medication and others of the same generic type.

Click the gray disclosure triangle beside any prescription in the details view to see complete patient, prescriber, pharmacy, and prescribed medication details, as well as the actual message that was sent to the pharmacy and its delivery status.

Review Medication Care Guidance
Click the “i” icon to view generic care guidance for the medication in question, including common indications, side effects, counseling messages, and black box warnings.

Work in Prescription History
The Prescription History component in PCC eRx shows a reverse chronological record of all prescriptions ordered by your practice for a given patient.

For each prescription, you can see the start and stop dates, medication, instructions, quantity and refills, prescriber or agent, and other details, including the destination pharmacy.
You can use the Prescription History to review, renew, or print a copy of a past prescription.
Prescription History vs Medication History: Prescription and Medication History offer distinct yet complementary views of a patient’s pharmacological treatment history. Prescription History is a reverse chronological list of all prescriptions ordered by your practice for a patient. Medication History displays a list of the patient’s active medications and may include items your practice didn’t prescribe, such as specialist medications or self-reported homeopathic remedies. Each one displays medication and prescription details and offers the possibility to renew medications, but you might find one to be better suited to your workflows than the other.
Import a Record of Prescriptions Filled by Retail Pharmacies
Use the Retail Rx History component in PCC eRx to search the Surescripts network for records of prescriptions filled for your patient by retail pharmacies. Surescripts is a vendor that facilitates e-prescription information exchange.
First, affirm that you have patient or guardian consent. Then click “Query Retail Rx History”.

Consent Checked By Default: The “Consent” box for retail prescription history is checked by default in your PCC system. You can uncheck it if the patient or guardian does not consent to you querying for retail prescription history.
PCC eRx retrieves the past two years of retail prescription history available from insurance companies and partner pharmaceutical systems. You can review instructions, refills, and other notes on file with the pharmacy. Note that a history probably does not include over-the-counter medications.
To see more information, click the clinician or refill icons.


Click “Copy” next to any historical prescription to copy it into the patient’s Medication History. PCC eRx will prompt you to select the matching medication from your system’s medication library, and then allow you to adjust information about the medication record before you save it to the patient’s chart.


After you save the medication, you can review it and make changes in the Medication History component.
Consent to Query: PCC recommends you add permission to query retail prescription history to your standard patient policy forms. Otherwise, you could ask the question once during a visit.
Query Constraints: A Retail Rx History query result remains visible in the PCC eRx section of the patient chart for 72 hours. You cannot re-query the patient’s retail prescription history within that time period. After the 72-hour period, you can re-query the patient’s retail prescription history.
Patient Match Criteria: Surescripts uses the patient’s first name, middle name or initial, last name, name suffix, date of birth, sex, full address including ZIP code, and phone number to find prescriptions that were filled at participating retail pharmacies within the last two years. The more consistent your practice is in filling out these patient details, the better chance you have of consistently getting high quality responses to your retail prescription queries.
Find Patients and Accounts
Use the search field in the upper-left corner of PCC EHR to quickly find any patient.

To find a family account, use the account finder in such tools as Payments, or whenever you add or reassign billing and custodial accounts to a patient.

Read below to learn handy tips and tricks for finding both patient and account records in PCC EHR.
Search for a Patient
You can always find a patient with the search tool in the upper-left corner of PCC EHR. You can use the patient finder while you are scheduling, viewing other queues, or reviewing a different chart.

The patient finder is designed to help you find patients quickly and easily. Simply type all or a part a patient’s name and the finder will search all first and last names and show you the results. Inactive patients will not appear in patient search results unless “Include inactive patients” is checked.
After finding a patient, you can open their chart, create a phone note, or perform other actions.
Search by Birth Date or Phone Number
You can also search for a patient by their birth date or phone number. PCC EHR is smart enough to know the difference: if you enter a number that can be read as a date, PCC EHR will show you all patients born on that date. If you are looking for a patient born on April 5, 2008, you can type any of the following:
- 040508
- 04/05/08
- 4508
- 4/5/08
- 04052008
- 04/05/2008
- 452008
- 4/5/2008
You can replace the digits “4” or “04” in any of the above number sequences and get the same result. Also, you can use or omit spaces between the month, day, and year. PCC EHR lets you enter dates in the way that is easiest for you when you are searching.
Any number that cannot be understood as a date will return a phone number search. If you were searching for PCC’s main office by phone number, you could enter:
- 800-722-7708
- 8007227708
- 800 722 7708
- (800) 722-7708
. . . or any variation thereof. PCC EHR is interested in the numbers, not the spaces, dashes, or parentheses, so again you can choose the method that works best for you.
Search by Other Patient Information
You can use some special prefixes to search for patients in other ways. For example, you can search for patients by their patient chart number using any of the following:
- pcc[number]
- #[number]
- pcc#[number]
- pt[number]
- pt#[number]
- patient[number]
- patient#[number]
You can also search based on your practice’s customizable patient fields.
Enter the patient field search key word, a colon, and the search text to search by a custom patient field.

Search for an Account
PCC EHR’s main search box is patient-based, and is used to open patient charts, create new phone notes, and similar.
When you open an account-based tool (like the Payments tool), or are when you add an account to a patient’s record, you will use the Account Finder.

The Account Finder works in the same way as the Patient Finder. The search box will return account names or phone numbers. It will not, however, search for birth dates.
Instead of finding patient numbers, the Account Finder can look for account numbers, using these prefixes:
- acct[number]
- #[number]
- acct#[number]
- account[number]
- account#[number]
You can also search on your practice’s custom Account Information fields, using customizable search terms.
Configure Patient Searches
You can search for patient charts using any of your practice’s four custom patient fields. You must first turn on and configure that feature. For example, if you wish to search by the Chart # field, you must activate that field for search in PCC EHR. Follow the procedure below to activate patient field searching and configure your search key words.
Open Practice Preferences
First, click on the Tools menu and select Practice Preferences.

Enter Search Words or Leave Blank
Next, enter a short search term for each field. When you enter a Search Key word, you activate the field and make it searchable in PCC EHR.

Turn Field Searching Off: If you do not wish to be able to search by one or more of the patient fields, leave the Search Key field blank for that field.
Save Your Changes
Click “Save” to save your changes.
Test Your Changes
You can test searching right away, by entering your Search Key, a colon, and some search text in the PCC EHR Find box.

Configure Account Searches
You can search for billing and custodial accounts using any of your practice’s six custom Account Information fields. You must first turn on and configure that feature. For example, if you wish to search by an alternate last name field, you must activate that field for search in PCC EHR. Follow the procedure below to activate account field searching and configure your search key words.
Open Practice Preferences
First, click on the Tools menu and select Practice Preferences.

Enter Search Term or Leave Blank
Next, enter a short search term for each field. When you enter a Search Key word, you activate the field and make it searchable in PCC EHR.

Turn Field Searching Off: If you do not wish to be able to search by one or more of the patient fields, leave the Search Key field blank for that field.
Save Your Changes
Click “Save” to save your changes.
Use the New Search Key
The next time you log into PCC EHR, you can search on the Alt Last Name field by entering the Search Key, a colon, and some search text in the Account Finder.

Add pocketPCC to Your Home Screen
Follow the instructions in this article to add a pocketPCC app-style icon to your mobile device.
PocketPCC is a web-based, mobile version of PCC EHR. You can access pocketPCC from any web browser, giving you access to patient data, messaging, and charting tools from anywhere in the world. By saving a link to pocketPCC on your phone’s home screen, the mobile version of PCC EHR will always be just one touch away. For details on configuring pocketPCC, visit Getting Started With pocketPCC.
Note: The instructions on this page can be used to add any web link to a mobile device’s home screen. You can use these steps to help your patients add PCC’s Patient Portal to their phones.
Add pocketPCC to Your Apple iOS Home Screen
Open Your Web Browser
First, open your browser. pocketPCC works in any browser; for this example, we’ll use Safari, the default browser for the iPhone.

Enter the url for pocketPCC
Enter your practice’s url for pocketPCC. Contact your office’s system administrator or PCC Support if you do not know your address. Typically, your pocketPCC login address will be your practice’s acronym (such as “ACRO”) followed by pocketpcc, and it will always use the https secure protocol: “https://ACRO.pcc.com/pocketpcc”.

Add the Link to pocketPCC to Your Home Screen
Touch the Action icon at the bottom of your screen (you may have to scroll down to make the Safari system icons appear), and then select “Add to Home Screen.” Name the link anything you want (it will default to “pocketPCC”) and click “Add”.


Add pocketPCC to Your Android Home Screen
Open Your Web Browser
First, open your browser. pocketPCC works in any browser; for this example, we’ll use Chrome, the default browser for Android devices.

Enter the url for pocketPCC
Enter your practice’s url for pocketPCC. Contact your office’s system administrator or PCC Support if you do not know your address. Typically, your pocketPCC login address will be your practice’s acronym (such as “ACRO”) followed by pocketpcc, and it will always use the https secure protocol: “https://ACRO.pcc.com/pocketpcc”.

Add the Link to pocketPCC to Your Home Screen
Touch the action overflow icon in the top corner of your screen, and then select “Add to Home Screen.” Name the link anything you want (it will default to “pocketPCC”) and click “Add”.


Bright Futures in PCC
Bright Futures is a national health promotion and prevention initiative led by the American Academy of Pediatrics. (brightfutures.aap.org)
PCC provides Bright Futures chart note protocols, periodicity schedules, handouts, and more to all PCC practices. For example, your default installation of PCC EHR includes sample Bright Futures visit chart note templates that your practice can customize or adjust to your visit workflow.
Read below to find out more about Bright Futures and see where you can use Bright Futures guidelines in PCC’s software and services.
What is Bright Futures, Anyway?
Bright Futures is a set of guidelines and recommendations for pediatric well visits. It includes “theory-based and evidence-driven guidance for all preventive care screenings and well-child visits.” (brightfutures.aap.org)

Bright Futures provides that guidance in the form of a periodicity schedule, educational materials, and other content that can be used to craft chart notes and pediatric practice workflows.
To learn more, visit the AAP’s Bright Futures website.
Bright Futures Visit Protocols
PCC EHR includes a complete set of chart note protocols based on Bright Futures recommendations. You can use these protocols to guide your visit workflow and chart visits. You can customize them and add and remove components to make them work for your practice.

If you are a new PCC client, you’ll see the latest Bright Futures-based chart note protocols in the Protocol Configuration tool.

If you joined PCC before 2018’s rollout of the new Bright Future’s charting recommendations, you may see protocols based on Bright Futures 3rd edition. You can contact PCC Support for help importing and configuring the latest protocols.
Are Bright Futures Protocols Too Long and Detailed to Use?
Some clinicians dislike the Bright Futures recommendations because they include too many sections and could lead to a well visit that takes too long to complete.
The developers of Bright Futures agree. Their recommendation: Use what the patient needs, and skip the rest.
Not every visit will require every screening or issue included on a Bright Futures well visit chart note template. A 15-second question about depression, for example, may or may not lead to a 15-minute depression screening. However, a big protocol is a powerful protocol. You can use what the patient needs, and skip the rest.
Bright Futures Handouts in PCC EHR’s Patient Education Tool
Bright Futures handouts, questionnaires, and other materials published by the AAP are available inside PCC EHR and also available by website login to all PCC Customers.

When you are working with a patient, you can open the Patient Education tool, pick a diagnosis, and the AAP portal window will display the appropriate handouts.
For more information, read: Patient Education and Handouts
Bright Futures Periodicity Schedule
The Bright Futures guidelines include recommendations for how often patients should be seen at each stage of development and what screenings and tests should be considered during each well visit. PCC provides recommendations and software tools to help you implement this schedule.

-
Review the AAP's Periodicity Schedule: You can review the AAP’s Bright Futures recommendations for each well visit here: The AAP Bright Futures Periodicity Schedule. It’s a great summary of the AAPs recommendations for preventative pediatric health care.
-
AAP's Bright Futures Periodicity Schedule is Included in PCC EHR: PCC’s Bright Futures chart note protocols include all screenings and other recommendations for each well visit.
-
How Do I Code and Bill for Procedures on the Bright Futures Periodicity Schedule?: PCC’s certified coder, Jan Blanchard, created a version of the periodicity schedule that displays billable codes for screenings and other procedures performed at each well visit. You can read it here: Coding for Bright Futures Periodicity Schedule
How can you best configure PCC EHR to implement this periodicity schedule for your practice? By setting up visit reasons for your schedule, using Bright Futures protocols or adding appropriate screenings to your visit protocols, and implementing workflow methods at your practice. Contact PCC Support for help.
Bright Futures 4th Edition
In 2017-2018, the AAP updated Bright Futures materials and recommendations to the 4th edition. Here are a few highlights of 4th edition changes:
-
Chart Note Templates: Bright Futures 4th Edition updated the AAP’s recommendations for well visits. PCC reviewed these updates and created new Bright Futures 4th Edition protocols. You can work with PCC Support and follow these instructions to install them on your system.
-
Questions and Guidelines: Bright Futures 4th Edition places an increased focus on the social determinants of health.
-
Periodicity Schedule: The AAP’s recommended visit periodicity schedule shifted slightly with Bright Futures 4th Edition. You can see the latest, up-to-date schedule here: AAP Bright Futures Periodicity Schedule Wonder what changes were made for Bright Futures 4th edition? Read the AAP’s notes about the changes.
-
Handouts: Bright Futures handouts, which are created for well visits and related issues for each age and sex, were also updated in Bright Futures 4th Edition. In PCC, you can access these materials with the Patient Education tool. You can print the materials, save them to a patient’s chart, or send them to patients and families with PCC’s Patient Portal.
For more information, visit Bright Futures.
Best Practices Workflow for Outbound Lab Orders
When a patient needs tests that your in-house lab cannot perform, it’s time to send out to an external facility.
The procedures outlined in this article will help your team stay organized as you requisition external lab tests, process results, and plan next steps.
The procedures are grouped by user role; your practice may find that some of the steps should be done by different individuals, which is fine. The important thing is that the steps are followed in a certain order, not who performs each task.
Orders Overview: For an overview of where to find and how to use orders in PCC EHR, watch this video on order workflow.
Lab Configuration: If you need help setting up lab orders, please read the Lab Configuration article, and get in touch with PCC Support.
The Provider Orders a Lab and Assigns the Task to “Nurse”
The provider begins by ordering a lab while charting a patient’s visit. The lab order has a task built into it, which the provider assigns to a generic, role-based user account such as “Nurse”.
Why Assign Tasks to Generic, Role-Based User Accounts?: When you assign tasks to a generic user such as “Nurse”, it makes it easier for staff members who share that role to work on the assignments as a group in the Visit Tasks queue. As long as someone with that role is working each day, you know your tasks will promptly be seen and attended to.
Order a Lab
Click “Order” to create the lab order.

Edit the Order
Click the “Edit” button beside the order.

Optionally fill out information tracked by your practice, such as the specimen collection date and source.

The order will eventually need a lab facility. The provider can add it out now or the person who generates the lab requisition can fill it out later.
In This Example: The provider doesn’t know which lab facility the patient’s insurance prefers so she leaves it blank. A member of the nursing staff will do the research and document a facility when it’s time to generate the requisition and call the lab for a pickup.
Add a Task or Edit the Built-In Task
Click “Add Task” or edit the task built into the order and select what should happen next.

Common next steps are Collect Specimen and Generate Requisition.
In This Example: The patient has provided a urine sample and the next step is to prepare a requisition that will accompany the sample to the lab.
Assign the Task to “Nurse”
In the To field, select the user who should complete the task.

In This Example: The provider assigns the task to the generic “Nurse” user. Many offices assign tasks to generic users so that staff members can monitor shared lists on the Visit Tasks queue.
Save the Order
Click “Save Order” to save your work.

Once the order has been saved, the Task will appear for the Nurse user on the Visit Tasks queue.
A Nurse Sees the Task and Generates a Requisition
Once the provider saves the new order, a nurse sees the related task appear on the Visit Tasks queue. The nurse carries out the task.
Open the Visit Tasks Queue and Filter it to See Tasks Assigned to “Nurse”
Open the Visit Tasks queue and set the Assigned User filter to “Nurse”.

Find and Open the “Generate Requisition” Task
Find the “Generate Requisition” task for the patient’s lab order and double-click to open it.

Open the Patient’s Chart from the Task Window
Within the task window, click “Open Chart”.

This opens the visit where the order was created.
Generate a Lab Requisition
Locate the Lab section of the patient’s visit.

Verify that a facility has been recorded within each lab order that will appear on the requisition.

Save your changes. Then, scroll to the top of the Lab component and click “Generate Requisition”.

Fill out the orders, diagnoses, and any other details relevant to the requisition.

Click “Generate” to see a preview of the requisition.
Print or Share the Requisition
If the patient or family needs a physical copy of the requisition, or you plan to fax a copy to the lab, you can print it from the document preview window.

You can also send a copy of the requisition in a portal message or share it to the patient’s portal documents.
Save and Close the Requisition
Click “Save” to save the requisition, close it, and return to the lab order in the patient’s chart.

The Nurse Marks the Task Complete and Creates a New Task for “Pending Lab”
The nurse marks the first task as complete, creates a new task, and assigns it to “Pending Lab” while the practice awaits the results.
Open the Lab Order and Mark the First Task Complete
Now that the requisition has been generated, the nurse can mark the task complete.
Find the lab order within the patient’s chart and click “Edit” to open it.

Complete the Task
Click the “Task Completed” box. You can edit the date, time, and user name if you need to. You can also enter a note in the field above, if you wish.

Add a New Task
Click the “Add Task” button to create a new task. This task will serve as a reminder that you are awaiting results from the lab.

Assign the New Task to “Pending Lab”
Select a task type such as “Results Needed” (or something similar) and assign the task to the generic user “Pending Lab”.

Tasks assigned to the generic “Pending Lab” user will remain on the Visit Tasks queue until results come back from the external laboratory.
Save + Exit the Patient’s Chart
Click the “Save” button to record your changes.

Exit the patient’s chart.
Results Arrive From the Lab
Results come in from the lab either as electronic lab (e-lab) results, or as documents. E-labs flow directly onto the E-labs Results queue in the EHR. Document results are scanned, printed, or faxed to PCC EHR. For information on how files are uploaded and stored in PCC EHR, read Documents and Scanning in PCC EHR.
A Nurse Attaches the Results to the Order
A nurse (or whoever monitors the “Pending Lab” user in the Visit Tasks queue) uses the Import Documents screen to attach the lab results to the patient’s chart. They send the results to the provider for signature. Then the nurse then opens the lab order, enters the results, and completes the associated “Results Needed” task.
What About E-labs?: If your order is an e-lab, you will find the results on the E-lab Results queue, rather than using the Import Documents screen. Aside from this, you can attach the results to the patient’s chart, visit, and order in the same way. For more information, read Manage Incoming E-lab Test Results.
Open Import Documents
From any window in PCC EHR, open Import Documents from the File menu or by clicking on the document icon in the bottom left corner of the screen.

Find the Lab Result and Corresponding Patient
Select the lab result document from the list on the left and use the patient finder on the right to search for the patient to whom the results belong. Double-click to select the right patient.

Attach the Results to the Patient’s Chart, Visit, and Order
Once you have selected the patient, categorize the file and attach it to the right visit and lab order.

Send the Results to the Provider for Signature
In the document options, select the provider who needs to sign the results.

Click the “Save” button to finalize the import and send the results to the provider’s signing queue.
Open the Visit Tasks Queue and Filter it to See Tasks Assigned to “Pending Lab”
Open the Visit Tasks queue and set the Assigned User filter to “Pending Lab”.

Find and Open the “Results Needed” Task
Find the “Results Needed” task for the patient’s lab order and double-click to open it.

Enter Lab Results and Mark the Task Complete
Enter the lab test results in the Results field of the lab order. Then, mark the “Results Needed” task complete.

Save the order.
See at a Glance that Results Are In: Once results have been entered into a lab order, the icon next to the lab order name changes to a green check mark. You can see the green check on the Visit Tasks queue and in the visit, phone note, or portal message where the lab was ordered.
The Provider Reviews and Signs the Order
The provider will see the results on their Signing queue as ready to sign. They can review the document, and optionally open the patient’s chart.
The provider can add a signing note as well as a messaging task, if needed.
Open Results From Signing Queue
Double-click on the lab result document from your Signing queue.

Review Results and Optionally Add Note
Look over the document. If applicable, add a note about the results before you sign.

Optional – Add a Task for Follow Up
Add a document task for the nurse (or whoever is appropriate) if additional follow-up is needed.

Sign the Order
Click “Sign”.

The results document automatically closes and returns you to the Signing queue.
Optional – Orders Follow-up Task(s)
The nurse (or whoever was assigned the document task) will see it on their Messaging queue.
The nurse can reference the document and associated notes as they carry out the task that was assigned to them.
Open the Task from the Messaging Queue
Double-click on the task to open it.

The lab results document will open in a new window.
Complete the Task
Click the “Task Completed” box.

You can continue to add additional tasks, as needed.
Save the Document
Click “Save” to complete the document task process.

While it is expected that there may be slight variations based on each practice’s physical workflow, following these guidelines will ensure that your practice does not lose track of outbound lab orders while moving through the process.
Manage Prescription Activity on the Rx Queue
The Rx Queue is a one-stop task queue where you can review and process pending prescriptions, sign off on agent prescriptions, respond to pharmacy renewal and change requests, and review and resolve prescription errors. Like other task queues in PCC EHR, you can use filters to tailor the display to your role and workflows.
Video: Watch Manage Prescription Activity on the Rx Queue to learn more.
Overview
The Rx Queue is a hub for prescription activity that may need your attention. A count at the top of the queue tells you how many items there are for you to review based on your filters.

Depending upon your settings and role, you may see up to five sections on the Rx Queue. Each section displays a list of prescriptions that require attention, sorted by patient.
-
Prescription Errors: Electronic prescriptions take a complex and winding path on the journey from your practice to the pharmacy. When errors occur along the way, you can see and address them on the Rx Queue.
-
Change Requests: Pharmacies can initiate electronic change requests when seeking your approval to dispense something other than what you prescribed. If you are a prescriber who has elected to accept change requests, you can see and address them on the Rx Queue.
-
Renewal Requests: Pharmacies can initiate electronic renewal requests when prescriptions are out of refills. If you are a prescriber who has elected to accept renewal requests, you can see and address them on the Rx Queue.
-
Pending Prescriptions: When clinical staff members prepare prescriptions, they appear in the Pending Prescriptions section of the Rx Queue for prescribers to finalize and send.
-
Agent Prescriptions: When authorized users sign and send prescriptions on behalf of an ordering provider, the ordering provider can review and sign off on them on the Rx Queue.
Why Can’t I See the Rx Queue?: If you can’t see the Rx Queue, then your PCC EHR user account has not been configured for PCC eRx, your PCC user role does not have permission to see the Rx Queue, or both. Speak with your practice administrator, or contact PCC Support for help. You can read Set Up PCC eRx User Access to learn more.
Set Your Filters
The Rx Queue is designed to serve different users in different roles. Use the filters at the bottom of the screen to tailor the queue to your role and workflows.
Use the Task Type filter to select the types of prescription activity you want to see. You can further refine by Location and Prescriber. Click “Save My Defaults” to save your most common settings for the next time you log in.

The count at the top of the queue pays attention to your filters so that the number always represents tasks that need your attention.
Work the Queue
You can take action on the Rx Queue to resolve issues and finalize prescriptions.
General Options
Some actions are available in multiple sections of the Rx Queue.
To select all queued prescriptions in a particular section, check the “Select All” checkbox.

To select all queued prescriptions for a particular patient in a section of the queue, click the checkbox beside the patient’s name.

To open a patient’s chart from the Rx Queue, click on their name.

To edit a prescription on the Rx Queue, click the red pencil icon beside it.

Resolve Prescription Errors
Prescription transmission errors can occur when the pharmacy’s system is down, or when Surescripts, the entity that manages the communication between pharmacies and PCC EHR, is unable to process your prescriptions. These transmission issues can prevent prescriptions from reaching the pharmacy. When that happens, PCC eRx displays errors at the top of the Rx Queue.
After encountering an error, PCC makes multiple attempts to send a prescription. If you’d like PCC to stop trying to send the prescription so you can take action yourself, click “Stop Retrying” to end the process.

When a prescription fails to send (or when you tell PCC eRx to stop retrying), you can take one of three actions:
- Select “Keep” to indicate that you’ve called the pharmacy and resolved the issue.
- Select “Delete” to delete the prescription.
- Select “Print” to print the prescription to give to the patient or fax to the pharmacy.
Once you make a selection, click “Resolve” at the bottom of the Prescription Errors section to remove the error from the queue.
Respond to Change Requests
If you are an ordering provider who has change requests enabled for your PCC eRx account, pharmacies may send electronic messages seeking approval to change something about a prescription you wrote.

Pharmacies use change requests to request script clarifications, generic substitutions, therapeutic interchanges, drug use evaluations, or confirmation of a prescribers’ credentials. Pharmacies may also use change requests to notify you when a medication requires prior authorization or is out of stock.
There are five standard ways you can respond to change requests:
-
Keep or Edit Original Prescription: Keep or edit the prescription you originally wrote, then send that in response to the change request.
-
Approve Requested Substitution: Approve the substitution suggested by the pharmacy, either as written or with edits.
-
Replace with New Prescription: Start a new prescription from scratch to replace the original.
-
Cancel Original Prescription: Notify the pharmacy that you want to cancel the original prescription.
-
Reassign: Reassign the change request to a different provider at your practice.
Choose the option that makes sense for your situation, then click “Sign and Process” at the bottom of the Change Requests section to send your response to the pharmacy.
Enable or Disable Change Requests: You will only receive change requests from pharmacies if the change request service is enabled for your user account. Someone at your practice with User Administration privileges in PCC EHR may enable or disable the renewal request service for your account in the User Administration tool. Read Set Up PCC eRx User Access to learn how.
Respond to Renewal Requests
If you are an ordering provider who has renewal requests enabled for your PCC eRx account, pharmacies may send an electronic request for a new prescription when a patient’s original runs out of refills.

There are four standard ways you can respond to renewal requests:
-
Approve __ Fill(s): Approve the pharmacy’s request to renew the original prescription with a specified number of fills.
-
Deny: Deny the pharmacy’s request to renew the original prescription.
-
Replace with new prescription: Start a new prescription from scratch to replace the original.
-
Reassign: Reassign the renewal request to a different provider at your practice.
Choose the option that makes sense for your situation, then click “Sign and Process” at the bottom of the Renewal Requests section to send your response to the pharmacy.
Enable or Disable Renewal Requests: You will only receive renewal requests from pharmacies if the renewal request service is enabled for your user account. Someone at your practice with User Administration privileges in PCC EHR may enable or disable the renewal request service for your account in the User Administration tool. Read Set Up PCC eRx User Access to learn how.
Process Pending Prescriptions
When users create and save prescriptions to send later, they appear on the Rx Queue as Pending Prescriptions. You can review and process pending prescriptions as a batch or one at a time.

To process a pending prescription, select it and click the “Process UNSIGNED Prescriptions” button at the bottom of the Pending Prescriptions section.
Reassign a Pending Prescription to Yourself: Did another prescriber create a new prescription, but not send it? You can approve and send the prescription and become the prescriber. When you process the prescription, PCC eRx will ask you to confirm reassignment.
Sign Agent Prescriptions
Certain users at your practice may be authorized to send prescriptions on behalf of an ordering provider. The ordering provider can view and sign off on those prescriptions on the Rx Queue.

To sign off on an agent prescription, select the prescription and click the “Sign” button at the bottom of the Agent Prescriptions section.
PCC recommends signing off on agent prescriptions on at least a weekly basis to keep your records up to date and support optimal performance of the Rx Queue.
Special Cases
Learn how to handle special scenarios that sometimes crop up on the Rx Queue.
Find Patient Matches for Unmatched Pharmacy Requests
Sometimes pharmacies send requests for patients that PCC EHR does not recognize.
When PCC EHR is not able to find a patient match for a particular pharmacy request, the patient name header appears orange with red text.

You may see “## Potential Matches” next to the patient’s name, which means PCC EHR has found patients with similar names.
Click on the patient’s name header and pick from the list of potential matches. You can also search for a different name.

Once you have found and selected a matching patient, the request displays on the Rx Queue with the matched patient’s name (your name for the patient). You can proceed as usual to approve or deny the request.

Review Printed Prescriptions
If a member of your clinical staff or a Provider Agent prints a prescription for a prescriber to sign and approve, the prescription is considered complete and sent and does not appear on the Rx Queue for review.
If your practice wishes for printed prescriptions to appear in the Provider Agent or Pending Prescriptions sections on the Rx Queue, PCC can change that setting for your practice.
Find Incomplete Orders by Date Range and Order Type
Use the Orders by Visit report to find incomplete orders for a date range, or all orders of a specific type.
You can work with patient orders in several places in PCC EHR, and depending on your focus, each place is useful. You can update an order in the patient chart; you can see open orders for a day in the Tasks column on the Schedule screen; and you can review a list of all orders on the Visit Tasks queue.
What about orders that have been open for a while? What if you need to see all orders of a specific type (such as referrals) in one list, in order to see how your practice is doing?
The Orders by Visit report finds all patient encounters in a selected date range and displays orders associated with those appointments. The report can be filtered by provider, order name, order status, and location (for multi-location practices).
Example: Find All Incomplete Referrals From the Previous Month
If you need to see all referrals from the past month that are not complete, how can you get that list quickly without combing through the Visit Tasks queue? Use the Orders by Visit report to create a list.
Open the Orders by Visit report
From the Reports menu, select Report Library, and then click on the Orders by Visit report.

Enter encounter criteria
Enter a date range for your search. You can also optionally filter by provider and/or location.

Select the order(s) to display in the report
Click in the Order Name field and either use the scroll bar or the Search field to find and select the order(s) you wish to track.
You can select a group of orders by using the search feature and the “Select All” button.

Select “Not Completed”
Select “Not Completed” in the Order Status field to find orders with outstanding issues.

Click “Generate”
Click the “Generate” button to run the report.

You can print or export the list so that you can work through each order. You can also click “Back” to return to the criteria screen and adjust the output.
Set Up PCC eRx User Access
Before a clinician or staff member can prescribe medications or modify a patient’s medication information, they must have PCC eRx enabled on their user account in PCC EHR. Follow the procedure in this article below to enable PCC eRx for providers or any staff at your practice.
Who Needs PCC eRx Access?: Any clinical or non-clinical staff may be granted access to PCC eRx. While all PCC EHR users can open charts and review Medication History, a staff member needs to have their PCC eRx account enabled in order to update patient pharmacy, medication allergy, or other information, as well as to work with prescriptions.
Watch a Video: You can learn how to set up and administrate PCC eRx user accounts by watching the PCC eRx – Set Up Staff and Clinicians video.
Configure a User’s eRx Access in PCC EHR
When you are ready to set up a PCC eRx user account, follow this procedure.
Open the User Administration Tool
Open the User Administration tool in the Tools menu.

Who Can Do This?: Your practice has one or more PCC administrators who are allowed to make changes to accounts. If you do not know your PCC administrators, contact PCC Support.
Double-Click to Open a User Account
Double-click on any user to edit their account information.

For Prescribers, Update Name, Credentials, and Double-Check License and Other IDs
If the user you selected will be sending prescriptions, review the First, Middle, and Last Name fields, along with the Professional Suffix. These identifiers will be used to create the eRx account, and they will appear on prescriptions.

Next, if the prescriber will be sending prescriptions with their own credentials, double-check that their identifiers are entered in the State License, NPI, and DEA fields.
Click the PCC eRx Tab
Click on the PCC eRx tab to set up prescribing roles and other options for the user.

Enable the User’s PCC eRx Account
Click “Enabled” to activate the patient’s PCC eRx account.

Select a Prescriber Role
Choose a Prescriber Role for the user. As you make a selection, PCC EHR will briefly summarize the abilities and responsibilities of each role.

Each Prescriber Role indicates certain permissions or levels of prescribing ability. You can see a description of the selected role at the bottom of the list. For a complete guide to PCC eRx Prescriber Roles, read the section below.
If you have not entered a required piece identification for the selected prescriber level, you will see a warning message.

Choose Prescriber Locations and Default Location
Select each of the locations where this user will be working with prescriptions. Pick a default location to help speed up their prescribing workflow.

Why Do I Need to Enter Locations and a Default Location?: Every prescription must have a prescribing location. PCC eRx automatically determines the location based on the encounter location; if a prescription is made for a well visit at a particular office, PCC eRx will assume that location. However, prescriptions made in the context of a portal message or other encounter for which there is no location must also have an official location. Use the first field to indicate at which locations a prescriber is authorized to prescribe. Next, indicate which location should be selected by default if the prescriber’s location can not be automatically determined.
Optionally, Enable Electronic Prescribing for Controlled Substances (EPCS), Renewal Requests, and Change Requests
If the user is a Provider or Mid-Level Provider, select the service level(s) they will require to carry out their work.
-
EPCS: The EPCS service enables prescribers to prescribe controlled substances electronically. Prescribers can complete the enrollment process later. For more information, read Register for EPCS.
-
Electronic Renewal Request Service: The electronic renewal request service enables pharmacies to submit renewal requests for patient prescriptions directly into PCC EHR.
-
Electronic Change Request Service: The electronic change request service enables pharmacies to submit change requests for patient prescriptions directly into PCC EHR.
Local regulations and user preference will influence which service levels you select.
Add Optional Permissions
Indicate whether or not the user needs access to reports that are embedded inside PCC eRx, and whether or not the user is a PCC eRx Administrator for your practice.

PCC eRx Reporting: PCC EHR includes a collection of PCC eRx reports in the Report Library. The user does not need this permission to access those reports. The PCC eRx reporting tools are reports built into PCC eRx.
PCC eRx Administrators: Your practice should have at least one PCC eRx Administrator. When you complete the EPCS process, you must have an administrator at your practice (who is not yourself).
Check that the User Has Access to the Rx Queue
Click on the “Role Assignment” tab at the top of the window and scroll through the permission list until you reach “Queues”. Check that the “Rx Queue” permission is selected.
If it is not, use the “Role(s)” drop-down to assign the user a different role that has permission to access the Rx Queue. You can also modify the permissions for their current role or create a new role once you save the changes you already made to their account.
Click “Save”
Click “Save” to save your account changes. The user will be able to use PCC eRx immediately.

Password Error: If the user has an old password that does not meet PCC EHR’s minimum requirements, you may see a password error. The user must change their password before you can continue, or you can change their password for them. PCC EHR passwords must be at least eight characters and may not contain words such as “password” or the user’s name.
Under the Hood: Prescribers Should be Linked to Billing Provider Entries
Certain prescribing functions require that the PCC EHR user’s account be linked to the appropriate billing provider. This should happen automatically when PCC Support helps you add a new clinician. In the Practice Management window, you can review your billing provider table for all prescribers and make sure that each one is linked to the appropriate PCC EHR user.

PCC eRx Prescriber Roles
When you enable PCC eRx for a PCC EHR user, you must select a PCC eRx Prescriber Role. Each role grants certain permissions and abilities. Higher-level roles include all the permissions and abilities of the roles that precede it.
-
Non-Clinical Staff: A user with the Non-Clinical Staff role cannot create or send prescriptions. They can update a patient’s pharmacies, and review all the information in the patient’s PCC eRx chart section. They cannot record a patient’s drug allergy information or medication history.
-
Clinical Staff: A user with the Clinical Staff role can create prescriptions. They cannot send them, but they can print them out for the physician. A higher-level user must review and process the prescriptions, either on the printed version, in the patient’s chart, or on the Rx Queue.
-
Provider Agent: A user with the Provider Agent role can create and send prescriptions for legend drugs, and can prepare (but not send) prescriptions for controlled substances. Although Provider Agent prescriptions for legend drugs send immediately, they are technically sent on behalf of an ordering provider. Ordering providers should routinely review and sign off on Provider Agent prescriptions on the Rx Queue.
-
Mid-Level Provider: A user with the Mid-Level Provider role can create and send prescriptions with their own credentials. Mid-Level Provider prescriptions include details of the prescriber’s supervising provider as required by the local jurisdiction.
-
Provider: Providers may create and send prescriptions under their own provider credentials.
What Role Should I Give My MA, LNA, LPN, RN, etc?: PCC eRx Prescriber Roles may not directly align with the clinical roles or titles you use at your practice. As your practice’s PCC eRx Administrator, you should assign eRx roles based on the skills and responsibilities of the individual. For example, if you wish for an individual to be able to send prescriptions, they must be at the level of Provider Agent or higher. Users who need to be able to prepare prescriptions must be at the level of Clinical Staff or higher. Your practice may decide to assign all RNs a specific role, or you may choose to grant certain permissions to certain staff members based on their credentials, experience, state or local laws, or other factors.
Hide Sensitive Diagnoses from the Patient Portal and Patient Reports
In PCC EHR, you can mark any diagnosis or Problem List, allergy, or Family Medical History list item as private. A private or “locked” diagnosis will not appear on patient reports and it will not appear in the patient portal.
Confidential Notes: You can also add confidential notes to a chart, which keeps them hidden on the screen when reviewing a chart. Click here to read more about confidential notes.
Hide a Single Patient’s Diagnosis or Problem
When you want to hide a single diagnosis for a specific patient, just de-select the “Include on Patient Reports” checkbox in the Diagnoses component right on the chart note.

A red lock icon will appear, and the diagnosis will not be visible in the patient portal, the Patient Visit Summary, or other patient reports for that visit.
What About Labs?: Labs and other orders can be hidden the same way while charting a visit. You will need to be in “Edit” mode in order to access the “Include on Patient Reports” checkbox.
Similarly, you can hide a Problem List item for the patient, from the Medical Summary section of the chart. Just click the lock icon next to the item on the Problem List.

A hidden problem will not appear on patient reports like the Patient Visit Summary, and it will not appear in the patient portal for users who have access to the patient’s records.

Where Does a Locked Diagnosis Still Appear? How Do I Send Records?
A hidden or “locked” diagnosis does not appear in the patient portal for any user, nor does it appear on reports like the Patient Visit Summary. However, it does appear in other places.
First, you can see all diagnoses on the chart note itself, which is available in the Visit History section of the chart. If you attempt to print a chart note, PCC EHR will warn you that it contains a sensitive diagnosis.

When you wish to send records out for a referral or for a transition of care, use the Summary of Care Record. You can select whether or not to include locked diagnoses as you generate the output.

What About pocketPCC?: The pocketPCC mobile application provides clinicians with the same access to patient information as PCC EHR. Locked diagnoses will display as they do in PCC EHR, with a red lock icon.
Hidden Orders and Diagnoses Appear on Time of Service Receipts: An order or diagnosis that is hidden will still appear on a time of service receipt, if it is generated after the charges have been posted.
Configure Default Hidden Diagnoses
Your practice can configure any diagnosis to be hidden or “locked” by default for all patients. You can also apply the change retroactively for all historical diagnoses.
When you wish to make a diagnosis hidden by default, open the Diagnosis Configuration tool and select a diagnosis.


When a patient has a diagnosis somewhere in their chart, by default it is “included on patient reports” and in the patient portal. To change this default status to private, simply uncheck the “Include on Patient Reports” box. When you do this, you will see the lock next to the description close and change to red.

Hide Historical Diagnoses: When you change the default status to private, your change will apply to all future diagnoses. Existing diagnoses on patient problem lists or patient charts for past visits will still be visible. To make past diagnoses private, check the box labeled “Apply historically throughout all patient charts”. This step cannot be reversed and only works one way; you cannot unlock all past diagnoses or undo this step once you have completed it. Once you click “Save”, all instances of that diagnosis will be hidden from the patient portal and patient reports for all patients.
Configure Visit Statuses in PCC EHR
PCC comes with a set of visit statuses that you can use to indicate patient status on the schedule screen. PCC encourages each practice to configure its own visit statuses to compliment the practice’s workflow.

Video: Watch Use Visit Status Counters to Know Where You’re Needed to learn more.
Customize Your Practice’s Visit Statuses
You can add any number of statuses to the ones already in PCC EHR, and you can select a color for each status.
Use the Visit Status Configuration tool to add or remove statuses. You can adjust their color and add or remove them from the Visit Status cycle.

Visit Statuses appear on the Schedule queue as well as at the top of the chart note. Your practice can click to move stepwise through the cycle, or click on the arrow to select any Visit Status manually.
Selecting Colors: Choosing colors for visit statuses that are easy to differentiate but also compliment each other can be challenging if you don’t have a few art classes under your belt. Two good online resources for creating color palettes are color.adobe.com and paletton.com.

Customize Your Visit Status Counters
Each PCC EHR user can configure their own Visit Status Counters. These counters appear at the bottom of your PCC EHR screen, letting you know at a glance the number of patients that are marked with specific statuses.

Visit Status Counters show you a count of a specific status, based on your personal user preference and your Schedule queue filters.
You can use the My Account tool to choose several different statuses to track. Each will appear in your practice’s custom color for that status.


Use the Visit Status Counters drop-down in the My Account tool to select which statuses you want to keep track of during the day.
Can I Set This Up For My Staff?: Each user can define their Visit Status Counters in the My Account tool. An administrator can also set up Visit Status Counters for other users in the User Administration tool.
Receive and Send Patient Portal Messages in pocketPCC
You can use pocketPCC to view and respond to portal messages from your patients. You can work with messages on the Messaging queue; and you can send, read, and respond to messages while viewing a patient’s chart.
Work with Portal Messages in the Messaging Queue
To go to your messaging queue, open pocketPCC and select Messaging from the main menu.

Click on any message in the queue to read, add a task, or reply to the message. That reply will go directly to the patient portal user who sent the original message.

If your practice uses a custom message protocol, some components that are available in PCC EHR may not appear in pocketPCC.
Work with Portal Messages in a Patient’s Visit History
You can review and reply to portal messages while working with a patient’s chart in pocketPCC.
To view portal messages, click on the chart menu and select “Visit History.”

Here you can see all chart notes, phone notes, portal messages and other encounters associated with the patient. If you want to see only portal messages, you can filter the history using the gear button.

Select the portal message you want to interact with, and click Edit to make notes or send a reply.

While editing a note, you can add tasks for yourself or a staff member. You can also send a reply to the message.

Send a New Portal Message to a Patient
You can send a new portal message to a patient or family member who uses the patient portal.
First, find the patient and open their chart. Then select “Add Portal Message” from the chart menu.

If more than one portal user has access to the patient’s records, you will be prompted to select the correct recipient from a pull-down menu.

Enter a Subject and Message and click “Send” to deliver the message. The portal user will receive an e-mail letting them know a portal message is waiting for them.
Patient Portal Messages vs. Direct Secure Messaging: The patient portal and PCC EHR support two different messaging technologies. Portal messages are a secure, optional messaging tool built into the patient portal. Patient portal users can exchange messages with their pediatric practice, and the practice can receive and send portal messages with PCC EHR or pocketPCC. Direct Secure Messaging, on the other hand, is a specialized message technology used to share and send medical information. It requires registration with a third-party service and it allows for secure transmission of C-CDA transition of care documents or visit summaries. For more information, refer to Receive and Respond to Portal Messages or Direct Secure Messaging.
Add an Attachment Code to a Claim
If a claim requires an attachment, such as an EOB from the primary, a certificate of medical necessity, a discharge summary, or other clinical documentation, use PCC EHR to add attachment information to the claim.
Whenever a claim requires an attachment, select the encounter in the Billing History section of the chart and click “Edit Charges”.

Depending on the circumstances, you may need to make other changes to the encounter or the charges. For example, if you’ve already processed a payor response, you should check the Procedures component to make sure the charges are currently pending the correct responsible party for the claim you wish to send.
Next, visit the Claim Information section and click “Add Attachment”.

PCC EHR will create a unique attachment ID. You can then set the Attachment Type and Transmission Method. These values will be submitted on the electronic claim.
Double-check that the checkbox for claim submission is checked, and that it is for the correct payor.

Then click “Save + Post” to save the attachment information and queue up a new claim.
For more details about editing charges and encounter and claim details, read Edit Encounter Charges and Claim Information.
Claim Attachment Information is Per Claim: When you add attachment information to an encounter, it is added to the next claim queued up for that encounter. If you later need to resubmit or send the claim to a different payor, for example, you should use the Claim Information section to add a new attachment.
Ask PCC For a Software Feature or Enhancement
PCC uses your requests and comments to help decide which features and services to develop. We depend on your feedback; we can’t make software without you.
Read the article below to learn the best way to submit a feature enhancement request.
Step 1: Determine the Need Behind Your Request
The most important step to effectively communicate your feature or enhancement request to PCC is to clearly understand the need.
PCC is dedicated to removing obstacles to practicing medicine. What obstacles are you facing, and how are they interfering with your workflow, slowing down your day, and preventing you from providing care to your patients?
As an example, you may have in mind a “feature request” for PCC, such as:
- a new screen where I can enter additional vaccine information
- a new blood pressure field on the chart note
- a nurse messaging feature in PCC EHR
…however, if you ask for the button, screen, or field you have in mind as a solution, PCC may struggle to understand what you wish to accomplish.
Instead, work with your clinicians or talk to PCC Support to discover the underlying need behind the request. Such as:
- My practice needs to track and report NDC codes for immunization lots when reporting to a state agency in order to be certified. Otherwise, we will not receive a program’s incentive payment.
- We sometimes record infant Blood Pressure on the patient’s leg, so we need to be able to indicate the leg to properly record that information in the patient’s chart, so we can compare “apples-to-apples” when looking at BP measurements over time.
- My nurses don’t know when they need to do a venipuncture. I need a way to tell them, or they will enter the room and not bring the proper equipment with them.
Bonus Surprise Solutions: When you work to identify the problem, sometimes PCC can help you find a solution that you may not have been aware of. PCC’s products have a lot of little-known features, and your PCC Client Advocate can help you discover great new workflow solutions. For example… did you know that PCC software can already track NDC codes, indicate that blood pressure was taken on a leg, and alert nurses to specific orders?
Step 2: Send Your Request to support@pcc.com
PCC carefully reviews and responds to every communication sent to support@pcc.com. We love to hear how PCC might improve your workflow and help you in your day-to-day efforts to improve quality of care.
When you craft your message to PCC Support, what can you write that will help best communicate your request?
Consider the following tips:
-
Use PCC's Magic User Story Formula: Try to craft your e-mail in the following structure: “As a… I need… so that…”. For example, “As a clinician, I need a way to indicate that I took blood pressure on the infant’s left leg, so that I am properly charting how I took blood pressure and all of my clinicians can understand the chart record and BP history later.” When you use this format, PCC will be certain to have the basic information they need to understand your request.
-
Talk to Your Client Advocate: Before and after you send your request, be sure and share your needs with your Client Advocate during your regularly scheduled PCC Support call. PCC Support wants to make sure your voice is heard, and they can help explore existing solutions or gather additional details that may help clarify your request.
Step 3: What Else Can I Do?
Now that PCC is tracking your enhancement request, is there anything else you can do about your need?
-
Offer to Provide Research Guidance: Can PCC call you and your staff and talk about your needs? When you send a request to PCC, let them know that you are available for an interview about the issue. During the research and development process, we interview Subject Matter Experts (SMEs), and the insight of you and your colleagues can be enormously helpful.
-
Offer to Be a Beta Tester or Pilot Tester: Does your practice have a high tolerance for disruption? Consider offering your practice as a beta or pilot tester for early, unfinished software. We test new software components, features, and releases with practices that care about the features and can test them thoroughly. Speak to your Client Advocate about becoming one of PCC’s beta or pilot testers.
-
Attend the PCC Users' Conference: PCC’s annual UC is a great environment to discuss the problems your practice is facing. You can use our Wishing Well and Roadmap planning sessions to voice your needs, and you can find other practices that have similar challenges and explore solutions together. At our Roadmap planning session, we invite you to participate in identifying priorities among all the different needs and requests that pediatric offices share.
-
Find Other Solutions on PCCTalk: PCCTalk is an online forum where PCC-using practices discuss problems and solutions, from coding to practice workflow. If you ask how other offices have dealt with an issue, they may surprise you with inventive solutions that PCC Support may not know about.
Note: PCC does not use PCCTalk as a source of enhancement requests or to solicit feature feedback. We do not “count votes” from PCCTalk and rarely add PCCTalk user comments to our tracking software.
-
Stay Tuned for PCC Futures, New Release Web Labs, and PCC Documentation: PCC is always building new software and services to meet client needs. A solution may already be on its way! If you read The Pulse, PCC’s newsfeed, you’ll be notified about PCC Futures and all release announcements so that you’ll be the first to learn about exciting new improvements.
-
Try Again, Ask For an Update, Talk More!: It doesn’t hurt to periodically check in about your requests! When you talk with your Client Advocate, be sure and continue to share the different challenges your practice is facing and how you’d like PCC to help. Once again, refer back to rule #1: always describe your challenge and how it interferes with your practice’s efforts to care for patients. PCC pays special attention to those challenges, and what we hear helps steer our software development as well as future services and strategic choices that we make long-term.
PCC’s entire reason for existing is to solve the problems your practice is facing, and we need your help to do it! As always, call or e-mail PCC Support at any time to discuss how we can help your practice meet new challenges.
Report on Lab Test Results in PCC EHR
You can report on lab test results in the Report Library in PCC EHR.
Run the Test Results Report
In the Report Library in PCC EHR, open the Test Results report from the Clinical category.

Set up the report filters. You can filter the report based on lab order date, test name, test status, encounter location, and lab facility. Note that you can only report on lab tests that you have ordered in PCC EHR at least once. For e-labs, you need to have received results for a given test at least once before you can include it on your report.

Generate the report. As you view the results, you can change which columns appear, drag them to rearrange their order, group the results, and change their sort order.

You can print the results or export them for use in a spreadsheet program, then share the report with anyone who needs to see it. When you export results to CSV format, the subelements of names (e.g., first, last) and addresses (e.g., street, city, state) split into separate columns so that they are easier to work with in a spreadsheet program.
When to Expect a CLIA Number: You will only see CLIA numbers in your report results for tests performed at lab facilities that are associated with a scheduling location in PCC EHR.
20,000 Row Limit: Reports in the Report Library are currently limited to 20,000 rows. If your output appears to be exactly 20,000 rows long, it may not contain all of the information that you are looking for. If this occurs, return to the Criteria screen and limit your report criteria until your rows are under 20,000. If all of your current criteria settings must be included in your report but you are still hitting the 20,000-row limit, contact PCC Support for help creating a specialized report.
Use the Test Results Report Instead of the Lab Test Report: The Test Results report in the Report Library does everything and more than the Lab Test report, which you can continue to access in the Reports menu in PCC EHR.
Customize the Test Results Report
You can create custom versions of the Test Results report. On custom reports, you can set up your own default search criteria and tailor the columns and sort order of the final output.
Open the Test Results report in the Report Library and click “Customize Report”.

In the customization window, pick the columns that you want to make available on the report and set up default search criteria.

When you have finished customizing the report, preview the results and adjust which columns are visible, the order in which they appear, and the order in which results sort. Then, save your custom report.
Whenever you run the custom report, it will remember your settings. Once the report looks the way you want it, save it.

Schedule the Test Results Report
If you need to run the Test Results report on a regular basis, you can schedule it to run automatically at regular intervals.
Open the version of the report that you want to schedule in the Report Library and click the “Schedule” button.

Name the schedule and pick how often and what time of day it should run.

The “Next Run” field will show you when the report is next scheduled to generate based on the criteria you set up. Click “Schedule” to finish scheduling your report to run automatically.
Scheduled reports appear on the Scheduled Reports tab in the Report Library, where you can change, stop, and re-start schedules.
You can view the results of your scheduled reports on the Saved Results tab in the Report Library.

When to Use the Test Results Report
You can use the Test Results report to gather information for lead and COVID test reporting to your regional health department.
First, make sure your practice records these tests using discrete lab tests in PCC EHR.

Next, run the report and select a date range and the tests you perform.

Make sure the report results are organized the way your state requires, then export the report to a CSV file.

If you need to make further adjustments, you can import the results into a spreadsheet program on your workstation (Excel, OpenOffice, etc.) and finish customizing the output to match your state’s requirements. When the report is ready, send it to your state!
For help configuring your lead and COVID tests, or creating and exporting a lead or COVID test report, contact PCC Support.
Configure User Selection Lists
There are a number of places in PCC EHR where you select from a list of EHR users. For example, you can filter a queue so that it displays only users that you want to follow:

And you can choose from a selection list when you assign an order or a task to a user:

Your practice can adjust the user selection list to make it easier and clearer to use.
When you want to customize your practice’s user selection list, go to the User Administration tool and select the User Selection List tab.

You can sort users in three ways. The first two options allow you to sort user lists by either last name or first name.
Keep disabled users on bottom: If you have disabled users that you would rather not sort through, you can force them to the bottom of either of the alphabetical sort lists by selecting the “Keep disabled users on bottom” check box.
If you would like to create your own sort order, choose the “Manually arrange” option. In this mode you can drag and drop users to appear anywhere you want in the list. You could use this to put all nurses at the top of the list, for example.

User Name Format: Use the menu at the bottom of this window to choose how you want the names in your lists to display: First Name and then Last Name; Last Name and then First Name; or Full Name. Note that the Full Name option displays the name from the Full Name field in the User Account Administration tool, which may not match the First Name and Last Name fields.

Care Centers: If you use PCC’s Care Center features, you can select a unique user order for each Care Center.
The snomedmap Report
The snomedmap program is a collection of custom reports that you can use to understand the relationship between the clinical SNOMED-CT and billing ICD-10 diagnosis codes you use on your PCC system.
For example, you can use the snomedmap report to:
- Review common SNOMED diagnoses that are mapped to an ICD-10 code that changed as part of an annual ICD-10 code update
- Review all the diagnoses in your practice’s PCC EHR Favorite diagnoses list that lack a default ICD-10 code
- Review a list of your 50 most commonly used diagnosis descriptions (whether they have a default mapping or not)
- Review the entire list of SNOMED diagnosis descriptions that lack a mapped ICD-10 billing code
Open the snomedmap Program and Run a Report
You can run snomedmap from your Practice Management windows. Contact PCC Support if you need help adding the report to your window.

Choose a report from the list at the top to see a description at the bottom of the screen.
Press F1 – Generate Report to generate a report.
Periodic Code Set Updates
When a code set update takes place, PCC adds custom reports to snomedmap to help practices prepare for the changes.
For example, PCC updates all practices for each annual ICD-10 code set update. After an update, your practice can use the snomedmap report to research any changes to codes that you use. A new annual mapping report, “Favorite SNOMEDs mapped to Deleted or Modified year/date ICD-10″ will appear at the top of the snomedmap report.

The report will show you all of your practice’s Favorites that are affected by the ICD-10 update. Since a diagnosis is marked as a Favorite once it is used, the report can give you a good overview of billing issues you might encounter when the new code set takes effect.

You can use the Billing Configuration tool in PCC EHR to update your mappings for codes you use.
What If I Do Not Update My ICD-10 Mapping?: If you do not configure a diagnosis billing code for a SNOMED description, and there’s no assisted mapping offered by the National Library of Medicine, clinicians may not see an ICD-10 code when they select a diagnosis on a chart note in PCC EHR. Instead, they can select a code on the Bill window (the “electronic encounter form”), or your biller can make a selection later when they post charges. Contact PCC Support for help with these tools.
Update Your SNOMED to ICD-10 Billing Mapping in PCC EHR
After you review reports in snomemap, you may wish to use the Billing Configuration tool to adjust which ICD-10 diagnoses are mapped to the SNOMED-CT descriptions in PCC EHR.

By using snomedmap and the PCC EHR Billing Configuration tool, your practice can review your most common billing codes that are affected by code updates and optionally make changes to your billing mapping.
Review Other Diagnosis Mapping Reports
In addition to code update reports, the snomedmap program includes useful reports for reviewing code mapping on your PCC system.
Select “Commonly Used SNOMED Descriptions…” to see a list of your 50 most common diagnoses for the past year and review their ICD-10 mapping.


This list is a great way to check out the default ICD-10 code mapping for your common diagnoses. If you disagree with how a diagnosis will be billed in ICD-10, or if a diagnosis has no assisted mapping, you can use the Billing Configuration tool to make changes.
Select “Favorite SNOMED Descriptions…” to review diagnoses on your Favorites list that lack a mapped ICD-10 code. The output will include the number of times your practice used each diagnosis in the past year.
You can use the Billing Configuration tool in PCC EHR to map ICD-10 codes to SNOMED descriptions.
Schedule a Patient
Use the Appointment Book in PCC EHR to schedule appointments, review and make changes to providers’ schedules, and place scheduling blocks.
Watch a Video: You can learn how to schedule a patient by watching Schedule a Patient in the Appointment Book and Schedule for Providers Across Multiple Locations.
Schedule an Appointment
For a simple overview of scheduling in the Appointment Book, use the following steps.
Open the Appointment Book
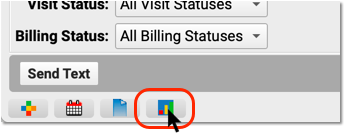
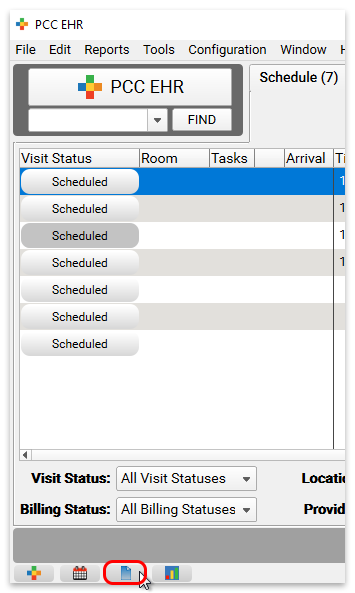
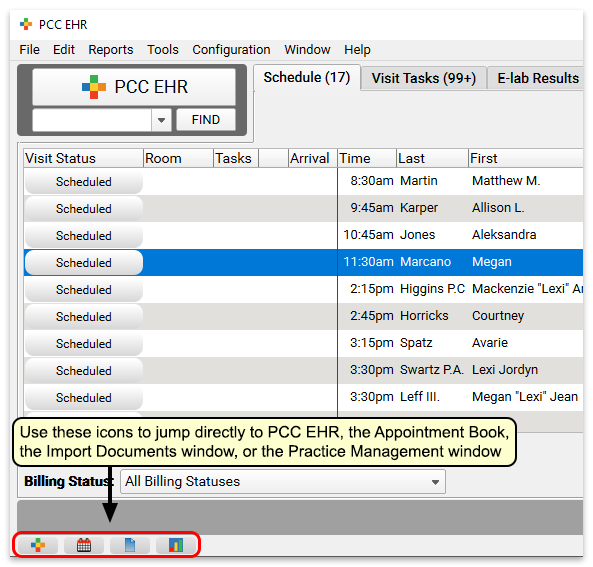
Click on the Appointment Book icon to open the Appointment Book.

Find the Patient
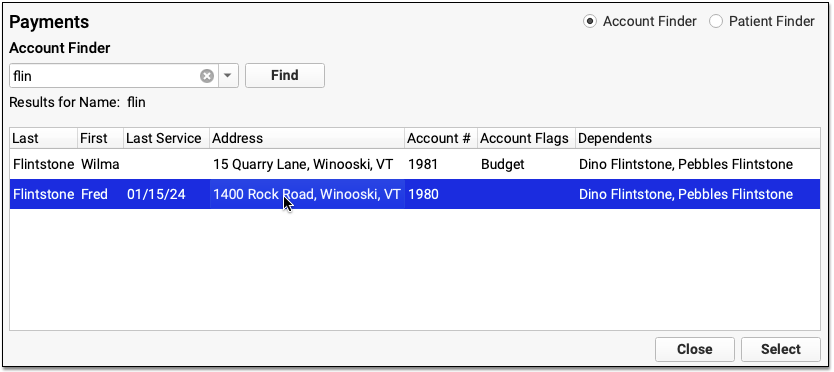
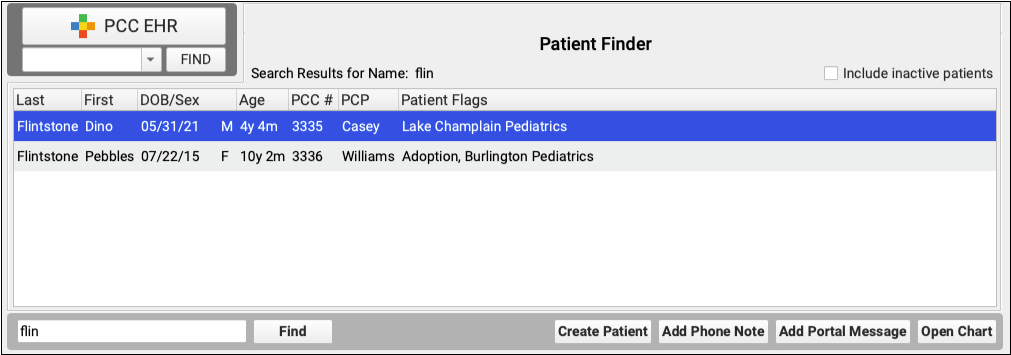
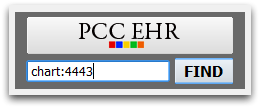
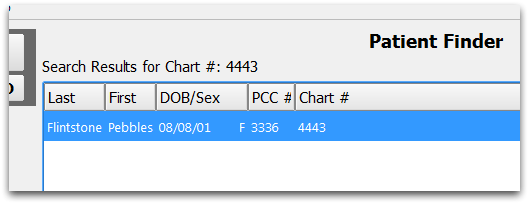
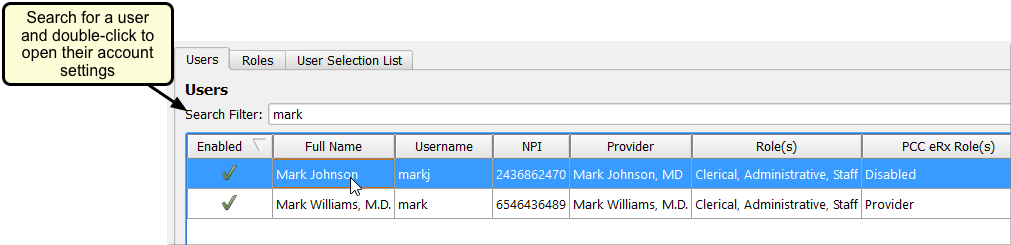
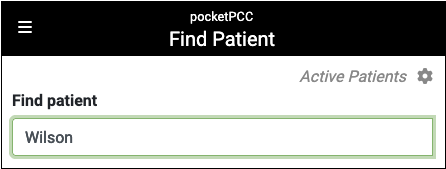
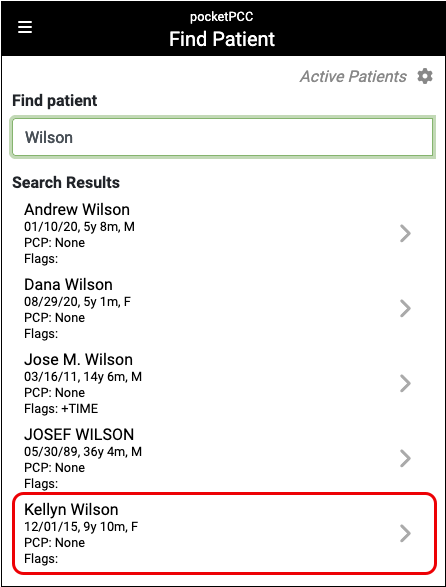
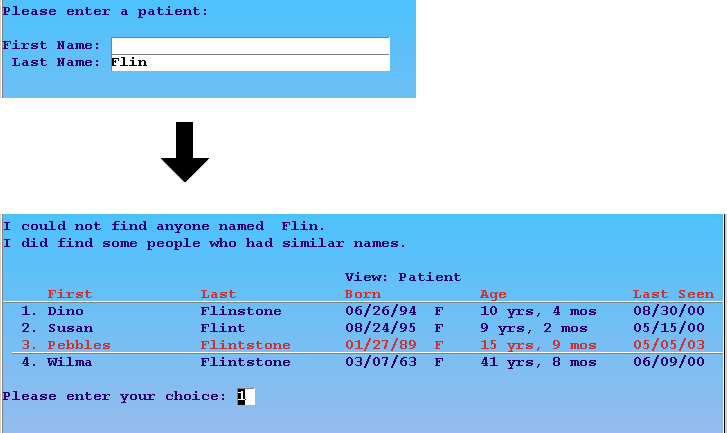
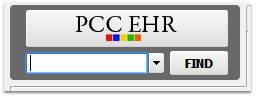
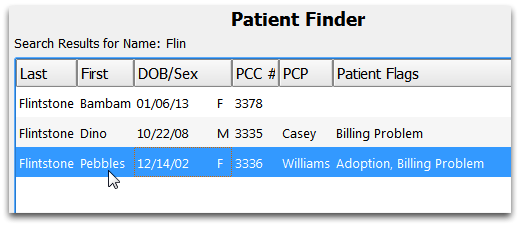
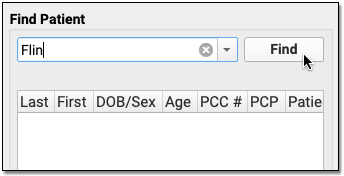
Type the patient’s name, phone number, or other details into the Patient Name field to search for a patient.
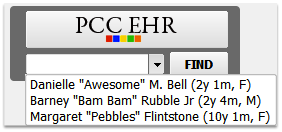
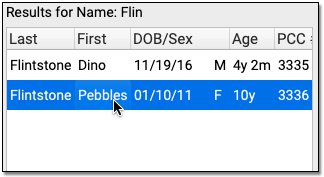
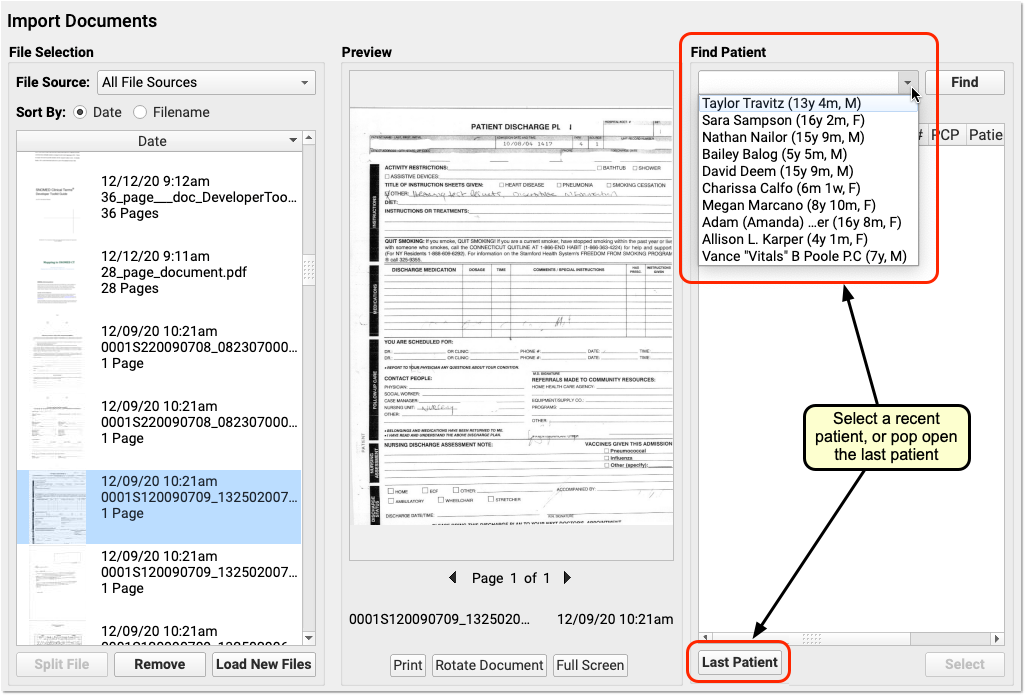
If you’re looking for a recently accessed patient or their sibling, you can select their name from the drop-down list.

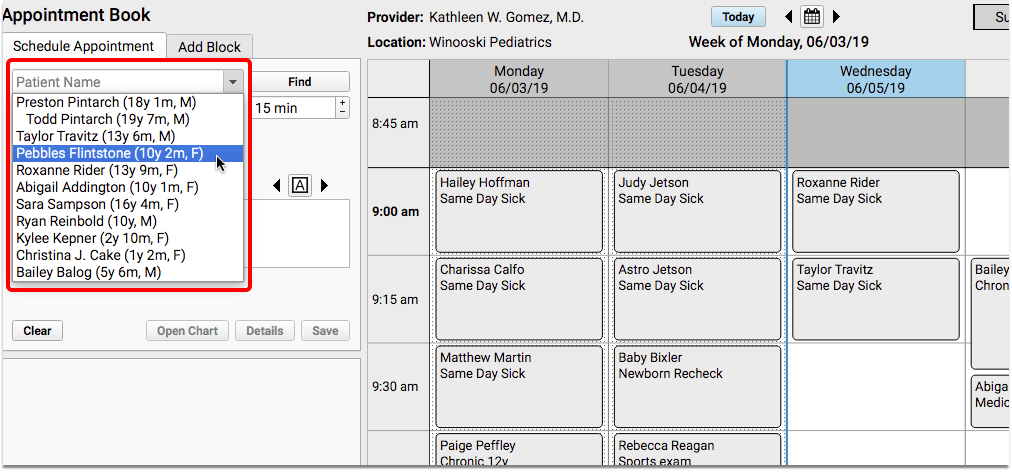
Siblings appear on the list for easy access. If you are scheduling for a patient who has never been to your practice before, you may need to add the patient and family account to your system.
Review and Update Patient Details
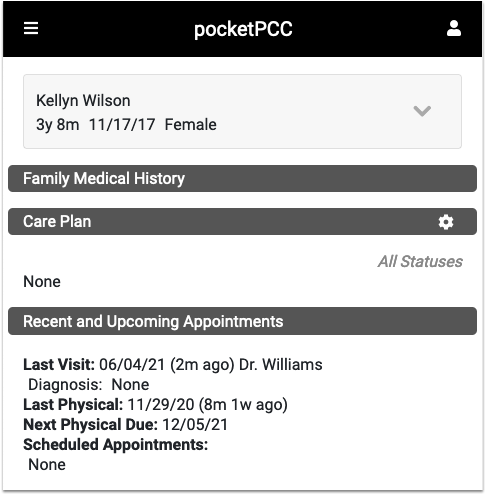
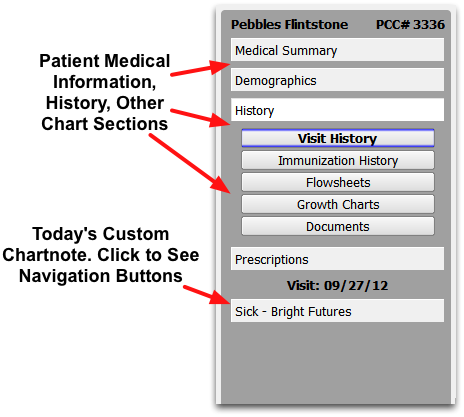
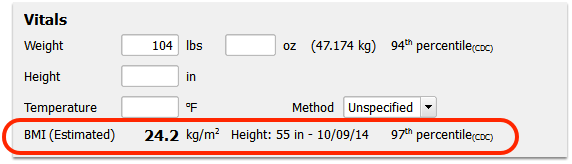
Click on the patient’s name to review basic information, such as recent vitals, gender identity details, and their primary care provider.

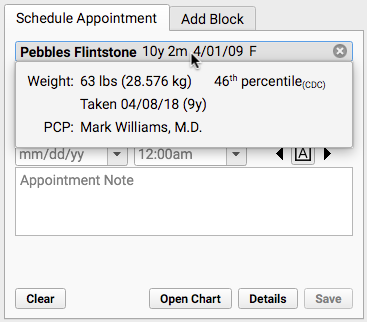
Depending on your practice’s configuration, the Patient Details window may open automatically when you find a patient. You can also click the “Details” button to open it. Use the customizable Patient Details ribbon to verify and update items in the patient’s chart as you schedule.

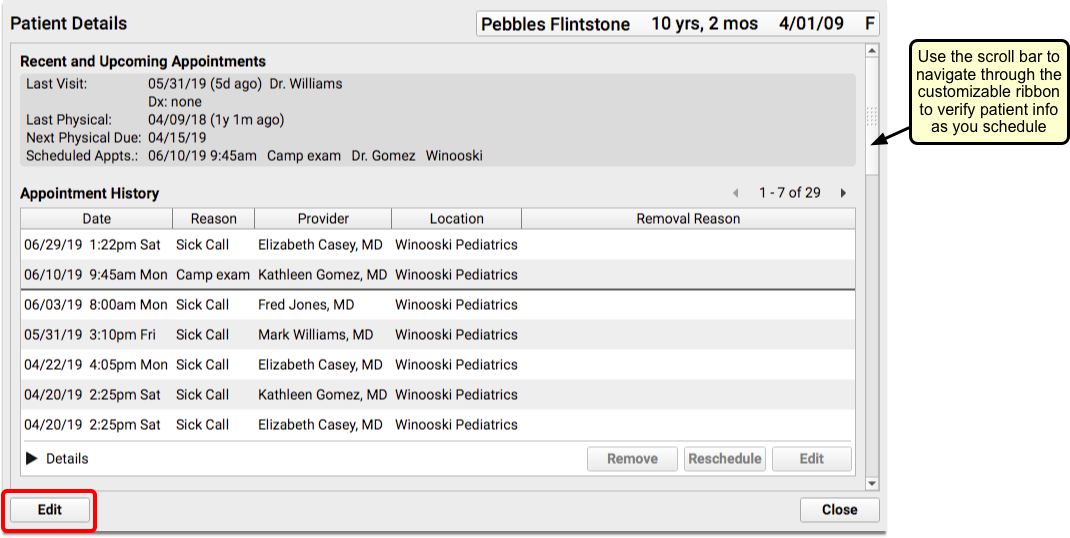
Click “Edit” to add or edit information.
You can update insurance information and then check the patient’s eligibility (based on today’s date).

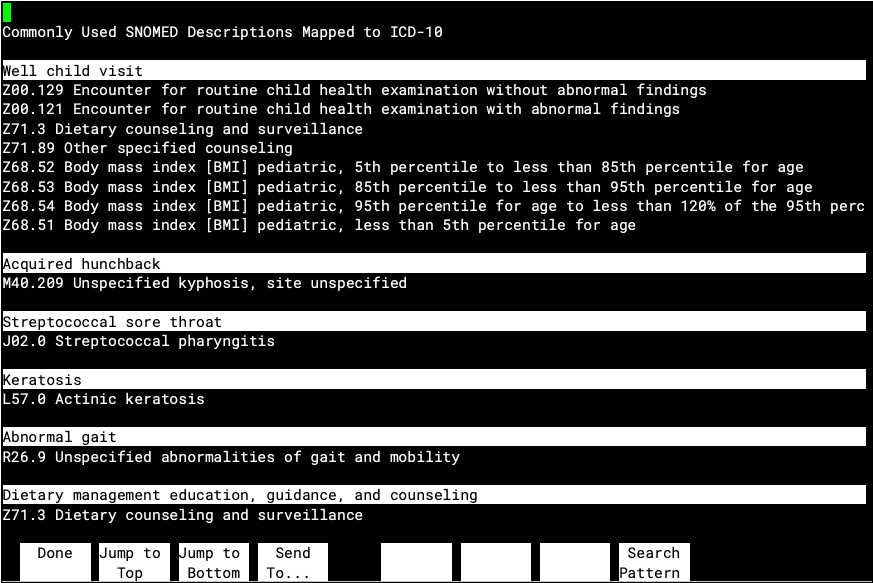
Select a Visit Reason
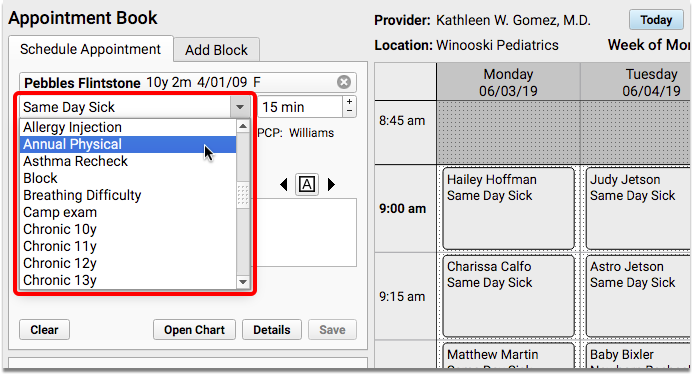
Your practice’s default visit reason will appear in the Visit Reason field. You can type or select a different visit reason.

The clinician’s configured visit length will appear next to the reason.
Select Location and Provider
The Appointment Book remembers which location and provider you last scheduled for and defaults to those settings. You can select a different provider and/or location at any time during the scheduling process.
Find an Open Time in the Schedule
Click anywhere on the grid to pick an appointment time.

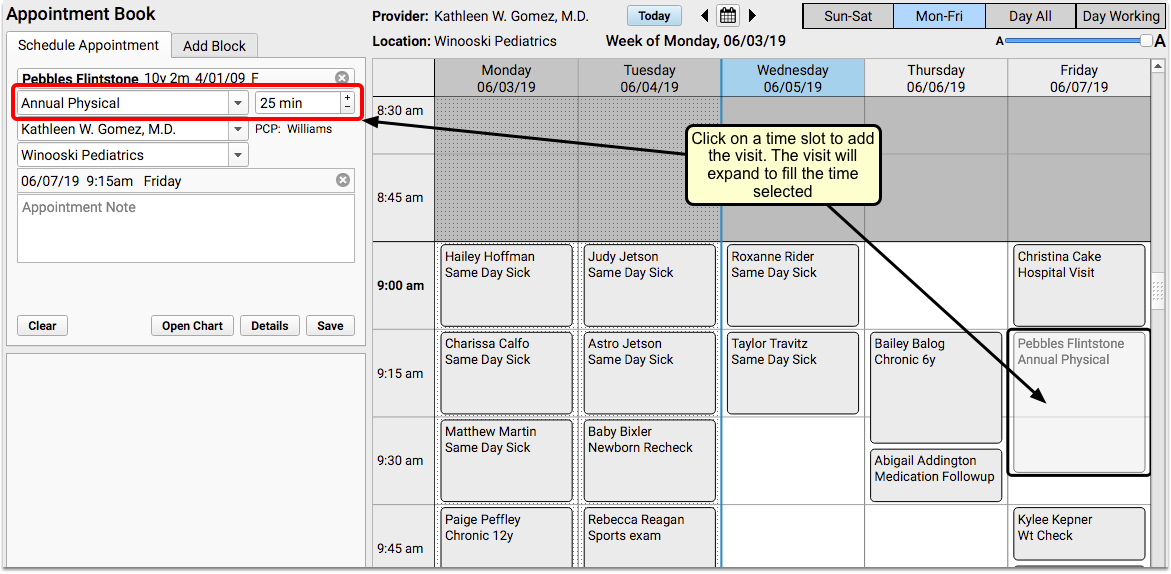
If there’s an obstacle in the calendar, an error message will display in the scheduling panel.

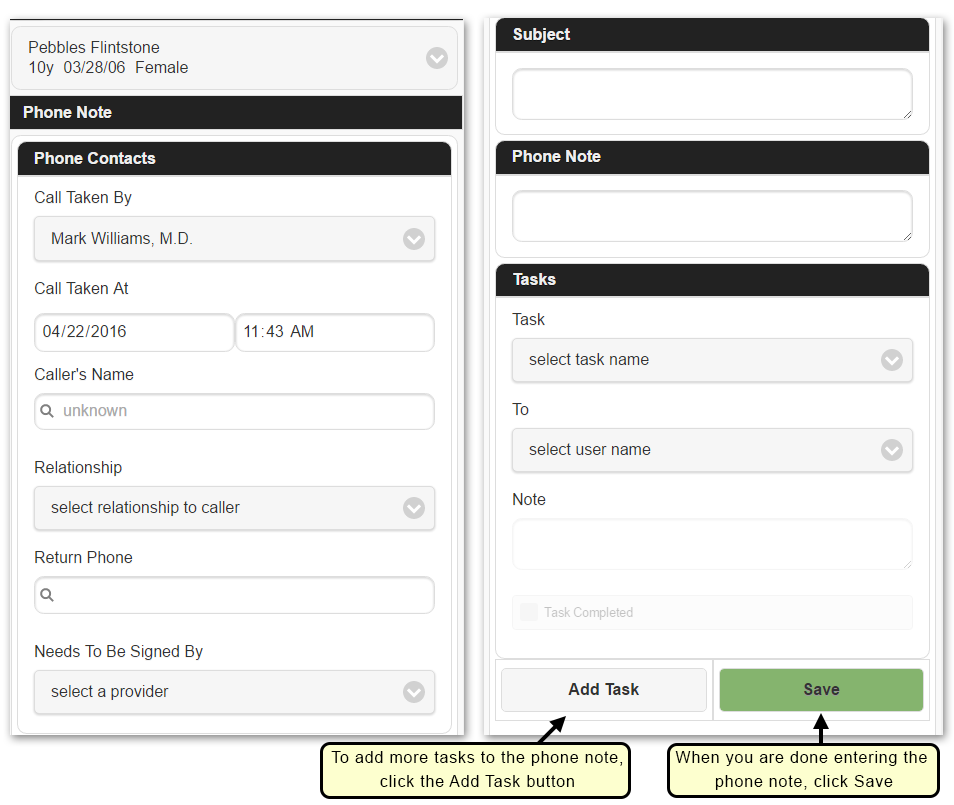
Enter an Appointment Note
Optionally enter notes about the appointment in the Appointment Note field. Appointment notes will be available on the Schedule screen, the top of the chart note, and anywhere your practice works with the encounter.
Save the Appointment
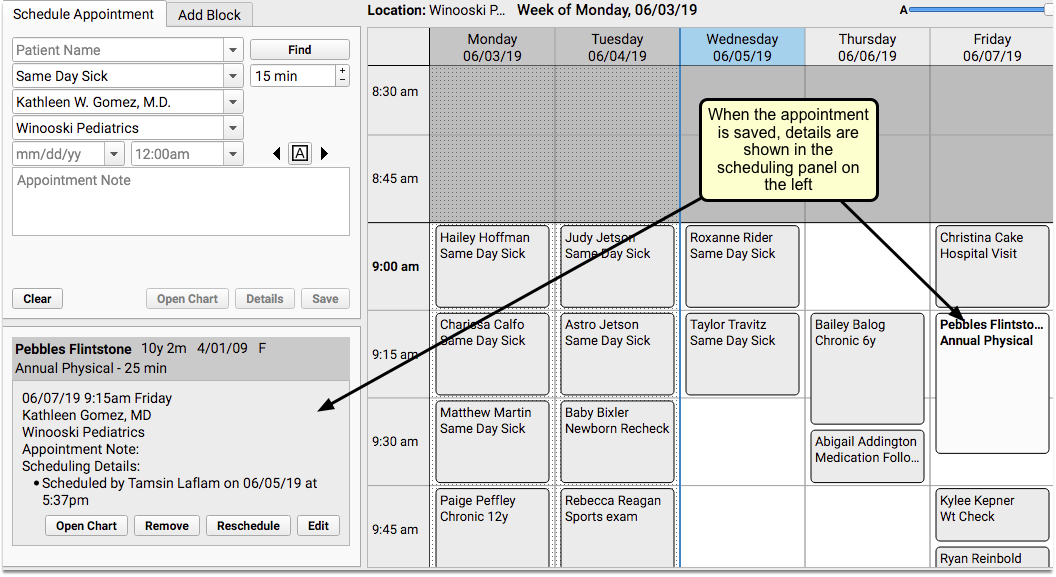
Click “Save” to confirm the appointment. The details of the new appointment will be shown on the left side of the screen.

Open the Appointment Book
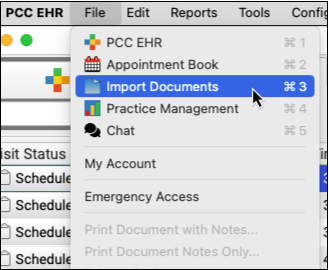
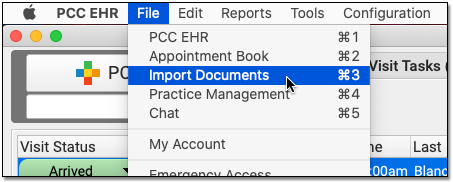
Open the Appointment Book with the Appointment Book icon at the bottom of your PCC EHR window.

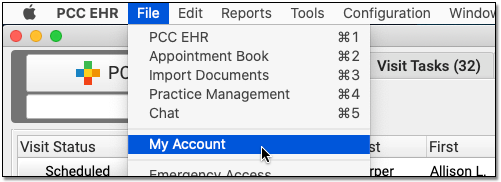
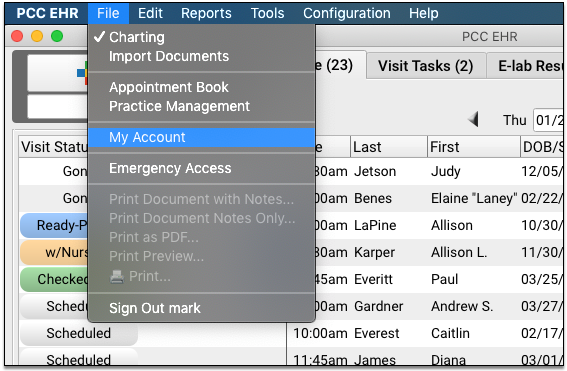
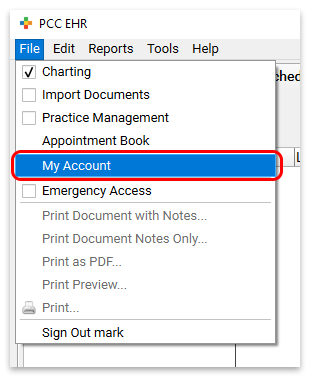
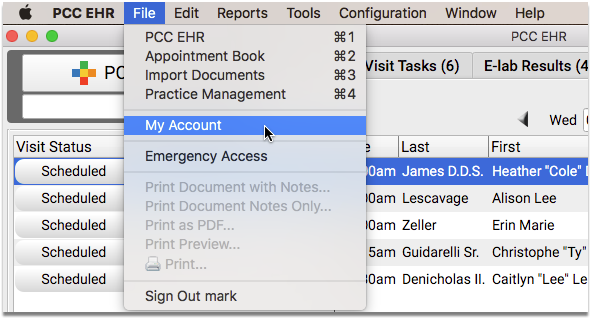
You can also select the Appointment Book from the File menu. You can also use the My Account tool to configure the Appointment Book to open as soon as you log in.
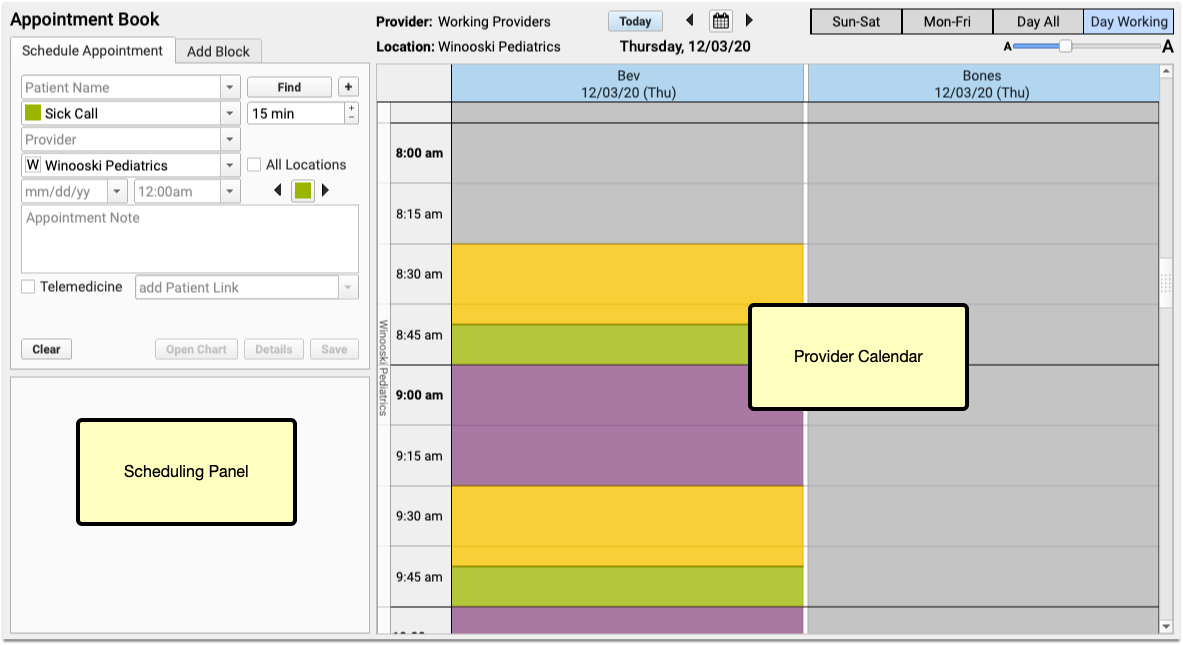
Review the Appointment Book, Provider’s Schedules, and Locations
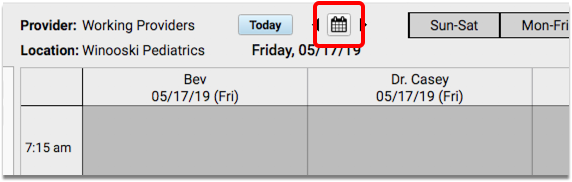
Days in the past are shaded with a dotted pattern, which appears much like a curtain over the days. Today’s column will include a blue header, and a blue line will appear down the left side of the day, clearly dividing the past from the present.
If your practice chooses to assign Visit Types, you may see color-coded guidance on the calendar to help schedulers see when certain types of appointments should be scheduled. You may also see colored stripes on the left of scheduled visits, indicating the actual visit type.
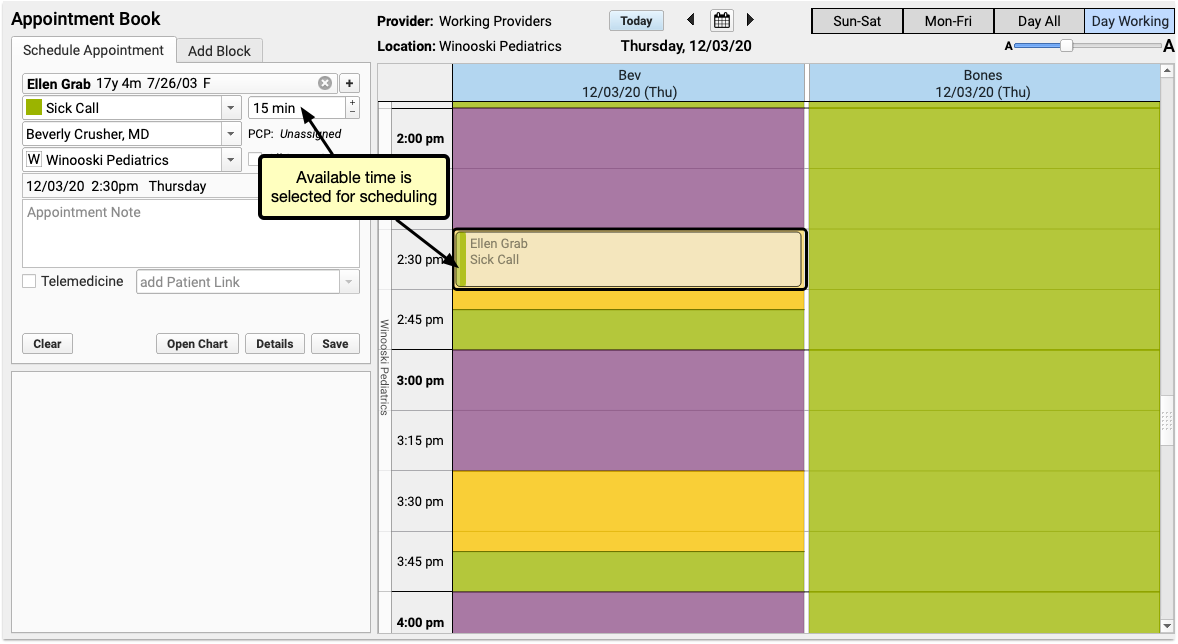
When you click on a time slot in the calendar that has open space, the Appointment Book will assume that you are attempting to schedule, and will select the available appointment space.

If the selected time slot has space for multiple appointments, the already-scheduled appointments will appear stacked, accordion-style, on the left side of the screen.

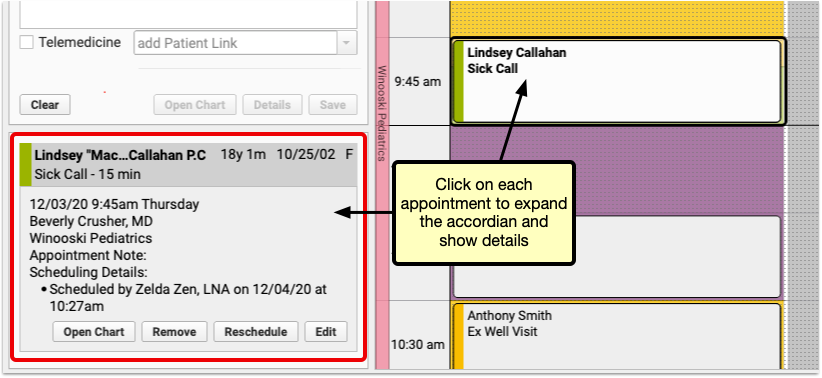
You can click on each scheduled appointment, either in the accordion or on the appointment grid to see details for that appointment.
View Multiple Providers’ Schedules
When a patient needs an appointment right away, it’s helpful to see availability for all of your providers at one time.
View Schedules Only for Providers Who Are Working on a Single Day
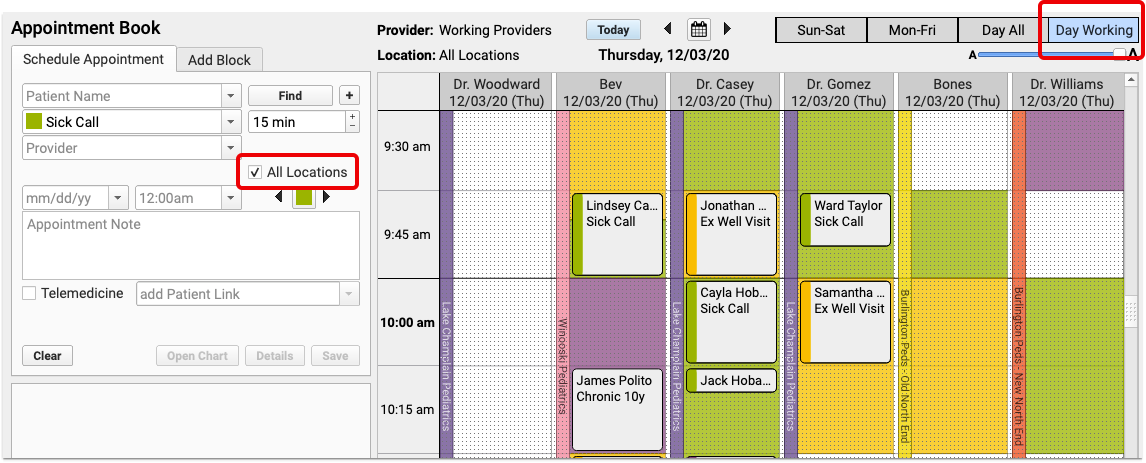
When you’re trying to schedule a visit, but your practice has several providers who work in different locations, use the “Day Working” view to see only providers who are scheduled to work for the selected day and location.

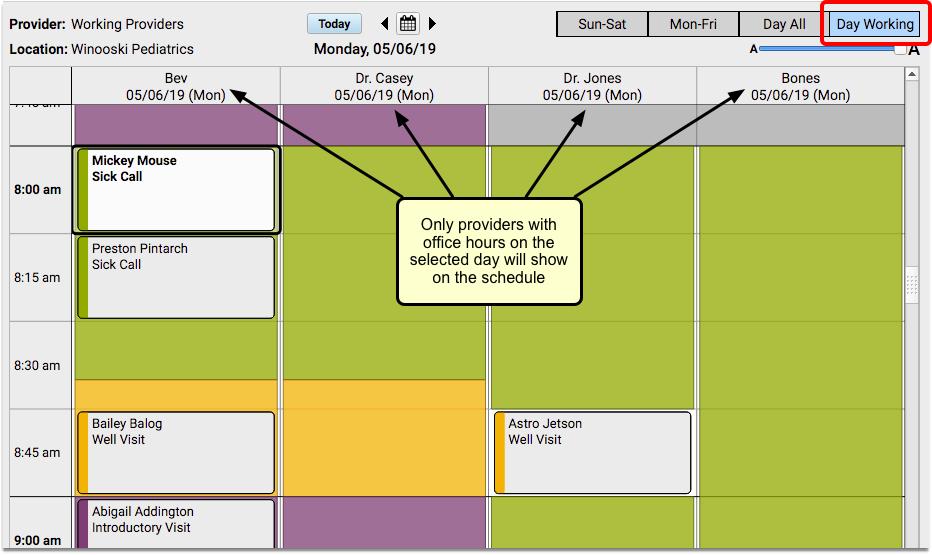
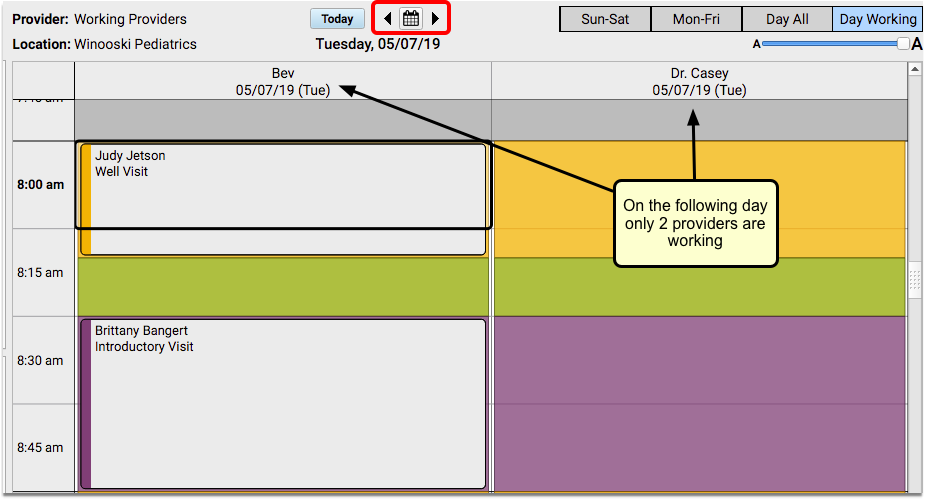
You can navigate through the calendar day by day and you will still see only the providers who are available at that location on the given day.

If you prefer to see all providers, regardless of their availability, use the “Day All” view.
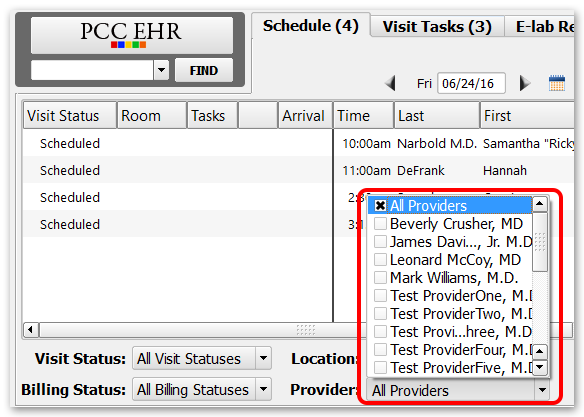
View Schedules for All Providers
Click on the “Day All” button to see all of your providers, regardless of where they are working on a given day.

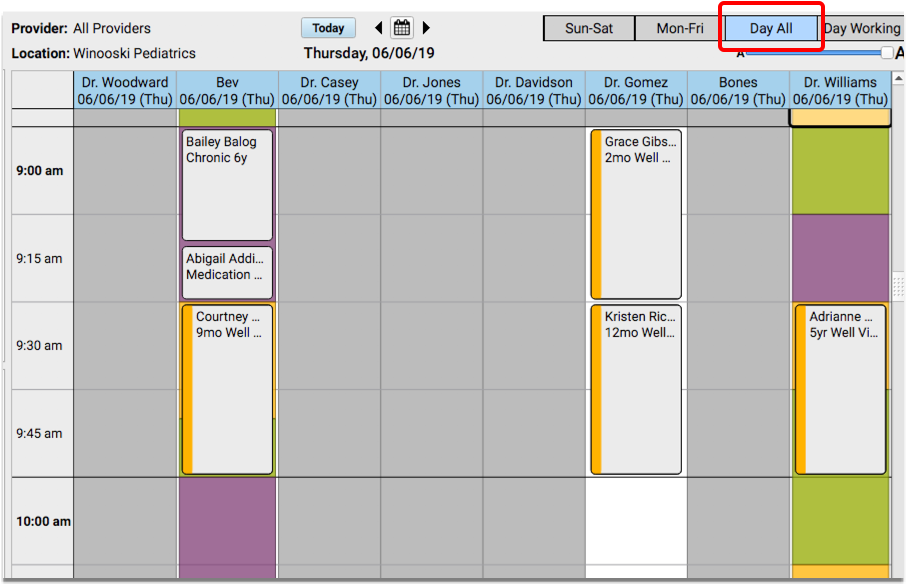
If you don’t already have a day selected, the current day will be displayed.
View Multiple Locations Simultaneously
If your practice has multiple locations, the Appointment Book will include color-coded location banners and an “All Locations” checkbox by default, to make it easier to differentiate between your scheduling locations at a glance.
When you need to schedule for a provider who works in multiple locations, you can click the “All Locations” checkbox to show all practice locations where the selected provider has appointment availability.

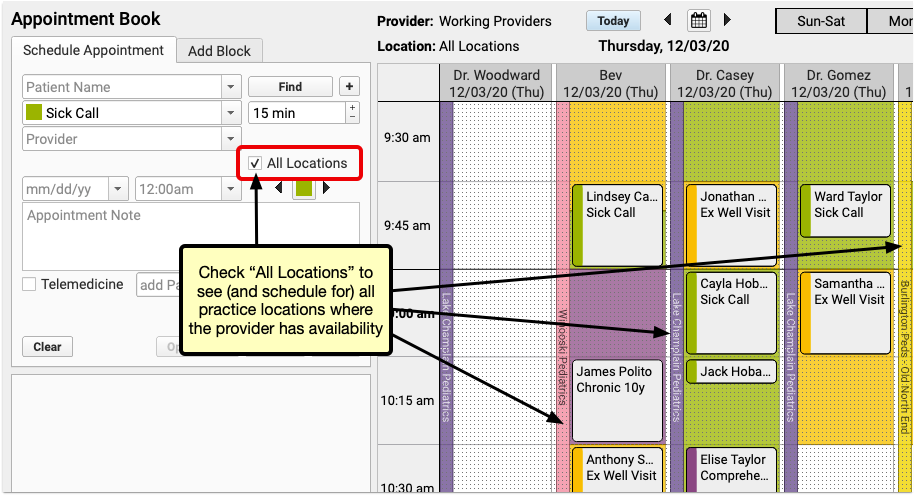
You will be able to see and schedule appointments for the provider on one screen, regardless of where they are working that day.
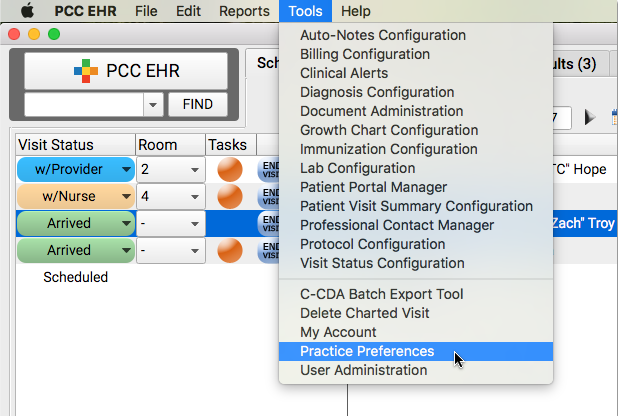
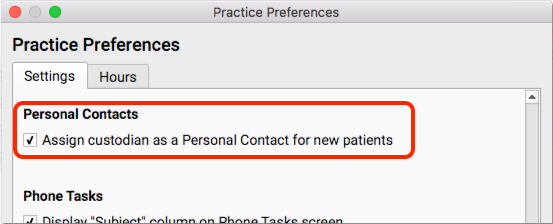
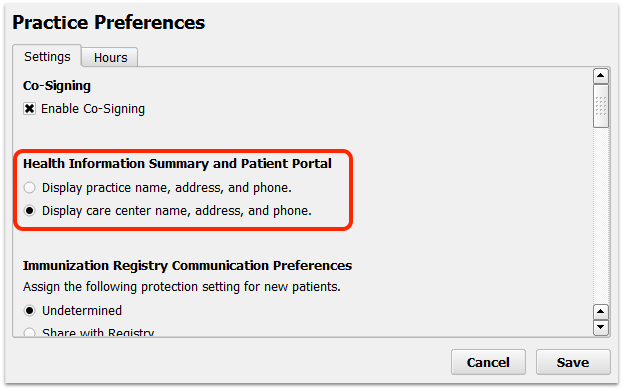
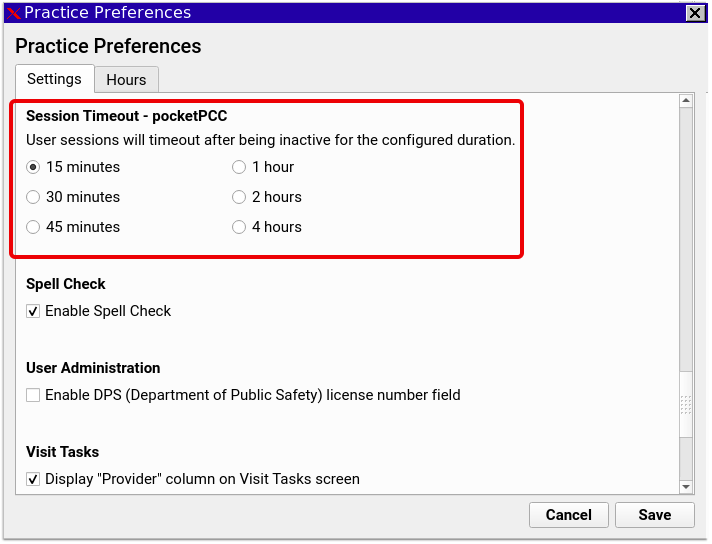
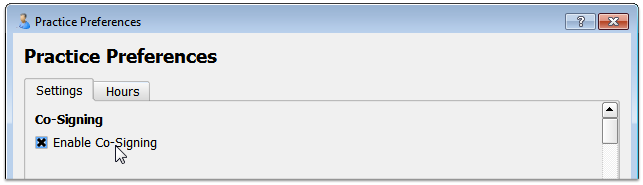
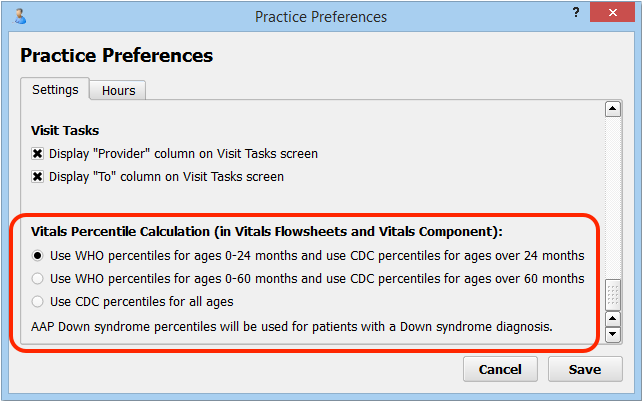
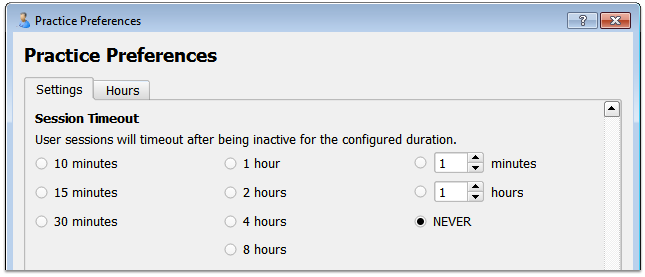
Turn Off Default Locations: Location banners and the “All Locations” checkbox are enabled by default if your practice has more than one scheduling location. If you prefer not to use either of these features, you can turn them off in the Practice Preferences configuration tool.
If you are scheduling in the Day Working view, and “All Locations” is selected, you will see all providers who are working that day, regardless of their location. The location banner will display which office they are working in throughout the day.

Care Center Locations: If your practice uses care centers, schedulers will only see the locations within their own care center.
Customize Locations: You can assign colors to your locations in the Practice Preferences tool.
Schedule Appointments: Use Visit Types and the Availability Finder
What time is the first available sick visit for Dr. Casey today? When is the first available well visit slot after the patient’s well visit due date?
You can use the Availability Finder tool to find the next open time slot for a specific Visit Type.

You can also use the Select Appointment Date & Time window for a more visual approach.
Note: Your practice will need to have Visit Types configured, as well as color-coded templates for your providers, to use the following features.
Search for the Next Open Time Slot for a Specific Visit Type by Color
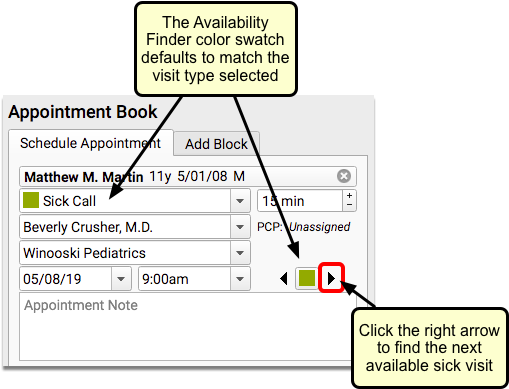
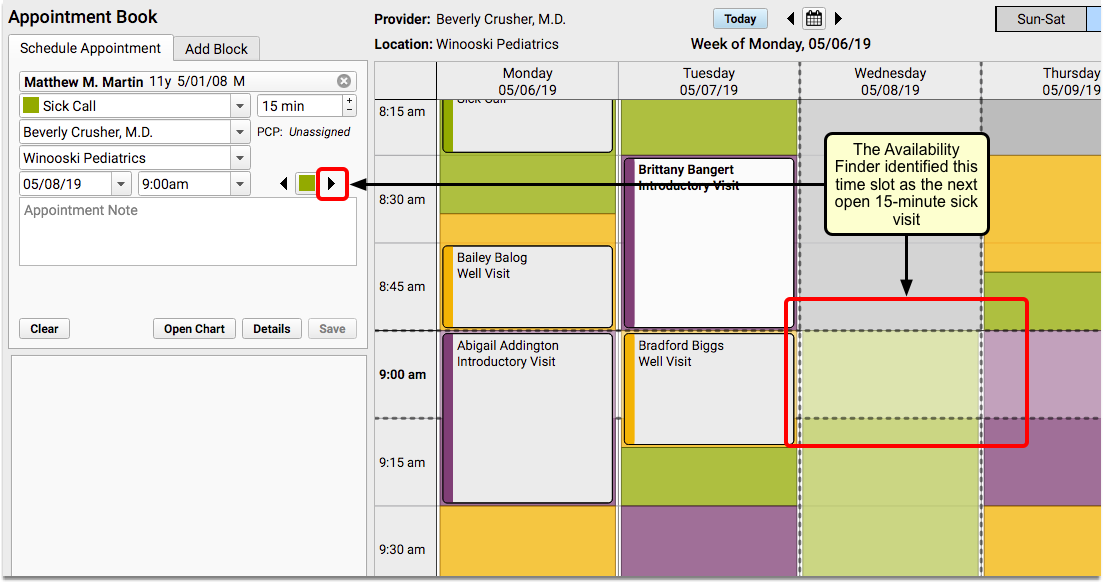
When you select a visit reason in the Schedule Appointment panel, the Availability Finder color swatch will display the same visit type color.
Note: If your practice does not use Visit Types, or does not color code provider scheduling templates, you can change the default setting for your availability searches to look for any open time slots.
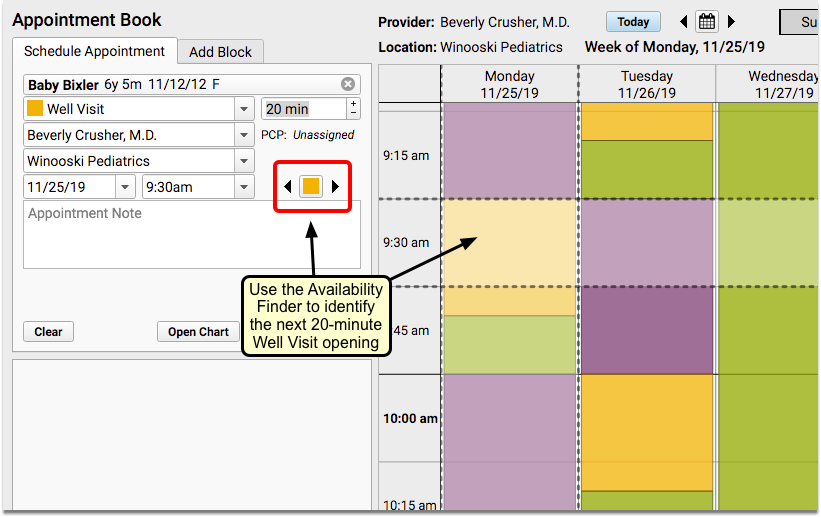
You can use the Availability Finder arrows to jump to the next open time slot for that visit type.

In the above image, the user clicked the right arrow, and the Appointment Book automatically selected the next available sick time.
You can click to select that slot, enter an Appointment Note, and click “Save” to schedule. Or, you can continue clicking the right arrow to see additional open time slots with that visit type.
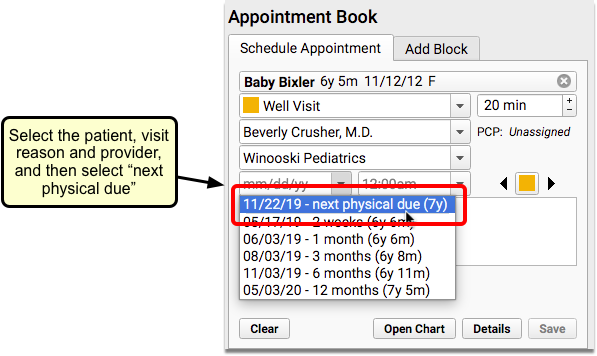
What about well visits? When you schedule a well visit, you typically start looking after the patient’s next physical due date, or whatever date in the future you want to begin the search.

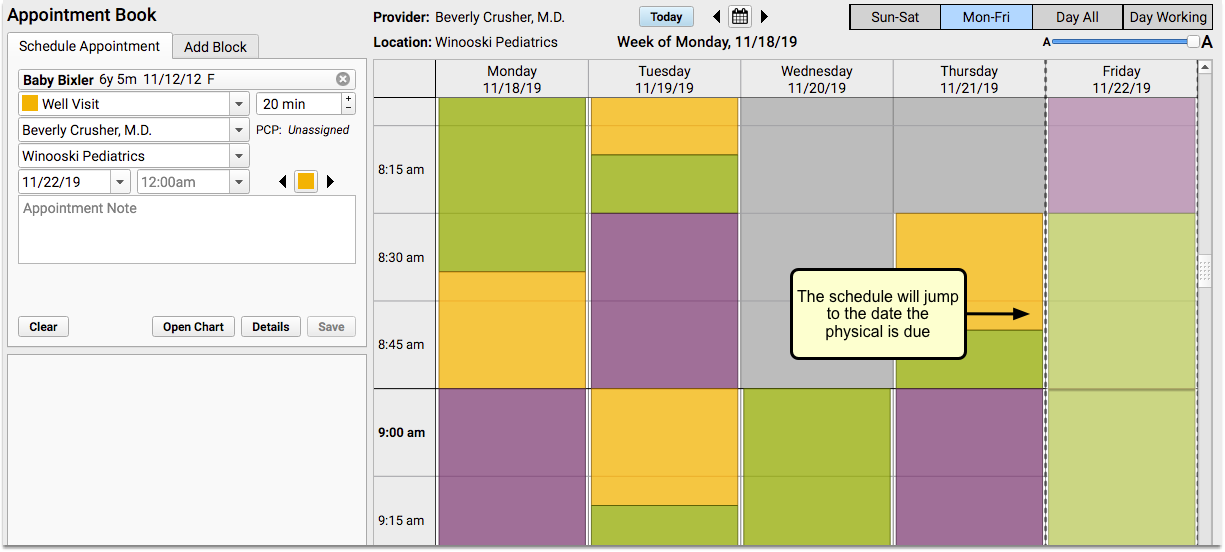
The Appointment Book will jump to that date. Then you can use the right arrow to find the first open Well Visit time.

If you don’t want the first appointment found, continue to click the right arrow to find the next opening. The Appointment Book will continue on to the next day and scroll the screen for you, or even flip to the next week. You can use the left arrow if you want to go back to the last offered time slot.
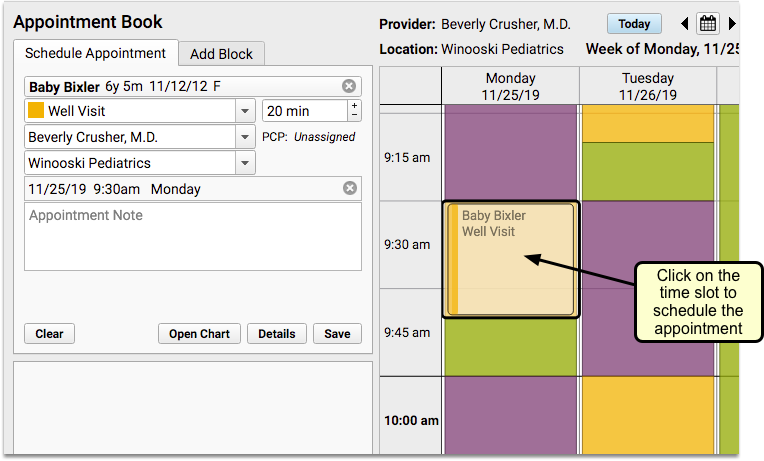
When you find the date and time you want, click on the time slot to begin scheduling.

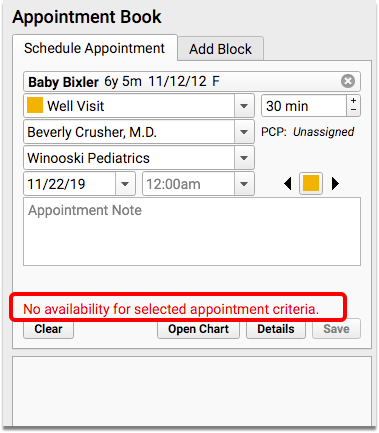
None Available: If there are no available appointments for the selected criteria, you’ll see a temporary message in the scheduling panel, which will disappear after a few seconds.

If you need to open up the search to include other visit types, you can click on the color swatch to reveal a drop-down selection of other visit types.

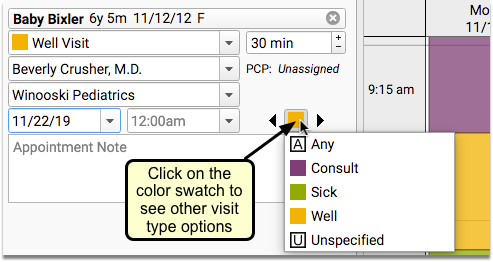
What Are Those Weird Looking Visit Types?: Use the “A” visit type to ignore the color swatch and find the next open slot for any of your visit types. Select “U” to look only for open time on the schedule with no assigned visit type.
Use the Select Appointment Date & Time Window to See All Available Visit Slots For Any Day
While clicking arrows to jump to the next available time slot can be handy, sometimes you want to see a broader view of open slots on your practice calendar.
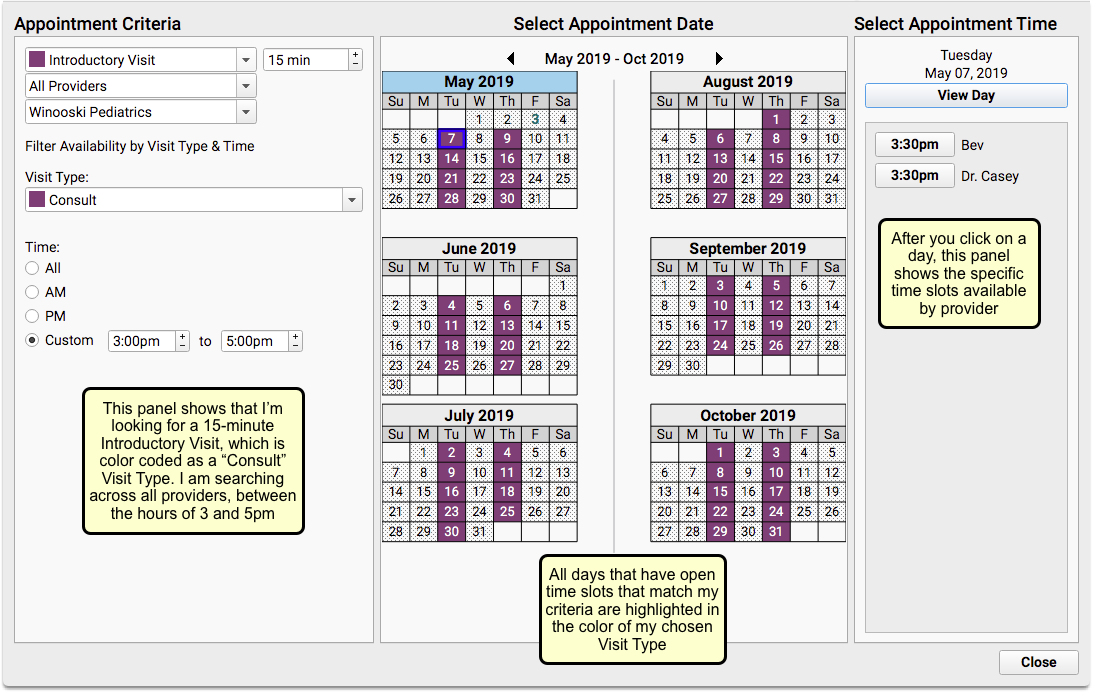
Use the Select Appointment Date & Time window to see available time slots for a selected Visit Type, over the next six months.
Click on the Calendar icon to open the Select Appointment Date & Time window.

When you need to find an opening for a sick or well visit (or any visit type), you can adjust the criteria within the Appointment Criteria panel on the left. You can set a different provider, location, or visit type.
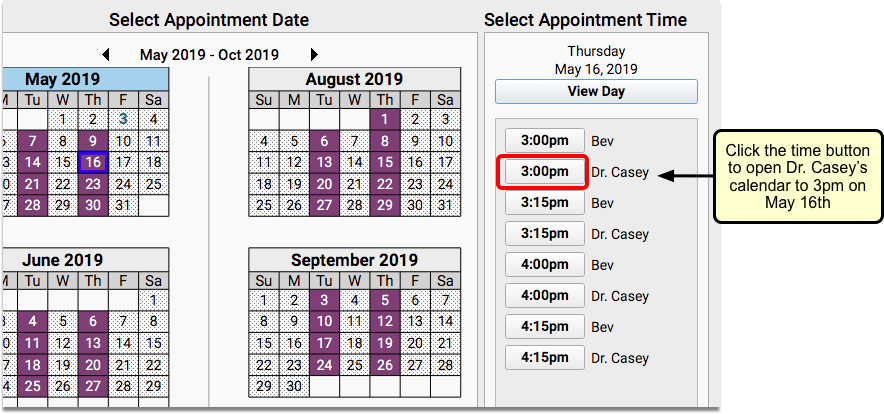
The Select Appointment Date panel in the center will show every day that includes availability matching your selected criteria. Days with availability will be highlighted in the color matching the Visit Type you selected. Days that are shaded with a dotted pattern have no time slots that match your criteria.
Click on a day within one of the calendars to see appointment availability, by provider, in the Select Appointment Time panel on the right.
When you find an open time slot that works for you, click the time button to return to your schedule.

The Appointment Book will open to your chosen date and time for the provider selected.

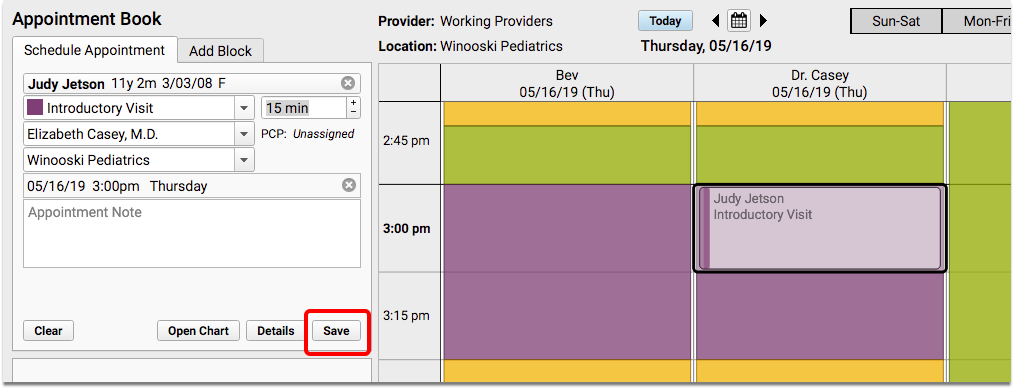
You can make changes in the scheduling panel if you need to, and then click “Save” to confirm the appointment.
Use the “All Locations” Feature in the Select Appointment Date & Time Window
When you select “All Locations” within the Select Appointment Date & Time window, you can view provider availability across all of your locations, six months at a time.

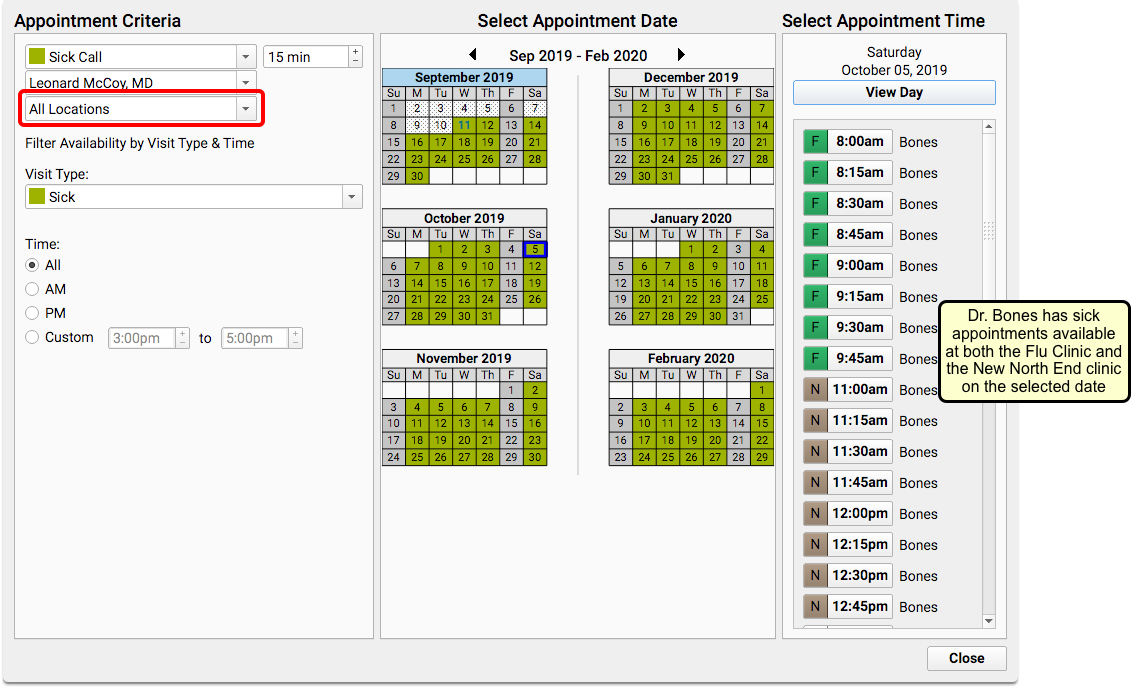
The Select Appointment Time panel on the right will include color swatches and location abbreviations to indicate which location has availability.
Schedule Siblings or Multiple Patients Simultaneously
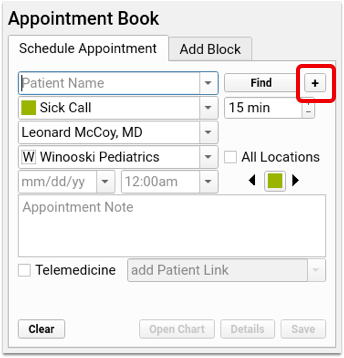
When searching for a patient, click the plus button to the right of the search box to open the Schedule Multiple Appointments window.

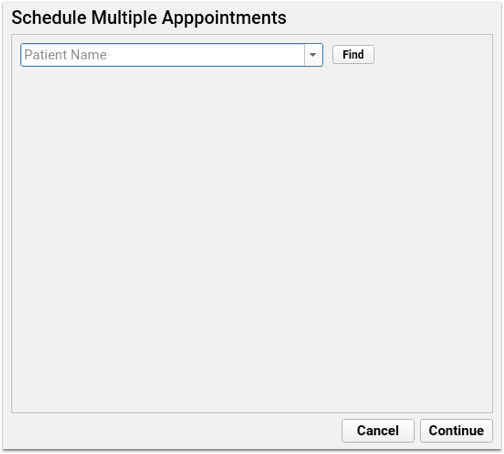
On the Schedule Multiple Appointments window you have the option to select multiple patients: find your first patient, select your visit reason, and enter any appointment notes. As you select each patient, another patient name search box will appear, and you can then search for another patient—either a sibling of the first patient, or any other patient.

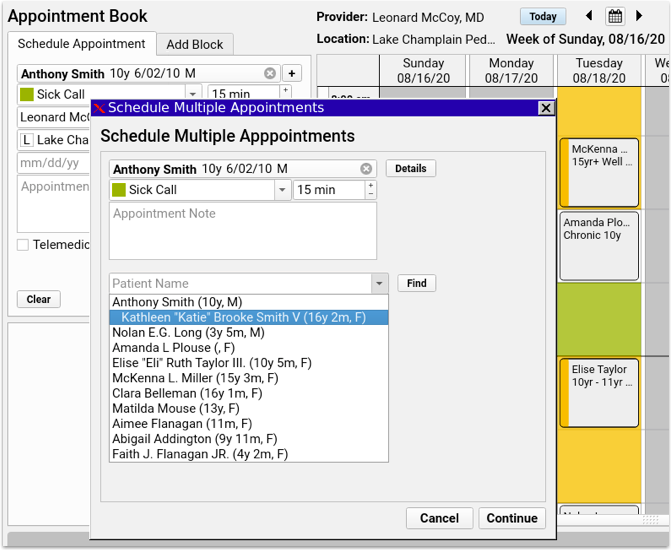
Every time you add a patient, a new patient name search box will appear below for the next patient. Enter as many patients as you need, then click “Continue”.

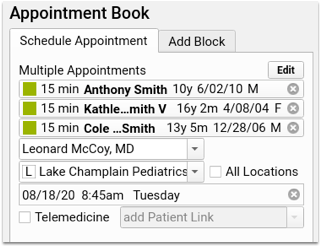
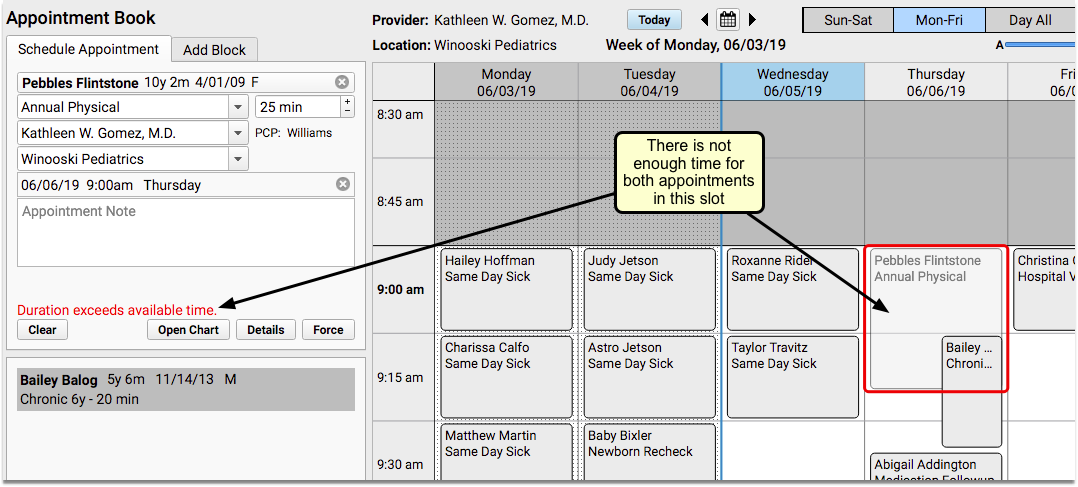
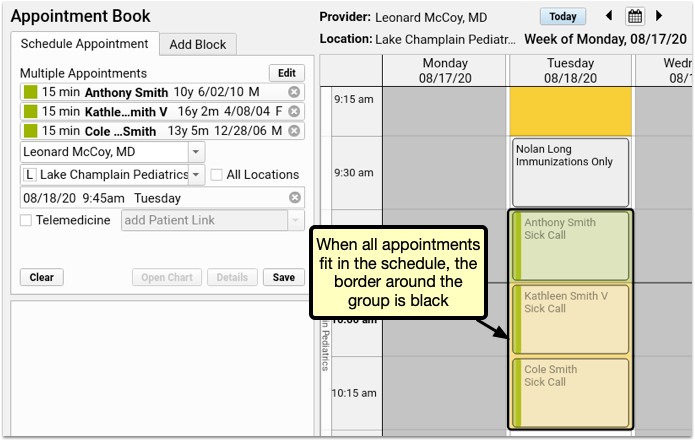
Each patient appears in the schedule appointment panel, and you can select an available time slot exactly as you would with a single patient. If there’s not enough space available for all appointments, the block of appointments appear with a red border, indicating the overlap with existing appointments.

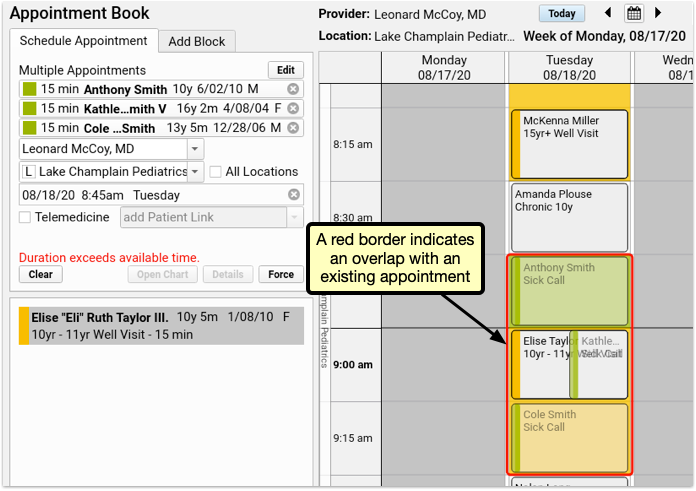
If your user account has permission to force in appointments, you can click Force to save all appointments despite the overlap.
Select a different time slot, where all the appointments fit, and you’ll be able to save without forcing in the appointments.

After scheduling multiple appointments, each can be edited, rescheduled, or canceled individually, just like any other appointment.
Schedule a Telemedicine Appointment
You can indicate that an appointment is telemedicine and optionally enter connection information for the appointment.

For a complete guide to scheduling and completing telemedicine appointments in PCC EHR, see Schedule, Chart, and Bill a Telemedicine Visit in PCC EHR.
Appointment Book Feature Reference
The Appointment Book includes several built-in features to keep your practice’s scheduling going smoothly and efficiently.
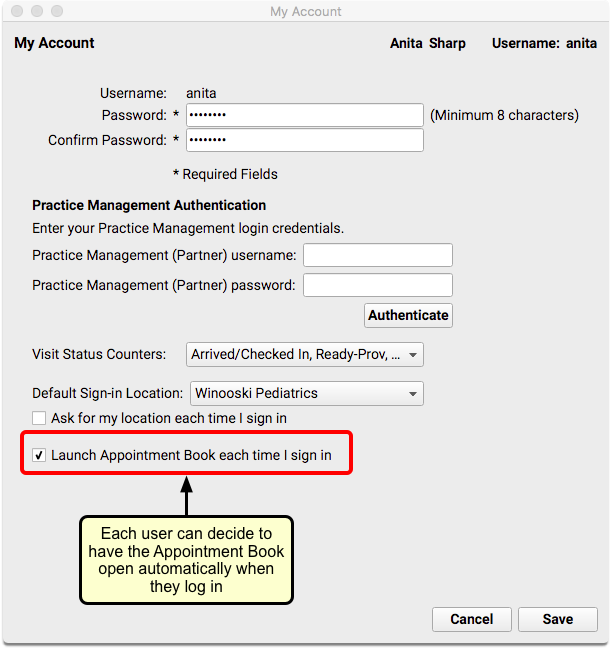
Open the Appointment Book Automatically
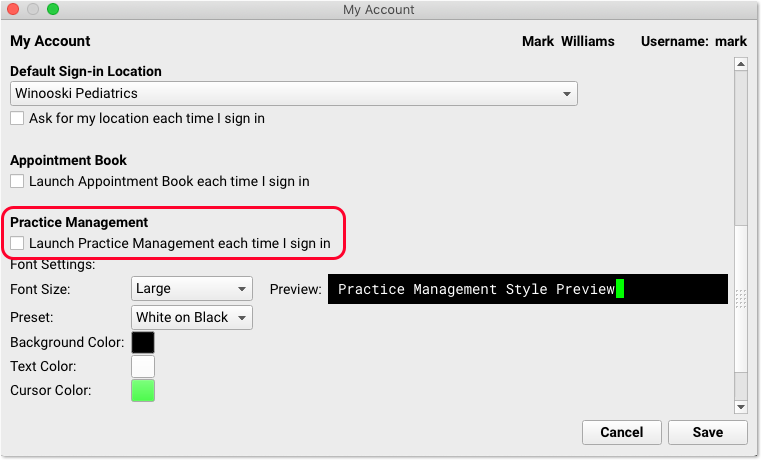
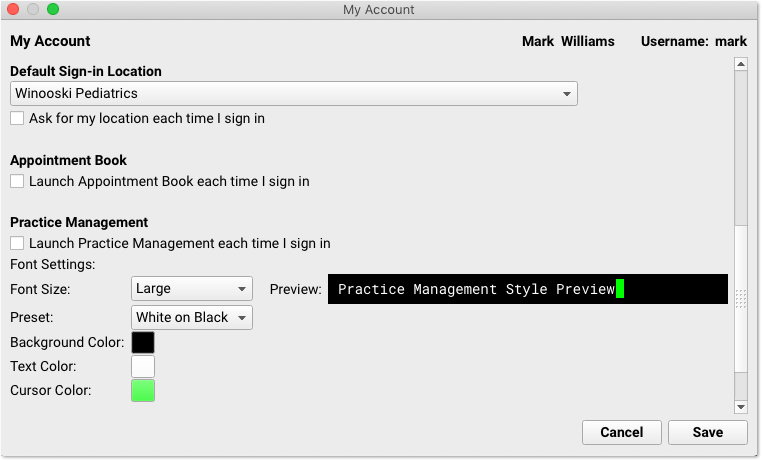
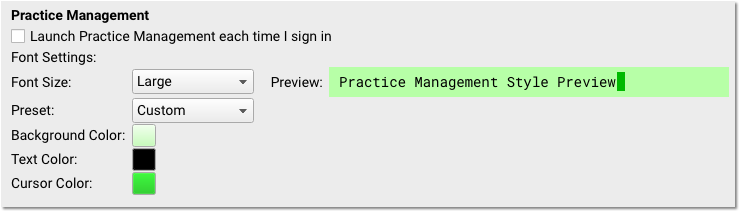
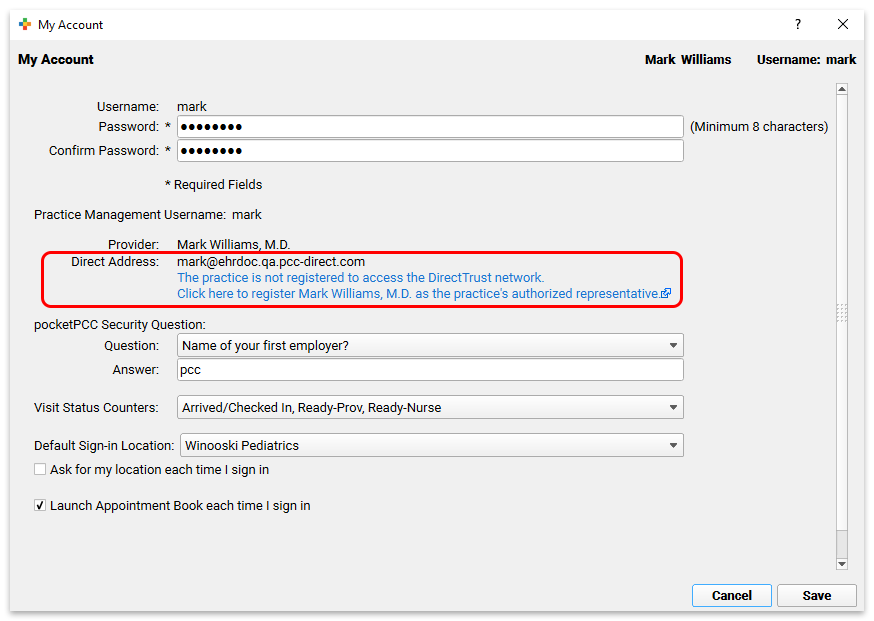
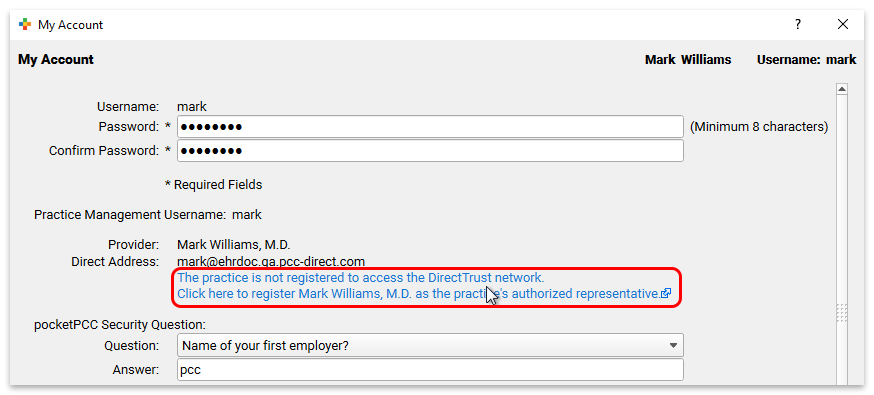
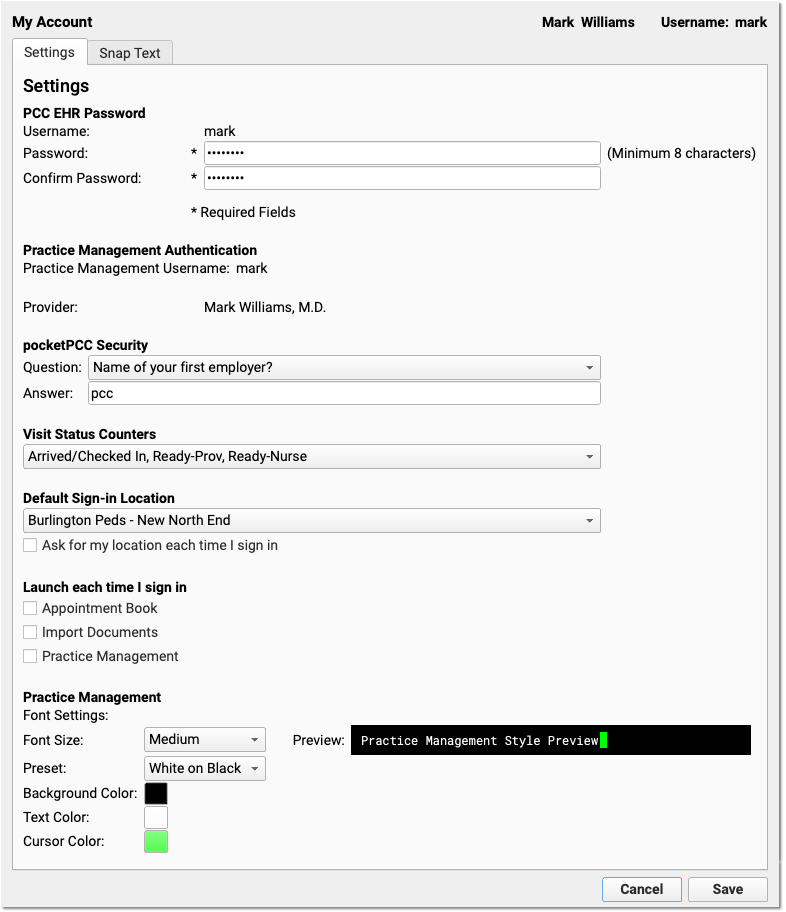
Users can choose to have the Appointment Book launch automatically every time they log in.
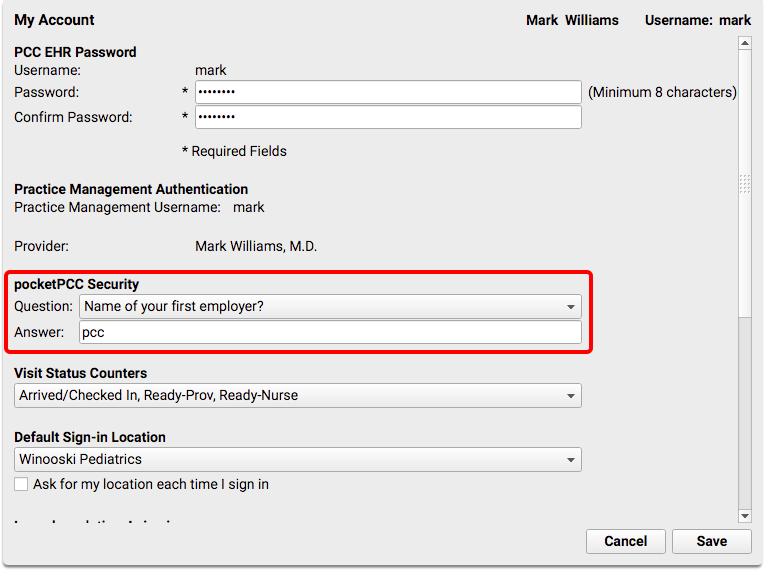
Set individual preferences in the My Account tool from the File menu.

Scale the Appointment Book to See More of Your Day
Adjust the scale slider in the upper-right corner of the Appointment Book to adjust how much of the day appears on your screen.

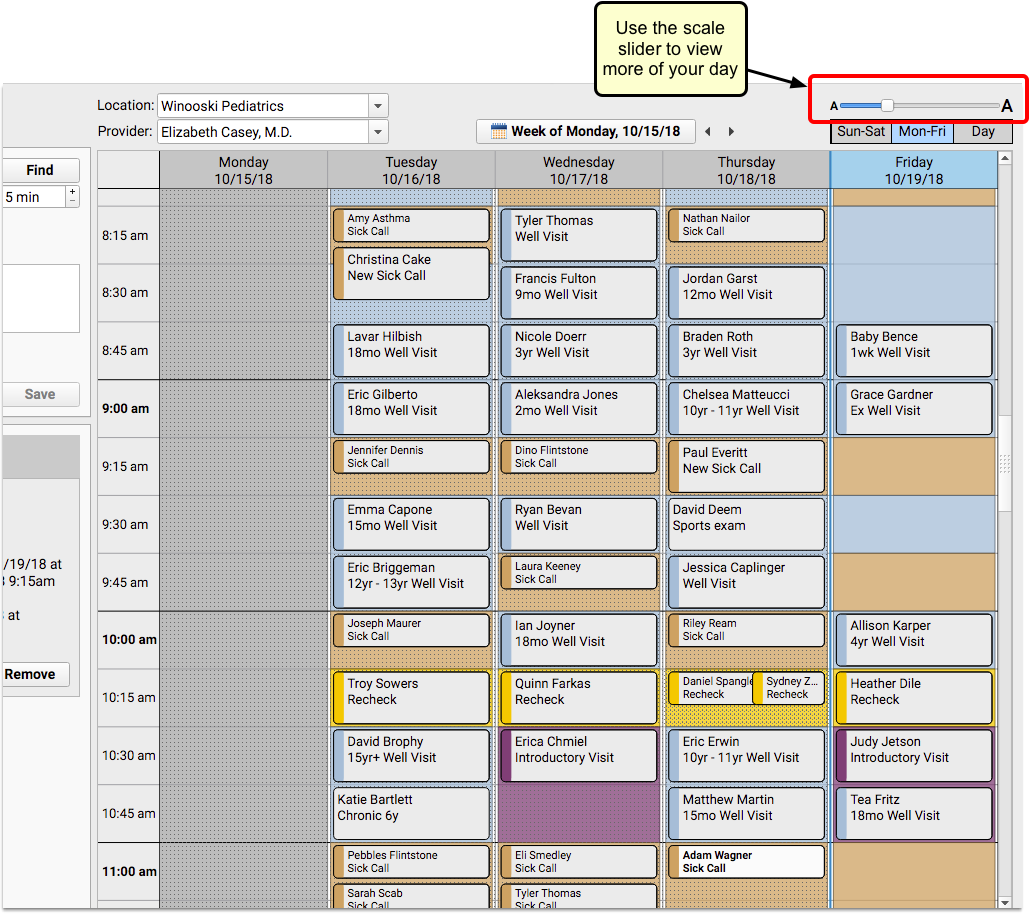
You can “zoom out” to see more of the day and find open time slots.
PCC EHR will remember your preferred scale, even if you log out.
Color-Code Your Schedule by Visit Type
On a busy schedule, you need to save time slots for sick visits and other types of visits that are scheduled late. You may also want to let schedulers know that some visit types need to be scheduled with specific providers or only on certain days.
If your practice chooses to use color-coded visit types, the Visit Reason drop-down field in the Schedule Appointment panel will include color swatches next to each reason that is part of a designated visit type.

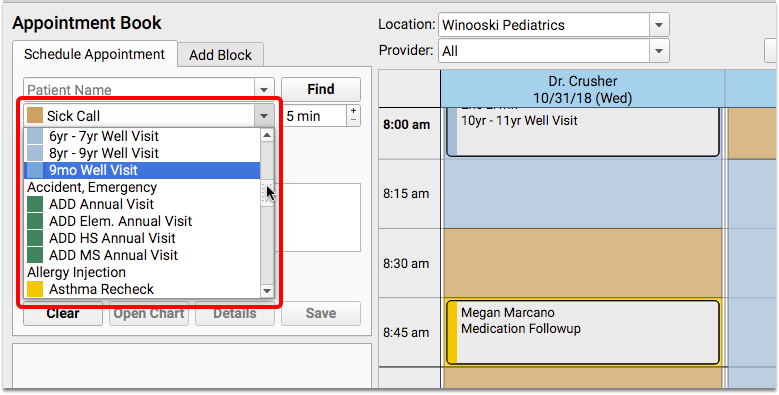
This will help schedulers to find a time slot on the appointment grid that matches the color of the visit type they are scheduling.
Your practice can include color blocks on your scheduling templates to give guidance to schedulers about where to place certain types of visits. In addition, visit bubbles display a stripe down the left to show the visit reason color of the actual visit, whether it matches the guidance in the background or not.

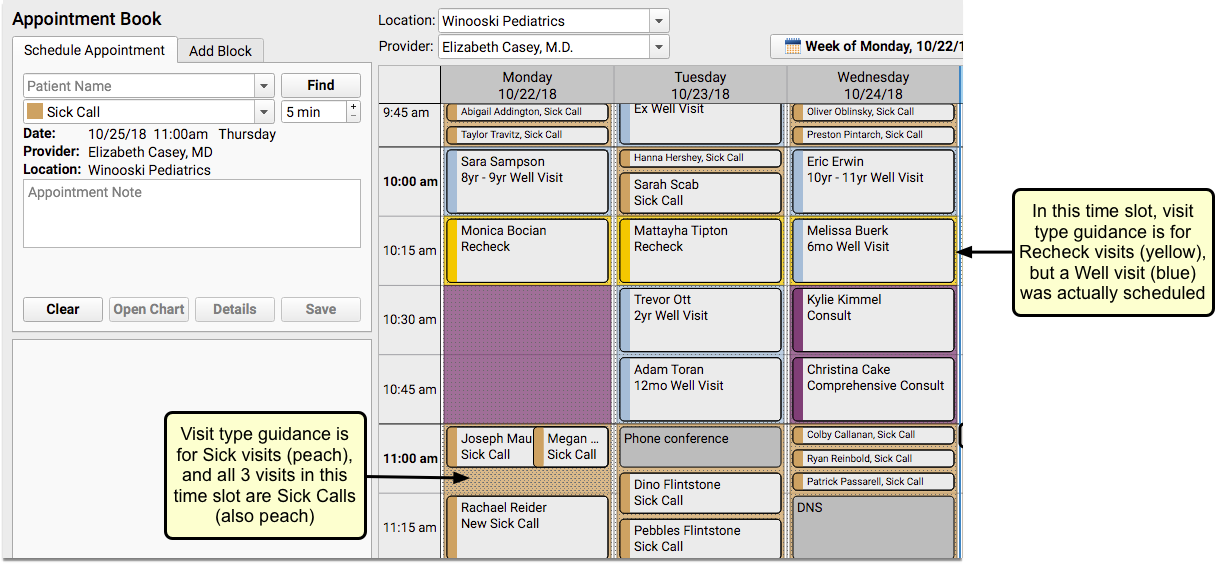
Users will not be prevented from placing appointments of one visit type on a time slot reserved for a different visit type.
For details about using color coding to set up visit types and for help with assigning visit type guidance to scheduling templates, read the Appointment Book configuration article on learn.pcc.com.
Find Siblings When You Schedule
How often do parents ask to schedule siblings for back-to-back appointments? The Appointment Book makes it faster and easier to schedule multiple family members simultaneously, as it includes a sibling list for the most recently searched for patient.
The list will be indented beneath the patient’s name, and can include up to ten siblings, sorted by age – youngest to oldest.

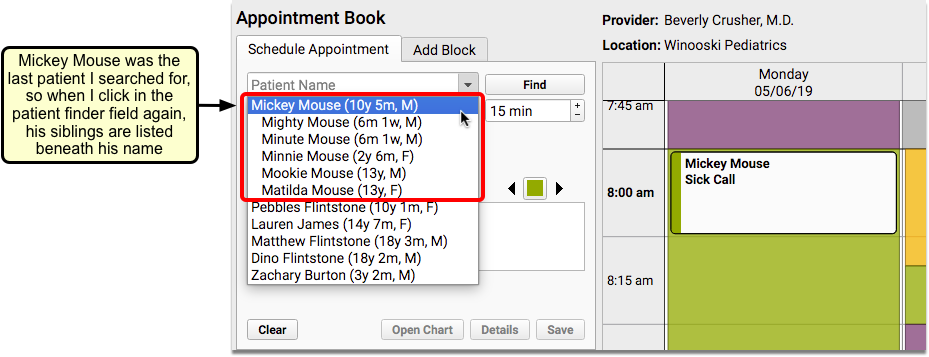
Siblings are defined as patients who share either a home or billing account.
Workflow Tip: Using this feature combined with the Availability Finder can help streamline your family scheduling process. For example, if you are scheduling two siblings for a sick visit, and your sick visit time slot is 15 minutes, you can search for the next available 30-minute sick visit. When you find one that works for the family, change the appointment to 15 minutes, and schedule one sibling right after the other.
Smart Scheduling Features
Often when scheduling, parents don’t ask for a specific date, but will inquire what you have tomorrow, or in two weeks, or three months. You can use smart scheduling terminology when searching the calendar at your practice. Alternatively, you can use the calendar browsing feature to jump to future dates for visual scheduling.

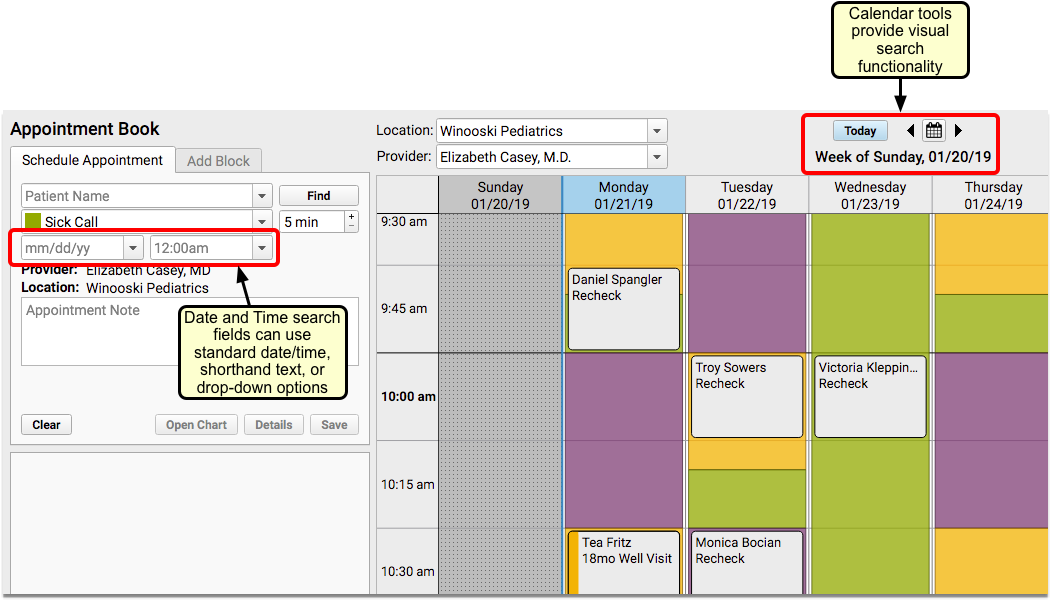
Enter Dates and Times to Search for Appointments
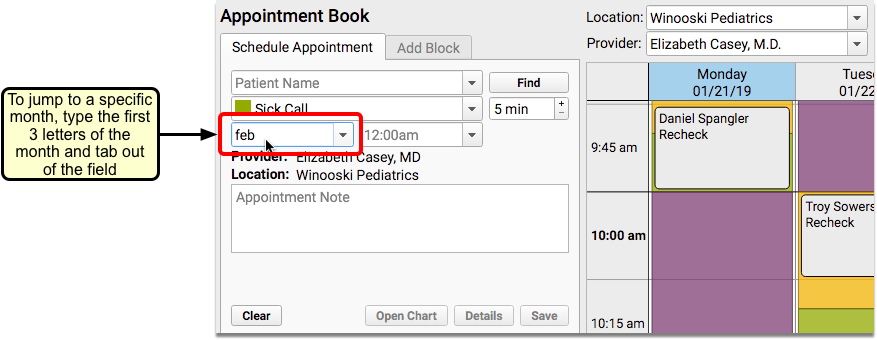
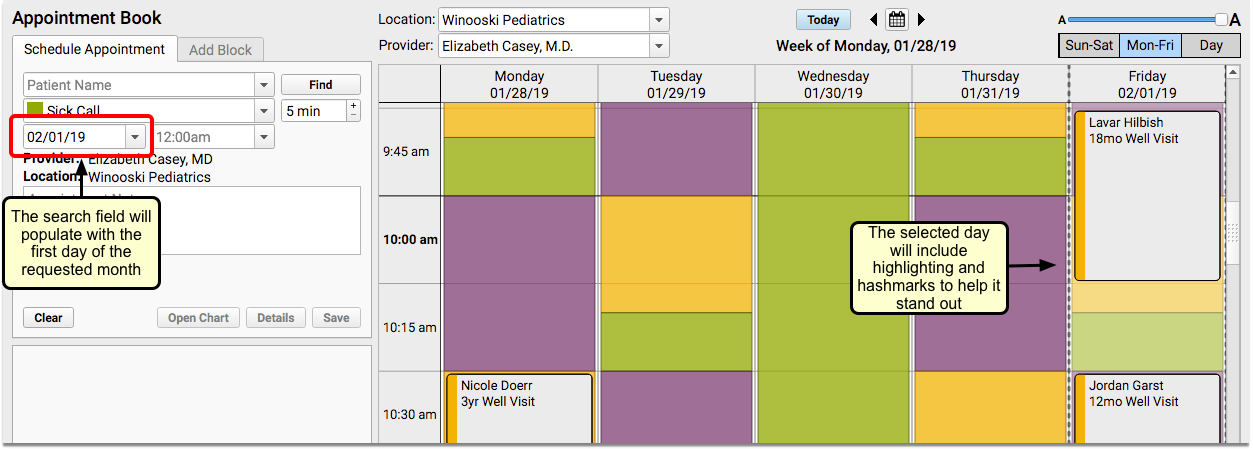
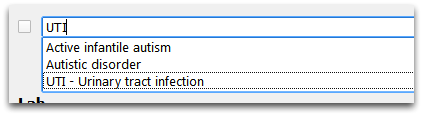
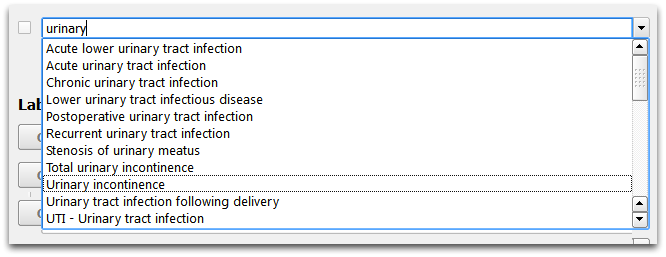
The date and time search boxes offer a few different ways to search for appointments. You can enter a specific date, use the drop-down options, or enter shorthand text. For example, you could enter the first three letters of a month, the letter “T” for today, or “2 weeks”, and the date that corresponds with your search command will appear.

The calendar will use hashmarks and highlighting to focus the date and time selected in the search fields.
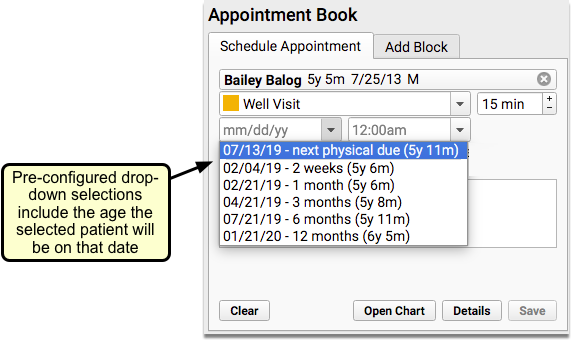
You can select from pre-configured drop-down options in both the date and time fields. For example, if you have a patient selected and choose the “next physical due” option, the date that they are due for a physical, as well as the age they will be on that date will populate the date field.

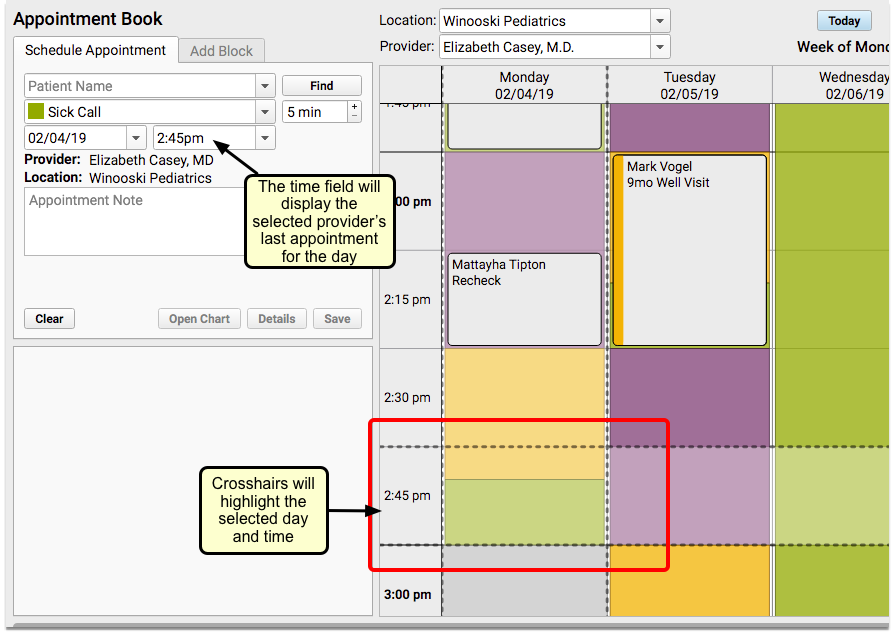
If you select “beginning of day” or “end of day” in the Time search field, you will be taken to the first or last time slot that the provider has hours that day.

Use the Availability Finder to Search by Visit Type
You can use the Availability Finder tool to find find the next open time slot for a specific Visit Type.

When you choose your visit reason, the Availability Finder will default to the Visit Type that matches the visit reason selected when scheduling.
Click on the right arrow to jump to the next open time slot for that visit type.

You can also click on the left arrow to go backward.
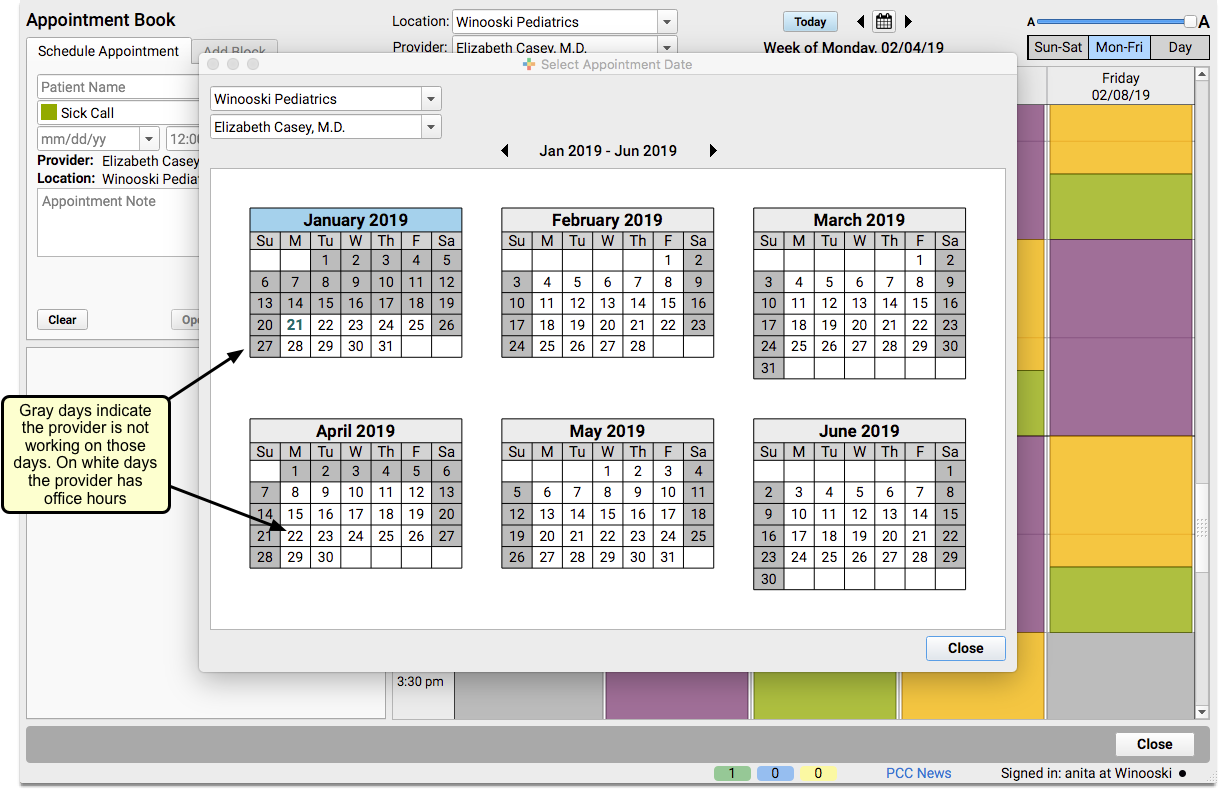
Use Calendar Search Window to Jump to Any Day
If you prefer a more visual approach to scheduling, you can use the calendar window to schedule. This will show you six months into the future, making it easy to find the day you need.

The calendar shows you the provider hours for the selected provider and location. Click on any day within the search window to jump to that day in the Appointment Book.
Multiple Schedulers Can Work Simultaneously
As you schedule in PCC EHR’s Appointment Book, you will be able to see other users who are setting up appointments at the same time.
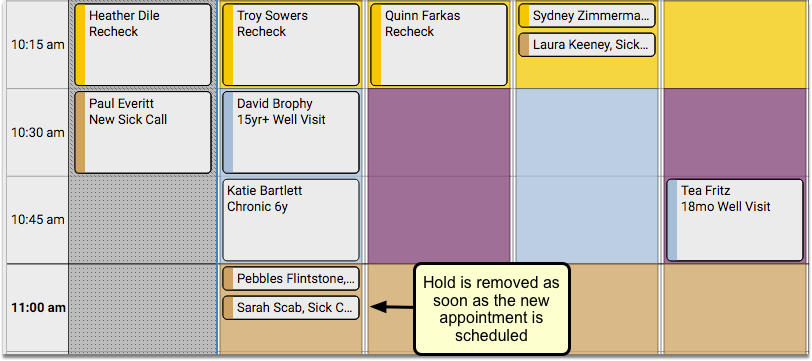
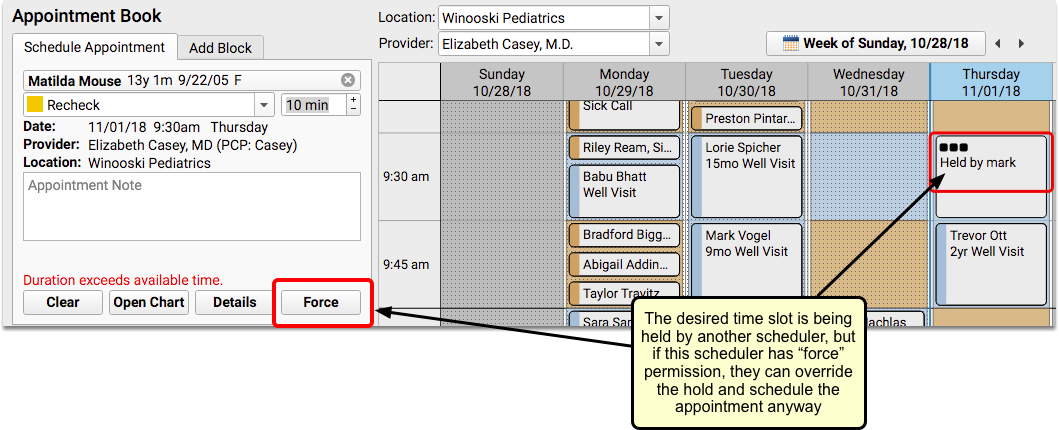
If another scheduler has selected a time slot on the calendar, it will appear on your screen with an ellipsis and the name of the scheduler.

Only the specific amount of time needed for the length of the appointment will be held. For example, if a 5-minute visit is being scheduled within a 15-minute time slot, other schedulers will be able to use the remaining 10 minutes simultaneously.
If you hold a time slot, the Appointment Book will continue to hold it if you open the patient’s chart, visit another tab, or perform another action. As long as the time slot remains selected, the Appointment Book will hold the time for you.
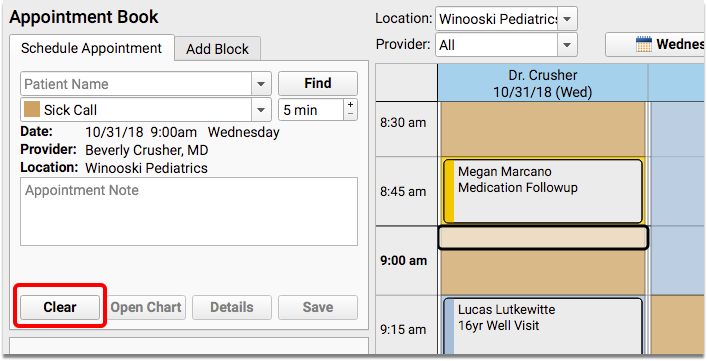
If you want to free up the cell you are holding, or if you are in the Appointment Book but do not wish to hold a specific cell, you can click the “Clear” button.

If you have permission to force in appointments, you can override your co-worker’s hold on a time slot.

Dynamic Use of Available Time Prevents Over-Booking
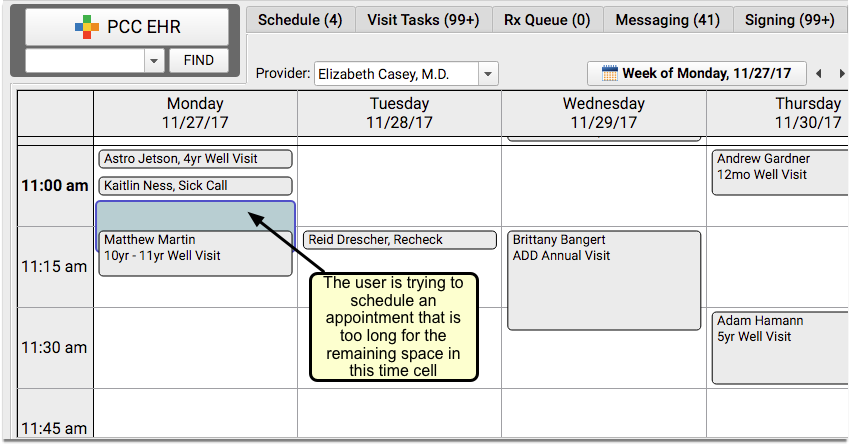
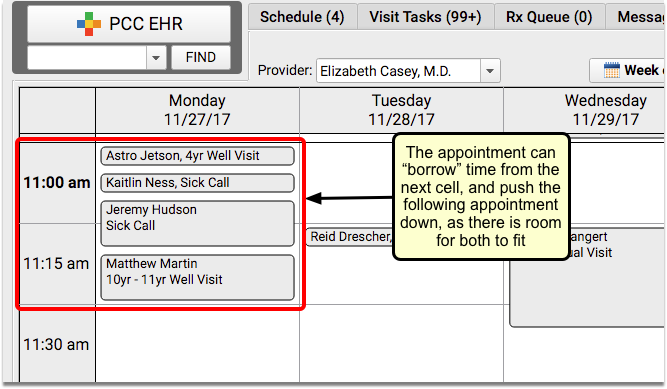
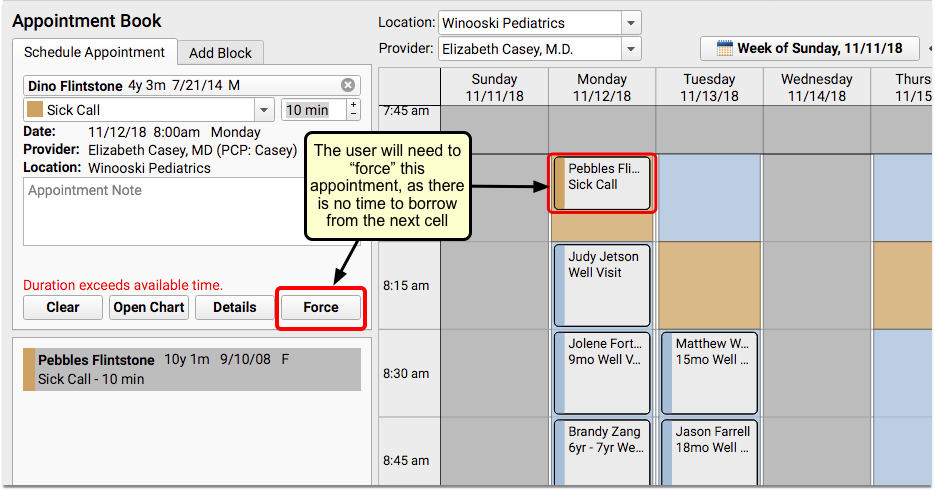
The Appointment Book will automatically accomodate longer appointments and, if necessary, fill time into the next cell.

Appointments will only borrow from the next time slot if there is sufficient time available. It will never change the start time of other appointments.
See Overbooked Time Slots At-A-Glance
If there is no room to push longer appointments into the next cell, you will need to have “force” permission to overbook a cell.

Overbooked appointments will stack side-by-side or one on top of the other. When a timeslot is overbooked or double-booked, you’ll see a patterned background indicating that the time is overstuffed.

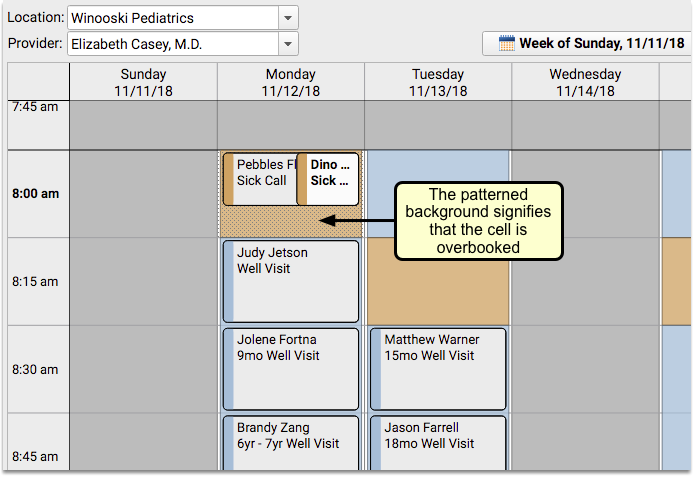
You can use this visual indicator to quickly understand all the places where the day will be extra busy.
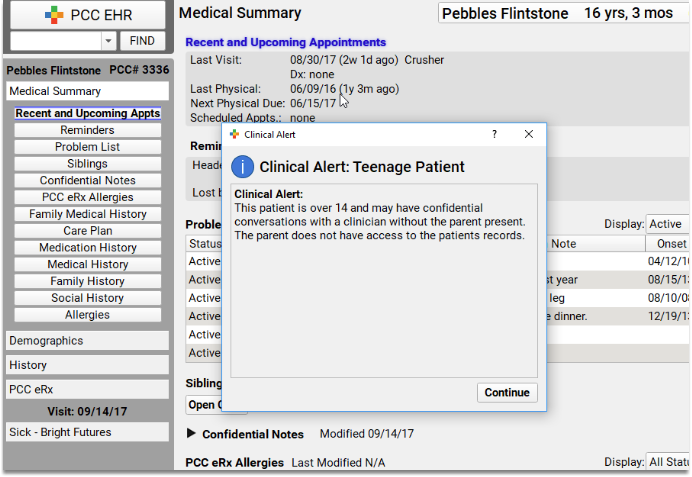
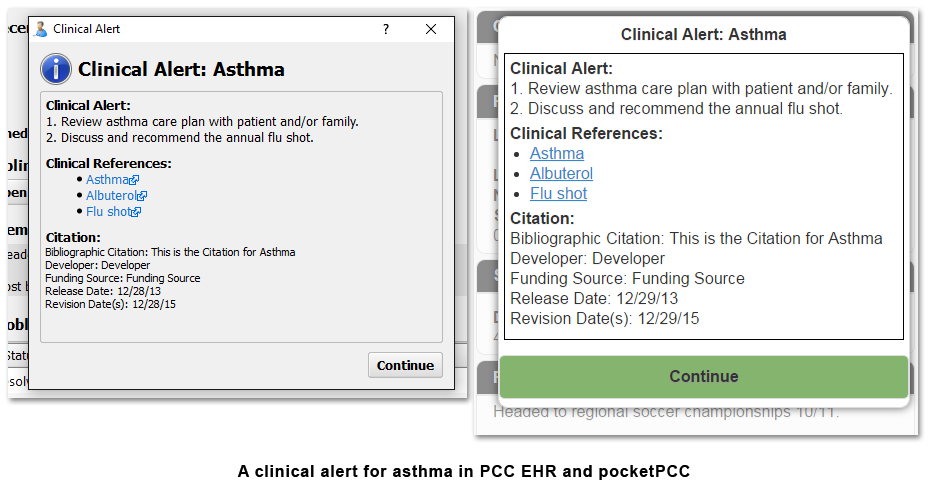
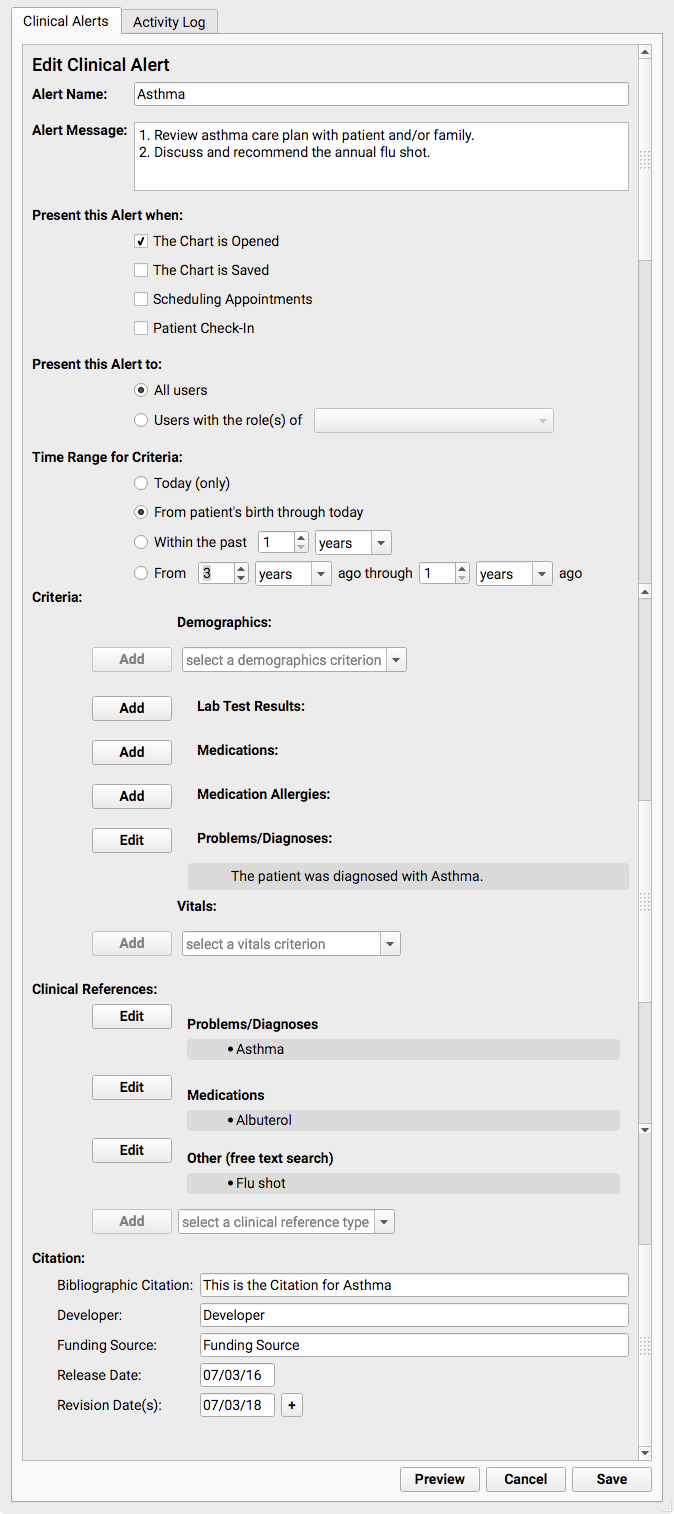
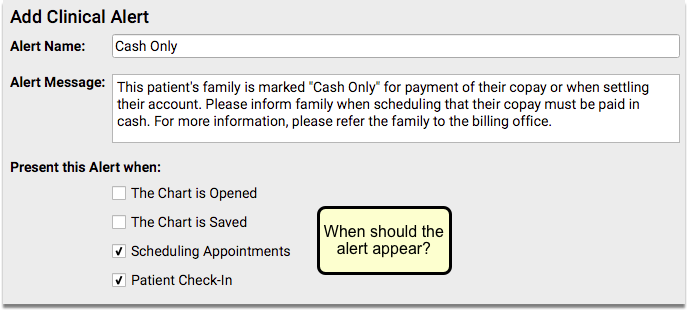
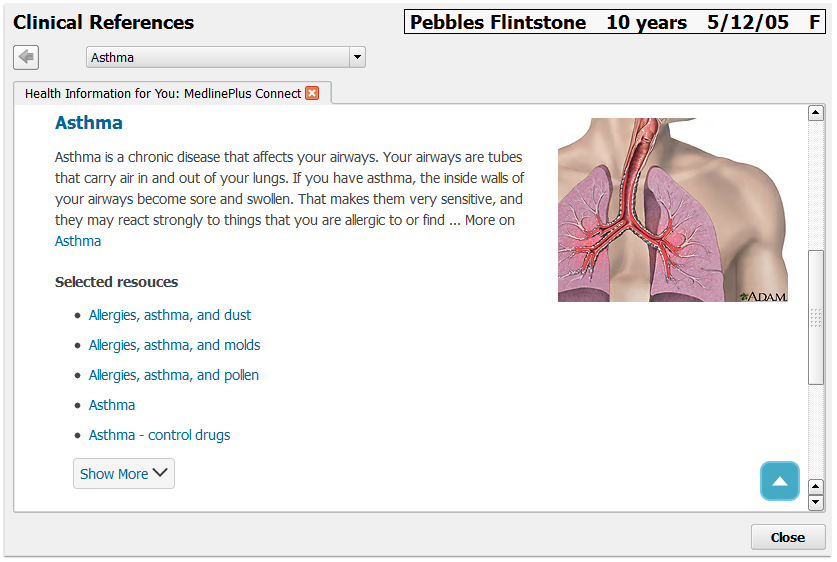
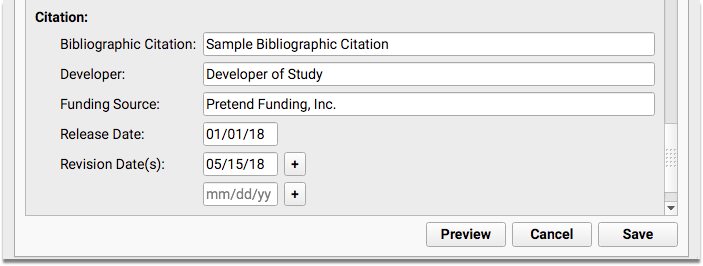
See Patient and Account Alerts As You Schedule
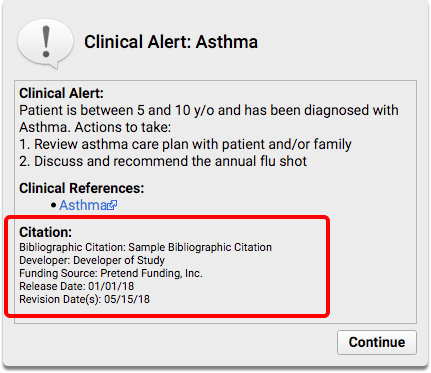
PCC’s Appointment Book can alert you to any important patient or account statuses, right after you select the patient to schedule. Your front desk staff will know immediately whether to schedule the patient, or if something else needs to happen first.
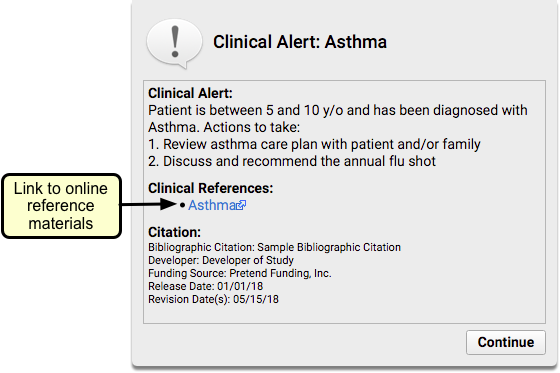
When you find a patient in the Appointment Book who meets the criteria for a scheduling alert, the alert will appear over the scheduling screen as soon as you select that patient.

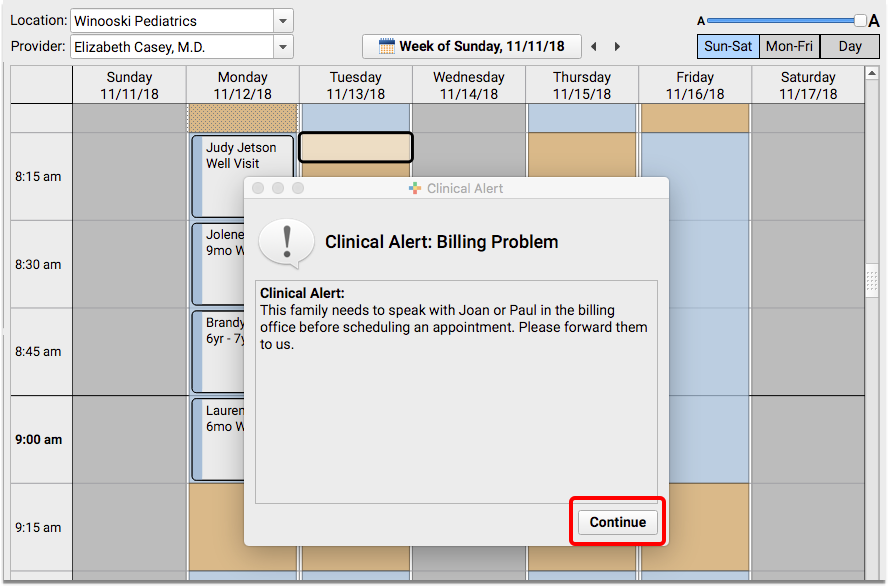
You can click “Continue” to ignore the alert and schedule the appointment.
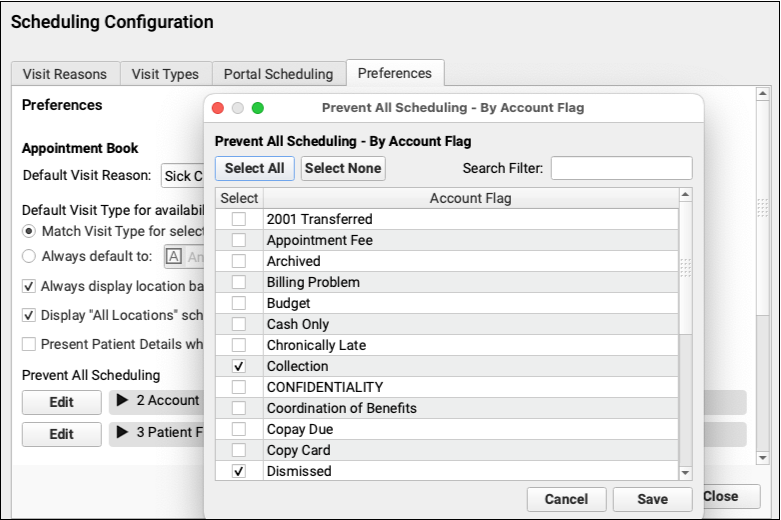
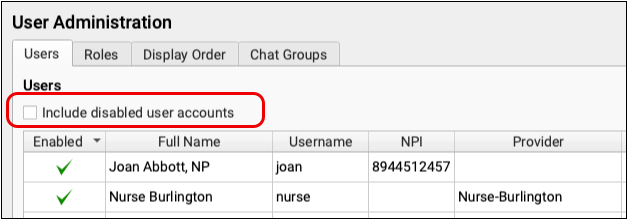
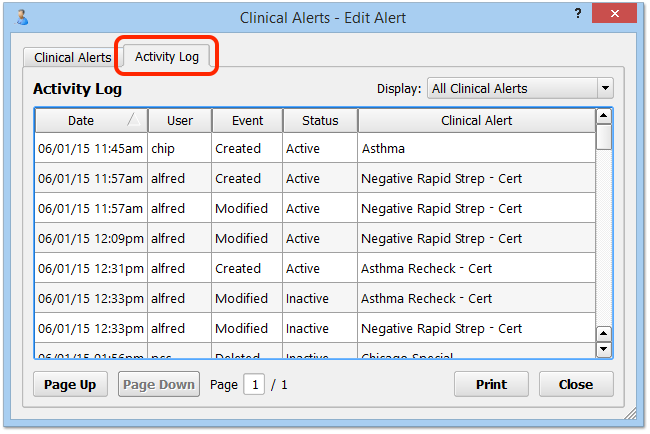
Prevent Scheduling Using Patient and Account Flags
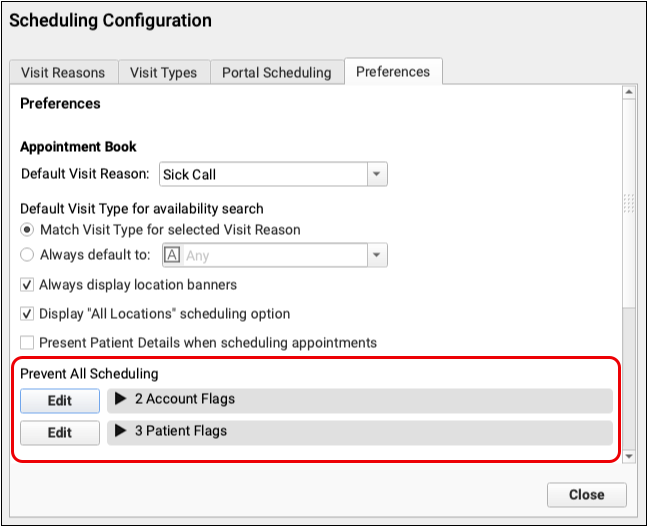
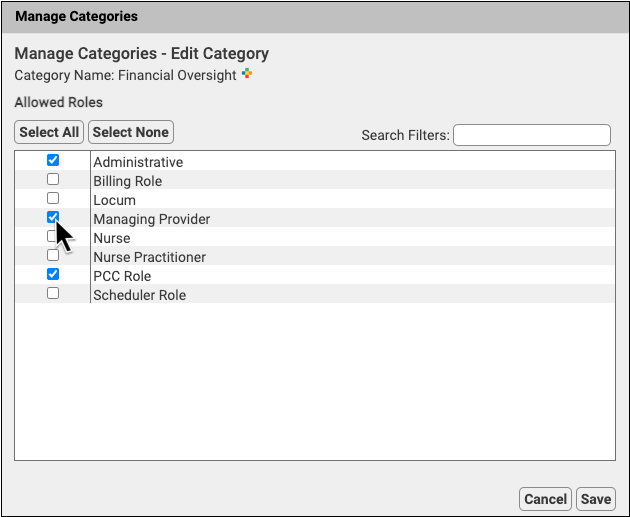
Prevent patients and accounts from being scheduled by assigning patient or account flags. In PCC EHR’s Scheduling Configuration window’a Preferences tab, select which flags should prevent scheduling by clicking Edit for either Account or Patient Flags, and checking the box for each flag that should prevent scheduling.

Any patient or account with one of those flags cannot be scheduled in the future.
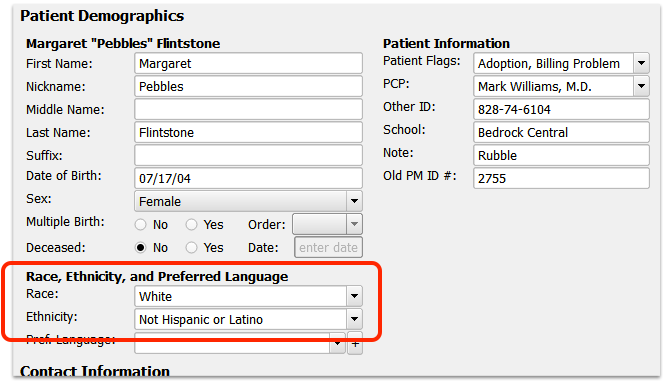
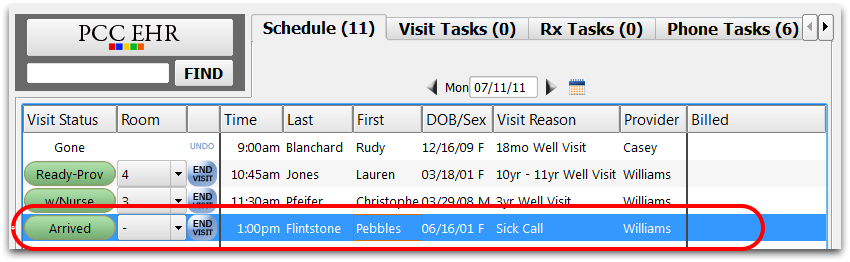
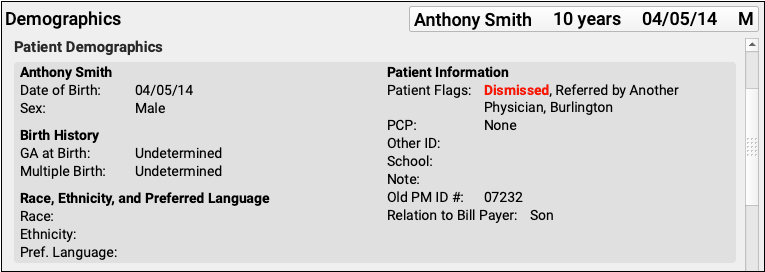
Flags that prevent scheduling are highlighted red in PCC EHR’s patient and account demographics components.

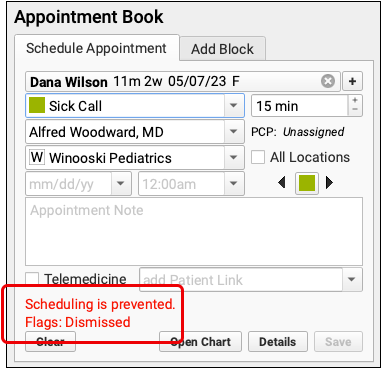
When you attempt to schedule a patient with any of your selected schedule-preventing patient or account flags, you will be unable to proceed with scheduling. Red text indicates that flags are preventing scheduling, and which flags are responsible.

When you schedule multiple appointments, any patients with a schedule-preventing flag will also be indicated with red text.

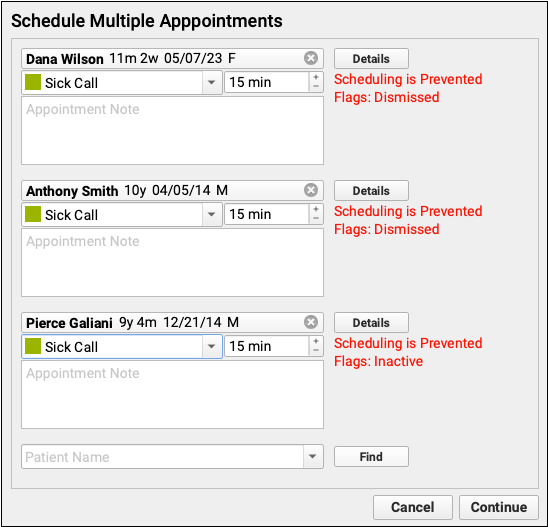
Any patients with the selected flags cannot be scheduled. Patients with appointments scheduled before adding a flag will remain on the schedule, but cannot be re-scheduled. Users with permission to force appointments cannot schedule patients with schedule-preventing flags.
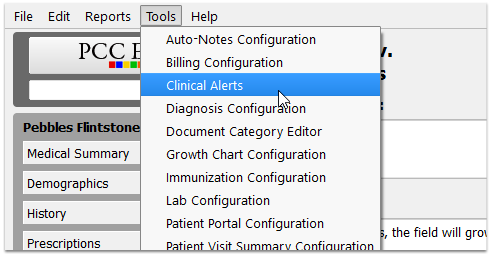
Create New Flags: To edit or create patient and account flags, use the Tables tool. See Use Custom Flags for Scheduling, Alerts, and Reporting to learn more.
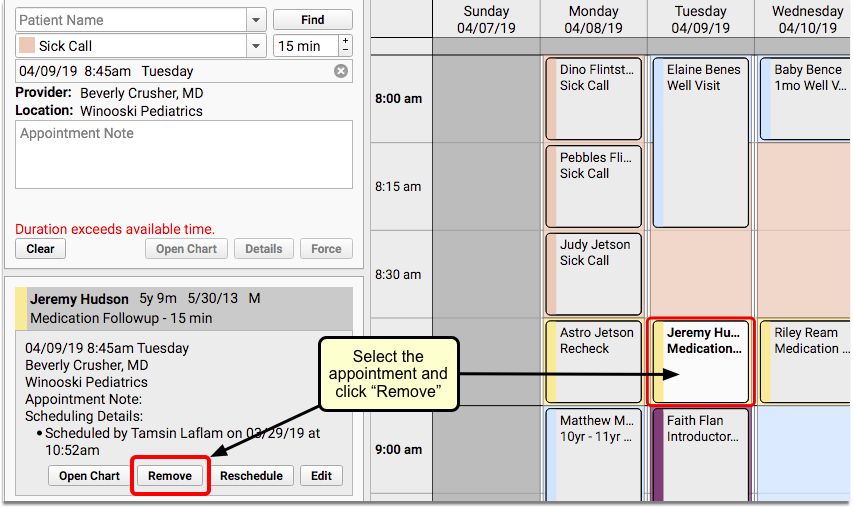
Remove or Cancel an Appointment
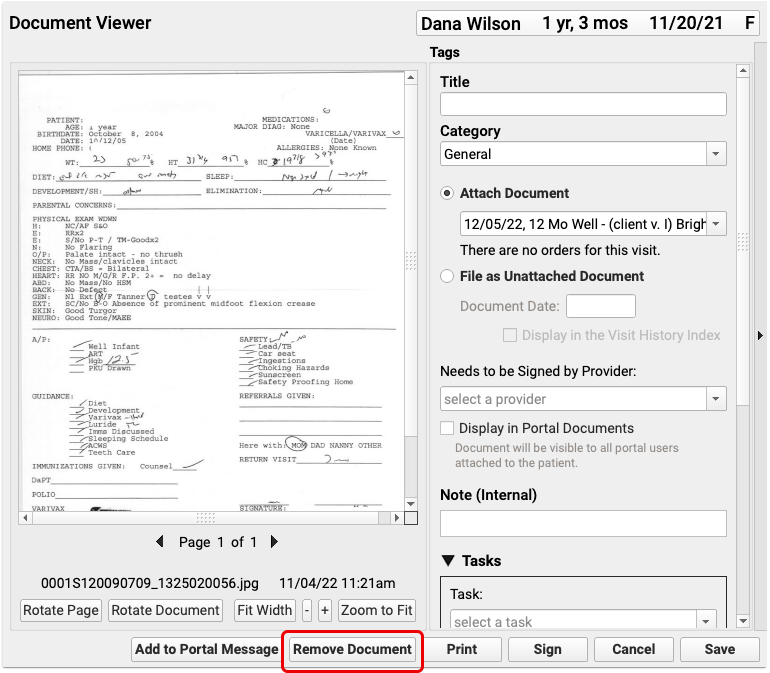
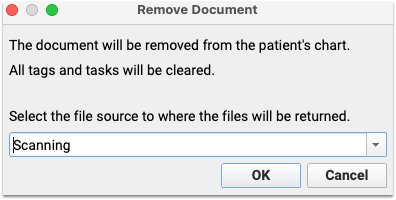
When you need to cancel an appointment, select it within the calendar grid and click “Remove”.

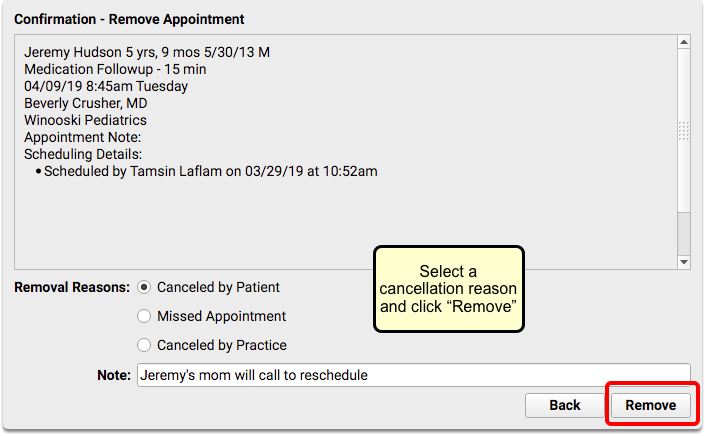
Select a reason that the appointment is being canceled and click “Remove”.
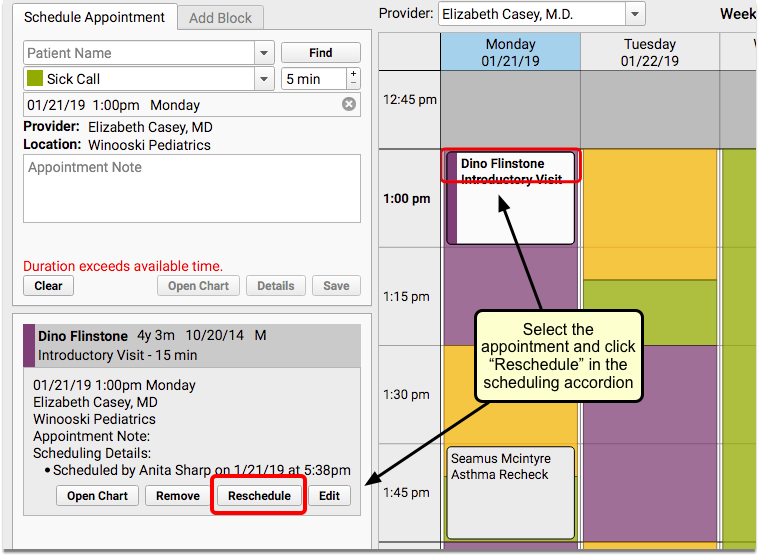
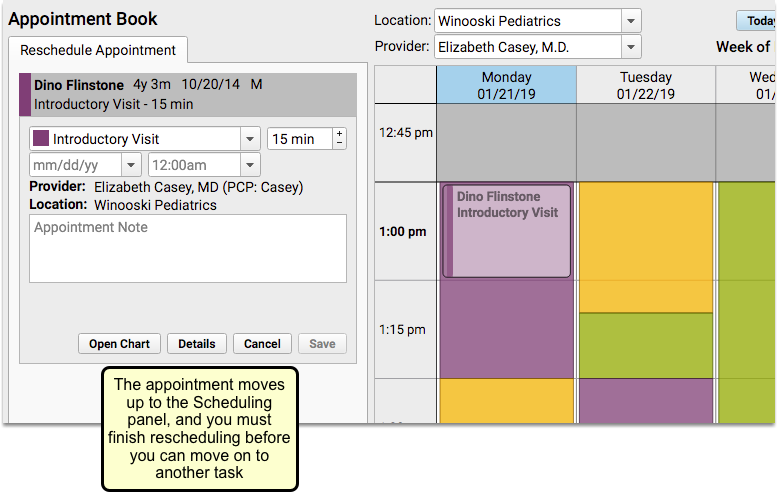
Reschedule an Appointment
When you need to change the date and/or time of an appointment, select it within the calendar grid and click “Reschedule”.
The appointment will move to the “Reschedule Appointment” tab.

Select a new appointment time and click “Save” to continue.
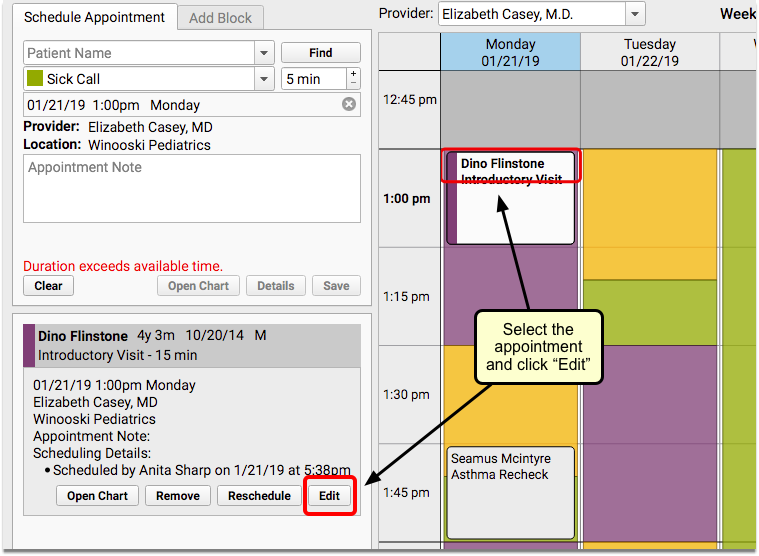
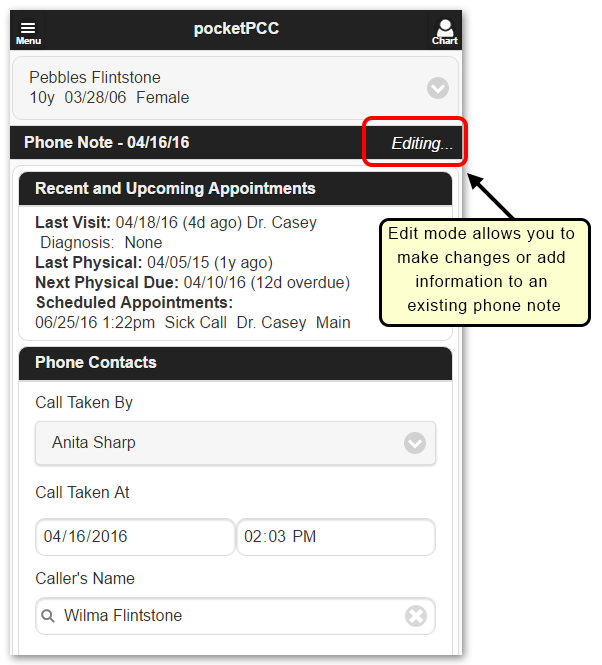
Edit Appointment Details
Sometimes you need to edit appointment details without changing the appointment time. For example, a well visit might turn into a sick visit, or the length of an appointment could need to be extended.
You can make changes to the details of an appointment that has already been scheduled in the Appointment Book, without having to reschedule it.
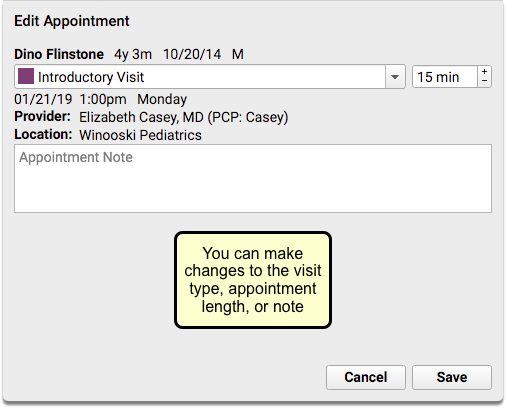
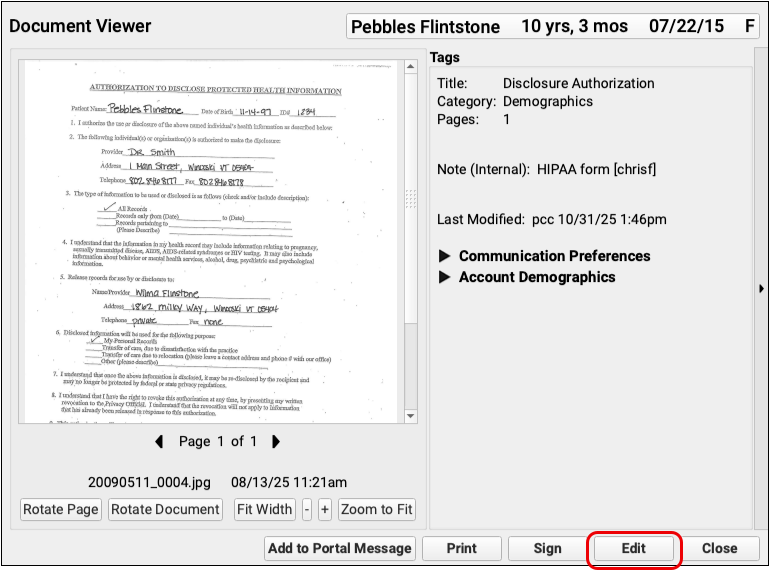
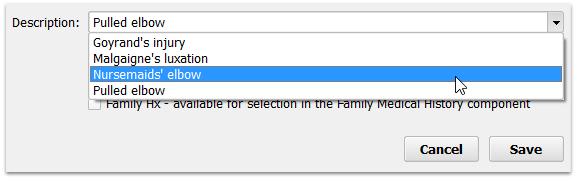
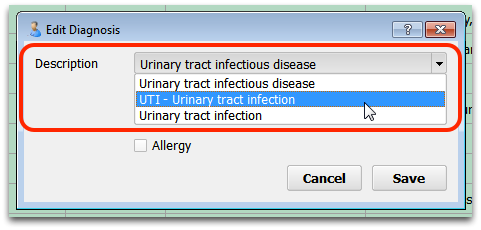
Click “Edit” to change the visit reason, duration, and/or the appointment note.

Make changes in the Edit Appointment window and click “Save” to continue.
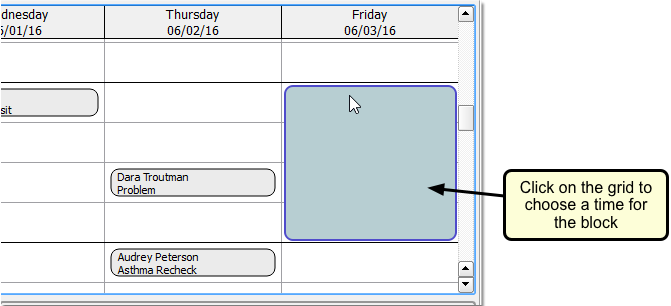
Place a Scheduling Block
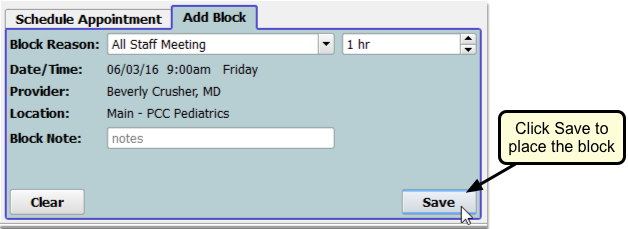
Click the Add Block tab to work with scheduling blocks. You can create a block just as you would schedule a patient.
First, enter a title in the Block Reason field or select a previously used reason from the drop-down, and then select the length of time for the block.

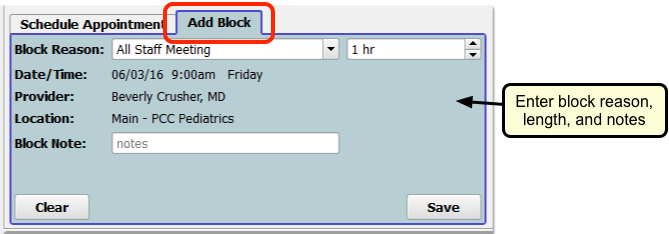
Select the area of the calendar to block out and click “Save”.

What About Changes to the Doctor's Schedule?: You can block time anywhere on the schedule for a single day. To change a provider’s schedule for a day or manage their available time, use the Provider Hours configuration tool.
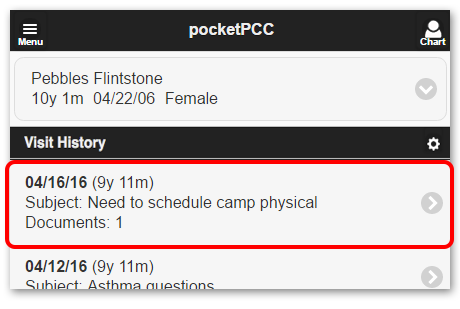
Review Appointment History
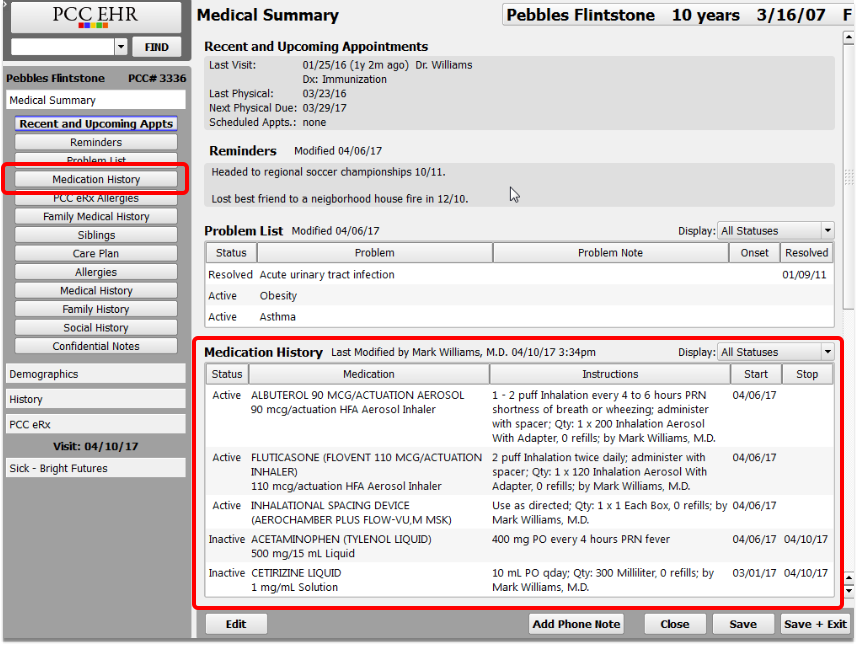
The Appointment History component displays all of a patient’s appointments and includes tools for making changes.

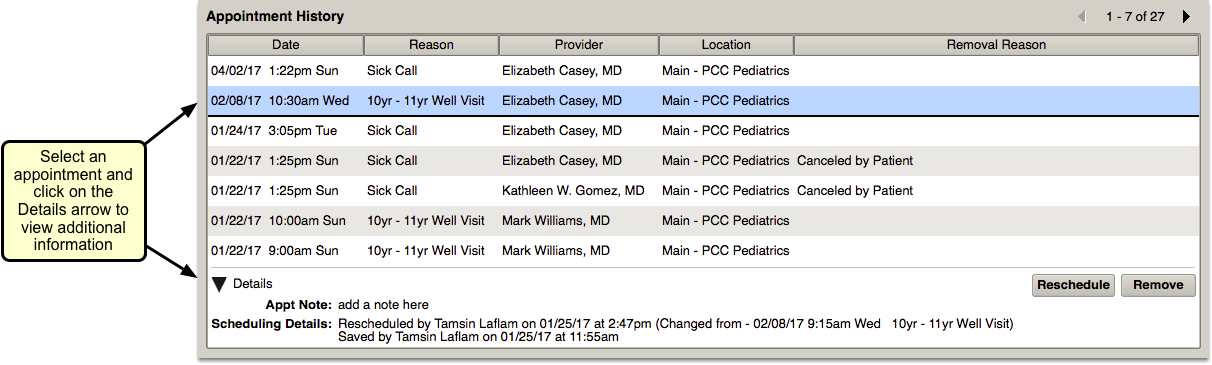
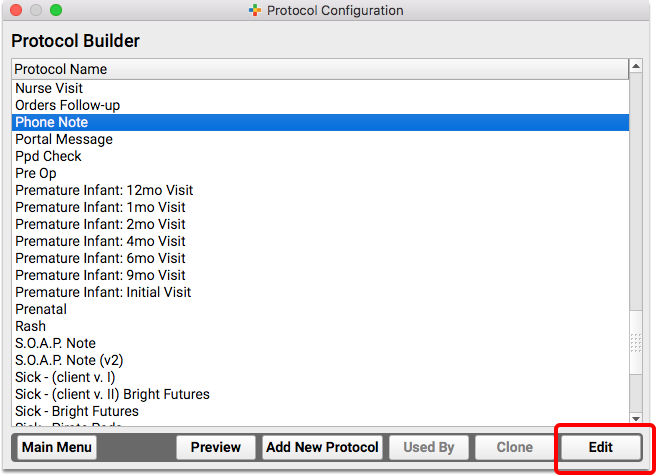
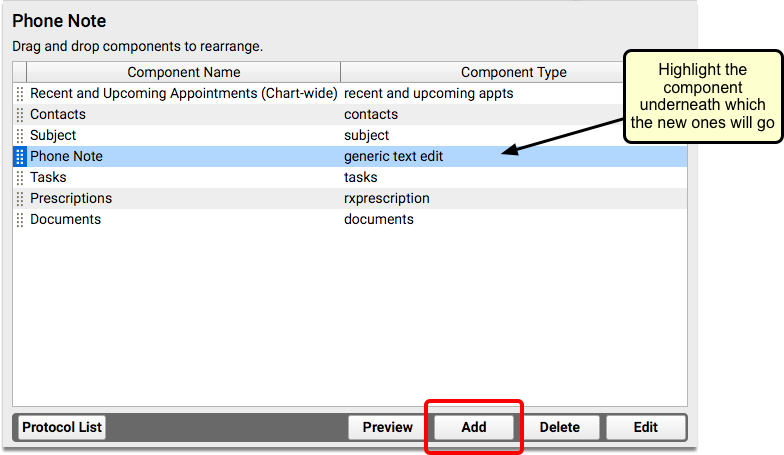
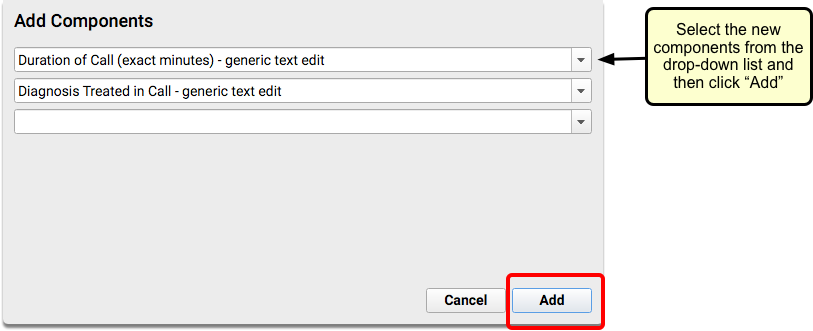
Your practice can add the Appointment History component to your Medical Summary, as well as chart and phone note protocols.
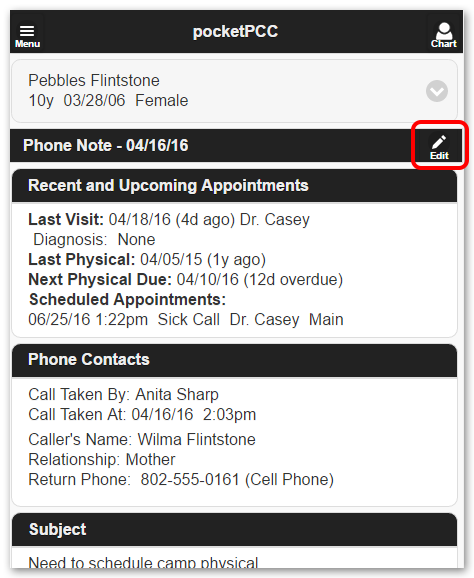
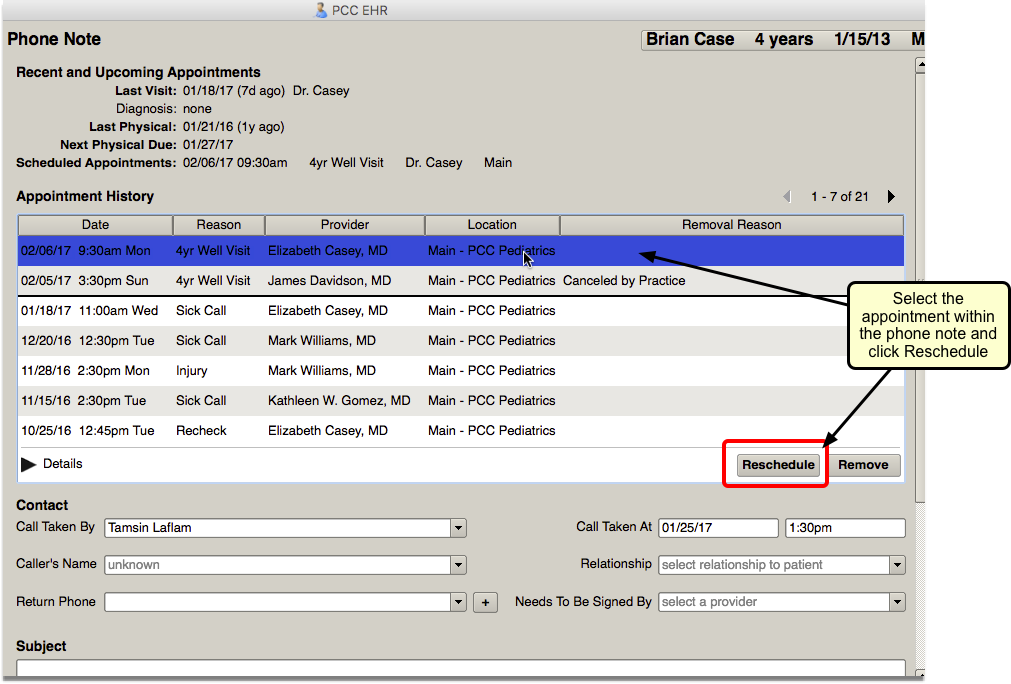
You can review a patient’s past appointments while charting, and can click to reschedule or remove upcoming appointments.
For example, you may have taken a call and opened a new phone note indicating the patient needs to reschedule. While recording the phone note, you can select the appointment on the Appointment History component and click “Reschedule”. PCC EHR will open the Appointment Book to the scheduled time. You can work with the family to choose a new time and/or clinician for the appointment.

Un-Cancel a Canceled Appointment
You can use the Appointment History component to reverse appointment cancelation.
Highlight the canceled appointment and click the new “Restore” button.

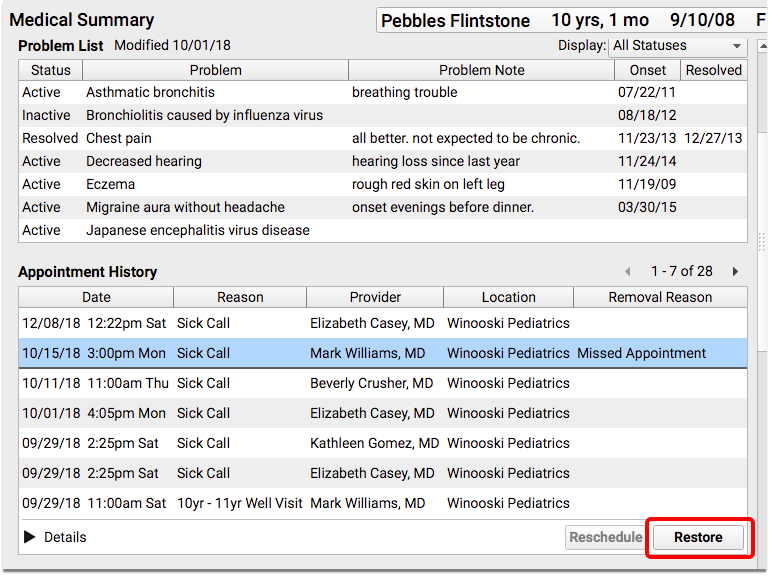
The “Restore” button replaces the “Remove” button when a canceled appointment is selected.
The Details option in the component will show that the appointment was removed and restored.

Find a Patient in pocketPCC
To view a patient’s chart in pocketPCC, you can either go through the Schedule, or use the Find Patient button.
View a Patient’s Chart From the Schedule
You can open any patient’s chart by selecting their name from your schedule.

Find Patient Button
If you need to review a chart for a patient who is not listed on the schedule, you can use the Find Patient button.
When you click on the “Find Patient” button, a “Recent Patients” list will appear beneath the search box.

Your last ten patients listed will include the most recent patients whose charts you opened, regardless of which PCC application you used.
Each patient is identified by name, current age and sex.
To search for a patient outside of the last ten, enter a name, birth date, phone number or PCC number in the text field and click Enter.

Results include each patient’s name, birth date, age, PCP, and flags. By default, inactive patients will not appear in search results. To find inactive patients, click the gear icon, and select “Include inactive patients”
Click on the patient to open their chart.

After you find a patient, you can review their Medical Summary, Demographics, Immunization History, Visit History and Documents. You can also add a new phone note or send a portal message.
Open and Use the Practice Management Window
Use the Practice Management window in PCC EHR to access PCC’s previous software suite, “Partner”.
Learn All Steps for the Biller Role: This article (and video) is part of the New User Training for Billers. You can use that outline to learn how to complete other billing tasks in PCC EHR.
How to Open a Practice Management Window
After permission is granted to a user role in the User Administration tool (see below), your PCC EHR users can use the Practice Management icon to open the Practice Management window.

Open Practice Management Window Automatically When You Log In
If you want your Practice Management window to open immediately when you log into PCC EHR, you can select the “Launch Practice Management each time I sign in” option in the My Account tool.

Use Multiple, Persistent Practice Management Sessions
You can use the plus (+) button to create multiple sessions. Each session will remember your work as long as you keep the Practice Management window open.

Your practice can use the Practice Management sessions to run reports while also performing important billing functions.
Access Permissions for the Practice Management Window
In order to access the Practice Management window feature, a user must have a Role with the “Practice Management” permission. You can set up and adjust your roles and assign them to users in the User Administration tool.
The system includes a second layer of user account security, which is controlled from your PCC Server. In most situations, permissions are synced between PCC EHR and Partner.
However, if for some reason the user’s PCC EHR login username and password do not match the server login information, PCC EHR will ask them to enter a username and password.

After a user enters it once, PCC EHR will remember this association and use it for future sessions.
Customize the Font Size and Color of Your Practice Management Window
When you are tracking down a billing issue for an account, you want your screen to be as clear and easy to read as possible. You can select your own preferred font size, font color, background color, and cursor color.

When you want to adjust your Practice Management window’s appearance, open the My Account tool.

You can choose a Small, Medium, or Large font. You can select a preset color option (white on black or black on white), and you can override those presets with your own preferred Background Color, Text Color, and Cursor Color.

As you make adjustments, a preview panel on the right will show you the final result. By using these tools, you can customize the Practice Management window’s appearance so it will be readable and easier on your eyes.
Customize Practice Management Window For Your Staff: All the users at your practice can make the above changes themselves in the My Account tool. You can also make these changes for them in the User Administration tool.
Find Patients or Accounts in Practice Management Programs
Whether you are editing demographics or posting payments in the Practice Management window, most programs are run for a patient or an account (a family). When you start running a program, you will be asked to select a patient or family. The checkin and checkout (check out) programs offer lists of today’s patients, but other programs ask for a name. You can also search by chart number, phone number, birth date, or several other variables, but the name is the easiest.
Here is what finding a patient by name looks like in all Partner programs:

In the example above, the user entered “Flin” as the last name and Partner found members of the Flinstone and Flint families. The user could then press Enter to open the first record or enter the number next to the desired patient.
Find Patients by Birth Date: You can find patients by birth date instead of account. Enter the birth date into the First Name field in any program and press Enter.
There are lots of tools for finding patients and accounts. For example, you can automatically recall the last patient you worked with or find their siblings.
Function Keys in Practice Management Programs
When you run a Partner program in the Practice Management window, the eight buttons across the bottom correspond with with F1 through F8 on your keyboard. The power of each key changes from program to program, but they are always labeled on your screen to help you understand their purpose.

The F12 key always takes you back one step or quits the program you are running without saving any changes.
AAP Resources: Pediatric Coding Newsletter, Red Book, and More
PCC offers our clients access to a number of resources from the AAP, including the Pediatric Coding Newsletter, Patient Education (including Schmitt, TIPP, and more), and the AAP Red Book.
PCC practices can access these resources can be found in two places: through a PCC Community to the AAP website and from within PCC EHR.
PCC EHR Also Includes Bright Futures Resources and Customization Options: In addition to the AAP resources listed below, PCC EHR includes optional Bright Futures chart note protocols and periodicity guidance. For more information, see Bright Futures in PCC.
AAP Pediatric Coding Newsletter

A monthly publication that provides practical and accurate answers to your most urgent pediatric coding questions. As a PCC client, you have access not to the current issue and the entire AAP Pediatric Coding Newsletter archive.
AAP Red Book Online

This is the online version of the AAP’s Red Book, a comprehensive reference on pediatric infectious diseases.
Pediatric Patient Education

The Pediatric Patient Education section of the AAP website contains a collection of handouts and information built specifically for pediatric patients and families, most available in Spanish as well as English. Handouts include Schmitt Pedatric Care Advice, TIPP, VIS, and more.
Access AAP publications through PCC EHR
Use the Patient Education tool in PCC EHR to access all three of these resources (and more).


For a complete guide on how to use Patient Education inside PCC EHR, read Find and Share Patient Education and Handouts.
Access AAP publications through PCC Community
You can access AAP resources by logging into PCC Community and following an authorization link to the AAP website.
First, visit the PCC Community website and log in. For information about registering for PCC Community, read, PCC Community: The Home of PCCTalk.
If the welcome message is hidden, click “Show Message”.

Next, click “Access the newsletter” to visit the AAP Pediatric Coding Newsletter. Because of your PCC Community login, you will have access to all the AAP resources described above.

You will see PCC’s logo on the site, indicating you are logged in through PCC. You can click to access the AAP Pediatric Coding Newsletter, the AAP Pediatric Redbook, and the AAP’s library of educational materials for patients.
Print the AAP Coding Newsletter: You can print out any issue of the AAP Coding Newsletter. First, log into PCC Community and use the instructions above to follow the link to the AAP’s website. Next, click on any story from the issue. Finally, click on the “PDF” link to download the entire issue to your computer. You can read the newsletter on your computer screen or print it.
HIPAA, Security Risk Assessments, and the Pediatric Practice
What is HIPAA? What should a pediatric practice do to meet HIPAA regulations? What should be in a pediatric practice’s privacy policy? And what’s a Security Risk Assessment?
This article discusses the many issues around HIPAA, Security Risk Assessments (SRAs), and what a pediatric practice should do to protect patient privacy and be in compliance with HIPAA regulations. Read below to learn about Business Associate Agreements, audits, and other HIPAA concepts.
Along the way, you’ll see sample documents and tips from PCC to help your practice be HIPAA-perfect.
What is HIPAA?
HIPAA, or the Health Information Portability and Accountability Act, is a set of policies, procedures and guidelines that were passed into U.S. law in 1996.
HIPAA has many provisions, including rules around health insurance, medical savings accounts, and other aspects of healthcare. When most people talk about HIPAA, they are talking about the HIPAA Title II sections on privacy, rules around information transactions, and security.
HIPAA defines Private Health Information, or PHI, and establishes it as the property of the patient. HIPAA says that the patient owns their medical records, and any organization that handles their PHI is obligated to take certain steps to protect their privacy. The patient (or guardian) is the only one who can do anything they want with their health information (share it, use it, etc.), and physicians and organizations need permission.
What Does HIPAA Require of a Pediatric Medical Practice?
What specifically does a pediatric practice need to do in order to follow HIPAA guidelines?
HIPAA obligates a medical practice to do the following:
- Assign the roles of HIPAA Security Officer and HIPAA Privacy Officer to someone at your practice
- Keep a signed Business Associate Agreement (BAA) with all vendors or other individuals who may come in contact with your patients’ Private Health Information (PHI).
- Create and maintain a HIPAA Privacy Policy for your practice.
- Perform an initial Security Risk Assessment for your practice, during which you look at all potential risks to your patients’ Private Health Information (PHI), and establish policies for protecting it.
- Create and maintain a HIPAA Security Policy for your practice, based on your Security Risk Assessment.
- Perform annual Security Risk Assessments, during which you review and update your HIPAA Security Policy, as needed, and log that you have done an annual review.
- Make a HIPAA Patient Privacy Policy available to patients and families, and have them sign a HIPAA agreement.
- Follow and enforce your practice’s written policies at your practice, taking reasonable steps to protect patient PHI.
In the sections below, you can learn more about each of these topics.
Violations, Penalties and Fines?: What are the risks to your practice if you do not follow HIPAA guidelines? Up until 2006, the HIPAA laws did not include clear actionable guidelines, and there was no rigorous enforcement. Since 2006, however, there have been tens of thousands of investigations of HIPAA violations, such as misuse and improper disclosure of patient PHI. Private practices are the most frequent group to receive corrective action, and millions of dollars in fines have been levied. (source)
Documents, Policies, Paper!: As you read the above obligations, you may have noticed that a big part of it includes developing a set of HIPAA policy documents and making them available to the correct people. The list of common HIPAA policy documents includes: Business Associate Agreement, HIPAA Privacy Policy, HIPAA Security Policy, and your HIPAA Patient Privacy Policy. Read below to learn more.
Assign Your Practice’s HIPAA Security Officer and HIPAA Privacy Officer
Who is in charge of HIPAA stuff at your practice? Who will handle the forms and policies, and who will help employees deal with PHI?
Your practice should assign the role of a HIPAA Security Officer and a HIPAA Privacy Officer to one or two people at your practice. These roles could be filled by your office manager, a managing provider, a human resources manager, or some other individual who has a head for policies and regulations.
Your HIPAA Security Officer will be the expert on your practice’s HIPAA policies. They will create and maintain the policy documents described below, implement those policies and make sure that your practice follows them, and they will be the person who everyone goes to if there is a breach in patient privacy. They will also oversee the annual renewal of the security risk assessment.
The HIPAA Privacy Officer is a more people-focused role. The privacy officer trains your staff and also assesses requests for PHI. They might take action or make changes around the office in order to protect patient privacy.
Sample Job Descriptions for HIPAA Security and Privacy Officer: You can find sample job descriptions online, from various third parties. You can also network with your fellow pediatricians on PCC Talk to find out how they fill these important roles.
Document Your Officers: Your HIPAA Security Policy, described below, should list who fulfills these two HIPAA roles at your practice. (164.308(a)(2), “identify security official”)
Business Associate Agreements (BAAs)
Your practice should maintain signed Business Associate Agreements with any vendor or third-party who might come in contact with your patients’ PHI. Keep a copy of these signed agreements. A Business Associate Agreement describes the limits and safeguards on how an entity has access to your patient’s PHI, and how they are/are not allowed to use it.
For example, you need to have a signed BAA with PCC. Patient PHI leaves your practice and passes through PCC’s servers when you submit insurance claims electronically. When you became a PCC client, we sent you a BAA which describes you, the “covered entity” and PCC, the “business associate”. Alternatively, your practice may have developed your own BAA and sent it to PCC to sign instead. PCC, in turn, has BAAs with clearinghouses and other entities that may receive patient PHI from us.

(More BAA information and samples at HHS.gov)
If your practice wishes to develop or update your BAA for use with third-parties, the HHS.gov website provides an excellent introduction to BAAs as well as sample BAA language that you can edit and adapt for your purposes.
You can also review your BAA with PCC as an example. A BAA is not a document that needs a great deal of customization for the average pediatric practice.
Do I Need a BAA With a Lab, My IT Professional, My Cleaning Service, etc.?: You might not need a BAA with every third-party or vendor with whom you do business. For example, if you fill out lab requisition forms and then give them to the patient, but you never actually send or distribute any form of PHI to a lab, you do not need a BAA with them. However, if your practice sends PHI directly to a vendor, you do need a BAA with that vendor. You need a BAA with any person or organization who might come into contact with patient PHI. For example, if an IT professional enters your premises to work on a computer that contains PHI, you should have a signed BAA with that IT professional or organization. If your cleaning service could potentially access paper charts in your practice, you should have a BAA with them. You do not need a BAA with your postal carrier or your internet service provider.
Security Risk Assessments
HIPAA obligates your practice to perform an initial Security Risk Assessment, as well as annual Security Risk Assessment updates. You will use the results of your Security Risk Assessment to create and periodically update your practice’s HIPAA Security Policy.
What do you need to do for your practice’s initial Security Risk Assessment? First, identify all potential security risks to PHI in your office. For example, you could start at your front door, walk around as if you are a patient or visiting professional, and identify every situation where a patient’s information may be revealed.
As you evaluate your office’s physical space, you should inventory your laptops, your procedures for closing the office, and carefully consider the different individuals and organizations that visit your practice and may come in contact with patient PHI. On the virtual side, you should consider all the technological ways that a patient’s PHI might be at risk.
Other Resources:
-
Automated Assessment Tool: The ONC’s Healthit.gov site provides an online tool that can walk you through performing an SRA. Every office is going to have different security risks, but by walking around your office and answering 150 questions, you can get a report that will cover most areas.
-
Security Risk Analysis Tip Sheet: CMS.gov publishes a tip sheet for issues around performing your security risk analysis. Read the Security Risk Analysis: Protect Patient Health Information article.
Initial SRA, Annual Reassessment, and Audits: After you perform an initial SRA, you should perform annual re-assessments, where you evaluate whether your existing policies are successful at mitigating risks to PHI, and to update your HIPAA Security Policy to reflect any changes. If a state agency performs an audit of your practice, they may ask to see your record of performing annual SRAs and what updates were made as a result of each annual SRA.
What do SRAs Have to Do With CMS and Meaningful Use?: One of the Meaningful Use measures used for the EHR Medicaid Incentive Program and PCMH requires that your office do annual SRAs. You should be doing them anyway, as part of your HIPAA compliance, but it’s notable that SRAs are part of CMS Meaningful Use guidelines as well.
HIPAA Security Policy
As you perform your initial Security Risk Assessment, your office will develop a written HIPAA Security Policy. As you identify risks, you will document what your office does to mitigate each risk. The finished document is your HIPAA Security Policy, and you should review it and update it each year when you perform your subsequent Security Risk Assessments.
Every office has different security needs, so PCC recommends you do not use a HIPAA Security Policy template or sample as a starting point.
Here are some examples of things your HIPAA Security Policy could cover:
- Who is your practice’s HIPAA Security Officer?
- How do you secure patient PHI technologically?
- Where do you keep your laptops each night?
- What do you do to ensure computer workstation security?
- How do you keep paper charts secure?
- How do you backup your PCC system? Are your backups encrypted?
- What do you do to mitigate each of the specific risks that you identified in your SRA?
- When do you perform your annual SRA?
For the official list of all the things your HIPAA Security Policy should say, the HHS provides a list of the HIPAA standards and what topics should be covered. PCC reviewed those guidelines and has additional information available. By walking through the standards and including each row, you can create a HIPAA Security Policy that will reflect the security policies of your practice and meet HIPAA guidelines.
PCC can not provide sample HIPAA Security Policies because the policy needs to be based on what your office does, and what your risks are, as discovered by performing a Security Risk Assessment. Do you have 2 employees, or 110? Are you in a high-crime area, or a small town? When you evaluate your security needs, your answers will be very different. The list of standards you must meet can be published in a table, but how your practice will meet those standards is particular to your practice.
Required Elements, Addressable Elements: As you review the HHS requirements, you will notice that some elements of a HIPAA Security Policy are classified as “Required” and some are classified as “Addressable”. A required element is a specific, required standard for security. It states precisely what your HIPAA Security Policy should say, and includes the guidelines that your practice should follow. An addressable element, on the other hand, is an issue that your office must have a policy about, though your practice’s specific policy is up to you. Your HIPAA Security Policy should include a reference to both Required and Addressable Elements, but the Addressable Elements will be customized based on your practice. For example, your HIPAA Security Policy should include your practice’s guidelines for when you terminate an employee, but there are no official guidelines for what those steps should be. As a “Required” example, your Security Policy should state that your practice will have a BAA with vendors.
Hire a Consultant?: Your practice may choose to hire a third-party consultant to help you perform your SRA and develop your HIPAA Security Policy. For example, PCC has worked successfully with Paul Vanchiere from the Pediatric Management Institute. PCC recommends caution when working with consultants, vendors, or state-sponsored organizations that may have divided motivations or may have a vested interest in selling you additional services or products. If your practice has a lawyer on retention, they can also provide consultation on HIPAA laws and regulations.
HIPAA Staff Privacy Policy Document
In addition to your HIPAA Security Policy, your practice needs a HIPAA Staff Privacy Policy.
The good news is that your HIPAA Staff Privacy Policy is much shorter than your Security Policy. It concisely describes when and how your staff can disclose PHI.
Your Privacy Policy should include:
- The name of your HIPAA Privacy Officer
- A list of reasons for when your practice would disclose PHI, such as upon receiving a court order, witnessing evidence of abuse, etc. Your policy should list all situations where your practice would disclose information without the patient or family’s consent.
- A description of how the practice disposes of any PHI they receive. For example, when a paper lab result arrives at the practice, what happens to it?
- Additional details that will help your staff perform the requirements of your HIPAA security policy, such as instructions for handling emailed PHI.
PCC created a downloadable list of items to include on your HIPAA Staff Privacy Policy: PCC’s Privacy Policy Recommendations. You can also read about all the standards at HHS.gov’s HIPAA Privacy Policy Summary page.
HIPAA Notice of Privacy Practices
Every patient, or patient guardian, must sign a HIPAA consent form when they first visit your practice.
If your practice is currently doing business, you are probably already doing this. If you’d like help writing or updating your HIPAA Notice of Privacy Practices or HIPAA consent form, we recommend reviewing this Department of Health and Human Services website, and working with your PCC colleagues.
The Office for Civil Rights issued a final rule on April 26, 2024 titled: HIPAA Privacy (New) Final Rule to Support Reproductive Health Care Privacy. The final rule requires covered health care providers, health plans, and health care clearinghouses to revise their Notice of Privacy Practices (NPP) in support of reproductive health care privacy. The deadline to update NPPs is February 16, 2026.
The Final rule NPP language and requirements begins here on the Federal Register: https://www.federalregister.gov/d/2024-08503/p-1046. We recommend you read this section of the Final Rule in full to determine the updates appropriate for your practice. We also encourage you to read the HIPAA Privacy Rule Final Rule to Support Reproductive Health Care Privacy: Fact Sheet HHS.gov, which provides a thorough overview of the final rule.
HIPAA Training At Your Office
You should train all employees on HIPAA privacy guidelines and your practice’s HIPAA policies.
For example, a HIPAA training should include:
- A definition of HIPAA
- What information is protected under HIPAA
- The “Minimum Necessary” HIPAA rule: if PHI must be disclosed in the course of your practice’s normal business, you only disclose the minimum amount of PHI necessary to resolve the problem
- The proper destruction of PHI that enters the office
- The types of PHI disclosure and the penalties for disclosing PHI
- What steps to follow if PHI is breached
- Review of the practice’s privacy and security policies
- Identify the practice’s HIPAA Security and Privacy officer(s)
You might schedule a class to teach a bunch of employees, or the HIPAA Privacy Officer might sit down and teach each new employee. You should make all employees aware of your Security and Privacy policies, and the employee should sign a HIPAA training form stating they have completed training and understand what is expected of them.
Document that Training Occurred: HIPAA requires that you document that the training has been provided (164.316). Along with any other kind of HIPAA activity, your practice should record when and who was trained and by whom. “if an action, activity, or assessment is required, maintain a written (which may be electronic) record of the action, activity, or assessment.” Record the training content, the date, and each attendee’s name along with any other materials or communication about the training.
Log Visitors and Repairs to the Office
If there is a breach of patient privacy on a particular day, you may need to create a list of all folks who entered your practice or could have had access to PHI.
In order to meet HIPAA requirements, your practice should keep a log of anyone who visits your office, along with the date and time and purpose of their visit. If they repair a laptop or other equipment, for example, you should record which laptop they repaired.
Network and Technology Audits and Scan Logs
If anyone sends you a report of a scan having to do with your technology, keep it. In case of an audit or security breach, the log or security scan will help identify problems or prove your office was making every effort to ensure patient security.
PCC provides your practice with a periodic Network Vulnerability Scan. PCC does not operate or maintain all aspects of your technology infrastructure, however. You may receive similar reports if you work with a different IT vendor.
Paper Charts, vs. Electronic Charts, and HIPAA
Sometimes a medical practice feels they do not need to perform Security Risk Assessments, or perform some other aspect of HIPAA preparation, because they use paper charts, because of their office configuration, or some other reason.
These assumptions are false. If your practice comes in contact with patient information of any kind, including demographic data, then you need to take HIPAA seriously and maintain the policies and guidelines described above.
Private Health Information, whether electronic (“ePHI”) or physical, is protected by HIPAA rules, and it includes any diagnoses or information used for billing, as well as patient names and birthdates.
Regardless of whether or not a medical practice uses an EHR, they need to go through the same steps, perform Security Risk Assessments, develop Security and Privacy Policies, inform patients of their HIPAA privacy policy, and maintain BAAs.
When You Get Audited, or Asked for Your Security Risk Assessment Records
If a state-sanctioned or other entity audits your practice, they may ask for a record of your security risk assessments or other evidence that you comply with HIPAA.
Here is a list of things your HIPAA Security Officer should keep on hand in case of an audit:
- Business Associate Agreements (BAAs) with all business associates
- Privacy and Security policies for your practice
- HIPPA Patient Privacy Policy
- Signed HIPAA training forms for all staff
- Log of visitors/repairs in the office
- Network/Technology Audit Logs
- Security Risk Assessment Record
For more information about any of the items on this list, read the sections above.
Will You Ever Get Audited?: There is a budget out there for doing audits nationally. Hospitals get audited more often, but some PCC practices have had a HIPAA-related audit by a state agency, or an agency representing the Health and Human Services (HHS) office.
The AAP's Guide to Audits: If you’d like to learn more about the audit process, the AAP published an article called What to Do When an Auditor Knocks On Your Practice’s Door in 2013.
Conclusion: What NOT to Do for HIPAA
The HIPAA rules are intended to protect patient privacy. They are not intended to prevent you from providing care to patients, or to prevent you from doing business.
Here are some other important “don’ts” for HIPAA: Don’t get scared. Don’t trust anyone who recommends massive office remodeling in order to meet HIPAA requirements. Don’t let an outside commercial entity provide you a “free” security audit or analysis. Don’t think you need to spend thousands of dollars or hire a consultant if you don’t want to.
Every medical practice needs to have a series of policies in place and train their staff to protect PHI, but they do not need to take extreme or expensive measures.
If you have questions or concerns about HIPAA compliance at your practice, PCC encourages you to contact us. We’d be happy to help.
Read the Pulse: PCC’s Newsfeed

The Pulse is a source of news and information for PCC clients. We use The Pulse to share information about our upcoming software releases, trainings, conferences, events and web labs, as well as pediatric news and industry information. We also announce PCC office closings and holidays.
Who Should Read the Pulse?
Any clinician, office manager, or pediatric staff member who wants to stay abreast of changes to their PCC system or software, learn about new releases or features, or find out about PCC events and other educational opportunities.
How Do I Read the Pulse?
To read the Pulse, click the “News” button in the lower-right corner of your PCC EHR window.

Articles appear with a list of headlines on the left-hand side of the window. Important and time-sensitive items will stick to the top of the news feed.
Vital Communication Tool: At least 1-2 people from your office should review The Pulse daily, as this is the main channel of communication PCC uses to share information about our software, products, and services. In the event of a service interruption or software problem, PCC will send an emergency message to everyone who receives The Pulse.
Can I Read the Pulse Online Instead?
You can also read the Pulse online here: PCC Pulse: Your Source For All Things PCC.
Contact PCC Support for password information.
You can also read updates on PCC Community, an online web forum.
Can PCC Email Me Updates and Important News Instead?
PCC sends periodic updates to a mailing list of our clients. Contact PCC Support to subscribe.
Newsletter Archives
If you missed a news item, have a question, or would like to check a past issue of the Pulse, contact PCC Support. We’ll help you find all the PCC news or information you’re looking for.
Acronyms and Industry Terms for the PCC Community
This article defines acronyms and terms of interest to pediatric practices and the PCC community. PCC has created this for the use of our clients, for our own internal use, and for searching purposes. If you have an acronym or term you’d like added to this glossary, send it to support@pcc.com.
21st Century Cures Act
AAP
ACA
ARRA
batch
C-CDA
PCC and other vendors use C-CDA-formatted files to transmit medical information. You can create a C-CDA for a patient record using the Summary of Care Record Report or for a single visit using the Patient Visit Summary. Patients and families can export a C-CDA from MyKidsChart. PCC even includes a C-CDA Batch Export Tool.
CMS
CPT
ECS
EDI
EEF
EHR
fame
fame. The name is an acronym for Family Editor. In PCC EHR, users edit family and account information in components in the patients chart or in tools like Patient Checkin.FDB
GPCI
HCFA
HIPAA
HIPAA has provisions for maintaining your health insurance when you switch employers, it created guidelines around medical savings accounts, and effected other aspects of healthcare.
When most people talk about HIPAA, however, they are talking about the Title II sections on privacy, rules around information transactions, and security
For more information, read HIPAA, Security Risk Assessments, and the Pediatric Practice.
HL7
ICD-10
LOINC
MU
- Improve quality, safety, efficiency, and reduce health disparities
- Engage patients and family
- Improve care coordination, and population and public health
- Maintain privacy and security of patient health information
For more information, visit HealthIt.gov’s Definitions Page for Meaningful Use.
NCQA
notjane
notjane. The name is a tongue-in-cheek acronym for Not Just Another Editor. In PCC EHR, users edit patient and account information in components in the patient’s chart or in tools like Patient Checkin.ODF
PCC
PCMH
PCMH encompasses a philosophy of patient care as well as a set of standards. It is an approach to care where “practices seek to improve the quality, effectiveness, and efficiency of the care they deliver while responding to each patient’s unique needs and preferences.” (AAFP.org)
Various state and local organizations, insurance carriers, and other governing bodies have adopted the PCMH standard and created paid incentive programs for practices that implement these principles.
PHI
pip
pip. The name is an acronym for Post Insurance Payments.RBRVU
RTPB
RVU
SAM
SRA
Surescripts
TST
Make Documents Available to Patients and Families in My Kid’s Chart
You can make documents available to patients and families in My Kid’s Chart, PCC’s patient portal. You can use this feature to share forms, test results, and other important documents with your patients and families.
When importing or editing a document, you have the option to share or remove a document from the patient portal. A “Display in Patient Portal” checkbox is available when importing documents, or when reviewing and editing a patient’s documents.


Displaying documents in patient portal is optional. If your practice does not want to share documents through the patient portal, open Patient Portal from PCC EHR’s Configuration menu, and uncheck the “Documents” box.

When the patient or guardian logs into My Kid’s Chart, a green dot and “Unread Document”, or “Unread Documents” appear on the Patient Portal’s home page, below the patient’s name.

In each patient’s chart, the portal displays the five most recent documents by default. To view more, the patient can click the “More” button at the bottom of the document list.

Documents appear in reverse chronological order, and if a document doesn’t have a title the word “Document” will appear instead. The user can click on a document to download and view it.
Vaccine Lot Report
You can run the Vaccine Lot report in PCC EHR to identify all patients who received a particular vaccine lot within a date range.
To run the report, go to the Reports menu, and click on Vaccine Lot Report.

You can run this report on a number of criteria, specifying date of administration, as well as Vaccine lot number or diluent lot number. You can also specify lot location, if you are a multi-location practice.

The report returns a table, sortable on any column by clicking the column title. This report can be printed directly, or saved as a *.csv file, and it includes the contact information for patients. If your practice is performing a vaccine recall, you can use this information to contact patient families.
Contact Information: The contact information in this table is pulled from the Patient’s Confidential Communication Preference from the Demographics section of the patient’s chart. If the patient does not have a contact preference, these columns will display the mailing address and phone number of the patient’s custodial account.
The PCC EHR Audit Log
Use the PCC EHR Audit Log to review details about system events pertaining to a patient’s chart. You might use the PCC EHR Audit Log when you need to:
- Review a complete record of who accessed or made changes to a specific patient’s chart
- Review all actions performed in PCC EHR by a particular user
- Review a particular session or event where a user edited a patient’s chart or made a particular change
Run the PCC EHR Audit Log
To view the log, select “PCC EHR Audit Log” from the Reports menu.

Before you generate the report, you can add filters to limit the output to a date range, a specific patient, one or more users, or one or more kinds of chart events.
Use the onscreen tools to enter a date or select other criteria.

If you wished to see everything a specific user did in relation to a specific patient’s chart, you could enter multiple criteria.
After choosing your criteria, click “Generate” to create the log and see the results.


On the results screen, you can see all chart events that met your chosen criteria.
Slow Performance, One User Only: The Chart Event Audit Log compiles thousands of records into an easy-to-read format. It takes considerable system resources, and can take several seconds to run. Only one user can open the Chart Event Audit Log at a time.
How to Read and Interpret the PCC EHR Audit Log
On the results screen, you can see the session ID, the date and time, the user, the patient, the event, and the source of the log entry.
If you hover your mouse cursor over any field, you can see more information.

The reference below explains how each column on the report works.
Session
You can click on the session ID button to narrow the report down to a specific user’s session, or just those parts of a user’s session related to a single patient’s chart.

After narrowing the report results, you can click “Back” to return to the full results.
Date/Time
User
Patient
Event
You can see a list of possible events by selecting the Event criteria from the report screen.

Source
New Entry Types Over Time: As PCC expands its databases and software tools, new Events and Sources will be added to the items available in the log. If you wish to review chart access from pocketPCC, for example, or if you are unsure whether or not something is included in the PCC EHR Audit Log, contact PCC Support.
Permission to Run the PCC EHR Audit Log
Your practice can customize which users can access the PCC EHR Audit Log by adding or removing access for a user role in the User Administration tool.


Review Your PCMH Measures and Performance on a Dashboard
The PCMH dashboard page contains all of the PCC Practice Vitals Dashboard measures that relate to NCQA’s 2017 PCMH standards. You can use this page to monitor your performance toward meeting specific elements and factors. You can also print this page to share the data with staff and providers and for submission to NCQA as part of your application for PCMH recognition.
To view your PCMH Dashboard page, log in to the Practice Vitals Dashboard and click the PCMH tab on the menu.

The dashboard is organized by PCMH elements and factors, making it straightforward to apply this data to PCMH recognition.
For more information, click on a measure to view a complete dashboard on just that measure.

Some of the factors on this page can be met by choosing measures listed in drop-down menus.


Printing: Some web browsers have trouble printing this page. If you cannot get it to print successfully, try right-clicking on the page and look for an option to “view frame” or “print frame”.
PCC Does Even More for PCMH: In addition to the reports in your Practice Vitals Dashboard, PCC’s software and services include many other features and reports that help you apply for PCMH. Read more about becoming a Patient Centered Medical Home.
C-CDA Batch Export Tool
The C-CDA Batch Export tool can export Summary of Care C-CDA files for all patients who had a charted visit in PCC EHR within a specified date range.
When Would You Use This Tool?: PCC can provide your practice with a better data export than provided by the C-CDA Batch Export tool, and you can create a single C-CDA for a single patient with the Summary of Care Record report. However, your practice may need to use the C-CDA Batch Export tool to illustrate data portability in the event of an audit by your state’s executors of the ARRA EHR Medicaid Incentive Program.
What Is C-CDA, and What Is Included in This Export?: The C-CDA Batch Export tool creates a zipped file containing Summary of Care records in C-CDA format. These files match the Meaningful Use Stage 2 criteria for a transition of care, specified as 170.314(b) of the Consolidated-Clinical Document Architecture. For more information, contact PCC Support.
Open the C-CDA Batch Export Tool
To export a batch of C-CDA files, run the C-CDA Batch Export Tool from the the Tools menu.

Turn On the Tool: If you do not see the C-CDA Batch Export tool in your tools menu, you can add it to a user role in the User Administration tool.
Choose a Date Range
Next, enter a date range for patient appointments, and click “Export”. PCC EHR will collect the information and package it into a zip file of C-CDA formatted files.


It takes several seconds to produce each C-CDA, so running a large record set for many patients will take some time.
Choose a Save Location
Your computer will prompt you to save the zipped C-CDA files locally to your workstation.

PHI: The C-CDA files include private health information. When you create and save this export to your personal computer, you are taking responsibility for their safe distribution. Delete these files when you are finished.
Contact PCC Support Instead: The C-CDA Batch Export Tool should never be needed for data export. If you need to export large sets of patient data from PCC EHR, PCC can instead provide a complete data export.
Hardware Guide: Your Personal Computer and Equipment
Your office will use computers, printers, scanners and other peripheral hardware to use PCC software and services.
PCC does not sell or maintain this equipment, but we can advise you on your purchases, and we will help you configure and set up your equipment to work with PCC software and your network.
Read the sections below to learn about recommended hardware and minimum requirements.
Contact PCC: No matter what new hardware you need to purchase, we encourage you to contact PCC’s Technical Solutions Team (1-800-722-1082, x2 or support@pcc.com) to discuss the model and sort out any installation issues. PCC has worked with hundreds of offices to design hardware solutions and our consultation is included in your PCC Care Plan.
Does PCC Provide Support For Your Personal Computer and Other Hardware?
- PCC supports the hardware in your office as it relates to PCC services. For example, our support team can help you set up a new printer and we can help you configure your new laptop to connect to PCC EHR.
- PCC can also make hardware and manufacturer recommendations that represent the “best bets” when considering cost and reliability.
- PCC cannot guarantee support for every type and brand of equipment.
- PCC does not provide support for your Windows or Macintosh workstations, including security and OS updates.
Computer Workstations
Your practice can use laptops or desktops to connect to PCC software. What are PCC’s minimum and recommended hardware requirements, and what else should you consider when you purchase a personal computer?
Recommended Workstation Specifications
The recommendations below are based on industry reviews and feedback from our clients’ experience at their practices. Many factors can influence real-world experience. PCC cannot guarantee the performance of specific hardware.
Workstation and operating system age do affect performance. We recommend that workstations have a manufacturer date that is no more than three years old. Investing in a high-quality CPU will improve the performance of PCC EHR. This is particularly important for clinicians who are regularly opening multiple charts and staff who require swift navigation for their workflow.
Windows PCs
Here are the minimum specifications we recommend for a PC workstation running Windows:
-
CPU: Modern Intel Core i5 Processor manufactured three years ago or fewer (avoid ARM processors)
-
Display Resolution: 1920 x 1080
-
RAM: 8GB
-
Storage: 128GB+ Hard Drive or Solid State Disk
-
Operating System: Windows 11 Pro
Display Resolution: Displays with a very high resolution (DPI) can cause an issue where some PCC application data may be cut off from the edges of your screen. PCC recommends purchasing laptops with a full high definition (FHD) display resolution (+/- 1920 x 1080). If you are unsure about a particular model, please contact PCC Support for guidance.
Recommended PC Models: Most current business-class personal computers from Dell, HP or Lenovo meet the specifications above and should perform well.
Operating System Details: For a Windows PC, PCC recommends the latest version of Windows Professional. See the Operating System Details below to learn more.
Apple Macintosh Computers
Here are the minimum specifications we recommend for an Apple Macintosh computer workstation:
-
CPU: Apple processor manufactured fewer than three years ago
-
RAM: 8GB
-
Storage: 256GB+ Hard Drive or Solid State Disk
-
Operating System: MacOS version 13 or later
Recommended Macintosh Models: Any current Macintosh model should perform well. iPads are not supported.
Laptops or Desktops?
If you use PCC EHR, you might prefer to purchase laptops that can be carried in and out of exam rooms. Or you may decide that installing a computer under a cupboard works well for you.
PCC clients report that laptops are more prone to theft and damage and often have battery problems. A desktop computer that can be permanently connected to your network over a Cat 5 cable will have fewer network problems than a wireless laptop. And it will be harder to steal or damage.
Laptops add convenience and mobility. You can carry a laptop into an exam room, set it up on an exam tray, transfer it to your office for charting later, and then take it home to continue your work.
If you purchase laptops, you may wish to invest in extra batteries or charging cables. If you purchase extra power adapters, you can plug in a laptop wherever you work, which will keep you from running out of power in the middle of a visit. Alternatively, you can select a laptop with exceptional battery life.
If you can plug your laptop directly into a network cable instead of relying on WiFi, that will improve connectivity. You might also consider anti-theft measures, such as locking cables or Apple’s Find My Mac service, which can locate your laptop remotely if it is stolen.
Can I Use a Tablet or Touchscreen Laptop?: PCC software is not designed for or tested on tablets or touchscreen laptops. Although PCC EHR sometimes works on such devices, PCC only provides software support for workstations that meet PCC’s minimum hardware requirements, which excludes tablets and touchscreen laptops. For an optimal PCC experience, please purchase computer workstations that explicitly meet the recommendations in this article, or contact PCC Support for additional help and guidance when making your purchase.
Dedicated For Practice Use
PCC strongly recommends that laptops and PCs intended for charting and practice management services be used only for those purposes.
If you have other computing needs, PCC recommends you use a different computer.
Operating System Details
PCC practices can use personal computers that run the Apple Macintosh OS or Microsoft Windows operating systems. PCC has worked extensively with each operating system and can share pros and cons of each.
Other Operating Systems: For questions about other operating systems, contact PCC Support at 1-800-722-1082 or support@pcc.com. PCC does not recommend operating systems that are no longer supported by the manufacturer.
Mobile Operating Systems: PCC’s mobile applications (pocketPCC and the patient portal) use your mobile device’s browser. They work with any modern mobile device running a standards-compliant browser.
To use PCC’s software and services, you can use desktop computers, laptops, or workstations that run the following operating systems.
Macintosh OS
You can connect to PCC EHR using an Apple Macintosh computer, such as an iMac or a Macbook Air. Macintoshes run on a virus-resistant, secure operating system based on Unix, just like your PCC server. PCC will help you connect your Macintosh to PCC software services, but PCC does not offer specific Macintosh support or training.
The Macintosh OS (or macOS) operating system is very crash resistant. Many PCC clients report that Macintosh laptops have better battery life than similar laptops from other manufacturers. The disadvantage of Macintosh computers is that they may cost more than some other options and some familiar software may not be available.
Any Macintosh computer running the current macOS is suitable for all PCC EHR functions. PCC recommends that Macintosh users update their computers to the most recent macOS version, as the updates are free and improve the security and reliability of the computer.
When Should I Update My System Software?: PCC recommends that Macintosh users regularly run the “Software Update” utility, found in the “About This Mac” option in the Apple menu, to ensure security on their machines. However, for major annual operating system releases, PCC recommends users wait a few months or until the first major patch before they update their workstations.
Microsoft Windows
You can connect to PCC EHR from a Windows PC, such as a Dell, HP, or unbranded computer, running a version of the Microsoft Windows operating system. PCC will help you connect your PC to PCC software services, but PCC does not offer specific Windows support or training.
Microsoft Windows is the most common operating system for computers sold by most vendors. Windows may contain security vulnerabilities that could endanger your office’s network, and there are more viruses for Windows than for other operating systems. Despite these drawbacks, Windows OS machines have the most available software, are the easiest to find, and are the most likely to have a range of local support vendors. Most PCC clients use Windows machines to connect to PCC EHR.
PCC recommends using the current Windows Professional Operating System.
When Should I Update My System Software?: When you use Windows PCs in your office, it is important to keep your virus protection software and Windows operating system up-to-date. For example, you can select the Windows Update application from the All Programs menu. For major operating system updates, PCC recommends you wait until a few months after the public release.
HIPAA Compliance: Do Not Purchase or Install Microsoft Windows Home or Basic Editions as these do not meet HIPAA requirements.
Check For Out-of-Date Operating Systems
PCC EHR presents a warning message on the log in screen if you are using a computer with an operating system that is nearing the end of its support life cycle. When a major operating system vendor (Microsoft, Apple) stops providing security updates or other support for an operating system, PCC typically ends support for it as well.
The warning will appear in red and it will state that you need to update your operating system before the next PCC EHR release. If the operating system is not updated, then the EHR will cease to work with the next release.

Microsoft Windows Domains
It takes a lot of work to maintain all of the Windows PCs in a pediatric practice. Between viruses, software installations and updates, and managing user account permissions, it can feel like a full time job. Some PCC pediatric practices elect to set up and install a Windows Domain to manage all of their workstations from a central server.
With a Windows Domain, you can manage software installation and user account management from a central PC. That computer will push configuration settings to all the Windows PCs in your practice. Virus protection and software updates can all be done once, instead of once for every workstation at your practice. Additionally, you can keep your PCs clean of malware or undesirable applications. Windows users at your practice will be able to log into Windows on all devices, and you can lock them out easily when they leave your practice.
A Windows Domain can be expensive to implement, and it requires maintenance and upkeep by a consultant and/or a system administrator at your practice. PCC does not sell, install or directly support Windows products, but our technical solutions team is knowledgeable about Windows Domains and can help you make a decision. Contact PCC Support for additional information.
Printers
What should you consider before purchasing a printer for your practice?
- PCC’s software is designed to work with printers that support PCL natively.
- PCC only supports networked printers, which can be wired or wireless.
- PCC does not support printers that connect to a PC by a USB cable. Your practice may use these printers at your desk for various purposes, but PCC does not recommend them for bulk printing. Some of PCC’s under-the-hood practice management tools cannot print directly to a USB-connected printer.
- PCC recommends only laser printers. Inkjet printers are not recommended for office use because they are less reliable and more costly over time.
- PCC software works with most HP LaserJet printers and multifunction devices. It works with many Brother, Kyocera, and Ricoh devices as well.
- Canon and Epson devices are typically not compatible with PCC software.
PCC Recommends HP Printers: PCC recommends Hewlett-Packard LaserJet Business printers because they have consistently demonstrated compatibility and reliability. They also support advanced features (e.g. duplex printing and tray selection).
Contact PCC Before Purchasing: Please call PCC Support to verify that a specific device you are considering purchasing is compatible with PCC software.
Scanners
A scanner takes a paper chart, insurance card, form letter, lab result, or other piece of paper and sends it to PCC EHR, where a user can import it into a patient chart. Some scanners need to plug into a workstation computer with a USB cable, other scanners can connect to your network on their own.
PCC will work with your office to help you determine your scanner needs and select an appropriate scanner. PCC cannot guarantee PCC EHR compatibility with a scanner we have not tested and approved, so if you have concerns, send PCC the make and model number of a scanner for verification before purchasing.
What About Copiers and All-In One Devices?: All-in-one printer, scanner, fax devices, or your practice’s copier, may have the ability to scan to a network folder, but they will be slower than a dedicated scanner.
Can You Lease a Scanner?: As with copiers, some offices lease powerful scanners, particular during the paper-chart conversion process. Have your vendor contact PCC at 1-800-722-1082 to discuss needs.
Recommended Scanners
PCC has experience with and supports specific Brother ADS network scanner models. We have tested these models and have Technical Solutions Team experts at PCC who can help you with their setup and operation.
These scanners do not need to be plugged in to a computer workstation, which allows easier access for all users who need to scan. Rather than relying on workstation software, this device is set up through its menu or through a web interface, and it sends scan jobs over your practice’s network. You can configure and operate these scanners from either Microsoft Windows or Apple Macintosh workstations.
If your practice’s IT specialist sets up a copier or a different model of scanner than those listed above, PCC can provide your technician with the network path used to send documents to PCC EHR. We are unable to provide additional assistance for unsupported scanners.
PCC's Setup Guide: PCC created a step-by-step process for setting up a Brother scanner. This help article references an older scanner model, but the basic steps should be similar.
Barcode Scanners
Barcode scanners come in corded and bluetooth models. PCC currently recommends investing in a corded 2D barcode scanner. Corded scanners can easily be plugged into any workstation, do not require a battery, and are generally more affordable than bluetooth models. Bluetooth scanners are portable, but require charging and can only pair with one workstation.


PCC does not recommend a particular barcode scanner, but has found Zebra, Symbol, and REALINN to be fairly reliable brands. If you want PCC to vet your barcode scanner choice prior to purchase, send an email to PCC Support with the models you are considering.
Warranty and Repairs: If your scanner breaks, you will need to contact the manufacturer for any repair requests.
If you choose a cordless model, you will need to pair the scanner with your workstation. Read this guide to learn how to pair a bluetooth scanner with your computer workstation.
For more information on selecting an immunization barcode scanner, read Use a Barcode Scanner to Manage Immunization Inventory.
Vision Screeners
Depending on your practice’s network and hardware configuration, PCC may support vision screeners such as GoCheck Kids and Welch Allyn Spot Vision Screener. These screeners send results directly to PCC EHR’s Import Documents tool. However, some configurations may require that you purchase third-party software.
Label Printers
You can print lab specimen labels from PCC EHR. PCC has tested this functionality with DYMO 450 and 550 label printers and 30336 (2-1/8” x 1”) and 30252 (3-1/2″ x 1-1/8″) labels.
Other printers and label sizes may work.
Other Hardware and Software Needs
For information about other hardware and software needs, contact PCC Support.
Submit Immunization Records to Your Registry
PCC EHR follows the CDC’s Meaningful Use HL7 implementation guidelines, allowing us to interface with most of the 56 immunization registries across the country. Historically, these registries have had their own set of immunization guidelines and implementation rules. However, state by state, they are now moving towards using a single national standard for immunization data.
Different registries may implement these guidelines in slightly different ways, but the instructions below are suitable for every registry. The CDC uses data from the registries to inform decisions on public health policy.
Preparation and Configuration for Immunization Registry Submission
Contact Your Immunization Registry and PCC
To begin this process, you will need to communicate with your immunization registry.
We Can Help: Contact PCC Support at 1-800-722-1082 or support@pcc.com. We can help you reach the appropriate registry and perform the setup and configuration steps below.
If in Texas, Make Sure All Clinicians Who Administer Immunizations are Configured with an NPI
Practices in Texas must configure all clinicians who administer immunizations with an NPI. Immunizations administered by individuals who are not configured with an NPI will be rejected by the registry.
Open your Providers table in the Tables tool and add your practice’s type II (office) NPI number to the “NPI” field of any clinician who administers immunizations and does not have an NPI of their own.
![]()
If you have “Nurse,” “Flu,” or similar providers configured, these should also get the type II (office) NPI.
Review Your CVX and MVX Codes
CVX and MVX codes are part of the HL7 standard used by the CDC, and are required for submitting accurate immunization information. You must enter these codes in your PCC system before submitting your data.
Enable Immunization Registry Communication Preferences
For each patient, your practice must document immunization registry communication preferences. Immunization registry communication preferences accompany immunization submissions to your registry and indicate how the registry may contact a patient and, optionally, what they may do with that patient’s information. You can set patients’ immunization registry communication preferences in the Communication Preferences component.
If immunization registry communication preferences are not already visible in the Demographics section of the patient’s chart, you may need to turn on the Immunization Communication Preference fields.
First, open Component Builder inside the Protocol Configuration editor.

Next, edit the Communication Preferences component and adjust which preferences appear in the component.

In the event that your immunization registry requests that you include a patient status with your vaccine record submissions, you can enable the Patient Immunization Registry Status field within the Communication Preferences component.

This field will allow you to record a patient status for submission to your immunization registry in accordance with the registry’s guidelines.
If in Connecticut, Enable the Medicaid Number Field
The Connecticut state immunization registry, CTWiZ, requests that a Medicaid number be submitted with patient immunizations. You can add a field for Medicaid number to the patient demographics screen in PCC EHR.
Open the Configuration menu and select Protocols. Then, click the “Component Builder” button.

Select the Chart-Wide Components tab, then edit the Patient Demographics component.

In the Patient Alternate Identifiers section of the Edit window, select “Patient Medicaid number” from the drop-down list.

Save and close out of the Protocol Configuration tool. The field for patient Medicaid number now appears in the Alternate Identifiers section of the Patient Demographics screen in PCC EHR.

When you record a Medicaid number in the Alternate Identifiers section of a patient’s chart, it automatically gets sent to the Connecticut immunization registry with immunization submissions.
Use the Lot Manager
The HL7 standard requires lot number and expiration dates for all vaccine data.
Always use the Lot Manager in the Immunization Configuration tool to maintain up-to-date lot information. Lot numbers and expiration dates must be entered for all vaccine inventory.
Optional: Configure PCC to Automatically Add a Custodian as Personal Contact
The HL7 standard requires a Personal Contact for each patient. Your practice can add the Personal Contact in the Demographics section of a patient’s chart. You can optionally use the Practice Preferences to configure PCC to automatically add the custodian as a Personal Contact when a new patient record is created.

Optional: Add Demographics Components to Chart Notes
The HL7 standard requires that every patient record include an Immunization Communication Preference and a Personal Contact. Your practice can update that information during a visit on the Demographics screen in PCC EHR.
Optionally, you can use the Protocol Configuration Tool to add the Communication Preferences component and/or the Personal Contacts component to chart notes, particularly new patient chart notes.
Collecting The Right Data
At every encounter where immunizations are administered, your practice must collect the required information for the registry.
Read the steps below to learn how to collect all required immunization-related information for the HL7 standard.
Assign a Clinician to the Encounter
A clinician with an NPI must be assigned to every visit. If your practice schedules visits for “Nurse”, for example, then during the visit you should change the provider in the Appointment Details section of the chart note to a real clinician.

For Every Patient, Collect Race, Ethnicity, and State-Specific Identifiers
Review and update race and ethnicity information during each visit. You can enter it in the Demographics section of the patient’s chart.

As with other components in PCC EHR, your office could add the Patient Demographics section to any chart note ribbon.
In Connecticut, Record Patients’ Medicaid ID Number
The Connecticut state immunization registry, CTWiZ, requests that patients’ Medicaid number be included with immunization submissions. You can record a Medicaid number in the Alternate Identifiers section of the patient demographics screen in PCC EHR.

It is possible to have multiple alternate ID fields enabled on your PCC system. If the Alternate Identifiers section of the demographics screen contains a blank drop-down field followed by a blank text field, click into the drop-down and select “Patient Medicaid number,” then record the patient’s Medicaid number in the text field.

If you already see an ID in the Alternate Identifiers section of the demographics screen and it is not a Medicaid number, click the plus (+) symbol to add a new row, select “Patient Medicaid number” from the drop-down list, then record the patient’s Medicaid number in the text field.

When you record a Medicaid number in the Alternate Identifiers section of a patient’s chart, it automatically gets sent to the Connecticut immunization registry with immunization submissions.
Review Immunization Registry Communication Preferences
You must review and fill out the Immunization Registry Communication Preferences for each patient. You can record these preferences in the Communication Preferences component in the patient’s Demographics, or anywhere your practice has added the Communication Preferences component.

Share with Registry: For each patient, permission to share immunization information with the registry must be set to either “Yes” or “No”.
Preferred Contact Method: Some registries (such as CAIR in California) state that the secondary “Preferred Contact Method” field must be sent to the registry if it is collected, but the field may be empty. From past experience with immunization registries, PCC recommends that all practices, regardless of state, fill this field with the patient or family’s contact preferences for information related to immunization registries. For example, if the family does not wish to be contacted, select “No Reminders and No Recalls”.
Patient Immunization Registry Status: Some registries require that a patient status be included with vaccine record submissions. You can meet this requirement by enabling the Patient Immunization Registry Status field in the Communication Preferences component and recording patients’ status there. The Patient Immunization Registry Status is independent from the patient and account flags on your PCC system. If you have the Patient Immunization Registry Status field enabled, you must manually ensure that it reflects patients’ status with your practice. Contact PCC Support to speak with an immunization registry support specialist who can help you use this field in accordance with your registry’s guidelines.
Review and Update Personal Contacts
During each visit, review and update the patient’s Personal Contacts. The Personal Contact component appears in the Demographics section of the patient’s chart. At least one contact is required by the HL7 standard.

For Every Patient, Fill Out VFC Eligibility During Each Visit
You must state whether or not a patient was eligible for VFC for every shot administered. PCC EHR can’t determine that for you, but it can provide your clinicians with all the information they need to determine eligibility and display a tool for assigning it quickly.

Train your staff to review the information and select VFC eligibility status during each visit.
Last Answer: At the patient’s next visit, PCC EHR will remember the patient’s previous VFC eligibility status. They can click “Last Answer” to enter it for all immunization orders.

Complete the Required Fields on the Immunization Component in the Chart Note
When recording immunization administration, you must fill out the VFC, Dose, Lot #, VIS, VIS Given date, Route, and Site fields per immunization.

Immunization History
When you are enter historical immunizations, be sure to select a “Source” from the dropdown.

Try to avoid selecting “New Immunization” unless you have access to details such as the lot number and manufacturer.
Data Cleanliness Best Practices to Minimize Submission Errors
Follow these five data cleanliness best practices to reduce the chance of errors in your nightly immunization registry submissions.
Record Key Demographic Details Before Entering Historical Immunizations
Before you enter historical immunizations, ensure that the patient’s demographic information is complete. At a minimum, fill out the patient’s:
- First and last name
- Date of birth
- Sex
- Race
- Ethnicity
- Primary language
- Mother’s maiden name (if required by your state registry), and
- At least one Personal Contact
The patient should additionally be linked to a home account that lists their custodian’s:
- First and last name
- Address, and
- Phone number
Obtain Consent to Share Immunization Data and Record the Patient’s Preference
Immunization data is protected health information and it is a patient’s right to withhold it from the state registry.
Your state may require you to submit immunization data to a registry unless a patient opts out, or require you to obtain affirmative consent from patients before submitting their data to a registry.
Either way, PCC recommends that you:
- inform patients about your immunization data reporting practices, and
- provide a way for patients to affirm or revoke consent to submit their immunization data to the registry.
Once you learn a patient’s preference, record it in the Immunization Registry Communication Preferences component on the patient Demographics screen to ensure your compliance with state law and reduce the chance of immunization registry submission errors.
Fill Out All Lot Details in the Vaccine Lot Manager
When you add new inventory to the Vaccine Lot Manager in PCC EHR, verify that the immunization you are adding inventory for lists the correct:
- CVX code
- MVX code
These details are configured by PCC Support in your Immunization and Diseases table when you receive the vaccine for the very first time.
Then, at a minimum, fill out the:
- Manufacturer
- NDC (from the box, not the vial)
- Lot Number
- Expiration Date
- Funding Source
Some of these details will auto-populate if you are using a scanner to add the lot to inventory. Registries receive lot information with each patient immunization record submission. Registries use lot details for population-level reporting and public safety initiatives.
Record an Administration Status for Every Vaccine Order
Every time you administer a vaccine, record all of the following information in the vaccine order in PCC EHR:
- the patient’s VFC status
- Dose
- Lot Number
- VIS and the date given
- an administration status (Administered, Refused, Contraindicated, or Canceled)
- If Administered, the route and site
- If Refused or Contraindicated, the reason
- Administering user, date, and time (these populate by default when you choose an administration status)
Regularly Check Administered Immunizations for Missing Information
Missing information, especially race, ethnicity, and VFC status, is the most common cause of immunization registry submission errors.
Use the Patient Immunization Administration Details report in the PCC EHR Report Library to find and correct patient immunization orders that are missing key information.
In the PCC EHR Report Library, create a custom version of the Patient Immunization Administration Details report that includes and displays columns for patient race, ethnicity, and VFC status. Read the step-by-step guide for creating a custom report.
Generate your custom report for the date range you are checking, then click on the race, ethnicity, VFC status, and other column headers to bring records with blank fields to the top of the list.
Use the patient name and vaccine details associated with each record to make corrections in patient charts.
By adopting these practices, you can limit immunization registry submission errors. If you have questions about how to incorporate these practices into your workflows, contact PCC Support.
Bidirectional Immunization Registry Interfaces
Certain practices now have the ability to retrieve immunization records on demand from their state registry at the click of a button in PCC EHR.
This feature is being rolled out one registry at a time and is currently available to practices in Alabama, Alaska, Arizona, Arkansas, California, Colorado, Connecticut, Delaware, Florida, Georgia, Hawaii, Idaho, Illinois, Indiana, Kansas, Kentucky, Louisiana, Maryland, Massachusetts, Michigan, Mississippi, Missouri, Nebraska, Nevada, New Hampshire, New Jersey, New Mexico, New York City, North Carolina, Ohio, Oklahoma, Oregon, Pennsylvania, Philadelphia, South Carolina, Tennessee, Texas, U.S. Virgin Islands, Vermont, Virginia, Washington, and Wyoming.
If you are interested in being able to use this feature once it becomes available in your state, contact PCC Support.
Patient Portal Practice Settings and Configuration
Your practice can configure what details and options appear in My Kid’s Chart, PCC’s patient portal.
Patient Portal Configuration
Use the Configuration tab of the Patient Portal Configuration tool to change or update what your patient portal users will see.

Use the checkboxes to determine what will appear in My Kid’s Chart for all users. Configuration changes are practice-wide, for all patients and all locations. (Note that specific orders can also be hidden on a case-by-case basis with the “Display on Patient Reports” checkbox within the orders themselves.)
Use the image and list below to review your options.

Turned Off By Default: Care Plans and Payments, as well as patient sex, race, ethnicity, preferred language, and smoking status are not visible in My Kid’s Chart by default. Your practice can check the boxes to enable these features.
-
Set Age-Based Privacy: The age-based privacy setting sets the age of emancipation for patients in My Kid’s Chart. When a patient reaches this age, all of their medical information is automatically hidden from all portal accounts (including their own). Your office can grant account access to patients above this age on an account-by-account basis. For more information, read Patient Portal User Account Administration.
-
Clinical Instructions: Your practice can share clinical instructions through the Patient Portal. You can add any generic chart note component to the Clinical Instructions, and they will appear in the portal.

Separate Configuration for the Patient Visit Summary Report: The configuration for Clinical Instructions in My Kid’s Chart is independent of the configuration for Clinical Instructions in the Patient Visit Summary Report. Read more here about configuring Clinical Instructions in the PVS.
-
Personal Balance: The Personal Balance feature is turned on for all practices by default. This feature allows patients’ families to see their outstanding balance within the portal. The Personal Balance feature must be turned on before your practice can receive payments through the patient portal.
-
Payments: Your practice can choose to enable auto-posting of payments made through your patient portal. You will need to select a payment type for each credit card listed, which will be used to identify portal payments in PCC reports. If you do not have an appropriate payment type option, you can add one in the Payment Types table or contact PCC Support for help. For more information, read Get Started with Patient Portal Payments.
-
Secure Messaging: Your practice can turn the Secure Messaging features of My Kid’s Chart on or off.
-
Secure Messaging Disclaimer: If your practices allows secure messaging to and from your practice, you can customize a message that will appear at the top of the screen whenever a portal user creates a new message.
Access Controlled: Like other configuration items, the Patient Portal Configuration tool is limited to those users with an appropriate user role. Use the User Administration Tool to review your practice’s roles and control who can make changes to My Kid’s Chart.
Automatic Privacy in My Kid’s Chart When a Patient Becomes an Adult
The My Kid’s Chart patient portal will automatically hide all patient records from all users when a patient reaches your practice’s defined emancipation age.
After the patient’s birthday, they will appear with a “Privacy Enabled” flag on the user’s account.

A parent or patient will still see that the patient is connected to their account, but they will not see any information about upcoming appointments and they will not be able to review patient records.

This feature meets HIPAA privacy guidelines and improves patient security. Here are some issues to keep in mind:
-
Messages Are Still Available: If your practice uses the Messages feature of My Kid’s Chart, parents will still be able to send your office messages and questions in relation to connected patients, even after they turn eighteen. Your staff should keep this in mind when responding to incoming questions on the Messaging queue in PCC EHR.
-
18, 16, or 21?: Age eighteen is the My Kid’s Chart default emancipation age, but your practice can set your state’s emancipation age in the Patient Portal Configuration tool, as shown above.
-
Special Circumstances: If your practice has teenage patients who use your patient portal, you may need to manually grant them access to their own records after they reach emancipation age. Or, if an adult patient has a guardian, that person may need to be granted access to the patient’s record. For help working with individual portal accounts, read Patient Portal User Account Administration.
Configure the Practice Address that Appears in My Kid’s Chart
If your practice uses PCC’s Care Center features to manage patients for several different pediatric offices that use the same practice database, you may want to set which office address each patient portal user will see when they log into My Kid’s Chart.
Use the Practice Preferences tool to set which location address appears in the patient portal, as well as on the Health Information Summary report.

After setting this option, the patient portal and the Health Information Summary will automatically display either your practice’s default address or the patient’s care center address. If the patient has no care center assigned, they will see the practice’s default address instead.
If a parent has several patients who visit physicians at different care centers, both addresses will appear for them when they log in to My Kid’s Chart.
Configure Which Growth Charts are Visible in the Patient Portal
Your practice can control which growth charts are shown in the patient portal by checking the box within the Portal Display column in the Growth Chart Configuration tool.

By default, the same Growth Charts that you use in PCC EHR will be visible to families in the portal. You can uncheck any that you don’t want showing up in the portal, or you can decide to disable growth charts in the portal entirely by unchecking the Growth Charts option in the Patient Portal Configuration tool.
Do You Hide Vitals Now? Growth Charts Displays Them: Your practice can specifically set whether or not to display patient vitals from each encounter in the patient portal. Growth Charts also display vitals collected by your practice. If you prefer to hide vitals information on chart notes and patient summaries, you may also wish to turn off Growth Charts.
Configure Where the Patient Portal Users Component Appears in PCC EHR
The Patient Portal Users component is added by default to the Patient Check-In protocol and to the Demographics section of the patient’s chart.

The chart-wide Patient Portal Users component can be added wherever else you need it, such as on phone notes, on the Medical Summary, or on every appropriate well visit protocol. By placing it in the context of the other work your practice does, you’ll be able to support your families better.
Use the Protocol Configuration tool to edit chart note protocols and chart sections.
Change the Default Logout Time in My Kid’s Chart
After 5 minutes of inactivity, My Kid’s Chart will log a user out. PCC can customize the logout time for your practice. Contact PCC Support for more information.
Automatically Inactivate Portal Message Conversations
Portal Messaging includes the option to prevent replies to a message thread after a selected number of days. If the portal user does not send a reply within the selected number of days, the conversation will become inactive and additional replies cannot be sent. The countdown resets every time a reply is sent.
The length of time before a conversation becomes inactive is set in Patient Portal Configuration.

You can select any number of days, from 1 to 99. Keep in mind that selecting too short a date range can prevent users from replying at all, so select a reasonable length of time.
Customize the Patient Portal Message Protocol
When your practice sends or receives a patient portal message, you work with a Portal Message protocol that includes the message information.

Your practice can customize this protocol to include other tools that your staff may find useful when responding to a portal message. For example, you could add the “Recent and Upcoming Appointments” component, or the “Forms” component.
To make changes to the Portal Message protocol, open Protocol Configuration from the Configuration menu and click “Protocol Builder”. The Portal Message protocol is listed with other protocols at your practice.

You can add, delete, and edit the components that appear when you work with portal messages.

Once you add a component, it will be available to your staff on every portal message sent or received afterwards.
Turn On and Customize Patient Portal Message Templates
PCC EHR includes three optional patient portal message templates that you can use as-is, or customize to work better for your office. You can also create your own messaging templates.
To work with patient portal message templates, click on the Messaging Templates tab of the Patient Portal Configuration tool.

Note: In order to use portal messaging templates, your practice must have Secure Messaging enabled in the Configuration tab.
Highlight the template you want to turn on and click “Edit”.

Select the “Display in Portal” checkbox.

You can also choose to automatically assign incoming messages of a certain template to a specific person at your practice.
You can make additional edits to the contents of your portal messages, and you can also create your own custom message templates. For more information, read the Guide to Portal Messaging Template Configuration.
Set Portal Message Conversations Inactivity
Portal Messaging includes the option to prevent replies to a message thread after a selected number of days. This is set in Patient Portal Configuration.

You can select any number of days, from 1 to 99. Keep in mind that selecting too short a date range can prevent users from replying at all, so select a reasonable length of time.
If the portal user does not send a reply within the selected number of days, the conversation will become inactive and additional replies cannot be sent. The countdown resets every time a reply is sent.

PCC’s Pediatric Billing Drop-In Sessions
PCC’s subject matter experts, including Jan Blanchard (CPC, CPEDC), host web labs about pediatric practice management, billing, coding, and other topics. Whether or not you are a PCC client, you can sign up to attend one. At PCC’s Billing Drop-In web labs, we discuss your questions and often preview upcoming billing functionality in PCC EHR.
Attend the Next PCC “Get Clients Paid” Web Lab
You can sign up for the next PCC Web Lab by clicking here:
Watch a Previous Session
Click in the table below below to review archived presentation files, video, or accompanying materials for PCC’s billing and coding web labs.
| Date | Session | Additional Links and Handouts |
|---|---|---|
| 2026-02 | February Pediatric Billing Drop-In (Register, or see all web labs) |
|
| 2026-01 | January Pediatric Billing Drop-In (slides, video) |
|
| 2025-12 | December Pediatric Billing Drop-In (slides, video) |
|
| 2025-11 | November Pediatric Billing Drop-In (slides, video) |
|
| 2025-10 | October Pediatric Billing Drop-In (slides, video) |
|
| 2025-09 | September Pediatric Billing Drop-In (slides, video) |
|
| 2025-08 | August Pediatric Billing Drop-In (slides, video) |
|
| 2025-07 | July Pediatric Billing Drop-In, Live at the UC! (course slides, drop-in slides, video) |
|
| 2025-06 | June Pediatric Billing Drop-In (slides, video) |
|
| 2025-05 | May Pediatric Billing Drop-In (slides, video) |
|
| 2025-04 | April Pediatric Billing Drop-In (slides, video) |
|
| 2025-03 | March Pediatric Billing Drop-In (slides, video) |
|
| 2025-02 | February Pediatric Billing Drop-In (slides, video) |
|
| 2025-01 | January Pediatric Billing Drop-In (slides, video) |
|
| 2024-12 | December Pediatric Billing Drop-In (slides, video) |
|
| 2024-11 | November Pediatric Billing Drop-In (slides, video) |
|
| 2024-10 | October Pediatric Billing Drop-In (slides, video) |
|
| 2024-09 | September Pediatric Billing Drop-In (slides, video) |
|
| 2024-08 | August Pediatric Billing Drop-In (slides, ICD-10 Pediatric Highlights, video) |
|
| 2024-07 | Pediatric Billing Drop-In at the 2024 PCC’s Users’ Conference (video) |
Other Links, Resources, and Publications
As you attend or watch one of PCC’s billing web labs, you may hear about common coding references, websites, or other resources.
- PCCTalk: PCC users ask coding and billing questions on PCCTalk, our online forum and e-mail newsletter community. Sign up to get started.
- AAP Pediatric Coding Newsletter: All PCC clients have unlimited access to the AAP’s Pediatric Coding Newsletter, along with the Pediatric Red Book and other educational resources.
- ICD-10 Transition Help: During the national transition to ICD-10 billing, PCC produced web labs and other content, and collected resources to help pediatric practices make the change.
11-2015 Sanofi Recall for Auvi-Q Epinephrine
Does your practice prescribe Sanofi’s Auvi-Q epinephrine injectors (“epi-pens”) to your patients? Sanofi has announced a nationwide recall of all strengths and all lot numbers.
PCC EHR has tools and reports that can help you contact patients affected by this recall. You can use the Patient Lists tool, or PCC eRx, to find patients who have a record of an Auvi-Q prescription in their chart.
Your Results May Vary: Sometimes the pharmacy selects the brand of epinephrine pen, and sometimes a patient may receive their prescription from a specialist or other care provider. PCC EHR can only report on the prescription details found in the patient’s chart. Your practice may elect to announce this recall to your patients based on broader criteria, such as all patients with severe allergies on their Problem List.
Recall Details
“The Sanofi recall involves all Auvi-Q currently on the market. It includes both the 0.15 mg and 0.3 mg strengths for hospitals, retailers and consumers. This includes lot numbers 2081278 through 3037230, which expire October 2015 through December 2016. The products have been found to potentially have inaccurate dosage delivery, which may include failure to deliver drug.”
Use the Patient Lists Tool
You can use the Patient Lists tool, in the Tools menu, to get a quick list of all patients with an Auvi-Q prescription and/or a general epinephrine prescription. You could also create a list of patients with anaphylaxis or other allergy diagnoses in their Problem List.
Open the Patient Lists Report Tool
Click on the Reports menu and select “Patient Lists”.

Click “Add”
Click “Add” to add a new patient list.

Add Title, Time Range, and Click to Add a Medication Criteria
On the Add Patient List screen, enter a title for your new list. Review the time range, and then click “Add” next to the Medications criteria.

For the widest possible search, use the “From patient’s birth through today” time range for the criteria.
Add Auvi-Q, and/or Your Practice’s Unspecified Epinephrine Pen Prescription
Use the drop-down search field to find the Auvi-Q prescription or your practice’s typical generic Epinephrine pen prescription.

Can't Find It? Not Sure If Epinephrine Pen Prescriptions Got Auvi-Q?: The Medication criteria for Patient Lists only shows medications that are in at least one patient’s Medication History. If your practice has no records of Auvi-Q or epinephrine, for example, you will not be able to add it as a criteria. If you are worried that a non-specific epinephrine prescription may have been filled with an Auvi-Q, you can add additional prescriptions to the criteria, as shown below.

Review Your List Criteria and Save Your Changes

Generate the Patient List
Select your patient list and click “Generate List”. Then click “Continue” to see the result.


Optional: Export the Patient List
You can work with the patient list right on the screen.
Optionally, you can click “Save as File” and export the list as a comma-separated-value document. You can import that document into any spreadsheet program, or open it with a Word Processor.
Contact PCC Support for help with the Patient Lists report tool or any features of PCC EHR.
Use the Drug Report Tool in PCC eRx
Alternatively, you can use the Drug Report tool in PCC eRx to find all Auvi-Q prescriptions, or all epinephrine prescriptions.
Visit the “Rx Tasks” Tab and Click “Options”
Open a PCC eRx window, either from the RxTasks queue or from a patient’s chart, and click “Options”.

Click “Drug Report”

Search for Epinephrine, or Auvi-Q
Use the search field to find Epinephrine, or Auvi-Q. The Drug Report tool can produce various lists based on either the brand name or generic name of a drug. You may want to try a couple of different searches to review your patients’ records.

Click the “Free Text” or Specific Prescription Option
Depending on your search, you may need to indicate whether you mean a specific prescription name or a free-text search for all drugs that include your search text. In testing, PCC found better results with the “free text” option.

Enter Provider or Date Range Criteria
Select primary care physicians or other care providers, and indicate a date range for when the drug was active. For most situations, you should search for all providers for a wide date range.
Click “Create Report” to view the results.

Active or Inactive?: The Drug Report looks for prescriptions that were active within a certain date range, or within the past 30 days, 6 months, etc. Since all Auvi-Q injectors are being recalled, regardless of whether the prescription is active, you may want to use a range that extends back to 2012, for example, when Auvi-Q was first approved.
Review Results, Run a New Search
PCC eRx will display all prescriptions that match the search text and the criteria options. After you review the result, you may want to re-run the Drug Report using a different search term (“epinephrine”, etc.) or criteria.

Contact PCC Support for help with the Drug Report or other features in PCC eRx.
Chart Amendment Requests
If a patient or family requests that you amend information in their chart, you can now record that amendment request.
For example, if a family objects to a diagnosis in the patient’s chart, you can create an amendment request on the visit for that day.
While viewing a chart note (or phone note or message task), select “Add Amendment Request” from the Edit menu.

Amendment requests appear similar to labs or other orders. You can enter request details and notes, and you can assign the request to a physician or other user for review.
The assigned user can complete the amendment request task from their Messaging queue. When they double-click on the task, the patient’s chart will open and scroll directly to the amendment request.

As you edit an amendment request, you can add a Decision Note and accept, deny, or cancel the request.
The history of the request will remain on the chart note (or wherever the request was added). Later, you can review amendment requests in the Visit History section of the patient’s chart.
Where Can I Create an Amendment Request?: You can create an amendment request on any visit chart note, on a phone note, on order and elab follow-up tasks, and on patient portal messages. You can create a request on a visit even before it is arrived.
Enter and Review Encounter Billing Notes
As you bill for an encounter or troubleshoot problems with a claim, you can keep encounter-specific notes that are attached to the billing history of the encounter.
Watch a Video: You can watch a video to learn how to work with account notes and encounter billing notes in PCC EHR.
While most commonly used while troubleshooting a billing issue, your front desk can use the Encounter Billing Notes component to enter notes before the encounter even occurs.

When posting charges, your biller can add a new note or a follow-up note.

Later, when working on claim issues or another billing problem, you can review encounter billing notes in the Billing History section of the patient’s chart.

Click “Edit Charges” to add new encounter billing notes to the encounter.

Encounter-Specific Billing Notes or General Account Notes?: In addition to Encounter Billing Notes, your practice can also use Account Notes to track ongoing concerns with a family. Encounter Billing Notes are specific to an encounter, Account Notes are not.
Encounter Billing Notes are associated with a particular encounter, for a particular patient. You can add additional notes and followup notes and they will all be associated with all charges for that patient’s encounter. If two patient accounts are merged, or charge information changes in some other way, notes will follow the encounter with which they are associated.
Summary of Care Record Report
The Summary of Care Record report produces a C-CDA-formatted chart summary for a patient.
Your practice can use the report as a transition of care document. Optionally, if your practice uses Direct Secure Messaging, you can transmit the report to another clinician or practice. See what data can be included C-CDA documents.
Generate the Summary of Care Record Report
When you need to create a Summary of Care, select “Summary of Care Record” from the Reports menu.

On the report’s criteria screen, you can indicate whether or not you are creating the record for a referral or transition of care.

Use the options on the screen to print or save the record as a PDF or C-CDA document.
Transition of Care For Meaningful Use: If you have indicated that the record is being created for a referral or transition of care, PCC EHR will track that you have generated the C-CDA document and it will update your Meaningful Use reporting totals.
Output Summary of Care Record for Specific Encounter
When you generate a Summary of Care Record for a referral, you can select a specific referral and optionally limit the output to information from that referral encounter.
First, choose the specific referral order from the selection pull-down menu.

By default, the referral Summary of Care Record will limit procedures, orders, and vitals noted for that given encounter date. (The output also includes the patient’s Problem List and other chart information not specific to a particular encounter.)
Optionally, you can deselect the “Limit to referral encounter” check box, and the Summary of Care report will generate the patient’s complete C-CDA with all available patient information.
The Summary of Care report output includes the patient’s insurance policy information, making it a good solution for referrals.

Transmit a C-CDA Transition of Care Document Using Direct Secure Messaging
If your practice uses Direct Secure Messaging, and you have a Direct Address configured for your user account, you can transmit a Summary of Care Record directly to another Direct Secure Messaging user, such as a specialist for a referral or another pediatric practice.
Select “Send via Direct Secure Message” and fill out the fields for the message.

For a step-by-step guide to sending a Direct Secure Message, read Send and Receive Direct Secure Messages.
Patient Portal Messages vs. Direct Secure Messaging: The patient portal and PCC EHR support two different messaging technologies. Portal messages are a secure, optional messaging tool built into the patient portal. Patient portal users can exchange messages with their pediatric practice, and the practice can receive and send portal messages with PCC EHR or pocketPCC. Direct Secure Messaging, on the other hand, is a specialized message technology used to share and send medical information. It requires registration with a third-party service and it allows for secure transmission of C-CDA transition of care documents or visit summaries. For more information, refer to Receive and Respond to Portal Messages or Direct Secure Messaging.
Customize Your Summary of Care (C-CDA) for Referrals
The Summary of Care (C-CDA) is configurable; instead of sending a full C-CDA to other care providers, you can select exactly which sections of the C-CDA to include.
Select which sections to include or omit by using the Summary of Care Record Configuration tool.

Practice-Wide Settings: The settings in the Summary of Care Record Configuration tool will apply to all EHR users.
When you run the Summary of Care Record report, it will only include the sections your practice has chosen.

Permission to use the Summary of Care Record Configuration tool is role-based.

Get Started with Direct Secure Messaging
Direct Secure Messaging, available in PCC EHR, is a communication technology used to exchange private medical information. Direct Secure Messaging requires special registration and unique addresses that are similar to, but not the same as, email.
Watch the Video: Watch Get Started with Direct Secure Messaging to learn how to configure your PCC system to send, receive, and reconcile direct secure messages.
If your practice activates Direct Secure Messaging and you register clinical users, you can:
- Send a direct secure message containing a Summary of Care (also called a Transition of Care) document to another medical practice
- Receive direct secure messages from other medical practices and add the information they contain to a patient’s chart
- Allow your patient and families to send a visit summary directly from the patient portal to another medical practice using a direct secure message
Patient Portal Messages vs. Direct Secure Messaging: The patient portal and PCC EHR support two different messaging technologies. Portal messages are a secure, optional messaging tool built into the patient portal. Patient portal users can exchange messages with their pediatric practice, and the practice can receive and send portal messages with PCC EHR or pocketPCC. Direct Secure Messaging, on the other hand, is a specialized message technology used to share and send medical information. It requires registration with a third-party service and it allows for secure transmission of C-CDA transition of care documents or visit summaries. For more information, refer to Receive and Respond to Portal Messages or Direct Secure Messaging.
Activate Direct Secure Messaging For Your Practice
When you are ready to activate Direct Secure Messaging for your practice, contact PCC Support. We will create your practice’s Direct Secure Messaging connection. PCC partners with Updox to manage the back-end of the service.
Create Direct Secure Messaging Accounts for Users
After Direct Secure Messaging is turned on for your practice, create a Direct Secure Messaging account for any user who needs to be able to send and receive direct secure messages.
Open User Administration
Open the User Administration tool from the Tools menu in PCC EHR.
Create a Direct Secure Messaging Account
Edit the user’s account, click on the “Direct Secure Messaging” tab, and create a Direct Secure Messaging account.

Who Needs a Direct Secure Messaging Account?: Users only need a Direct Secure Messaging account in order to send and receive direct secure messages. Other operations, such as matching inbound messages to the right patients, reconciling the contents of inbound messages to patient charts, or deleting inbound messages, may be performed by any user who has the relevant role permissions in PCC EHR. No Direct Secure Messaging account is required to perform these actions.
View and Manage the User’s Direct Secure Message Account
After you create the account, you can see the user’s Direct Secure Messaging address as well as options to deactivate their account or set directory preferences.

Users Can Look Up Their Own Direct Secure Message Address
Users with Direct Secure Messaging accounts may look up their own addresses in the My Account tool under the File menu in PCC EHR.

Users can share their Direct Secure Messaging address with patients or other medical practices for the purpose of receiving transition of care documents.
Register Your Practice with the DirectTrust Network
Once your practice’s Direct Secure Messaging service is enabled, users with accounts can send direct secure messages to individuals in other organizations who also have a Direct Secure Messaging address.
As with an email address, if you know the Direct Secure Messaging address of another individual you can send them a message. If you do not know whether your recipient has a Direct Secure Messaging address or what their address is, you can search for them by name or organization in one of several directories.
Updox maintains a directory of individuals and organizations who use their Direct Secure Messaging service. From the moment your practice activates Direct Secure Messaging, users with accounts can search the directory for the Direct Secure Messaging addresses of other members.
Updox also offers the option to register for the DirectTrust Network. The DirectTrust Network grants access to a directory of Direct Secure Messaging addresses far beyond Updox’s network. Members of the DirectTrust Network can look up each others’ Direct Secure Messaging addresses.
In order to register with the DirectTrust Network, one Direct Secure Messaging user at your practice must undergo identity verification and register to serve as your practice’s legal representative. Only one Direct Secure Messaging user at your practice needs to complete the registration with the DirectTrust Network.
To register, the designated user opens the My Account tool in PCC EHR and clicks on the blue link below their Direct Secure Messaging address.

The link redirects to a registration form on Updox’s website.

The user completes the registration steps on the Updox website. They will need to enter identifying information and answer demographic questions to verify their identity.
Once the process is complete, you will see the result in the User Administration tool, or in the My Account tool.

Once one user on your system has registered your practice with the DirectTrust Network, all Direct Secure Message users will have access to the Direct Secure Messaging trust network.
What to Do When the Authorized Representative Leaves Your Practice: When you disable a user account in PCC EHR, it also disables their Direct Secure Messaging account. If you disable the account of your authorized representative, PCC EHR will send a message to Updox, the third-party vendor that manages Direct Secure Messaging accounts. Your practice will lose access to the DirectTrust Network until you register a new authorized representative. To register a new authorized representative, contact PCC Support with the name of the person you would like to designate.
Configure Users to Work with Inbound Messages
Users with the right role permissions can work with inbound direct secure messages in PCC EHR. These users do not need a Direct Secure Messaging account.
With the right role permissions, users in PCC EHR can match inbound messages to the correct patient, reconcile clinical data from inbound messages to patient charts, and, in exceptional cases, delete inbound messages. Each operation is controlled by a separate permission in the User Administration tool.

The Messaging Queue permission gives users access to the Messaging queue in PCC EHR, where they can match inbound messages to the correct patient. The Reconciliation permission gives users the ability to reconcile clinical data from inbound messages to patient charts. The Direct Secure Message Removal permission gives users the ability to delete inbound messages from the Messaging queue in PCC EHR. Deletion is an irreversible action that should only be taken under special circumstances, such as when you receive a message for a patient who does not belong to your practice.
You can add the above permissions to existing roles or create new roles dedicated to Direct Secure Messaging. To learn more about creating and assigning user roles in PCC EHR, read Set User Roles for Permissions and Security.
Send a Direct Secure Message with a Summary of Care Record
You can use Direct Secure Messaging to send a message and a Summary of Care Record to a specialist for a referral or to another clinician as part of a transition of care.
For more information, read the Send and Receive Direct Secure Messages help article.
Receive a Direct Secure Message and Add It to a Patient’s Chart
To learn how to receive a Direct Secure Message in PCC EHR, as well as how to add it to a patient’s chart, work with the message and import medical data, read Send and Receive Direct Secure Messages.
Customize Your Practice’s Direct Secure Message Protocol
When you work with Direct Secure Messages in PCC EHR, you can use a custom protocol that includes components that will help you respond to the information in the message and take action.
Your practice can customize the Direct Secure Message protocol in the Protocol Configuration tool. For example, you may want to add the patient’s Problem List, History, or Upcoming Appointments components to assist your workflow when you read and evaluate a Direct Secure Message.

For information about protocols in PCC EHR, you can read about Protocol Configuration.
Patients and Families Can Send Direct Secure Messages in MyKidsChart, the Patient Portal
Once your practice has activated Direct Secure Messaging, your patients and families can use the patient portal to send their own visit summary directly to other physicians and medical practices.

To learn more, read Send and Receive Direct Secure Messages.
PCC Community: The Home of PCCTalk
PCC Community is an online forum and email listserv for users of PCC’s pediatric software. By connecting to PCC Community, you can join discussions about issues facing pediatric practices as well as PCC’s software and services.
You can access PCC Community and PCCTalk through a website or through your email inbox, accessing the information and community discussion you value in the format that works best for you.
Watch a Video: You can watch a complete video introduction to PCC Community and PCC Talk.

PCC Community has multiple categories, with PCCTalk being the main category for discussions among the practices that use PCC. We also have categories for PCC News and PCCTalk Archives (a collection of posts from our former platform).
This FAQ will help you get started with the PCC Community forum.
Frequently Asked Questions
-
How do I access PCCTalk and PCC Community?
Visit https://community.pcc.com to login to PCC Community.
-
Can I use PCCTalk without logging into the PCC Community website?
No problem! Once you are a member of PCC Community, you can send an email to: pcc+talk@discoursemail.com. When you create a new post or reply to a post someone else made, your message will post in the PCCTalk category of PCC Community.
-
How do I sign up to become a member?
You can join the PCC Community and PCCTalk anytime by filling out the form at: https://www.pcc.com/talk/.

2018 Accounts From PCCTalk to PCC Community: If you are a current PCCTalk member on May 7th, 2018, you will automatically receive an invitation from us to join PCC Community. If you sign up by May 6th, you will be included in our automatic invitation on May 7th. If you want to join PCC Community after that date, or you never received an automatic invite, simply fill out the online form and we’ll send you an invitation.
-
I signed up, now what? Respond to your invitation to join PCC Community!
You’ll first receive an invitation email asking you to join PCC Community.

Click the link in the email to open a Web browser where you can enter your new username and full name, and create a password. After you fill out the fields, click “Accept Invitation”.

Important--Sign Up, and Confirm: Next, return to your email. You’ll get a second email message where you can confirm and activate your account. For your membership to be fully complete, you need to open the second email message from PCC Community and click the link to Confirm and Activate your new account. Once you do that, you’ll be taken to the PCC Community home page and can start exploring. (Note: if you fail to take action on the second email to confirm and activate your account, you will not be allowed to login again. When you accept the invitation in the first email, it allows you to access PCC Community right away, but that is the only instance of access allowed. Leaving and trying to access it a second time requires action on the second email).

-
How do I adjust my email settings and other user preferences?
From the PCC Community home page, click on the circle with your initial (or profile image) in the upper-right corner of the screen. Then click on the “person” icon to see options for your account. Click on Preferences (with the ‘gear’ icon) to see account preferences.

-
Account Settings: The first screen you’re brought to is your Account screen. This is where you can send yourself a Password Reset email if you want to change your password. Scroll to the bottom and you’ll see where you can upload or change your Profile Picture. If you don’t want a profile picture, the image will just display with your first initial. Don’t forget to ‘Save Changes’ when you’re done.
-
Profile Settings: These settings are completely optional, but if you want you can add an ‘About me’, your ‘Location’ and the URL of your practice’s website. Click ‘Save Changes’ when you’re done.
-
Email Settings: By default, PCC Community is set up with Mailing List Mode enabled. That means you will receive an email per post for any posts made in the PCCTalk or PCC News Categories.

Mailing list mode is a great way to ensure you get important PCC-specific news delivered right to your inbox. However, if you do not want an email for every new post, uncheck the box next to ‘Enable mailing list mode’. From there, go to the Activity Summary section above Mailing List mode, and check the box next to ‘When I don’t visit here, send me an email summary of popular topics and replies’. The default setting in the dropdown is daily, but you have many options for how often you’d like to receive an Activity Summary of posts.
Click the dropdown menu to choose from: every 30 minutes, hourly, daily, every three days, weekly, or every two weeks. Note that you will only receive a digest if you do not visit the PCC Community website. If you visit the site, the time of your visit will reset, and you will receive another Activity Summary when the interval has elapsed.
You cannot have Mailing List mode and Activity Summary mode both enabled at the same time (you cannot receive an email per post AND a digest of all posts). You must choose one or the other. If you want to use PCC Community primarily as a listserv, you’re all set – an email per post is the default and you do not need to adjust any settings. Make sure to click ‘Save Changes’ if you make any adjustments to settings here.
-
Notification Settings: This is where you can turn on desktop notifications, allow other users to send you personal messages, and more. For example, you could create an email notification whenever there is a new PCC News topic.
-
Categories Settings: A subtopic of the Notification Settings. You can do things like enter certain topics you want to track in specific categories.
-
Interface Settings: This is where you can customize how your PCC Community interface looks. The Default theme is a white background, but you can change it to ‘Dark’ in the dropdown if you want a black background. The default Home Page is Categories (and when we refer to the ‘Home Page throughout this guide, we are referring to the Categories page). If you want, you can choose Latest from the dropdown, and then your PCC Community homepage will show all the latest posts from all the categories combined. There are a few other settings under Other that you can enable or disable as you like. Don’t forget to save changes.
-
-
Can I Redirect PCC Community Messages to a Different Email Address?You may have signed up for PCC Community using your PCC email, but want to read messages and get notifications at a different address. Click on your profile initial or picture, select the person icon, and visit Preferences.

From there, you can click on the wrench icon to change your email, or add other email addresses.

-
Can I Change My Emails So They Include the Whole Conversation?By default, PCC Community will send you all announcements and PCCTalk discussions. However, they only include the most recent reply in a conversation thread. If you would like to see the entire conversation thread, you can adjust your “Include previous replies…” setting in your Email preferences.
-
How do I navigate around the PCC Community website?At any time, you can click the PCC Logo in the upper-left of the screen to return to the main page of PCC Community. You can also use the “hamburger” menu just to the left of your profile in the upper-right corner of the screen to access Categories, Popular topics, and other sections.
-
Help me get oriented on the Home Page of PCC CommunityThe default home page for PCC Community is the Categories page. On this page, you’ll see a Welcome Banner at the top, providing you with some quick tips on getting started. If you’re all set with the info in it, you can get rid of the banner by clicking the X on its upper right corner. This will streamline the look of your homepage. Important: once you get rid of the Welcome Banner you can’t get it back, so only close it if you are certain you don’t need future access to the information it provides.

Currently, the Categories page has 3 categories: PCCTalk, PCC News, and PCCTalk Archives. You’ll see a description of each category below its title. Click on the title of any category to see all the posts in that category. The most current posts are at the top of each category.
Also on the homepage, next to the red ‘Categories’ tab, you’ll see a ‘Latest’ tab. Clicking on that tab brings you to a collection of all posts from all categories, with the most recent posts at the top.
You can also access a specific category by choosing from the drop-down menu to the left of the red ‘Categories’ tab.
-
How do I read posts from PCCTalk and PCC Community?
If you receive PCC Community messages in mailing list mode, then each post will arrive in your email. If you instead subscribe to an Activity Summary, you’ll get periodic emails showing you recent topics.
On the PCC Community website, you can click on a specific category (PCC Talk or PCC News) or on the ‘Latest’ tab to read posts. Click on any post to read the full conversation thread.
-
How do I create a new conversation on PCCTalk?
Once you are a member of PCC Community, you can send an email to: pcc+talk@discoursemail.com. Your message will post in the PCCTalk category of PCC Community.
Or, on the website, you can click “New Topic” in the upper-right corner of the screen to create a new post.
After you click “New Topic”, you’ll see a message composition box where you can create your post. Create a title for your post. The default category is PCCTalk, which is the only category you can create posts for (the other categories are read-only), so there is no need to change it.
As you type the body of your post, a preview of the post will appear in the right hand side of the composition box. That will show you exactly how your post will appear once you publish it. For example, if you wanted to include an emoji in your post by typing it out with words (:grin:), it would appear with the written words where you are typing, but the actual emoji would appear in the preview.
Speaking of emojis, if you don’t want to type them yourself, you can click on the emoji button on the toolbar of the composition box and click on the emoji you want to add. Again, you will see it appear as text in your left hand composition screen, and as the actual emoji in the right hand preview screen. Once you’re done writing, click the blue “Create Topic” button to publish your post to the PCCTalk category.
Mention a Specific Member: If you want to mention a specific member of the forum in your post (so that they’ll be notified that they were mentioned in a post), you can use the “@” symbol in front of their username. For example, you could say, “@Chip can you tell me the dates of the next UC?” Making a post that way would alert Chip that he was mentioned in a post, rather than making a post and waiting or hoping for him to see it. You can review your own direct-mention notifications by clicking on your profile, selecting the Preferences gear, and then clicking Notifications from the menu on the top of the screen. (Note: that same screen will also give you notifications about responses to posts and likes people gave you.)
-
How do I respond or reply to a conversation on PCCTalk?
If you receive PCC Community messages in your email, you can reply to any message thread directly to join the conversation.
On the PCC Community website, click on the post to open it and then click the blue ‘Reply’ button at the bottom of the thread. That will create a new reply to the thread as a whole. If there are multiple people in the conversation, you can also click on the gray ‘Reply’ at the bottom of a specific comment to reply to that person’s comment directly. A reply to a specific person will still be viewable to all users.
-
Can I bookmark important conversations or announcements for later?
Want to easily access an interesting post later? You can bookmark an entire conversation thread by clicking the bookmark icon at the bottom menu of the thread (to the left of the blue ‘Reply’ button). Or, you can bookmark a specific comment in the thread by clicking the bookmark icon inside the comment box.
To access your bookmarked items, click your profile photo and choose the bookmark icon from the dropdown menu that appears. A list of your bookmarked items will appear. Click ‘Remove Bookmark’ next to an individual item to delete it from the list.
You can also let everyone know you ‘like’ a specific comment, or an entire thread, by clicking the heart icon under a comment or a conversation thread.
-
How do I send a direct message to other PCC Community members?
You can send a direct, private message to another user that will not be visible to other users. There are three ways to do this. The easiest is to click on your profile and choose the ‘mail’ icon from the dropdown menu. That will take you to a screen where you can see any messages people have sent you directly. Click the blue ‘New Message’ button to compose a private message to another member.
Or you can click your profile photo, choose the Preferences gear, and then choose the Messages tab from the menu on the top of the screen. This brings you to your inbox, where you can compose a new direct message, and see a list of current messages people sent to you, as well as your sent messages and archived messages.
Another way to access the direct message functionality is from the “hamburger” menu on upper right of the screen next to your profile photo. Choose ‘Users’, and then search for the member you want by scrolling or typing into the search bar. Click the name of the user you want and then click the blue ‘Message’ button.
-
Can I access PCC Community on-the-go?
Yes you can! The PCC Community forum is optimized for mobile viewing, so you’ll find it easy to interact with the platform on a mobile device. Access it the same way you would on a desktop, by going to https://community.pcc.com and entering your username and password. There is a password reset link on the login screen in case you forget or need to reset your password.
-
Can I see the most popular posts?
Yes, it’s easy to find the most popular topics. From the top-right “hamburger” menu (next to your profile photo), click ‘Top’. That brings you to a list of the top topics from all categories combined. The default setting is for the Year, but click the drop-down menu next to the date range to choose other views such as: Today, Week, Month, or Quarter. Viewing top topics is a great way to catch up on information you may have missed.
New for 2018: The top topics will be reset in May of 2018, when PCCTalk is moving to the new PCC Community website.
Still have questions or need help?
We’re here for you! Contact pccmarketing@pcc.com with any questions.
Create and Edit Phone Notes in pocketPCC
You can use pocketPCC on your mobile device or Web browser to create and edit phone notes in PCC EHR, along with tasks assigned to users. Back in PCC EHR, nurses and other users can pick up and respond to Phone Note tasks on the Messaging queue, as they would any phone note.
Create a Phone Note
To create a phone note in a patient’s chart, select ‘Add Phone Note’ from the chart menu.

Here you can add a phone note just as you would in PCC EHR.

Press the Save button to save your phone note. PCC EHR will add it to the patient’s record and return you to the patient’s Medical Summary.
Add a Task: If you want to follow up on an issue, ask your staff to schedule an appointment, or perform another action, fill out the task information in the Tasks section. The first, blank task appears automatically.
Tasks are Optional: If you have completed everything necessary for the phone note, you can leave the task blank and the phone note will be added to the patient’s Visit History with no task.
Multiple Tasks: You can press the Add Task button to create additional tasks. For example, you may need to have a nurse call the family back to schedule an appointment, but you may also want to call in a prescription for a patient or prompt another person at your practice to perform a task. Press the Add Task button for each new task.
More Information in PCC EHR: The Phone Note protocol in PCC EHR may display more information and other components than pocketPCC. The pocketPCC “Add Phone Note” tool does not display all possible components, and your practice may add additional components to the Phone Note protocol in PCC EHR.
Review and Edit Phone Notes
To review a phone note, select ‘Visit History’ from the chart menu.

You will see all chart notes, phone notes, portal messages and other encounters associated with the patient. If you want to see only phone notes, you can filter the history using the gear button.
Select the phone note you want to review, and click the Edit button to make changes or add tasks.


Changes will not be saved unless you click ‘Save’ at the bottom of the page.
Get Started in pocketPCC
With pocketPCC, you can use any web browser or mobile device to review your daily schedule, look at a patient’s medical summary or demographic information, prescribe medications, create phone notes, and more.
Read the procedure below to log in and get started.
Is Your pocketPCC Account Ready?
Before you can log in to pocketPCC, your practice’s user administrator must grant you a user role that includes pocketPCC access.
Next, you must open the My Account tool from the File menu in PCC EHR and set a security question.

If you do not see the pocketPCC security question fields, then your account does not yet have access to pocketPCC. For more information, read the Configure pocketPCC User Accounts help article.
Password Security Requirements: If you haven’t changed your password in a while, you may need to pick a new password that meets PCC EHR’s password security requirements. Common passwords (like “password”, “1234” or the user’s username or real name) are not allowed, and passwords must be at least 8 characters.
Visit Your Practice’s pocketPCC Address
Enter your practice’s pocketPCC address into a browser on your computer or your mobile device. Contact your office’s system administrator or PCC Support if you do not know your address. Typically, your pocketPCC login address will be your practice’s acronym (ACRO) followed by pocketpcc, and it will always use the https secure protocol: “https://ACRO.pcc.com/pocketpcc”. In this example, our practice’s ACRO=bedrockpeds, so the url is “https://bedrockpeds.pcc.com/pocketpcc”. If you are not sure what your practice’s acronym is, contact PCC support.
Bookmark pocketPCC or Add it To Your Home Screen: You can add pocketPCC to your home screen, or bookmark the URL for quick access later. Follow these instructions to add pocketPCC to your home screen.

Log In
Enter your username and password on the login screen.

Your pocketPCC username and password are the same as your PCC EHR username and password.
First Time On This Device? Enter Your Security Question
If this is the first time you have logged in on this browser or device, you must answer your security question.

Two Month Security Check: pocketPCC will ask you to verify your security question every two months, on each device.
Private Browsing: Private or Incognito browsing mode prevents pocketPCC from retaining the answer to your security question. If you typically use Private or Incognito browsing, you’ll need to answer your security question every time you log in.
Enable Cookies: PocketPCC uses cookies to keep you logged in. If you have trouble logging in, or find yourself being logged out frequently, ensure that your phone’s browser accepts cookies.
Start Using pocketPCC
Once you’ve logged into pocketPCC, pick a provider (such as yourself) to see the schedule.


pocketPCC Remembers You: Once you have selected the clinician you wish to see, such as yourself, pocketPCC will remember and display that clinician each time you log in on the same device. You can change it at any time.
Open a Chart
Select any patient to open their chart.

For more examples of what you can do in pocketPCC, check out the help articles below.
Log Out
Select “Sign Out” from the pocketPCC Menu to log out.
Automatic Sign Out: pocketPCC will automatically log you out after 15 minutes of inactivity.
Set Up and Configure pocketPCC User Accounts
Follow the procedure below to set up pocketPCC user accounts at your practice.
Is pocketPCC Activated For Your Practice?
Contact PCC Support when you are ready to use pocketPCC at your practice. We’ll turn on the service on your system.
Set pocketPCC Session Timeout
When pocketPCC is enabled for your practice, you can configure how long an unused pocketPCC session will remain open.
Open the Practice Preferences window from PCC EHR’s Configuration menu.

Select one of the six timeout lengths and click save. When any user leaves pocketPCC unused for more than the selected period of time, it will automatically log out. Any action in pocketPCC, even scrolling or typing, will prevent a user from being logged out.
Give pocketPCC Permission to a User Role
In PCC EHR, all access permissions are controlled by user roles. To activate pocketPCC access for users at your practice, first grant the right to a user role, such as a physician or clinician role.


Optionally, Create a New Role: If you want more granular control of which users have pocketPCC access, you could create a new role that includes only pocketPCC access. Read the Set User Roles help article to learn more about user roles.
Review and Assign Role to Users
After you make pocketPCC access available to a user role, edit user accounts who should have access to pocketPCC and grant them that role. For example, you may need to assign the clinician role to each clinician at your practice.
On the Users tab of the User Administration tool, open the user and visit their Settings tab.

Click on the user role that grants them pocketPCC access. If you have created a “pocketPCC” role, you can grant each appropriate user that role.
Create a Security Question
Before they can log in to pocketPCC, each pocketPCC user must create a security question.
Each user can open the My Account tool from the Tools menu.

Next, they can use the pull-down menu to define their security question and answer.
How Will My Security Question Be Used?: pocketPCC will ask the user the security question the first time they log in to pocketPCC with a new device.
Password Security Requirements: If the user has not changed their password in a while, they may need to pick a new password that meets PCC EHR’s password security requirements. Common passwords (like “password”, “1234” or the user’s username or real name) are not allowed, and passwords must be at least 8 characters.
Log In to pocketPCC
After setting a security question, each user can log in to pocketPCC on a web browser or mobile device and get started!
For more information, read the Get Started in pocketPCC help article.
Take a Screenshot
Follow the instructions below to create a screenshot.
Use this guide if you need to quickly share an image of a PCC product or service with a PCC Support member.
Avoid Capturing PHI: When you are trying to illustrate something you are seeing on your screen, be careful not to include any patient identifiers (such as names, dates of services, or ID numbers) in your screenshot.
Windows 7 Screenshots
Open the Snipping Tool
Click on the Start button and type “Snip” into the search box. Then click “Snipping Tool”.

Snip an Image
Click and drag to select a portion of your screen. You can also click “New” and click and drag to take another screenshot.
Share
After you snip an image, you can immediately paste that image into an e-mail or another program. Click on the File menu and select Paste.
You can also click the floppy disk icon, “Save Snip”, and follow the onscreen instructions to save the image as a file on your computer. Then you can attach that image to an e-mail or transfer it another program.
Macintosh OSX Screenshots
Press command-shift-4
Hold down the command key and the shift key, and then press 4. (On some keyboards, the command key contains a square squiggle or an apple symbol.)
Select Your Screenshot
Click and drag the area you wish to capture.
Share
Your image will be saved to your desktop. You can open it in preview or an image editor program, or attach it to an e-mail.
Note: In addition to command-shift-4, you can also press command-shift-3 to capture the entire screen.
Linux Terminal Workstations (Gnome, KDE, Most Other Linux Operating Systems)
Select Your Window
Click to select the window that you wish to capture.
Press Alt-Print Screen
On your keyboard, hold down the Alt key and press the Print Screen key. On some keyboards, the Alt key may be the option key, and the Print Screen key may read “PrtScn” or similar.
Choose Where to Save the Image
Use the dialog box to choose where to save the file.
Share
Linux will save your image. You can open it in an image editor program or attach it to an e-mail.
iOS Device (iPhone, iPad)
Hold Home and Press Sleep/Wake
Press and hold the home button and then immediately press your device’s Sleep/Wake button.
Note: The Home button is a central button on the front of your device, the Sleep/Wake button is on the top of the device.
Wait for Click Sound or Flash
After one second, the iOS will capture a screenshot. It will indicate the image was taken with a click sound or a flash. You can release the two buttons.
Share
iOS saves your image into the Camera Roll on your device, inside the Photos app. You can open the Photos app and share the image, composing a new e-mail message or posting it somewhere else.
Android Device
Screenshots for an Android smart phone do not all work in the same way. Here are the instructions for a 2012 or later Android 4.0 phone.
Hold Volume Down and Press Power
Press and hold the Volume Down button and then immediately press your device’s Power button.
Note: The Home button is a central button on the front of your device, the Sleep/Wake button is on the top of the device.
Wait for Screen Flash
Within a couple seconds, the screen will flash and you can release the buttons.
Share
Android saves your image into the Gallery on your device. You can open the Gallery and share the image, composing a new e-mail message or posting it somewhere else.
Find and Open a Patient Chart
The sections below describe the many tools for finding and opening a chart, once you have logged in to PCC EHR.
Open a Chart, Overview
Select a Patient From the Appointment List
Use the Schedule screen to find a patient you wish to review. You can use the calendar to pick a different day and use the Provider or Location drop-down menus to limit which appointments appear.

You can also find a patient on the Visit Tasks, Phone Tasks, or Signing Queue and then click “Open Chart”.
Alternative: Open a Recently Opened Chart
If you have opened a chart previously, you can start typing or use the pull-down arrow in the Find field to open a recently opened chart.

Alternative: Search for a Patient
You can find a patient by entering part of their name, their phone number, or their birthdate in the search box. Then press Enter or click “Find”. Inactive patients will not appear in patient finder results unless “Include inactive patients” is checked.

Search Tips: You can enter a patient’s date of birth with either a 2-digit or 4-digit year (01/15/99 or 01/15/1999), and you can include slashes (/) or not (01151999). For phone numbers, enter seven or ten digits with any formatting (800-722-1082, or 8007221082). You can also search by patient PCC number by preceding a number with “pcc” or “patient”. For more information, read Search for Patients and Accounts in PCC EHR.
Double-Click on Patient Name or Select and Click “Open”
To open a chart, either double-click on the patient’s name or select them and click the “Open” button at the bottom of the screen.

Review Chart
Use the navigation buttons on the left-hand side of the screen to review sections of the chart or chart a visit.

Tips for Searching for a Patient
You can search for charts by name, birth date, phone number, patient PCC number, or any of the custom patient fields that your practice has assigned a search key word.
To learn about all the different search options, read Search for Patients and Accounts in PCC EHR.
Concurrent Access: Can Two People Read a Chart at the Same Time?
Different users can access and add information to a patient’s chart at the same time. However, a single user can not open the same chart twice at the same time.

If you log into PCC EHR on two different computers and attempt to open the same chart a second time, PCC EHR will prompt you to save your changes and close the chart elsewhere, discard any changes, or cancel and leave the chart open on your other login or screen.
Set User Roles for Permissions and Security
You can use the User Administration tool to define permissions for the PCC EHR users at your practice. First, run the User Administration tool to define user roles. Then, assign one or more roles to each user account. Read below to learn more.
All Permissions: For a complete reference to all available Permission settings in a Role, jump to the Permissions Reference below.
Open the User Administration Tool
To get started, run User Administration from the “Tools” menu.

Review Who Has Each User Role
You can see which users have each role on the Users tab of the User Administration tool.

Users can have more than one role. They will have all permissions designated by each of their roles.
Disabled Users: Even disabled users, such as those who have left your practice, may have roles assigned. If you wish to delete an unneeded role, open those old user accounts and remove the role.
Define or Edit User Roles
Click on the Roles tab to review and edit your practice’s list of user roles.

You can see the description of each role and the number of users assigned that role.
Double-click on a role to review what permissions it includes or change the name.

You can evaluate and design user roles that work with your practice’s needs. Keep in mind that users can have more than one role, so you can design around access needs as well as job title. You might have a Office Administration role with permissions for all functions, and a Physician role that grants access to just those features a physician would need, for example.
See the Permissions Reference below to learn more about the different permissions available.
Delete Unneeded Roles: After updating and consolidating the different permissions in each role, you may find you no longer need a role. You can delete any role that has no assigned users.
Assign Roles to Users
When you want to assign or remove a role from a user, open the User Administration tool and double-click on the user.

Next, click on the Role Assignment tab and select one or more user roles.

The gray window below the drop-down menu will display the permissions the user will have based on the roles that you select.
User roles make it easy to assign a set of permissions to a new user, or redefine the role of each staff member at your practice. Additionally, user roles make other features in PCC EHR more powerful.
What About eRx Roles?
Prescriber and eRx administration tools are set inside each user’s account. They are not defined by a PCC EHR role. For more information, read the Set Up PCC eRx User Access article.
Permissions Reference
Read the descriptions below to learn about each of the account role permissions in PCC EHR. To grant a user any of the permissions listed below, first add it to a user role. Then, assign that role to a user.
Changes at Login: Remember that any changes to user settings take place the next time that a user logs in. If you disable an account or grant access to a tool, your changes will not take effect immediately if the user is logged in when you make the change.
Appointment Book
Practices who use the Appointment Book with PCC EHR will see these permissions.
Users with the Appointment Book permission may open the Appointment Book from the PCC File menu or the Appointment Book icon found in the lower-left corner of the PCC EHR interface. On the Appointment Book, they can schedule appointments for providers.
-
Blocks: Users with blocking permission can add blocks to a provider’s schedule to indicate that they should not have any appointments scheduled during that period of time.
-
Force Appointment: Users with permission to force appointments are able to overbook the schedule, and may also override another user’s hold on a time slot.
-
Provider Hours: Users with Provider Hours permission may use the Provider Hours tool to configure and assign templates to each provider’s calendar, including optional color-coded visit type guidance.
-
Visit Reason Editor: Users with this permission may use the Visit Reason Editor to create and work with visit reasons, set visit reason durations by provider, and select the practice’s default visit reason.
Auto-Notes Configuration
PCC EHR can automatically fill out notes for radio line selections. For example, when you check “Normal” for items in a Physical Exam, PCC EHR can pop-in your personal notes for what “Normal” means for you in the notes field. The Auto-Notes configuration permission determines whether or not a user may edit Auto-Notes.
-
(basic user access): By default, all users can configure their own Auto-Notes, either by right-clicking on a note or by opening the Auto-Notes Configuration tool in the Tools menu.
-
Practice Defaults Configuration: Users with permission to edit the practice defaults can select the “Practice” user inside the Auto-Notes Configuration tool and enter the Auto-Notes for the practice.
-
Configuration of All Users: Users with “All Users” permission may run the Auto-Notes Configuration tool and review and edit Auto-Notes for any user. If a provider asked an assistant to type up all of their charting notes, that assistant would need this permission.
Billing Configuration
Users with the Billing Configuration permission may open the Billing Configuration tool. In that tool, they can customize which procedure billing codes are triggered by each order, define which ICD-10 billing code will be used by default for each SNOMED-CT diagnosis description, and what diagnoses and procedures will appear for easy selection on the Bill screen in PCC EHR.
Read the Configure Procedure and Diagnoses Billing help article to learn more.
Bills
Users with the Bills permission may open the Bills tool, generate personal bills, review the log of bill runs, review the contents of any bill, and change your practice’s custom messages that appear on bills. Read Generate Personal Bills to learn more.
C-CDA Batch Export Tool
Users with this permission can export large batches of patient data from PCC EHR using the C-CDA Batch Export Tool.
Charted Visit Deletion
Users with the Charted Visit Deletion permission may delete charted visits (after the appointment has been canceled or deleted). To learn how, read the Delete a Visit from a Patient’s Chart article.
Chart Export
Users with the Chart Export permission may export a patient’s whole chart in just a few clicks. Learn how.
Stop and Think Before You Assign: The patient chart export exposes all of the Protected Health Information (PHI) stored in your system for a particular patient. This information is protected by law and sharing it inappropriately may harm the patient, their caregivers, you, and your practice. Before you update a role with the chart export permission, consider whether this permission is appropriate for all users with that role.
Claims
Users with the Claims permission may open the Claims tool, process and submit claims, view the list of claims that can not be submitted and need a correction, and view the logs of all claim submissions including which claims were delayed, held, or routed to paper for printing.
Claim Holds
Users with the Claim Holds permission may visit the Claim Holds tab of the Claims tool and define criteria that will prevent claims from being submitted.
Delay
Users with the Delay permission may visit the Claim Delay tab of the Claims tool and define how many days after the date of service claims will be blocked from being processed and submitted.
Clinical Alerts Editor
Users with the Clinical Alerts Editor permission may open the Clinical Alerts tool and define PCC EHR alerts. Clinical Alerts include alerts for scheduling, billing, and other functions, not just those of a clinical nature.
Combine Accounts and Patients
Users with Combine Accounts and Patients permission can combine two duplicate patients, or two duplicate accounts into a single patient or single account. Merging two patients or two accounts permanently combines all available data and cannot be undone.
Read the Merge Duplicate Patients and Accounts help article to learn more.
Diagnosis Configuration
Users with the Diagnosis Configuration permission may access the Diagnosis Configuration tool in the Tools menu.
They can use that tool to edit the practice’s list of Allergy and Favorite diagnosis from the master list of SNOMED-CT descriptions, as well as map the descriptions to an appropriate ICD-9 (before October 2014) or ICD-10 (after October 2014) billing code. You can also use the Diagnosis Configuration tool to determine which diagnoses should be hidden or “locked” by default, and to retroactively hide all instances of a diagnosis in all chart history.
Read the Diagnosis Configuration help article to learn more.
Direct Secure Message Removal
Users with the Direct Secure Message Removal permission may delete incoming Direct Secure Messages. Read the Direct Secure Messaging help article to learn more.
Document Administration
Users with the Document Administration permission may open the Document Administration Tool in the Tools menu. They may then add, edit, or delete document categories, configure document file sources, and set a default document category for saved Patient Education handouts.
Only users who need to change the way that PCC EHR stores and categorizes documents should have this permission.
For more information, read the Document and Scanning Configuration help article.
E-lab Results Queue and Deletion
Users with the E-Lab Results queue permission will have an additional queue in PCC EHR, “E-Lab Results” which they can use to review incoming e-lab results and then place them in a patient’s chart. Optionally, users may have the E-Lab Result Deletion permission. Those users can handle special circumstances where a result can not be placed in a chart and should be destroyed.
For more information, read the Import E-lab Test Results help article.
E-lab Result Unlinking
Users with the E-Lab Results Unlinking permission may access the Unlink E-labs tool in the Tools menu in PCC EHR. The Unlink E-labs tool allows users to unlink e-lab results attached to the wrong patient or encounter and return them to the E-lab Results Queue.
For more information, read the Unlink E-lab Results from a Patient or Encounter.
Electronic Remittance Advice
Users with the Electronic Remittance Advice permission may open the Electronic Remittance Advice tool in PCC EHR and view responses to claims from payers. Read Read ERA 835s From Payors to learn more.
Process and Delete ERA Files
Users with the Process and Delete ERA Files permission may open the Electronic Remittance Advice and process incoming adjudications from payors and delete an ERA sent to your practice in error. Read Read ERA 835s From Payors and Post Insurance Payments to learn more.
Emergency Access
Users with the Emergency Access permission may turn on Emergency Access, an item in the File menu, which grants access to all PCC EHR features and security levels.
Forms Configuration, Delete Form, and Signature Image Configuration
The Forms Configuration, Delete Form, and Signature Image Configuration permissions appear in User Administration as soon as the Forms tool is enabled, either in Configuration Mode or live. Users with the Forms Configuration permission may access the Forms Configuration tool in PCC EHR and create, manage, and edit forms therein.
The Delete Form permission is an extra layer on top of Forms Configuration that allows users to delete forms from the Forms Configuration tool, and therefore your PCC system.
The Signature Image Configuration permission is another layer that allows users to upload, delete, and manage permissions of provider signatures used on forms generated in PCC EHR.
For more information about what users can do with the Forms Configuration, Delete Forms, and Signature Image Configuration permissions, read Configure Forms in PCC EHR.
Growth Chart Configuration
Users with the Growth Chart Configuration permission may open the Growth Chart Configuration tool and make changes to which growth charts appear in PCC EHR.
For more information, read the Configure Growth Charts help article.
Immunization Configuration
Users with the Immunization Configuration permission may open the Immunization Configuration tool and configure the order of immunizations and which immunizations appear by default on the patient’s Immunization History chart section.
Immunization Registry Response Viewer
Users with permission to access the Immunization Registry Response Viewer may review acknowledgement responses from the immunization registry, highlighting warnings and errors that may need to be fixed. For more information, read the Immunization Registry Response Viewer article.
Insurance Balances
Users with the Insurance Balances permission may open the Insurance Balances tool, which includes dynamic worklists for processing claim rejections, a summary of your practice’s insurance accounts receivable, and a worklist for all unpaid encounters with insurance balances.
Insurance Payments
Users with the Insurance Payments permission may open the Insurance Payments tool and manually post insurance payments and adjustments, adjust expected copay amounts, and queue up claims for the next responsible party.
Lab Configuration
Users with the Lab Configuration permission may open the Lab Configuration tool and configure labs for your practice.
Patient Lists
Users with the Patient Lists permission can open the Patient Lists reporting tool and create customizable lists of patients.
Patient Portal Administration
Users with the Patient Portal Administration permission can open the Portal Portal Manager and use the Administration tab to manage family accounts that have access to patient account information.
Read the Patient Portal User Account Administration article to learn more.
Patient Portal Configuration
Users with the Patient Portal Configuration permission can open the Portal Portal Manager and use the Configuration tab to change what appears in the practice’s patient portal, set the default emancipation age for patient privacy, and enable or disable the messaging feature.
Read the Patient Portal Configuration article to learn more.
Patient Portal Message Deletion
Users with the Patient Portal Message Deletion permission can delete incoming messages from the patient portal. Read the Receive and Respond to Portal Messages help article to learn more.
Patient Reminders
Users with the Patient Reminders permission can open the Patient Reminders reporting tool and create custom lists of patients and export them for mail merge reminders.
Patient Visit Summary Configuration
Users who have this permission are allowed to run the Patient Visit Summary Configuration tool. They can select which information will appear on the Patient Visit Summary Report by default, including office contact information and which patient chart sections to include. Settings will apply to all visit summaries generated within the practice.
Payments Tool
Users with the Payments Tool permission may open the Payments tool, post personal payments to an account, write-off credits, reverse payments, view an account’s payment history, and perform other payment-related functions.
Personal Balances Tool
Users with permission to access the payments tool can be given access to the Personal Balances tool where they can create a worklist and follow up on unpaid personal balances.
PCC EHR Audit Log
Users with permission to access the PCC EHR Audit Log may see a detailed record of everything that has happened with a patient’s chart, including everyone who has viewed the chart and what components they have accessed. For more information, read the PCC EHR Audit Log article.
Chat Message Log
Users with permission to access the Chat Message Log, a tab within the PCC EHR Audit Log, can review all PCC EHR Chat messages in order to investigate practice policy violations.
Phone Encounter Performance
Users with the Phone Encounter Performance permission can run the Phone Encounter Performance report.
Phone Note Deletion
Users with the Phone Note Deletion permission have the ability to delete faulty phone notes.
pocketPCC Access
Users with the pocketPCC Access permission can log in to pocketPCC and access PCC functions from a web browser or mobile device. After granting a user a role that includes pocketPCC access, the user must set a security question in the My Account tool before they can log in.
Post Charges
Users with the Post Charges permission can click “Ready to Post” or “New Items” from the Schedule screen in order to open the Post Charges tool. On the Post Charges ribbon, they can review and update encounter codes, add claim information, add payments, print a receipt, and queue up a claim.
Practice Management
Users with the Practice Management permission may select the Practice Management window from the PCC File menu or the icon in the lower-left corner of the screen. The Practice Management window is a temporary tool used to provide access to a few under-the-hood billing, collections, and configuration tools that are found in PCC’s previous software suite, Partner.
Practice Preferences
Users with the Practice Preferences permission may open the Practice Preferences tool from the Tools menu. Practice Preferences include a wide variety of PCC EHR options, including automatic logout and columns on the Schedule queue.
Practice Vitals Dashboard
Users with permission to access the Practice Vitals Dashboard may review the practice’s financial and clinical health based on national and regional pediatric benchmarks. For more information, read the Login and Review Your Practice Vitals Dashboard article.
Print Visit Forms
Users with the Print Visit Forms permission can open the Print Visit Forms tool, which is used to generate a batch of forms used for a day’s encounters.
Professional Contact Manager
Users with the Professional Contact Manager permission may open the Professional Contact Manager tool. They can then manage the list of your practice’s professional contacts, school medical personnel, and other providers who may be part of patient care plans.
Protocol Configuration
Users with the Protocol Configuration permission may open the Protocol Configuration Tool. They can then use the Protocol Builder, Component Builder, and Protocol Map to change the charting experience of every user in the practice.
Only users who will be helping your office design their chart notes should have Protocol Configuration permission.
Queues
Users with each of the “Queues” permissions will see those queues visible when they log into PCC EHR. This includes the daily schedule in PCC EHR (also called the Schedule screen), along with queues for e-lab results, messaging, prescriptions, signing, and visit tasks.

The queues are listed in alphabetical order. If a user has multiple roles assigned in the User Administration tool, they will see all queues available to any of their roles.
Reconciliation
Users with Reconciliation permission may view and import data to patient files from transition of care documents received in C-CDA format through Direct Secure Messaging.
Report Library
Users with permission to access the Report Library may view reports, customize reports, delete scheduled reports, manage Report Library categories, and send Broadcast Messages. For more information about running reports, read PCC EHR Report Library. To learn about sending Broadcast Messages to all contacts on a patient list, read Batch Messaging Through PCC EHR’s Report Library.
User roles with the Manage Categories permission control access to which roles can see specific reporting categories.

To restrict or grant access to a category, click on the “Manage Categories” button in the Report Library, then edit the category and check or uncheck a user role.

For more information about restricting access to reports in the Report Library, read Restrict Access to Reports in the Report Library.
Signing
Users with Signing permission may sign charts, documents, and other items. They may click “Sign” at the bottom of an open chart note or within an order, or they may use the Signing queue in PCC EHR.
Only providers who need to sign charts and other items should be granted this permission.
Requires Co-Signer (visits and phone notes)
Users with the Requires Co-Signer item can sign charts, but they must then indicate which physician will co-sign their work.
Only providers who need a supervising physician to review and sign their chart notes should be given this selection.
The Requires Co-Signing permission will not appear unless your practice has enabled co-signing in the Practice Preferences.
Snap Text Configuration
Users with the Snap Text Configuration permission may set up and adjust system-wide snap text for use by all PCC users at the practice.
Summary of Care Record Configuration
Users who have this permission are allowed to run the Summary of Care Record Configuration tool. They can select which sections of the C-CDA to include on the Summary of Care Record Report. Settings will apply to all EHR users within the practice.
Tables
Users who have the Tables permission are allowed to open the Tables configuration tool, which is used to define under-the-hood lists used in PCC EHR’s functionality, such as your practice’s list of charges, payment types, and more.
User Administration Tool
Users who have the User Administration Tool permission are allowed to run the User Administration Tool. They can add or disable PCC EHR users, change any user’s password, and define the rights of other users. They can also define PCC eRx prescriber roles and permissions and configure a user’s Direct Secure Messaging options.
You should only grant this permission to a few users at your practice. Note that PCC has this permission so that PCC Support can help you administer your user accounts.
For more information, read the Change Passwords and Other User Settings article.
Visit Status Configuration
Users with the Visit Status Configuration permission may open the Visit Status Configuration Tool. They can then edit the names and colors of pre-configured visit statuses that appear on the schedule screen, or create custom statuses for your practice.
Emergency Access Mode
PCC EHR has an Emergency Access mode which allows specified users to have access to features that would otherwise be locked. You can set who should have Emergency Access permission by granting the permission to any user role in the User Administration tool.

Any user with that role will be able to override their normal user permissions by using the “Emergency Access” option under the File menu.


While in Emergency Access mode, the user will have access to all PCC EHR settings and permissions. All activity will be logged.
Update PCC EHR on Your Computer
If the PCC EHR client software on your PC, Macintosh, or Linux device is not up to date, the login window will tell you. Click “Ok” to download and begin the update.

The installer will launch automatically. The installer looks different on different computers, but in each case you can simply click “Next” or “Continue” to step through the process.
The Windows setup application looks like this:

The Macintosh setup application looks like this:

Manual Updates
You can also perform a manual update by downloading the PCC EHR Client. Open a Web browser and visit your server’s PCC downloads page. It gives you direct access to important PCC downloads, as well as links to PCC support and our online documentation at learn.pcc.com.
The url is simply your PCC acronym followed by pcc.com/downloads. So, if your acronym was ABCD, your downloads page would be at https://ABCD.pcc.com/downloads

In-Office Link: This link will work when your computer or workstation is connected to your office’s PCC network. If you use a third-party to manage your network, or need to connect to PCC EHR from a home office, contact your Client Advocate for download assistance.
Read Install and Configure PCC EHR on a New Computer to learn more.
Review Documents for a Patient
You can review patient documents in several different ways.
Review Documents in the Documents Section of the Patient’s Chart
Navigate to the Documents section of a patient chart from the History button. Here you can see a list of all patient and account documents, organized by category and sorted by date.

Visit the Working with Documents help article to learn more about the Documents section of the patient chart.
Access Recent Documents Quickly
The Documents section of the patient’s chart includes a “Recent Documents” list, which displays the five most recent documents in a patient’s chart.

You can quickly find the most recently imported or modified documents in the patient’s chart. When you are hunting for a lab result, or attaching the latest handout to a patient portal message, you can grab the document you need without having to browse the categories. The Recent Documents list is also available when you attach a document as an attachment to a portal message.
Review Documents From the Patient’s Encounter History
While reviewing a patient’s Visit History screen, you may open any documents associated with a visit.

You may also see unattached documents filed for a specific date.
Review Documents on the Signing Queue
If a document requires a signature, you can review and sign it from the Signing queue.

Alternatively, if a document is attached to another item that needs to be signed (such as a visit, order, or phone note), you can review the document from the signing queue while signing the other item.

Review Documents on the Messaging Queue
If a document includes a task, you can review it and work on the task(s) from the Messaging queue.

Remove or Delete a Document
You may scan a document by mistake, or scan it twice. You might also add a document to a chart by mistake. Sometimes, you may need to rescan a document or throw away a document that was scanned in error.
Follow the instructions below to remove a document from a chart or from the Import Documents queue.
Remove a Document from a Patient’s Chart
Click on any document in a patient’s Documents screen, click “Edit”, and then click “Remove Document”. A new window will appear prompting you to select a file source for the removed document.


After you remove a document, it will return to the file source you selected, in the Import Documents screen.
Remove a Document from the Import Documents Screen
If you wish to completely remove a document, open the Import Documents screen, select the document from the list, and click “Remove Document”.

Recover Removed Images
After you remove an image, it is kept on your PCC server for a period of time, in case it was removed in error.
Contact PCC Support to recover a removed image.
You can customize how long removed images are kept on your server. The default time is 30 days. After the safety backup time has passed, the file is permanently deleted from your PCC server. Contact PCC Support to change how long removed images are stored.
Note: If a scanned document has ever been attached to a patient’s chart, it will remain a part of your system’s permanent record and will not be deleted. Even after you remove it from the patient’s chart and from the import queue, your system will maintain a copy for chart auditing purposes.
Health Information Summary Report
You can generate a paper or electronic copy of a patient’s health record with the Health Information Summary Report.
Health Information Summary for Transitions of Care?: For a summary of care record, for a referral or other transition of care, use the more complete and C-CDA formatted Summary of Care Record report. The Health Information Summary is a less formal chart summary for patient, family, and clinician use. The PCC 7.0 update removed the outbound transition of care selection options from the Health Information Summary report.
View the Report
Open a patient chart and select “Health Information Summary” from the Reports menu.

The report includes basic patient demographics and information from the patient’s Medical Summary screen, such as problems, allergies, and medication history. It also includes labs (and all results), screenings, radiology, and medical tests in the patient chart.
Save as PDF or Print the Report
Click “Save as PDF…” to open your computer’s standard Save dialog window.
Click “Print” to open your computer’s standard Print dialog window.


