Work with Pharmacies
Find and select a pharmacy while you prescribe, see where prescriptions were sent and dispensed, manage patient pharmacies, tailor pharmacy settings to your preference, and set up searchable pharmacy nicknames.
Article Under Construction: This article is being updated to reflect new functionality in PCC 10.4, which arrived on October 12th, 2025. Some images may not match your PCC system.
Contents
Find and Select a Pharmacy
Look up a pharmacy as you prescribe and set it as the destination for your patient’s prescriptions.
On a New Prescription
Find and select a pharmacy while you write a prescription.
Start a Prescription
Start a prescription in PCC eRx by searching for a medication in the Prescribe component.
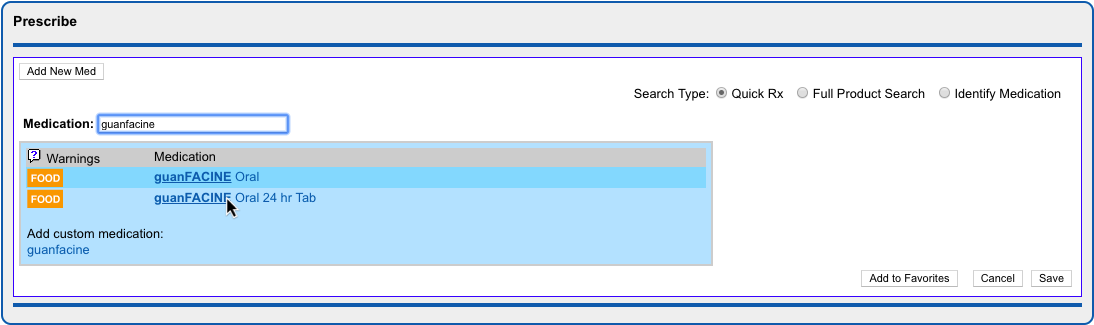
You can also renew or start a fresh prescription from entries in the patient’s Medication History or Prescription History.
Locate the Pharmacy on the Prescription Preview
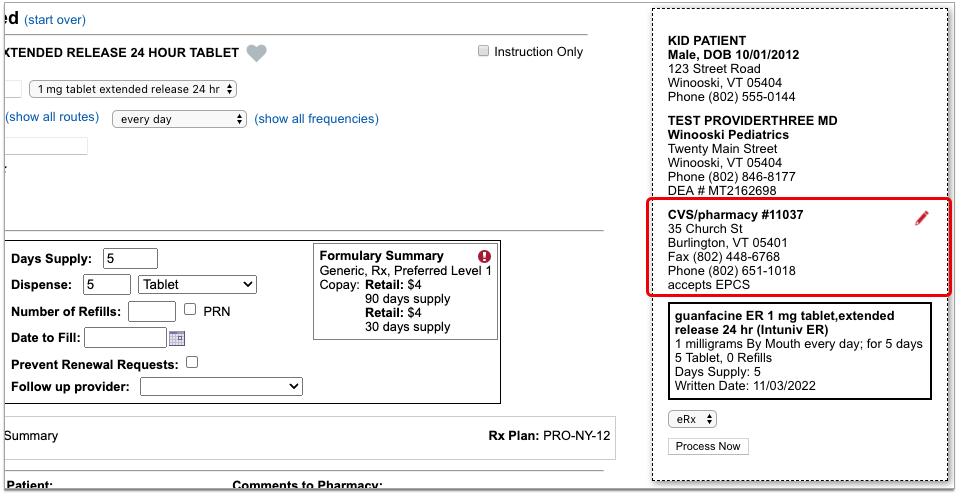
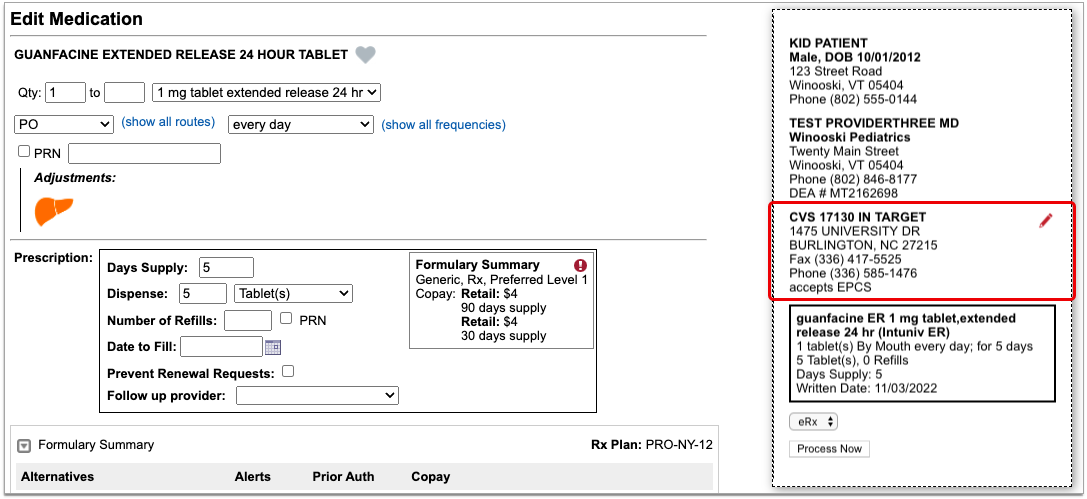
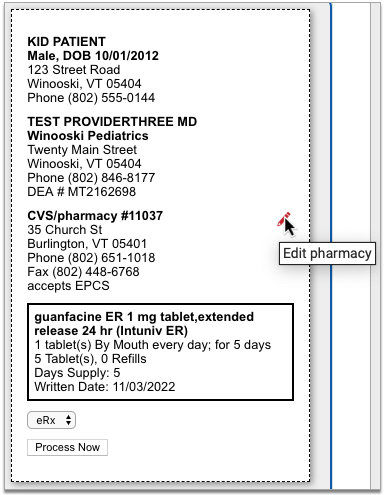
Once on the prescription editing screen, locate the pharmacy on the prescription preview.
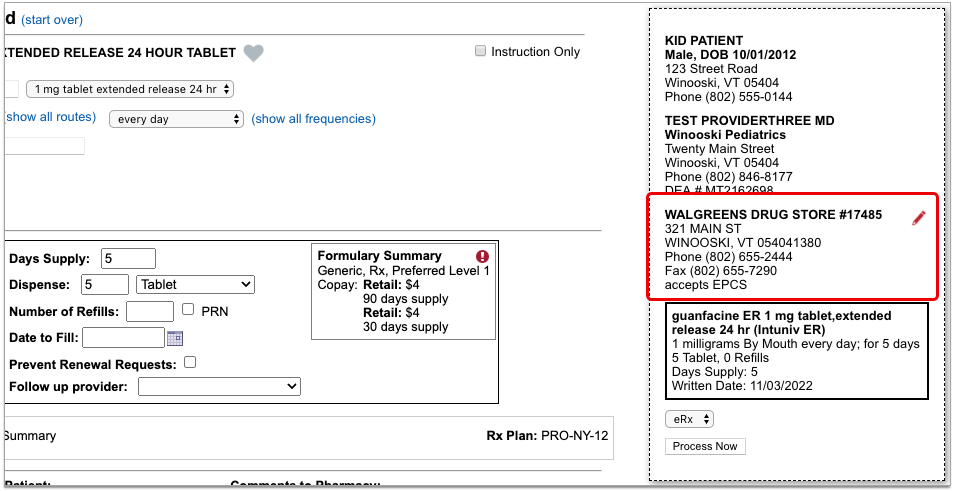
The standard pharmacy for new prescriptions is the patient’s default pharmacy. If the patient has no saved pharmacies, the pharmacy field on the prescription starts out blank.
Edit the Pharmacy
Click the red pencil icon beside the pharmacy field to edit it.
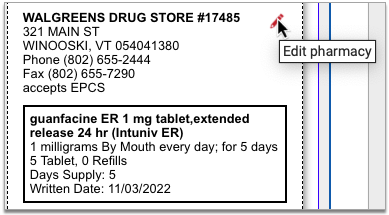
Pharmacy search options open in a new window.
Choose a New Pharmacy
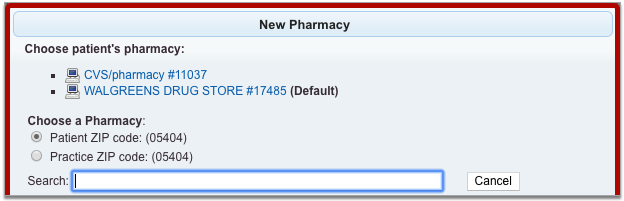
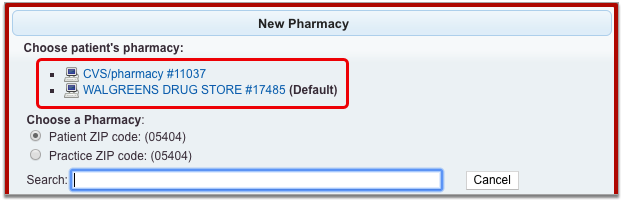
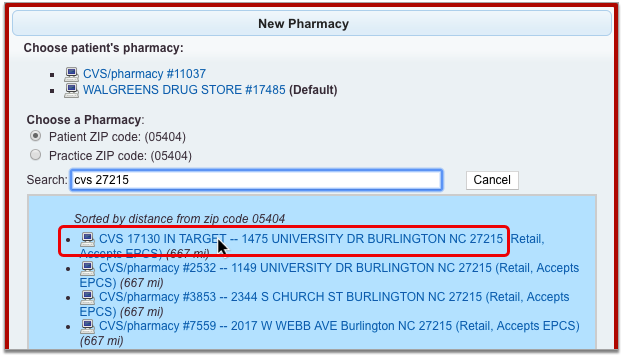
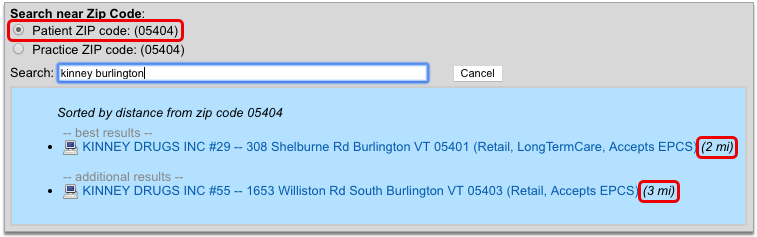
The patient’s saved pharmacies appear at the top of the pharmacy search window. Beneath those, you can search for a new pharmacy.
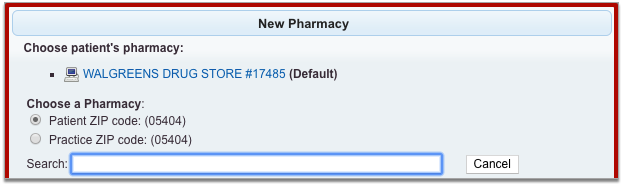
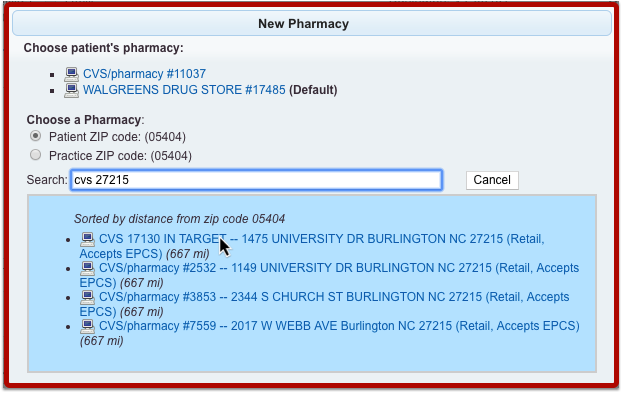
Pharmacy search results display by order of distance from the patient’s home or your practice’s ZIP code. You can search by pharmacy name, address, cross street, or nickname. All of these pieces of information display in the pharmacy search results.
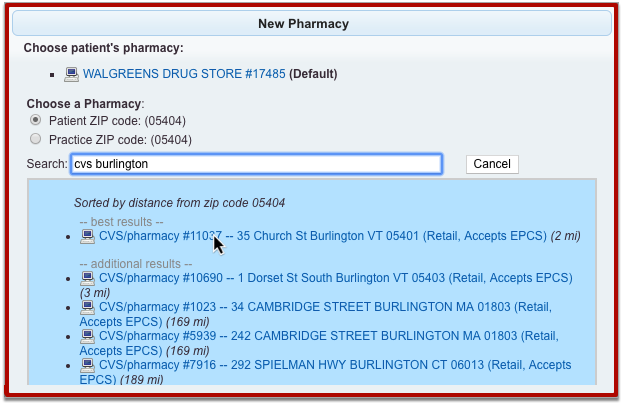
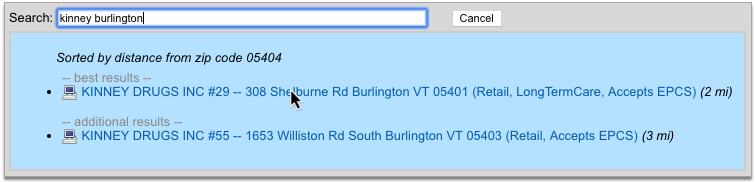
Select the pharmacy where you want to send the prescription.
Review the Pharmacy on the Prescription Preview
After you select a pharmacy, the pharmacy search window closes and returns you to the prescription editing screen.
Review the prescription preview to make sure that the pharmacy is now correct. You can edit it as many times as it takes to select the right pharmacy.
You can send new prescriptions right away, or save them to be sent later. Read on to learn how to edit the pharmacy on pending prescriptions.
On a Pending Prescription
You can change the pharmacy on pending prescriptions before sending them out the door.
Find the Pending Prescription
Locate the pending prescription that you need to edit.
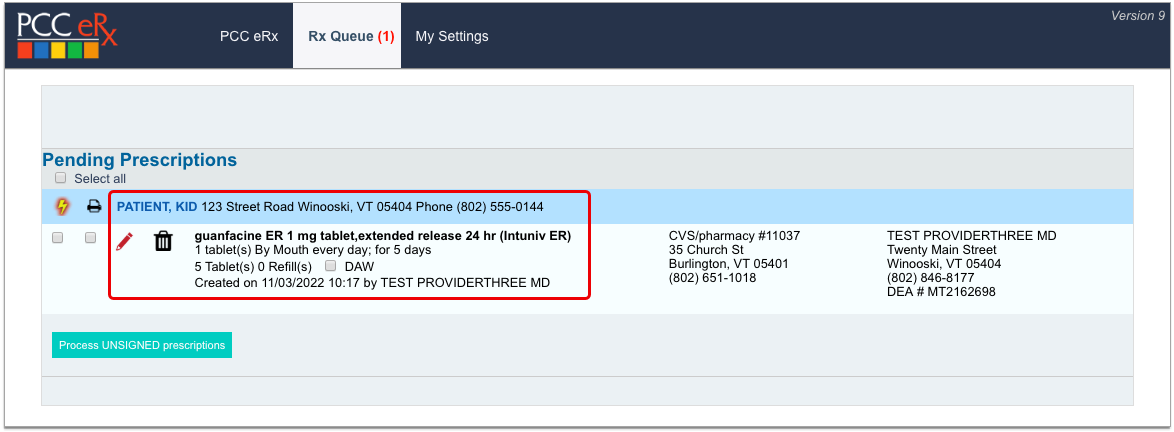
You can find pending prescriptions in the Review & Sign component within the PCC eRx section of the patient’s encounter or on the Rx Queue.
Edit the Prescription
Click the red pencil icon beside the prescription to edit it.

Edit the Pharmacy on the Prescription Preview
Find the pharmacy on the prescription preview, then click the red pencil icon to edit it.
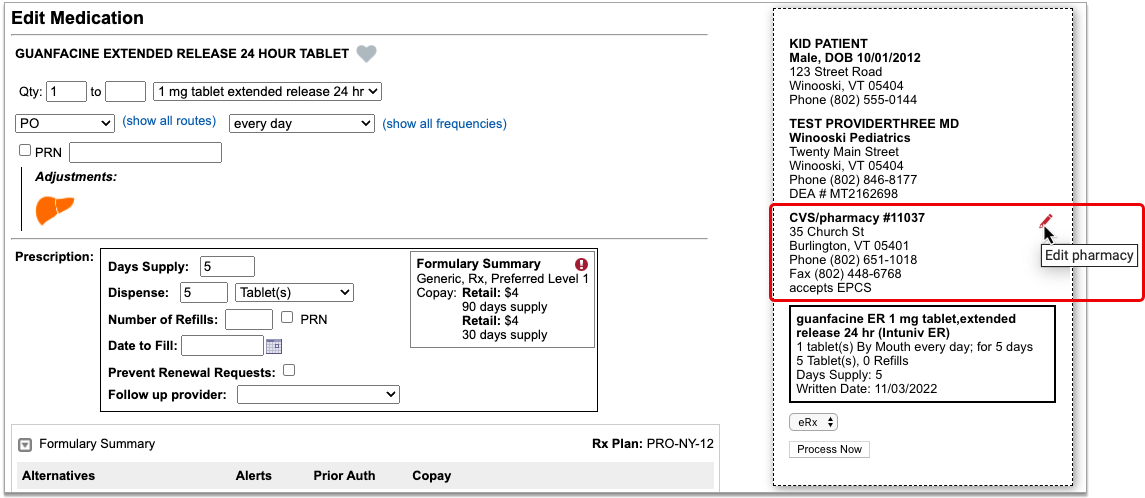
Pharmacy search options open in a new window.
Choose a Different Pharmacy
The patient’s saved Pharmacies appear at the top of the pharmacy search window. Beneath those, you can search for a different pharmacy.
Pharmacy search results display by order of distance from the patient’s home or your practice’s ZIP code. You can search by pharmacy name, address, cross street, or nickname. All of these pieces of information display in the pharmacy search results.
Select the pharmacy where you want to send the prescription.
Review the Pharmacy on the Prescription Preview
After you select a pharmacy, the pharmacy search window closes and returns you to the prescription editing screen.
Review the prescription preview to make sure that the pharmacy is now correct. You can edit it as many times as it takes to select the right pharmacy.
You can send the pending prescription right away, or save it to be sent later. If you want to edit the pharmacy for multiple pending prescriptions, or split up a batch of pending prescriptions to go to different pharmacies, read on.
For Multiple Pending Prescriptions
You can edit the pharmacy for multiple pending prescriptions at the same time, and optionally split up a batch of pending prescriptions to go to multiple different pharmacies.
Find the Pending Prescriptions
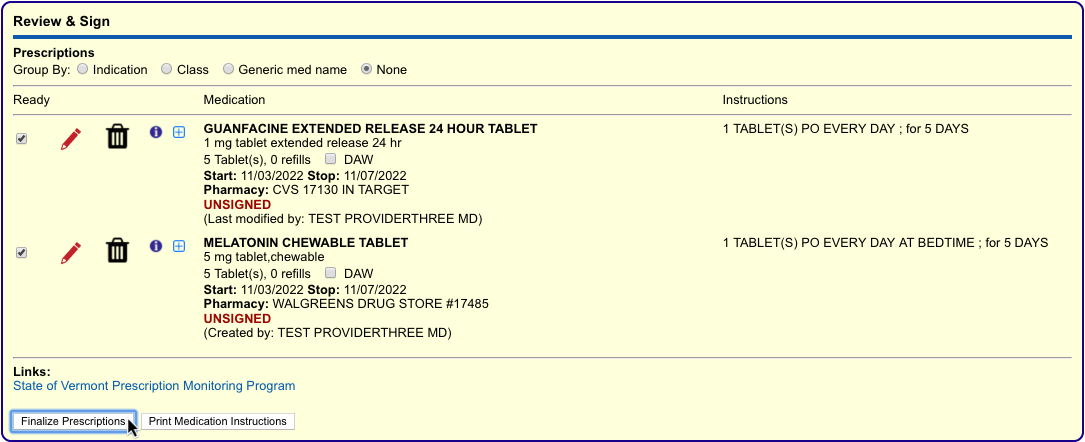
Open the PCC eRx section of the patient’s encounter and go to the Review & Sign component.
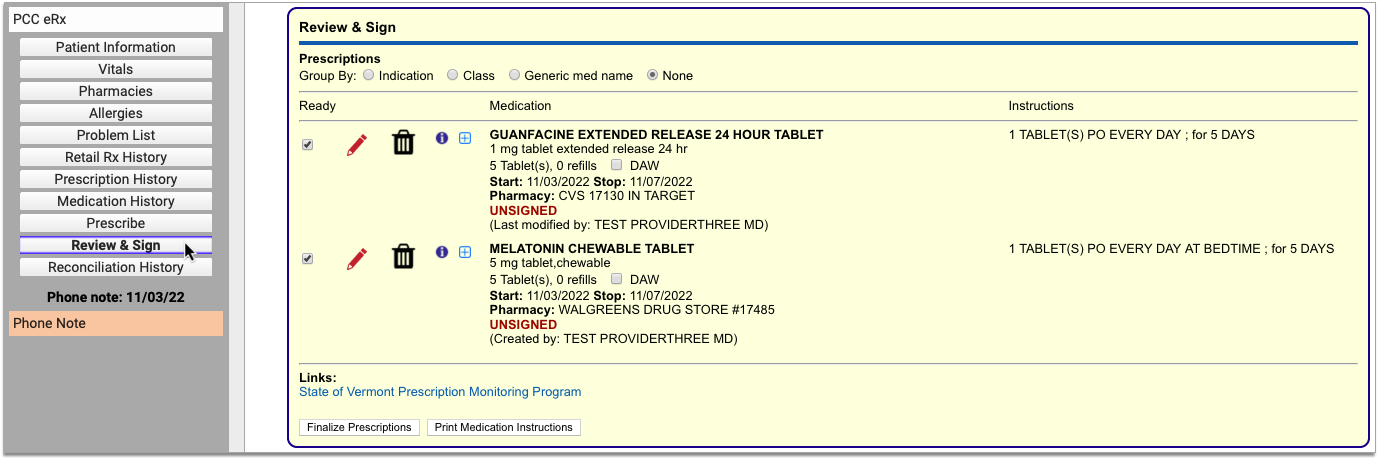
The patient’s pending prescriptions queue appear in that component pending processing.
Finalize Prescriptions
Click the “Finalize Prescriptions” button to launch the Prescription Review window.
In Prescription Review, you can edit prescription details such as the pharmacy.
Edit the Pharmacy
In the Prescription Review window, prescriptions display beneath the pharmacy where they are queued to be sent.
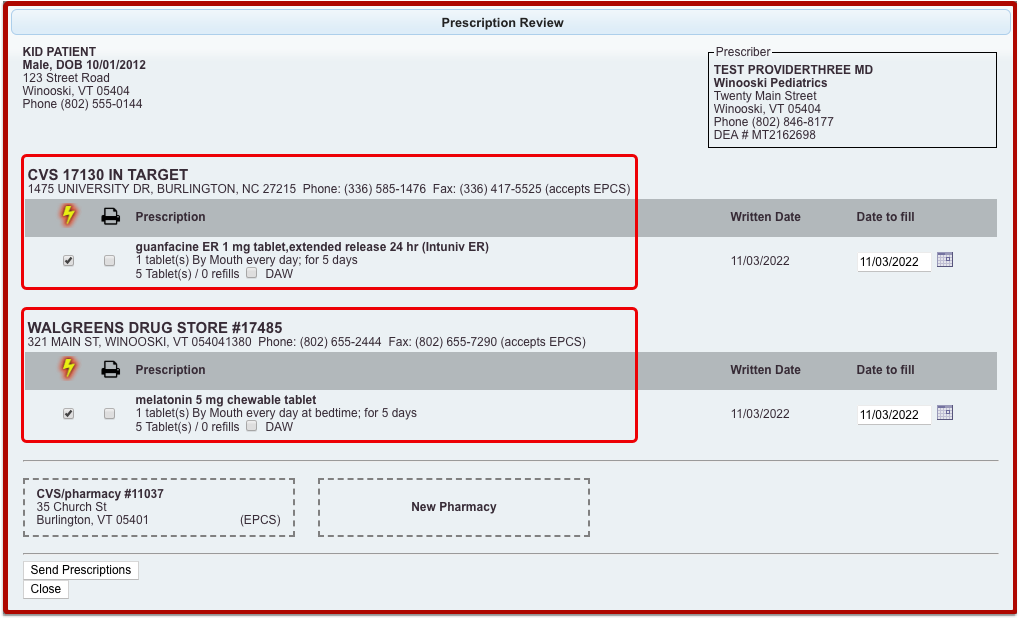
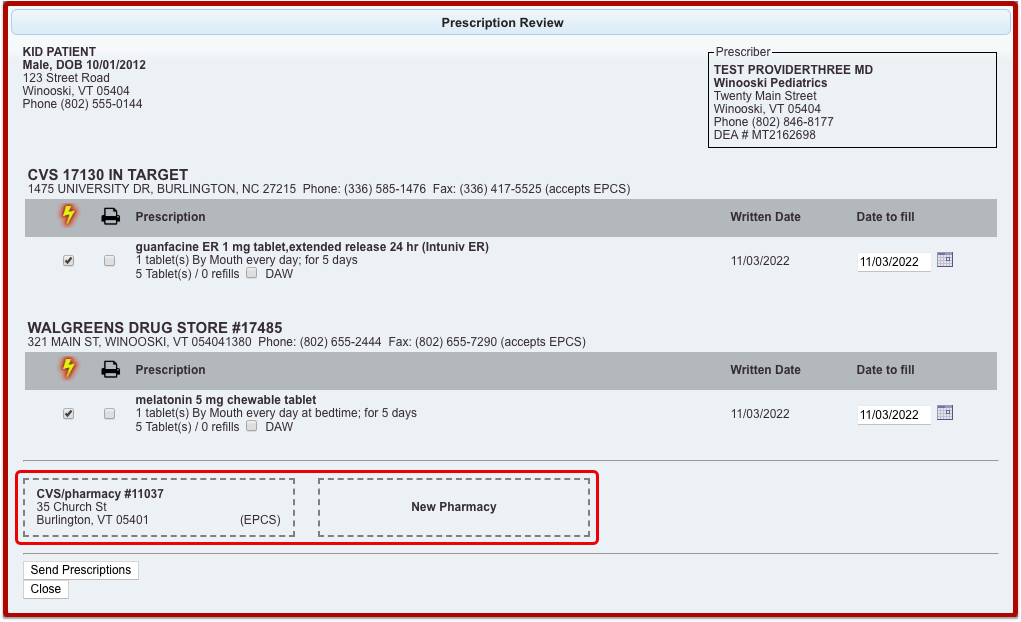
The patient’s additional saved pharmacies appear as tiles at the bottom of the window, along with the option to add a pharmacy, which opens the pharmacy search options.
You can pair prescriptions and pharmacies by dragging them together with your mouse cursor until you see a yellow highlight.
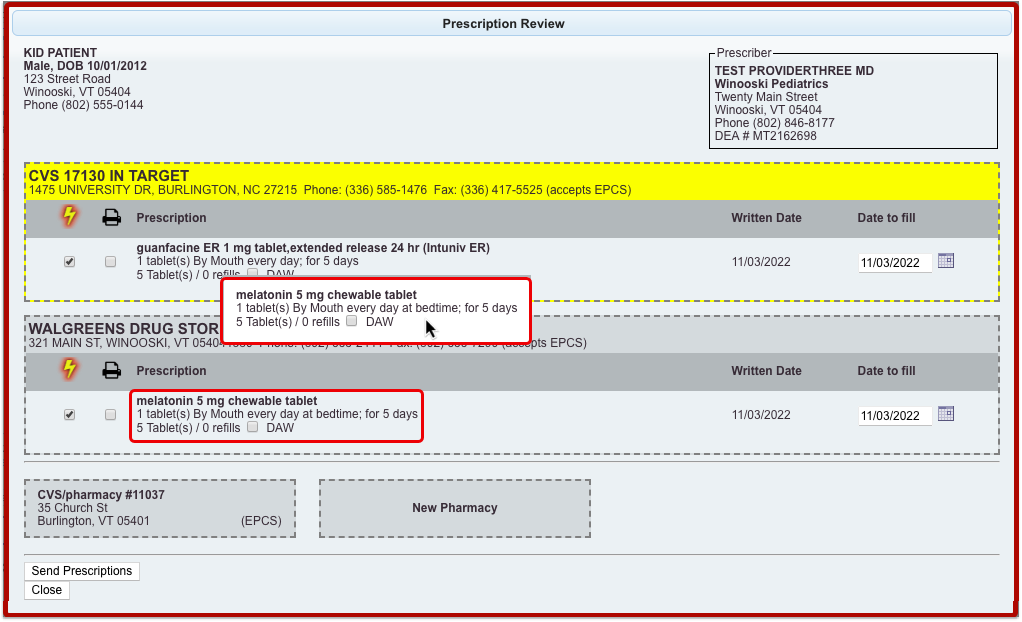
You can use the drag and drop function to pair prescriptions and pharmacies one at a time, or to replace a pharmacy that has several prescriptions queued.
Finish Processing the Prescriptions
Review the prescriptions to make sure each one is going to the right pharmacy.
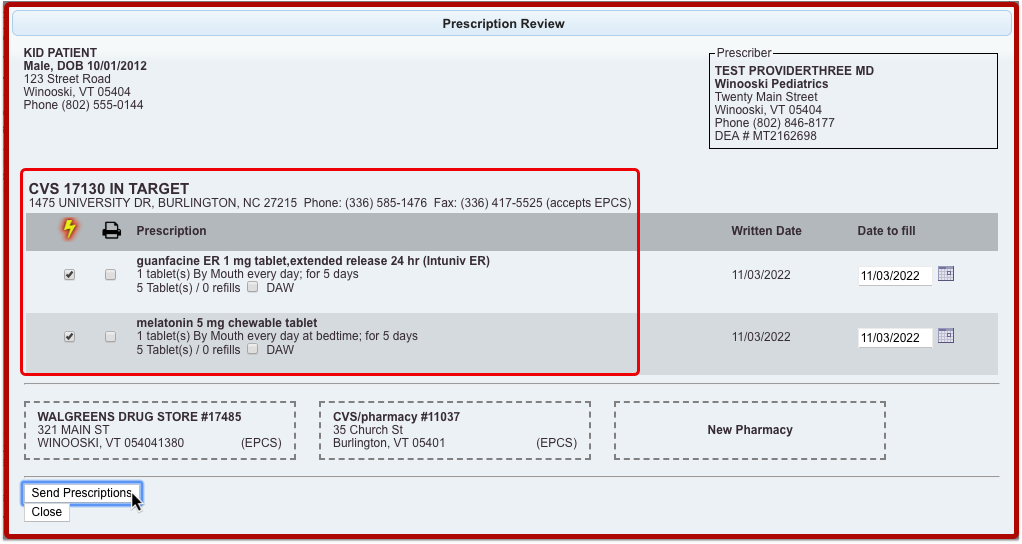
Click “Send Prescriptions” to send all of the prescriptions at once to their respective pharmacies.
See Where a Prescription Was Sent or Picked Up
See where a prescription was sent or picked up in PCC EHR and PCC eRx.
See Where a Prescription Was Sent
There are many places in PCC EHR where you can review where a prescription was sent.
In the patient’s Visit History, find the encounter where the prescription was written. The encounter summary shows what was prescribed and where the prescription was sent.
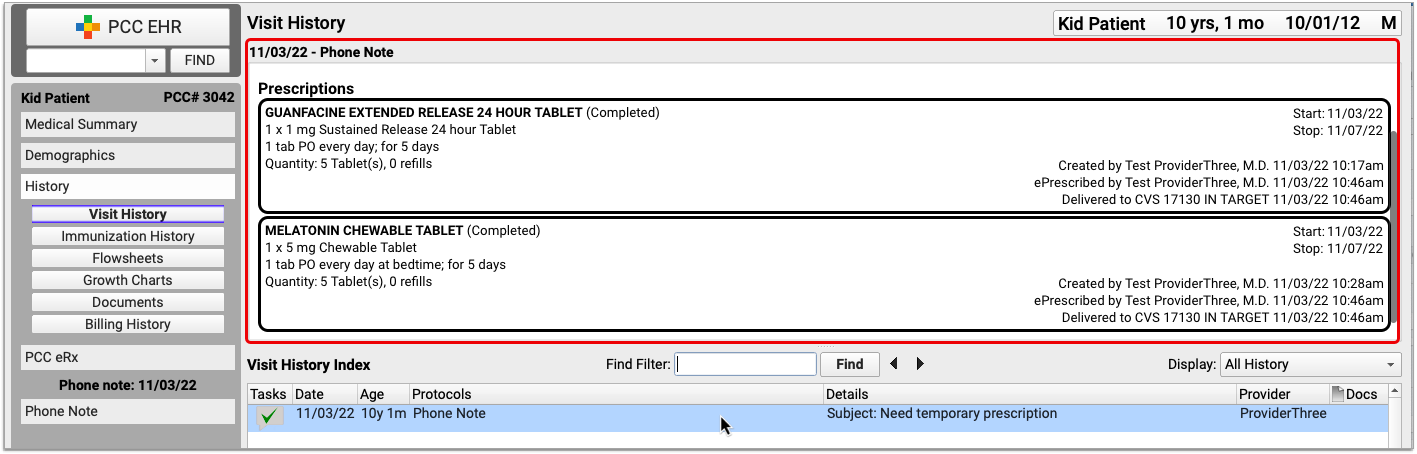
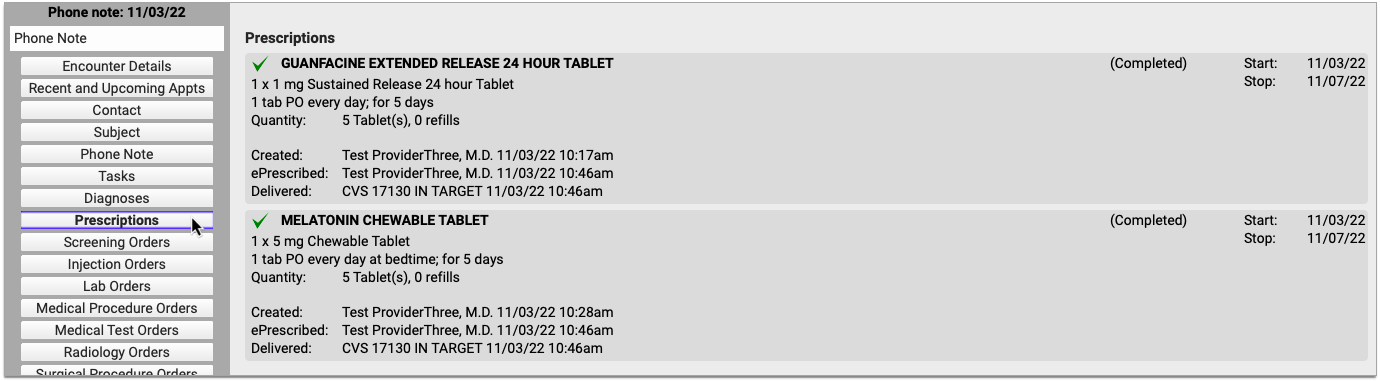
If you open the encounter, you can jump to the Prescriptions component to see the same information in the context of the visit.
If you want to see information about all of the patient’s past prescriptions, open the PCC eRx section of their chart and go to the Prescription History.

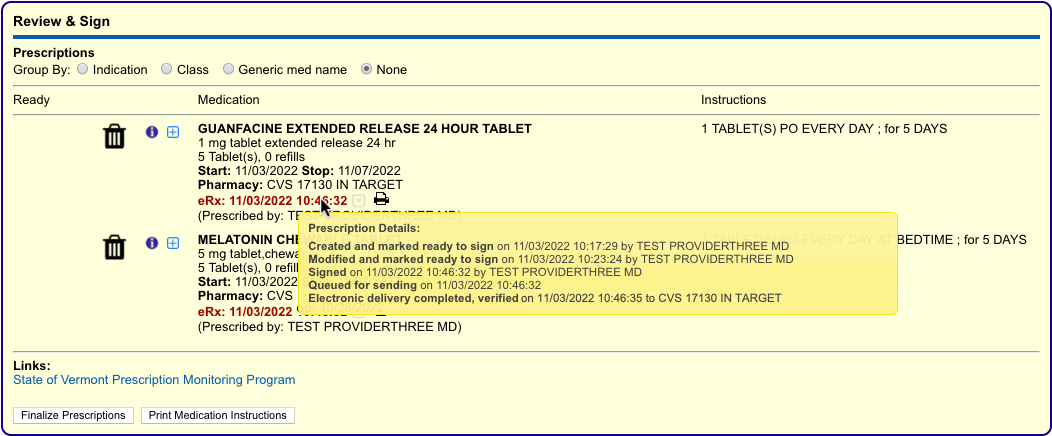
For the most complete details about how, when, and where a prescription was sent, open the PCC eRx section of the encounter where it was prescribed. Then, jump to the Review & Sign component.
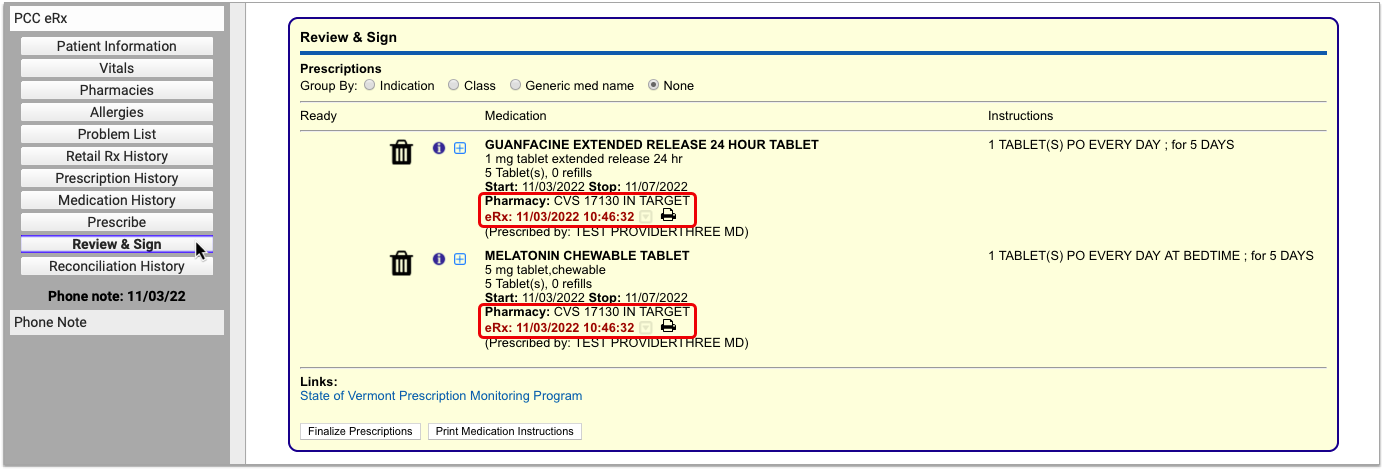
After being sent, prescriptions in the Review & Sign component list a pharmacy, a timestamp, and other details. Hover over the timestamp to see an overview of the prescription’s journey from your office to the pharmacy.
For the maximum amount of detail about how, when, and where the prescription was sent, click the gray disclosure triangle next to the timestamp in Review & Sign.

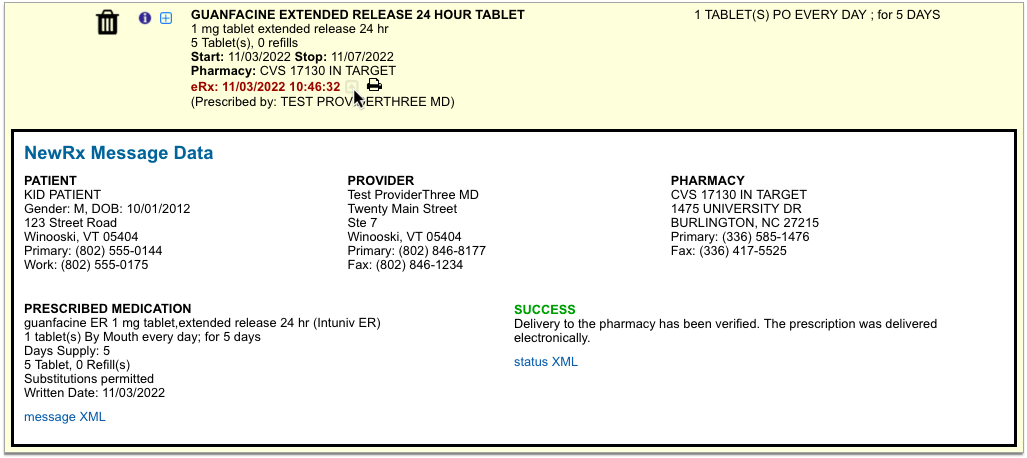
Complete pharmacy information and a delivery status appear in plain text, as well as in the XML message contents. The XML message contains the actual data sent by PCC eRx to the pharmacy.
See Where Prescriptions Were Picked Up
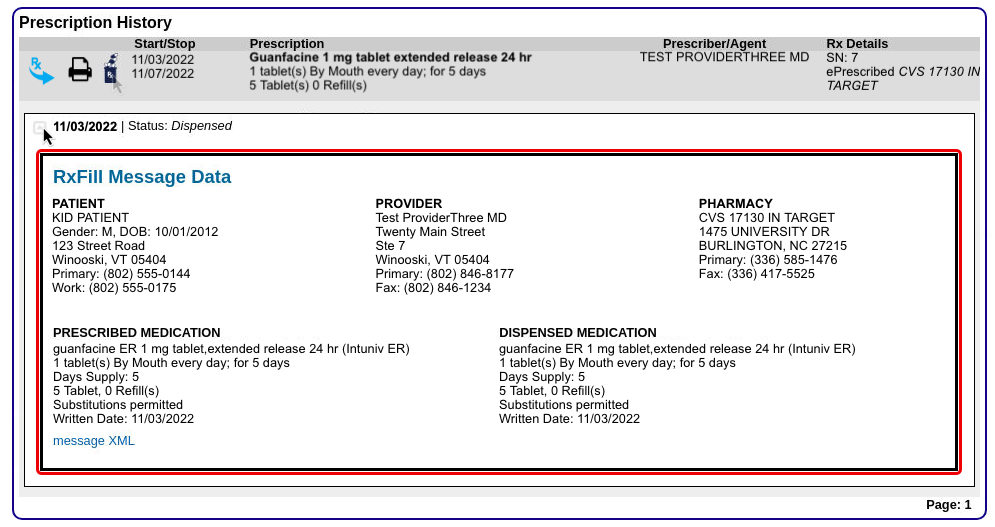
Some pharmacies send messages back to prescribers to indicate that a prescription was picked up. When this information is provided, you can see it in the patient’s Prescription History.

A pill bottle icon indicates that a pharmacy provided dispensing information about the prescription. Click the icon to see what the pharmacy sent.
Another place you can sometimes see which pharmacy dispensed a prescription is in the patient’s Retail Rx History. After receiving and recording consent from the patient, click the doctor icon beside any prescription to see what Surescripts was able to find about who prescribed it and where it was dispensed.
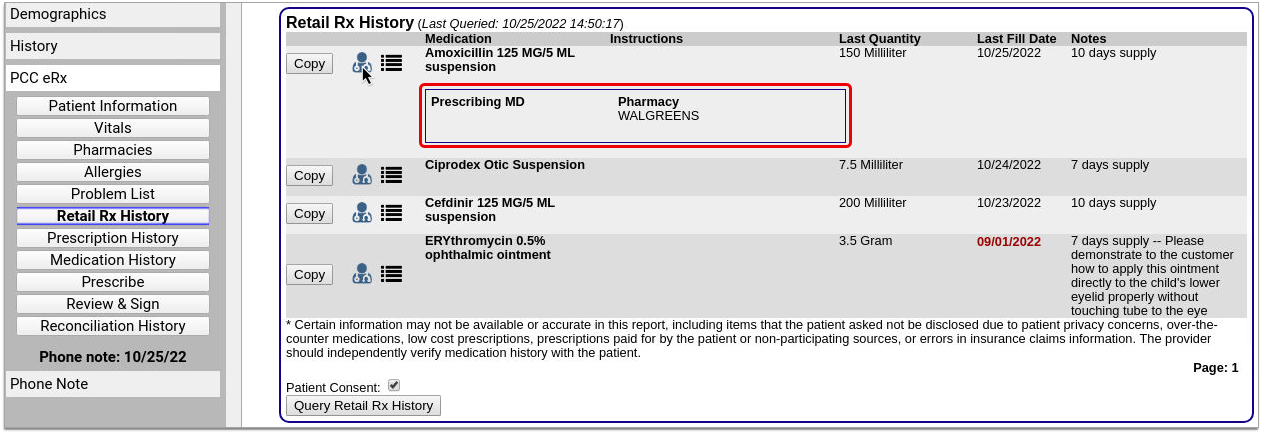
The Retail Rx History is especially useful for learning about prescriptions that were not prescribed from your practice. Please note that you may only query patients’ Retail Rx History once every 72 hours.
Manage Patient Pharmacies
Track your patient’s pharmacies, including their default pharmacy.
The Pharmacies Component
You can track and manage your patient’s pharmacies in the Pharmacies component within PCC eRx. To get to the Pharmacies component, open your patient’s chart and click the PCC eRx button.

If the patient has a visit, phone note, or portal message today, PCC eRx opens to that encounter. If not, you can select a past encounter.

Once in PCC eRx, click the Pharmacies anchor button to jump to the Pharmacies component.

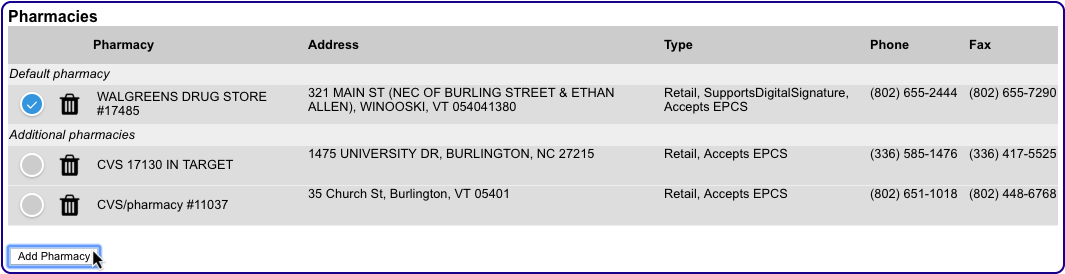
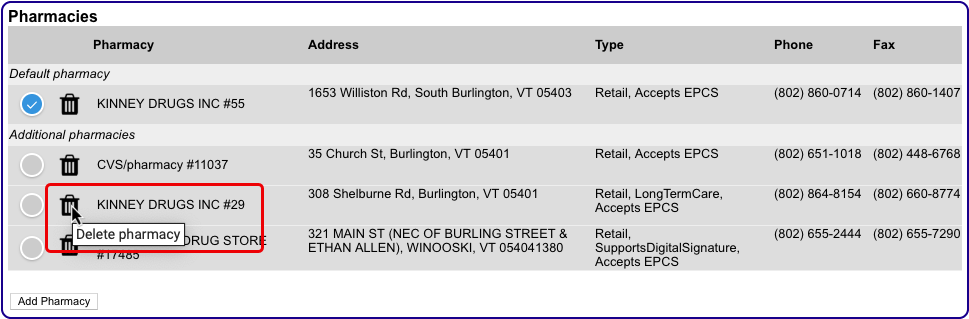
Use the Pharmacies component to create a list of the patient’s preferred pharmacies and set a default pharmacy for all of their future prescriptions.
When you search for a pharmacy while writing a prescription, the pharmacies saved in the patient’s Pharmacies component appear at the top of the list for easy selection.
To learn more about picking a pharmacy while you write a prescription, read Find and Select a Pharmacy.
Add a Pharmacy
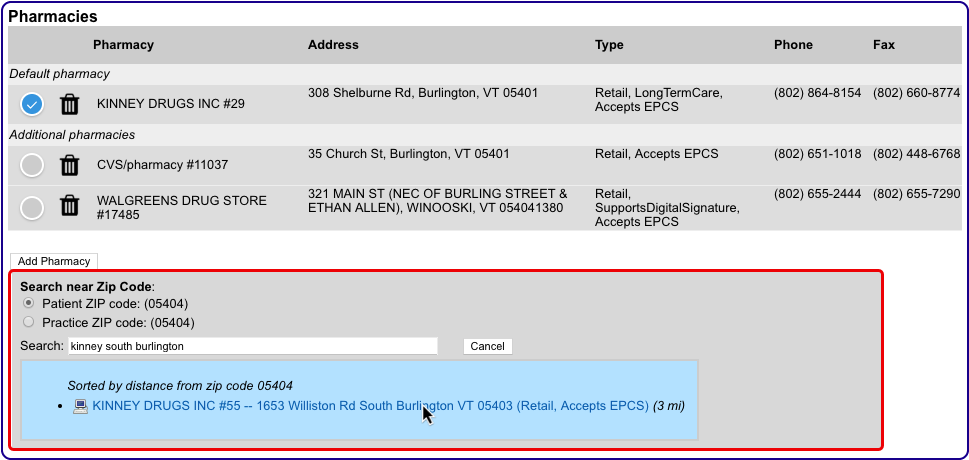
Click the “Add Pharmacy” button in the Pharmacies component to add a new pharmacy to the patient’s list.
The button launches a window where you can search for pharmacies by name, address, cross street, or custom nickname.

Pharmacies that match your search terms appear in order of distance from the patient’s home ZIP code or that of your practice, depending upon which option you have selected.
You can change the search terms and ZIP code criterion at any point to refine the pharmacy search results. When you have located the correct pharmacy, select it to add it to patient’s saved pharmacies.
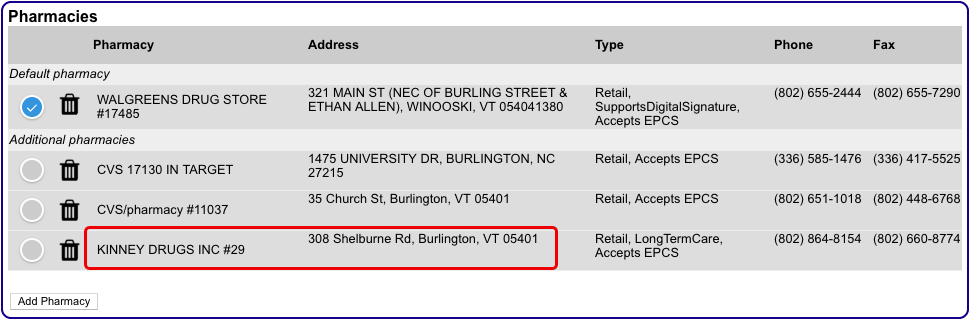
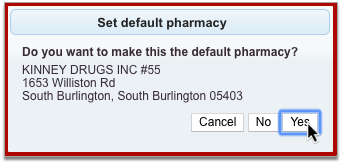
The very first pharmacy you add to the Pharmacies component automatically gets set as the patient’s default pharmacy. The pharmacies you add after that follow your personal default pharmacy setting on the My Settings page. To learn more, read Default Pharmacy Settings.
Prescriptions Always Start Out Using the Default Pharmacy: Prescriptions always start out using your patient’s default pharmacy. If you add a new entry to the Pharmacies component but do not make it the patient’s default, subsequent prescriptions will not start out using that new pharmacy. To use the new pharmacy, edit the prescription and manually select the new pharmacy in the pharmacy search window.
Delete a Pharmacy
To remove a pharmacy from the Pharmacies component, click the trash can icon beside it.
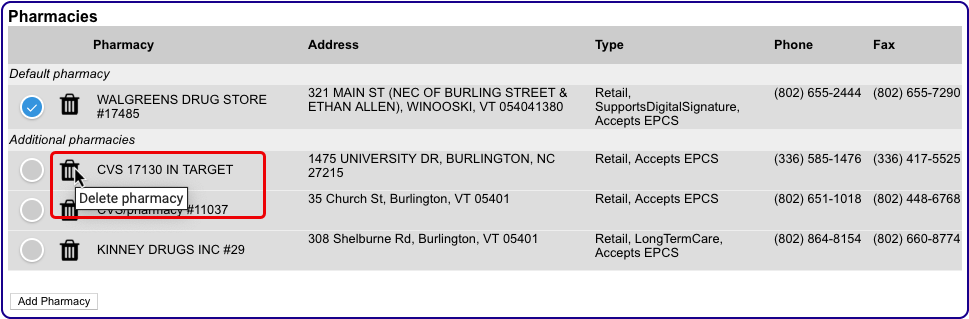
If you delete your patient’s default pharmacy, the first pharmacy alphabetically becomes their new default.
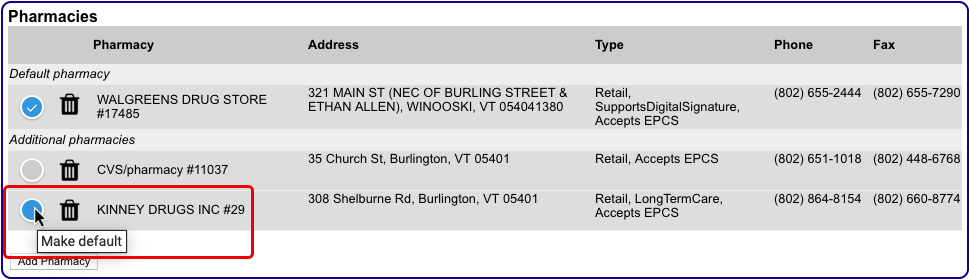
Set a Default Pharmacy
The default pharmacy is the presumed destination for your patient’s new prescriptions. You can see and update your patient’s default pharmacy in the Pharmacies component in PCC eRx.
The first pharmacy you add to the patient’s Pharmacies list automatically becomes their default. As you add other pharmacies, you can manually set the default using the Default radio button.
If you delete your patient’s default pharmacy, the first pharmacy alphabetically becomes their new default.
You can configure PCC eRx to automatically make a pharmacy the patient’s default as soon as it’s added to the Pharmacies component. To learn how, read Default Pharmacy Settings.
Keep Sibling Pharmacies in Sync
You can configure PCC eRx to keep pharmacy information up-to-date between siblings. To learn how, read Sibling Pharmacy Settings.
Manage Your Pharmacy Preferences
Make certain patient pharmacy behaviors automatic for your user account in PCC eRx.
Default Pharmacy Settings
You can control how the default pharmacy updates when you add a new entry to the Pharmacies component in a patient’s chart.
Open PCC eRx and go to the My Settings tab.

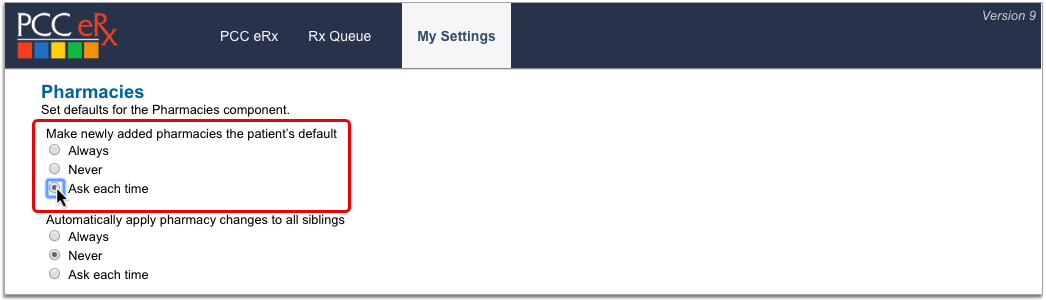
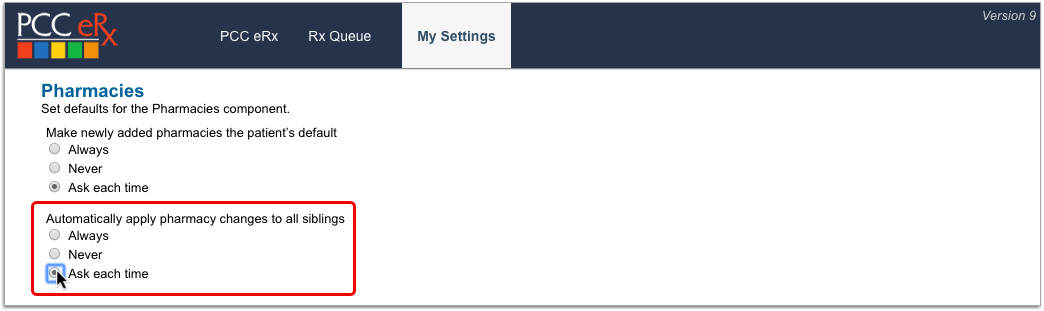
Find the Pharmacies section. The first group of radio buttons gives you global control over what happens to a patient’s default pharmacy when you add a new pharmacy to the Pharmacies component in their chart.
-
Always: Automatically make a pharmacy the patient’s default as soon as it’s added to the Pharmacies component.
-
Never: Never make a pharmacy the patient’s default when it’s added to the Pharmacies component.
-
Ask each time: Prompt me to update the patient’s default every time I add a new pharmacy to the Pharmacies component.
The default pharmacy setting only applies when you add a new pharmacy to the Pharmacies component using the “Add Pharmacy” button. The pharmacies you add while prescribing or finalizing a prescription are not governed by this setting and never update the patient’s default.
Sibling Pharmacy Settings
You can configure PCC eRx to keep siblings’ pharmacies in sync.
Open PCC eRx and go to the My Settings tab.

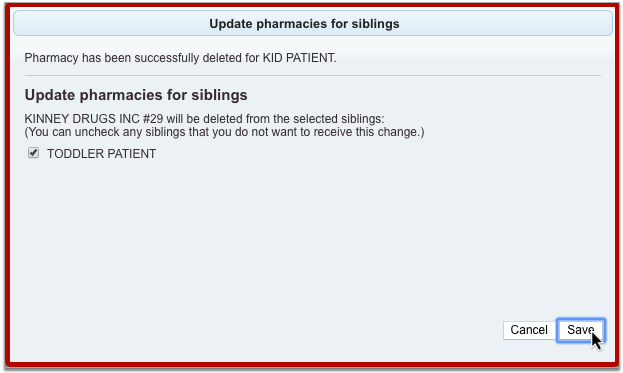
Find the Pharmacies section. The second group of radio buttons lets you control how a change to one patient’s pharmacies affects their siblings. Changes include adding or deleting a pharmacy in the Pharmacies component, or updating the default pharmacy.
-
Always: Automatically update all siblings with changes I make in the Pharmacies component for one.
-
Never: Never update siblings with changes I make in the Pharmacies component for one.
-
Ask each time: Prompt me to update siblings every time I make a change in the Pharmacies component for one.
The sibling pharmacy setting only applies when you make changes to pharmacies in the Pharmacies component for a patient who has siblings. The pharmacies you add to a patient while prescribing or finalizing a prescription are not governed by this setting and never get added to siblings.
Create Searchable Pharmacy Nicknames
Users with Administration privileges in PCC eRx can set up practice-wide, searchable nicknames for pharmacies that are otherwise tricky to find.
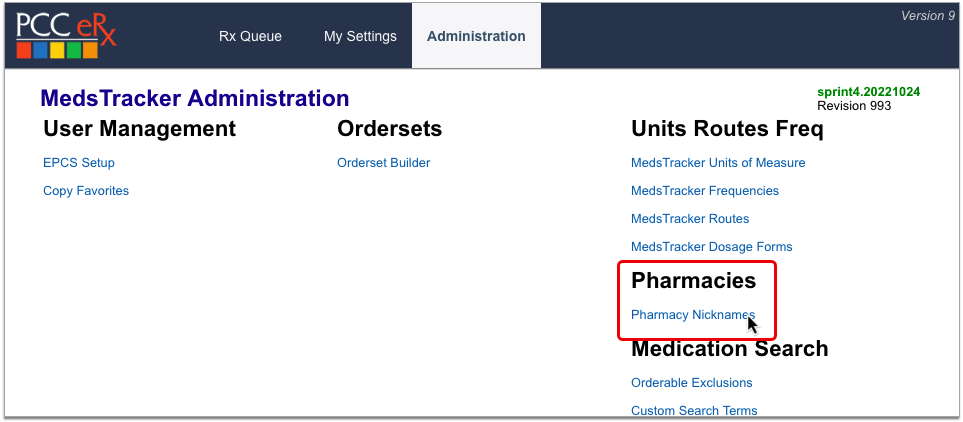
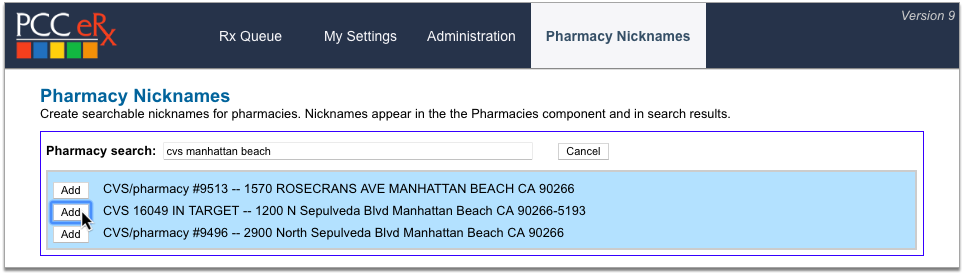
In PCC eRx, click the Administration tab. Then, click the link for “Pharmacy Nicknames.”
In the Search field, type the name of the pharmacy you want to nickname, then click the “Add” button beside it.
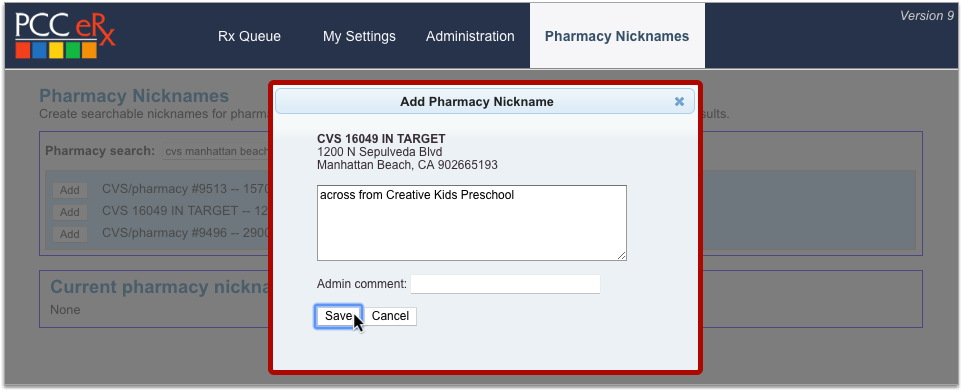
Create a nickname for the pharmacy, optionally leave an internal note explaining the purpose of the nickname, then click “Save”.

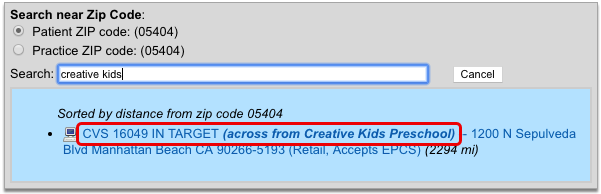
Pharmacy nicknames display anywhere you can see and search for pharmacy information in PCC eRx.

You can edit and delete pharmacy nicknames on the Pharmacy Nicknames configuration page. Click the x icon to delete a nickname or the pencil icon to edit.
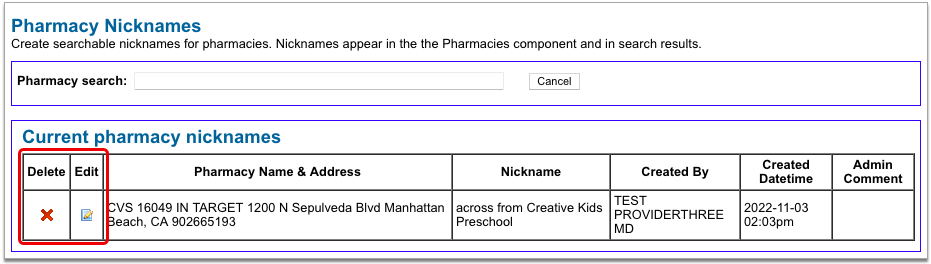
You can also edit a pharmacy nickname by searching for the pharmacy in the search field at the top of the configuration page and clicking the “Edit” button beside it.

Avoid Using Special Characters: For an optimal experience, avoid using special characters in pharmacy nicknames. Nicknames that contain special characters such as double quotes (“), ampersands (&), angle brackets (<>), and at signs (@) cannot be found by searching for those characters and may become difficult to edit once saved.