Connect to PCC Services using a VPN
In most cases, PCC recommends using SecureConnect to connect remotely to your PCC server. However, if your practice has specific needs (such as remote printing) that necessitate using a VPN to connect to your PCC server, follow the steps below to learn how to obtain a VPN key, install and configure VPN software, install and configure RDP software, and connect.
Why Does PCC Use VPN and RDP?: To protect PHI, best security practice includes the use of a VPN (virtual private network) between remote computers and your PCC server. A VPN provides a secure, encrypted “tunnel” for data communication between your remote computer and your PCC server. The Remote Desktop Protocol interface provides a low-latency solution to using a software program, like PCC EHR, without data loss, and additionally provides a reliable, consistent interface that doesn’t rely on you installing PCC software at home.
Use pocketPCC Instead: You can review your schedule, see many sections of a patient’s chart, and create phone notes on any internet-connected device using pocketPCC. You only need a VPN and RDP connection when you wish to run the full, desktop versions of PCC’s products and services.
Contents
- 1 Get Started: Contact PCC Support
- 2 Windows PC: Install and Configure Remote Connection Software
- 3 Apple Macintosh: Install and Configure Remote Connection Software
- 4 Windows PC: Connect to Your Practice’s PCC Server
- 5 Macintosh OS X: Connect to Your Practice’s PCC Server
- 6 Update from Microsoft Remote Desktop 8 to Microsoft Remote Desktop 10
- 7 VPN Software Options
- 8 RDP Server Options for Your Practice
Get Started: Contact PCC Support
Before you can set up a VPN connection on your home computer, you must contact your practice’s System Administrator and PCC Support.
PCC will generate a secure encryption key and send it to you in an e-mail. The key will work only for you.
Windows PC: Install and Configure Remote Connection Software
Follow these instructions to install and configure VPN and RDP software on a personal computer running the Windows operating system.
Check Your E-Mail
Upon request, PCC will send authorized users an e-mail with a VPN key.
Temporarily Disable Your PC’s Virus Protection Software
This step is optional, but recommended. Your anti-virus software may interfere with the steps below, including downloading .zip and .exe files and installing the VPN software. Turn it off before proceeding.
Save the E-Mail Attachment to Your PC
Save the .zip file that is attached to the VPN e-mail. You can save it to your desktop or somewhere in your Documents folder.
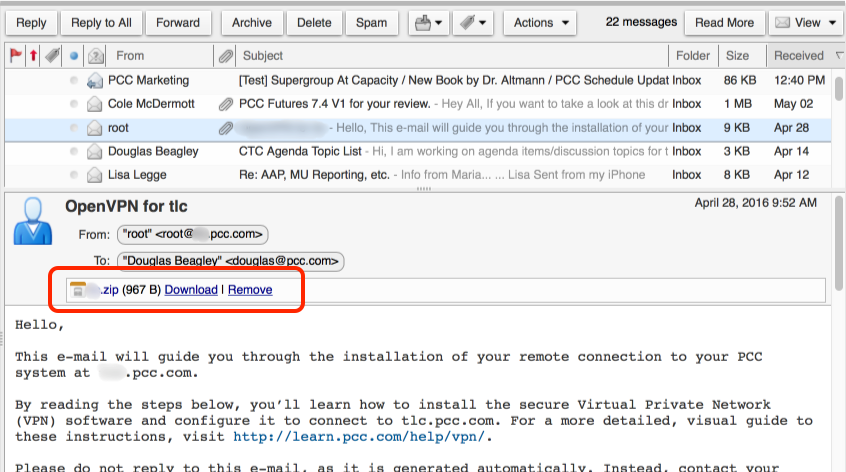
The filename will be your practice’s PCC client acronym followed by “.zip”. For example, if you work at Bedrock Prehistoric Pediatric Partners, your client acronym may be BPPP. The file attached to your e-mail will be “bppp.zip”.
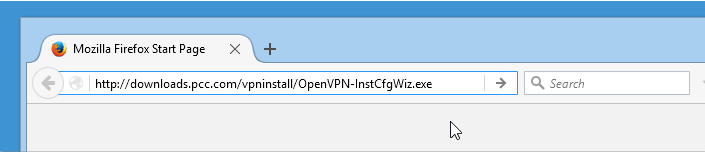
Download the OpenVPN GUI Application Installer
Use a web browser to download the OpenVPN GUI application installer. The link to the installer is:
https://build.openvpn.net/downloads/releases/openvpn-install-2.3.18-I602-x86_64.exe
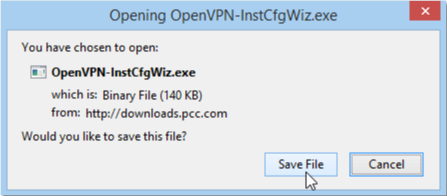
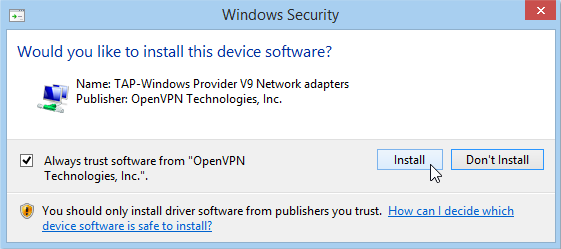
Run the OpenVPN Installer
Run the OpenVPN installer by double-clicking on the downloaded file, “OpenVPN-InstCfgWiz.exe”.

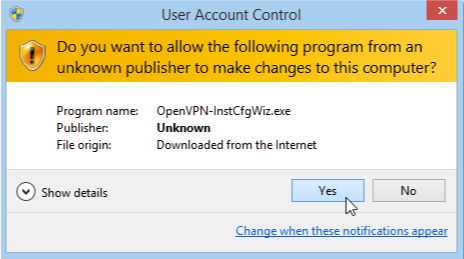
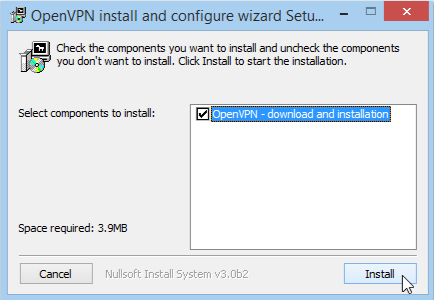
Follow Installer Steps to Install OpenVPN GUI
Follow the installer steps by clicking “Install” and “Next” for each step.

When Prompted, Select Your VPN .zip File
When the installer prompts you for your VPN .zip file, click on the button and browse to the .zip file that you saved in the steps above.
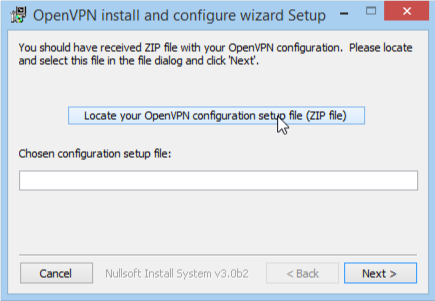

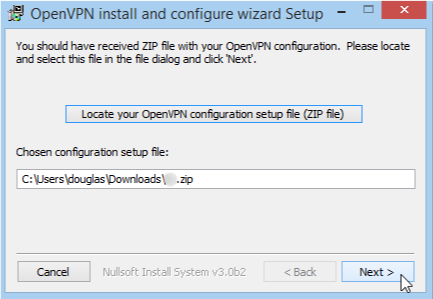
The filename will be your practice’s PCC client acronym followed by “.zip”. For example, if you work at Bedrock Prehistoric Pediatric Partners, your client acronym may be BPPP. The file attached to your e-mail will be “bppp.zip”.
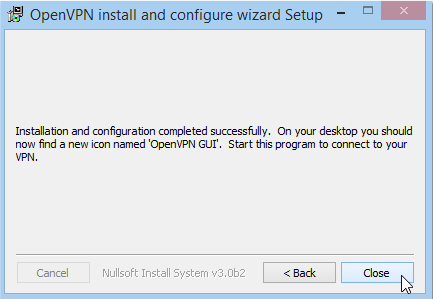
When the installer is finished, click “Close”.
Re-Enable Your Virus Protection
If you disabled your virus protection software, re-enable it once the installation is complete.
Run OpenVPN GUI
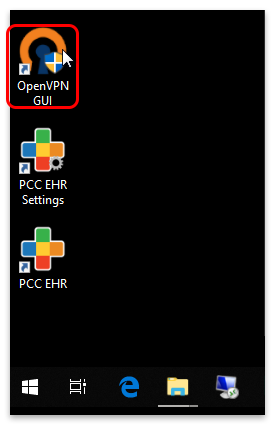
When the installation is complete, you will see a new icon on your desktop labeled “OpenVPN GUI”. You can also find it through your Windows Start menu.
Double-click on the “OpenVPN GUI” icon on your desktop (or single-click in your Start menu).
Use the OpenVPN Icon to Start a Connection
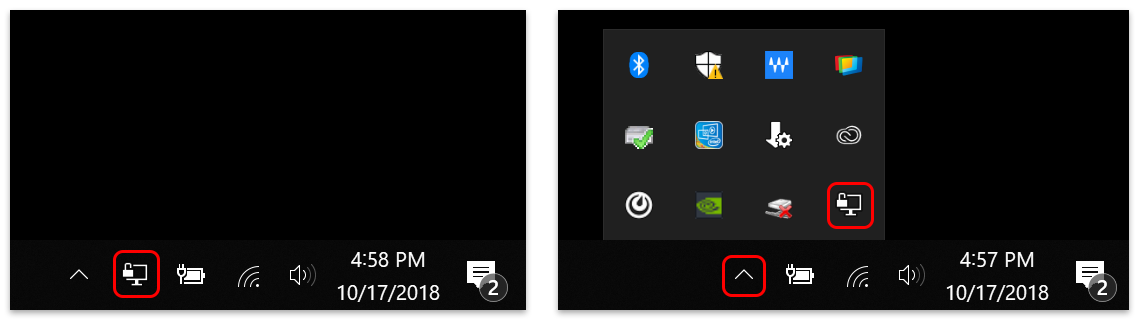
The OpenVPN icon will appear in the lower-right corner of your screen, either directly in the system tray on your task bar, or behind the reveal arrow in your task bar. That icon operates the VPN tunnel to your practice. Double-click on the toolbar icon to start the VPN connection.
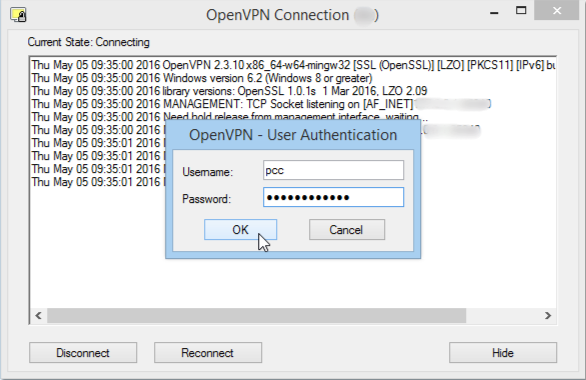
Enter Your PCC Username and Password
When prompted, enter your PCC username and password. Use the same username and password you use to log in to PCC EHR.
Confirm the Connection is Working
The toolbar icon in the lower-right corner will turn green, indicating that the VPN tunnel is now open.

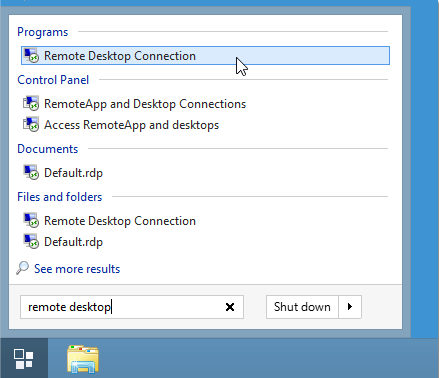
Run Remote Desktop Connection
Now that your VPN tunnel connection is open, run the Remote Desktop Connection application.
Search your computer for “Remote Desktop Connection” and run the Program result.
Configure For Easy Connection: If you are configuring a computer that will connect to your office on a regular basis, you can create an alias of the Remote Desktop Connection program on your desktop or pin it to your task bar. Just right-click on the application and select “Pin to Start Menu” or “Pin to Task Bar”.
Enter Your Practice’s Server Name, a Colon, and a Port Number
In the Remote Desktop Connection application, enter the “Computer” to which you want to connect.
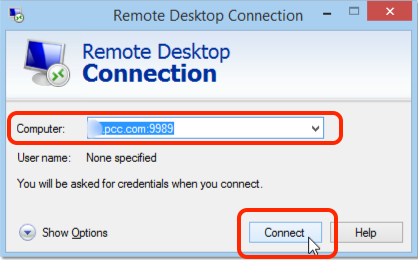
The computer you wish to connect to is your practice’s PCC server. The name of your server consists of your client acronym and “pcc.com”. If you work at Beagle Pediatrics Unlimited, for example, your domain might be “bpu.pcc.com”. You must also enter a colon (:) and specify the port number 9989, as shown.
Security Note: 9989 is not the standard RDP port. PCC uses port 9989 as an added security feature.
Set It Once, RDC Will Remember: After you enter the address and port number once, and connect, the Remote Desktop Connection application will remember your preferences. If you want, you can click “Show Options” and enter a username as well, and then save your settings.
Click Connect
Click “Connect” to open a remote desktop connection to your practice’s PCC Server.
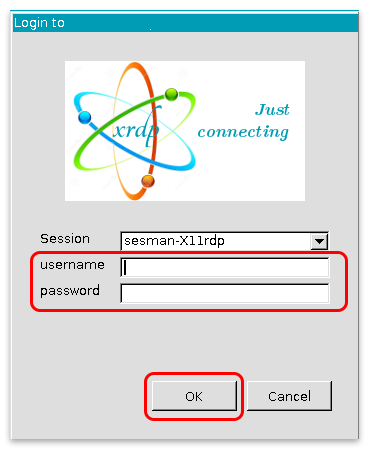
Enter Login Information
Use your PCC username and password to log in. Use the same username and password you use to log in to PCC EHR.
Depending on your PCC Server configuration, you may see a default login or a PCC-branded login.
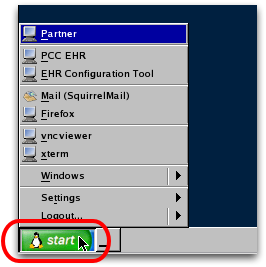
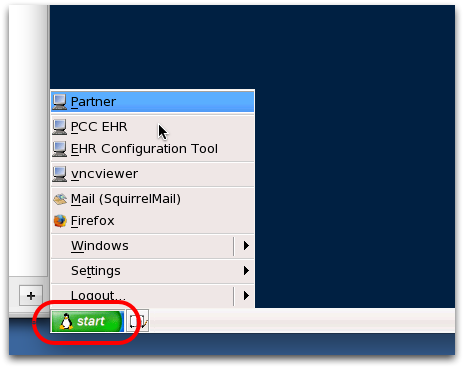
From the Desktop, Click “Start” and Select a PCC Program or Service
RDP creates a secure, virtual workspace for running PCC programs. You can click on the start penguin to open PCC EHR, SquirrelMail, Firefox, or a terminal.
Log Out
When you are finished, click on the penguin and select “Logout…”. If you do not log out, your programs will remain running.
Configuration is Finished, Next Time…
Now that you have configured your PC to connect to your practice’s PCC server, you can connect at any time with fewer steps. The Remote Desktop Connection application, for example, will remember your practice’s name and the 9989 port.
For a refresher of just the connection steps, or to help whoever you configured this PC for, read Connect to Your PCC System from Home.
Apple Macintosh: Install and Configure Remote Connection Software
Follow these instructions to install and configure VPN and RDP software on a personal computer running the Macintosh OSX operating system.
Check Your E-Mail
Upon request, PCC will send authorized users an e-mail with a VPN key. Look for an e-mail from the “root” user of your PCC Server. It will have an attachment.
Save the E-Mail Attachment to Your Macintosh
Save the .zip file that is attached to the VPN e-mail. You can save the file on your desktop or in another folder.
The filename will be your practice’s PCC client acronym followed by “.zip”. For example, if you work at Bedrock Prehistoric Pediatric Partners, your client acronym may be BPPP. The file attached to your e-mail will be “bppp.zip”.
Download the Tunnelblick Application
Use your Web browser to download the latest version of Tunnelblick, the Macintosh VPN software application. The link to the installer is on this page:
https://tunnelblick.net/downloads.html
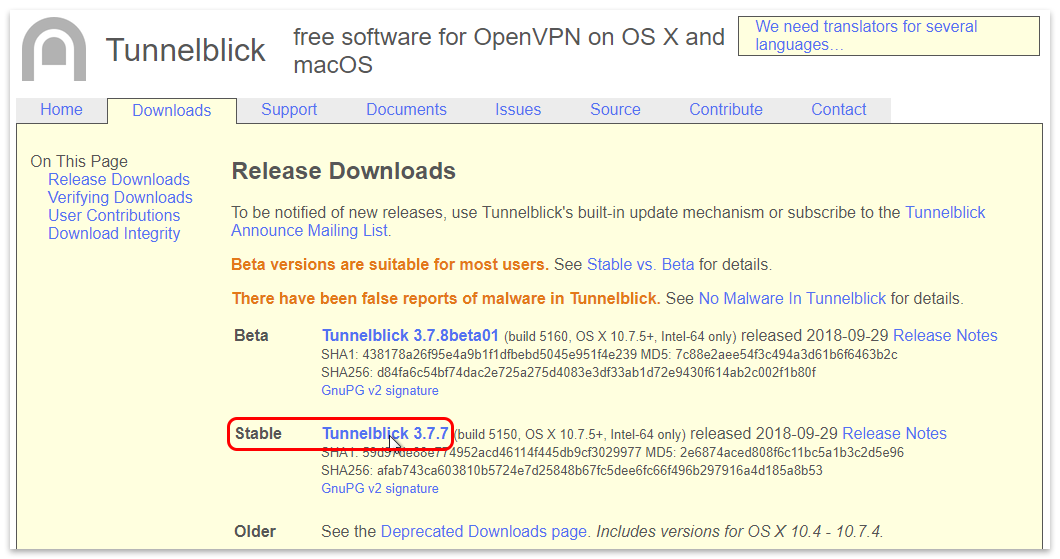
PCC recommends you download the current “Stable” release of the Tunnelblick software.
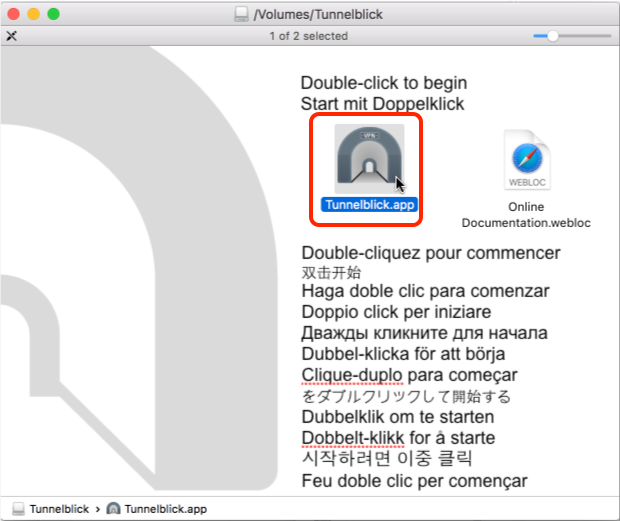
Install the Tunnelblick Application
Open the downloaded Tunnelblick.dmg file. You can double-click on the Application to automatically install it, or drag the application to your Applications folder. Optionally, you can add the application to your Dock.
Run Tunnelblick Automatically: If you connect every day, you may choose to add Tunneblick to your system login items. Under the Apple menu, select System Preferences–>Users & Groups–>Login Items, and click the plus (+) button.
Was the Installation Successful?
When the Tunnelblick application is installed and running, you will notice a tunnel-shaped icon in the menu bar in the upper-right corner of your screen. That icon operates the VPN tunnel to your practice’s terminal server.
Double-Click on the .zip File and Open the Enclosed .ovpn File
Find the .zip attachment you saved to your Macintosh and double-click to decompress it. In the resulting folder, double-click on .ovpn file.
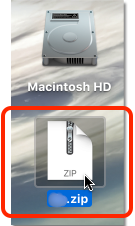

The filenames will begin with your practice’s PCC client acronym. For example, if you work at Bedrock Prehistoric Pediatric Partners, your client acronym may be BPPP. The file attached to your e-mail will be “bppp.zip” and the enclosed file will be “bppp.ovpn”.
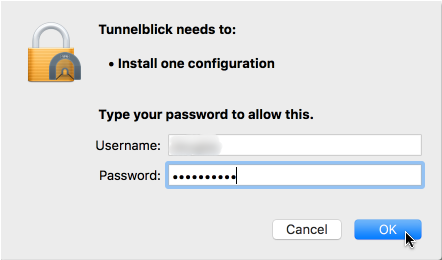
Your Macintosh will open Tunnelblick using your .ovpn VPN file. Tunnelblick will ask whether the key is for all users or just you, and ask you to confirm the installation with your username and password. Use the username and password for your Macintosh.

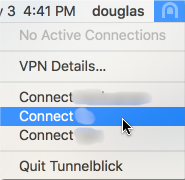
Click on the Tunnelblick Icon and Select “Connect…”
Click on the Tunnelblick Icon and select the connection to your office.

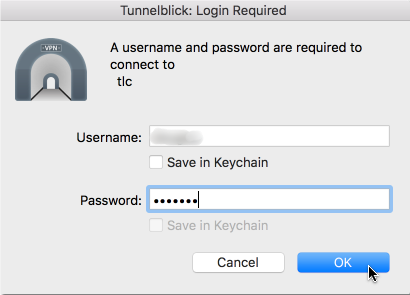
Enter Your PCC Username and Password
When prompted, enter your PCC username and password. Use the same username and password you use to log in to PCC EHR.
Confirm the Connection is Working
The tunnel icon will turn solid, indicating that the VPN tunnel is now open.

Install Microsoft Remote Desktop
Launch the App Store and install Microsoft Remote Desktop.
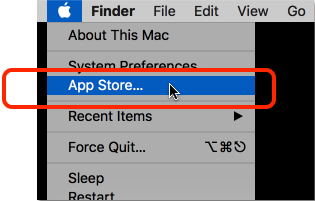
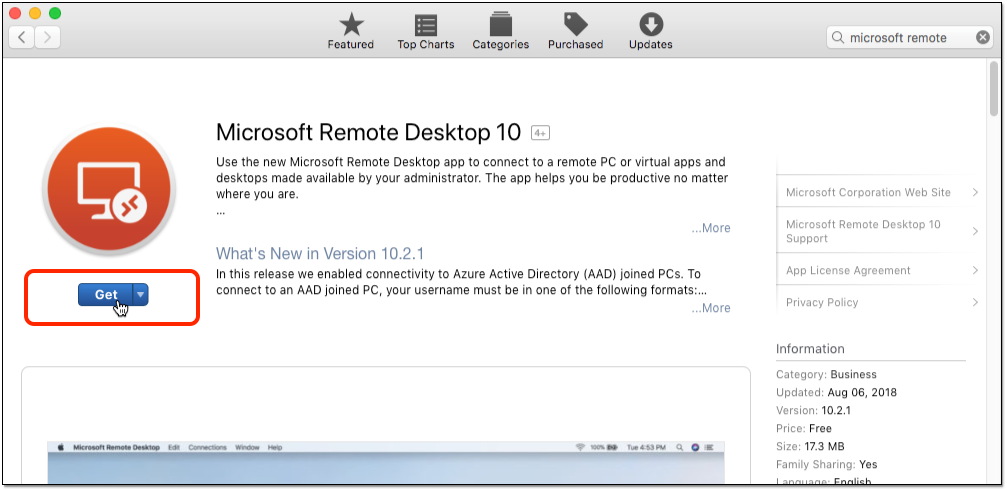
You can launch the App Store by selecting “Software Update” from the Apple menu, and then search for Microsoft Remote Desktop.
Run Microsoft Remote Desktop
Run the Microsoft Remote Desktop application. You can find it in your Applications folder. You can also add it to your Dock for quick access.

Add a New Server
The first time you run Microsoft Remote Desktop, you will need to add your practice’s PCC server information as well as your PCC login information. Click Add Desktop and fill out the information as shown.
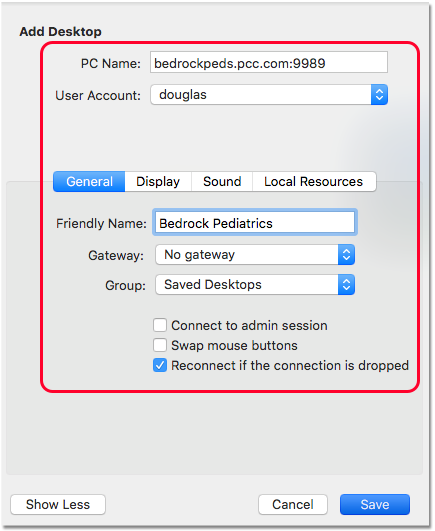
Your “User Account” information is your PCC username and password.
Replace “Bedrock Pediatrics” with your Practice name or other easy to remember name for your connection to the server. Use your office’s PCC acronym for the PC name field. If you do not know your office’s PCC name, contact PCC Support at 800-722-1082 or ask your office’s system administrator.
-
PC Name: your PCC acronym, with pcc.com and port 9989: acronym.pcc.com:9989
-
User Account: use the menu to enter your PCC credentials
-
Friendly Name: your name for your practice
Optionally, you can configure your connection’s display and other window settings.
Click Save to close the window, and Microsoft Remote Desktop will save your new connection settings.
Add Microsoft Remote Desktop to Your Dock: If you will be connecting often, you can add Microsoft Remote Desktop to your dock. Either drag the application to your Dock, or right-click on the Dock icon when the program is running and select Options–>Keep in Dock.
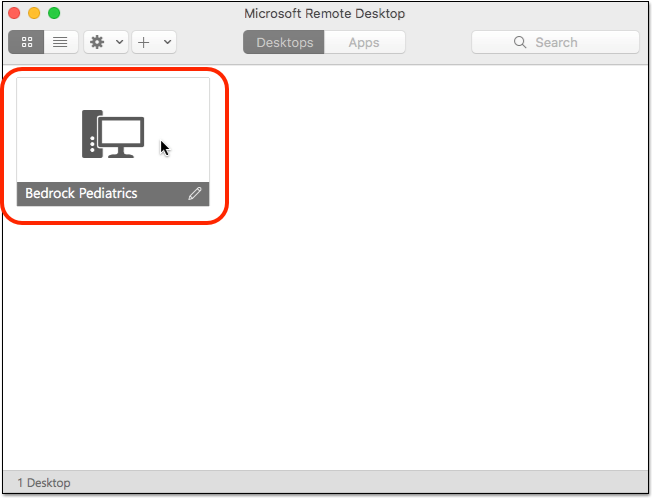
Open an RDP Connection to Your Office’s Server
When you want to connect to your office, check that your Tunnelblick connection is still running, run Microsoft Remote Desktop, and double-click on your office’s PCC server.
From the Desktop, Click “Start” and Select a PCC Program or Service
RDP creates a secure, virtual workspace for running PCC programs. Click on the start penguin to open Partner, PCC EHR, the PCC EHR Configuration tool, SquirrelMail, Firefox, or a terminal.
Log Out
When you are finished, click on the penguin and select “Logout…”. If you do not log out, your programs will remain running.
Configuration is Finished, Next Time…
Now that you have configured your Macintosh to connect to your practice’s PCC server, you can connect at any time with fewer steps. The Microsoft Remote Desktop Connection application, for example, will remember your practice’s name and the 9989 port.
Windows PC: Connect to Your Practice’s PCC Server
After completing the configuration above, follow the procedure below to connect to your office using a Windows PC computer. These instructions are generally the same for Windows XP through Windows 10. (PCC recommends you update all PCs to Windows 7 or better.)
Run OpenVPN GUI
Double-click on the “OpenVPN GUI” icon on your desktop (or single-click in your Start menu).
Use the OpenVPN Icon to Start a Connection
The OpenVPN icon will appear in the lower-right corner of your screen, either directly in the system tray on your task bar, or behind the reveal arrow in your task bar. That icon operates the VPN tunnel to your practice. Double-click on the toolbar icon to start the VPN connection.
Enter Your PCC Username and Password
When prompted, enter your PCC username and password. Use the same username and password you use to log in to PCC EHR.
Confirm the Connection is Working
The toolbar icon in the lower-right corner will turn green, indicating that the VPN tunnel is now open.
Run Remote Desktop Connection
Now that your VPN tunnel connection is open, run the Remote Desktop Connection application.
Search your computer for “Remote Desktop Connection” and run the Program result.
Configure For Easy Connection: If you are configuring a computer that will connect to your office on a regular basis, you can create an alias of the Remote Desktop Connection program on your desktop or pin it to your task bar. Just right-click on the application and select “Pin to Start Menu” or “Pin to Task Bar”.
Review or Enter Your Practice’s Server Name, a Colon, and a Port Number
Your practice’s PCC server address and RDP port should appear in the Computer field on your screen.
If it doesn’t, you can enter it and the program will remember the address the next time you connect. The computer you wish to connect to is your practice’s PCC server. The name of your server consists of your client acronym and “pcc.com”. If you work at Beagle Pediatrics Unlimited, for example, your domain might be “bpu.pcc.com”. You must also enter a colon (:) and specify the port number 9989, as shown.
Click Connect
Click “Connect” to open a remote desktop connection to your practice’s PCC Server.
Enter Login Information
Use your PCC username and password to log in. Use the same username and password you use to log in to PCC EHR.
Depending on your PCC Server configuration, you may see a default login or a PCC-branded login.
From the Desktop, Click “Start” and Select a PCC Program or Service
RDP creates a secure, virtual workspace for running PCC programs. You can click on the start penguin to open Partner, PCC EHR, the PCC EHR Configuration tool, SquirrelMail, Firefox, or a terminal.
Log Out
When you are finished, click on the penguin and select “Logout…”. If you do not log out, your programs will remain running.
Macintosh OS X: Connect to Your Practice’s PCC Server
Follow the procedure below to connect to your office using a Macintosh computer after completing the Macintosh configuration above.
Run TunnelBlick
If it is not already running, open the TunnelBlick application from your Applications folder or Dock.
Click on the Tunnel Icon and Connect to Your Practice’s VPN
Click on the Tunnelblick Icon on your menu bar and select the connection to your office.
Run Microsoft Remote Desktop
Run the Microsoft Remote Desktop application. You can find it in your Applications folder or your Dock.
Connect to Your Office’s PCC Server
In the list of “My Desktops”, double-click on your office’s PCC server.
Wait for Connection, Enter Username and Password if Requested
A new screen will open and the program will connect to your practice’s server. You may be asked to re-enter your username and password. Use the same username and password you use to log in to PCC EHR.
From the Desktop, Click “Start” and Select a PCC Program or Service
RDP creates a secure, virtual workspace for running PCC programs. Click on the start penguin to open Partner, PCC EHR, the PCC EHR Configuration tool, SquirrelMail, Firefox, or a terminal.
Log Out
When you are finished, click on the penguin and select “Logout…”. If you do not log out, your programs will remain running.
Update from Microsoft Remote Desktop 8 to Microsoft Remote Desktop 10
In 2018, Microsoft will deprecate version 8 of their Macintosh Remote Desktop application. If you use Microsoft Remote Desktop 8, you may be prompted to download an update to version 10. You can also download the newer application using the instructions above.
When you update to version 10, you will lose your configuration and saved connection settings.
You can work with a PCC Technical Solutions team member to set up your remote connection again, or use the instructions above. Alternatively, before you update you can open Microsoft Remote Desktop 8, export your settings, and then import them to Microsoft Remote Desktop 10.
VPN Software Options
The above instructions show you how to install OpenVPN or Tunnelblick, along with your private VPN key, to open a VPN tunnel to your PCC practice.
There are many VPN software options other than OpenVPN and Tunnelblick. PCC has also successfully used Viscosity for the Macintosh system.
For help understanding your software options, contact PCC Support.
RDP Server Options for Your Practice
RDP (Remote Desktop Protocol) creates a secure desktop environment on a remote computer. RDP opens a portal to a desktop environment that runs on your practice’s PCC server.
Your office can choose which RDP service runs on the PCC server at your practice. You can use the free xRDP service which runs by default or set up and install a Windows RDP server.
xRDP
xRDP is a free Linux-based solution that runs on your PCC server. In your remote office or at home, you can run RDP client software on your personal computer (see instructions above) and a window will open displaying a Linux-based desktop environment. In that desktop window, you can run PCC programs.
The advantages of xRDP are that it is free, quick to install and configure, and provides access to remote or home offices. The disadvantages are that some users do not wish to use a Linux desktop environment, RDP is slower than working in the office, and xRDP sometimes fails to establish new connections.
xRDP is not developed or maintained by PCC, it is a third-party service that runs on your PCC server.
Windows RDP
Large practices may choose to install and maintain a Windows RDP server. Remote users would run RDP client software (see below) and a window would open and display a Windows-based desktop environment. In that desktop window, they would run PCC programs.
The advantages of Windows RDP are that it is stable, actively developed, and presents the user with a familiar OS interface. The disadvantage is the significant cost, both for licensing the software and installing and maintaining an additional server at your practice.
Choosing the Best Solution For Your Practice
Work with PCC Support to discuss your remote connection needs. We’ll help you design a solution that’s perfect for you, and we provide ongoing support to test and reconfigure your connections as your needs evolve.