Configure Forms in PCC EHR
The Forms Configuration tool in PCC EHR allows you to create and manage your own auto-filling forms, handouts, policies, and letters, that you can edit and generate more easily.
Watch a Video: Learn how to create a form from scratch, or clone and edit a form with the Create a Form and Clone and Edit a Form videos.
Contents
- 1 Create or Edit a Form
- 2 Generate or Print a Form
- 3 Configure Variables
- 4 Use the Variables Shortcut
- 5 Understand the Form Preview Screen
- 6 Customize Your Letterhead
- 7 Set Up a Provider Signature
- 8 Work with PDF Forms
- 9 Configure the Patient and Account Forms Component
- 10 Enable the Forms Configuration Tool
- 11 Set Permissions for the Forms Configuration Tool
Create or Edit a Form
Use the Forms Configuration tool to build, preview, and publish your own auto-filling forms, handouts, policies, and letters.
Add a New Form
To create a new form letter from scratch, add a form in the Form Configuration tool.
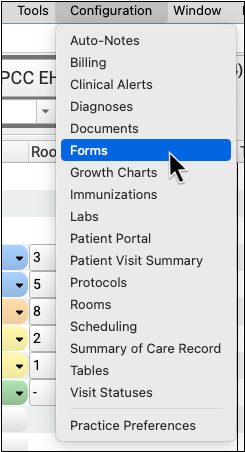
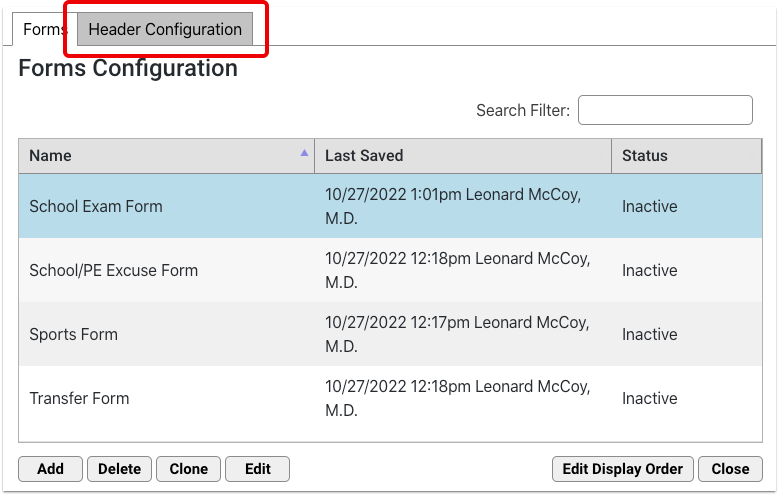
Open the Forms Configuration Tool
Select “Forms” from the Configuration menu to open the Forms Configuration tool
Choose a Form Type
Choose the type of form you want to create. Each type of form has a specific set of variables, based on the recipient of the form.

- Patient forms are generally directed to the family, school, or specialists. These might include excuse forms, asthma action plans, referral forms, and so on.
- Account forms are directed to the account holder (the guarantor or custodian). These are usually billing- or insurance-related forms such as past due letters, address verification letters, or policy-related mailings.
Add a New Form
Click the “Add” button to create a new patient or account form.
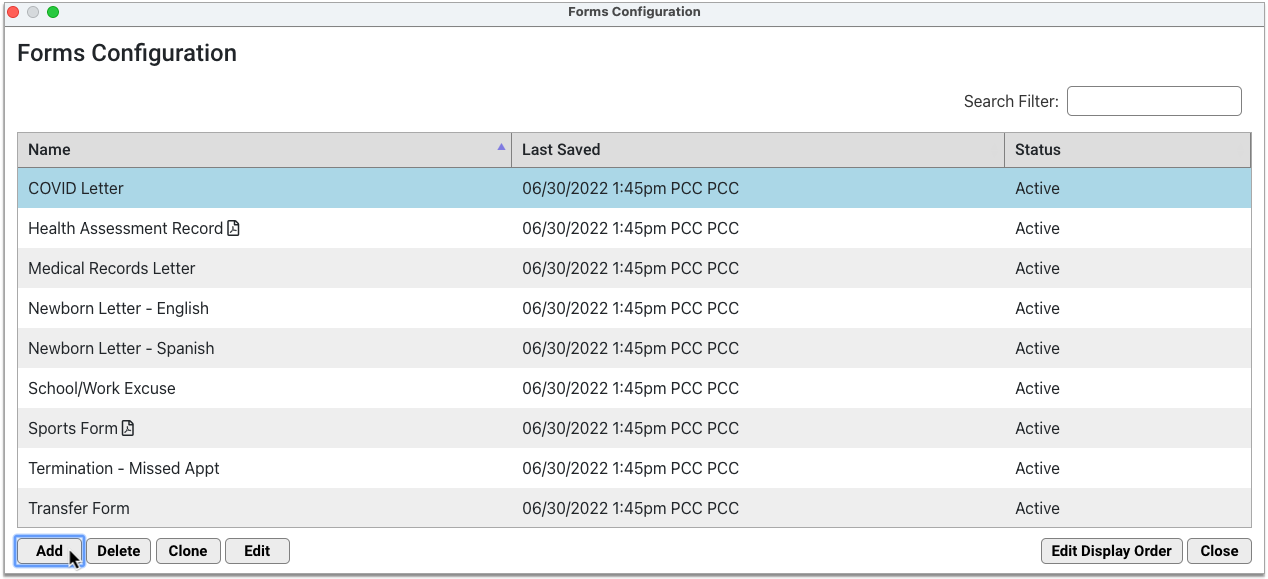
The default workspace is an 8.5 x 11-inch page with 1-inch margins.
Name the Form
Give the form a unique name.
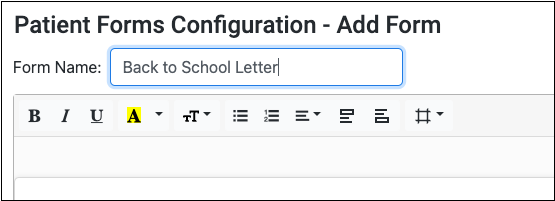
Other users at your practice will see this name on the Patient or Account Forms component drop-down list n the patient’s chart. The name will also be used as the default document title when you generate the form.
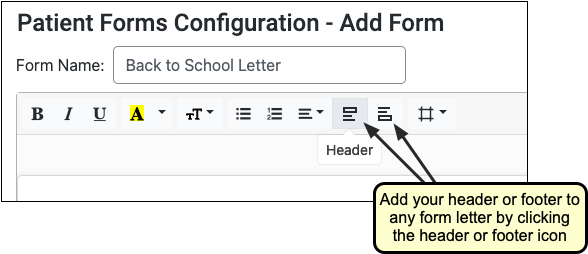
Add Letterhead
To add your header or footer (or both) to any form, click the header or footer icons.
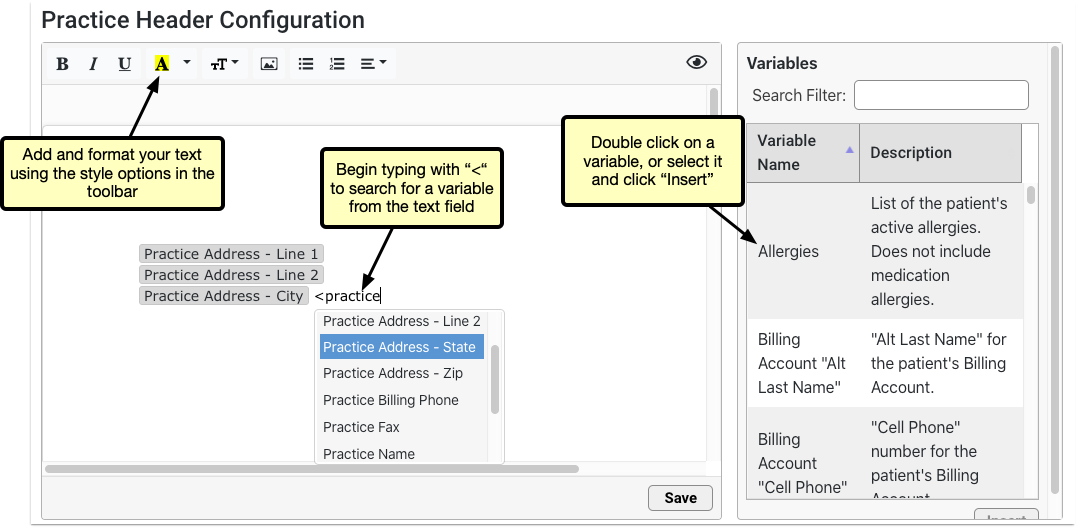
Compose Text
Click on the workspace and type or copy and paste to add text.
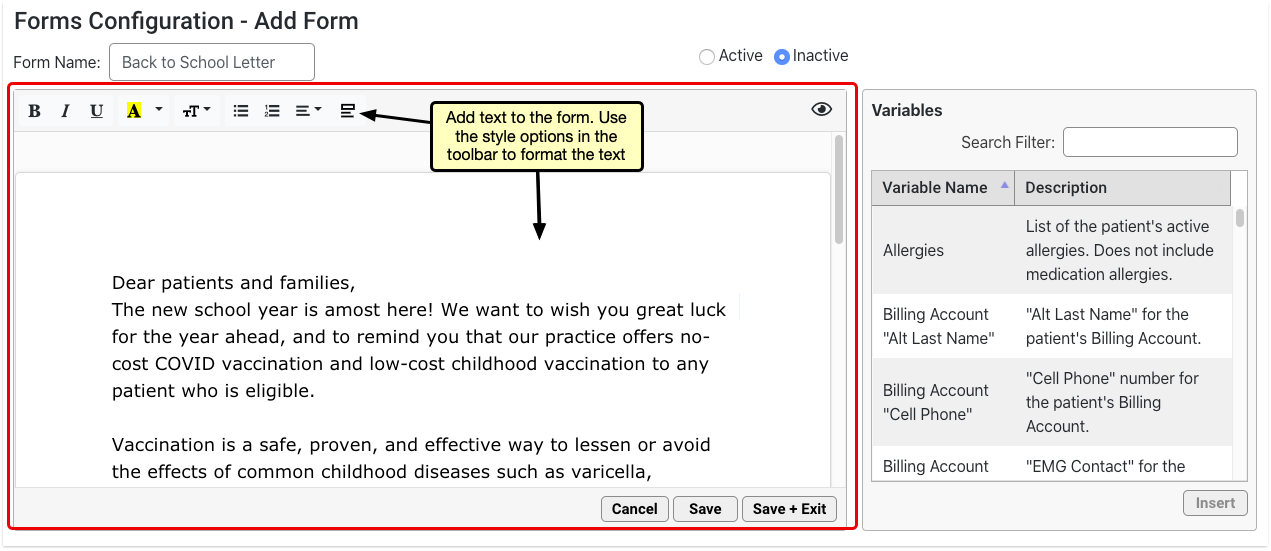
Use the style options in the toolbar to customize the font size, weight, and color, as well as the text alignment and list style. Only one font is available at this time.
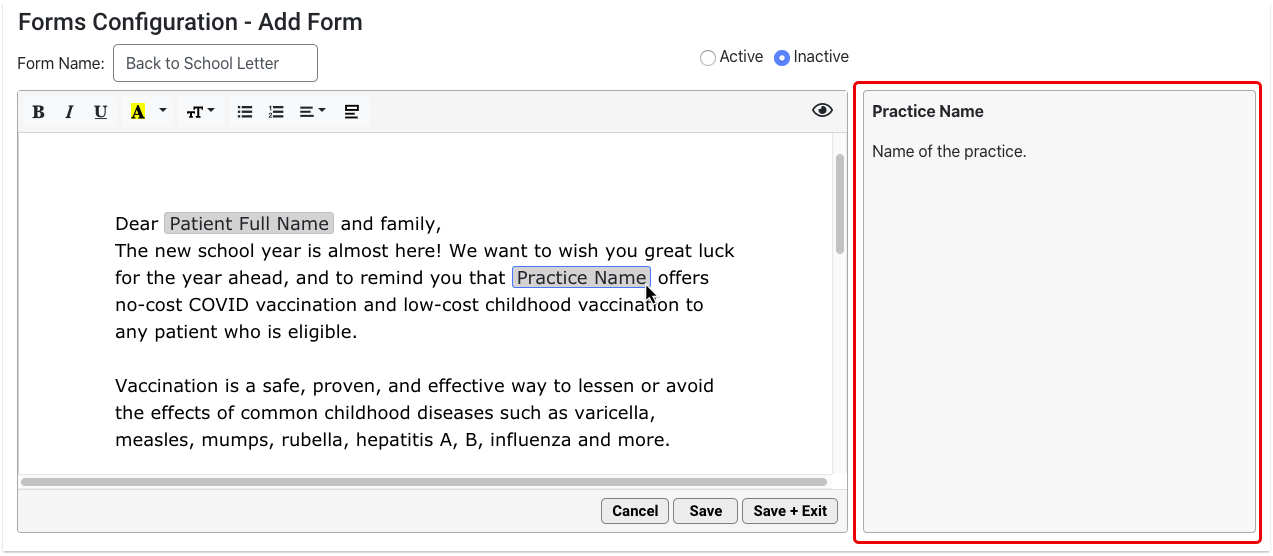
Search For and Insert Variables
Use the Variables pane to find and insert variables. Double-click on any variable to insert it onto the form, or select the variable and click the “Insert” button.
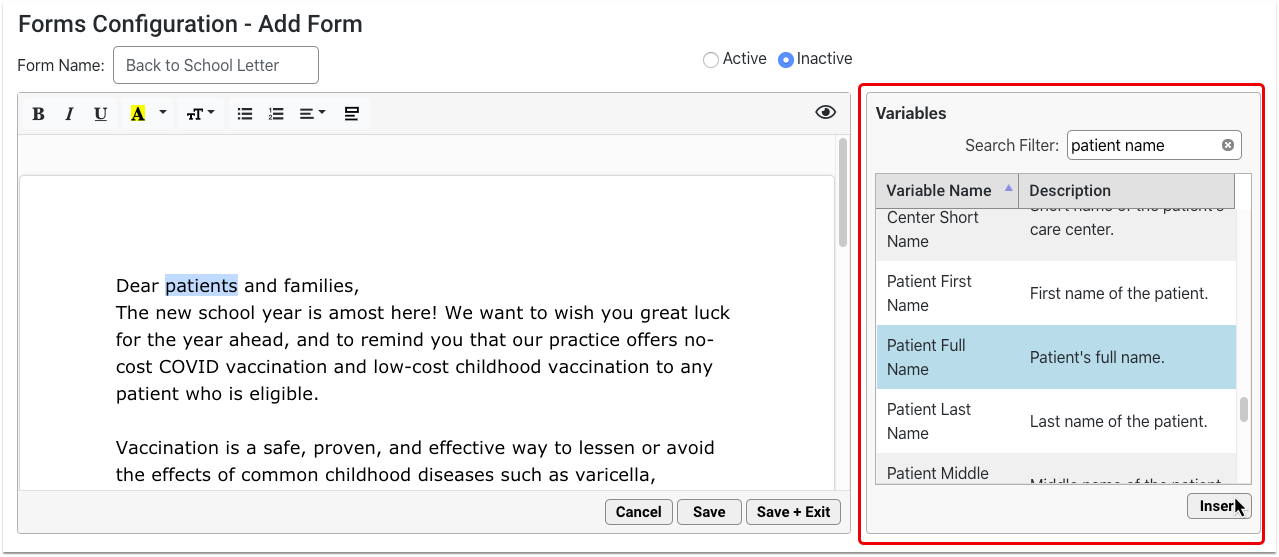
The variable inserts where your cursor is placed on the form.
You can optionally add variables using the variables shortcut. To learn more, read Use the Variables Shortcut.
Fill Decision Variable Fields As Needed
Click on orange variables to fill out the required field in the options pane.

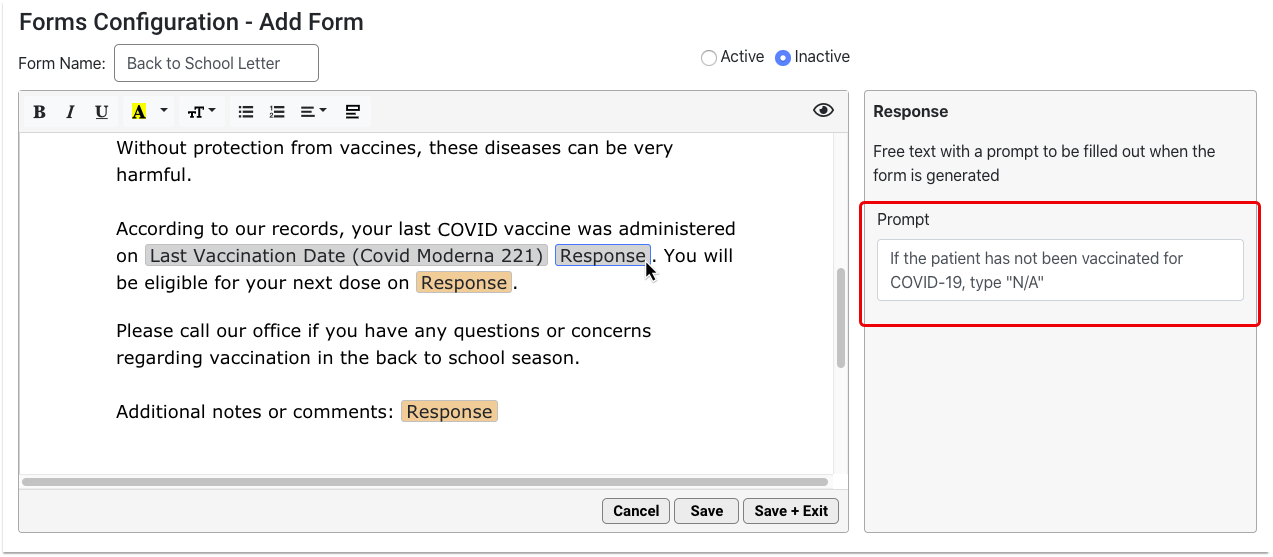
Add Response Variable Prompts As Needed
Configure each Response variable with a prompt. The prompt should tell the person filling out the form what kind of information to include in their response.
Add a Provider Signature Image and Related Variables
Find and insert a provider signature image variable wherever you want the selected provider’s signature to display.
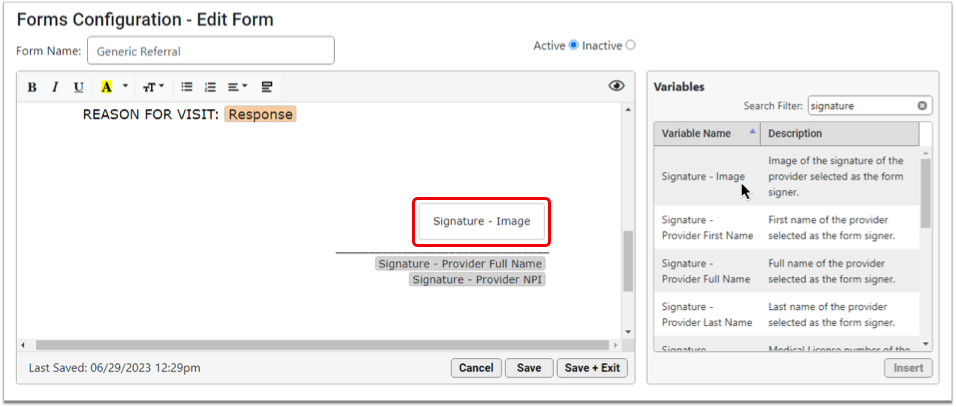
Only one provider’s signature image can be selected at the time of form generation. You can add the signature provider’s full name, NPI or Tax ID in addition to the signature image.
To learn more about configuring provider signatures, read Configure Provider Signatures.
Adjust Margins
Click the icon to view the margin size choices and, optionally, adjust the margins.
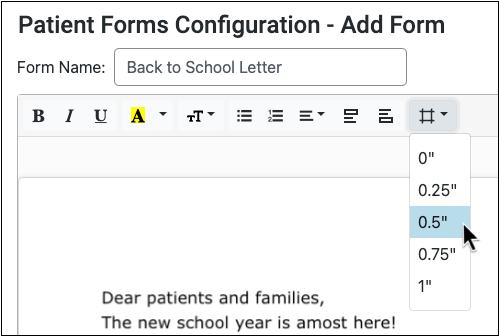
When you select a different margin size, the form updates in real time.
Preview
Click the eye icon in the top right corner of the form to preview it at any time.
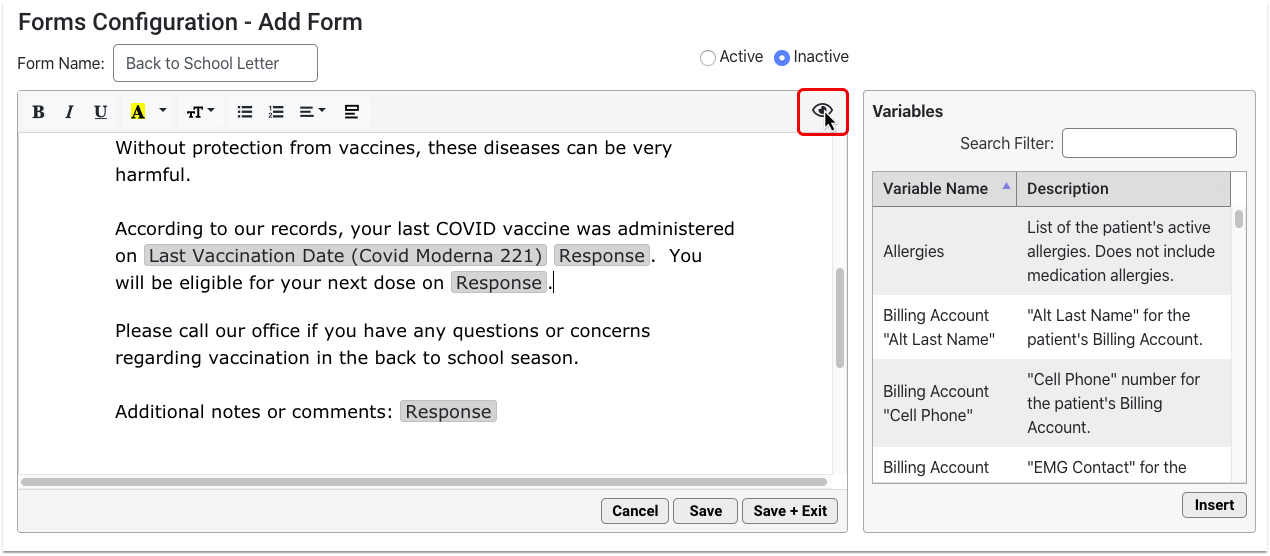
The form renders in real time. Variables auto-fill with real data. Where there is no data to auto-fill, the variable renders as blank.
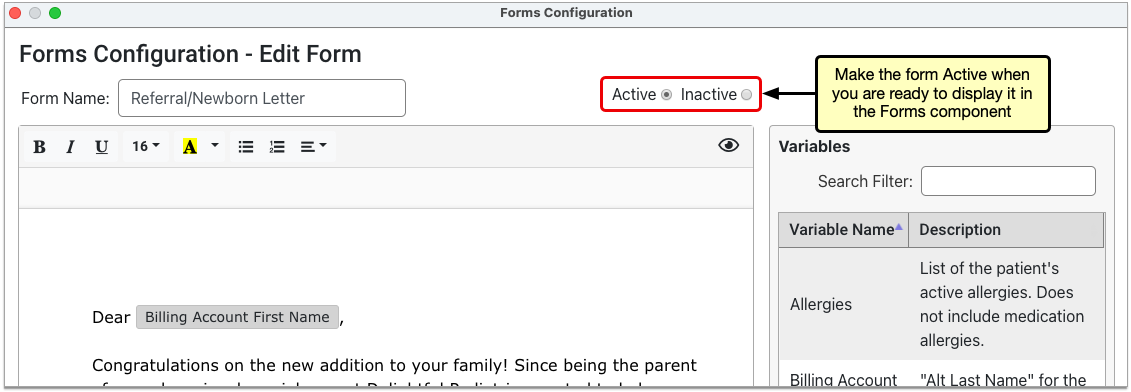
Make the Form Active
When the form is complete and ready to be added to the Patient or Account Forms component in the patient’s chart, change its status to Active in the top right corner of the form configuration window.
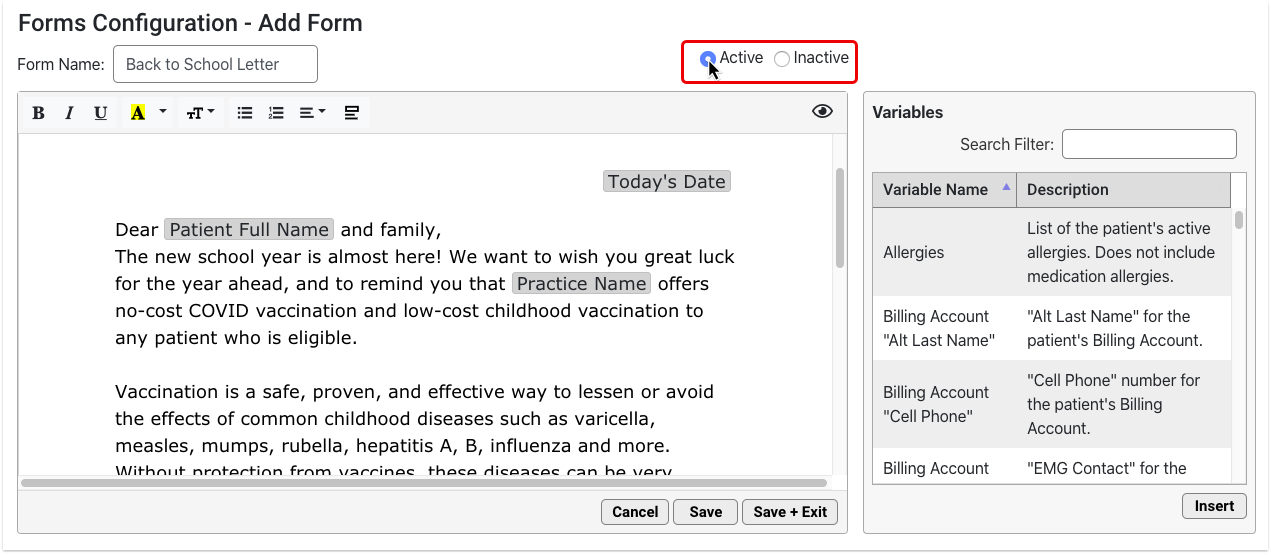
New forms start out as Inactive by default to prevent other users at your practice from generating them before they are ready.
Save the Form
Click “Save” or “Save + Exit” to save your work.
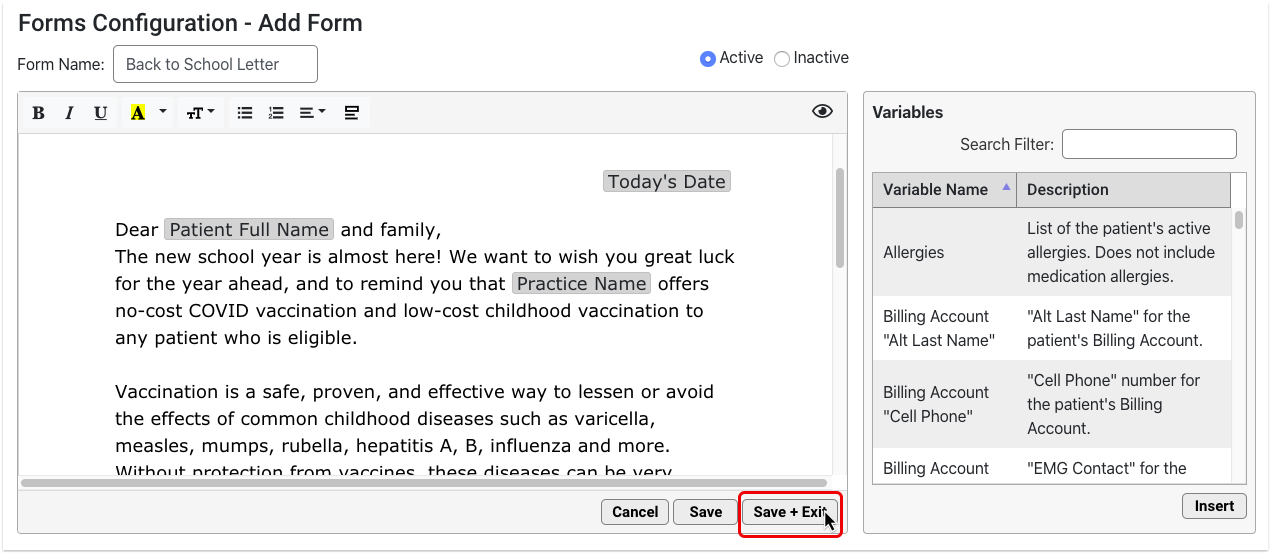
A “Last Saved” timestamp at the bottom of the form editor tells you the last time the form was saved.
Optionally Test Printing
If your practice generates form letters that have unusual formatting, use response variables or other special features, you may want to confirm that they print as expected.
Clone an Existing Form
When you need to create a variation on an existing form, clone a saved form instead of starting from scratch. Your practice can create a base form, such as a simple letter with today’s date and demographic variables, to reduce the time you to spend composing new forms.
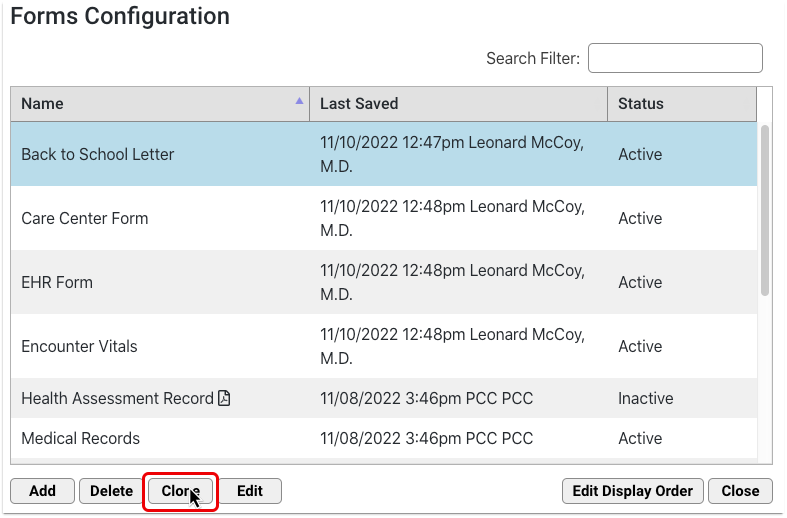
To make a copy of a saved form, select it and click the “Clone” button.
The copy opens in the form editor, where you can start making changes right away without affecting the original form.
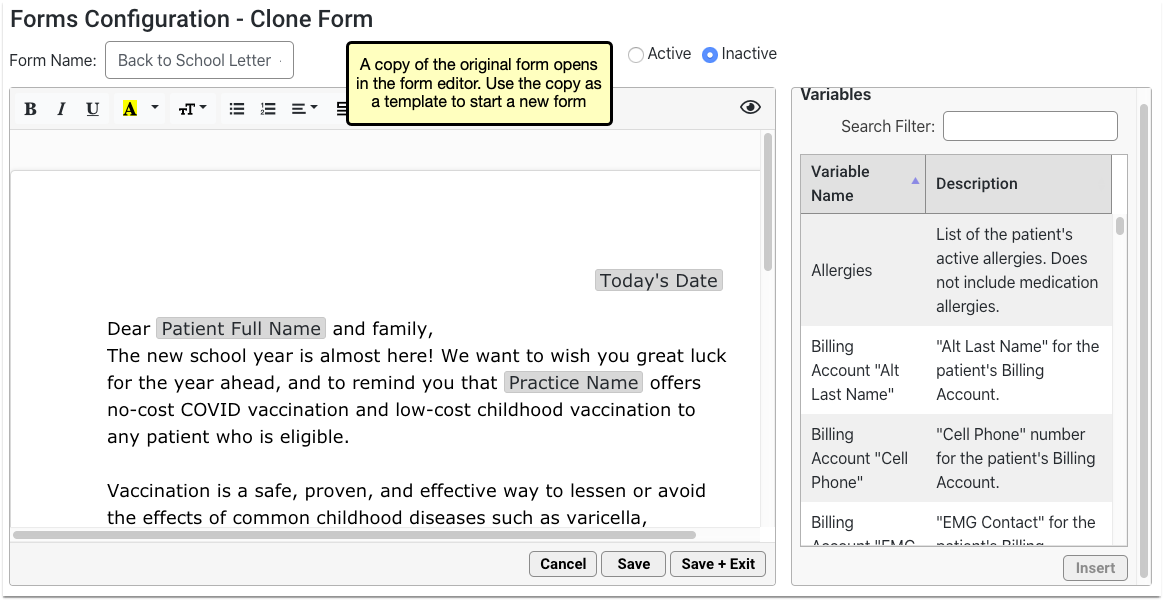
Rename your form and make your edits, then save the copy as you would a new form. Forms that are not renamed will be saved with “Copy” at the end of the original form’s name.
Edit or Delete a Form
You can update and make changes to saved forms at any time.
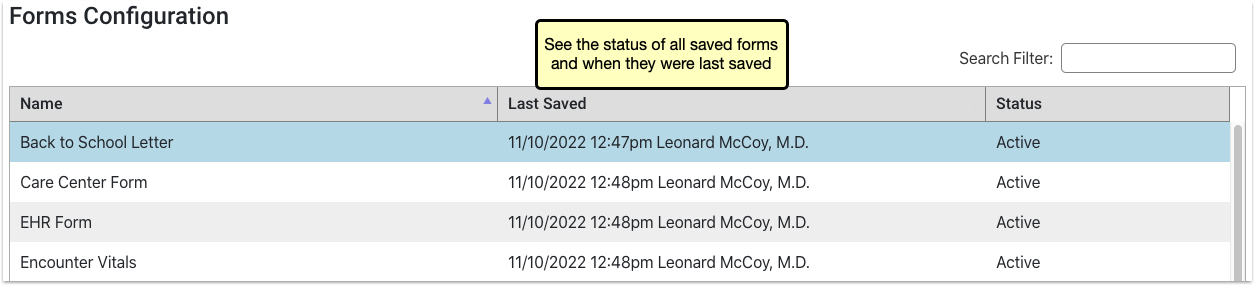
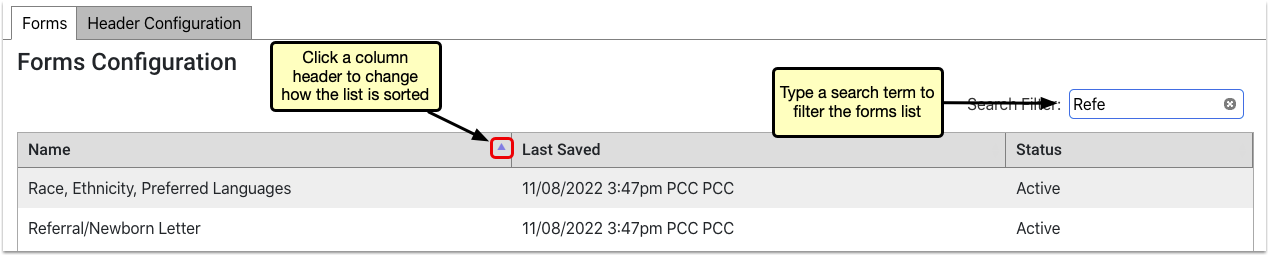
Find the Form
Use the Search Filter to narrow down the list or click the column headers to change how the list is sorted.
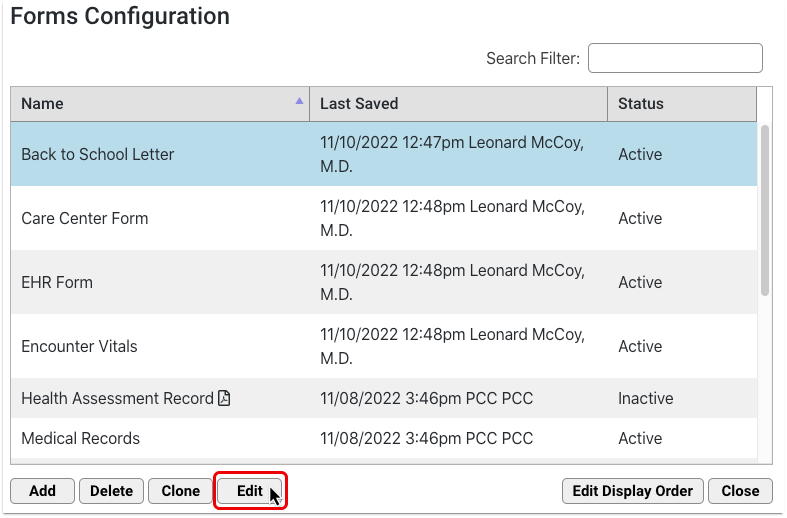
Open the Form
To open a saved form, double-click it or select it and click the “Edit” button.
Edit the Form
You can make changes to your form name, text, formatting, variables and status.
To discard all changes to a form that you are currently working on, click the “Cancel” button.
Save the Form
When your edits are complete, click “Save + Exit”.
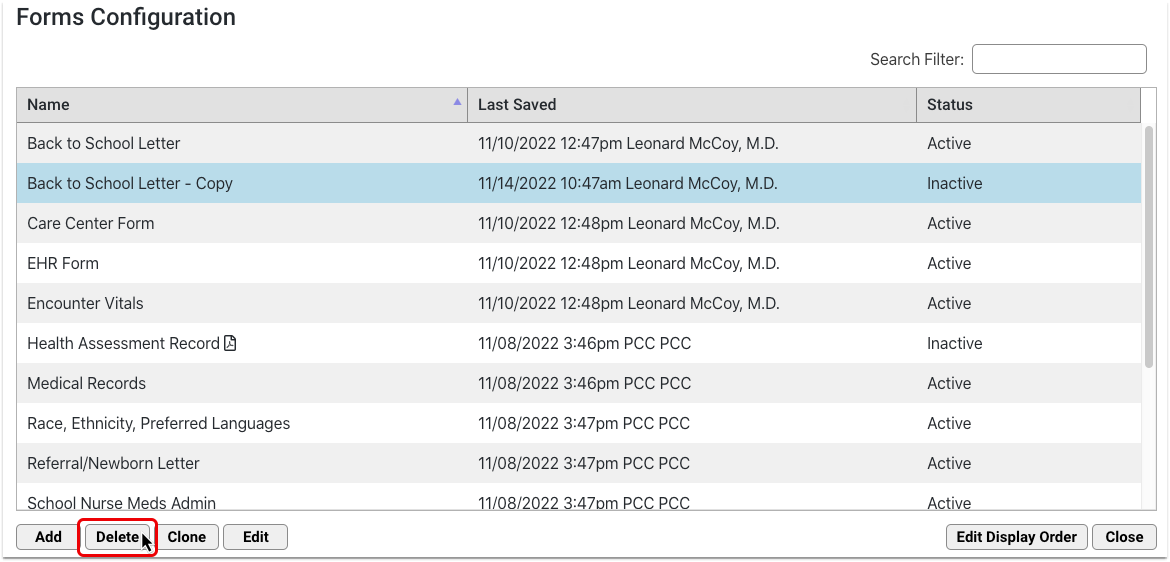
Optionally Delete a Form
To delete a saved form, select it and click the “Delete” button. This action is protected by a special user permission in the User Administration tool.
Deleted forms are removed from both the Forms Configuration tool and the Patient or Account Forms component. If you need to restore a form that was deleted by accident, contact PCC Support.
Generate or Print a Form
When you need to generate or print a form, use the chart-wide Patient or Account Forms component to generate a patient form, enter additional information as needed, and work with the form in the document viewer. Your practice can add the Patient or Account Forms component to any protocol ribbon in PCC EHR.

For more detailed information on how to generate forms in PCC EHR, read Generate Forms in PCC EHR.
Configure Variables
Variables are placeholders in patient and account forms that populate specific information when the form is generated. Some variables require further configuration.
- Simple variables auto-fill with patient data. Some simple variables are configurable.
- Decision variables require additional setup when creating the form in the Forms Configuration tool.
- Response variables require configuration when creating the form. These allow staff and providers to input text when the form is generated.
Click on any inserted variable to open its configuration options in the pane to the right of the workspace and follow the instructions in the pane. Contact PCC Support at 802-846-8177 or 800-722-7708 with any questions.

Configure Simple Variables
Most simple variables have no configuration options and only provide a description.
Some simple variables have formatting options. For example, you can customize the date format for date variables.

Configure Decision Variables
Decision variables turn orange as soon as you insert them. These require further configuration.
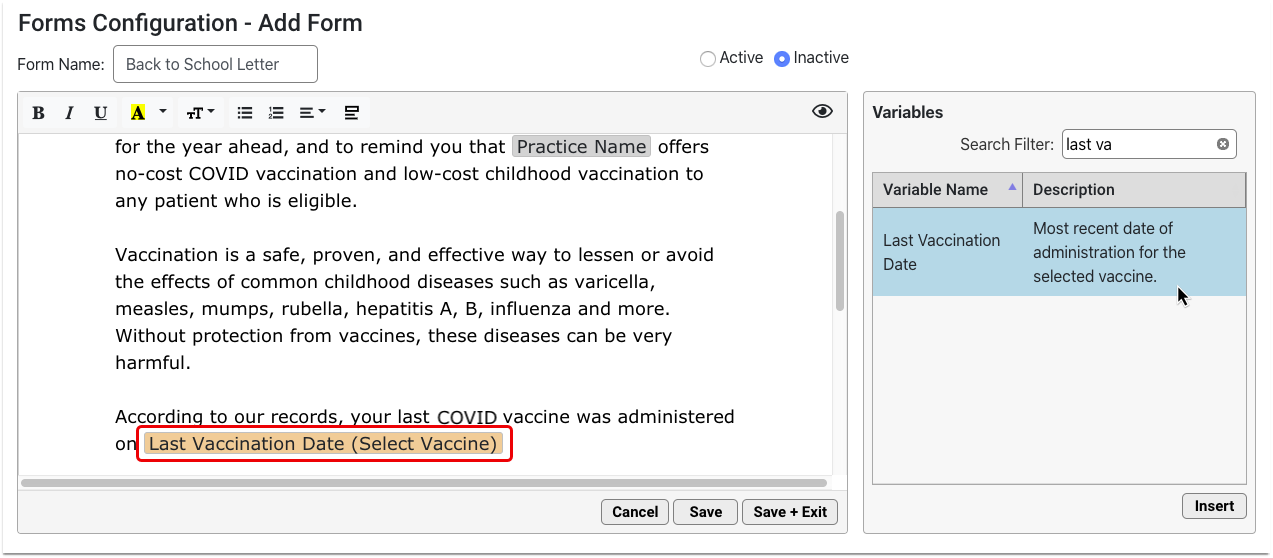
Click on the orange variable and fill out the required field in the options pane. The required field is also highlighted in orange.
Once configured, the orange highlight goes away and the variable name updates to reflect the settings you chose.
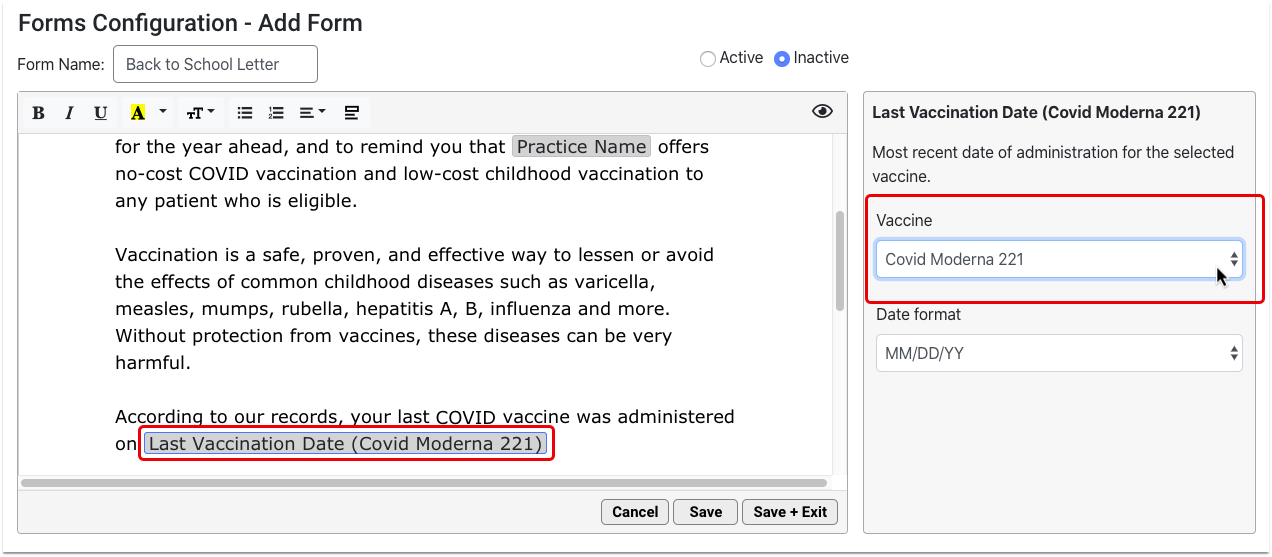
You must configure all orange decision variables in order for the form to work properly.
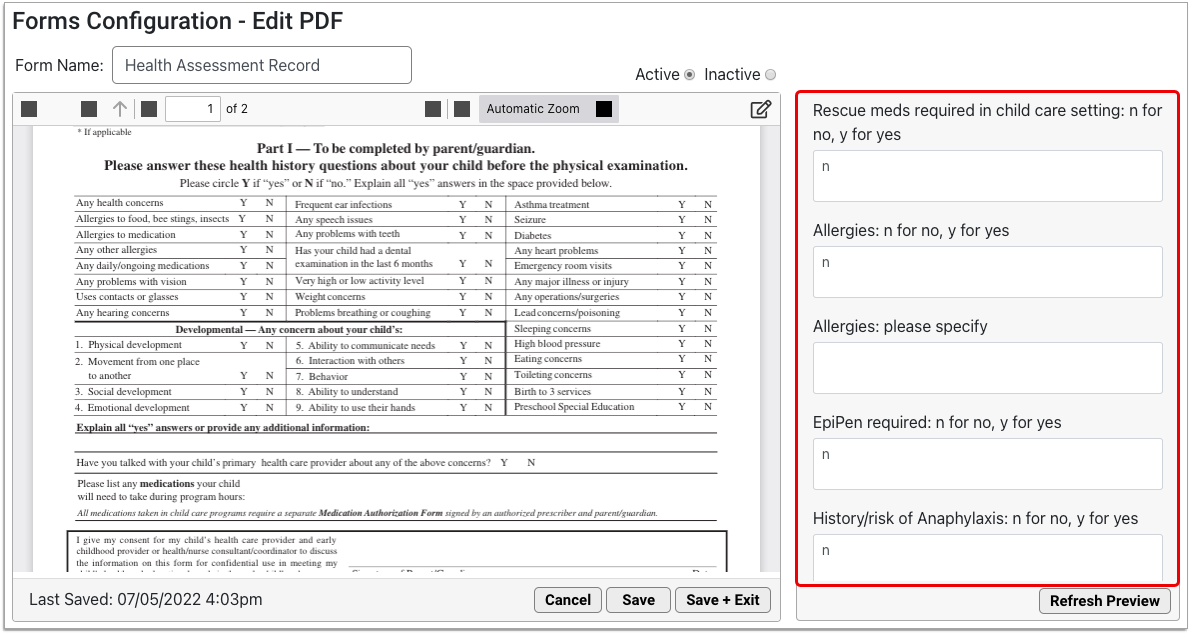
Configure Response Variables
Response variables prompt anyone who generates the form to add a free text response. That response populates onto the generated version of the form.
Add Response variables wherever you want providers and staff to contribute free text responses to the form.
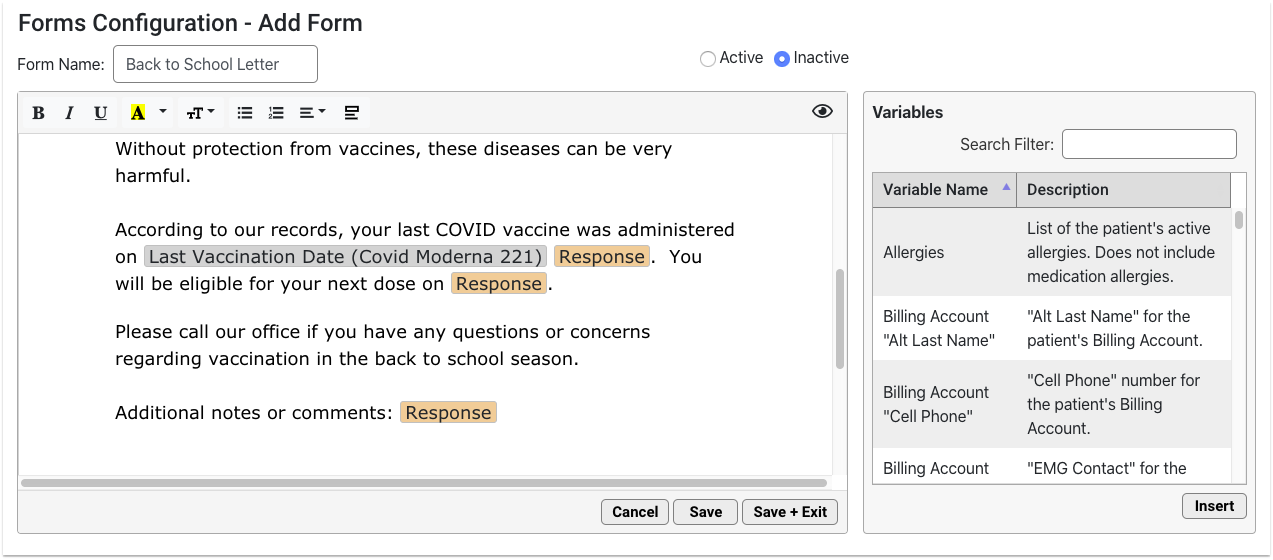
Configure each Response variable with a prompt. The prompt should tell the person filling out the form what kind of information to include in their response.
You can add as many Response variables as you want.
Use the Variables Shortcut
You can quickly insert a variable while you are typing in your form.
Open the Variable List
When you get to a spot in the text where you would like to insert a variable, type “<” to call up the quick-insert variable list.
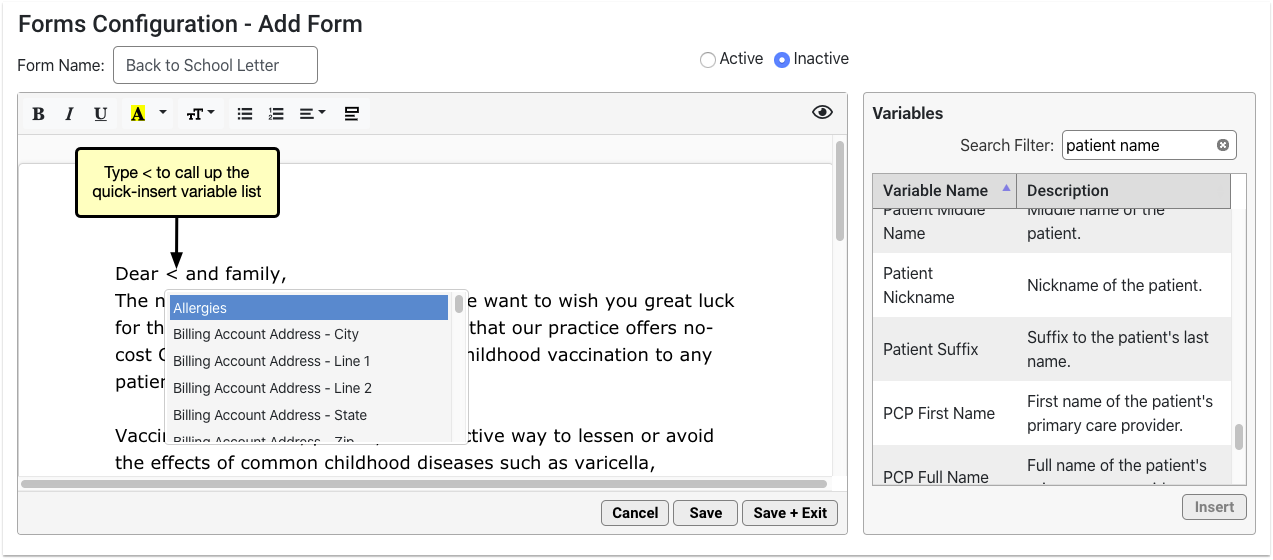
The quick-insert variable list is identical to the list in the Variables pane.
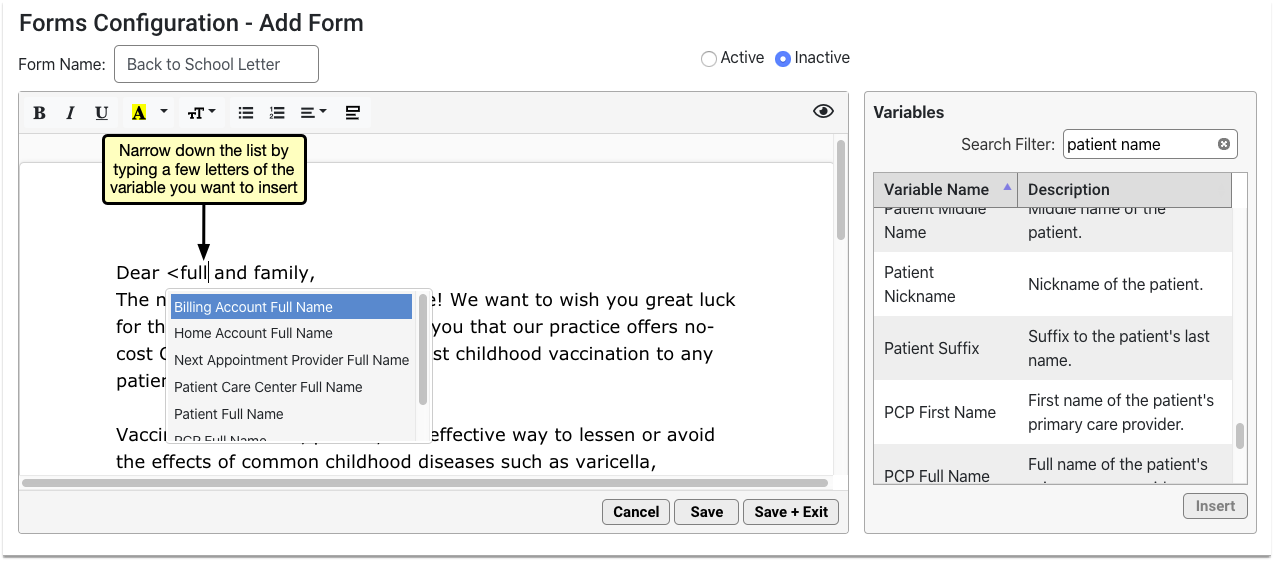
Narrow the List
Narrow down the list by typing a few letters of the variable you want to insert.
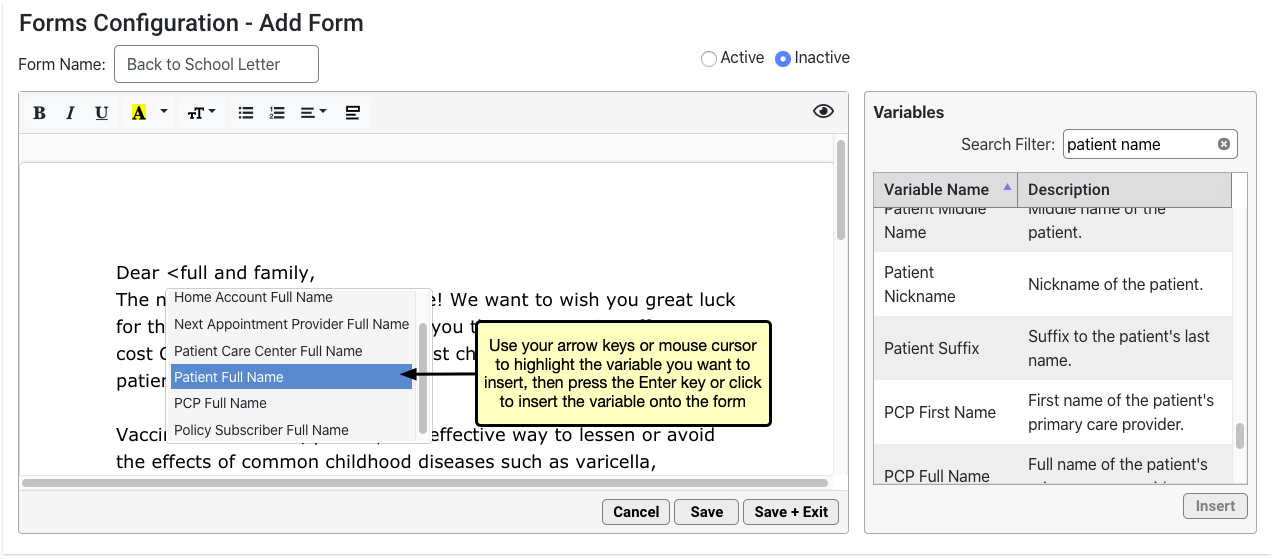
Select the Variable
Use your arrow keys or mouse cursor to select the variable you want from the list, then press the enter key or click to insert it onto the form.
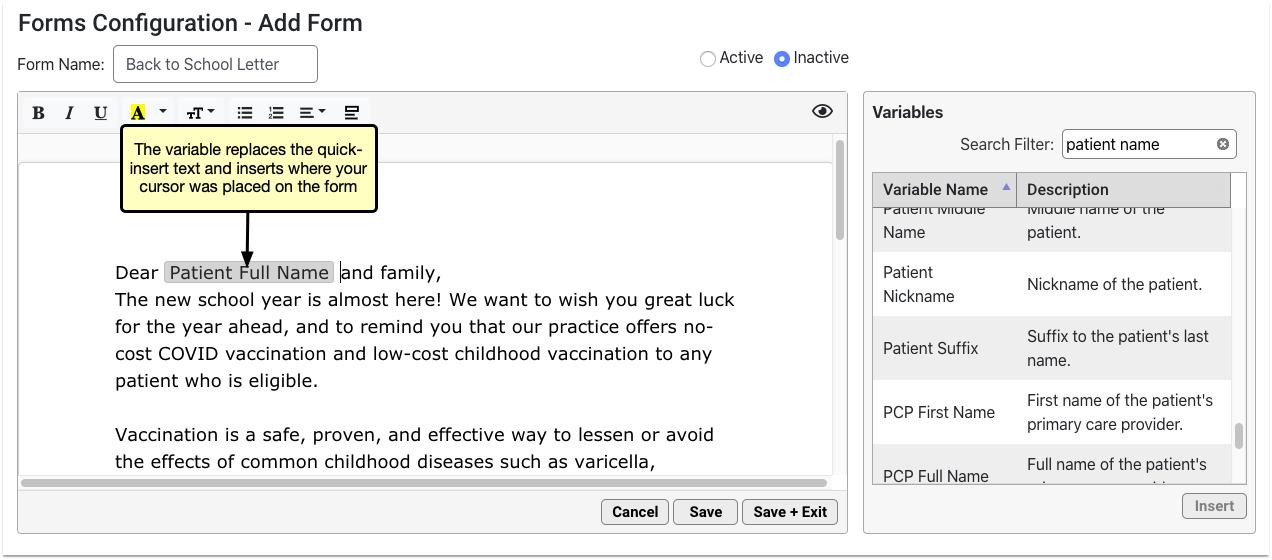
The variable replaces the quick-insert text that you typed.
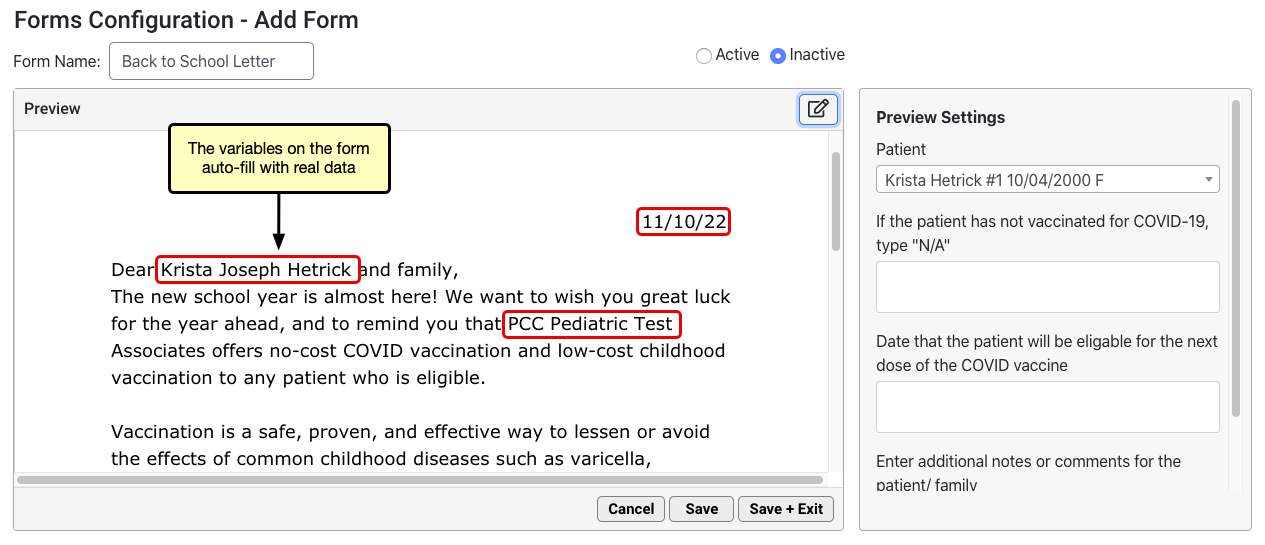
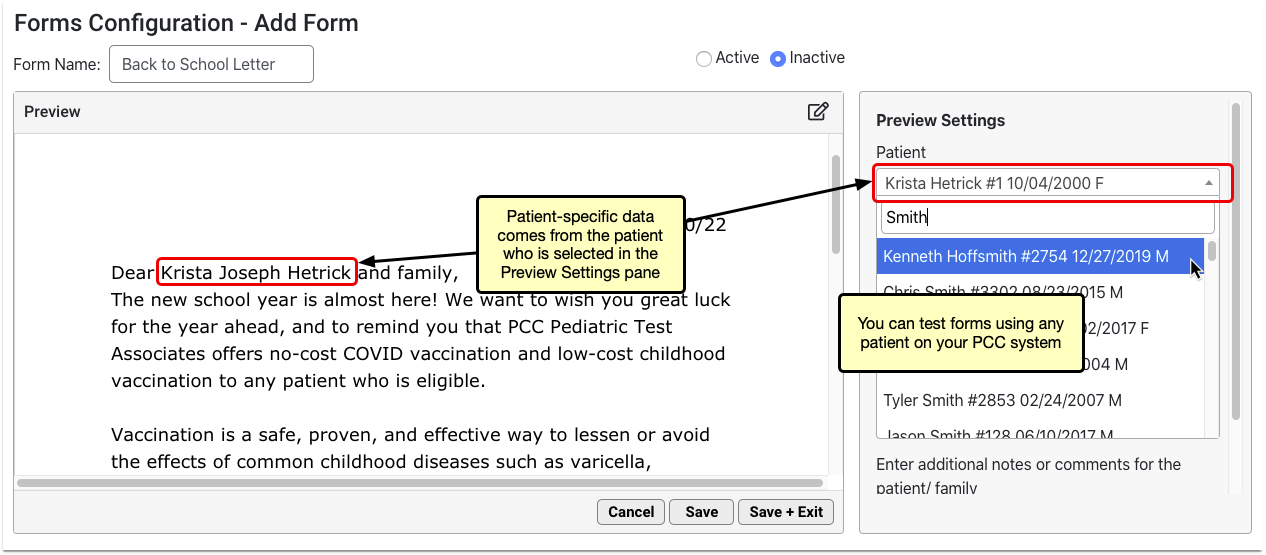
Understand the Form Preview Screen
You can preview the form as you build it to see how it will look and feel when generated for patients or accounts.
Click the eye icon in the top right corner of the form to preview it.
The form renders in real time. Variables auto-fill with real data. Where there is no data to auto-fill, the variable renders as blank.
The data comes from the patient or account that is selected in the Preview Settings pane. Anyone using the Forms Configuration tool can change the selected patient or account at any time. Preview remembers the patient or account that was most recently selected by any user in the Forms Configuration tool.
If the form includes Response variables, you can test out how providers and staff will interact with them. Read and respond to the prompts in the Preview Settings pane.
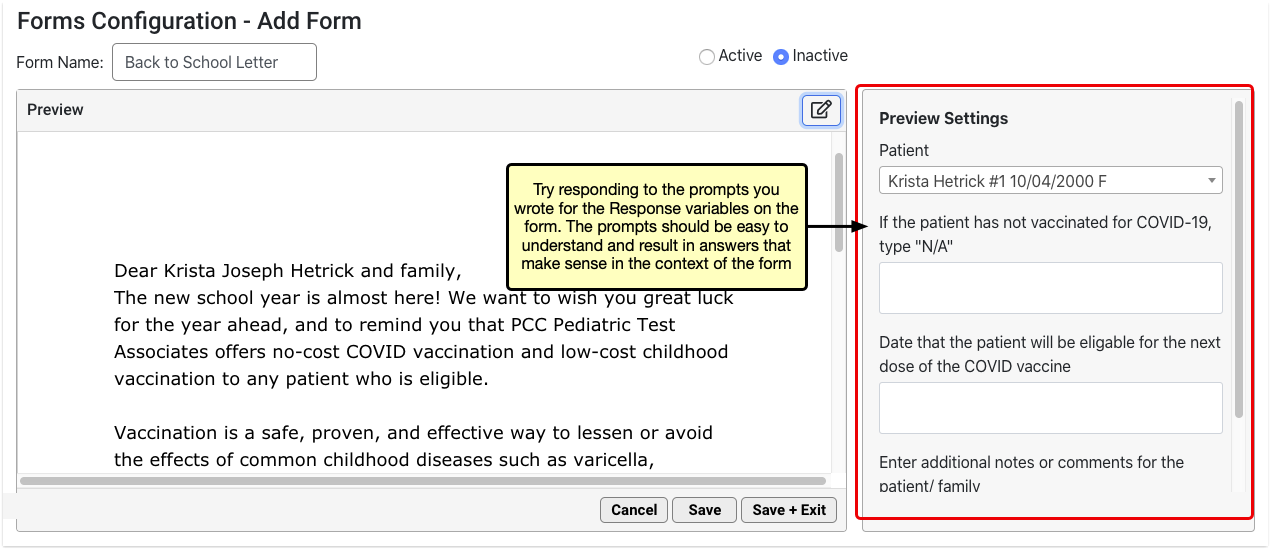
As you type responses, the text appears inline on the form.
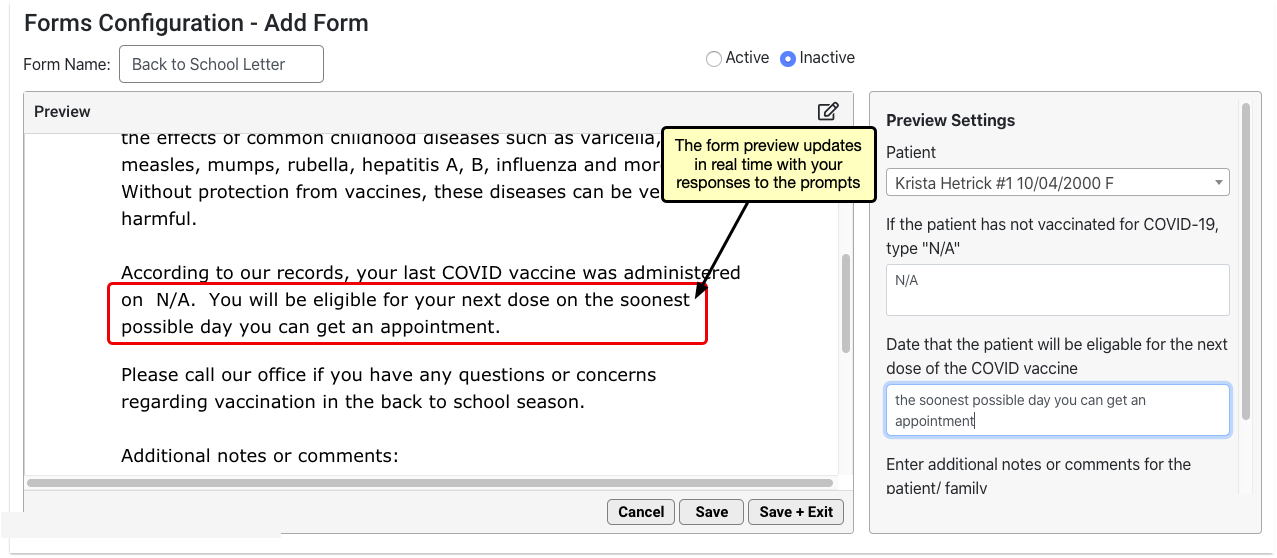
The response boxes and the form itself grow to accommodate the response text.
When you have finished previewing the form, click the pencil and paper icon in the top right corner of the form to return to edit mode.
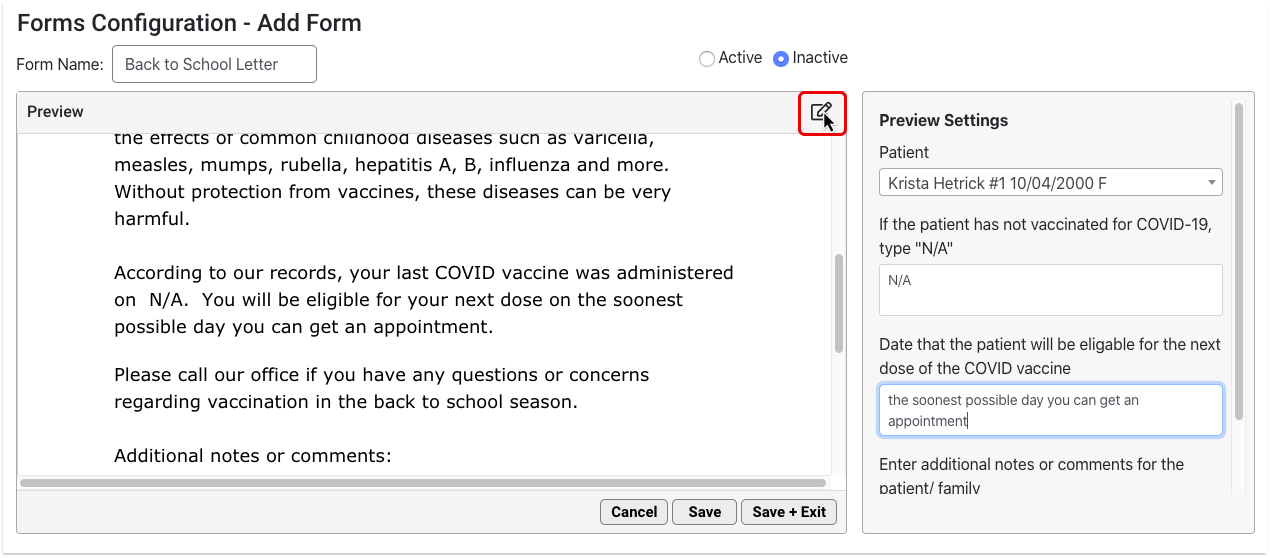
You can switch between preview and edit modes as often as needed.
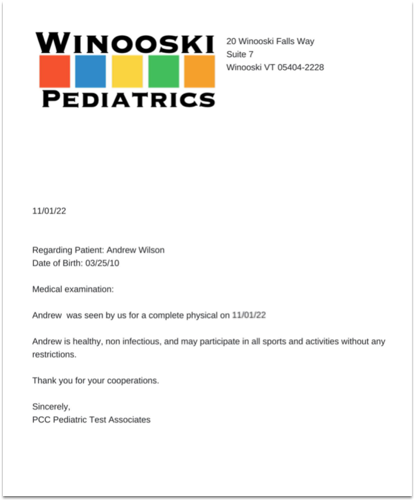
Customize Your Letterhead
Configure your letterhead in advance of composing forms so that you can add a header or footer to any form with one click. Letterhead in PCC EHR consists of one header option and one footer option. Configuration is applied to all forms that contain a header or a footer.
Open the Letterhead Tab
To create a new header and footer, open the Letterhead tab.
Add Variables or Text
Insert variables using the Variables list or the quick-insert shortcut list. You can type or copy and paste text in your letterhead.
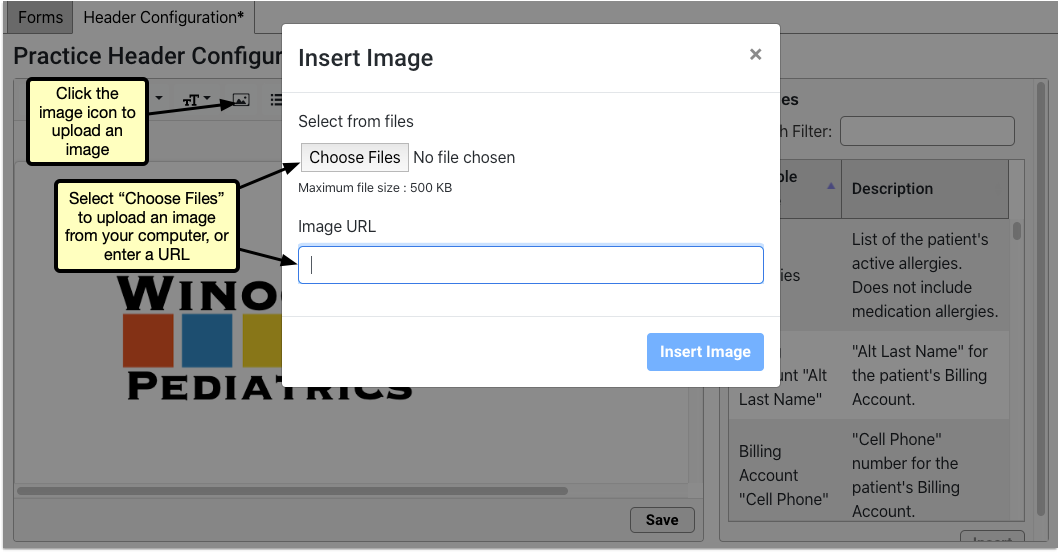
Upload a Logo
If you have a letterhead image or a logo, click the picture icon to upload it from your computer or enter the URL of the image.
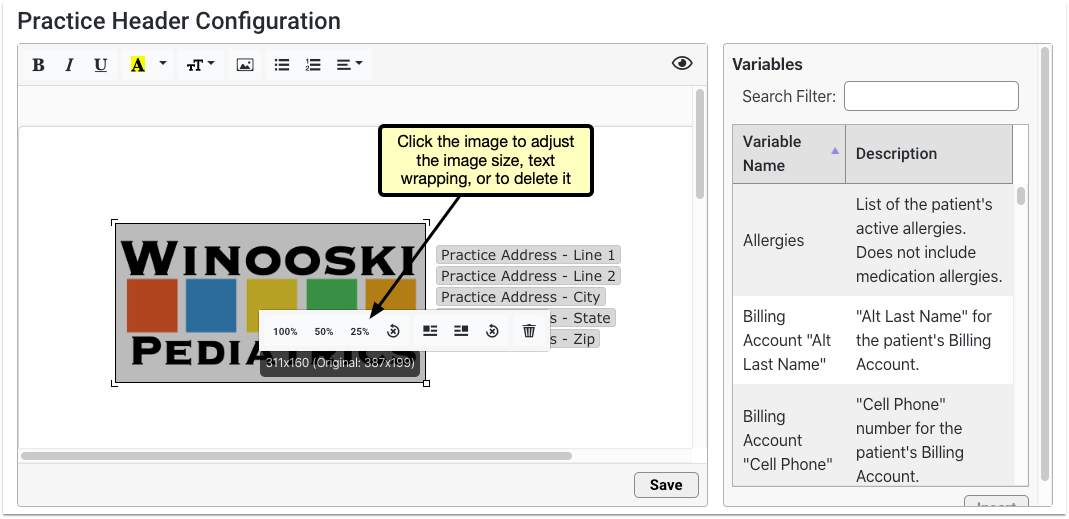
Optionally Resize or Format
Adjust the size, orientation, or text wrapping by clicking the image and selecting from the menu. Any variable or text can be resized or formatted using the toolbar options.
Optionally Adjust Margins
You can adjust the margins on your forms and practice letterhead to improve their appearance and make better use of space.
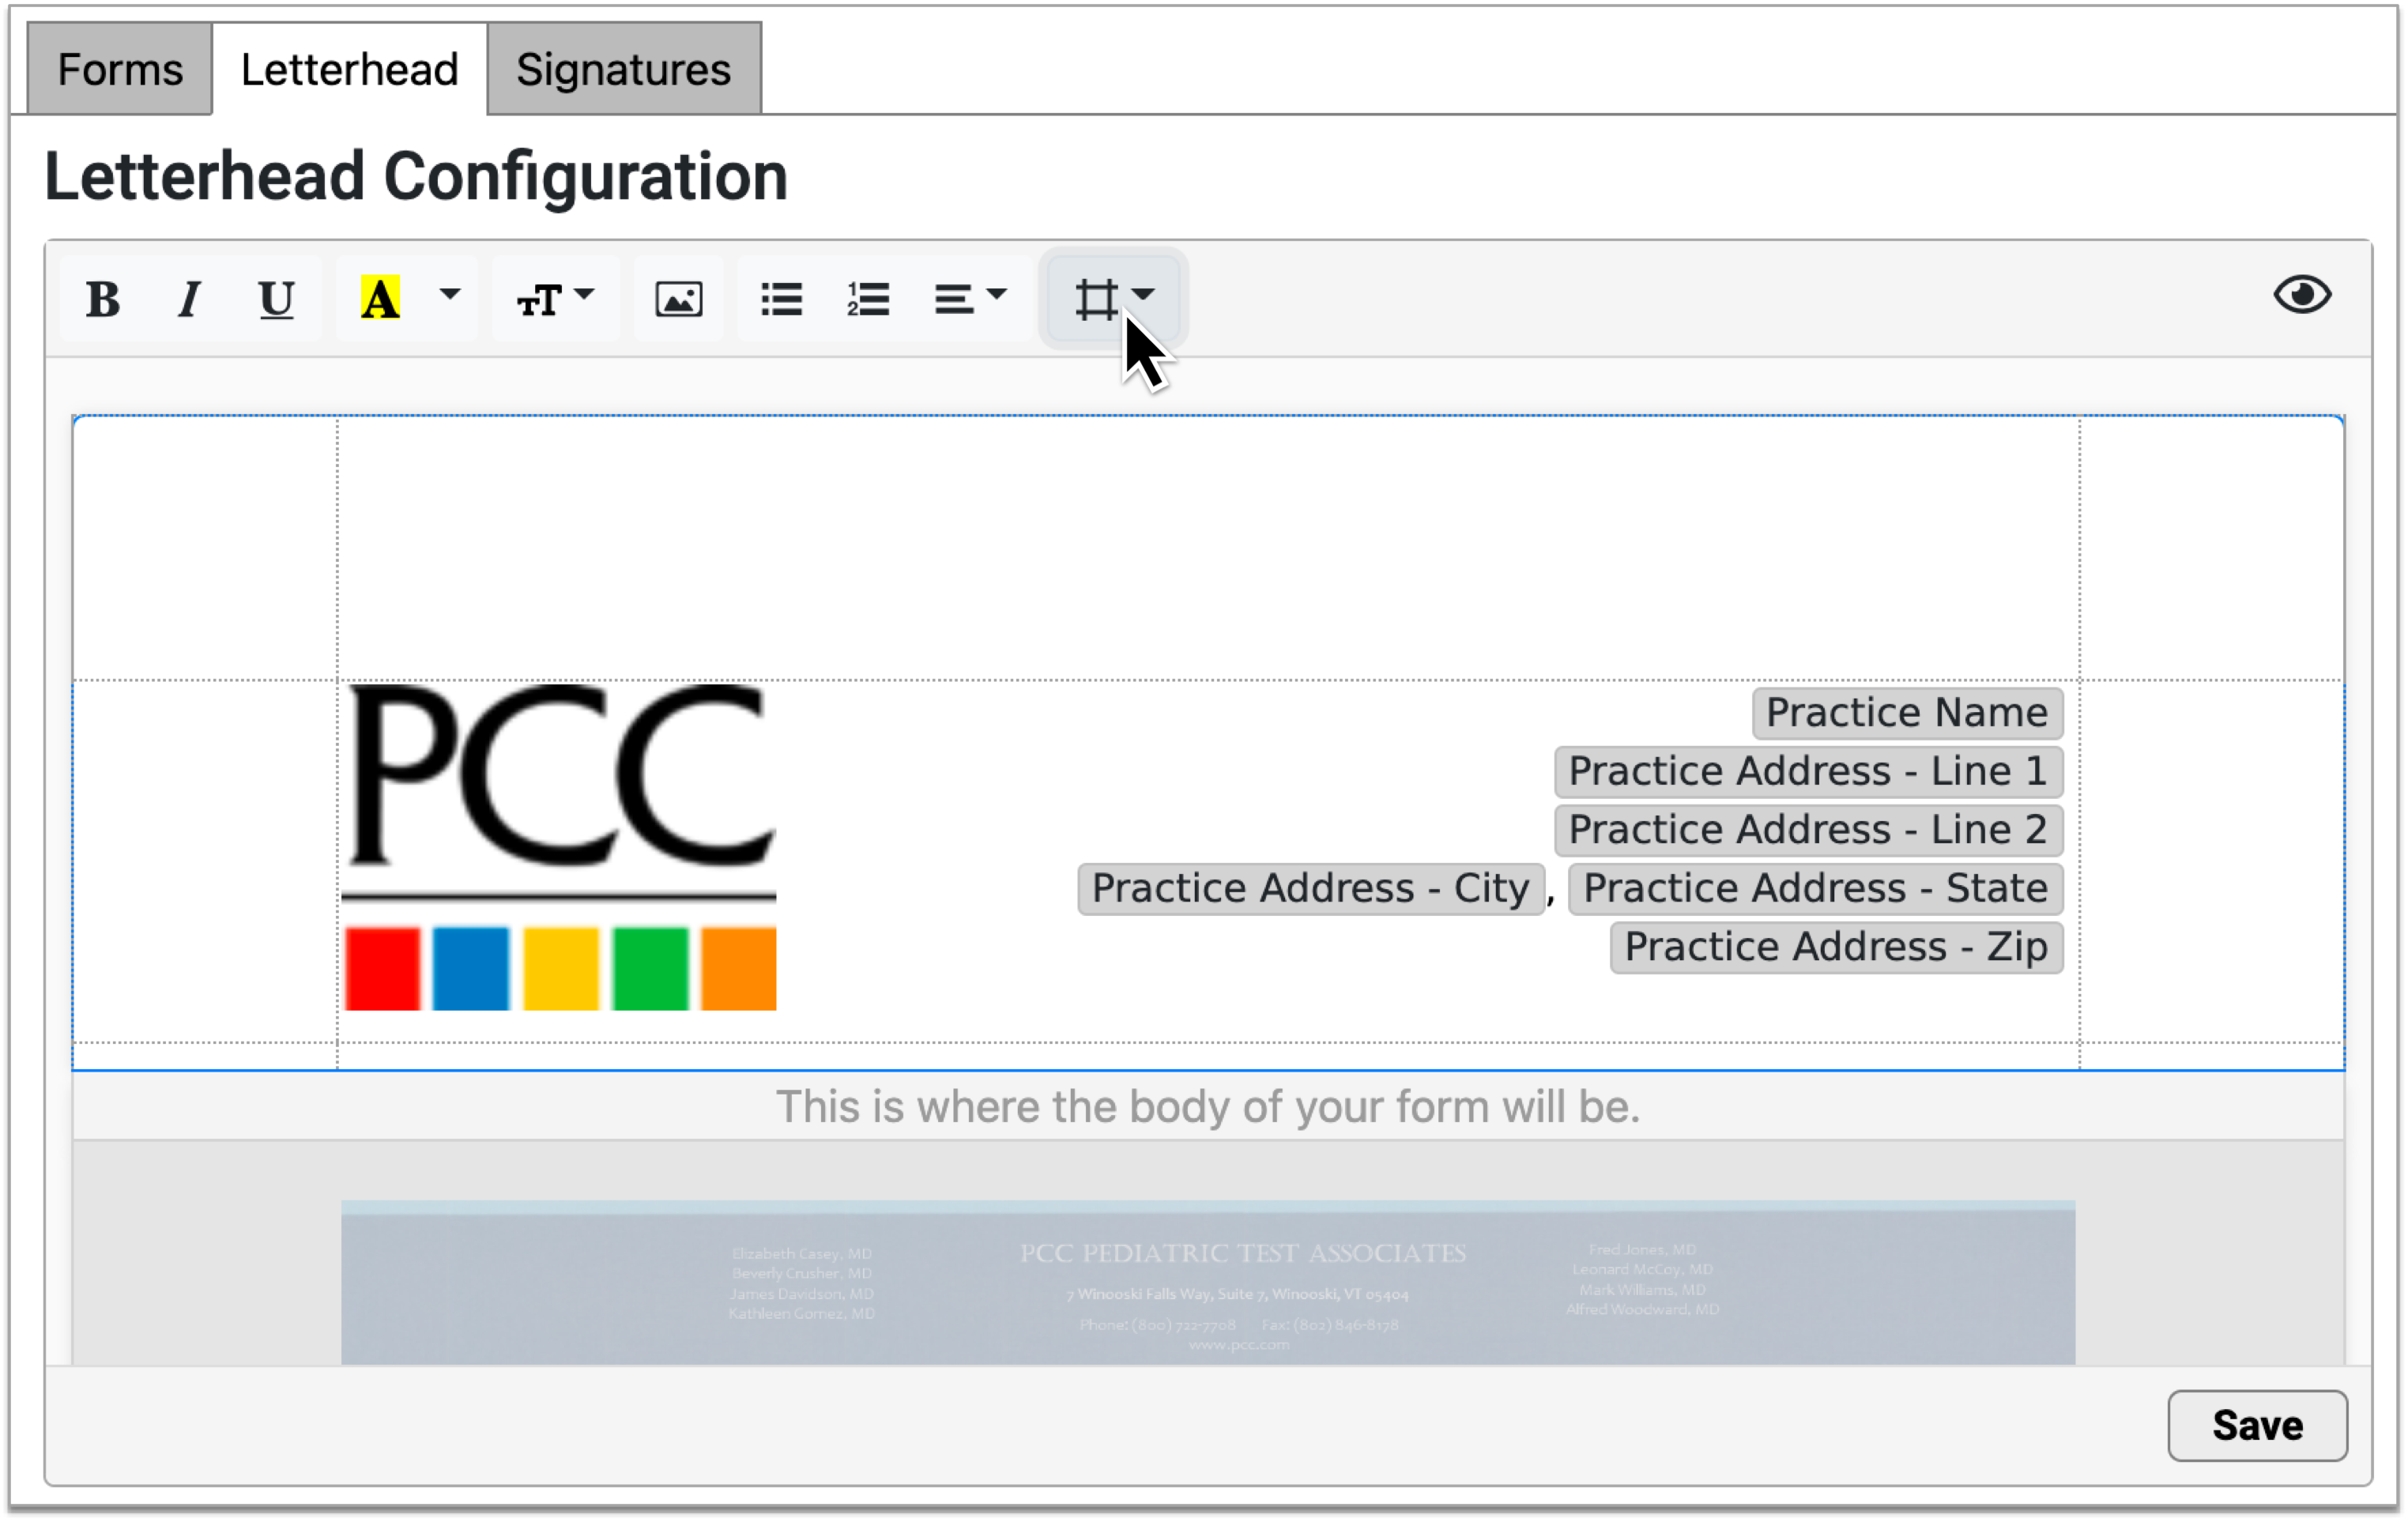
Hover over the margins icon to see current margin settings.
Save and Test
Once you’ve completed your letterhead, click “Save”. To test the layout, add your header and footer to a form and generate or print it.
To make further edits to your letterhead, click back into the Letterhead tab and make your edits. Any changes will be applied to all forms that include a header or footer.
Set Up a Provider Signature
Your practice can upload electronic signatures for each of the providers at your practice. Once the signature image is uploaded, you can set permissions for which staff members are allowed to generate the signature. When a signature image is not allowed to generate, the signature area remains blank, so that the provider can sign the form by hand.
Signatures should be written using a black pen on white unlined paper and scanned at a high resolution.
To read more about preparing and configuring signatures, read Configure Provider Signatures.
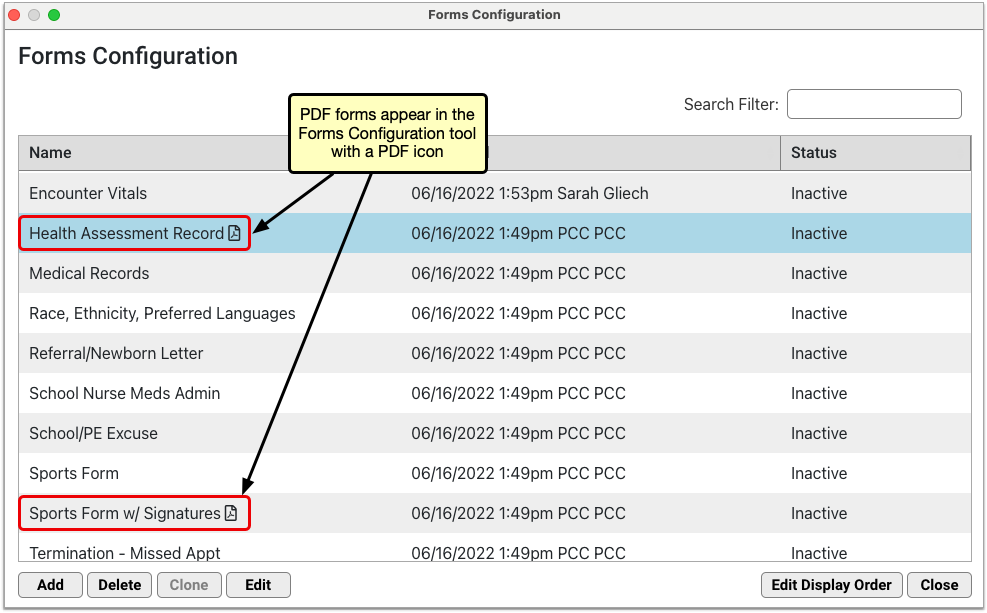
Work with PDF Forms
Some forms come to your practice pre-formatted or are too complex to build in the Forms Configuration tool. Common examples of these are state or school forms. PCC Support can upload PDF versions of these forms into the Forms Configuration tool, where you can view, configure, and manage many aspects of them yourself.
Alternate Layouts: Some organizations will accept alternate formatting or layouts as long as the form contains the same information as the original. Contact the sending organization to find out more.
Add a PDF Form
Contact PCC
Contact PCC Support at 802-846-8177 or 800-722-7708 if you think you need to upload a PDF form into PCC EHR.
Send the Original Form to PCC
PCC Support will request a copy of the PDF form. When you send the original form via email or support ticket, please identify the following:
- Which fields on the form should auto-fill with patient or account data
- Where to insert free text response fields
- Whether the form needs to be able to be signed by more than one provider
PCC Support will use the information you provide to build a smart version of the form that can be saved as a PDF and added to the Forms Configuration tool. This may take some time.
Copyright Protected Forms: If you want to upload a form created or owned by a third party, ensure that you have permission to use the form beforehand. PCC assumes no responsibility for verifying that you have permission to use a form.
View the PDF
Once the PDF form is available in the Forms Configuration tool, you can view, configure, and manage many aspects of it on your own. PDF forms are marked by a PDF icon on the main page of the Forms Configuration tool.
Double-click on a PDF form to open it in edit mode. You can also select it and click the “Edit” button.
Edit the PDF
In edit mode, you can:
- view the form contents and any smart configuration that PCC Support built in
- Rename the form
- Configure prompts that tell providers and staff how to fill out the free text response fields on the form
- Preview the form using real data from any patient on your PCC system
- Set the status of the form to Active or Inactive, which controls whether providers and staff can find it in the Patient or Account Forms components and generate it for patients
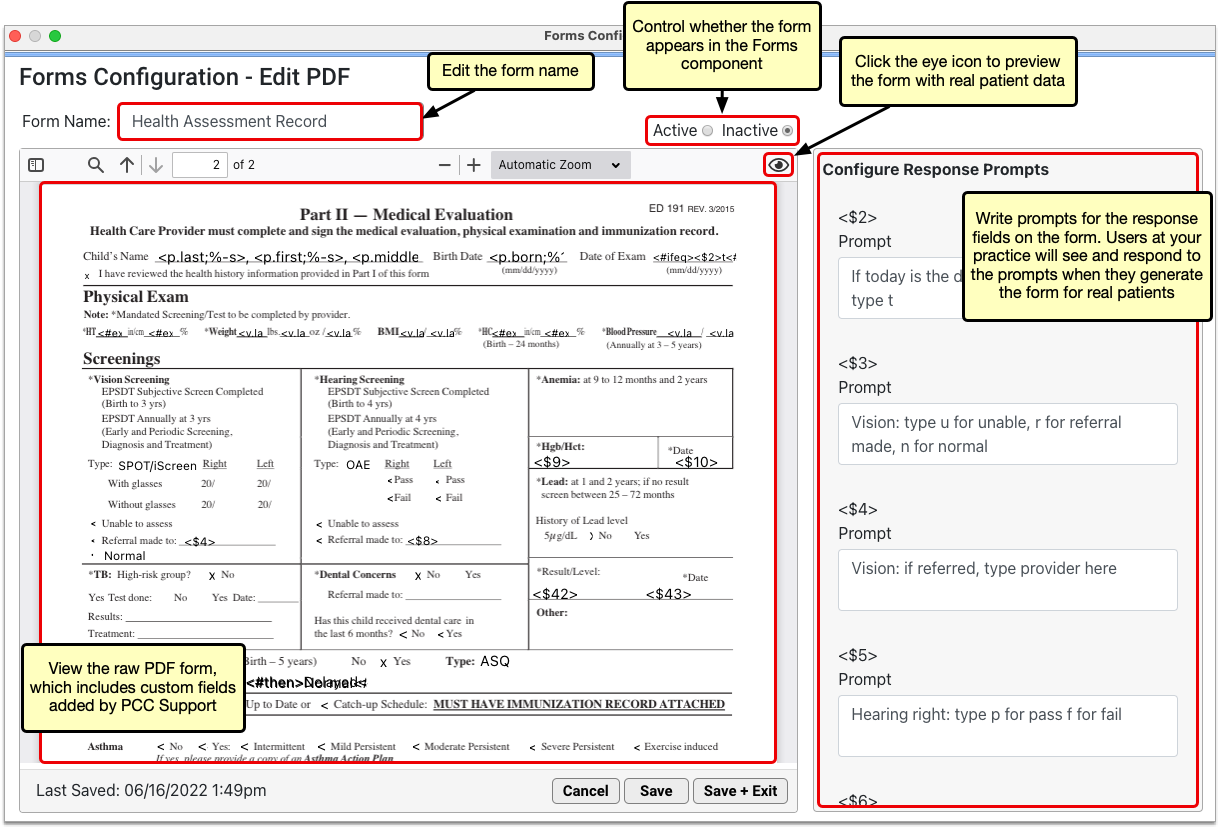
You cannot edit the body of PDF forms in the Forms Configuration tool. Contact PCC Support to request changes to the body contents of PDF forms.
Forms Need Unique Names: In order to save a form, you must give it a unique name. The form editor prevents you from saving forms that do not have unique names.
Configure New Prompts as Needed
If a PDF form is migrated with more user response fields than it used to have, additional response prompt lines will automatically appear in the “Configure Response Prompts” pane when you edit the PDF.
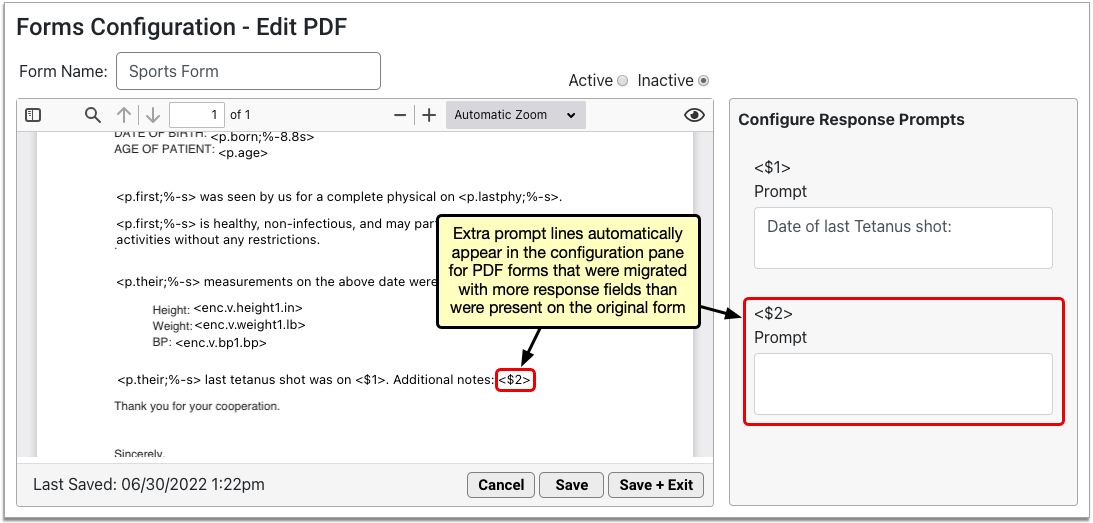
Reasons for Extra Prompts: Response fields are a versatile tool for creating forms that optimally serve your practice and patients. In the process of migrating your PDF forms to the new forms solution, PCC Support might realize that additional response fields are needed to improve the form’s function for your practice. These additional fields should not come as a surprise to you. Be should be sure to write prompts that help users understand how to fill them out when they generate the form for patients.
Delete Unneeded Prompts
Some PDF forms might prompt you to delete unneeded response prompts when you first edit them. This happens when the PDF form contains fewer response fields than it used to and it no longer requires the same number of prompts. Typically, PCC Support will adjust this for you, but you might encounter it yourself from time to time.
If you do encounter the prompt to delete unneeded response prompts when you open a PDF form, either contact the person on PCC Support who helped you with that form, or read through the original list of prompts associated with the form and delete those that are no longer needed.
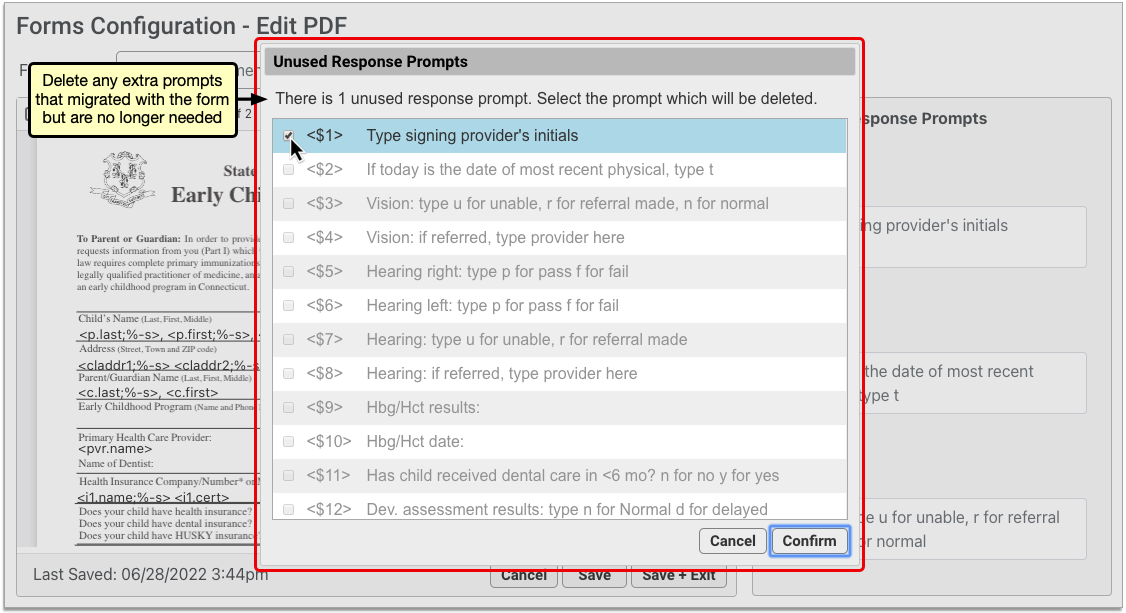
Reasons for Unneeded Prompts: When PCC Support helps you migrate your PDF forms into the Form Configuration tool, they will adjust your forms to work within the Forms Configuration tool. In the process, the number of response fields on your PDF forms may be reduced. The step of deleting unneeded prompts when you first open a migrated PDF form is the final step of adjusting the form to take advantage of all functionality in the Forms Configuration tool.
Save and Test the PDF
Save any changes you made, and generate or print the form to test it out. If your practice generates PDFs that contain unusual features, be sure to test that they work as expected.
Optionally Adjust Printer Settings for Watermarks
If you worked with PCC to generate a watermark on your forms, you may need to adjust the printing settings on your workstation for the watermark to print at the right darkness level.
Contact PCC for PDF Edits and Unusual Requirements
If PCC Support helped you set up a custom form with unusual scripting or special information requirements, you will need to coordinate with PCC Support to make additional adjustments after uploading and testing your PDF.
Preview a PDF Form
When you edit a PDF form in the Forms Configuration tool, click the eye icon in the top right corner of the form canvas to preview it.
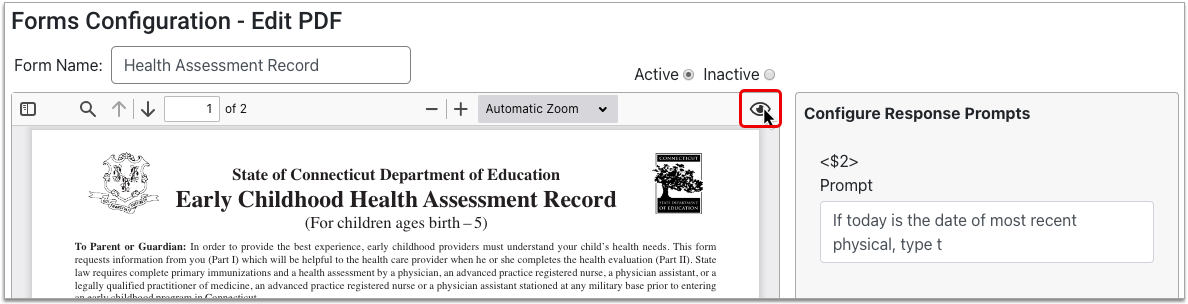
The auto-filling variables on the form render with real data from the patient selected in the Preview Settings pane. Where there is no data to auto-fill, variables render as blank.
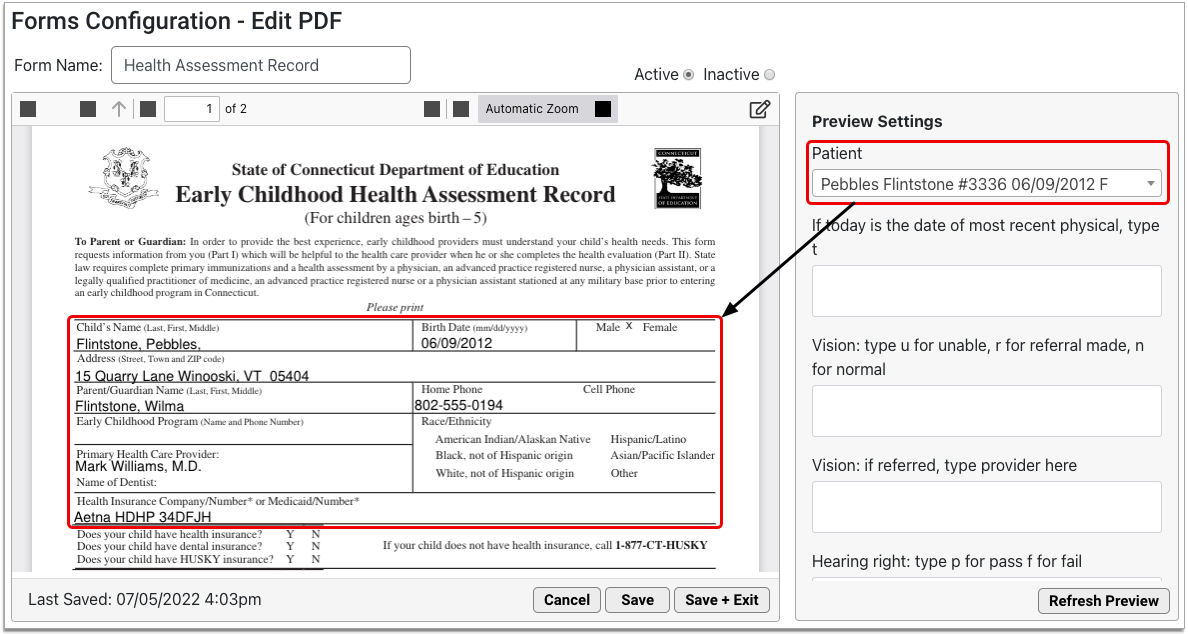
You can change the preview patient to any patient on your PCC system, and fill out the user response fields to test out the experience of generating the form.
Click the “Refresh Preview” button to test out the form with the new data you entered into the Preview Settings pane.
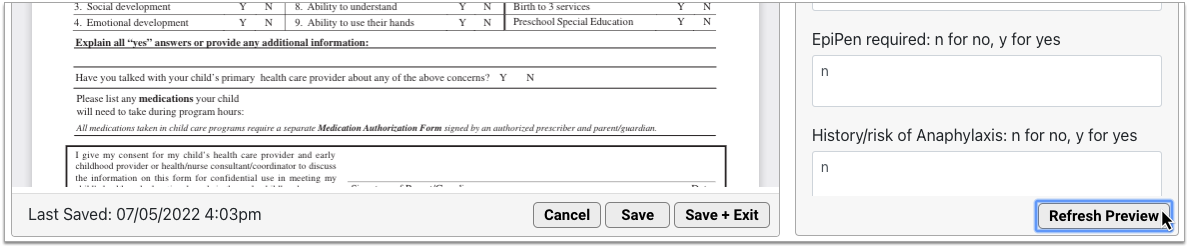
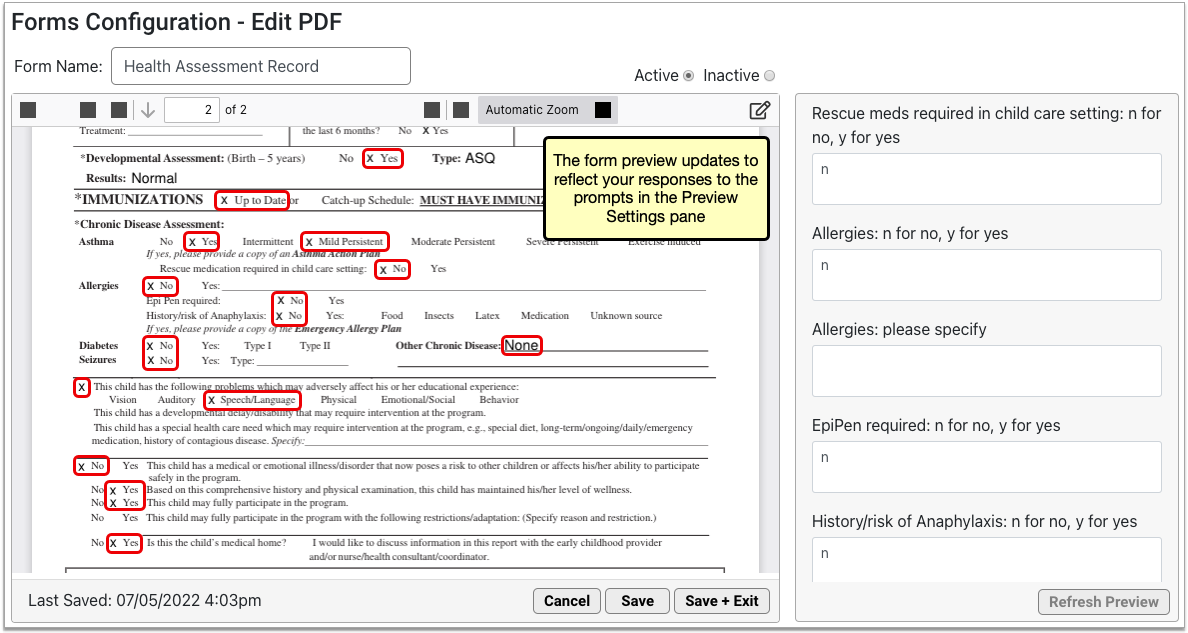
The form preview updates to reflect the information you entered in the Preview Settings pane.
Delete a PDF Form
You can remove the PDF forms your practice no longer needs from PCC EHR.
On the main page of the Forms Configuration tool, select the PDF form you want to remove and click the “Delete” button.
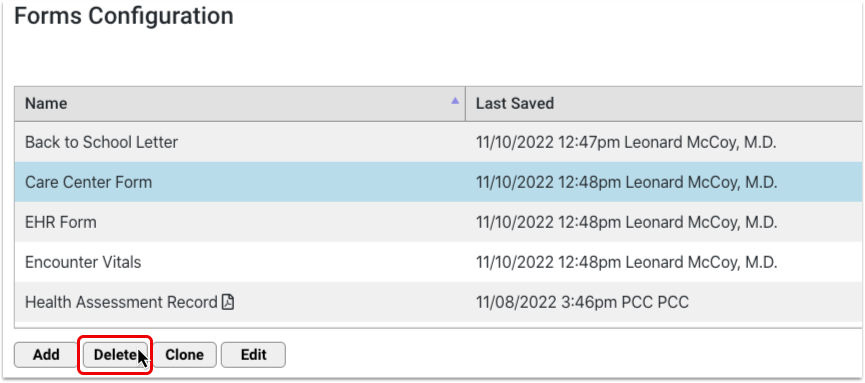
The “Delete” button is protected by a special user permission in the User Administration tool.
Configure the Patient and Account Forms Component
You can control which forms appear in the Patient and Account Forms components, the order in which they are listed, their names, and whether they appear by default for single-click generation in patient charts.
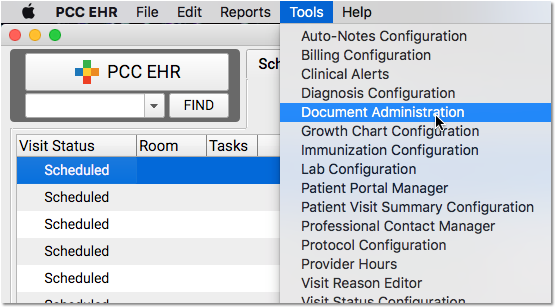
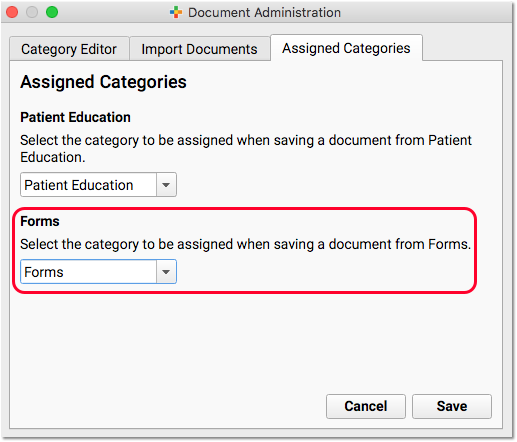
Adjust Default Forms Category
By default, PCC EHR will save a form letter into a Patient or Account Forms category, which you can later review in the Documents section of a patient’s chart.
You can use the Document Administration tool to change the default category for forms.
Show or Hide Forms in the Patient and Account Forms Components
The status of a form determines whether it appears in the Patient and Account Forms components. Active forms appear in the Patient and Account Forms component; inactive forms do not.
You can change the status of a form by selecting a different status in the top right corner of the window.
The new status takes effect as soon as you save the form.
Contact PCC for Assistance: If you have not switched to using the Forms Configuration tool in PCC EHR, contact PCC Support for help adding or removing forms from the Patient and Account Forms components.
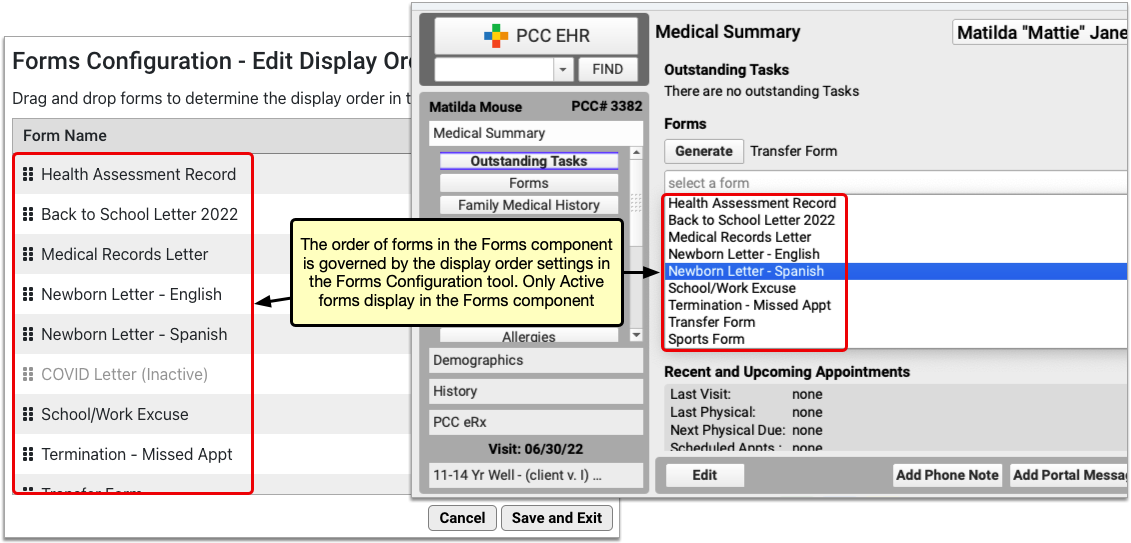
Set the Display Order of Forms
You can control the order in which forms display in the Patient and Account Forms components.
Open the Forms Configuration tool, then click the “Edit Display Order” button.
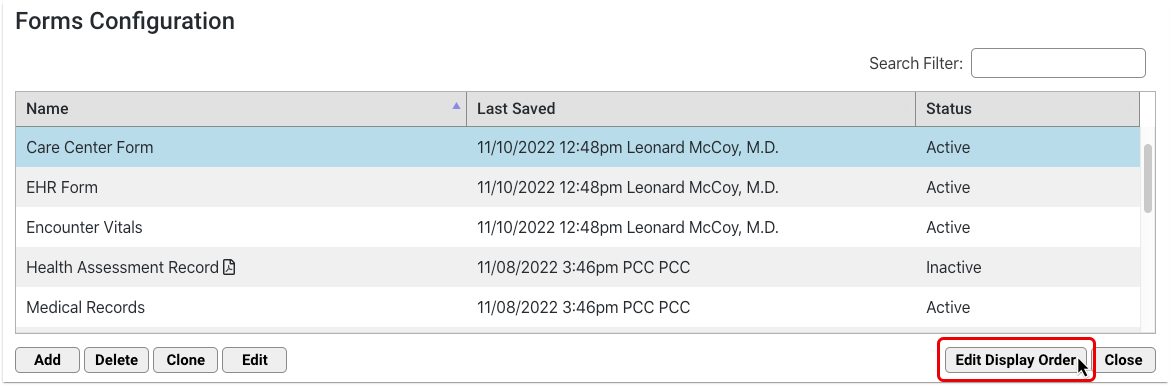
Drag and drop the forms to rearrange the list order.
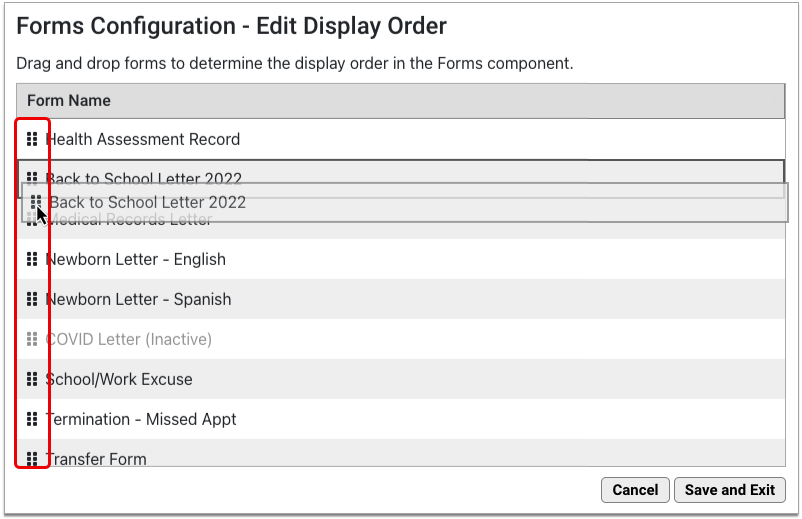
The list includes both active and inactive forms, but only active forms display in the Patient and Account Forms components.
Click “Save and Exit” to save your work and return to the main page of the Forms Configuration tool. The Patient and Account Forms components will update to reflect your changes as soon as you click “Save and Exit”.
Where Are My Changes?: Lists of forms in the Forms Configuration tool always display in alphanumeric order. Changes made in the Edit Display Order window dictate how active forms display in the patient and account forms components within PCC EHR.
Configure Single-Click Form Generation
You can improve form letter workflow for your practice by making sure the right forms appear on the right protocols. You can add buttons to your visit protocols that let you generate forms with a single click.
When you have decided which protocols will contain the Patient and Account Forms components, follow the instructions below to adjust which forms appear as single-click forms by default.
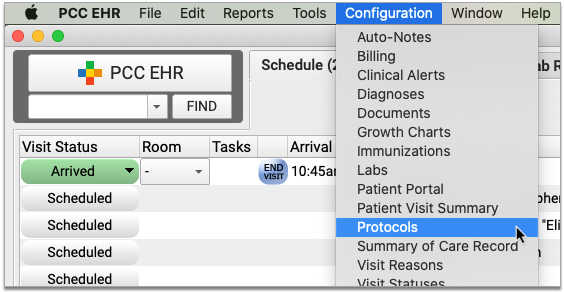
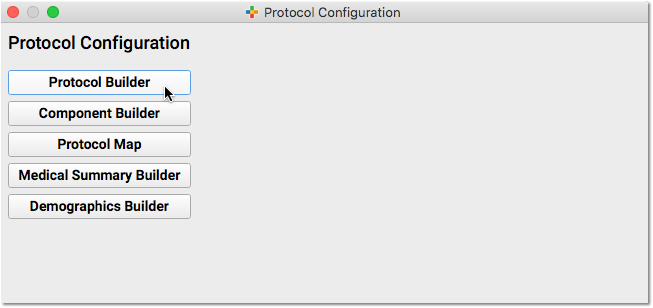
Open Your Protocol in Protocol Configuration
Open the Protocol Configuration tool and pick a chart section or protocol where you will add or move the Patient and Account Forms components.
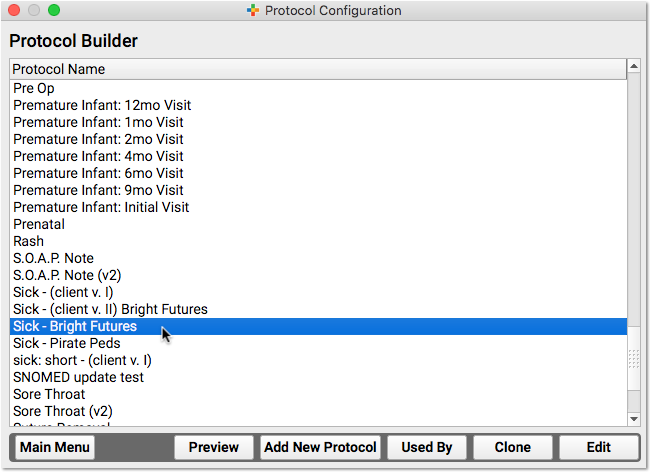
When a practice does not have the Forms Configuration tool enabled, the Account Forms component will appear, but not be selectable.
Add the Patient or Account Forms Component
Click “Add” to add the Patient or Account Forms component to your protocol. Use the tab on the side to slide it to a new location in the protocol.
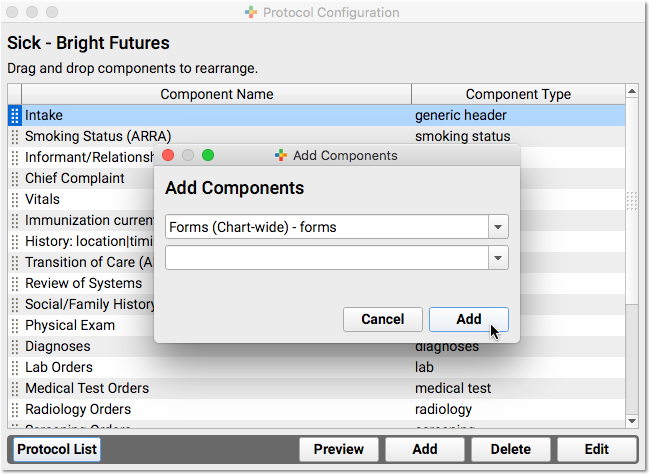
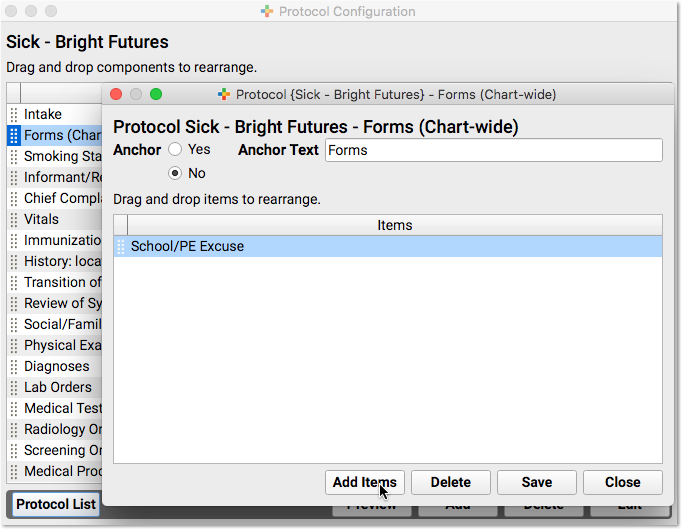
Select Single-Click Forms
Double-click on the component to set up default forms for that chart note or chart section. For example you could configure School/PE Excuse letters to be single-click in sick visits, or make form letters single-click in the Medical Summary or Demographics chart sections.
Enable the Forms Configuration Tool
PCC must enable the Forms Configuration tool at your practice before you can create and manage your own auto-filling forms, handouts, policies, and letters in PCC EHR.
Learn how to enable the Forms Configuration tool.
If you decide to switch to the Forms Configuration tool in PCC EHR, tell PCC Support what you like about it and what would make it more useful for your practice. Your feedback will guide the development of the new forms solution.
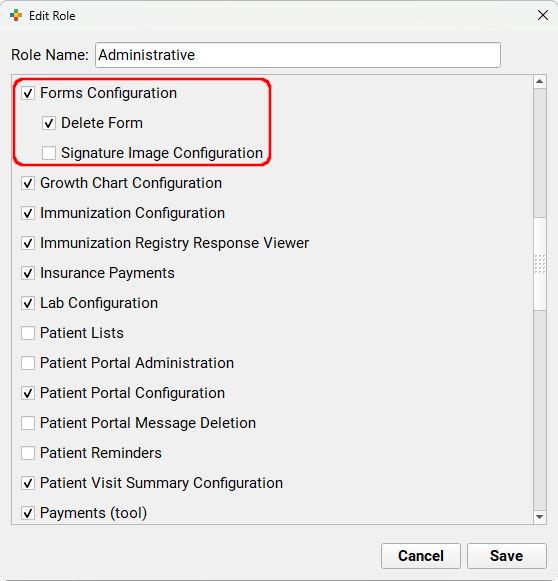
Set Permissions for the Forms Configuration Tool
Use the User Administration tool to adjust which user roles can access the Forms Configuration tool as well as which user roles can delete forms or configure signatures.
To find out more about setting permissions, read Set User Roles for Permissions and Security.