Get Started with Patient Portal Payments
Your patients and families can pay their bills on their mobile device, using PCC’s patient portal (My Kid’s Chart). Once your practice has signed up and enabled account balances and portal payments, you will collect money faster and have fewer bounced checks.
Read the sections below to learn about how portal payments will work for your families, prerequisites for your practice and how to sign up, ideas for how to encourage families to use the new feature, and how your practice can review and work with payments made through the portal.
Contents
- 1 How Families Review Their Balance and Pay Their Bill in the Patient Portal
- 2 Configure Your Practice and Get Ready For Portal Payments
- 2.1 Does Your Practice Use the Patient Portal?
- 2.2 Consider Cost and Workflow Impact to Your Practice
- 2.3 Make a Practice-Wide Plan For All Care Centers and Portal Payments
- 2.4 Turn On Personal Balances in the Patient Portal
- 2.5 Adjust Your Workflow So You Always Link Portal Users to Billing Accounts
- 2.6 Review Your Payment Types
- 2.7 Decide Whether to Post Automatically or Manually
- 3 Sign Up with Payment Pros
- 4 Tell Families They Can Pay in the Portal
- 5 Post Portal Payments to Accounts Automatically or Manually?
- 6 Review and Work With Incoming Portal Payments
How Families Review Their Balance and Pay Their Bill in the Patient Portal
Once your practice has enabled portal payments, families with linked billing accounts will be able to see any charges that include an outstanding personal balance.
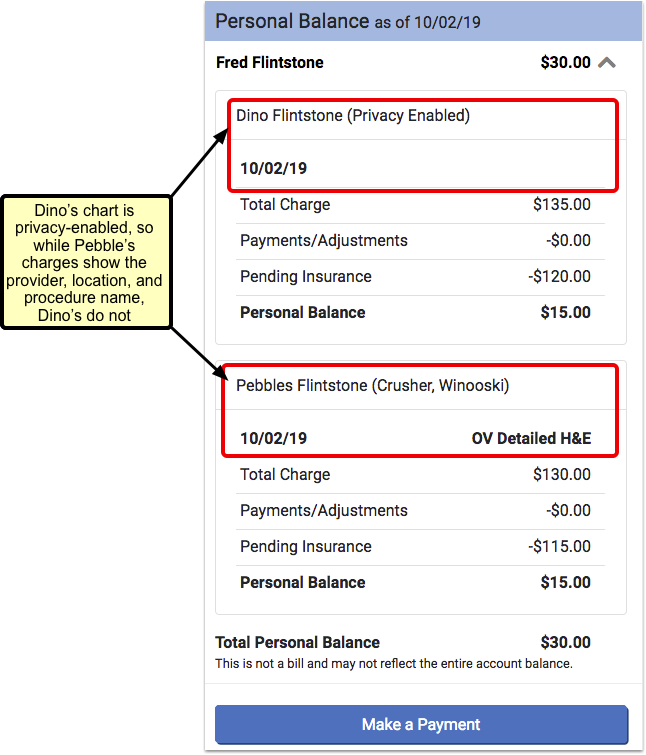
Portal users will see charges for all patients associated with their portal account, whether the patient is privacy-enabled or not. However, for privacy-enabled patients they will only see the date and charge – not the provider, location, or procedure name.
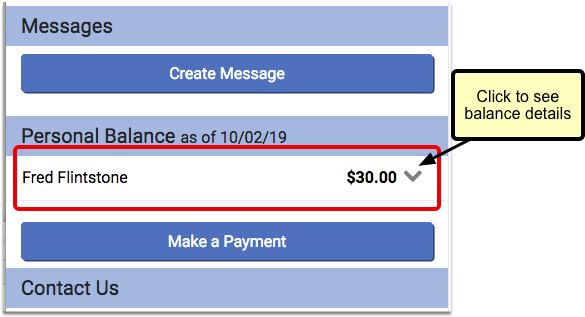
They will also see a “Make a Payment” button beneath their personal balance information.
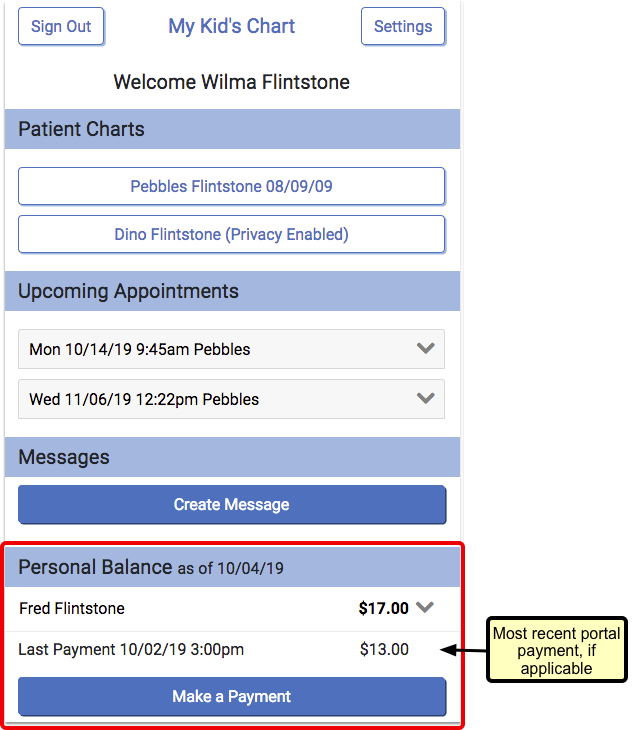
If the family has used the mobile payment option previously, they will also see a “Last Payment” listed above the button. Only the most recent portal payment will be shown.
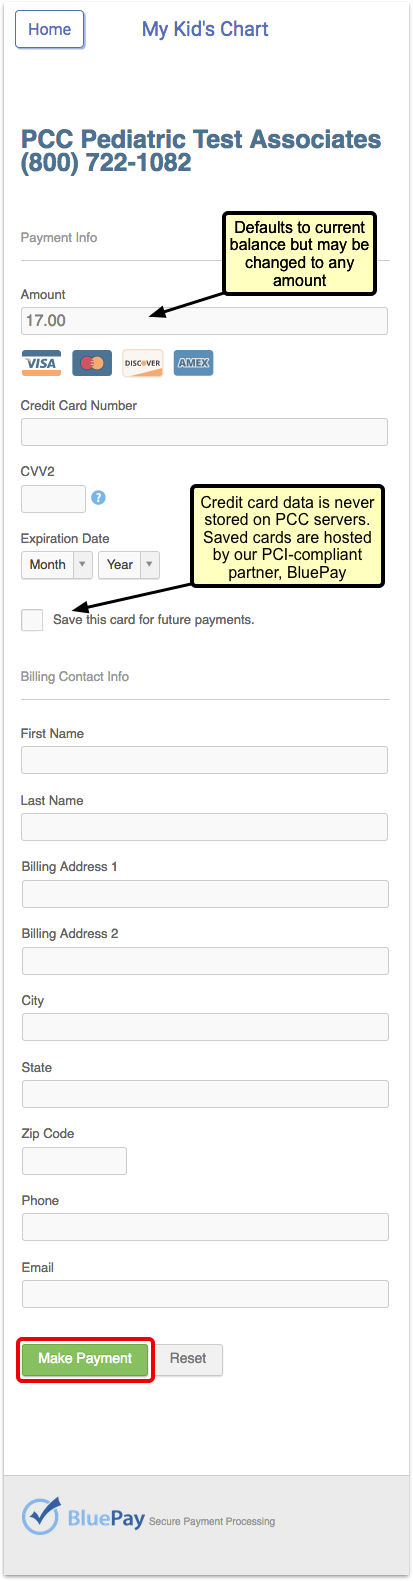
If the user has not previously saved credit card information, then when they press the “Make a Payment” button, the portal will prompt them to enter their basic credit card information, billing address, and e-mail address.
If the family chooses to save the new credit card, it will default to their “preferred” card for future use.
After the payment is made, the portal user will see the result of the transaction. The date and time of payment will appear, and whether the payment was successful or not.
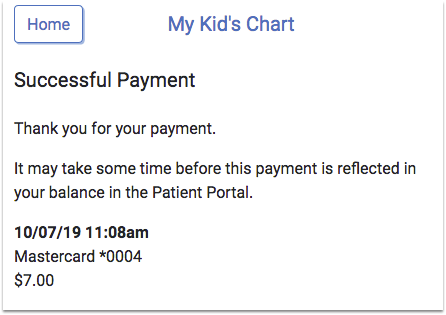
The balance in the patient portal will be adjusted as soon as the payment is posted.
The BluePay service will send receipts to the email address that the portal user entered on the payment screen. Your practice can opt to receive copies of each receipt email.
Families Can Store Multiple Credit Cards
Portal users with more than one credit card stored will choose one card to be the “preferred” card. When a portal user makes a payment, their preferred card will be selected by default.
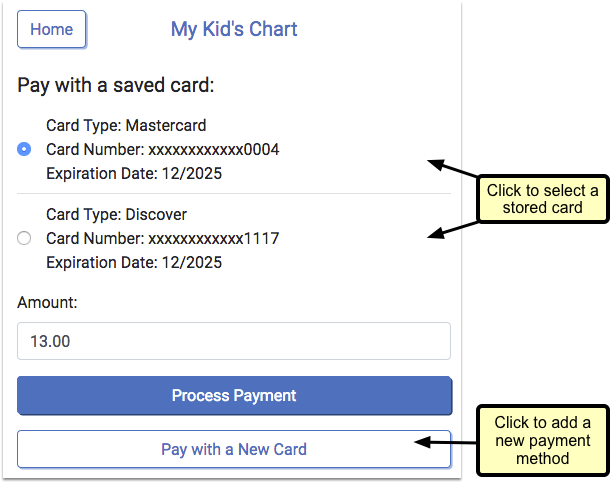
The user can select a different card for the current payment by clicking the drop-down and choosing another stored card.
Card Data is Secure: Credit card data is never stored on your PCC server, but is managed by our PCI-compliant partner, BluePay.
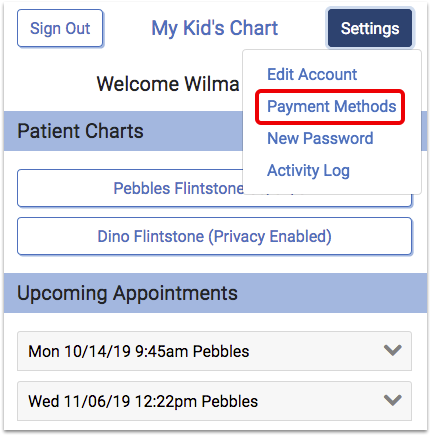
Families Can Manage Their Stored Cards
The patient portal includes a “Payment Methods” setting, where portal users can add a new card or edit their stored cards outside of the payment screen.
Portals users can select a card to make edits. They can update the expiration date or change their preferred card. If a user no longer wants the card to be stored, they can remove the card.
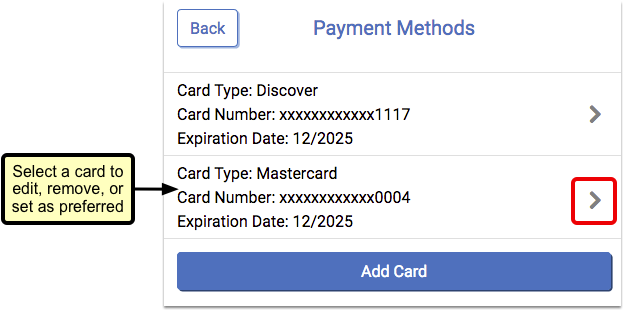
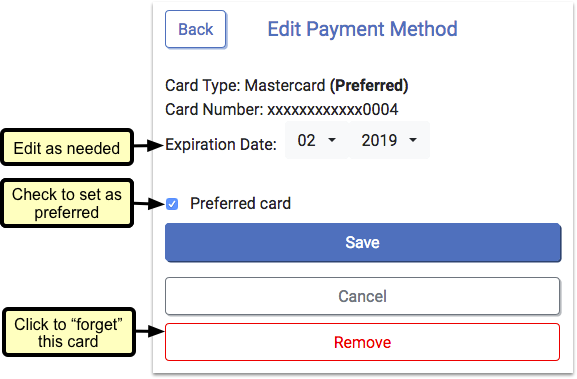
Expired cards will appear in red.
Configure Your Practice and Get Ready For Portal Payments
Before PCC can add the “Make a Payment” option to your practice’s patient portal (My Kid’s Chart), you need to make sure the following configuration and startup procedures are in place.
Does Your Practice Use the Patient Portal?
First, your practice must be using the patient portal, My Kid’s Chart, and signing up your patients and families. For more information about the portal (My Kid’s Chart), check out our patient portal resources on learn.pcc.com.
Consider Cost and Workflow Impact to Your Practice
Contact Payment Pros with any fee-related questions about accepting payments through your patient portal. Talk to your staff, talk to PCC, and decide if portal payments is affordable and makes sense for your practice’s needs.
Make a Practice-Wide Plan For All Care Centers and Portal Payments
If your practice has multiple locations, separated as Care Centers with PCC, you need to make a practice-wide plan for portal payments.
If you turn on portal payment for your practice, they will be available for all care centers. It is not possible for some care centers to implement portal payments and not others.
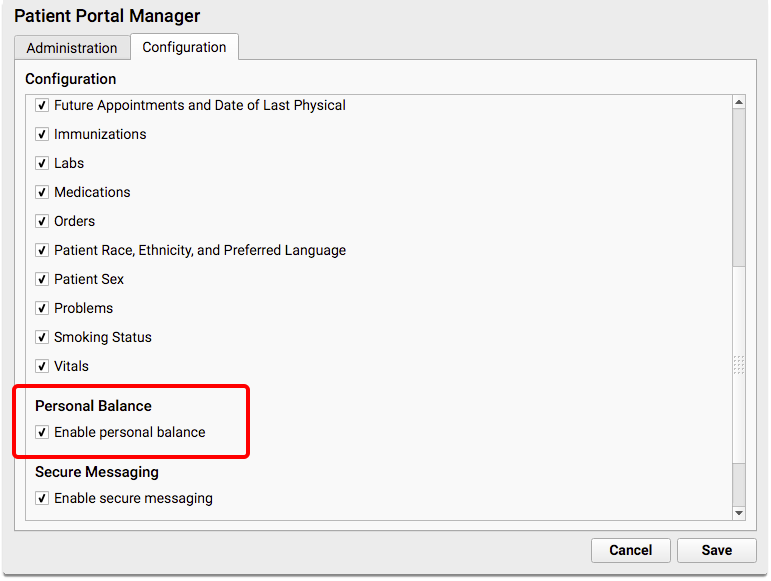
Turn On Personal Balances in the Patient Portal
Next, your practice must make sure that the Personal Balance feature is enabled in the patient portal. This it turned on by default, but may be changed in the Configuration tab of the Patient Portal Manager.
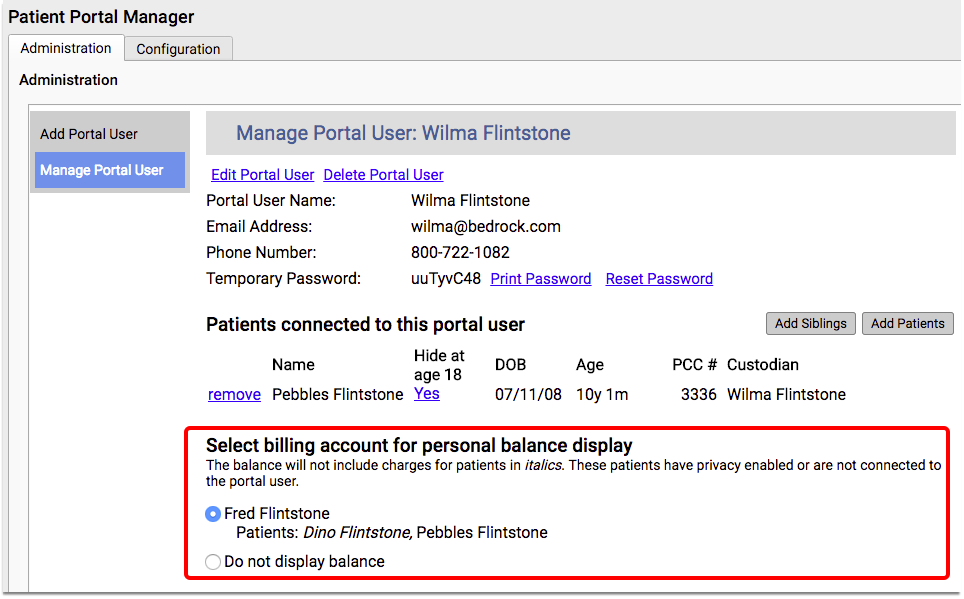
Adjust Your Workflow So You Always Link Portal Users to Billing Accounts
When you work with each family, make sure a billing account is assigned to each portal user. Only portal users with associated billing accounts will be able to see the “Make Payment” button in the portal.
For more information on this feature of the portal, review the My Kid’s Chart User Account Administration article.
Here are some recommendations for getting portal users hooked up to accounts:
-
PCC Can Help: PCC can perform a one-time batch migration that will join all portal users with a single billing account that corresponds to the patient(s) in their portal, if a 1:1 direct relationship is available. Talk to your Client Advocate about this option.
-
Manual Assignment: For more complicated situations, when there is more than one billing account associated with the patient(s) in a user’s portal, your office will need to decide which billing account to link to their portal. This is a simple process, but will take some time, depending on how many portal users you have with this scenario.
-
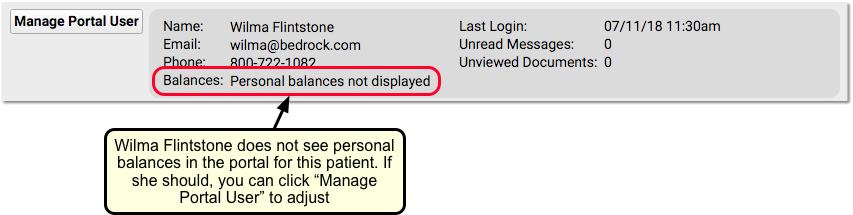
Add Billing Account Assignment to Your Check-In Workflow: Review the Patient Portal Users component during Patient Check-In to see if a family uses the patient portal, and to see if a billing account for personal balances is assigned for the user. You can click “Manage Portal User” if you need to add one.
Review Your Payment Types
In order to track payments separately on your reports, you may want to review and update your practice’s list of payment types.
For example, you may wish to add new payment types for portal payments. You can do so in the Payment Types table in the Tables tool, found in the Configuration menu.
When you configure auto-posting of incoming portal payments, you can select specific payment types and match them to the types sent by your credit card vendor.
Decide Whether to Post Automatically or Manually
Will PCC automatically post incoming portal payments, or will your practice review portal payments and post them manually later? Read the Post Portal Payments to Accounts Automatically or Manually? section below, make a decision and adjust your configuration.
Sign Up with Payment Pros
When you are ready to add mobile payments to your patient portal, follow the procedure below.
Contact PCC Support and/or Payment Pros
Contact PCC Support when your practice is ready to start receiving mobile payments through your patient portal.
Some practices work directly with Payment Pros first, others start by sorting out details in their configuration with PCC Support. Either path works! If you have questions about pricing or other details, PCC can put you in touch with Payment Pros.
Review the Steps Above
If you haven’t already done so, read the section above, “Configure Your Practice and Get Ready For Portal Payments”. PCC Support can help you review and update your practice’s configuration.
Fill Out an Application
You might sign up directly with Payment Pros after you discuss pricing and details with them. Alternatively, a PCC interoperability team member may provide an electronic copy of the Payment Pros Merchant Application.
You will need to enter demographic, business, and tax information.
You will also be required to provide a canceled check from the checking account where you want payments to be directed.
Log In to the BluePay Gateway
A representative from Payment Pros will send you an email verifying that you have been registered.
The email will include your new account name, username, and password, which you can use to log in to the BluePay Gateway.
Set a Go-Live Date
PCC will coordinate a go-live date between your practice and BluePay. On the go-live date, portal users will see the “Make Payment” button in your patient portal, and you will be able to accept mobile payments.
Payment Pros Procedure Flyer: PCC and Payment Pros have worked together to make this process simple. Payment Pros has produced a flyer which explains the process.
Tell Families They Can Pay in the Portal
Your families will be more likely to pay their bills in the portal if you let them know about this option. How can you educate families about this new service and drive them to your portal to make payments?
Here are some suggestions for how to encourage families to use your new portal payment feature:
-
Add a Note to Your Paper Bills: Add a note with your patient portal’s URL address to your paper bills, letting your families know they can save a stamp or a phone call and pay their bill online, 24/7.
-
Post Flyers in Your Office: Print new flyers advertising the new portal feature (and reminding families to use your portal) and post them in conspicuous places around your office, such as in the waiting room, in exam rooms, and at your checkout desk.
-
Splash it on Your Website: Add a link to your portal from your practice’s website. Add a colorful banner with a note encouraging families to check out your portal and its new convenient payment option.
-
Post on Social Media: Use your Facebook or Twitter account to announce that families can now pay their bill through your patient portal.
-
Talk It Up: Sometime the most effective marketing is word of mouth. Educate your staff about how portal payments work, and make sure they are passing on the knowledge to families when they come in for visits.
-
Phone Hold System: Add a message to the “on hold” feature of your phone system, informing families that they can save time by getting forms, reviewing appointment information and paying their bills through the patient portal. This may be particularly effective if you have a separate billing phone number.
Post Portal Payments to Accounts Automatically or Manually?
Once families start paying their bills in the patient portal, how will the money make it to their account on your PCC system?
PCC EHR can automatically receive payments and post them to the appropriate account. Later, you can review portal payments reports to reconcile and review activity.
Alternatively, your practice can take a manual approach: log into the BluePay portal to review the list of payments, optionally download an activity log, and then post the payments into your PCC system yourself.
Option 1: Auto-Post Payments Made Through the Patient Portal
When a family pays their bill in the patient portal, PCC can automatically post that payment to the account. Your PCC system will apply the payment toward the portal user’s associated Billing Account, from oldest to newest charges. If an over-payment is made, the account will receive a credit.
PCC billing reports, as well as the balance that families see in the portal, will be automatically updated to show that the payment has posted.
Working with Portal Payments in PCC: On PCC reports, such as proving out reports, auto-posted portal payments will appear with the username “portalpmt” and location “portal”.
Configure Auto-Posting Portal Payments
If your practice wants to enable auto-posting for payments through your patient portal, use the Configuration tab in the Patient Portal Manager.
Check the box for “Automatically Post Portal Payments”, and select a payment type for each type of card displayed. The payment type you select will be the one that is displayed in reports.
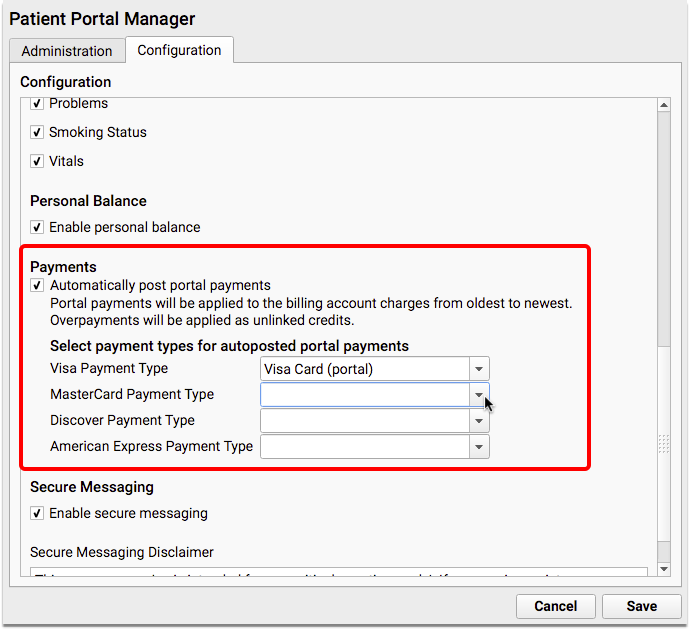
These fields are all required. If you do not already have an appropriate payment type, or you wish to add a new payment type for accounting purposes, you can add one in the Payment Types table in the Tables tool in the Configuration menu or contact PCC Support.
Option 2: Review Payments from Your Portal Users and Manually Post Payments
Instead of auto-posting, your practice can use receipts and reports to review payments and post them manually into PCC.
There are a few different methods you could use to make sure you see all portal payments. Read the next section to learn about each one.
After you have a list of payments, you can manually post them to an account in PCC EHR. (See Post Personal Payments.)
Review and Work With Incoming Portal Payments
Whether you are posting payments manually, or you just want to analyze portal payment activity, there are several methods you can use to make sure you know about every portal payment.
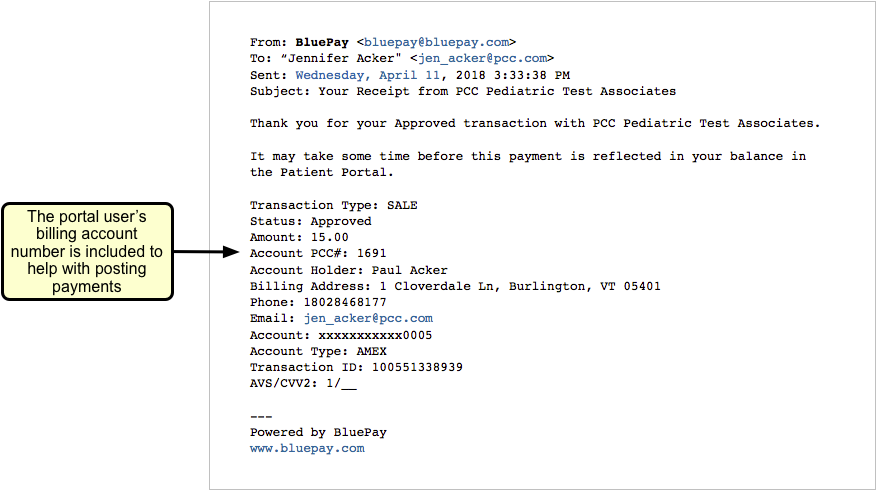
Receive a Copy of Every Portal Payment Receipt
Whenever a family makes a payment, BluePay sends receipts to the email address that the portal user entered on the payment screen. Your practice can opt to receive copies of each receipt email.
Use the Portal Payments Report in PCC EHR
Use the Portal Payments report, in the Report Library in PCC EHR, to find and list incoming portal payments to your practice.
You can find the report in the Billing and Patient Portal reports categories, or search in the All Reports category.

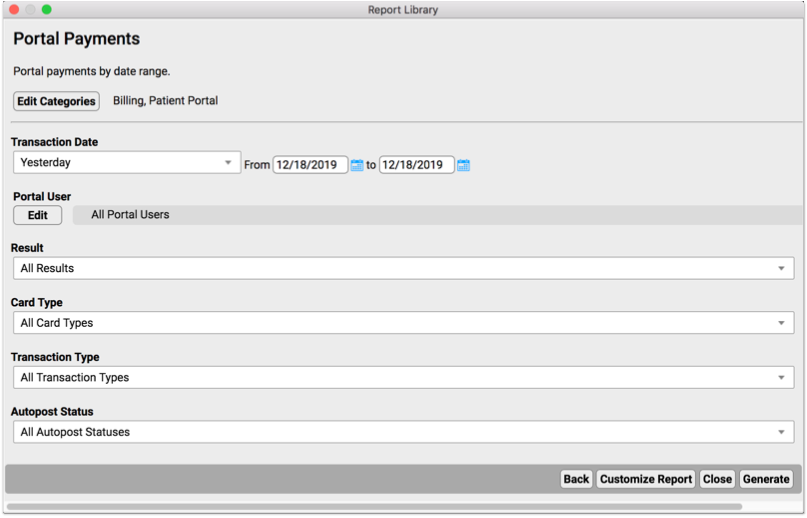
Select a range of dates, and optionally limit your report by portal user, result, card type, transaction type, and autopost status. The resulting report will list all payments made through the portal, including account details for each payment.
Log Into BluePay and Download an Activity Log
Alternatively, your practice can log directly into the payment processing website (the BluePay Gateway) to review and download a log of all portal payment activity.
Do I Ever Need to Do This?: The Portal Payments report in PCC EHR includes all the information your practice should need for reconciling or researching portal payments, or for posting payments manually. However, if something doesn’t add up or you need to do further research, you have the option to log directly into the BluePay Gateway. PCC does not manage this website, so the screens and steps below may change over time.
To access your activity log on the BluePay Gateway, follow the steps below.
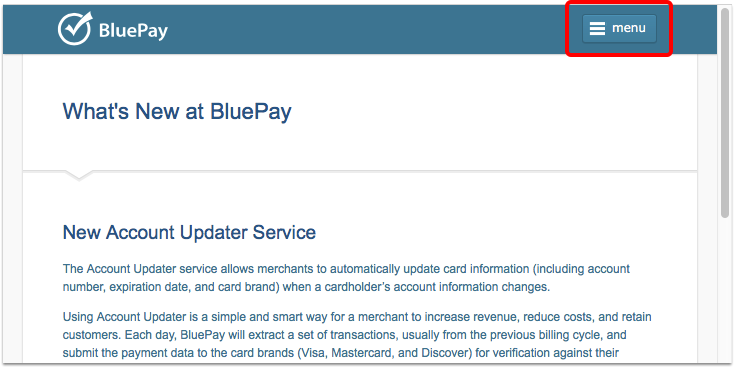
Log In to the BluePay Gateway
Go to the BluePay Gateway and enter your account name, username, and password.
Open the Transaction List Screen from the Menu
Open the menu and select PROCESSING, followed by Transactions, and then Trans. List.
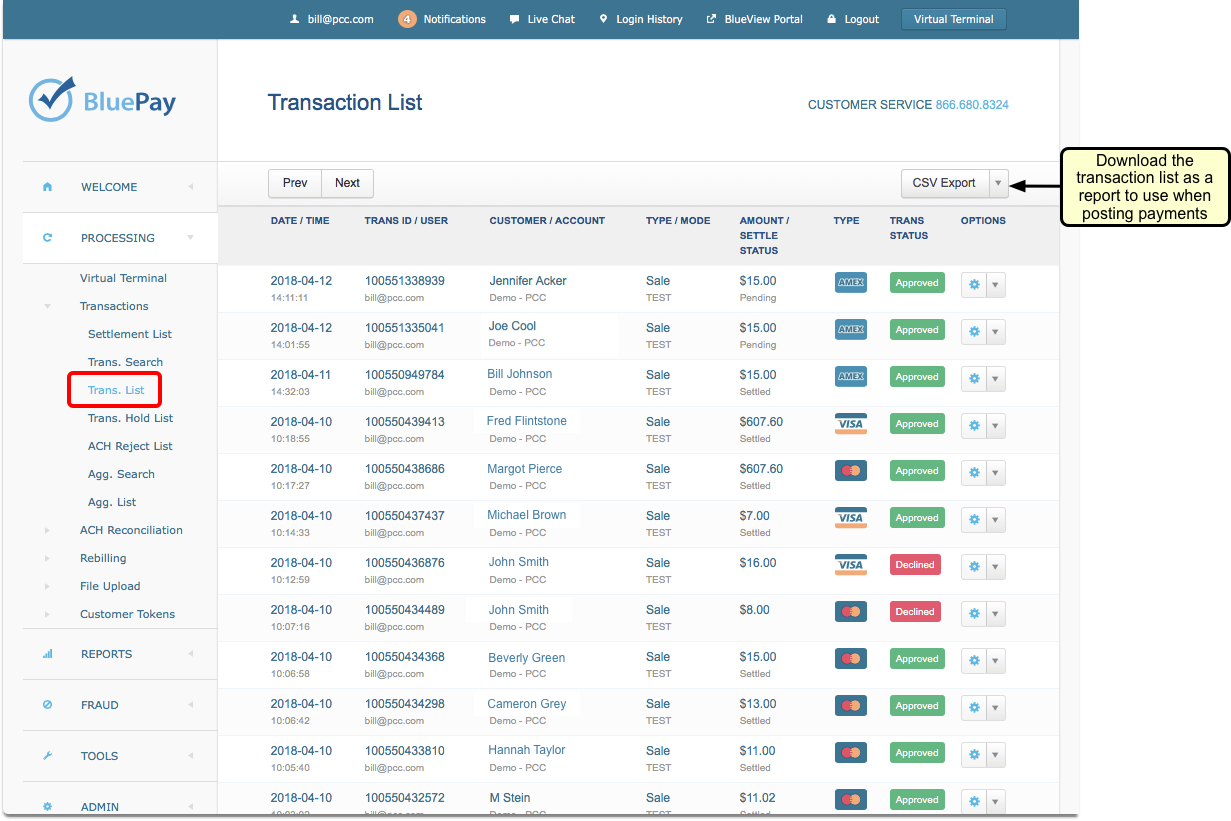
Optionally: Download a CSV Export File
If you want a copy for a spreadsheet, or intend to post payments manually (instead of automatically), you may next want to download the payment log.
Select the CSV Export option to download a report of the activity log. Make sure that you choose to include column headers in your report.
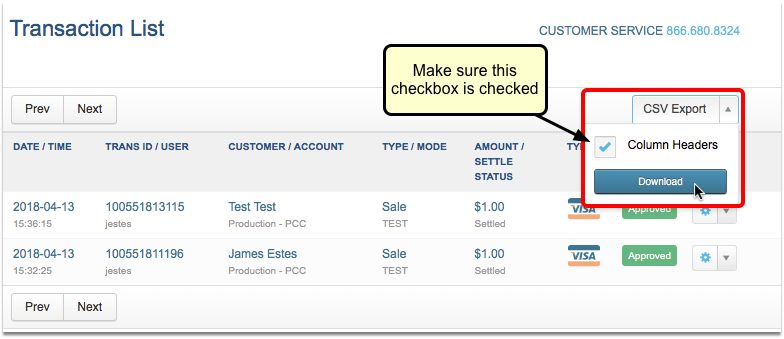

The downloaded spreadsheet will include a “Custom ID” field, which displays the portal user’s associated PCC Account ID#. This number will be helpful for you to have if you post payments manually in Practice Management.
Optionally: Reconcile Payments with Deposits, and Post Payments in the Payment Posting Program (pam)
Once you have a payment record in hand, you can compare it with your payment deposits from BluePay, and post appropriate payments in Practice Management. You can use the PCC account number to quickly jump to the correct account and apply the payment to outstanding charges.
To learn more about posting personal payments and adjustments, read Post Personal Payments.
Need More Help?: For additional questions about working with the BluePay Gateway, please contact our portal payment partner, Payment Pros, at (866) 773-3390 or info@paymentpros.net.