Configure the Appointment Book
Read the sections below to learn how to configure the Appointment Book in PCC EHR.
Contents
- 1 Update User Roles for Scheduling Functionality
- 2 Configure Visit Reasons, Visit Types, and Defaults
- 3 Configure Provider Hours and Open Your Calendar
- 4 Configure Patient Details Window
- 5 Customize Location Banners in the Appointment Book
- 6 Choose the Appointment Book Display Unit for Your Practice
- 7 Report on Schedule Usage
Update User Roles for Scheduling Functionality
Once the Appointment Book is in use by your practice, you need to indicate which users can schedule, and which providers can be scheduled for appointments.
Assign Scheduling Permissions
Use the Roles tab within the User Administration tool to either create new scheduling roles, or to assign scheduling permissions to existing user roles.
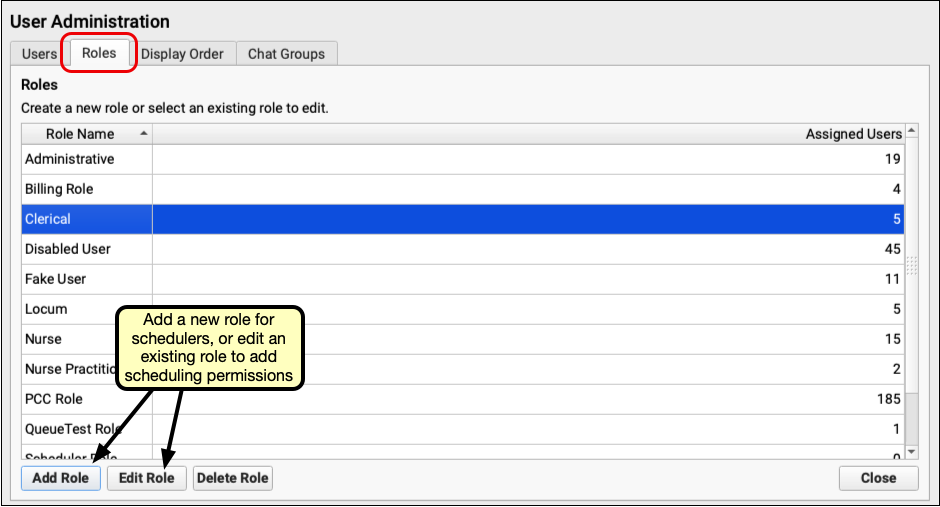

If you add new scheduling roles, make sure that you assign the appropriate roles to your scheduling staff. For more information about working with user roles, read the Set User Roles for Permissions and Security article on PCC Learn.
Indicate the Scheduling Providers at Your Practice
Use the User Administration tool to indicate which users can be scheduled for appointments.
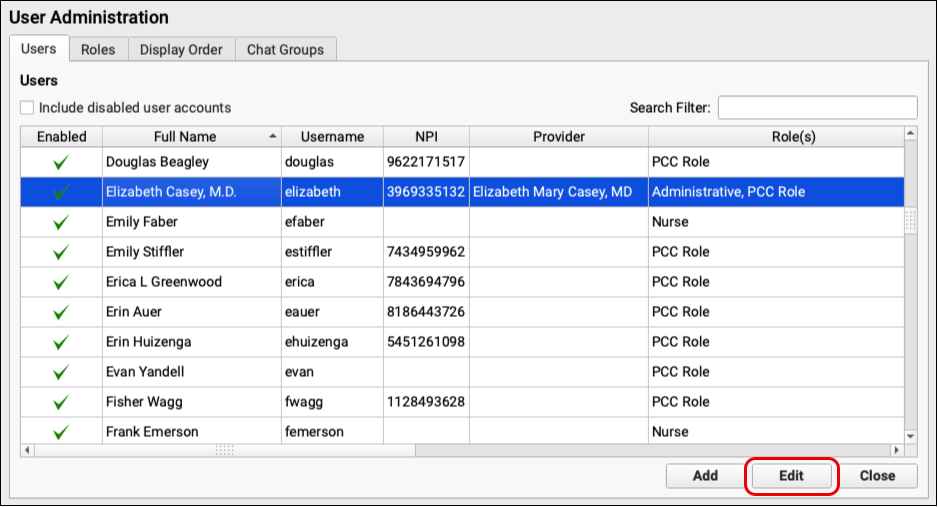
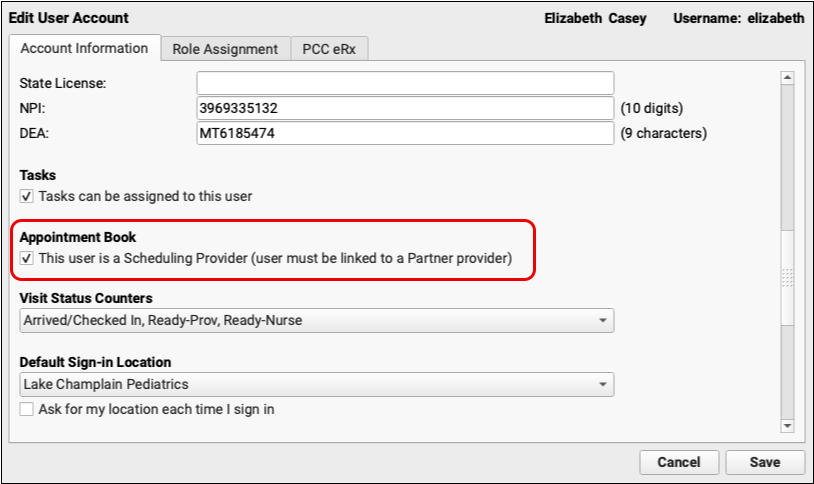
Edit the user’s account and indicate that they are a scheduling provider.
The scheduling provider must have an entry in the Providers table that contains a matching EHR User field. Each user must log all the way out, close and reopen the login window before the new provider will appear on the Appointment book.
To learn how to add a new entry to the Providers table, read Add and Configure a Clinician.
To learn what to do when a provider leaves a practice, read Steps to Take When a Clinician Leaves the Practice.
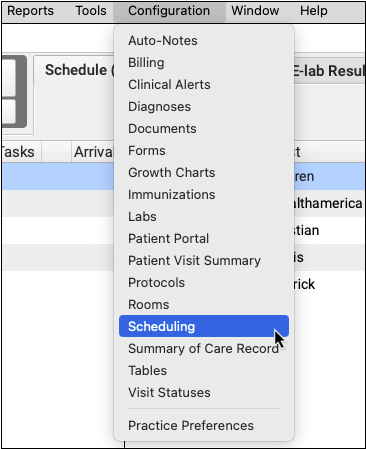
Configure Visit Reasons, Visit Types, and Defaults
Use Scheduling Configuration to create and work with visit reasons and optionally assign them to color-coded visit types, set visit reason durations by provider, and choose your practice’s default Visit Reason for scheduling, and default Visit Type for searching.

Visit Reasons
Use the Visit Reasons tab to work with your practice’s visit reasons. You can customize the duration for each visit reason, by provider. If your practice uses color coding as guidance for your schedulers, you can also assign a visit type to each visit reason.
Select a visit reason and click “Edit” to make changes.

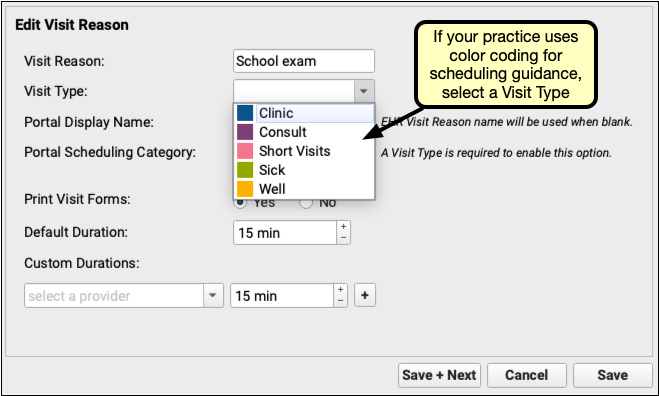

You can change a visit reason’s name, optionally assign a visit type, choose whether forms will print for the visit (see Print Visit Forms), define its default duration, or set custom durations by provider, in 5-minute increments.
Optional: Visit Types
Visit types are used to color code your schedule so that anyone scheduling can see what type of appointment should be scheduled within each block of time. For example, you may have one visit type named “Well Visits” that includes the visit reasons “infant well visit”, “1 yr well visit”, “2 yr well visit”, etc.
You can decide what color to use for each visit type, and where the colored time slots will appear on the schedule, by provider.
Open the Visit Types tab, and click “Add” to create a new visit type.

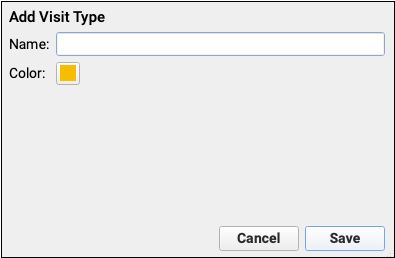
Enter a name for your visit type, and click “Save” if you are satisfied with the default color assigned. If you want to change the color, click on the color swatch.
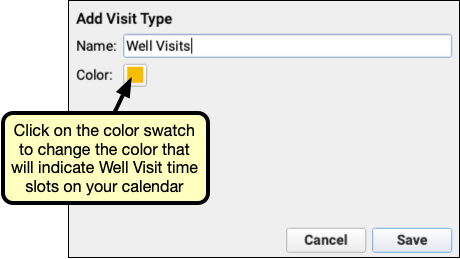
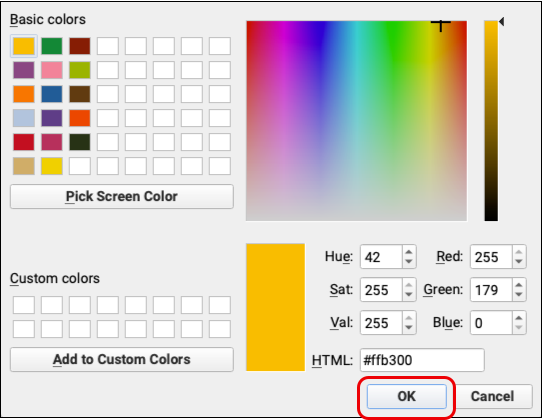
You can choose from the color-blind friendly options provided in the Basic Colors palette, or you can create your own color scheme instead.
When you have finished adding visit types, you will be ready to assign them to visit reasons on the Visit Reasons tab.

Visit Reason and Visit Type Defaults
Use the Preferences tab to set a default Visit Reason for scheduling in the Appointment Book, and default Visit Type for searching with the Availability Finder.

If your practice uses Visit Types with assigned colors, the radio button will default to “Match Visit Type for selected Visit Reason”.
If your practice does not use Visit Types, you can choose to have the Availability Finder ignore the Visit Reason and instead search for availability of “Any” visit type.
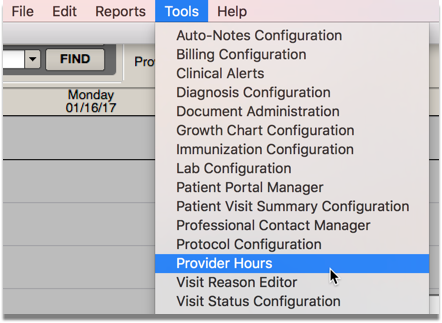
Configure Provider Hours and Open Your Calendar
Use the Provider Hours tool to configure and assign templates to each provider’s calendar at your practice. You can optionally add color-coded visit type guidance to let schedulers know what types of appointments to schedule throughout the day.
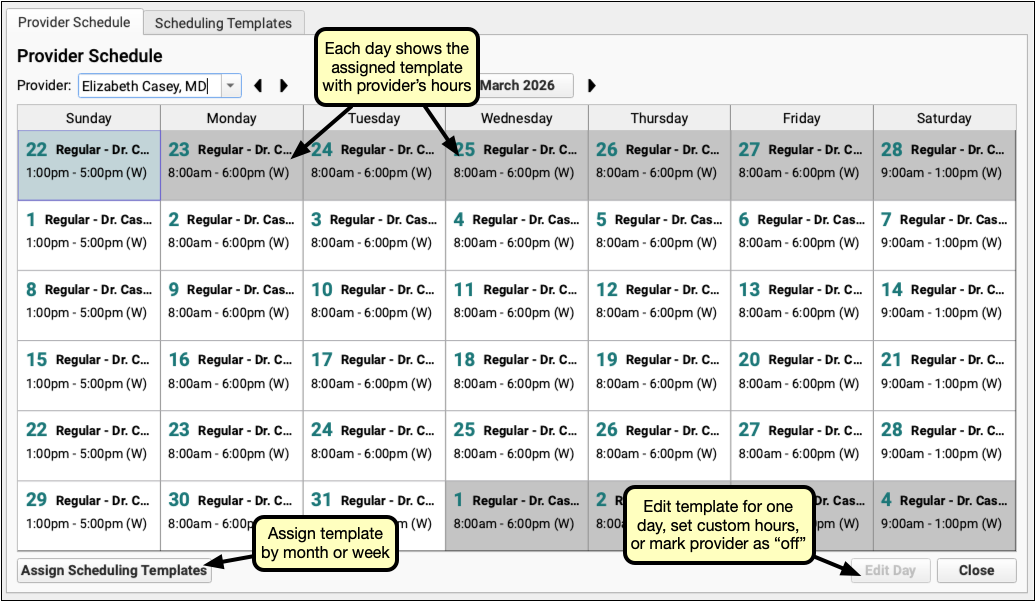
You can assign templates by month or by week, and you can edit individual days to select a different template, edit the hours for that day, or indicate that the provider is off.
More than one provider can use the same template, if appropriate.
Configure Templates for Provider Hours and Visit Types
Open the Scheduling Templates tab. You will see a list of your practice’s scheduling templates.
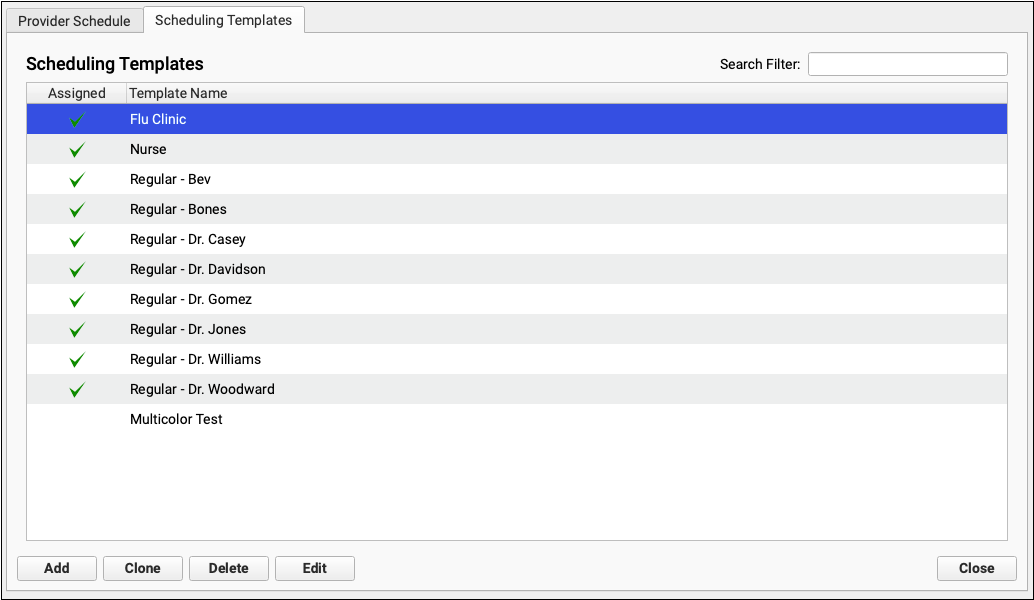
A green checkmark in the Assigned column indicates that the template has been applied to at least one provider’s calendar.
You can create a new template by clicking the “Add” button.
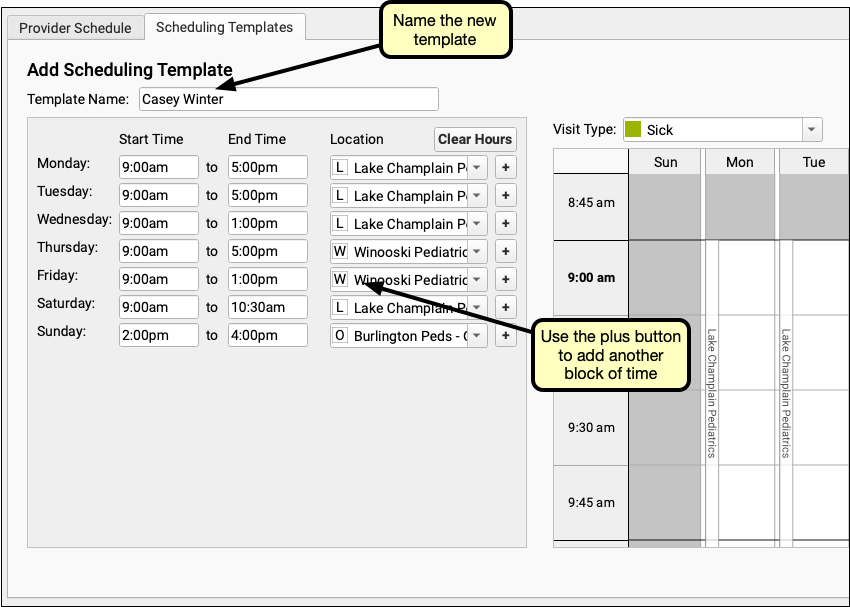
You can enter multiple start and end times, at different locations if applicable, to account for breaks or hospital rounds. You can create as complex a daily schedule as needed.
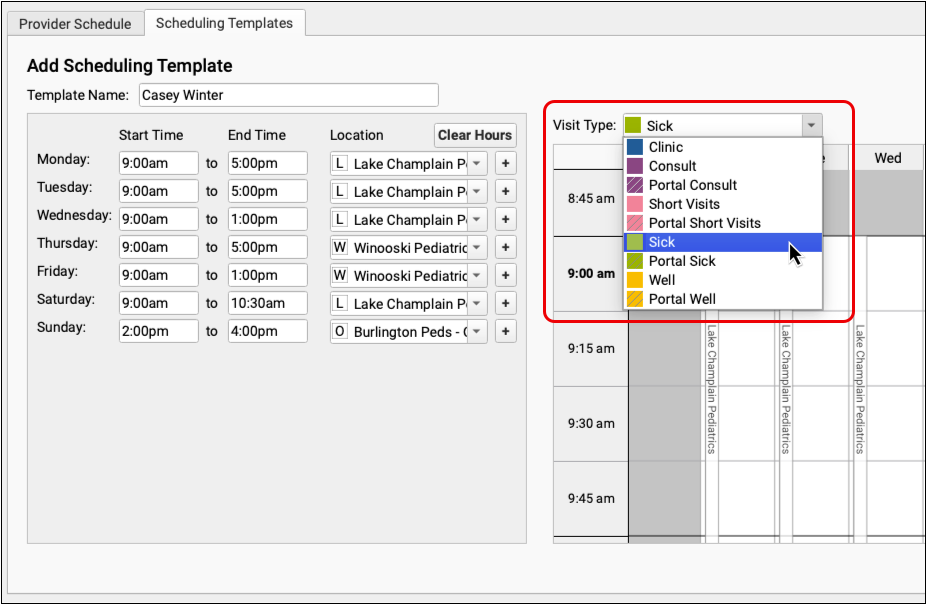
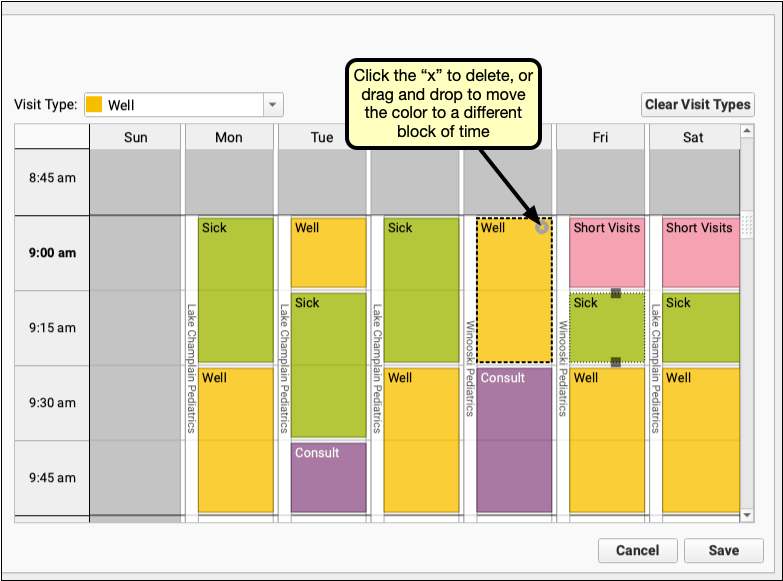
Optionally, you can assign color-coded visit type guidance to a scheduling template to help schedulers know what types of appointments to schedule throughout the day. Select a color from the Visit Type drop-down and then “paint” that color onto blocks of time within the schedule.
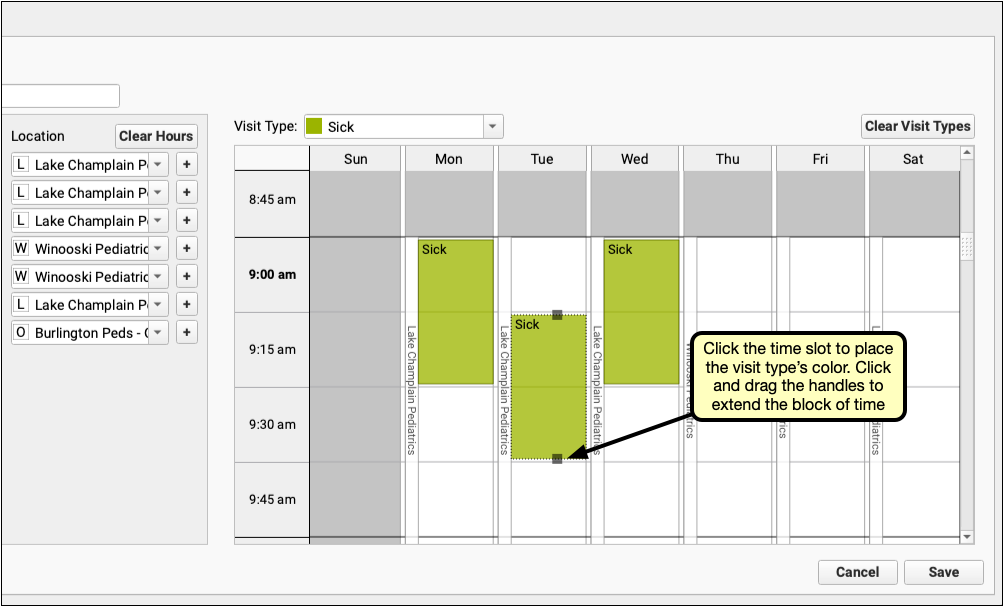
If you need to make changes, click on the block of time to edit it. You will see grab handles that will allow you to move the color block, or an ‘x’ to delete it.
When you are finished, click “Save” to complete the new template.
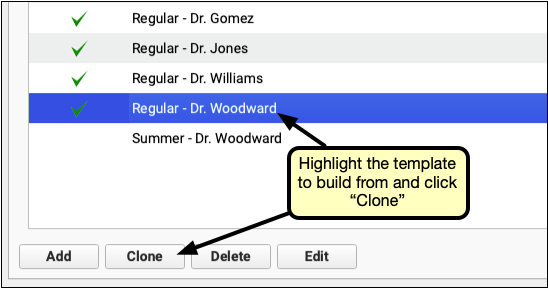
If you prefer to build off of an existing template, you can clone it and save yourself from having to create a new template from scratch.
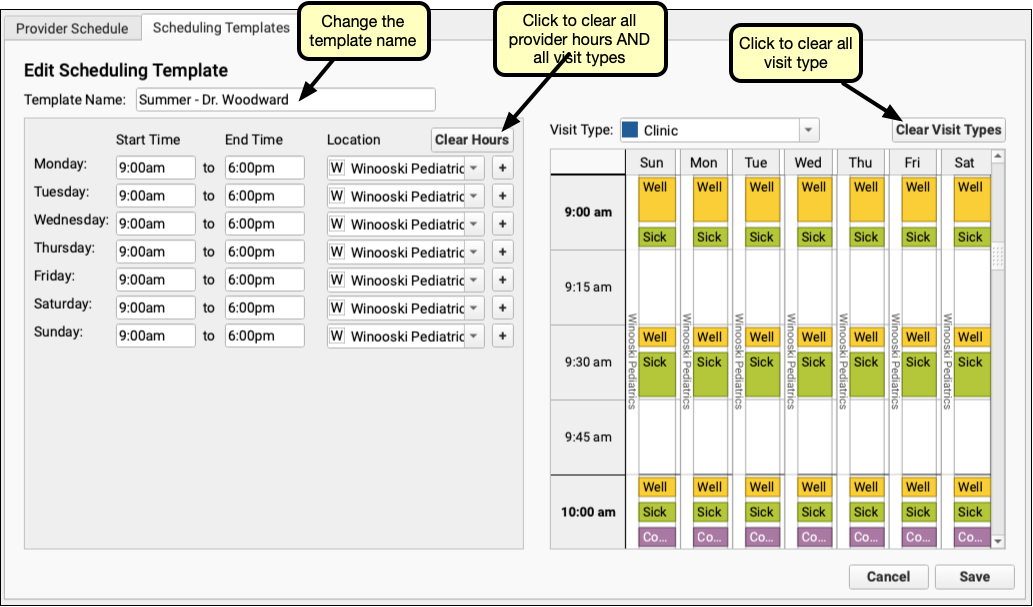
You can use the new “Clear Hours” button to clear the entire template, with the exception of the template name, or the new “Clear Visit Types” button to keep the same hours for the new template, but change the visit type guidance. You can also just make changes to any part of the schedule.
If you edit a template that has already been assigned to any provider calendars, changes to the template will be reflected in future dates only.
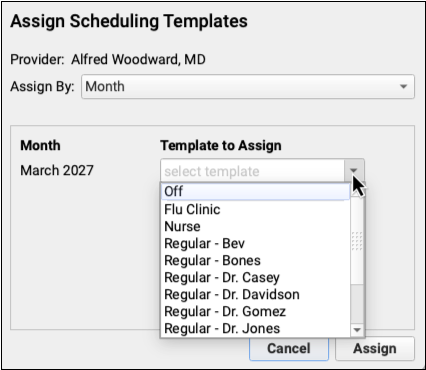
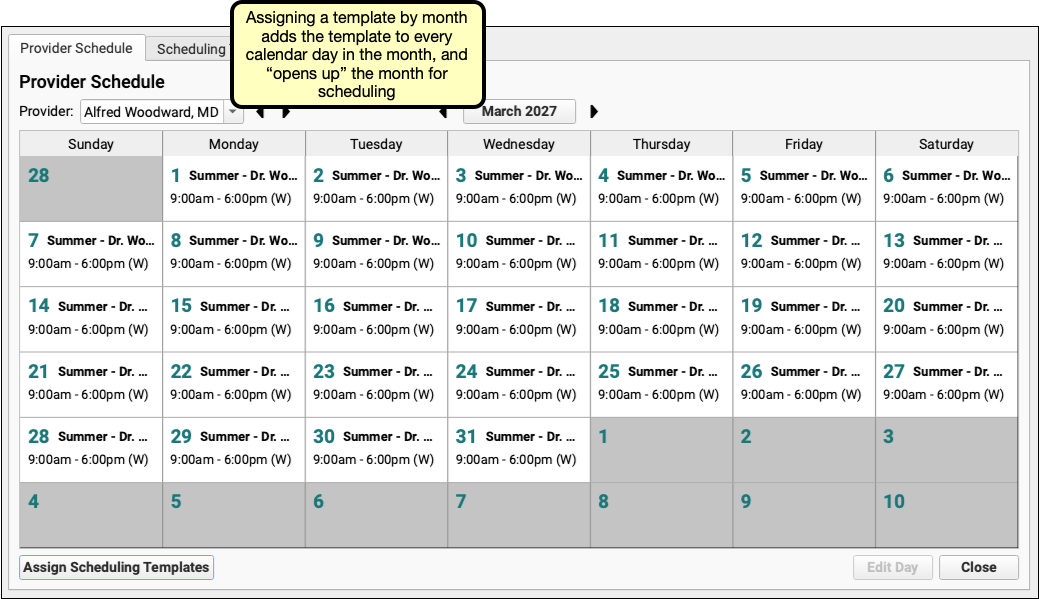
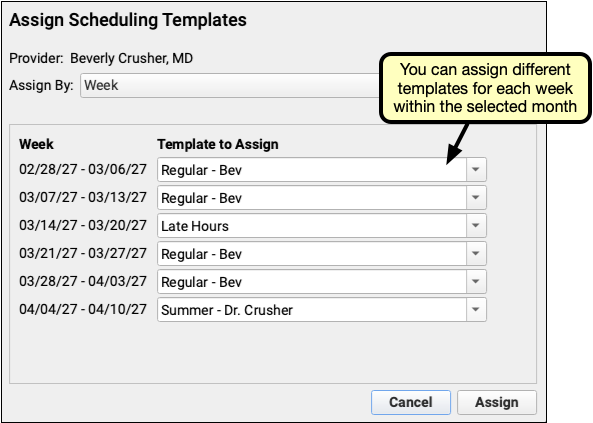
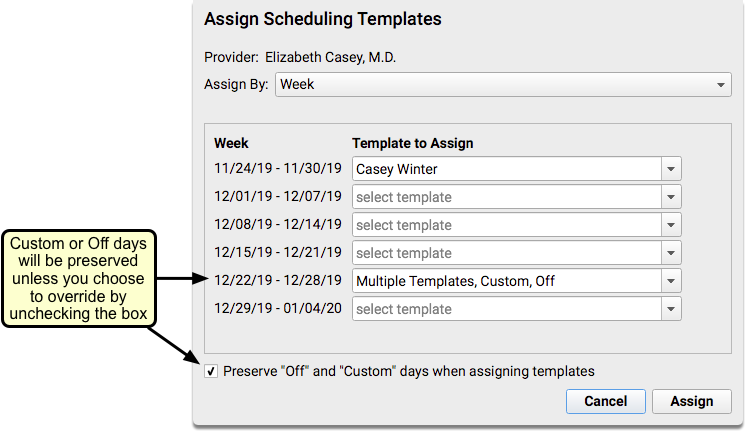
Assign Templates to a Provider’s Calendar
You can assign templates to a provider’s calendar from the Provider Schedule tab, using the “Assign Scheduling Templates” button. You can open up a provider’s calendar for scheduling by assigning templates by month or by week.
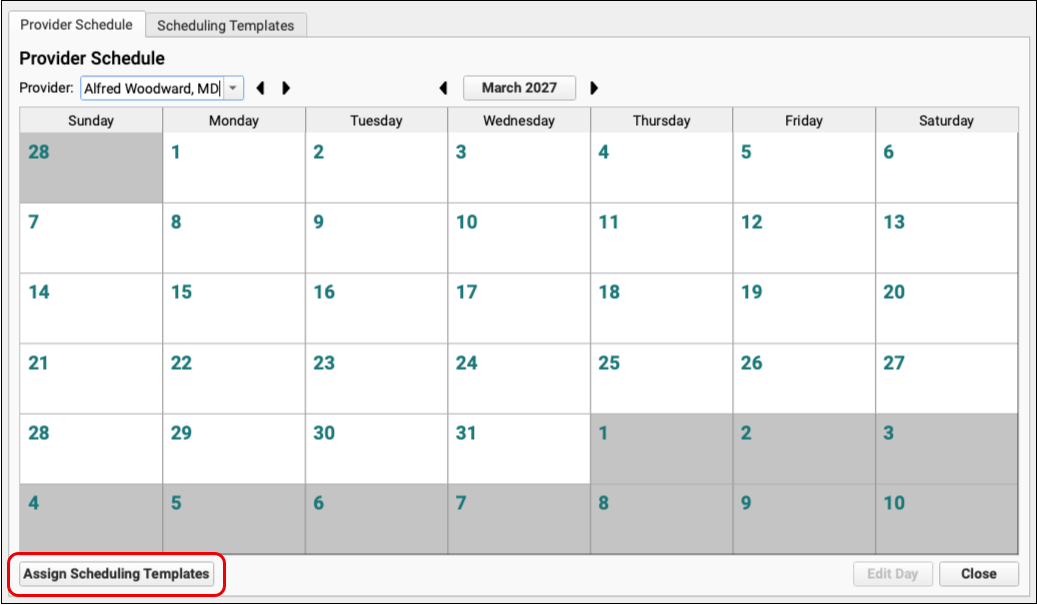
If you choose the monthly option, the template will be assigned to all calendar days within the selected month.
If you choose the weekly option, you can set templates for any week that is displayed on the screen.
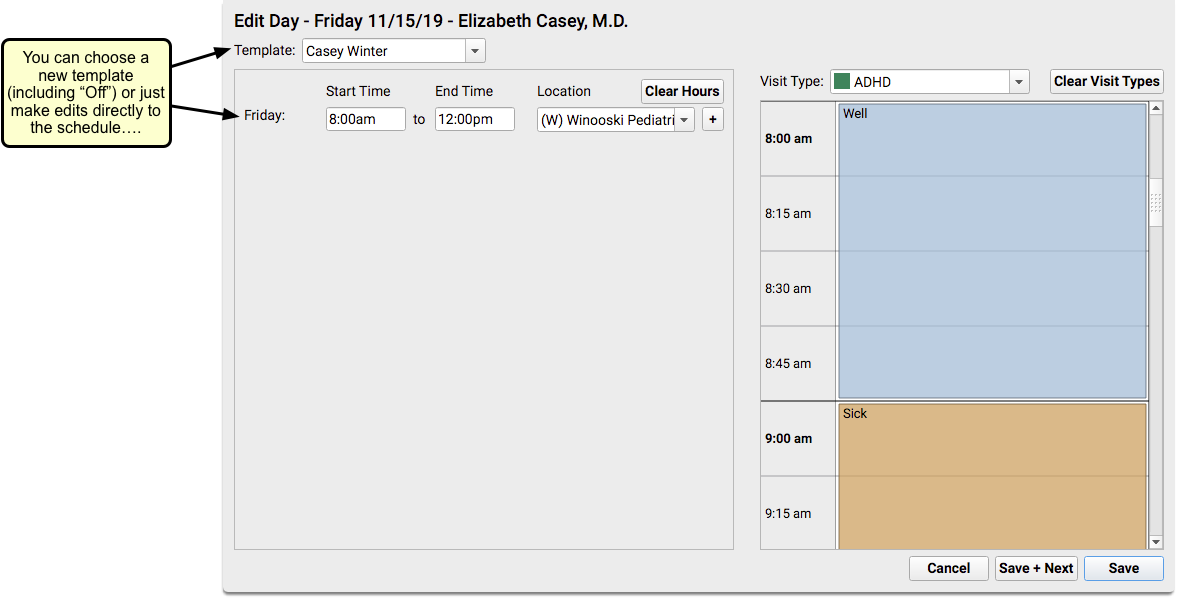
Edit One Day on the Calendar
Creating a template makes sense for a normal schedule. But what about a doctor’s vacation days? Or when there’s a conference or special meeting? Are you running a flu clinic?
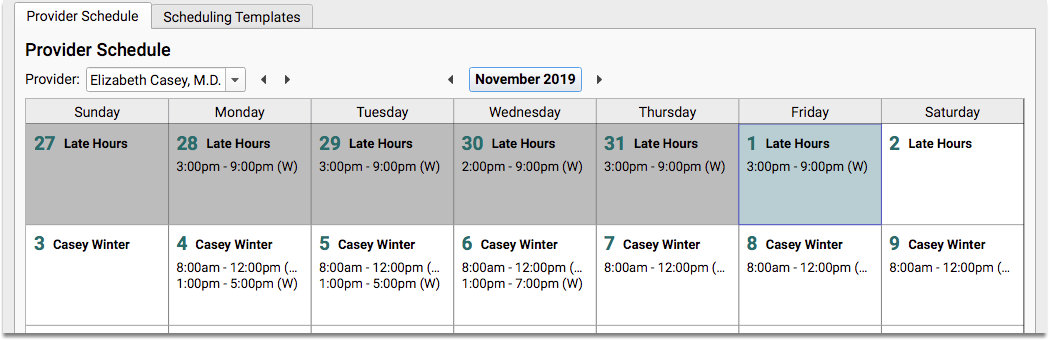
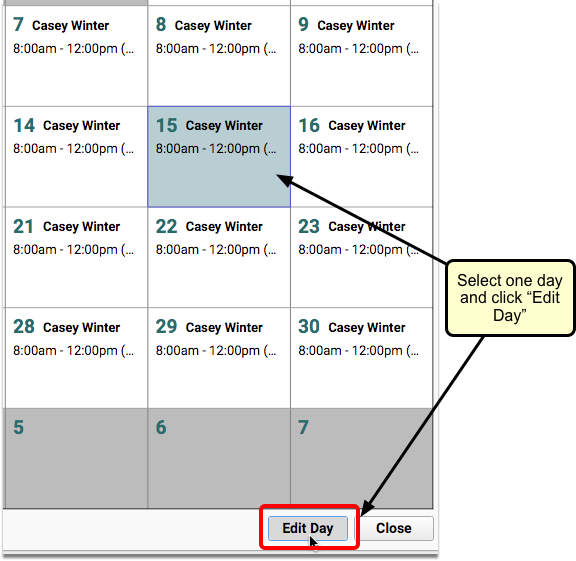
You can edit individual days on a provider’s calendar to select a different template, change the hours for that day, or indicate that the provider is off or on vacation.
Double-click on a single day, or select a day and click the “Edit Day” button.
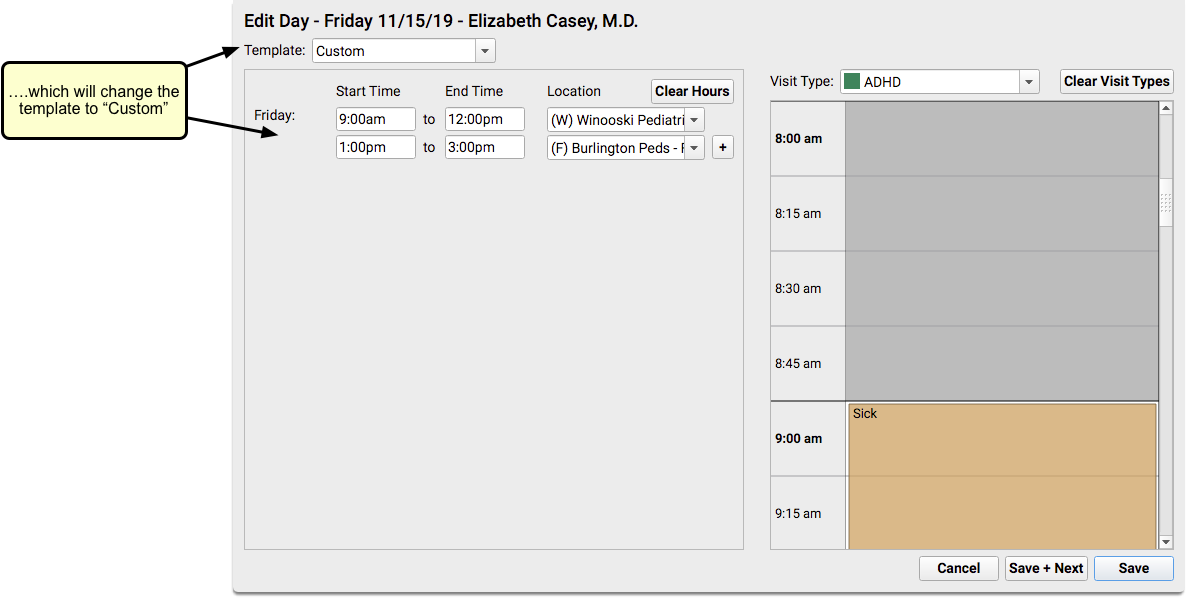
If you assign templates after creating individual “Custom” or “Off” days, those days will not be changed unless you uncheck the “Preserve off and custom” checkbox.
You can uncheck the box if you want to override previously scheduled “Custom” or “Off” days.
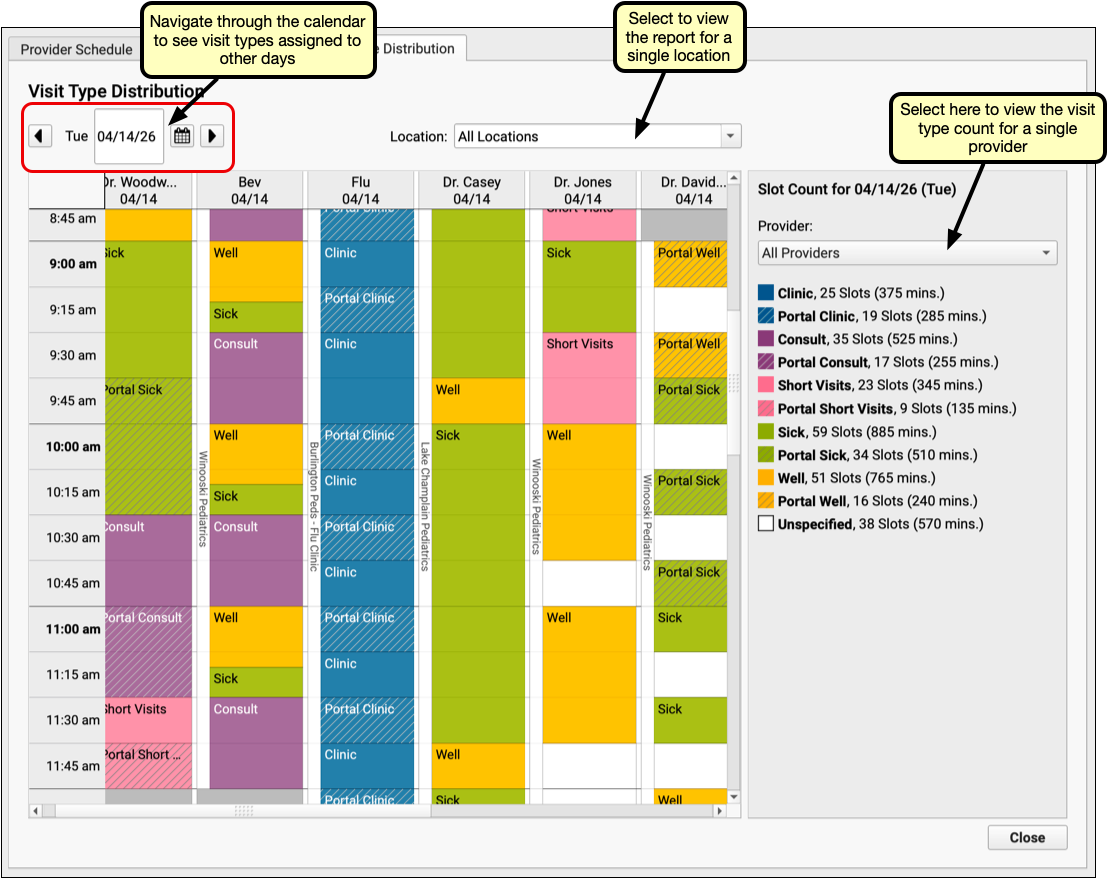
Check the Visit Type Distribution Report
The Visit Type Distribution report counts time slots assigned to each visit type. Click the Visit Type Distribution tab in the Provider Hours tool. By default, the report displays today’s date, for all locations and providers. The right column, called “Slot Count” shows the color, visit type, number of assigned time slots, and time count of those minutes. The default view includes all providers. Use the drop-down menu above to limit the report to a single provider. The calendar on the left shows each provider’s visit types for the day. If your practice has multiple locations, use the location drop-down menu to view just one.
Configure Patient Details Window
What information should you review with a family before you schedule the patient? The Patient Details window includes several components by default: Appointment History, Recent and Upcoming Appointments, Patient Demographics, Account Demographics, and Policies.
You can add any chart-wide components you like, and rearrange the order of the items in the window to suit your office’s needs.
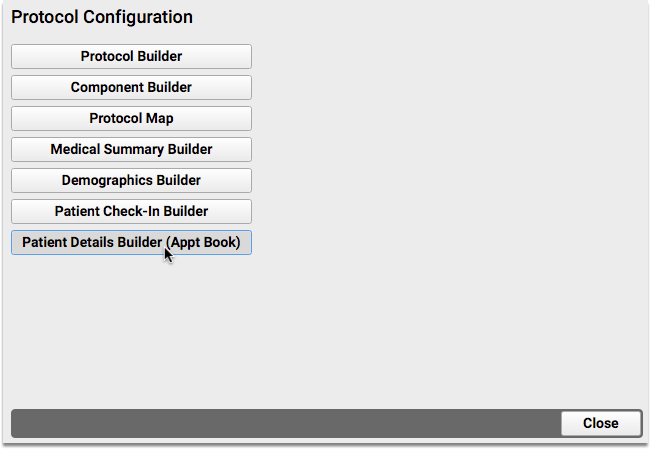
From the Protocol Configuration tool, select “Patient Details Builder (Appt Book)”.
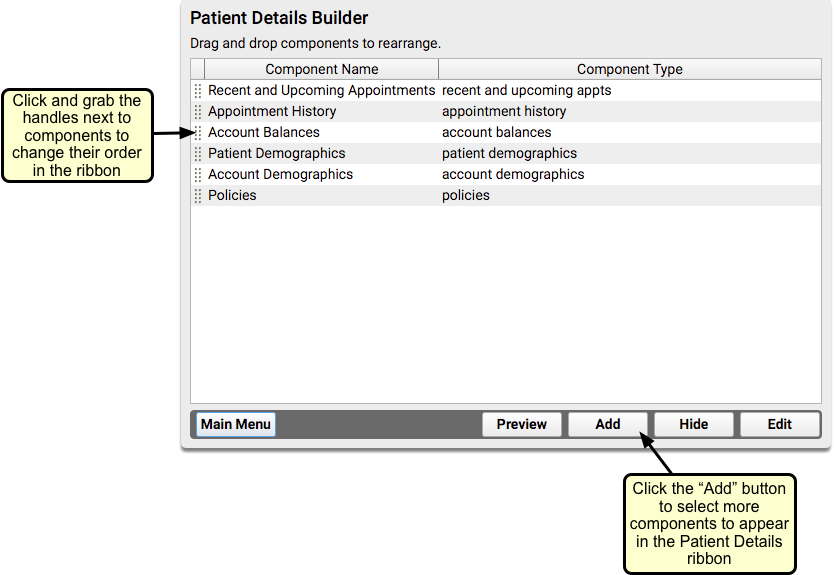
You can click the “Add” button to include any additional chart-wide components, and drag and drop component names to rearrange how they appear on the Patient Details window.
For example, maybe you always ask for insurance information and double-check cell phone numbers. Maybe you manage patient portal users. You can add, remove, and move components around to make sure staff has the details they need when they schedule.
Turn Off Automatic Patient Details Window
The Patient Details window is set by default to open automatically as an appointment is scheduled. If this workflow doesn’t work for your practice, you can turn it off.
Within the Preferences section of the Scheduling configuration ool, simply uncheck the checkbox next to “Present Patient Details when scheduling appointments”.
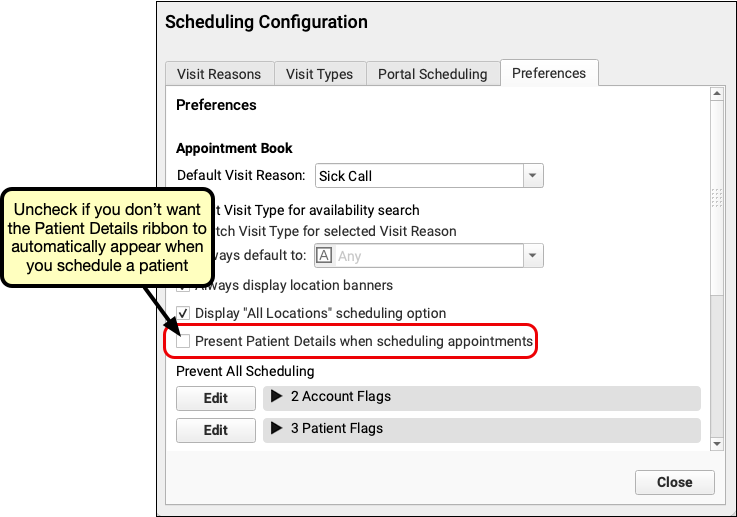
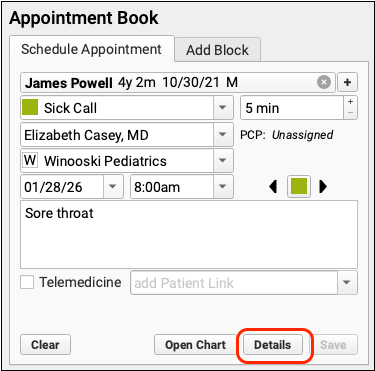
The scheduler can still access the Patient Details window by clicking “Patient Details” from the Schedule Appointment panel.
Customize Location Banners in the Appointment Book
Use the Hours tab within the Practice Preferences tool to assign colors to each of your practice’s locations.
You can decide what color to use for each location, by clicking on the new color swatch option to the right of the Location name.
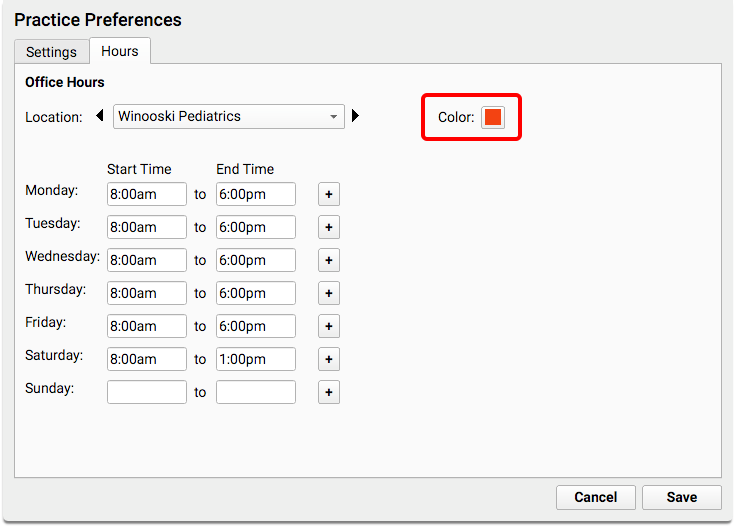
This is the color you will see on the Location banner that displays down the left side of each column on the calendar (if “Display All Locations” is enabled in the Settings tab).
Turn Off Default Location Banners and/or “All Locations” Option
Both location banners and the “All Locations” checkbox are turned on by default for practices with more than one scheduling location.
You can use the Settings tab within the Practice Preferences Configuration tool to turn either of these features off, if you don’t want to use them in your practice.
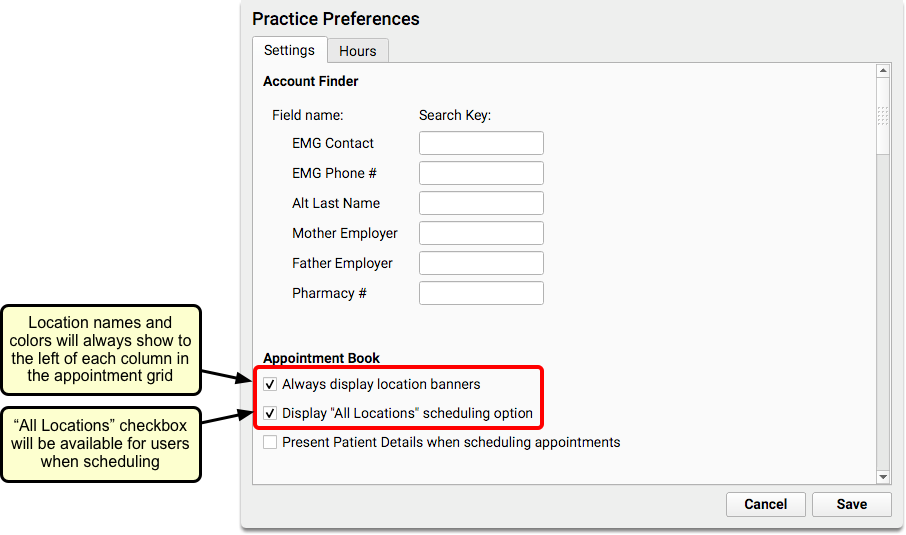
When “Always display location banners” is checked, a location banner will display on the calendar, even if you are only viewing one location.
When “Display ‘All Locations’ scheduling option” is checked, the “All Locations” checkbox will display in the scheduling panel of the Appointment Book, allowing you to see provider availability across all of your locations.
Choose the Appointment Book Display Unit for Your Practice
Your practice can configure your Appointment Book display grid in time units that work best for your office.
You can choose from time slots of 10, 15, 20 or 30 minutes.
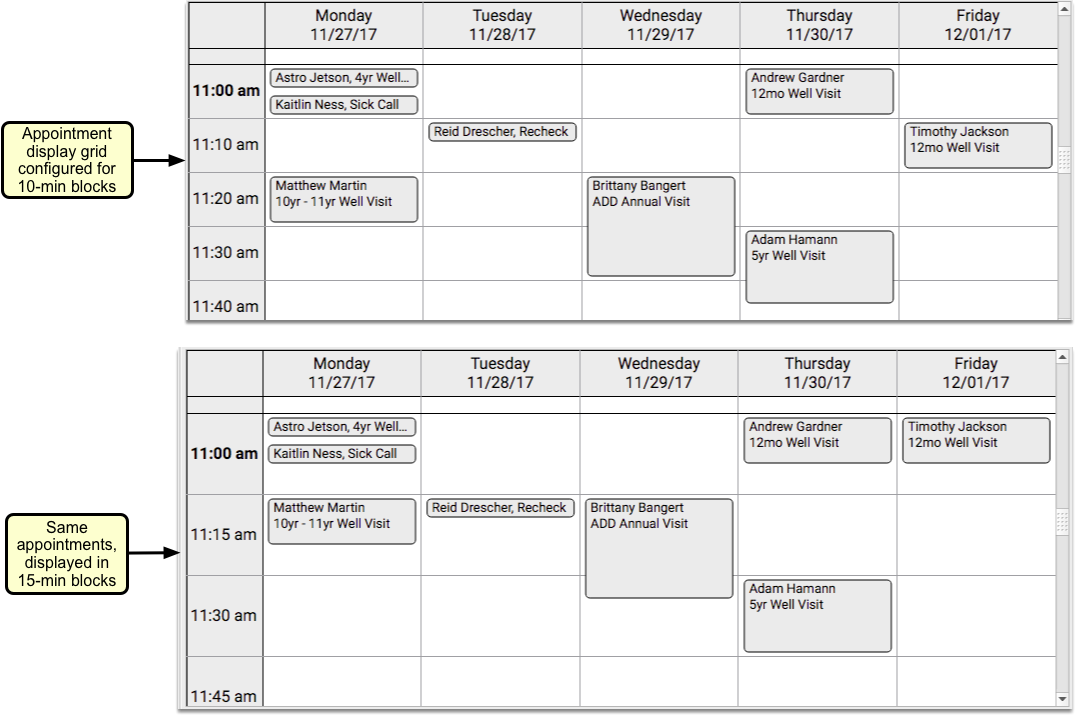
The Appointment Book’s time unit determines the start times of your appointments. For example, if you use a 20 minute unit, all of your appointments in the 9:00 hour would begin at 9:00, 9:20, or 9:40.
Contact PCC Support to configure your Appointment Book scheduling grid.
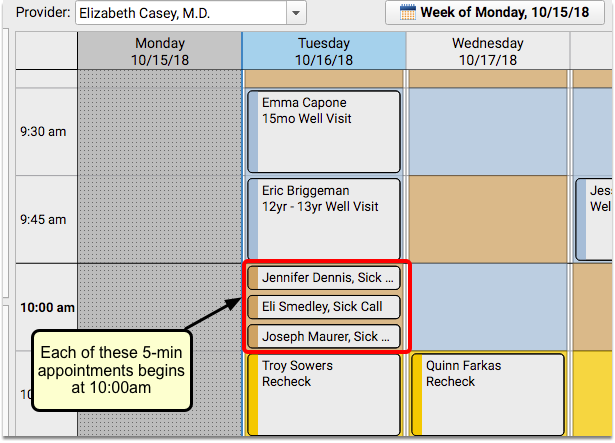
Short Appointment Lengths
As you design your schedule, remember that short appointments will all begin at the same start time in a single time slot. For example, if you use the default 15-minute Appointment Book time grid, you could schedule up to three separate 5-minute appointments, all set to begin at the same time.
Report on Schedule Usage
How can you tell if you’re making the most of your scheduling resources? How do you know what proportion of your provider’s schedule is being filled over time? How do you assess the distribution of scheduled visit types, blocks, or minutes available for each provider, year over year?
The Provider Schedule Utilization Report is a flexible reporting tool that allows your practice to understand the appointment distribution of your provider’s schedules and locations over time. Read Report on Schedule Usage to learn more.