You can prescribe medications electronically from patient visits, phone notes, portal messages, and other patient encounters in PCC EHR.
Intro Video: To learn the basics of prescribing in less than 5 minutes, watch Prescribe Medications.
New User Training Video: To go deeper as a new user without getting overwhelmed, watch Prescribing 101: PCC eRx Essentials for New Users.
Create and Send a Prescription
Learn the basic workflow of how to prescribe a medication in PCC EHR. You can also prescribe from pocketPCC.
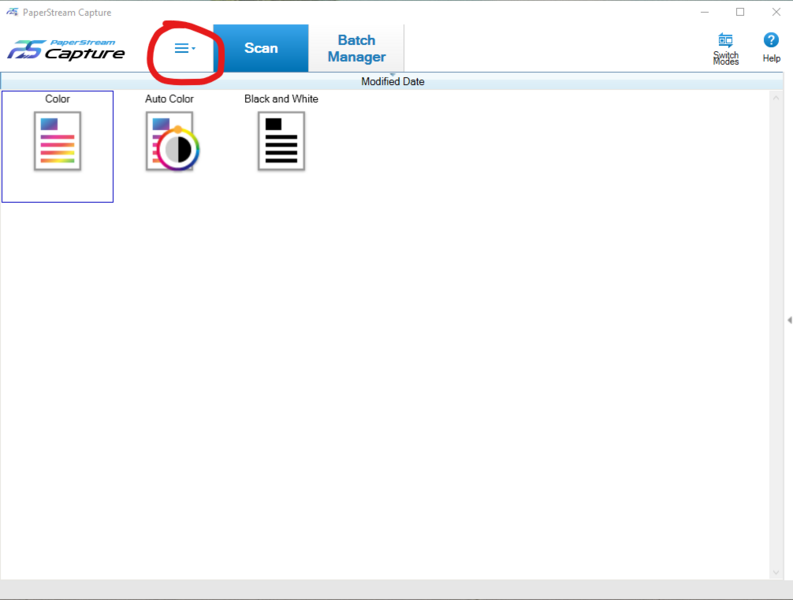
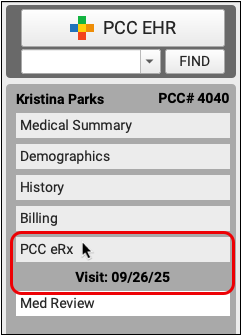
Open PCC eRx
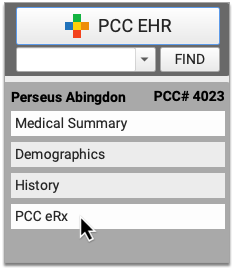
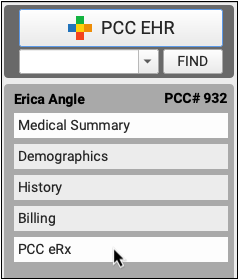
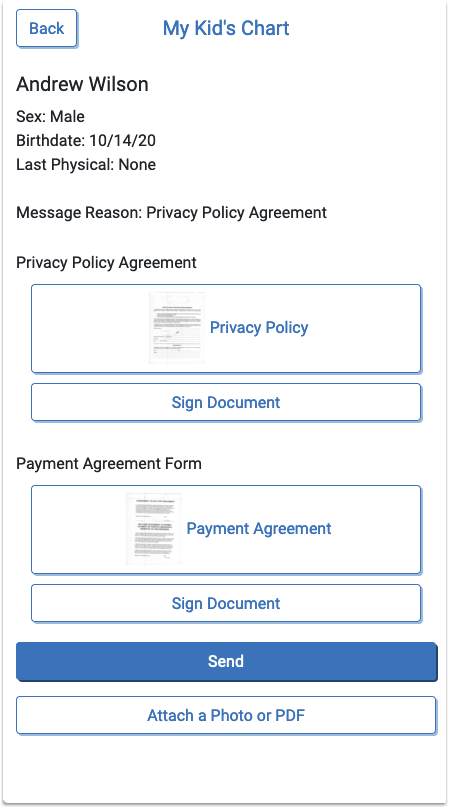
From a visit, phone note, or portal message, click on the “PCC eRx” button.
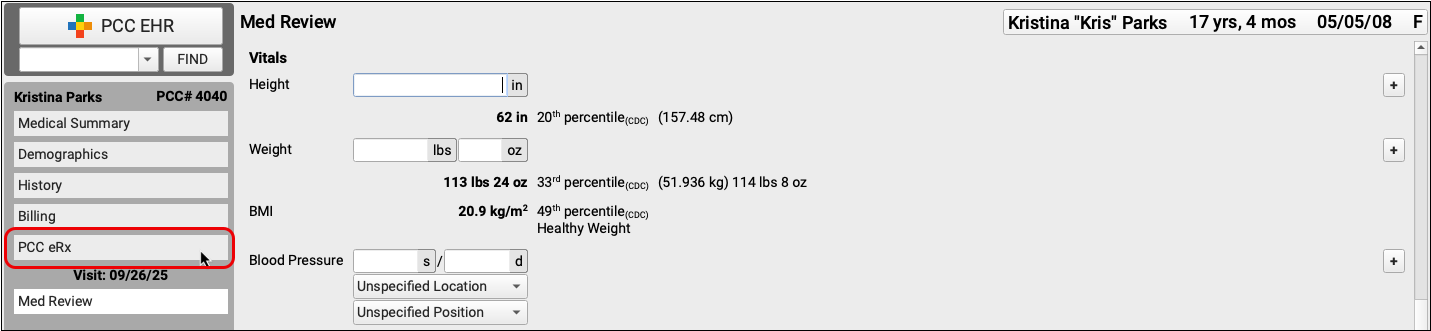
When you click the button, PCC eRx opens within the patient’s chart.
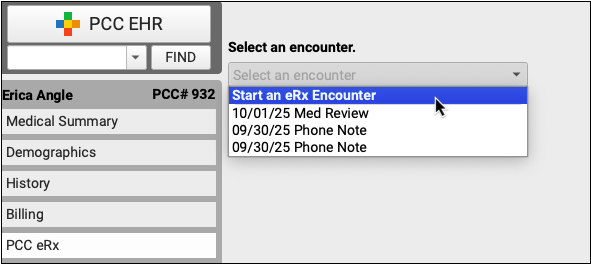
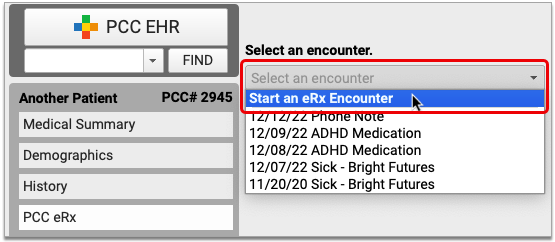
Optionally Create an eRx Encounter: If you wish to review eRx information for a patient and there is no corresponding visit note, phone note, or portal message, click the “PCC eRx” button in the patient’s chart and choose the “Start an eRx Encounter” option from the “Select an encounter” drop-down.
Review the Patient’s Details and History
Within PCC eRx, you can review the patient’s vitals, pharmacies, allergies, problem list, retail prescription history, prescription history, and medication history.
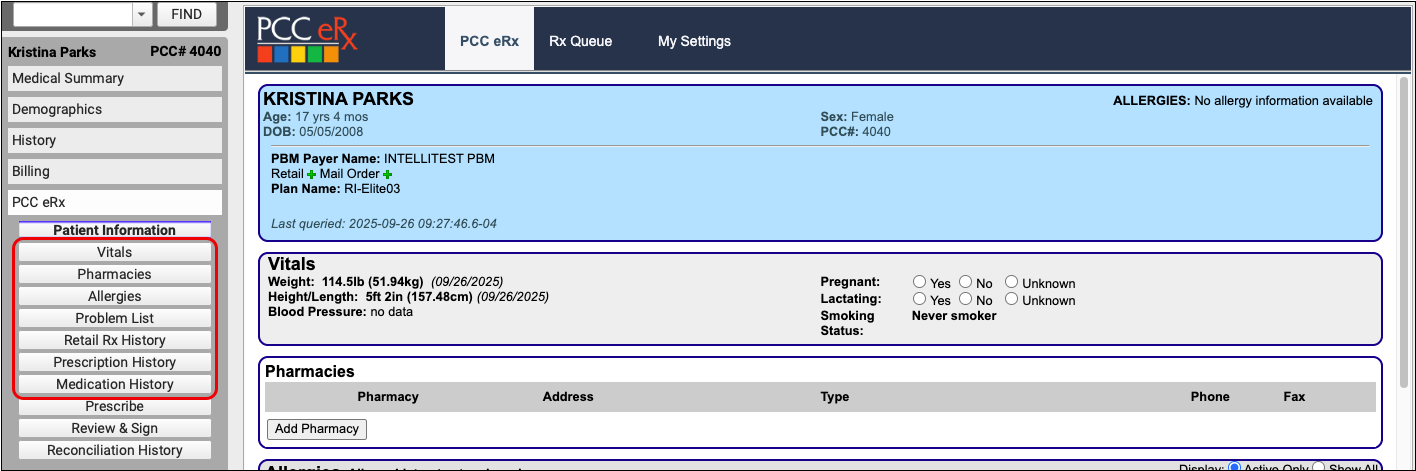
You can take different actions in each component, such as filtering the view to show active and inactive entries, marking the contents as reviewed, adding and retiring entries, or editing what is already there.
Learn About Each Component: To learn what information appears in each component of the PCC eRx screen and which actions you can take, read the PCC eRx Component Reference.
Go to the Prescribe Component
Click on the “Prescribe” button to jump to the Prescribe component of PCC eRx.

The Prescribe component is where you can write prescriptions for your patient.
Renew or Refill a Medication Instead: Instead of writing a new prescription, you can renew or refill a medication that is already in the patient’s history. Click the “blue swish” Renew Medication icon beside any entry in the patient’s Prescription History or Medication History to renew it. You can process refill requests from pharmacies on the Rx Queue.
Choose a Medication
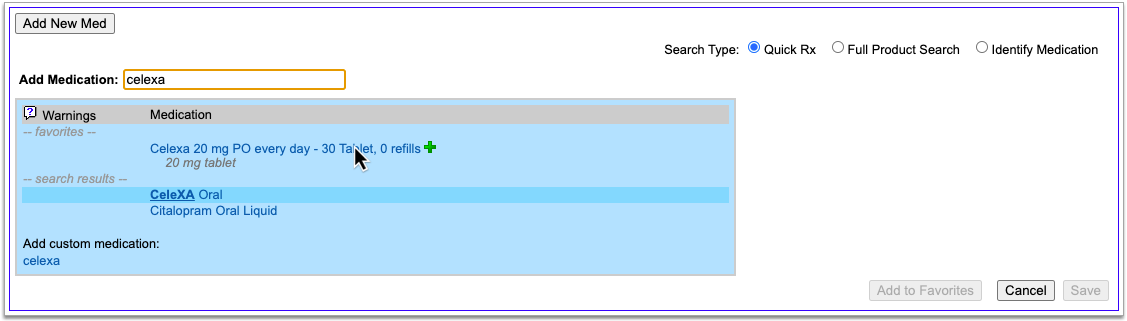
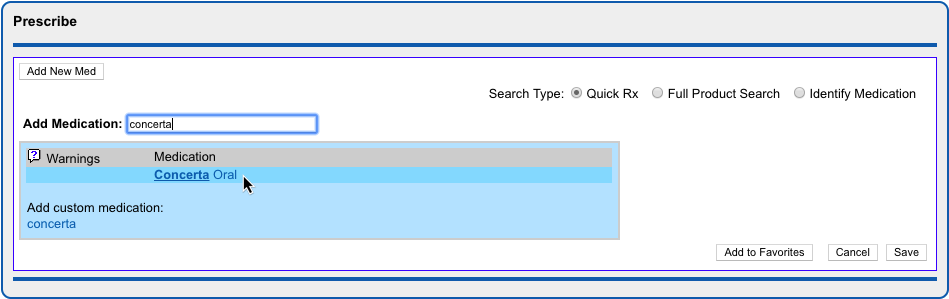
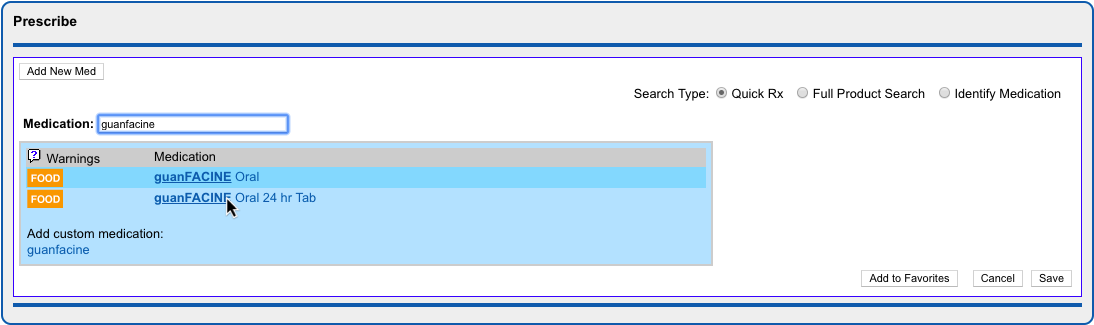
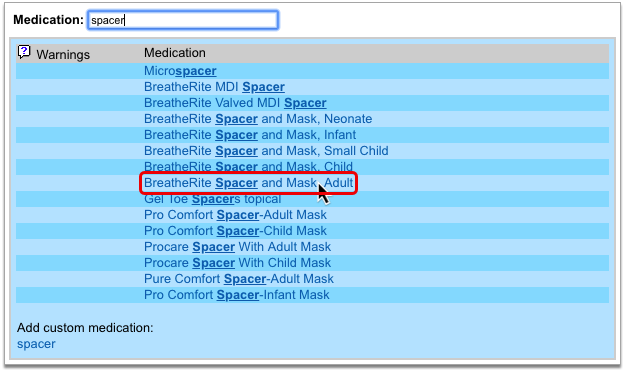
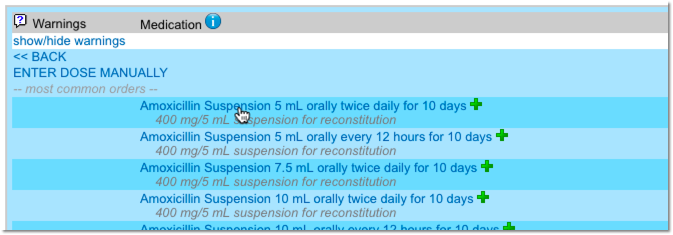
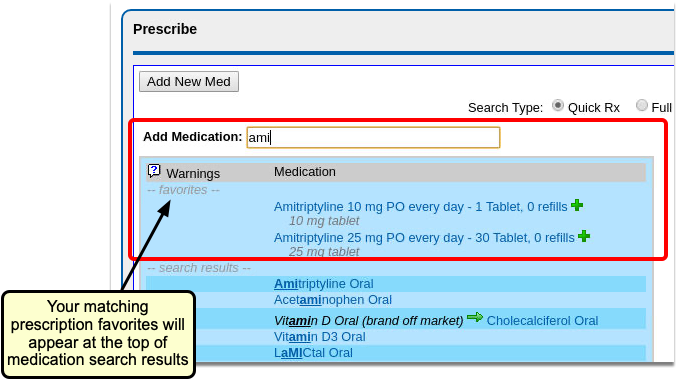
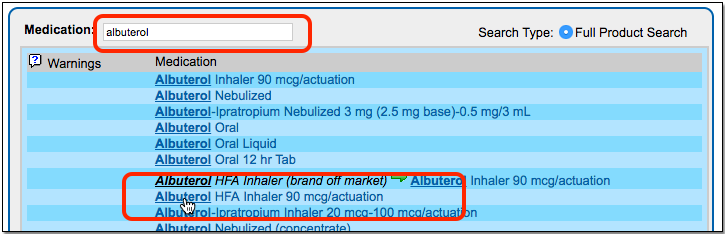
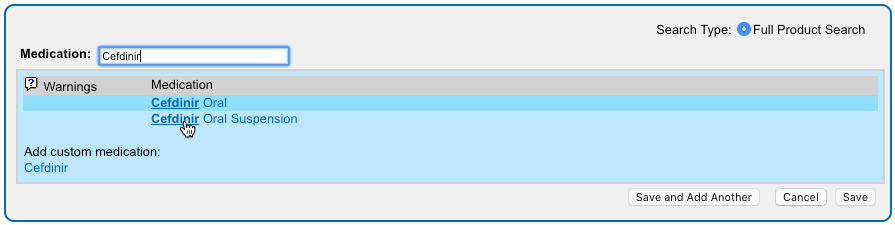
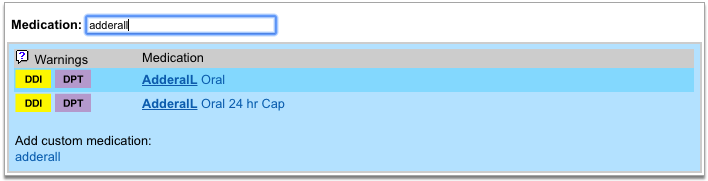
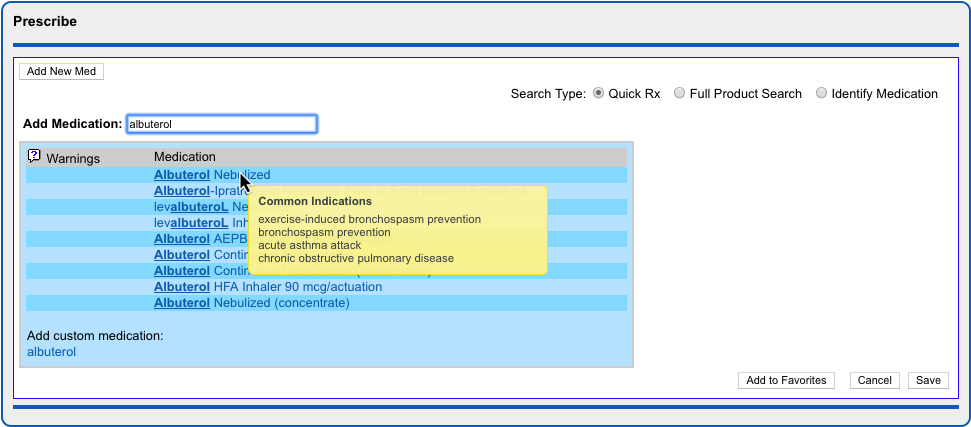
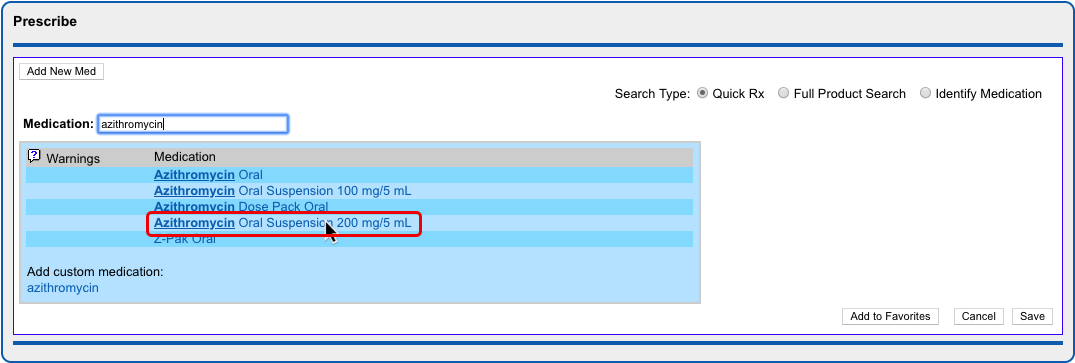
In the Prescribe component, start typing the name of the product you want to prescribe in the “Add Medication” box.

As you type, a list of common, age-appropriate products matching your search term appears. Click on the product you want to prescribe.
Full Product Search: If your initial search turns up no results, select the “Full Product Search” radio button beside the search box. The Full Product Search expands the search beyond common, age-appropriate medications. Prescribers looking to prescribe durable medical equipment, for example, should use the Full Product Search option. Note that the Full Product Search does not account for age-appropriateness when returning results.
Prescribe from Favorites: Another way you can prescribe is from your Favorites list. Learn how to create, prescribe, and manage favorites in the PCC eRx Favorites article.
Optimize Search: You can save time when searching for drugs in PCC eRx by creating practice-wide search shortcuts, hiding unused drugs and dosing statements, and more. Read Optimize PCC eRx Searches with Shortcuts and Hiding to learn how.
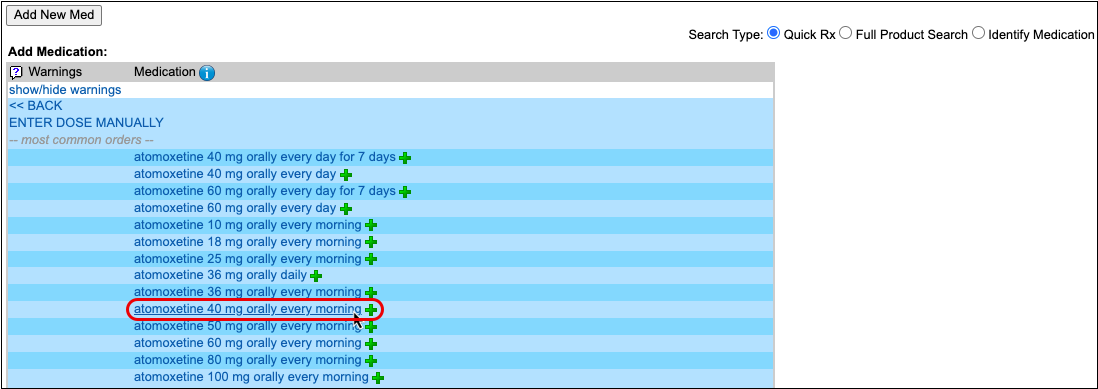
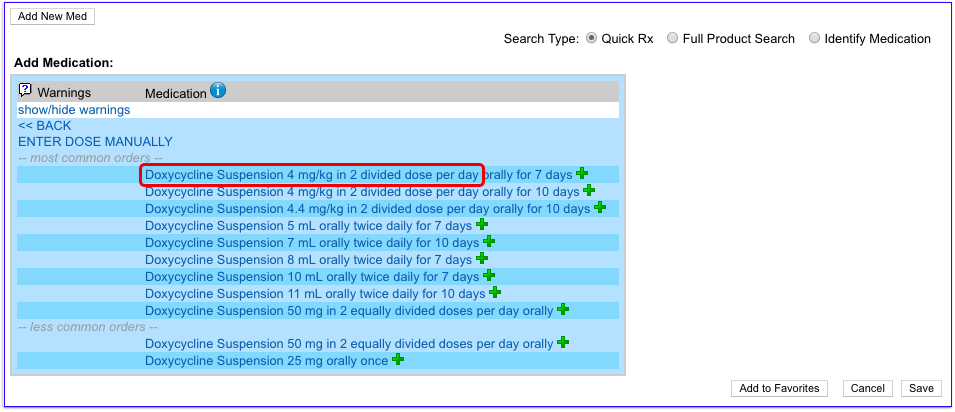
Select a Dosing Statement
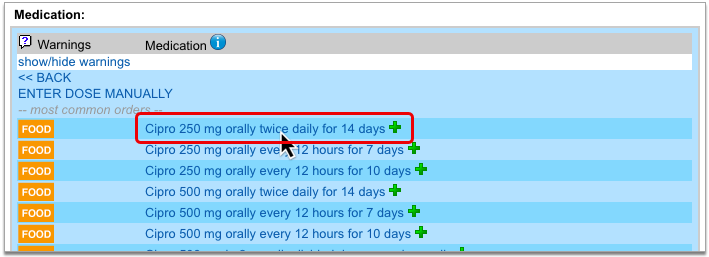
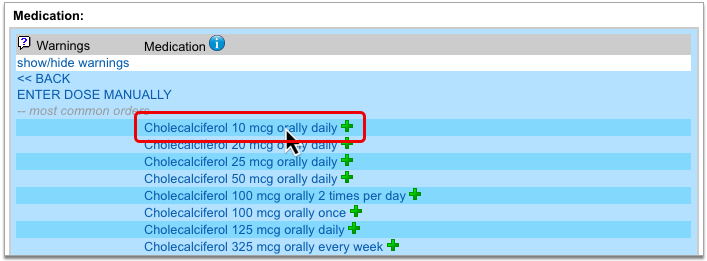
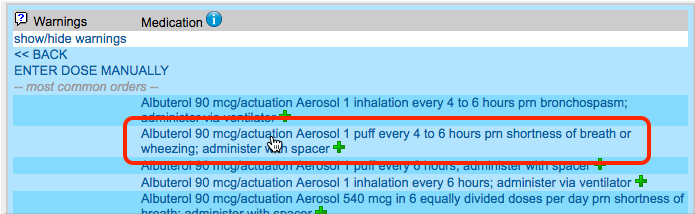
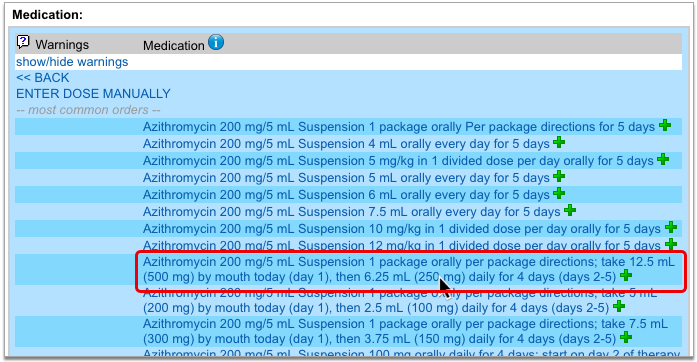
After you select a product, you are presented with a list of common, age-appropriate dosing statements and instructions. Choose a statement that exactly or closely matches the prescription you intend to write. The statement serves as a shortcut to start a prescription, which you can customize and expand upon in the next step.
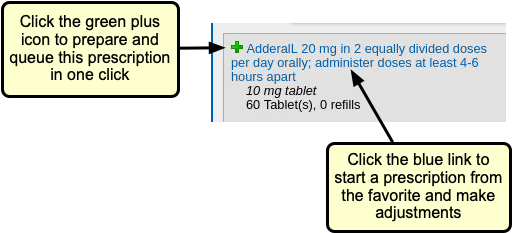
Alternate Prescribing Workflows: If one of the dosing statements matches exactly what you would like to prescribe, you can click the green plus icon beside it to prepare the prescription and queue it to be reviewed, signed, and sent to the pharmacy. If you cannot find a dosing statement that roughly approximates the prescription you are trying to write, you can click “Enter Dose Manually” instead. This starts a prescription from scratch.
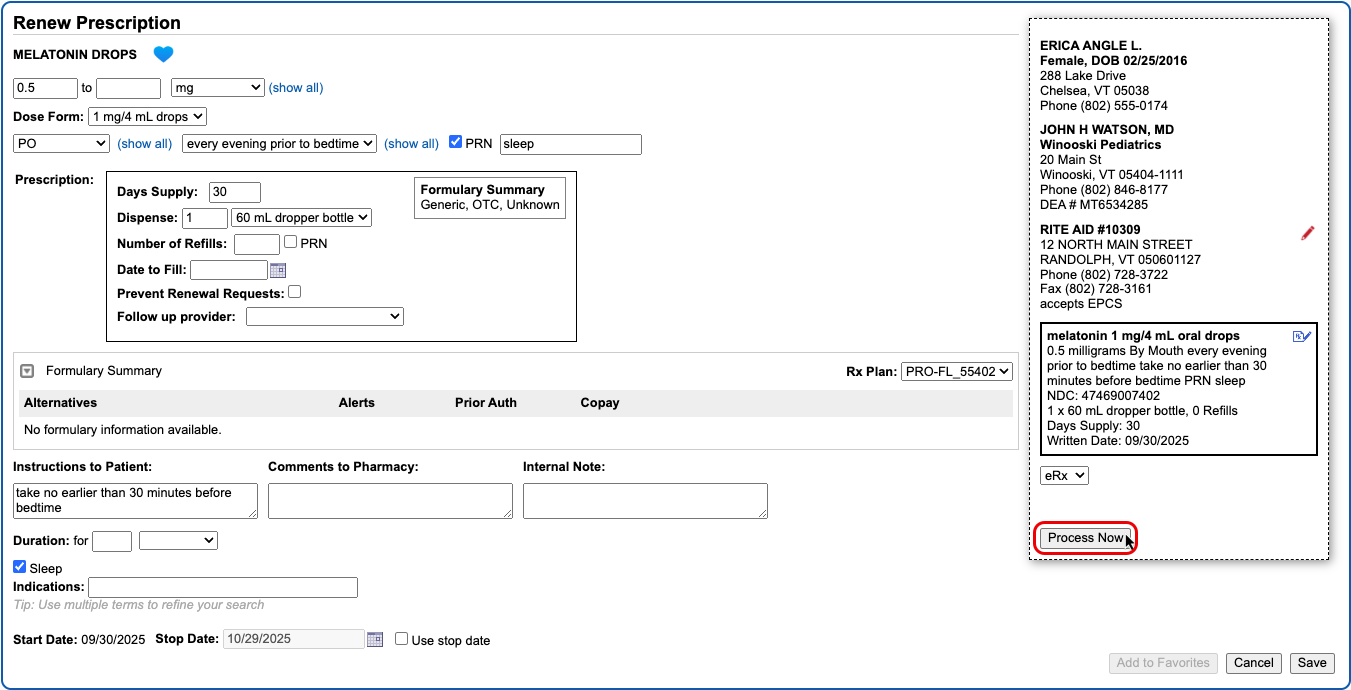
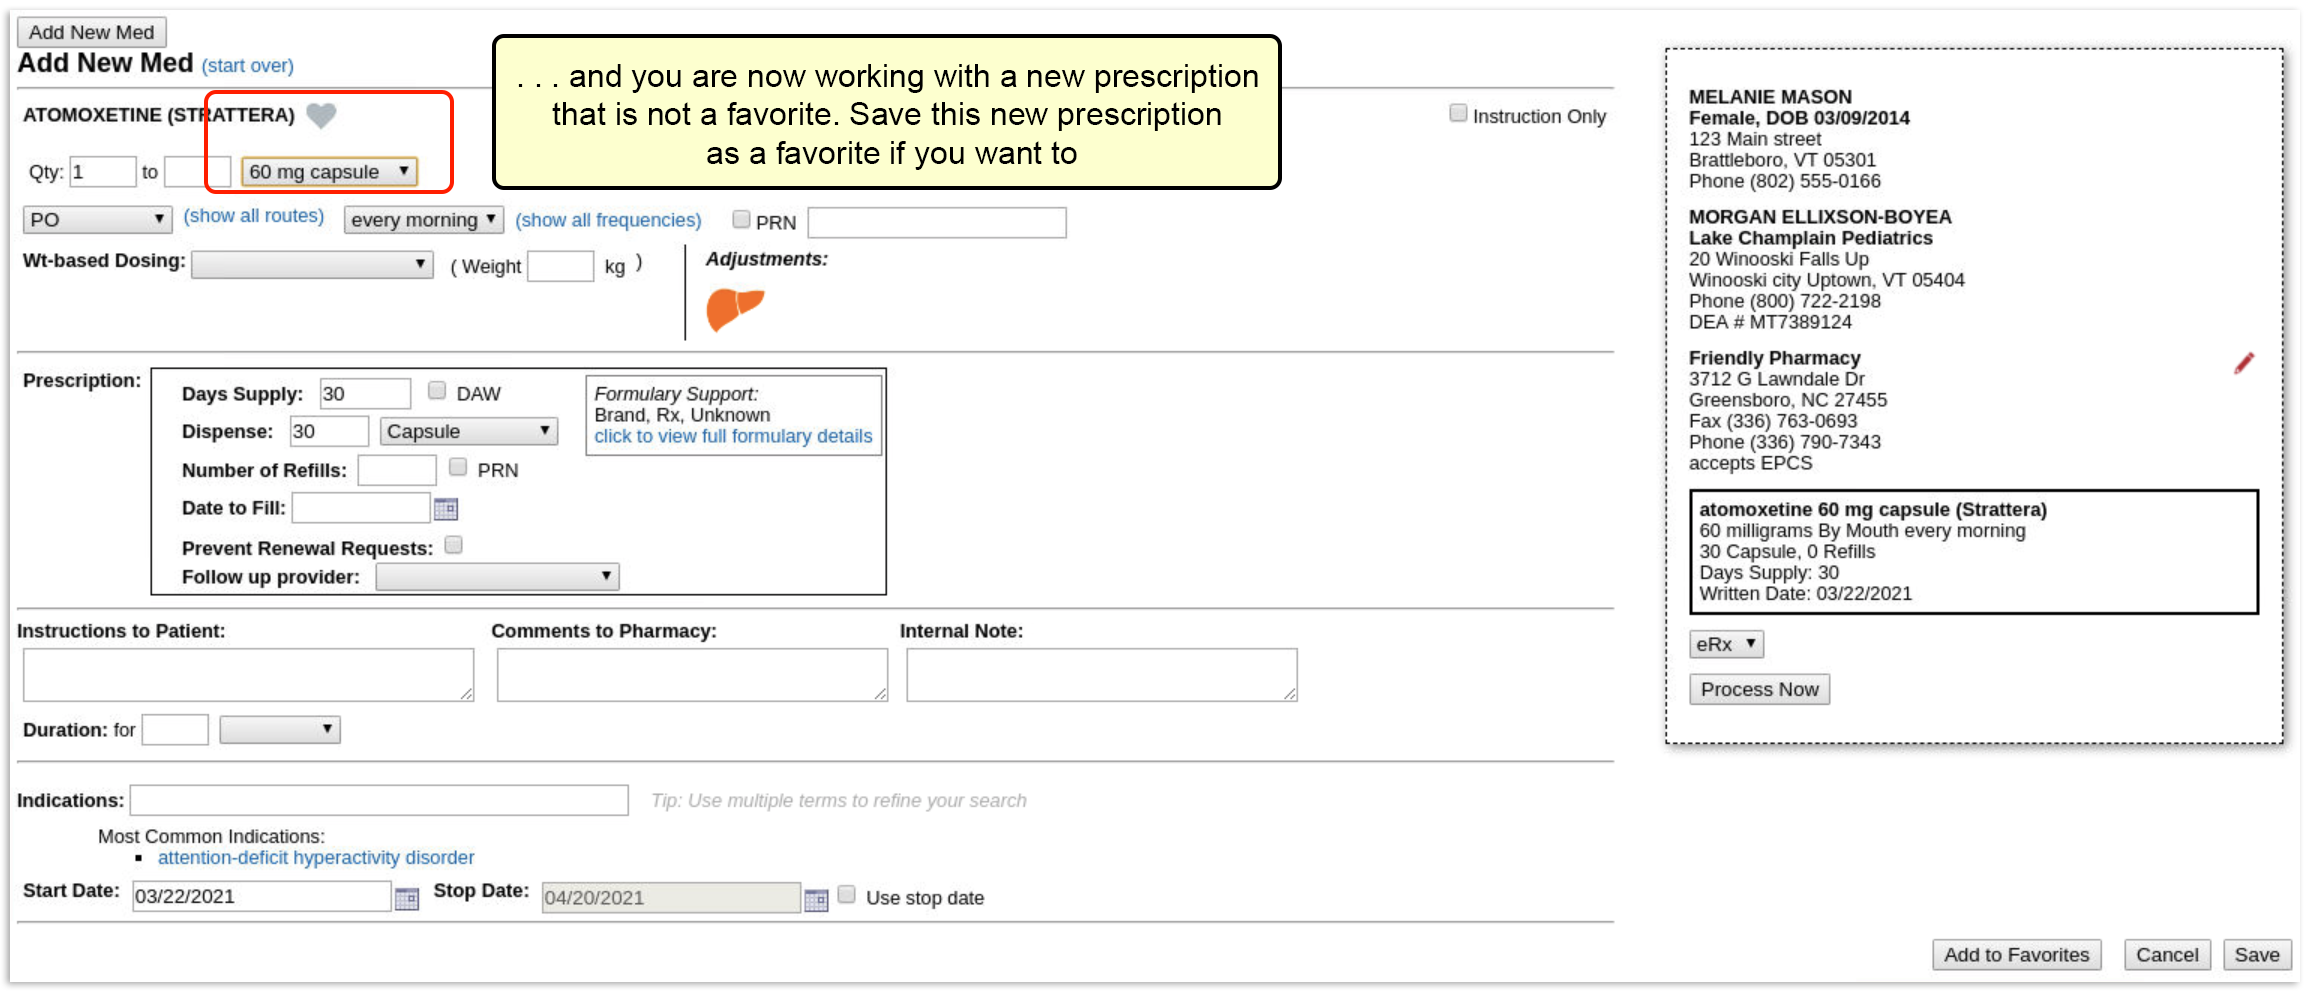
Customize and Complete the Prescription
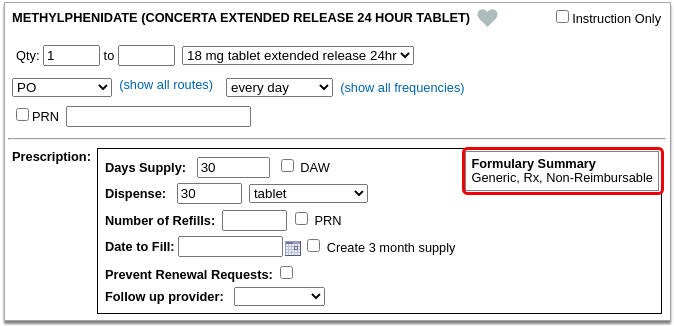
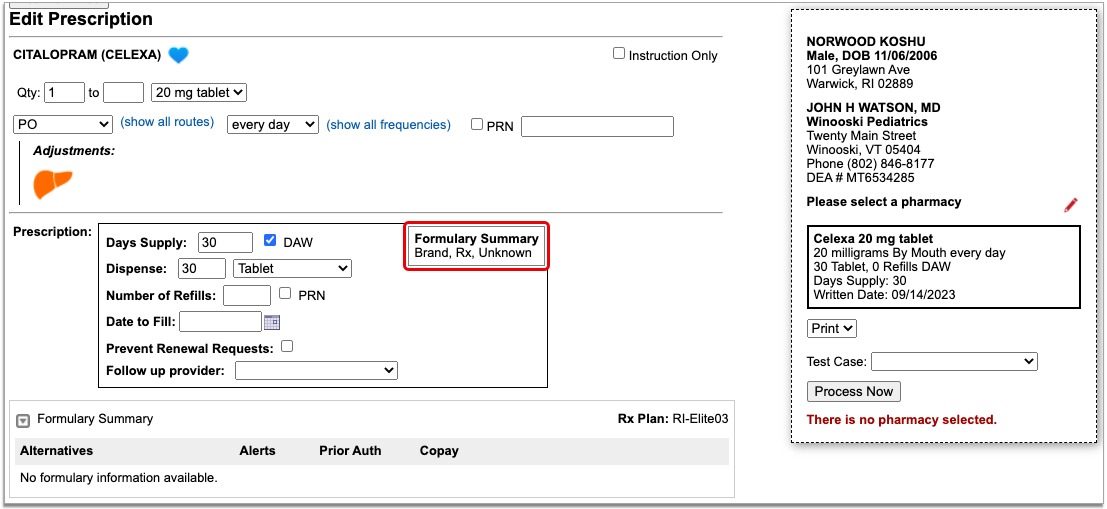
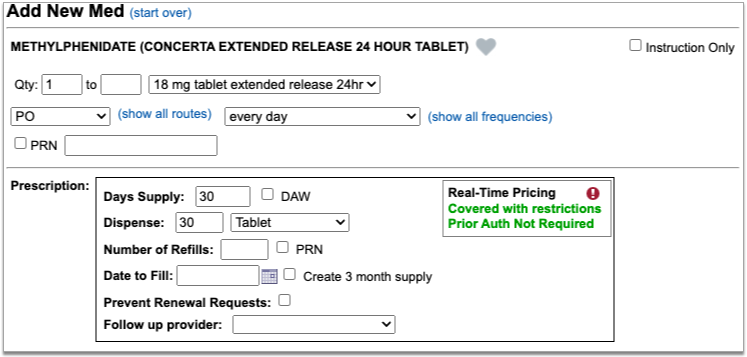
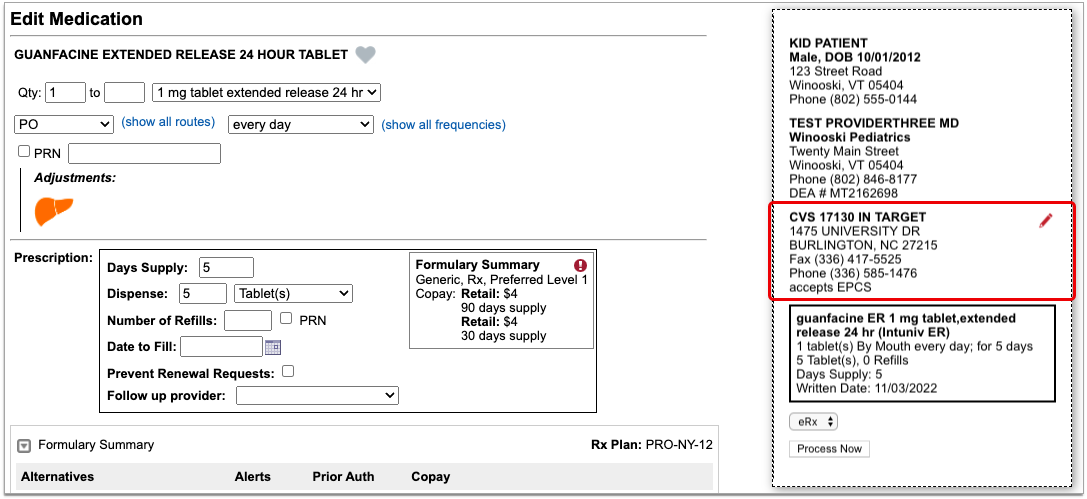
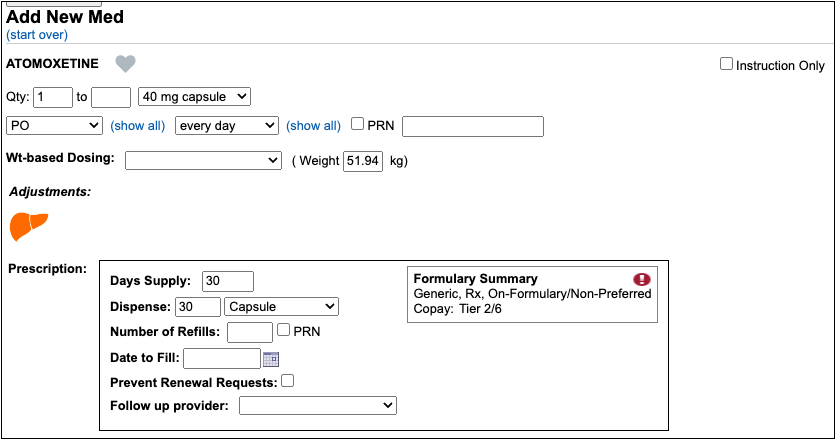
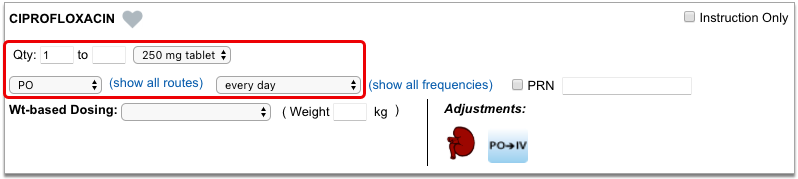
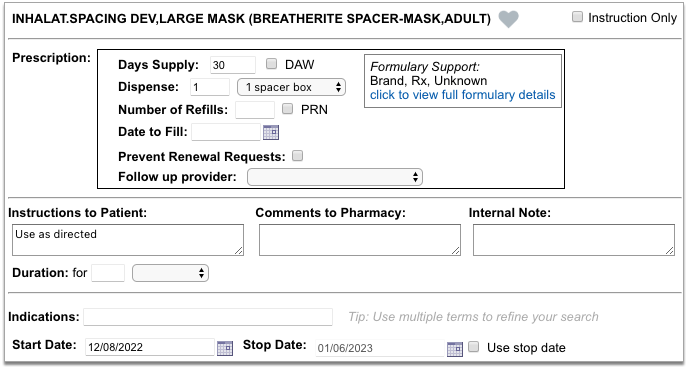
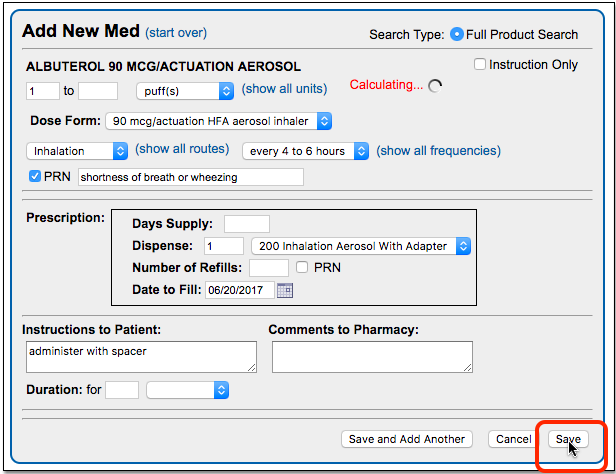
After selecting a dosing statement, review the prescription in detail and fill out the remaining fields.
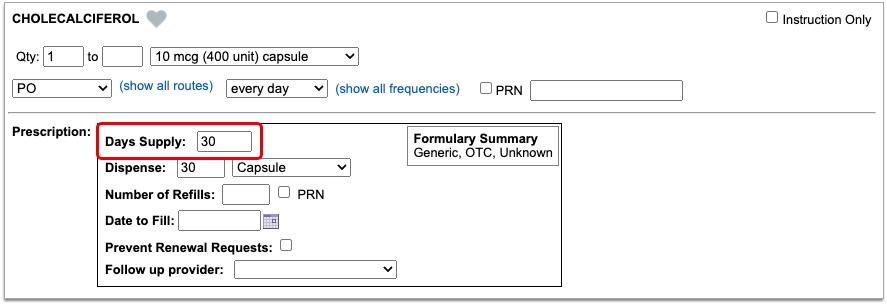
First, specify the dose form, amount, route, and frequency. This tells the patient how much to take and when to take it.
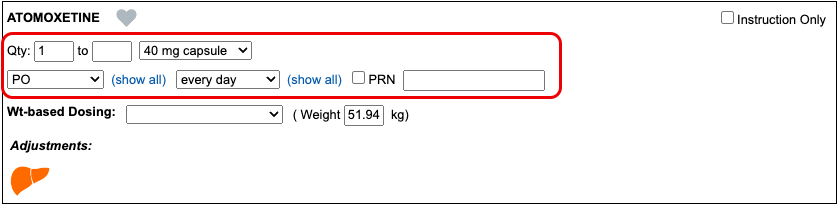
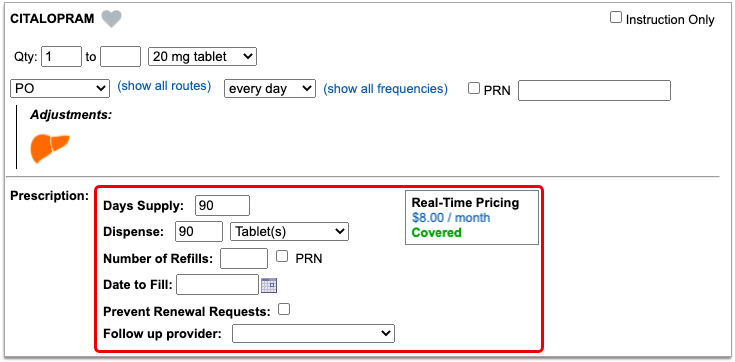
Then, specify the days supply and the dispense quantity and form. This tells the pharmacy how much to dispense and in what form.
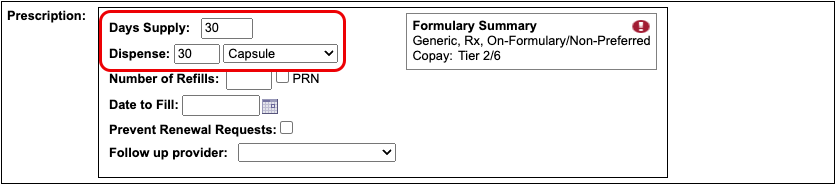
The start date for the prescription defaults to today.
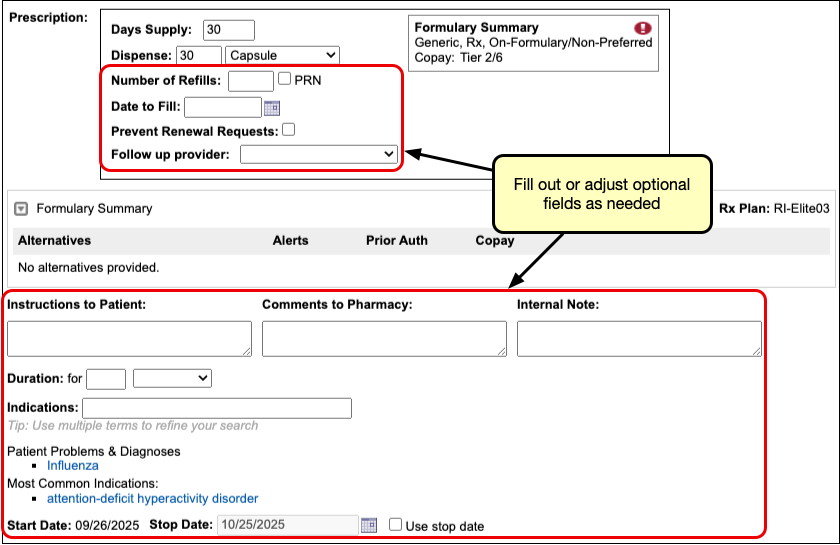
Optionally, you can:
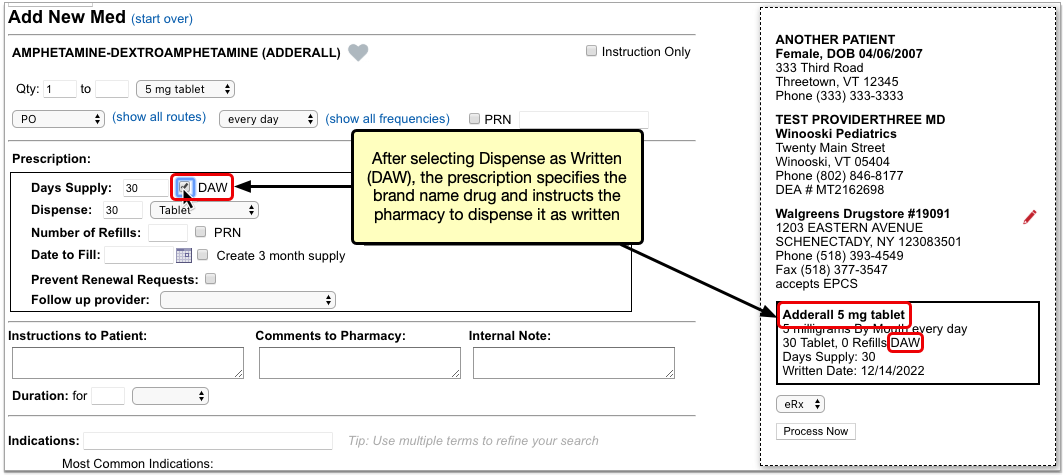
- direct the pharmacy to dispense brand name drugs as written (DAW), disallowing generic substitutions
- specify a number of refills
- specify a date to fill
- indicate whether the pharmacy may send electronic renewal requests for the prescription
- indicate who should receive follow-ups about the prescription, if you are writing it on behalf of another provider
- write out instructions for the patient and pharmacy
- document an internal note that’s only visible to other users at your practice
- set a duration for the prescription
- add indications
- and specify prescription start and stop dates
If you prescribe under the supervision of another provider, indicate their name in the “Supervising Provider” field. If you are preparing the prescription on a provider’s behalf, indicate their name in the “Ordering Provider” field.


Days Supply, Duration, and Stop Dates: You can use the days supply, duration, and stop date fields to create prescriptions that stay neat and tidy once added to the patient’s medication history. Learn how in the “Days Supply, Auto-Calculation, Stop Date, and Duration” section below.
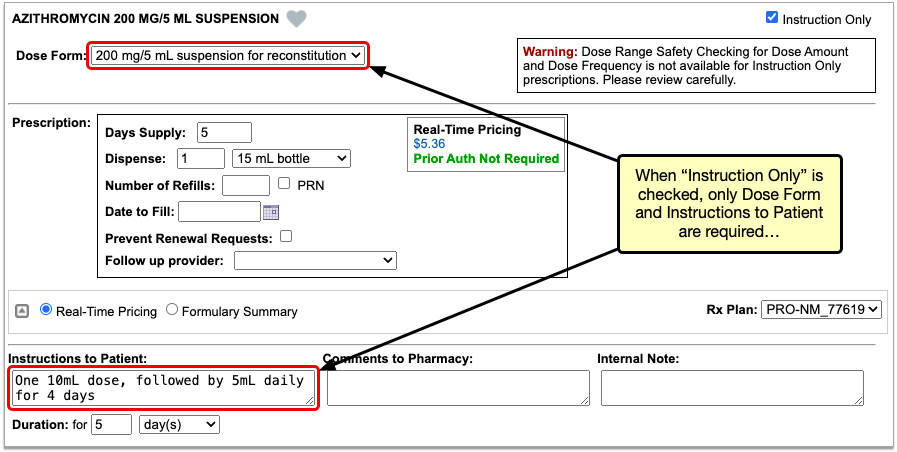
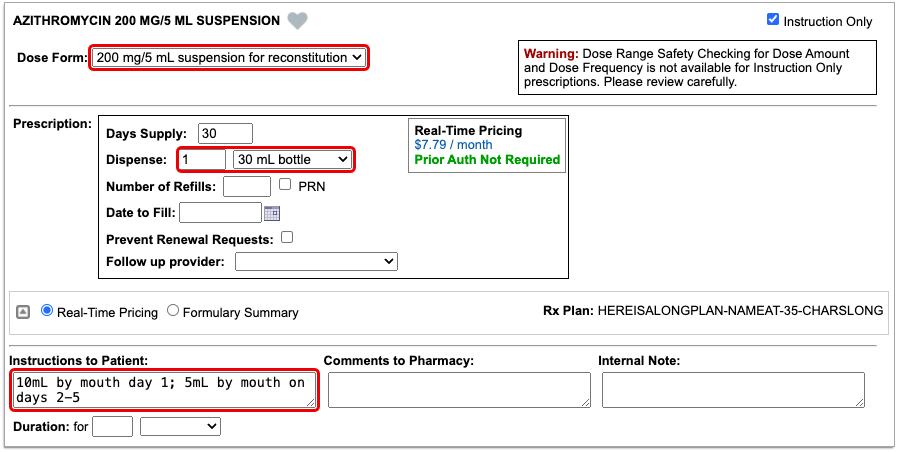
If the dosing instructions are more complex than the standard fields for quantity, route, and frequency allow, check the “Instruction Only” box.
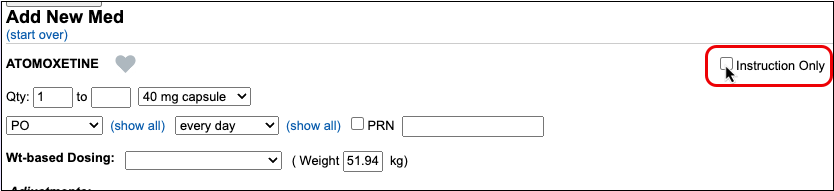
The “Instruction Only” option allows you to write your own dosing instructions for the patient instead of requiring you to use the standard fields for quantity, route, and frequency.
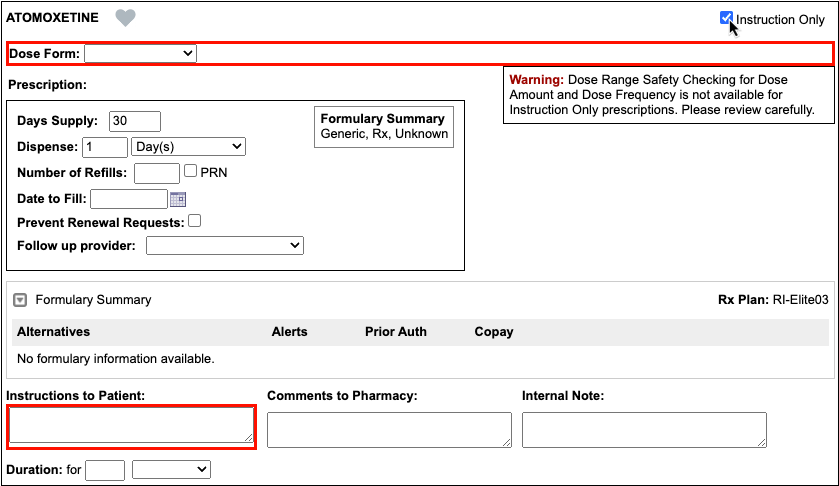
Because instruction-only prescriptions allow you to bypass certain fields that are used for safety checking, they cannot trigger all forms of safety alerts.
Prescribe Multiple Months’ Supply of Schedule II Controlled Substances: If you are prescribing a Schedule II controlled substance, you can turn a single prescription into a three- or two-month supply in one click. Only users in certain roles can prepare, sign, and send controlled substance prescriptions. You can learn more about prescribing controlled substances in the article Prescribe Controlled Substances.
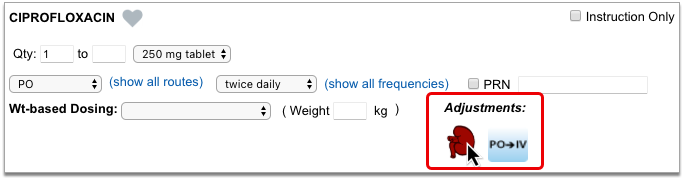
Weight-Based Dosing: When you select a weight-based dosing statement, it starts a weight-based prescription using the patient’s most recent weight measurement. On fixed-dose prescriptions, you can switch to a weight-based dosing scheme by entering values in the “Wt-Based Dosing” and “Weight” fields. To learn more about weight-based dosing in PCC eRx, read the “Weight-Based Dosing” section below.
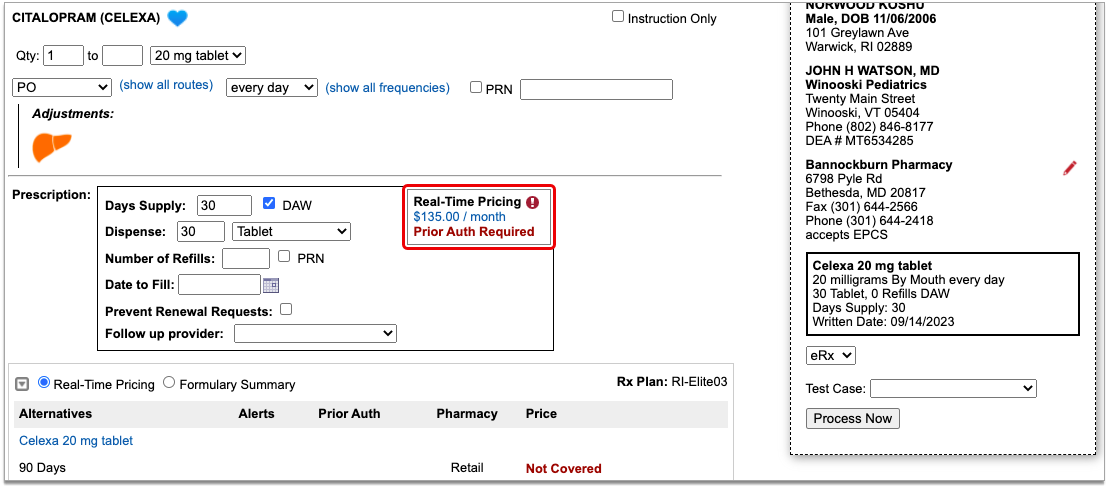
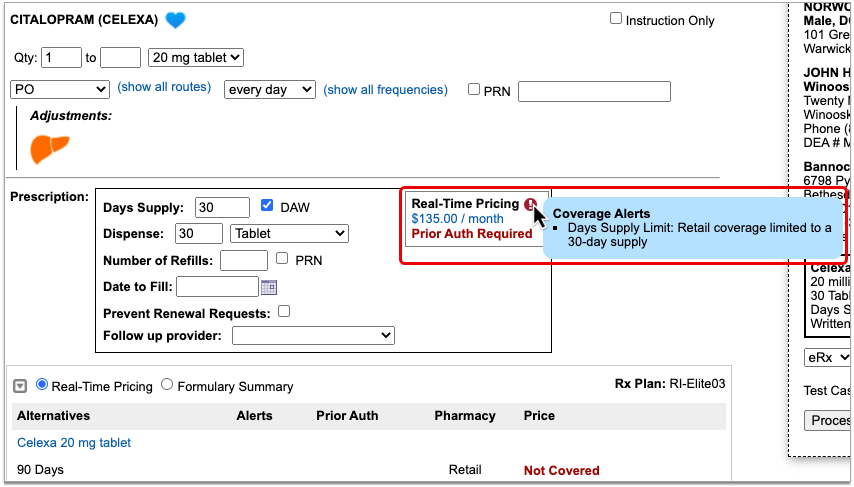
Real-Time Pricing and Formulary Support: As soon as you start your prescription, PCC eRx reaches out to the patient’s prescription insurance in real-time for pricing and coverage information, then displays the results beside your prescription. To learn more, read Check Prescription Pricing and Insurance Coverage While You Prescribe.
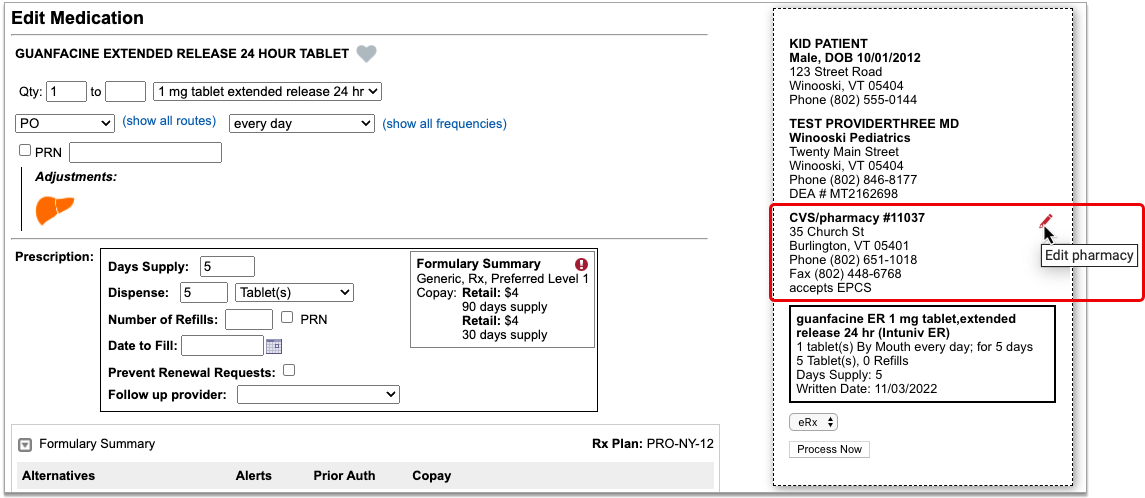
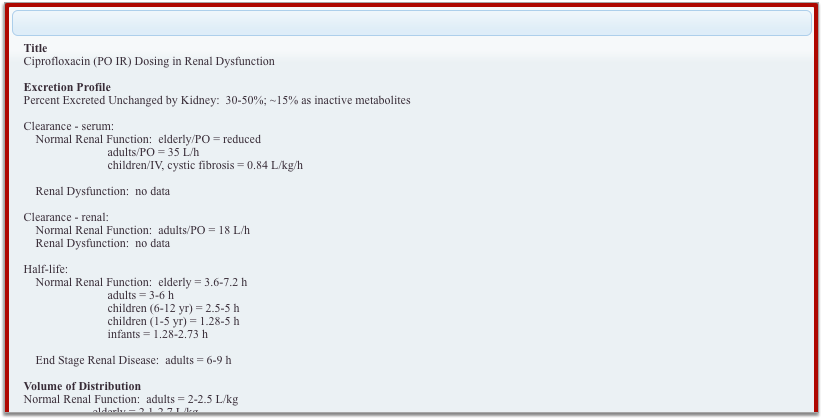
Recommended Adjustments: Drugs that carry considerations for patients with renal, hepatic, or other systemic impairment show the relevant organ in the Adjustments section as you prescribe. The recommended adjustment is based solely on the drug being prescribed, not the patient’s record.
Check Your Work
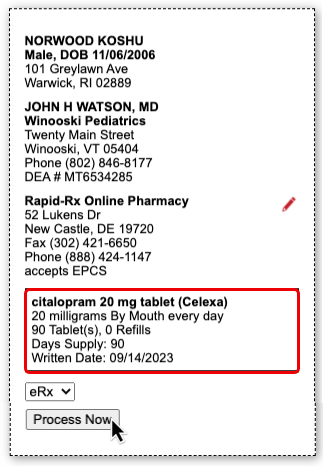
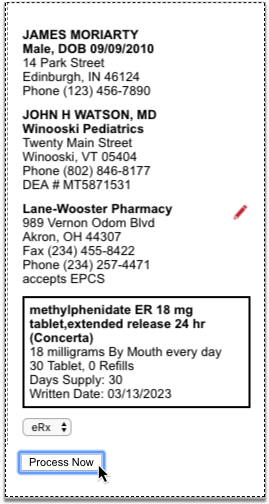
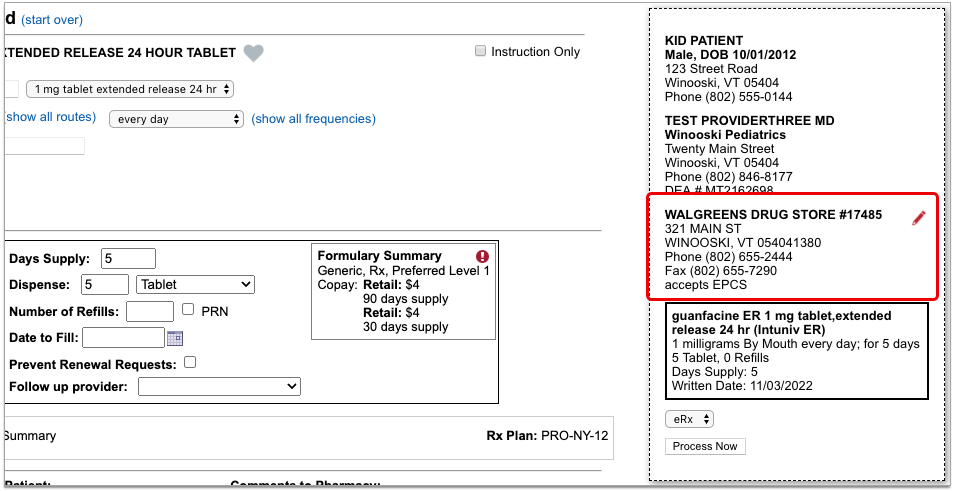
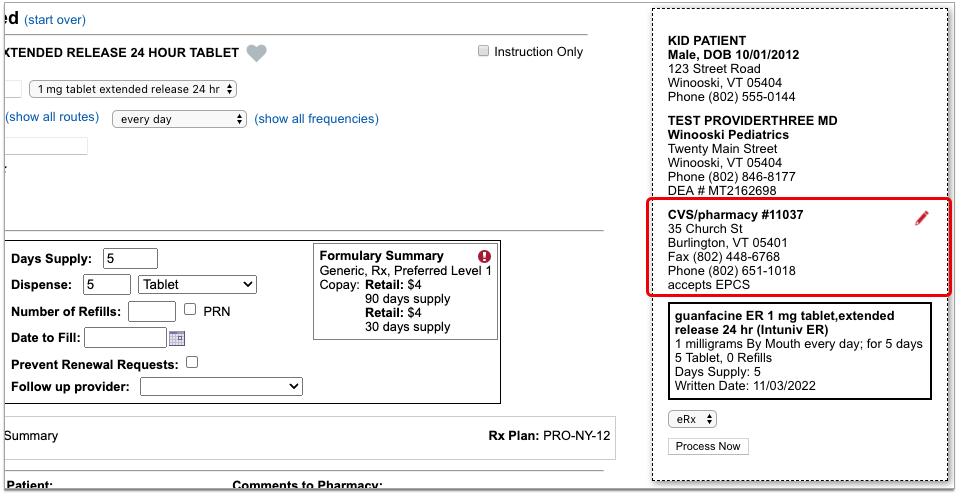
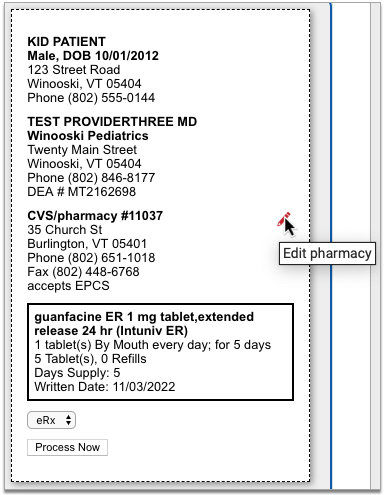
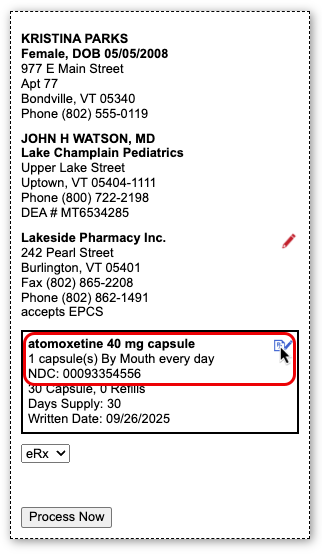
As you write a prescription, you can see a live preview of what the pharmacy will receive on the right side of the screen.
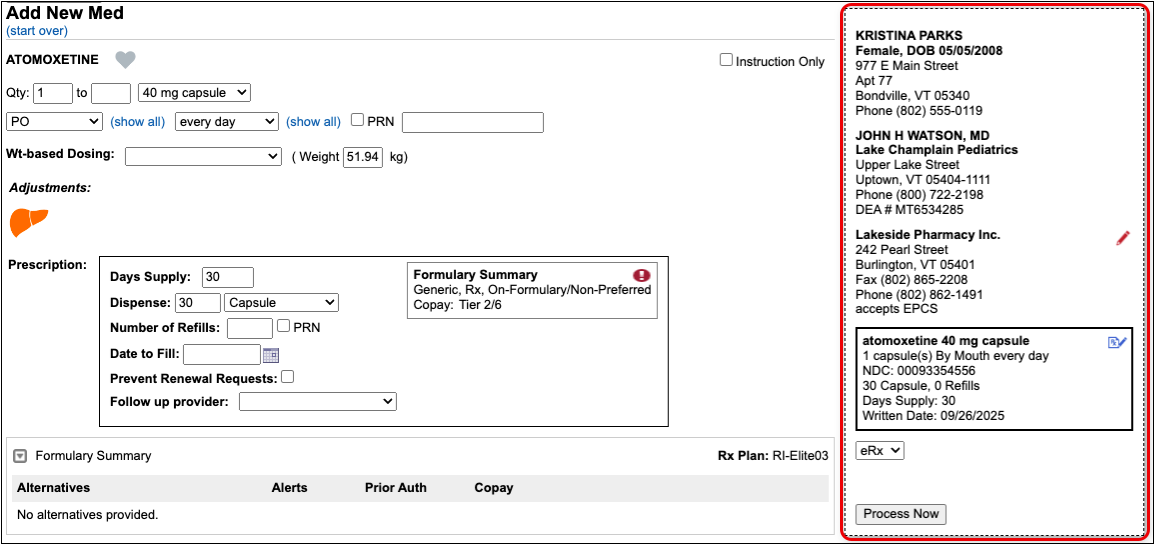
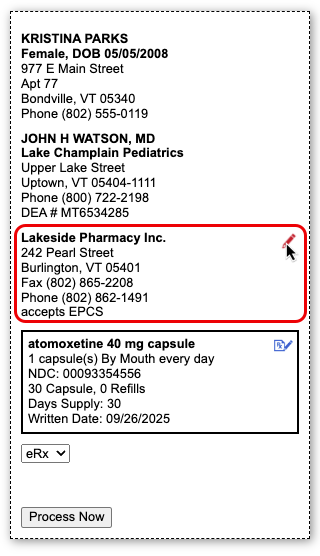
Check the preview and make sure the prescription isn’t missing any key information, such as a destination pharmacy or certain instructions.
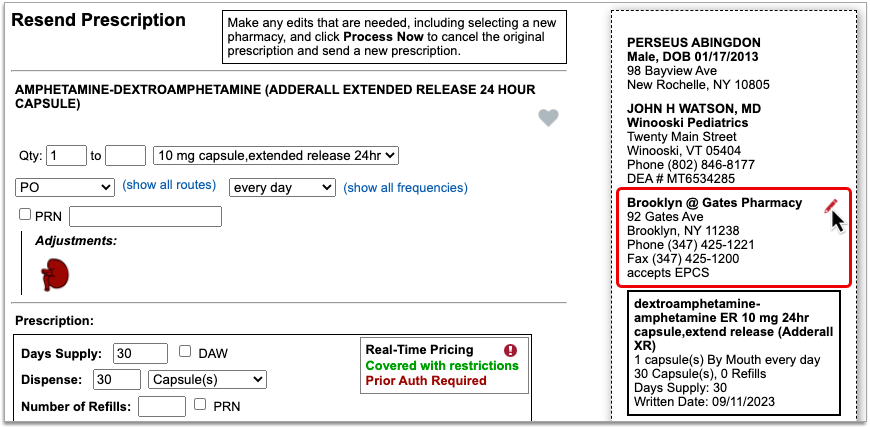
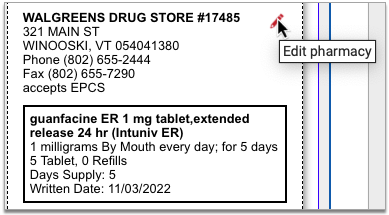
You can update pharmacy information right on the prescription preview.
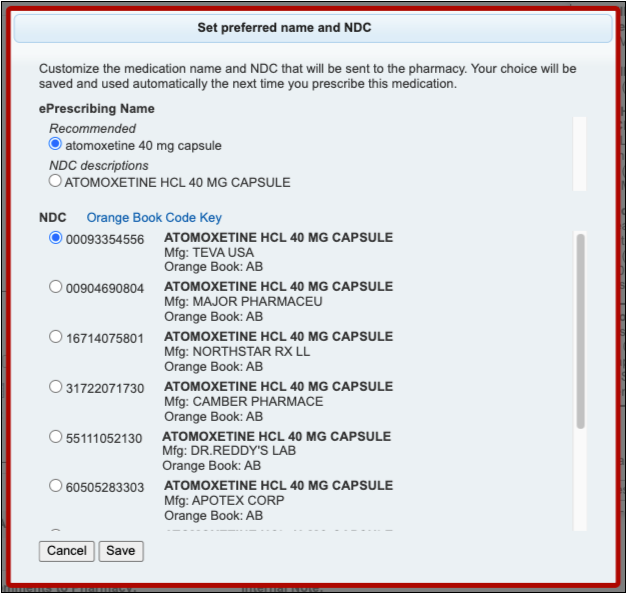
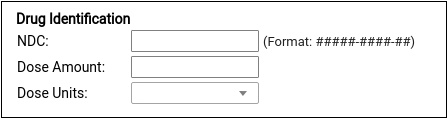
You can also modify the name and NDC that will go to the pharmacy with the prescription. This option is best used in cases where the standard defaults cause confusion at the pharmacy. PCC eRx will remember your selections the next time you prescribe the same drug, strength, and form.
If you are missing certain instructions, red text on the prescription preview tells you what fields you need to fill out.
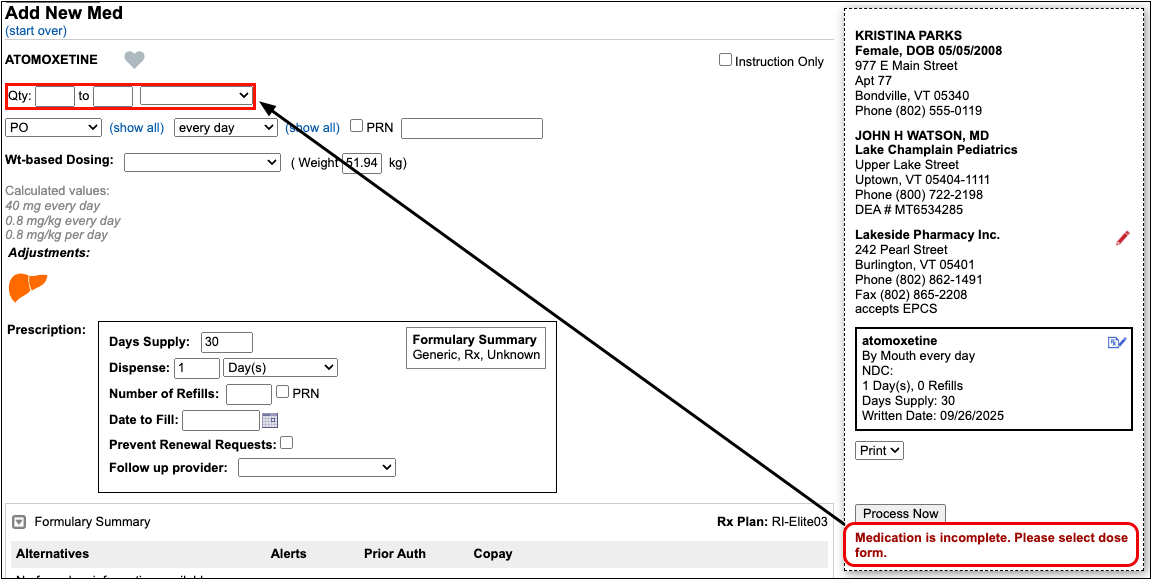
As you fill in the missing information, the preview updates to reflect your changes and the red text disappears, indicating that the prescription is ready to send.
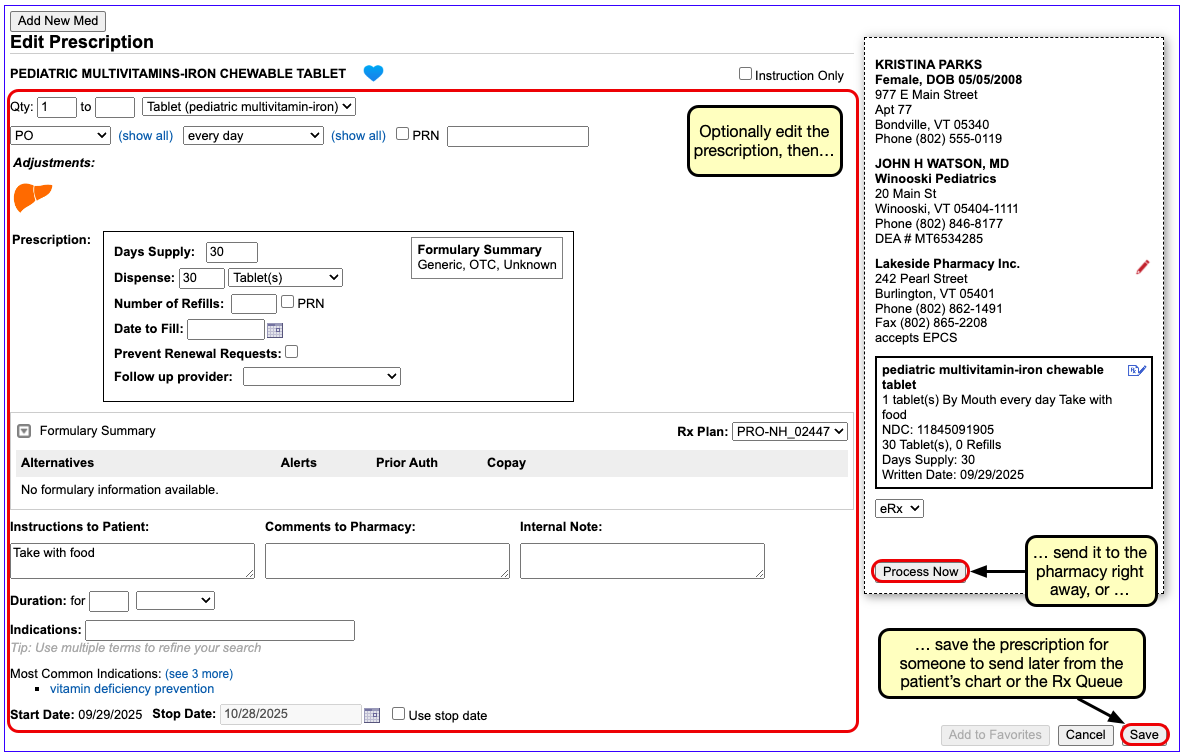
Send, Print, or Save the Prescription
Once written, you can electronically send the prescription to the pharmacy, print a physical copy, or save and process it later.
Option 1: Send the Prescription
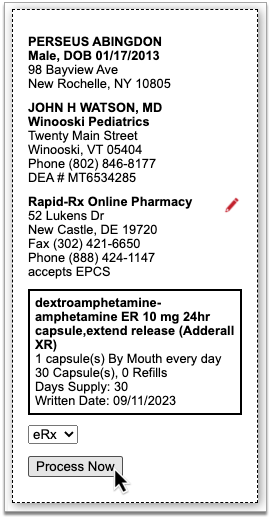
To send the prescription electronically, verify that “eRx” is selected on the prescription preview and click the “Process Now” button.
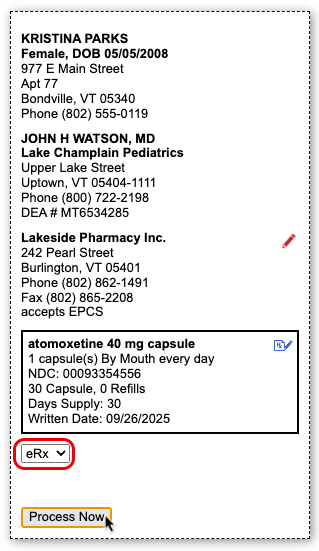
The prescription goes to the pharmacy electronically while you move on to your next task.
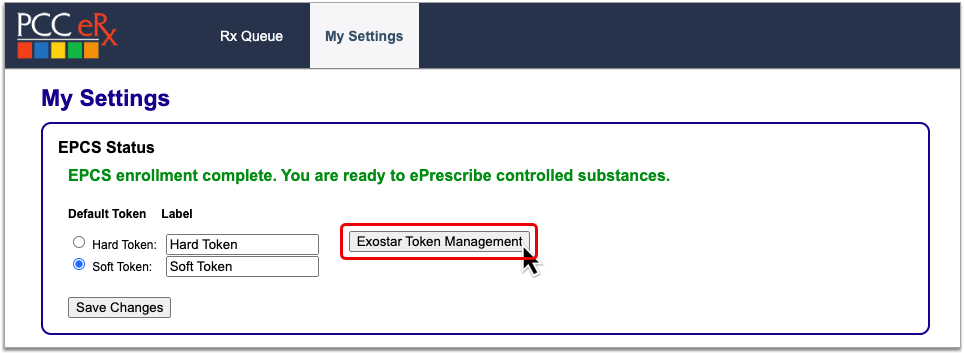
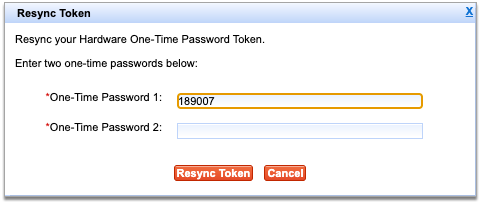
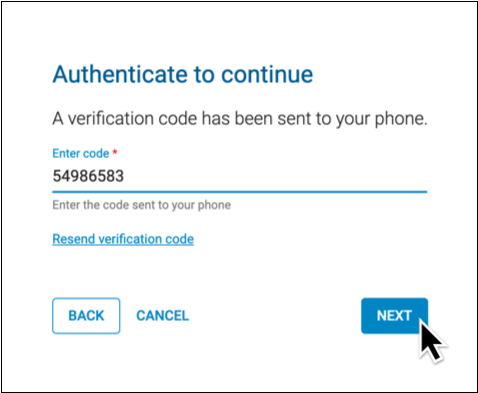
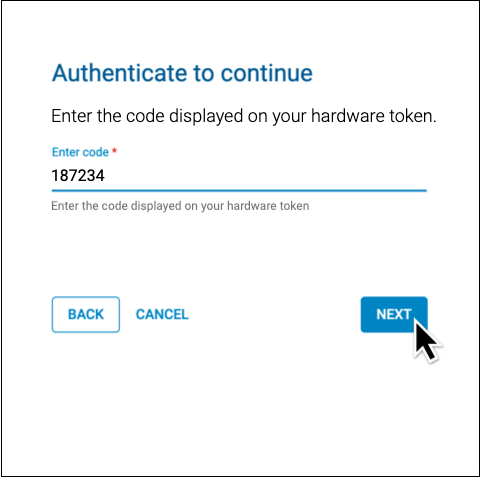
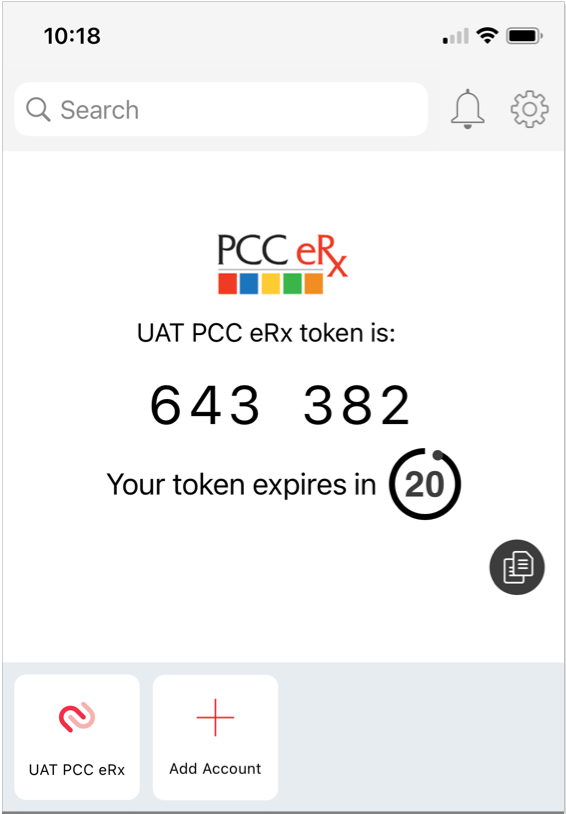
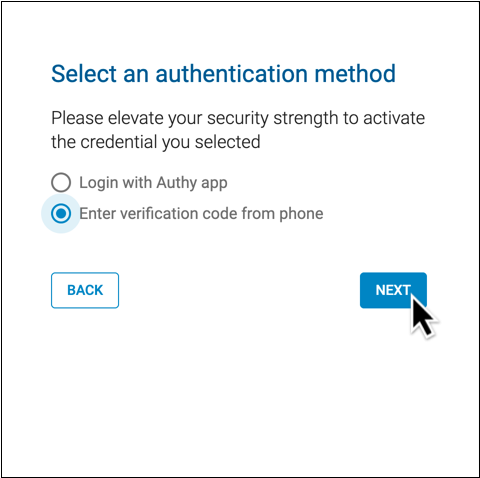
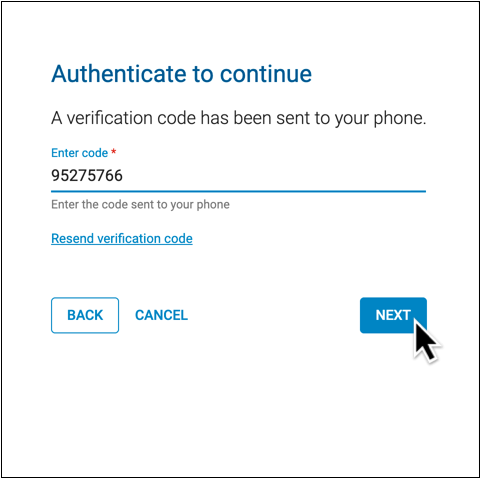
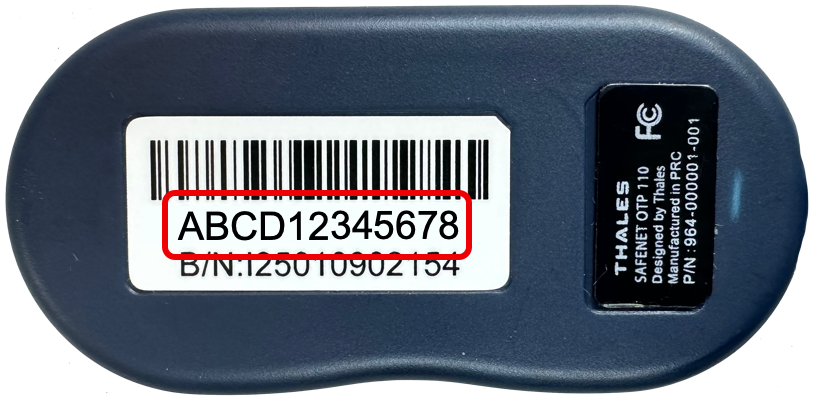
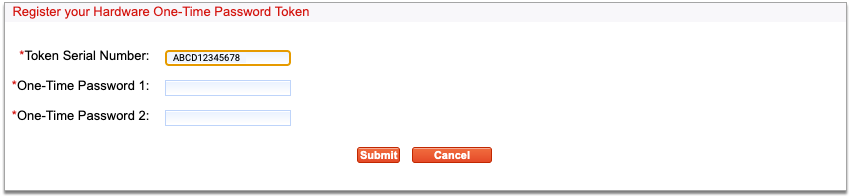
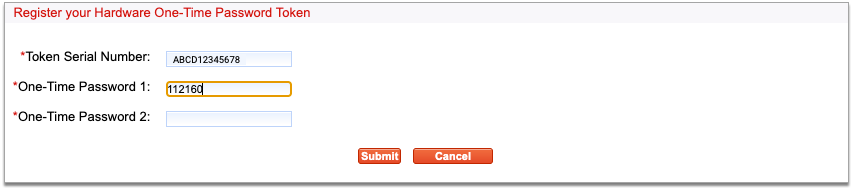
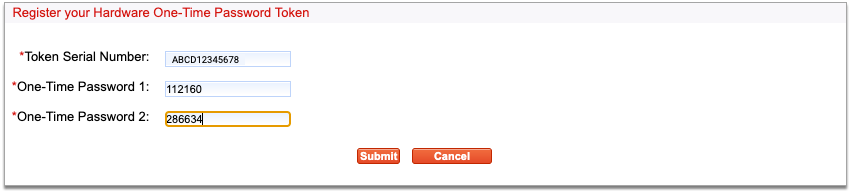
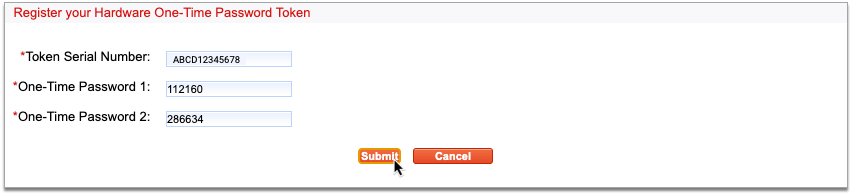
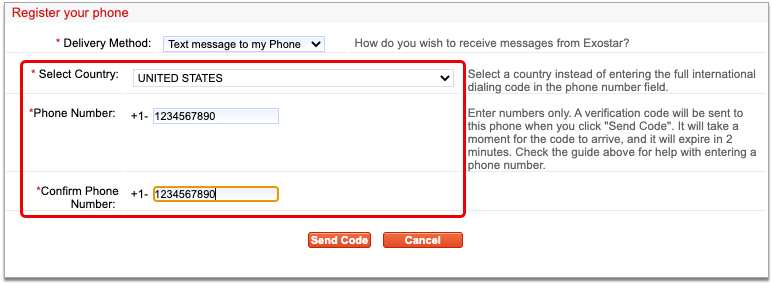
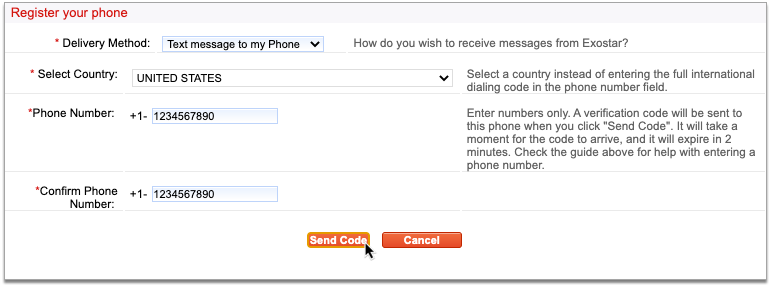
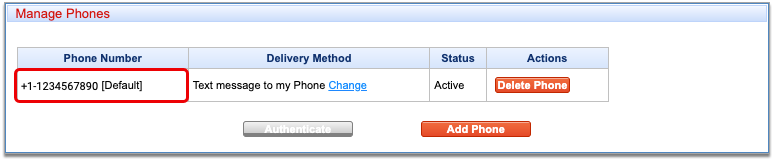
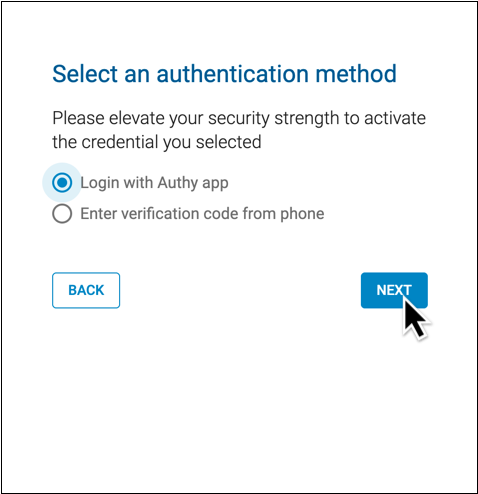
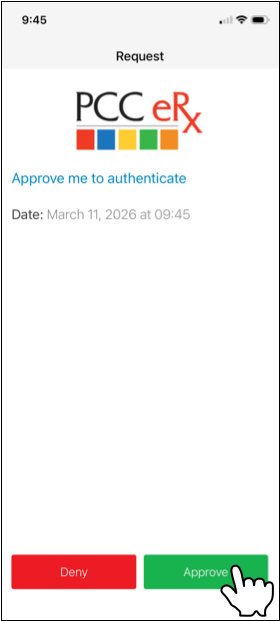
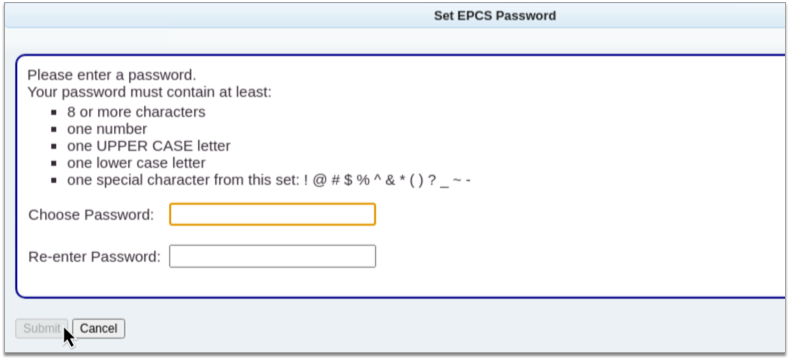
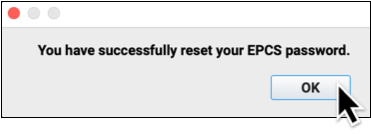
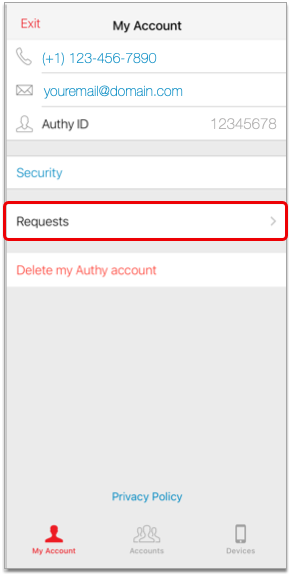
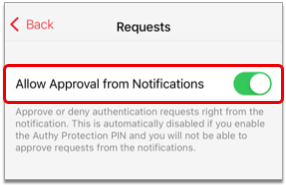
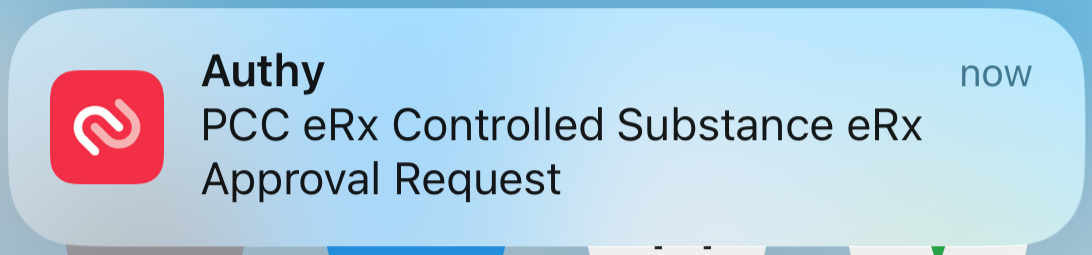
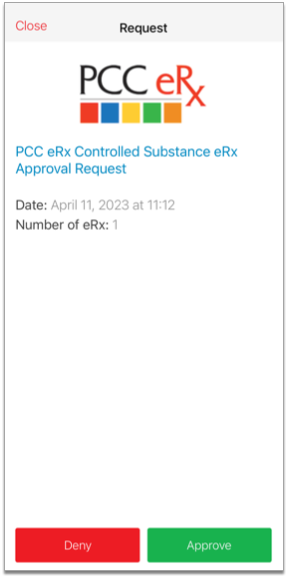
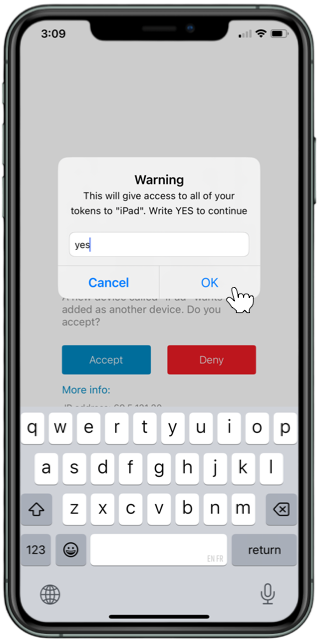
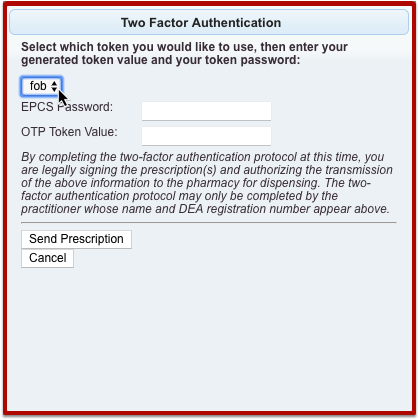
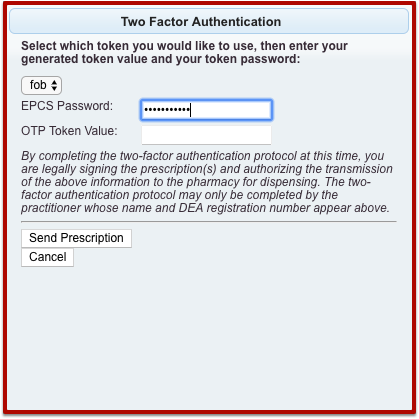
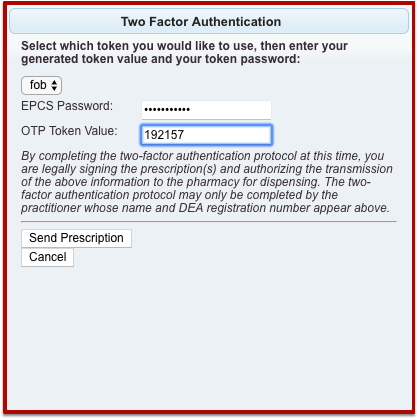
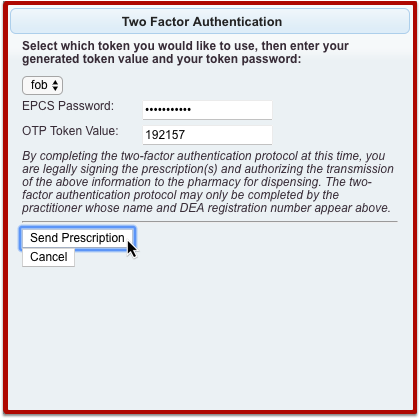
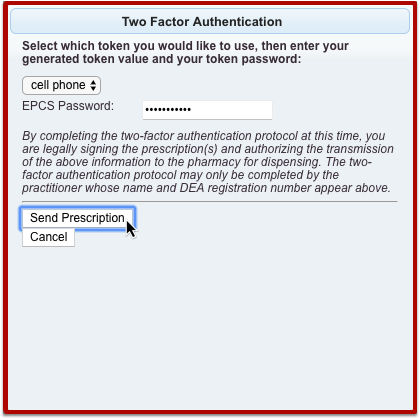
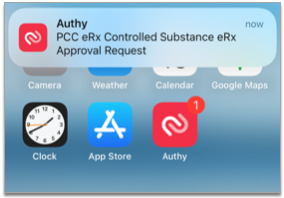
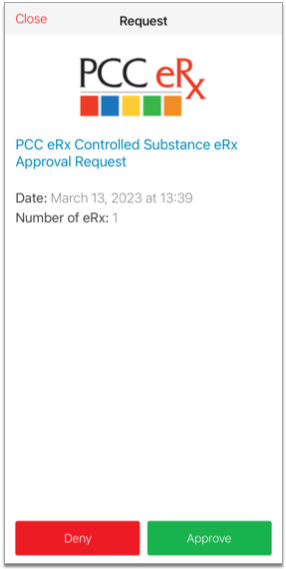
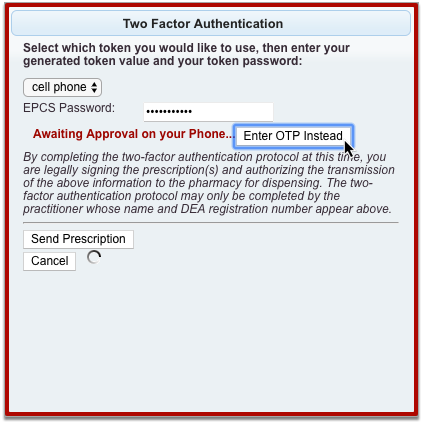
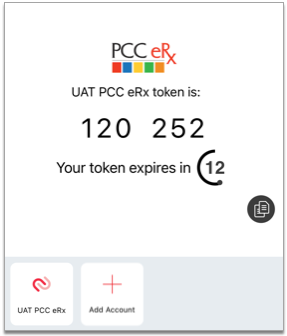
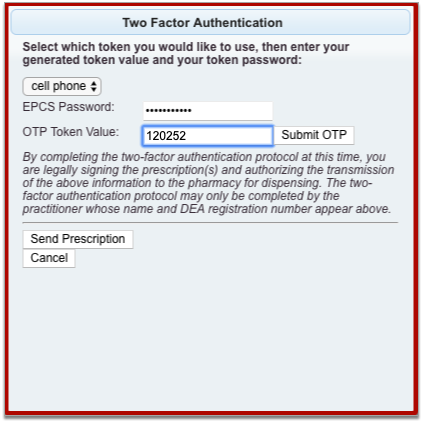
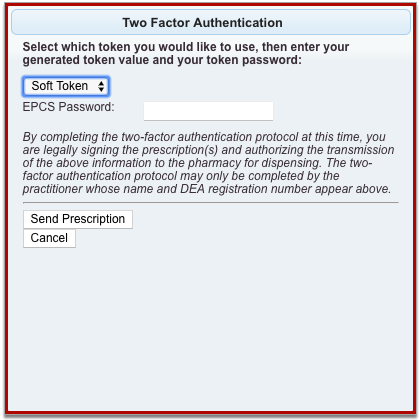
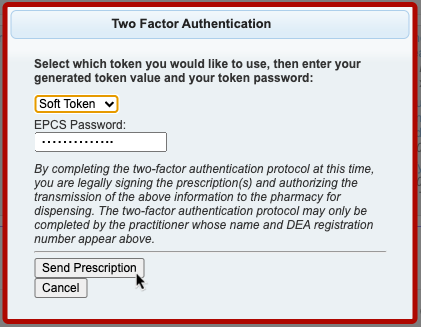
Authentication Required for Electronic Prescribing of Controlled Substances (EPCS): When processing electronic prescriptions for controlled substances, you must prove your identity by entering a personal password and a code generated by an electronic authentication token that is tied to your NPI and DEA credentials. To learn more about electronic prescribing of controlled substances and how to obtain an electronic authentication token, read Prescribe Controlled Substances.
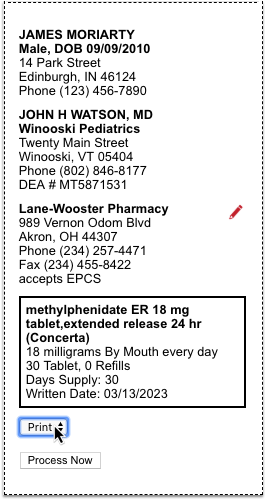
Option 2: Print the Prescription
If printing is enabled for prescriptions at your practice, you can print the prescription instead of sending it electronically. Select “Print” on the prescription preview and click the “Process Now” button.
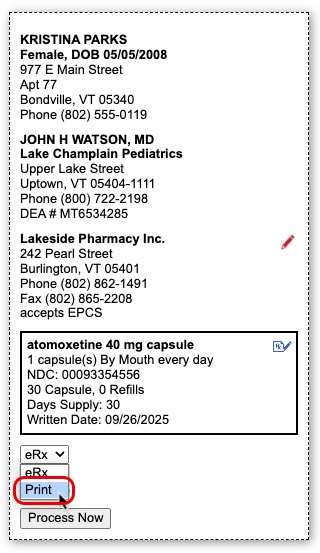
The ability to print prescriptions is only enabled where allowed by local regulations.
Option 3: Save the Prescription and Process it Later
If you want to queue the prescription to send or print later, click the “Save” button at the bottom of the window.
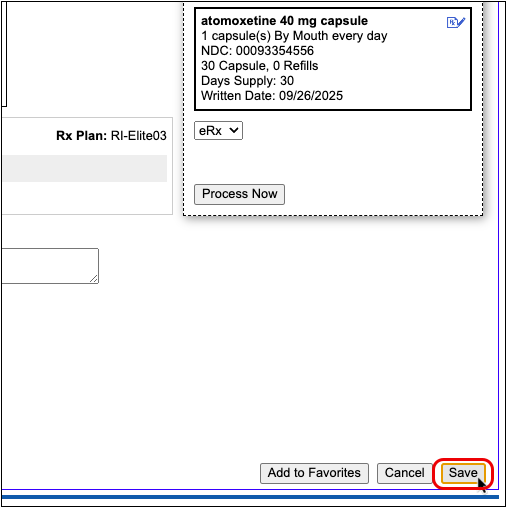
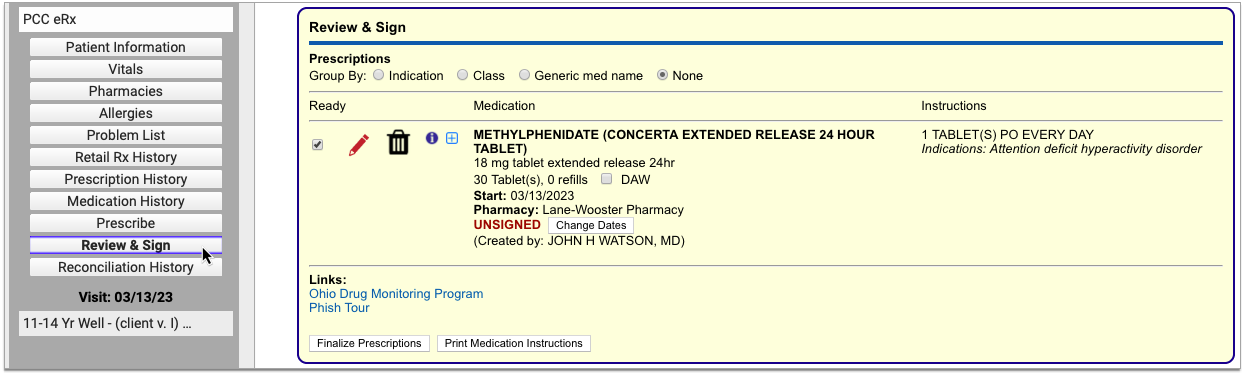
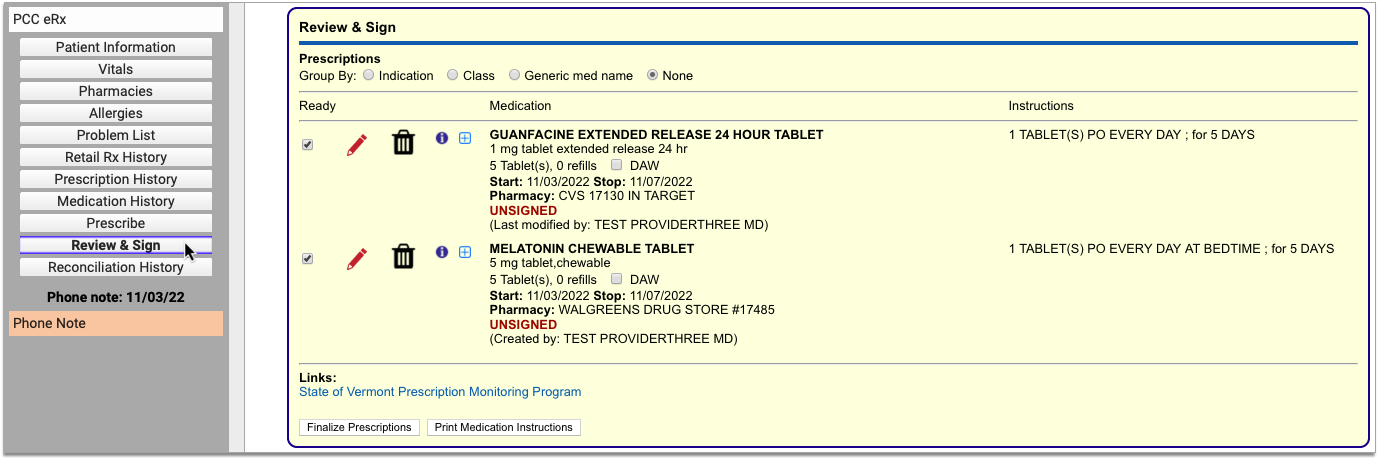
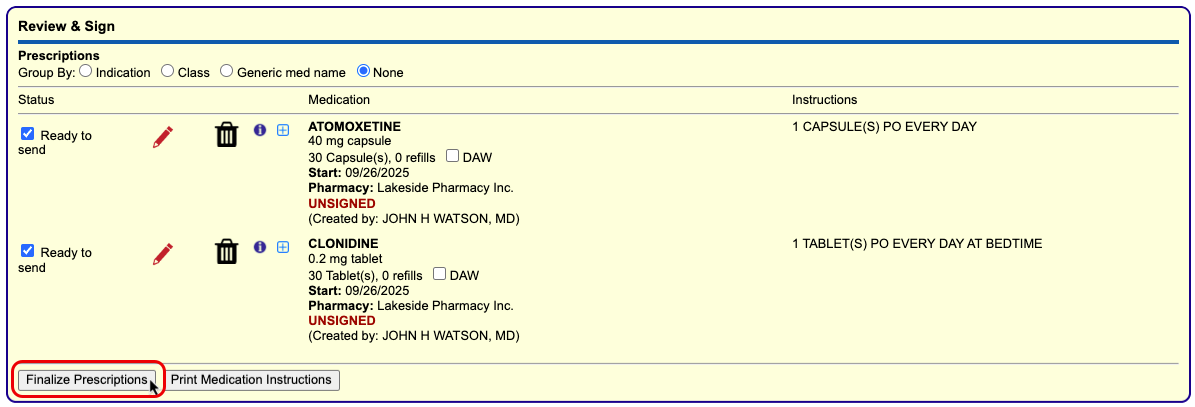
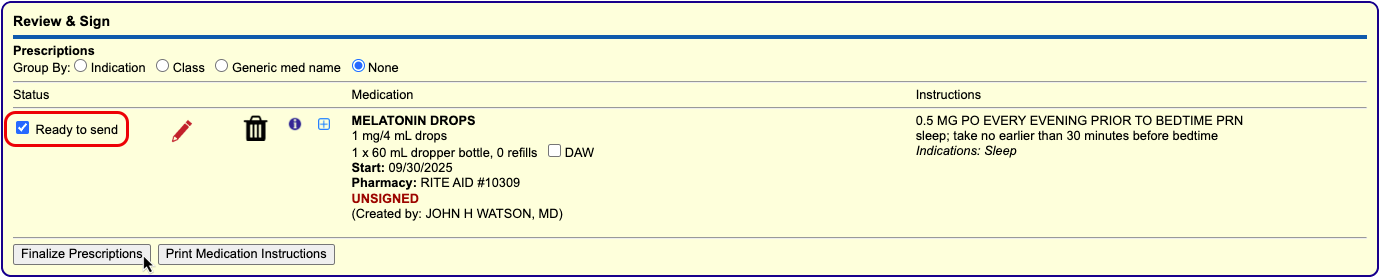
When you click “Save,” the prescription saves into the Review & Sign component of PCC eRx pending further action.

You can edit, send, print, or delete pending prescriptions at any time from Review & Sign.
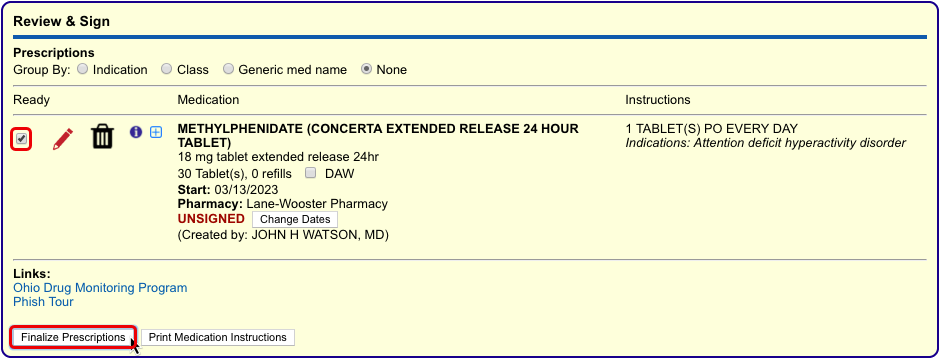
When you finalize pending prescriptions in Review & Sign, you can put finishing touches on them as a batch before processing them to be printed or sent electronically to the pharmacy.
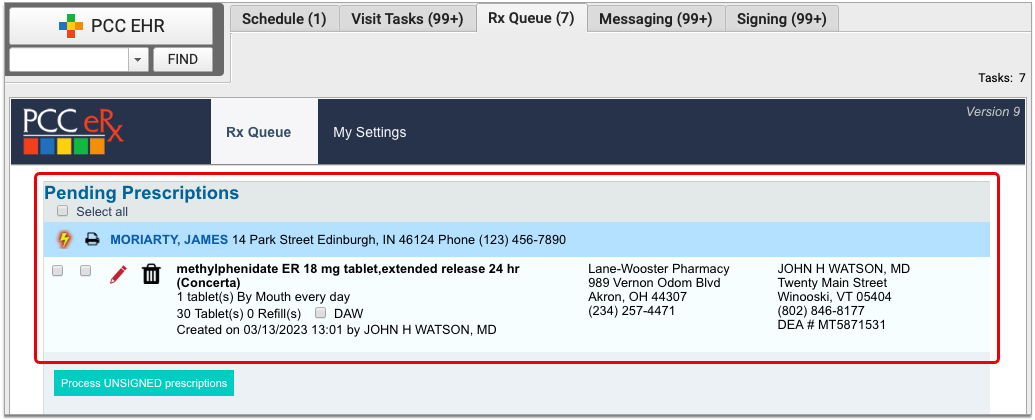
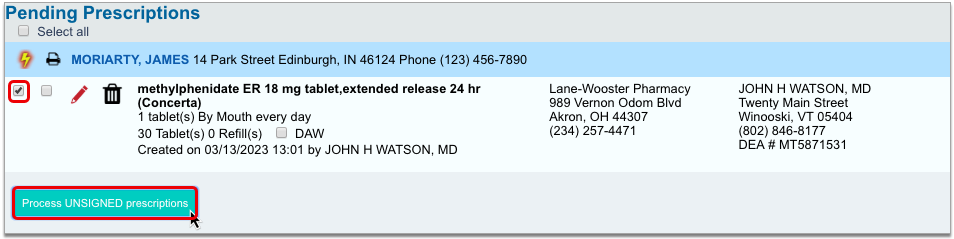
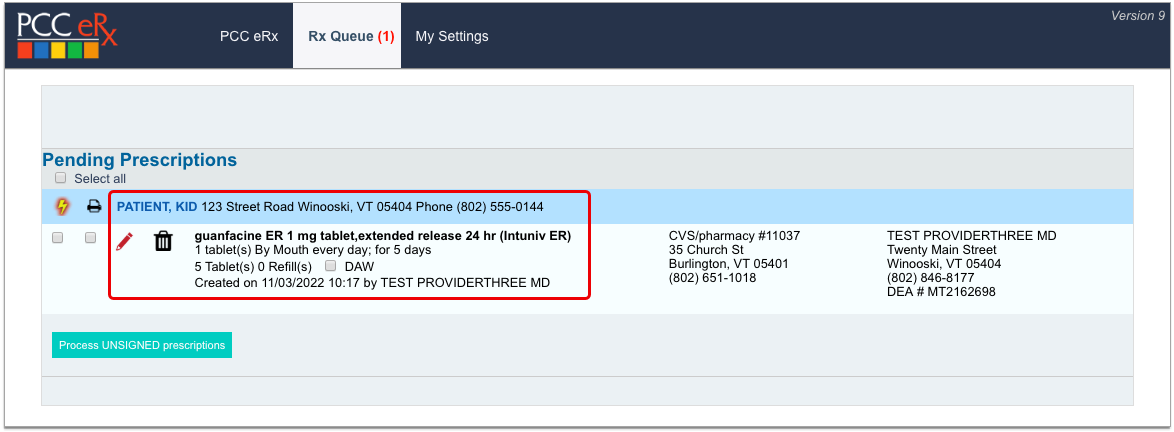
Work With Pending Prescriptions on the Rx Queue: In addition to working from a patient’s specific PCC eRx page, you can also edit, process, and delete pending prescriptions for any patient from the Rx Queue in PCC EHR. Learn more about the Rx Queue in the article The Rx Queue: Alternate Prescribing Workflows.
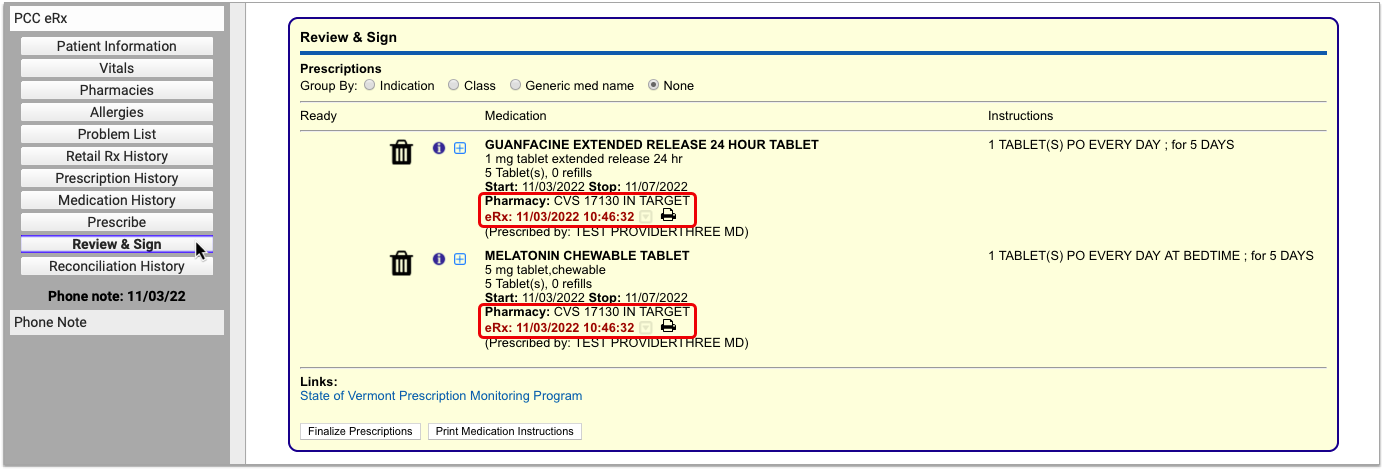
Review Completed Prescriptions
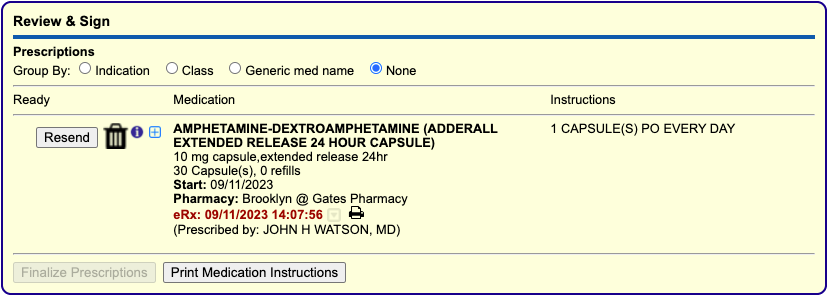
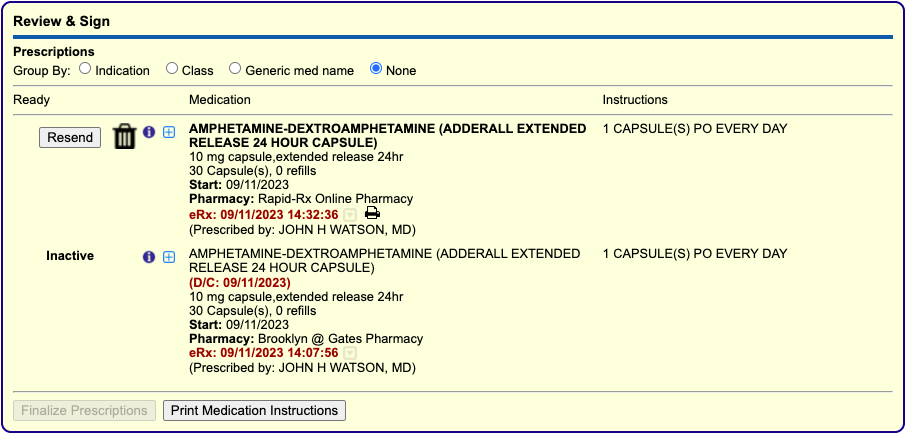
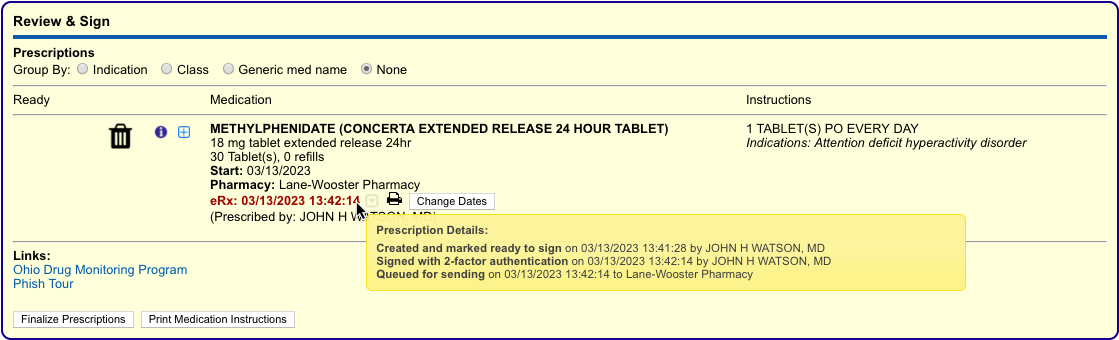
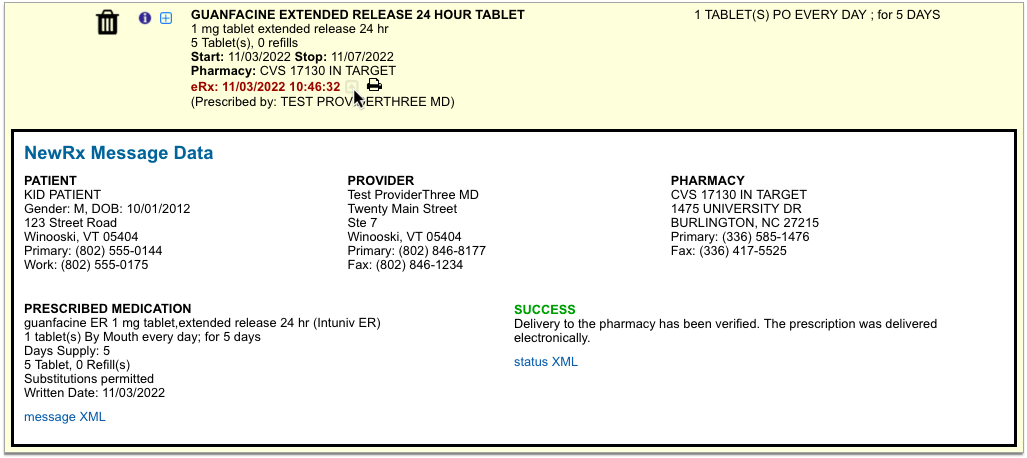
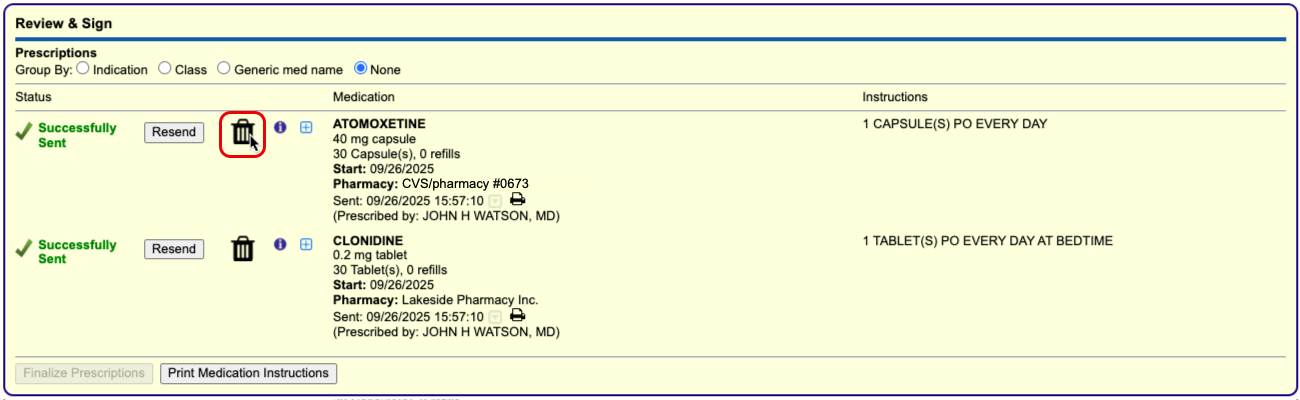
Prescriptions that have been printed or sent to the pharmacy remain in the Review & Sign component of the patient’s PCC eRx encounter and receive a timestamp indicating how and when they were processed. A bold, green status indicates successful transmission to the pharmacy.
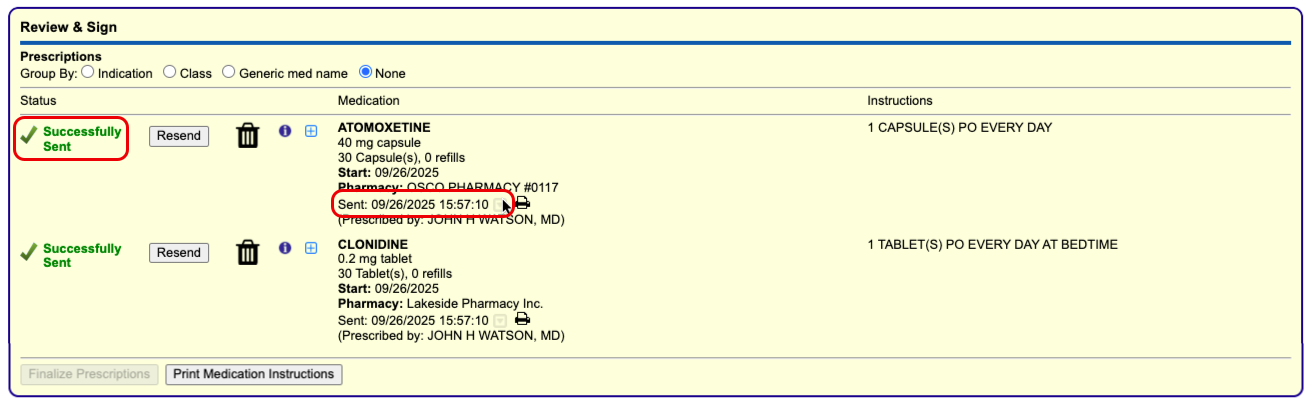
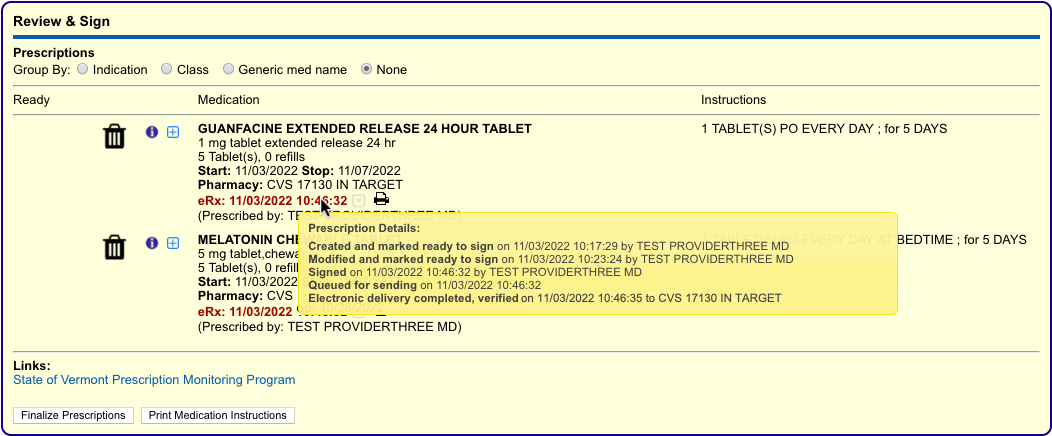
You can find out more information about how and when a prescription was sent to the pharmacy by hovering over the timestamp or clicking the grey disclosure triangle icon beside it. The information in these areas can help you determine precisely when a prescription left your system.
Cancel Sent Prescriptions: Click the trash can icon next to sent prescriptions in Review & Sign to cancel and delete them from the patient’s Prescription History. Where possible, an electronic cancellation is sent to the pharmacy. To learn more about how to cancel and delete prescriptions, read the “Cancel and Delete Sent and Printed Prescriptions” section of this article.
Prescription Features
PCC eRx empowers you to prescribe quickly, effectively, and safely with features that auto-calculate doses and dispense quantities, check for allergy and drug interactions, and more.
Weight-Based Dosing
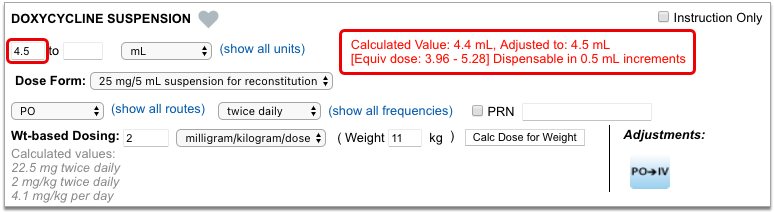
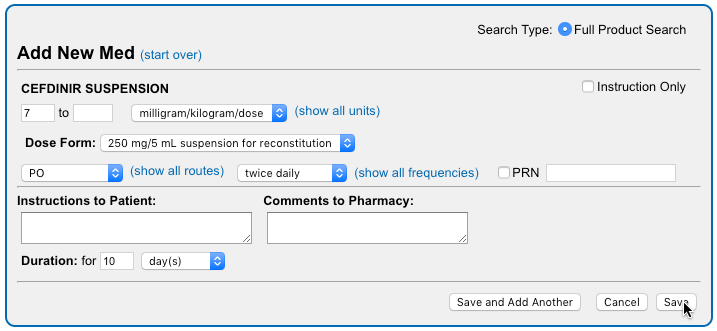
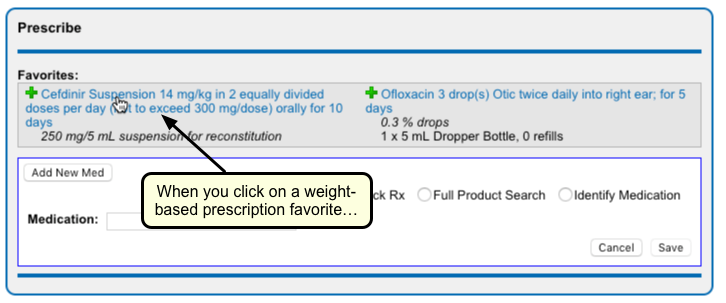
When you search for a drug that is commonly prescribed using weight-based dosing, such as liquid antibiotics, PCC eRx presents weight-based dosing statements as an option or by default. Dosing statements are shortcuts to pre-fill a prescription, so you don’t have to complete every field manually. Weight-based dosing statements are typically expressed as a number of milligrams per kilogram per day (mg/kg/day) divided into a number of doses per day.
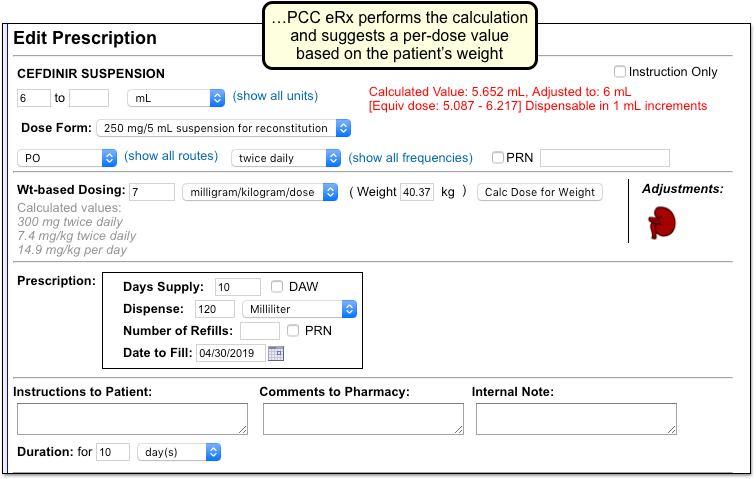
Choose a dosing statement that approximates the prescription you are trying to write. PCC eRx uses the information provided in the dosing statement and the patient’s most recently documented weight to start a prescription expressed as milligrams per kilograms per dose (mg/kg/dose), which you can then edit and refine to your exact liking.

The calculated volume per dose displays in red beside the dosing fields. If the calculation results in a volume that is impractical to measure or dispense, PCC eRx rounds it to the nearest dispensable amount within acceptable range.
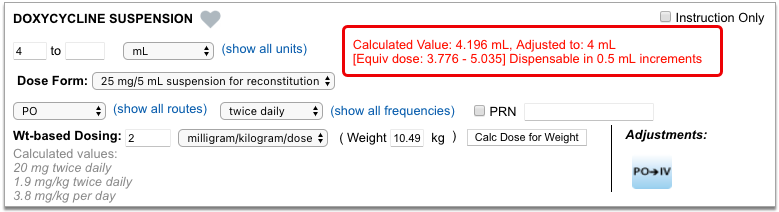
You do not have to accept PCC eRx’s dose calculation, and can manually update any dosing field to meet the exact needs of the patient in question.

If you want to recalculate a dose using a different number of mg/kg/dose or patient weight, you can change those values in the Wt-based Dosing section of the prescription and click “Calc Dose for Weight”. When you recalculate a dose, it updates the calculated volume per dose (in red) and the actual values in the dosing fields.
At any point while filling out a prescription that uses weight-based dosing, you can use the Calculated Values section in grey to double-check that the current dose values result in an appropriate total amount of medication for the patient.
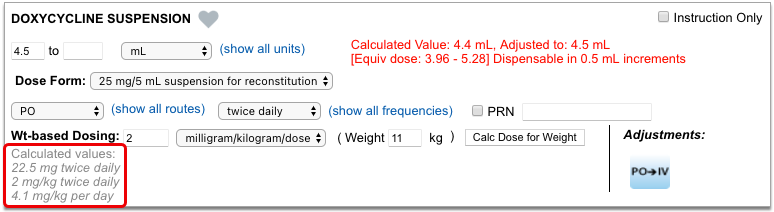
Unlike the dose volume calculation in red, which only reflects PCC eRx’s most recent calculation based on a patient weight and number of mg/kg/day, the Calculated Values section updates dynamically whenever you change one of the actual dose values, giving you a real-time appreciation for the total daily dose for which the prescription is currently written.
Trust Your Judgment: Weight-based dosing calculations in PCC eRx are strictly based on your selections, information provided about the patient’s weight, and accepted guidance about the medication. They cannot replace your professional judgment about a patient’s specific needs or situation. Always defer to your own professional judgment when prescribing medications and tailor doses accordingly.
Days Supply, Auto-Calculation, Stop Date, and Duration
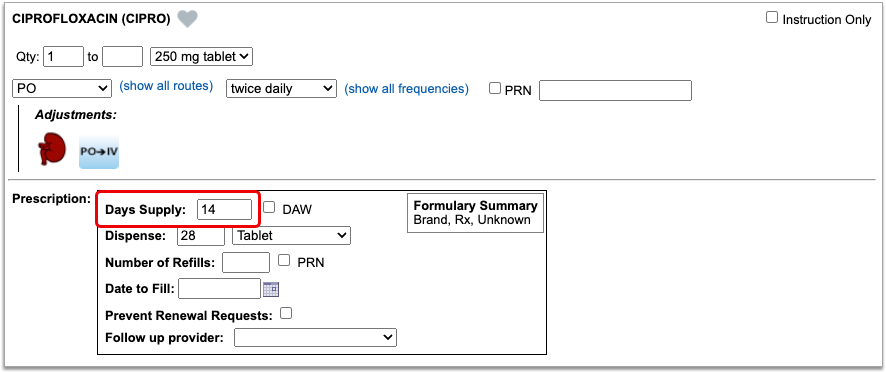
When you create a prescription, PCC eRx automatically looks at the days supply to calculate a dispense quantity, stop date, and more.
Days Supply and Auto-Calculation
PCC eRx automatically fills out the Days Supply field when you start a prescription. Days supply is the number of days a prescription is intended to last.
When you renew a medication or pick a dosing statement that specifies a duration, PCC eRx automatically uses that duration to fill out the Days Supply field.
If you pick a dosing statement that has no duration, or you use the “Enter Dose Manually” option, PCC eRx automatically starts a prescription for a 30-day supply.
To auto-calculate a dispense quantity and form, PCC eRx multiplies the dose quantity, frequency, and form by the days supply, then translates the result into something the pharmacy can logically dispense.
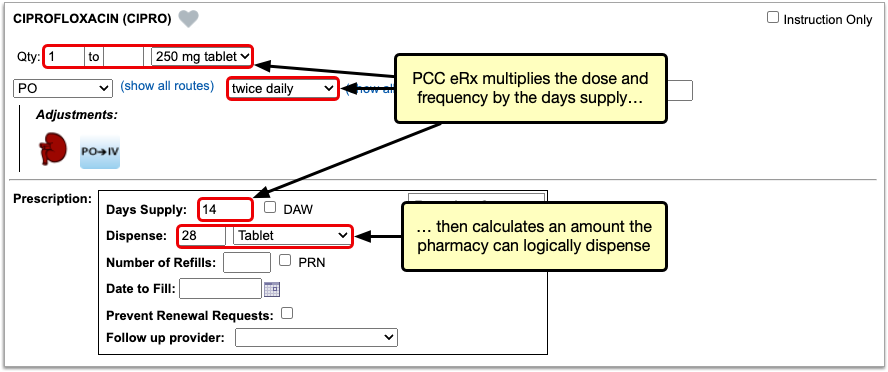
You can manually change the value in the Days Supply field at any time and PCC eRx will auto-calculate a new dispense quantity and form.
There are some cases where the Days Supply field is not used in the dispense quantity calculation, such as when you create a prescription for a piece of equipment, or for a medication that is dispensed as a standard tube, canister, box, or other package. In these cases, PCC eRx defaults to a dispense quantity of one.

When writing a prescription that is dispensed in a standard package size, always double-check that the dispense quantity is sufficient for the intended usage.
Stop Date and Duration
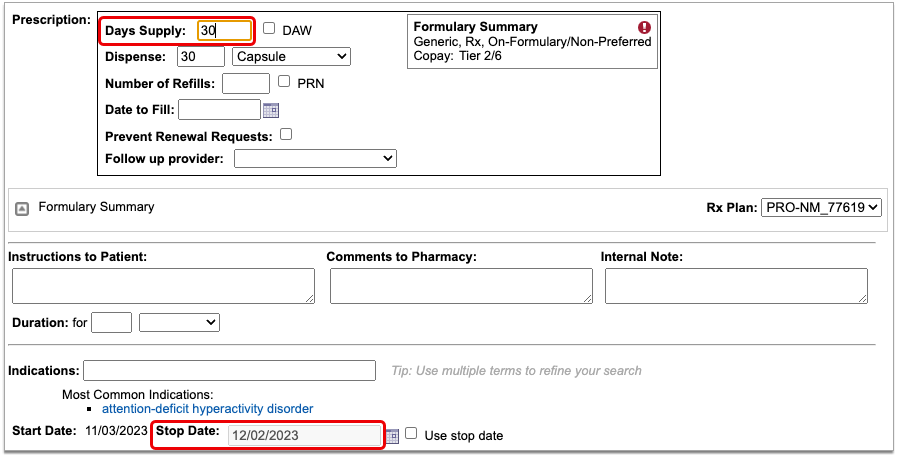
PCC eRx automatically determines the stop date for prescriptions using the days supply. On short-term prescriptions, defined as 29 days or less, PCC eRx also auto-selects the “Use Stop Date” checkbox and fills out the Duration field.
If needed, you can manually alter the stop date, “Use Stop Date” checkbox, and duration of a prescription. When “Use Stop Date” is selected, PCC eRx automatically discontinues the medication in the patient’s Medication History once the stop date has been reached.
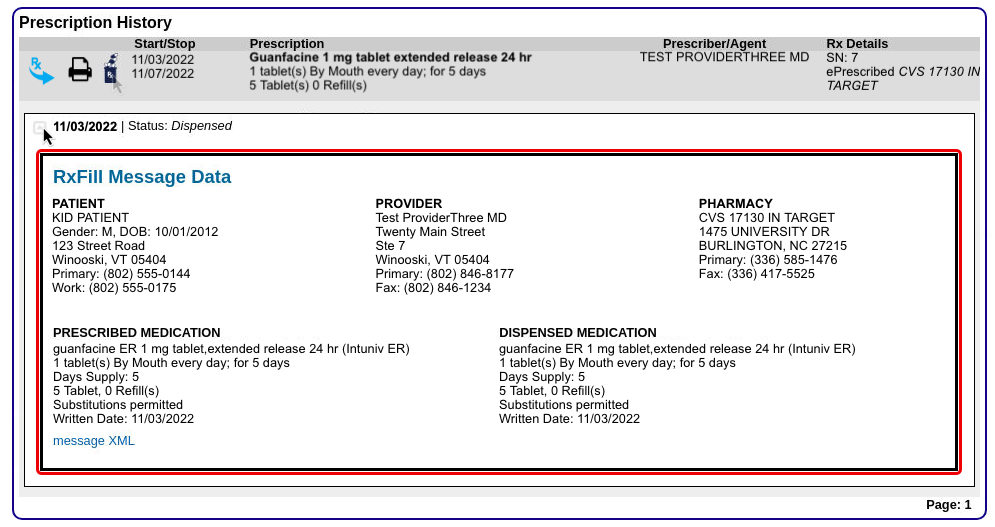
Stop dates display in the Prescription History component in PCC eRx, indicating when a prescription is expected to have run its course. You can use this information to validate patient requests for additional medication or to prompt discussions about compliance.
Dispense Brand Name Drugs as Written (DAW)
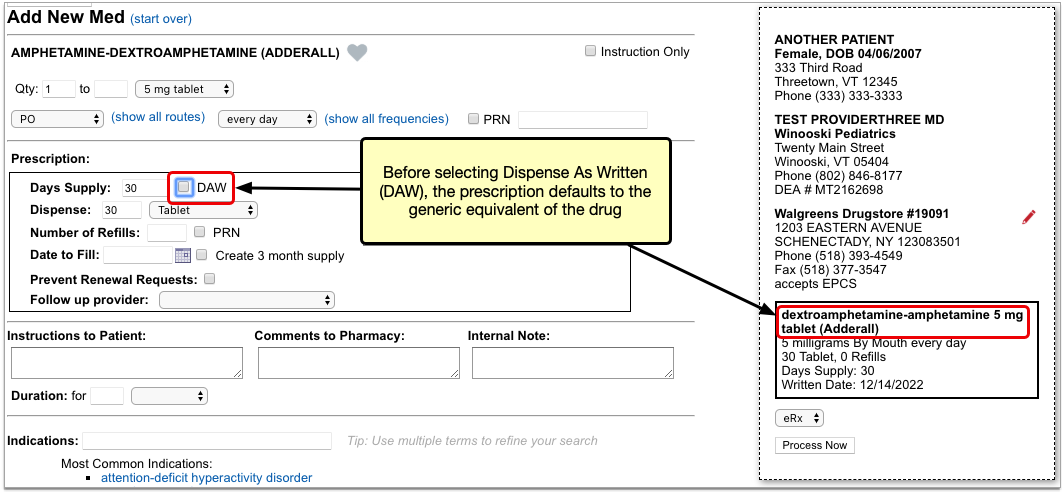
When you prescribe a brand name drug with a generic equivalent, you can specify that the pharmacist dispense the prescription as written, without substitution. The Dispense As Written (DAW) option only appears on prescriptions for drugs that you search for by brand name.
To specify that a drug should be dispensed as written, select the “DAW” checkbox when you write the prescription.
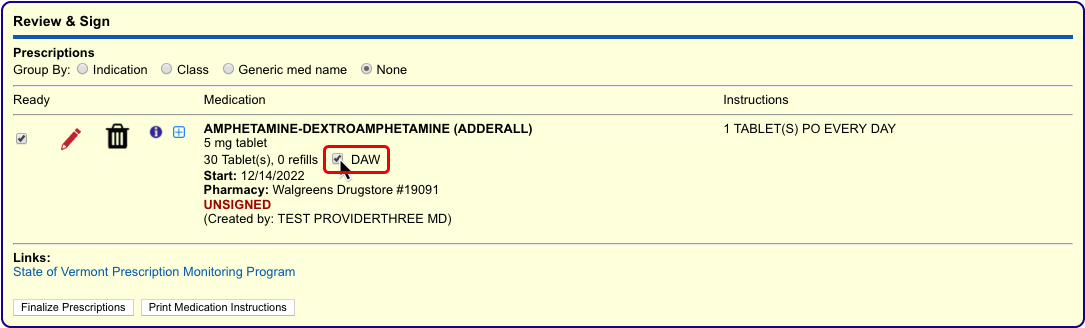
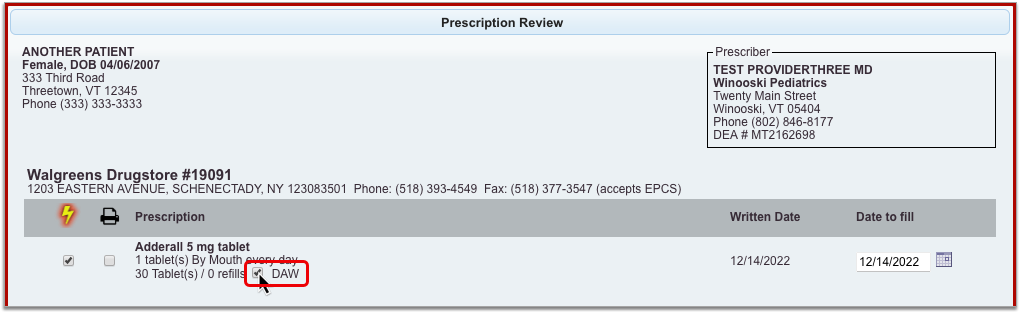
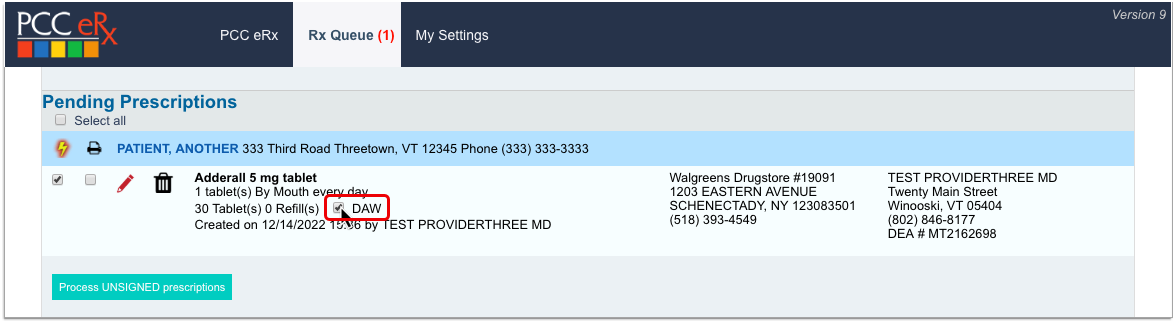
In addition to being available when you create or edit a prescription, the “DAW” checkbox appears beside pending prescriptions in the Review & Sign section of PCC eRx, the Finalize Prescriptions window, and on the Rx Queue.
You can check or uncheck the “DAW” box in any of these places before sending the prescription to the pharmacy.
Instruction-Only Prescriptions
The “Instruction Only” option on prescriptions lets you write your own dosing instructions for the patient instead of requiring you to use the standard fields for quantity, route, and frequency.
After starting a prescription, check the “Instruction Only” box to bypass the standard dosing fields. Then, write instructions directing the patient how to use the product.
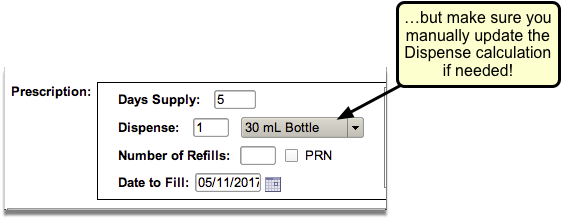
If the prescription is for a medication, you must also select a dose form so the pharmacy knows what strength to dispense and verify that the total dispense quantity is sufficient for the intended usage.
You can use the “Instruction Only” option to prescribe a loading dose or taper, or to create any prescription that cannot be written using the standard dosing fields. You can also use the “Instruction Only” option when you build custom medication items.
Reduced Safety Checking for Instruction-Only Prescriptions: Because instruction-only prescriptions allow you to bypass certain fields that are used for safety checking, they cannot trigger all forms of safety alerts. For example, instruction-only prescriptions are subjected to allergy and duplicate therapy checks, but cannot trigger dose range warnings.
Indications
You can view common indications for medications while you prescribe, and use indications to transmit diagnosis codes with your prescriptions.
Search for a medication in the Prescribe component, then hover over it to view its common indications.
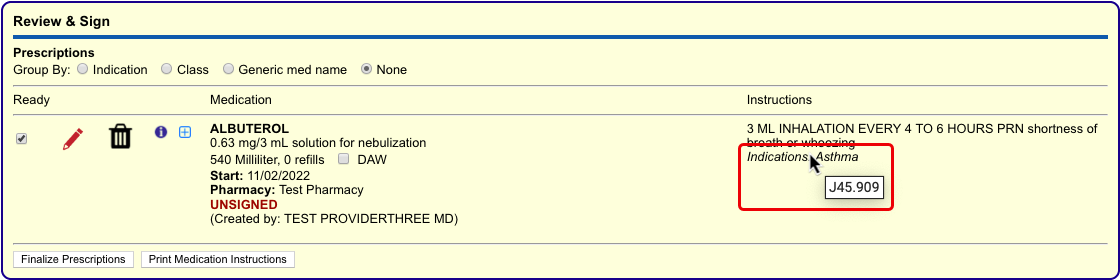
To transmit diagnosis codes with a prescription, add indications to it as you prescribe.
PCC eRx suggests indications from several different sources, such as the patient’s current visit, their problem list, and the most common indications for the medication. Click the suggested indications to add them to the prescription, or search for other options in the Indications field.
Indications map to diagnostic terms in your PCC database, which in turn map to ICD-10 codes. When you save and finalize the prescription, PCC eRx transmits the ICD-10 code for each indication to the pharmacy and documents it in the Review & Sign component.
If you add an indication to a prescription that does not map to an ICD-10 code, PCC eRx transmits the text description of the indication to the pharmacy instead.
Indication Mapping is Not User-Editable: Unlike the diagnoses that appear in other parts of your PCC system, you cannot edit how indications in PCC eRx map to ICD-10 codes. If you have concerns about how a specific indication is mapped, contact PCC Support.
Medication Warnings and Safety Alerts
PCC eRx alerts prescribers on the product search screen when a drug may be inappropriate for the current patient’s age, contraindicates one of their documented allergies, interacts with other drugs or certain foods, or duplicates a therapy that they are currently taking.
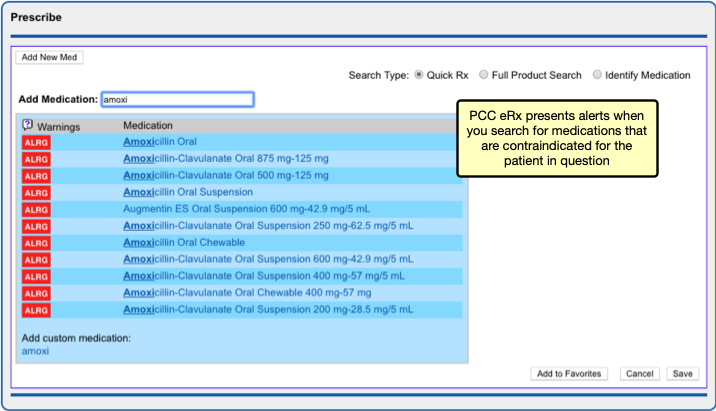
If you choose to prescribe a medication that is contraindicated for some reason or outside of normal parameters for the patient in question, automated safety checking protocols in PCC eRx present you with alerts that you must manually override before you can complete the prescription.
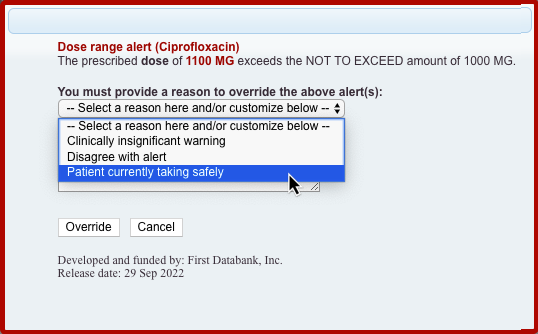
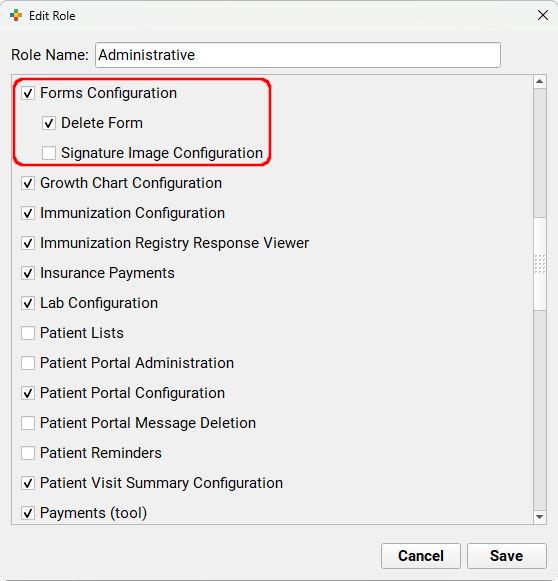
A user with Administration permissions in PCC eRx can customize the frequency and sensitivity of warnings and alerts at your practice, create a list of custom medication warnings, and manage the list of safety checking override reasons. To learn more, read Customize PCC eRx Alerts and Warnings.
Prescription Favorites
You can save your most common — or trickiest — prescriptions in a personalized “favorites” list for easy future prescribing.
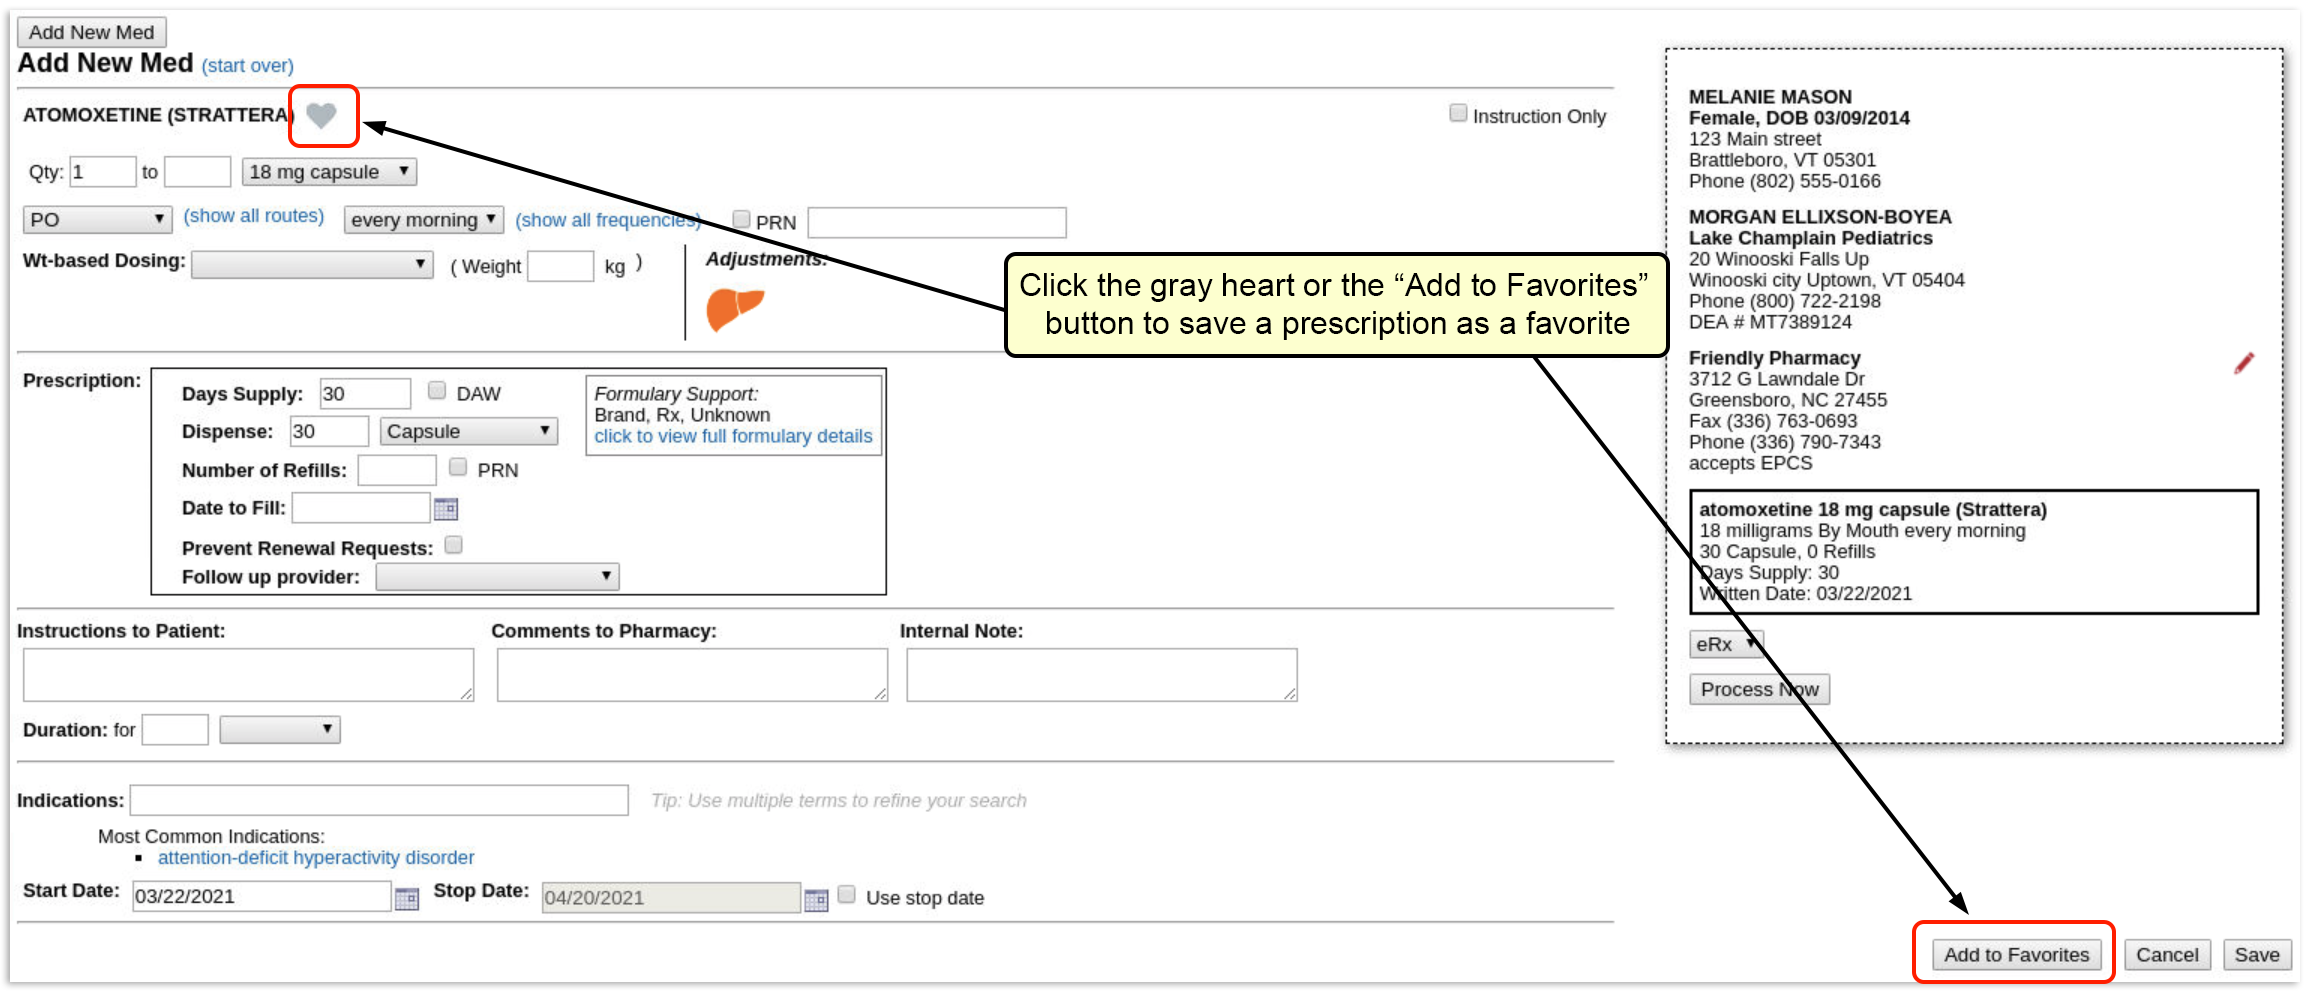
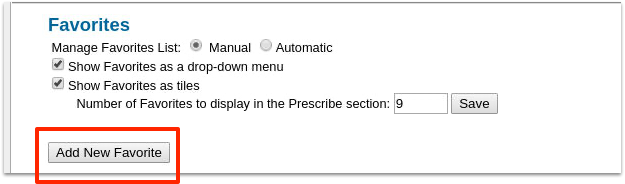
To create a favorite, start a prescription then click the heart icon or the “Add to Favorites” button.
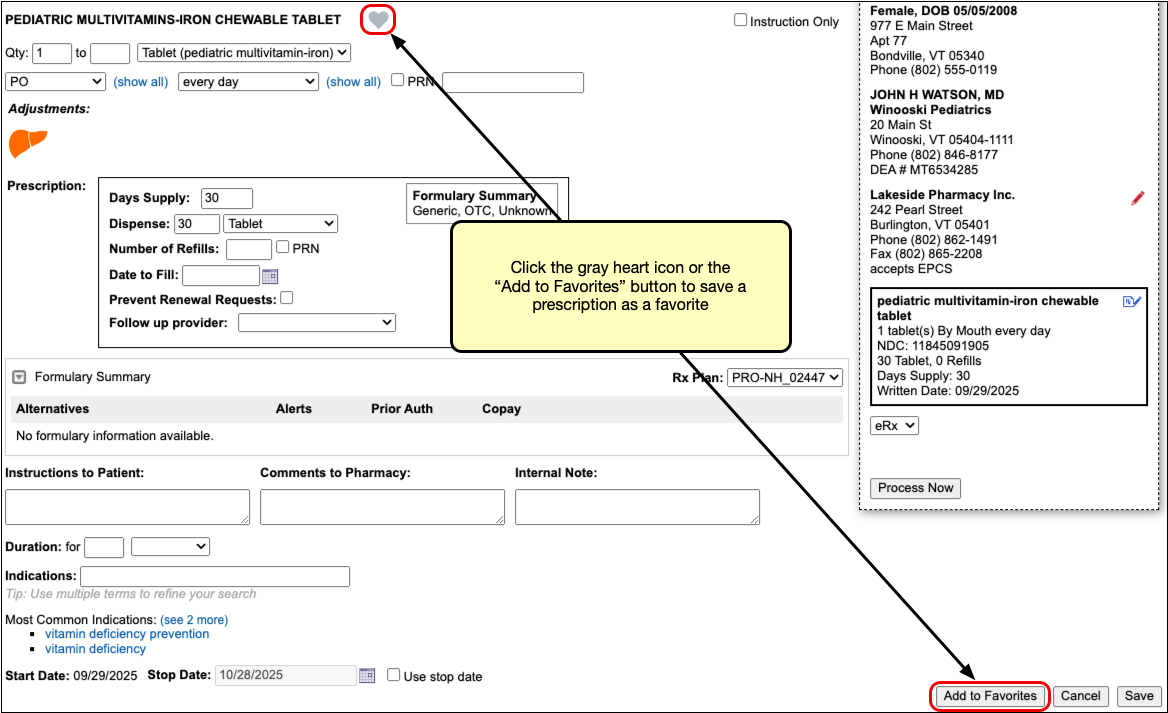
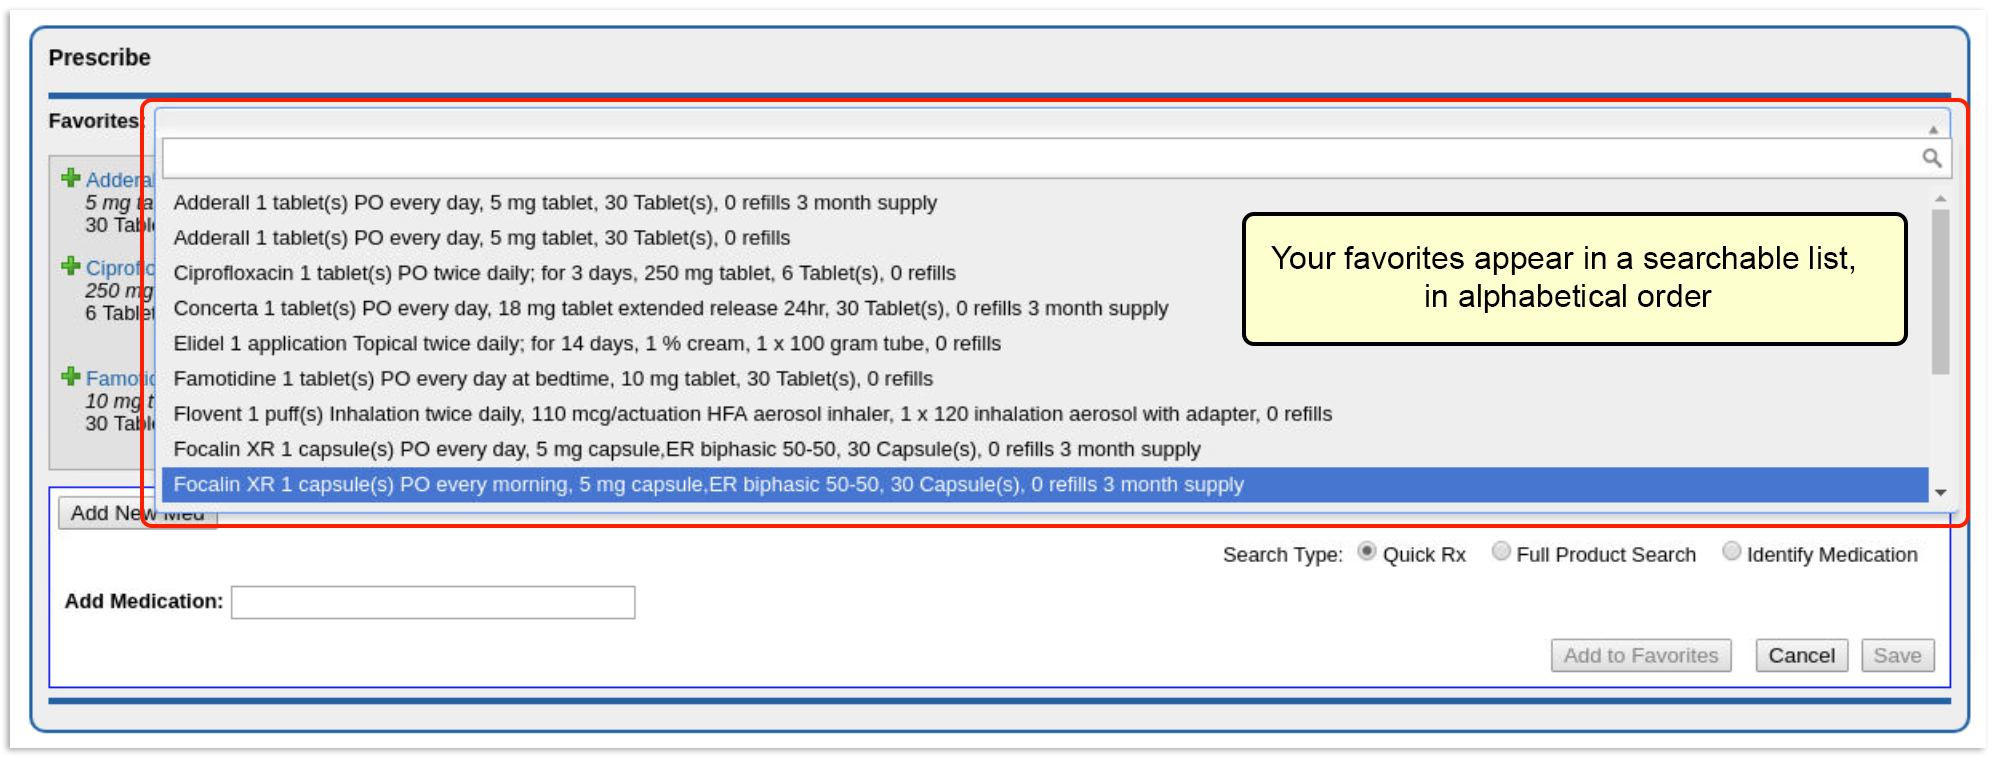
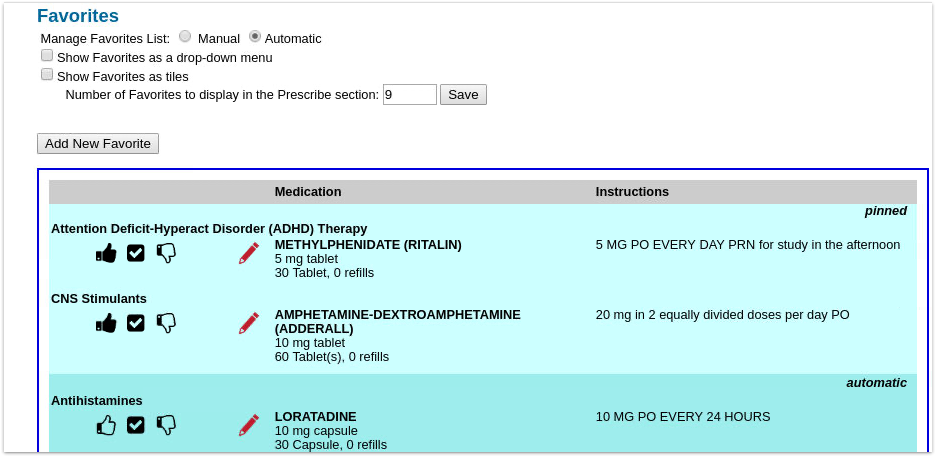
The prescription saves to your favorites list exactly as written, where you can quickly find and re-prescribe it for any patient. Favorites always display at the top of the search results when you start a new prescription from scratch.

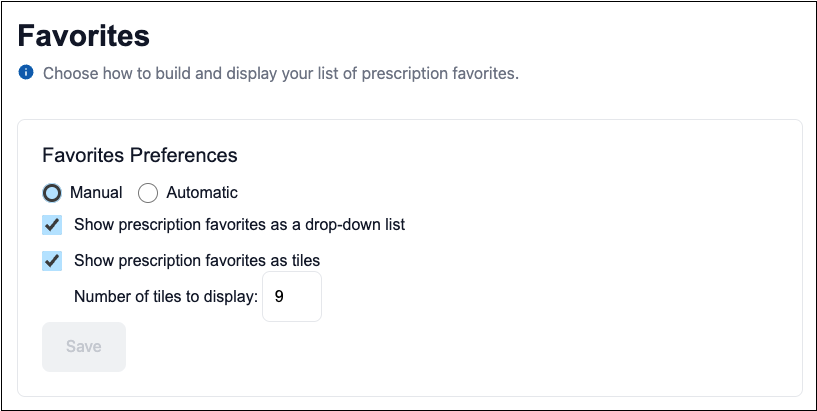
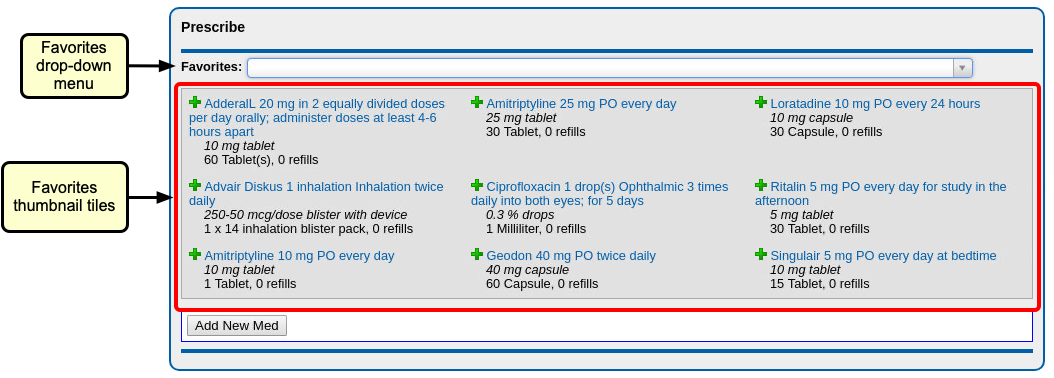
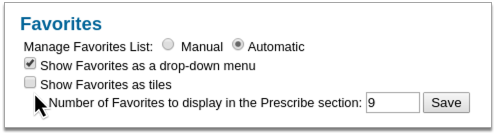
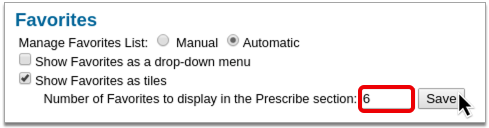
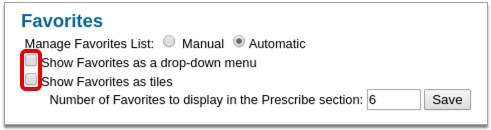
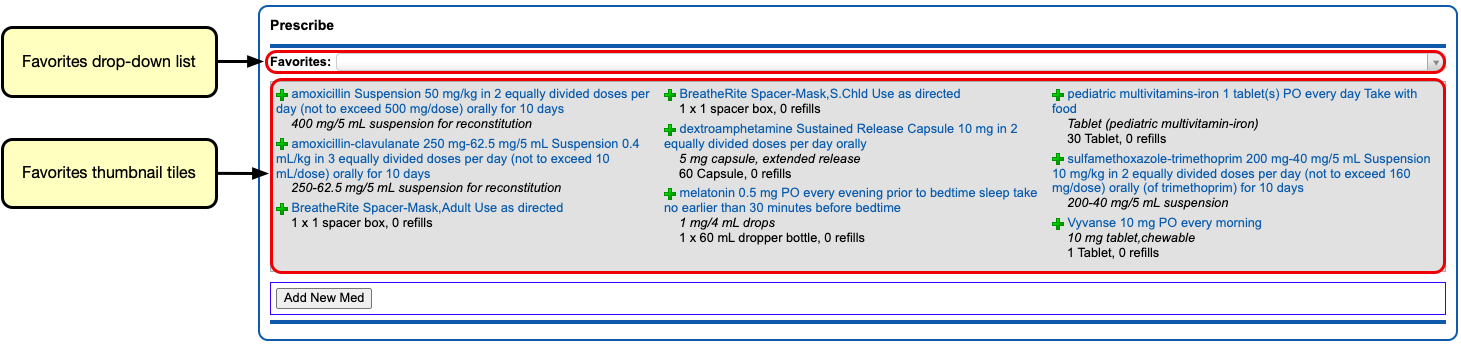
They can also be displayed as thumbnail tiles or in a searchable drop-down list in the Prescribe section in PCC eRx.
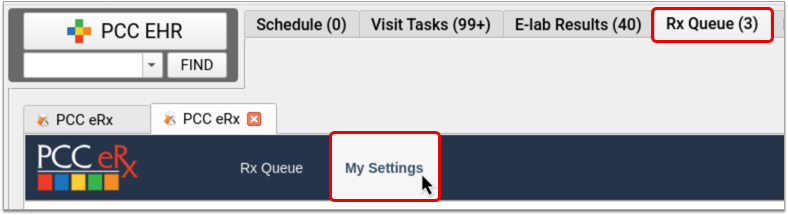
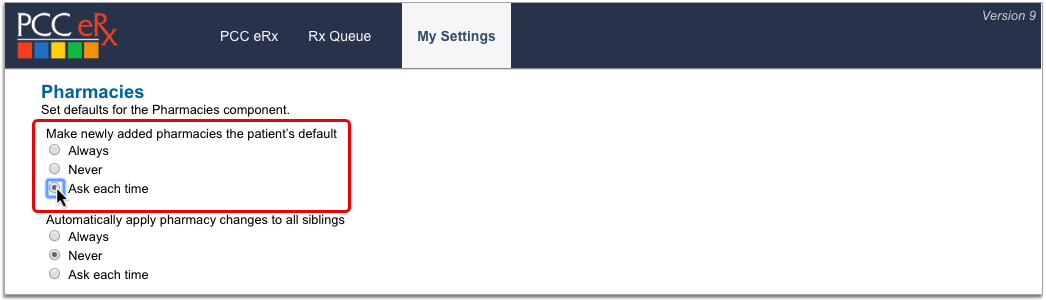
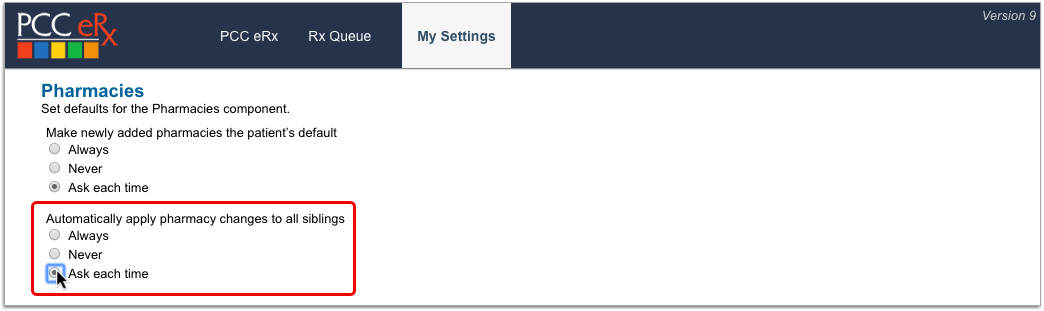
You can customize how your favorites display using the Favorites configuration on the My Settings page in PCC eRx.
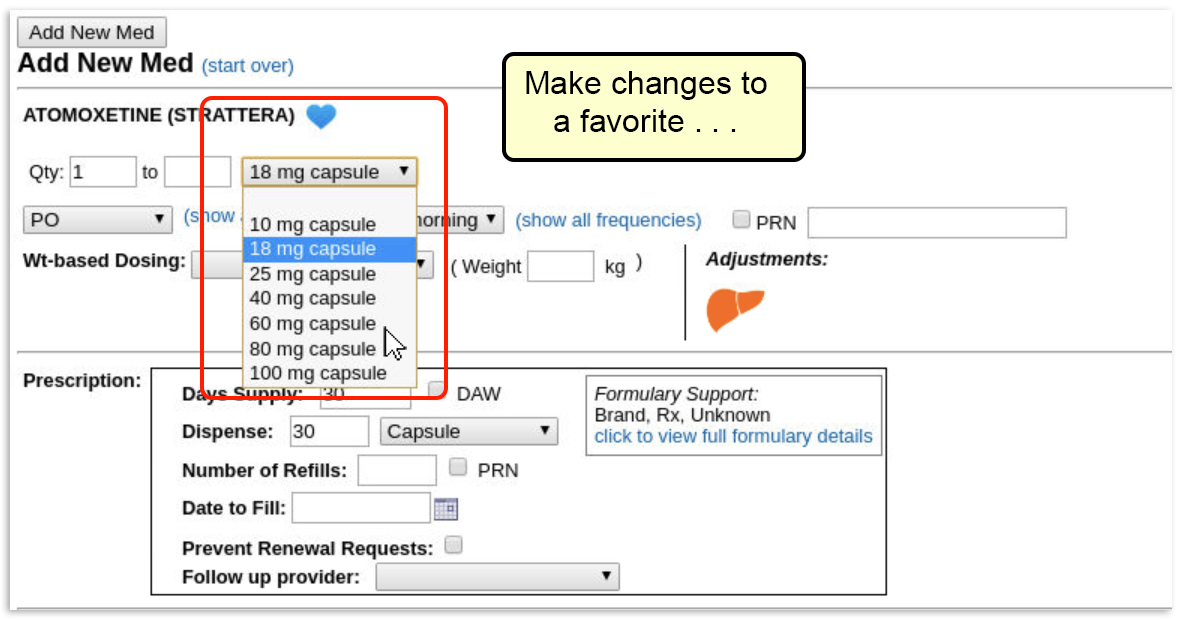
For more in-depth information about prescription favorites, including how to edit or delete them and use automatic favorites, read PCC eRx Prescription Favorites.
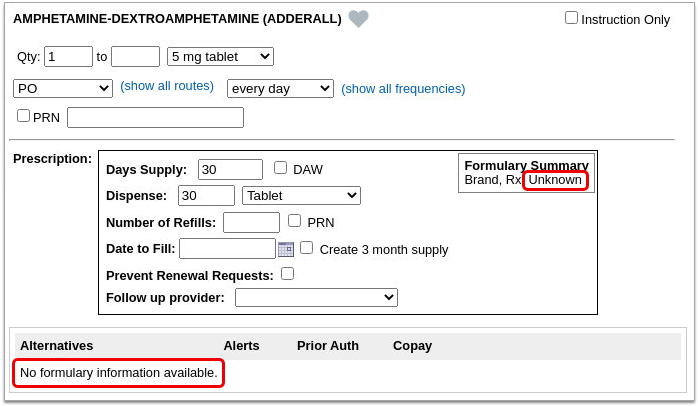
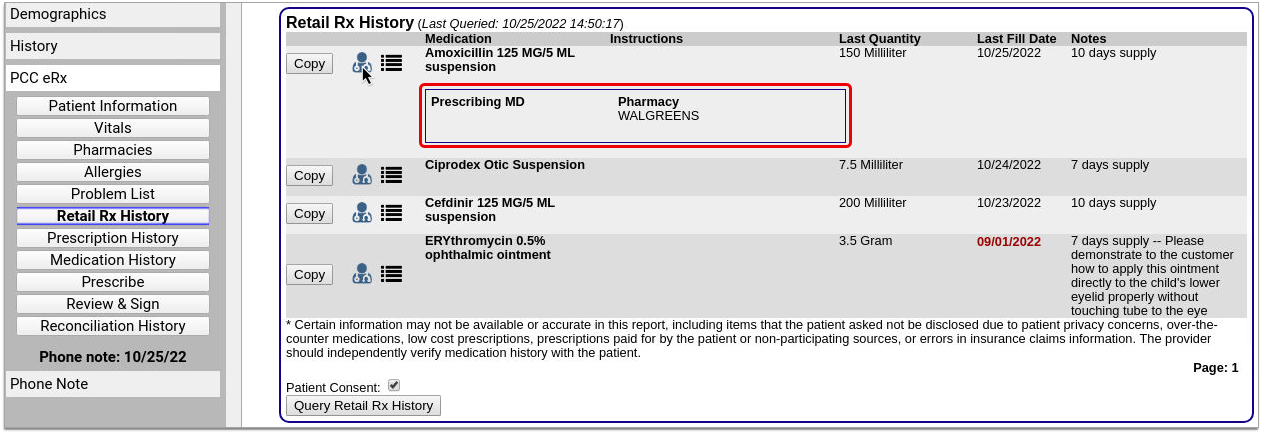
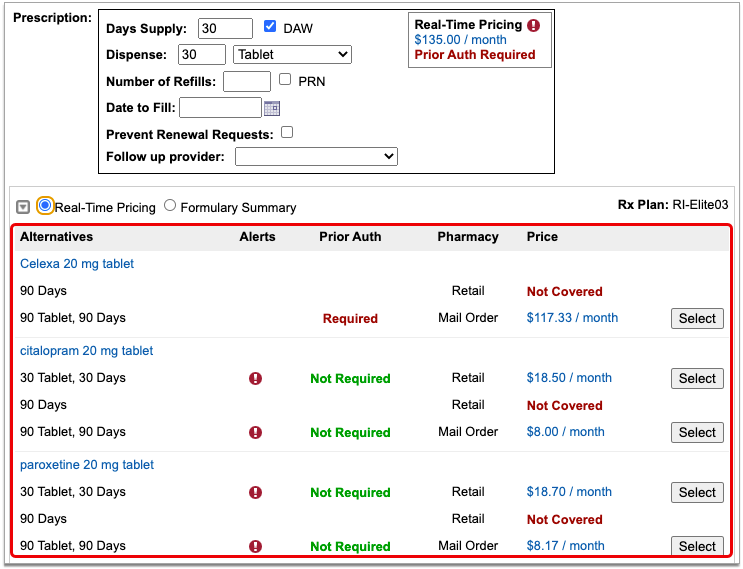
Real-Time Pricing and Formulary Support
As you prescribe, PCC eRx checks with the patient’s prescription insurance plan in real-time for patient-specific pricing and coverage information.
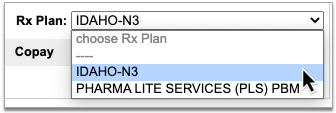
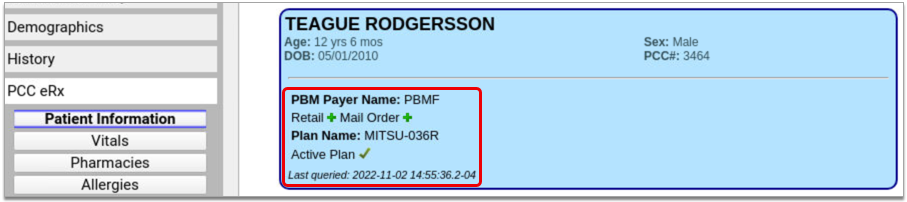
The prescription insurance plan details come from Surescripts, the vendor that facilitates digital information exchange for e-prescribing. Using only the patient’s demographic information, Surescripts reaches out to its network of prescription benefit managers and finds the patient’s prescription insurance plan(s). Plan information displays in the Patient Information component in PCC eRx, where you can see the name of the prescription benefit manager, the covered pharmacy types, and the plan name and status.
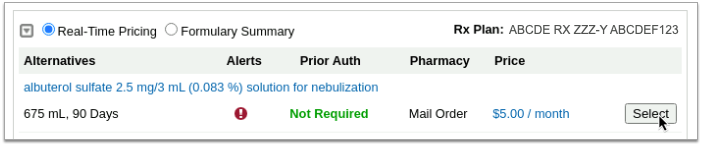
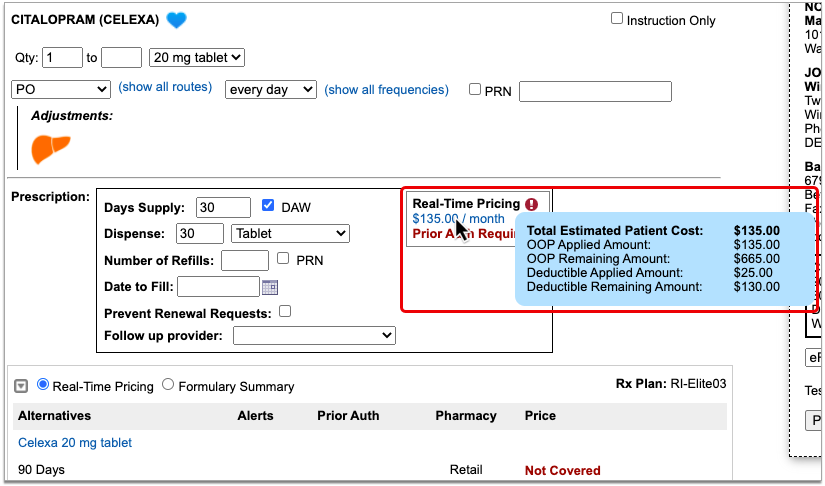
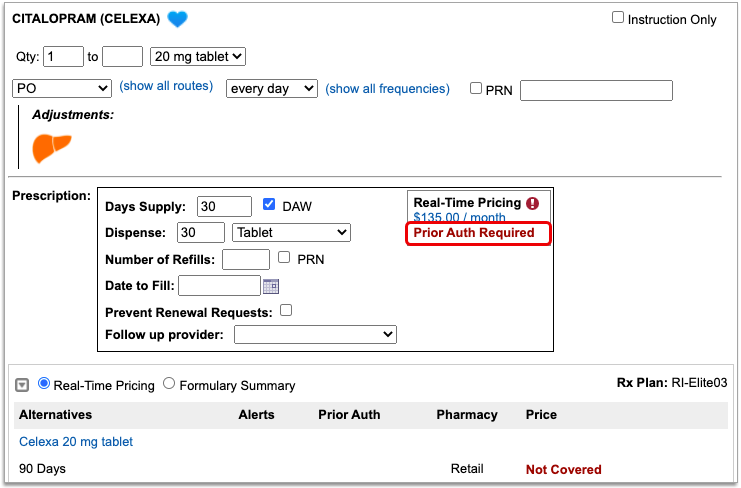
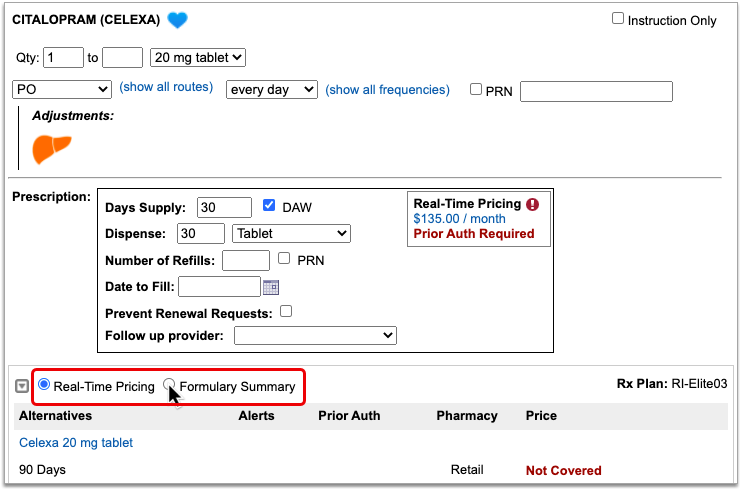
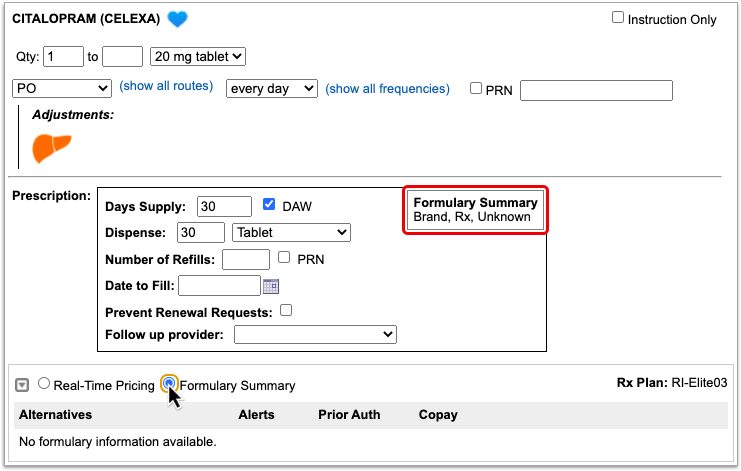
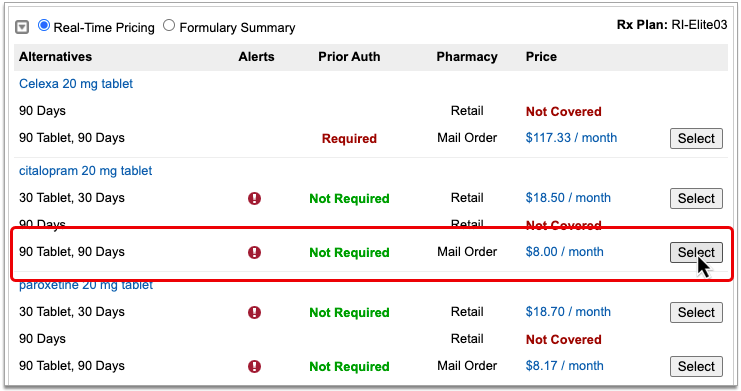
As you prescribe, PCC eRx checks with the patient’s plans for real-time, patient-specific pricing and coverage details, then displays that information beside your prescription.
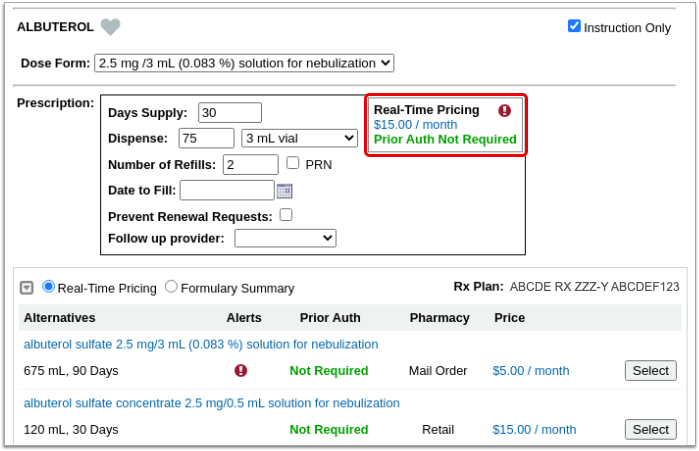
If a drug is expensive, not covered, or requires prior authorization, check to see if any of the alternatives suggested by the insurance plan could work instead.
To learn everything there is to know about Real-Time Pricing and formulary support in PCC eRx, or to watch the video, visit Check Prescription Pricing and Insurance Coverage While You Prescribe.
Prescription Drug Monitoring Program Links
While PCC does not yet offer direct integrations with prescription drug monitoring programs (PDMP), you can configure PCC eRx to display links to your regional PDMP website and other important reference sites. Once configured, the links display in the Review & Sign component within the PCC eRx section of patient charts.
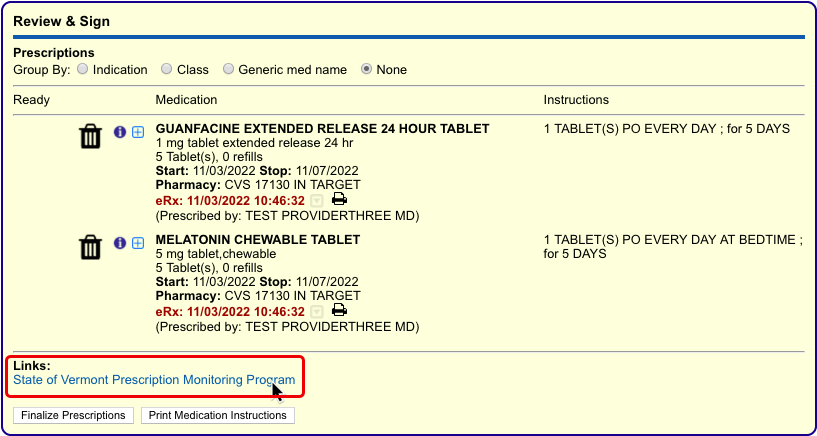
Click any link to open the associated website in a browser tab within PCC EHR. Once open, you can interact with the website just as you would in any internet browser.
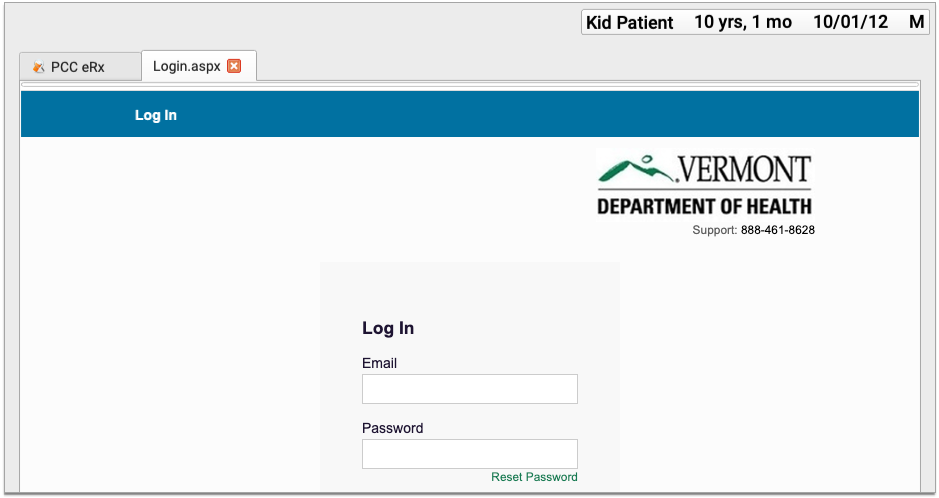
When you have completed what you need to do on the website, click the red “x” icon on the browser tab to close it.
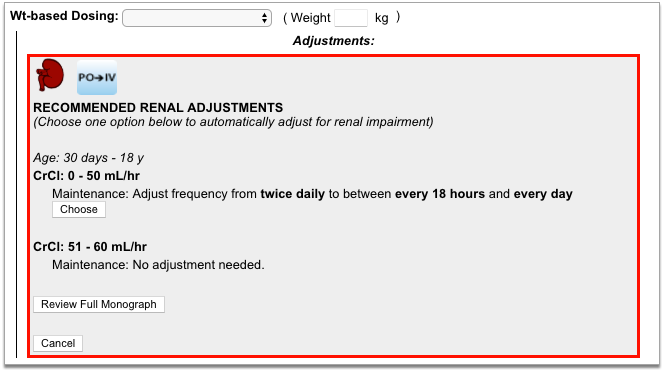
Renal, Hepatic, and Other Dosing Adjustments
PCC eRx presents an icon in the shape of a kidney or liver when you prescribe a drug with adjusted dosing for patients with renal or hepatic impairment. Click the icon to view the recommended adjustments.
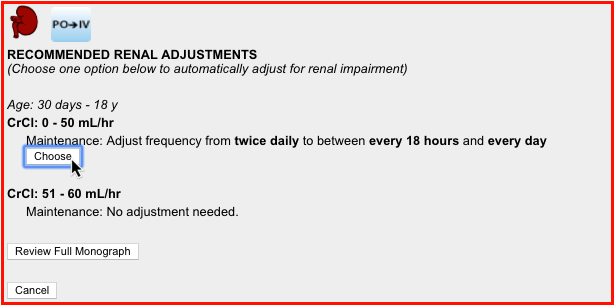
Adjustments are categorized by age and impairment. When you choose an adjustment, PCC eRx recalculates the dose accordingly.
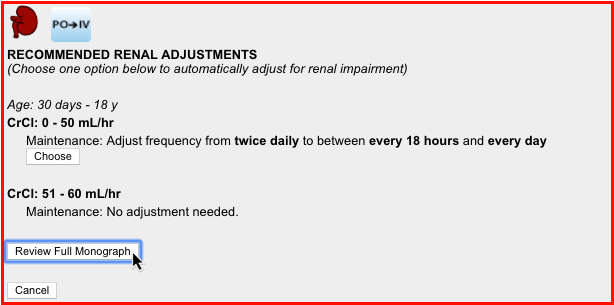
If you want more information about the recommended adjustments, you can open and view the full monograph within the adjustments pane.
PCC eRx presents the renal and hepatic adjustment icons for relevant drugs regardless of the present patient’s problems, diagnoses, or lab results. Use your professional judgment to determine whether adjustments are truly needed for any given patient.
Other Dosing Adjustments: PCC eRx occasionally presents icons in the Adjustments section of a prescription that are not related to renal or hepatic impairment, such as an icon to indicate dosing adjustments for intravenous administration. Simply click the icon to see more details about the recommended dosing adjustment.
Common Prescribing Scenarios
PCC eRx offers flexible options to manage complex yet common prescribing scenarios.
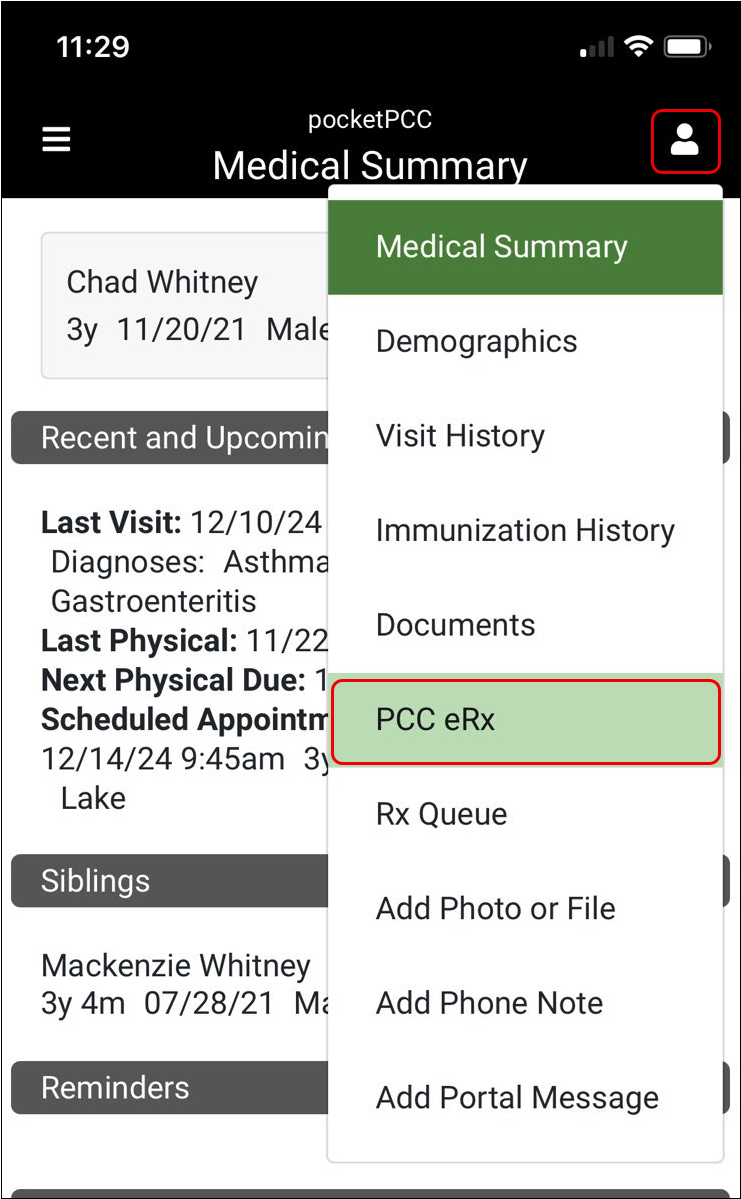
Prescribe from Your Phone
When you’re away from your work computer, you can use pocketPCC to prescribe from your phone, tablet, or other internet-connected device. Learn how.
Prescribe Equipment, Supplies, and Services
When you want to prescribe durable medical equipment (DME) or supplies, use the “Full Product Search” option to search for the item.

If the item you wish to prescribe is available in the list, select it to start a prescription, then prescribe it normally.
If the equipment or supply you wish to prescribe is not available in the full product search, or you wish to prescribe a service such as speech therapy, a user with PCC eRx Administration privileges must create it as a custom medication item before you can prescribe it.
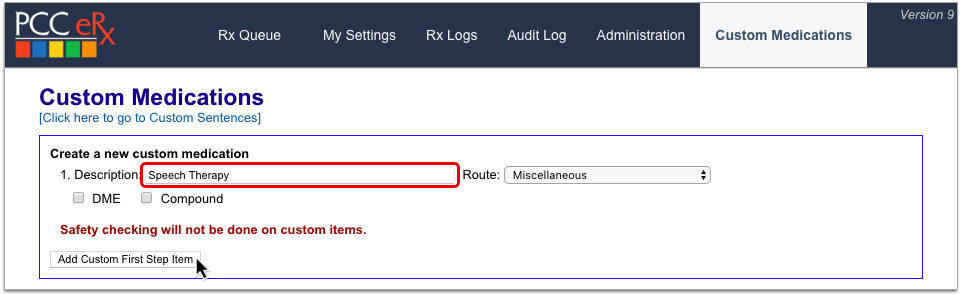
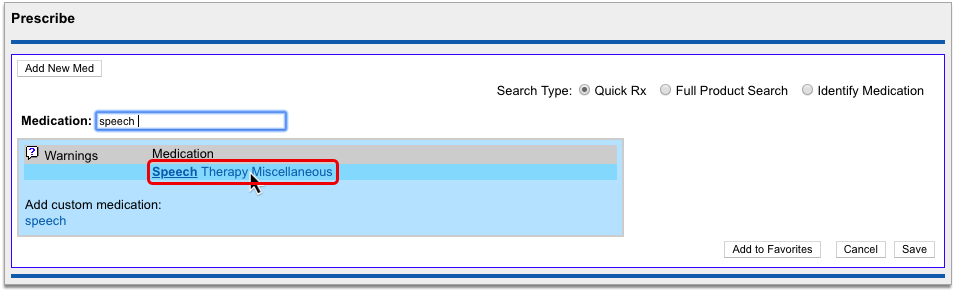
Once the equipment, supply, or service has been created as a custom medication item, you can search for it as you would any other medication and prescribe it normally.
You can learn how to create custom medication items in the article Create Custom Medication Items in PCC eRx.
Contact PCC Support for Help: Special prescribing scenarios carry many considerations, and what works for one practice might not work for another. Contact PCC Support if you need help writing prescriptions for less common items.
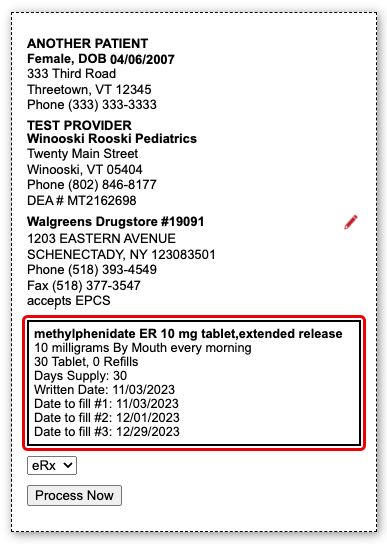
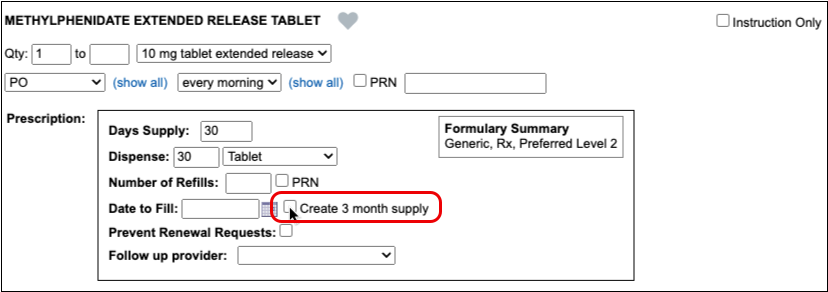
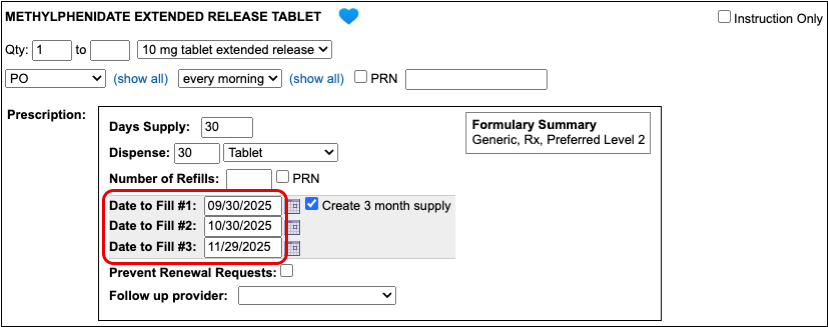
Prescribe a Multiple-Month Supply of Schedule II Drugs
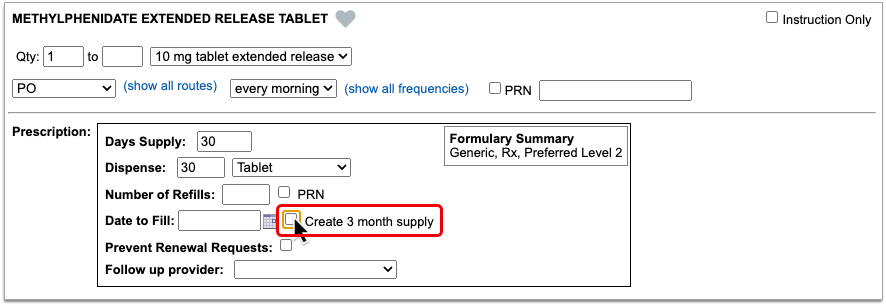
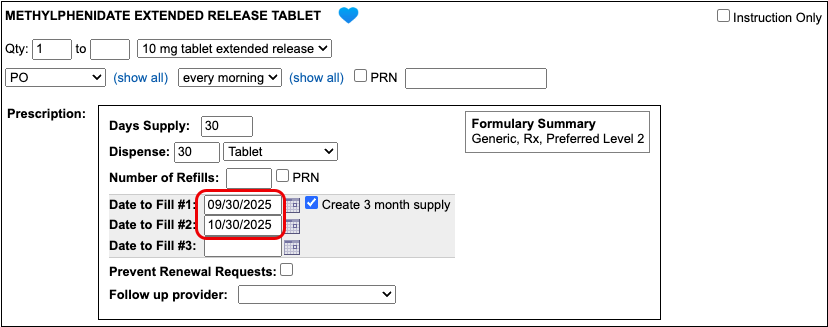
In a single click, you can turn a prescription for a schedule II drug into a three-month supply. This function is most commonly used to prescribe maintenance medications for the treatment of ADHD.
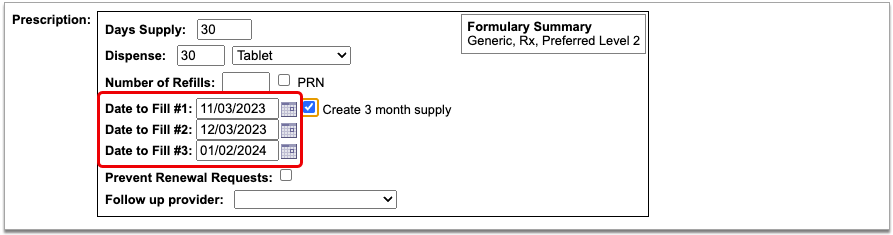
Start a prescription for a schedule II drug, then check the “Create 3 month supply” box.
The prescription goes from having one date to fill to having three successive ones that are calculated from today’s date based on days supply. If you delete the third date to fill, you can turn this into a prescription for a two-month supply.
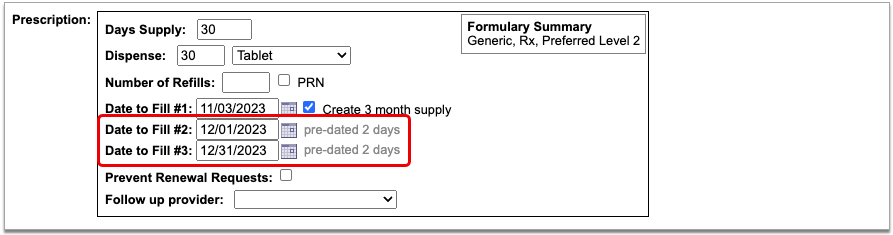
If you want the patient to be able to pick up the second and third prescriptions in the series a little before they’re needed, you can manually adjust the dates to fill. This is called pre-dating.
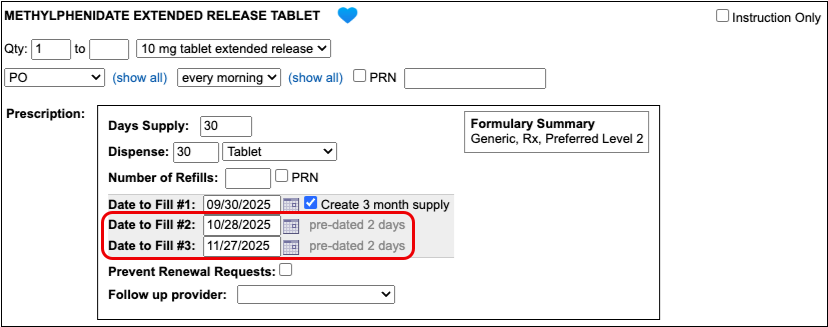
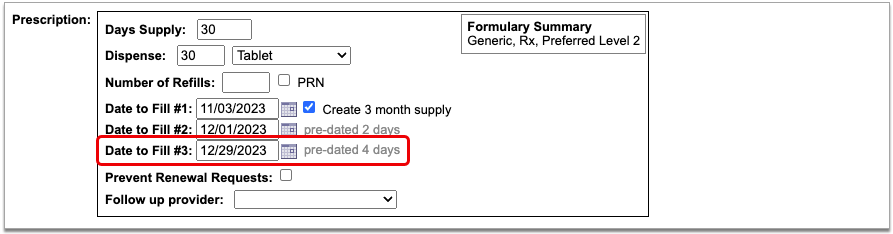
When you pre-date the second prescription in the series, the third automatically becomes pre-dated by the same number of days. If you want to pre-date the third prescription for a different number of days, you can manually change its date to fill without affecting the first two prescriptions in the series.
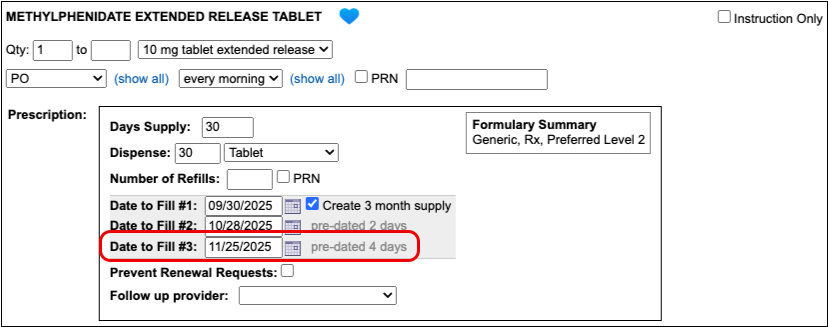
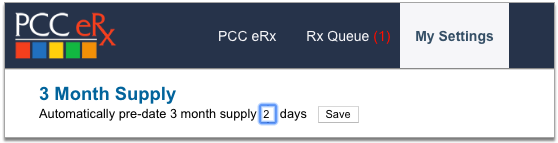
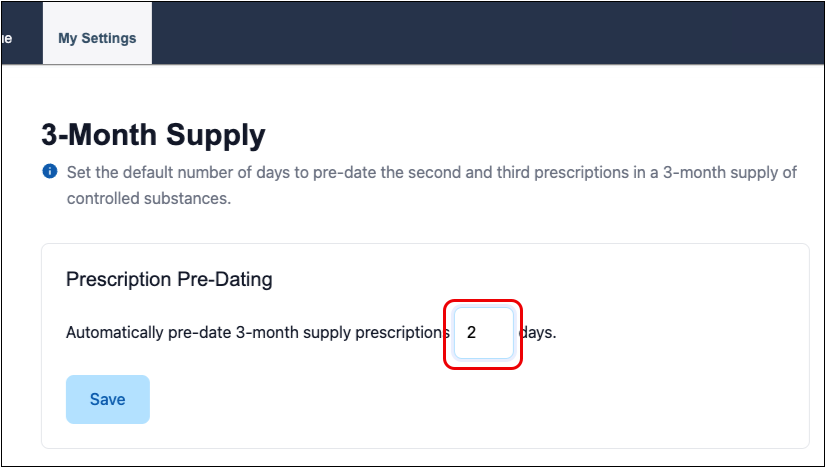
If you always want to pre-date the second and third prescriptions in a series of three by a certain number of days, you can set that up in your PCC eRx settings.
When you are ready to send the prescription, process it as usual. You will only be prompted to enter your EPCS credentials once.
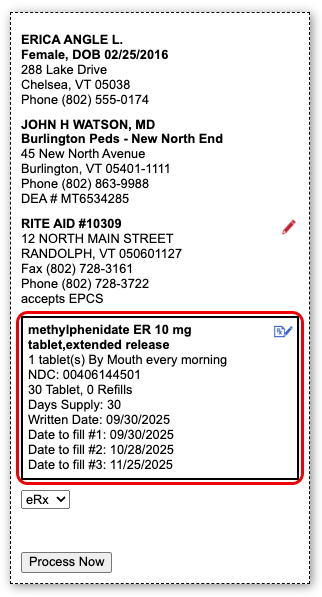
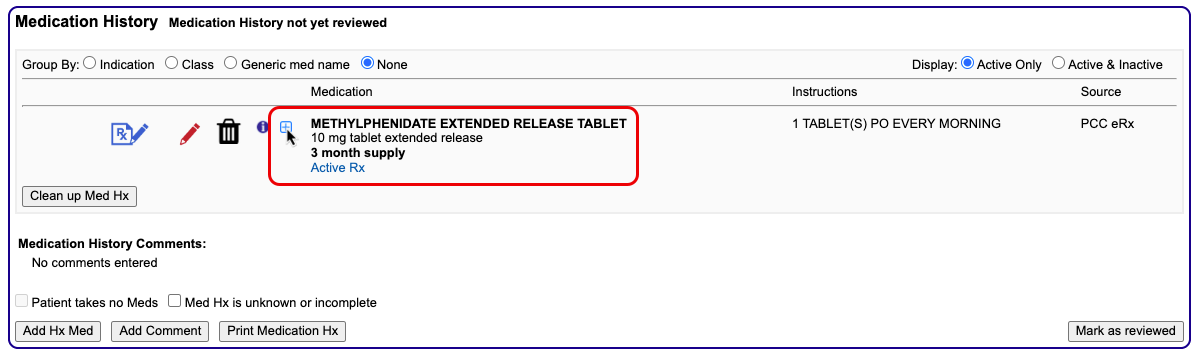
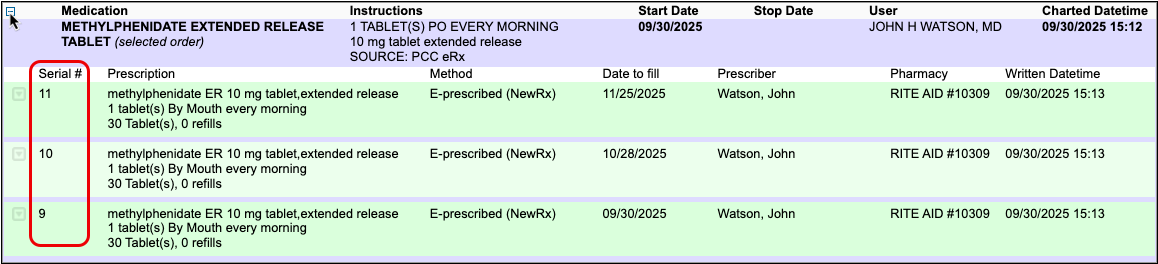
Even though it feels like you are sending one prescription and all three months display as a single entry on the Rx Queue, in the patient’s Medication History, and in their Prescription History, each month’s supply goes to the pharmacy as a separate prescription with unique a serial number.
If you need help troubleshooting issues with a prescription for a multiple-month supply, contact PCC Support.
Prescribe from Favorites
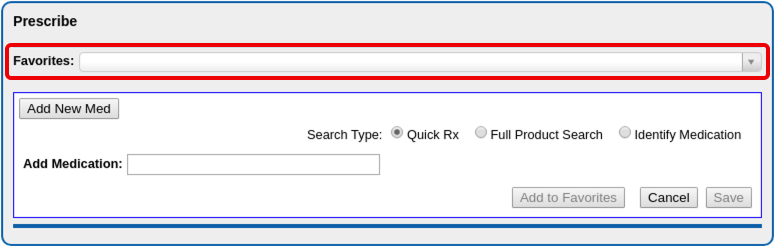
You can save your most common — or trickiest — prescriptions in a personalized “favorites” list for easy future prescribing. Depending on your personal settings in PCC eRx, favorites may display in a searchable drop-down list or as thumbnail tiles in the Prescribe component.
Your favorites also appear at the top of the search results when you search for a product in the Prescribe component.
Select a favorite from the searchable drop-down list, thumbnail tile display, or medication search results to start a prescription. From there you can edit the prescription, save and queue it, or process right away.
For more information about how to prescribe with, create, edit, delete, or manage the display of favorites in PCC eRx, read PCC eRx Prescription Favorites.
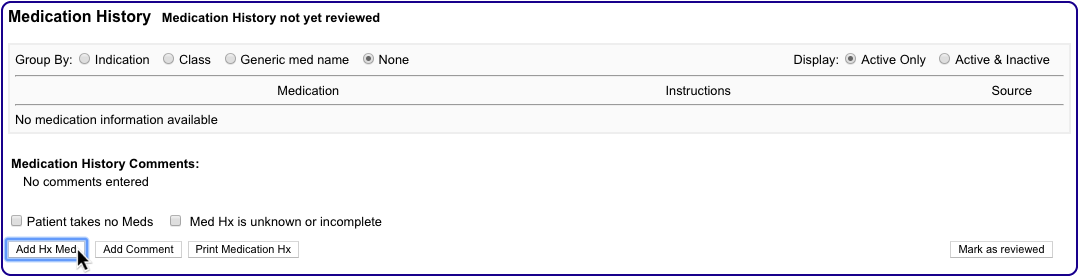
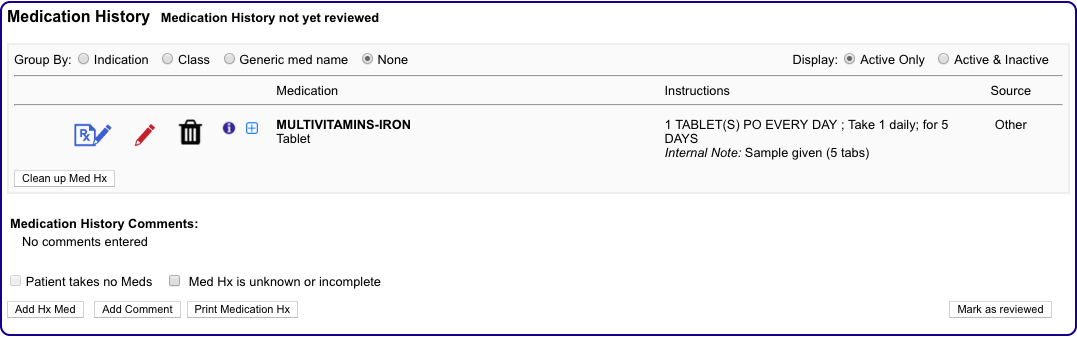
Document Historic, OTC, and Sample Medications
If you provide a sample medication, or a patient reports use of an over-the-counter or historic medication, you can record it directly in the patient’s Medication History.
Click the “Add Hx Med” button to add new entries to the patient’s Medication History.
For more information about adding historical medications in PCC eRx, read the Medication History article.
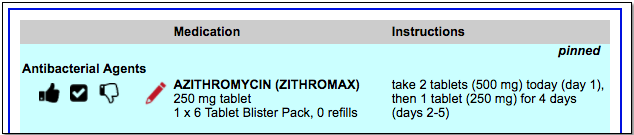
Create a Taper or Loading Dose
When you want to prescribe a taper or loading dose, search for the medication and select a dosing statement that includes the base strength you wish to prescribe.
Select the dosing statement that most closely resembles how you want the patient to take the medication.
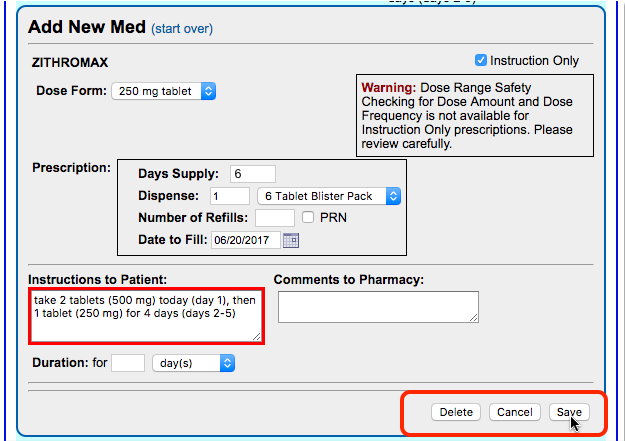
If you see no dosing statements that match your instructions for the patient, pick any statement and then select “Instruction Only”.

The “Instruction Only” option lets you write your own dosing instructions for the patient instead of requiring you to use the standard fields for quantity, route, and frequency. Note that you must indicate a dose form on instruction-only prescriptions so the pharmacy knows what medication strength to dispense.
Verify Dispense Quantity Before Processing Instruction-Only Prescriptions: Because instruction-only prescriptions allow you to bypass certain fields that are used to auto-calculate a dispense quantity and form, PCC recommends that prescribers double-check that the total dispense quantity of instruction-only prescriptions is sufficient for their intended use.
Reduced Safety Checking for Instruction-Only Prescriptions: Because instruction-only prescriptions allow you to bypass certain fields that are used for safety checking, they cannot trigger all forms of safety alerts. For example, instruction-only prescriptions are subjected to allergy and duplicate therapy checks, but cannot trigger dose range warnings.
Save Common Instructions as Snap Text: You can save common taper or loading dose instructions as snap text, then add them to the Instructions to Patient box on prescriptions by typing a shortcut. Learn how.
Prescribe Compounds
When you want to prescribe a compound, start by searching for it by name in the medication search.
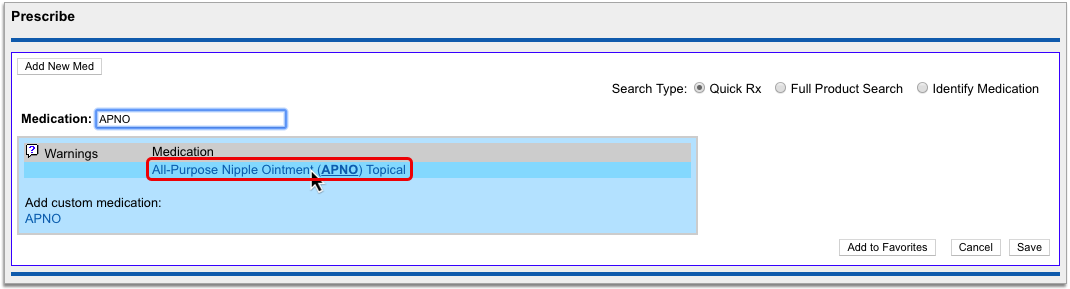
Your PCC system has standard entries for All-Purpose Nipple Ointment (APNO) and Magic Mouthwash. These entries contain itemized lists of ingredients and their ratios, each of which undergoes safety checking when you prescribe.
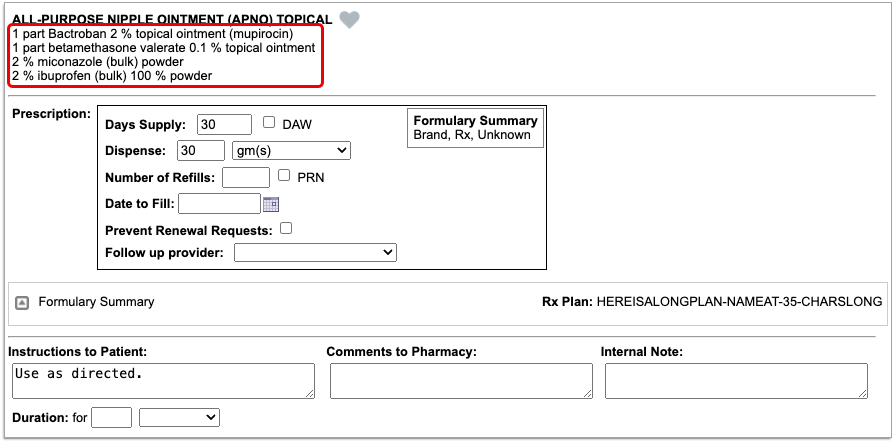
Standard compound entries may be e-prescribed just like any other medication.
If you wish to change the “recipe” of a standard compound entry or request that a new compound be added to your PCC system, contact PCC Support.
Optionally Create Compounds as Custom Medication Items: You can optionally configure compounds on your PCC system using the custom medication option. While this approach works, it only allows you to create instruction-only prescriptions for compounds, which can be e-prescribed but do not trigger all forms of safety alerts. You can learn more about custom medication items in PCC eRx by reading Create Custom Medication Items in PCC eRx.
Renew Prescriptions
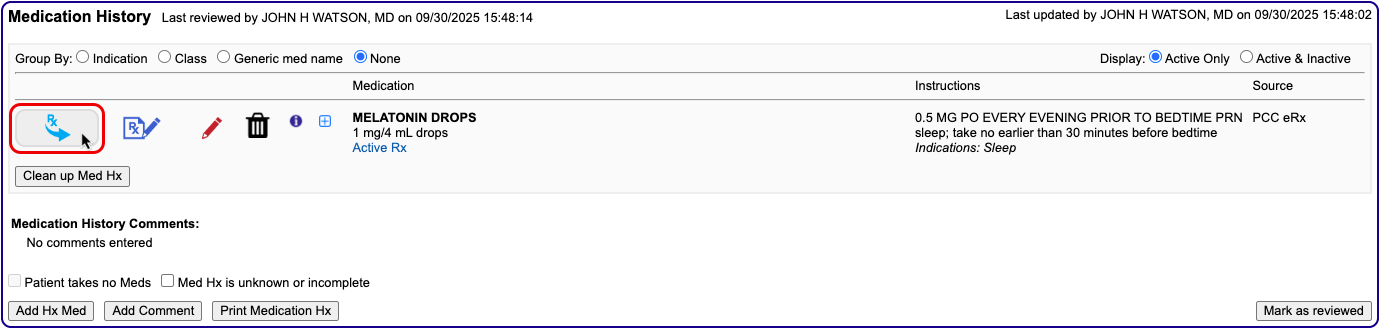
When a patient is out of refills for a prescription, you can renew it from the Prescription History or Medication History component in PCC eRx.
Open the PCC eRx section of the patient’s chart. If the patient does not have a visit, phone note, or portal message today, create an eRx encounter from the drop down.
In the patient’s Prescription History or Medication History, find the prescription that needs to be renewed then click the “blue swish” icon to prepare and queue it for processing.
If your Renewal Workflow in My Settings is set to “Open the renewal in an edit window, where I can optionally modify it and send it immediately”, the blue swish icon opens the renewal for editing, where you can process it immediately using the “Process Now” button.
Once you prepare the renewal, process it as you would any prescription.
You can also renew prescriptions by responding to renewal requests from pharmacies on the Rx Queue. Pharmacies most commonly send renewal requests when patients try to fill prescriptions that have no more refills.
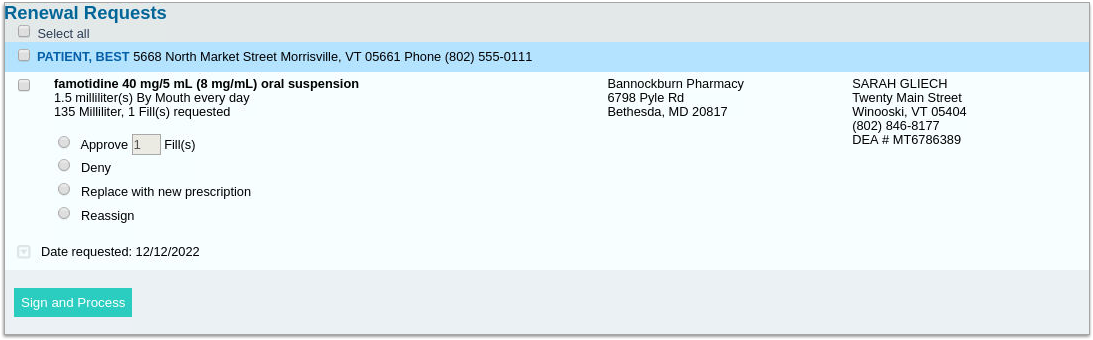
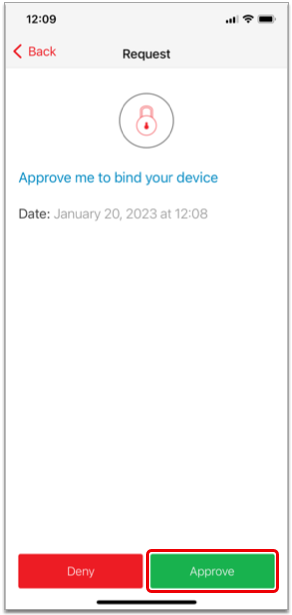
You can take different actions in response to a renewal request, such as approving it as written with a number of refills, denying it, replacing it with new prescriptions, or reassigning it to a different prescriber.
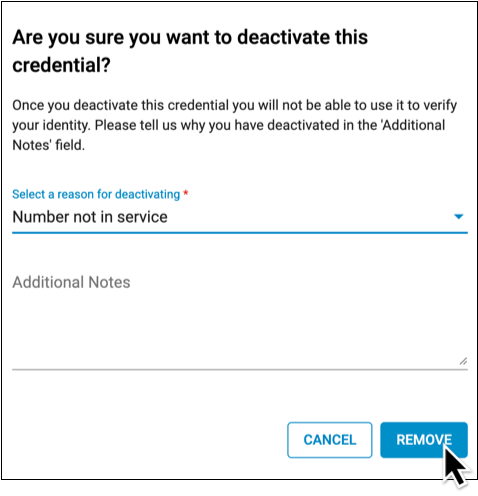
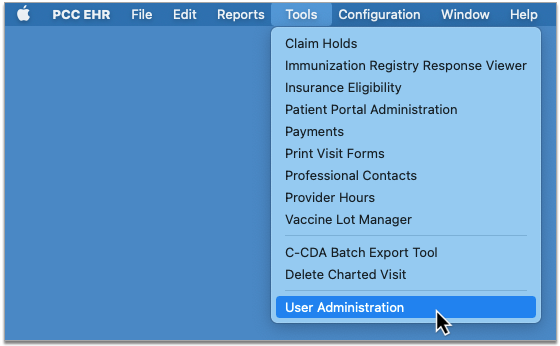
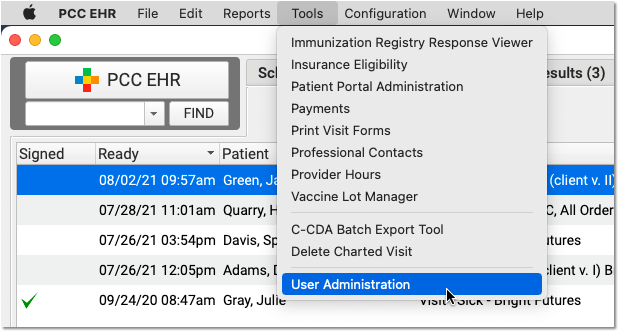
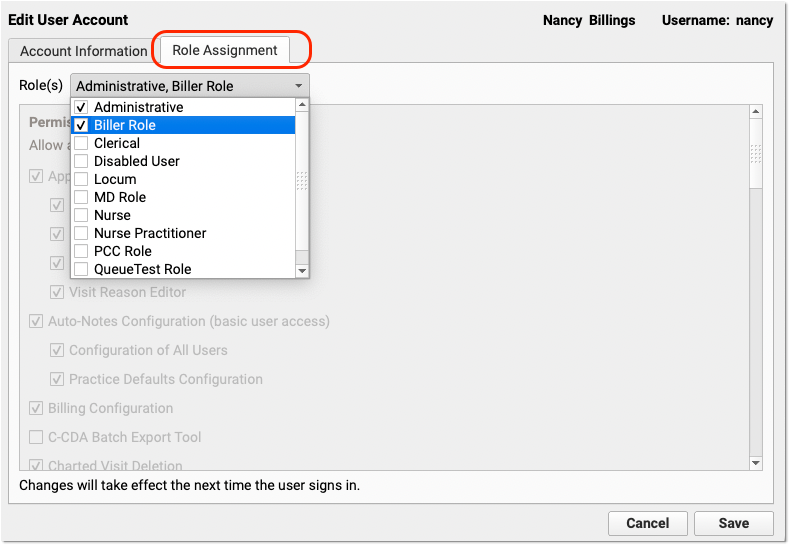
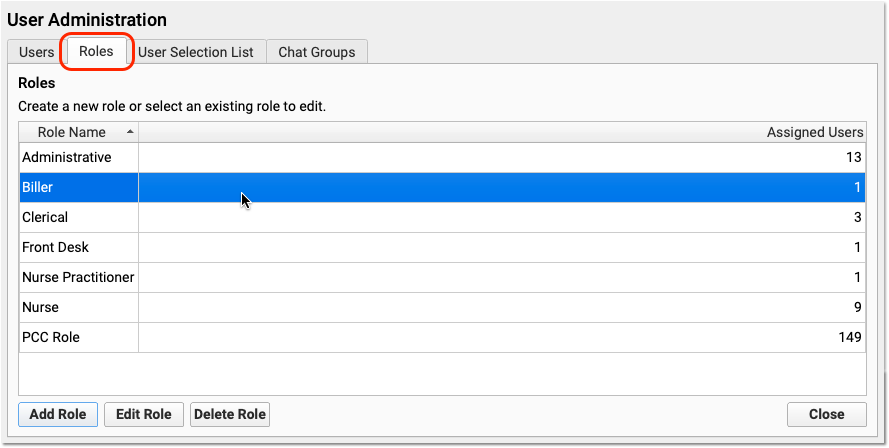
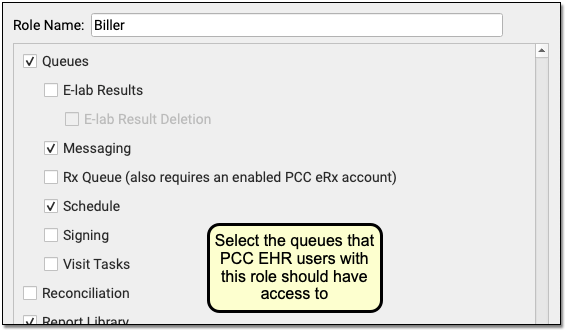
Enable or Disable Renewal Requests: You will only receive renewal requests from pharmacies if the renewal request service is enabled for your user account. Someone at your practice with User Administration privileges in PCC EHR may enable or disable the renewal request service for your account in the User Administration tool.
Choose Your Renewal Workflow: You can choose whether the “Renew Prescription” icon opens renewals in an edit window or immediately queues them for sending. Configure your Renewal Workflow in the Renew Prescriptions section of the My Settings page.
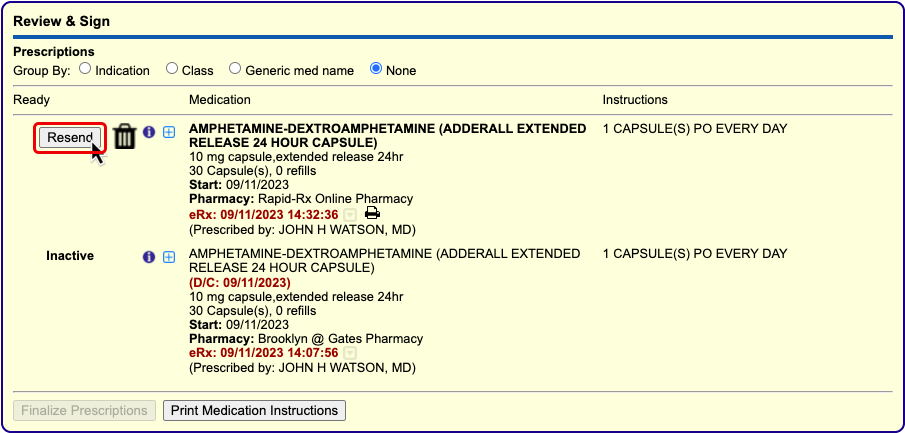
Resend a Prescription
For seven calendar days after you send a prescription, you can resend it to a different pharmacy, or to the same pharmacy with different details.
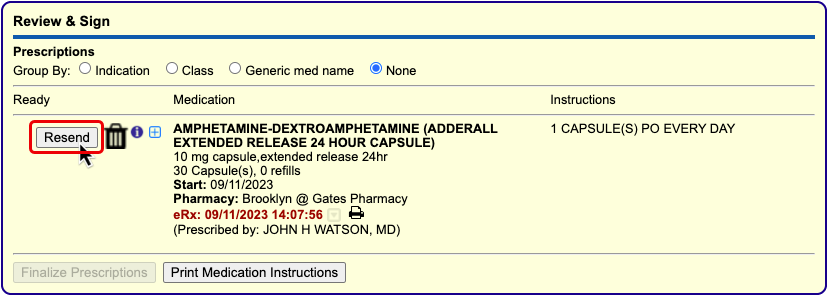
PCC eRx sends a cancellation to the pharmacy for the original prescription when you resend a new version.
The “Resend” button is sensitive to each user’s PCC eRx role and permissions. Only Providers, Mid-Level Providers, and Provider Agents may resend prescriptions for legend drugs. Only Providers and Mid-Level Providers who are registered for EPCS may resend prescriptions for controlled substances. Anyone with permission to prepare and save a pending prescription can queue up a resend for a prescriber’s approval.
To learn more and see it in action, visit Resend a Prescription.
Send Prescriptions to Multiple Different Pharmacies
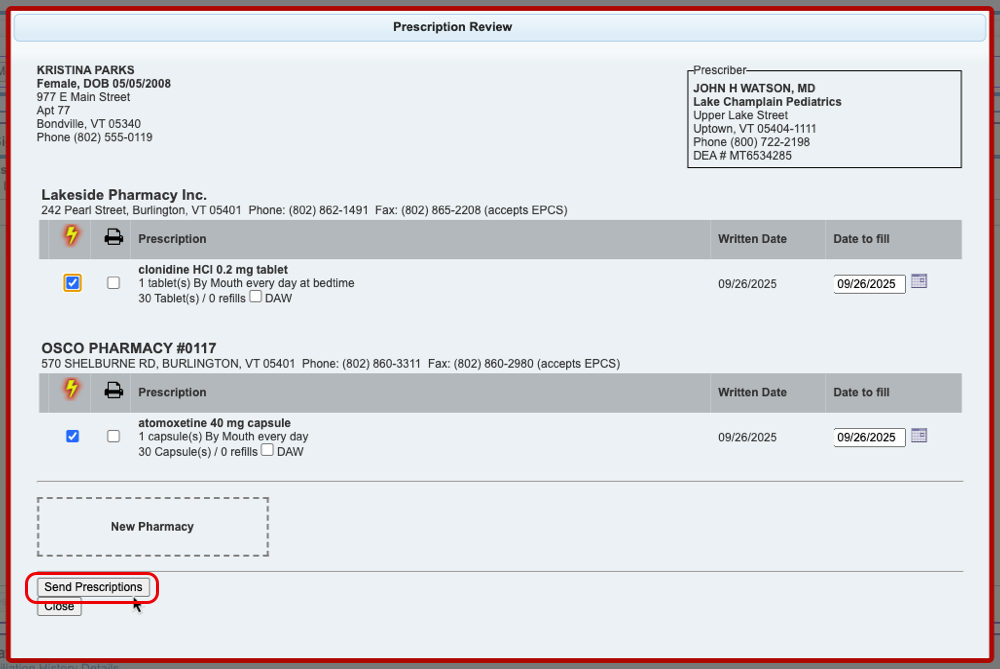
You can prescribe to several pharmacies at once when you finalize pending prescriptions from the Review & Sign component of a patient’s visit, phone note, or portal message in PCC eRx.
Go to the Review & Sign component and click “Finalize Prescriptions”.
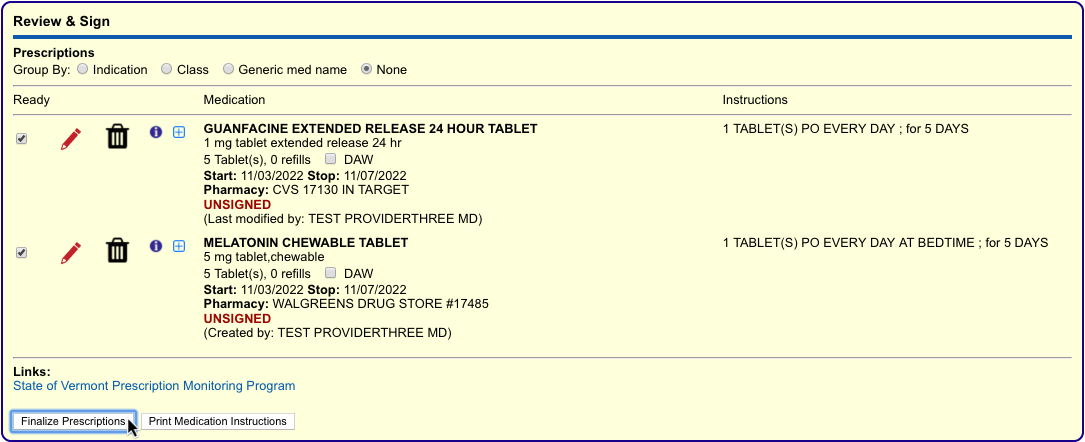
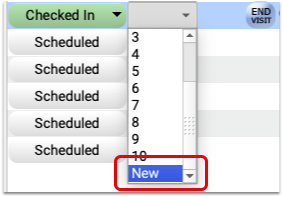
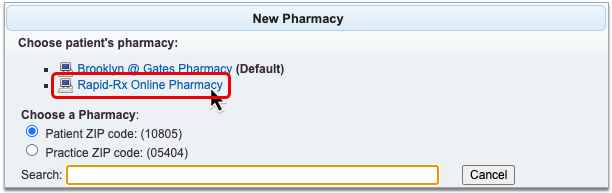
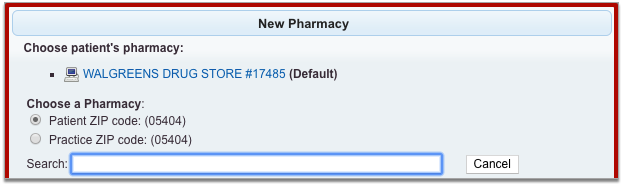
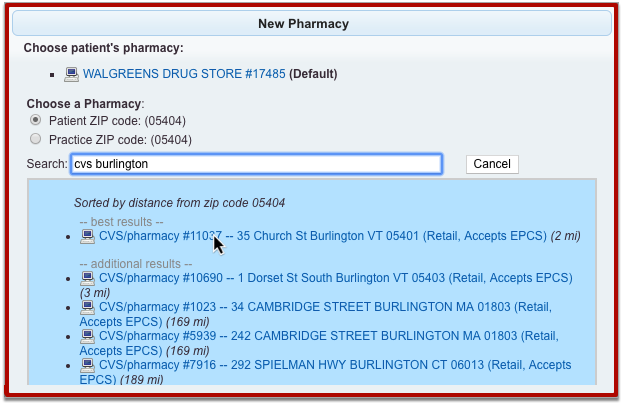
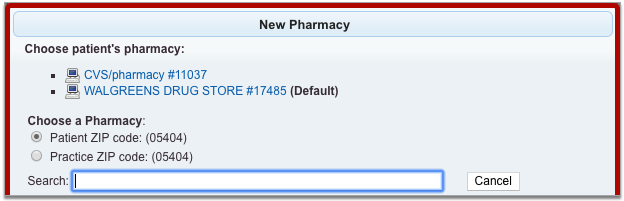
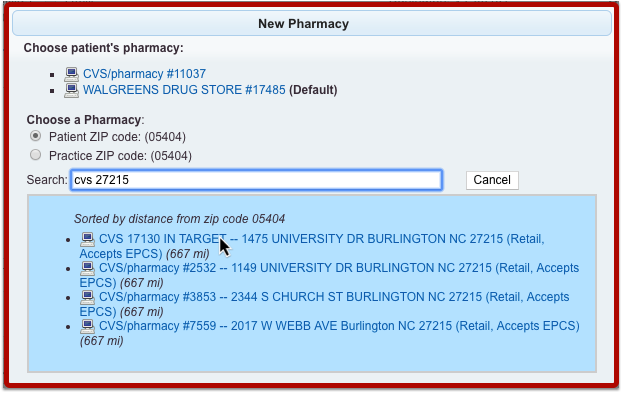
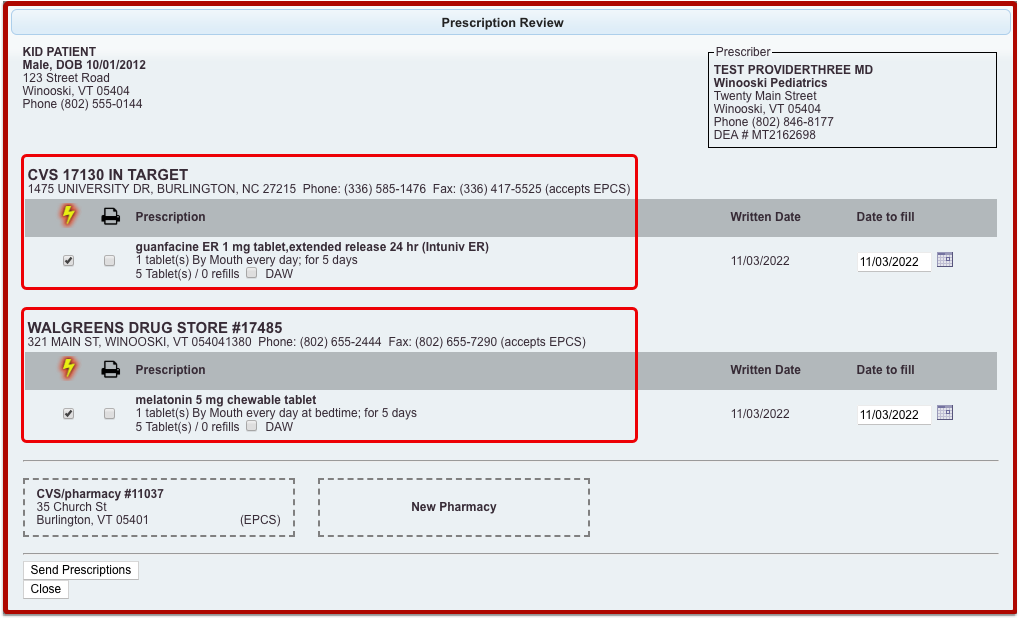
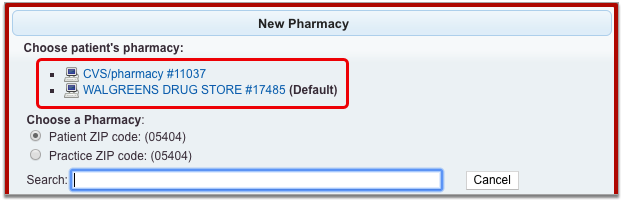
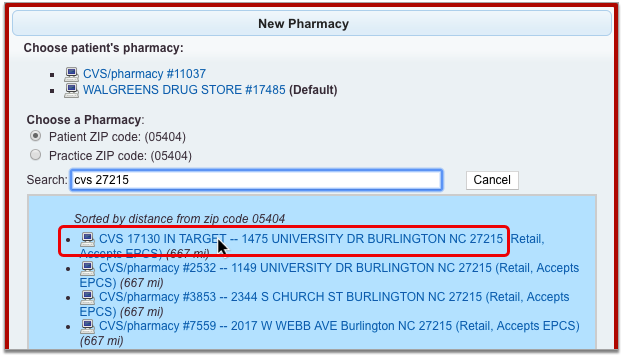
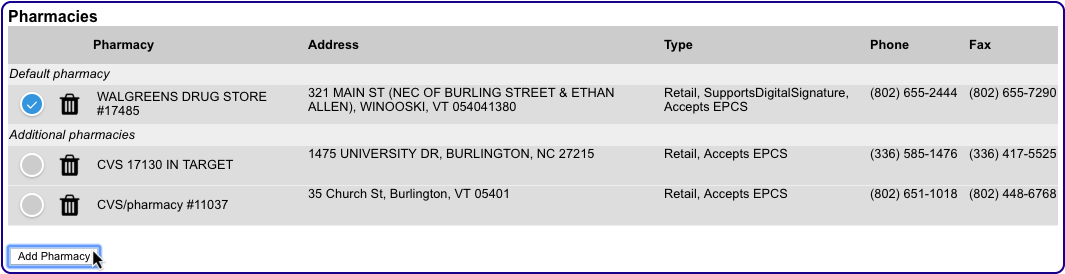
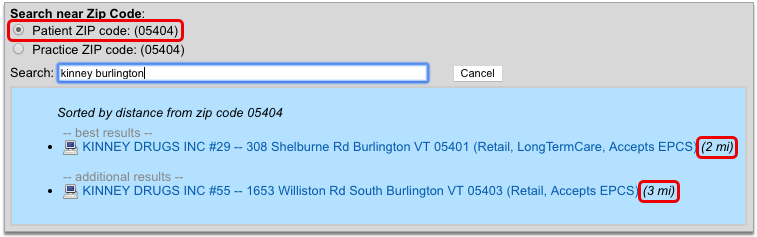
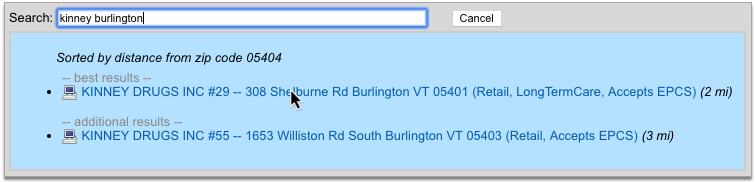
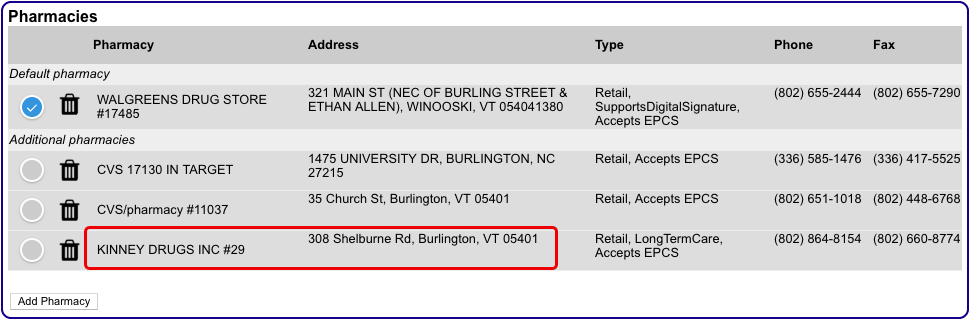
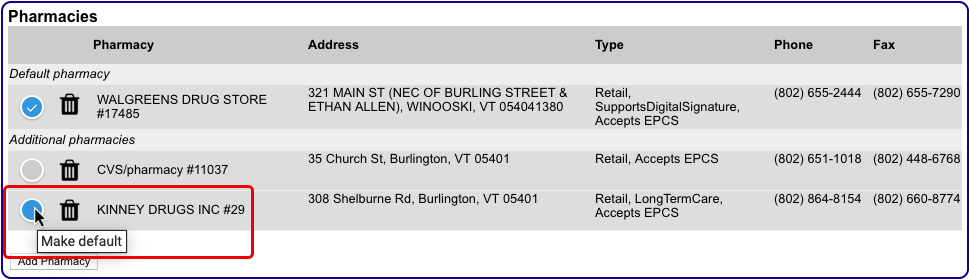
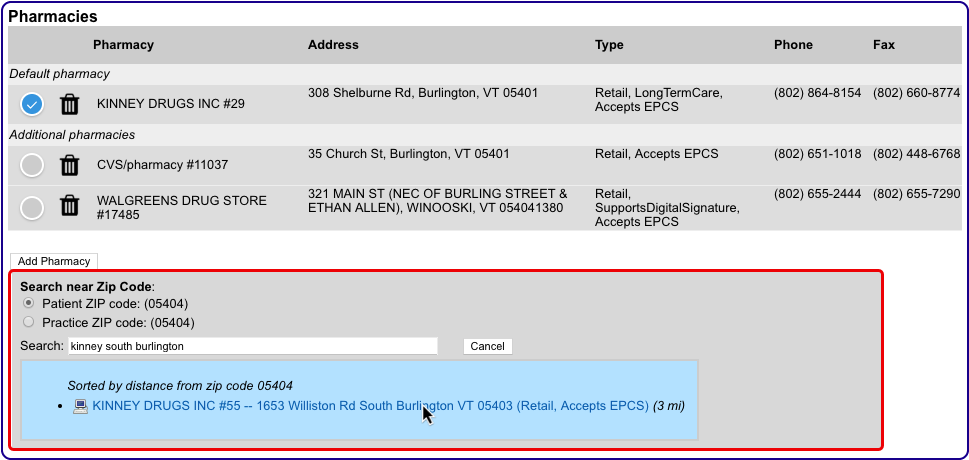
The Prescription Review window lists the patient’s pending prescriptions and the current pharmacy for each. At the bottom of the window you can see the patient’s other saved pharmacies and the option to add a new pharmacy.
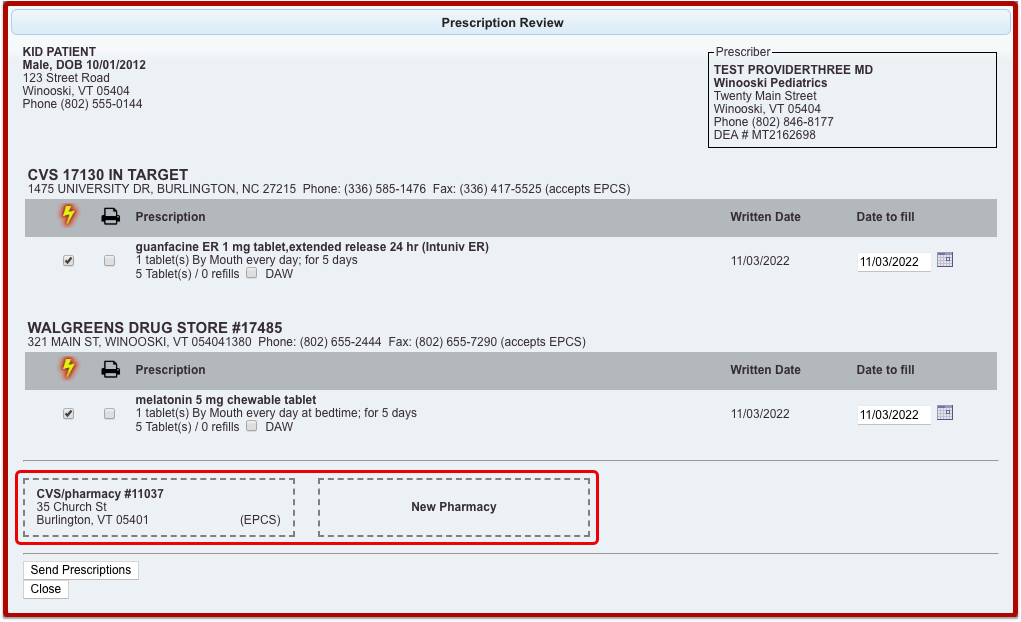
You can pair prescriptions and pharmacies, or exchange one pharmacy for another, by dragging the screen elements together. When a yellow highlight appears, release your mouse cursor to complete the pairing or exchange.
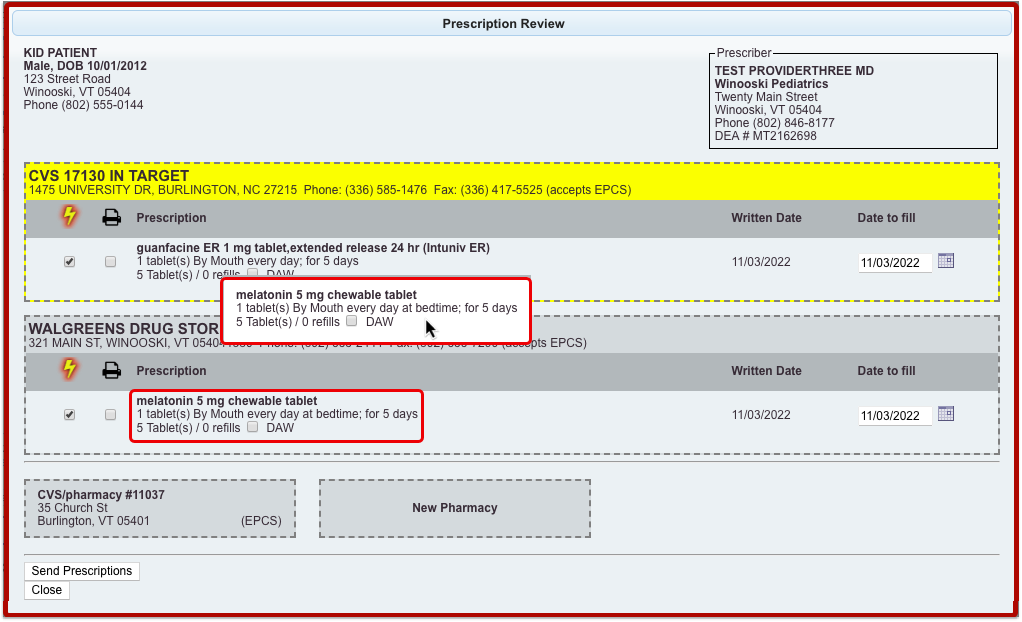
Once paired, prescriptions and pharmacies display together. Each prescription may only be paired with one pharmacy.
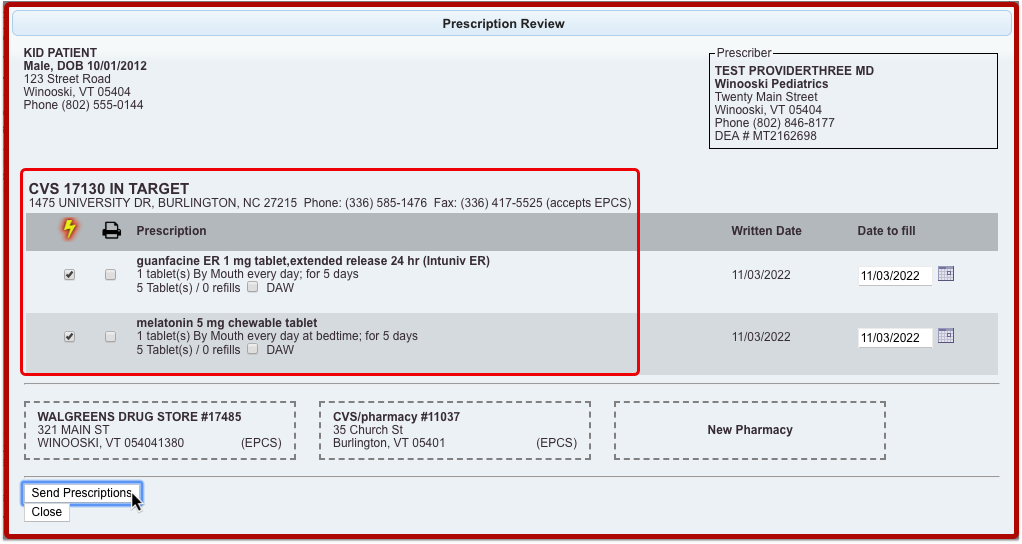
When all prescriptions have been paired with the correct pharmacy, click “Send Prescriptions” to process all of them at once.
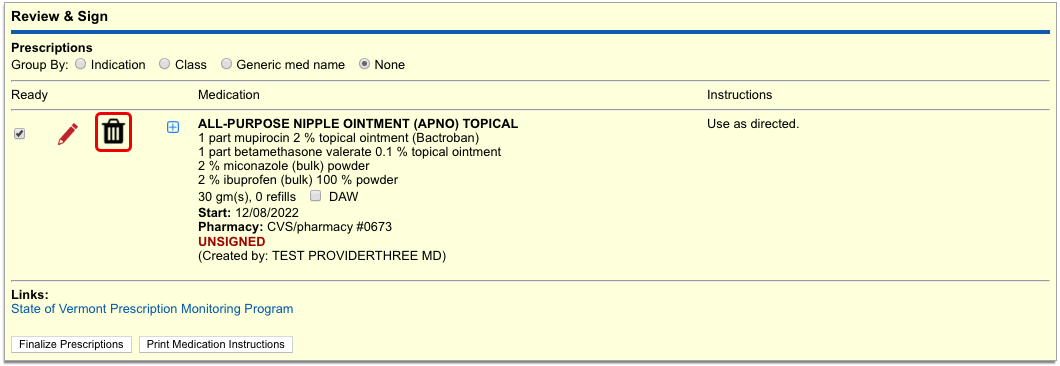
Delete Pending Prescriptions
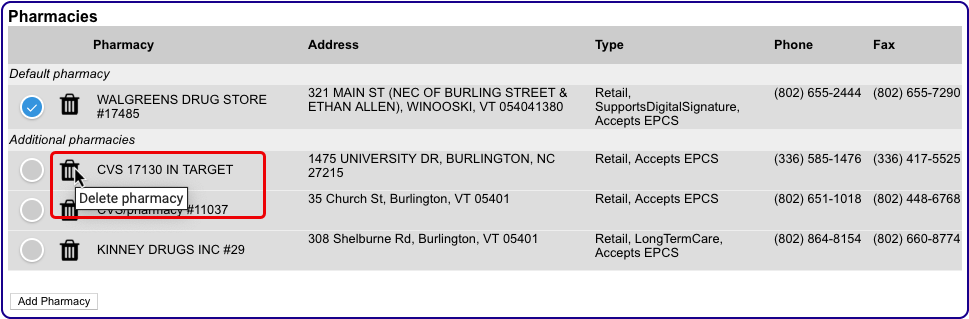
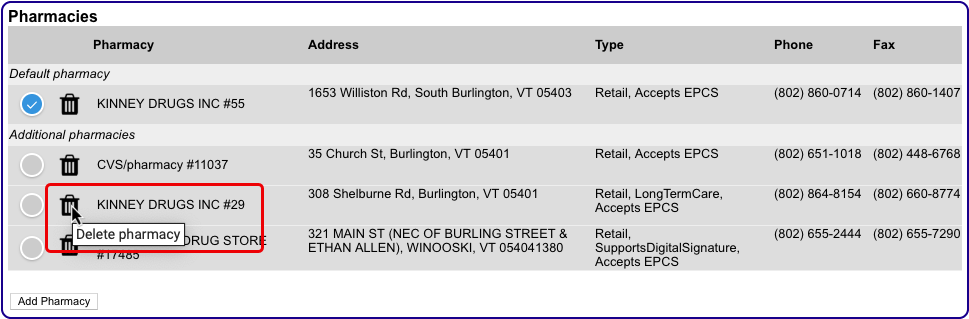
You can delete pending prescriptions from several places in PCC eRx before they get printed or sent to the pharmacy.
Pending prescriptions save into the Review & Sign component in PCC eRx within the patient’s visit.
You can also find them on the Rx Queue in PCC EHR.
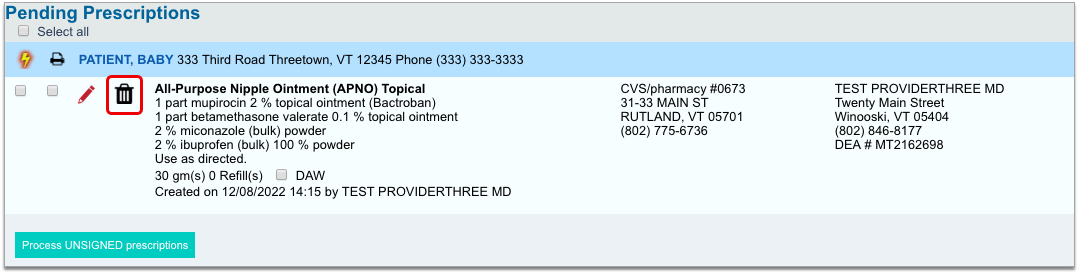
In either place, click the trash can icon beside the prescription to delete it. When you delete a pending prescription, its details do not enter the patient’s medication or prescription histories, nor do they display in the Prescriptions component of the patient’s visit, phone note, or portal message.
Information about deleted pending prescriptions is available in the Rx Audits section of the Rx Logs in PCC eRx. If you need help researching a deleted pending prescription, contact PCC Support.
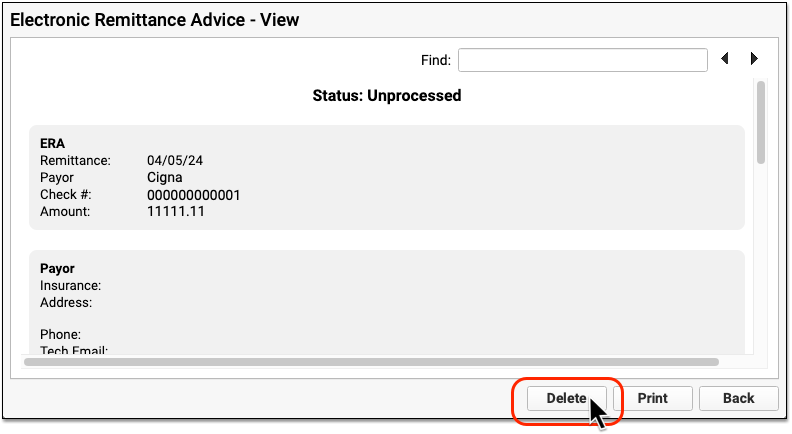
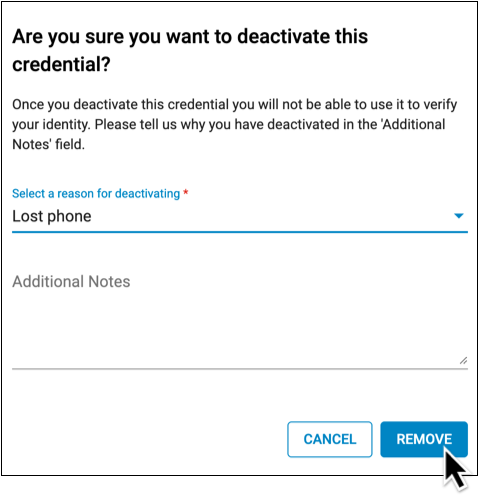
Delete and Cancel Prescriptions that Were Sent or Printed in Error
In PCC eRx, you can delete and cancel prescriptions that were sent or printed in error.
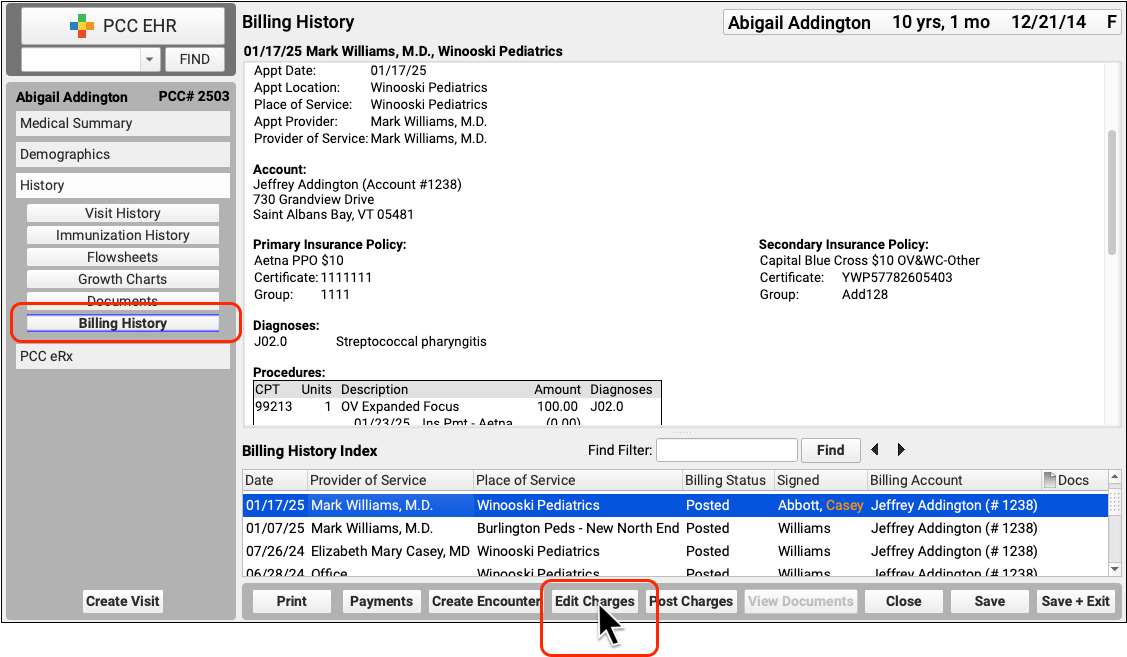
In the patient’s Visit History, find and open the encounter where the medication was prescribed, then click the PCC eRx button.
Jump to the Review & Sign section, then click the trash can icon beside the prescription that was sent or printed in error. If the prescription has passed its stop date, you will not be able to delete it.
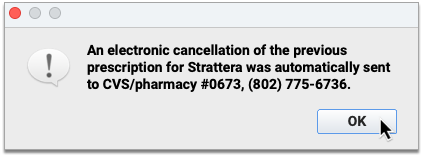
When you delete an electronic prescription, PCC eRx automatically sends a cancellation to the pharmacy and notifies you that a cancellation has been sent. The notification includes the pharmacy’s phone number in case you want to follow up with a phone call.
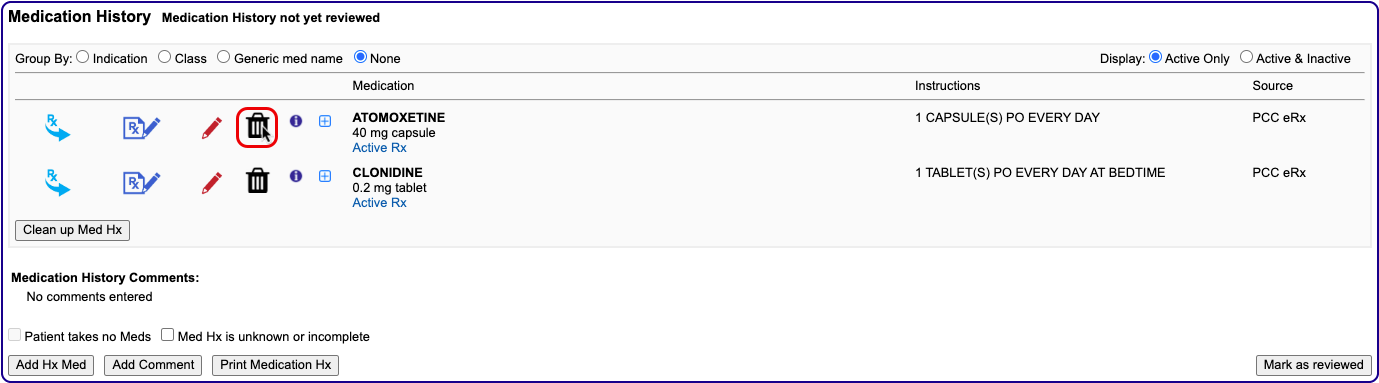
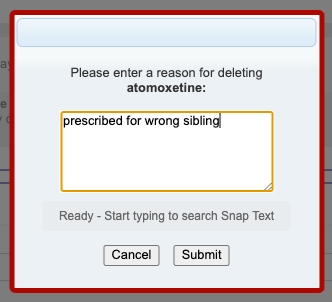
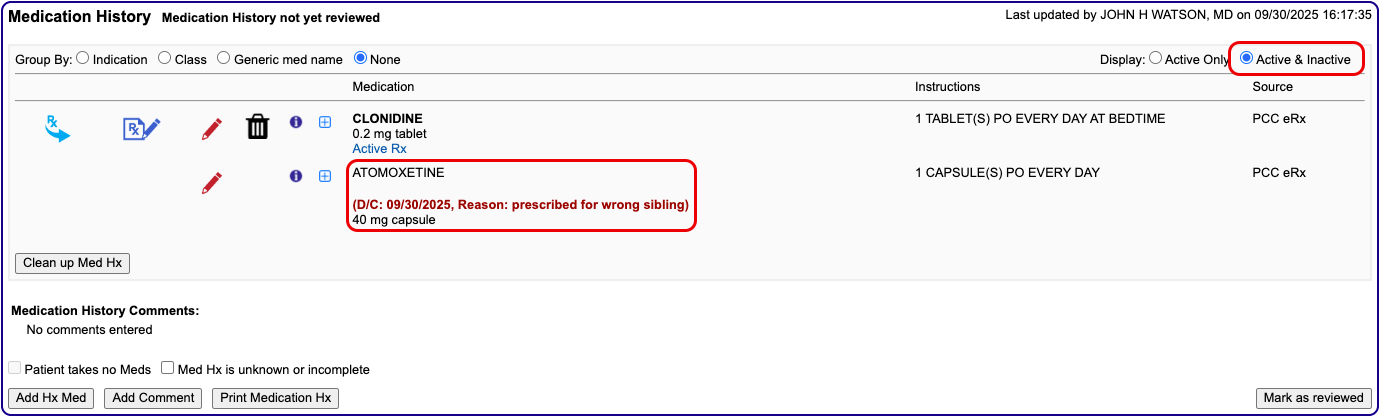
Deleted prescriptions get removed from the Review & Sign component and the patient’s Prescription History, but the medication remains active in the patient’s Medication History. You can delete the medication from the patient’s history by clicking the trash can icon beside it and recording a reason for deletion.
Deleted medications and their reasons for deletion appear in the inactive section of the patient’s Medication History.
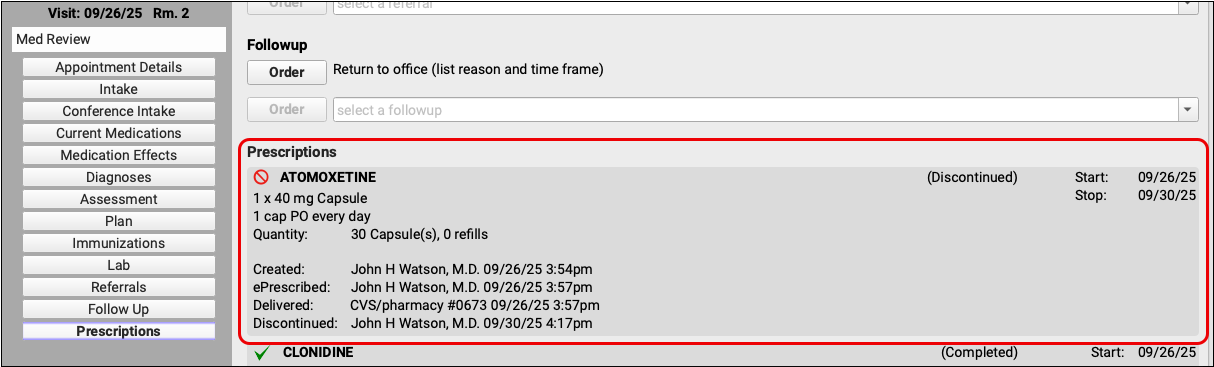
For maximum transparency, prescriptions deleted in this manner continue to appear in the Prescriptions component of the patient’s encounter note in PCC EHR, albeit with an updated status indicating that they have been discontinued.
Learn More About Medication History: To learn more about how to work in patients’ Medication History, read Review and Update Medication History.
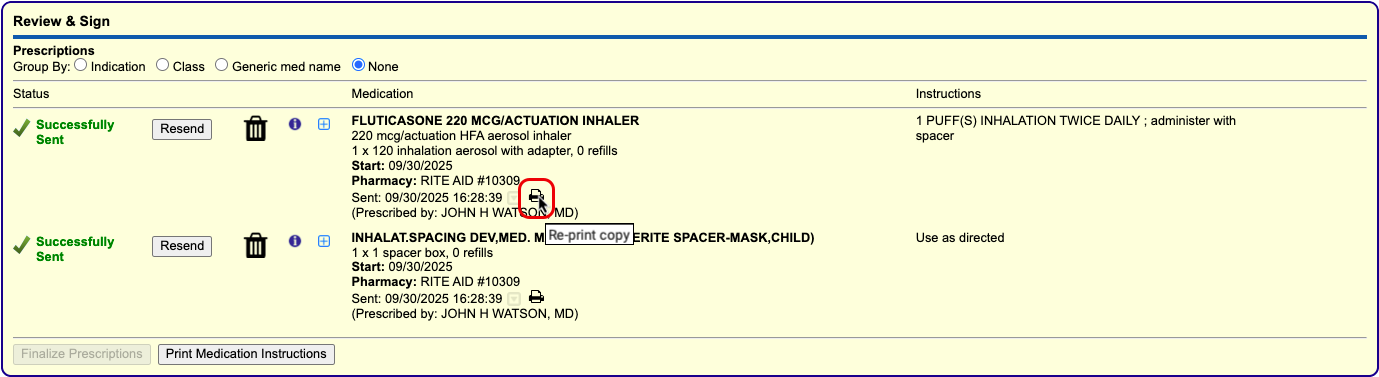
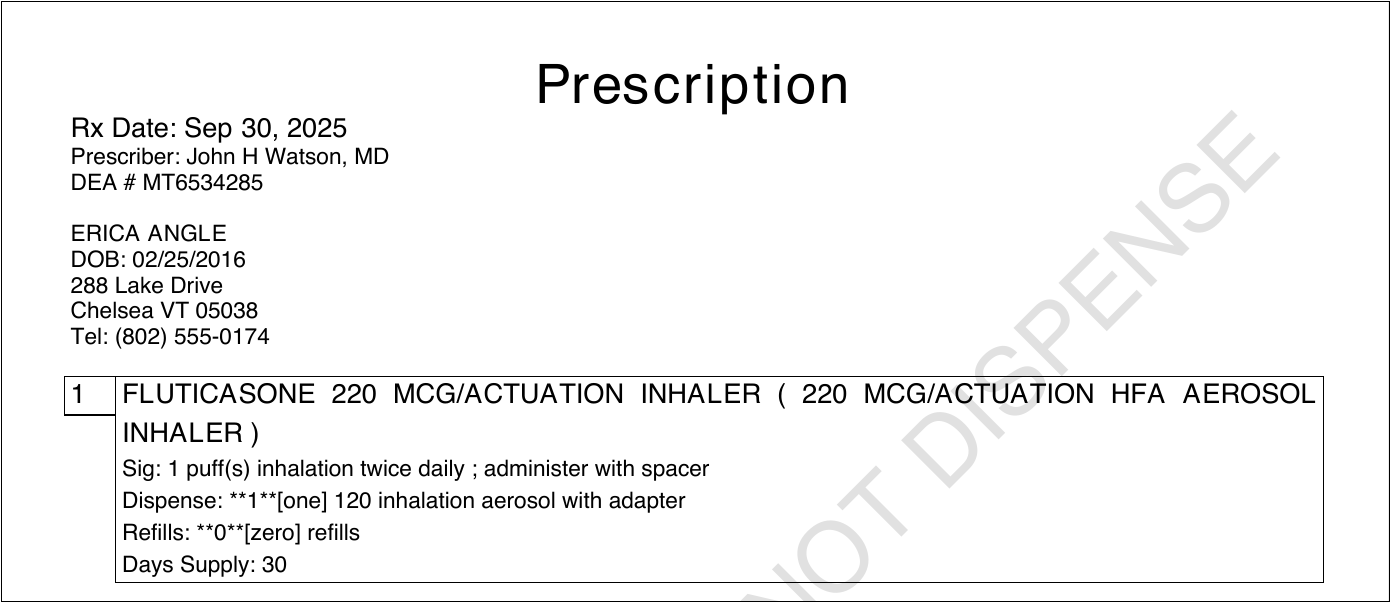
Reprint Prescriptions
You can print void and original copies of processed prescriptions from the Review & Sign component in PCC eRx.
Click the printer icon beside any processed prescription to print a void copy of it for documentation purposes.
Void copies are watermarked with the words DO NOT DISPENSE so that they cannot be used at a pharmacy.
To reprint an original copy of a prescription for a non-controlled substance, hover over the printer icon in Review & Sign and click the secondary icon that appears beside it.
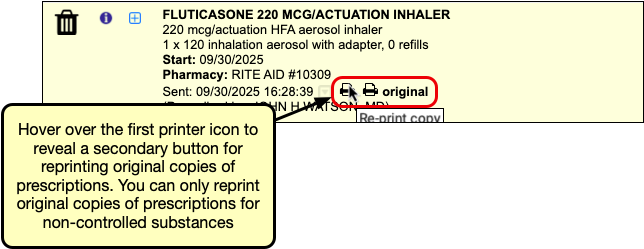
Original copies may be used at a pharmacy to fill the prescription. There is no way to reprint an original prescription for a controlled substance.
In addition to the Review & Sign component, you may also print void copies of processed prescriptions from a patient’s Prescription History.

It is not possible to print original copies of processed prescriptions from the Prescription History component.
Available Where Printing Is Enabled: Local regulations dictate whether prescription printing may be enabled for your practice. The ability to print copies is only available at practices where printing is generally enabled.
Respond to Pharmacy Change Requests
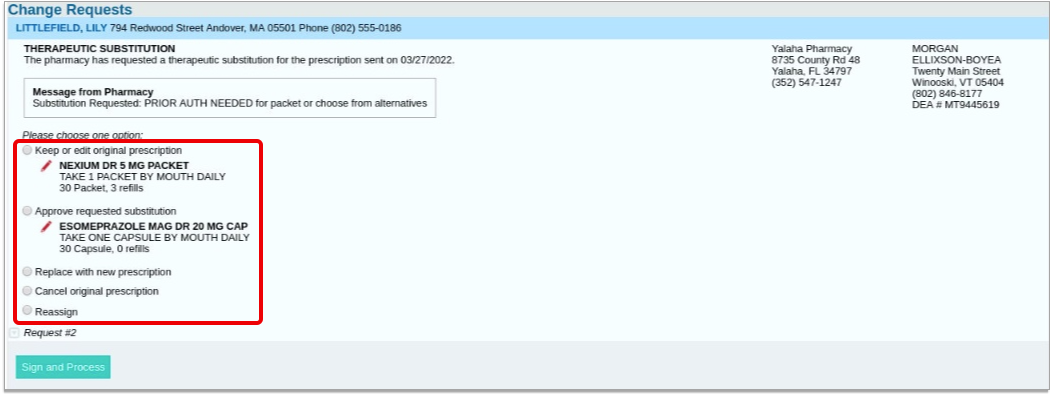
Change requests are electronic messages that pharmacies use to request script clarifications, generic substitutions, therapeutic interchanges, drug use evaluations, or confirmation of a prescribers’ credentials. Pharmacies can also use change requests to notify you when a medication requires prior authorization or is out of stock.
If you have Mid-Level or Provider permissions in PCC eRx, you can optionally enable the change request service for your account.
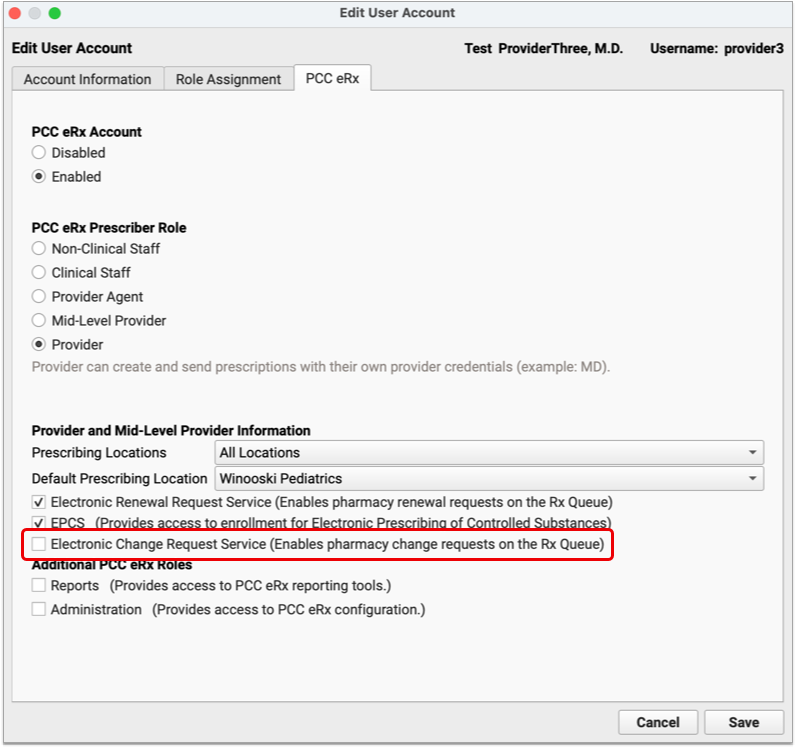
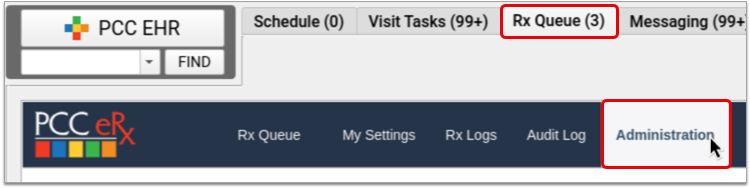
When enabled for your account, change requests sent in response to your prescriptions appear on the Rx Queue in PCC EHR alongside pending prescriptions and renewal requests.
There are five standard response options for change requests:
-
Keep or Edit Original Prescription: Keep or edit the prescription you originally wrote, then send that in response to the change request.
-
Approve Requested Substitution: Approve the substitution suggested by the pharmacy, either as written or with edits.
-
Replace with New Prescription: Start a new prescription from scratch to replace the original.
-
Cancel Original Prescription: Notify the pharmacy that you want to cancel the original prescription.
-
Reassign: Reassign the change request to a different provider at your practice.
The prescription you send in response to the change request is what the patient will be able to fill. If your response to a change requests is a prescription for a controlled substance, you must enter your EPCS credentials in order to finish processing and sending it.
Prescribe Outside a Visit
You can prescribe from a phone note or portal message in PCC EHR, or create a dedicated eRx encounter if the patient has no other encounter with which to associate a prescription.
To prescribe from a phone note or portal message, open it in PCC EHR, then click the PCC eRx button to access prescribing functions.
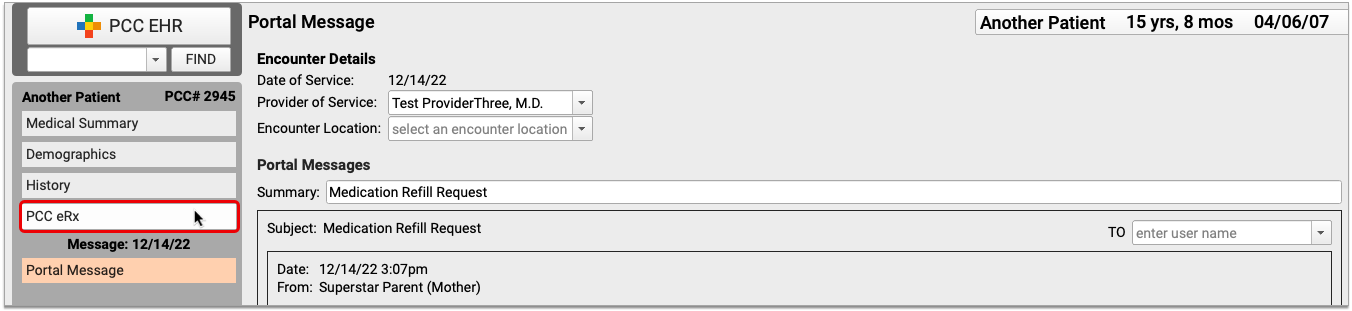
If the patient has no visit, phone note, or portal message on the date you wish to prescribe, you can create an eRx encounter instead. Open the patient’s chart, click the PCC eRx button, and select “Start an eRx Encounter” from the drop-down.
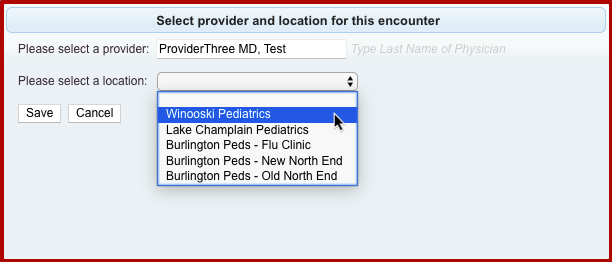
Once in PCC eRx, you can prescribe normally. If there is no encounter location recorded in the phone note or portal message, or you are working in an eRx encounter, PCC eRx will prompt you to select a prescribing location for your prescriptions.
You may also be prompted to select a provider for the encounter.
View and Manage E-Prescribing Errors
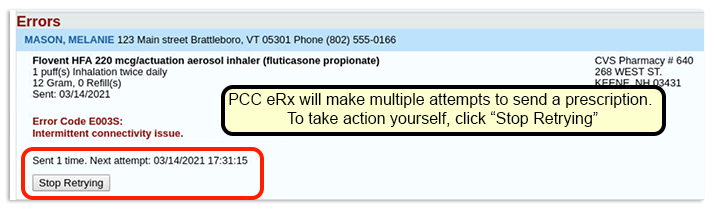
Prescription transmission errors can occur when the pharmacy’s system is down, or when Surescripts, the entity that manages the communication between pharmacies and PCC EHR, is unable to process your prescriptions. These transmission issues can prevent prescriptions from reaching the pharmacy. When that happens, PCC eRx displays errors at the top of the Rx Task Queue.
After encountering an error, PCC makes multiple attempts to send a prescription. If you’d like PCC to stop trying to send the prescription so you can take action yourself, click “Stop Retrying” to end the process.
When a prescription fails to send (or when you tell PCC eRx to stop retrying), you can take one of three actions:
- Select “Keep” to indicate that you’ve called the pharmacy and resolved the issue.
- Select “Delete” to delete the prescription.
- Select “Print” to print the prescription to give to the patient or fax to the pharmacy.
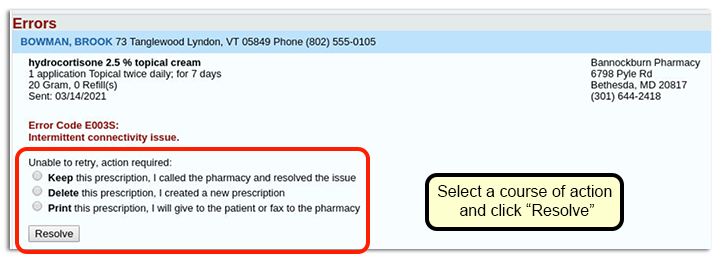
Once you make a selection, click “Resolve” to remove the prescription from the queue.
Transmission errors also appear in the Prescription History section of PCC eRx.

View Medication History and Prescribing Activity Beyond PCC eRx
PCC eRx is a special layer within PCC EHR dedicated solely to medications and prescribing. You can view some of the information and activity recorded in PCC eRx in other places on your PCC system, too. This is especially useful if you aren’t a prescriber yourself and you just need to reference a patient’s Medication History or the prescribing activity from a specific encounter.
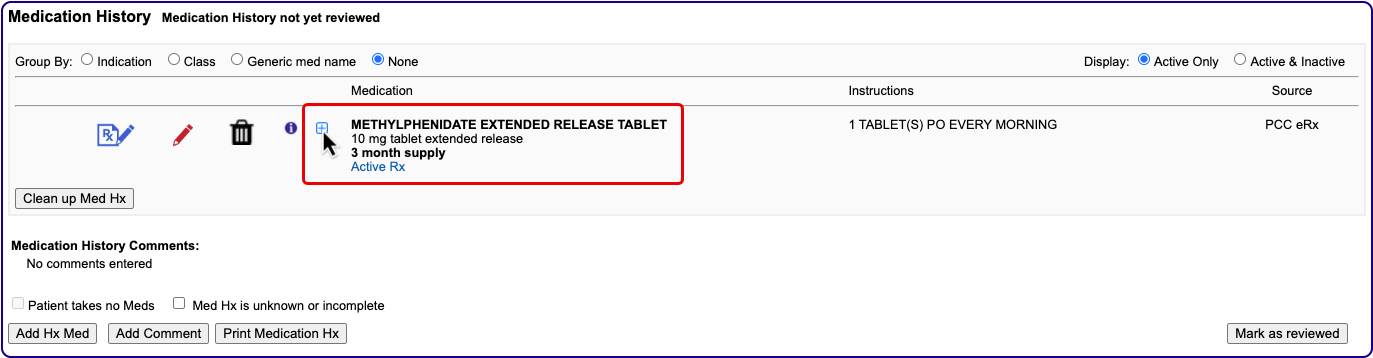
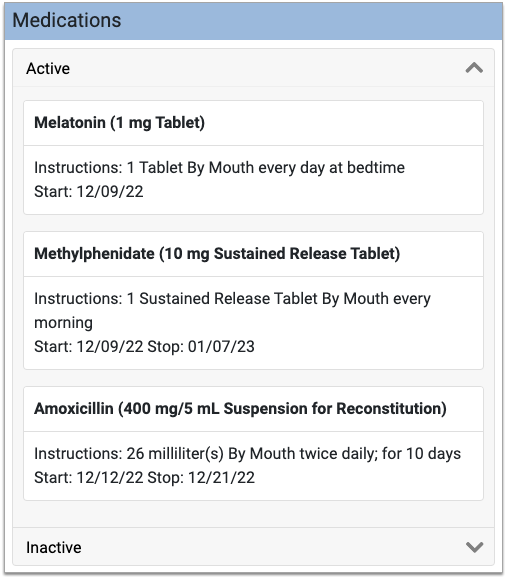
Medication History
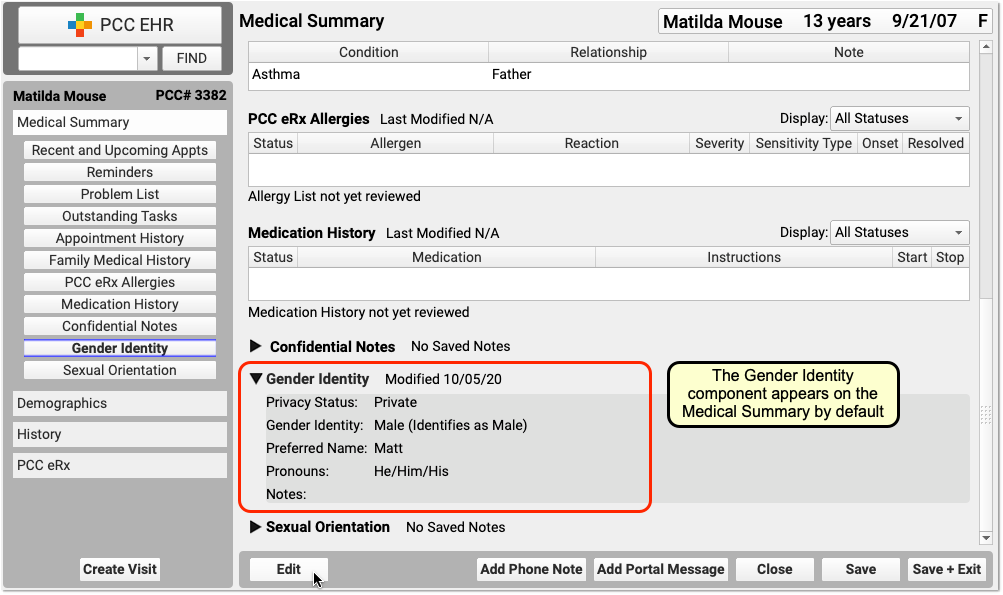
Beyond PCC eRx, you can see a patient’s medication history and when it was most recently marked as reviewed wherever your practice has chosen to show the Medication History component.

Typically, the Medication History component appears in the Medical Summary portion of the patient chart. It can also be configured to appear in visit protocols, phone notes, portal message encounters, the patient check-in screen, and a few other places.
You cannot edit the information in the Medication History component outside of PCC eRx.
If you want patients and their family members to be able to view their active and inactive medications, your practice can reveal this information in the patient portal.
It is not possible to view, save, print, or reprint prescriptions from the patient portal.
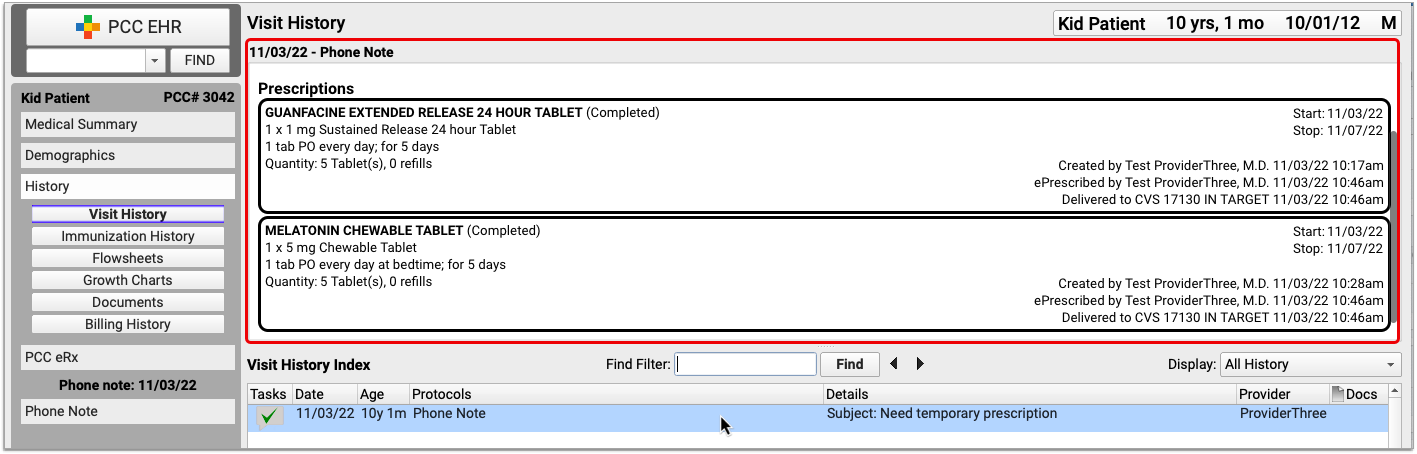
Prescription Activity
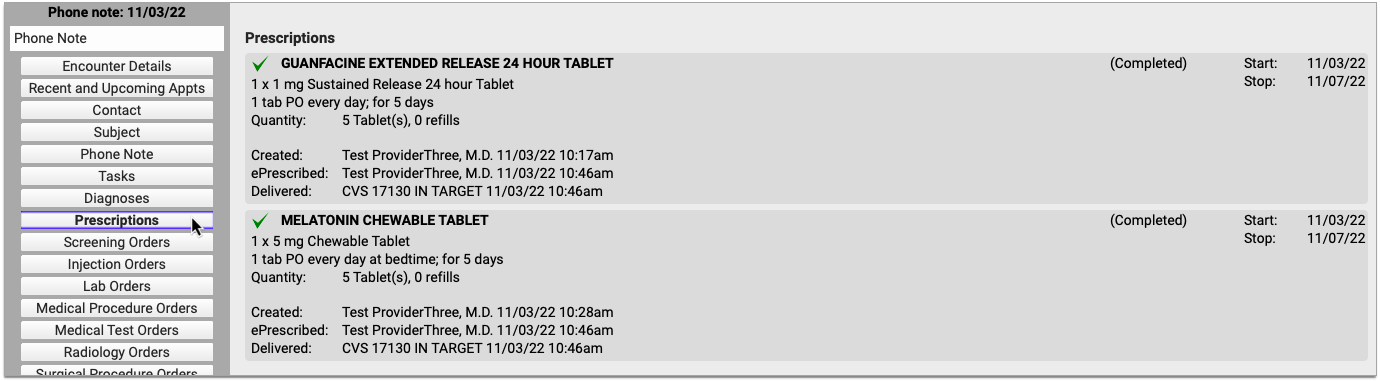
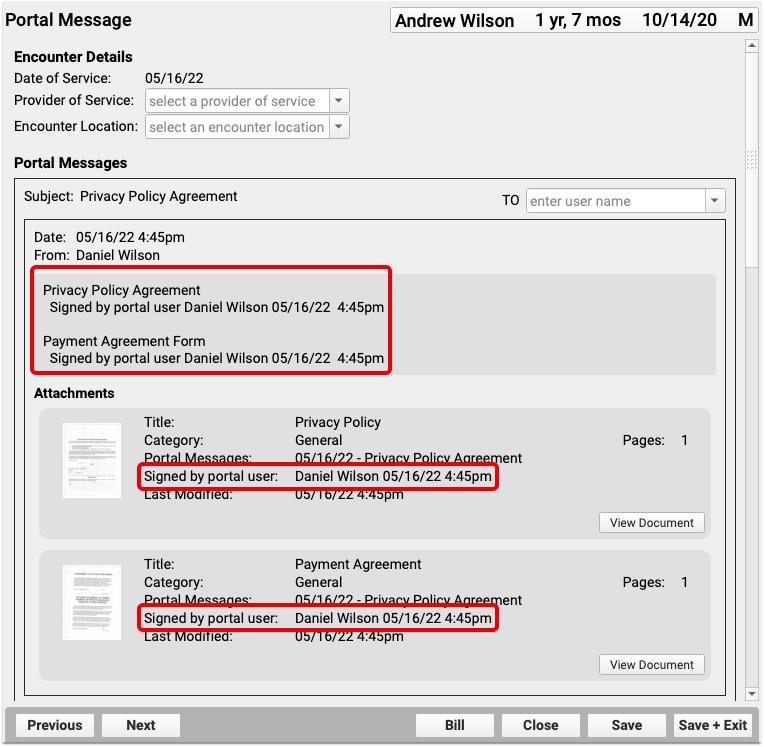
When you prescribe something in PCC eRx, the corresponding encounter note in PCC EHR automatically updates to include a Prescriptions component.
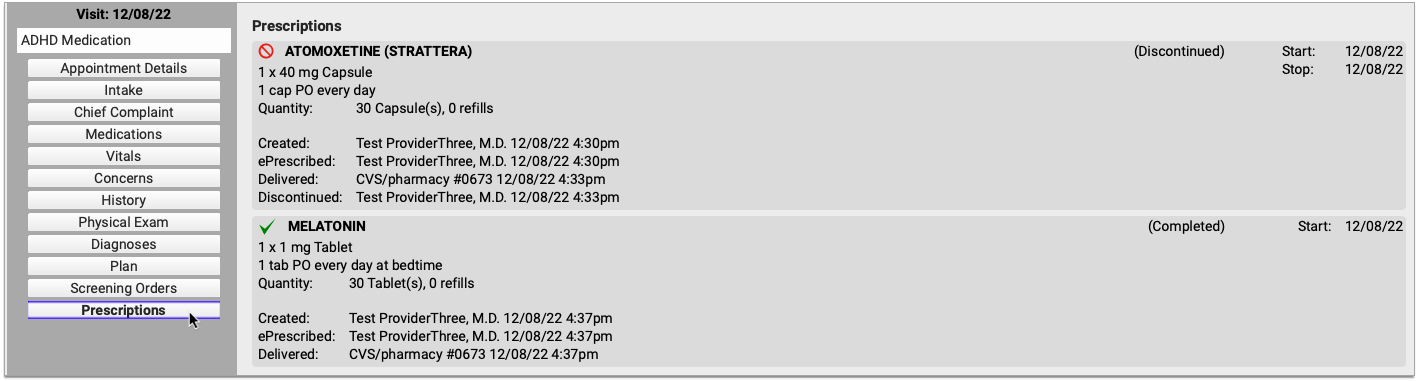
The Prescriptions component shows a read-only view of all prescribing activity connected to that visit, phone note, portal message, or eRx encounter.
Encounter-specific prescription activity, general prescription history, and copies of prescriptions are not available in the patient portal.
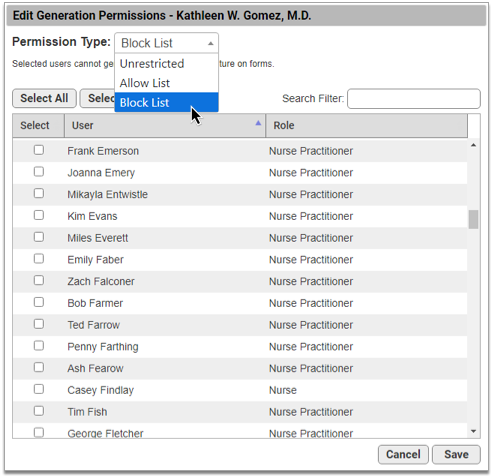
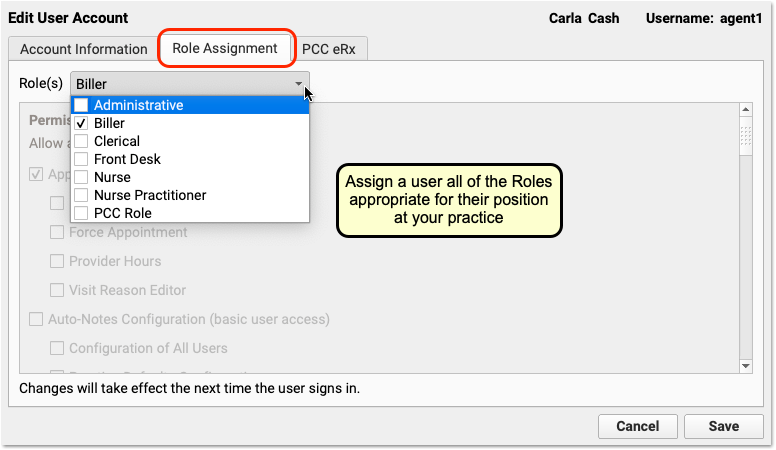
Prescribing Roles and Permissions
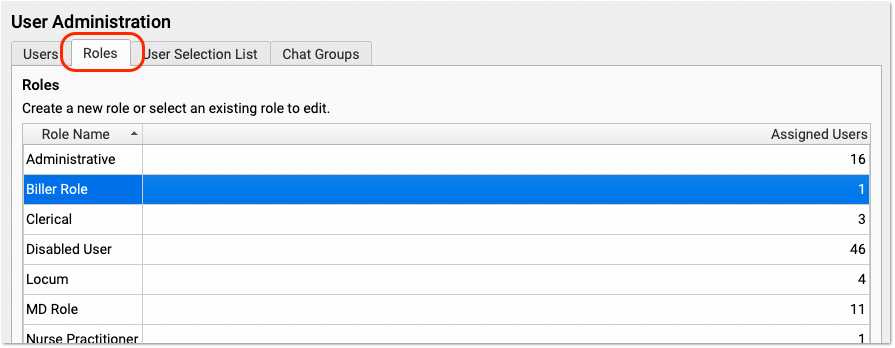
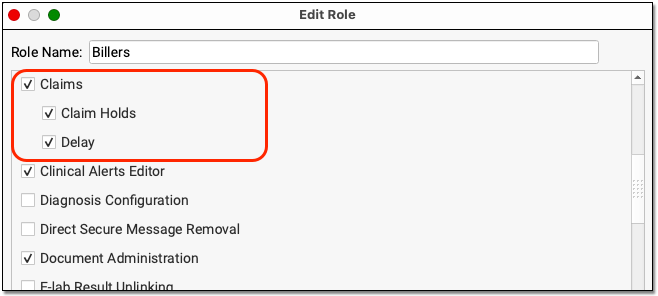
In the User Administration tool in PCC EHR, users may be assigned one of five different PCC eRx roles:
-
Non-Clinical Staff: Non-Clinical Staff may edit patient pharmacies but may not create or send prescriptions.
-
Clinical Staff: Clinical Staff may create prescriptions for providers to review, sign, and send.
-
Provider Agent: Provider Agents may create and send prescriptions on behalf of a credentialed ordering provider. Provider Agent prescriptions automatically appear for signing on the ordering provider’s queue.
-
Mid-Level Provider: Mid-Level Providers may create and send prescriptions under their own provider credentials while indicating a supervising provider.
-
Provider: Providers may create and send prescriptions under their own provider credentials.
Prescribing roles and permissions should be assigned to users according the rules and regulations of the jurisdiction in which you practice. To learn more about prescribing roles in PCC eRx, read Set Up PCC eRx User Access.