PCC’s Billing Training Course
PCC offers a comprehensive course on using its software for pediatric billing and collections. Contact PCC at support@pcc.com or 802-846-8177 or 800-722-7708 to find out when the next course is.
Watch the most recent PCC Billing Training Course using the video links below. The complete course is about nine hours.
PCC’s Billing Training Course
- Billing Training Session 1:
Account Structure, Eligibility, and Checkin - Billing Training Session 2:
Post Charges and Submit Claims - Billing Training Session 3:
Post Insurance and Personal Payments - Billing Training Session 4:
Insurance and Personal AR, Account History, and Editing Charges - Billing Training Session 5:
Table Maintenance and Proving Out - Billing Training Session 6:
Oversight Reporting
Topic By Topic Videos: You can also choose specific topics and dive into more detail on the New Biller Training Outline page.
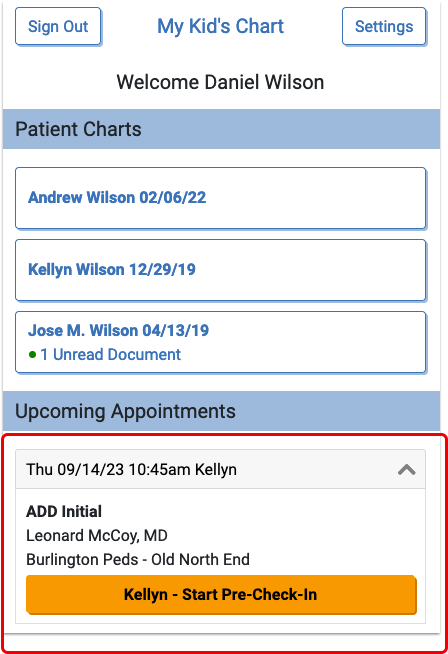
Patient Pre-Check-In
Once enabled by PCC, the Patient Pre-Check-In process begins in the Patient Portal. Pre-Check-In is available seven days before the patient’s appointment, and two days prior to the appointment, the patient’s billing account will receive a Portal message that pre-check-in is available.
Patient Portal Users Required: Pre-Check-In requires a patient to have a patient portal user linked to their Billing or Home account.
Watch a Video : View a short video demonstrating Pre-Check-In through the patient portal
Pre-Check-In in The Patient Portal
When the billing account Patient Portal user logs into PCC’s Patient Portal, they will find and click an orange “Start Pre-Check-In” button for each patient with an appointment scheduled within the next seven days.
Pre-Check-In includes three sections to be completed and confirmed: Patient Information, Billing Account, and Insurance. By clicking “Edit” below Patient Information, portal users can update existing information and add any requested information.
Patient Information
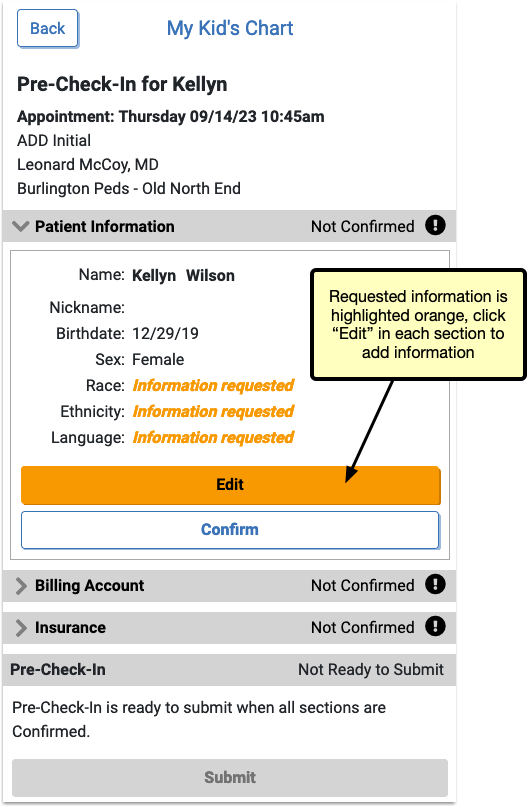
When editing, any information missing is highlighted in orange.
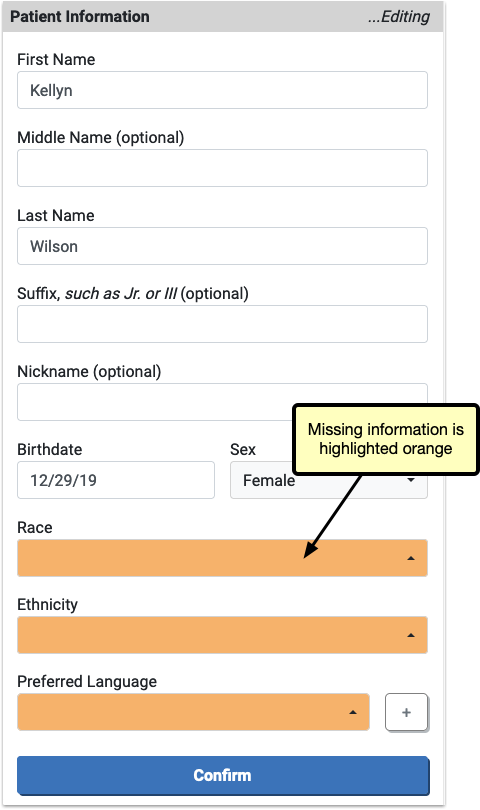
The information already on file for this patient can be edited by the portal user.
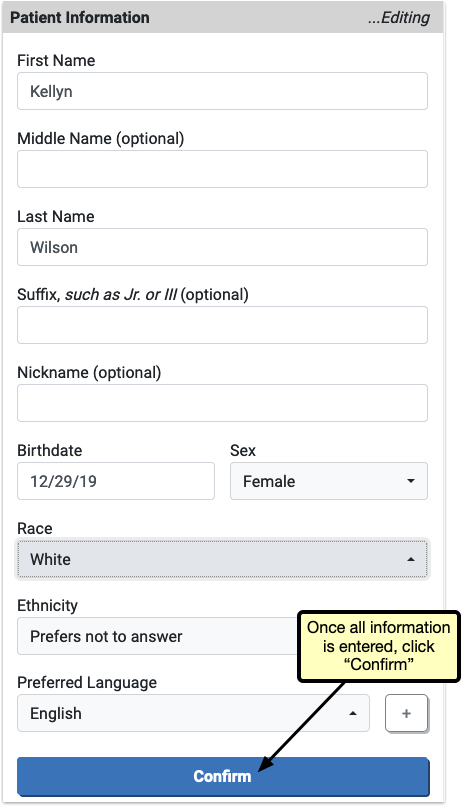
After completing any edits to Patient Information and any requested information is filled out, the user will click “Confirm” to save the changes.
Billing Account
The Billing Account section works the same way as Patient Information: the user will edit any existing information, fill out any orange highlighted missing information, and then click “Confirm”.

After completing and confirming Billing Account information, Insurance is the final section to complete.
Insurance
In Insurance, users can click “Edit” to confirm that the existing insurance is still active, or mark it as expired if it’s no longer valid. By clicking “Add Insurance” users can enter a new insurance.
Both “Add Insurance” and “Edit” include the option to upload an image or PDF of the front and back of the patient’s insurance card. These images will be added to an automatically created “Pre-Check-In Insurance Cards” category in PCC EHR, or to a document category selected in Document Administration.
When all three sections have been completed and confirmed, each will be marked “Confirmed” in green, but can be edited again by re-opening the section and clicking “Edit” if needed.
Click “Submit”.

Optional: Pay Personal Balance
If your office has enabled portal payments, the Pre-Check-In confirmation page includes the option to make a payment for any patient with a personal balance.

Users can review the details of the balance by clicking the arrow next to the balance. The “Make a Payment” button opens the payment screen, where the portal user can complete a payment. If the user prefers to pay at the office, clicking the “Pay at the Office” button will return the user to the patient portal home screen.
After completing Pre-Check-In, users without a personal balance will be redirected back to the patient portal home page.
Pre-Check-In in PCC EHR
A visit’s Pre-Check-In status is indicated on the Schedule queue by a clipboard icon.

An empty, gray clipboard icon indicates a visit where Pre-Check-In is available through the Patient Portal, but has not yet been completed by a user. A filled, orange clipboard appears on visits where Pre-Check-In has been completed through the Patient Portal, but not yet reviewed and imported by your practice. The checked, green clipboard signifies that Pre-Check-In is complete and imported. Visit reasons not configured for Pre-Check-In will have no icon.
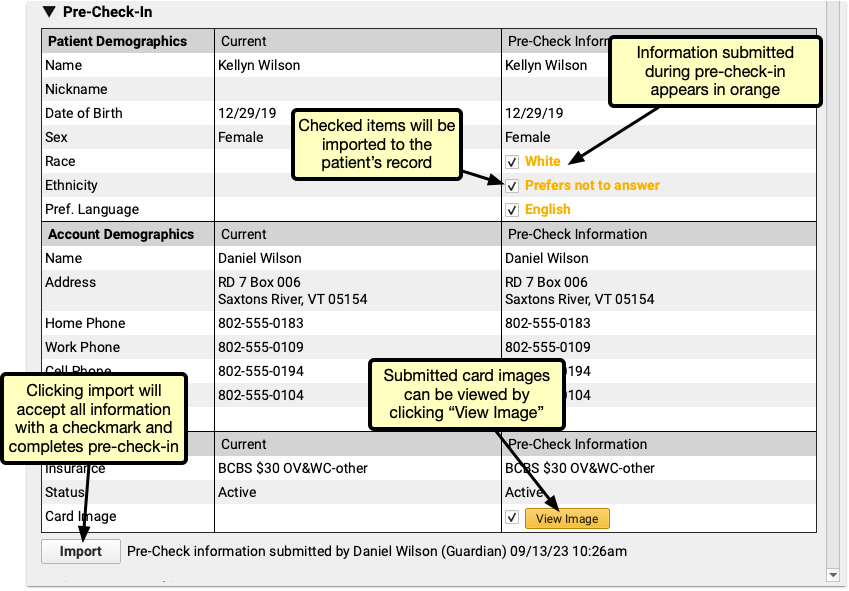
When a portal user completes Pre-Check-In in PCC’s Patient Portal, the submitted information appears in Patient Check-In. All information added, edited, and confirmed by the portal user appears under the rightmost “Pre-Check Information” column. New or updated information appears in orange, with a checkbox.
By default, each checkbox is checked. If you decide that the submitted pre-check-in information should not be imported, uncheck the box. Insurance card images can be viewed by clicking the “View Image” button.
Click “Import” to import all checked information and overwrite the current information.
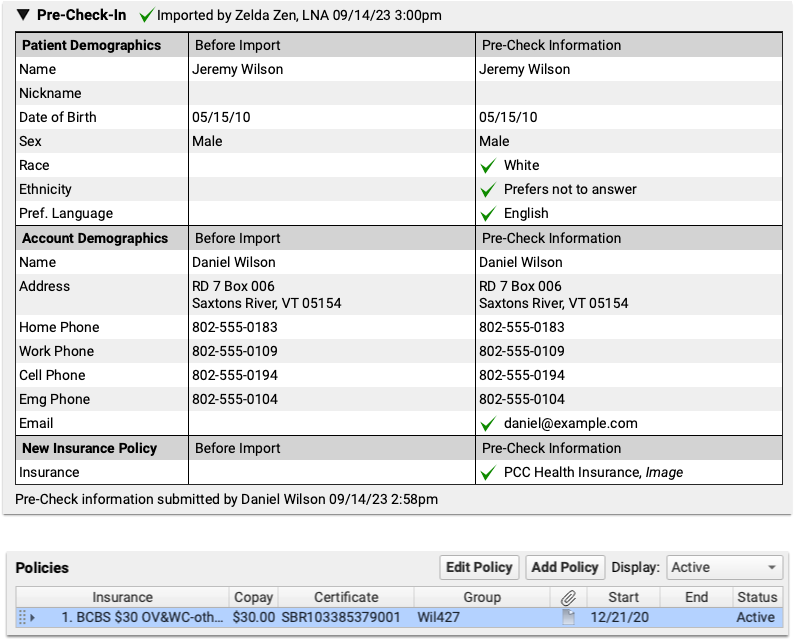
Adding a New Insurance
If, during pre-check-in, a patient has no insurance, or a user adds an additional insurance, you’ll need to add that insurance during Check-In through PCC EHR.

A “New Policy Imported via Pre-Check-In” line appears under the Policies component in PCC EHR.

Select the policy and click “Edit Policy” to open and enter the details of the policy.

The images submitted via pre-check-in appear at the bottom of the window, click “View Document” to review the insurance cards for the insurance details.
If the patient has siblings and the insurance is the same as those siblings, the sibling’s policy will appear at the top of the Insurance drop-down menu, and will automatically fill in the policy details.

With pre-check-in data imported, and any new insurance added, pre-check-in is complete, and you can continue your check-in process as usual.
Add Additional Pre-Check-In Users
When a patient has more than one patient portal user associated with their account, those additional patient portal accounts can be added to Pre-Check-In, and complete Pre-Check-In from their own account.
When Pre-Check-In is enabled, a component called “Pre-Check-In Recipient” appears in each patient’s demographics component. In edit mode, it includes a drop-down menu listing all other patient portal users linked to the patient.
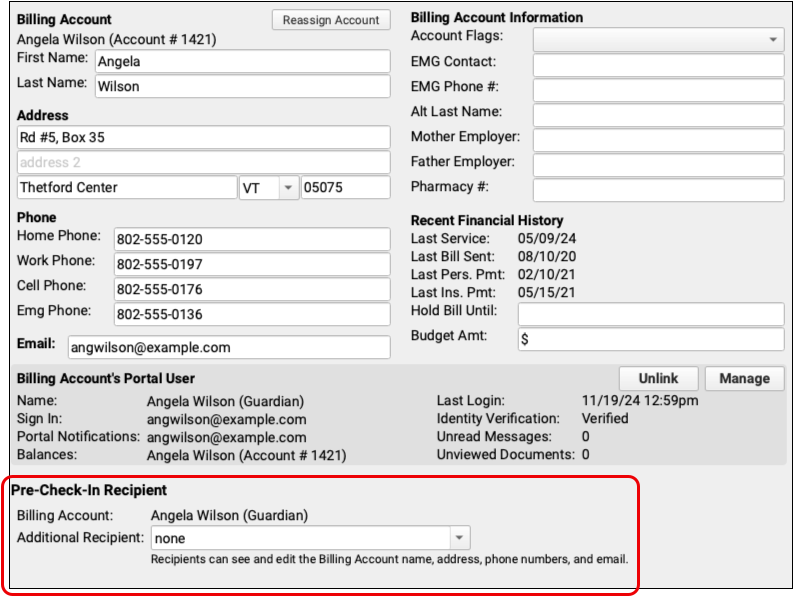
Select an patient portal user linked to this patient to receive the Pre-Check-In notification and option to complete Pre-Check-In.
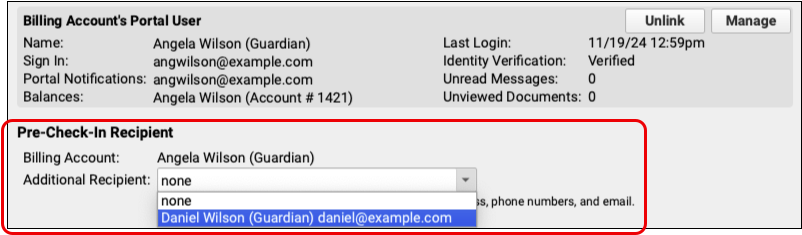
After selecting a user and saving your changes, additional users can be added the same way.
Once a user begins Pre-Check-In, the additional users will be notified that Pre-Check-In is in progress on the patient portal home page.
Any Pre-Check-In recipient can continue Pre-Check-In, but once any user submits Pre-Check-In, check-in is complete, and ready to be reviewed and imported in PCC EHR.
Review Chat Logs in PCC EHR
The Chat Message Log records your saff’s usage of PCC EHR’s Chat messages, so you can review communication between your team members and investigate policy violations.
Owing to PCC EHR’s chat potentially containing sensitive information, the Chat Log report is a separate permission from the Audit Log in PCC’s User Administration tool. To access the Chat Log you’ll need to add Chat Log permission to the appropriate user role.
When logged in as a user with the above permission enabled, the Chat Message Log is a separate tab within the PCC EHR Audit Log.

Select a range of dates, and one or more users. Be careful when selecting date ranges and users, as this report pulls the full text of all chats within the selected date range for each selected user, so chat log results can quickly get very large.
Once you’ve narrowed down your report filters, click “Run” to run the report.
The results are listed, by default, oldest to newest, so you can read the results as a conversation, from the top to the bottom. Each conversation can be collapsed or expanded using the arrow to the left.
When multiple users are selected, results will include all interactions between two or more of the selected users.
Selecting Multiple Users: When more than two users are selected, Chat Message Log results will include all interactions between two or more of the selected users. If a group chat includes two users you selected and a third you didn’t, that group chat will be included in the results.
Check Prescription Pricing and Insurance Coverage While You Prescribe
When you prepare a prescription, you can see how much it will cost out-of-pocket, whether it requires prior authorization, and if there are more cost-effective alternatives.
Video: Watch Check Prescription Pricing and Insurance Coverage While You Prescribe to see it in action.
Overview
When you prepare a prescription, PCC eRx instantly displays pricing and insurance coverage information. The information is provided in real time by the pharmacy benefit manager that administers the patient’s prescription insurance plan.
First, PCC eRx displays Real-Time Pricing.
Real-Time Pricing: Real-Time Pricing can tell you exactly how much a prescription will cost out-of-pocket, whether it requires prior authorization, how much of it will apply to the patient’s deductible, and more. Real-Time Pricing displays on the prescription editing screen once you pick a medication and define a quantity, days supply, and pharmacy. These details are routed to Surescripts, the entity that enables electronic information exchange between PCC eRx and other organizations. Surescripts then asks the pharmacy benefit manager that administers the patient’s prescription insurance plan for pricing and coverage information and passes those details back to PCC eRx.
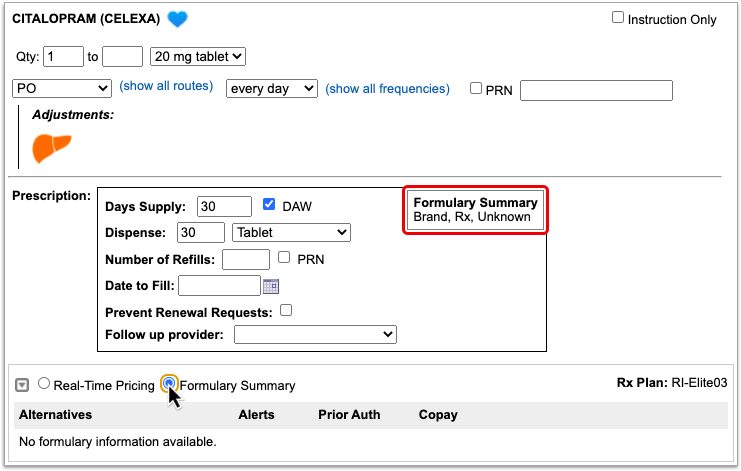
If the prescription does not contain enough information for the pharmacy benefit manager to provide Real-Time Pricing, or the plan is not set up for Real-Time Pricing, PCC eRx automatically displays a Formulary Summary instead.
Formulary Summary: A Formulary Summary can generally tell you the copay tier for a prescription, whether the drug is on- or off-formulary, its preference level, and a dollar-sign rating as to how expensive it is out-of-pocket. The Formulary Summary displays as soon as you pick a medication and arrive at the prescription editing screen. The prescription details are routed to Surescripts, which asks the pharmacy benefit manager that administers the patient’s prescription insurance for formulary-level coverage information, then passes it back to PCC eRx. The Formulary Summary may not reflect the patient’s exact prescription benefit status, but can give a sense of how a prescription is covered under the general rules of their prescription insurance plan.
If both Real-Time Pricing and a Formulary Summary are available, you can switch between the two.

If the patient’s prescription insurance sends neither Real-Time Pricing nor a Formulary Summary, PCC eRx makes it clear that there was no response.
If the patient has multiple prescription insurance plans, you can switch between them to see how the prescription is covered under each one.
No Need to Change How You Collect Policy Information: PCC eRx receives the patient’s prescription insurance plan information directly from Surescripts, which relies on basic demographic details in the patient’s chart, not the information recorded in the Policies component, to find the patient’s coverage.
Each plan may suggest alternatives to your original prescription. You can switch to any alternative at the click of a button.
If you switch to an alternative or edit the original prescription, PCC eRx automatically runs a new prescription benefit check.
Usually, Real-Time Pricing and the Formulary Summary contain helpful and clear information, but sometimes they can be difficult to interpret. For help navigating confusing responses and scenarios, read What to Do About Poor or Confusing Responses.
Check Prescription Pricing and Coverage
When you prepare a prescription, you can see how much it will cost out-of-pocket, whether it requires prior authorization, and if there are more cost-effective alternatives.
Start a Prescription
Start a prescription in PCC eRx.
There are many ways to start a prescription. You can create one from scratch in the patient’s visit, renew an historic medication, or prescribe a favorite.
For detailed instructions about how to start a prescription, read Prescribe Medications.
Select a Medication and Strength to See Formulary Summary Information
As soon as you choose a medication and strength for your prescription, PCC eRx starts checking how much it will cost out of pocket and how it’s covered under the patient’s prescription insurance. The results display in a box beside the prescription.
With only a medication and strength, PCC eRx can usually display a Formulary Summary result from the patient’s prescription insurance. The Formulary Summary can tell you the copay tier for the medication, whether it is on- or off-formulary, and provide a dollar-sign rating as to how expensive it is out of pocket.
Enter a Quantity, Days Supply, and Pharmacy to See Real-Time Pricing and Alerts
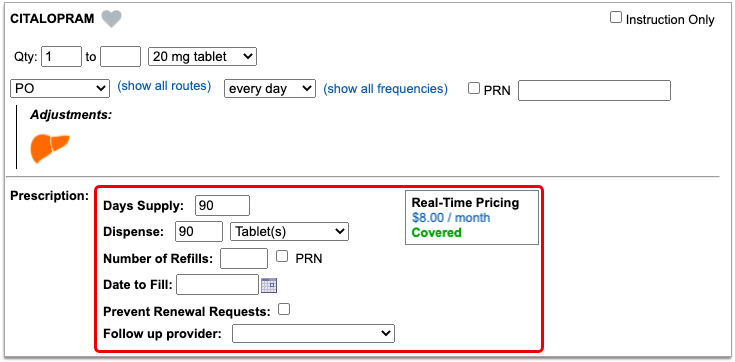
Once you enter a quantity, days supply, and pharmacy for the prescription, PCC eRx can usually display a Real-Time Pricing result from the patient’s prescription insurance.
Real-Time Pricing can tell you exactly how much the prescription will cost out of pocket each month, how much of that cost will apply to the patient’s deductible, whether the medication requires prior authorization, and more.
Price
If the Real-Time Pricing response includes a price, hover over it to see if the insurance company shared how it will apply to the patient’s deductible.
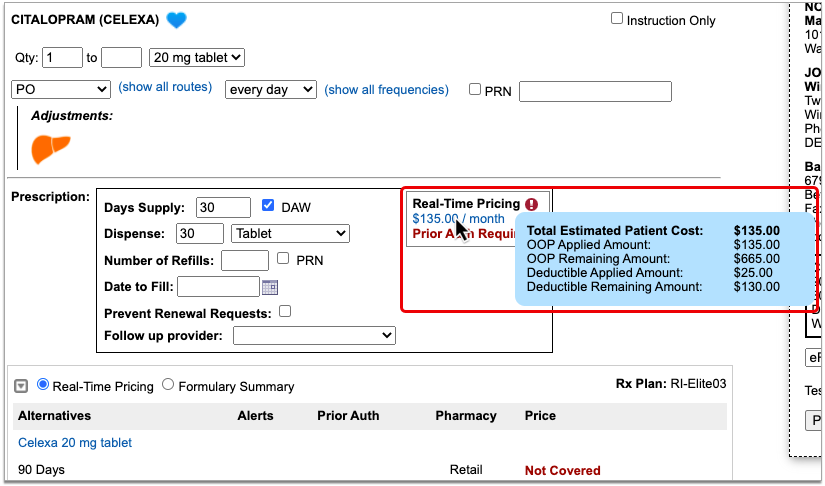
Coverage Alerts
An alert icon indicates that there are coverage alerts for the prescription. Hover over the icon to view the alerts.
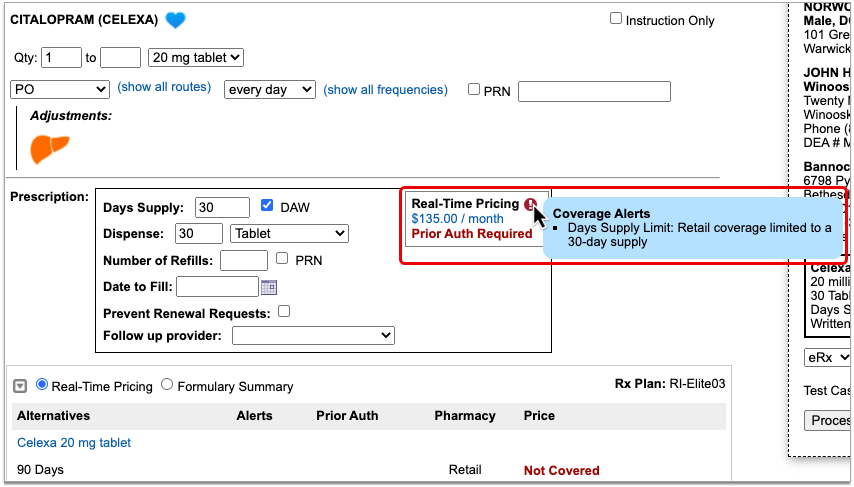
Coverage alerts may include information such as days supply limits, next fill dates, and coverage limitations based on age and sex.
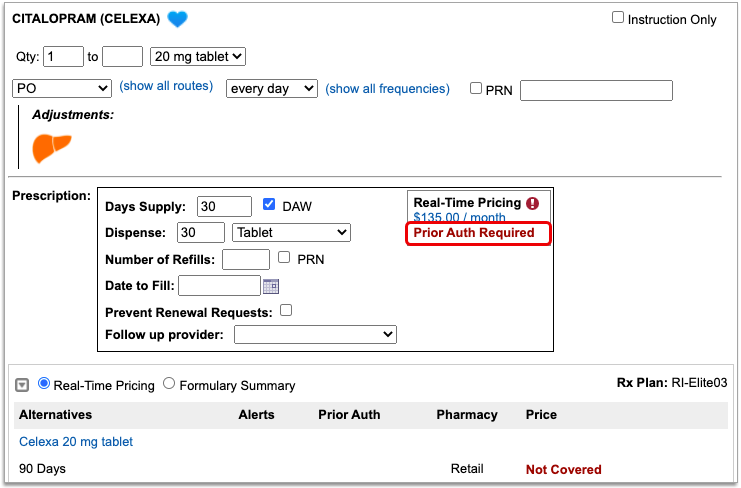
Prior Authorization and Coverage Status
The insurance plan may also send a prior authorization or coverage status, which displays in green if the medication is covered or does not require prior authorization, or in red if the prescription is not covered or does requires prior authorization.
Optionally, Check a Different Plan
The name of the plan that provided the pricing and coverage information displays in the “Rx Plan” field beneath the prescription. If the patient has multiple prescription insurance plans, the Rx Plan field becomes a drop-down and you can switch between them.
When you switch to a different plan, PCC eRx checks it for pricing and coverage information and displays those results beside the prescription.
Optionally, Switch Between Real-Time Pricing and Formulary Results
The radio buttons beneath your prescription indicate which types of responses the patient’s prescription insurance sent. If you see a Formulary Summary in addition to the Real-Time Pricing response, you can select it to see what it contains.
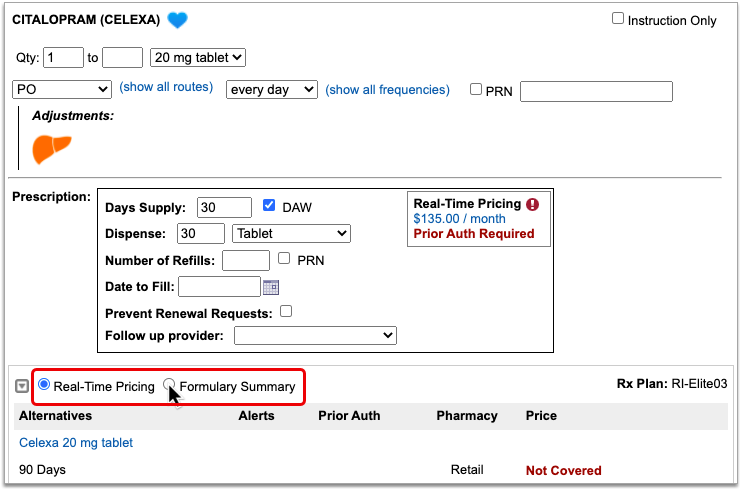
PCC eRx defaults to displaying Real-Time Pricing, since that response usually contains more concrete and actionable information. If the plan could not provide any response at all, PCC eRx indicates that there was no coverage information to be found.
Prescription pricing and coverage information is provided in real time by the pharmacy benefit manager responsible for administering the patient’s prescription insurance plan. PCC eRx connects with the pharmacy benefit manager through Surescripts, the vendor who enables electronic information exchange between PCC eRx, pharmacies, and other entities.
Surescripts and the pharmacy benefit manager use demographic information — not the insurance policy details recorded in PCC EHR — to find the patient’s prescription insurance plans.
Check Alternatives
Prescription insurance plans can send alternatives for you to consider instead of the prescription you wrote. Those alternatives display in a table beneath your prescription.
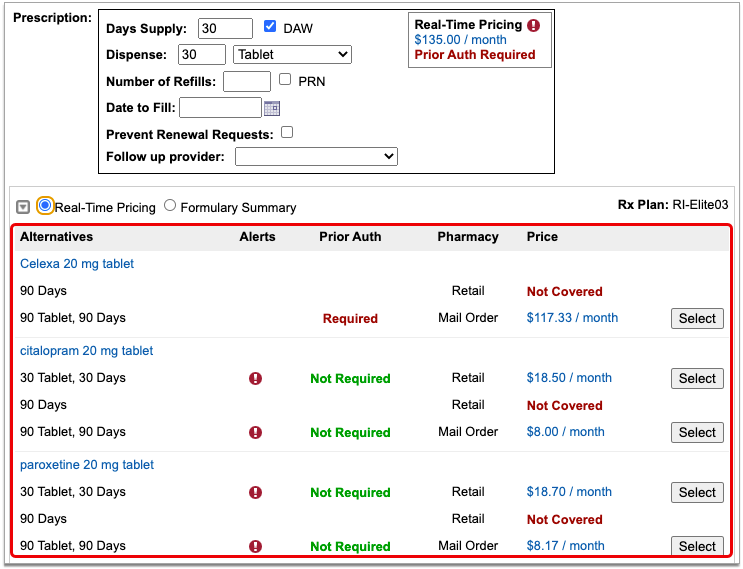
Alternatives may be cheaper for the patient, have fewer restrictions, or be covered without prior authorization.
If the original prescription you wrote is expensive, not covered, or requires prior authorization, see if one of the alternatives could work instead.
Alternatives may specify a different quantity, pharmacy type, or medication than the original prescription. Use your best clinical judgment to determine if one of the alternatives might be appropriate for your patient.
Easy Price Comparison: To ease comparison between the original prescription and alternatives, all prices are expressed as a cost per month.
Optionally Hide Alternatives: Click the gray disclosure triangle in the top left corner of the Alternatives section to hide it from view. Click the disclosure triangle again to show hidden alternatives. If you want the Alternatives section to be collapsed by default, update your Real-Time Pricing and Formulary display preference on the My Settings page.
Optionally, Prescribe an Alternative
If one of the alternatives suggested by the patient’s prescription insurance proves to be a good option, click the “Select” button to switch to it. As soon as you click “Select,” PCC eRx replaces the original prescription with the selected alternative and displays the pricing and coverage information for it.
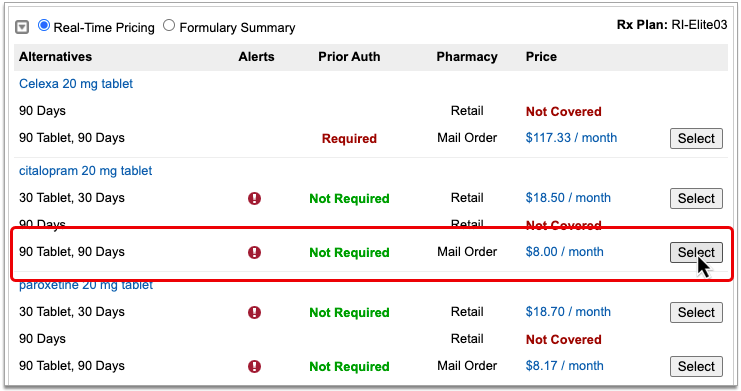
If you select an alternative that lists Mail Order as the pharmacy type, PCC eRx automatically updates the prescription to use the mail order pharmacy suggested by the insurance plan. If the patient prefers to use a different mail order pharmacy, you can manually update the pharmacy on the prescription to reflect the patient’s preference.
Double-Check Before and After You Select: Before you select an alternative, double-check the drug, quantity, duration, and other details to ensure that it is clinically appropriate for your patient. After you select an alternative, verify that the dosing instructions for the prescription are accurate, especially if the alternative is in a different form than the original medication. Edit the prescription for the alternative as needed until the instructions are correct for your patient.
Process the Prescription
Once you are satisfied with the prescription, process and send it to the pharmacy.
What to Do About Poor, Confusing, or Nonexistent Responses
Not all prescription insurance plans respond the same way to prescription benefit checks, and sometimes the responses that do come through are unhelpful, sparse, or confusing. While PCC does not control the messages that come from prescription insurance plans and cannot provide definitive interpretations of their responses, there are some common cases that have relatively straightforward solutions. Read on to learn about those cases and how to navigate them:
-
'No Matching Coverage Details Provided' Message: When you see the message “No matching coverage details provided” in a Real-Time Pricing response, it indicates that the patient’s prescription insurance did not provide comment on the prescription as written and likely wants you to prescribe an alternative. This is most common when the total dispense quantity indicated on your prescription is less than the minimum standard package size that can be dispensed by the pharmacy. Review the alternatives suggested by the patient’s prescription insurance to see how standard package sizes are covered and optionally select one that is appropriate for your patient.
-
'Pharmacy Not Found' Message: Certain prescription insurance plans only cover prescriptions that route through mail order pharmacies and reply with the message “Pharmacy not found” when assessing a prescription that indicates a retail pharmacy. You can ignore the message if the prescription is covered under one of the patient’s other plans, or consider switching the prescription to a mail order pharmacy.
-
No Coverage Details and Only One Alternative: If no coverage details are provided for a prescription that you wrote and the prescription insurance plan only suggests a single alternative in a quantity that cannot cover the entire course of the patient’s treatment, it usually means that the plan only covers that lesser quantity of medication for the indicated timespan.
-
Not Covered and No Good Alternatives: If the prescription is not covered, has a coverage alert, and none of the suggested alternatives match what you are trying to prescribe, hover over the alert to see if it contains a description in words about what the prescription insurance plan will cover. For example, if the coverage alert indicates that a different quantity would be covered, try changing your prescription to match that advice, then wait to see if Real-Time Pricing updates with a more useful response.
-
Albuterol Inhalers: To reduce clicks and prescribe the most cost-effective option when your patient needs an albuterol inhaler, consider the following: 1) Many prescription insurance plans appear to prefer 6.7g albuterol inhalers to the larger, 18g ones. 2) If you write prescriptions for a total number of inhalers rather than a total number of grams, prescription insurance plans may not be able to provide coverage details.
-
Contradiction Between Real-Time Pricing and the Formulary Summary: If you notice a contradiction between the Real-Time Pricing and Formulary Summary for a prescription, defer to the Real-Time Pricing.
Nonexistent Responses
Some pharmacy benefit managers do not share real-time pricing and coverage insights. PCC and Surescripts have prepared a letter template that you can use to encourage them to do so (shown below).
PCC can review your practice’s specific Real-Time Pricing response rate and let you know which prescription insurance plans are not currently sharing real-time pricing and coverage insights. Contact PCC Support for help customizing this letter and learning to whom it would best be addressed.
UC 2023 Videos and Course Materials
In 2023, PCC’s Users’ Conference was held in Burlington, Vermont. We celebrated PCC’s 40th anniversary with a 1980s theme.

Over 700 attendees participated both online and in-person in 63 courses, sessions, and round tables on issues of importance to pediatric practices.
Sessions were recorded, and where possible we’ve made them available on a PCC UC 2023 playlist, and using the links below. Attendees can access course and video information on the PCC Events app. Most materials will be available for at least one year following the conference.
You can review the UC 2023 Dashboard Awards, photo albums, and more at pcc.com’s UC 2023 page.
Course Descriptions, Slides, and Videos
| Course Title | Course Description | Materials |
| 2023 Coding Updates |
Join PCC’s Jan Blanchard for a heads up on the new Pediatric ICD-10 and CPT coding changes for 2023.
Presented By: Jan Blanchard |
|
| 2024 NCQA PCMH Annual Reporting Changes |
Get insider knowledge of the 2024 NCQA PCMH Annual reporting changes and learn how to implement the changes with effective workflows.
Presented By: Kate Taylor, Amanda Ciadella |
|
| A Doctor and a Coder Walk into a Bar |
The exact types of expertise needed to really nail documentation and E&M compliance are shared in this entertaining and interactive session. Krekamey Craig, MD shares real encounter examples from her experience as a practicing Pediatrician and Jan Blanchard highlights the coding guardrails around billing for these Primary Care Pediatric services. Come get the best guidance from both of the worlds you must navigate to be paid for all that you do and to *keep* that payment.
Presented By: Jan Blanchard, Krekamey Craig |
|
| A Practical Guide on Auditing Your Billing Department |
Every office should have a strong understanding of their billing practices. Performing regular internal audits is an essential part to keeping your practice thriving and developing a plan that fits the needs of your organization is attainable. In this session you will learn the tools you need in areas such as correct modifiers, verifying large write-off balances, A/R follow-up and more.
Presented By: Heidi Chamberlin |
|
| Addressing Grief and Loss in Practice |
Many of our children and families have experienced the loss of a loved one during the COVID-19 pandemic. However, pediatricians have not been traditionally trained in grief counseling and report discomfort in addressing this topic with patients. This session will discuss the basics in addressing grief and loss with and provide tips regarding how to comfort and partner with families during these most difficult experiences.
Presented By: Colleen Kraft |
|
| Advanced Reporting Workshop |
Looking to gain a deeper understanding of how to build customized reports using PCC’s reporting tools including the Smart Report Suite (srs) and the EHR Report Library? Join us for this hands-on, interactive workshop to explore some of the advanced functionality within PCC’s reporting tools. Your PCC instructors will introduce you to report data sources and how to build customized report filters and output to meet your reporting needs. Come prepared with a laptop enabled with connectivity to your practice. One goal of this session is to create at least one new customized report on your own practice server.
Presented By: Tim Proctor, Jim Smith, Kate Taylor |
|
| Advancing Pediatrics 2023 |
Mark will discuss how the American Academy of Pediatrics (AAP) is working to solve the challenges currently facing pediatricians and pediatric medicine. Improvements are needed across the pediatric health care system to empower pediatricians to care for children and families.
Presented By: Mark Del Monte, JD |
|
| Allow Me to Introduce Myself: Professional Bios in 500 Words or Less |
This workshop will cover the basics of what constitutes a great professional bio for websites, speaking events, professional networking, and more. Attendees will workshop their bios and compare with partners for half the session.
Presented By: Allie Squires |
|
| An Independent Pediatrician’s Journey to Ukraine |
As news of the war in Ukraine escalated in 2022, Dr. Kent Kleppinger listened in with increasing concern from his practice in Laramie, Wyoming. When Dr. Kleppinger decided to step in to help physicians in Ukraine, he didn’t hesitate; he went all in.
Presented By: Kent Kleppinger, MD |
|
| Ask Chip |
Bring your practice management questions and PCC’s resident practice management expert, Chip Hart, will answer them live.
Presented By: Chip Hart |
|
| Back to the Future A PCC Roadmap Review |
A review of the past year of PCC changes and a preview of what’s to come. Come learn what PCC has in store for you!
Presented By: Scott Ploof |
|
| Billing Drop In Live from the UC! |
Come meet all of your Pediatric Billing peers at this live, in person event modeled on our monthly virtual get togethers. No one knows your work like billing experts! Who better to offer solutions, time savers, shortcuts, tools, and resources than your fellow peers who are also using PCC? This is an opportunity to bring your questions and challenges to peers and experts in a low-key, casual, and friendly face-to-face environment.
Presented By: The Get Paid Team |
|
| Burnout: Or How I Stopped Worrying and Learned to Love the Job |
Burnout has reached an all-time high among physicians in pediatrics. Using the latest information from positive psychology as well as proven stratgies from professional organizations, Dr. Trimble hopes to guide you through the best ways to understand and finally manage burnout. Don’t miss this opportunity to empower your people and bust through the chaos!
Presented By: Robert Trimble |
|
| CHADIS Workflow Roundtable (In-Person Only) |
This is an opportunity for clients to get together and discuss CHADIS workflow challenges, best practices, and more. Learn from PCC’s CHADIS expert, Sasha Pavlovic, and others in a conversational setting.
Presented By: Sasha Pavlovic |
|
| Change Management for Managing Change |
Every day in a busy pediatric practice you’re overwhelmed by the number of tactical decisions you need to make. This makes it difficult to think strategically for your practice. How can you ever evolve to become the practice you dreamed of being if you don’t have the time or organizational capacity to make the necessary changes. We will review a few simple guidelines that will help your practice make important changes to improve the quality of your care and the success of your practice.
Presented By: Chip Hart |
|
| Dark Side of the Moon |
This is a class about how to use your practice as a tool to reach beyond the walls of your office. Vaccine clinics at local schools, mobile wellness visits at a homeless shelter, presence at the local farmer’s markets, and pairing with local vendors are all ways in which to explore other sides of the four walls of your office.
Presented By: Katie Schafer |
|
| Dashboard Awards Presentation |
We’ll present this year’s dashboard awards at lunch!
Presented By: PCC |
|
| Disaster Preparedness for Solo and Small Practices: Lessons from My Journey with Cancer |
I will use my personal journey with cancer to illustrate the kinds of planning and preparation that small and solo practice owners need to consider. We’ll discuss issues of continuity, insurance, communication and lessons learned for self-care to help ensure that when the unthinkable happens, the survival of one’s practice can take a back seat to returning to health.
Presented By: Seth Kaplan |
|
| Enneagram Magic: The Power of Self- Awareness |
“Teamwork makes the dream work;” but first, one must look within themselves. Self-awareness helps us be fiercely present, have honest conversations, build trust and ultimately improve relationships, culture and productivity. The enneagram offers a self- awareness framework to better understand the “why” behind our actions AND inspires us to be curious about understanding the “whys” of those around us. During this session, we will do a deep dive into how to use the enneagram to promote self-discovery, provide feedback and improve teaming at work and at home. That is where the magic lies.
Presented By: Akshata Hopkins |
|
| Everybody Wants to Use New Forms (In-Person Only) |
Join our Forms Development Team for a discussion of the migration process to PCC’s new forms solution and an opportunity to experiment with the product on your own. This hands-on workshop will include guided exercises allowing you to experience the Forms Configuration Tool within your own EHR system. Attendance at the prior “Sweet Forms O’ Mine” introductory session is recommended. This session will not be streamed for virtual attendees.
Presented By: Dan Gillette, Tim Proctor |
|
| Front Desk Best Practices |
Explore front desk best practices related to scheduling, check-in, insurance verification and copay collection and what has changed as offices work within the pandemic. Understand the importance of the front desk when it comes to your practice’s workflow and collection process.
Presented By: Lynne Gratton |
|
| Get Ready to Dive Into Credit Card Processing: Let the Fun Begin! |
We surveyed the PCC practices and the strong majority wanted a credit card processing workshop using CardPointe and/or BluePay with a strong emphasis on Credit Card on File (workflows, pros/cons etc), PCI Compliance, Patient Portal Marketing and setting up/maintaining payment plans.
Presented By: James & Sarah Estes |
|
| Grow Your Own EDI Superuser |
Explore the lifecycle of electronic eligibility requests, claim submissions, and ERA responses. Along the way, you will learn about the underlying transactions (837P, 270 and 271, 835). By the end of this course, you’ll become the EDI superuser your practice needs: you’ll understand how to troubleshoot eligibility issues, decode confusing payor responses, and when to work with PCC.
Presented By: Ben Brandt |
|
| Hardware Petting Zoo (In-Person Only) |
We will display and describe current and older equipment supplied by PCC, as well as allow participants to actually plug, click and manipulate equipment. This session is an intro to hardware for the techno-phobic.
Presented By: Tom Anderson,James Frei,Stephen Moore,Thomas Heller |
|
| Hardware Petting Zoo (In-Person Only) |
We will display and describe current and older equipment supplied by PCC, as well as allow participants to actually plug, click and manipulate equipment. This session is an intro to hardware for the techno-phobic.
Presented By: Tom Anderson, James Frei, Stephen Moore, Thomas Heller |
|
| How To Assess Opportunities for Growing or Selling Your Practice |
Do you have buyers knocking on your door? How do you know if selling is right for you? Should you hold on or sell out? There may be other options …
Presented By: Susanne Morgana Brennan, MBA |
|
| How To Market Your Practice With No Time, Talent, or Money |
20 years ago, patients still found their pediatricians through a combination of word-of-mouth and the Yellow Pages. Although parent-to-parent marketing is still vital, 2023 is about Google, review sites, and cell phones. How can you, a pediatrician with no time, money, or social media talent, connect with these new millennial parents?
Presented By: Chip Hart |
|
| ImmTrac Roundtable (In-Person Only) |
An opportunity for Texas clients to discuss workflows that impact immunization submissions to ImmTrac.
Presented By: Romni Palmer |
|
| Leave Behind the Dark Side: Post Charges, Payments, Submit Claims, and More in PCC EHR! |
Complete your daily billing tasks in PCC EHR! From checking eligibility to working with personal payments, to submitting claims and posting insurance payments, PCC EHR has tools that will empower your billing lifecycle. Leave behind the text-based darkness of yesterday and learn about PCC EHR’s latest features.
Presented By: Brian Kennedy |
|
| Messaging to Patients |
Learn the proper usage and best practices for PCC’s various messaging tools. Get up to date with all the recent changes, tips and tricks from patient engagement support specialists, Scarlett Tomlinson and Sasha Pavlovic
Presented By: Sasha Pavlovic,Scarlett Tomlinson |
|
| Monitoring your Immunization Submissions |
This course covers the basics of using the Immunization Registry Response Viewer to check on your practice’s submissions to the state registry.
Presented By: Romni Palmer |
|
| PCC Benefits A Case Study |
The benefit package provided by a company to its employees reflects the culture of the organization and provides the employer with the opportunity to demonstrate their commitment to the employer/employee relationship.
Presented By: Grace Kuzmin, Bill VanDeventer |
|
| PCC EHR Customizations & Workflow for Pediatric Medical Homes |
Patient Centered Medical Home is not just a certificate, it’s actually a concept of care delivery. Learn from industry experts the most effective patient-facing workflows that affect your daily operations.
Presented By: Kate Taylor, Amanda Ciadella |
|
| PCC eRx Open Lab (In-Person Only) |
New this year! Stop by our eRx-specific open lab for personalized answers to all your prescribing questions. Want help with your Favorites? Need a refresher on custom medications or other configuration options? Have an eRx bug you want squashed? Our eRx team is here to help.
Presented By: Morgan Ellixson Boyea, CPhT, CSPO |
|
| PCC Shortcuts For Faster Charting |
This Advanced Beginner/Intermediate level workshop session reminds users how to configure snap text, auto-notes, Dx favorites, billing configuration, labs/orders, protocols, and tasking to reduce the time they spend charting. Bring your laptops for hands-on time at the end of the session.
Presented By: Sarah Bunning |
|
| Pre-Check-In Takes Flight! |
Do you dream of greeting patients at the front desk with a just a smile, and NO paperwork? That’s the vision for a new feature in PCC development: Patient Pre-Check-In. In this session we will demonstrate the initial Pre-Check-In functionality and we will review designs for the remaining planned functionality. PCC will be seeking a few practices to pilot the feature and help us grow it to be ready for all practices. We will discuss the reality of what it means to pilot the first version, and we will provide opportunity for you to share your wishes for how this new feature should evolve to serve the needs of your practice and the patients and families you serve.
Presented By: Erica Greenwood, Amanda Smith |
|
| Preconference Morning Session |
Live Stream the morning preconference sessions here!
Presented By: Nick Meunier, Tim Proctor, Morgan Ellixson Boyea, CPht, CSPO |
|
| Preconference: Introduction to Practice Vitals Dashboard |
As a managing physician or practice administrator, have you ever wondered how your practice is performing with key clinical and financial indicators? This introductory session will provide an overview of PCC’s robust Dashboard reporting capabilities, focusing on measures that will allow you to keep your finger on the pulse of your practice.
Presented By: Tim Proctor |
|
| Preconference: PCC eRx 101: Prescribing Fundamentals |
Are you brand new to prescribing with PCC eRx? Or simply want a review of the fundamentals? Join PCC’s Morgan Ellixson-Boyea, CPhT, CSPO for an in-depth tour of our prescribing software including dedicated time for questions. This course is designed for beginners, but anyone interested in learning more about PCC eRx is welcome to join us.
Presented By: Morgan Ellixson Boyea, CPhT, CSPO |
|
| Preconference: Tour of the EHR |
This course begins with a run-through of appointment book, clinical workflows, where to find it, where to configure it, and what to do if you’re stumped. We will spend some time in protocols, scheduling templates, clinical alerts, and more.
Presented By: Nick Meunier |
|
| Proactively Manage Insurance A/R |
In today’s challenging insurance environment, insurances are working overtime to limit reimbursement to providers. To get the most out of your contracted rates you first need to start with managing your insurance denials and the obstacles they throw your way in delaying payment. This session will touch on frequent denials, clearinghouse rejections, payer guidelines and so much more.
Presented By: Rebecca Lamb |
|
| Promoting a Vaccine Against Cancer: Increasing HPV Vaccination Rates in Your Practice |
In the United States, high-risk HPV cause 3% of all cancers in women and 2% of all cancers in men. The HPV vaccine is extremely effective against preventing HPV related cancers yet only 54% of US teens are up to date on the vaccine and in many areas its as low as 30%. I will discuss how, through small yet effective interventions, Pelican Pediatrics increased our rates from 33% to 88% and how you can too.
Presented By: Eliza Varadi |
|
| Real Time Prescription Benefit Service: An Industry Perspective |
Join PCC’s Dewey Howell, MD, PhD (the creator of PCC eRx!) for an in-depth review of an exciting change for PCC eRx: Real-Time Prescription Benefit Services. See a sneak peak of our upcoming changes and provide early feedback. Your input matters!
Presented By: Dewey Howell, MD, PhD |
|
| Reporting Drop-in Session (In-Person Only) |
Join your peers and PCC’s reporting experts to discuss reporting needs at your practice in this part discussion, part workshop session. This is an opportunity to bring your reporting questions and challenges to peers and experts in a low-key, casual, and friendly environment.
Presented By: Tim Proctor, Jim Smith, Kate Taylor |
|
| Sailing Into The Wind: How To Survive In A Big Practice Market |
How can a small, primary care practice survive in a health care market that appears to favor the larger groups? Learn how small practices can not only survive, but THRIVE, in big practice markets.
Presented By: Susan Kressly,Chip Hart |
|
| Sharing Clinical Records: DSM & CDE |
This course will explore Direct Secure Messaging and Clinical Document Exchange, two solutions that allow your practice to share data more easily with third parties. Learn the difference between the solutions, how they complement each other, and how to onboard!
Presented By: Jennifer Marsala |
|
| Sweet Forms O’ Mine An Introduction to New PCC Forms |
This introductory session will show you what it takes to convert to PCC’s new forms solution and the simple-to-use and powerful features that await you on the other side. Join PCC’s Forms development team as they walk you through creating new forms within the form configuration tool, highlighting how to insert variables, response prompts, headers, signatures, and much more.
Presented By: Dan Gillette |
|
| The Art of Delegation |
In this session, Dr. Skinner will review the business case for delegation in the physician practice, uncover the typical roadblocks to delegation success, and share practical tips that help attendees improve their delegation skills in their offices.
Presented By: Katrina Skinner |
|
| The Next Generation Preparing Your Practice for a Long and Prosperous Future |
Preparing to hand off a practice you’ve built is a daunting prospect. Taking over an existing practice is similarly daunting. In this course, you will learn how to prepare your practice to be handed off to the next generation. This course will cover structuring ownership and compensation to ease the transition as well as finding and preparing the right people to lead your practice into the future.
Presented By: Paul Vanchiere, MBA |
|
| The Pediatrician Experience: Participating in the AAP’s PROS Network Research |
This session will provide background on PROS research, current projects, innovative approaches used with PCC, and will highlight the experience from the practitioner perspective of participating in PROS research
Presented By: Alexander Fiks |
|
| To the Right of Boom: What Happens After a Cyber-Security Incident Occurs |
Learn about what happens after a cyber security incident occurs. Empower yourself by learning about post-event situational awareness and how to respond and recovery from a “boom”. We will review the 4 major actions every practice must take before a security incident is detected and after.
Presented By: Marissa Maldonado |
|
| Unstoppable. A Framework for Reaching Practice Goals. |
In this session we will talk about how to align your entire team towards your practice goals to ensure they are met and celebrated by all. By the end of the session, participants should be able to define at least one practice goal and will have a framework that what will tell them exactly how to make sure that goal is accomplished not by them, but by their team.
Presented By: Emily Floyd |
|
| Using PCC Dashboard Data to Serve Your Community |
Join us to hear how Dr. Seth Kaplan from TLC Pediatrics of Frisco, TX uses PCC’s Dashboard to make data-driven decisions for his practice. This session will provide an overview of PCC’s robust Dashboard reporting capabilities, focusing on financial and clinical measures that will allow you to keep your finger on the pulse of your practice.
Presented By: Tim Proctor,Seth Kaplan |
|
| Welcome & Morning Announcements | Presented By: PCC | |
| What Retirement Taught Me About Retirement Planning |
Retirement planning is not something that can be left to be taken care of when one decide that it’s time to retire. Rather, it is something that should be started as soon as one begins that first job. Planning takes different forms and addresses different topics as one moves through the stages of a career, but each choice sets the stage for future ones. While this talk will briefly discuss financial issues usually associated with retirement planning, the focus will be more on understanding one’s identity as a physician, and how that will shape the choices one makes throughout that career, especially those which will impact the timing, process, risks and benefits associated with retirement.
Presented By: Jesse Hackell |
|
| What’s Changed with Implementations? |
Your office has been on PCC EHR for 5 years or more and your implementation process was 5 years ago. How do we do implementations now? What are the configurations we setup for new clients which you may not be taking advantage of? Learn how current implementations may change how you use PCC EHR.
Presented By: Lynne Gratton |
|
| What’s Next for PCC eRx |
Join PCC’s Morgan Ellixson-Boyea, CPhT, CSPO for a sneak peek into the next year of development for PCC eRx. In addition, you’ll hear about recent bug fixes and improvements, learn new tips & tricks, as well as cast your vote for future enhancements of PCC eRx! Session will also include open Q&A.
Presented By: Morgan Ellixson Boyea, CPhT, CSPO |
|
| What’s Past is Prologue |
We’ll share how the original vision for PCC–40 years ago!–designed to emphasize long-term relationships and empower our clients, continues to guide the company vision for today and the future.
Presented By: Erin Auer |
|
| Which Interfaces are Right for Your Practice? |
Discover which PCC integration options best address specific data sharing use-cases, and which might be a good fit for your practice.
Presented By: Scott Kirby |
|
| Why You Need Data and Getting the Data You Need |
At the conclusion of this presentation, participants should be able to: illustrate how to turn a “word problem into a math problem” just like in middle school, identify appropriate sources of the data required to make an Evidence Based Practice Management Decision, construct a plan and collect the data required to make an important assessment of the practice.
Presented By: Chip Hart |
|
| Writing Playbooks That Are Awesome |
Playbooks are important for every pediatric practice: they explain how you want your schedulers to do your appointments; they describe the dress code and attendance policies for your staff in your employee handbook; they lay out steps to take in the case of vaccine temperature excursion. How can you write procedures that are clear, relevant, up-to-date, and don’t suck?
Presented By: Suzanne Berman |
Configure Provider Signatures for Patient and Account Forms
You can upload provider signatures, set permissions for who is allowed to generate them, and include them on patient and account forms in the Forms Configuration tool in PCC EHR.
Video: Watch Configure Form Letterhead and Signatures to learn more.
Your practice will need to be live with the Forms Configuration tool to take advantage of this functionality. Learn how to enable the Forms Configuration tool in Switch to the Forms Configuration tool in PCC EHR.
Prepare a Provider Signature
Your practice can upload electronic signatures for each of the providers at your practice. Once the signature image is uploaded, you can set permissions for which staff members are allowed to generate the signature. When the signature image is not allowed to generate, the signature area remains blank, so that the provider can sign the form by hand.
The provider should sign unlined white paper with black ink. Scan the image at a high resolution and save it on your computer. If you have the option, make the signature image a transparent PNG.
You can use a signing pad or computer application and save the image to your computer. Use black lines on a white background for the greatest contrast. Crop the image closely. If you have the option, make the signature image a transparent PNG.
Add a Signature Image
Once you have prepared a provider signature, open the Signatures tab in the Forms Configuration tool and upload your signature.
Open the Signatures Tab
Open the Forms Configuration tool from the Configuration menu in PCC EHR. Then click on the Signatures tab.
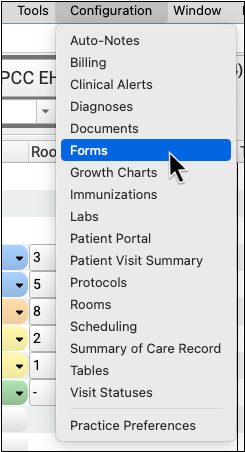

Select a Provider
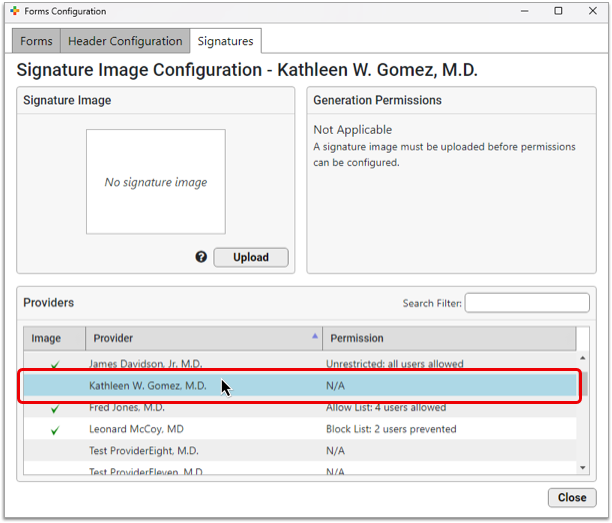
Select a provider from the Providers table.
Open the File Viewer
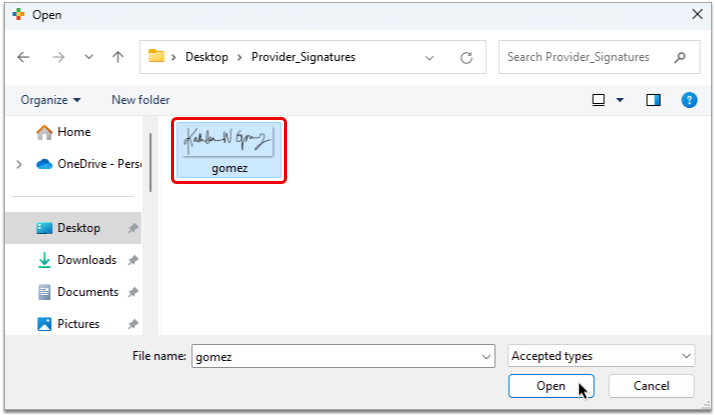
Click the “Upload” button in the Signature Image pane to open the file viewer.
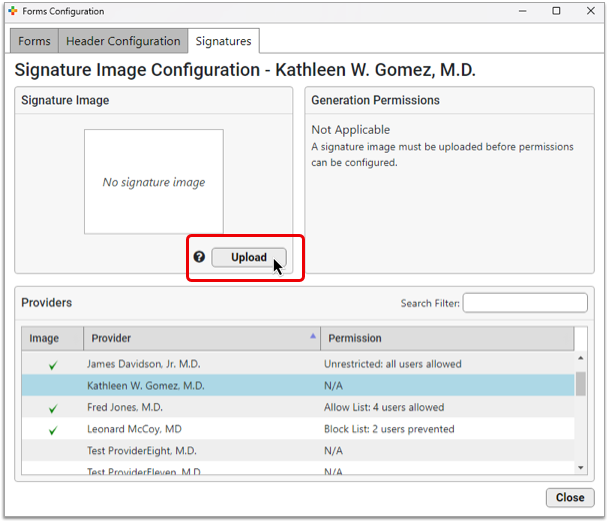
Select your Image
Select the scan file from your computer and click “Open”.
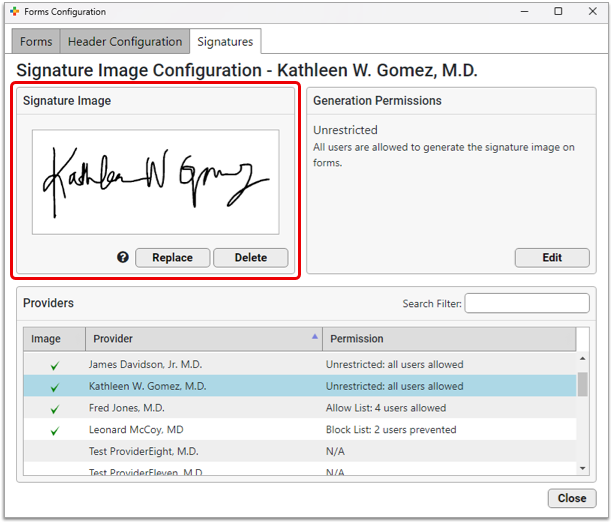
The signature appears in the Signature Image pane as it will display on patient and account forms, and a green check mark appears beside the Provider’s name in the Providers table.
Optionally Replace or Delete the Uploaded Image
You can replace the image or delete it if you need to make changes.
Migrate Existing Signatures: If your practice already has signatures on forms but you haven’t started using the Forms Configuration tool, rest assured that those signatures will link to the correct provider once you migrate to the new tool and be ready to use immediately.
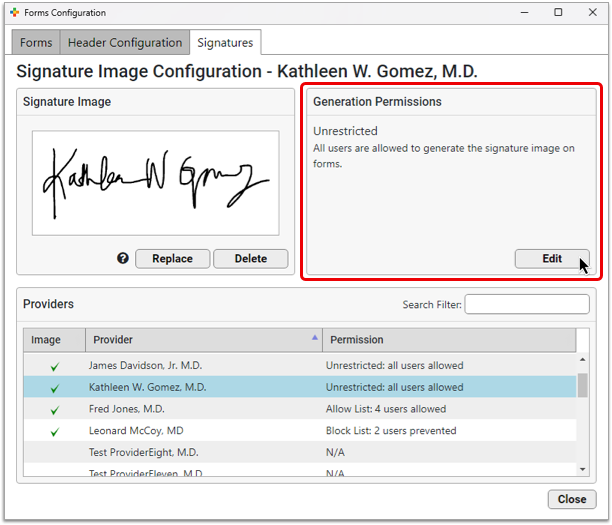
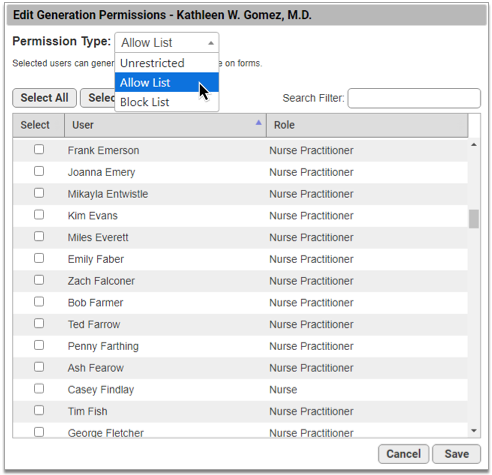
Set Signature Generation Permissions
You can control which users are allowed to generate a given signature on patient and account forms. By default, all provider signatures are set to “Unrestricted”, meaning any user at your practice can generate them on forms.
Select a provider from the list, then click the “Edit” button in the Generation Permissions pane.
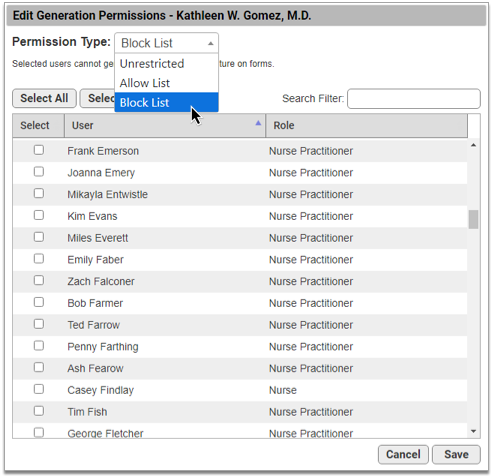
Use the drop-down menu to adjust the Permission Type.
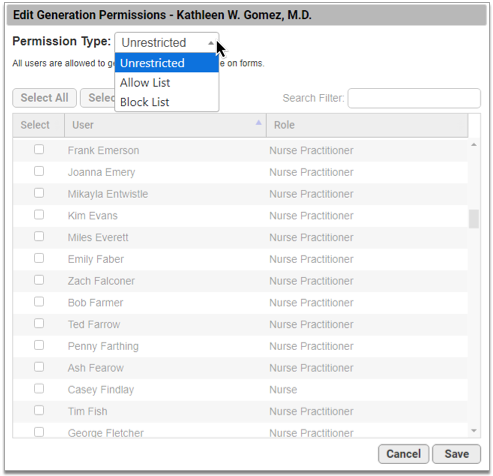
There are three permission types:
-
Unrestricted: Any user can generate the signature on patient and account forms.
-
Allow list: Only selected users can generate the signature.
-
Block list: Selected users cannot generate the signature.
The type you select determines who can generate the provider’s signature on forms.
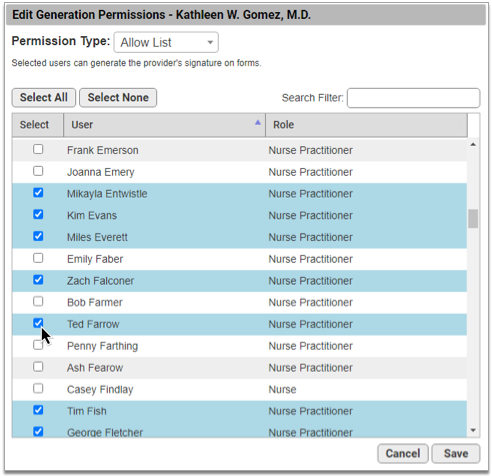
Create a List of Allowed Users
To create a list of users who are authorized to generate a signature, choose “Allow List” from the Permission Type drop-down, then select the users who may generate the provider’s signature on patient and account forms.
Create a List of Blocked Users
To create a list of users who are not authorized to generate a signature, choose “Block List” from the Permission Type drop-down, then select the users who are not permitted to generate the provider’s signature on patient and account forms.

Once you have finished updating the permissions, click the “Save” button to return to the Signature Image Configuration overview.
Switching Permission Types: Switching between permission types clears out all user selections.
Set Permissions for Signatures Tab Access
Users need explicit permission to access the Forms Configuration tool in PCC EHR and the Signatures tab within it. You can add the Forms Configuration and Signature Image Configuration permissions to user roles in the User Administration tool in PCC EHR.
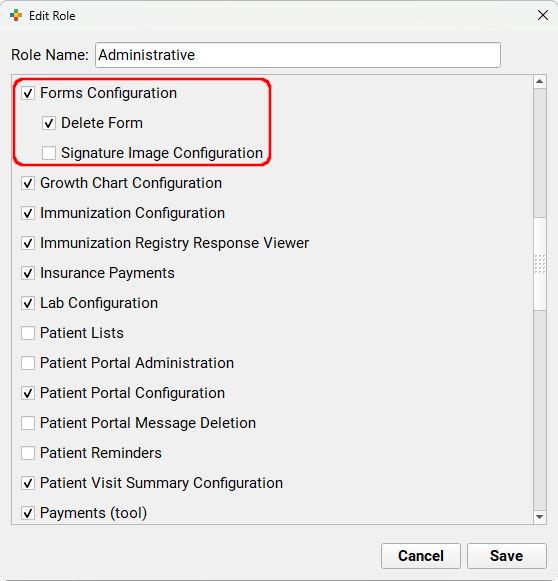
Users with the Forms Configuration permission can access the Forms Configuration tool and all of its functions with the exception of form deletion and signature configuration. Users with the Signature Image Configuration permission can see and access the Signatures tab and all of its functions.
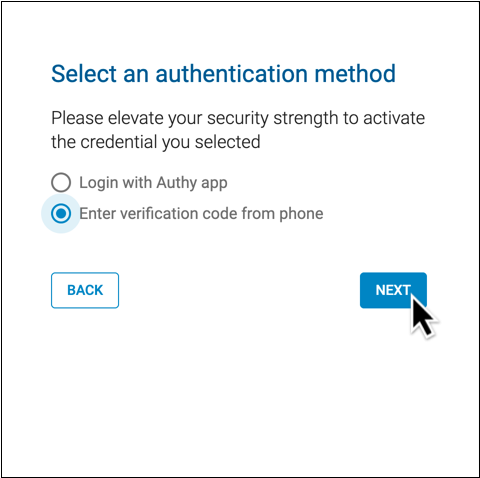
Manage Your EPCS Account, Tokens, and Password
After registering for electronic prescribing for controlled substances (EPCS), you can manage your EPCS account and authentication tokens in the Exostar Account Management tool. You can also reset your EPCS password with help from an eRx Administrator.
Open Exostar Account Management
Use the Exostar Account Management tool to add a new token to your EPCS account, remove or resync an existing token, or manage your backup phone number.
Open the Rx Queue
Click on the Rx Queue tab in PCC EHR to open PCC eRx.

Go to My Settings
Click on the “My Settings” link in the top navigation bar to open your personal PCC eRx settings.

Open Exostar Account Management
Click on the “Exostar Account Management” button on the EPCS tab of the My Settings page to access your Exostar account details.
Read on to learn which actions you can take within Exostar Account Management.
Resync Your Hard Token
When PCC eRx stops accepting one-time passwords from your hard token, you can try resyncing it to restore your ability to use it as a factor of authentication for EPCS.
Grab Your Hard Token
Get your hard token in hand. You will need it to complete the resync.
Open Exostar Account Management
Click the “Exostar Account Management” button on the My Settings page in PCC eRx.
Resync Your Token
Find the Hardware Token (One-Time Password) card within your Exostar account settings and click the “Resync your token” link.

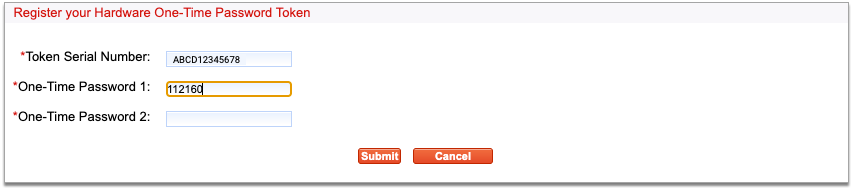
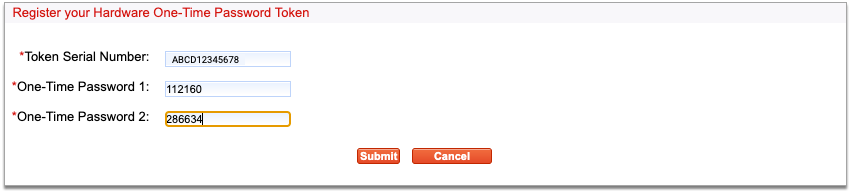
Enter Two One-Time Passwords from Your Hard Token
Press the button on your hard token to generate a one-time password, then enter it into the field labeled “One-time password 1”.
Press the button a second time to generate another password, then enter it into the field labeled “One-time password 2”.
Both fields are required to resync your token.
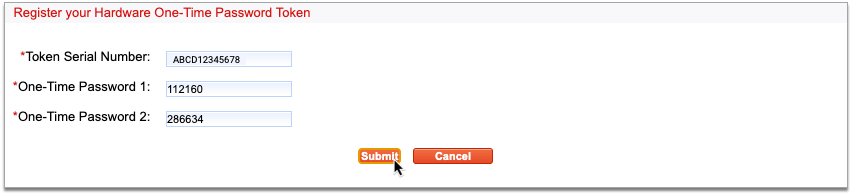
Finish Resyncing Your Token
Click the “Next” button after entering both passwords to finish resyncing your token.
If you receive an error message, try again, double-checking that both passwords have been entered correctly.
After resyncing, try sending an electronic prescription for a controlled substance to see if it has been restored. If resyncing does not restore use of your hard token, contact PCC Support.
Remove a Lost or Broken Token
If you lose access to one of your tokens, deactivate and remove it from your EPCS account so that you can add back a functional replacement.
Open Exostar Account Management
Click the “Exostar Account Management” button on the My Settings page in PCC eRx.
Check That You Have a Backup Phone Number for Your Exostar Account
Check that you have a Phone-Based (One-Time Password) backup phone number connected to your Exostar account. If you do not, set one up now before moving on to the next step.
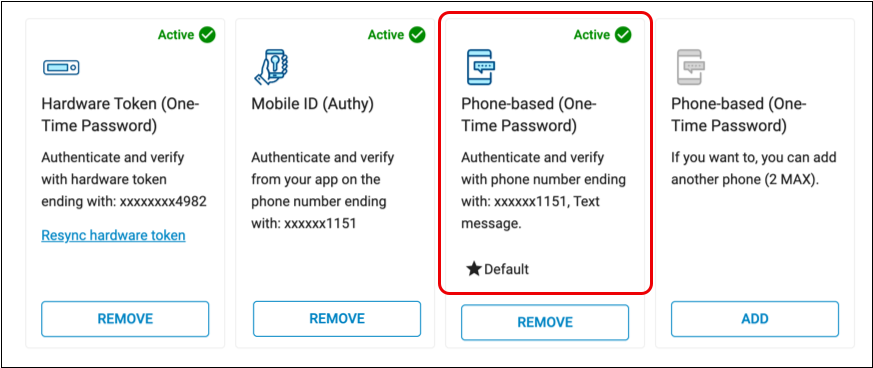
A backup phone number ensures continued access to your Exostar account if neither a hard nor soft token is accessible, functional, or connected to your account.
Click “Remove” on the Lost or Broken Token
Click the “Remove” button on the token you need to remove.

To remove your hard token, click “Remove” on the Hardware Token (One-Time Password) card. To remove your soft token, click “Remove” on the Mobile ID (Authy) card.
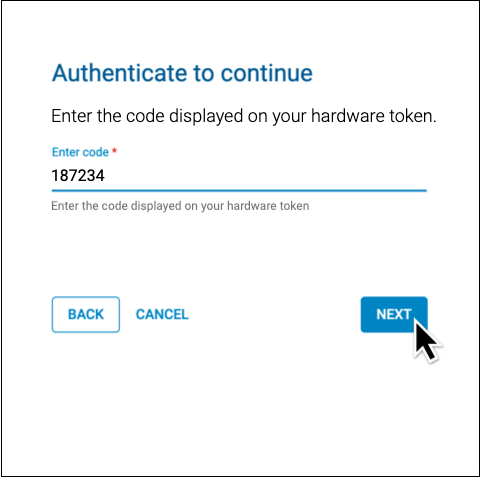
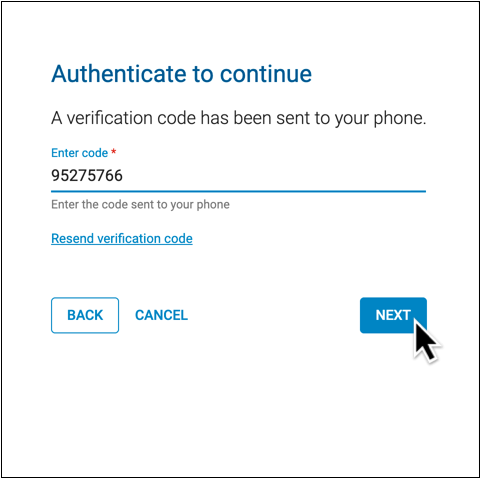
Authenticate Your Identity
Choose a method to authenticate your identity, then click “Next”.

Enter the code from the method you selected.
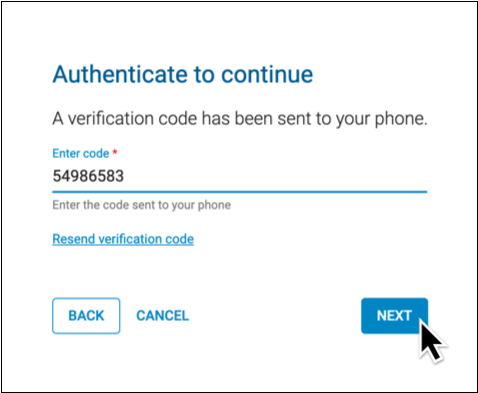
You can authenticate using a code generated by your hard token, your PCC eRx soft token in the Authy app, or with a code sent to your phone by call or text.
Not Prompted to Authenticate?: That’s okay! You only need to authenticate once per session while working in Exostar Account Management. You may not be prompted to authenticate if you already proved your identity while taking another action in Exostar Account Management.
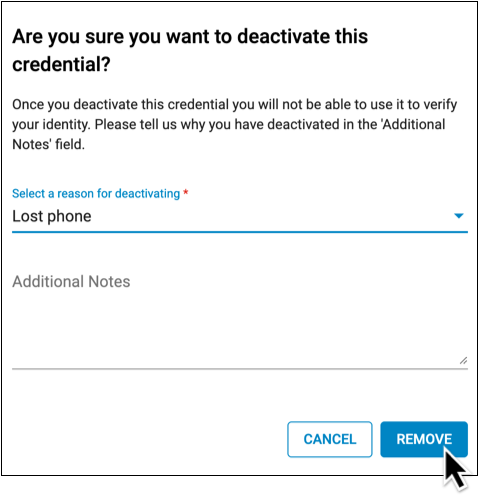
Record the Reason for Removing the Token
Document your reason for removing your token.

Click “Remove”
Click the “Remove” button to finish removing your token.
After you remove a token, you can add back a replacement for it.
Add a New or Replacement Token
You can use the Exostar Account Management tool to add a new or replacement token to your Exostar account. This is useful when you need to replace a lost or broken hard token, set up a soft token using a new cell phone number, or configure a soft token for the first time after having skipped that step in the EPCS registration process.
Add a New or Replacement Soft Token
Set up your smartphone as a factor of authentication for EPCS.
Grab Your Smartphone
Get your smartphone in hand. If you haven’t already, install the Authy app.
Open Exostar Account Management
Click the “Exostar Account Management” button on the My Settings page in PCC eRx.
Add or Activate a Mobile ID
Find the Mobile ID (Authy) card within your Exostar account settings.
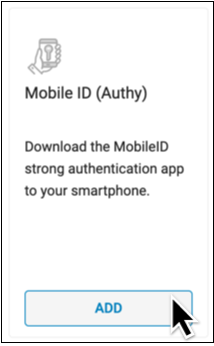
Click the button at the bottom of the card. It will say “Add” or “Activate” depending on the status of your Exostar account.
If the button says “Remove” you already have a soft token linked to your account. Follow the steps to remove your current token before proceeding any further.
Authenticate Your Identity
Choose a method to authenticate your identity, then click “Next”.
Enter the code from the method you selected.
You can authenticate using a code generated by your hard token, or with a code sent to your phone by call or text.
Not Prompted to Authenticate?: That’s okay! You only need to authenticate once per session while working in Exostar Account Management. You may not be prompted to authenticate if you already proved your identity while taking another action in Exostar Account Management.
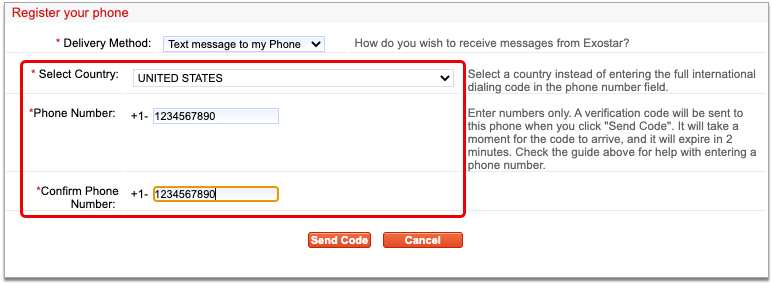
Enter Your Phone Number and Email Address
Enter the phone number associated with your smartphone and the email address that you used to register for EPCS.
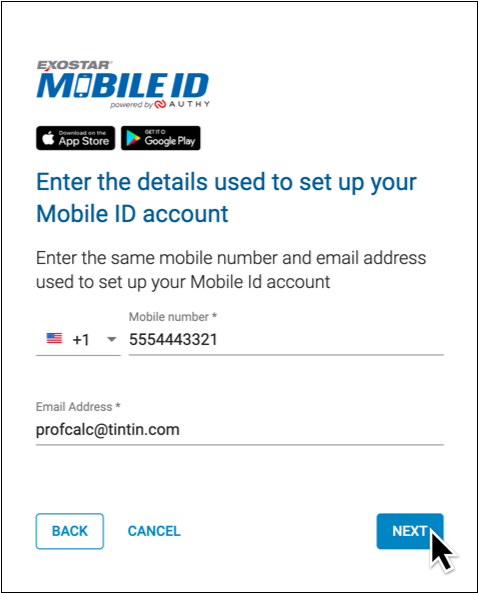
Click “Next” to proceed.
Tap the Authy Notification on Your Smartphone
Pick up your smartphone and tap the push notification from Authy to open the app.
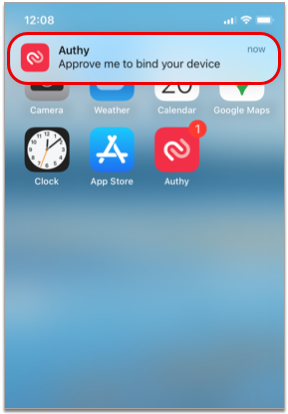
No Notification? Open the App Manually: If you have the Authy app installed but do not receive a push notification, open Authy manually instead by tapping the app icon on your home screen.
Don’t Have the Authy App? Download it Now: If you do not have the Authy app installed on your smartphone, you will receive a text message with a download link instead of a push notification. Open the text message, click on the link, and install the Authy app before moving on to the next step.
Tap the Notification Icon in the Authy App
Tap the notification bell icon in the Authy app.
The red counter on the notification bell indicates that you have a new request to add a token.
Approve the Pending Request
Tap the pending request from PCC eRx to approve it. Then, tap the green “Approve” button to confirm.
Once you approve the pending request, your smartphone becomes registered as a soft token for EPCS in PCC eRx.
Request Timeout: If the pending request from PCC eRx times out before you have a chance to approve it, tap “Exit” in the top left corner of your phone screen, click the “Verify with Mobile ID code” link in PCC eRx, then enter a one-time password from your smartphone to finish the registration process.
No Notification? Finish Set Up Manually: If the notification bell in the Authy app does not display a red counter but you can see the PCC eRx soft token on your screen, click the “Verify with Mobile ID code” link in
PCC eRx, then enter a one-time password from your smartphone to finish the registration process.
Once registered, your soft token is bound to your identity, phone number, and device. Only you may use it as a second factor of authentication when sending electronic prescriptions for controlled substances from PCC eRx.
Add a Replacement Hard Token
Add a hard token as a factor of authentication for EPCS. If you already have a hard token, try resyncing it before setting up a new one.
Order New Hard Tokens from PCC: If your practice needs to order new hard tokens, contact PCC Support. PCC orders hard tokens from Exostar at no cost to you. Once ordered, Exostar ships hard tokens directly to your practice, generally in less than two weeks.
Grab Your New Hard Token and Your Smartphone
Get your new hard token and your smartphone in hand.
You will need your hard token in order to register it as an authentication method for EPCS.
You will need your smartphone in order to authenticate that you are authorized to make changes to this account.
Open Exostar Account Management
Click the “Exostar Account Management” button on the My Settings page in PCC eRx.
Add a Hardware Token
Find the Hardware Token (One-Time Password) card within your Exostar account settings.

Click the “Add” button at the bottom of the card.
If the button says “Remove” you already have a hard token linked to your account. Follow the steps to remove your current token before proceeding any further.
Authenticate Your Identity
Choose a method to authenticate your identity, then click “Next”.
Enter the code from the method you selected.
You can authenticate using a code generated by your PCC eRx soft token in the Authy app, or with a code sent to your phone by call or text.
Not Prompted to Authenticate?: That’s okay! You only need to authenticate once per session while working in Exostar Account Management. You may not be prompted to authenticate if you already proved your identity while taking another action in Exostar Account Management.
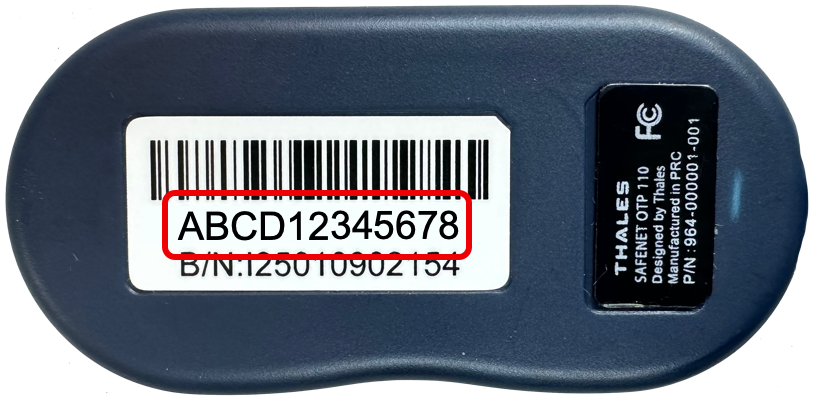
Enter Your Hard Token’s Serial Number
Enter the serial number from the back of your hard token into PCC eRx.
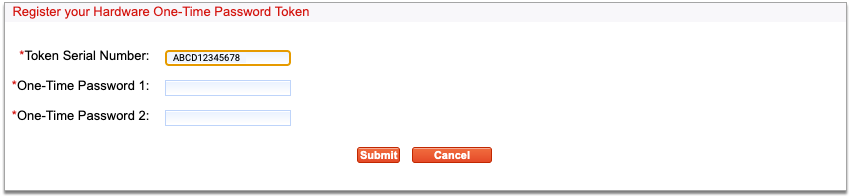
Enter Two One-Time Passwords from Your Hard Token
Press the button on your hard token to generate a one-time password, then enter it into the field labeled “One-Time Password 1”.
Press the button a second time to generate another password, then enter it into the field labeled “One-Time Password 2”.
Both fields are required to add your token.
Click “Next”
Click the “Next” button to finish registering your hard token.
Once registered, your hard token is bound to your identity. Only you may use it to validate your identity when sending electronic prescriptions for controlled substances from PCC eRx.
Manage the Backup Phone Number for Your Exostar Account
You can set up a phone number as a backup authentication method for your Exostar account in case you lose access to both your hard and soft tokens. While you cannot use the backup phone number to send prescriptions for controlled substances, you can use it to authenticate in Exostar Account Management so that you can add new tokens back to your account and resume prescribing.
PCC recommends setting up at least one phone number when you register for EPCS, but you can update your backup phone number settings at any time in Exostar Account Management.
Add a Backup Phone Number
You can add one or several phone numbers as backup authentication methods for your Exostar account. You can use these phone numbers to authenticate and unlock the other actions in Exostar Account Management, which is especially useful if you lose access to both of your EPCS tokens and want to set up new ones without having to go through the Exostar identity proofing process a second time.
Open Exostar Account Management
Click the “Exostar Account Management” button on the My Settings page in PCC eRx.
Add a Backup Phone Number
Find the Phone-Based (One-Time Password) card within your Exostar account settings.

Click the “Add” button at the bottom of the card.
Authenticate Your Identity
Choose a method to authenticate your identity, then click “Next”.
Enter the code from the method you selected.
You can authenticate using a code generated by your hard token or your PCC eRx soft token in the Authy app. If you already have a backup phone number connected to your account, you can use that to authenticate, too.
Not Prompted to Authenticate?: That’s okay! You only need to authenticate once per session while working in Exostar Account Management. You may not be prompted to authenticate if you already proved your identity while taking another action in Exostar Account Management.
Enter Your Phone Number and Choose a Delivery Method
Enter your phone number and choose whether you would like to be contacted by voice or text.
This phone number and delivery method will be used to receive verification codes from Exostar.
Click “Next” to proceed.
Receive the Verification Code from Exostar
Wait for a call or text from Exostar with your verification code.
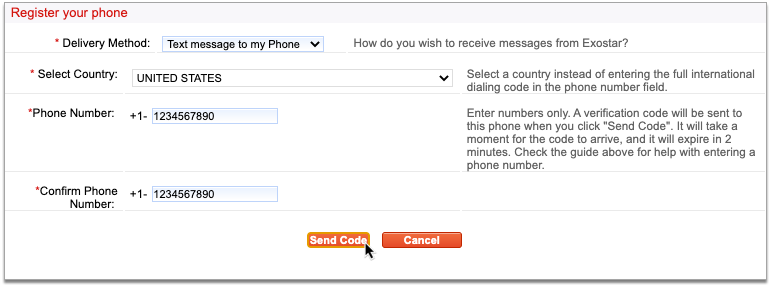
Enter the Verification Code on Your Computer Screen
Type the verification code into the field on your computer screen.
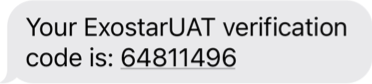
Click “Next” to finish adding your backup phone number.
Resend Code: If you do not receive a code, check that you entered your phone number correctly. Once confirmed, click “Resend verification code” and wait to receive a different code. If you do not receive a code after a second attempt, contact PCC Support for assistance.
You can add up to three backup phone numbers to your Exostar account.
Remove a Backup Phone Number
You can remove old backup phone numbers from your EPCS account.
Open Exostar Account Management
Click the “Exostar Account Management” button on the My Settings page in PCC eRx.
Click “Remove” on the Phone Number to Delete
Click the “Remove” button on the Phone-based (One-Time Password) card that lists the phone number you would like to delete.
Authenticate Your Identity
Choose a method to authenticate your identity, then click “Next”.
Finish verifying your identity using your selected method.
You can authenticate using a code generated by your hard token, your PCC eRx soft token in the Authy app, or a valid backup phone number connected to your Exostar account.
Not Prompted to Authenticate?: That’s okay! You only need to authenticate once per session while working in Exostar Account Management. You may not be prompted to authenticate if you already proved your identity while taking another action in Exostar Account Management.
Select a Reason for Removal
Use the drop-down to select the reason you are removing your backup phone number.

Provide additional detail if desired.
Finish Removing the Number
Click the “Remove” button to finish deleting this backup phone number.
If you deleted the only backup phone number listed on your Exostar account, add a new one right away to ensure that you will be able to unlock your account settings in Exostar Account Management even if you lose access to both of your EPCS tokens.
Reset Your EPCS Password
If you lost or forgot your EPCS password, ask an eRx Administrator at your practice to help you reset it.
eRx Administrator Steps
First, an eRx Administrator resets the prescriber’s password.
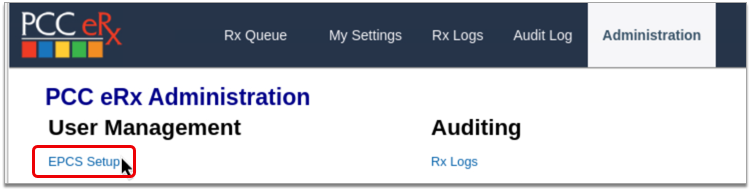
Open PCC eRx Administration
On the Rx Queue tab in PCC EHR, click “Administration”.
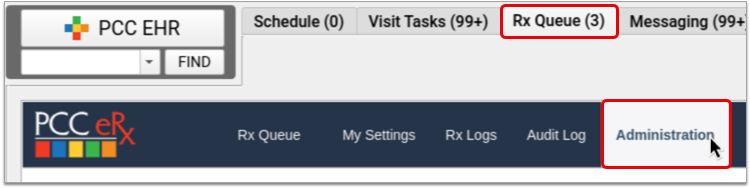
Open EPCS Setup
Click on the “EPCS Setup” link.
Find the Prescriber
Search for the prescriber by last name.

Edit the Prescriber
Click the “Edit” link on the prescriber’s account.
Reset the Prescriber’s Password
Click the “Reset EPCS Password” button.
The screen updates with a message showing that the prescriber can reset their password.
Prescriber Steps
Next, the prescriber chooses a new password.
Open My Settings in PCC eRx
On the Rx Queue in PCC EHR, click “My Settings”.
Create a New EPCS Password
Click the “Set up my EPCS password” button, then create a new password that meets all of the criteria.

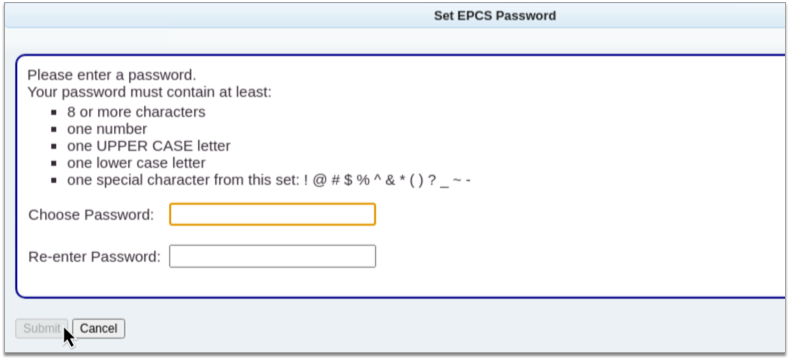
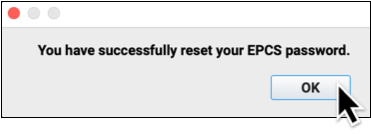
Click “Submit”
Click the “Submit” button to save your new password.

Never Revoke Your EPCS Account
Never Revoke Your Account: Never click the “Revoke OTP account and all credentials” button in Exostar Account Management. If you believe you might need to take that action, contact PCC Support first.
Claim Processing and Needs Correction Error Reference
When you process your claims, your PCC system reviews them for accuracy before submitting them electronically. This “claim scrubbing” results in cleaner claims, fewer claim rejections due to errors, and faster payment. Claims that need corrections will appear in the Needs Correction tab in the Claims tool.
What Claim Information Does PCC “Scrub” for Errors?
What kinds of pre-submission errors can your PCC system check for? What does it review before the claim is submitted? Here’s a partial list shared by PCC’s EDI specialists:
- Patient first and last name
- Patient date of birth
- Patient Care Center assignment
- Account (guarantor and custodial) names
- Account address line, city, state, and ZIP
- Account phone number
- Patient / account relationship
- Referring provider
- Service date (relative to current date, patient date of birth)
- CPT / HCPCS code (the claim processor checks your practice’s procedure code table to see that the codes on the claim are valid for the service date)
- ICD-10-CM code (valid for service date; primary non-External Cause code)
- Place of service address line, city, state, ZIP, phone number, and code
- CARC values and charge / payment / adjustment balancing
- NPI, tax identifier, and taxonomy code
- Inpatient admission date
- Practice address line, city, state, and ZIP
- Pay-To Provider address line, city, state, and ZIP
- Payor address line, city, state, ZIP, and [clearinghouse] identifier
- Subscriber first and last name
- Subscriber identifier
- Subscriber group identifier
- Subscriber date of birth
- Subscriber address line, city, state, and ZIP
- Original claim reference number
- Accident state
- Special characters (if any required fields include emojis, accented characters, or other characters that are not part of the mandated standard, PCC claim scrubbing replaces or removes them)
PCC’s claim processing reviews all of the above and more.
Special Behavior for Special Characters
Many payers are unable to process claims with certain characters, such as ñ,í,è, and ü, leading to errors, claim rejections, and delayed payment. When processing outgoing claims, your PCC system replaces these and other special characters with letters that comply with the X12 Basic Character Set that all payers are required to support.
Similarly, if a claim submission contains an emoji or other unrecognized character, PCC’s claim processing will remove it.
This filtering alters only the claim and does not change the patient or family’s information on your system.
When I See an Error, What Does It Mean? How Do I Fix a Claim Error?
The table below displays all the claim errors that can appear in the Needs Correction tab, in logs, or in other PCC reports that show claims that could not be submitted.
Claim Rejections and Denials: This list includes the errors created when you process your claims. Remember to also review claim rejections and denials, found in responses from claim clearinghouses and payors. See Respond to Claim Rejections.
| Error Code | Reason Claim Can Not Be Submitted | Suggestions to Fix | Previous Description (found in logs prior to PCC 9.6) |
| 100 | The patient’s first or last name is missing. | Edit the patient’s first or last name. | The patient’s name is invalid |
| 102 | The patient’s date of birth is either missing or invalid. | Review and update the patient’s date of birth. | The patient’s date of birth is invalid |
| 103 | The patient’s relationship code ([CODE]) for the relationship “[RELATIONSHIP]” is invalid. | Review the patient’s policies and update the patient’s relationship to the subscriber. If the relationship is already correct, review the codes for that relationship in your Relationships table. | Invalid relationship code found |
| 104 | The patient’s relationship to the subscriber is missing. | Review the patient’s policies and update the patient’s relationship to the subscriber. | Patient’s relationship to the insured is invalid |
| 105 | The patient’s PCP is not assigned. | Add a PCP to the patient’s demographics. | Patient does not have a provider entered in (the patient record) |
| 106 | Some part of the policy’s subscriber address is missing or incomplete. | Review the patient’s policies and update the subscriber address. | Subscriber address is bad |
| 200 | The billing account ([PCC#]) is missing a first or last name. | Edit the first or last name of the patient’s billing account. | The guarantor’s name is invalid |
| 202 | Some part of the billing account’s ([PCC#]) address is missing or incomplete. | Edit the address of the billing account. | The guarantor’s address is bad |
| 204 | The home account ([PCC#]) is missing a first or last name. | Edit the first or last name of the patient’s home account. | The custodian’s name is invalid |
| 205 | Some part of the home account’s ([PCC#]) address is missing or incomplete. | Edit the home account and update the address. | The custodian’s address is bad |
| 207 | The subscriber’s date of birth is either missing or invalid. | Edit the patient’s policy and enter a valid subscriber date of birth. | The insured’s date of birth is invalid |
| 208 | The policy’s certificate number has fewer than 2 characters. | Edit the patient’s policy and enter a valid certificate number. | The insurance certificate number is invalid |
| 209 | The policy’s group number is missing. | Edit the patient’s policy and enter a valid group number. | The insurance group number is invalid |
| 210 | The policy “[INSURANCE PLAN]” is not active for the date(s) of service. | Review the patient’s policies, and verify policy effective dates are correct. Review the charges for this encounter and ensure they are pending the correct policy. If you change the responsible party for the charges, generate a new claim and delete this claim. | Claim is for an insurance company no longer on the patient |
| 300 | Some part of the insurance plan address is missing or incomplete. | If you want to file a claim with this plan, update the address of the plan in the Insurance Companies table. | The insurance company address is bad |
| 302 | The payor ID for the insurance plan is missing. | If you want to file a claim with this plan, add the plan’s payor ID in the Insurance Companies table. | The ins company does not have a payor ID number in ted |
| 303 | The place of service “[POSNAME]” has an invalid address. | Contact PCC Support to update the place of service’s address. | The Place of Service Address is invalid |
| 305 | The place of service “[POSNAME]” is missing an NPI. | Contact PCC Support to update the place of service’s NPI. | The place of service NPI is invalid |
| 306 | The referring provider’s name is missing. | Edit the referring provider and update their name. | The referring provider’s name is invalid |
| 307 | The [CHOICE] for the referring provider “[NAME]” is missing. | Edit the referring provider and update any missing information. | The referring provider’s %s is invalid |
| 308 | The provider “[COMMON.PROV.NAME]” is missing their tax ID. | Edit the provider and update their Tax ID. | The provider Tax ID is invalid |
| 309 | The provider “[COMMON.PROV.NAME]” is missing their taxonomy code. | Edit the provider and update their taxonomy code. | The provider taxonomy code is invalid |
| 310 | The provider “[COMMON.PROV.NAME]” is missing an NPI. | If you want to file this claim with this provider, update the provider’s NPI in the Providers table. If the provider is not correct, either update the charges with the correct billing provider or delete and repost the encounter. | The provider NPI is invalid |
| 311 | Some part of the practice’s address is missing or incomplete. | Edit Practice Configuration and update the practice’s address, including a ZIP+4 code. | The Practice Address is invalid. The Practice Address requires at least one address line, city, state, and ZIP+4. |
| 312 | Some part of the batch-specific practice address is missing or incomplete. | Contact PCC. | The Alternate Practice Address, from the insurance batch configuration, is invalid. The Alternate Practice Address requires at least one address line, city, state, and ZIP+4. |
| 313 | Some part of the batch-specific pay-to practice address is missing or incomplete. | Contact PCC. | The Pay-To Practice Address, from the insurance batch configuration, is invalid. The Pay-To Address requires at least one address line, city, state, and ZIP+4. |
| 314 | The billing account’s zip code ([ZIP CODE]) is less than nine digits. | Edit the billing account to include a ZIP+4 code. | POS: Home: Guarantor needs ZIP+4 |
| 314 | The home account’s zip code ([ZIP CODE]) is less than nine digits. | Edit the home account to include a ZIP+4 code. | POS: Home: Custodian needs ZIP+4 |
| 700 | The procedure “[COMMON.PROC.NAME]” has a code ([PROC.CODE]) with less than 5 characters. | If you want to file this procedure on the claim, edit the procedure’s code in the Procedures table. Otherwise, change the responsible party of the charge so it is personal. Then the procedure will not be filed on this claim. | Procedure code contains less than 5 characters |
| 701 | The procedure “[COMMON.PROC.NAME]” has a code ([PROC.CODE]) that is invalid for the date of service. | Delete and repost the charges for the encounter. | The procedure code “XXXXX” is obsolete for the date of service. |
| 702 | The procedure code modifier ([MODIFIER]) for the procedure code ([CODE]) is invalid. | Modifiers can only have 2, 4, 6, or 8 characters. Edit the procedure and update the billing code. | The procedure modifier “XXX” has an invalid number of characters. |
| 703, 704, 705, or 706 | The diagnosis code ([CODE]) is invalid for the date of service. | Edit the encounter’s charges and change the diagnoses. If the encounter was posted for the wrong date of service, delete the charges and repost them with the correct date. | Diagnosis code is not valid for the date of service |
| 708 | The place of service “[POSNAME]” is missing a POS code (schedule [A-F]). | Contact PCC Support to update the POS code. | Place Of Service(POS) code is invalid |
| 710 | The date of service ([DOS]) is invalid. | Date(s) of service must be after 1980. Delete and repost the charges for the encounter. | Charge posting date is invalid |
| 711 | The date of service ([DOS]) is invalid. | Date(s) of service must be today or in the past. Delete and repost the charges for the encounter. | Charge posting date is in the future |
| 721 | The primary diagnosis code on the claim must not be an External Cause code (beginning with V, W, X, Y). The current primary diagnosis is “[DIAG NAME]” ([DIAG CODE]). | Edit the encounter’s charges and change the order of the diagnoses. | The primary diagnosis cannot be an External Cause diagnosis code |
| 722 | The total of CARC adjustment(s) and insurance payment amounts from the primary insurance can not exceed the charge amount. Procedure: [PROCEDURE NAME] Charge Amount: $[######] Primary Payment: $[######] CARC Total: $[######] | Delete the payments and adjustments, repend the charges towards the appropriate responsible party, and then repost the payments and adjustments so they include the correct CARC amounts. | The total posted CARC adjustment(s) and insurance payment cannot exceed the the charge amount. |
| 800 | The date first seen ([DATE]) must be within the dates of service. | Edit the date first seen for the encounter’s charges. | Date first seen is after the first date of service |
| 801 | This claim is missing the accident state. | Enter the accident state for the encounter’s charges. | Accident was posted without entering the accident state |
| 803 | This inpatient hospital claim is missing the admit date. | Enter the admit date for the encounter’s charges. | Inpatient hospital service was posted without an admission date |
| 804 | This claim, with a claim delay code of 09, is missing a payer claim control number. | Enter the payer claim control number into the Reference Number field for the encounter’s charges. | A Reference Number is required when the Claim Delay Code is “09” |
| 996 | This claim has no insurance policy. | Review the patient’s policies, and verify policy effective dates are correct. Review the charges for this encounter and ensure they are pending the correct policy. Generate a new claim and delete this claim. | Claim batched w/o insurance. Check insurance effective dates |
| 997 | The charge ID ([CHARGE HANDLE]) can not be processed. | Contact PCC. | No configuration match found for this charge |
| 998 | The charges for this claim are no longer associated with this patient ([PCC#]). | Identify the correct patient account and review their account history. Generate a new claim and delete this claim. | Charges for a sibling were found rebatched with this claim |
| 1001 | The billing account ([PCC#]) can not be accessed. | Contact PCC. | Error getting account data pcc=%ld |
| 1002 | The patient ([PCC#]) can not be accessed. | Contact PCC. | Error getting patient data pcc=%ld |
Install and Set Up the Authy App
The Authy app turns your smartphone into a secure password generator for taking certain actions on your PCC system. Secure Authy passwords are used in conjunction with your regular PCC password to provide an extra layer of security for your account. The concept of requiring two passwords to access a digital service is known as two-factor authentication.
PCC requires two-factor authentication to:
This article covers how to install and set up the Authy app on your smartphone or tablet and tailor notifications to your preference.
If you already have the Authy app installed, use the links above to configure two-factor authentication for PCC SecureConnect, EPCS, and RoundCube.
Install the Authy App
Install the Authy app on your Apple or Android smartphone or tablet.
On iPhone or iPad
Find Authy in the App Store and install it on your iPhone or iPad.
Open the App Store
Tap the App Store icon to open it on your device.

Search for Authy
Search for the Authy app in the App Store, where it appears under the name “Twilio Authy.”
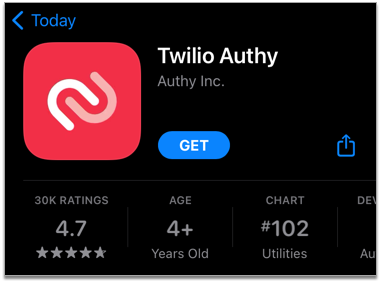
Install Authy
Tap the “Get” button to install the Authy app. Follow the prompts on your screen to confirm and complete the purchase. The Authy app is free of charge.
On Android Phones and Tablets
Find Authy in the Google Play store and install it on your Android phone or tablet.
Open the Google Play Store
Tap the Google Play Store icon to open it on your device.

Search for Authy
Search for the Authy app in the Google Play Store, where it appears under the name “Twilio Authy Authenticator”.
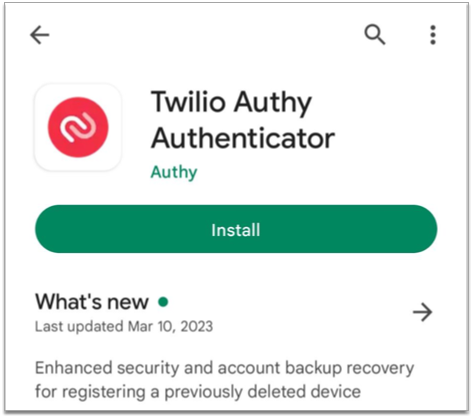
Install Authy
Tap the “Install” button to install the Authy app. Follow the prompts on your screen to confirm and complete the purchase. The Authy app is free of charge.
Register Your Device
After downloading the Authy app, register your device and create an account.
Open the Authy App
Open the Authy app on your device.
Register Your Phone Number
Type in your phone number to begin the registration process.
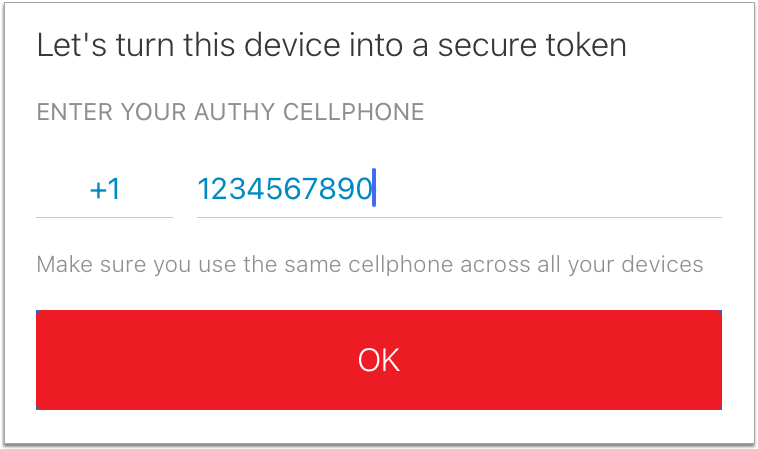
Register Your Email Address
After you type in your phone number, an email field appears.
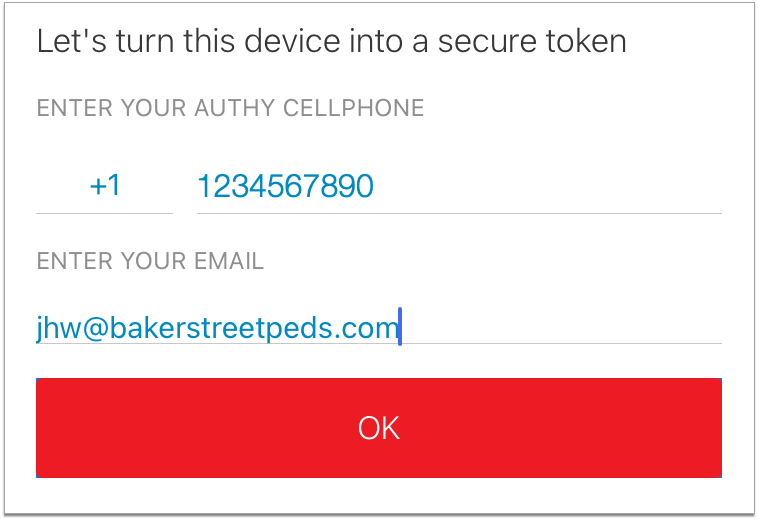
Type in your email address then tap the “OK” button.
Choose a Verification Method
Choose a method to verify your phone number. You can verify by text (SMS) or phone call.
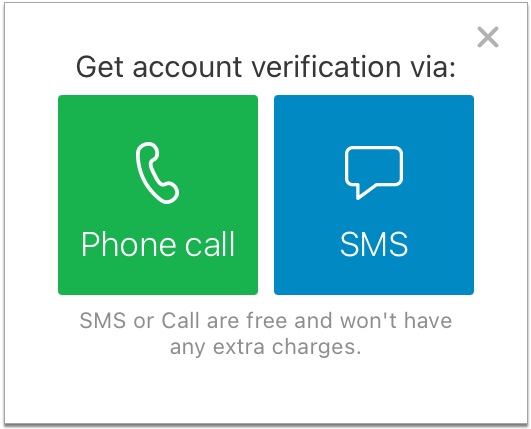
Get Your Registration Code
Answer the call from Authy or open your text messages to retrieve your registration code.
Receipt of the registration code is how Authy verifies that your phone number was entered accurately.
Enter Your Registration Code
Type your registration code into the Authy app.
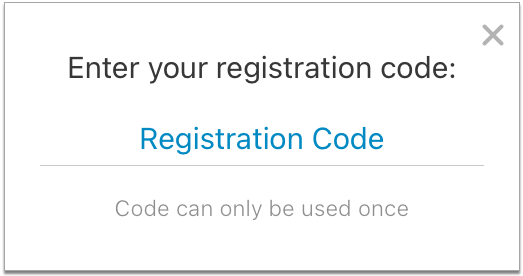
Alternatively, if you received your code by text, you can tap the registration link in the text message instead of typing your code into the app.
Authy automatically finishes creating your account after you enter the code.
Allow Authy Notifications
If prompted, allow the Authy app to send you notifications.
Among other things, Authy uses notifications to prompt for identity verification with a single tap, which is the most convenient way to validate your identity from your smartphone, tablet, or connected Apple Watch.
Enable Backups and Create a Backup Password
Enable backups in Authy in case you need to be able to access your account from a different device. Backups are most commonly used to regain account access after switching phones.
Click on the gear icon, then click “Accounts” to go to your settings.
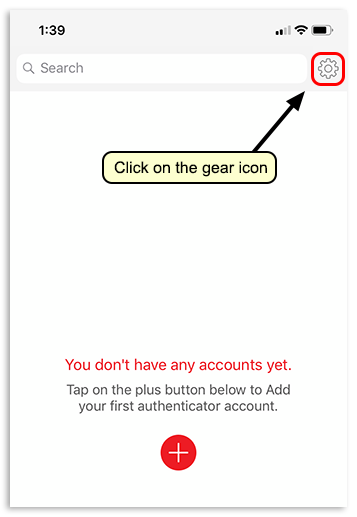
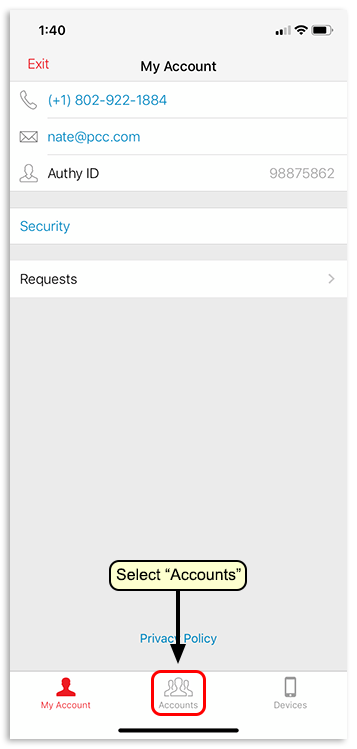
Turn on “Authenticator Backups”.
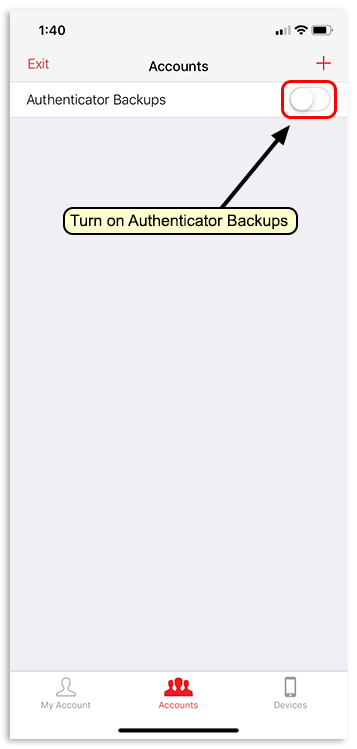
Create a password, click “Enable Backups”, then confirm your new backup password by typing it again.
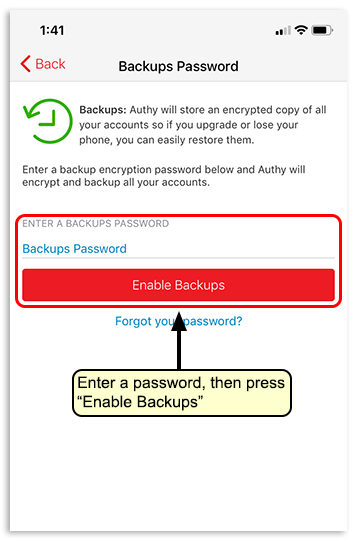
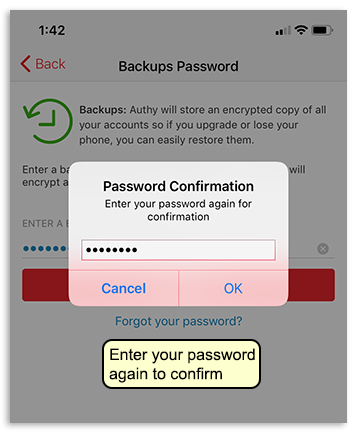
Remember your backup password in case you need to use it to access your Authy account on a new device. You can return to this screen to change your backup password at any time.
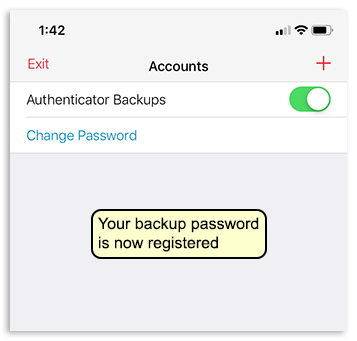
Add Authentication Tokens for SecureConnect, Roundcube, and EPCS
Add a secure token to the Authy app for each sign-in or action on your PCC system that requires two-factor authentication. The parts of your PCC system that require two-factor authentication are PCC SecureConnect, EPCS, and, if configured for it, Roundcube (your PCC email).
Follow the links above to learn how to set up two-factor authentication for each service.
Set Up Notifications and One-Touch Approval
Authy has a feature that allows you to complete two-factor authentication by tapping a notification from the app. Read on to learn how to set it up on your smartphone, tablet, and connected Apple Watch.
On Your Phone
Enable Authy notifications on your phone, then set up one-touch approvals in the Authy app.
Open Your Phone Settings
Open your smartphone’s settings.
Find Settings for the Authy App
Locate the settings for the Authy app, then tap to view them.

Allow Notifications from the Authy App
Allow notifications from the Authy app on your smartphone and tailor the notification style to your preferences.
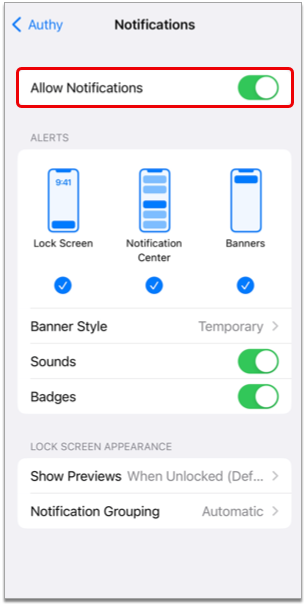
When you are done, exit your smartphone’s settings.
Additionally, on iPhone and iPad
Open the Authy App
Open the Authy app on your smartphone.

Tap the Gear Icon
Tap the gear icon in the top right corner of the Authy app.
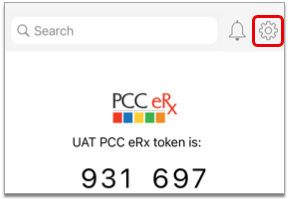
Tap “Requests”
Tap the “Requests” option in the middle of the screen.
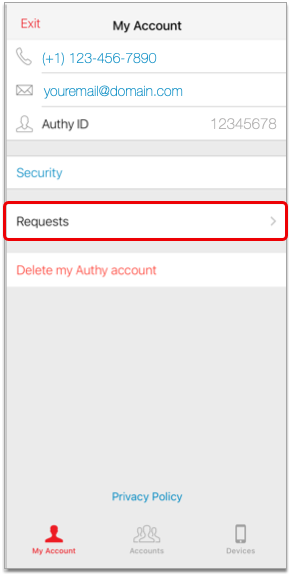
Allow Approval from Notifications
Enable the “Allow Approval from Notifications” option.
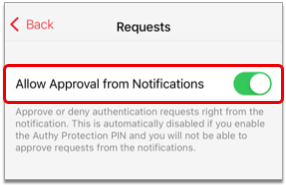
When you are done, exit the Authy app.
After completing these steps, you can approve or deny authentication requests from Authy by tapping one of the options in the push notification it sends to your smartphone.
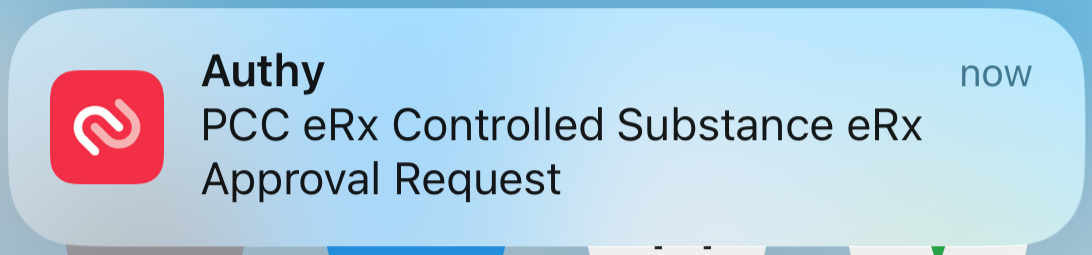
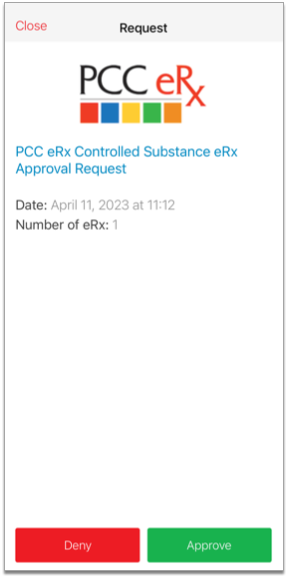
On Your Apple Watch
Push Authy notifications to your Apple Watch for one-touch approval.
Open the Watch App on Your iPhone
Open the Watch app on your iPhone.
Find Authy in Your Watch Settings
Scroll through your Watch settings until you find the Authy app.
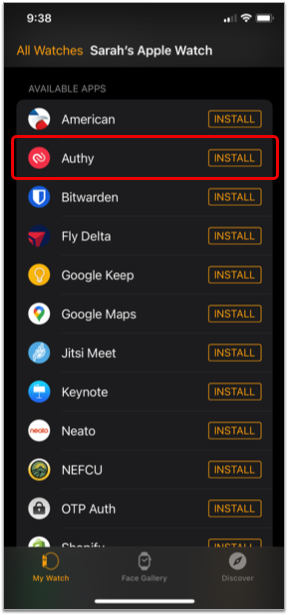
If Needed, Install the Authy App on Your Watch
If the Authy app isn’t already installed on your watch, tap the “Install” button.

Once installed, you can access Authy on your Apple Watch.
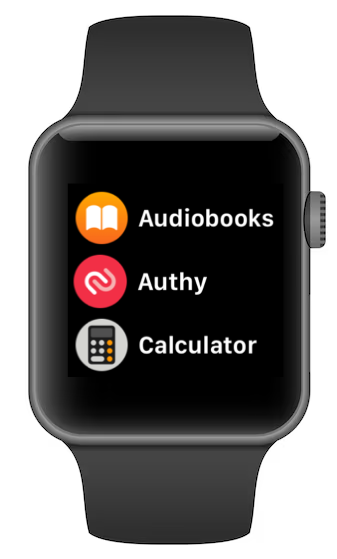
The next time you take an action in PCC that requires a security code from Authy for two-factor authentication, the Authy app will send an authentication request to your Apple Watch as well as to your phone.
You can also open the Authy app on your Apple Watch at any time, without notification, and use the security code it generates to validate your identity.
Access Your Authy Account on a New Device
If you lose your device or want to access Authy on multiple devices, read on.
Restore Access on a New, Lost, or Inaccessible Device
Read Authy’s instructions about how to access your existing Authy account on a new device.
Restore Authy Access on a New, Lost, or Inaccessible Phone
Set Up Authy on Multiple Devices
Open Authy on Your Primary Device
Open the Authy app on the device you normally use.

Enable Multi-Device in Your Authy Account
Open your Authy account Settings, go to the Devices tab, then turn on the “Allow multi-device” switch.
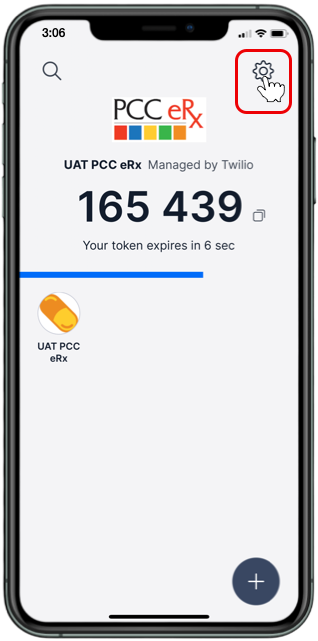
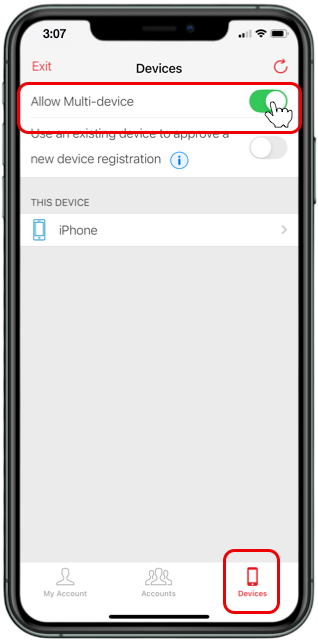
Download Authy on a New Device
Download the Authy app on a new device, like your tablet or a second smartphone, if you have one.
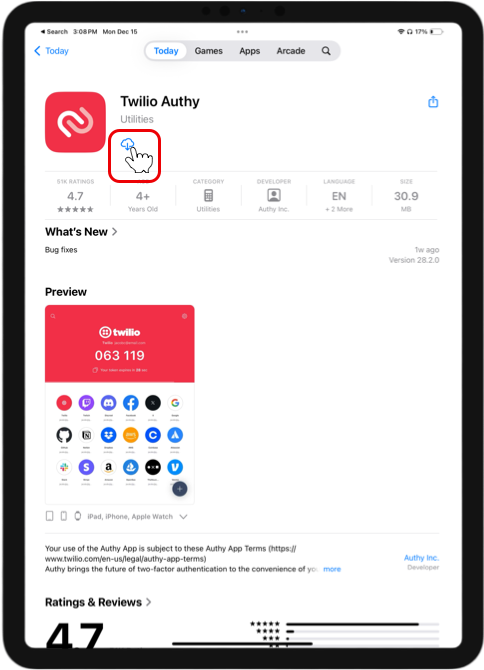
Sign into Authy on Your New Device
Open the Authy app on your new device, then sign into your account.

Verify Your Account
Choose a verification method for your account. If you choose “Use existing device with Authy installed”, Authy will send a notification to your main device requesting approval to add a new device to your account.
Approve the New Device
On your main device, approve the request from the Authy app to add a new device to your account.

Once you add your new device, Authy recommends turning off the multi-device switch in your account settings until the next time you want to add a device. You can continue to use Authy on all of your approved devices when the multi-device switch is off.
For more information, read Authy’s instructions about how to Set Up Authy on Multiple Devices
Enable Backups For Best Results: The backup functionality in Authy allows you to restore your two-factor authentication tokens on a new device, ensuring that you won’t have to add each one back from scratch every time you get a new phone. To enable backups, follow the instructions in Step 8 of Register Your Device. It is important to choose a password you will remember, or to store it somewhere safe where you can reference it in case you should need it.
Helpful Authy Links
Sometimes there are hiccups and you need to reset your two-factor authentication account in the Authy app. PCC has found the following links useful for resolving issues in the Authy app.
-
-
Restore Authy Access on a New, Lost, or Inaccessible Phone: Did you lose your phone or upgrade to a new one? Learn how to restore Authy access or recover your account.
-
Delete, Hide, or Decrypt Two-Factor Authentication Accounts in the Authy App: Do you need to delete a connection in the Authy app? Learn how.
-
Reconfigure Authy After Losing or Forgetting Your Backup Password: Did you forget the backup password for your Authy account? Learn how to reconfigure Authy.
-
Patient Engagement Trainings and Drop-In Sessions
PCC’s Patient Engagement Team hosts regular drop-in sessions for PCC clients. Join us and other PCC users to have your questions answered by the Patient Engagement team, and to learn more about PCC’s patient communication, engagement, and clinical tools. You’ll even get occasional sneak peeks into upcoming PCC features and solutions.
Watch a Previous Drop-In Session
Click in the table below below to review the presentation video or any available accompanying materials for each web lab.
| Date | Topics | Presentation | Additional Links and Handouts | ||
|---|---|---|---|---|---|
| 2025 | February 24 | Portal Self-Scheduling Drop-In Weblab | Video | Download a PDF of this session’s slides | |
| 2025 | November 5 | Portal Self-Scheduling New and Upcoming Features Training | Video | ||
| 2025 | June 26 | Portal Self-Scheduling Training | Video | Download a PDF of this session’s slides | |
| 2025 | May 29 | Portal Pre-Check-In Training | Video | Download a PDF of this session’s slides | |
| 2025 | April 29 | Portal Self-Scheduling Training | Video | Download a PDF of this session’s slides | |
| 2023 | February 21 | Patient Portal Messaging and Templates | Video | Download a PDF of this session’s slides | |
| 2022 | October | Patient Communication Tools | Video | ||
| 2022 | September | Leveraging CHADIS’s Tools and Workflows With Guests Hana Schwartz and Sharissa Epps from CHADIS |
Video | ||
| 2022 | August | Patient Engagement (Care for Patients) Inaugural Q&A Drop-In Session |
Video | ||
Prescribe Controlled Substances (EPCS)
Anyone with permission to create prescriptions in PCC eRx can prepare and edit prescriptions for controlled substances. Some users may additionally print those prescriptions in accordance with local regulations. Registered users can send electronic prescriptions for controlled substances (EPCS).
Read on to learn how to prescribe controlled substances in PCC eRx.
Article Under Construction: This article is being updated to reflect new functionality in PCC 10.4, which arrived on October 12th, 2025. The current descriptions may not include everything you can do on your PCC system.
Register for EPCS
Prescribers must register for the ability to send electronic prescriptions for controlled substances. To learn more, read Register for EPCS.
Create and Send Electronic Prescriptions for Controlled Substances (EPCS)
You can create prescriptions for controlled substances in PCC eRx just as you would for any other medication, then send them electronically using your EPCS credentials.
Start a Prescription
Start a prescription in PCC eRx for the drug you wish to prescribe.
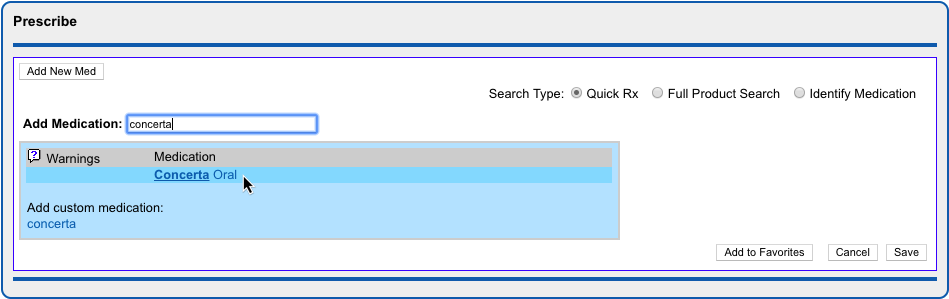
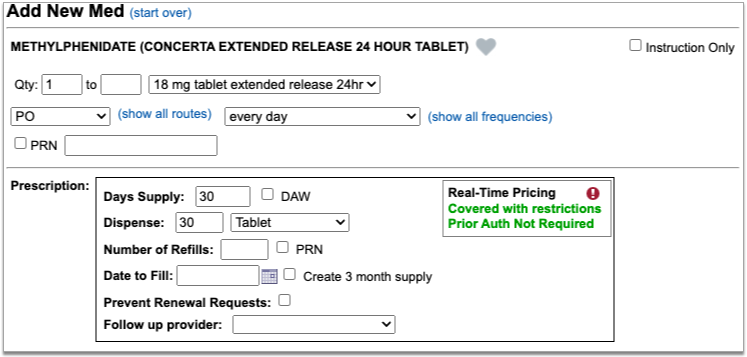
If you are a prescriber with EPCS credentials, move on to the next step. Otherwise, save the prescription and the leave the next steps for a prescriber who is authorized to send electronic prescriptions for controlled substances.
For more detail about how to access PCC eRx and create a prescription, read Prescribe Medications.
Process the Prescription Electronically
You can process prescriptions electronically from three different places in PCC eRx: RapidRx, Review & Sign, and the Rx Queue.
RapidRx
RapidRx is the prescription preview on the right hand side of the screen when you create or edit a prescription.
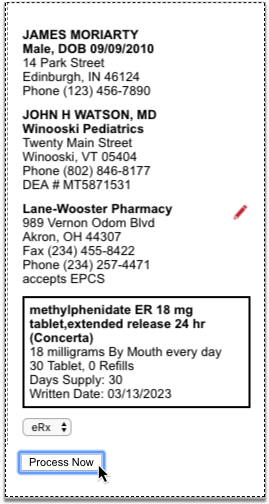
To process the prescription electronically from RapidRx, set the drop-down to “eRx” and click the “Process Now” button.
Review & Sign
When you save a prescription to be processed later, one of the places you can find it again and finish up is in the Review & Sign section of PCC eRx within the patient’s encounter.
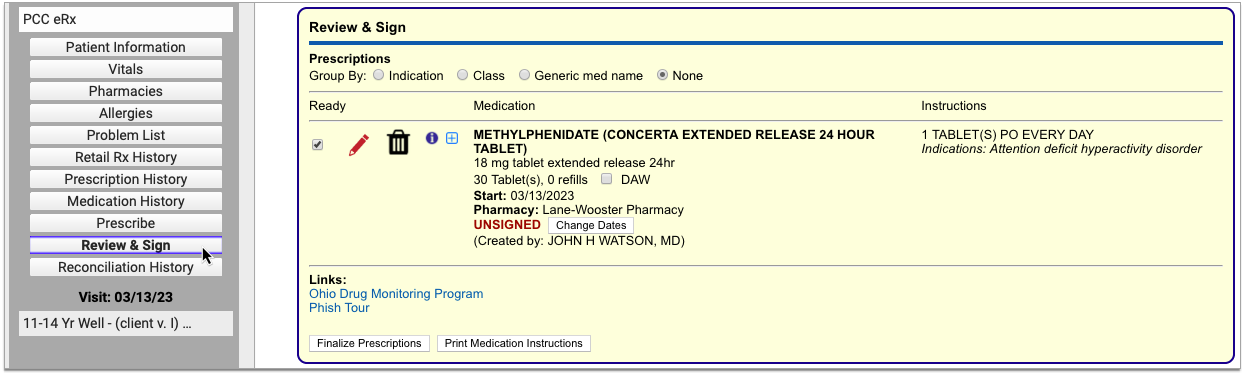
To process an electronic prescription for a controlled substance from Review & Sign, verify that the “Ready” checkbox is selected, then click the “Finalize Prescriptions” button.
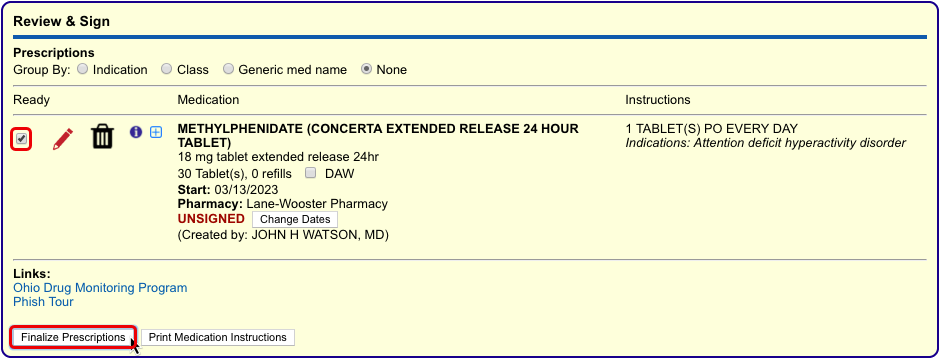
In the Prescription Review window that pops up, verify that the checkbox in the lightning bolt column beside the prescription is selected.

Then, click the “Send Prescriptions” button.
Rx Queue
Another place you can find and process pending prescriptions is in the Pending Prescriptions section of the Rx Queue in PCC EHR.
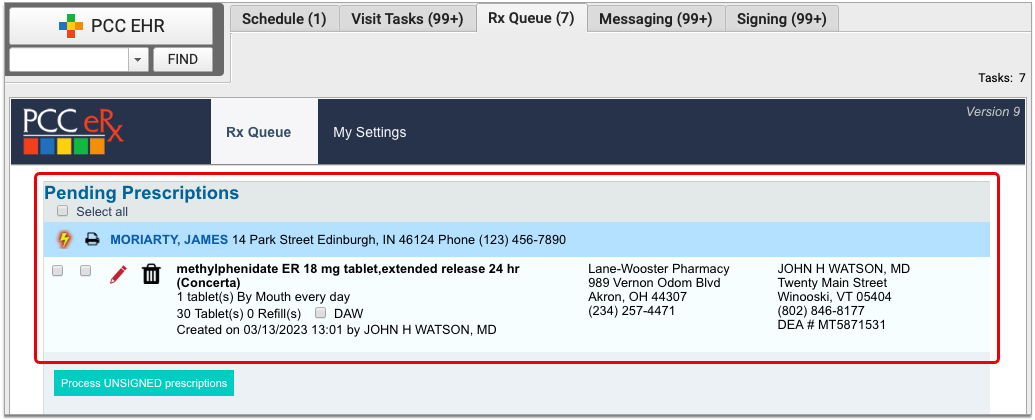
To process an electronic prescription for a controlled substance from the Rx Queue, select the lightning bolt checkbox in the column beside it, then click the “Process Unsigned Prescriptions” button.
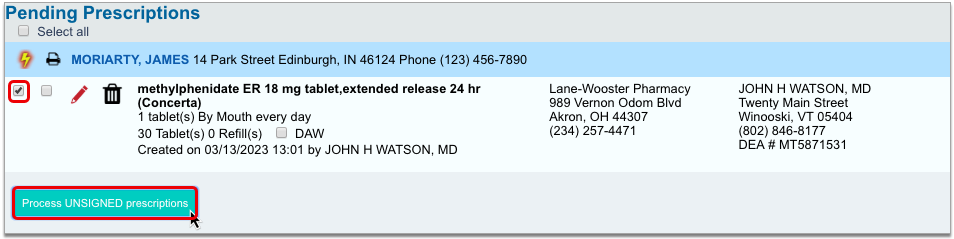
Select a Token
In the Two-Factor Authentication window, indicate which token you plan to use to validate your identity for this prescription.
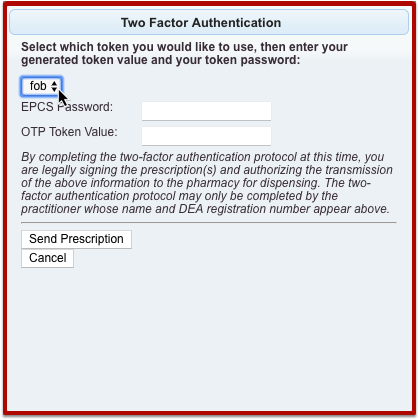
You set up at least one token when you registered for EPCS.
Enter Your Personal Prescribing Password
Once you have indicated a token, enter your personal prescribing password.
You set up your password when you registered for EPCS.
Option 1: Enter A One-Time Password From Your Hard Token
If you indicated that you will use your hard token to prescribe the medication, press the button on the token to generate a one-time password then enter the password into the Two-Factor Authentication window in PCC eRx.
Click the “Send Prescription” button to finish processing the prescription.
Option 2: Approve the Prescription Using the Authy App on Your Smartphone
If you indicated that you will use your soft token to prescribe the medication, enter your EPCS password then click the “Send Prescription” button in the Two-Factor Authentication window in PCC eRx to finish validating your identity and send the prescription.
If the Authy app on your smartphone is configured to send you push notifications for one-touch approval, tap the notification on your smartphone, then tap the green “Approve” button.
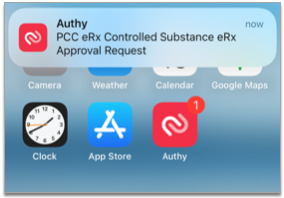
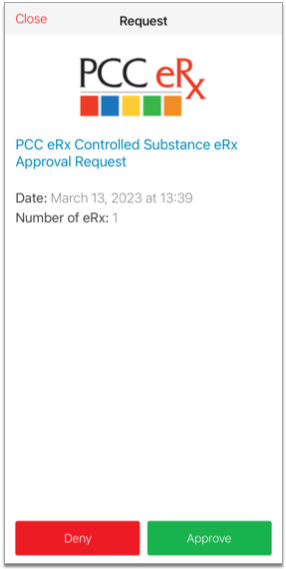
If you don’t have Authy push notifications set up, open the Authy app on your phone and tap the green “Approve” button there.

If you don’t see the green “Approve” button within the Authy app, click the “Enter OTP Instead” button in the Two-Factor Authentication window in PCC eRx.
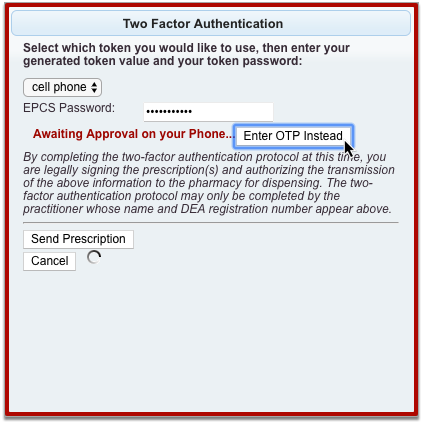
Then, type a one-time password from your PCC eRx soft token into PCC eRx.
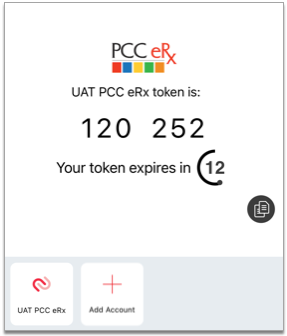
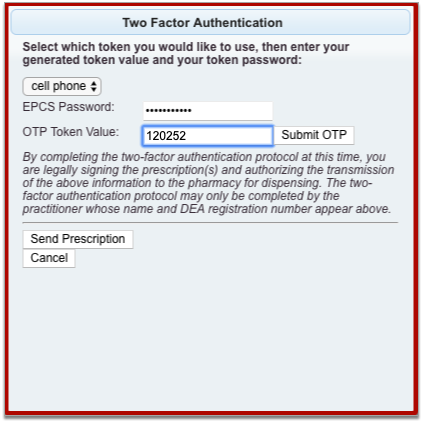
Once you submit your OTP in PCC eRx or tap the green “Approve” button in the Authy app, the prescription finishes processing.
You can check the status of sent prescriptions in the Review & Sign component of the PCC eRx encounter where they were prescribed. Hover over the red date and timestamp beneath a prescription to see its status.
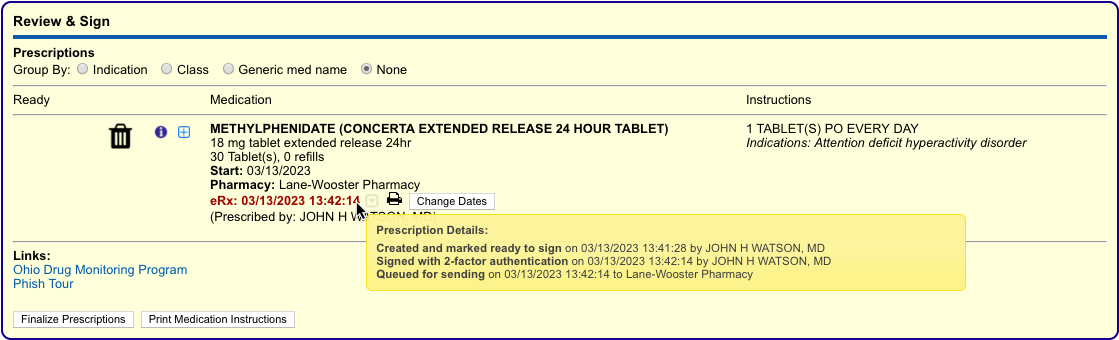
Sent prescriptions also appear in the patient’s Medication History, Prescription History, and the Prescriptions component of their encounter in PCC EHR. If you need information about how to cancel and delete prescriptions that were sent in error, read “Cancel and Delete Prescriptions that Were Sent or Printed in Error” in the Prescribe Medications article.
To learn more about how to register for electronic prescribing for controlled substances (EPCS), read Register for EPCS.
Prescribe a 3-Month Supply of a Schedule II Controlled Substance
In a single click, you can turn a prescription for a Schedule II drug into a three-month supply. This function is most commonly used to prescribe maintenance medications for the treatment of ADHD.
Start a prescription for a Schedule II drug, then check the “Create 3 month supply” box.
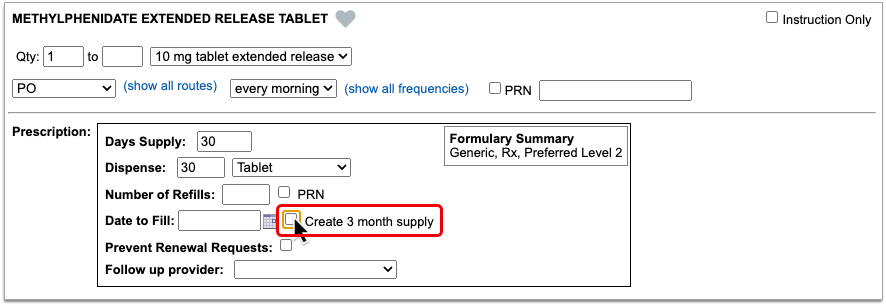
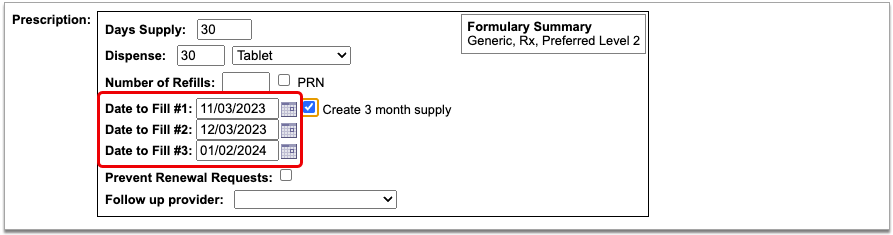
The prescription goes from having one date to fill to having three successive ones that are calculated from today’s date based on days supply.
If you want the patient to be able to pick up the second and third prescriptions in the series a little before they’re needed, you can manually adjust the dates to fill. This is called pre-dating.
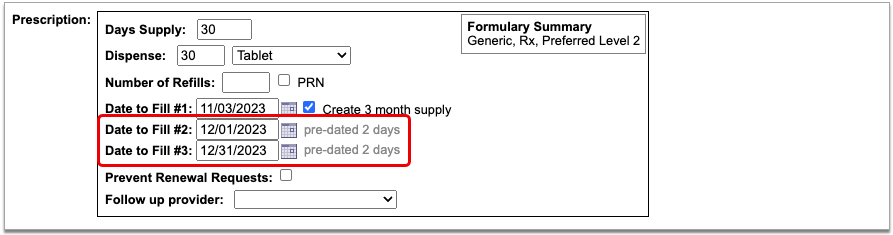
When you pre-date the second prescription in the series, the third automatically becomes pre-dated by the same number of days. If you want to pre-date the third prescription for a different number of days, you can manually change its date to fill without affecting the first two prescriptions in the series.
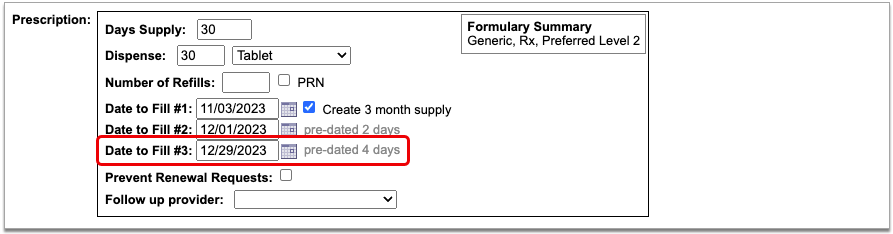
If you always want to pre-date the second and third prescriptions in a series of three by a certain number of days, you can set that up in your PCC eRx settings.
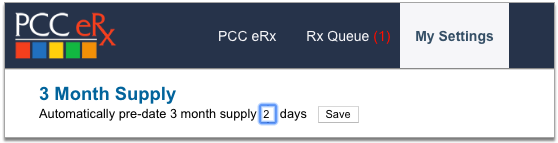
When you are ready to send the prescription, process it as usual. You will only be prompted to enter your EPCS credentials once.
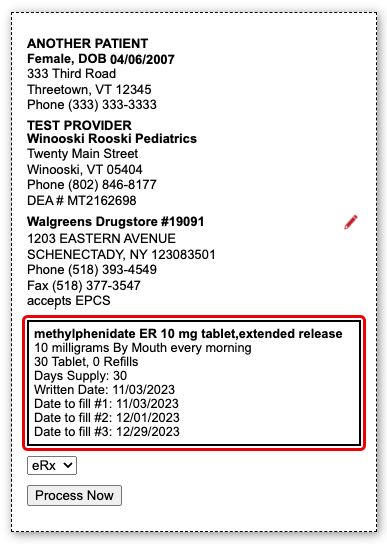
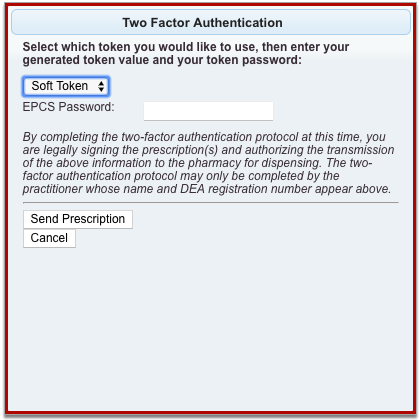
Even though it feels like you are sending one prescription and all three months display as a single entry on the Rx Queue, in the patient’s Medication History, and in their Prescription History, each month’s supply goes to the pharmacy as a separate prescription with unique a serial number.
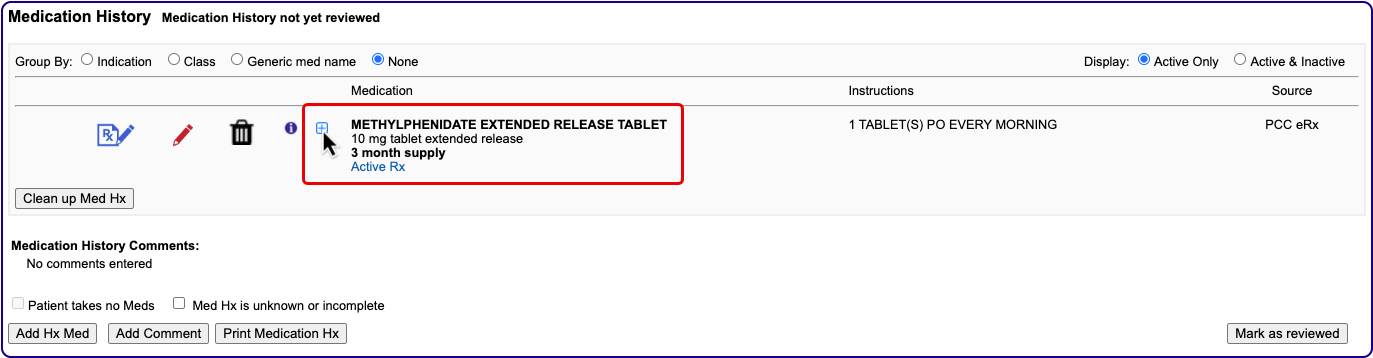

If you need help troubleshooting issues with a prescription for a three-month supply, contact PCC Support.
Renew Controlled Substance Prescriptions
You can renew a controlled substance prescription from a patient’s Medication History, Prescription History, or pharmacy refill request just as you would any other medication. Whoever finalizes the renewal must be authorized to send electronic prescriptions for controlled substances.
For more detailed information about how to renew prescriptions, read the “Renew Prescriptions” section of the Prescribe Medications article.
Send EPCS in Response to Pharmacy Change Requests
When you respond to a change request with a prescription for a controlled substance, you must enter your EPCS credentials to finish processing and sending it, just as you would with a new prescription.
Change requests are electronic messages that pharmacies use to request script clarifications, generic substitutions, therapeutic interchanges, drug use evaluations, or confirmation of a prescribers’ credentials. Pharmacies can also use change requests to notify you when a medication requires prior authorization or is out of stock. Change requests appear on the Rx Queue in PCC EHR alongside pending prescriptions and renewal requests.
There are five standard response options for most change requests:
-
Keep or Edit Original Prescription: Keep or edit the prescription you originally wrote, then send that in response to the change request.
-
Approve Requested Substitution: Approve the substitution suggested by the pharmacy, either as written or with edits.
-
Replace with New Prescription: Start a new prescription from scratch to replace the original.
-
Cancel Original Prescription: Notify the pharmacy that you want to cancel the original prescription.
-
Reassign: Reassign the change request to a different provider at your practice.
Certain kinds of change requests, such as notifications that prior authorization is required, have different, more tailored response options.
Print Controlled Substance Prescriptions
PCC enables printing for controlled substance prescriptions on a practice-by-practice basis in accordance with local regulations. Not all states allow controlled substance prescriptions to be printed, and states that do allow it have differing restrictions as to who can do so. Where printing is allowed, users who have permission to do so will see a “Print” option anywhere you can finalize and process prescriptions in PCC eRx.
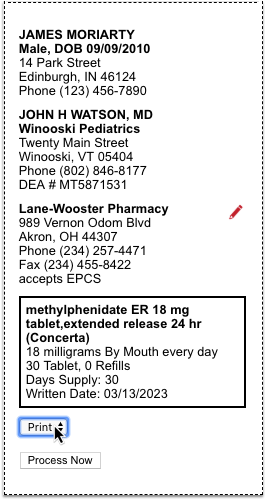
To learn more about reprinting prescriptions, or providing void copies for documentation and reference purposes, read “Reprint Prescriptions” in the Prescribe Medications article.
Work on Claim Errors, Rejections, and All Unpaid Claims
After you prepare and submit claims, how do you deal with stuck claims, rejections, claims with no response from the payor, and other unpaid encounters?
Read below for an overview of PCC’s tools for your insurance A/R workflow.
Fix Claims that Need Corrections
Your PCC system automatically catches many problems before a claim leaves your practice; it holds back claims that contain errors or otherwise need corrections.
After you prepare and submit claims, you can review all claims that need corrections.
You can work your way down the list, open each queued claim for more information, and use tools in the Claims tool to correct the issue. The claim will then go out when you next prepare and submit claims. Claims that needed corrections are also logged in the Log tab of the Claims tool.
For more information, read Submit Claims.
Respond to Every Claim Rejection
If unaddressed, rejected claims result in lost revenue. Use the Rejected Claims worklist to review and respond to every claim rejection sent to your practice.
To learn more, read Respond to Claim Rejections.
Read Electronic Remittance Advice From Payors
You can review all ERAs from payors in the Electronic Remittance Advice tool.
ERAs provide complete details about the payor’s adjudication, including payments, adjustments, denials, and unusual circumstances. Read the Read ERA 835s from Payors article to learn more.
Review the Claim History of a Specific Encounter
When you need to understand when a claim was sent, acknowledged, rejected, paid, or resubmitted, use the Claim History found in the encounter’s Billing History.

The Claim History shows the lifecycle of all claims for the encounter, from submission to resolution. You can see when a claim was queued, held, delayed, processed, received by PCC’s clearinghouse, acknowledged by the payor, and more. By clicking on a link, you can read the payor’s original electronic response.
For more information, read Review an Encounter’s Billing History.
Followup on Unpaid Encounters with Insurance Balances
What if a problem was fixed, but a claim was never resubmitted? And how can you follow up on appeals, or on claims where the payor never responds? Use the Unpaid Encounters tab in the Insurance Balances tool to review an aged summary of your insurance A/R and an unpaid encounters worklist.
To learn more, read Follow Up on Unpaid Encounters with Insurance Balances.
UC 2022 Videos and Course Materials
![]()
In 2022, PCC’s Users’ Conference returned to Burlington, Vermont. Our theme this year was Resilience and Rejuvenation! We recognize that you are in pediatrics because of your patients and their families. We want to honor that and help you make your practice a place that supports them through every phase of their journey with you.
Over 500 attendees participated both online and in-person in 46 courses, sessions, and round tables on issues of importance to pediatric practices.
Sessions were recorded, and where possible we’ve made them available on a PCC UC 2022 playlist, and using the links below. Attendees can access course and video information on the PCC UC 2022 app, which will be available for one year following the conference.
Learn more on PCC.com’s UC2022 wrap-up page.
Course Descriptions, Slides, and Videos
| Course Title | Course Description | Materials |
| 2022 Coding Updates |
Join PCC’s Jan Blanchard for a review of the ICD and CPT changes in play this year. She’s not Donelle Holle, but she’s still awesome!
Presented By: Jan Blanchard |
|
| 5 Security Policy Tips to Implement for a More Secure Practice |
Learn what and how to implement 5 Security Policies today for your practice that will help ensure you are staying up to date with the evolving Cyber Security Landscape.
Presented By: Marissa Maldonado |
|
| AAP PROS Update |
Join Alex Fiks of the AAP’s Pediatric Research in Office Settings (PROS) group to learn about PROS past, present, and future. He’ll highlight recent studies that PCC clients have collaborated on and preview some upcoming study opportunities.
Presented By: Alexander Fiks |
|
| Allow Me to Introduce Myself: Professional Bios in 500 Words or Less |
This workshop will cover the basics of what constitutes a great professional bio for websites, speaking events, professional networking, and more. Attendees will workshop their bios and compare with partners for half the session.
Presented By: Allie Squires |
|
| Ask Chip |
Practices can bring their questions to the session to have them answered live by Chip with helpful input from the audience.
Presented By: Chip Hart |
|
| Best Payment Processes: A Review Into Payment Workflows, Credit Card on File and PCI Compliance |
How are you taking payments now? Are you employing the best payment processes for your practice? It’s a good idea to review your payment processes and ensure they grow along with you. There are various factors that can require a reassessment of these workflows, including security changes to reduce PCI scope, technology advancements and environmental obstacles, to name a few. We’ll provide examples of what other practices are doing and explain why they work. Payment acceptance methods PCC clients use include combinations of patient portal integration, hosted payment pages, virtual terminals and physical terminals. Like a lot of things, payment processes is not “one size fits all.” Seeing the ways other practices combine these methods in their offices will be useful in assessing the payment workflow of your own practice.
Presented By: James & Sarah Estes |
|
| Billing and Payment Workflows (Post 9.4 release) |
This session will explore all the ways Billing and Collection tools may be accessed through PCC EHR.
Presented By: Ben Brandt |
|
| Billing Workflow Roundtable (in-person only) |
Come hear about the tips and tricks your colleagues employ to make PCC work for them. We’ll explore shortcuts, pro tips, and words to the wise that will help you work smarter.
Presented By: Jan Blanchard |
|
| Budgeting For Pediatric Practices |
Bring together all the financial data points to plan your future! Join Paulie Vanchiere from PMI as he walks you through the steps to create a budget for your practice. Leveraging practical experience, participants will learn what they need to know to properly plan your financial future.
Presented By: Paul Vanchiere |
|
| Clinical Oversight Reporting |
As a managing physician or practice administrator, have you ever wondered which clinical reports you should be monitoring regularly to ensure the practice is operating successfully? This session will highlight PCC’s robust reporting capabilities, with a focus on clinical oversight reporting. You will learn how to report on clinical operations related to vaccine inventory, orders, and prescription activity. Discover how to use PCC’s Report Library for preventive and chronic care recall. We will also delve into high-level strategic reporting of clinical measures within PCC’s Dashboard including vaccine rates, well visit rates, screening rates, and more. Discover the numbers that really matter to your practice’s clinical health and how to find and track the information you need most.
Presented By: Tim Proctor |
|
| Compliance – You Don’t Know What You Don’t Know |
Did you know as a Provider every time you credential with Medicaid or Medicaid HMO’s you are attesting that you have an effective Compliance Program? Yes, really. Do Your Practice Policies Meet Federal & State Regulations? Is Your Practice following OIG Guidelines? Are you familiar with Sec 1866? Did you Choose a Qualified Compliance Officer? Is Your Compliance Program Effective? Is Your Practice Utilizing Competencies Effectively? -Attendees will learn best practice risk assessment methodologies, how to define an audit scope, when to perform audits, what to look for, how to document and next steps when hazards or vulnerabilities are discovered.
Presented By: Michelle Richards |
|
| Creating Efficiencies within E&M Guidelines |
In 2021 we focused on the newness of the guidelines, this year let’s focus on getting the guidelines right!
Presented By: Shannon Deconda |
|
| Delivering on Your Practice Culture |
Are you running a practice where personal responsibility isn’t baked in? Do people leave shifts early? Do they wait for someone to tell them what to do? Are messes left for someone else (you!) to clean? Do your patients miss a lot of appointments? Is your clinical performance disappointing? How can you lead your practice to understand that they are part of a team with a common goal. You’ll also learn tips for honestly assessing BOTH of your practice’s cultures; the culture you aspire to and the culture you actually have.
Presented By: Chip Hart |
|
| Expanding Your Practice |
This talk will focus on how to expand your practice and will address such topics as adding services to your existing location, opening an additional location, adding providers and/or partners, exploring and assessing joint ventures (with hospitals and other 3rd parties), and so on.
Presented By: Susanne Morgana Madden, MBA,Paul Vanchiere |
|
| Financial Oversight Reporting |
As a managing physician or practice administrator, have you ever wondered which financial reports you should be monitoring regularly to ensure the practice is operating successfully? This session will highlight PCC’s robust reporting capabilities, with a focus on billing oversight and productivity reporting. You will learn how to do a pricing and payment analysis, and develop an understanding of high-level strategic reporting of financial measures within PCC’s Dashboard product. Discover the numbers that really matter to your practice’s financial health and how to find and track the information you need most.
Presented By: Tim Proctor |
|
| Forms with Benefits |
Find out how PCC’s new forms solution can help you get more out of patient form letters. In the new way of doing things, your current forms get an upgrade and you can create new templates from scratch. Discover the benefits of switching up how you do forms, what it takes to convert to the new solution, and the simple, powerful tools that await you on the other side.
Presented By: Bastien Gliech,Dan Gillette,Kayla Robinson |
|
| Front Desk Best Practices |
Explore front desk best practices related to scheduling, check-in, insurance verification and copay collection and what has changed as offices work within the pandemic. Understand the importance of the front desk when it comes to your practice’s workflow and collection process.
Presented By: Lynne Gratton |
|
| Get the most out of the CHADIS and PCC EHR integration |
This session will offer practical insights, peer-tested ideas, and tips for getting the best return on your CHADIS integration. Some of the topics we’ll cover include: improving your patient portal usage rates, following up on outstanding questionnaires, modifying your CHADIS screening assignments, and many more. Bring your questions and ideas to this session. This course is primarily intended for existing users of the CHADIS-PCC integration, but the tips and tricks in this session will be beneficial to clients who are in the process of integration, or who would like to get started.
Presented By: Sasha Pavlovic |
|
| Healthcare Engagement and Experience |
In 2022 and beyond, primary care must continue to adapt to Gen Y and Gen Z parents.This talk explores the ways in which healthcare professionals can connect and engage with patients/families.
Presented By: Todd Wolynn |
|
| How Much Should I Pay An Employed Clinician? |
Hiring a new physician or nurse practitioner and wondering not only what you should pay, but what you can AFFORD to pay? This simple exercise will walk you through determining the maximum salary of your employed clinicians and review the non-salary drivers that motivate clinicians.
Presented By: Alex Meyer, MBA |
|
| How not to be a BWitch |
Exploration of professional interactions among women, the negative impacts of the Queen Bee Syndrome, and how changes can be made for women to help uplift each other.
Presented By: Hiral Lavania |
|
| How the COVID Pandemic Permanently Changed How We Practice |
Since the onset of COVID pediatric practices have had to change how we practice. Initially these changes seemed temporary but after 18 months many of the changes have actually improved many of our workflows and will likely stay. Some of the changes include or are related to : telemedicine, remote check-in, vaccine clinics, waiting rooms as well as addressing social and economic issues.
Presented By: Eliza Varadi |
|
| How To Effectively and Profitably Add Behavioral Health Services To Your Practice |
This talk will focus on how to incorporate Behavioral Health services into your practice from a ‘line of service’ perspective: Who do you hire? What services do you offer? Do you outsource? How do you promote to patients? How can you ensure its profitable?
Presented By: Susanne Morgana Madden, MBA,Amanda Ciadella |
|
| How To Give Vaccines Without Giving Away The Farm |
Do you know how much it really costs to administer vaccines? Are you properly billing for your vaccines? Learn how to measure your real product and administrative costs and discover practices ways to improve your delivery efficiency. Special appearance by Dr. Christoph Diasio to discuss vaccinating adults in the pediatric medical home.
Presented By: Christoph Diasio,Chip Hart |
|
| How To Maximize Your Preventive Care Clinical and Financial Workflow |
We will discuss how to use different reports and PCC Dashboard information to maximize your well check recalls and minimize outstanding balances.
Presented By: Jim Leahy,Hiral Lavania |
|
| How to Organize and Run a Successful Drive-Thru Vaccination Clinic |
Since the onset of the pandemic – we have turned our annual fluclinics into a drivethru – we have been able to perfect the technique – vaccinating 3 times the number of people while being socially distanced in their car. Once COVID vaccines rolled out we added those to our drivethru. Our last drivethrus included flu vaccines and COVID vaccines without any confusion and easy documentation. I would like to present the logistics and organization of the drivethru clinic
Presented By: Eliza Varadi |
|
| Humor in Medicine |
You don’t need to be a shoulder specialist to find humor in medicine. Jim Smith’s comedic routine will teach how incorporating humor and levity into your practice can help you connect with and provide better care for your patients.
Presented By: Jim Smith |
|
| Impact Beyond The Exam Room |
At the end of this presentation, attendees will understand that they can have impact beyond the exam room. They will also discover the different ways they can accomplish this.
Presented By: Dr. Unachukwu |
|
| Impact of COVID on Preventive Care |
2020 was the first time in decades of measurement that most pediatric clinical benchmarks declined – well visit coverage, depression screening, even vaccines. What does the data tell us about the impact of COVID on the services pediatricians provided in 2020 and what should we be doing about it?
Presented By: Chip Hart |
|
| LIVE Pediatric Billing Drop In |
Come meet all of your Pediatric Billing peers at this live, in person event modeled on our monthly virtual get togethers. No one knows your work like billing experts! Who better to offer solutions, time savers, shortcuts, tools, and resources than your fellow peers who are also using PCC? This is an opportunity to bring your questions and challenges to peers and experts in a low-key, casual, and friendly environment.
Presented By: Jan Blanchard,Douglas Brosseau |
|
| Oversight Reporting Workshop (in-person only) |
Take what you’ve learned in the Financial and Clinical Oversight Reporting courses and start to put it into place in your practice. Bring your laptop, log into your system, and start working with your reports and your data today!
Presented By: Tim Proctor |
|
| Patient Recall Strategies |
You know you have patients you haven’t seen in a while. How do you get them back in the office so they get the care they need? PCC’s Jim Smith will review recall strategies to bring your overdue patients back.
Presented By: Jim Smith |
|
| Preventive Care vs Sick Visit and Combo Care |
Sometimes it’s not just a well child visit, and sometimes it’s not just a sick visit. The key is ensuring proper documentation to bill appropriately for services rendered.
Presented By: Shannon Deconda |
|
| Promoting Child Health Through Advocacy |
Pediatricians are natural advocates and using these skills to advance and promote child health is impactful. This talk will review why advocacy is important, how to hone and develop those skills, as well as provide AAP examples of successful advocacy efforts.
Presented By: Sandy Chung |
|
| Refugee and Migrant Health and Your Pediatric Medical Home |
The United States is seeing increases in the numbers of children and unaccompanied youth fleeing violence from countries in Central America, Haiti, and Afghanistan. This session will examine what these new populations of children mean to your community as well as highlight pediatric practices that are developing the capacity to care for these children.
Presented By: Colleen Kraft |
|
| Should You Run? |
More women are needed to hold public office. Is it in your future? Hear from one female pediatrician who ran–and won!
Presented By: Katie Schafer |
|
| The Changing Nature of Malpractice Suits in Pediatrics |
While the allegations of negligence in care have not changed much, the tactics and focus of plaintiff’s attorneys have evolved in concert with the changes in technology and documentation. This session will review several cases where the outcome depended not just on what the physician did or did not do, but on the technical processes of management and documentation.
Presented By: Jesse Hackell |
|
| The Five Biggest Mistakes Pediatricians Make |
The 5 Biggest Business Mistakes Pediatricians Make Why do good independent pediatricians fail? Failure is an opportunity to reassess and learn from mistakes. While you’re good at your profession, it’s not enough to simply be a good pediatrician anymore. You also need to understand and excel at the business of pediatrics to make an independent practice truly thrive. It’s easy to develop habits over time that allow you to just get by, but not excel in your practice. With a few simple changes, you can improve your business, delight your patients, and create a better workplace culture. Take the opportunity of mistakes to make your practice stronger and more agile than ever.
Presented By: Chip Hart |
|
| The Magic of Tidying Up: Pediatric Executive Edit |
Pediatricians frequently work in silos where their perfectionism and inability to say no leads to burnout and exhaustion. Many pediatricians have not cultivated their superpower of delegation or learned the art of automation to create more time for things that bring them joy. A pediatrician’s health, well-being, and personal development are crucial to the sustainability of their practice. In this thought-provoking and highly-motivating session, attendees will apply the principles of a popular decluttering movement to create more calendar space so they will have the emotional, mental, and physical bandwidth to care for their patients, families, and communities.
Presented By: Katrina Skinner |
|
| The Patient Centered Medical Home (PCMH) For Children With Special Healthcare Needs |
It’s not a building! Family/Youth Leaders have an important role to play in a patient centered medical home. Learn what makes a medical practice a medical home, about the certification process and how family/youth leaders are integral to its success.
Presented By: Jan Blanchard,Amanda Ciadella |
|
| Time Tested Protocols for Personal Billing |
Accounts receivable management is a constant battle for pediatricians. As the financial burden of healthcare shifts further towards the patient in the form of higher deductibles and copays, providers who have reliable and effective Personal Billing protocols will maintain a healthy cash flow and maximum revenue. This session will outline proven processes for efficient and effective Personal AR management. Target areas will include collections, front desk coordination, handling patient questions, managing aging balances.
Presented By: Rebecca Lamb |
|
| Update on the 21st Century Cures Act and Data Segmentation |
Discussion of progress made and pitfalls encountered in the process of learning how to segment data in the EHR to assure access to critical health information while also preserving confidentiality. Exploration of steps the pediatric provider should be prepared to take in view of our unique obligation to both children and their parents.
Presented By: Jesse Hackell |
|
| Welcome Session (Wed) and “Don’t Stop Believin’!” | Presented By: PCC | |
| Welcome and Morning Announcements (Thu) | Presented By: PCC | |
| Welcome and Morning Announcements (Fri) | Presented By: PCC | |
| What’s New? |
We’ve released a ton of software in the last year. Come learn about all the new things at PCC since our virtual UC in 2021!
Presented By: Scott Ploof |
|
| What’s Next for PCC eRx |
Join PCC’s Morgan Ellixson-Boyea, CPhT, CSPO for a sneak peek into the next year of development for PCC eRx. In addition, you’ll hear about recent bug fixes and improvements, learn new tips & tricks, as well as cast your vote for future enhancements of PCC eRx! Session will also include open Q&A.
Presented By: Morgan Ellixson Boyea |
|
| What’s Next? |
During this session the PCC roadmap will be presented. The session will also include PCC’s planned release schedule.
Presented By: Megan Maddocks |
Work with Pharmacies
Find and select a pharmacy while you prescribe, see where prescriptions were sent and dispensed, manage patient pharmacies, tailor pharmacy settings to your preference, and set up searchable pharmacy nicknames.
Article Under Construction: This article is being updated to reflect new functionality in PCC 10.4, which arrived on October 12th, 2025. Some images may not match your PCC system.
Find and Select a Pharmacy
Look up a pharmacy as you prescribe and set it as the destination for your patient’s prescriptions.
On a New Prescription
Find and select a pharmacy while you write a prescription.
Start a Prescription
Start a prescription in PCC eRx by searching for a medication in the Prescribe component.
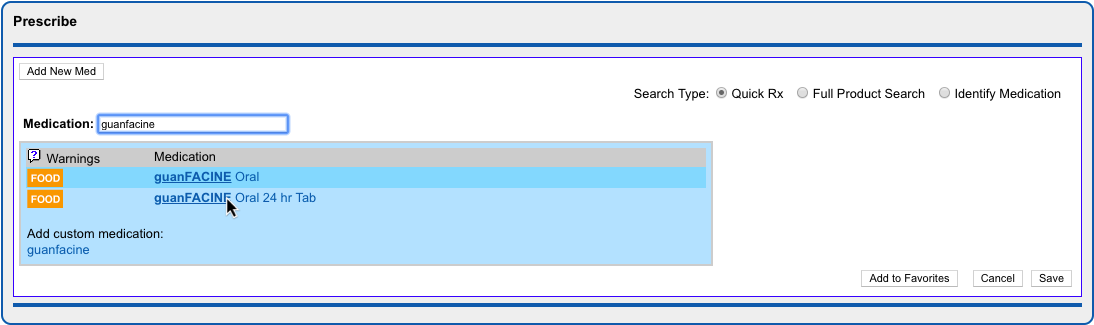
You can also renew or start a fresh prescription from entries in the patient’s Medication History or Prescription History.
Locate the Pharmacy on the Prescription Preview
Once on the prescription editing screen, locate the pharmacy on the prescription preview.
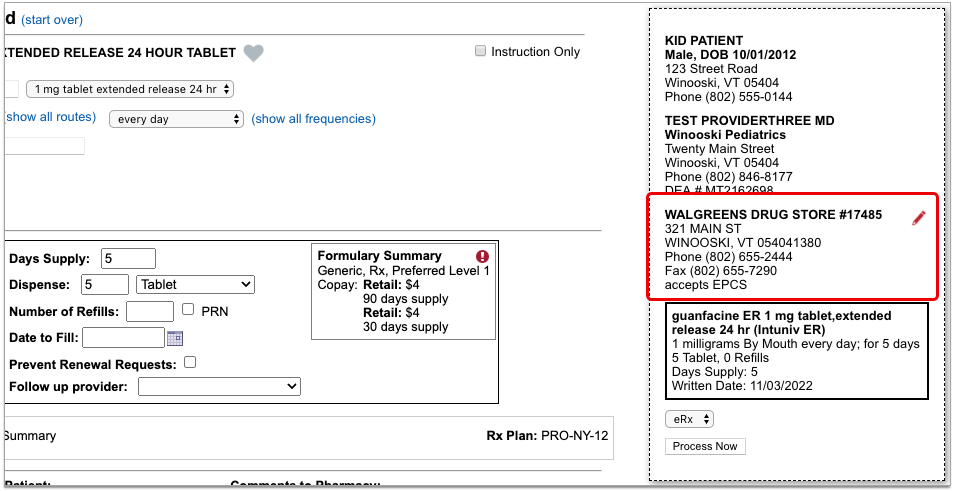
The standard pharmacy for new prescriptions is the patient’s default pharmacy. If the patient has no saved pharmacies, the pharmacy field on the prescription starts out blank.
Edit the Pharmacy
Click the red pencil icon beside the pharmacy field to edit it.
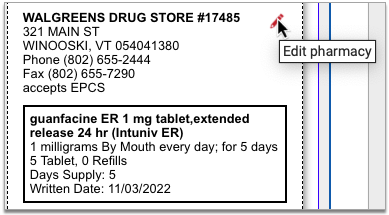
Pharmacy search options open in a new window.
Choose a New Pharmacy
The patient’s saved pharmacies appear at the top of the pharmacy search window. Beneath those, you can search for a new pharmacy.
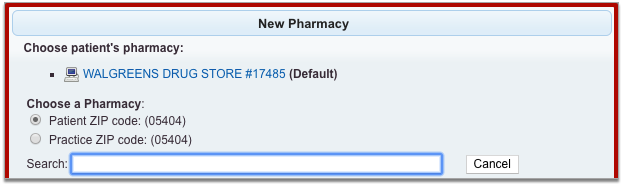
Pharmacy search results display by order of distance from the patient’s home or your practice’s ZIP code. You can search by pharmacy name, address, cross street, or nickname. All of these pieces of information display in the pharmacy search results.
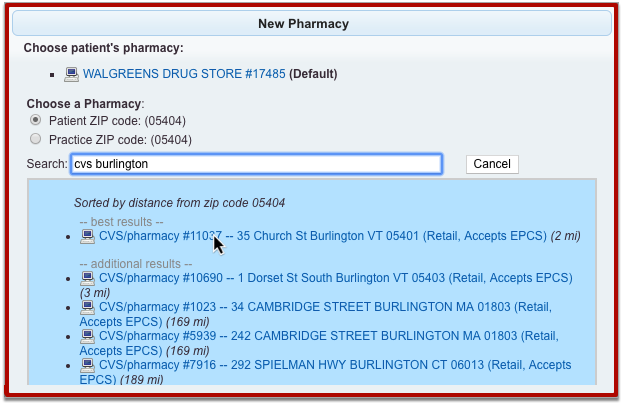
Select the pharmacy where you want to send the prescription.
Review the Pharmacy on the Prescription Preview
After you select a pharmacy, the pharmacy search window closes and returns you to the prescription editing screen.
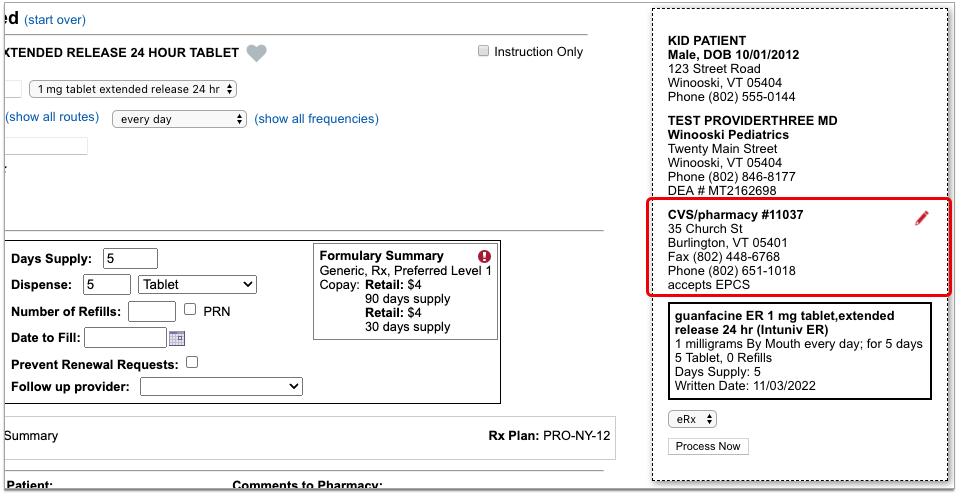
Review the prescription preview to make sure that the pharmacy is now correct. You can edit it as many times as it takes to select the right pharmacy.
You can send new prescriptions right away, or save them to be sent later. Read on to learn how to edit the pharmacy on pending prescriptions.
On a Pending Prescription
You can change the pharmacy on pending prescriptions before sending them out the door.
Find the Pending Prescription
Locate the pending prescription that you need to edit.
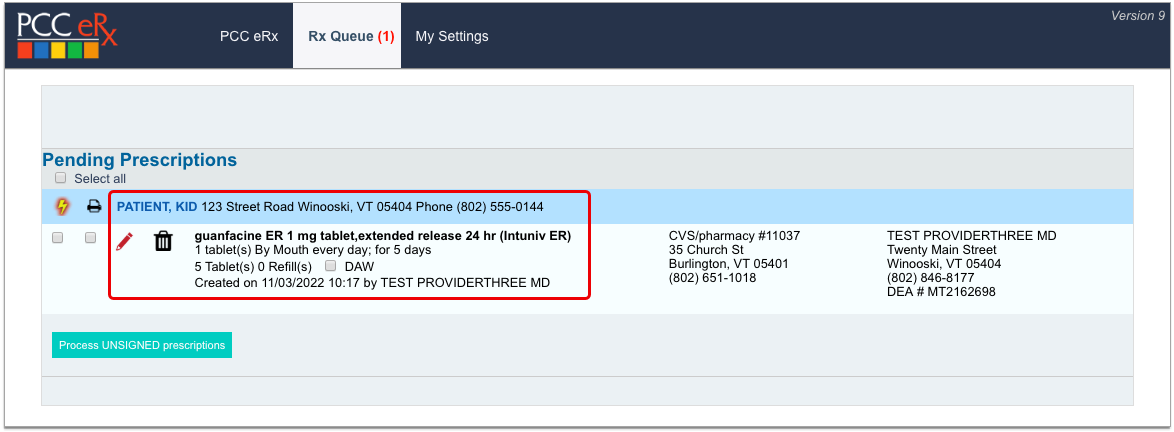
You can find pending prescriptions in the Review & Sign component within the PCC eRx section of the patient’s encounter or on the Rx Queue.
Edit the Prescription
Click the red pencil icon beside the prescription to edit it.

Edit the Pharmacy on the Prescription Preview
Find the pharmacy on the prescription preview, then click the red pencil icon to edit it.
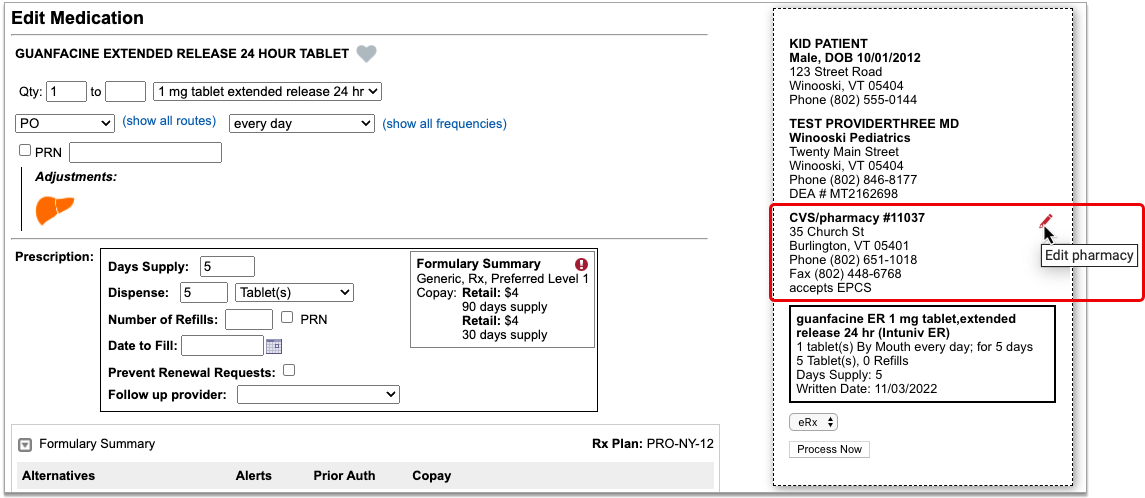
Pharmacy search options open in a new window.
Choose a Different Pharmacy
The patient’s saved Pharmacies appear at the top of the pharmacy search window. Beneath those, you can search for a different pharmacy.
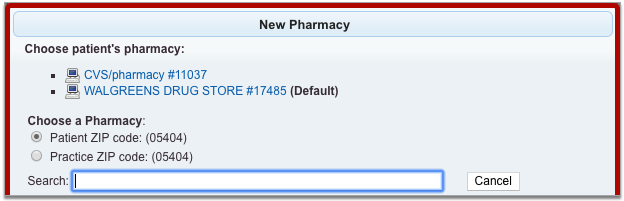
Pharmacy search results display by order of distance from the patient’s home or your practice’s ZIP code. You can search by pharmacy name, address, cross street, or nickname. All of these pieces of information display in the pharmacy search results.
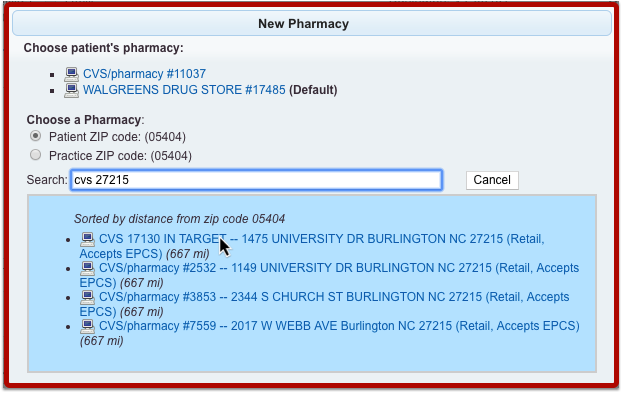
Select the pharmacy where you want to send the prescription.
Review the Pharmacy on the Prescription Preview
After you select a pharmacy, the pharmacy search window closes and returns you to the prescription editing screen.
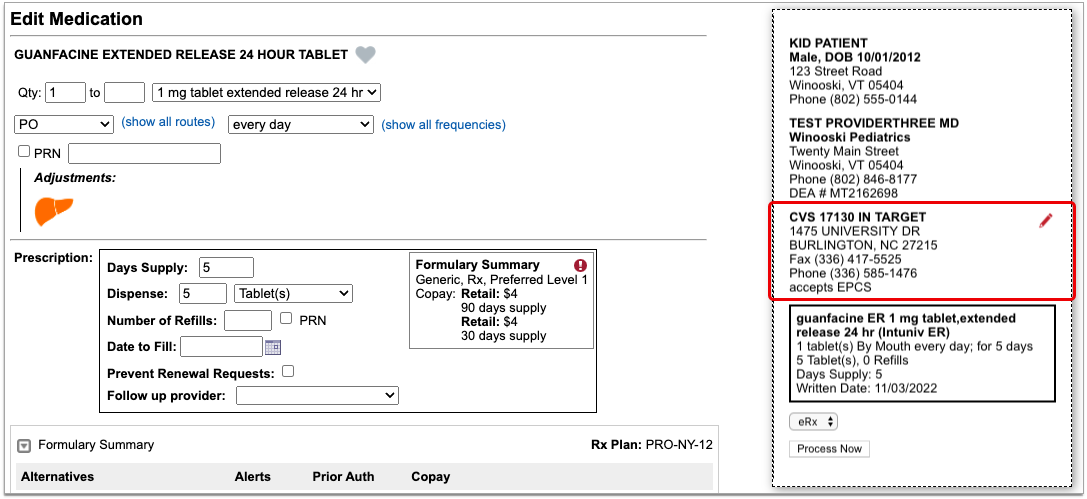
Review the prescription preview to make sure that the pharmacy is now correct. You can edit it as many times as it takes to select the right pharmacy.
You can send the pending prescription right away, or save it to be sent later. If you want to edit the pharmacy for multiple pending prescriptions, or split up a batch of pending prescriptions to go to different pharmacies, read on.
For Multiple Pending Prescriptions
You can edit the pharmacy for multiple pending prescriptions at the same time, and optionally split up a batch of pending prescriptions to go to multiple different pharmacies.
Find the Pending Prescriptions
Open the PCC eRx section of the patient’s encounter and go to the Review & Sign component.
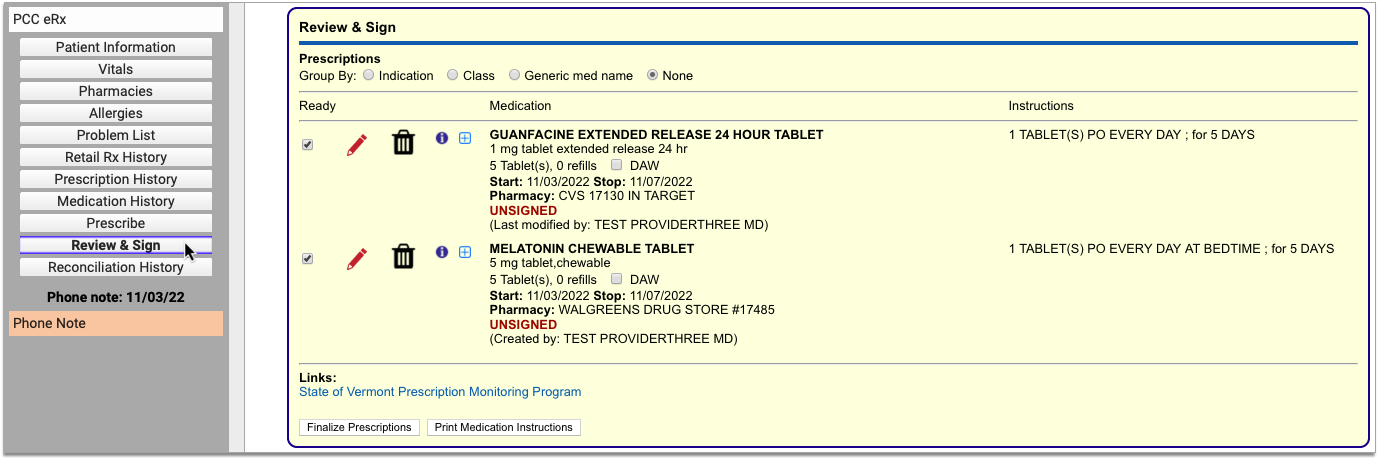
The patient’s pending prescriptions queue appear in that component pending processing.
Finalize Prescriptions
Click the “Finalize Prescriptions” button to launch the Prescription Review window.
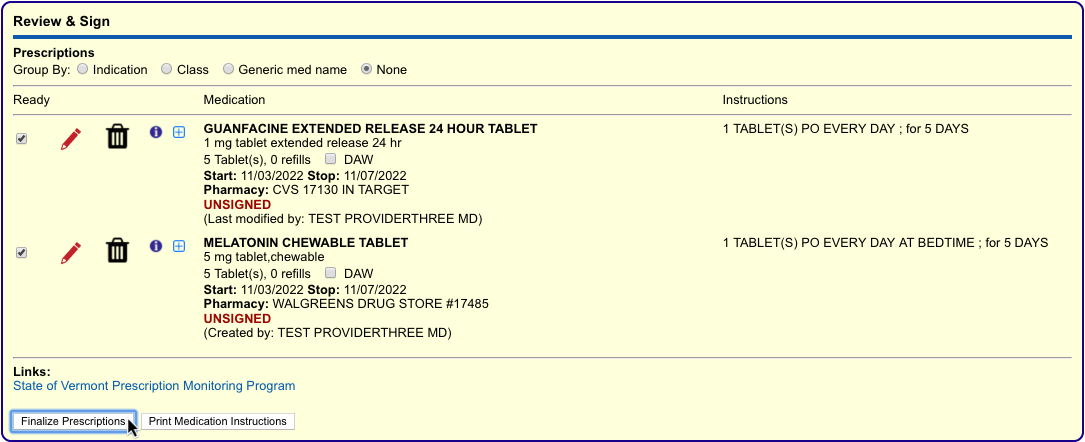
In Prescription Review, you can edit prescription details such as the pharmacy.
Edit the Pharmacy
In the Prescription Review window, prescriptions display beneath the pharmacy where they are queued to be sent.
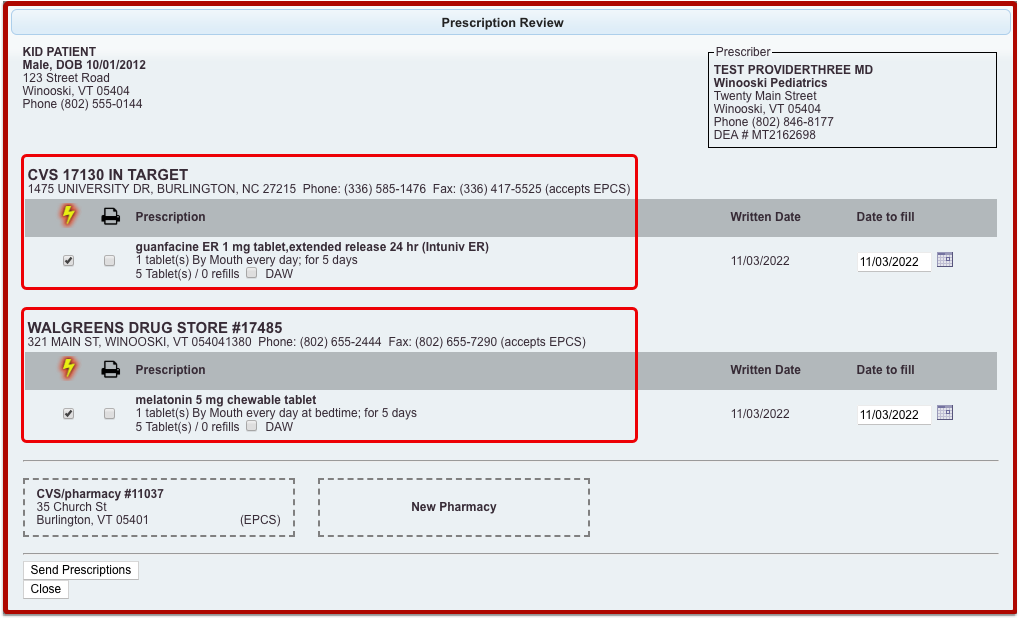
The patient’s additional saved pharmacies appear as tiles at the bottom of the window, along with the option to add a pharmacy, which opens the pharmacy search options.
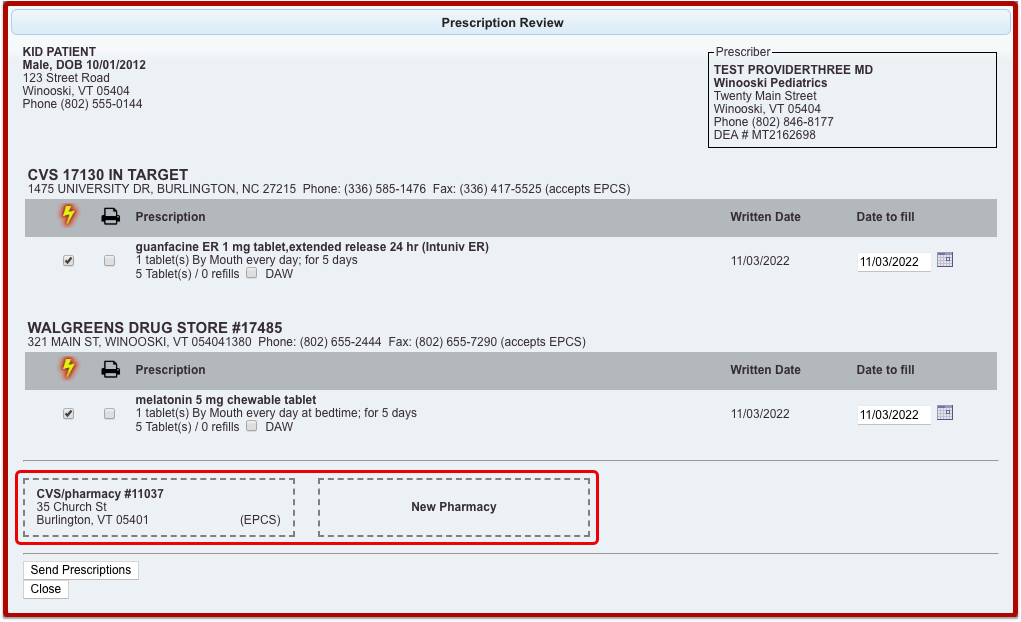
You can pair prescriptions and pharmacies by dragging them together with your mouse cursor until you see a yellow highlight.
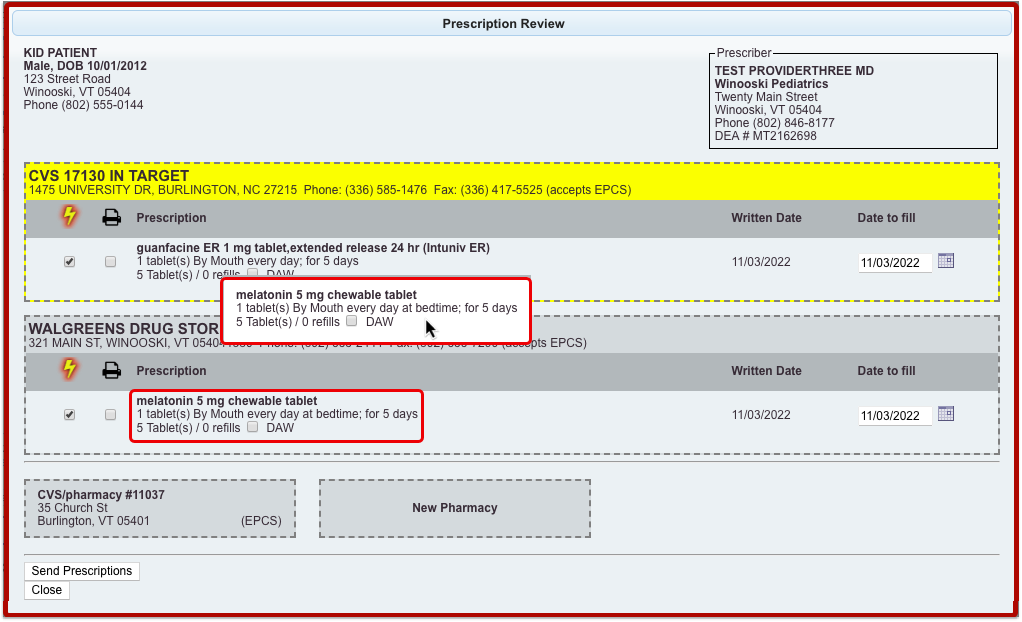
You can use the drag and drop function to pair prescriptions and pharmacies one at a time, or to replace a pharmacy that has several prescriptions queued.
Finish Processing the Prescriptions
Review the prescriptions to make sure each one is going to the right pharmacy.
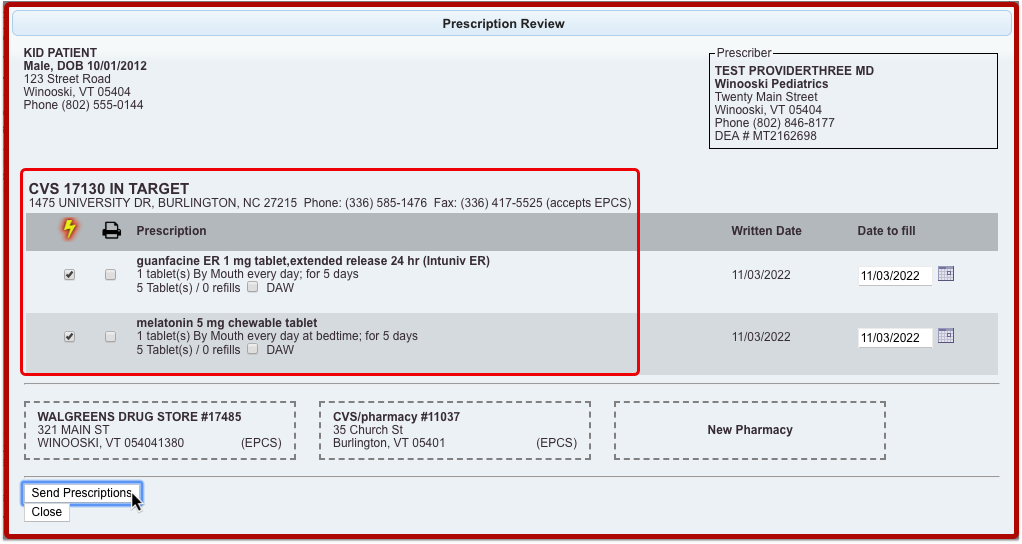
Click “Send Prescriptions” to send all of the prescriptions at once to their respective pharmacies.
See Where a Prescription Was Sent or Picked Up
See where a prescription was sent or picked up in PCC EHR and PCC eRx.
See Where a Prescription Was Sent
There are many places in PCC EHR where you can review where a prescription was sent.
In the patient’s Visit History, find the encounter where the prescription was written. The encounter summary shows what was prescribed and where the prescription was sent.
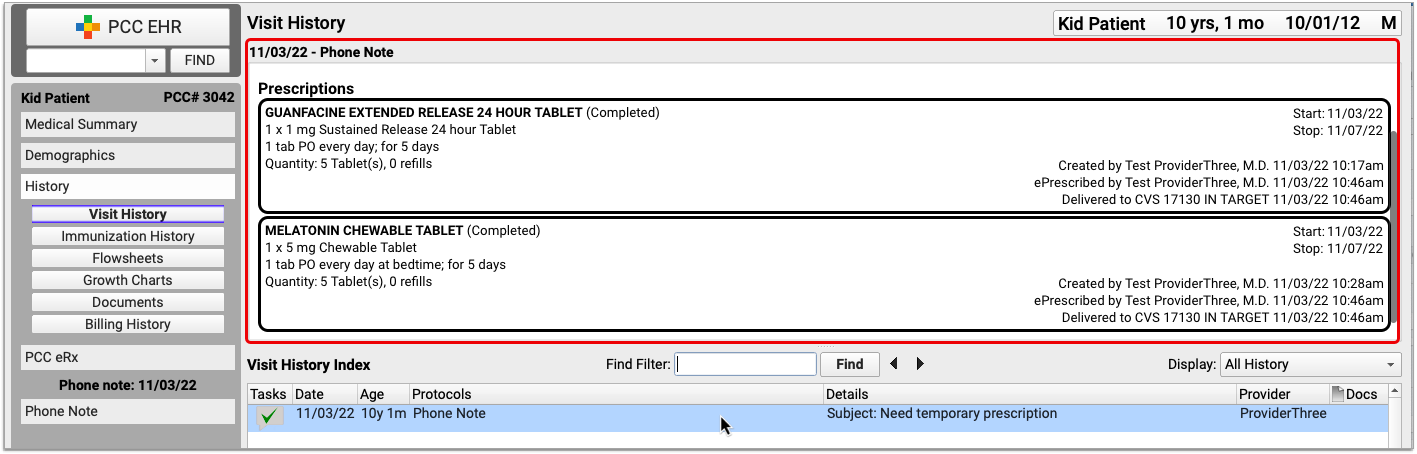
If you open the encounter, you can jump to the Prescriptions component to see the same information in the context of the visit.
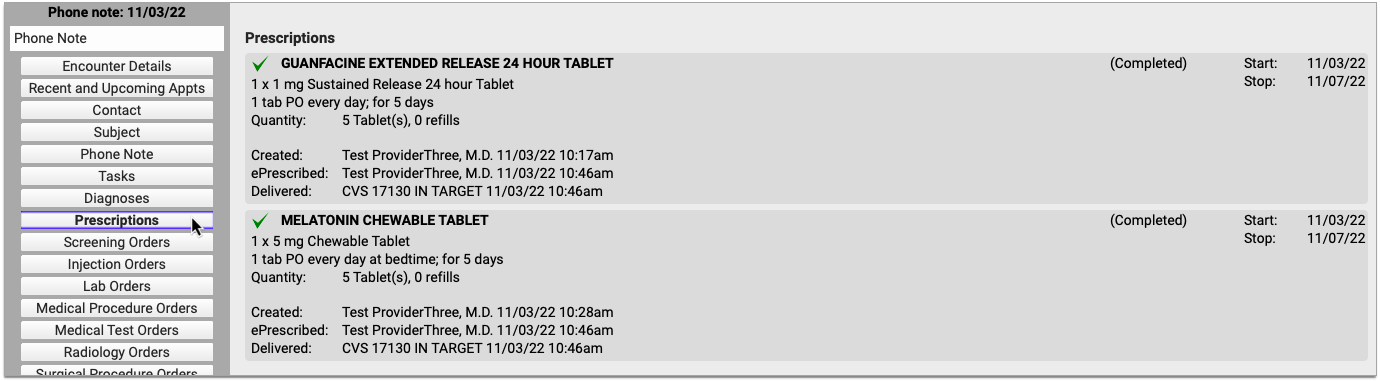
If you want to see information about all of the patient’s past prescriptions, open the PCC eRx section of their chart and go to the Prescription History.

For the most complete details about how, when, and where a prescription was sent, open the PCC eRx section of the encounter where it was prescribed. Then, jump to the Review & Sign component.
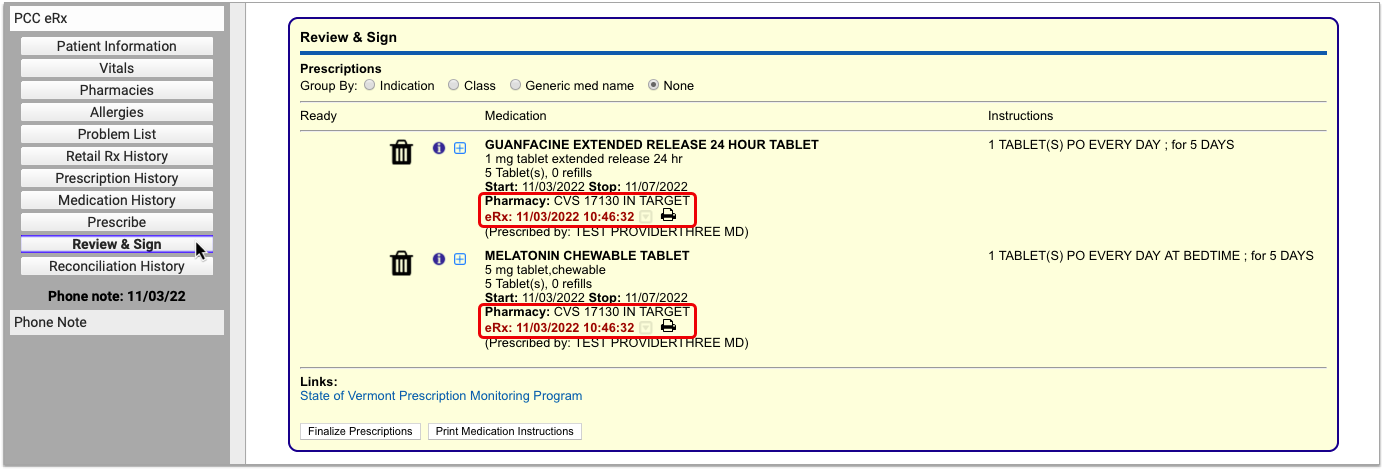
After being sent, prescriptions in the Review & Sign component list a pharmacy, a timestamp, and other details. Hover over the timestamp to see an overview of the prescription’s journey from your office to the pharmacy.
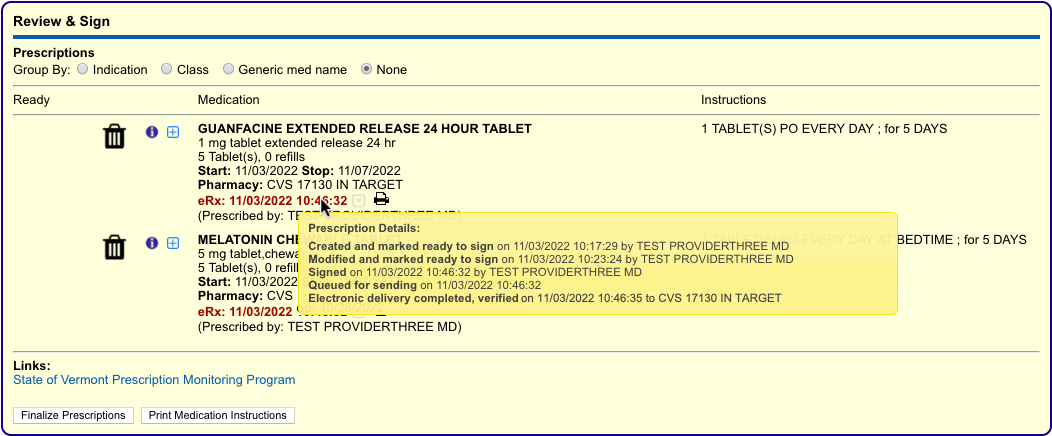
For the maximum amount of detail about how, when, and where the prescription was sent, click the gray disclosure triangle next to the timestamp in Review & Sign.

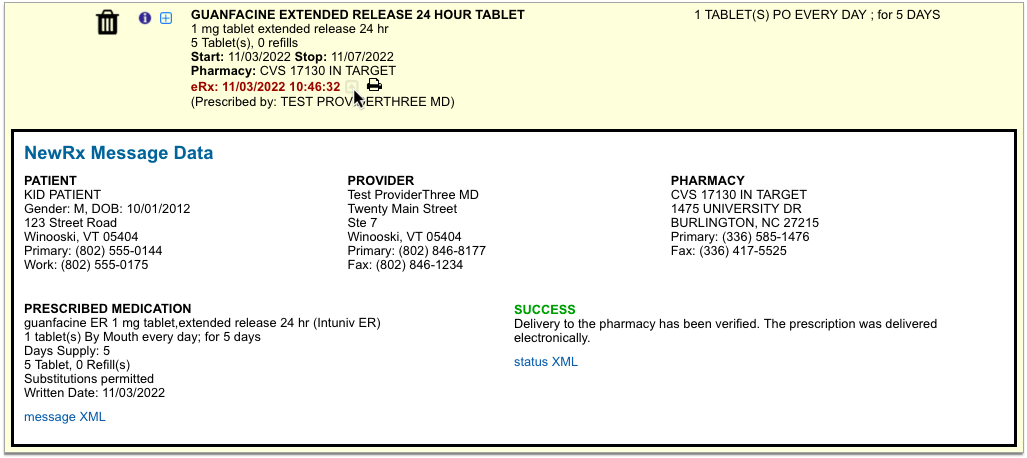
Complete pharmacy information and a delivery status appear in plain text, as well as in the XML message contents. The XML message contains the actual data sent by PCC eRx to the pharmacy.
See Where Prescriptions Were Picked Up
Some pharmacies send messages back to prescribers to indicate that a prescription was picked up. When this information is provided, you can see it in the patient’s Prescription History.

A pill bottle icon indicates that a pharmacy provided dispensing information about the prescription. Click the icon to see what the pharmacy sent.
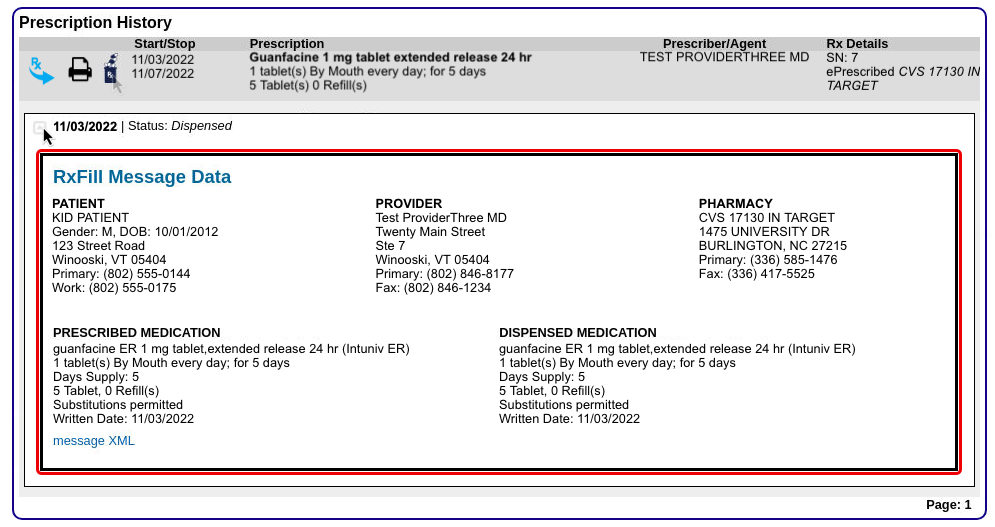
Another place you can sometimes see which pharmacy dispensed a prescription is in the patient’s Retail Rx History. After receiving and recording consent from the patient, click the doctor icon beside any prescription to see what Surescripts was able to find about who prescribed it and where it was dispensed.
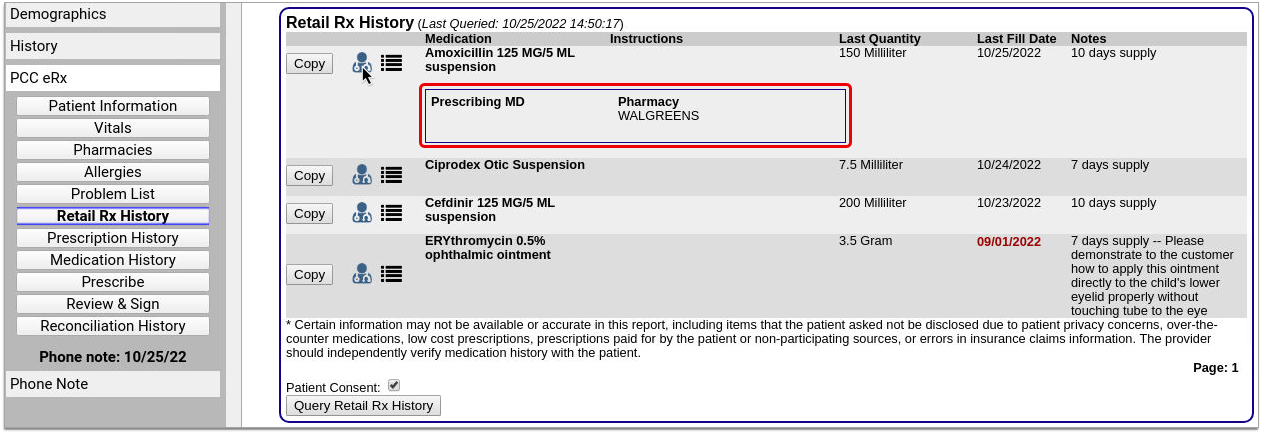
The Retail Rx History is especially useful for learning about prescriptions that were not prescribed from your practice. Please note that you may only query patients’ Retail Rx History once every 72 hours.
Manage Patient Pharmacies
Track your patient’s pharmacies, including their default pharmacy.
The Pharmacies Component
You can track and manage your patient’s pharmacies in the Pharmacies component within PCC eRx. To get to the Pharmacies component, open your patient’s chart and click the PCC eRx button.

If the patient has a visit, phone note, or portal message today, PCC eRx opens to that encounter. If not, you can select a past encounter.

Once in PCC eRx, click the Pharmacies anchor button to jump to the Pharmacies component.

Use the Pharmacies component to create a list of the patient’s preferred pharmacies and set a default pharmacy for all of their future prescriptions.
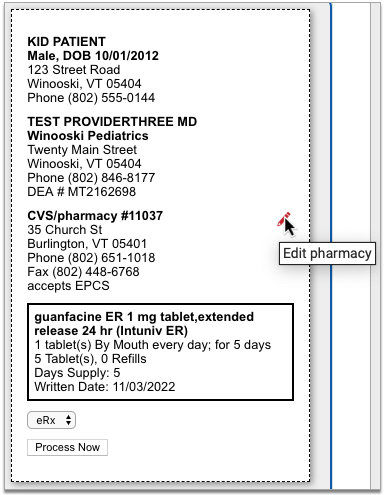
When you search for a pharmacy while writing a prescription, the pharmacies saved in the patient’s Pharmacies component appear at the top of the list for easy selection.
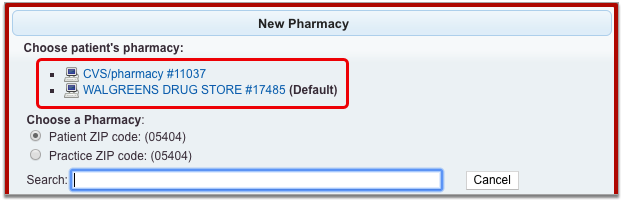
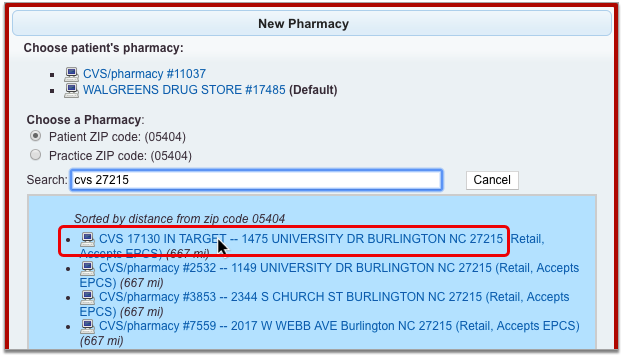
To learn more about picking a pharmacy while you write a prescription, read Find and Select a Pharmacy.
Add a Pharmacy
Click the “Add Pharmacy” button in the Pharmacies component to add a new pharmacy to the patient’s list.
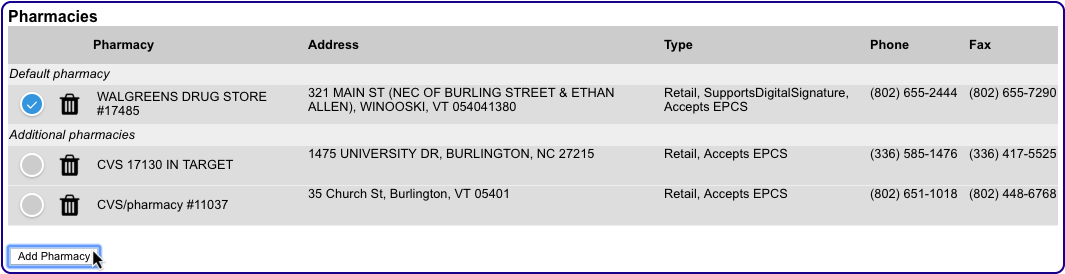
The button launches a window where you can search for pharmacies by name, address, cross street, or custom nickname.

Pharmacies that match your search terms appear in order of distance from the patient’s home ZIP code or that of your practice, depending upon which option you have selected.
You can change the search terms and ZIP code criterion at any point to refine the pharmacy search results. When you have located the correct pharmacy, select it to add it to patient’s saved pharmacies.
The very first pharmacy you add to the Pharmacies component automatically gets set as the patient’s default pharmacy. The pharmacies you add after that follow your personal default pharmacy setting on the My Settings page. To learn more, read Default Pharmacy Settings.
Prescriptions Always Start Out Using the Default Pharmacy: Prescriptions always start out using your patient’s default pharmacy. If you add a new entry to the Pharmacies component but do not make it the patient’s default, subsequent prescriptions will not start out using that new pharmacy. To use the new pharmacy, edit the prescription and manually select the new pharmacy in the pharmacy search window.
Delete a Pharmacy
To remove a pharmacy from the Pharmacies component, click the trash can icon beside it.
If you delete your patient’s default pharmacy, the first pharmacy alphabetically becomes their new default.
Set a Default Pharmacy
The default pharmacy is the presumed destination for your patient’s new prescriptions. You can see and update your patient’s default pharmacy in the Pharmacies component in PCC eRx.
The first pharmacy you add to the patient’s Pharmacies list automatically becomes their default. As you add other pharmacies, you can manually set the default using the Default radio button.
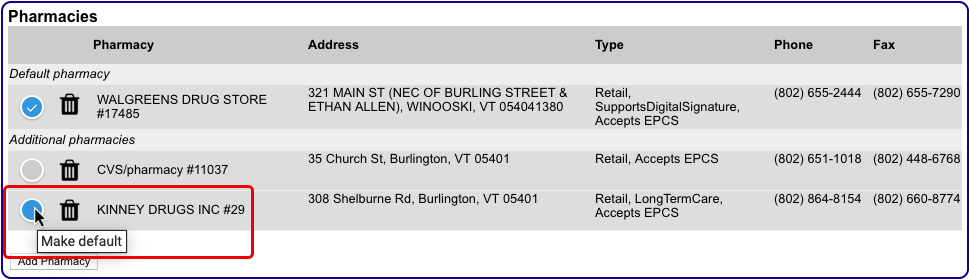
If you delete your patient’s default pharmacy, the first pharmacy alphabetically becomes their new default.
You can configure PCC eRx to automatically make a pharmacy the patient’s default as soon as it’s added to the Pharmacies component. To learn how, read Default Pharmacy Settings.
Keep Sibling Pharmacies in Sync
You can configure PCC eRx to keep pharmacy information up-to-date between siblings. To learn how, read Sibling Pharmacy Settings.
Manage Your Pharmacy Preferences
Make certain patient pharmacy behaviors automatic for your user account in PCC eRx.
Default Pharmacy Settings
You can control how the default pharmacy updates when you add a new entry to the Pharmacies component in a patient’s chart.
Open PCC eRx and go to the My Settings tab.

Find the Pharmacies section. The first group of radio buttons gives you global control over what happens to a patient’s default pharmacy when you add a new pharmacy to the Pharmacies component in their chart.
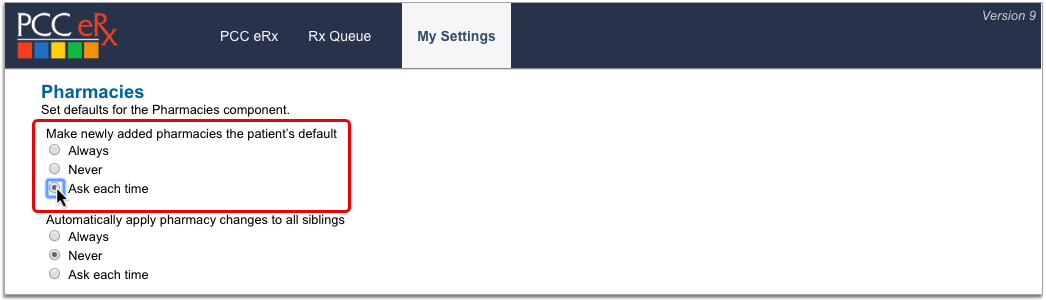
-
Always: Automatically make a pharmacy the patient’s default as soon as it’s added to the Pharmacies component.
-
Never: Never make a pharmacy the patient’s default when it’s added to the Pharmacies component.
-
Ask each time: Prompt me to update the patient’s default every time I add a new pharmacy to the Pharmacies component.
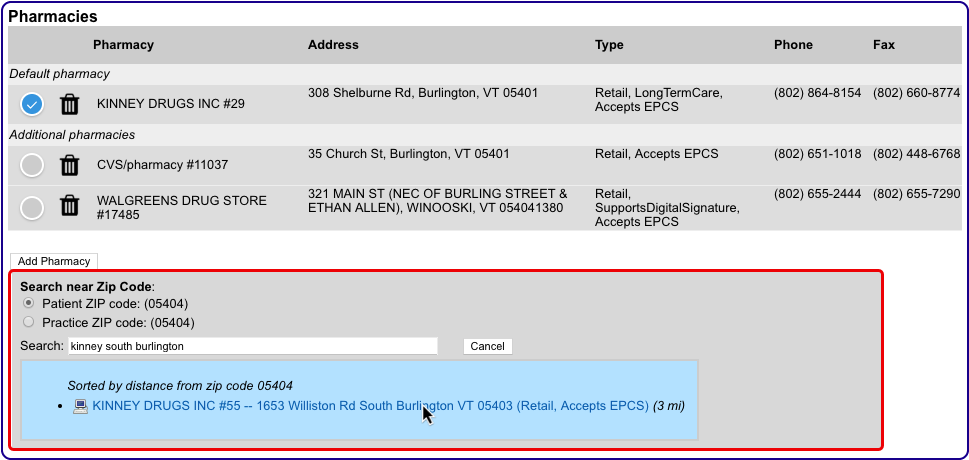
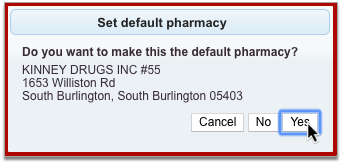
The default pharmacy setting only applies when you add a new pharmacy to the Pharmacies component using the “Add Pharmacy” button. The pharmacies you add while prescribing or finalizing a prescription are not governed by this setting and never update the patient’s default.
Sibling Pharmacy Settings
You can configure PCC eRx to keep siblings’ pharmacies in sync.
Open PCC eRx and go to the My Settings tab.

Find the Pharmacies section. The second group of radio buttons lets you control how a change to one patient’s pharmacies affects their siblings. Changes include adding or deleting a pharmacy in the Pharmacies component, or updating the default pharmacy.
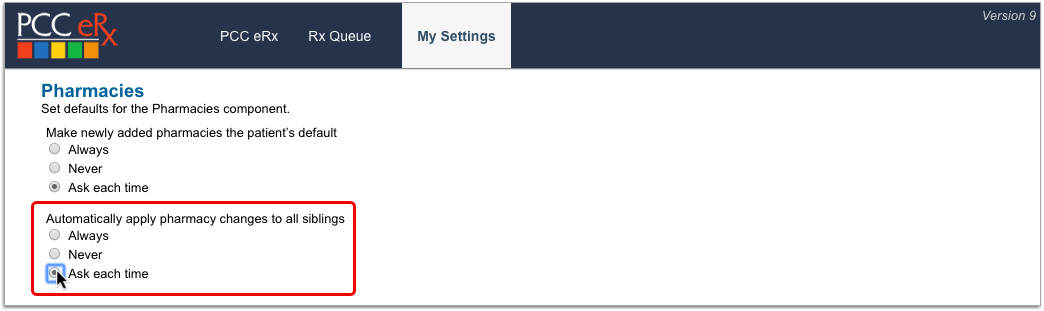
-
Always: Automatically update all siblings with changes I make in the Pharmacies component for one.
-
Never: Never update siblings with changes I make in the Pharmacies component for one.
-
Ask each time: Prompt me to update siblings every time I make a change in the Pharmacies component for one.
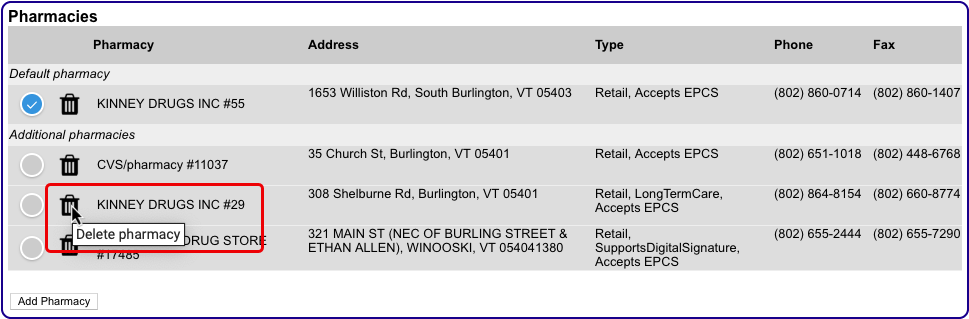
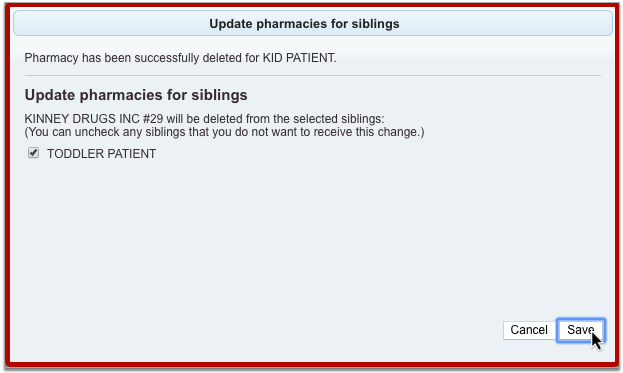
The sibling pharmacy setting only applies when you make changes to pharmacies in the Pharmacies component for a patient who has siblings. The pharmacies you add to a patient while prescribing or finalizing a prescription are not governed by this setting and never get added to siblings.
Create Searchable Pharmacy Nicknames
Users with Administration privileges in PCC eRx can set up practice-wide, searchable nicknames for pharmacies that are otherwise tricky to find.
In PCC eRx, click the Administration tab. Then, click the link for “Pharmacy Nicknames.”
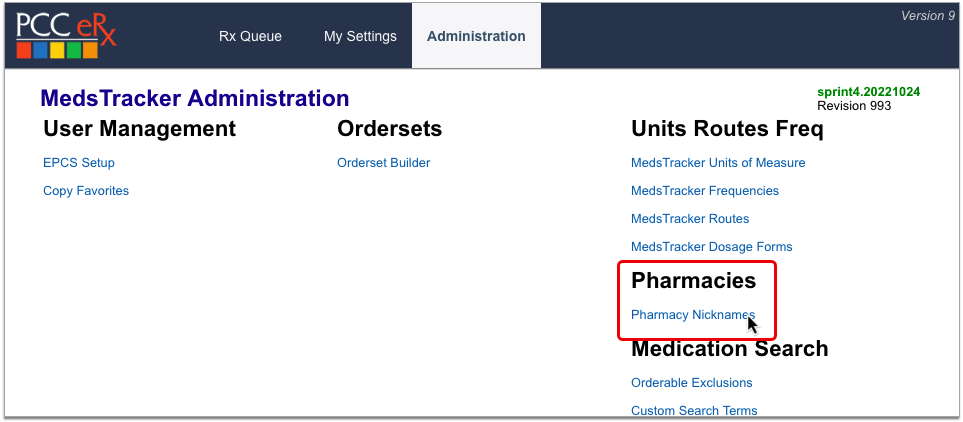
In the Search field, type the name of the pharmacy you want to nickname, then click the “Add” button beside it.
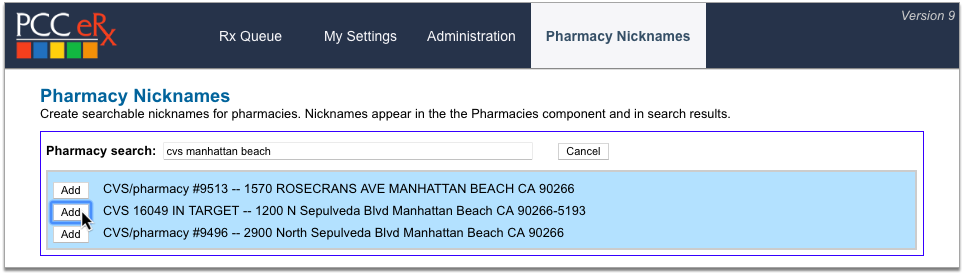
Create a nickname for the pharmacy, optionally leave an internal note explaining the purpose of the nickname, then click “Save”.
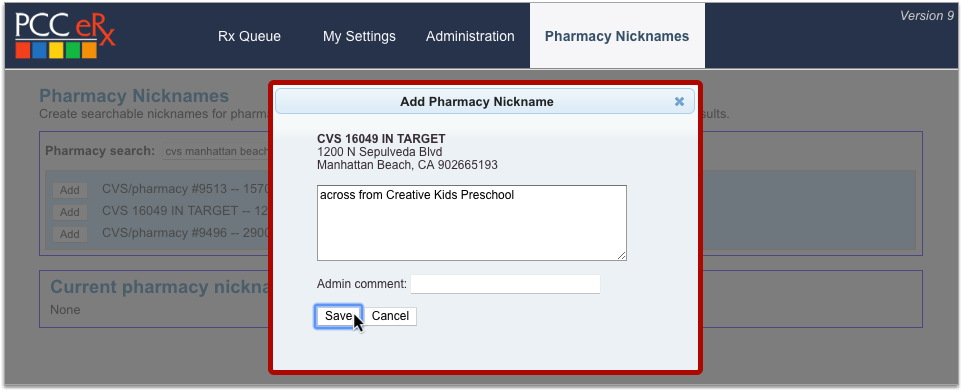

Pharmacy nicknames display anywhere you can see and search for pharmacy information in PCC eRx.
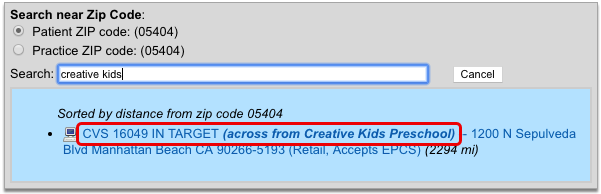

You can edit and delete pharmacy nicknames on the Pharmacy Nicknames configuration page. Click the x icon to delete a nickname or the pencil icon to edit.
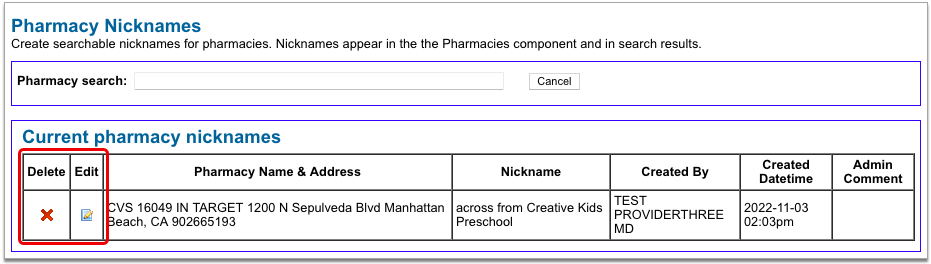
You can also edit a pharmacy nickname by searching for the pharmacy in the search field at the top of the configuration page and clicking the “Edit” button beside it.

Avoid Using Special Characters: For an optimal experience, avoid using special characters in pharmacy nicknames. Nicknames that contain special characters such as double quotes (“), ampersands (&), angle brackets (<>), and at signs (@) cannot be found by searching for those characters and may become difficult to edit once saved.
Prescribe Medications
You can prescribe medications electronically from patient visits, phone notes, portal messages, and other patient encounters in PCC EHR.
Intro Video: To learn the basics of prescribing in less than 5 minutes, watch Prescribe Medications.
New User Training Video: To go deeper as a new user without getting overwhelmed, watch Prescribing 101: PCC eRx Essentials for New Users.
Create and Send a Prescription
Learn the basic workflow of how to prescribe a medication in PCC EHR. You can also prescribe from pocketPCC.
Open PCC eRx
From a visit, phone note, or portal message, click on the “PCC eRx” button.
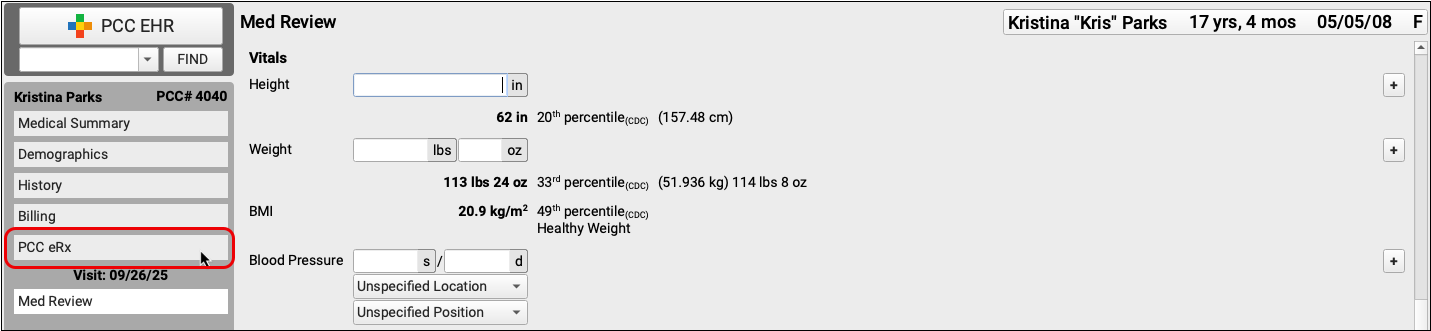
When you click the button, PCC eRx opens within the patient’s chart.
Optionally Create an eRx Encounter: If you wish to review eRx information for a patient and there is no corresponding visit note, phone note, or portal message, click the “PCC eRx” button in the patient’s chart and choose the “Start an eRx Encounter” option from the “Select an encounter” drop-down.
Review the Patient’s Details and History
Within PCC eRx, you can review the patient’s vitals, pharmacies, allergies, problem list, retail prescription history, prescription history, and medication history.
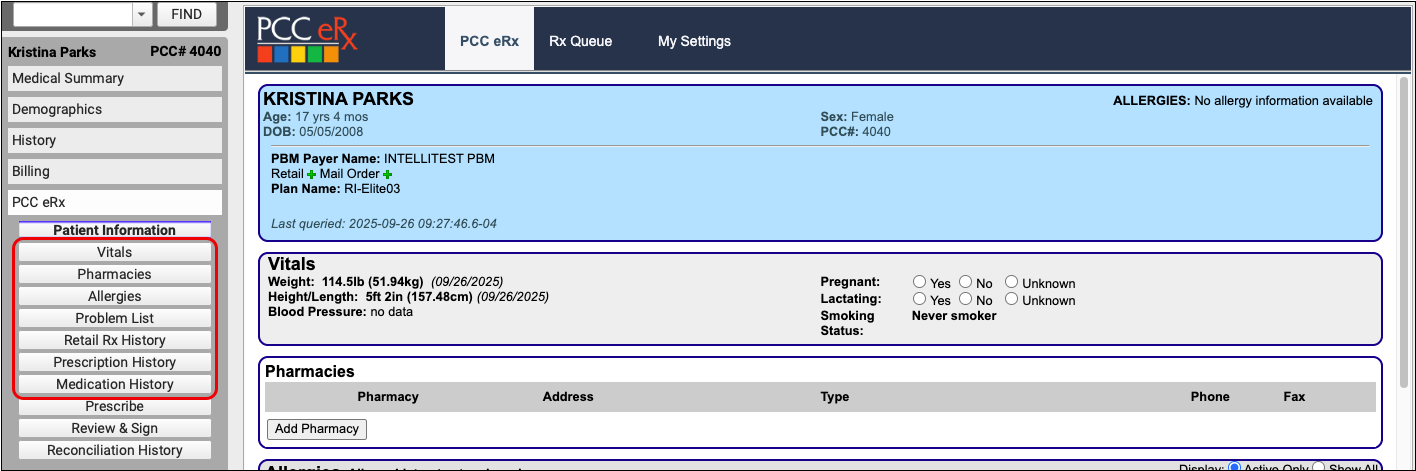
You can take different actions in each component, such as filtering the view to show active and inactive entries, marking the contents as reviewed, adding and retiring entries, or editing what is already there.
Learn About Each Component: To learn what information appears in each component of the PCC eRx screen and which actions you can take, read the PCC eRx Component Reference.
Go to the Prescribe Component
Click on the “Prescribe” button to jump to the Prescribe component of PCC eRx.

The Prescribe component is where you can write prescriptions for your patient.
Renew or Refill a Medication Instead: Instead of writing a new prescription, you can renew or refill a medication that is already in the patient’s history. Click the “blue swish” Renew Medication icon beside any entry in the patient’s Prescription History or Medication History to renew it. You can process refill requests from pharmacies on the Rx Queue.
Choose a Medication
In the Prescribe component, start typing the name of the product you want to prescribe in the “Add Medication” box.

As you type, a list of common, age-appropriate products matching your search term appears. Click on the product you want to prescribe.
Full Product Search: If your initial search turns up no results, select the “Full Product Search” radio button beside the search box. The Full Product Search expands the search beyond common, age-appropriate medications. Prescribers looking to prescribe durable medical equipment, for example, should use the Full Product Search option. Note that the Full Product Search does not account for age-appropriateness when returning results.
Prescribe from Favorites: Another way you can prescribe is from your Favorites list. Learn how to create, prescribe, and manage favorites in the PCC eRx Favorites article.
Optimize Search: You can save time when searching for drugs in PCC eRx by creating practice-wide search shortcuts, hiding unused drugs and dosing statements, and more. Read Optimize PCC eRx Searches with Shortcuts and Hiding to learn how.
Select a Dosing Statement
After you select a product, you are presented with a list of common, age-appropriate dosing statements and instructions. Choose a statement that exactly or closely matches the prescription you intend to write. The statement serves as a shortcut to start a prescription, which you can customize and expand upon in the next step.
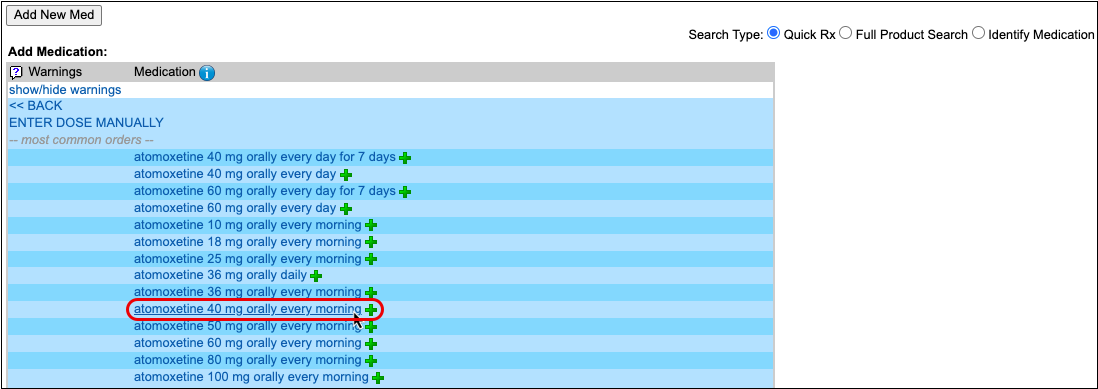
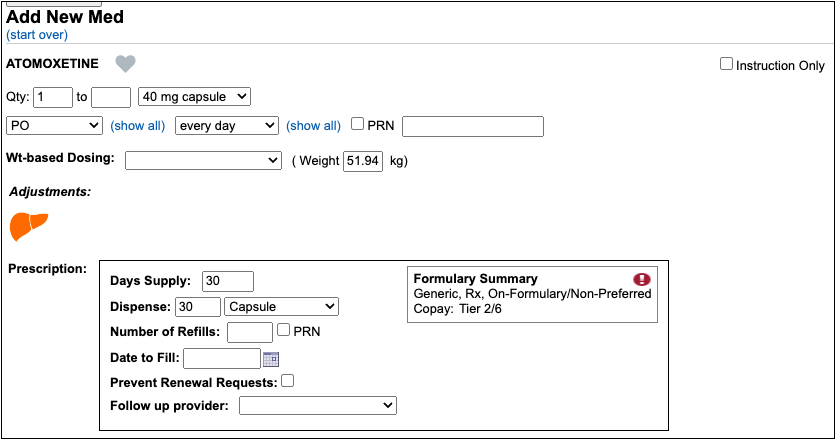
Alternate Prescribing Workflows: If one of the dosing statements matches exactly what you would like to prescribe, you can click the green plus icon beside it to prepare the prescription and queue it to be reviewed, signed, and sent to the pharmacy. If you cannot find a dosing statement that roughly approximates the prescription you are trying to write, you can click “Enter Dose Manually” instead. This starts a prescription from scratch.
Customize and Complete the Prescription
After selecting a dosing statement, review the prescription in detail and fill out the remaining fields.
First, specify the dose form, amount, route, and frequency. This tells the patient how much to take and when to take it.
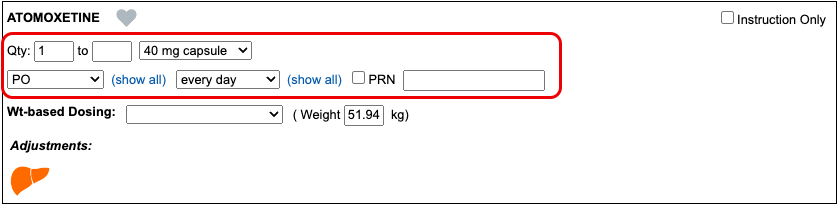
Then, specify the days supply and the dispense quantity and form. This tells the pharmacy how much to dispense and in what form.
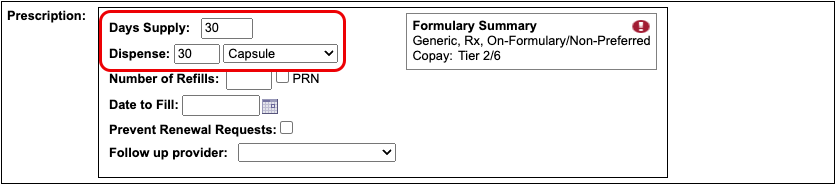
The start date for the prescription defaults to today.
Optionally, you can:
- direct the pharmacy to dispense brand name drugs as written (DAW), disallowing generic substitutions
- specify a number of refills
- specify a date to fill
- indicate whether the pharmacy may send electronic renewal requests for the prescription
- indicate who should receive follow-ups about the prescription, if you are writing it on behalf of another provider
- write out instructions for the patient and pharmacy
- document an internal note that’s only visible to other users at your practice
- set a duration for the prescription
- add indications
- and specify prescription start and stop dates
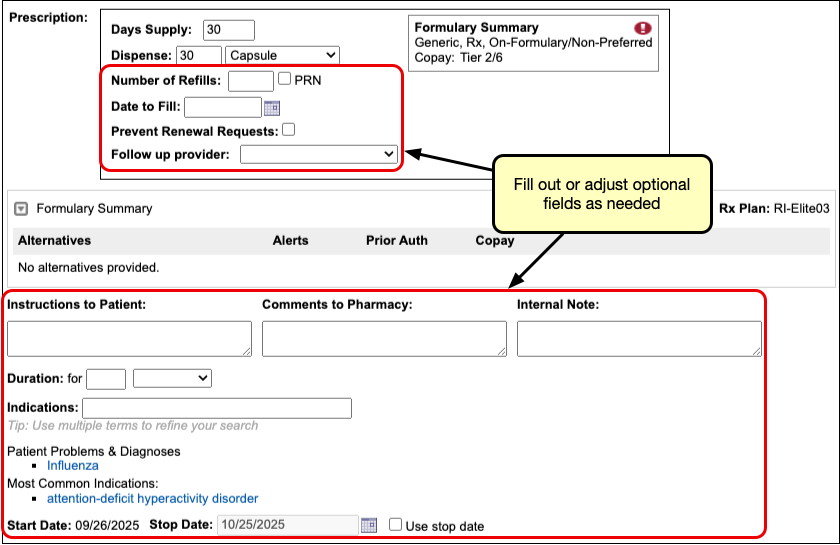
If you prescribe under the supervision of another provider, indicate their name in the “Supervising Provider” field. If you are preparing the prescription on a provider’s behalf, indicate their name in the “Ordering Provider” field.


Days Supply, Duration, and Stop Dates: You can use the days supply, duration, and stop date fields to create prescriptions that stay neat and tidy once added to the patient’s medication history. Learn how in the “Days Supply, Auto-Calculation, Stop Date, and Duration” section below.
If the dosing instructions are more complex than the standard fields for quantity, route, and frequency allow, check the “Instruction Only” box.
The “Instruction Only” option allows you to write your own dosing instructions for the patient instead of requiring you to use the standard fields for quantity, route, and frequency.
Because instruction-only prescriptions allow you to bypass certain fields that are used for safety checking, they cannot trigger all forms of safety alerts.
Prescribe Multiple Months’ Supply of Schedule II Controlled Substances: If you are prescribing a Schedule II controlled substance, you can turn a single prescription into a three- or two-month supply in one click. Only users in certain roles can prepare, sign, and send controlled substance prescriptions. You can learn more about prescribing controlled substances in the article Prescribe Controlled Substances.
Weight-Based Dosing: When you select a weight-based dosing statement, it starts a weight-based prescription using the patient’s most recent weight measurement. On fixed-dose prescriptions, you can switch to a weight-based dosing scheme by entering values in the “Wt-Based Dosing” and “Weight” fields. To learn more about weight-based dosing in PCC eRx, read the “Weight-Based Dosing” section below.
Real-Time Pricing and Formulary Support: As soon as you start your prescription, PCC eRx reaches out to the patient’s prescription insurance in real-time for pricing and coverage information, then displays the results beside your prescription. To learn more, read Check Prescription Pricing and Insurance Coverage While You Prescribe.
Recommended Adjustments: Drugs that carry considerations for patients with renal, hepatic, or other systemic impairment show the relevant organ in the Adjustments section as you prescribe. The recommended adjustment is based solely on the drug being prescribed, not the patient’s record.
Check Your Work
As you write a prescription, you can see a live preview of what the pharmacy will receive on the right side of the screen.
Check the preview and make sure the prescription isn’t missing any key information, such as a destination pharmacy or certain instructions.
You can update pharmacy information right on the prescription preview.
You can also modify the name and NDC that will go to the pharmacy with the prescription. This option is best used in cases where the standard defaults cause confusion at the pharmacy. PCC eRx will remember your selections the next time you prescribe the same drug, strength, and form.
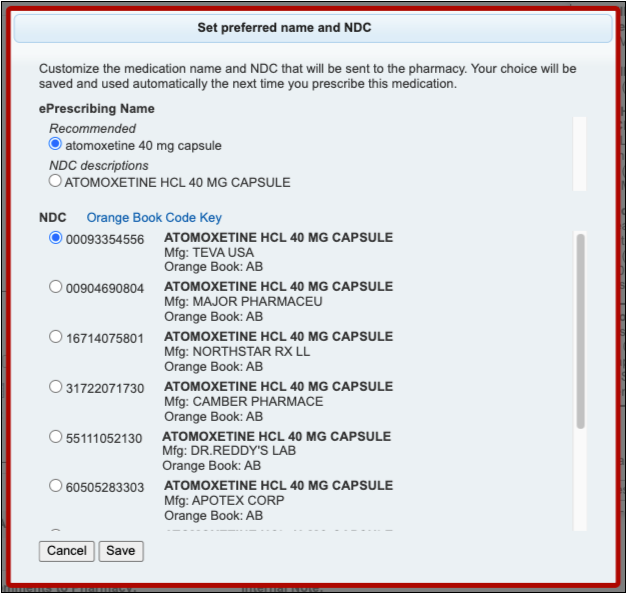
If you are missing certain instructions, red text on the prescription preview tells you what fields you need to fill out.
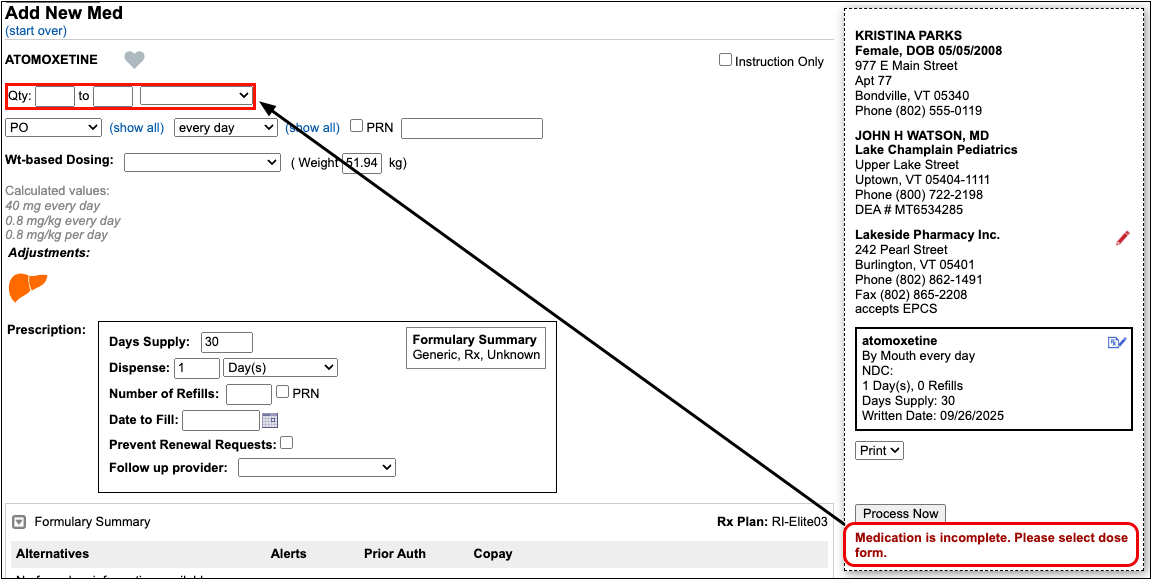
As you fill in the missing information, the preview updates to reflect your changes and the red text disappears, indicating that the prescription is ready to send.
Send, Print, or Save the Prescription
Once written, you can electronically send the prescription to the pharmacy, print a physical copy, or save and process it later.
Option 1: Send the Prescription
To send the prescription electronically, verify that “eRx” is selected on the prescription preview and click the “Process Now” button.
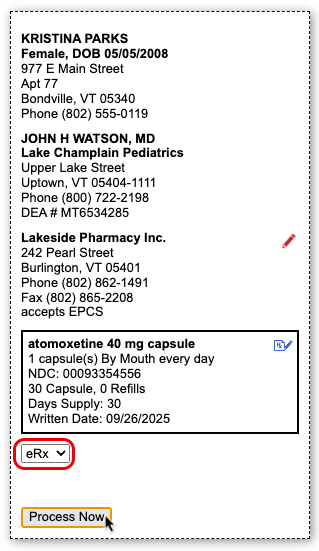
The prescription goes to the pharmacy electronically while you move on to your next task.
Authentication Required for Electronic Prescribing of Controlled Substances (EPCS): When processing electronic prescriptions for controlled substances, you must prove your identity by entering a personal password and a code generated by an electronic authentication token that is tied to your NPI and DEA credentials. To learn more about electronic prescribing of controlled substances and how to obtain an electronic authentication token, read Prescribe Controlled Substances.
Option 2: Print the Prescription
If printing is enabled for prescriptions at your practice, you can print the prescription instead of sending it electronically. Select “Print” on the prescription preview and click the “Process Now” button.
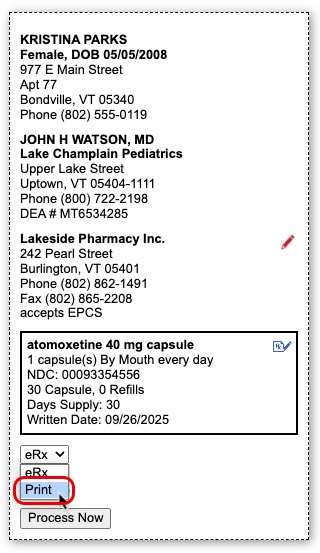
The ability to print prescriptions is only enabled where allowed by local regulations.
Option 3: Save the Prescription and Process it Later
If you want to queue the prescription to send or print later, click the “Save” button at the bottom of the window.
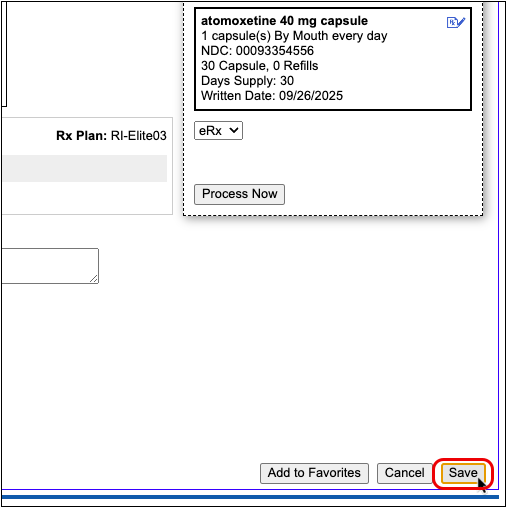
When you click “Save,” the prescription saves into the Review & Sign component of PCC eRx pending further action.

You can edit, send, print, or delete pending prescriptions at any time from Review & Sign.
When you finalize pending prescriptions in Review & Sign, you can put finishing touches on them as a batch before processing them to be printed or sent electronically to the pharmacy.
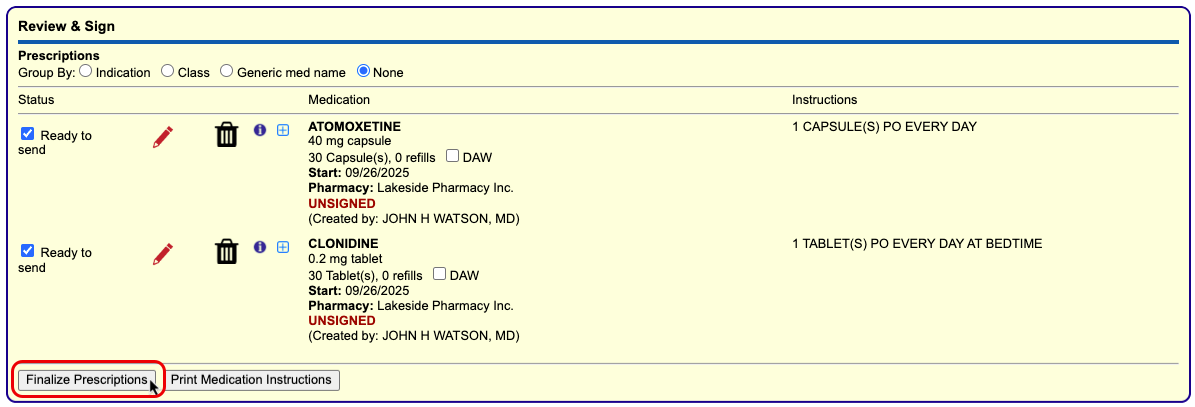
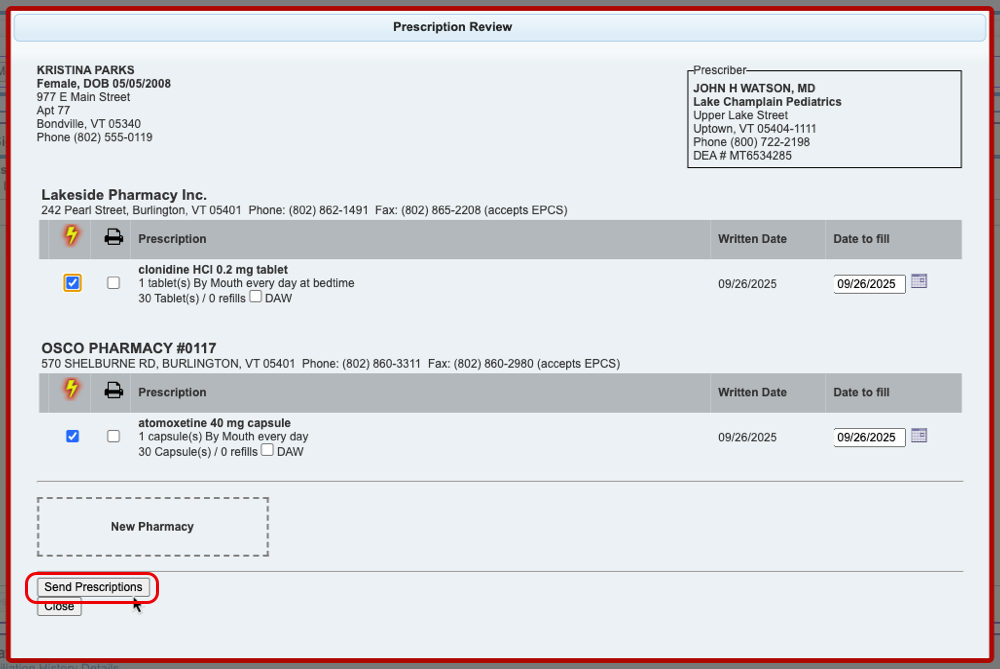
Work With Pending Prescriptions on the Rx Queue: In addition to working from a patient’s specific PCC eRx page, you can also edit, process, and delete pending prescriptions for any patient from the Rx Queue in PCC EHR. Learn more about the Rx Queue in the article The Rx Queue: Alternate Prescribing Workflows.
Review Completed Prescriptions
Prescriptions that have been printed or sent to the pharmacy remain in the Review & Sign component of the patient’s PCC eRx encounter and receive a timestamp indicating how and when they were processed. A bold, green status indicates successful transmission to the pharmacy.
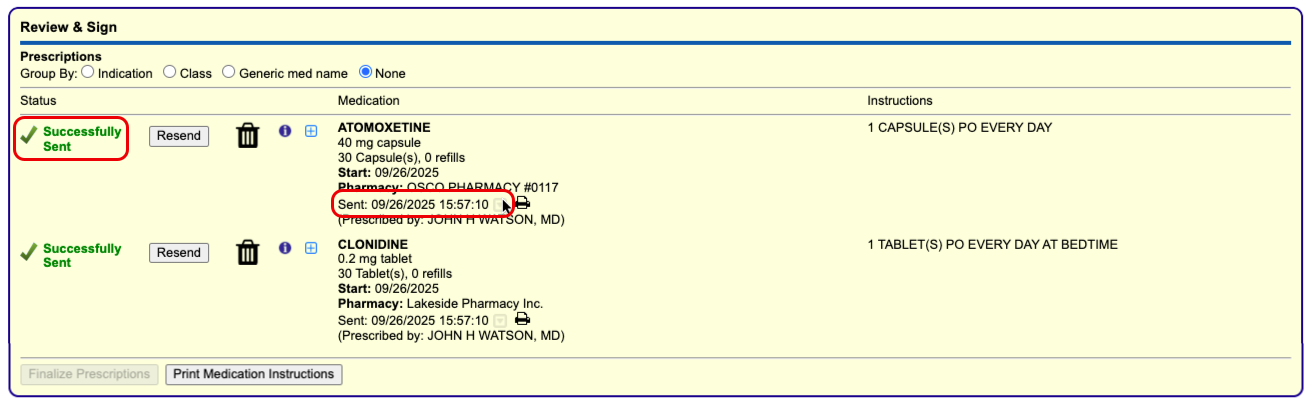
You can find out more information about how and when a prescription was sent to the pharmacy by hovering over the timestamp or clicking the grey disclosure triangle icon beside it. The information in these areas can help you determine precisely when a prescription left your system.
Cancel Sent Prescriptions: Click the trash can icon next to sent prescriptions in Review & Sign to cancel and delete them from the patient’s Prescription History. Where possible, an electronic cancellation is sent to the pharmacy. To learn more about how to cancel and delete prescriptions, read the “Cancel and Delete Sent and Printed Prescriptions” section of this article.
Prescription Features
PCC eRx empowers you to prescribe quickly, effectively, and safely with features that auto-calculate doses and dispense quantities, check for allergy and drug interactions, and more.
Weight-Based Dosing
When you search for a drug that is commonly prescribed using weight-based dosing, such as liquid antibiotics, PCC eRx presents weight-based dosing statements as an option or by default. Dosing statements are shortcuts to pre-fill a prescription, so you don’t have to complete every field manually. Weight-based dosing statements are typically expressed as a number of milligrams per kilogram per day (mg/kg/day) divided into a number of doses per day.
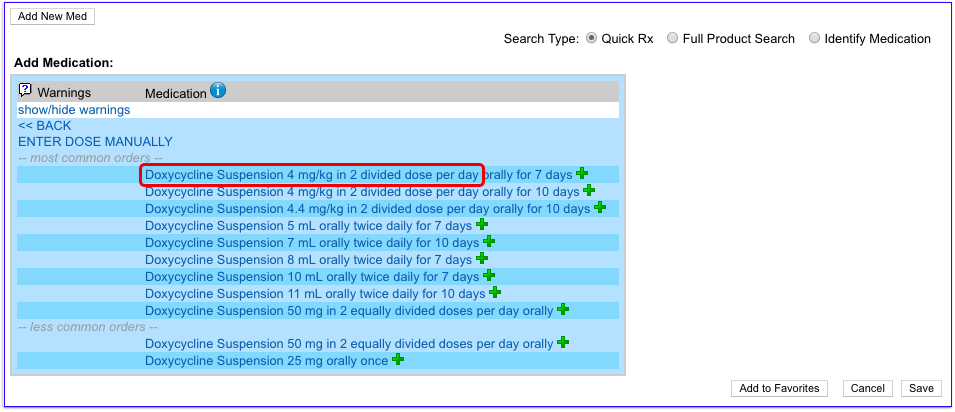
Choose a dosing statement that approximates the prescription you are trying to write. PCC eRx uses the information provided in the dosing statement and the patient’s most recently documented weight to start a prescription expressed as milligrams per kilograms per dose (mg/kg/dose), which you can then edit and refine to your exact liking.

The calculated volume per dose displays in red beside the dosing fields. If the calculation results in a volume that is impractical to measure or dispense, PCC eRx rounds it to the nearest dispensable amount within acceptable range.
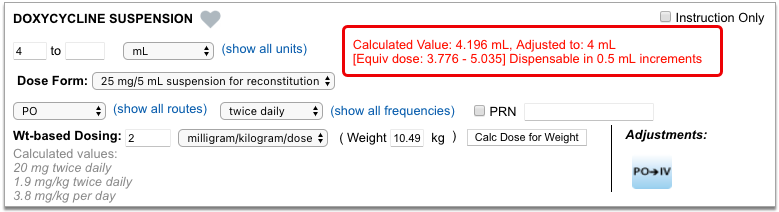
You do not have to accept PCC eRx’s dose calculation, and can manually update any dosing field to meet the exact needs of the patient in question.

If you want to recalculate a dose using a different number of mg/kg/dose or patient weight, you can change those values in the Wt-based Dosing section of the prescription and click “Calc Dose for Weight”. When you recalculate a dose, it updates the calculated volume per dose (in red) and the actual values in the dosing fields.

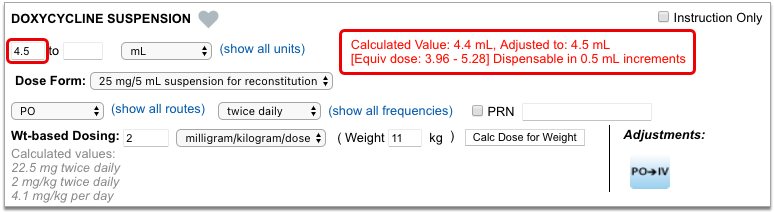
At any point while filling out a prescription that uses weight-based dosing, you can use the Calculated Values section in grey to double-check that the current dose values result in an appropriate total amount of medication for the patient.
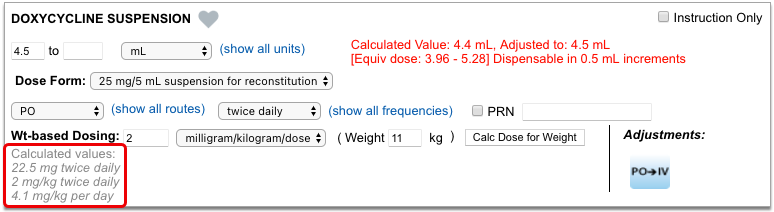
Unlike the dose volume calculation in red, which only reflects PCC eRx’s most recent calculation based on a patient weight and number of mg/kg/day, the Calculated Values section updates dynamically whenever you change one of the actual dose values, giving you a real-time appreciation for the total daily dose for which the prescription is currently written.
Trust Your Judgment: Weight-based dosing calculations in PCC eRx are strictly based on your selections, information provided about the patient’s weight, and accepted guidance about the medication. They cannot replace your professional judgment about a patient’s specific needs or situation. Always defer to your own professional judgment when prescribing medications and tailor doses accordingly.
Days Supply, Auto-Calculation, Stop Date, and Duration
When you create a prescription, PCC eRx automatically looks at the days supply to calculate a dispense quantity, stop date, and more.
Days Supply and Auto-Calculation
PCC eRx automatically fills out the Days Supply field when you start a prescription. Days supply is the number of days a prescription is intended to last.
When you renew a medication or pick a dosing statement that specifies a duration, PCC eRx automatically uses that duration to fill out the Days Supply field.
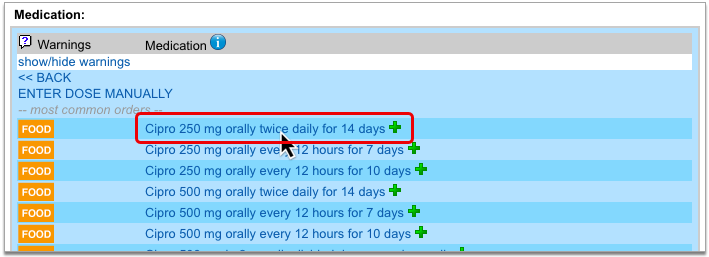
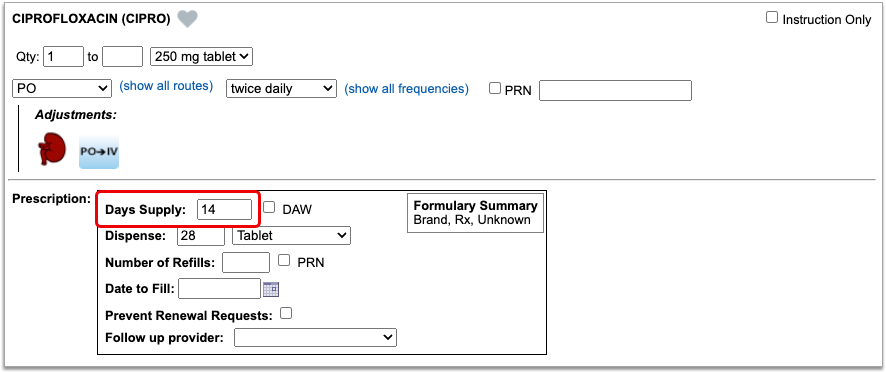
If you pick a dosing statement that has no duration, or you use the “Enter Dose Manually” option, PCC eRx automatically starts a prescription for a 30-day supply.
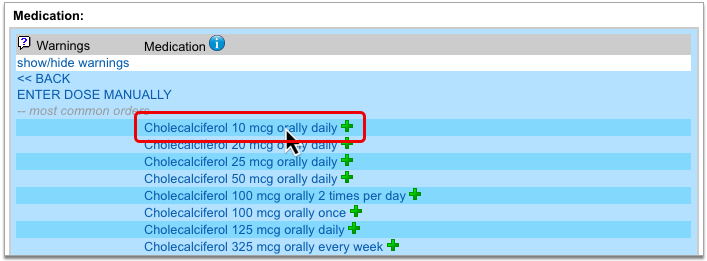
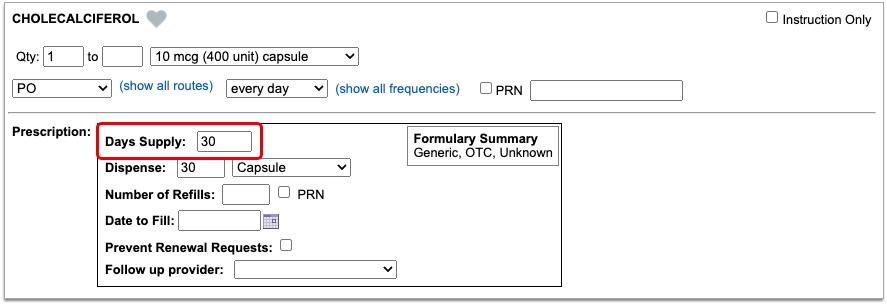
To auto-calculate a dispense quantity and form, PCC eRx multiplies the dose quantity, frequency, and form by the days supply, then translates the result into something the pharmacy can logically dispense.
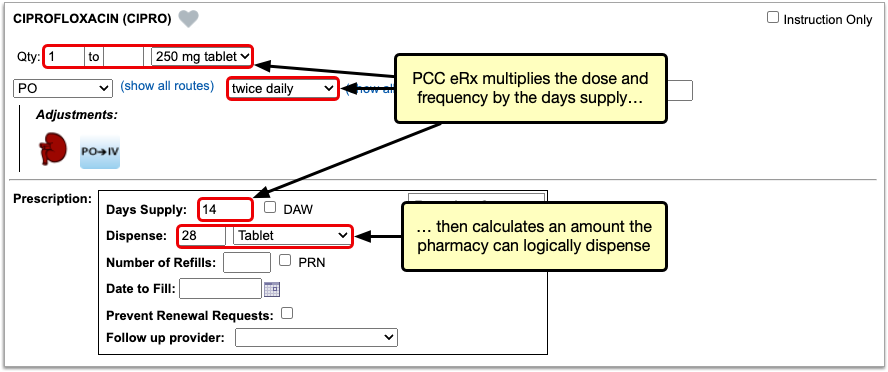
You can manually change the value in the Days Supply field at any time and PCC eRx will auto-calculate a new dispense quantity and form.
There are some cases where the Days Supply field is not used in the dispense quantity calculation, such as when you create a prescription for a piece of equipment, or for a medication that is dispensed as a standard tube, canister, box, or other package. In these cases, PCC eRx defaults to a dispense quantity of one.

When writing a prescription that is dispensed in a standard package size, always double-check that the dispense quantity is sufficient for the intended usage.
Stop Date and Duration
PCC eRx automatically determines the stop date for prescriptions using the days supply. On short-term prescriptions, defined as 29 days or less, PCC eRx also auto-selects the “Use Stop Date” checkbox and fills out the Duration field.
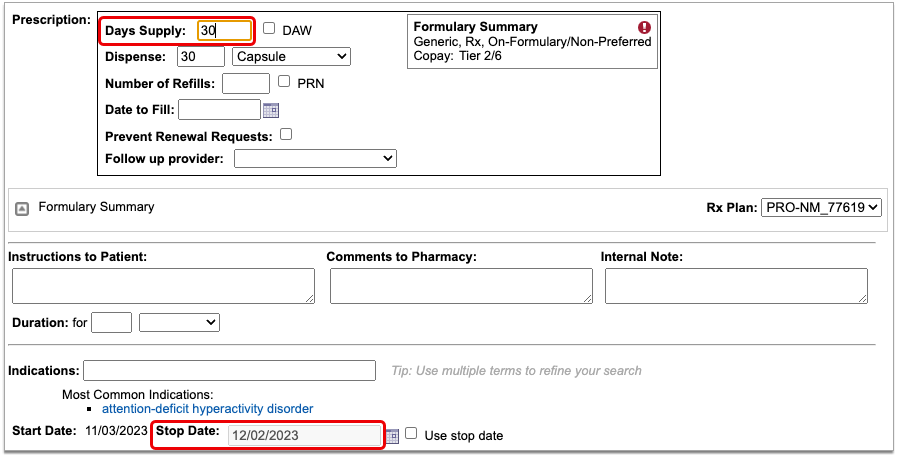

If needed, you can manually alter the stop date, “Use Stop Date” checkbox, and duration of a prescription. When “Use Stop Date” is selected, PCC eRx automatically discontinues the medication in the patient’s Medication History once the stop date has been reached.
Stop dates display in the Prescription History component in PCC eRx, indicating when a prescription is expected to have run its course. You can use this information to validate patient requests for additional medication or to prompt discussions about compliance.
Dispense Brand Name Drugs as Written (DAW)
When you prescribe a brand name drug with a generic equivalent, you can specify that the pharmacist dispense the prescription as written, without substitution. The Dispense As Written (DAW) option only appears on prescriptions for drugs that you search for by brand name.
To specify that a drug should be dispensed as written, select the “DAW” checkbox when you write the prescription.
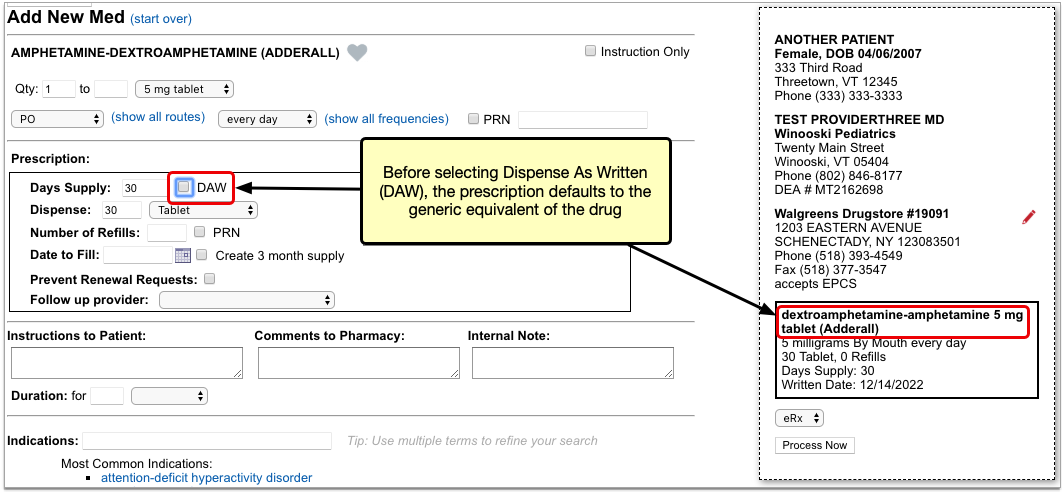
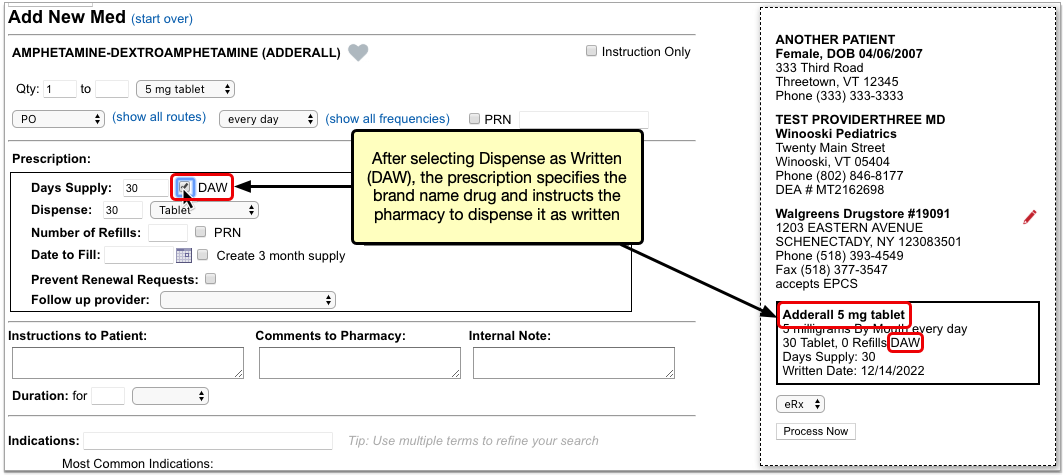
In addition to being available when you create or edit a prescription, the “DAW” checkbox appears beside pending prescriptions in the Review & Sign section of PCC eRx, the Finalize Prescriptions window, and on the Rx Queue.
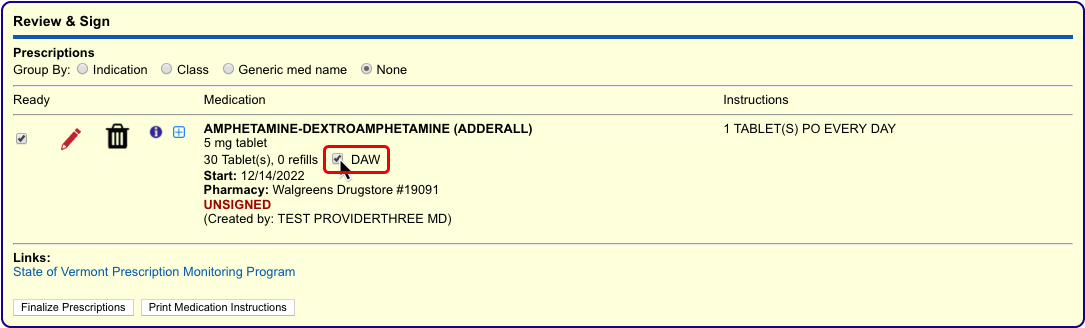
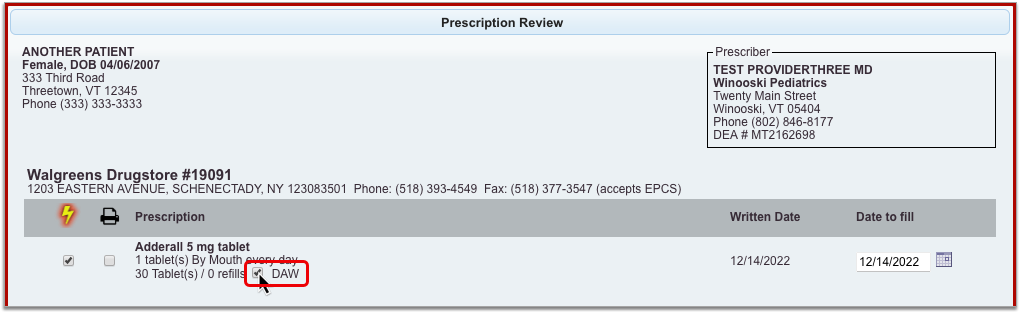
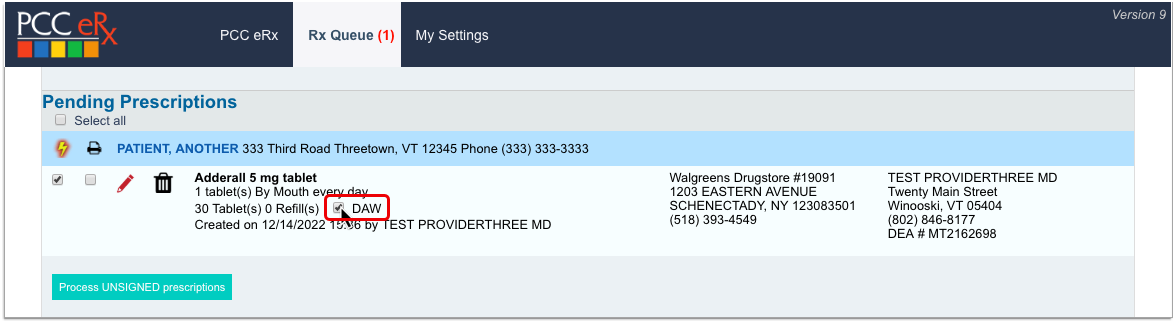
You can check or uncheck the “DAW” box in any of these places before sending the prescription to the pharmacy.
Instruction-Only Prescriptions
The “Instruction Only” option on prescriptions lets you write your own dosing instructions for the patient instead of requiring you to use the standard fields for quantity, route, and frequency.
After starting a prescription, check the “Instruction Only” box to bypass the standard dosing fields. Then, write instructions directing the patient how to use the product.
If the prescription is for a medication, you must also select a dose form so the pharmacy knows what strength to dispense and verify that the total dispense quantity is sufficient for the intended usage.
You can use the “Instruction Only” option to prescribe a loading dose or taper, or to create any prescription that cannot be written using the standard dosing fields. You can also use the “Instruction Only” option when you build custom medication items.
Reduced Safety Checking for Instruction-Only Prescriptions: Because instruction-only prescriptions allow you to bypass certain fields that are used for safety checking, they cannot trigger all forms of safety alerts. For example, instruction-only prescriptions are subjected to allergy and duplicate therapy checks, but cannot trigger dose range warnings.
Indications
You can view common indications for medications while you prescribe, and use indications to transmit diagnosis codes with your prescriptions.
Search for a medication in the Prescribe component, then hover over it to view its common indications.
To transmit diagnosis codes with a prescription, add indications to it as you prescribe.
PCC eRx suggests indications from several different sources, such as the patient’s current visit, their problem list, and the most common indications for the medication. Click the suggested indications to add them to the prescription, or search for other options in the Indications field.


Indications map to diagnostic terms in your PCC database, which in turn map to ICD-10 codes. When you save and finalize the prescription, PCC eRx transmits the ICD-10 code for each indication to the pharmacy and documents it in the Review & Sign component.
If you add an indication to a prescription that does not map to an ICD-10 code, PCC eRx transmits the text description of the indication to the pharmacy instead.
Indication Mapping is Not User-Editable: Unlike the diagnoses that appear in other parts of your PCC system, you cannot edit how indications in PCC eRx map to ICD-10 codes. If you have concerns about how a specific indication is mapped, contact PCC Support.
Medication Warnings and Safety Alerts
PCC eRx alerts prescribers on the product search screen when a drug may be inappropriate for the current patient’s age, contraindicates one of their documented allergies, interacts with other drugs or certain foods, or duplicates a therapy that they are currently taking.
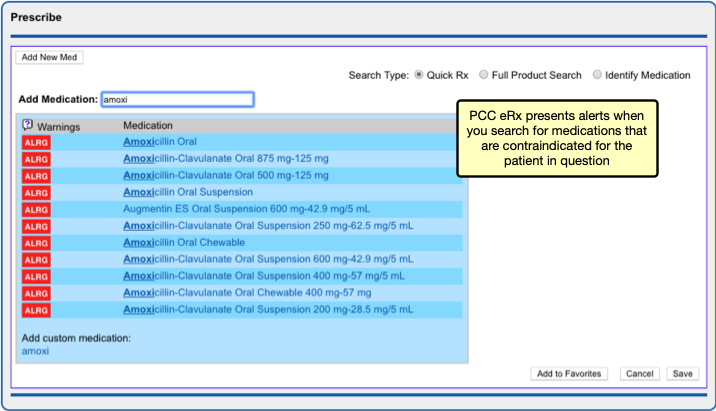
If you choose to prescribe a medication that is contraindicated for some reason or outside of normal parameters for the patient in question, automated safety checking protocols in PCC eRx present you with alerts that you must manually override before you can complete the prescription.
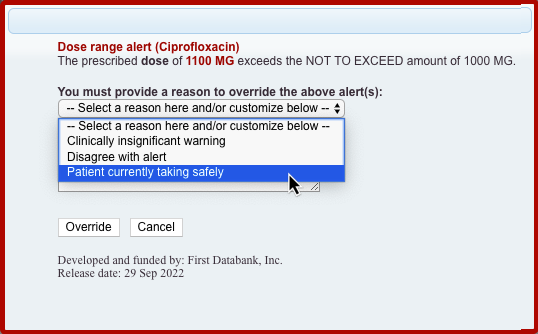
A user with Administration permissions in PCC eRx can customize the frequency and sensitivity of warnings and alerts at your practice, create a list of custom medication warnings, and manage the list of safety checking override reasons. To learn more, read Customize PCC eRx Alerts and Warnings.
Prescription Favorites
You can save your most common — or trickiest — prescriptions in a personalized “favorites” list for easy future prescribing.
To create a favorite, start a prescription then click the heart icon or the “Add to Favorites” button.
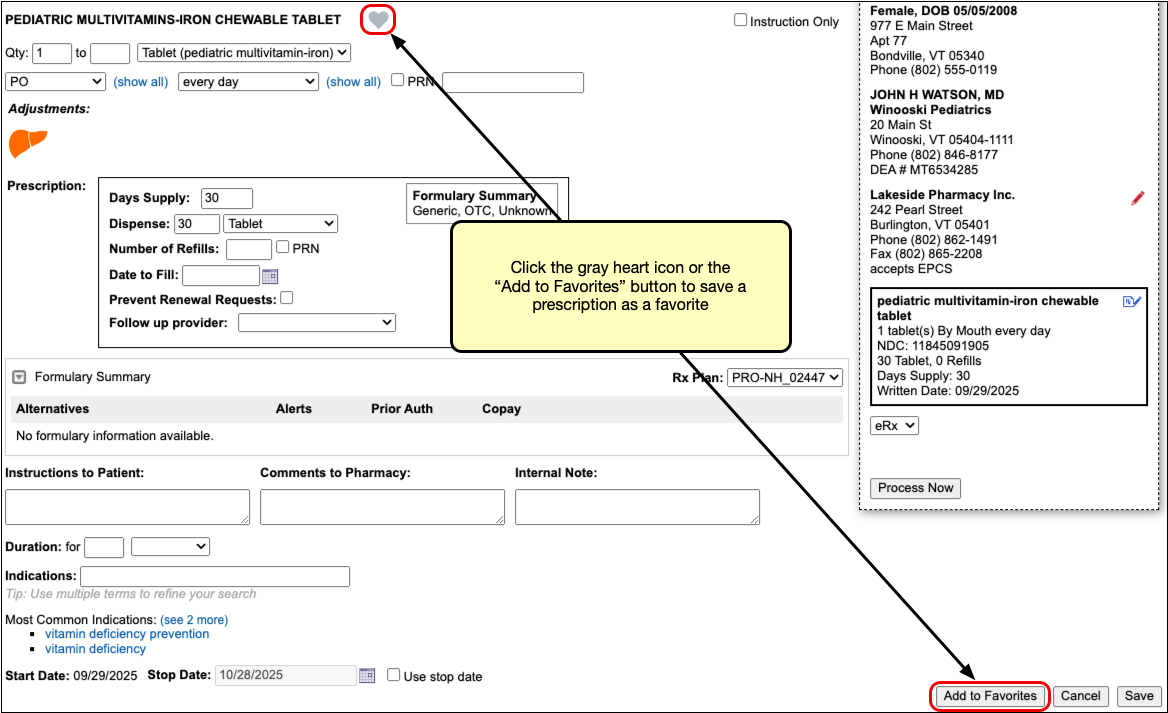
The prescription saves to your favorites list exactly as written, where you can quickly find and re-prescribe it for any patient. Favorites always display at the top of the search results when you start a new prescription from scratch.

They can also be displayed as thumbnail tiles or in a searchable drop-down list in the Prescribe section in PCC eRx.
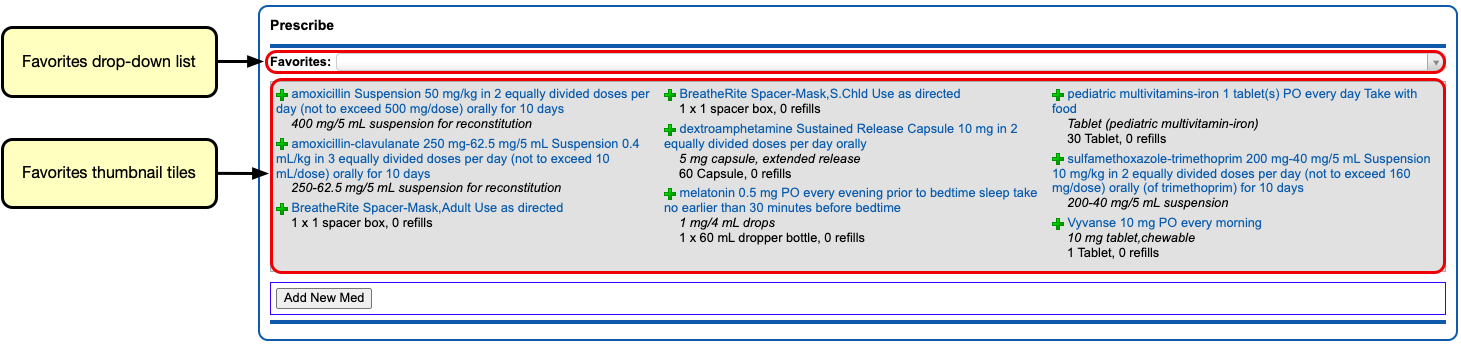
You can customize how your favorites display using the Favorites configuration on the My Settings page in PCC eRx.

For more in-depth information about prescription favorites, including how to edit or delete them and use automatic favorites, read PCC eRx Prescription Favorites.
Real-Time Pricing and Formulary Support
As you prescribe, PCC eRx checks with the patient’s prescription insurance plan in real-time for patient-specific pricing and coverage information.
The prescription insurance plan details come from Surescripts, the vendor that facilitates digital information exchange for e-prescribing. Using only the patient’s demographic information, Surescripts reaches out to its network of prescription benefit managers and finds the patient’s prescription insurance plan(s). Plan information displays in the Patient Information component in PCC eRx, where you can see the name of the prescription benefit manager, the covered pharmacy types, and the plan name and status.
As you prescribe, PCC eRx checks with the patient’s plans for real-time, patient-specific pricing and coverage details, then displays that information beside your prescription.
If a drug is expensive, not covered, or requires prior authorization, check to see if any of the alternatives suggested by the insurance plan could work instead.
To learn everything there is to know about Real-Time Pricing and formulary support in PCC eRx, or to watch the video, visit Check Prescription Pricing and Insurance Coverage While You Prescribe.
Prescription Drug Monitoring Program Links
While PCC does not yet offer direct integrations with prescription drug monitoring programs (PDMP), you can configure PCC eRx to display links to your regional PDMP website and other important reference sites. Once configured, the links display in the Review & Sign component within the PCC eRx section of patient charts.
Click any link to open the associated website in a browser tab within PCC EHR. Once open, you can interact with the website just as you would in any internet browser.
When you have completed what you need to do on the website, click the red “x” icon on the browser tab to close it.
Renal, Hepatic, and Other Dosing Adjustments
PCC eRx presents an icon in the shape of a kidney or liver when you prescribe a drug with adjusted dosing for patients with renal or hepatic impairment. Click the icon to view the recommended adjustments.
Adjustments are categorized by age and impairment. When you choose an adjustment, PCC eRx recalculates the dose accordingly.
If you want more information about the recommended adjustments, you can open and view the full monograph within the adjustments pane.
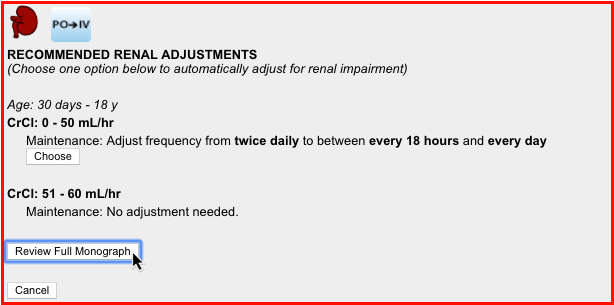
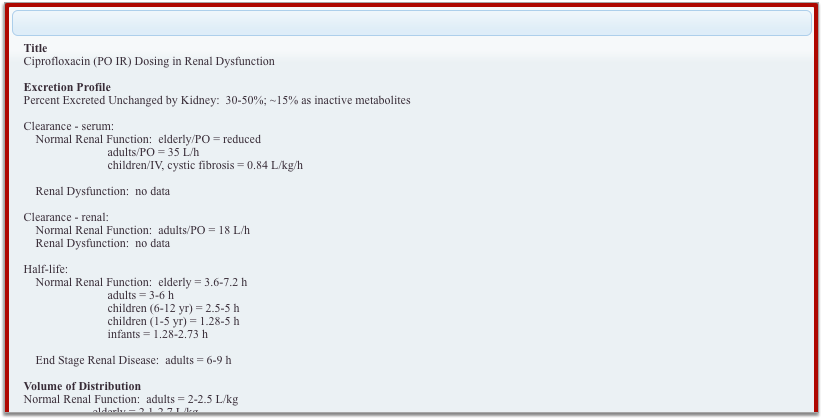
PCC eRx presents the renal and hepatic adjustment icons for relevant drugs regardless of the present patient’s problems, diagnoses, or lab results. Use your professional judgment to determine whether adjustments are truly needed for any given patient.
Other Dosing Adjustments: PCC eRx occasionally presents icons in the Adjustments section of a prescription that are not related to renal or hepatic impairment, such as an icon to indicate dosing adjustments for intravenous administration. Simply click the icon to see more details about the recommended dosing adjustment.
Common Prescribing Scenarios
PCC eRx offers flexible options to manage complex yet common prescribing scenarios.
Prescribe from Your Phone
When you’re away from your work computer, you can use pocketPCC to prescribe from your phone, tablet, or other internet-connected device. Learn how.
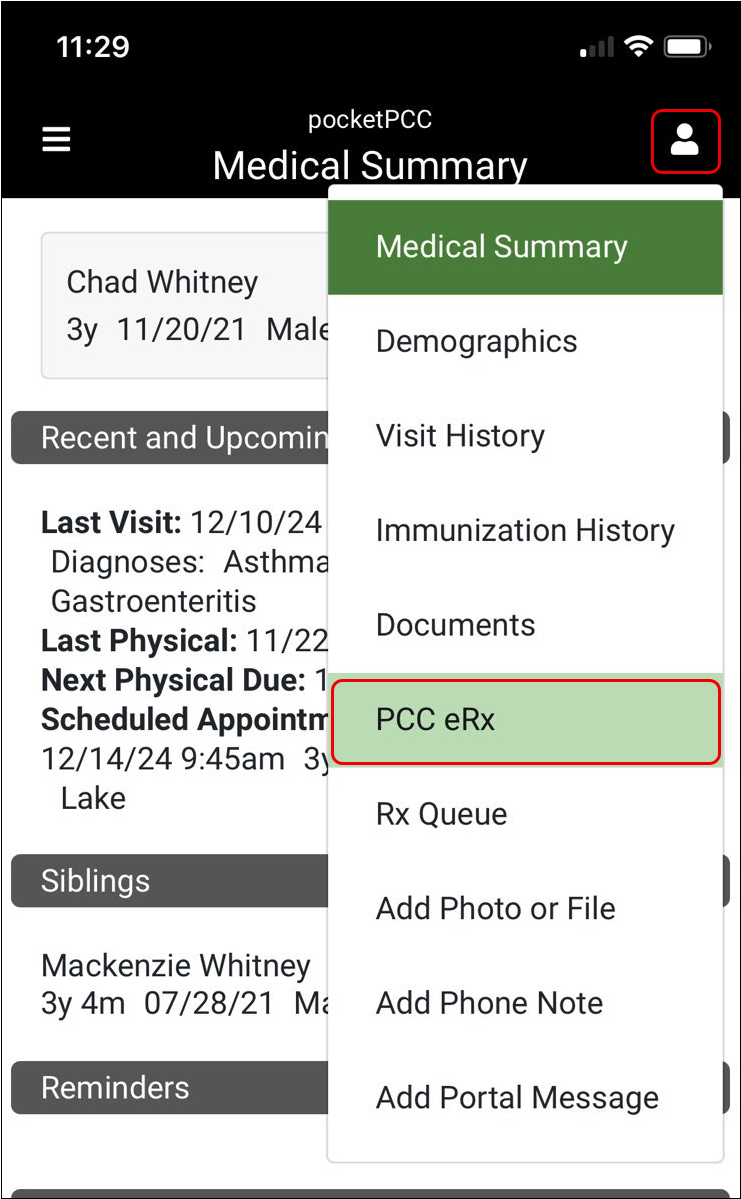
Prescribe Equipment, Supplies, and Services
When you want to prescribe durable medical equipment (DME) or supplies, use the “Full Product Search” option to search for the item.

If the item you wish to prescribe is available in the list, select it to start a prescription, then prescribe it normally.
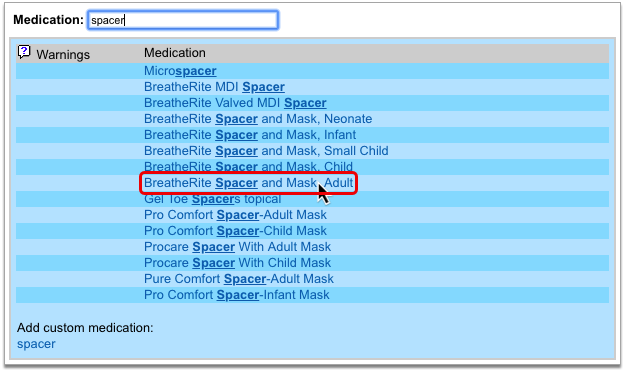
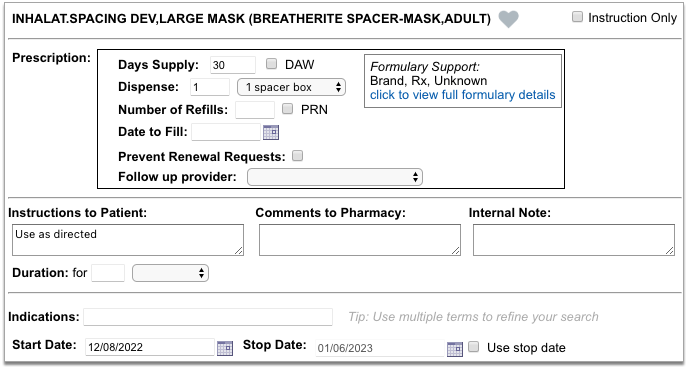
If the equipment or supply you wish to prescribe is not available in the full product search, or you wish to prescribe a service such as speech therapy, a user with PCC eRx Administration privileges must create it as a custom medication item before you can prescribe it.
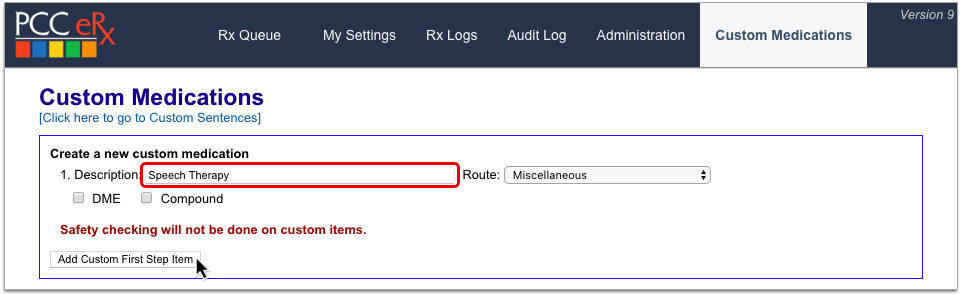
Once the equipment, supply, or service has been created as a custom medication item, you can search for it as you would any other medication and prescribe it normally.
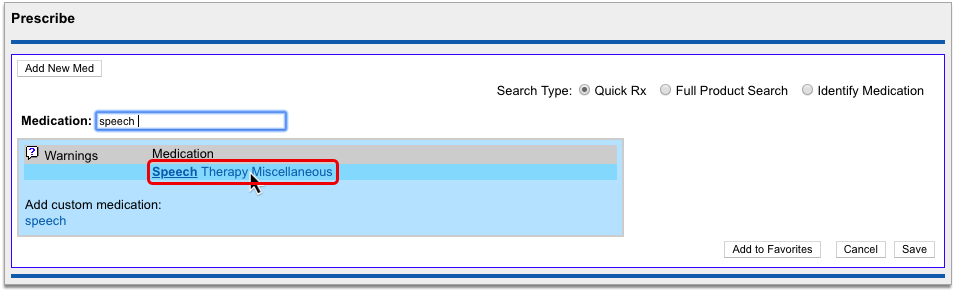
You can learn how to create custom medication items in the article Create Custom Medication Items in PCC eRx.
Contact PCC Support for Help: Special prescribing scenarios carry many considerations, and what works for one practice might not work for another. Contact PCC Support if you need help writing prescriptions for less common items.
Prescribe a Multiple-Month Supply of Schedule II Drugs
In a single click, you can turn a prescription for a schedule II drug into a three-month supply. This function is most commonly used to prescribe maintenance medications for the treatment of ADHD.
Start a prescription for a schedule II drug, then check the “Create 3 month supply” box.
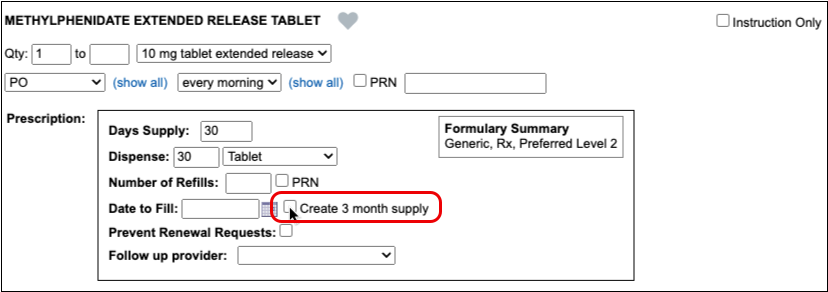
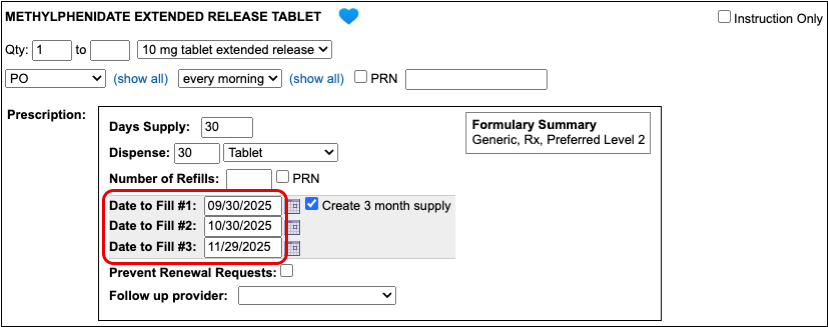
The prescription goes from having one date to fill to having three successive ones that are calculated from today’s date based on days supply. If you delete the third date to fill, you can turn this into a prescription for a two-month supply.
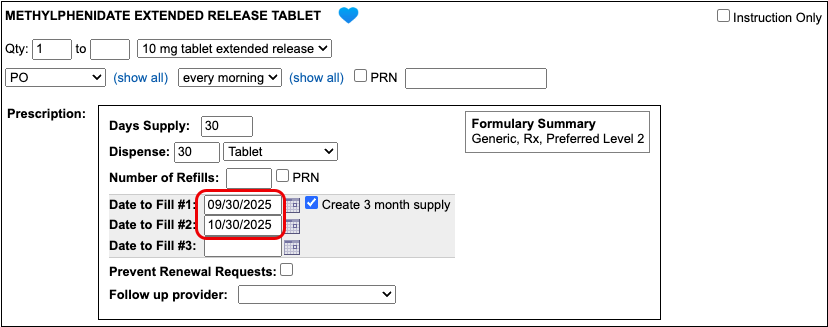
If you want the patient to be able to pick up the second and third prescriptions in the series a little before they’re needed, you can manually adjust the dates to fill. This is called pre-dating.
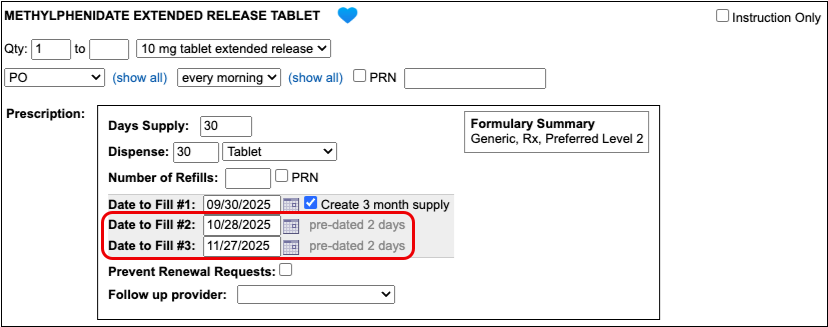
When you pre-date the second prescription in the series, the third automatically becomes pre-dated by the same number of days. If you want to pre-date the third prescription for a different number of days, you can manually change its date to fill without affecting the first two prescriptions in the series.
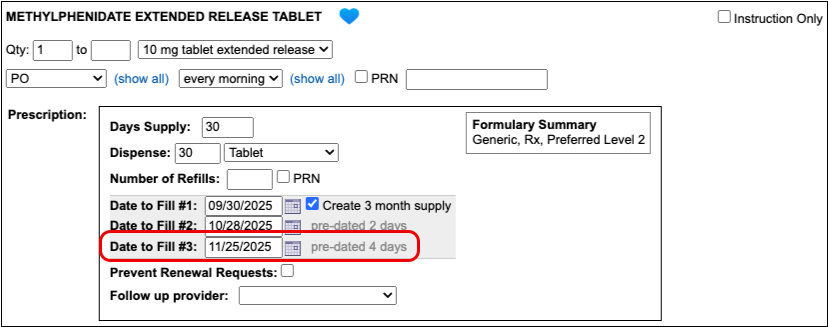
If you always want to pre-date the second and third prescriptions in a series of three by a certain number of days, you can set that up in your PCC eRx settings.
When you are ready to send the prescription, process it as usual. You will only be prompted to enter your EPCS credentials once.
Even though it feels like you are sending one prescription and all three months display as a single entry on the Rx Queue, in the patient’s Medication History, and in their Prescription History, each month’s supply goes to the pharmacy as a separate prescription with unique a serial number.
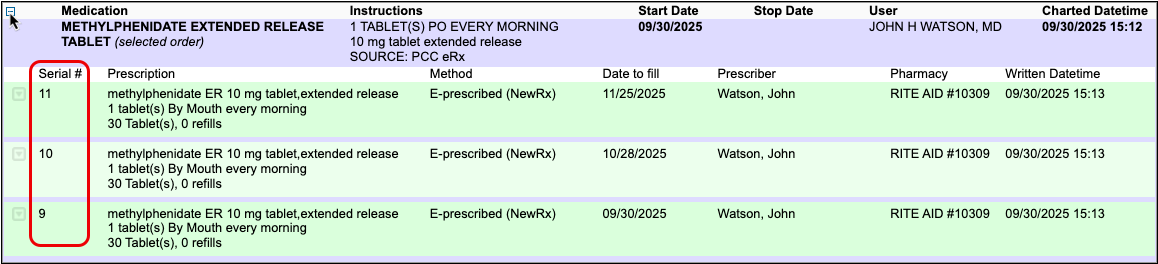
If you need help troubleshooting issues with a prescription for a multiple-month supply, contact PCC Support.
Prescribe from Favorites
You can save your most common — or trickiest — prescriptions in a personalized “favorites” list for easy future prescribing. Depending on your personal settings in PCC eRx, favorites may display in a searchable drop-down list or as thumbnail tiles in the Prescribe component.
Your favorites also appear at the top of the search results when you search for a product in the Prescribe component.
Select a favorite from the searchable drop-down list, thumbnail tile display, or medication search results to start a prescription. From there you can edit the prescription, save and queue it, or process right away.

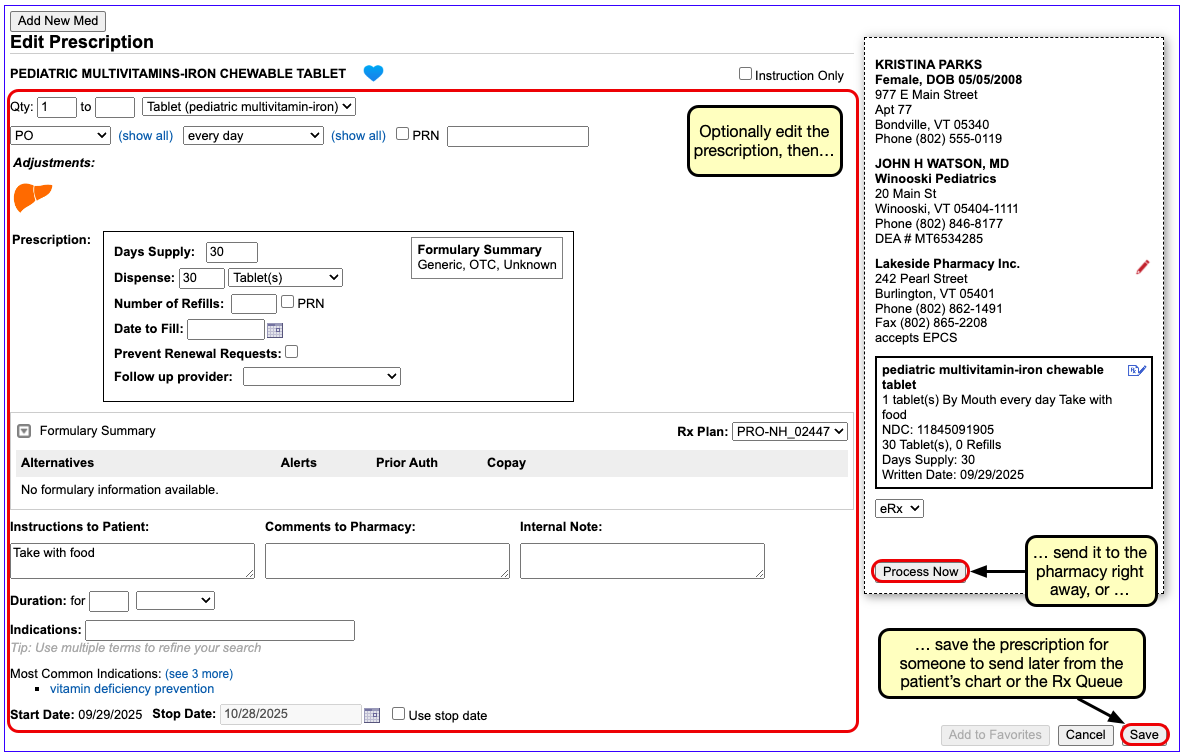
For more information about how to prescribe with, create, edit, delete, or manage the display of favorites in PCC eRx, read PCC eRx Prescription Favorites.
Document Historic, OTC, and Sample Medications
If you provide a sample medication, or a patient reports use of an over-the-counter or historic medication, you can record it directly in the patient’s Medication History.
Click the “Add Hx Med” button to add new entries to the patient’s Medication History.
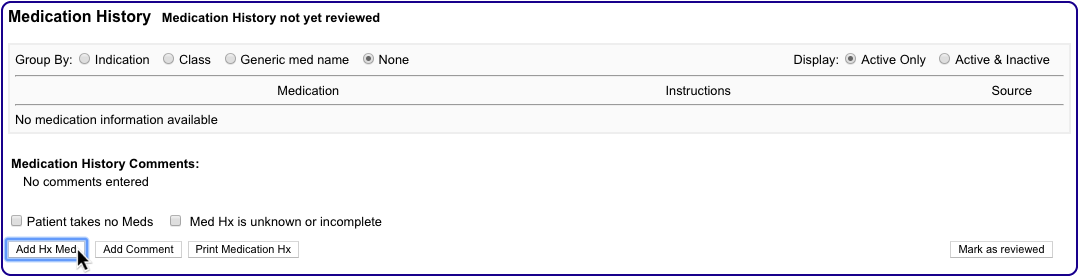
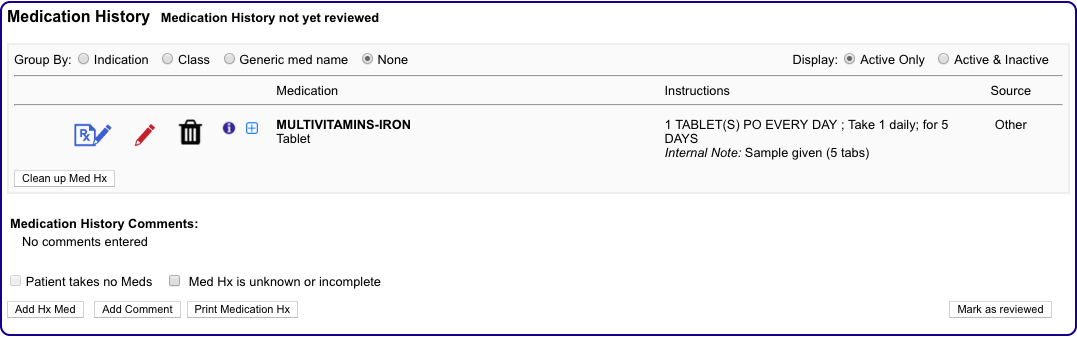
For more information about adding historical medications in PCC eRx, read the Medication History article.
Create a Taper or Loading Dose
When you want to prescribe a taper or loading dose, search for the medication and select a dosing statement that includes the base strength you wish to prescribe.
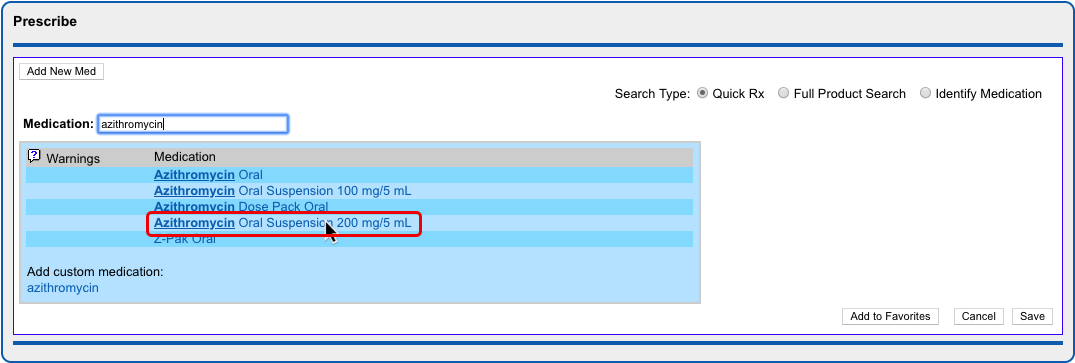
Select the dosing statement that most closely resembles how you want the patient to take the medication.
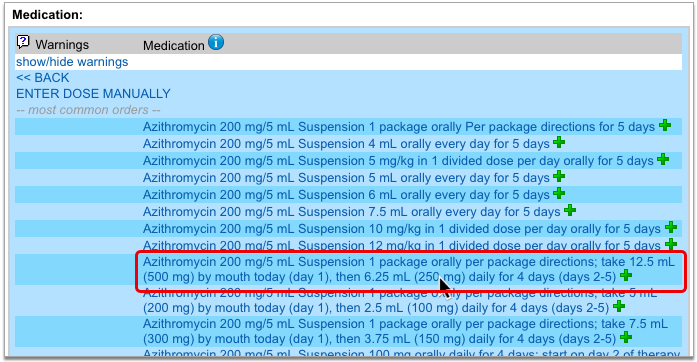
If you see no dosing statements that match your instructions for the patient, pick any statement and then select “Instruction Only”.

The “Instruction Only” option lets you write your own dosing instructions for the patient instead of requiring you to use the standard fields for quantity, route, and frequency. Note that you must indicate a dose form on instruction-only prescriptions so the pharmacy knows what medication strength to dispense.
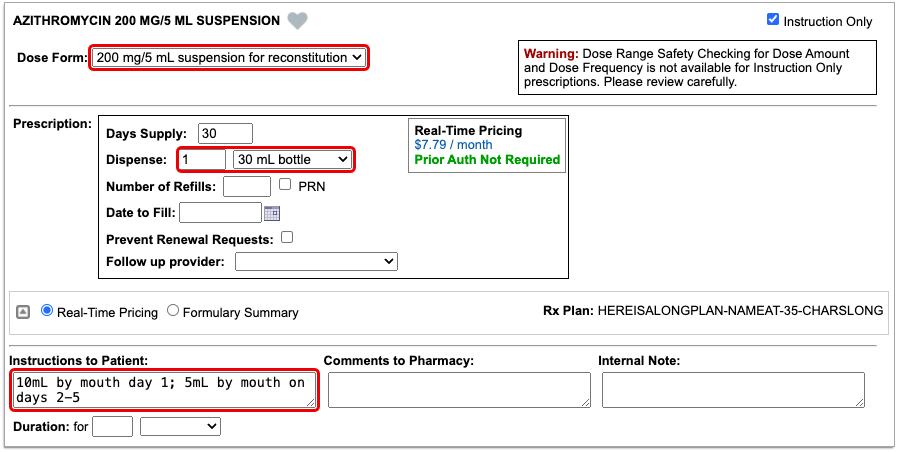
Verify Dispense Quantity Before Processing Instruction-Only Prescriptions: Because instruction-only prescriptions allow you to bypass certain fields that are used to auto-calculate a dispense quantity and form, PCC recommends that prescribers double-check that the total dispense quantity of instruction-only prescriptions is sufficient for their intended use.
Reduced Safety Checking for Instruction-Only Prescriptions: Because instruction-only prescriptions allow you to bypass certain fields that are used for safety checking, they cannot trigger all forms of safety alerts. For example, instruction-only prescriptions are subjected to allergy and duplicate therapy checks, but cannot trigger dose range warnings.
Save Common Instructions as Snap Text: You can save common taper or loading dose instructions as snap text, then add them to the Instructions to Patient box on prescriptions by typing a shortcut. Learn how.
Prescribe Compounds
When you want to prescribe a compound, start by searching for it by name in the medication search.
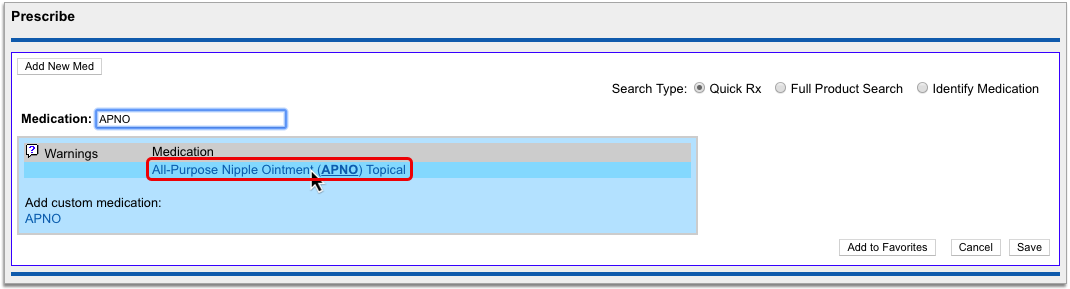
Your PCC system has standard entries for All-Purpose Nipple Ointment (APNO) and Magic Mouthwash. These entries contain itemized lists of ingredients and their ratios, each of which undergoes safety checking when you prescribe.
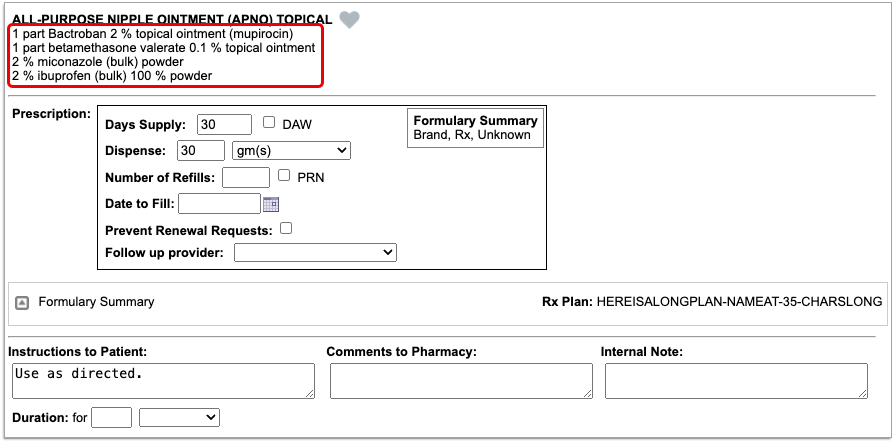
Standard compound entries may be e-prescribed just like any other medication.
If you wish to change the “recipe” of a standard compound entry or request that a new compound be added to your PCC system, contact PCC Support.
Optionally Create Compounds as Custom Medication Items: You can optionally configure compounds on your PCC system using the custom medication option. While this approach works, it only allows you to create instruction-only prescriptions for compounds, which can be e-prescribed but do not trigger all forms of safety alerts. You can learn more about custom medication items in PCC eRx by reading Create Custom Medication Items in PCC eRx.
Renew Prescriptions
When a patient is out of refills for a prescription, you can renew it from the Prescription History or Medication History component in PCC eRx.
Open the PCC eRx section of the patient’s chart. If the patient does not have a visit, phone note, or portal message today, create an eRx encounter from the drop down.
In the patient’s Prescription History or Medication History, find the prescription that needs to be renewed then click the “blue swish” icon to prepare and queue it for processing.

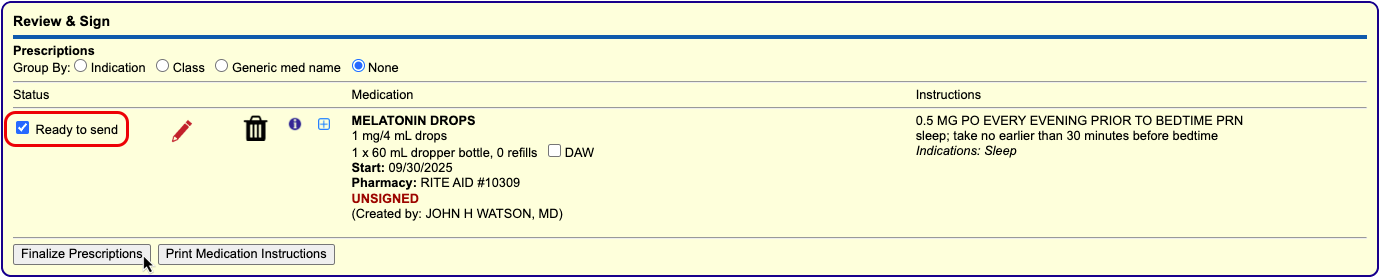
If your Renewal Workflow in My Settings is set to “Open the renewal in an edit window, where I can optionally modify it and send it immediately”, the blue swish icon opens the renewal for editing, where you can process it immediately using the “Process Now” button.
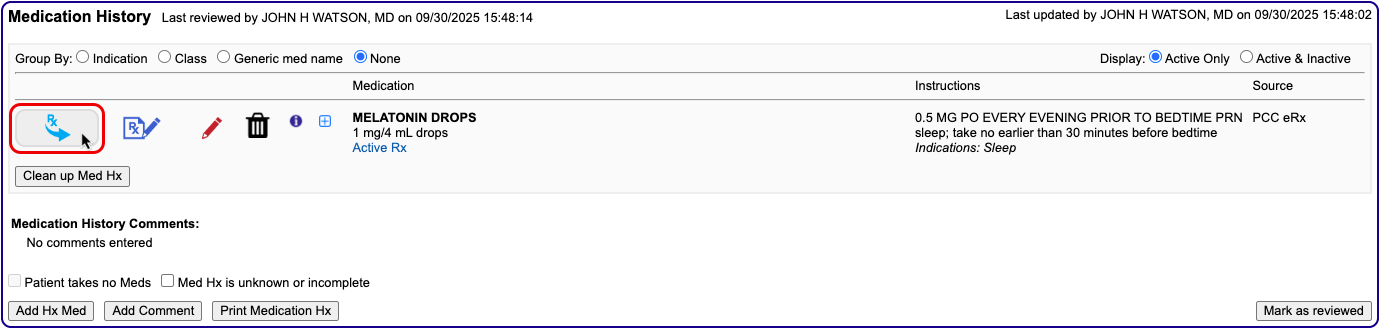
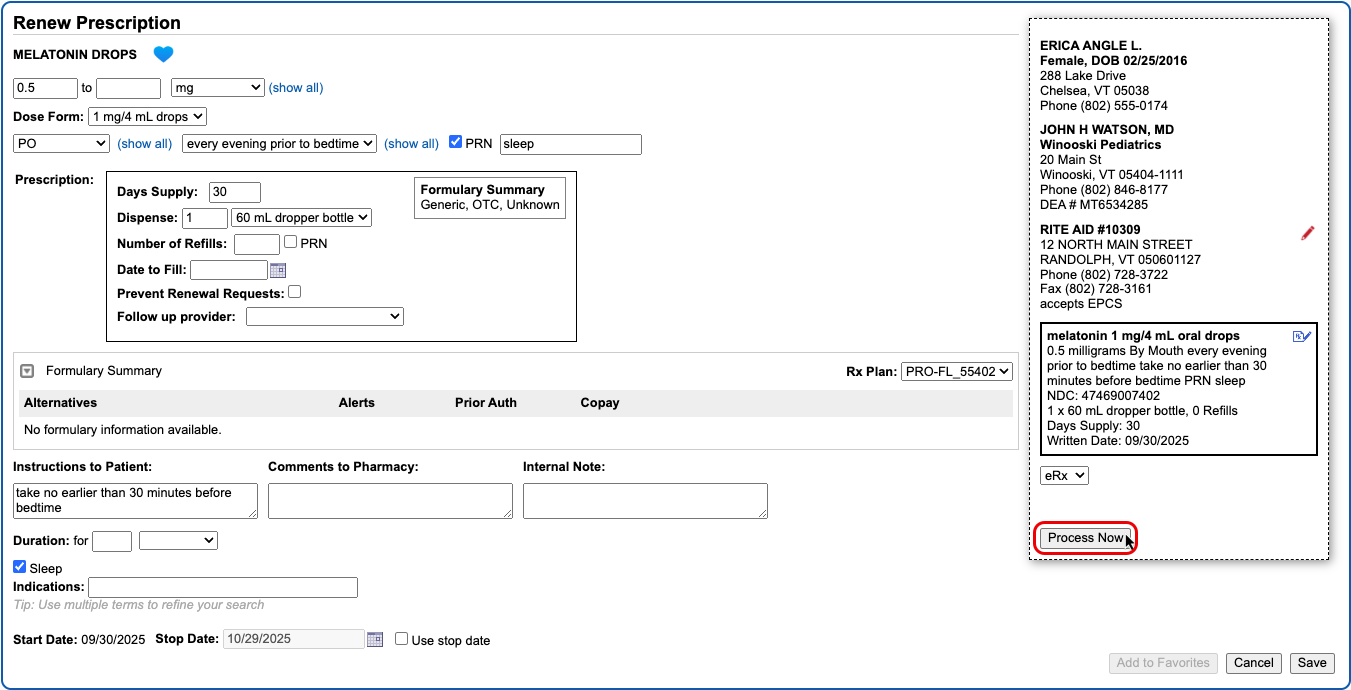
Once you prepare the renewal, process it as you would any prescription.
You can also renew prescriptions by responding to renewal requests from pharmacies on the Rx Queue. Pharmacies most commonly send renewal requests when patients try to fill prescriptions that have no more refills.
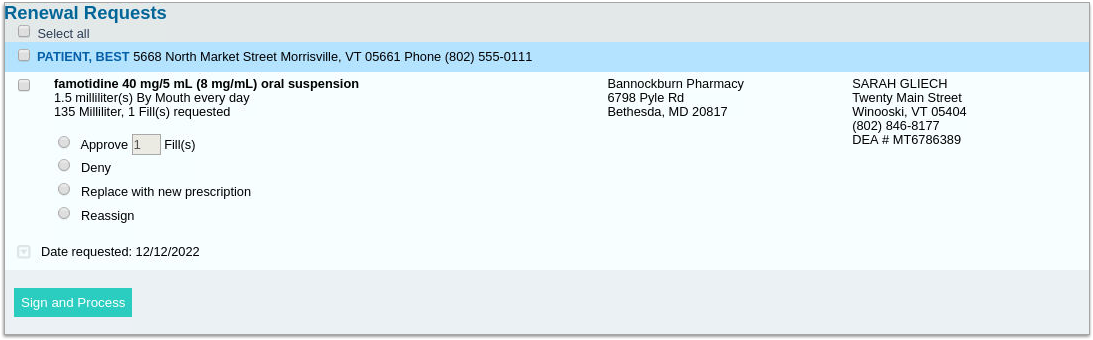
You can take different actions in response to a renewal request, such as approving it as written with a number of refills, denying it, replacing it with new prescriptions, or reassigning it to a different prescriber.
Enable or Disable Renewal Requests: You will only receive renewal requests from pharmacies if the renewal request service is enabled for your user account. Someone at your practice with User Administration privileges in PCC EHR may enable or disable the renewal request service for your account in the User Administration tool.
Choose Your Renewal Workflow: You can choose whether the “Renew Prescription” icon opens renewals in an edit window or immediately queues them for sending. Configure your Renewal Workflow in the Renew Prescriptions section of the My Settings page.
Resend a Prescription
For seven calendar days after you send a prescription, you can resend it to a different pharmacy, or to the same pharmacy with different details.
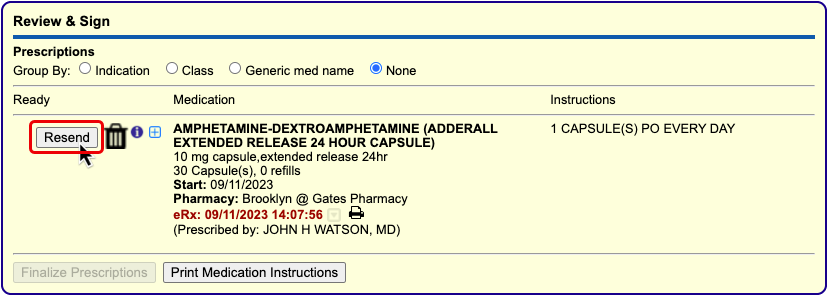
PCC eRx sends a cancellation to the pharmacy for the original prescription when you resend a new version.
The “Resend” button is sensitive to each user’s PCC eRx role and permissions. Only Providers, Mid-Level Providers, and Provider Agents may resend prescriptions for legend drugs. Only Providers and Mid-Level Providers who are registered for EPCS may resend prescriptions for controlled substances. Anyone with permission to prepare and save a pending prescription can queue up a resend for a prescriber’s approval.
To learn more and see it in action, visit Resend a Prescription.
Send Prescriptions to Multiple Different Pharmacies
You can prescribe to several pharmacies at once when you finalize pending prescriptions from the Review & Sign component of a patient’s visit, phone note, or portal message in PCC eRx.
Go to the Review & Sign component and click “Finalize Prescriptions”.
The Prescription Review window lists the patient’s pending prescriptions and the current pharmacy for each. At the bottom of the window you can see the patient’s other saved pharmacies and the option to add a new pharmacy.
You can pair prescriptions and pharmacies, or exchange one pharmacy for another, by dragging the screen elements together. When a yellow highlight appears, release your mouse cursor to complete the pairing or exchange.
Once paired, prescriptions and pharmacies display together. Each prescription may only be paired with one pharmacy.
When all prescriptions have been paired with the correct pharmacy, click “Send Prescriptions” to process all of them at once.
Delete Pending Prescriptions
You can delete pending prescriptions from several places in PCC eRx before they get printed or sent to the pharmacy.
Pending prescriptions save into the Review & Sign component in PCC eRx within the patient’s visit.
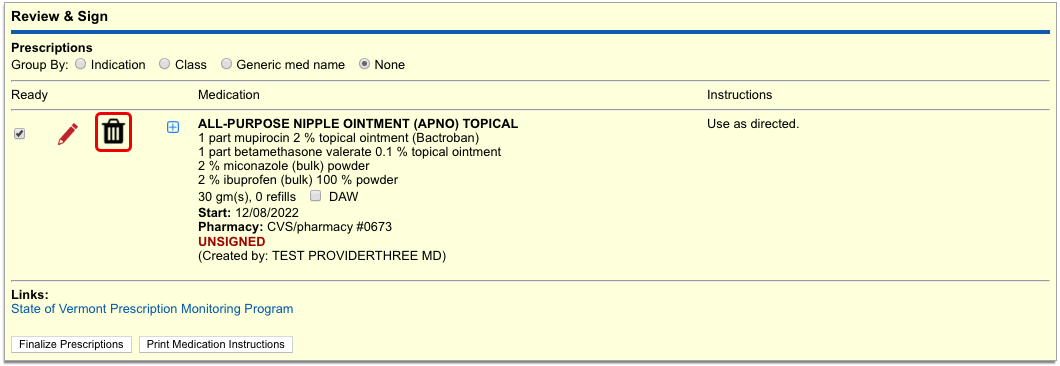
You can also find them on the Rx Queue in PCC EHR.
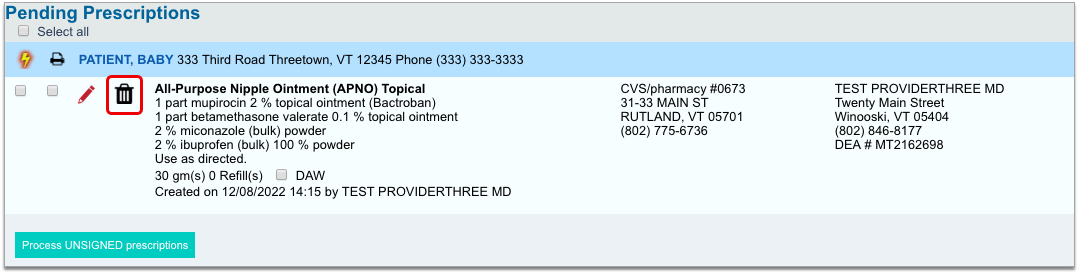
In either place, click the trash can icon beside the prescription to delete it. When you delete a pending prescription, its details do not enter the patient’s medication or prescription histories, nor do they display in the Prescriptions component of the patient’s visit, phone note, or portal message.
Information about deleted pending prescriptions is available in the Rx Audits section of the Rx Logs in PCC eRx. If you need help researching a deleted pending prescription, contact PCC Support.
Delete and Cancel Prescriptions that Were Sent or Printed in Error
In PCC eRx, you can delete and cancel prescriptions that were sent or printed in error.
In the patient’s Visit History, find and open the encounter where the medication was prescribed, then click the PCC eRx button.
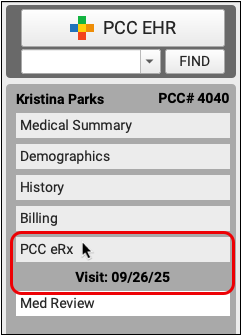
Jump to the Review & Sign section, then click the trash can icon beside the prescription that was sent or printed in error. If the prescription has passed its stop date, you will not be able to delete it.
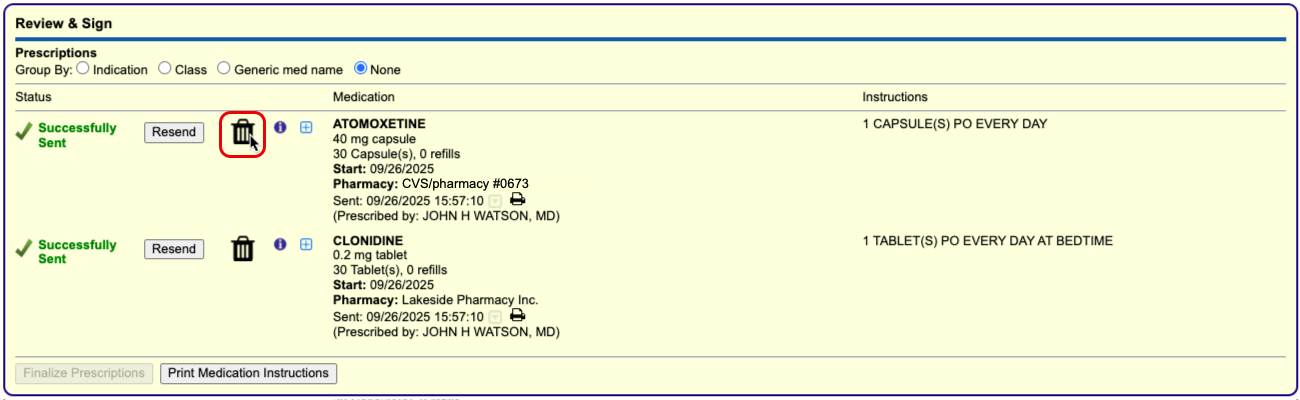
When you delete an electronic prescription, PCC eRx automatically sends a cancellation to the pharmacy and notifies you that a cancellation has been sent. The notification includes the pharmacy’s phone number in case you want to follow up with a phone call.
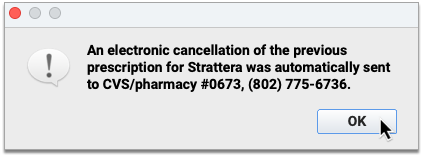
Deleted prescriptions get removed from the Review & Sign component and the patient’s Prescription History, but the medication remains active in the patient’s Medication History. You can delete the medication from the patient’s history by clicking the trash can icon beside it and recording a reason for deletion.
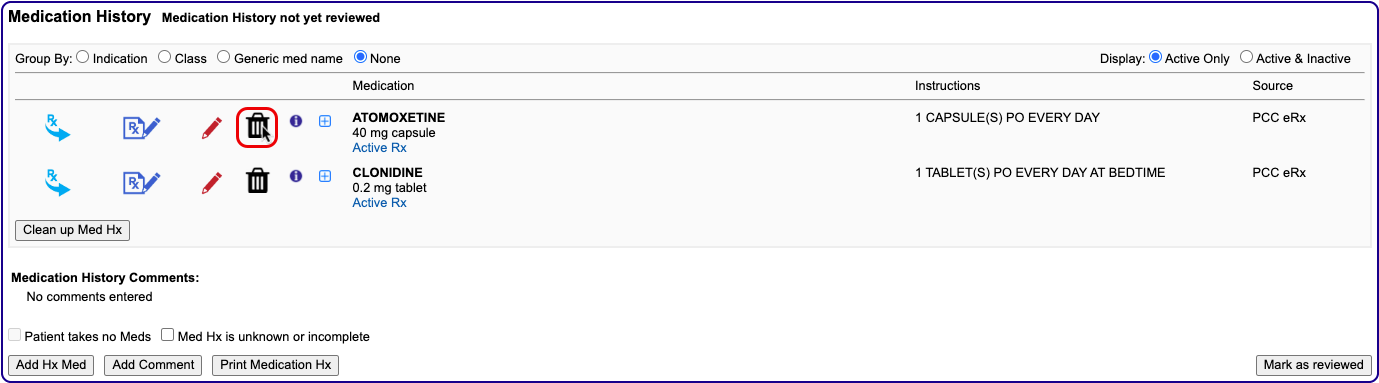
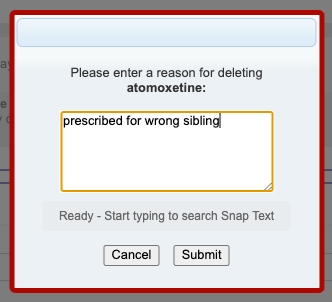
Deleted medications and their reasons for deletion appear in the inactive section of the patient’s Medication History.
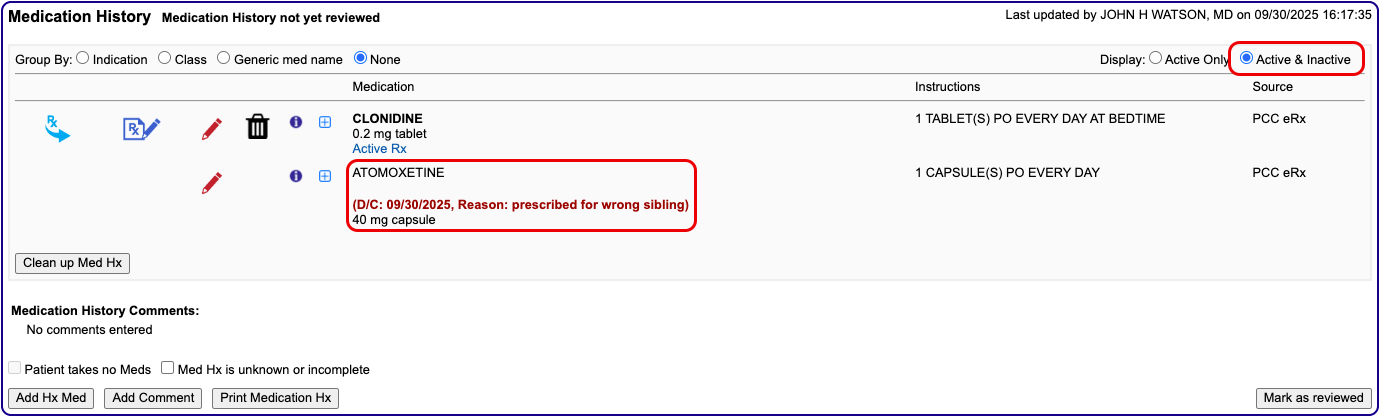
For maximum transparency, prescriptions deleted in this manner continue to appear in the Prescriptions component of the patient’s encounter note in PCC EHR, albeit with an updated status indicating that they have been discontinued.
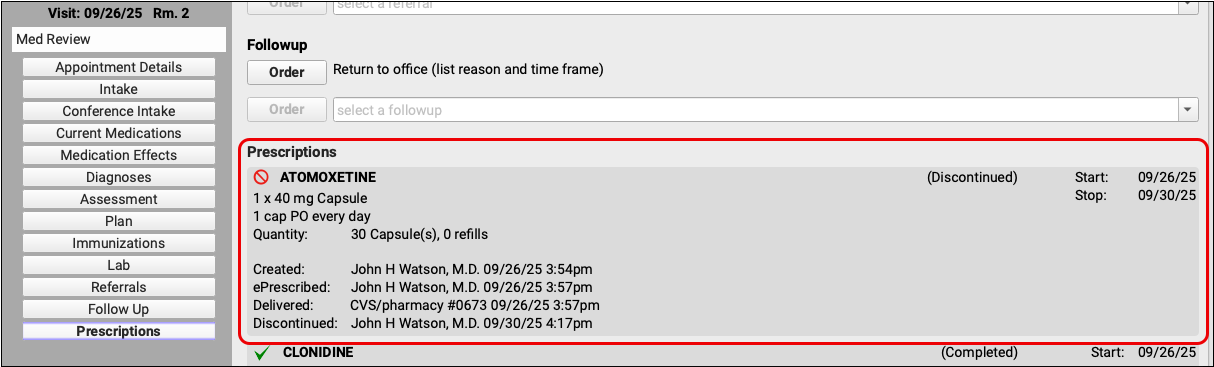
Learn More About Medication History: To learn more about how to work in patients’ Medication History, read Review and Update Medication History.
Reprint Prescriptions
You can print void and original copies of processed prescriptions from the Review & Sign component in PCC eRx.
Click the printer icon beside any processed prescription to print a void copy of it for documentation purposes.
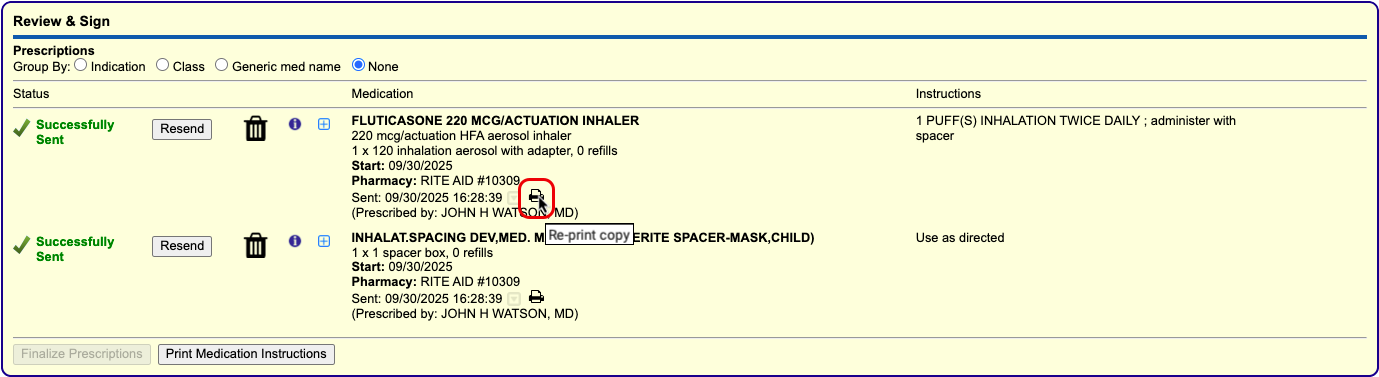
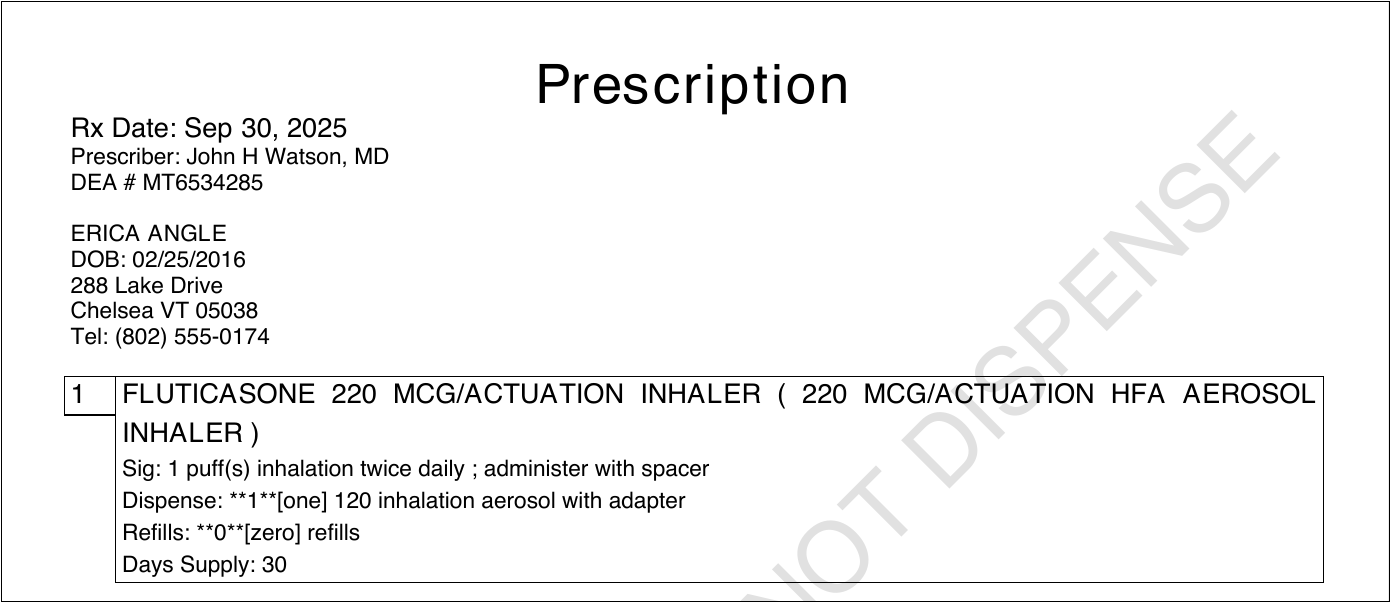
Void copies are watermarked with the words DO NOT DISPENSE so that they cannot be used at a pharmacy.
To reprint an original copy of a prescription for a non-controlled substance, hover over the printer icon in Review & Sign and click the secondary icon that appears beside it.
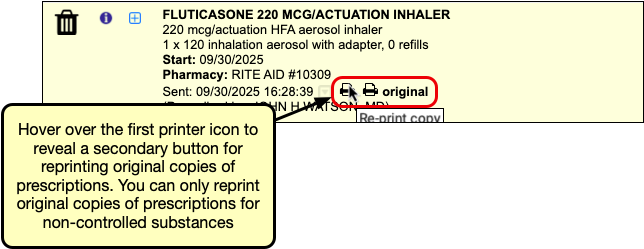
Original copies may be used at a pharmacy to fill the prescription. There is no way to reprint an original prescription for a controlled substance.
In addition to the Review & Sign component, you may also print void copies of processed prescriptions from a patient’s Prescription History.

It is not possible to print original copies of processed prescriptions from the Prescription History component.
Available Where Printing Is Enabled: Local regulations dictate whether prescription printing may be enabled for your practice. The ability to print copies is only available at practices where printing is generally enabled.
Respond to Pharmacy Change Requests
Change requests are electronic messages that pharmacies use to request script clarifications, generic substitutions, therapeutic interchanges, drug use evaluations, or confirmation of a prescribers’ credentials. Pharmacies can also use change requests to notify you when a medication requires prior authorization or is out of stock.
If you have Mid-Level or Provider permissions in PCC eRx, you can optionally enable the change request service for your account.
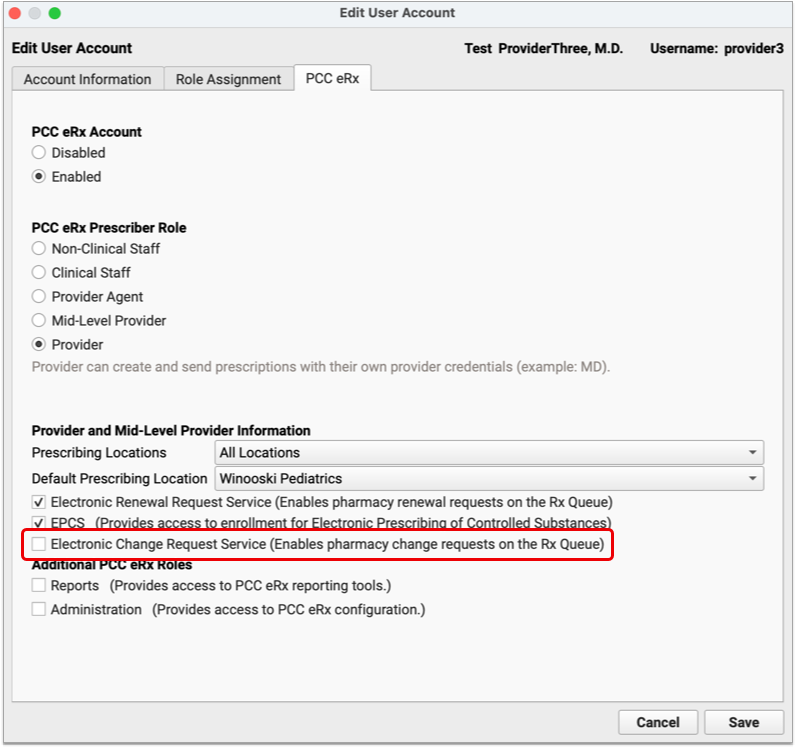
When enabled for your account, change requests sent in response to your prescriptions appear on the Rx Queue in PCC EHR alongside pending prescriptions and renewal requests.
There are five standard response options for change requests:
-
Keep or Edit Original Prescription: Keep or edit the prescription you originally wrote, then send that in response to the change request.
-
Approve Requested Substitution: Approve the substitution suggested by the pharmacy, either as written or with edits.
-
Replace with New Prescription: Start a new prescription from scratch to replace the original.
-
Cancel Original Prescription: Notify the pharmacy that you want to cancel the original prescription.
-
Reassign: Reassign the change request to a different provider at your practice.
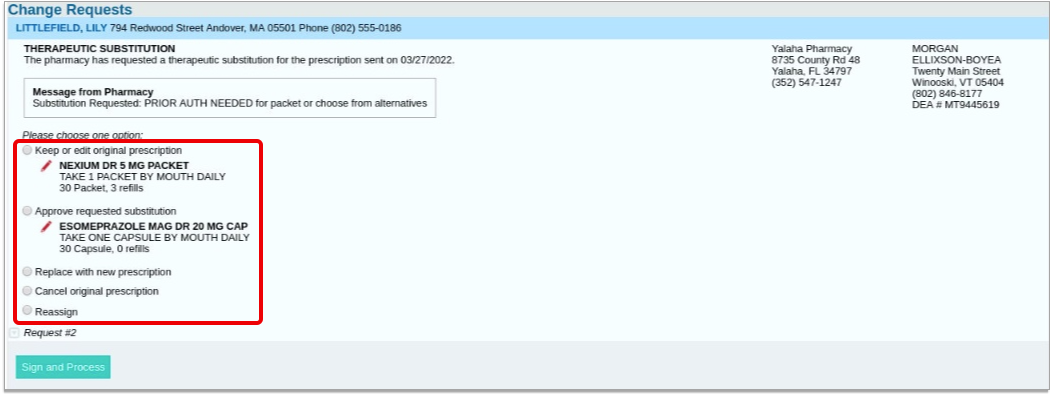
The prescription you send in response to the change request is what the patient will be able to fill. If your response to a change requests is a prescription for a controlled substance, you must enter your EPCS credentials in order to finish processing and sending it.
Prescribe Outside a Visit
You can prescribe from a phone note or portal message in PCC EHR, or create a dedicated eRx encounter if the patient has no other encounter with which to associate a prescription.
To prescribe from a phone note or portal message, open it in PCC EHR, then click the PCC eRx button to access prescribing functions.
If the patient has no visit, phone note, or portal message on the date you wish to prescribe, you can create an eRx encounter instead. Open the patient’s chart, click the PCC eRx button, and select “Start an eRx Encounter” from the drop-down.

Once in PCC eRx, you can prescribe normally. If there is no encounter location recorded in the phone note or portal message, or you are working in an eRx encounter, PCC eRx will prompt you to select a prescribing location for your prescriptions.
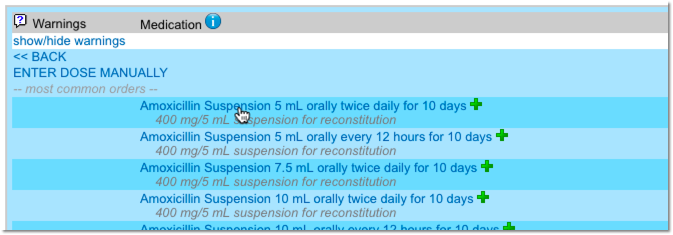
You may also be prompted to select a provider for the encounter.
View and Manage E-Prescribing Errors
Prescription transmission errors can occur when the pharmacy’s system is down, or when Surescripts, the entity that manages the communication between pharmacies and PCC EHR, is unable to process your prescriptions. These transmission issues can prevent prescriptions from reaching the pharmacy. When that happens, PCC eRx displays errors at the top of the Rx Task Queue.
After encountering an error, PCC makes multiple attempts to send a prescription. If you’d like PCC to stop trying to send the prescription so you can take action yourself, click “Stop Retrying” to end the process.
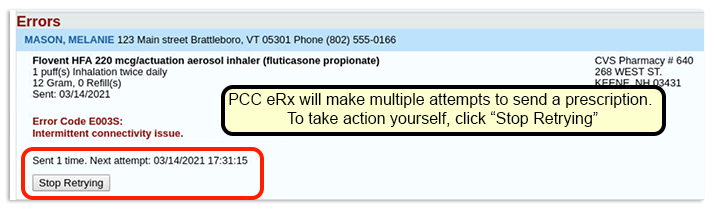
When a prescription fails to send (or when you tell PCC eRx to stop retrying), you can take one of three actions:
- Select “Keep” to indicate that you’ve called the pharmacy and resolved the issue.
- Select “Delete” to delete the prescription.
- Select “Print” to print the prescription to give to the patient or fax to the pharmacy.
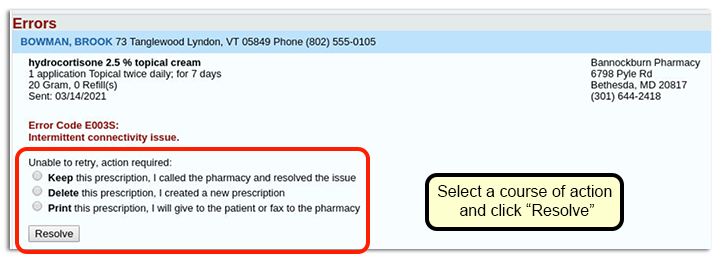
Once you make a selection, click “Resolve” to remove the prescription from the queue.
Transmission errors also appear in the Prescription History section of PCC eRx.

View Medication History and Prescribing Activity Beyond PCC eRx
PCC eRx is a special layer within PCC EHR dedicated solely to medications and prescribing. You can view some of the information and activity recorded in PCC eRx in other places on your PCC system, too. This is especially useful if you aren’t a prescriber yourself and you just need to reference a patient’s Medication History or the prescribing activity from a specific encounter.
Medication History
Beyond PCC eRx, you can see a patient’s medication history and when it was most recently marked as reviewed wherever your practice has chosen to show the Medication History component.

Typically, the Medication History component appears in the Medical Summary portion of the patient chart. It can also be configured to appear in visit protocols, phone notes, portal message encounters, the patient check-in screen, and a few other places.
You cannot edit the information in the Medication History component outside of PCC eRx.
If you want patients and their family members to be able to view their active and inactive medications, your practice can reveal this information in the patient portal.
It is not possible to view, save, print, or reprint prescriptions from the patient portal.
Prescription Activity
When you prescribe something in PCC eRx, the corresponding encounter note in PCC EHR automatically updates to include a Prescriptions component.
The Prescriptions component shows a read-only view of all prescribing activity connected to that visit, phone note, portal message, or eRx encounter.
Encounter-specific prescription activity, general prescription history, and copies of prescriptions are not available in the patient portal.
Prescribing Roles and Permissions
In the User Administration tool in PCC EHR, users may be assigned one of five different PCC eRx roles:
-
Non-Clinical Staff: Non-Clinical Staff may edit patient pharmacies but may not create or send prescriptions.
-
Clinical Staff: Clinical Staff may create prescriptions for providers to review, sign, and send.
-
Provider Agent: Provider Agents may create and send prescriptions on behalf of a credentialed ordering provider. Provider Agent prescriptions automatically appear for signing on the ordering provider’s queue.
-
Mid-Level Provider: Mid-Level Providers may create and send prescriptions under their own provider credentials while indicating a supervising provider.
-
Provider: Providers may create and send prescriptions under their own provider credentials.
Prescribing roles and permissions should be assigned to users according the rules and regulations of the jurisdiction in which you practice. To learn more about prescribing roles in PCC eRx, read Set Up PCC eRx User Access.
Print a Receipt
You can print a receipt whenever you post a payment. You can also print a receipt for any payment(s) in an account’s history.
Watch a Video: Watch Print a Receipt to learn all the ways to generate a receipt in PCC EHR.
Billing Codes and Descriptions Include Confidential Information: When you print or export billing records, including receipts, bills, and histories, the output includes procedures and diagnoses from patient encounters. These codes and descriptions may reflect clinical information that was marked confidential in the chart.
Print a Receipt During Patient Check-In
During patient check-in, you can enter a payment and print a simple payment receipt.

Read Check In a Patient to learn more.
From the Schedule screen in PCC EHR, you can open up the Patient Check-In tool later and print or reprint a receipt.
Print a Receipt When You Post Charges
When you post charges and payments for an encounter, or create a new billing or hospital encounter, you can click a button to generate a receipt when you save the charges.
You can also return to the Post Charges ribbon and click “Generate Receipt” later.
Read Post Charges in PCC EHR, Post Administrative Fees Without an Appointment, or Post Hospital Charges to learn more.
Print a Receipt When You Enter a Payment
When you enter a payment in the Payments tool in PCC EHR, you can click “Print Receipt” to generate a detailed receipt.
Print Receipts for Any Previously Posted Payments
Use the Payments tool in PCC EHR to print a receipt for any payment(s) on an account.
Open the Payments Tool for the Account
First, open the Payments tool and find an account.

Review the Account’s Payment History
Click on the History tab to view the account’s complete payment history.

Select One or More Payments
Select a payment.
You can shift-click or command-click to select multiple payments in the history.

Click “Print Receipt”
Click “Print Receipt” to generate a new receipt for the selected payment(s).
The receipt displays each payment, along with details about which charges each payment applies towards.
Different Receipts for Different Needs: The receipt created from the Payments tool includes more information about the encounter than a simple payment receipt. You can generate a receipt any time you post a payment, and it may not always be appropriate to share a detailed receipt. Your practice should consider when to provide a basic payment receipt or the more detailed payment history receipt. You can also print an encounter’s complete charge and payment history in the Billing History section of a patient’s chart.
Do You Need More Information Than a Receipt?
If you need to provide the family with more details than a receipt provides, you can print the Account History for a given encounter date or print the encounter’s Billing History.
Enter and Review Account Notes
You may wish to record details about an account or billing situation with a family. Read below to learn about Account Notes in PCC.
Watch a Video: You can watch a video to learn how to work with account notes in PCC EHR.
Where Can I See Account Notes?
You can enter and review account notes in the Account Notes component. By default, the component appears in the Payments tool.
After opening Payments and finding an account, scroll down. The Account Notes component appears underneath Account Demographics.
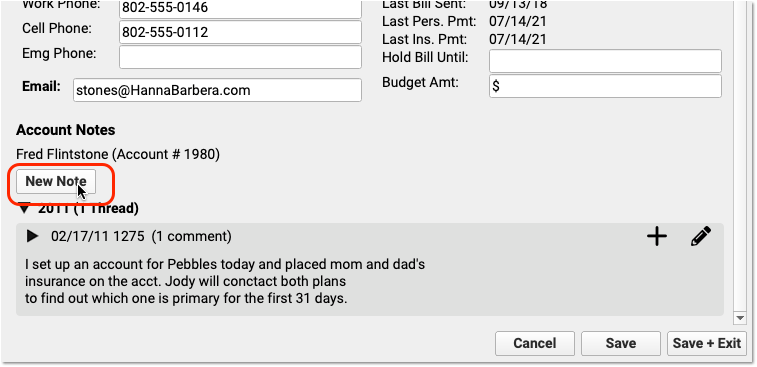
Your practice can also add the Account Notes component to any protocol in PCC EHR. For example, your practice might want to be able to review billing account notes when handling a phone call.
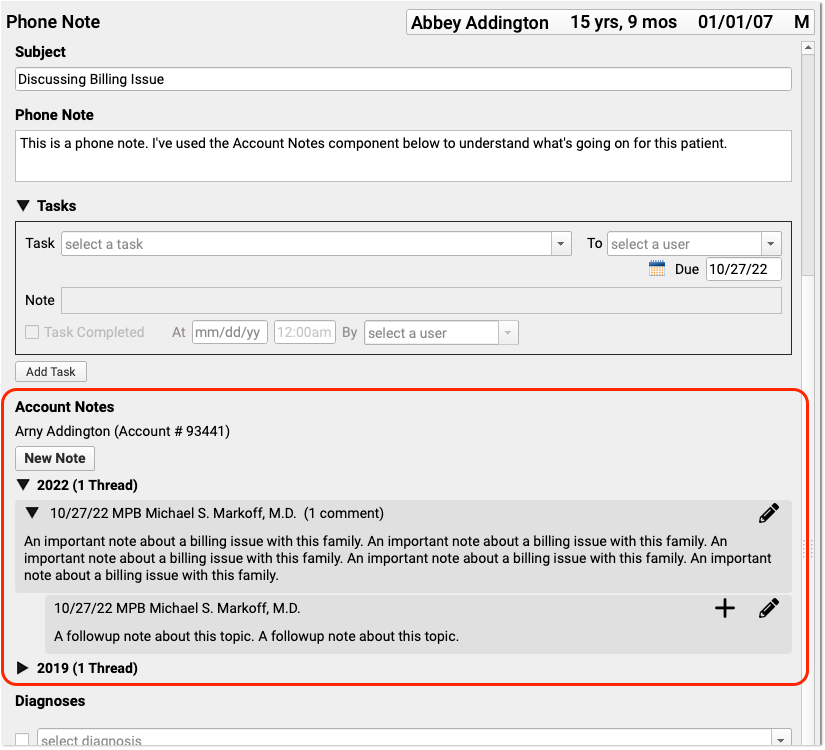
You can use the Account Notes component to track details about family and financial issues. If you add the component to your practice’s Demographics, Patient Check-In, Phone Notes, or Post Charges protocols, then billers and other staff will have easy access to the tool.
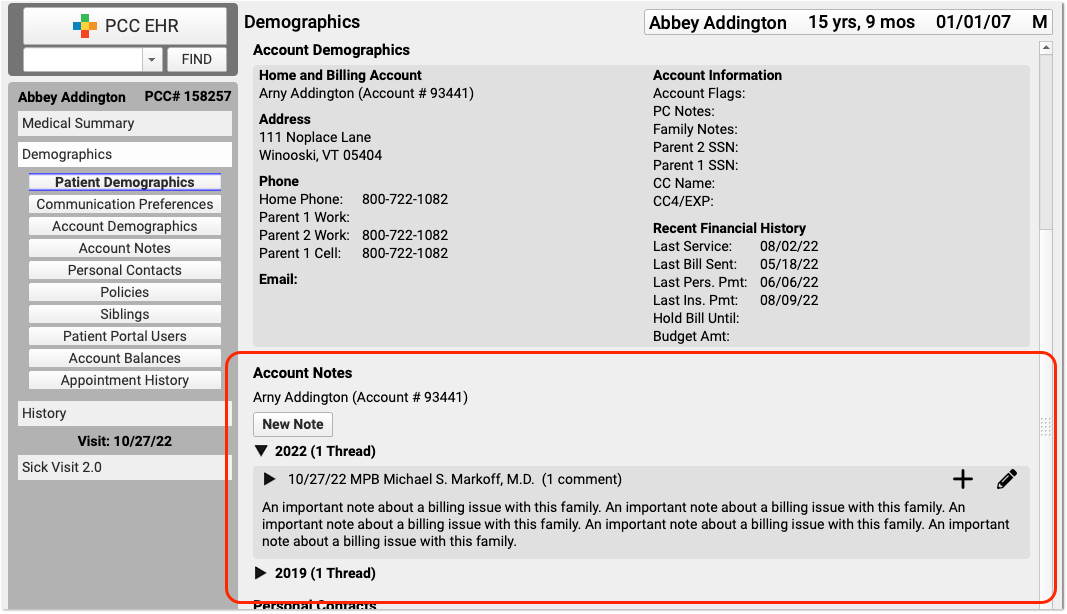
Account Notes always appears in the Payments tool in PCC EHR. Use the Protocol Configuration tool to add the component to other protocols. Contact PCC Support for help.
When you add the Account Notes component to other locations in PCC EHR, consider the following:
-
Permissions: The Account Notes component is not locked down by a user role. If you add the Account Notes to the Patient Check-In protocol, for example, then any user who can access Patient Check-In will also be able to review and update Account Notes. Consider your practice’s ideal workflow as you customize your protocols and assign permissions to each of PCC EHR’s tools.
-
Will You Replace Old Notes Fields?: If your practice begins using Account Notes on other ribbons in PCC EHR, you may want to deprecate the use of other fields. For example, if you used a custom “Billing Notes” text box, you might choose to stop using that field. You could migrate any old notes into a family’s Account Notes when they next visit your practice, and later remove the old field from your protocols.
Add a Note, Edit a Note, and Add a Followup Note
Click “New Note” to create a new note.
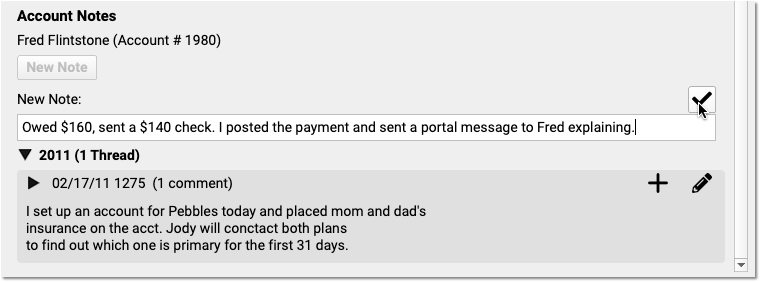
Click the checkbox to save your note.
If you want to add something to your note later, click the pencil icon to edit a note.
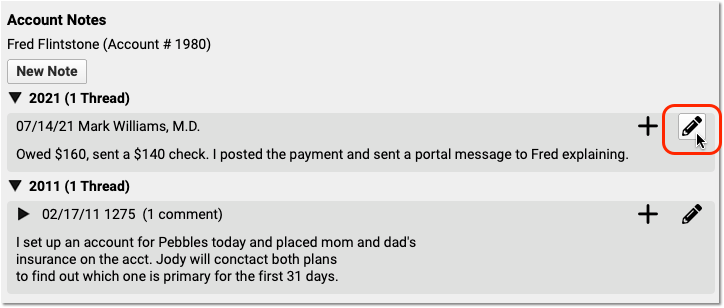

Do you have follow-up information about an existing note? Click the plus symbol (+) to add a follow-up note to an existing note.
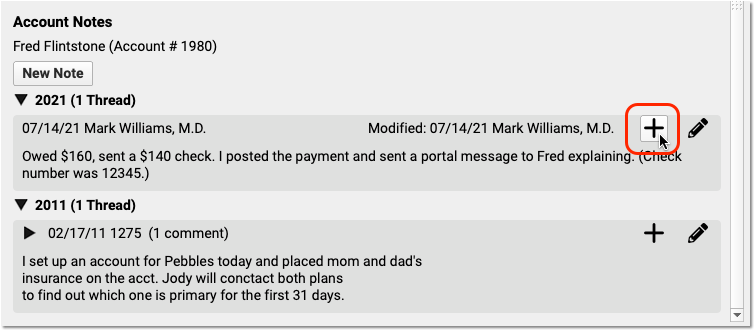

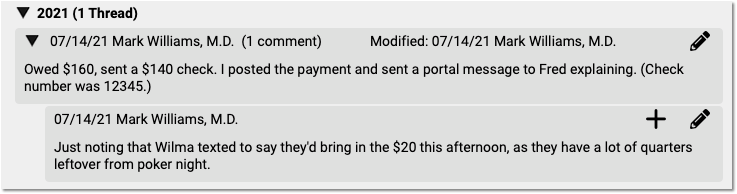
You can create multiple follow-up notes to track a billing issue as it continues.
Review Payment History and Edit Payments
You can review payment history by encounter, or see all payment history for an account. You can also edit payments that were posted incorrectly and adjust how payments are applied to charges. Read below to learn how.
To learn how to enter payments, read Post Personal Payments or Post Insurance Payments. To learn about the many ways to generate a receipt for families, read Print a Receipt.
Watch a Tutorial Video: To see a demonstration of the features in this article, watch Review Payment History and Post Insurance Payments.
Review Payment History for an Encounter
Use the Billing History in a patient’s chart to review detailed charge and payment information for any encounter.
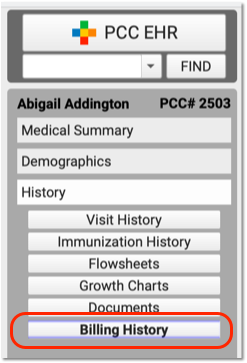
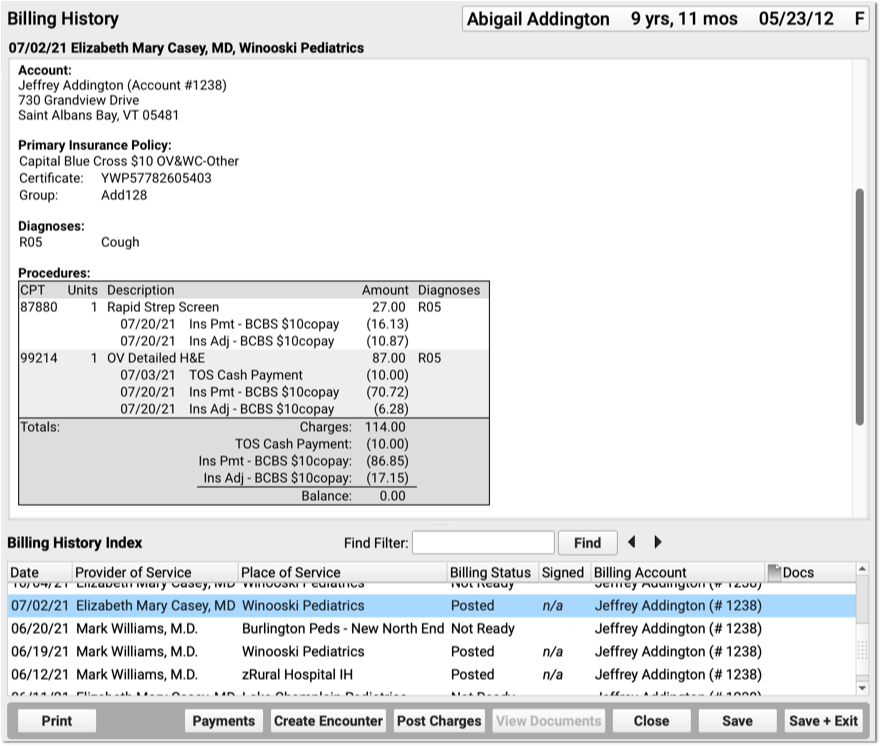
The Billing History displays all of the billing-related information for an encounter.
In the Procedures section, you can review charges for the encounter and a history of all payments.
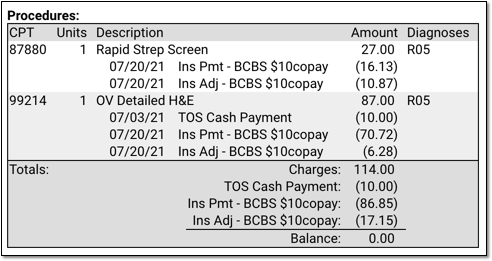
For each charge, you can see personal payments, insurance payments, and adjustments.
If any unapplied (or “unlinked”) payments on an account are paying off charges, you will see the “Payment (Unapplied)” amount indicated for each charge and in the totals section.
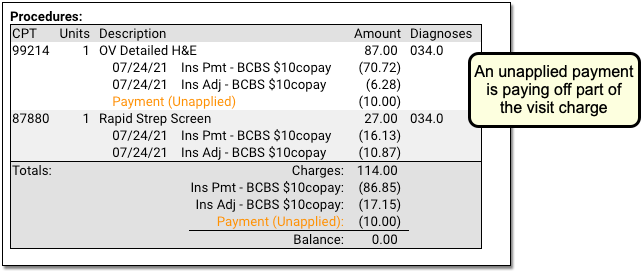
In the Payments section, you can review payments posted on the same date as the encounter. To configure which payment types appear in this section, contact PCC Support.
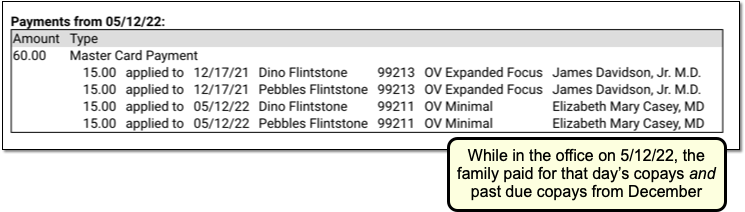
For each payment, you can review what charges the payment applies towards.
See Bounced Checks and Other Payment Reversals
If a payment has been reversed (such as a returned check or a stopped credit card payment), it will appear along with the reversal procedure. The payment description will be struckthrough to help you identify that it was reversed. (If only part of a payment has been reversed, then the payment is still partly valid and the strikethrough line will not appear.) PCC identifies reversals as any account adjustment procedure of the types Receipt-NSF or Receipt.
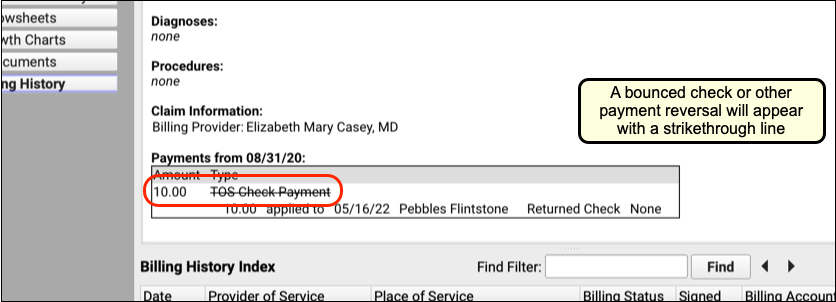
Jump to the Payment History from the Encounter’s Billing History
After you review the charges and payments for an encounter, you may want to work with the billing account’s payment history and make changes. Click the “Payments” button to open the Payments tool.
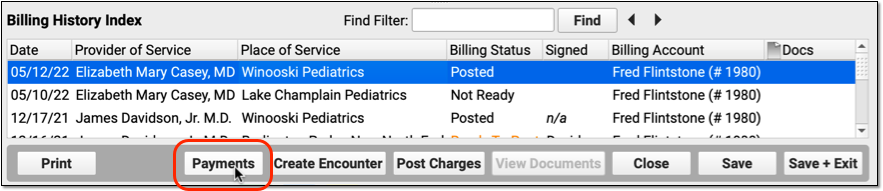
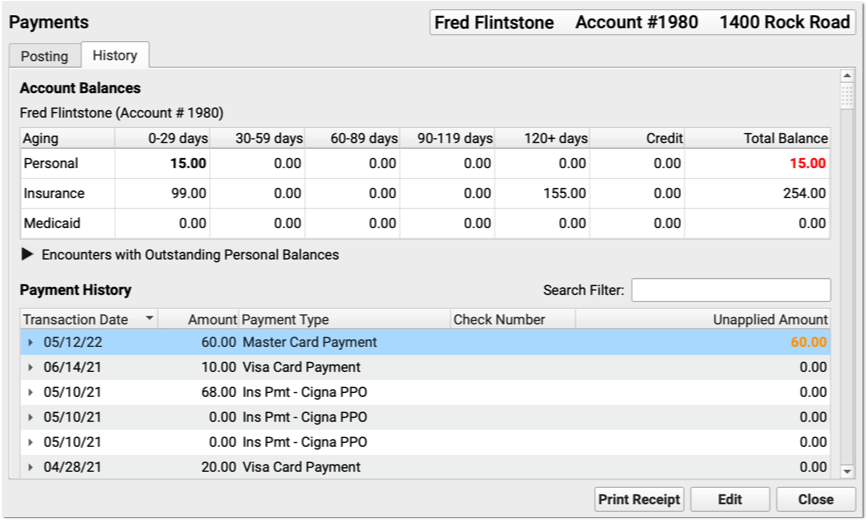
In the Payments tool, you can edit payments, add notes, print a receipt, or make changes to how a payment is applied.
Review an Account’s Complete Payment History
Use either the Payments tool or the Insurance Payments tool to review and edit an account’s full payment history.
Open an Account’s Payment History
You can jump to Payments from within a patient’s Billing History, as shown above. Or you can open it from the Tools menu:
You can search for an account by name or use other search parameters, like an account phone number. The list of matching search results includes a Dependents column to help you confirm that you have the right account.
Alternatively, you can search by patient using the Insurance Payments tool:
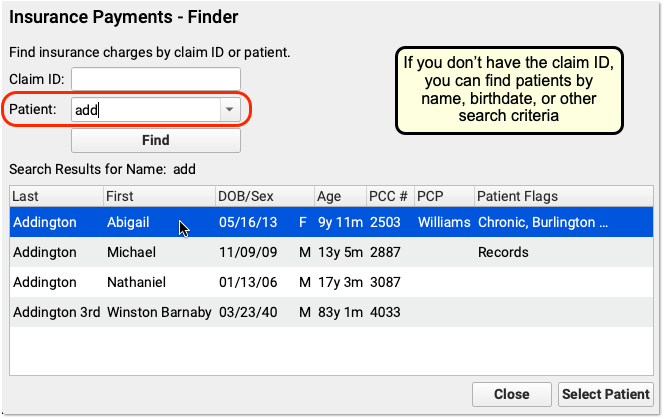
After opening either the Payments tool or the Insurance Payments tool, click on a “History” tab to see the account’s payment history.
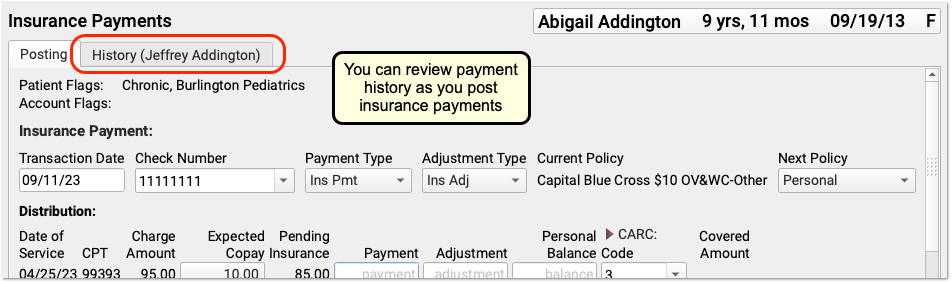
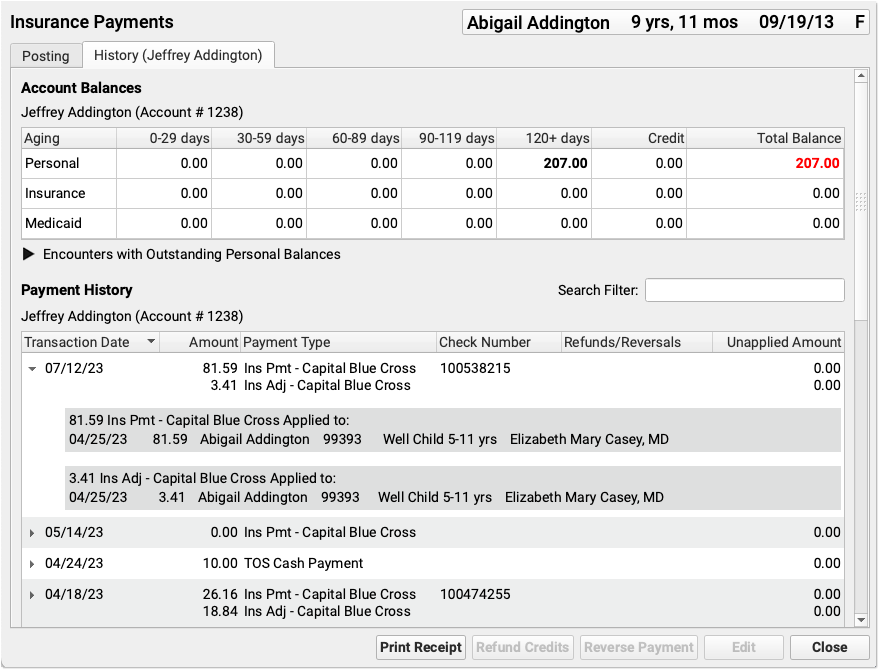
If you are working in the Insurance Payments tool and the patient has had charges with more than one account, you will see two history tabs.
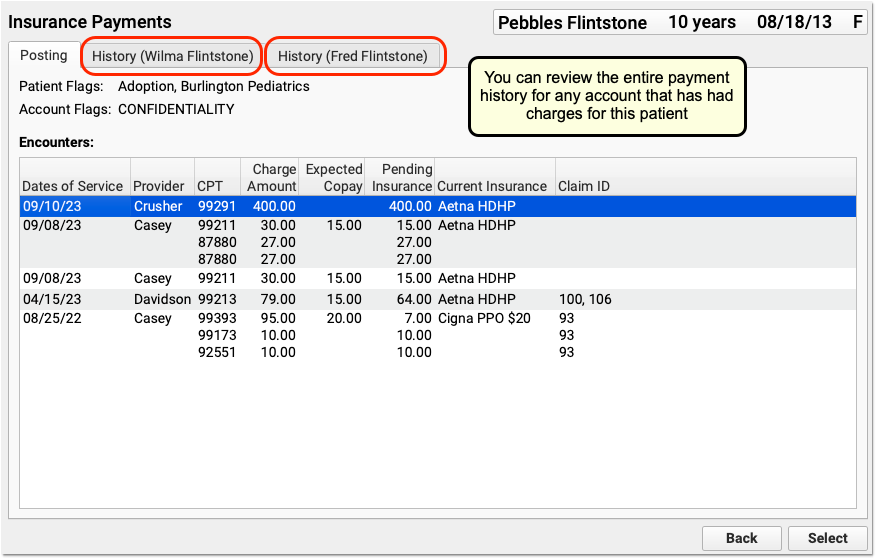
Understand the Payment History
Whether you are reviewing an account’s payment history in the Payments tool or the Insurance Payments tool, the screen is the same.
Aged account totals appear at the top, followed by a list of payments. The most recent payments appear at the top of the list. For each payment, you can identify the Transaction Date, the Amount, the Payment Type, the Check Number, whether any Refunds or Reversals are applied, and any Unapplied Amount.
Check Number or EFT Trace Number?: “Check Number” is the conventional term for the unique number associated with a payment. Depending on how your practice received the funds, the check number may actually be an EFT trace number.
Click the disclosure arrow next to a payment to see what charges it applies towards.
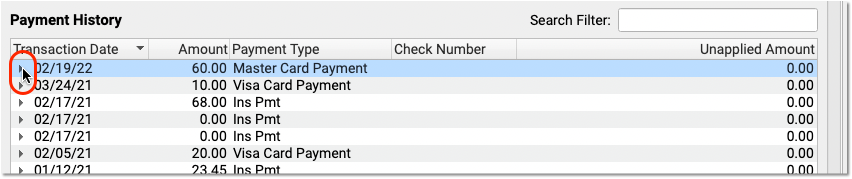
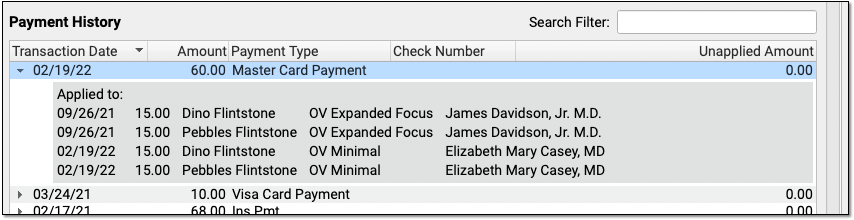
If any portion of a personal payment is unapplied, the payment amount appears in bold orange in the Unapplied Amount column. You can click the disclosure arrow to see more details about unapplied payments.
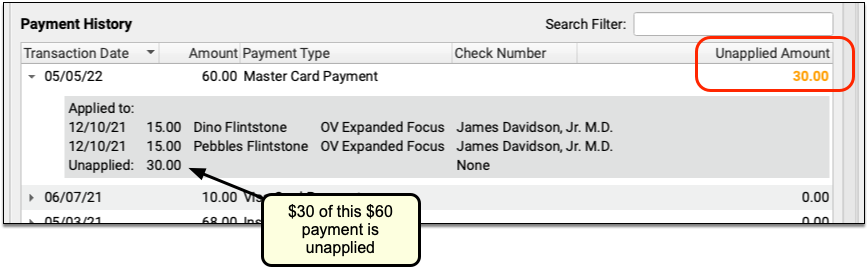
Since insurance payments and adjustments are posted together, they are grouped together in the history.
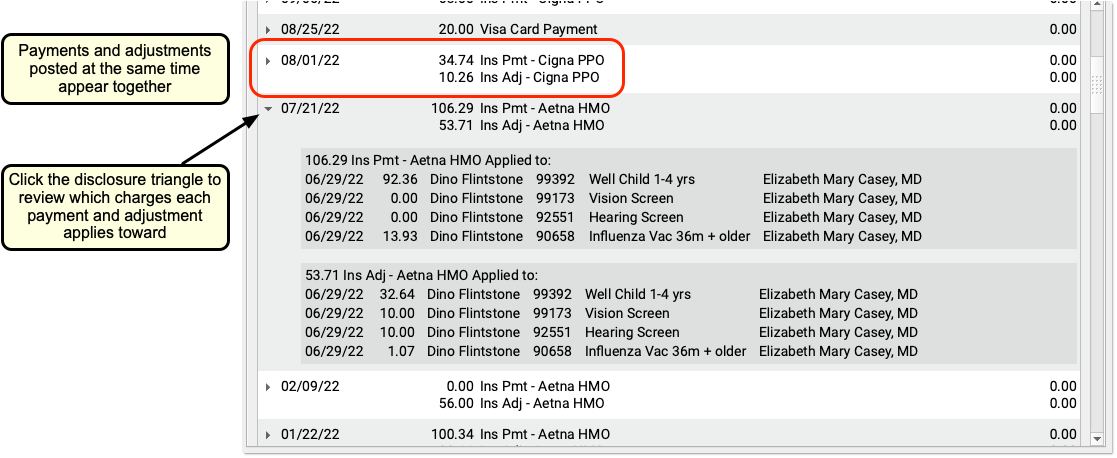
As in the Billing History in the patient’s chart, any reversed payment is struck through, along with details of the reversal. The original payment transaction date, amount, type, and check number are preserved.
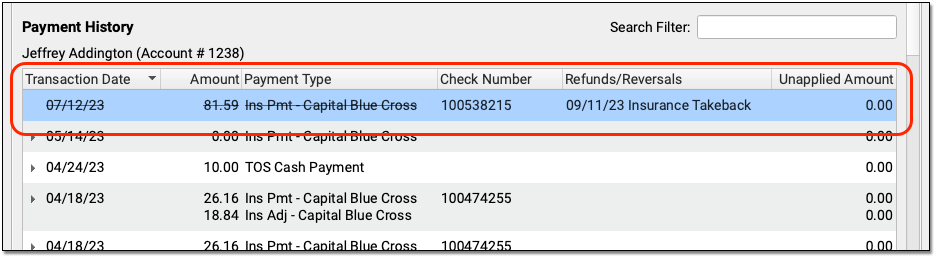
You can use the History tab in the Payments tool or the Insurance Payments tool to review account balance and payment information. Then you can switch to the Payment or Posting tabs to post payments or perform other actions.
Edit Personal Payments
Double-click on a personal payment in the History tab to make changes.
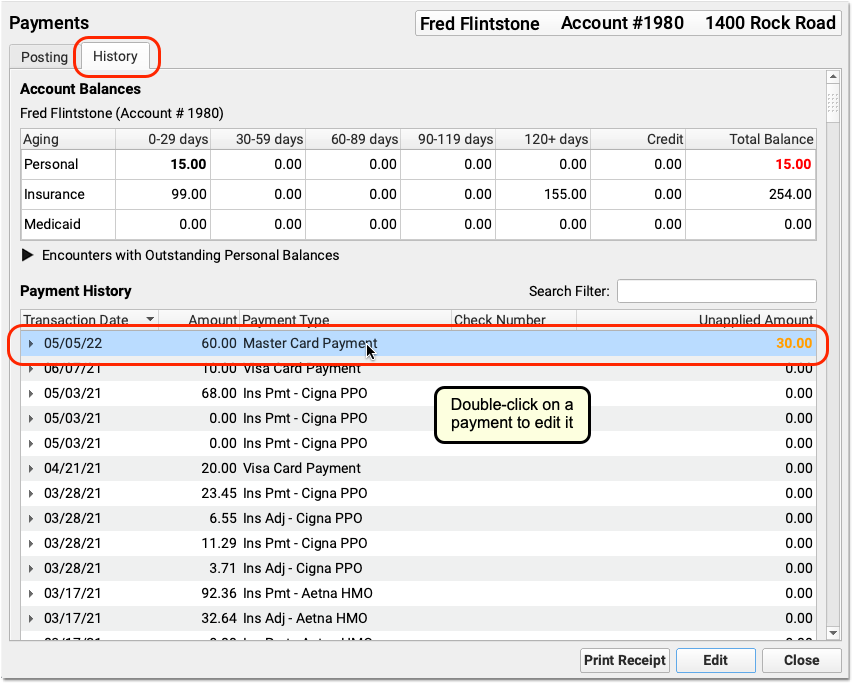
You can modify the transaction date, payment type, amount, or check number. You can also change how much of a payment applies towards balances on personal charges, and you can use the Distribution section to specify which charges the payment applies towards.
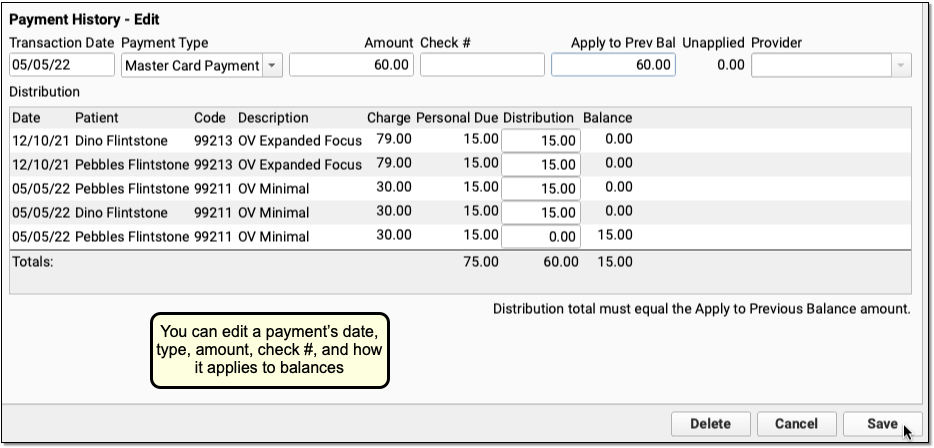
Click “Save” to save any changes to the payment. Or, click “Delete” to delete the personal payment.
In addition to fixing mistakes made during payment entry, your practice can use the History tab to identify unlinked payments, edit them, and apply them towards appropriate charges on an account.
Editing a Payment Updates Your Daysheet and Other PCC Auditing Reports: When you edit a payment, it will update your system’s underlying payment reports. For example, the Daysheet report will display a negative entry and a positive entry, reflecting the removal of the old payment and the addition of the new payment with your saved changes.
Edit Insurance Payments
Double-click on an insurance payment to make changes.
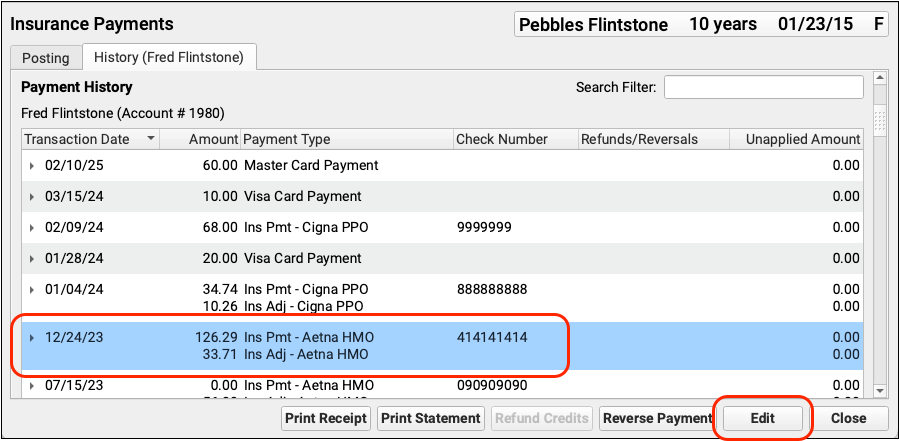
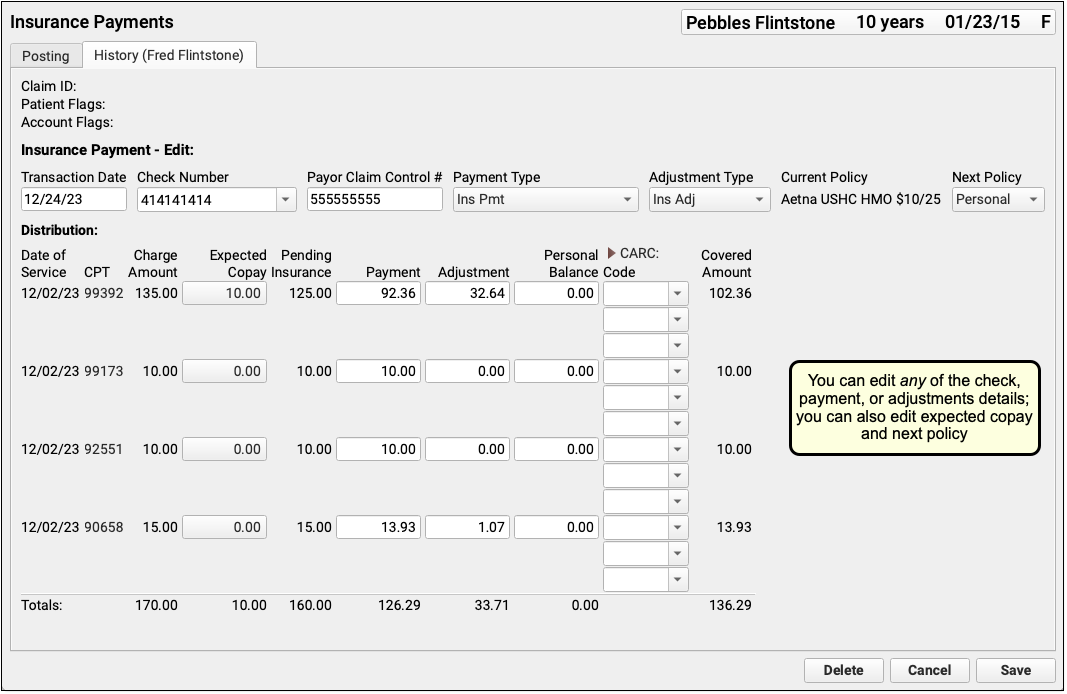
You can edit any aspect of the insurance payment and adjustment, including the transaction date and other payment information, amounts, and CARC information. You can also change the expected copay amount for a procedure. If you’ve learned the patient had another policy for the date of service, you can also update the Next Policy field to change the responsible party for the charges.
For more information, read Post Insurance Payments and Adjustments.
Print Receipts for Posted Payments
In the History tab in the Payments tool, you can select any payment(s) and click “Print Receipt” to print a receipt. For a detailed guide, read Print a Receipt.
Include Signable Policy Documents in Patient Portal Message Templates
Speed up your check-in process by including the Agreement field to a Patient Portal Messaging template, so patients can review and electronically sign policy documents before they arrive.
Create or Edit a Message Template
Open the Patient Portal Configuration tool from PCC EHR’s Configuration menu and open the Messaging Templates tab. Click “Add” to create a new message template, or “Edit” to add the Agreement field to an existing template.
Add The Agreement Field
From the field drop-down menu, select the Agreement Field and click “Add”.
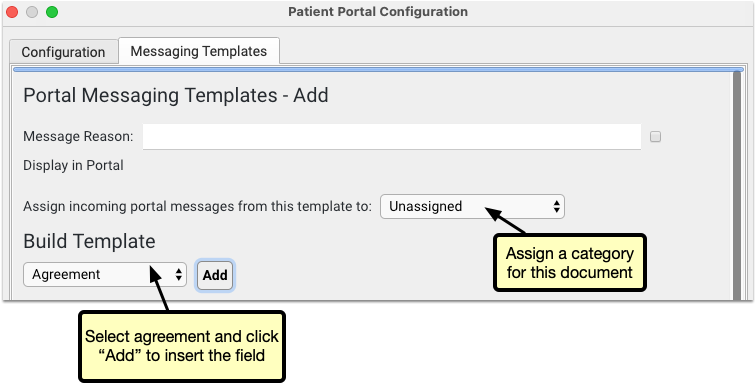
Upload Documents
Click “Attach Document” to select a file. This file will be available for all Patient Portal users to review and sign when they select this message type. Select a document category for this document to be assigned in the chart’s documents.
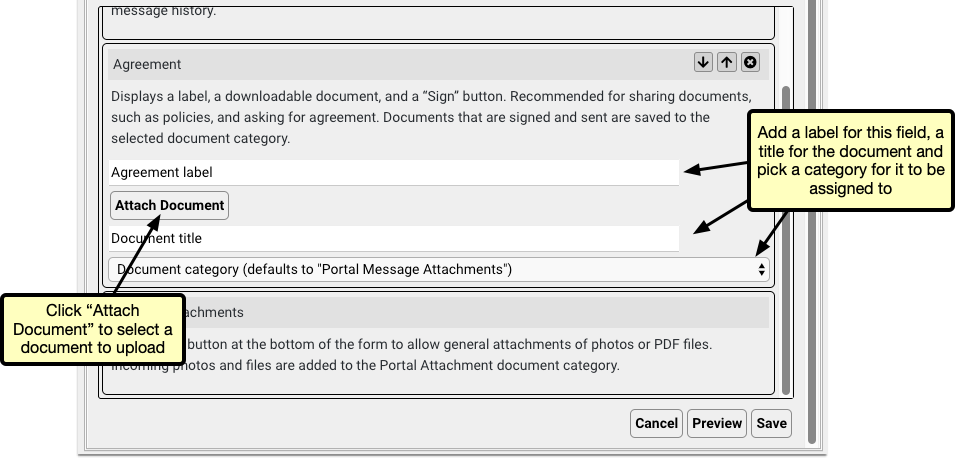
Add a Label and Title
Once you’ve uploaded the document, give it a label and a title. The label will appear in the message template to indicate to the user what the document is, and the title will appear as the file name in the patient’s documents.
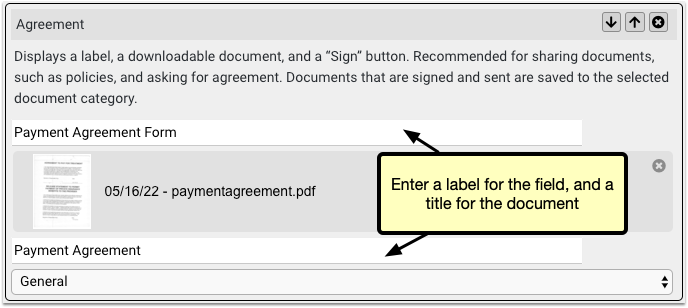
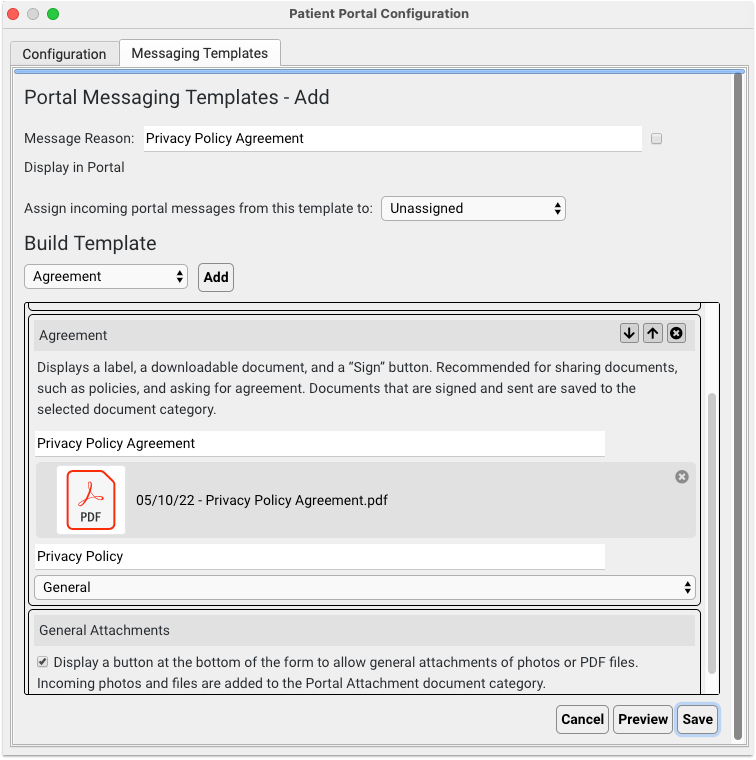
Add Additional Agreements
You can add multiple agreement fields, so if you need several documents signed, add an agreement field for each one, and upload each document.
Optional: Update Your Policy Documents
If you update or create a new policy document, you can replace the document in your Patient Portal Messaging Template and uploading a new one. To remove the document, edit the message template and click the X icon next to the document, then click “Attach Document” to upload a new version of the document.
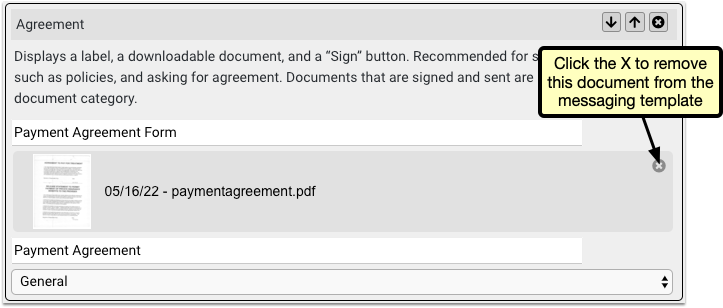
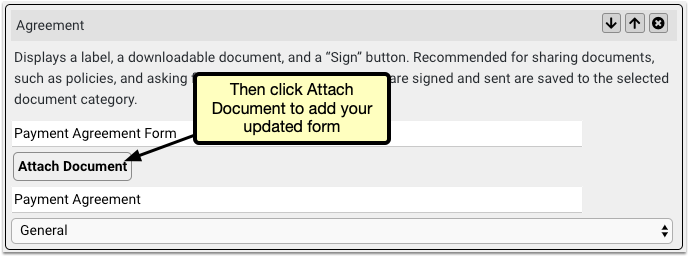
Portal Users Sign and Send the Documents
When a portal user selects the new template, they’ll find each document waiting for them. They can review each document and click “Sign” to attach an electronic signature, along with a time and date stamp.
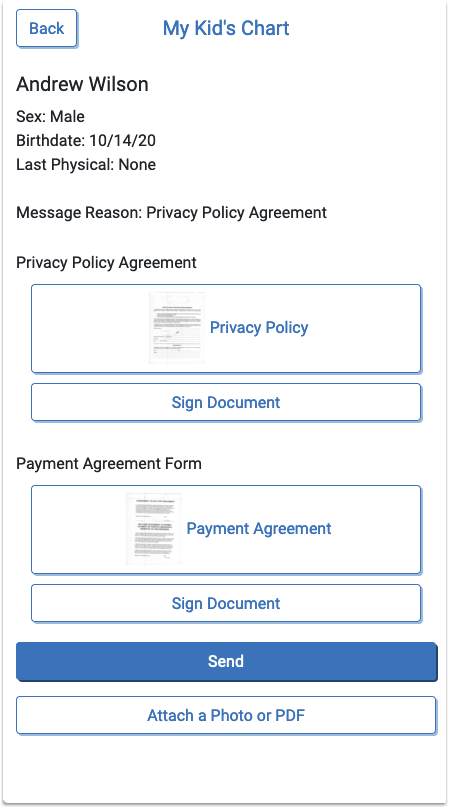
Once the user has signed the documents and sent the portal message, you’ll find it in the Messages Queue, the patient’s history and the patient’s documents.
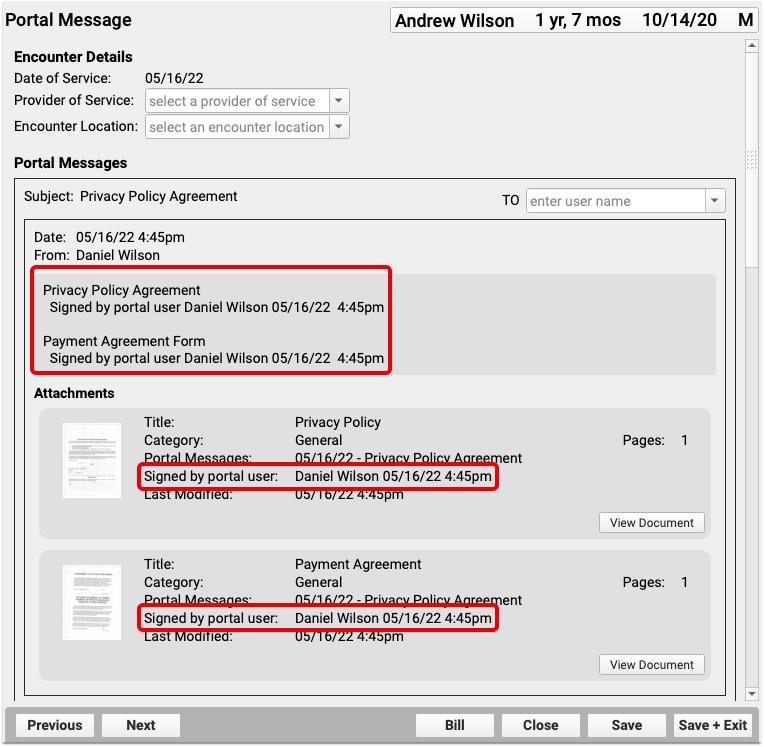
If there are multiple documents in the message template, and the user elects to sign only one, no signed tag or timestamp will appear on the unsigned documents, but the user can send a new message to sign or resign any document.
PCC eRx Prescription Favorites
PCC eRx has the ability to keep track of the medications you most commonly prescribe as “favorites”. Selecting from a list of favorites can save you quite a bit of time as you prescribe.
You can add favorites on-the-fly as you prescribe, or you can opt to allow PCC eRx to automatically adjust your list of favorites based on your ongoing prescription activity.
If you want to manage your favorites list, you can do that in the My Settings tab in PCC eRx.
Favorites Are Set By Prescribers: If you are clinical staff or a provider agent, then you will see the ordering provider’s favorites. For more information about prescriber roles, read PCC eRx Prescriber Roles.
Article Under Construction: This article is being updated to reflect new functionality in PCC 10.4, which arrived on October 12th, 2025. Some steps and images may not match your PCC system.
Prescribe with Favorites
There are three ways that you can see your favorites within the Prescribe component:
- At the top of search results when you begin a new prescription
- As thumbnail tiles (optional)
- In a drop-down menu (optional)
Favorites always appear first whenever you search for a medication.
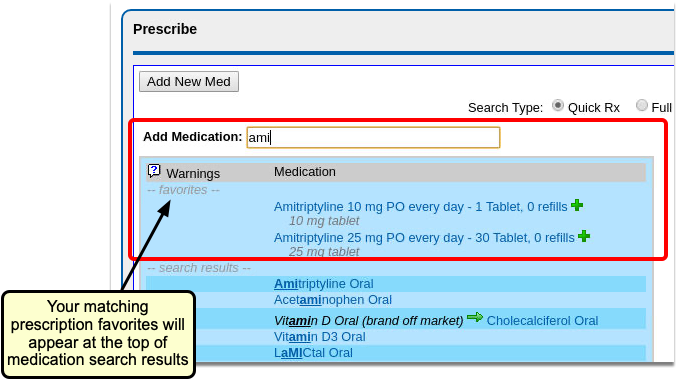
If you would like to see some (or all) of your favorites as you prescribe, you can choose to display them as thumbnail tiles or in a drop-down menu.
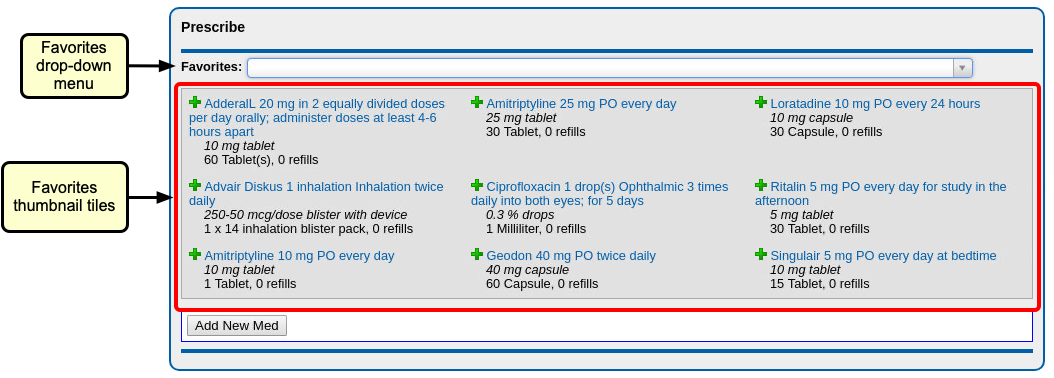
With thumbnail tiles, you can choose how many favorites to display at one time.
Thumbnail tiles also include the green plus icon, which sends the prescription directly to the Review & Sign component, ready to be sent to the pharmacy.
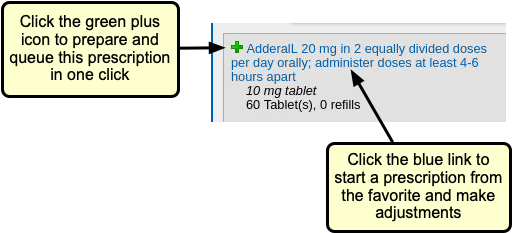
If you have a long favorites list, using the searchable drop-down menu makes it easy to find the right prescription.
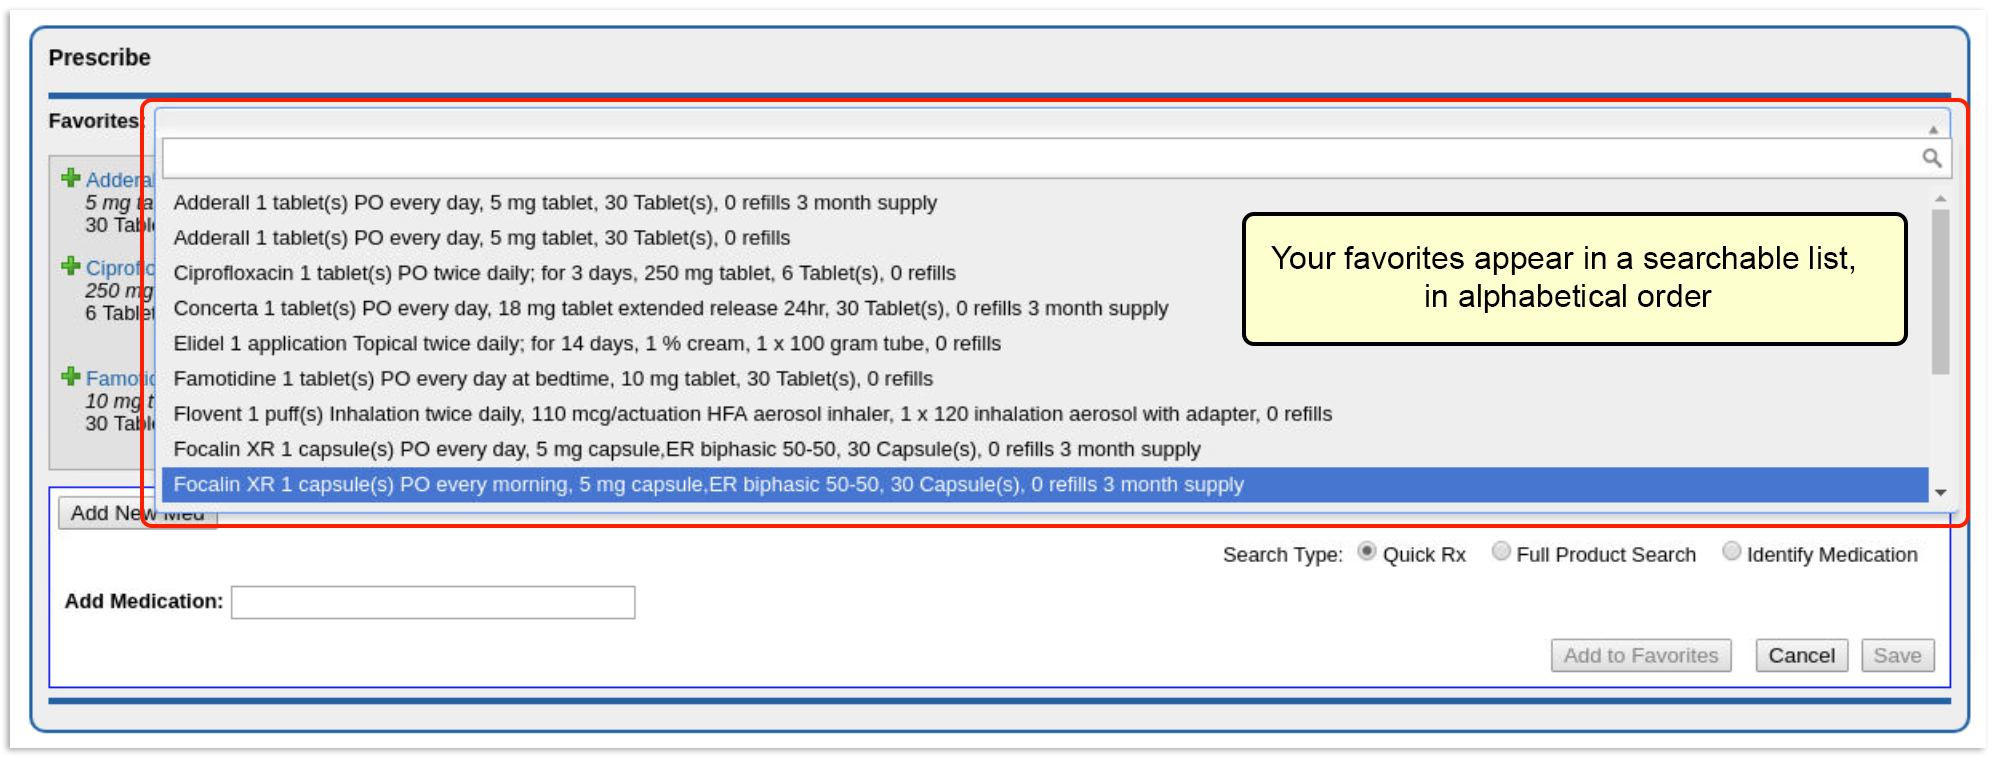

For each favorite prescription, you see the name, dosing statement, quantity, and instructions. When you select a favorite from the drop-down, you will be taken directly to the Edit Prescriptions window, with the dosing statement already filled in.
To see how you can customize your favorites display options, read the section below titled Choose How Favorites Appear in the Prescribe Component.
Add a New Favorite as You Prescribe
You can add new favorites on-the-fly as you prescribe, with one click.
Create a Favorites List All at Once: If you prefer to set up several favorites at one time, you can add favorites manually from the My Settings tab. Weight-based favorites that auto-calculate for you must be added in My Settings.
To create favorites as you prescribe, simply click the gray heart icon next to the drug name, or click the “Add to Favorites” button at the bottom of the Add New Med window.
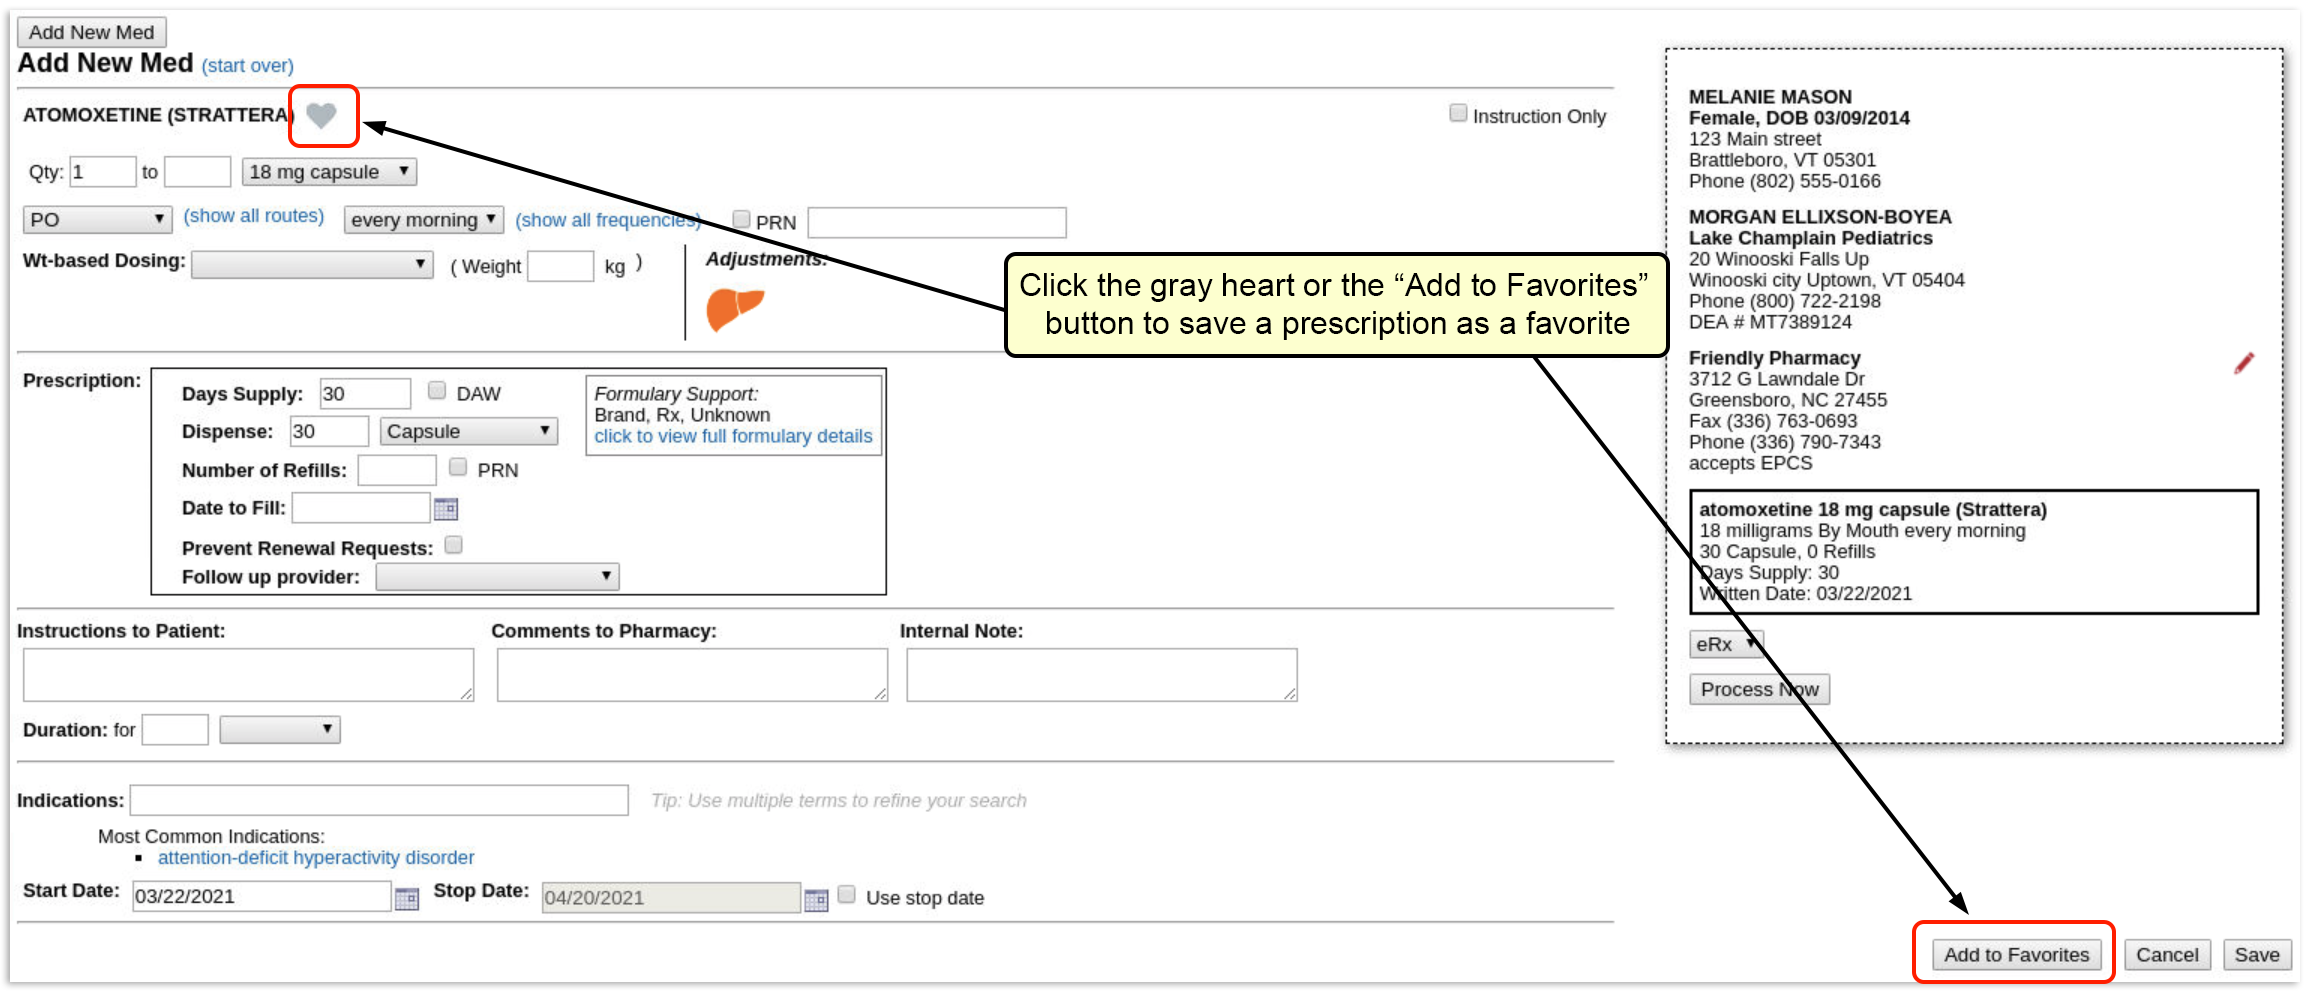

If you are prescribing something that is already a favorite, the heart will be colored blue. If you make changes to that favorite, the heart will turn gray, indicating that it is no longer a favorite. You can then save this new prescription as a new favorite.
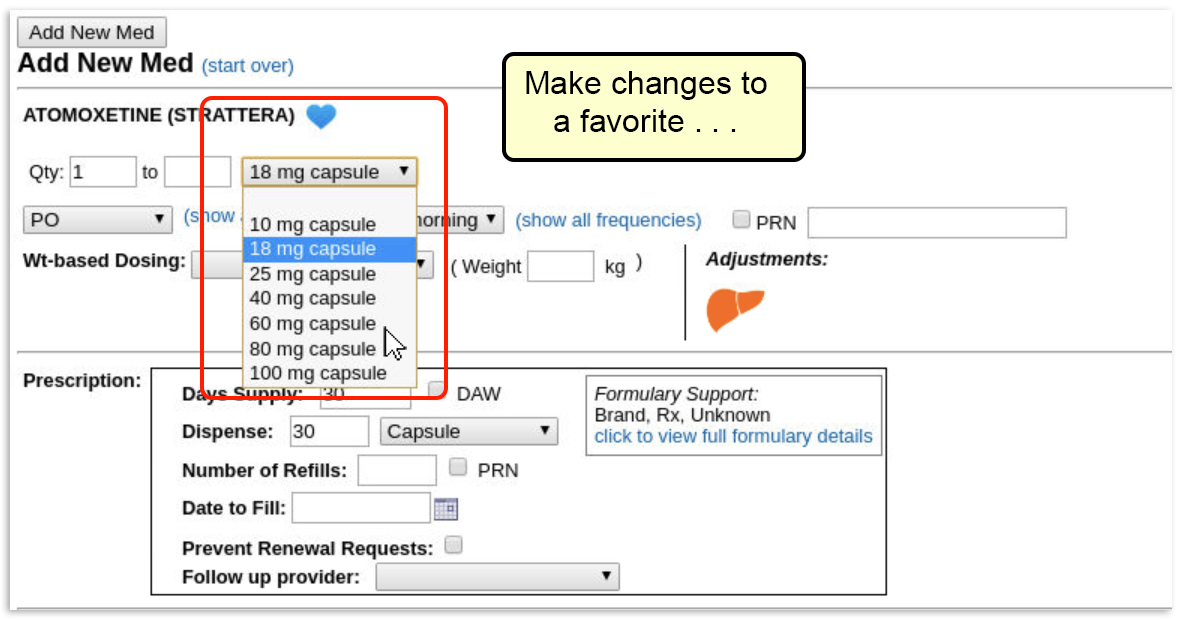
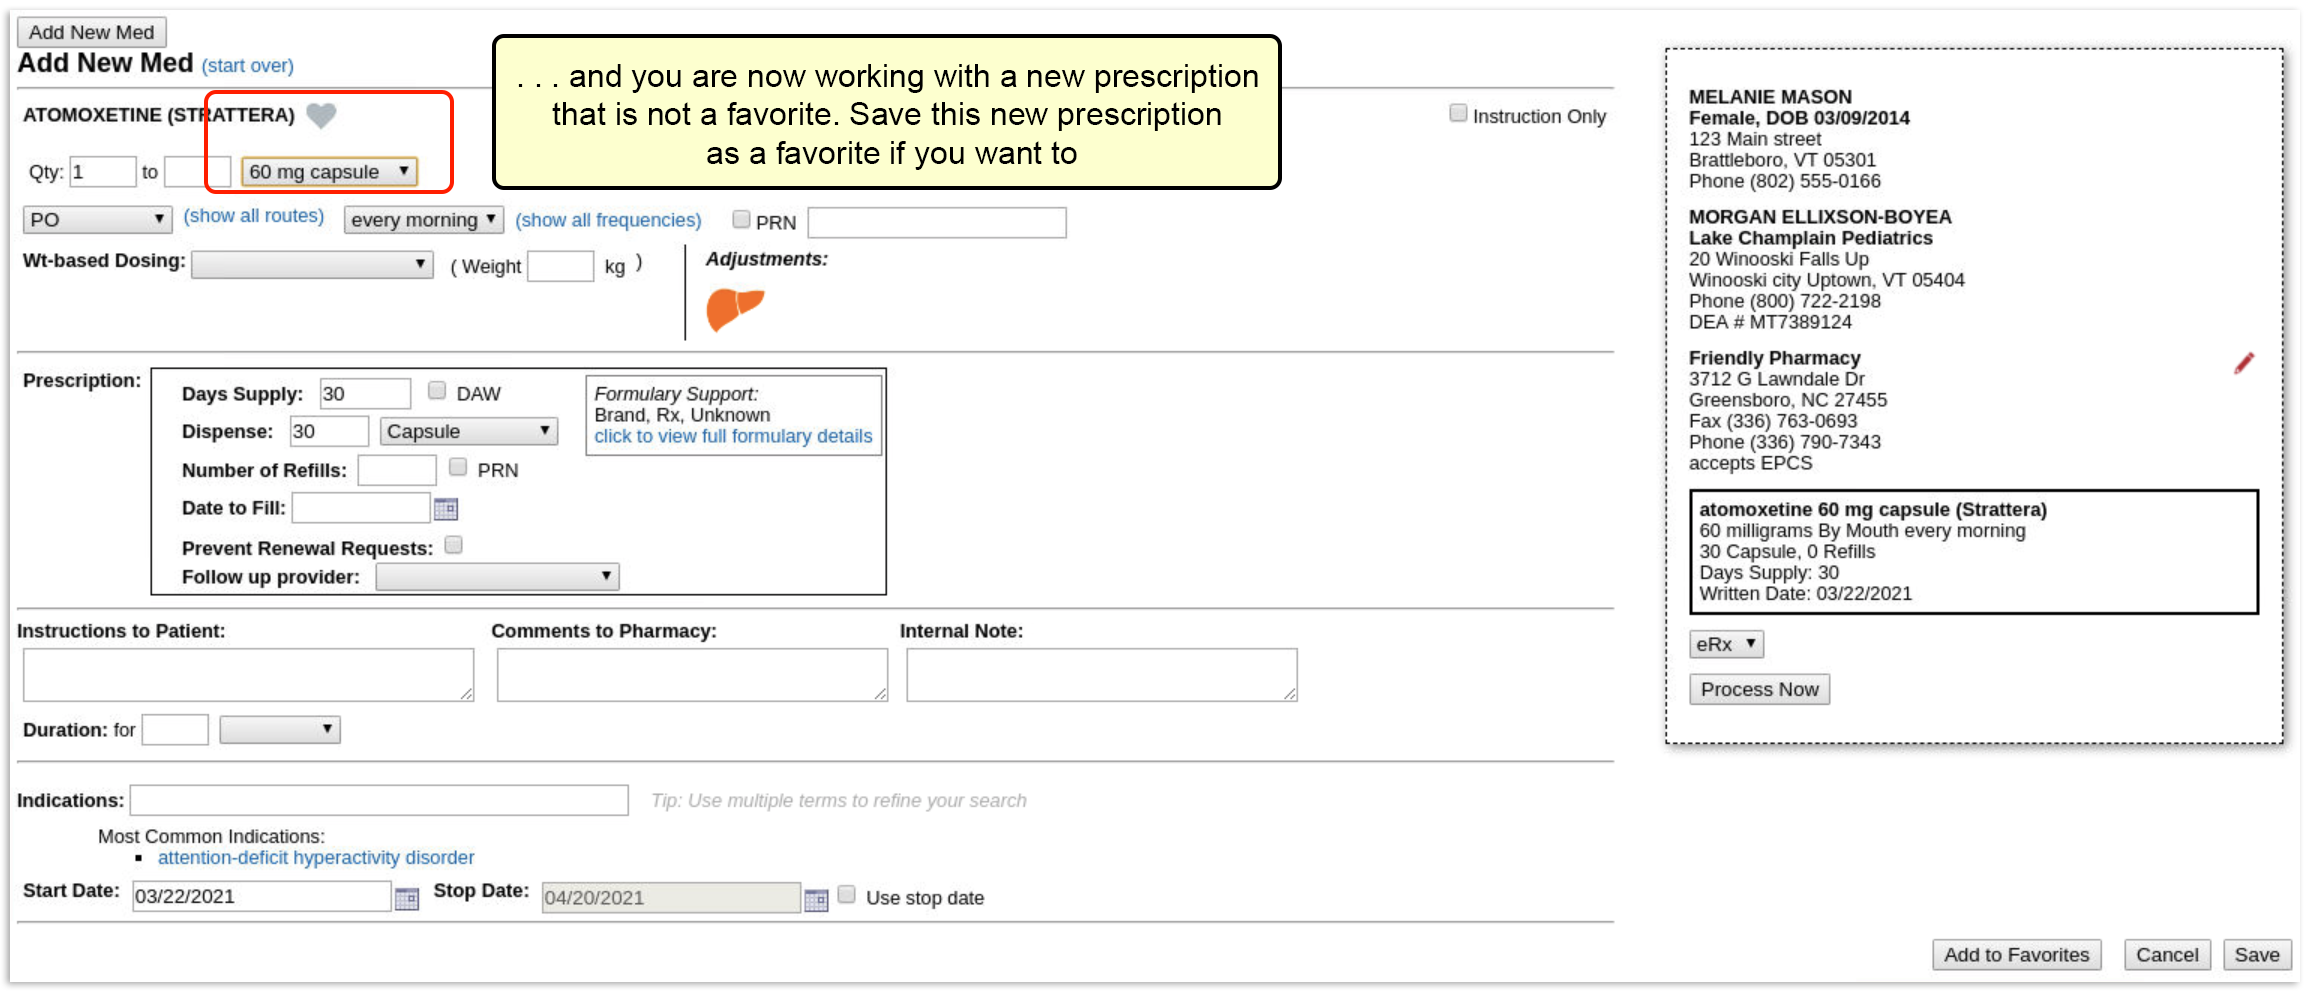
Favorite fields: The following information is saved as part of a favorite: drug name, route, frequency, dosage form, dose, dose max, dose unit of measure, strength, strength max, strength unit of measure, dispense quantity, dispense unit of measure, and refills.
Can I Delete a Favorite?: You cannot remove a favorite while prescribing. To remove something from your favorites list or otherwise manage favorites, go to the My Settings tab in PCC eRx.
Manage Your Favorites from My Settings
Favorites are maintained and managed within the My Settings tab in PCC eRx. Here you can choose how new favorites should be added (automatically or manually), and how favorites will appear when prescribing. The My Settings tab is where weight-based favorites are created, and where you can edit, delete, pin, or exclude existing favorites.
To manage your favorites, click the “My Settings” link on the PCC eRx menu bar, and scroll down to the “Favorites” section.
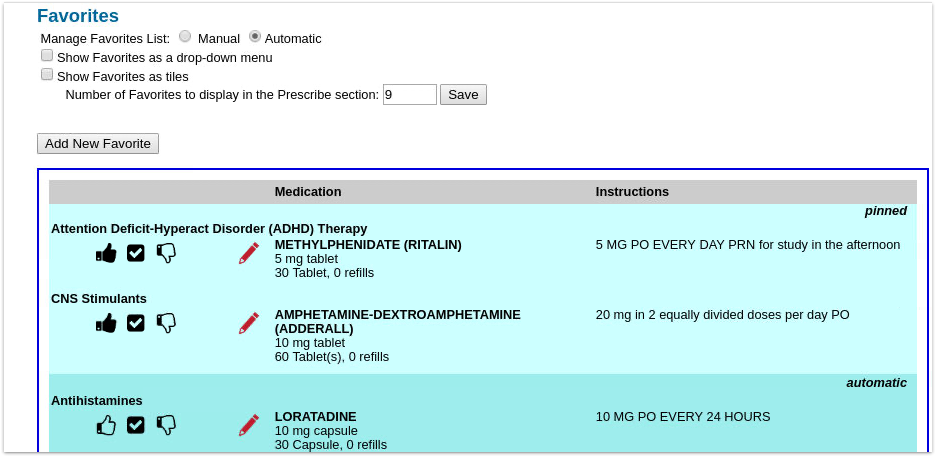
All of your favorites, whether manually created or automatically generated, display in the table, grouped first by status (pinned, automatic, excluded), and then by drug class (ADHD, Antihistamines, Asthma/COPD, etc).
For each prescription, you can see the name, dosing statement, quantity, and instructions.
Turn Automatic Favorites Off or On
If Automatic favorite management is turned on in My Settings, your most commonly prescribed medications are added as favorites automatically. You can still add favorites manually, if you like.
The Manage Favorites List function can be set to either “Manual” or “Automatic”.

When set to “Automatic”, PCC eRx keeps track of your last six months of prescribing activity and automatically updates your Favorites list as you go. This can be a very helpful feature, but keep in mind that slight differences in details will create more than one version of a drug to appear on your Favorites list.
If you would rather not have PCC eRx “remember” your prescribing activity, select “Manual”. When your favorites list is managed manually, medications are only added as favorites when you intentionally do so.
Need Help Cleaning Up Your Favorites List?: Turning off Automatic Favorites does not remove existing auto favorites from your list. If you find that you have too many favorites for your list to be useful, contact PCC Support for help cleaning up your list.
You can edit, delete, and manage how favorites will appear, whether “Automatic” or “Manual” is selected.
Choose How Favorites Appear in the Prescribe Component
When you prescribe with PCC eRx, you can choose how (or if) you want your favorites list to be displayed. You can choose to display them as thumbnail tiles, in a drop-down menu, both ways, or not at all.
In the “Favorites” section of the My Settings tab, check the box beside whichever favorites display method you want to enable (you can choose both if you like).
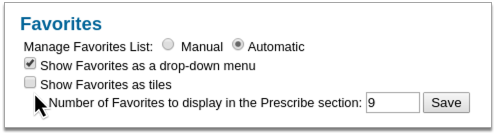
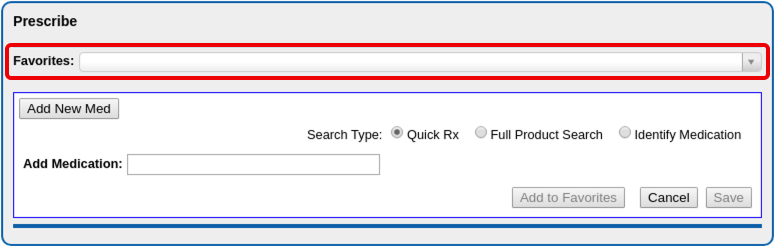
If you choose to display favorites as tiles, you can choose how many tiles to display.
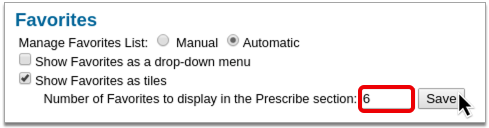
Number of Favorites to Display: If you have chosen to see your favorites as tiles, you can select the number of tiles to show with the “Number of Favorites to display in Prescribe section” field. The Favorites drop-down menu will always contain all favorites.
If you would rather not see a Favorites section displayed as you prescribe, and prefer to only see favorites suggested as you search, you can uncheck both favorite display methods.
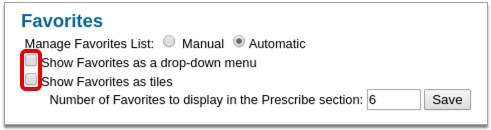
Add Favorites Manually from My Settings
If you want to set up new favorites outside of your prescribing workflow, go to the My Settings tab, scroll down to the Favorites section, and click “Add New Favorite”.
Find the drug (or supply) and dosing statement for the new favorite.
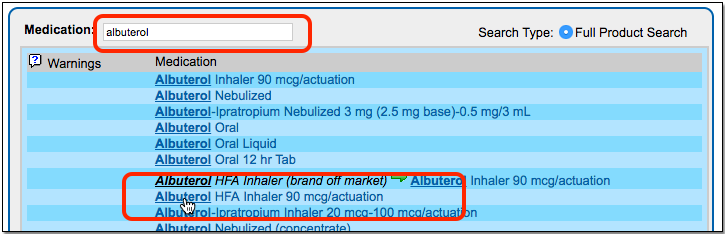
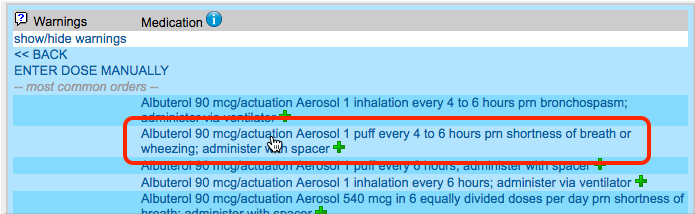
Enter additional prescription details, if needed, and click “Save”.
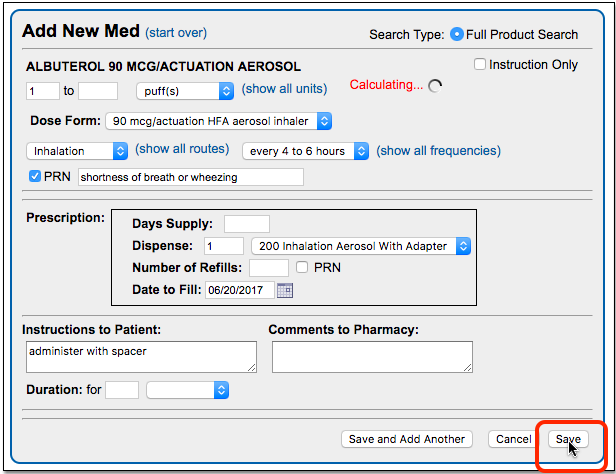
Working with Weight-Based Favorites
You can create weight-based prescription favorites that will automatically calculate volume-per-dose based on a patient’s weight. For weight-based favorites, PCC eRx saves the math, not the actual dose; the dose is calculated when you prescribe from the favorite.
From the Favorites section of the My Settings tab, click “Add New Favorite”.
Find the medication and pick a weight-based dosing statement. (Note: You can pick any dosing statement as a template, but selecting a weight-based dosing statement saves a step.)
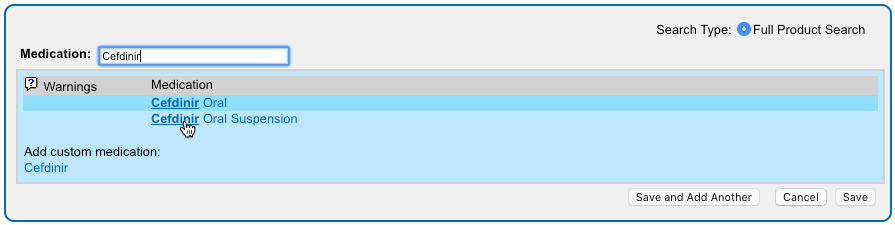

PCC eRx understands that you want to create a weight-based favorite, and it will display the medication with a “milligram/kilogram/dose” value.
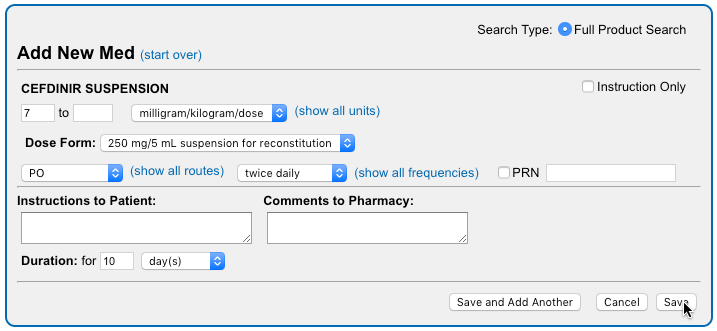
Make any adjustments needed, enter additional prescription details if desired, and click “Save”.
Your new prescription favorite will appear in the Prescribe component.
When you select the favorite to prescribe, PCC eRx will check the patient’s weight and calculate a per-dose value based on the weight of the patient and the strength of the medication.
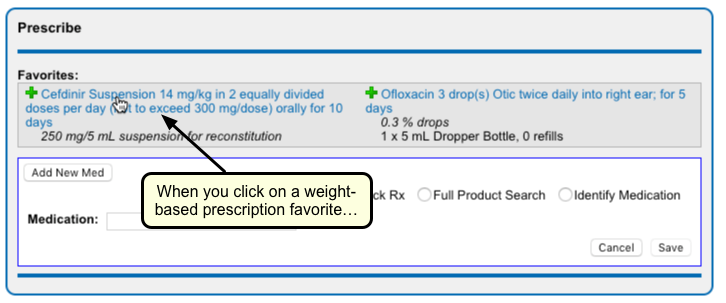
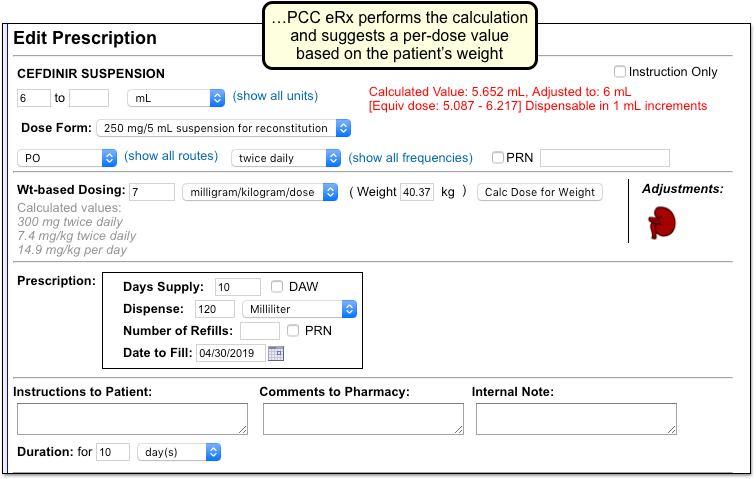
Edit or Delete an Existing Favorite
If you need to adjust a favorite, or delete it, go to the My Settings tab, scroll down to the Favorites section, and find the favorite within the table.
Click the red pencil icon to edit an existing favorite.

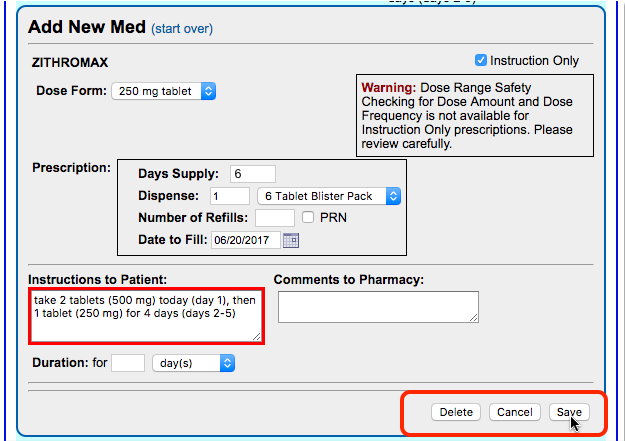
In the above example, we changed the Dispense information for the favorite prescription.
Click “Save”. The changes made will be reflected in the Favorites table.
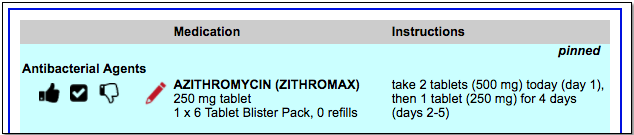
Delete a Favorite: From the edit window, you can also delete a favorite if you don’t want to see it on the list anymore. Just click “Delete” to remove it.
Pin, Unpin, and Exclude
You can use the icons to the left of each favorite within the table to indicate active and inactive favorites, and (depending on your selected favorites display method) which are your preferred favorites.

There are 3 icons within the favorites table:
-
-
thumbs up: The thumbs-up icon denotes a “pinned” prescription. Pinned prescriptions only matter if you have chosen to see your favorites as tiles. If you have more favorites than space within your tiled favorites section, pinned prescriptions are given display preference. All manually added prescriptions are pinned by default. You can un-pin a favorite by de-selecting the thumbs up icon.
-
checkbox: A checked prescription simply means it is an active favorite. Automatically added favorites are checked but unpinned by default. You can choose to pin an automatically added favorite by clicking the thumbs-up icon.
-
excluded: The thumbs-down icon denotes an inactive (excluded) favorite. Inactive favorites are not included in your favorites display or when searching for prescriptions. Marking a favorite as “excluded” is relevant if you have Automatic favorites turned on, because it blocks the specific drug and sig from being added to the list again.
-
Click on an icon to unpin, pin, or exclude a favorite.


Delete or Exclude?: You can click the red pencil icon to edit a favorite and then click “Delete” to remove it. However, if you prescribe the medication again and you have Automatic management turned on, the prescriptions can show up on your Favorites list again. If it a favorite is “excluded”, you will not see it on your Favorites list.
Administrator Only: Share Favorites Among Prescribers
You can pass favorites back and forth among different prescribers at your practice. For example, one pediatrician could create favorites and then have an eRx administrator share them with other pediatricians.
Only a PCC eRx Administrator can copy favorites between users. For more information, read Set Up PCC eRx User Access.
To copy favorites, go to the “Administration” tab. Within the User Management section, click “Copy Favorites”.

Next, use the first search field to find a user from whom you wish to copy favorites. Use the second search field to find one or more users who will receive the copied favorites.
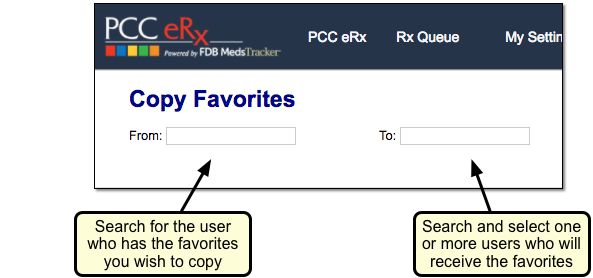
Review the list of favorites for the “From” user. You can de-select any that you do not wish to copy.
Finally, choose one of the options on the right to either add the copied favorites, or completely replace the destination user’s favorites with the copies from the first user.
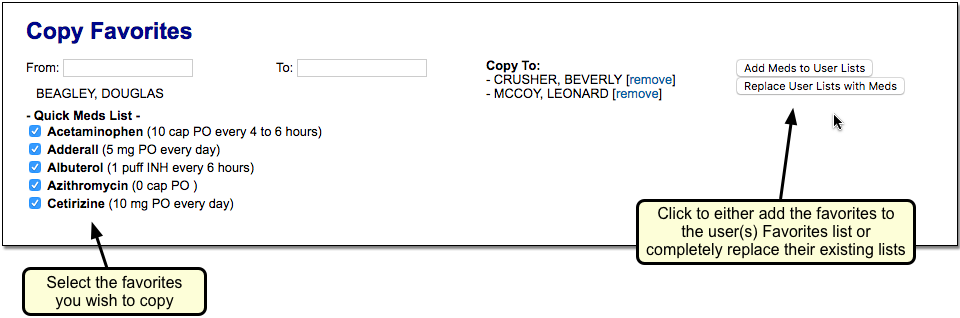
Switch to the Forms Configuration Tool
The Forms Configuration tool in PCC EHR empowers you to create and manage your own auto-filling forms, handouts, policies, and letters. With help and guidance from PCC Support, you can switch to the Forms Configuration tool when the time is right for your practice. Read more to learn why, when, and how to make the switch.
Explore What’s New
Learn about the benefits of the Forms Configuration tool in PCC EHR and evaluate your readiness to make the switch.
The Benefits of Switching
Switching to a new way of doing things takes time and preparation, but there are many reasons your practice might want to put in the effort to switch to the Forms Configuration tool in PCC EHR.
You should consider switching to the Forms Configuration tool if you want:
- More control over the creation and maintenance of your practice’s forms, handouts, policies, and letters in a user-friendly interface
- Fewer back-and-forth emails with PCC Support when you need to make changes to a form
- Smarter functionality for forms that require a signature or include visit-specific data, and
- Better ways to add free text on the fly when generating forms for patients and accounts.
Read Configure Forms in PCC EHR to learn more about what you can do in the Forms Configuration tool, and speak with PCC Support to learn if the time is right for you to make the switch.
Evaluate Your Readiness
The Forms Configuration tool includes early access tools that are still under construction. To learn if the Forms Configuration tool is ready to meet your practice’s needs, contact PCC Support.
PCC Support can explain how the tools work and help you determine whether the time is right for your practice to switch over.
Together, you will explore:
- the functionality of the forms you currently generate in PCC EHR
- whether the Forms Configuration tool can support that existing functionality
- your level of interest in switching to the Forms Configuration tool
- and the amount of time and people power you can devote to the process of switching over.
With these factors in mind, PCC Support will make a recommendation about whether now is the time for your practice to consider switching to the Forms Configuration tool.
Make the Switch
Follow these steps when you decide to make the switch to the Forms Configuration tool.
Give the Green Light
After the evaluation period, tell PCC Support whether you want to make the switch to the Forms Configuration tool. PCC Support will note your interest in activating the Forms Configuration tool and contact you when we are ready to begin your onboarding. When it’s your time to make the switch, PCC Support will actively guide you through the process.
Depending on your current configuration and the amount of time that you and PCC Support have to devote to the transition, the process of switching to the Forms Configuration tool can take anywhere from one hour to several months. Work closely with PCC Support to plan the transition at a pace that works for everyone.
Follow PCC’s Pre-Migration Instructions
Based on the evaluation of your current forms configuration and the functionality that is available in the Forms Configuration tool, PCC Support might recommend that you take certain pre-migration steps. Pre-migration steps typically include things like recreating certain forms as PDFs before you migrate to the Forms Configuration tool.
PCC Support Enables Configuration Mode
When the pre-migration steps are complete, PCC Support will enable the Forms Configuration tool in Configuration Mode.
In Configuration Mode, PCC Support can migrate your current forms into the Forms Configuration tool in PCC EHR and you can finish setting them up without interrupting your practice’s existing workflows.
PCC Support Migrates Your Current Forms
After enabling Configuration Mode, PCC Support will migrate your current forms into the Forms Configuration tool. The migration will take into account the functionality that is available in the Forms Configuration tool and might change the appearance or function of some of your forms, all of which PCC Support should make clear to you well before the migration process begins.
Migrated forms retain their protocol mapping, so you can continue to generate them with a single click wherever you have buttons set up for that in PCC EHR. You can learn more about the Forms component and protocol mapping in the article Generate Forms in PCC EHR.
Once PCC Support indicates that your existing forms have been migrated into the Forms Configuration tool, you can set up user access to the Forms Configuration tool and finish configuring your forms.
Set Up User Access
Users need special permission in order to access the Forms Configuration tool. The ability to delete forms within the tool is also protected by a special permission. You can set up these permissions while in Configuration Mode.
Open the User Administration tool in PCC EHR.
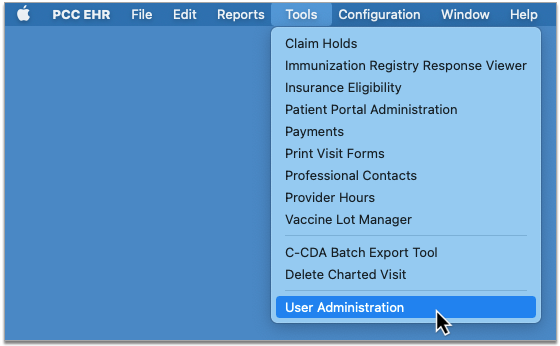
On the Roles tab, create a new Forms Configuration role or add the Forms permission to an existing user role.

Follow the same steps to assign the Delete Form permission to users at your practice.
Finish Configuring Your Migrated Forms
After PCC Support migrates your existing forms into the new Forms Configuration tool, it’s up to you to finish configuring them for use.
Open Forms Configuration
Open the Forms Configuration tool.
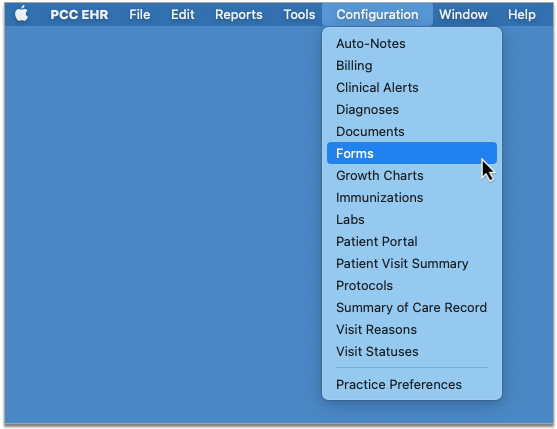
Check that the Right Forms Were Migrated
Review the list of forms and make sure that those you wanted to migrate are present.
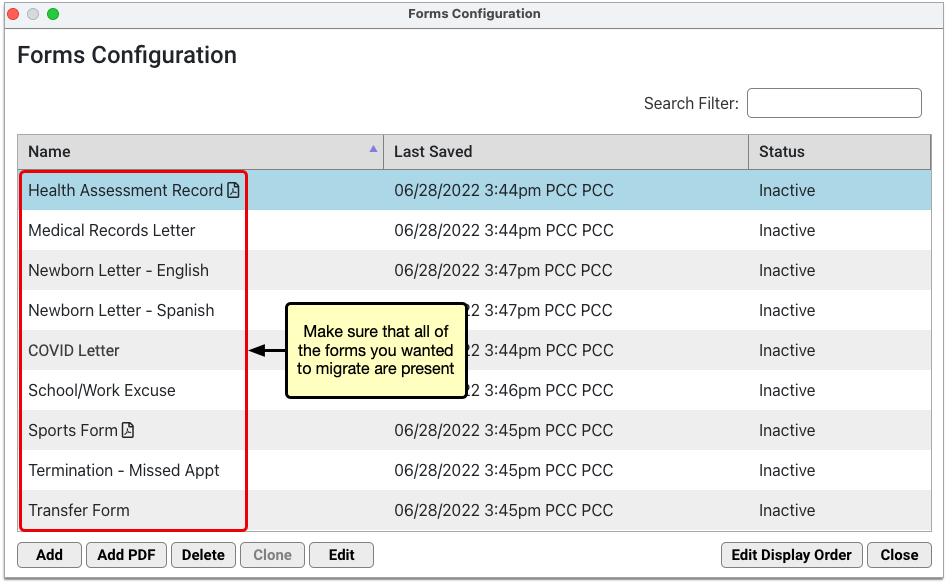
If any of the forms are missing, speak with your contact on PCC Support.
Finish Configuring PDF Forms
Edit the forms that have PDF icons to review and touch up their configuration.

On PDF forms that include user response fields, you can review and edit the prompts that users will see and respond to when they generate the form for patients.
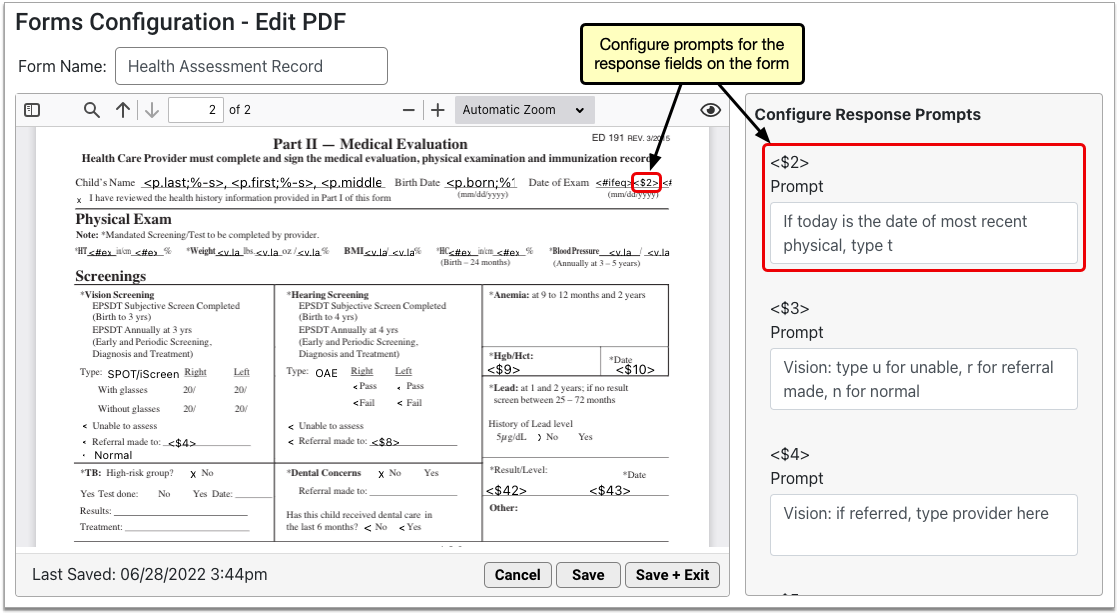
In addition to response prompts, you can configure the names of PDF forms and preview them using real patient data. To learn more about how to work with PDF forms in the Forms Configuration tool, read Configure Forms in PCC EHR.
Recreate Non-PDF Forms Using the Embedded Form Editor
Forms that do not have a PDF icon in the Forms Configuration tool were migrated with only their titles and background protocol mapping and must be recreated in the embedded form editor.
To recreate the forms, edit them in the Forms Configuration tool and use the tools in the form editor to recreate their contents.
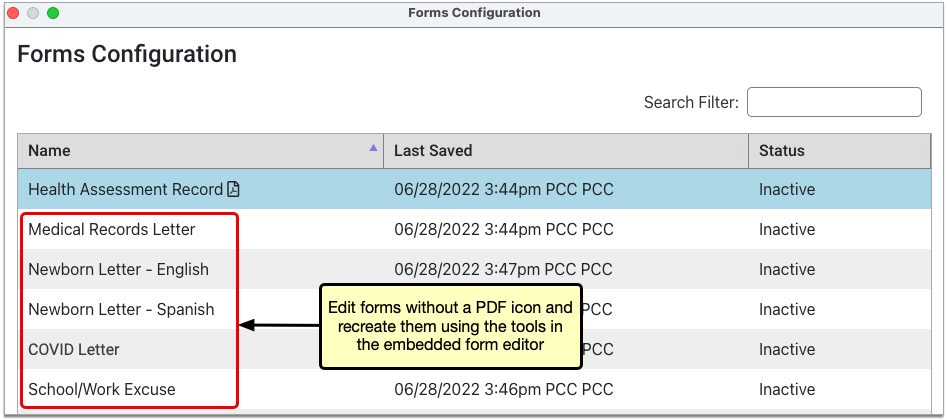
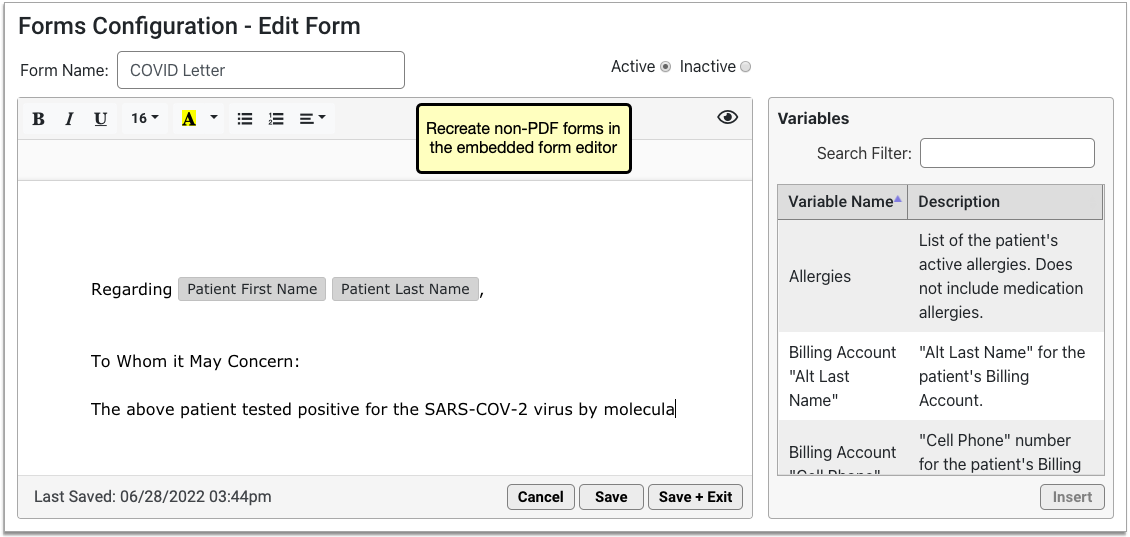
At your request, PCC Support can send you copies of the forms that need to be recreated and assist you with the recreation process.
To learn more about how to create and manage forms in the Forms Configuration tool, read Configure Forms in PCC EHR.
Make Your Forms Active
When you have finished configuring your migrated forms, edit them and set their status to active so that other users at your practice will be able to generate them for patients when you finish making the switch to the Forms Configuration tool.
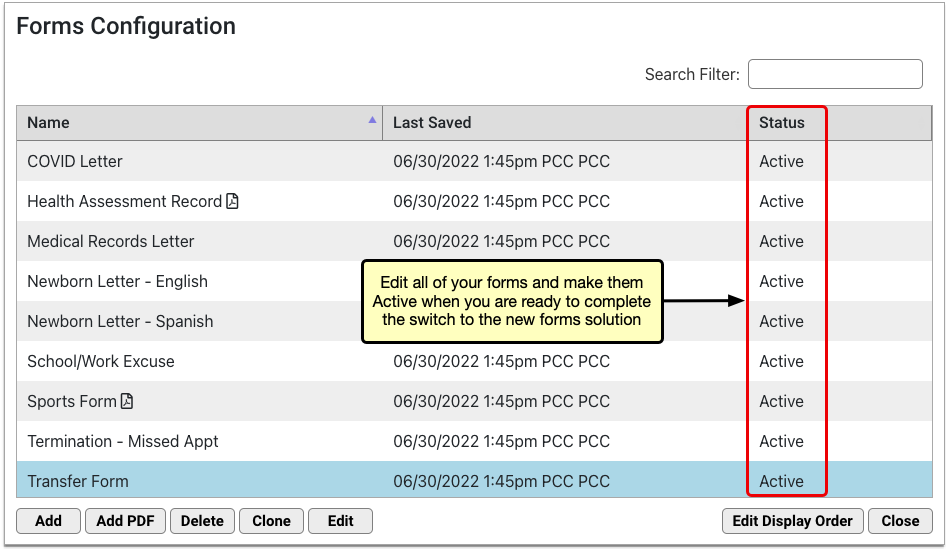
You can learn everything there is to know about working in the Forms Configuration tool in the article Configure Forms in PCC EHR.
Complete a Final Check
When you have finished configuring your migrated forms, complete a final check with PCC Support.
The purpose of this check is to make sure that your forms are working properly, that your questions have been answered, and that you are ready to make the final switch to the Forms Configuration tool.
PCC Support Enables the Forms Configuration Tool
Tell PCC Support when you are ready to switch your whole practice over to using your newly configured forms.
PCC Support will fully enable the Forms Configuration tool.
Once enabled, the Forms component will stop pointing to your old forms and users at your practice will only be able to generate forms that have been configured in the Forms Configuration tool.
Optionally Revert to the Legacy Tools: If you find that the Forms Configuration tool does not work for your practice, PCC Support can disable it and restore your ability to generate forms the old way. This function may also be used to temporarily disable the Forms Configuration tool while PCC Support troubleshoots issues that arise with migrated forms.
Configure Claim Holds and Claim Delay
When your practice needs to prevent certain claims from being submitted, you can create a claim hold. A claim hold prevents claims from going out for specific dates of service, billing providers, places of service, and insurance plans.
You can also configure your practice’s claim delay, which prevents any claim from going out until a certain number of days after the date of service.
Watch a Video: You can watch a video to learn about Claim Holds and Claim Delay.
Review Claim Holds
Open the Claims tool from the Tools menu in PCC EHR and visit the “Holds” tab.

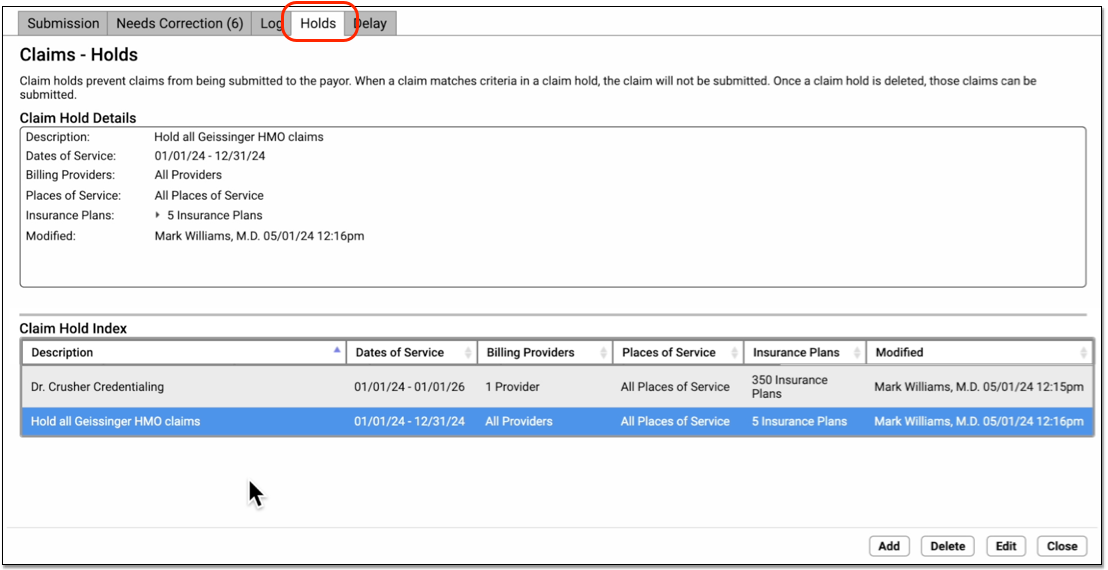
Your practice can use User Roles to specify which users can open the tool. (See Set User Roles for Permissions and Security)
Click on an existing claim hold in the Claim Hold Index to view details.
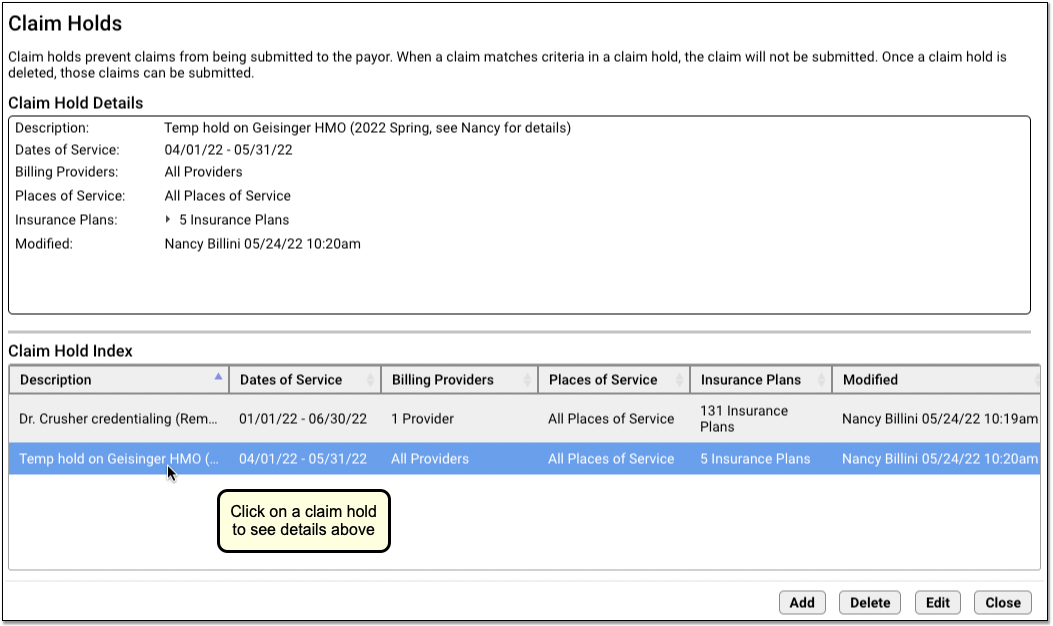
Create a New Claim Hold
Follow the procedure below to create a new claim hold.
Click “Add”
To create a new claim hold, click “Add”.
Enter a Description and Dates of Service
A claim hold requires a description and a date range for dates of service.
-
Description: You can include a lengthy description indicating the purpose of the claim hold.
-
Dates of Service: Enter the claim hold date range. Claims for these dates of service, including the start and end date, will be held until the hold is deleted or changed.
Select Billing Providers, Places of Service, and Insurance Plans
Select additional optional criteria for the new claim hold. You can restrict a claim hold to specific billing providers, places of service, and/or a subset of insurance plans to which your practice bills.
-
Billing Providers: Click “Edit” to select which providers’ claims will be held. When processing claims, PCC will hold claims with a Billing Provider that matches one of the providers listed in the claim hold.
-
Places of Service: Click “Edit” to select which locations’ claims will be held. You can select one or more places of service. When processing claims, PCC will hold claims with a Billing Location that matches places of service listed in the claim hold.
-
Insurance Plans: Click “Edit” to select which insurance plans’ claims will be held. You can search and sort by plan name, plan group, or the payor id used for electronic submission.
When making a selection, you can search a list and use “Select All” and “Select None” to quickly pick groups of providers, locations, or plans.

Click “Save”
Click “Save” to finish creating the claim hold.
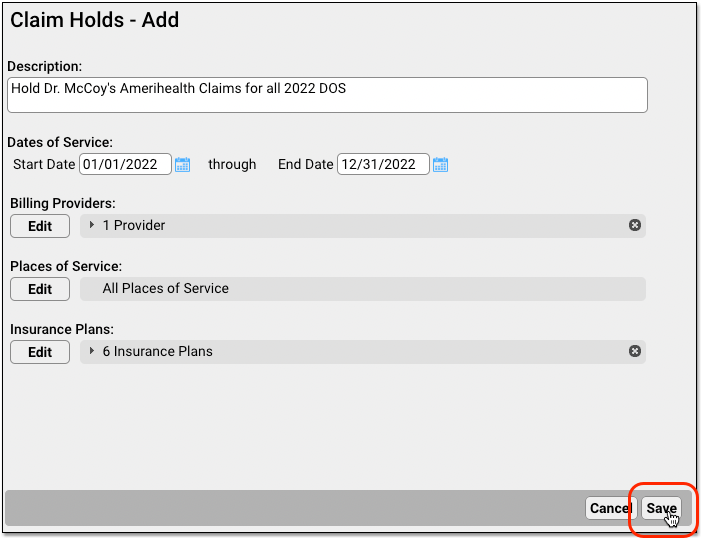
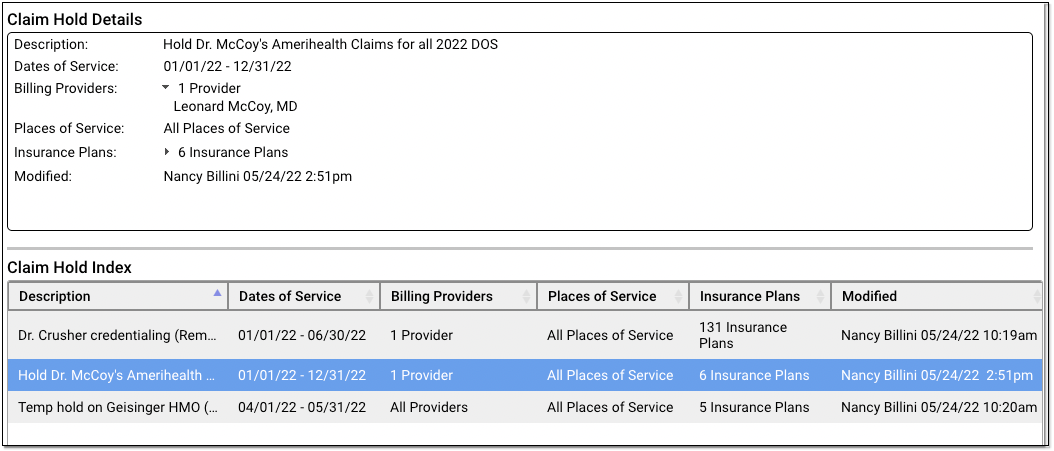
Holds are immediately active. After you create a hold, any claims that match the specified dates of service, providers, locations, and insurance plans will not be sent out when you process claims.
When Does a Claim Hold Expire? Never: Claim holds are based on dates of service, so they never expire. Any claims that match the indicated dates of service and the other criteria for the hold will never be sent. In order to release held claims, you must either delete the hold or edit the dates of service or other criteria to change which claims are held.
View Which Claims Were Held
Your practice’s claim holds stop claims when they are processed for submission.
You can review which claims were held in the Log tab of the Claims tool in PCC EHR.

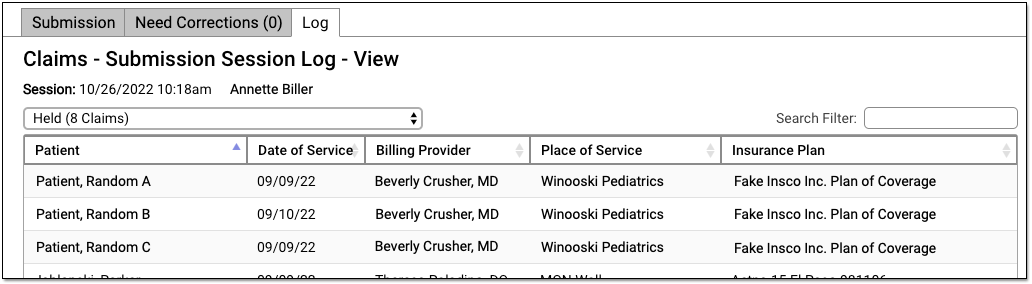
To learn more read Submit Claims.
If your practice submits claims with PCC’s previous claims tool, Prepare/Submit Electronic Claims (preptags/ECS), then no log is created of which claims were held.
Edit or Delete a Claim Hold
Select a claim hold and click “Edit” to make changes.
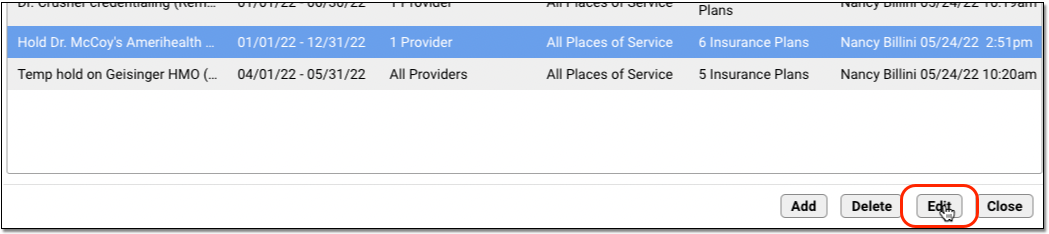
For example, you may have a claim hold for a new clinician which holds claims for all insurance plans. As they become credentialed with each payor, you can edit the claim hold and make changes to the insurance plan criteria. Doing so will release claims that do not match the new criteria.
Select a claim hold and click “Delete” to delete a claim hold.
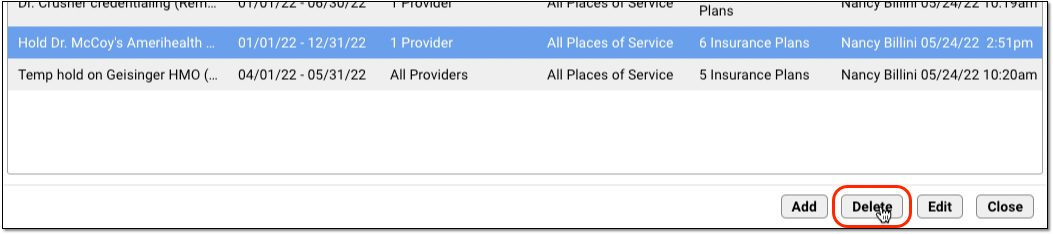
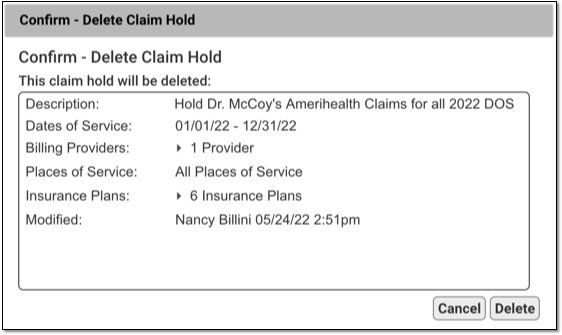
The next time you process and submit claims, any claims held by the deleted hold will be processed and sent.
Configure Your Practice’s Claim Delay
Your practice may want to prevent all claims from going out until a day or two after the date of service. This gives billers extra time to complete charge posting or review encounters to make sure all procedures were billed correctly.
When you want to adjust your practice-wide claim delay, open the Claims tool and visit the Delay tab.

Enter your practice’s desired number of days and click “Save”.
Whenever you process and submit claims, the Claims tool will check each date of service and delay any claim that is younger than your claim delay.
Grant User Access to the Claim Holds and Claim Delay Configuration
Your practice can designate which user roles will have access to claim configuration tools.
User the Roles tab on the User Administration tool to edit an appropriate role.
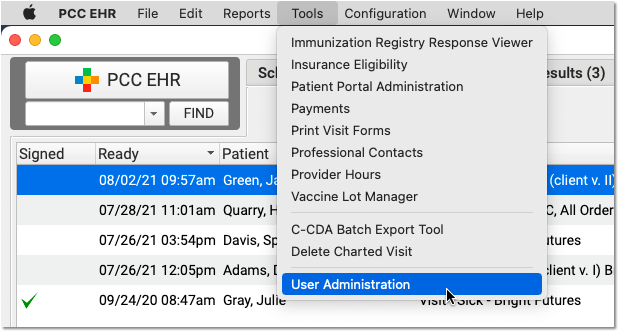
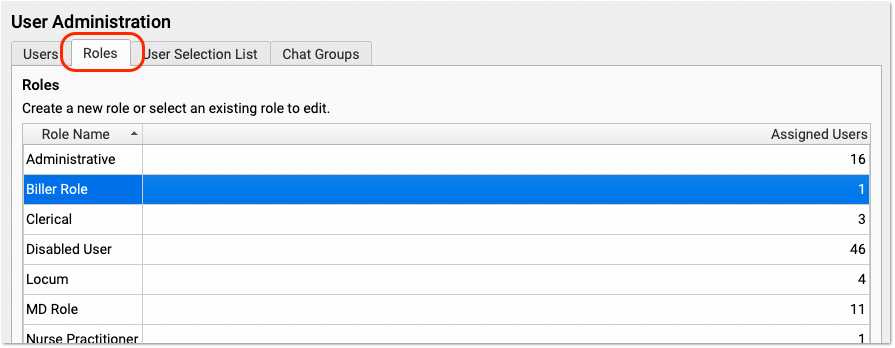
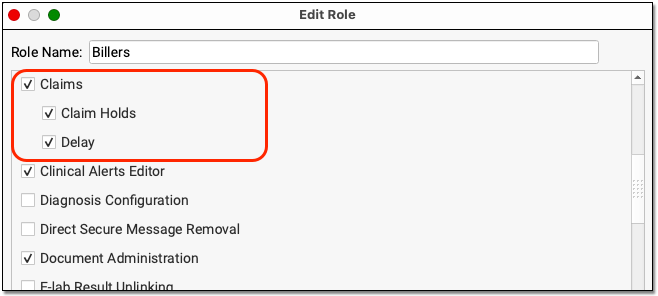
Next, review that appropriate users are assigned that role.
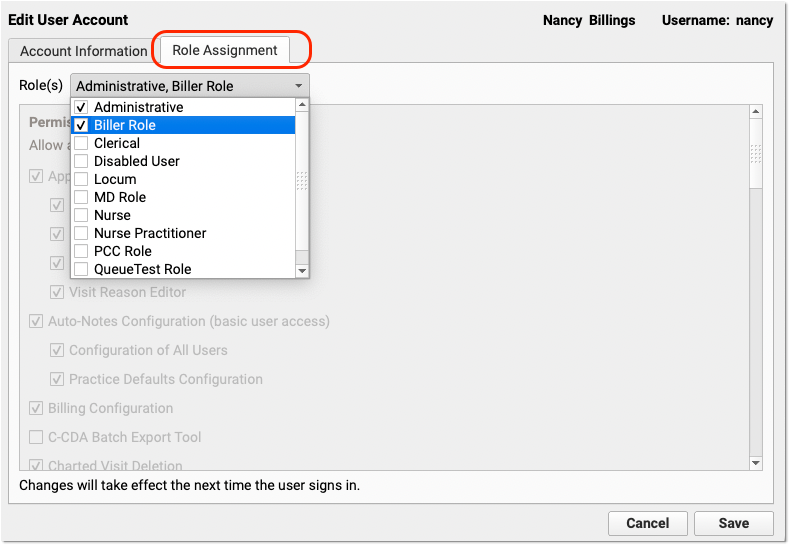
Change the Copay Due on a Charge After Charges are Posted
When you learn that a patient was charged the wrong copay for a visit, how can you change the amount due? You may be trying to manually post an insurance payment and find yourself unable to do so because the copay amount for the office visit procedure is incorrect.
Full Documentation: This is a quick reference guide to a common problem. For more details, read Change the Responsible Party and Copay for Charges.
Edit Charges and Change the Copay
Select the encounter in the patient’s Billing History and click “Edit Charges”.
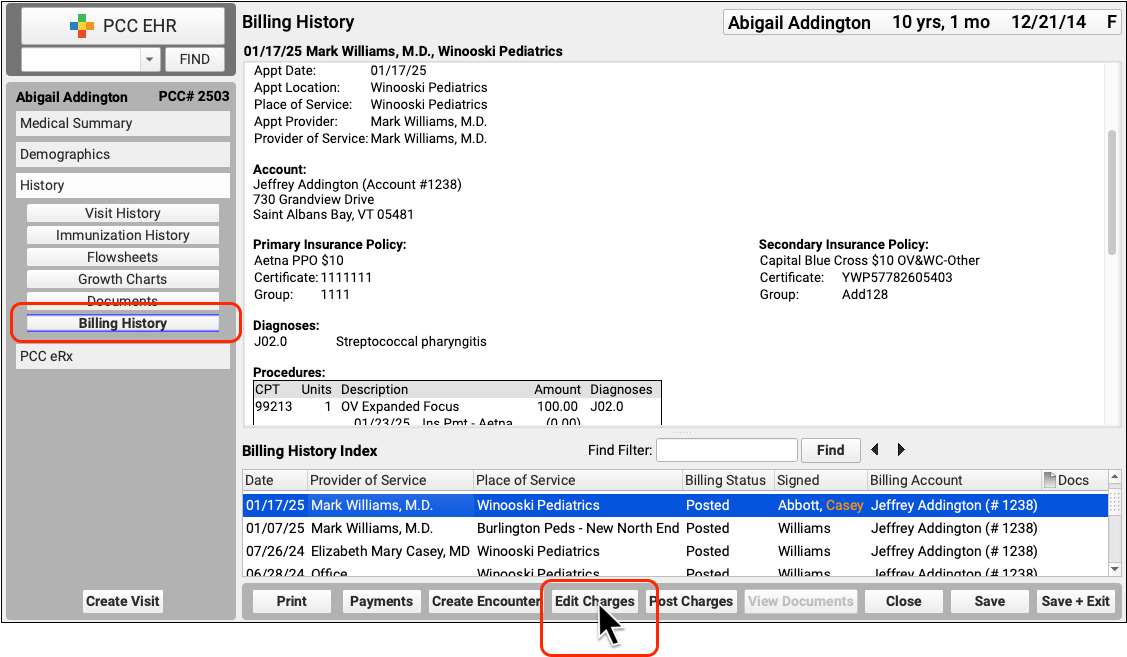
Next, use the Procedures component to change the personal amount due. You can change other details about the charges as needed.

Click “Save + Post” to update the encounter’s charges.
After changing the copay amount, you can immediately queue up a new claim. Read Edit Encounter Charges and Resubmit Claims to learn more.
Change the Copay As You Post Insurance Payments
As you post insurance payments and adjustments, you can change the copay amount if (for example) the payer’s response indicates a different expected amount.
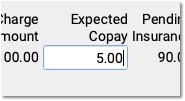

When you save, PCC EHR will automatically unlink personal payments down to the new expected amount, if needed.
Edit Your Practice’s Procedures, Codes, Adjustments, and Prices
When you need to add a new billing code to your PCC system, create a new version of a code that includes modifiers, or adjust your practice’s prices for procedures or adjustment types, use the Tables tool in the Configuration menu.
Watch a Video: Watch Edit Your Prices and Billing Procedure Codes for a video tutorial of these steps.
Procedure Code Guidance: The procedure codes discussed in this article are intended only as examples. You should consult the AMA’s current CPT Coding Guide and work with your insurance payers to verify what codes you should report on claims. Your practice updates and maintains your billable procedure list, codes, and prices in the Procedures table in the Tables configuration tool on your PCC system.
Edit Your Practice’s Billable Procedures, Codes, and Prices
Use the Procedures table in the Tables tool to update your practice’s billing procedures, codes, and prices.
Open the Procedures Table
Open the Procedures table in the Tables tool in PCC EHR.
Review Your Existing Procedures
The Procedures table contains all of your practice’s billable procedures, charges, fees, as well as adjustment offsets used by your PCC system.
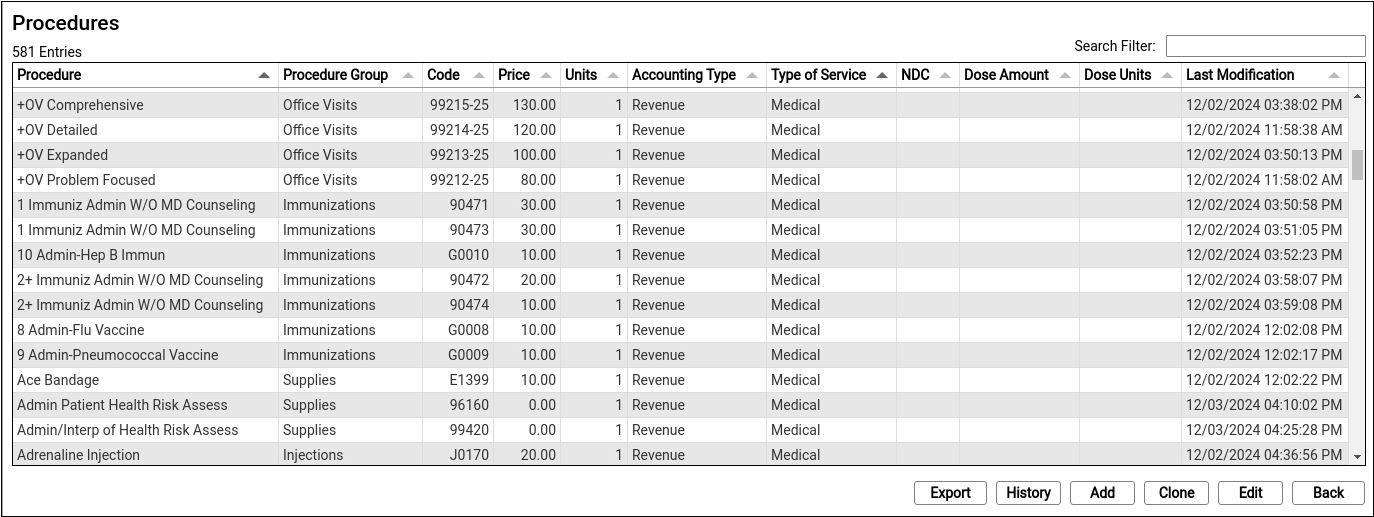
Double-click on an entry to open and edit the details of a procedure.
You can search for specific procedures and sort the list by different columns. Click “Export” to download a comma-separated-value (CSV) file of the entire table for use in a spreadsheet. Click on an entry and then click “History” to see a record of all changes made to a procedure.
Clone or Add a New Procedure
Select an entry and click “Clone” to add a new procedure based on an existing one.
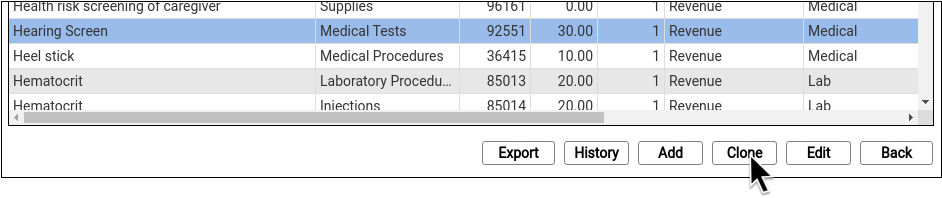
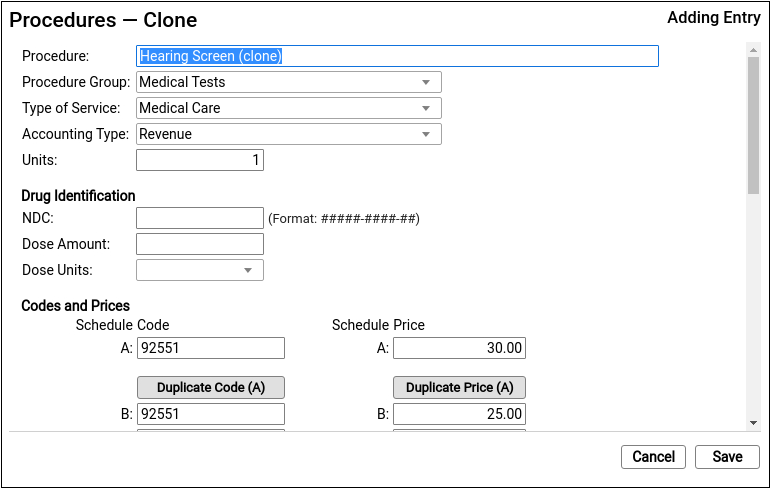
It’s easiest to start by cloning a similar procedure. You can also click “Add” to create a new entry from scratch.
Do Not Overwrite or Erase the Name of an Existing Procedure: Never edit and overwrite an existing procedure entry, as this may affect your billing history. Even if a procedure has been retired and replaced with a new CPT code (for example), always clone and create a new entry.
Update the Cloned Procedure’s Name, Group, Type of Service, and Units
At the top of the screen, update the procedure’s name and basic information that indicates how the new procedure entry will be used.
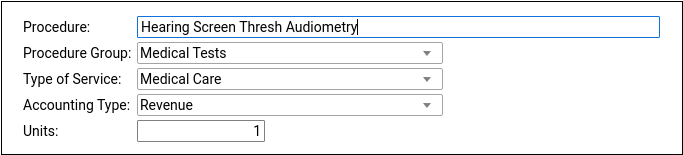
If you cloned an existing procedure, some of these fields will be filled out for you. For a typical billable procedure, the Type of Service will be “Medical Care” and the Accounting Type will be “Revenue”. See the sections below for a complete reference.
Optional: Update Medication Fields
If the procedure is an immunization, injection, or a drug you administer at your practice, enter the NDC and dosage information that will appear on the claim.
Enter the NDC code for the smallest administered dose; use the code found on the vial, not the box or carton. Read Add and Configure Immunizations for more tips on filling out these fields.
Enter the Billing Code
Enter the procedure billing code in the procedure code field for Schedule A. Then click “Duplicate Code (A)” to populate the alternative code schedules.

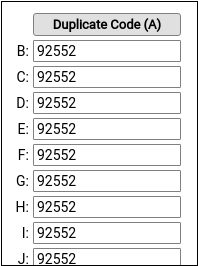
Under rare circumstances, your practice might enter different codes, or a code with a modifier, in different schedules for particular insurance payers. See the sections below to learn more.
PCC does not provide or distribute CPT billing codes, and the example above is for illustration only.
Enter Your Price for the Procedure
Enter your practice’s price for the procedure in the Schedule A Price field. Then click “Duplicate Price (A)” to populate the alternative price schedules.
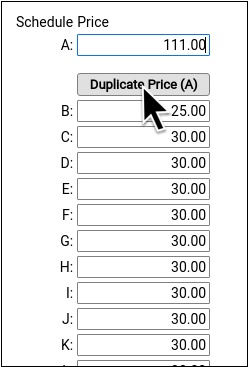
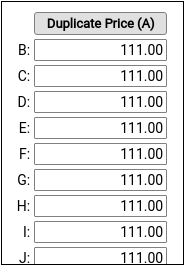
Under rare circumstances, such as when using the same procedure for both medicaid and non-medicaid immunizations, your practice might use an alternate fee schedule for particular insurance payors. See the sections below to learn more.
PCC does not provide pricing recommendations, and the example above is for illustration only.
Save Your Changes
Click “Save” to save your changes.

Configure Orders, Billing, and Chart Notes
After you add or update a billing procedure on your PCC system, you may want to take these additional steps:
-
Contact PCC to Complete Immunization Configuration: If you are adding a new immunization to your PCC system, contact PCC Support. Read Add and Configure Immunizations to learn more.
-
Update Your Practice's Orders: When you link a procedure billing code to an order, PCC EHR will automatically add it to the encounter when the clinician clicks “Order”. Read Configure Order Billing, Diagnoses, and the Bill Window to learn more.
-
Add New Orders to Chart Notes: When you add a new procedure and configure a new order on your PCC system, you may want to add the order to chart notes. When you make an order a default on a chart note protocol, the clinician can create the order and add the billable procedure to the encounter with a single click. Read Configure Protocols to learn more.
-
Update the Bill Window: You can edit your practice’s Bill window, a.k.a. “the electronic encounter form”, to make it easy to select a common procedure or fee when a clinician codes an encounter.
Procedures Table Field Reference
A procedure includes a name, accounting type, and other values.
-
Procedure Name: You can name a billing procedure anything that will be useful for your practice. Your clinicians, billers, and the patient’s family will see this name in various contexts, such as a receipt or bill. Insurance payers do not review or verify a procedure’s name, relying instead on the billing procedure code.
-
Accounting Type: Billable procedures you perform in your practice should have an accounting type of “Revenue”. Other Account Types, such as “Receipt” and “Revenue – Non-Service” are used for refunds, insurance write offs, and other less common accounting situations.
-
Procedure Group: The Procedure Group field is a customizable value used for reporting purposes; it does not usually affect billing or how a procedure is ordered or completed.
-
Type of Service: The Type of Service field was originally used to indicate a code on claims, but it is no longer part of the claim standard. For most procedures performed by your practice, use “Medical Care”. If the procedure is a lab, select “Diagnostic Laboratory”. When your PCC system formats claims, it includes an appropriate CLIA identifier for procedures with a type of service “Diagnostic Laboratory”.
-
Units: If you always bill a procedure as a set number of multiple units, you could adjust the Units field. Normally, units are selected when your practice bills an encounter, so this field is almost always set to “1”.
-
NDC: For immunizations or drugs you administer in your practice, enter the National Drug Code. The National Drug Code is an 11-digit number used to identify the vaccine or medication you administer. NDC codes found in the Vaccine Lot Manager are used for your state registry, but are not used for billing. NDC codes needed for billing should still be managed through the Procedures Table. For examples and more details, see Add and Configure Immunizations in PCC EHR.
-
Dose Amount and Dose Units: For immunizations or drugs you administer in your practice, enter the dose and dose units found on the vial, pouch, or tube that you administer. For example, if a vaccine is administered as 0.3 mL, you would enter “0.3” and “mL”. For more details, see Add and Configure Immunizations in PCC EHR
-
Code Schedule A: The billing code that will appear on the claim for this procedure.
-
Code Schedule B-Z: Alternate billing codes for unusual configuration needs. Normally, you will click “Duplicate Code” in order to enter the same code for all schedules. PCC supports optional schedules due to deprecated “local codes”, which are no longer part of the claim standard used in the U.S. If your practice has a schedule specifically configured for Medicaid billing, and your state Medicaid program requires a modifier, you can enter the full code and the modifier into a CPT field for that schedule. PCC Support can configure which claims will use a custom code schedule. Alternatively, your practice can clone a Procedure entry and create a specific version of the procedure for Medicaid billing, for example.
-
Price Schedule A: The price you will bill for the procedure.
-
Schedule Codes B-Z: Alternate prices for unusual configuration needs. Normally, you will click “Duplicate Code” in order to bill the same price for all schedules. In unusual circumstances, such as when you have a special contract with a payor or wish to use the same procedure entry for medicaid (VFC) immunizations vs non-medicaid immunizations, you might use an alternate price schedule. PCC Support can configure which claims will use a custom price schedule.
Adding a Procedure with a Code Modifier
If your practice needs a code with one or more modifiers, such as the common -25, you should clone an existing procedure and adjust the clone’s title and code schedules to indicate the modifier.
Common modifiers include -25, -26, and -59, but the CPT standard and payer requirements sometimes use more complex modifiers, such as -Q6, and CMS has developed HCPCS Level II Modifiers, such as -E1, -TC, and -XS (see AAPC).
When your practice adds a modified version of a code to your procedures table, it becomes available to all users when they post charges or edit charges for an encounter.
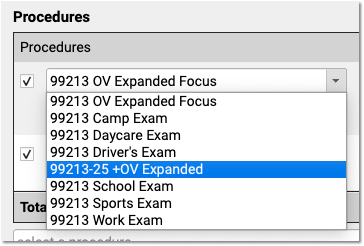
Configure Adjustments, Fees, and Refunds with an Appropriate Code and Accounting Type
In addition to billable clinical procedures, the Procedures table includes your practice’s adjustments, fees, refunds, and any accounting item that would increase an account’s balance or offset a payment.
Claims require a linked diagnosis, so PCC’s software requires a linked diagnosis for any procedure billing code that has five or more characters, such as a “99213”. If you are creating or updating your practice’s administrative fees (or other charges that do not require a diagnosis), use a billing code with fewer than five characters. For example, if you are creating a “Forms Fee” or “Missed Appointment Fee”, you could use a billing code of “X” or “FEE”, or whatever would be clearest for your practice.
When you edit refunds, adjustments, and other unusual procedures, the Accounting Type field indicates their purpose. Various PCC reports include or exclude different accounting types, or put them in special columns, in order to provide your practice with a better understanding of your accounts receivable.
Procedure Accounting Type Reference
The table below describes different categories of these procedures, their related “Accounting Type” in the table, and how they are used for each accounting operation.
What Are Adjustments in the Procedures Table Used For?: For examples of how you would use the procedures with these accounting types, see Refund or Write Off Account Credits and Reverse a Payment.
| Procedures | Accounting Type | Explanation and Usage |
|---|---|---|
| All clinical procedures performed in a practice | Revenue | Billable procedures you perform in your practice should have an accounting type of “Revenue”. Office visits, immunizations, and more are examples of revenue procedures. You can post these procedures as charges in the Post Charges window. |
| Non-Clinical service fees | Revenue – Svc Chg | Tasks you perform for a family that are non-clinical, and have a charge, have an accounting type of “Revenue – Svc Chg”. Examples include record transfer fees, form fees, rebilling fees, and similar. |
| Fees or other non-service fees | Revenue Non-Service | When your practice charges a bounced check fee, a forms fee, or some other fee that is not billed to an insurance payer, you use a procedure with an accounting type of “Revenue Non-Service”. The procedure will appear like any other charge on the account. |
| Capitation, incentive payment, insurance interest, overpayment, or withhold payment adjustments | Revenue Non-Service | When an insurance company sends you a capitation payment, interest payment, or other type of less-common payment, you post an adjustment procedure with an accounting type of “Revenue Non-Service” to indicate what the payment is for. Then you post the payment. For more information see Post Capitation Checks, Incentive Payments, Interest Payments, Overpayments, and Withhold Payments. |
| Write off a credit that you will not refund | Revenue Credit W/O | When you wish to classify a credit on an account as income, you can offset it with an adjustment procedure with an accounting type of “Revenue Credit W/O”. This means you are classifying the credit as income to the practice, and you do not intend to refund it. |
| Returned check or other stopped payment adjustment | Receipt – NSF | When a check bounces or another type of payment is stopped, your practice negates the payment by linking it to an adjustment procedure with an accounting type of “Receipt – NSF”. You might also post a fee. |
| Credit refunds | Receipt – Refund | When you refund a credit to a family, you post an adjustment procedure to the account with an accounting type of “Receipt – Refund”. |
| Insurance takebacks and other insurance refund adjustments | Receipt – Refund | When you need to issue an insurance refund, or an insurance company issues a “takeback” for a payment you already posted, you post an adjustment procedure with an accounting type of “Receipt – Refund”. Then you link the original payment to that adjustment procedure. |
Provide Good Faith Estimates for Pediatric Encounters
If a family does not have insurance, or the family won’t be using insurance for an encounter, then a pediatric practices needs to provide a “Good Faith Estimate” for the cost of care when an encounter is scheduled more than 3 days in advance.
This requirement came into effect on January 1st, 2022 as part of the “No Surprises Act”, and it aims to reduce the likelihood of a family receiving an unexpected medical bill.
Apply the Good Faith Estimate Rules for Pediatrics
Under what circumstances would a pediatric practice need to provide a Good Faith Estimate, and what should the estimate include?
Review the Types of Encounters You Schedule
Your practice schedules a variety of encounters, including physicals or “well visits”, next-day or same-day sick appointments, rechecks, and various consultations.
A typical pediatric practice should be prepared to offer Good Faith Estimates for their well visits, recheck visits, or consults—any appointment that would likely be scheduled more than three days in advance. It is unlikely you will need to provide a GFE for typical “sick” encounters, but you may wish to create one anyway for less-common circumstances.
Develop Estimates That Are Within $400
When you provide a Good Faith Estimate, it should declare the expected cost of services typically performed during the type of encounter, with an accuracy within $400.
For example, your Well Visit Good Faith Estimate might list expected amounts for a well visit and immunization administrations for each age, including amounts for common screenings.
While you are not required to detail the individual costs associated with an encounter, your practice may choose to list common procedures and prices to help the family understand what is included in the GFE.
Always Verify Payment Information When You Schedule
Medical professionals are not required to provide GFEs if the patient or family intends to bill insurance for the encounter, or if the practice will bill an insurance payer on behalf of the family.
Therefore, in addition to developing a GFE form for certain encounter types, your practice should review how you schedule appointments.
Whenever you schedule any encounter, your practice should:
- Ask the patient or family how the encounter’s charges will be paid
- Collect or update the patient’s insurance information
- Provide a GFE if the encounter will not be paid by insurance
PCC software includes customizable tools that can help your practice complete these tasks, such as Clinical Alerts which can appear during scheduling, the customizable Patient Details ribbon, and the ability to check insurance eligibility at any time (including a tool for reviewing eligibility for all scheduled patients). Contact PCC Support for help getting started with any of these tools.
No Insurance, Or Not Using Insurance For a Given Encounter: When a patient or family indicates that they do not have insurance, or that they do not intend to bill insurance for a specific encounter, and the appointment is scheduled three or more days in advance, you should provide a Good Faith Estimate that lists the expected charges with an accuracy within $400.
Develop a Workflow for Sending out GFEs
When your practice knows that a family will not be paying for an encounter with insurance, you should provide them with a Good Faith Estimate within three days of scheduling the appointment.
Your practice could use various methods to accomplish this. You can produce the required form immediately after you schedule the appointment, using the Forms component, and then deliver it using the patient portal.
If the family does not have a portal account, you can generate a PDF and use email or physical mail. You can work with PCC Support to adjust your forms and customize reports to meet this need.
Create Good Faith Estimate Forms
Your practice can develop quick Good Faith Estimate forms to help you provide a Good Faith Estimate whenever it is needed. For example, you could create a form letter that lists your GFEs for each type of encounter, and then send that form to families through the Patient Portal.
VFC and TOS Cash Discounts: If your practice administers VFC or other reduced-rate immunizations, you may wish to account for that difference in your GFEs. Similarly, if your practice offers a discount for payment received at time of service, you can include that information on your GFE forms.
While your practice is not required to provide an itemized charge list, many practices are choosing to do so in order to define the amounts included in the Good Faith Estimate.
Olney Pediatrics in Maryland and North Augusta Pediatrics has shared a sample Well Visit form (charge amounts have been removed for this image), which allows them to quickly create a GFE by checking off the details for a scheduled encounter and entering a total:
You can download a Microsoft Word file version for use at your practice.
The AAP has also created several sample forms:
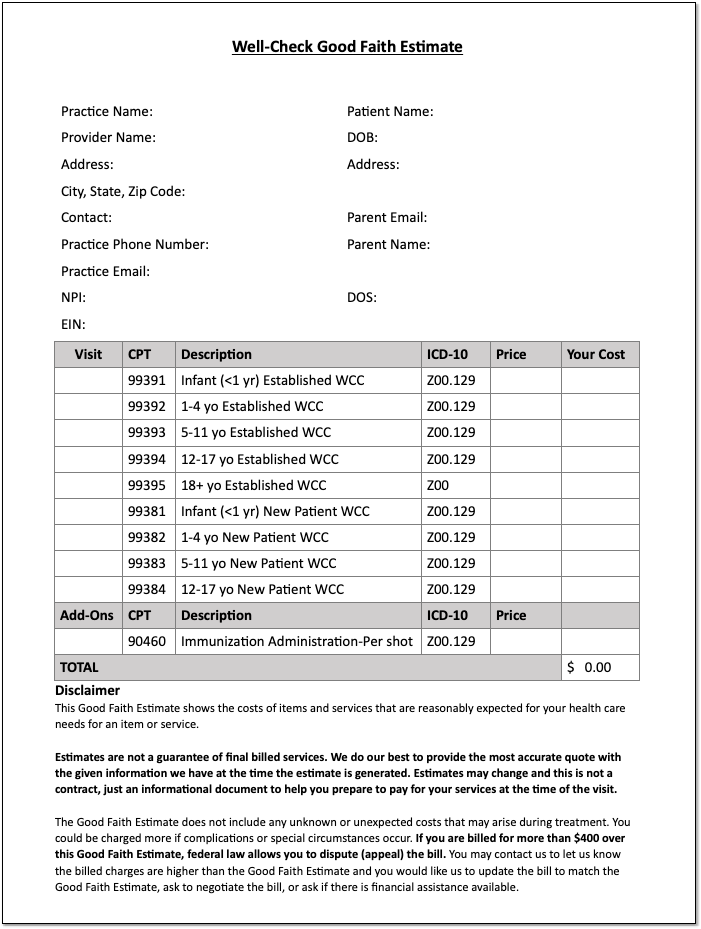
In order to provide an accurate GFE for lab work that may occur outside of your practice, you may want to contact your lab companies. The AAP created a sample letter:
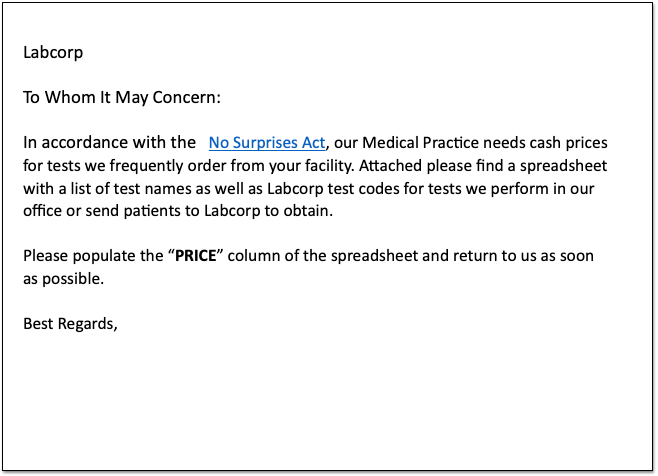
You can access the above AAP’s materials through the SOAPM website.
Contact PCC Support for help setting up your Good Faith Estimate forms.
Configure the Immunization History
The Immunization History appears in the History section of patient charts and in the Immunizations section of visits, phone notes, and portal messages.
The Immunization History has two parts: Vaccines and Diseases. The Vaccines section shows patients’ vaccine history, organized by immunization name. The Diseases section shows patients’ history of vaccine-preventable disease.
You can customize the default layout of the Immunization History to optimize it for all users and patients at your practice.
Configure the Vaccines Section
You can configure the layout and default display functionality of immunizations in the Vaccines section of the Immunization History.
Open the Configuration menu in PCC EHR and select the Immunizations option.
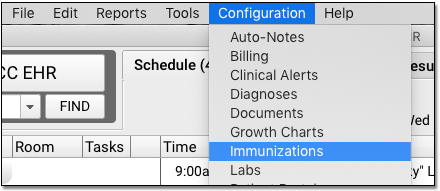
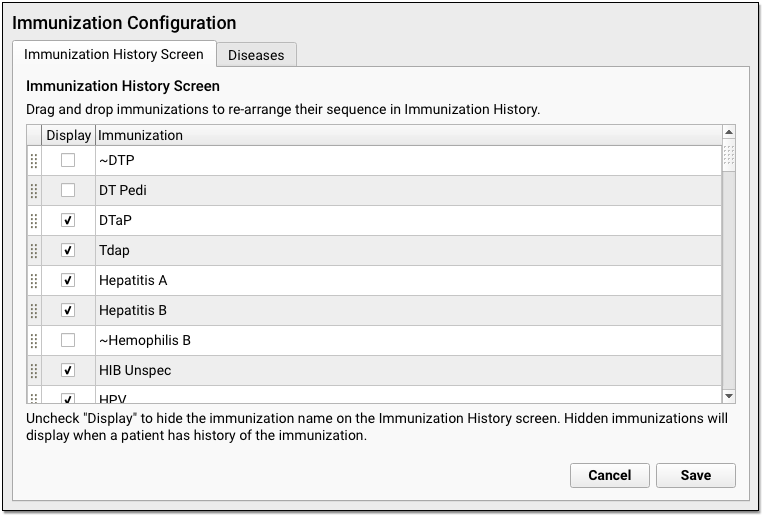
On the Immunization History Screen tab, click and drag the immunization rows to reorder them. Immunizations display on the Immunization History in the order you establish here.

To display immunizations by default on the Immunization History, check the “Display” box. Immunizations configured this way display as rows on the Immunization History even when patients have not received them.
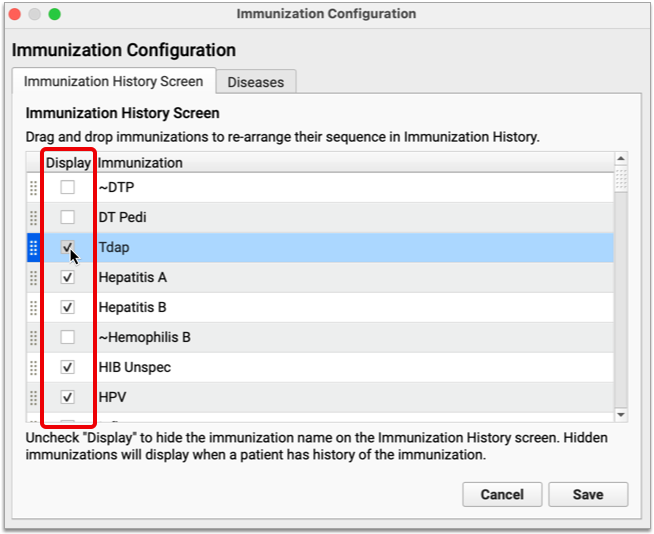
Immunizations where the “Display” checkbox is blank remain hidden from the Immunization History until patients have received them.
When you have finished configuring the Vaccines section of the Immunization History screen, click “Save” to commit your changes and exit the tool.
Call PCC Support to Edit Immunizations or Add Combination Vaccines: The list of available immunizations in PCC EHR comes from your Immunization and Diseases table and other configuration under the hood in the Practice Management window. Contact PCC Support for help editing immunizations or adding new combination vaccines.
Configure the Diseases Section
You can customize the layout of diseases on the Immunization History screen.
Open the Configuration menu in PCC EHR and select the Immunizations option. Once in the configuration tool, click the Diseases tab.
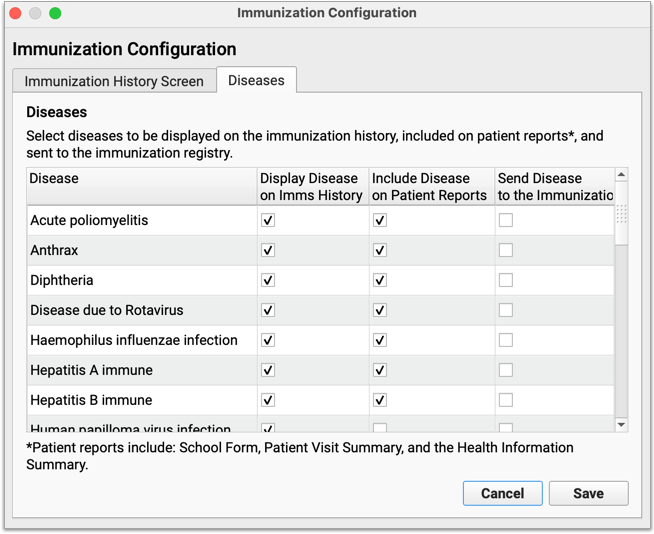
On the Diseases tab, you can configure which vaccine-preventable diseases display on the Immunization History and elsewhere in PCC EHR. Vaccine-preventable diseases that are checked off in this configuration pane only display for patients who have received a diagnosis.

Check with PCC Support About Immunization Registry Configuration: Not all registries accept vaccine-preventable disease information for patients. If you would like to learn whether the registry with which you interface accepts this information, contact PCC Support to speak with an immunization registry specialist.
When you have finished configuring the Diseases section of the Immunization History screen, click “Save” to commit your changes and exit the tool.
Canceling and Rescheduling CHADIS Appointments and Moving CHADIS Results
When your patients and families complete CHADIS questionnaires,the results are automatically assigned to the patient’s upcoming visit. Canceling a visit will also cancel those orders, making CHADIS results unavailable in the patient’s history or in a newly scheduled visit. Use the following workflow and suggestions to ensure that assigned and completed questionnaires are saved and available in a patient’s chart.
Whenever possible, reschedule an appointment instead of canceling it. Rescheduling maintains the same appointment data, so completed CHADIS questionnaires are moved to the new date along with any other information added to the visit where it was originally scheduled.

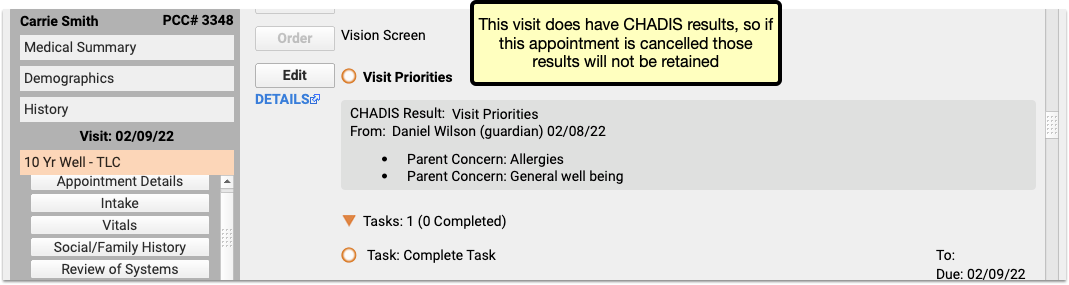
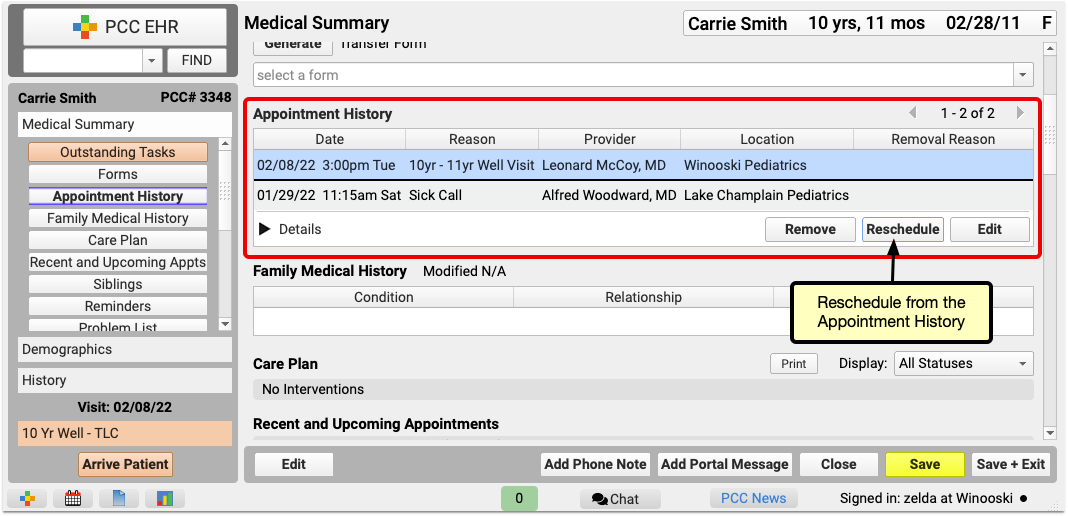
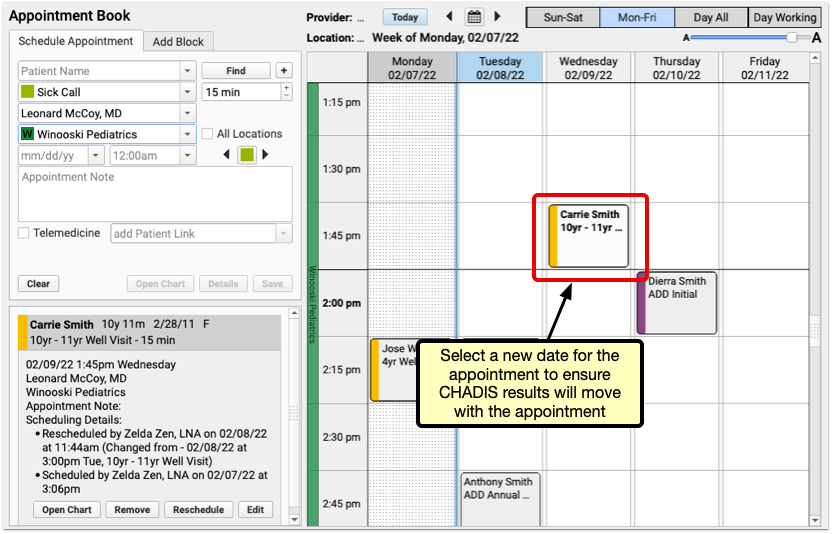
If an appointment with CHADIS results needs to be canceled, or will be rescheduled for a future date yet to be determined, cancel the appointment. When the time comes to schedule the replacement appointment, restore the appointment through the patient’s appointment history, and then reschedule it as above.
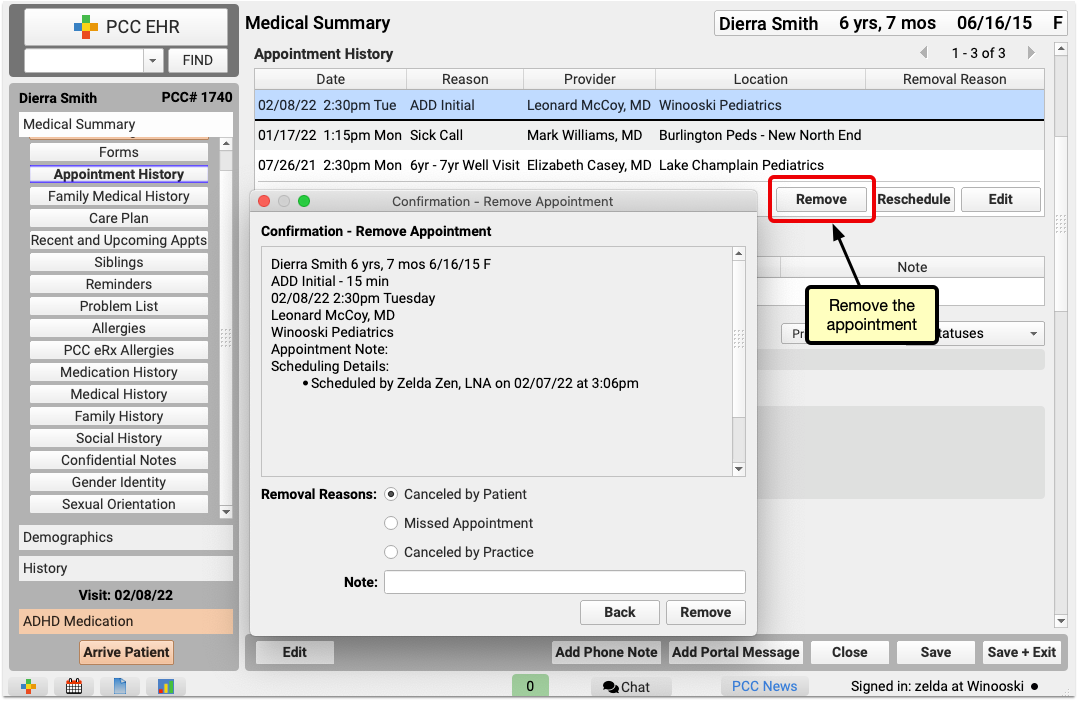
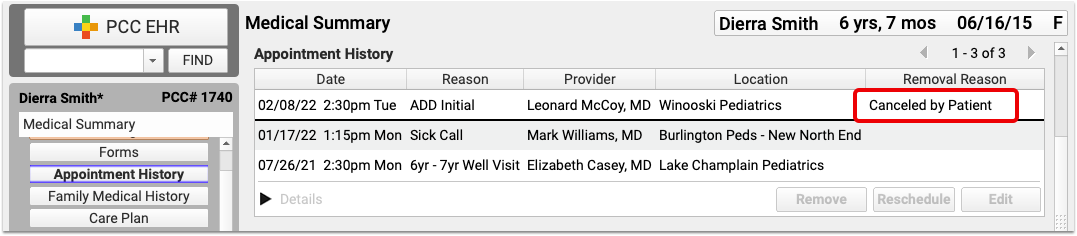
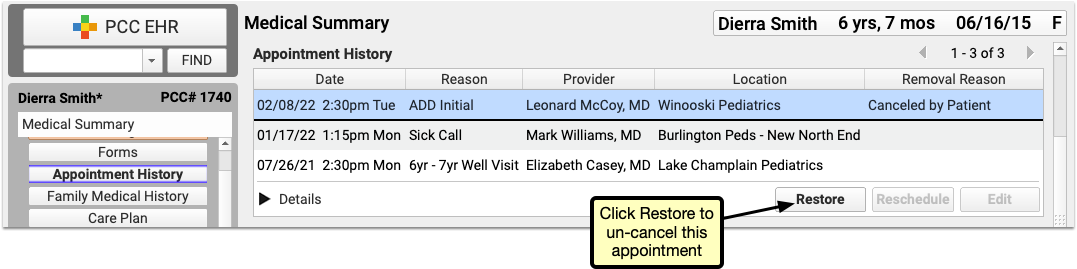
Rescheduled visits are not counted as canceled visits. If you want to mark a visit as “canceled by patient”, but still move the CHADIS results to a replacement appointment, then reschedule the visit with the CHADIS questionnaire, as above, and then create a new visit for the original time and date, and cancel that one. The canceled and the rescheduled visit will appear in the patient history, with the earlier one marked as canceled.
Other tips
- Any appointment scheduled for the following seven days could include CHADIS results, so be sure to check for results before canceling any appointments in the near future.
- CHADIS results will trigger the orange ball in the patient’s history and the EHR schedule queue, but there’s no way to tell that results have arrived in the Appointment Book, so it’s best to manage cancellations and rescheduling through the Appointment History component in the patient’s Medical Summary.
- If an appointment with CHADIS results is canceled instead of rescheduled, there’s no way to move that data to another appointment. The only option is to print the results to the EHR then attach the document to the new appointment.
- CHADIS will not reassign the same questionnaires to a patient twice within a number of days, (usually 14, though that can be changed through the CHADIS web interface). If an appointment with CHADIS results is canceled, and a new appointment is scheduled outside of that date range, then CHADIS will reassign the questionnaires and the user will need to complete them again.
Move CHADIS Results to a Different Encounter
When a patient misses or cancels an appointment after completing CHADIS questionnaires, you can move those CHADIS results and orders to another encounter, so that no results are lost, and no users need to repeat any questionnaires.
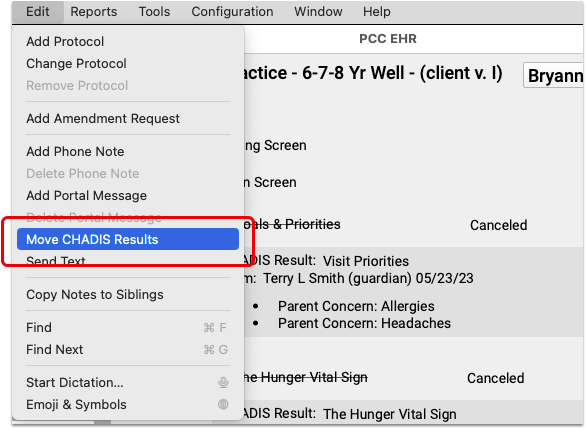
When viewing a visit that includes CHADIS orders and results, select “Move CHADIS Results” from the Edit menu. Move CHADIS Results opens a window with a drop-down menu including the patient’s visits and the option to create a new Unsolicited Chadis Results encounter.
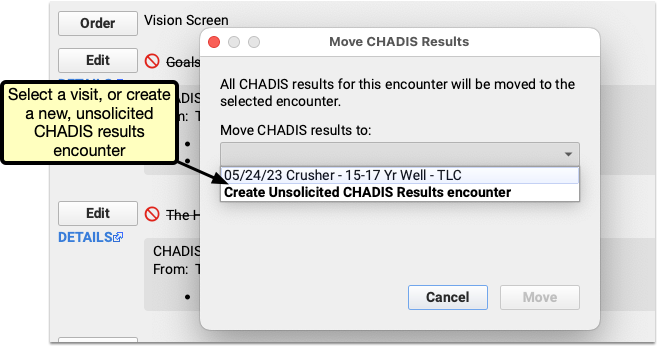

After making your selection and clicking move, you’ll have the opportunity to confirm your choice, or click “Back” to return to the previous visit selection window.
Once you confirm your selection by clicking “Move” the orders and results will appear in the visit you selected.
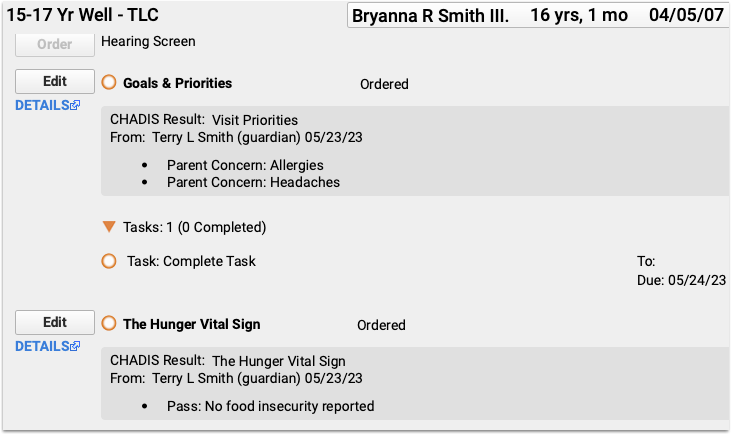
Use a Billing Service with PCC
Some pediatric practices use a billing service instead of (or in addition to) in-house billing staff.
PCC maintains an index of billing services that have used PCC in the past, along with a quick “things to consider” Billing Service Shopping List for practices who are looking into using a billing service.
Billing Service List
Not a Recommendation or Endorsement: PCC makes no recommendation for particular billing services. Inclusion on this list means we know that the service has used PCC software at some point, and that they’ve shared their contact information with us.
| Name | Contact | Phone | Website | Business Address | |
| Altus Pediatric Billing | Emily Floyd | emily@altussolutionsgroup.com | (972) 607-4130 | https://altuspediatricbilling.com/ | 7200 State Highway 161, Suite 350, Irving, TX 75039 |
| AM Med Solutions | Sunny Gazahi | sg@ammedsol.com | 888-811-5391 x100, Fax: 1-646-292-5178 |
www.ammedsol.com | 247 Prospect Ave, Suite 4C, Brooklyn, NY 11215; 1368 N US 1, Suite 404, Ormond Beach, FL 32174 |
| Bookkeeping & Business Services, LCC (BBS) | Diane Richards | info@bbs1040.com, drichards@bbs1040.com | (978) 794-1919 | Bookkeeping & Business Services, LCC | 302 Broadway, Methuen, MA, 01844 |
| IPMSO Remote Biller | Susanne Morgana Brennan | brennan@ipmso.org | (877) 774-7726 (877-771-PRCM) | The Verden Group | 48 Burd St Suite 104 Nyack, NY 10960 |
| Medical Solutions | Stephanie Dubert | info@sotxbilling.com | (956) 630-2225 | Medical Solutions | 612 Nolana, Suite 330, McAllen, TX 78504 |
| PedsOne | Tim Rushford | tim@pedsone.com | (866) 371-6118 | PedsOne | 10 East Allen Street, Suite 100 Winooski, Vermont 05404 |
Billing Service Shopping List
PCC created a Billing Service Shopping List guide in 2021. It includes questions to ask and things to consider when you research a billing service.
Contact PCC
Get in touch with PCC if you have questions about our policies and procedures for working with billing services. If you begin working with a billing service, let us know!
You can find other PCC clients who use billing services on PCC Community.
Share and Print Lab Results Through the Patient Portal
Your patients and families can download and print lab results from PCC’s Patient Portal, so there’s no need to upload COVID-19 and other test results manually. Portal users can access test results from their phone or computer, to print and share wherever they’re needed.
When you check “Include on Patient Reports” while ordering a lab in PCC EHR, the lab order automatically appears in the Patient Portal in the patient’s Labs section, and in the lab component of the visit itself.
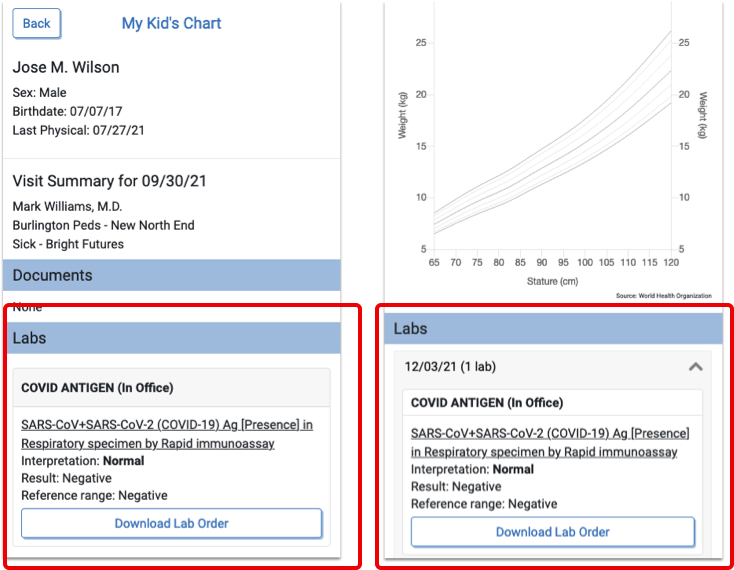
The Download Lab Orders button generates a PDF file of the lab results. The PDF is very similar to the lab order details view in PCC EHR, though some minor items are changed to make the lab results clearer and easier to read.
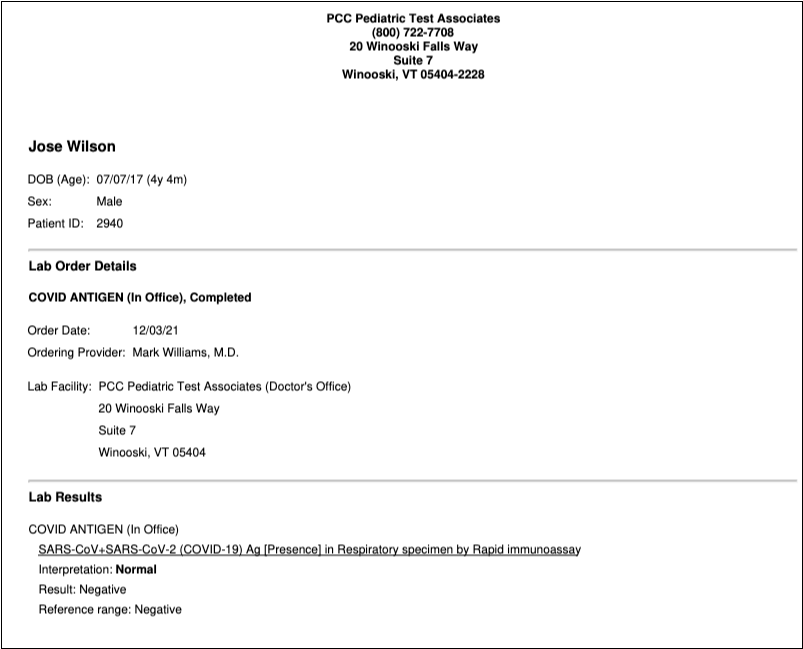
Portal users can save the PDF to their phone or computer, or print it and have it in hand for schools, camps, and any other occasion where test results are needed.
Configure Forms in PCC EHR
The Forms Configuration tool in PCC EHR allows you to create and manage your own auto-filling forms, handouts, policies, and letters, that you can edit and generate more easily.
Watch a Video: Learn how to create a form from scratch, or clone and edit a form with the Create a Form and Clone and Edit a Form videos.
Create or Edit a Form
Use the Forms Configuration tool to build, preview, and publish your own auto-filling forms, handouts, policies, and letters.
Add a New Form
To create a new form letter from scratch, add a form in the Form Configuration tool.
Open the Forms Configuration Tool
Select “Forms” from the Configuration menu to open the Forms Configuration tool
Choose a Form Type
Choose the type of form you want to create. Each type of form has a specific set of variables, based on the recipient of the form.

- Patient forms are generally directed to the family, school, or specialists. These might include excuse forms, asthma action plans, referral forms, and so on.
- Account forms are directed to the account holder (the guarantor or custodian). These are usually billing- or insurance-related forms such as past due letters, address verification letters, or policy-related mailings.
Add a New Form
Click the “Add” button to create a new patient or account form.
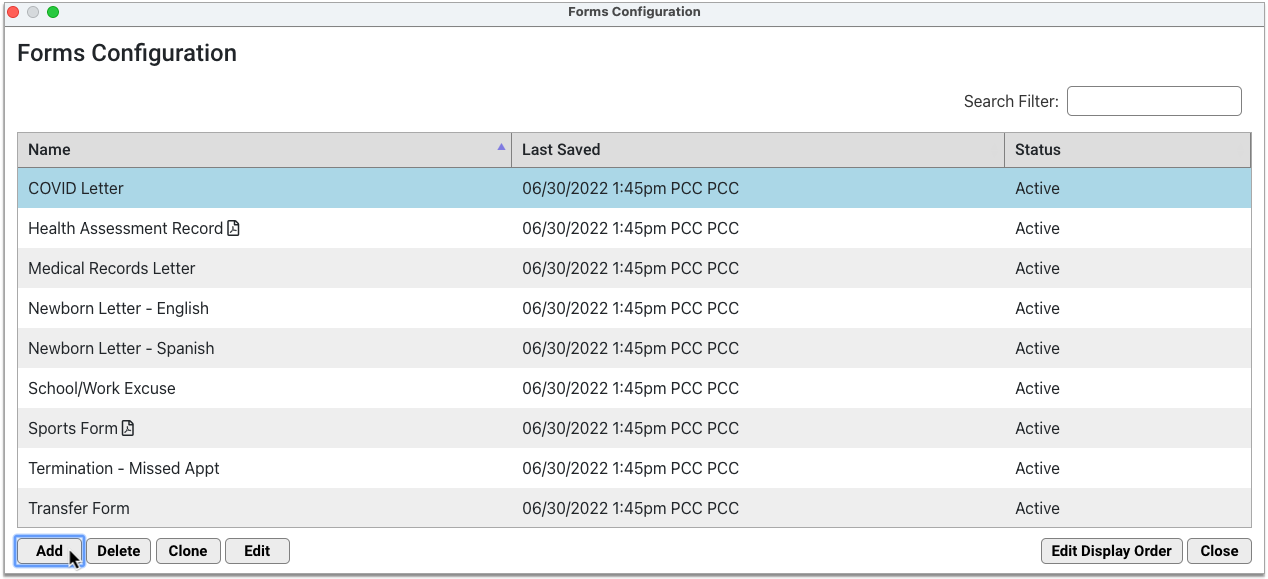
The default workspace is an 8.5 x 11-inch page with 1-inch margins.
Name the Form
Give the form a unique name.
Other users at your practice will see this name on the Patient or Account Forms component drop-down list n the patient’s chart. The name will also be used as the default document title when you generate the form.
Add Letterhead
To add your header or footer (or both) to any form, click the header or footer icons.
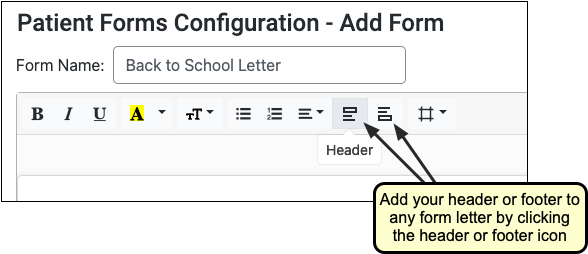
Compose Text
Click on the workspace and type or copy and paste to add text.
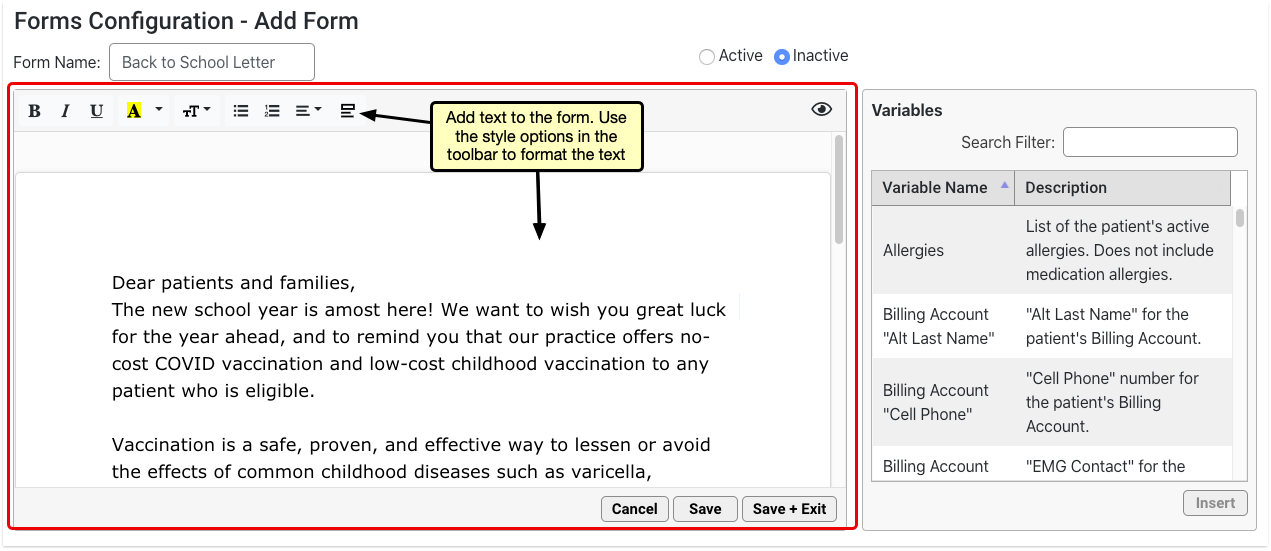
Use the style options in the toolbar to customize the font size, weight, and color, as well as the text alignment and list style. Only one font is available at this time.
Search For and Insert Variables
Use the Variables pane to find and insert variables. Double-click on any variable to insert it onto the form, or select the variable and click the “Insert” button.
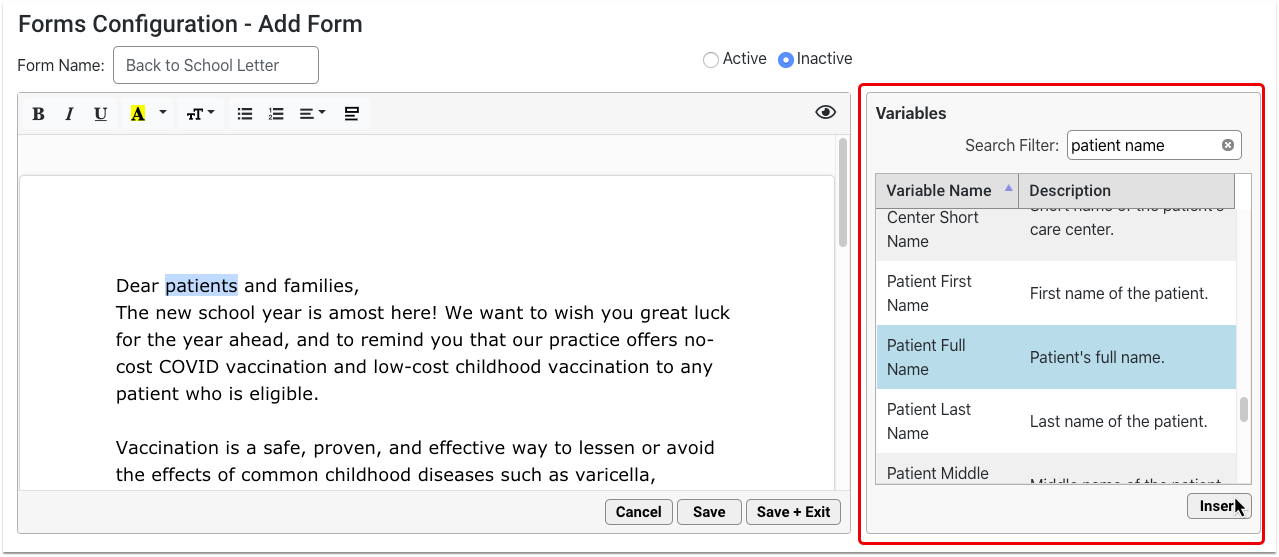
The variable inserts where your cursor is placed on the form.
You can optionally add variables using the variables shortcut. To learn more, read Use the Variables Shortcut.
Fill Decision Variable Fields As Needed
Click on orange variables to fill out the required field in the options pane.

Add Response Variable Prompts As Needed
Configure each Response variable with a prompt. The prompt should tell the person filling out the form what kind of information to include in their response.
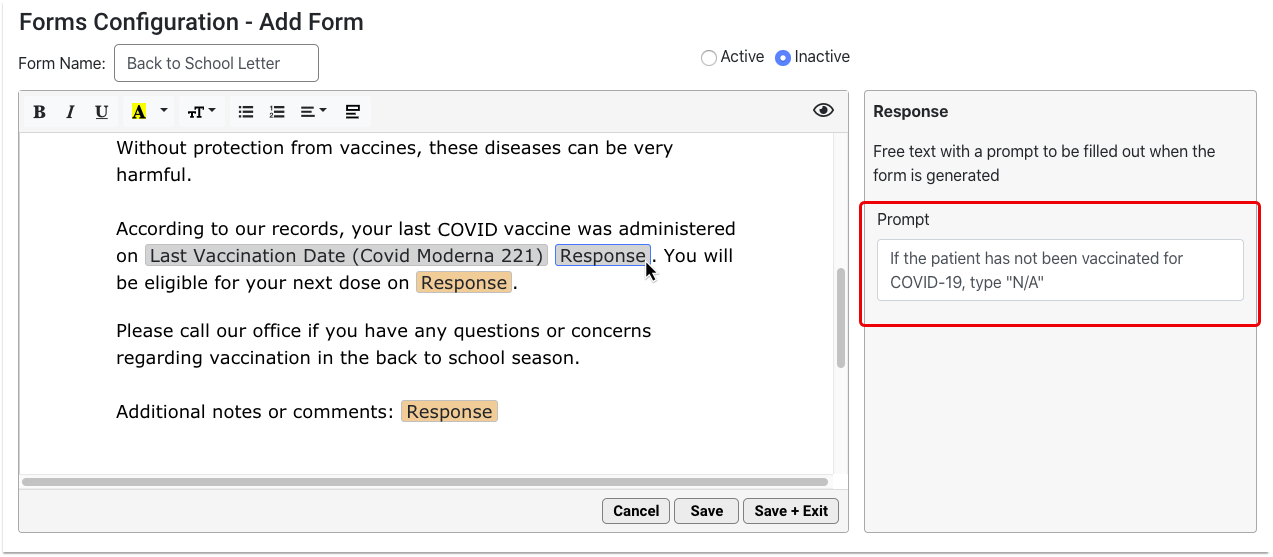
Add a Provider Signature Image and Related Variables
Find and insert a provider signature image variable wherever you want the selected provider’s signature to display.
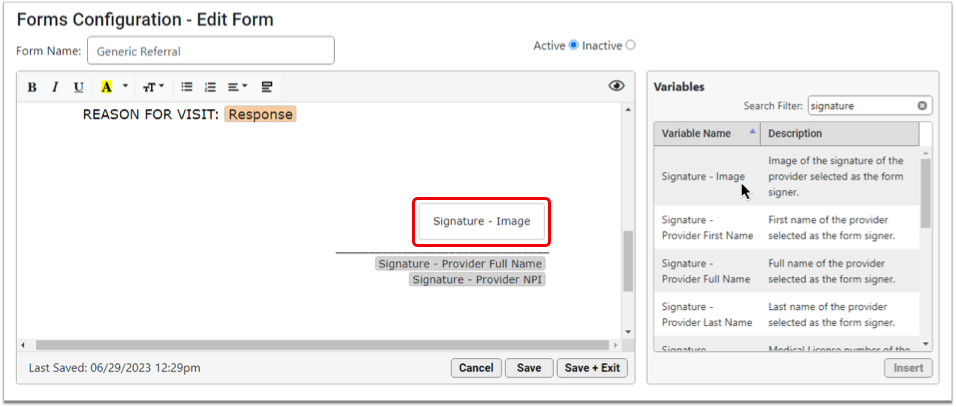
Only one provider’s signature image can be selected at the time of form generation. You can add the signature provider’s full name, NPI or Tax ID in addition to the signature image.
To learn more about configuring provider signatures, read Configure Provider Signatures.
Adjust Margins
Click the icon to view the margin size choices and, optionally, adjust the margins.
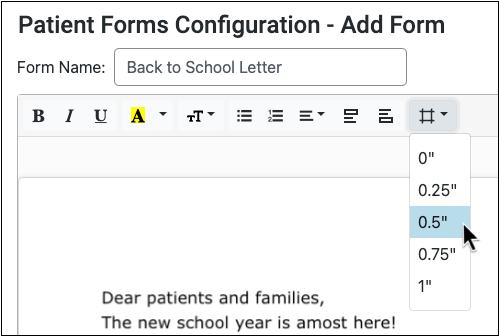
When you select a different margin size, the form updates in real time.
Preview
Click the eye icon in the top right corner of the form to preview it at any time.
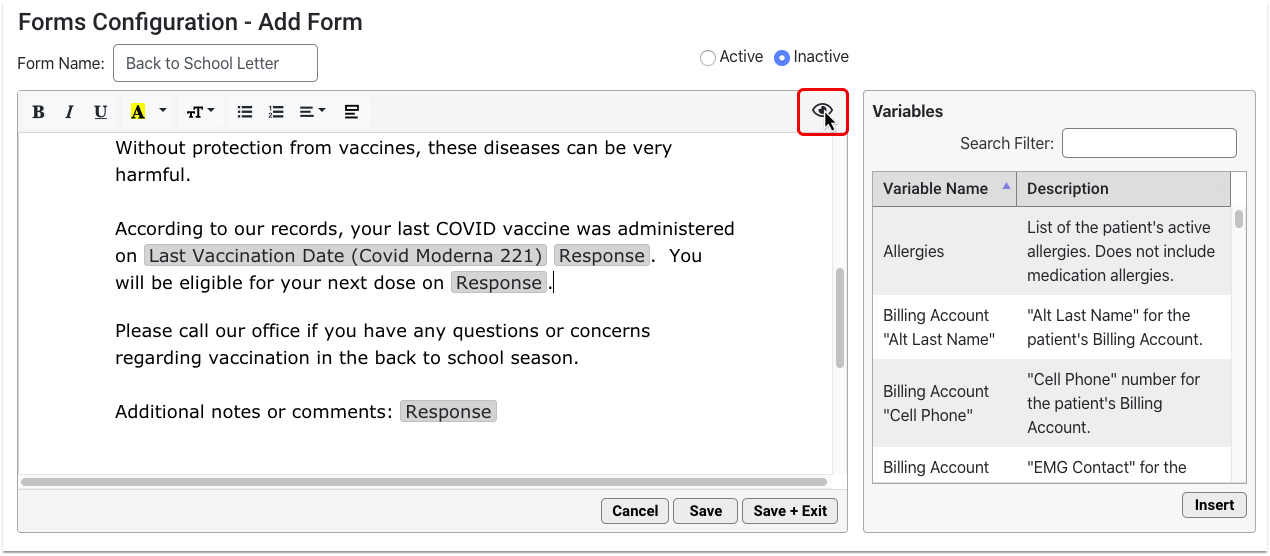
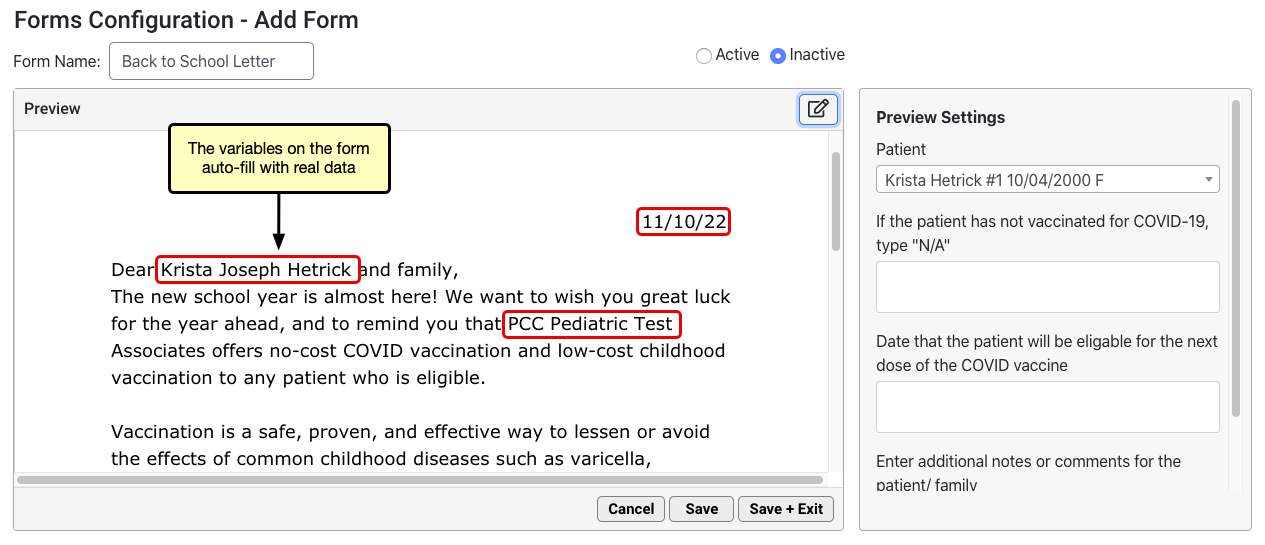
The form renders in real time. Variables auto-fill with real data. Where there is no data to auto-fill, the variable renders as blank.
Make the Form Active
When the form is complete and ready to be added to the Patient or Account Forms component in the patient’s chart, change its status to Active in the top right corner of the form configuration window.
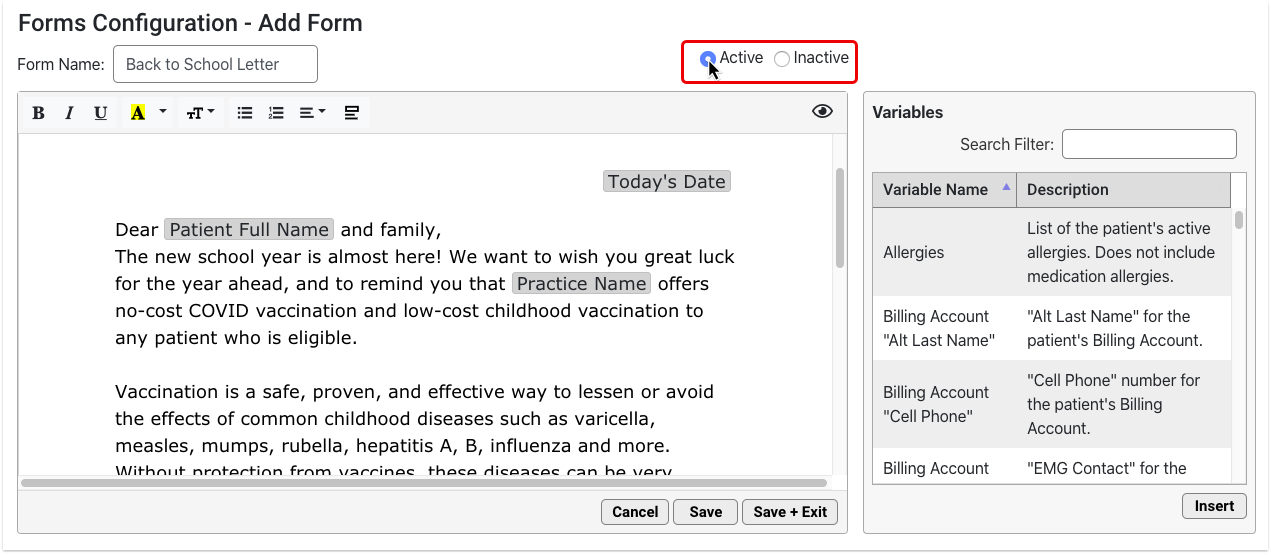
New forms start out as Inactive by default to prevent other users at your practice from generating them before they are ready.
Save the Form
Click “Save” or “Save + Exit” to save your work.
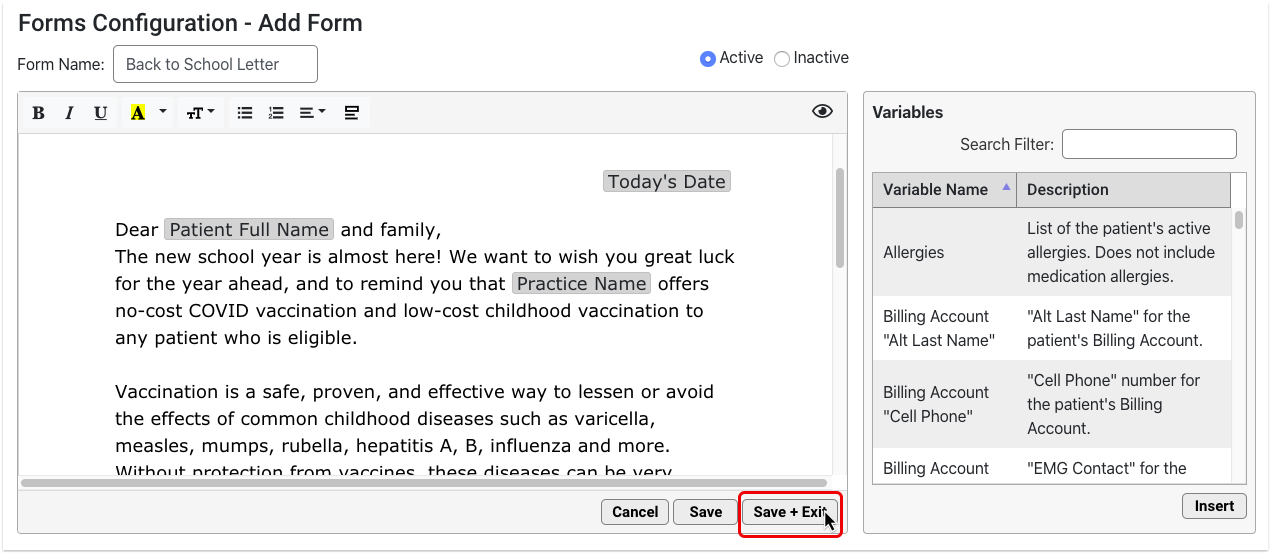
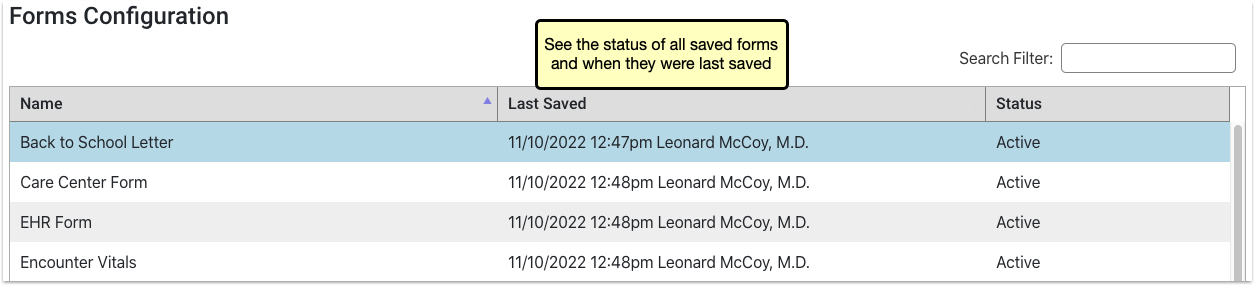
A “Last Saved” timestamp at the bottom of the form editor tells you the last time the form was saved.
Optionally Test Printing
If your practice generates form letters that have unusual formatting, use response variables or other special features, you may want to confirm that they print as expected.
Clone an Existing Form
When you need to create a variation on an existing form, clone a saved form instead of starting from scratch. Your practice can create a base form, such as a simple letter with today’s date and demographic variables, to reduce the time you to spend composing new forms.
To make a copy of a saved form, select it and click the “Clone” button.
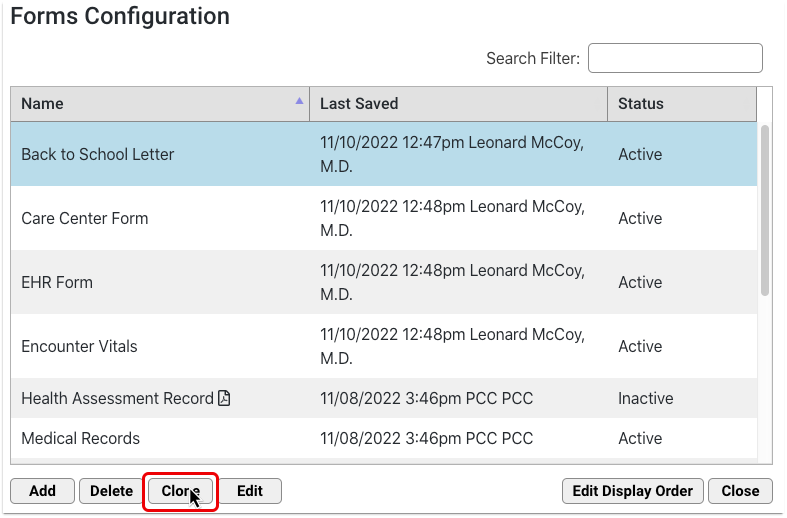
The copy opens in the form editor, where you can start making changes right away without affecting the original form.
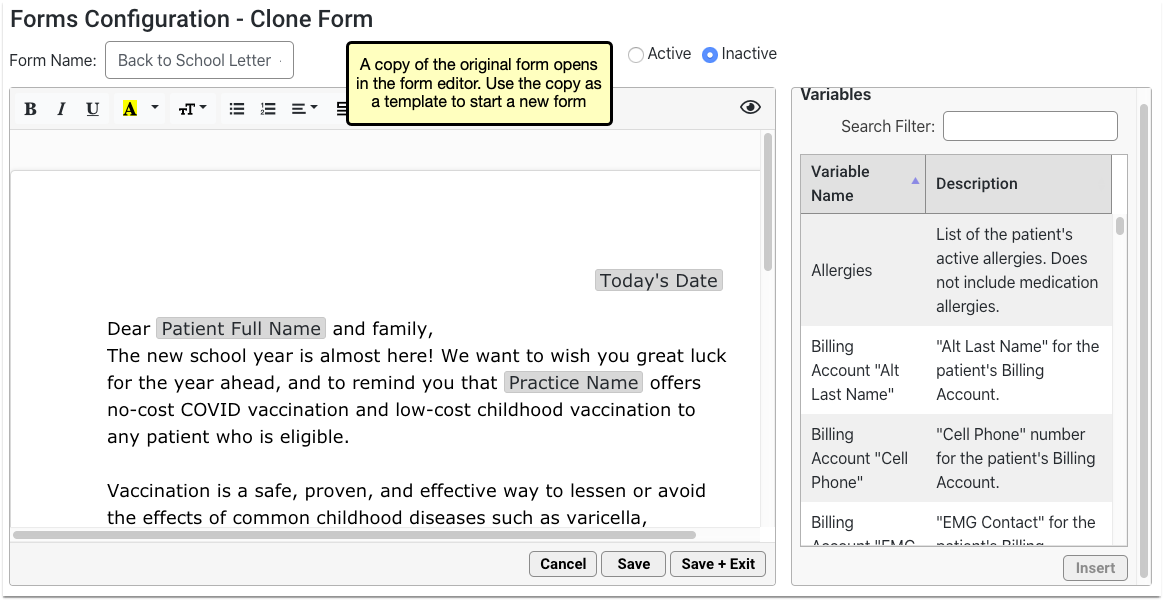
Rename your form and make your edits, then save the copy as you would a new form. Forms that are not renamed will be saved with “Copy” at the end of the original form’s name.
Edit or Delete a Form
You can update and make changes to saved forms at any time.
Find the Form
Use the Search Filter to narrow down the list or click the column headers to change how the list is sorted.
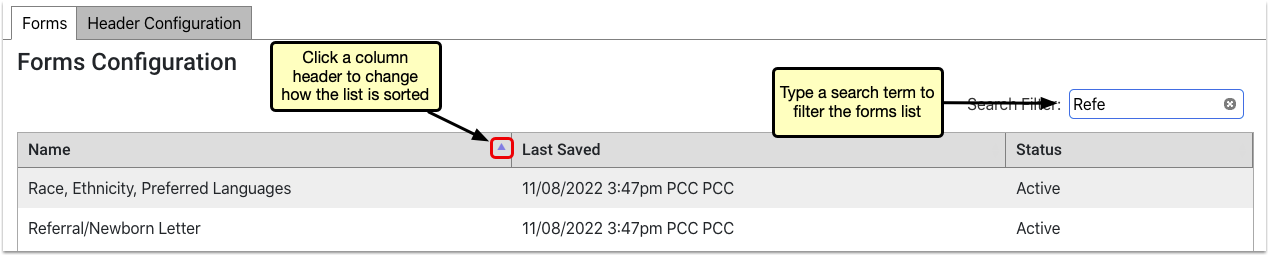
Open the Form
To open a saved form, double-click it or select it and click the “Edit” button.
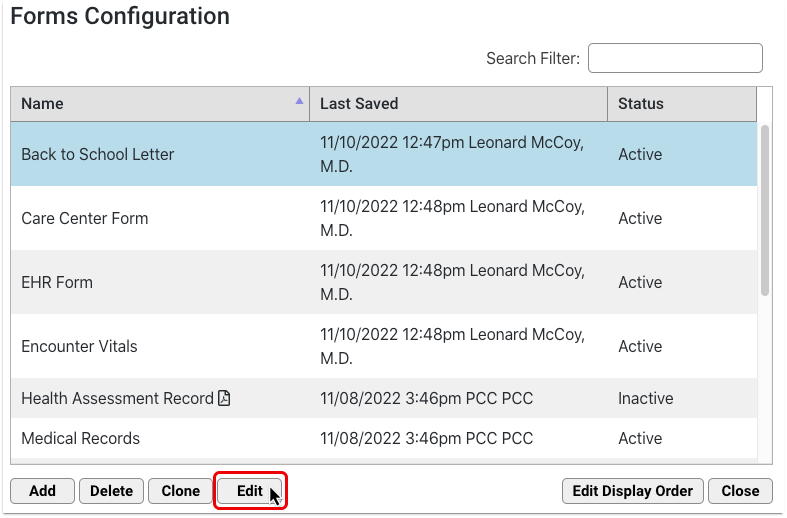
Edit the Form
You can make changes to your form name, text, formatting, variables and status.
To discard all changes to a form that you are currently working on, click the “Cancel” button.
Save the Form
When your edits are complete, click “Save + Exit”.
Optionally Delete a Form
To delete a saved form, select it and click the “Delete” button. This action is protected by a special user permission in the User Administration tool.
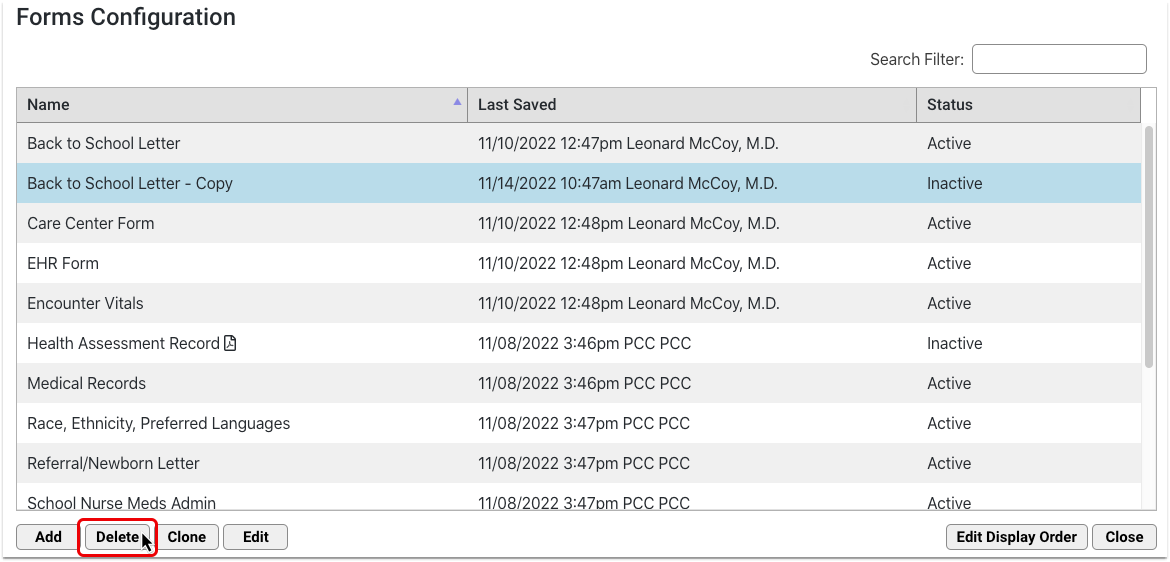
Deleted forms are removed from both the Forms Configuration tool and the Patient or Account Forms component. If you need to restore a form that was deleted by accident, contact PCC Support.
Generate or Print a Form
When you need to generate or print a form, use the chart-wide Patient or Account Forms component to generate a patient form, enter additional information as needed, and work with the form in the document viewer. Your practice can add the Patient or Account Forms component to any protocol ribbon in PCC EHR.

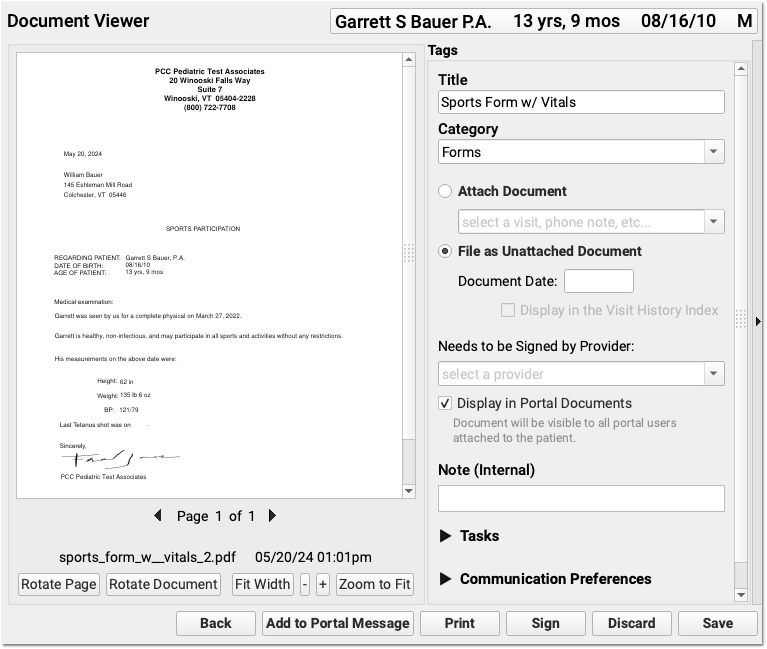
For more detailed information on how to generate forms in PCC EHR, read Generate Forms in PCC EHR.
Configure Variables
Variables are placeholders in patient and account forms that populate specific information when the form is generated. Some variables require further configuration.
- Simple variables auto-fill with patient data. Some simple variables are configurable.
- Decision variables require additional setup when creating the form in the Forms Configuration tool.
- Response variables require configuration when creating the form. These allow staff and providers to input text when the form is generated.
Click on any inserted variable to open its configuration options in the pane to the right of the workspace and follow the instructions in the pane. Contact PCC Support at 802-846-8177 or 800-722-7708 with any questions.

Configure Simple Variables
Most simple variables have no configuration options and only provide a description.
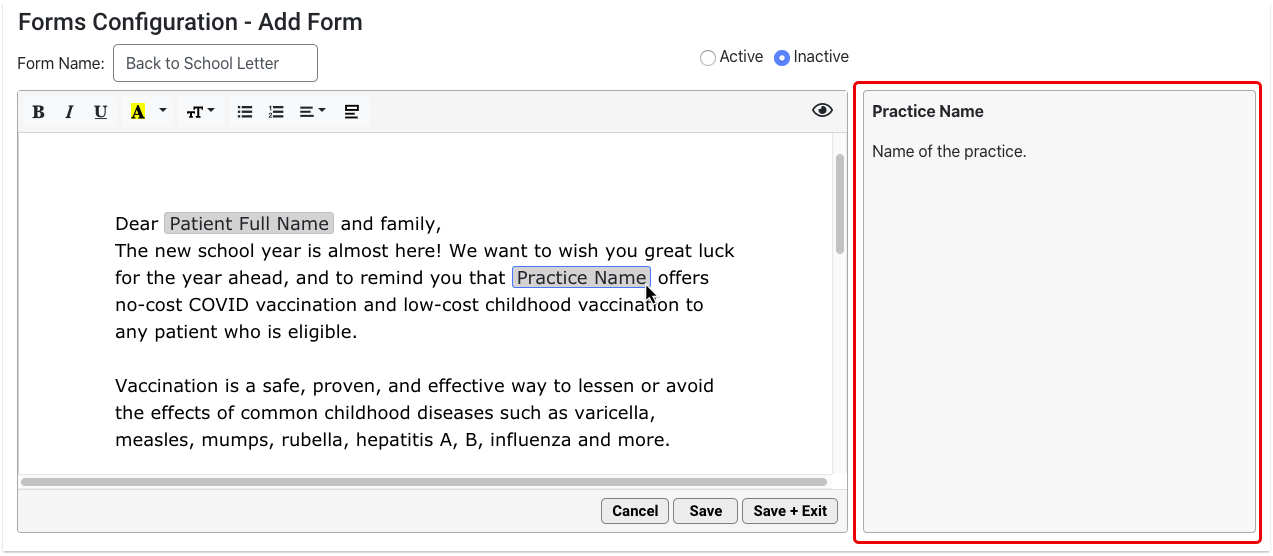
Some simple variables have formatting options. For example, you can customize the date format for date variables.

Configure Decision Variables
Decision variables turn orange as soon as you insert them. These require further configuration.
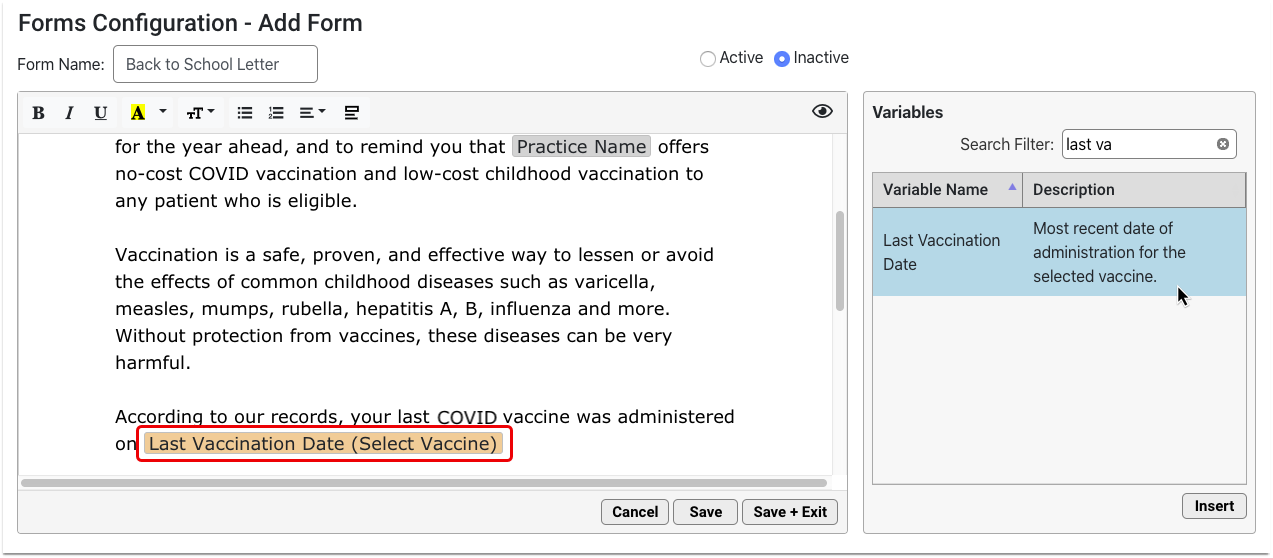
Click on the orange variable and fill out the required field in the options pane. The required field is also highlighted in orange.
Once configured, the orange highlight goes away and the variable name updates to reflect the settings you chose.
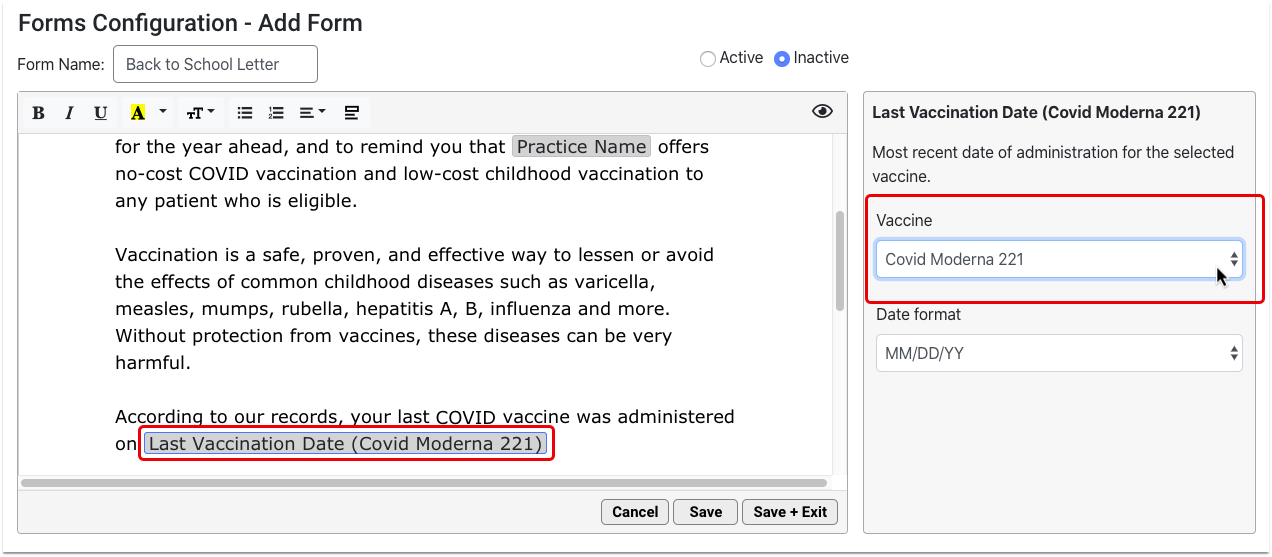
You must configure all orange decision variables in order for the form to work properly.
Configure Response Variables
Response variables prompt anyone who generates the form to add a free text response. That response populates onto the generated version of the form.
Add Response variables wherever you want providers and staff to contribute free text responses to the form.
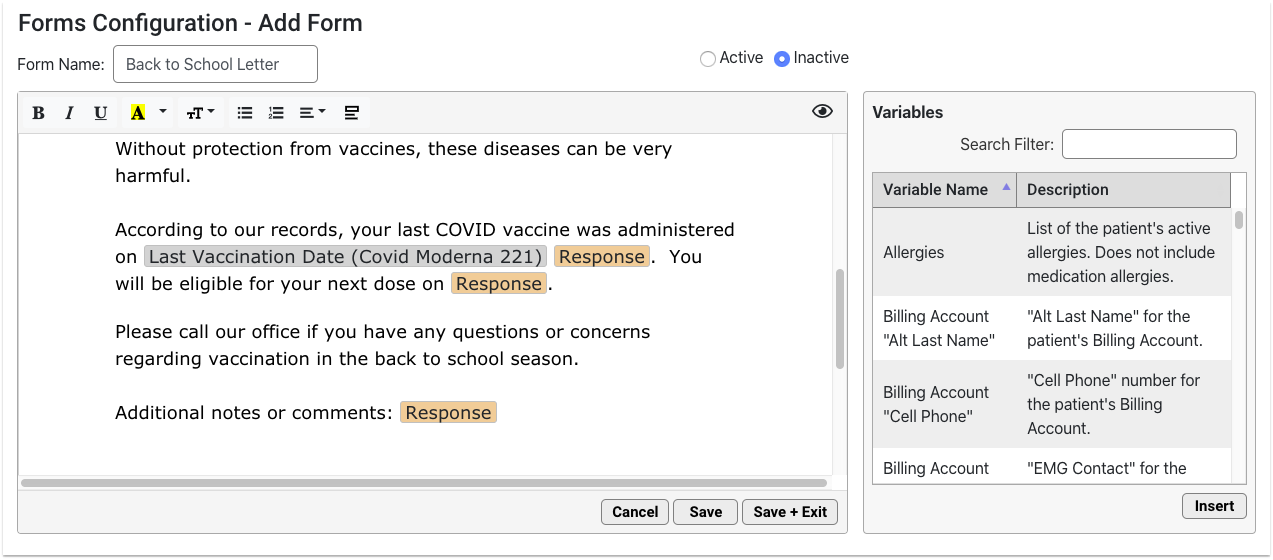
Configure each Response variable with a prompt. The prompt should tell the person filling out the form what kind of information to include in their response.
You can add as many Response variables as you want.
Use the Variables Shortcut
You can quickly insert a variable while you are typing in your form.
Open the Variable List
When you get to a spot in the text where you would like to insert a variable, type “<” to call up the quick-insert variable list.
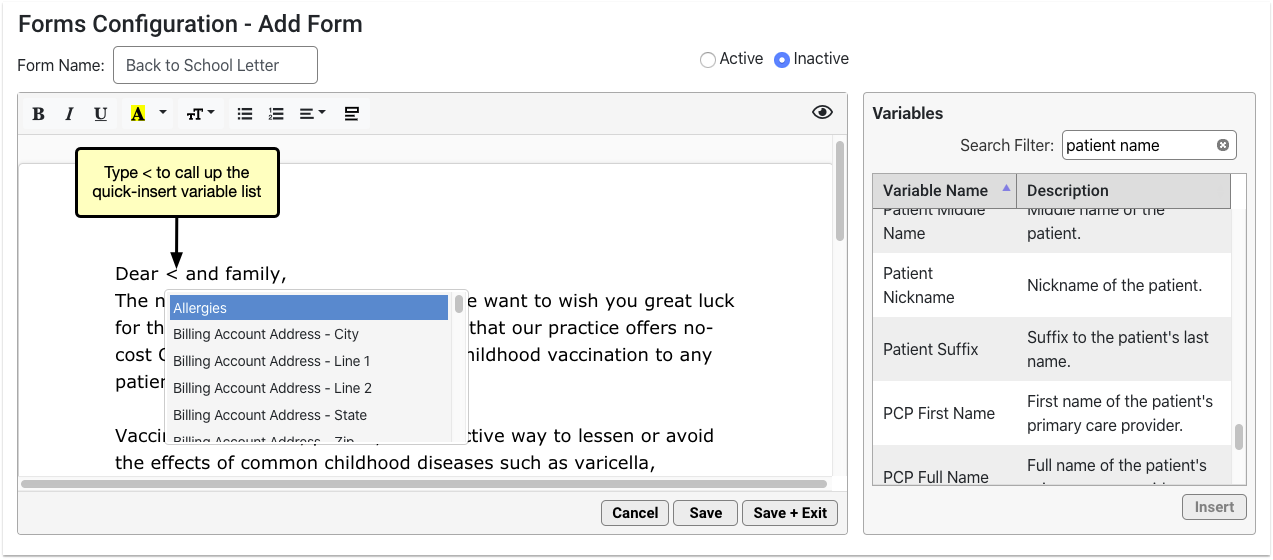
The quick-insert variable list is identical to the list in the Variables pane.
Narrow the List
Narrow down the list by typing a few letters of the variable you want to insert.
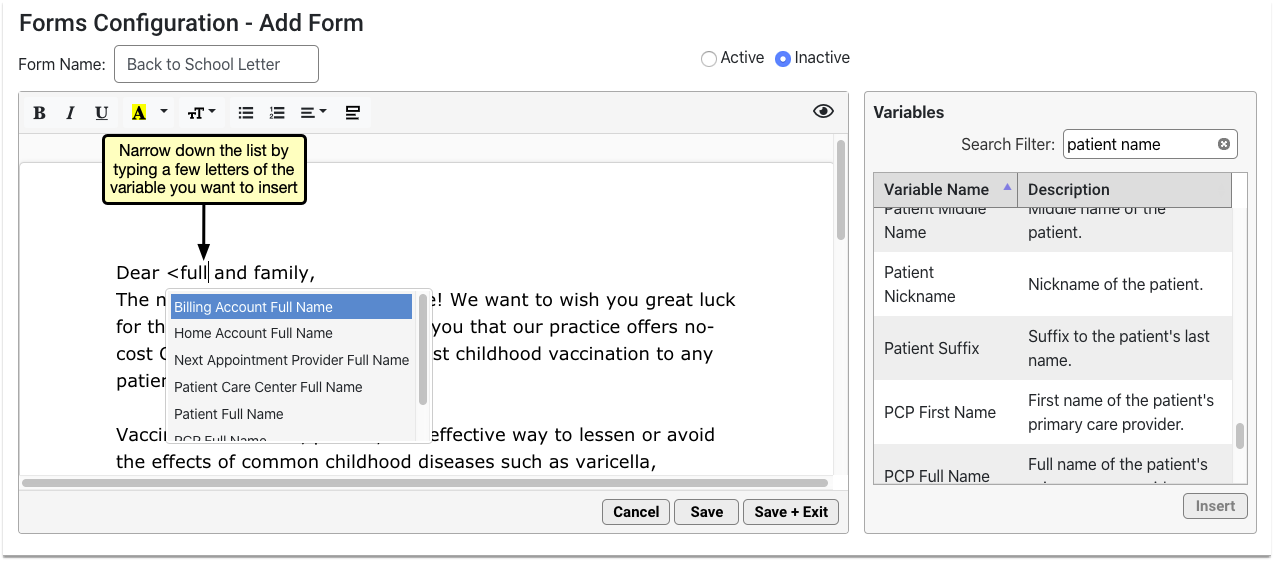
Select the Variable
Use your arrow keys or mouse cursor to select the variable you want from the list, then press the enter key or click to insert it onto the form.
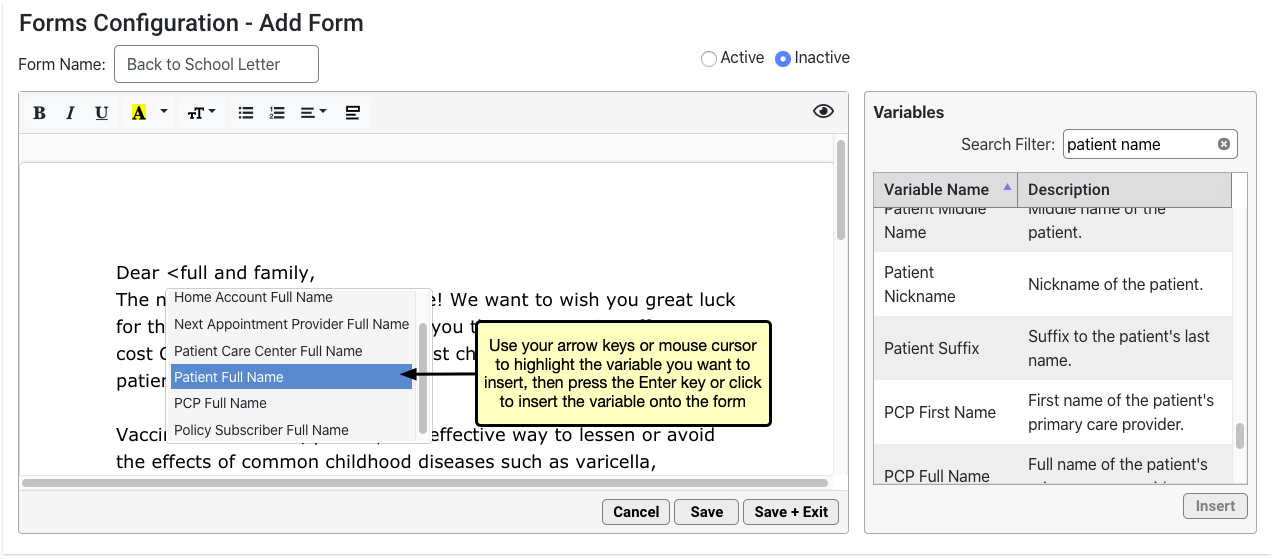
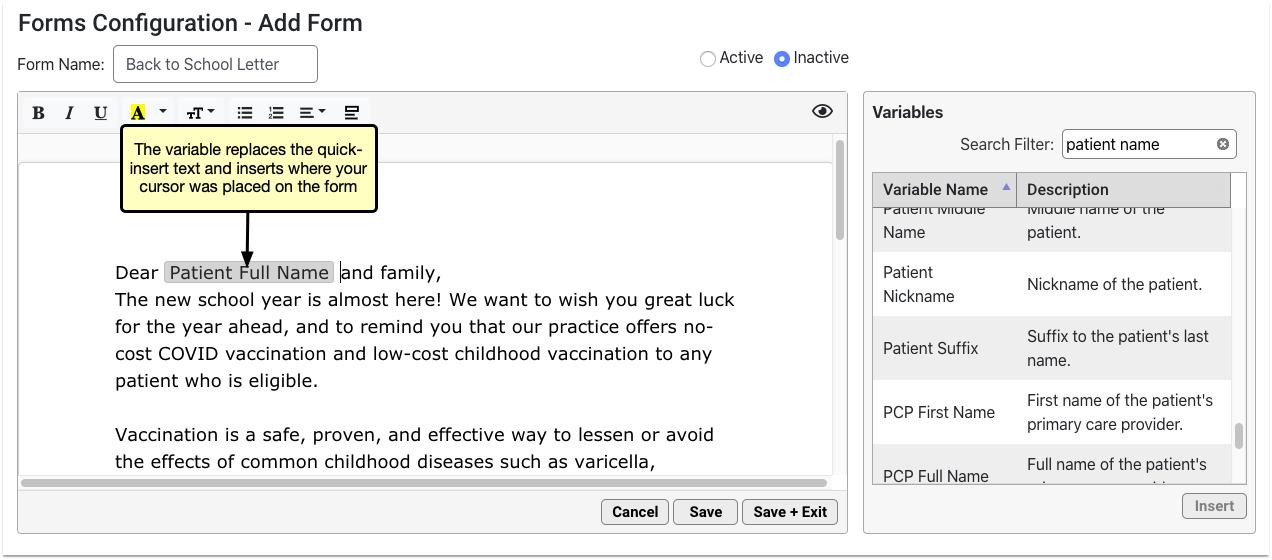
The variable replaces the quick-insert text that you typed.
Understand the Form Preview Screen
You can preview the form as you build it to see how it will look and feel when generated for patients or accounts.
Click the eye icon in the top right corner of the form to preview it.
The form renders in real time. Variables auto-fill with real data. Where there is no data to auto-fill, the variable renders as blank.
The data comes from the patient or account that is selected in the Preview Settings pane. Anyone using the Forms Configuration tool can change the selected patient or account at any time. Preview remembers the patient or account that was most recently selected by any user in the Forms Configuration tool.
If the form includes Response variables, you can test out how providers and staff will interact with them. Read and respond to the prompts in the Preview Settings pane.
As you type responses, the text appears inline on the form.
The response boxes and the form itself grow to accommodate the response text.
When you have finished previewing the form, click the pencil and paper icon in the top right corner of the form to return to edit mode.
You can switch between preview and edit modes as often as needed.
Customize Your Letterhead
Configure your letterhead in advance of composing forms so that you can add a header or footer to any form with one click. Letterhead in PCC EHR consists of one header option and one footer option. Configuration is applied to all forms that contain a header or a footer.
Open the Letterhead Tab
To create a new header and footer, open the Letterhead tab.
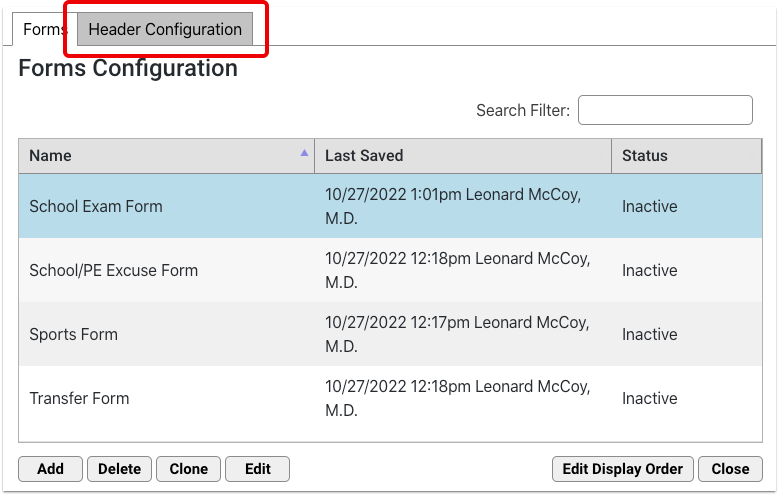
Add Variables or Text
Insert variables using the Variables list or the quick-insert shortcut list. You can type or copy and paste text in your letterhead.
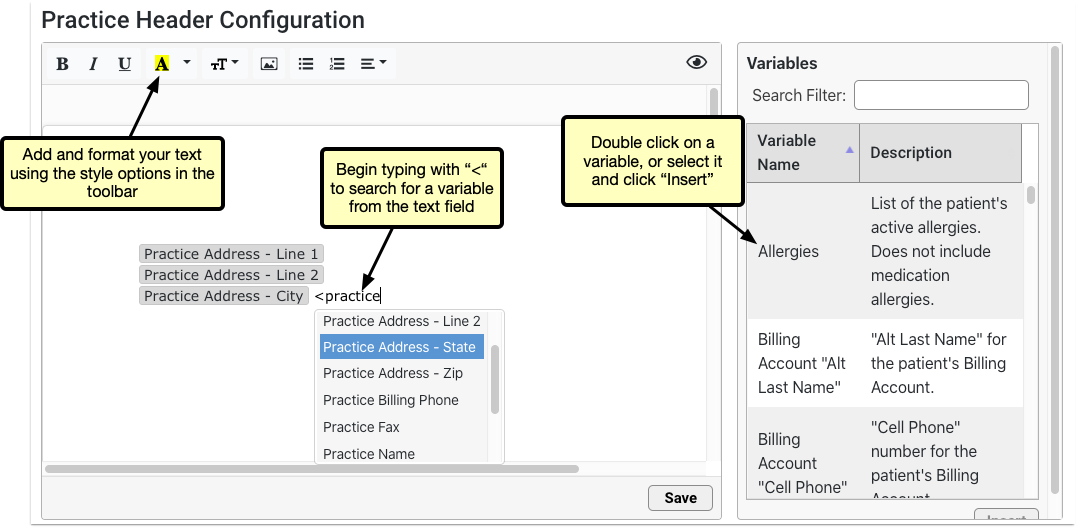
Upload a Logo
If you have a letterhead image or a logo, click the picture icon to upload it from your computer or enter the URL of the image.
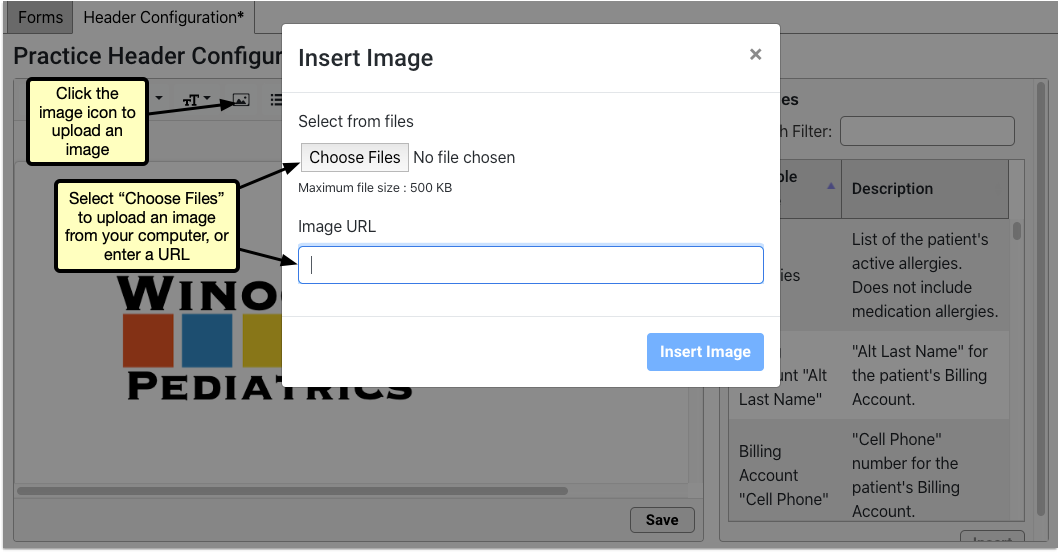
Optionally Resize or Format
Adjust the size, orientation, or text wrapping by clicking the image and selecting from the menu. Any variable or text can be resized or formatted using the toolbar options.
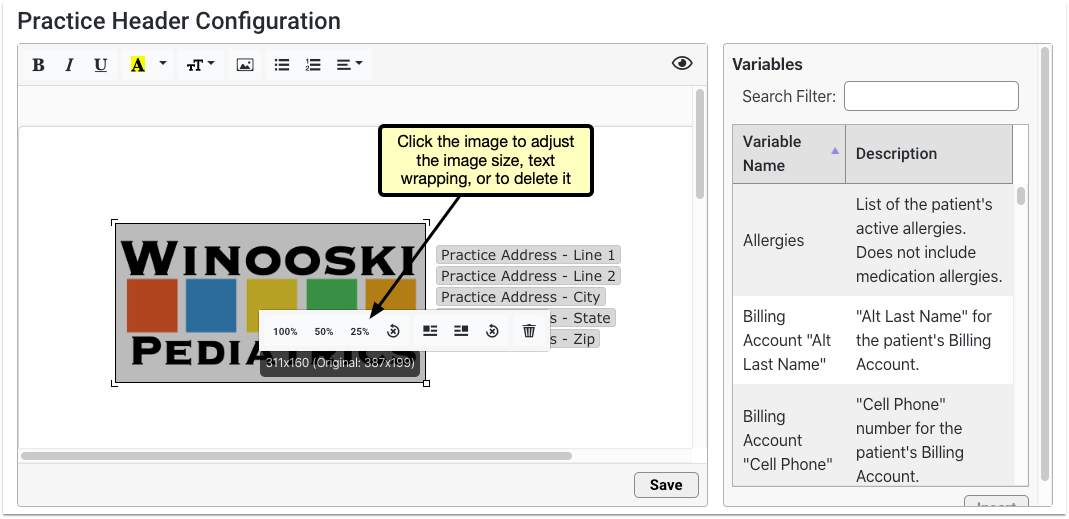
Optionally Adjust Margins
You can adjust the margins on your forms and practice letterhead to improve their appearance and make better use of space.
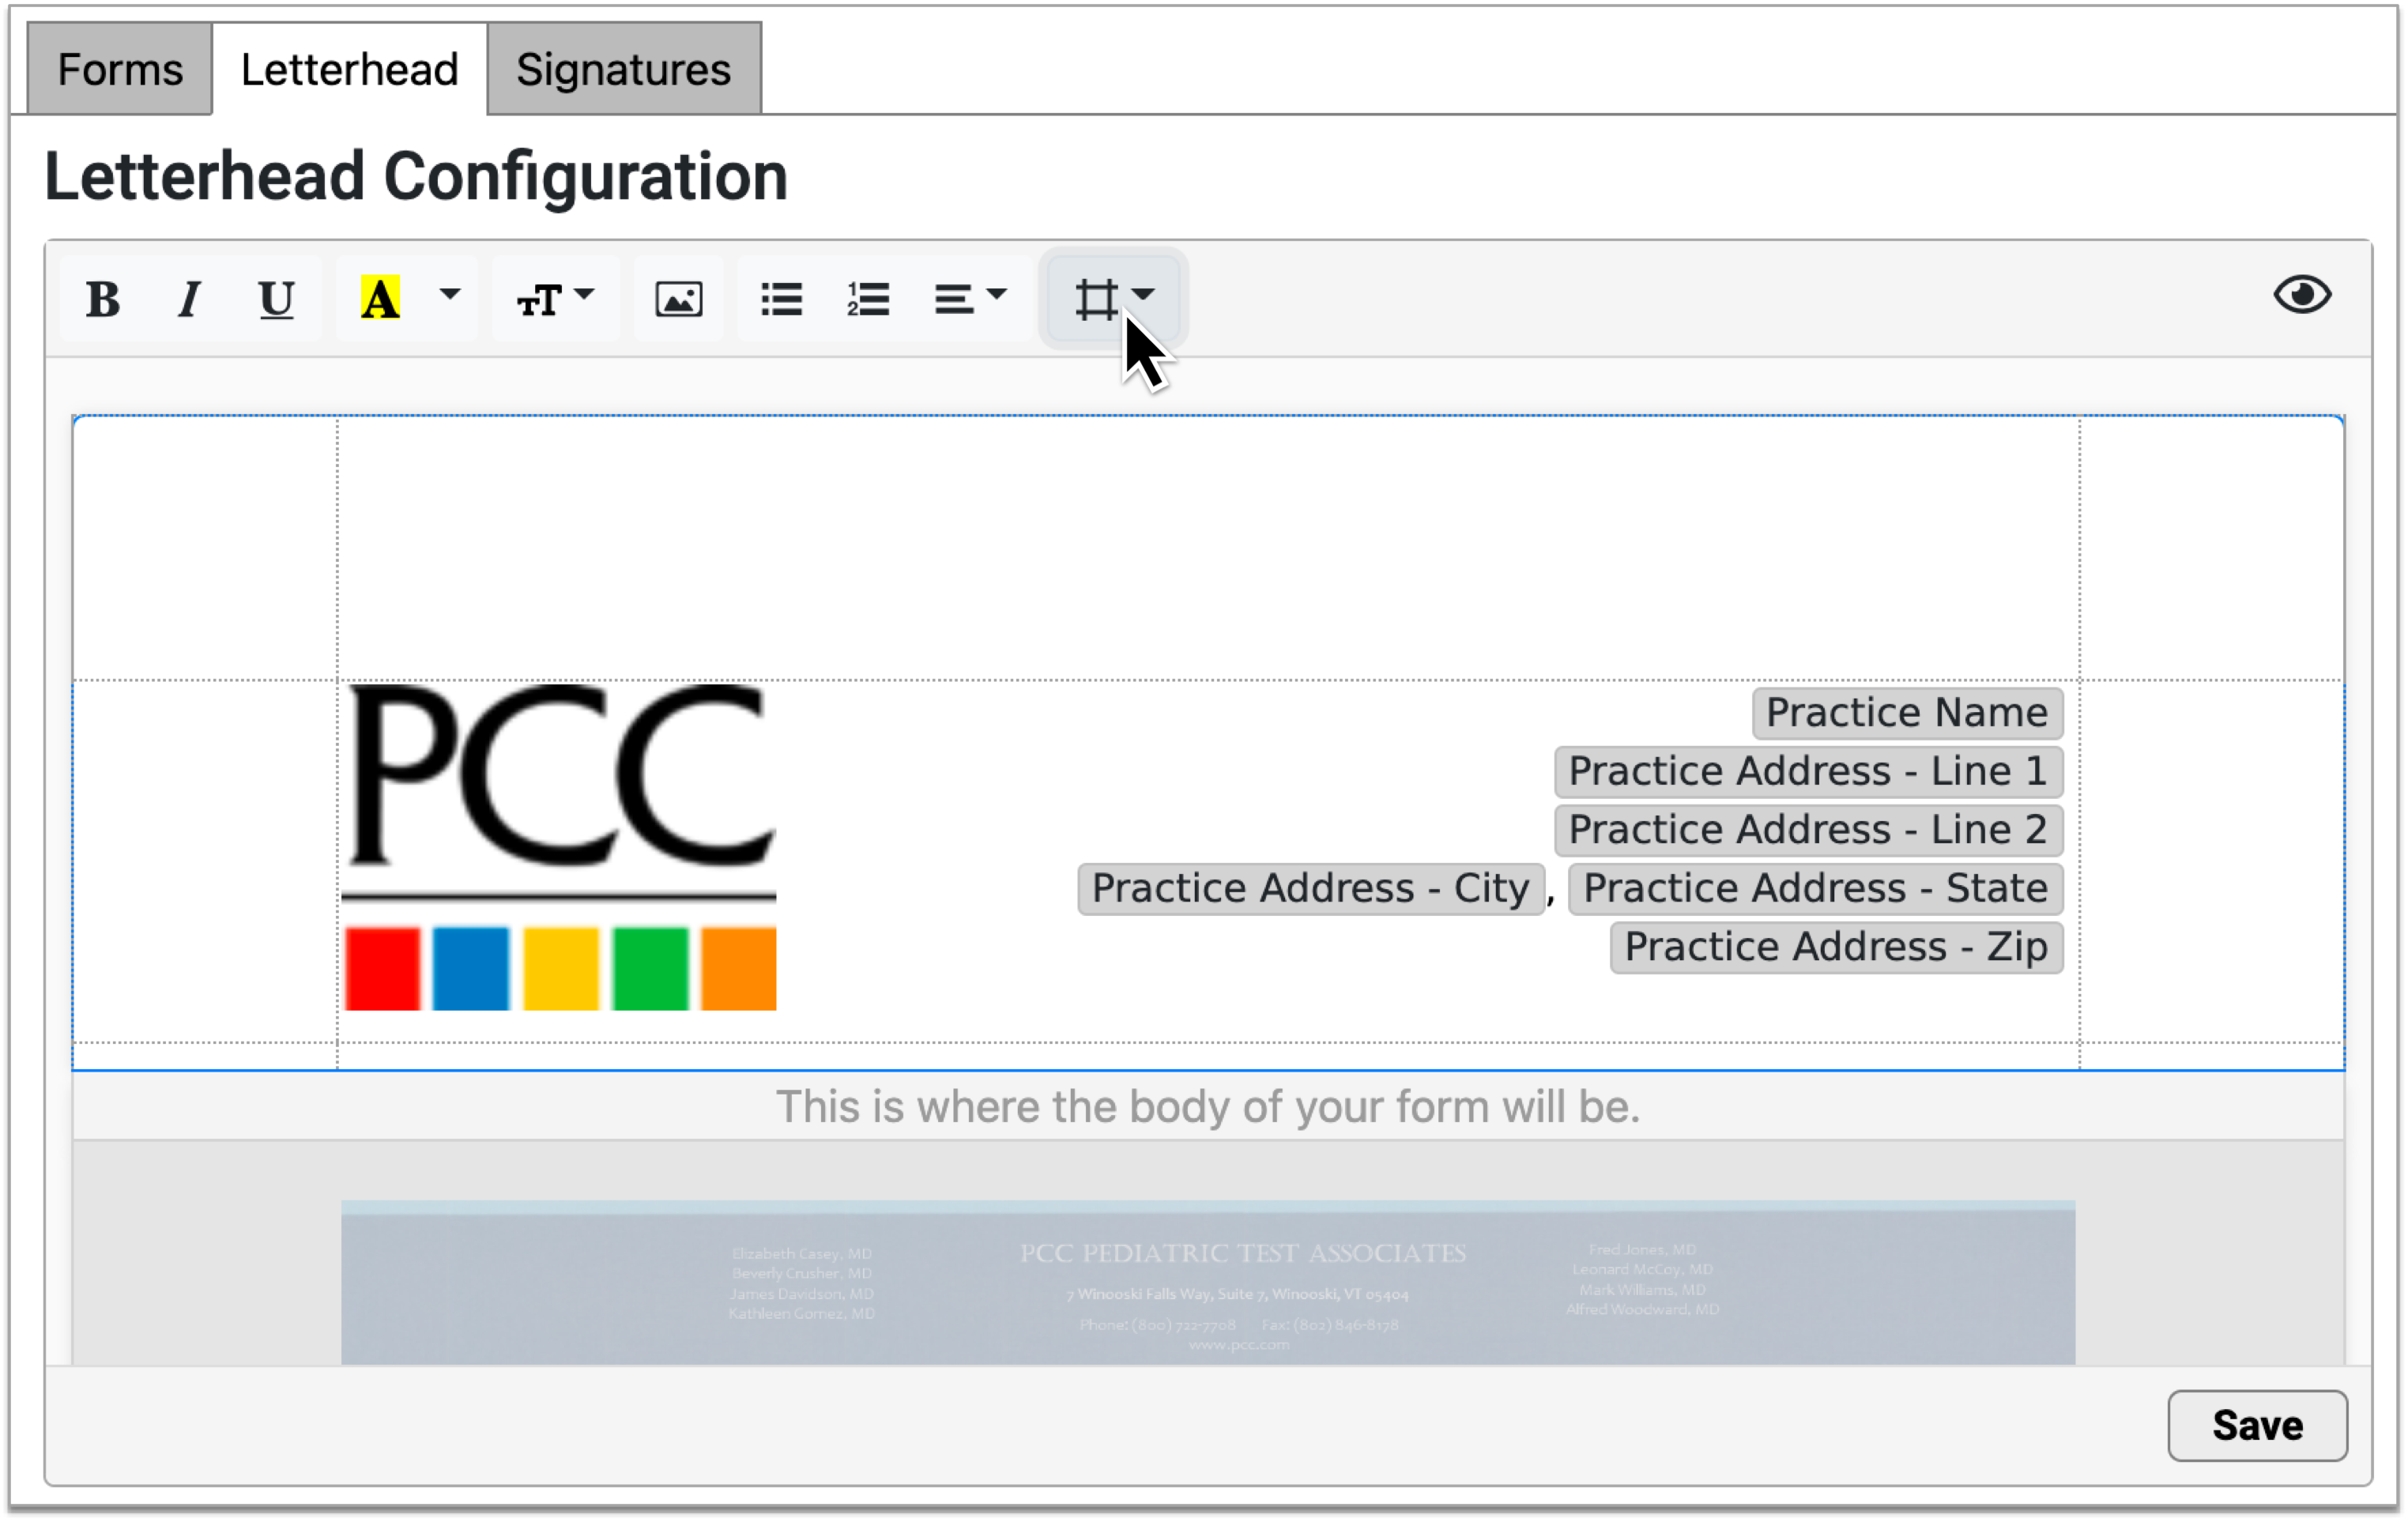
Hover over the margins icon to see current margin settings.
Save and Test
Once you’ve completed your letterhead, click “Save”. To test the layout, add your header and footer to a form and generate or print it.
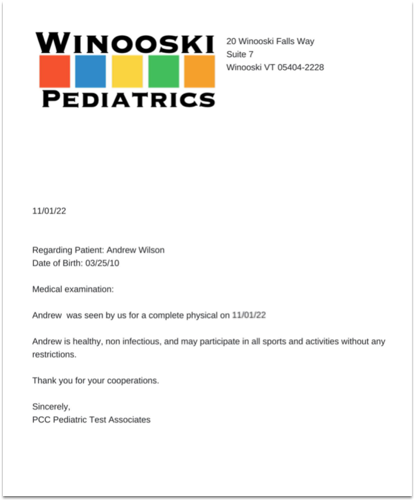
To make further edits to your letterhead, click back into the Letterhead tab and make your edits. Any changes will be applied to all forms that include a header or footer.
Set Up a Provider Signature
Your practice can upload electronic signatures for each of the providers at your practice. Once the signature image is uploaded, you can set permissions for which staff members are allowed to generate the signature. When a signature image is not allowed to generate, the signature area remains blank, so that the provider can sign the form by hand.
Signatures should be written using a black pen on white unlined paper and scanned at a high resolution.
To read more about preparing and configuring signatures, read Configure Provider Signatures.
Work with PDF Forms
Some forms come to your practice pre-formatted or are too complex to build in the Forms Configuration tool. Common examples of these are state or school forms. PCC Support can upload PDF versions of these forms into the Forms Configuration tool, where you can view, configure, and manage many aspects of them yourself.
Alternate Layouts: Some organizations will accept alternate formatting or layouts as long as the form contains the same information as the original. Contact the sending organization to find out more.
Add a PDF Form
Contact PCC
Contact PCC Support at 802-846-8177 or 800-722-7708 if you think you need to upload a PDF form into PCC EHR.
Send the Original Form to PCC
PCC Support will request a copy of the PDF form. When you send the original form via email or support ticket, please identify the following:
- Which fields on the form should auto-fill with patient or account data
- Where to insert free text response fields
- Whether the form needs to be able to be signed by more than one provider
PCC Support will use the information you provide to build a smart version of the form that can be saved as a PDF and added to the Forms Configuration tool. This may take some time.
Copyright Protected Forms: If you want to upload a form created or owned by a third party, ensure that you have permission to use the form beforehand. PCC assumes no responsibility for verifying that you have permission to use a form.
View the PDF
Once the PDF form is available in the Forms Configuration tool, you can view, configure, and manage many aspects of it on your own. PDF forms are marked by a PDF icon on the main page of the Forms Configuration tool.
Double-click on a PDF form to open it in edit mode. You can also select it and click the “Edit” button.
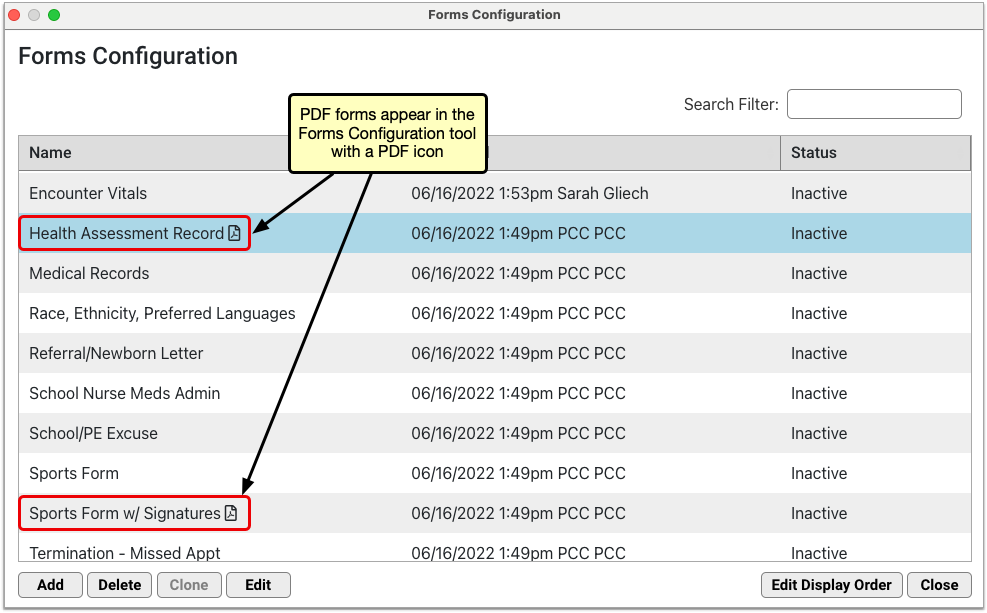
Edit the PDF
In edit mode, you can:
- view the form contents and any smart configuration that PCC Support built in
- Rename the form
- Configure prompts that tell providers and staff how to fill out the free text response fields on the form
- Preview the form using real data from any patient on your PCC system
- Set the status of the form to Active or Inactive, which controls whether providers and staff can find it in the Patient or Account Forms components and generate it for patients
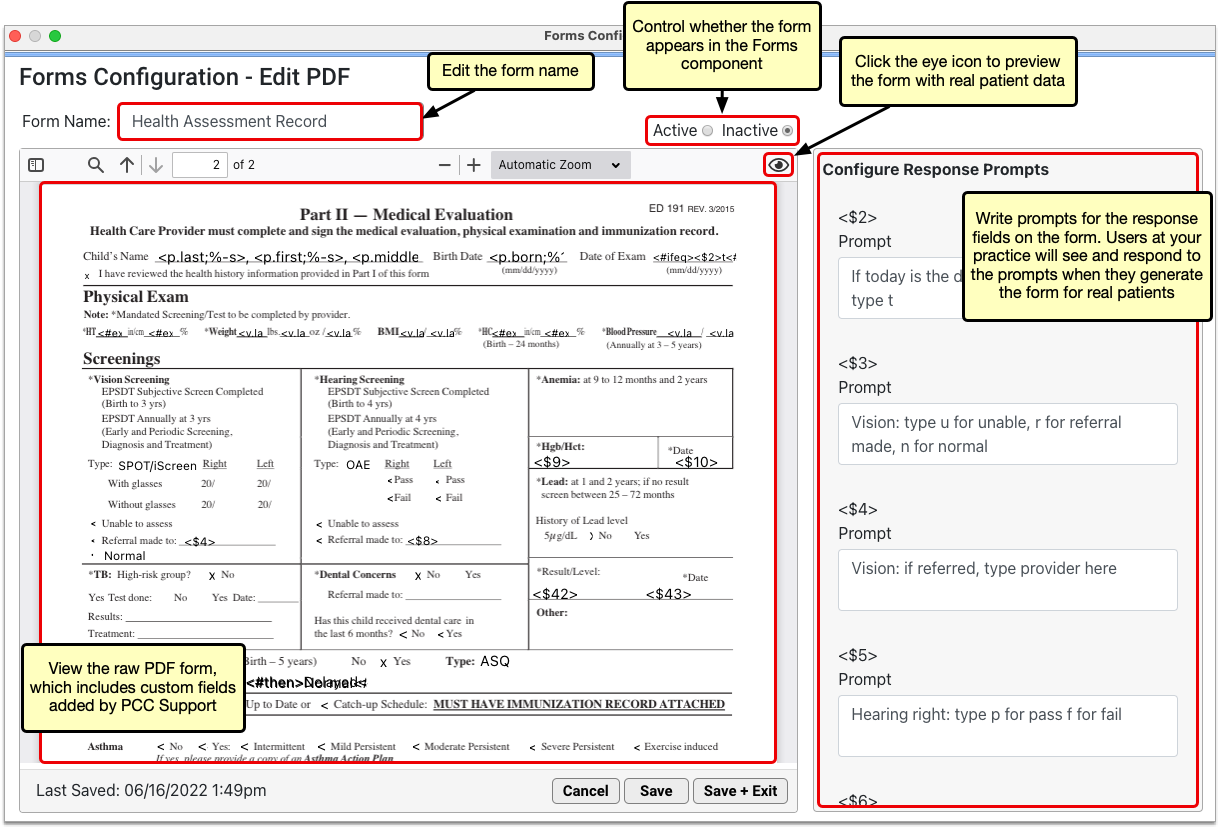
You cannot edit the body of PDF forms in the Forms Configuration tool. Contact PCC Support to request changes to the body contents of PDF forms.
Forms Need Unique Names: In order to save a form, you must give it a unique name. The form editor prevents you from saving forms that do not have unique names.
Configure New Prompts as Needed
If a PDF form is migrated with more user response fields than it used to have, additional response prompt lines will automatically appear in the “Configure Response Prompts” pane when you edit the PDF.
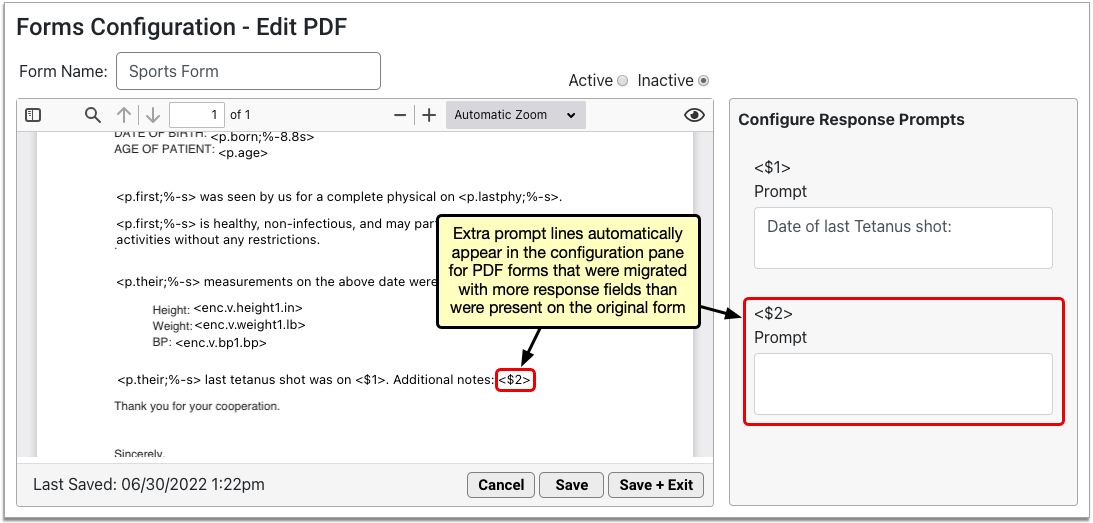
Reasons for Extra Prompts: Response fields are a versatile tool for creating forms that optimally serve your practice and patients. In the process of migrating your PDF forms to the new forms solution, PCC Support might realize that additional response fields are needed to improve the form’s function for your practice. These additional fields should not come as a surprise to you. Be should be sure to write prompts that help users understand how to fill them out when they generate the form for patients.
Delete Unneeded Prompts
Some PDF forms might prompt you to delete unneeded response prompts when you first edit them. This happens when the PDF form contains fewer response fields than it used to and it no longer requires the same number of prompts. Typically, PCC Support will adjust this for you, but you might encounter it yourself from time to time.
If you do encounter the prompt to delete unneeded response prompts when you open a PDF form, either contact the person on PCC Support who helped you with that form, or read through the original list of prompts associated with the form and delete those that are no longer needed.
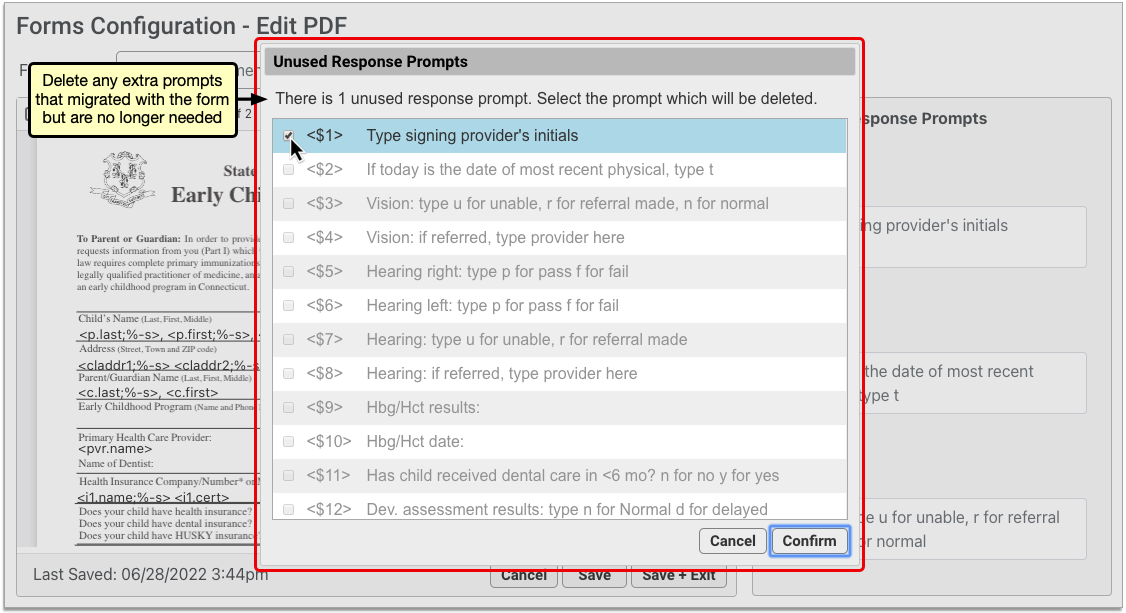
Reasons for Unneeded Prompts: When PCC Support helps you migrate your PDF forms into the Form Configuration tool, they will adjust your forms to work within the Forms Configuration tool. In the process, the number of response fields on your PDF forms may be reduced. The step of deleting unneeded prompts when you first open a migrated PDF form is the final step of adjusting the form to take advantage of all functionality in the Forms Configuration tool.
Save and Test the PDF
Save any changes you made, and generate or print the form to test it out. If your practice generates PDFs that contain unusual features, be sure to test that they work as expected.
Optionally Adjust Printer Settings for Watermarks
If you worked with PCC to generate a watermark on your forms, you may need to adjust the printing settings on your workstation for the watermark to print at the right darkness level.
Contact PCC for PDF Edits and Unusual Requirements
If PCC Support helped you set up a custom form with unusual scripting or special information requirements, you will need to coordinate with PCC Support to make additional adjustments after uploading and testing your PDF.
Preview a PDF Form
When you edit a PDF form in the Forms Configuration tool, click the eye icon in the top right corner of the form canvas to preview it.
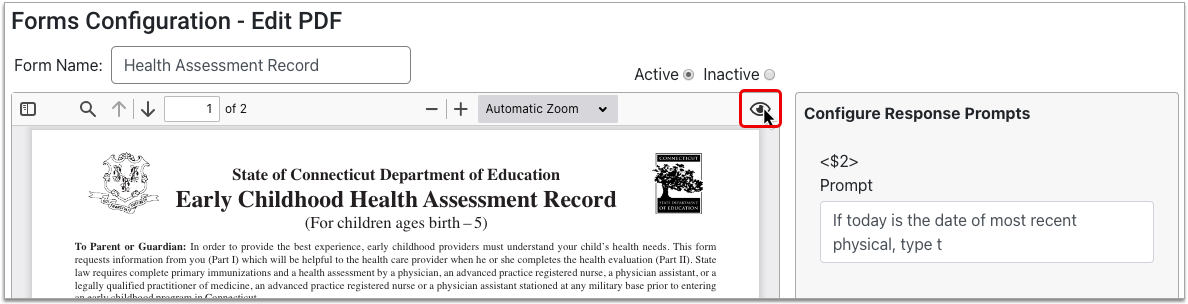
The auto-filling variables on the form render with real data from the patient selected in the Preview Settings pane. Where there is no data to auto-fill, variables render as blank.
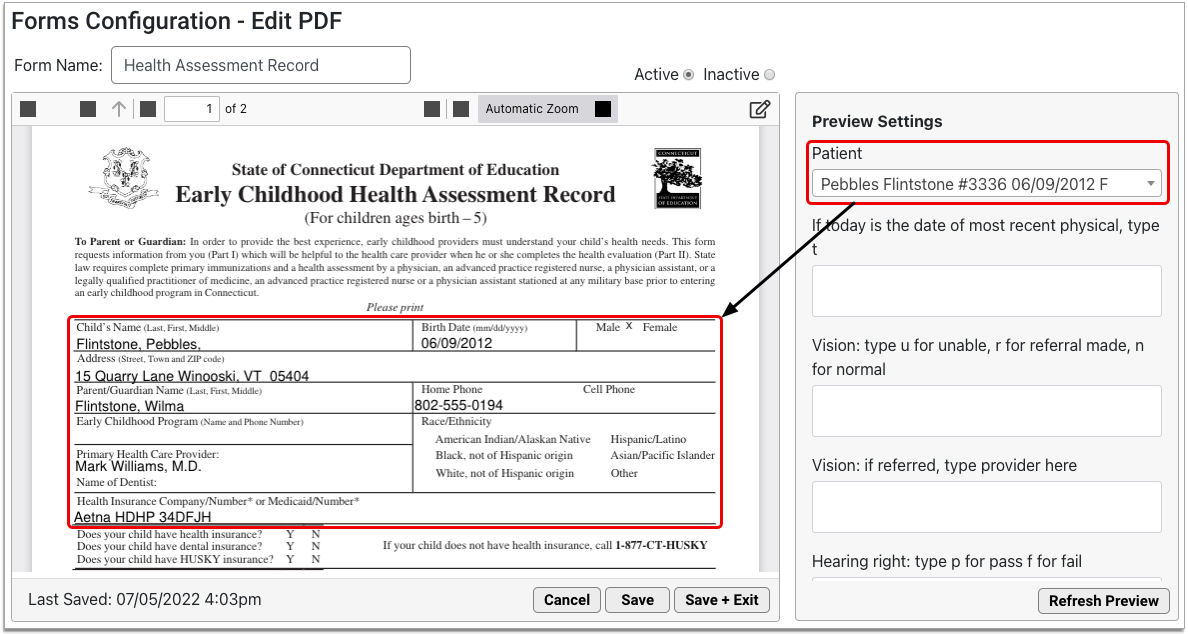
You can change the preview patient to any patient on your PCC system, and fill out the user response fields to test out the experience of generating the form.
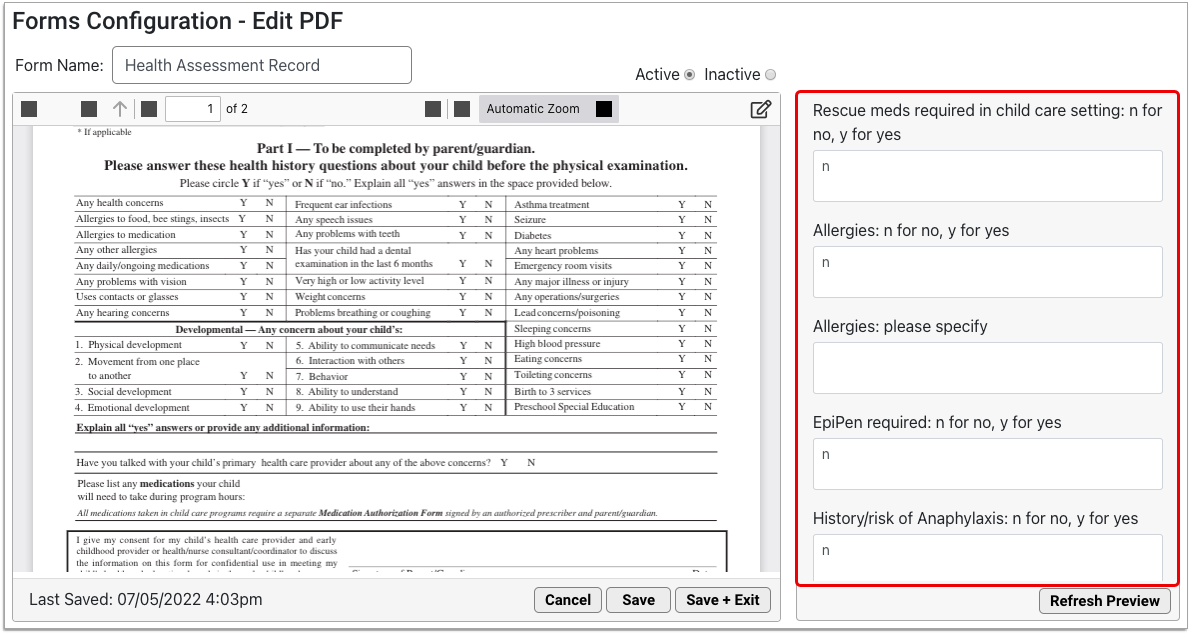
Click the “Refresh Preview” button to test out the form with the new data you entered into the Preview Settings pane.
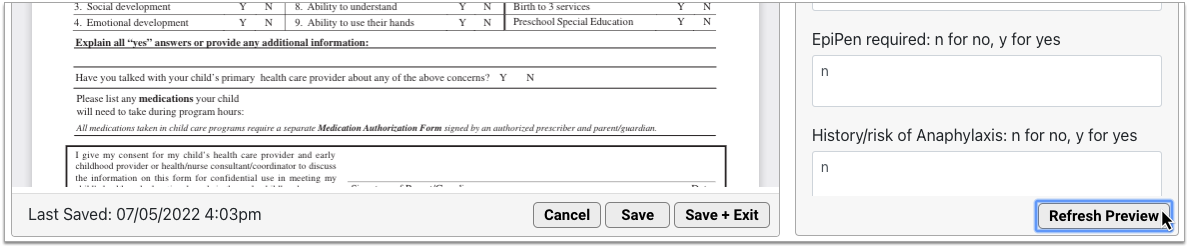
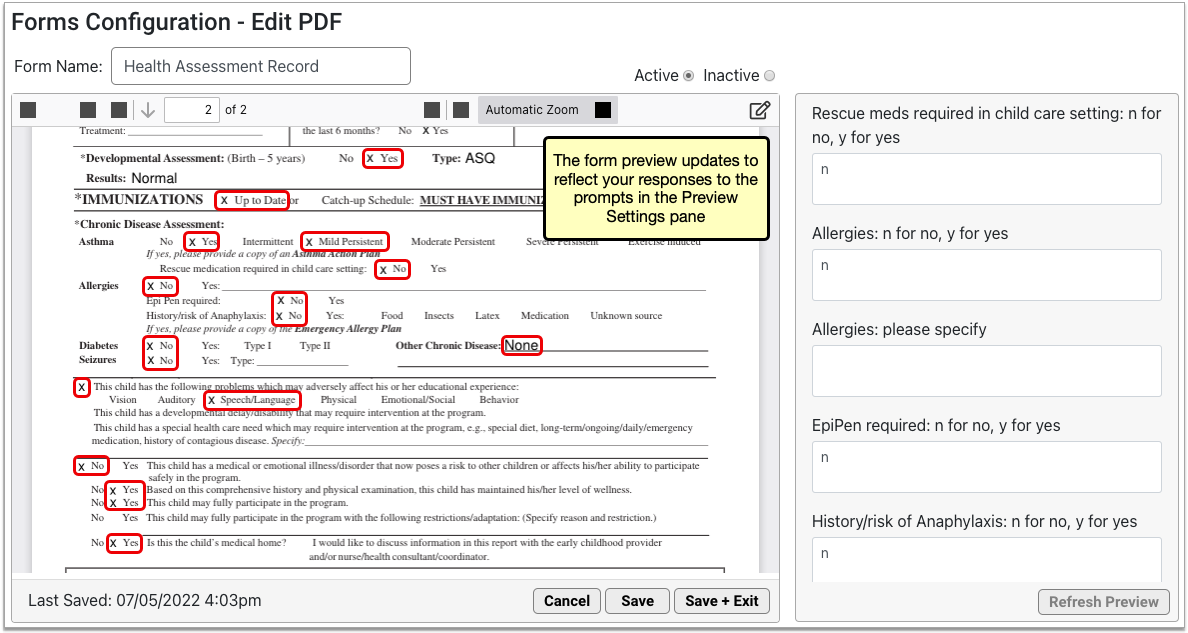
The form preview updates to reflect the information you entered in the Preview Settings pane.
Delete a PDF Form
You can remove the PDF forms your practice no longer needs from PCC EHR.
On the main page of the Forms Configuration tool, select the PDF form you want to remove and click the “Delete” button.
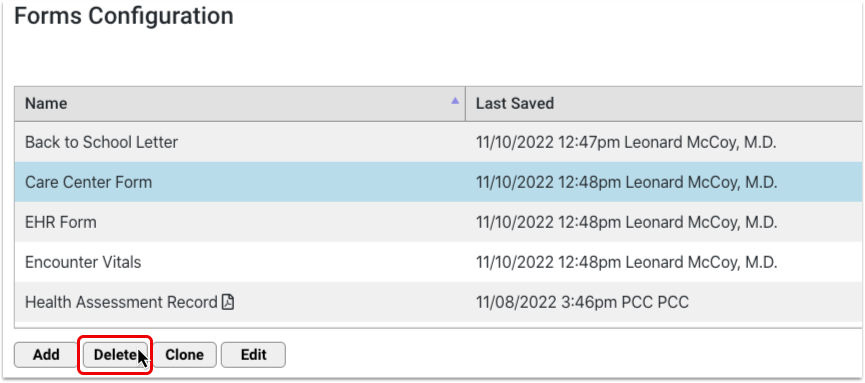
The “Delete” button is protected by a special user permission in the User Administration tool.
Configure the Patient and Account Forms Component
You can control which forms appear in the Patient and Account Forms components, the order in which they are listed, their names, and whether they appear by default for single-click generation in patient charts.
Adjust Default Forms Category
By default, PCC EHR will save a form letter into a Patient or Account Forms category, which you can later review in the Documents section of a patient’s chart.
You can use the Document Administration tool to change the default category for forms.
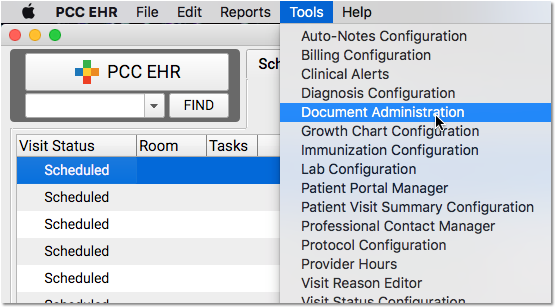
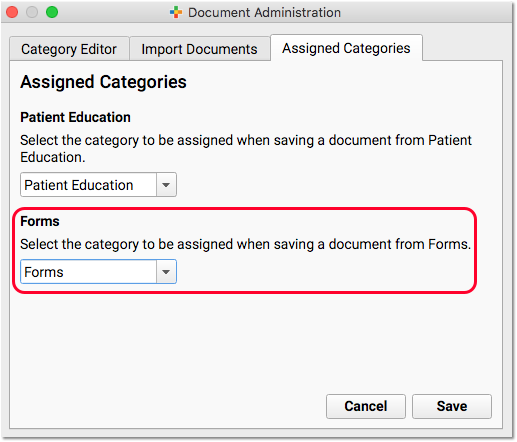
Show or Hide Forms in the Patient and Account Forms Components
The status of a form determines whether it appears in the Patient and Account Forms components. Active forms appear in the Patient and Account Forms component; inactive forms do not.
You can change the status of a form by selecting a different status in the top right corner of the window.
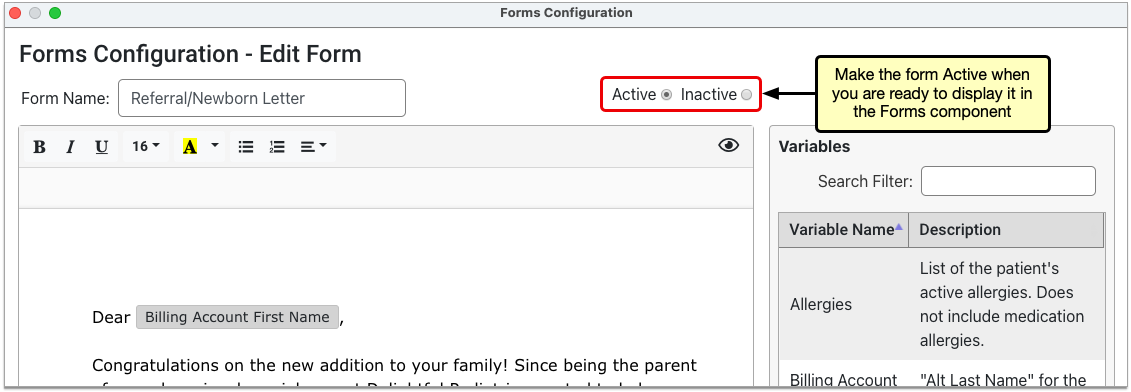
The new status takes effect as soon as you save the form.
Contact PCC for Assistance: If you have not switched to using the Forms Configuration tool in PCC EHR, contact PCC Support for help adding or removing forms from the Patient and Account Forms components.
Set the Display Order of Forms
You can control the order in which forms display in the Patient and Account Forms components.
Open the Forms Configuration tool, then click the “Edit Display Order” button.
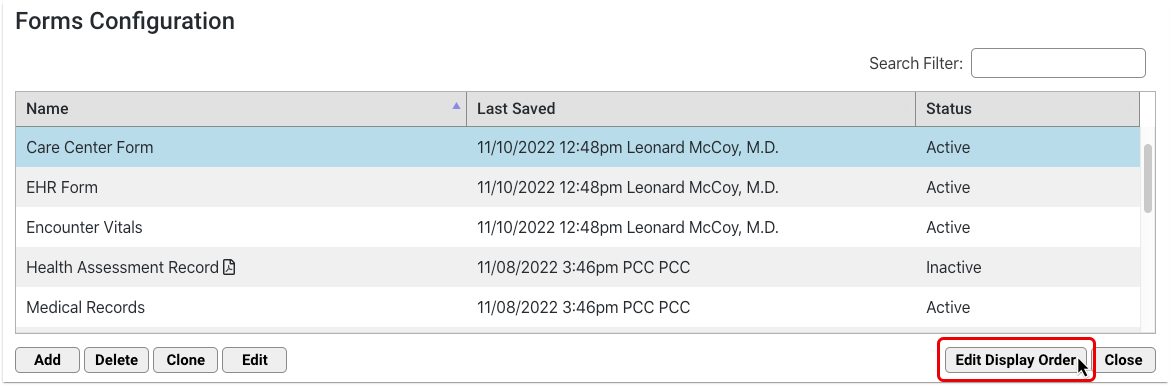
Drag and drop the forms to rearrange the list order.
The list includes both active and inactive forms, but only active forms display in the Patient and Account Forms components.
Click “Save and Exit” to save your work and return to the main page of the Forms Configuration tool. The Patient and Account Forms components will update to reflect your changes as soon as you click “Save and Exit”.
Where Are My Changes?: Lists of forms in the Forms Configuration tool always display in alphanumeric order. Changes made in the Edit Display Order window dictate how active forms display in the patient and account forms components within PCC EHR.
Configure Single-Click Form Generation
You can improve form letter workflow for your practice by making sure the right forms appear on the right protocols. You can add buttons to your visit protocols that let you generate forms with a single click.
When you have decided which protocols will contain the Patient and Account Forms components, follow the instructions below to adjust which forms appear as single-click forms by default.
Open Your Protocol in Protocol Configuration
Open the Protocol Configuration tool and pick a chart section or protocol where you will add or move the Patient and Account Forms components.
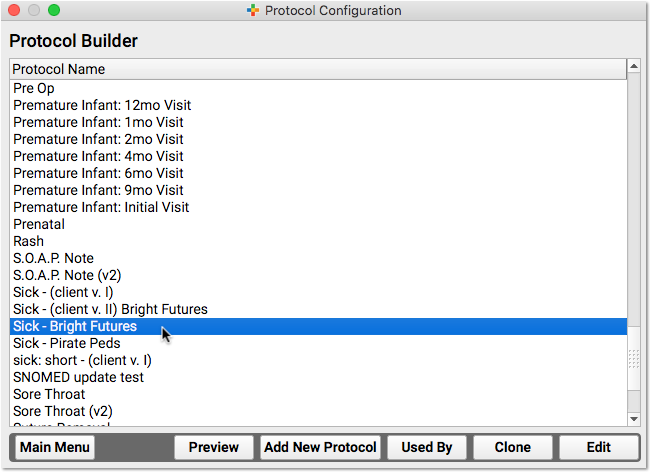
When a practice does not have the Forms Configuration tool enabled, the Account Forms component will appear, but not be selectable.
Add the Patient or Account Forms Component
Click “Add” to add the Patient or Account Forms component to your protocol. Use the tab on the side to slide it to a new location in the protocol.
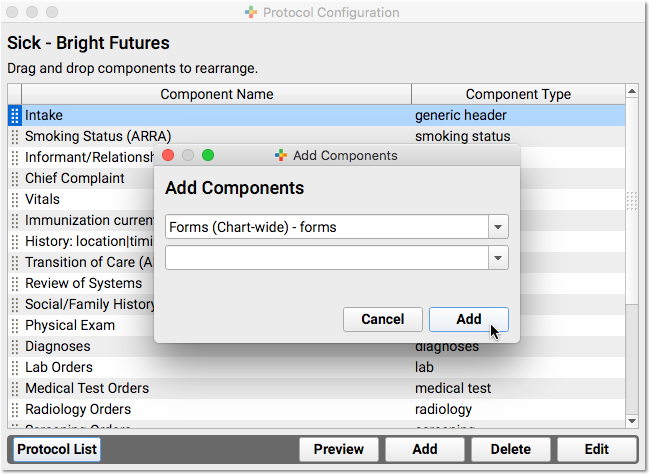
Select Single-Click Forms
Double-click on the component to set up default forms for that chart note or chart section. For example you could configure School/PE Excuse letters to be single-click in sick visits, or make form letters single-click in the Medical Summary or Demographics chart sections.
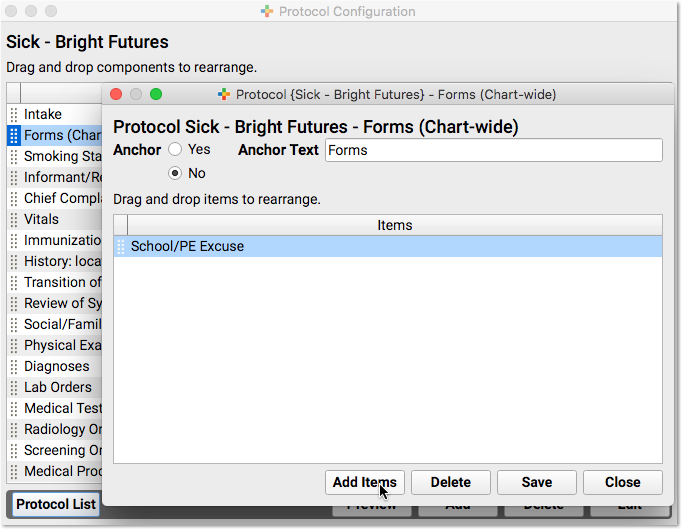
Enable the Forms Configuration Tool
PCC must enable the Forms Configuration tool at your practice before you can create and manage your own auto-filling forms, handouts, policies, and letters in PCC EHR.
Learn how to enable the Forms Configuration tool.
If you decide to switch to the Forms Configuration tool in PCC EHR, tell PCC Support what you like about it and what would make it more useful for your practice. Your feedback will guide the development of the new forms solution.
Set Permissions for the Forms Configuration Tool
Use the User Administration tool to adjust which user roles can access the Forms Configuration tool as well as which user roles can delete forms or configure signatures.
To find out more about setting permissions, read Set User Roles for Permissions and Security.
Set Up a Brother ADS-2800W Scanner
Read the procedures below to set up and configure a Brother ADS-2800W scanner.
Prepare for Setup
You will need to take the following actions before you can set up your scanner.
Contact PCC Support to Set Up Scanner Bucket
If you do not have an existing scanner bucket, call or email PCC Support at (800)722-7708 or support@pcc.com to request a new scanner bucket.
Replacing an existing scanner?: If you are replacing an existing scanner you can use your old scanner’s bucket. To find your existing bucket number, log in to PCC EHR, select Documents from the Configuration menu, visit the Import Documents tab, and choose a bucket from the “File Source” column.
Find Your Wireless Information
Ask your Office Manager, Managing Provider, or local IT person for the name of your office wireless network and password.
Connect Your Scanner to Your Wireless Network
Follow the steps outlined here to connect your scanner to your wireless network.
Find Your Scanner’s IP address
Turn on your scanner and use your scanner’s control panel to follow the steps in this image. Choose WLAN for step 3 if you are using a wireless internet connection.
Find Your Scanner’s Default Login Password
The default password is either “initpass” or the password located on the back or bottom of the machine after “Pwd”.
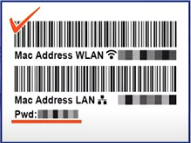
Configure Your Scanner Settings
Access Your Scanner in a Browser Window
Open a web browser and type the IP address of your scanner. (Example: https://12.345.6.7) Log in with your Login Password if prompted.
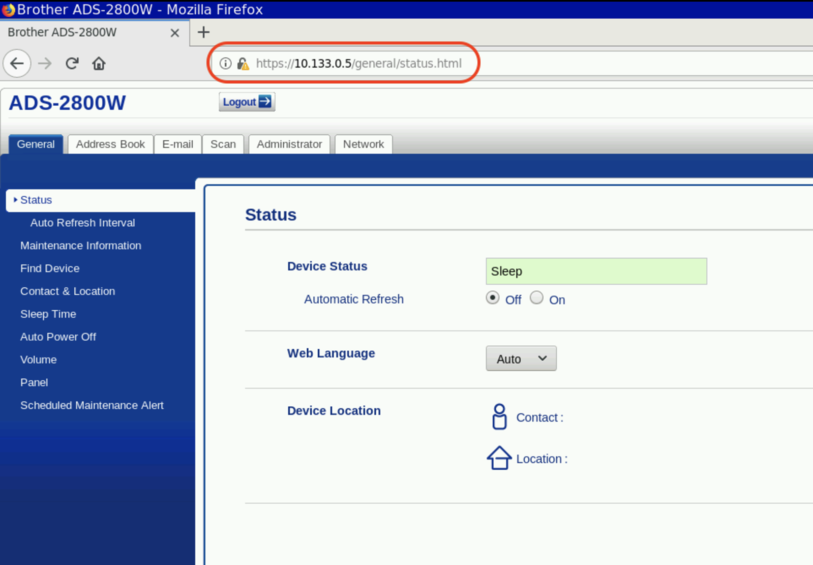
Set Status
Select the “General” tab, then select “Status” and check the following:
- Device status is set to “Sleep”.
- Automatic Refresh is set to “Off”.
- Web Language is set to “Auto”.
- Device Location is blank.
Set Network to “Both”
Select the “Network” tab, then select “Interface” and check the following:
- Interface is set to “Auto Switching (Enable Both Interfaces)”.
- Wi-Fi Direct is Disabled.
Submit Network Selections
Click “Submit”.
Configure Wireless Settings
Open Wireless Setup Wizard
Select the “Network” tab and then select “Wireless (SetupWizard)”. Click “Start Wizard”.
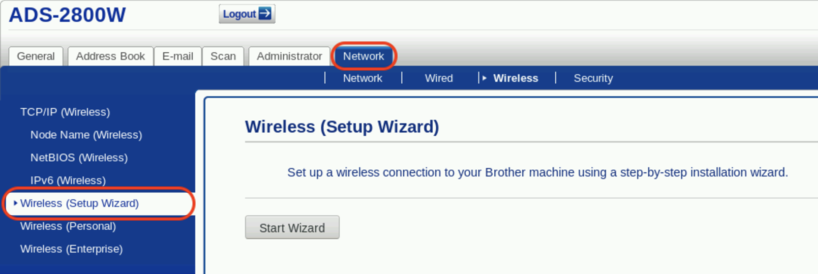
Connect to Your Wireless Network
Choose your office’s wireless network from the dropdown. Enter your wireless password in the Network Key field, and click “Next”.
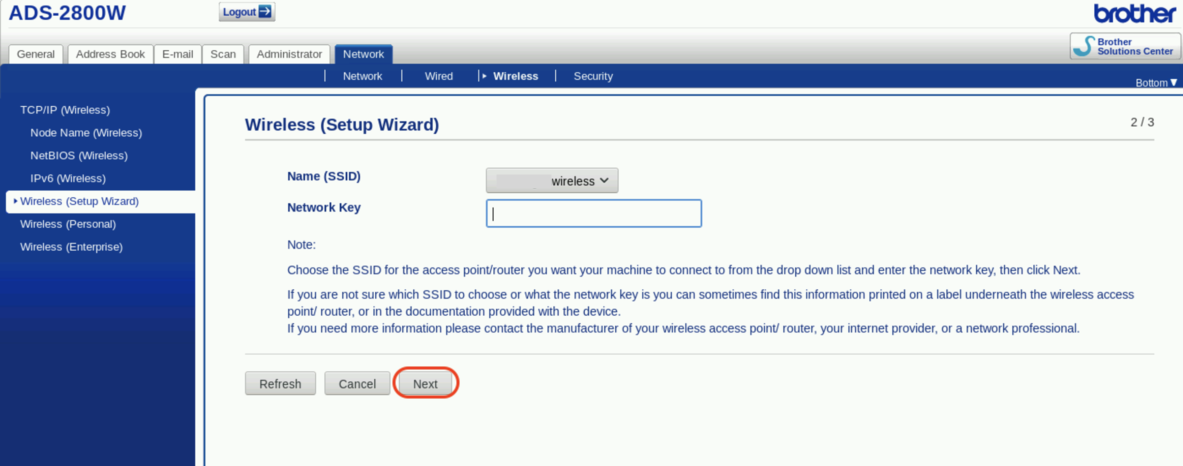
Enable Wireless Interface
Click “Yes”.
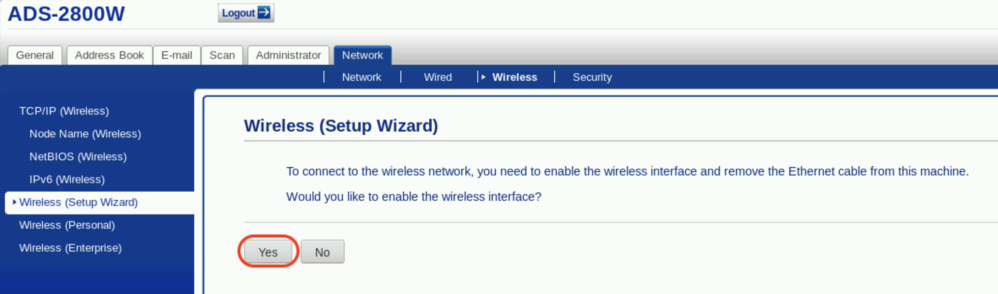
Configure Profile Settings
Set Profile to Network
Click on the “Scan” tab. Then click “Scan to FTP/SFTP/Network/SharePoint”. Set Profile 1 to “Network”.
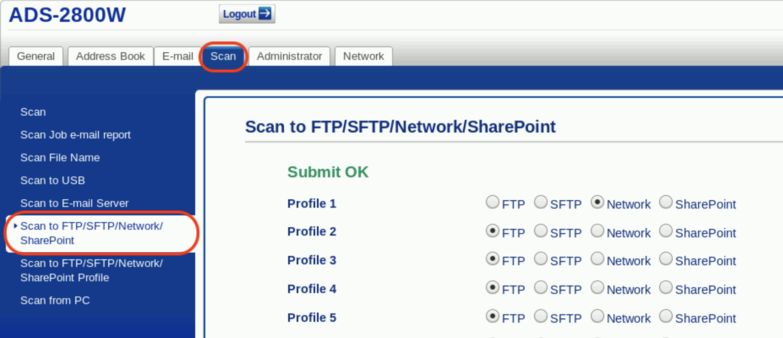
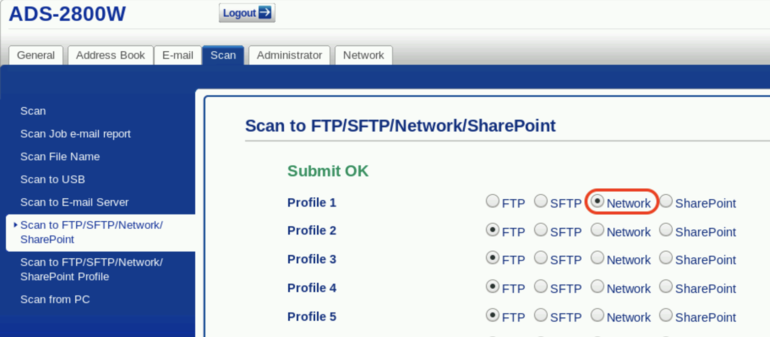
Save Profile Settings
Click “Save” at the bottom of the page.
Confirm Profile Settings
Click on the “Scan” tab. Then click “Scan to FTP/SFTP/Network/SharePoint Profile” and confirm that Profile 1 is set to “Network”.
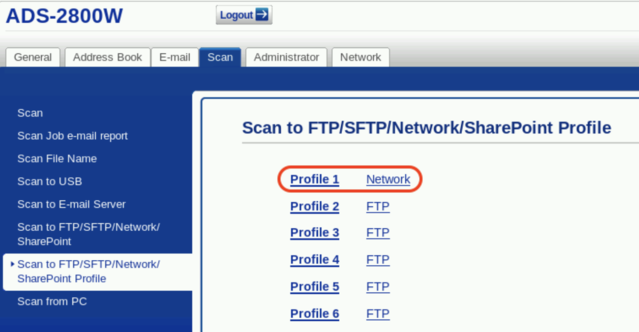
Set Profile Path
Click on “Profile 1” and set the following:
- Profile Name: PCC EHR
- Network Folder Path: \\acro\scanning\bucket### (Example: \\gkp\scanning\bucket001)
- File Name: Use default
- Quality: Color 200 dpi
- File Type: PDF Multi-Page
- Document Size: Letter

Continue Setting Profile Path
Scroll down and set the following:
- Use PIN for Authentication: Off
- Pin Code: 0000
- Auth. Method: Auto
- Enter the scanning username: nobody
- Enter the scanning password: nobody
- Reenter the scanning password: nobody
Click “Submit”.
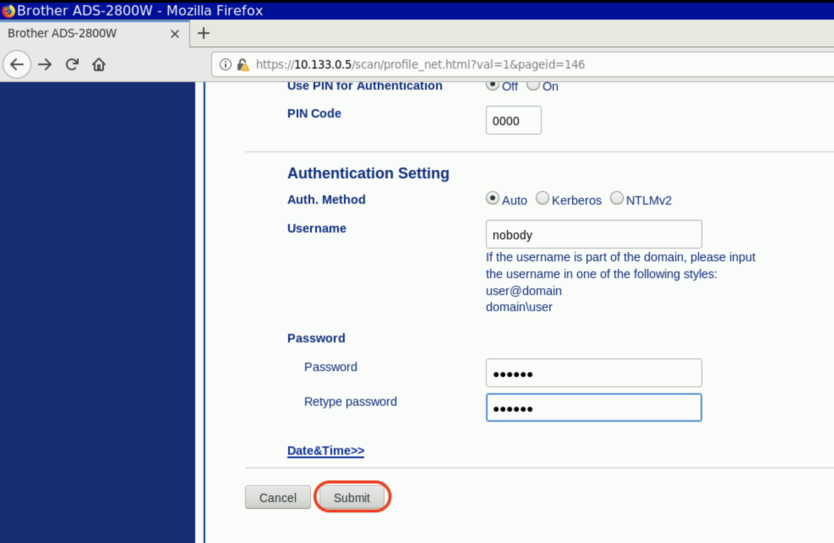
Sync Date and Time With Server
Select the “Administrator” tab and then select “Date & Time”. Enter your current date, time, and time zone. Set Auto Daylight to “On”. Select Synchronize with SNTP server.
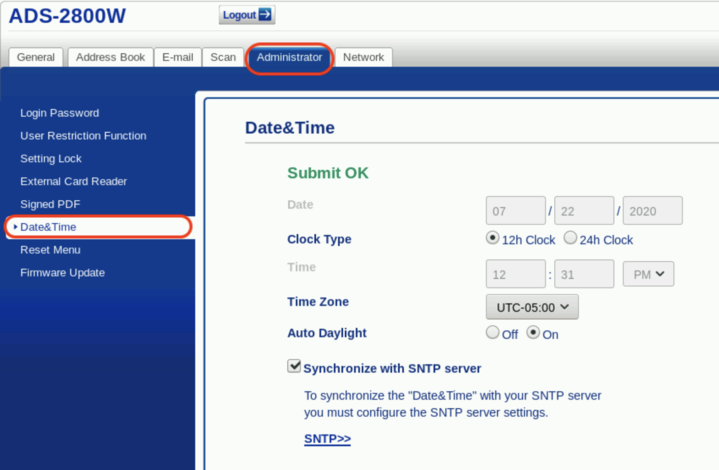
Click “Submit” or “Save” if prompted.
Test Your Scanner
Your scanner is now configured. Follow the instructions in your manual to run a test page. Upon completing a scan, your scanned document will appear in the Import Documents tool in PCC EHR. For more information, review this article: Attach a Document to a Patient’s Chart
Downloadable versions of Brother manuals and user guides can be found here.
Virtual Advanced Training Sessions
PCC offers online Virtual Advanced Training on topics designed to help your practice take better advantage of PCC’s features and tools. You’ve been using PCC EHR for a little while, and now you’re ready for a deep dive into how PCC can best intersect with your practice’s day-to-day workflow.
PCC hosts VAT sessions monthly, providing instruction followed by live discussion where you can ask questions, hear about what other practices are doing, and discuss implementation with PCC experts.
You can catch up on the recorded, instructional parts of these sessions any time using the links in the list below:
- Front Desk Essentials
- PCC EHR Tips & Tricks (Advanced Training Session)
- Invalid article ID or slug
- Invalid article ID or slug
- Post Personal Payments and Write Off Charges
- Review Payment History and Edit Personal Payments
- Autopost ERAs in PCC EHR
- Manually Post Insurance Payments and Adjustments
- Reverse an Insurance Payment (Post a Takeback)
For more information, or to find out how to attend a live session, contact PCC Support at 802-846-8177 or 800-722-7708.
Also, for a self-guided overview based on roles, see Training for New PCC Users.
Update Your PCC Email Preferences
PCC reaches out to one or more folks at your office via email, and PCC services (like the online PCC Community) have optional email notifications.
If your practice has a new Office Manager, or you get a new email address, how do you update the ways that PCC contacts you? How do you set your preferences for different kinds of email communication from PCC?
Set Email Preferences for PCC Updates and Announcements
PCC sends information about software updates, disruptions to services, news about important issues facing pediatricians, and more to an email mailing list.
PCC recommends that at least one person at your practice sign up for these emails, such as an Office Manager or managing provider. We are careful to limit how many emails we send, and you can set which types of email messages you receive. These emails are sent from the pccmarketing@pcc.com address.
-
Subscribe: To subscribe to PCC updates and announcements, call 802-846-8177 or 800-722-7708 or send an email to support@pcc.com.
-
Change Your Email Address: To change the email address you use to read PCC communication, send an email to support@pcc.com to subscribe your new email address. Then, in your old email address account, use the Unsubscribe link from the bottom of an email from PCC.
-
Unsubscribe or Change What Messages You Receive: To change your email preferences or the address that you use, click on a link to “Manage Preferences” or “Update your email preferences” found at the bottom of an email from PCC.
You can find links to unsubscribe or change email preferences at the bottom of emails from PCC.

When you click a link to manage preferences, you can indicate whether you would still like to receive emails about PCC EHR and Company News, Pediatric Resources, the Pediatric Insights Blog, The Independent Pediatrician, Job Notifications, and emails from PCC Sales.
Click the “Update email preferences” button at the bottom to save your changes.
Set Email Preferences for PCC Community and PCC Talk
PCC Community is an online forum where you can ask questions of other pediatric practices and learn about important issues in pediatrics. It’s also a place where you can get caught up on PCC news, blogs, and announcements. Learn more by reading the PCC Community help article.
PCC Community can automatically send you email notifications about new posts, or digests collecting the new posts since you last visited.
-
Sign Up: To sign up for PCC Community, which can include email updates, see the instructions in the PCC Community help article.
-
Unsubscribe, Change Email Address or Change What Messages You Receive: To change your email preferences for PCC Community, see the instructions in the “How do I adjust my email settings and other user preferences?” and “Can I redirect PCC Community messages to a different email address?” questions in the PCC Community help article.
Change Email and Contact Information for Individual Communication from PCC
PCC Support sometimes needs to email your practice directly about support issues, software update migration, and other issues.
PCC keeps a list of contacts for your practice, with corresponding emails and phone numbers.
To change who PCC should contact, or to change the email address or phone number they should use, call 802-846-8177 or 800-722-7708 or email support@pcc.com.
Install a Fujitsu fi-7160 Scanner for PCC EHR
PCC recommends the Fujitsu fi-7160 scanner because of its reliability and performance. Older models of the fi series, like the 6110, are acceptable alternatives. All scan settings are controlled through the included PaperStream software.
Install a Fujitsu fi-7160 Scanner for PCC EHR on Windows
Follow the steps below to install and configure a Fujitsu fi-7160 on a Microsoft Windows PC for use with PCC EHR.
Download the Scanner Driver and Application
Unplug Your Scanner
Unplug your scanner from your workstation before software installation. Fujitsu fi-7160 scanners plug into workstations with a USB cable.
Visit Fujitsu’s Downloads Page
Open a web browser to Fujitsu’s fi Series downloads page (https://imagescanner.fujitsu.com/global/dl/).
Download the PaperStream IP Driver
Select your scanner’s series, scanner model, and your PC workstation’s operating system. Click “Display software list”.
Click “Download” next to PaperStream IP (TWAIN)
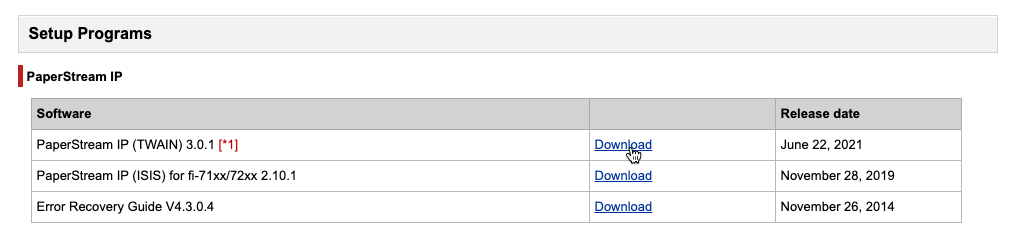
If the download does not begin automatically, click the “Download” link called PSIPTWAIN(version number).exe
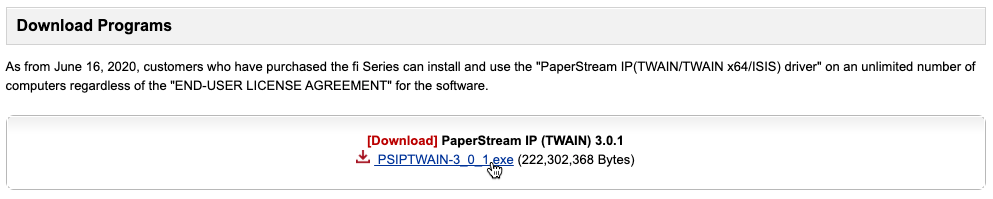
If prompted to run or save, select “Save”.
Download the PaperStream Capture Application
Click the “Back” button on your browser to view the previous page. In the applications section, click “Download” next to PaperStream Capture.
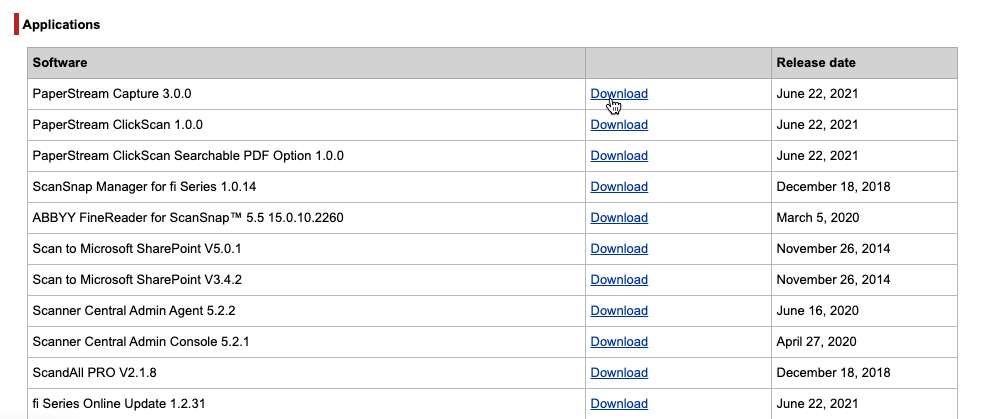
Enter your scanner’s serial number.
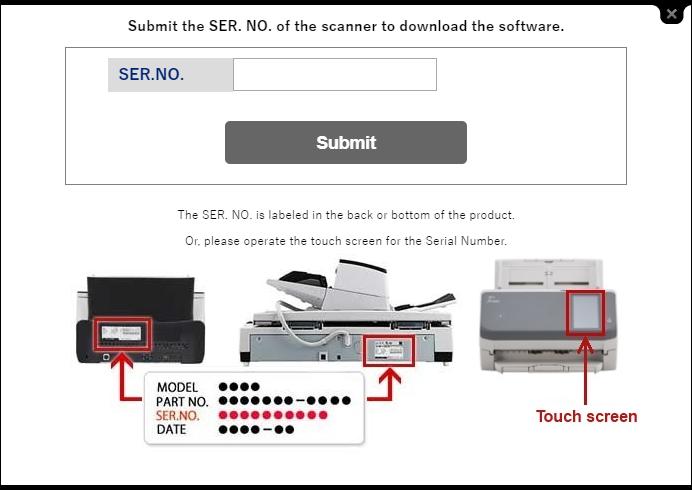
If the download does not begin automatically, click the “Download” link containing PSC(version number).exe. If prompted to run or save, select “Save”.
Install the Scanner Driver and Application
Launch the PaperStream IP Driver
Open your Downloads folder and launch the driver installer, PSIPTWAIN(version number).exe. If prompted to allow changes to this computer, select “Yes”. The installer will run a script to install necessary files, and then open a PaperStream IP Driver Setup window. Click “Next” to continue.
Install the PaperStream IP Driver
On the following screen, confirm that PaperStream IP and Scanner Central Admin are both checked, then click “Next”.
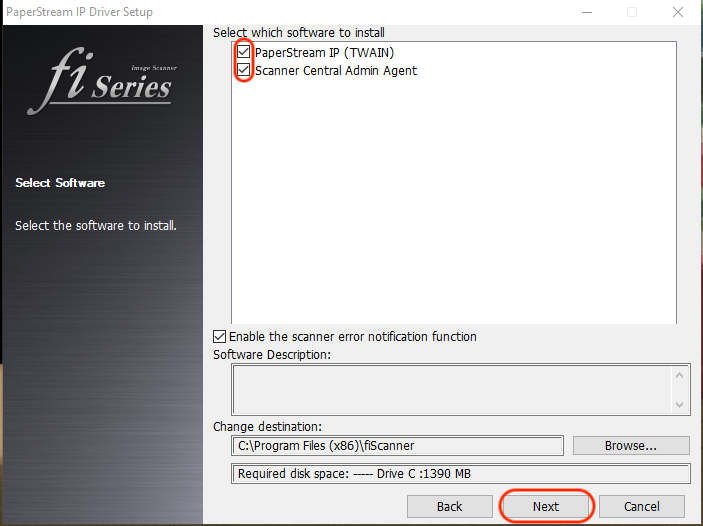
Read the agreement, check the “I accept…” box and click “Install”.
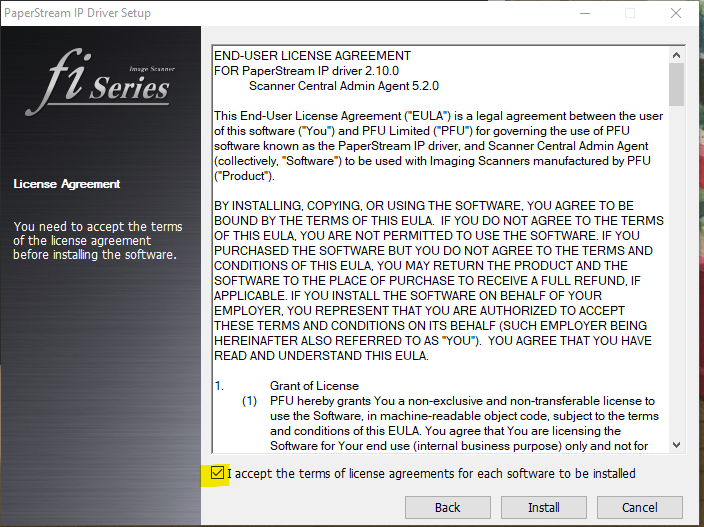
Installation may take several minutes. When complete, all three boxes (PaperStream, Software Panel and Scanner Agent) will be checked, and the “Stop” button will change to “Close”. Click “Close” to complete the driver installation.
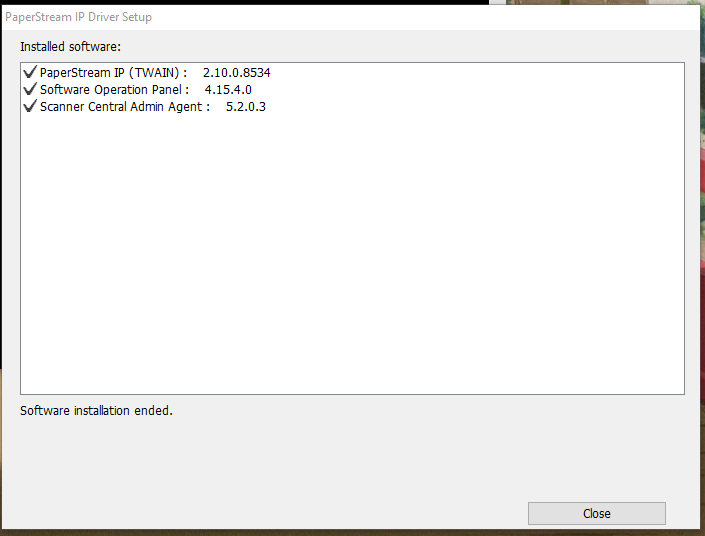
Install PaperStream Application
Return to your Downloads folder and open the PaperStream application installer. You may be prompted to choose your language, and a PaperStream setup window will open.
- Check “I accept the terms…”
- Select “Basic (use basic functions with no limitations)”.
- Uncheck “Display sample profiles”.
- Uncheck “Show Welcome on startup”.
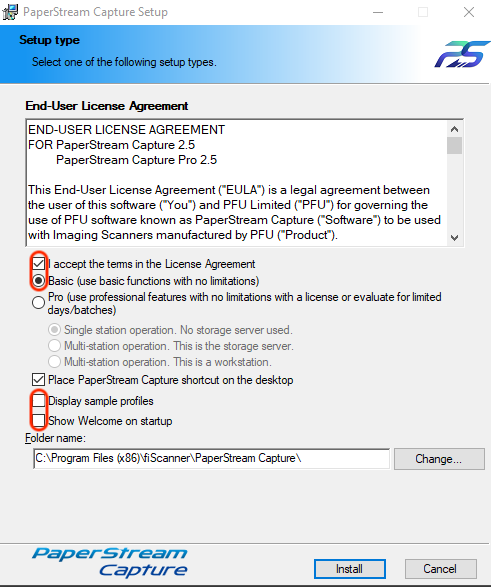
Click “Install”. When the installation is completed, click “Finish”. Click “OK” when prompted.
Configure Scanner Buttons
Plug in Your Scanner
PCC recommends that you plug your scanner into a USB 3.0 port for optimal speed.
Open the Windows Printers & Scanners Settings Panel
Find and open the Printers & Scanners settings window from your Windows Start menu. The fi-7160 should appear on the list of added devices.
Select Scanner and Properties
Click the device once, then click the “Manage” button.
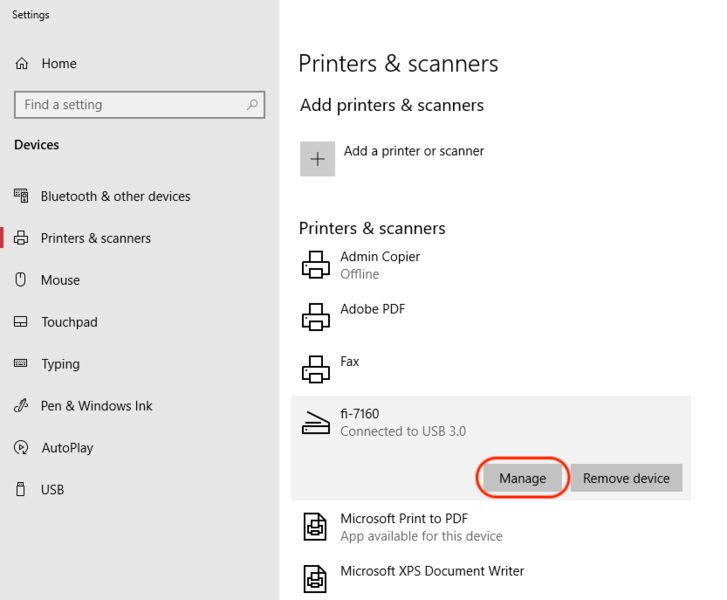
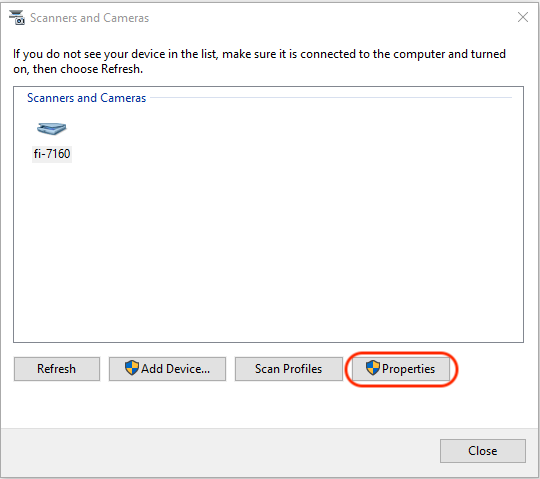
Next, click “Properties”.
Configure the Scan Button to Launch PaperStream Capture
Select the Events tab.

- Confirm that “Select an event:” is set to “Scan Button”.
- Select “Start this program:”
- Choose PaperStream Capture from the drop-down menu.
Now PaperStream Capture will run when the scan button is pressed on the physical scanner. Click “OK” to close this window.
Configure Scanner Profile and Destination
In this section you will configure the scanner’s settings and route the finished scans to PCC EHR.
Open the PaperStream Capture Application
Open the PaperStream Capture Application from the Start menu or desktop icon.
Create a Scanner Profile
Click the Lines menu next to the blue Scan button.
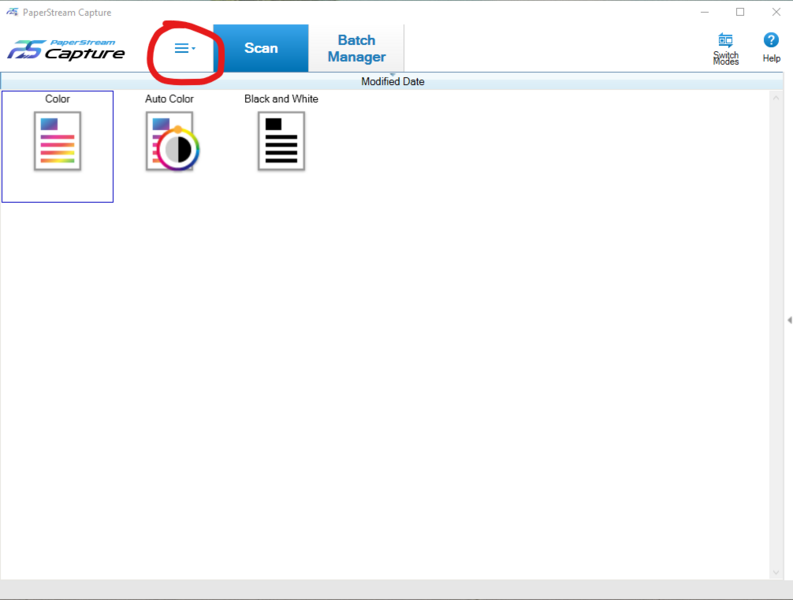
Select “Configure Profiles” from the drop-down options and click on the plus (+) button to add a scanner profile.

On the left menu select “1. Name” and add the Name “EHR”.
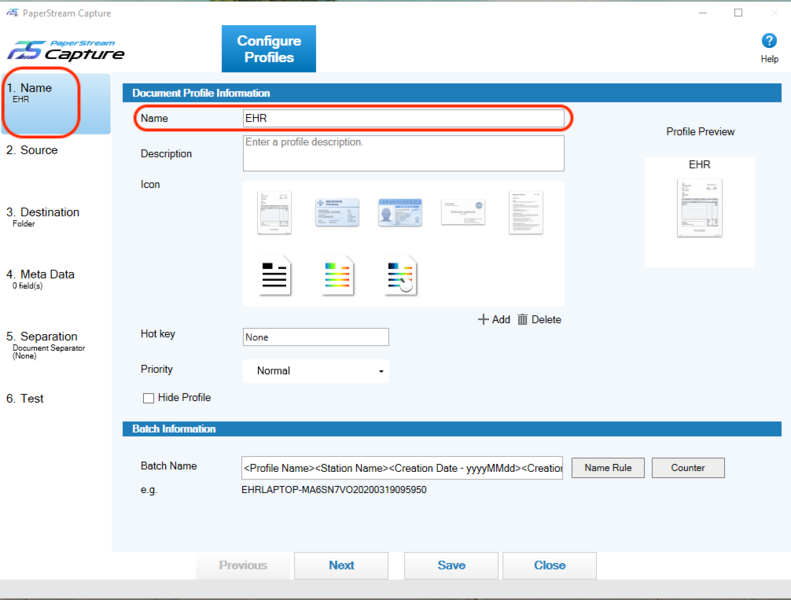
Confirm that PaperStream IP fi-7160 is in the Source Box
Select “2. Source” from the left menu. PaperStream IP fi-7160 should be visible in the “Source” box.

If the PaperStream IP fi-7160 is not in the “Source” box, there may be a problem with installation. Contact support at 1(800)722-7708 or support@pcc.com to troubleshoot the issue.
Configure Source Parameters
In the Source Parameters box, set the following:
- Color Mode: Auto Color
- Resolution: 200 dpi
- Leave the Paper Size, Sides, and Continuous Scan as defaults.
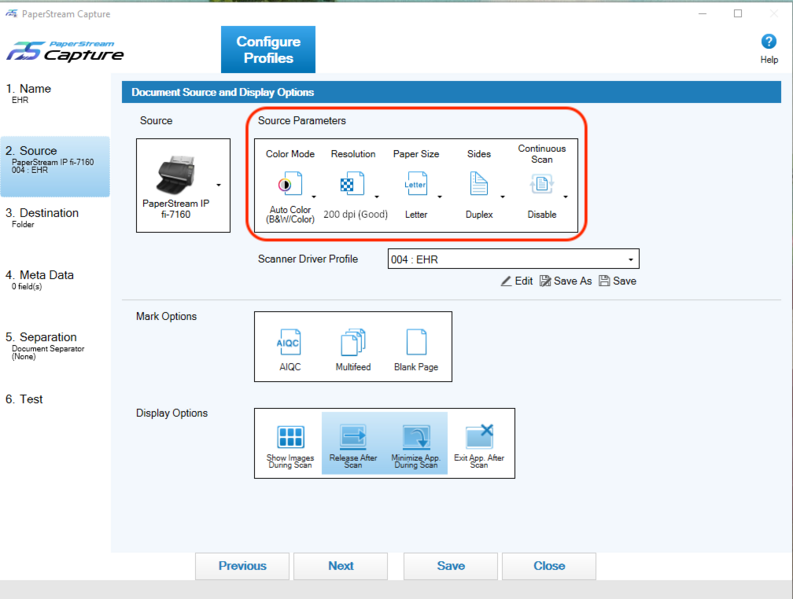
Configure Display Options
In Display Options, set the following:
- “Release After Scan”
- “Minimize App. During Scan”
- Do not select “Exit App After Scan”, as this can slow scanning time.
Leave Mark Options on the default settings.
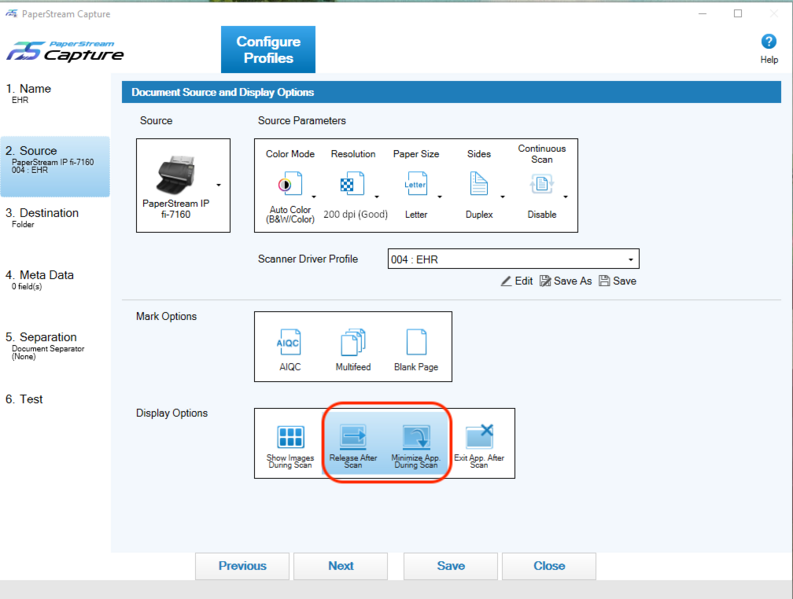
Save and Name Your Profile
Click “Save As” under the Scanner Driver Profile drop-down. Name this driver profile “EHR” at the prompt.
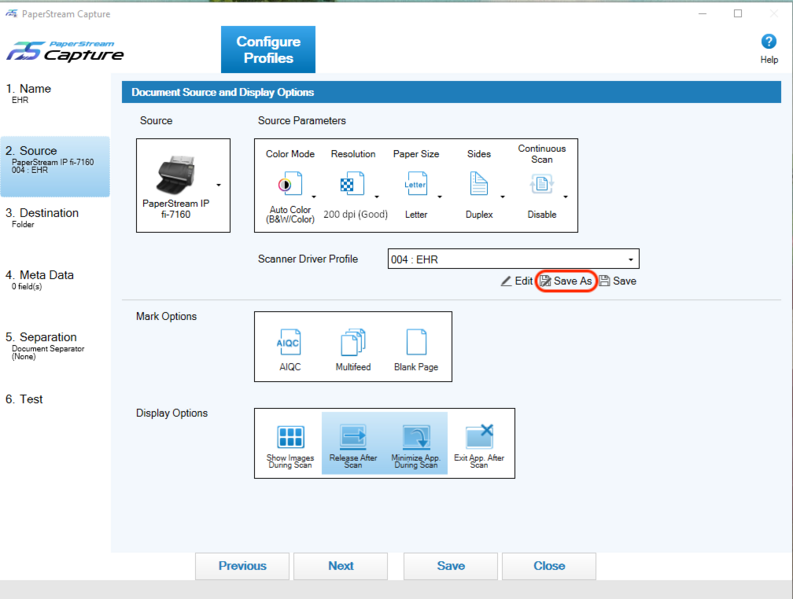
Configure Your Scanner Profile Destination
Select “3. Destination” on the left menu. Change the default TIF to a PDF.
In the Folder field, type: \\acro\scanning\bucket###. Replace “acro” with your PCC practice acronym and “###” with your chosen bucket number (bucket001, for example). Use only lowercase for the acronym, and backslash “\” as opposed to “/” forward slash.
Which Bucket?: To pick a bucket number, log in to PCC EHR, select Documents from the Configuration menu, visit the Import Documents tab, and choose a bucket from the “File Source” column. For more information on buckets, visit Configure Document Categories, File Sources, and Default Behaviors.
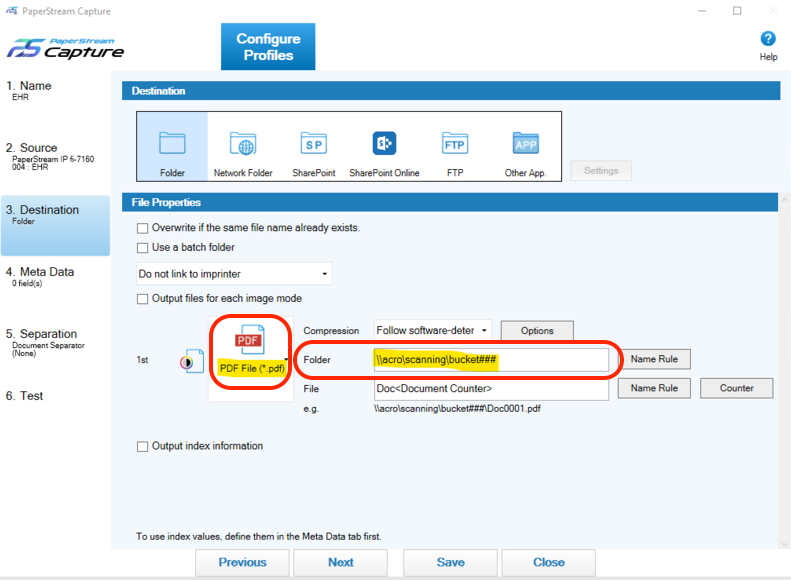
Save You Scanner Configuration
Click “Save”. If a warning pops up, click “Yes” and “Close”.
Return to the Main Screen
Click the “Back” button to return to the main screen.

Map Your Scanner to the EHR Profile
Click the Lines menu and select the Administrator Tool. Select “Usability” from the left menu. Choose the “EHR” profile from the Scan drop-down.
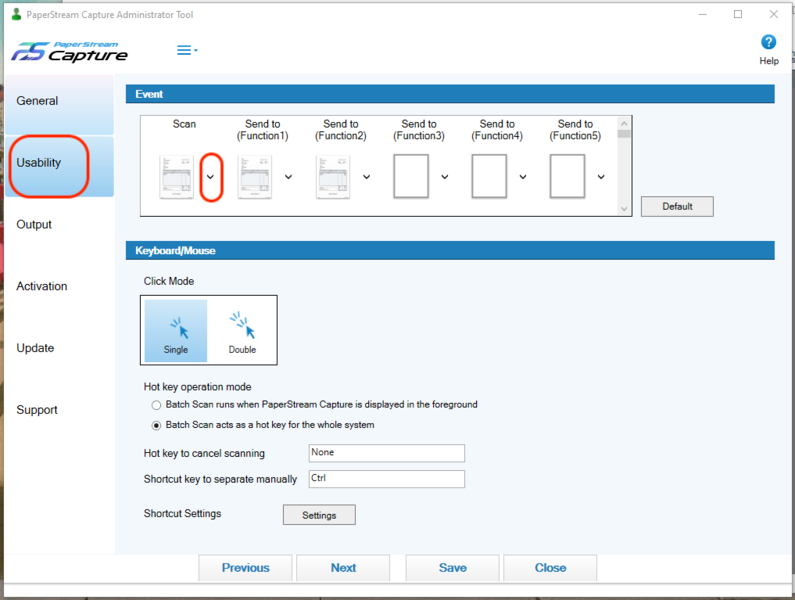
Save Your Scanner Profile
Click “Save” and then “Close” to return to the main screen. Your EHR profile and rules are now set and you are ready to try a test scan.
Test Scanning a Document to PCC EHR
Follow the Fujitsu fi-7160 instructions to scan your first document. This first scan will be slow as the service is running for the first time.
When the scan completes, log into PCC EHR and navigate to Import Documents. The PaperStream application will flash orange on your toolbar as the scan is processed and the “Load New Files” button on the Import Documents screen will highlight yellow. Click the “Import Documents” button to load the scan into PCC EHR.
By default, you will see documents from all sources. You can change the File Source drop-down to select a specific bucket. Your scanner is now fully installed. For more information on importing documents, visit Attach a Document to a Patient’s Chart.
Configure Incoming CHADIS Questionnaire Results
When your patients, parents, and other users complete a CHADIS questionnaire, the results are automatically returned to PCC EHR, so you can review results quickly, without logging in to CHADIS at all.
To configure results, and ensure that incoming results are matched to the correct visit type, begin by linking questionnaires to orders through the Protocol tool in PCC EHR’s Configuration menu.
Open Protocol Configuration
In Protocol Configuration, select Component Builder, and open the Screening Orders component.
Any of these orders can be associated with a CHADIS questionnaire.
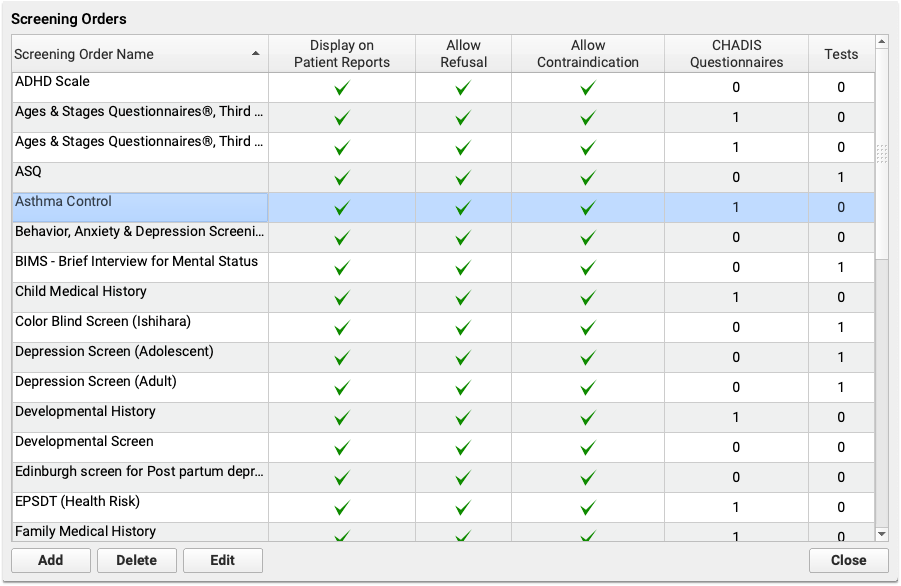
Open Questionnaires
Click “Add a Questionnaire” to open the full list of CHADIS questionnaires.
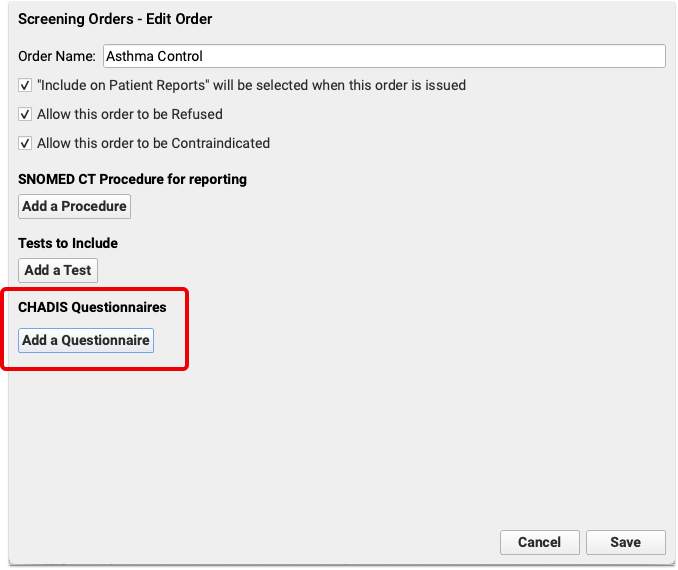
Select Questionnaire
Select one or more questionnaires to link it to the screening order selected above. You can use the search box in the upper right corner of the window to narrow the list of questionnaires and find exactly the questionnaire you need.
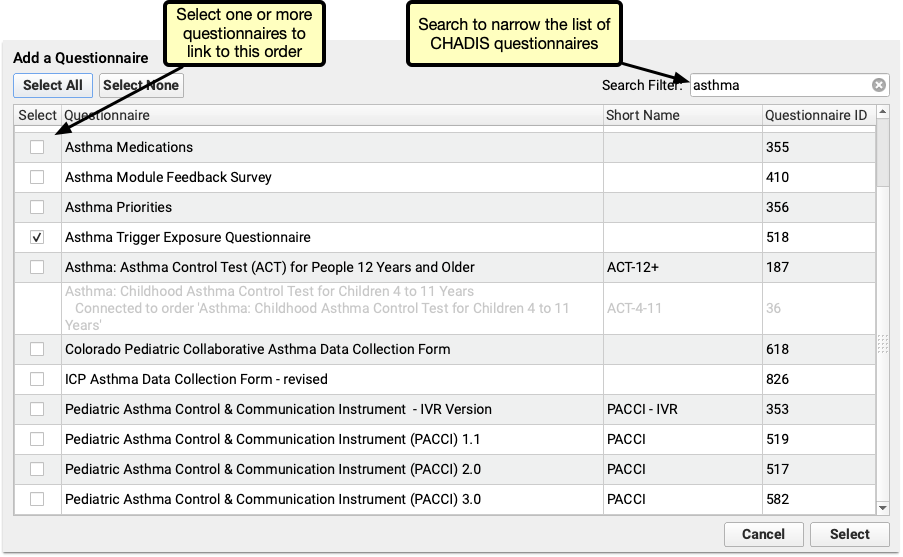
Each Questionnaire Can be Assigned Once: Each order can have multiple questionnaires assigned to it, but each questionnaire can only be associated with a single order. If a questionnaire is gray and cannot be selected, that questionnaire is already assigned to an order.
Some things to consider as you’re adding questionnaires to orders:
- The simplest configuration is to add one order per questionnaire. For example, if you use CHADIS questionnaire #947, ADHD Developmental Intake Form, then create an order called “ADHD Developmental Intake Questionnaire” and assign the questionnaire to it.
- For questionnaires that have different versions sorted by age, consider assigning all ages to a single order. Assigning all ages to one screening order, means you only need to configure billing for one order, rather than a separate order for each age.
- Some questionnaires have different versions based on the respondent. For example, the Pediatric Symptom Checklist questionnaires include versions for both the parent and patient. Assigning both to the same order will group the results together in the visit, making it easier to compare the two without and closing two separate orders.
- Consider the workflow for incoming results. If results require creating a task, such as manually updating medical history, assign those medical history questionnaires to a single order, and then assign one task from that order.
Decide If a Signature is Required
If a signature should be required on the results when they arrive, check the signature required box. Any questionnaire that requires a signature will appear on the signing queue when the result arrives.
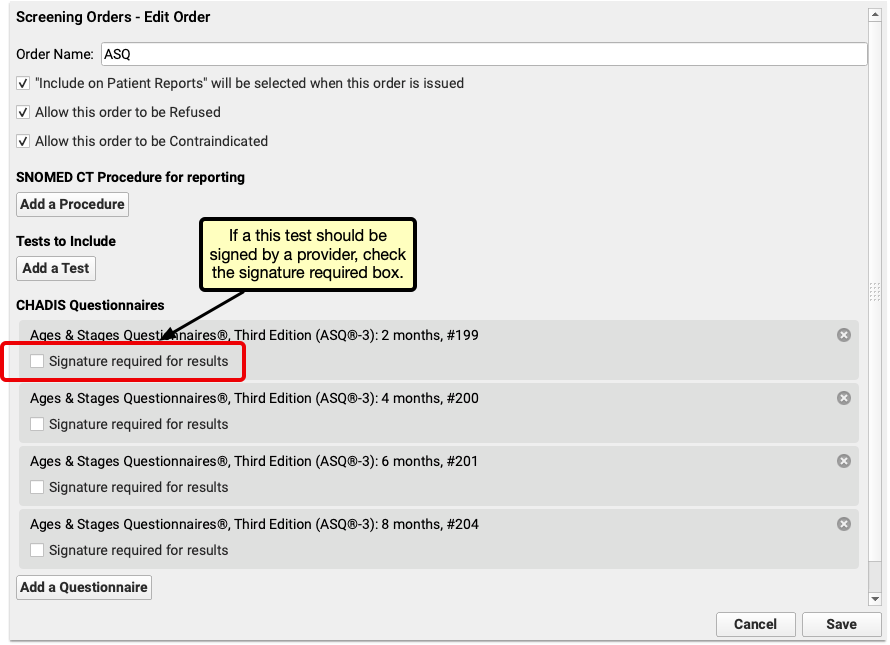
Link LOINC codes to Screening Orders
To track CHADIS screening questionnaires for Clinical Quality Measures and PCMH, add matching tests to each Screening Order. Under the “Tests to Include” heading, click “Add a Test” and select the appropriate test. When tracking for Clinical Quality Measures, depression screenings require a result before they will appear in CQM reports.
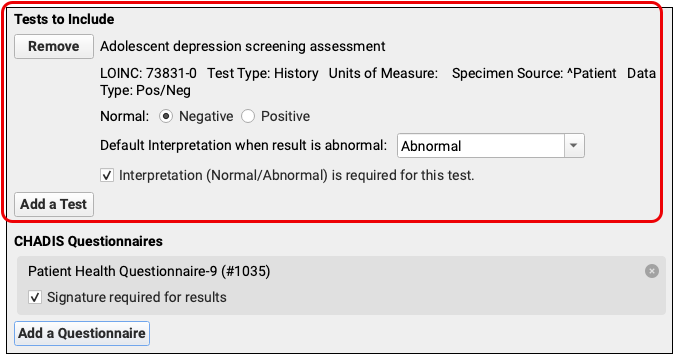
Tasks are automatically assigned a due date the same day as the visit, so that tasks won’t appear on the task list before the patient arrives.
When a provider opens the visit, the results are available to review. New tasks can then be assigned and results entered.

Clicking “Details” opens the CHADIS results. If an order includes results from multiple respondents, each respondent’s results will have their own tab.
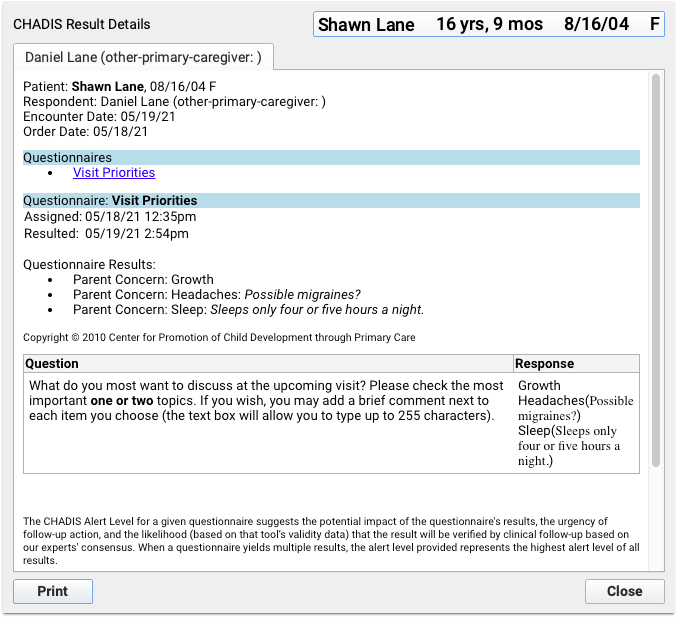
If a CHADIS result arrives that has not been assigned to a patient or portal user, results will appear unassigned in the messaging queue.
Unassigned results are similar to documents or lab results. Select them, search for the patient and assign them to a visit. Once results are assigned the patient and visit, they can be reviewed, signed and marked complete.
Mark an Appointment As Missed or Canceled
When a patient doesn’t show up for a visit or your practice needs to cancel an appointment, you can change the appointment’s status in PCC EHR and report on it later.
Mark an Appointment as Missed or Canceled in the Patient’s Chart
You can mark an appointment as missed or canceled in the Appointment History component within a patient’s chart.
Open the Patient’s Chart
Use the search box in the top left corner of the PCC EHR window to search for the patient whose appointment you need to mark as missed or canceled.
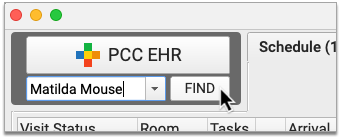
Select the patient from the search results to open their chart.
Find the Appointment History Component
Find the Appointment History component within the patient’s chart. Usually it appears in the patient’s Medical Summary.
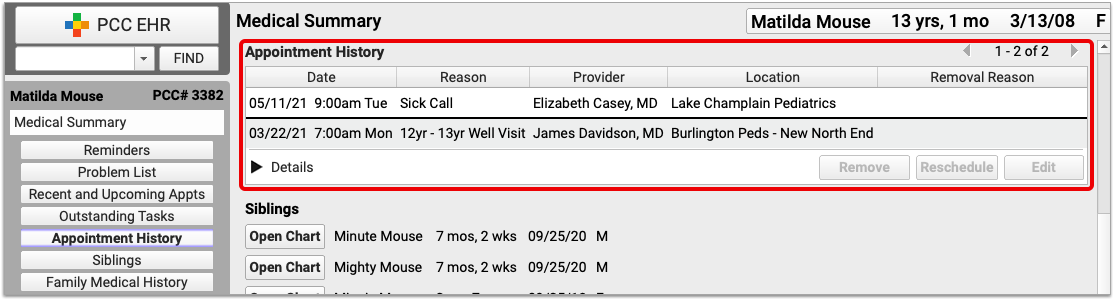
Where is the Appointment History Component?: The Appointment History component can be configured to appear in patient charts and other places in PCC EHR. If you can’t find the Appointment History component, speak to an administrator at your practice and ask to have it added, or contact PCC Support for help.
Find the Appointment and Mark It Missed or Canceled
Within the Appointment History component, find and select the appointment you want to mark as missed or canceled.
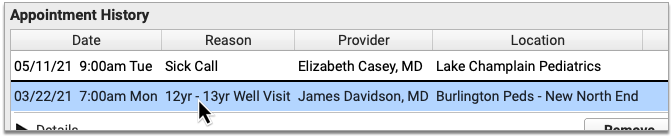
Click the “Remove” button, then choose a reason for removing the appointment.

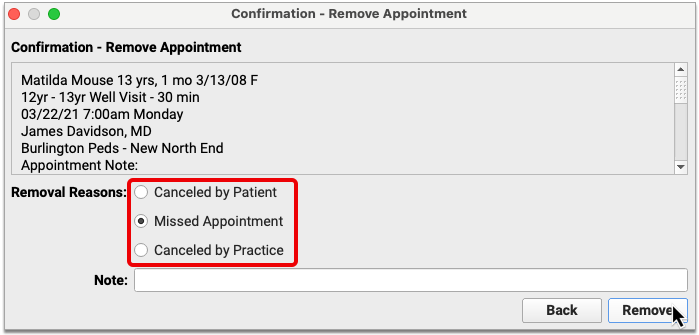
Optionally leave a note, then click the “Remove” button to finish marking the appointment as missed or canceled.
Missed and canceled appointments do not appear on the schedule screen in PCC EHR, and also get removed from the Appointment Book.
You can report on missed and canceled appointments in the PCC EHR Report Library.
Mark an Appointment as Missed or Canceled in the Appointment Book
It’s easy to mark appointments as missed or canceled when working in the Appointment Book.
Open the Appointment Book
Find the calendar icon in the bottom left corner of your PCC EHR window and click it to open the Appointment Book.

You can also open an Appointment Book window from the File menu in PCC EHR.
Go to the Day of the Appointment
Once in the Appointment Book, go to the day of the appointment that was missed or needs to be canceled.
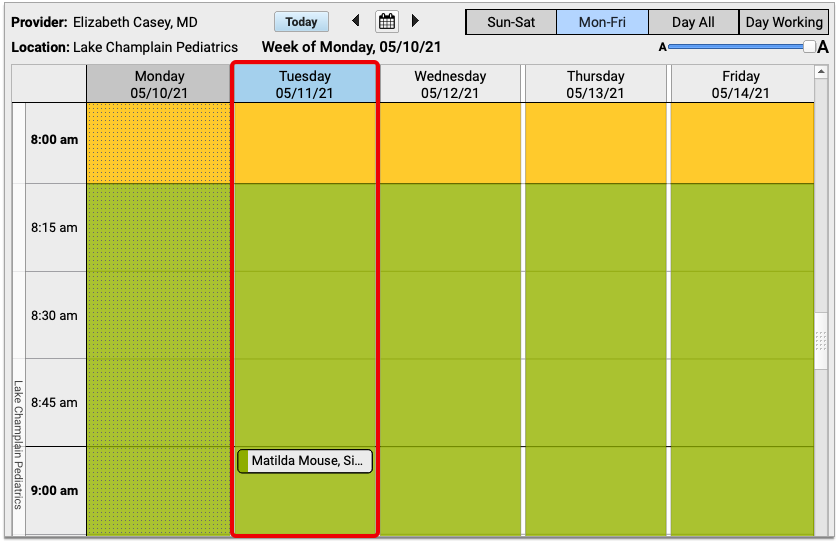
You can advance the calendar view one week or day at a time by using the arrows at the top of the Appointment Book window.
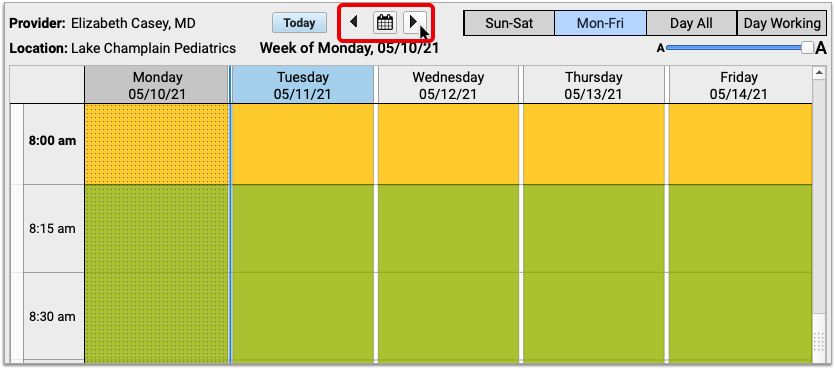
You can also click on the calendar icon at the top of the Appointment Book and use it to select the day you want to view.
Find the Appointment in the Schedule
Once on the right day in the Appointment Book, locate the appointment you need to mark as missed or canceled.
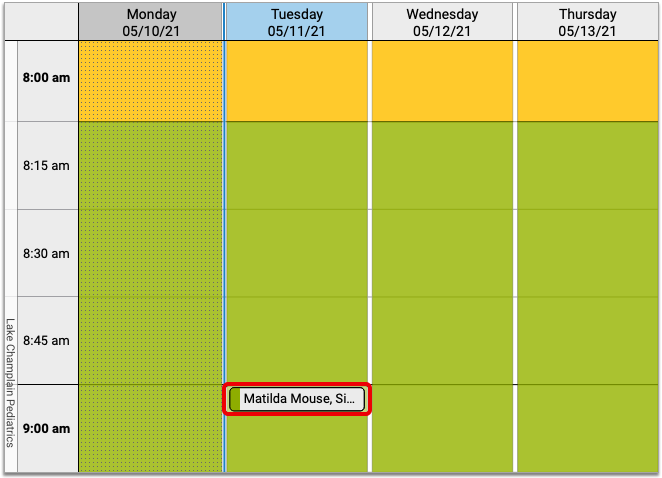
Depending on how you are viewing the schedule, you might need to scroll up and down or from side to side in order to find the appointment.
Select the Appointment and Mark it Missed or Canceled
Click on the appointment with your mouse.
Once selected, details about the appointment appear on the left edge of the Appointment Book window, along with buttons which allow you to take actions.

Click the “Remove” button, then choose a reason for removing the appointment and optionally leave a note.
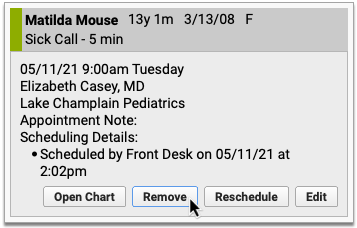
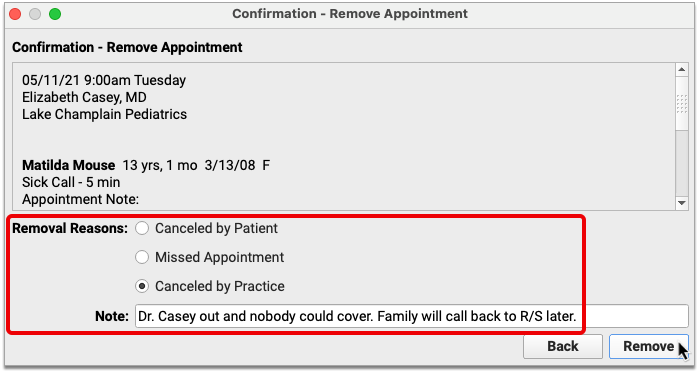
Click the “Remove” button to finish marking the appointment as missed or canceled.
Missed and canceled appointments do not appear on the schedule screen in PCC EHR, and also get removed from the Appointment Book.
You can report on missed and canceled appointments in the PCC EHR Report Library, or look up any patient’s missed and canceled appointments in the Appointment History component in their chart.
Report on Missed and Canceled Appointments
You can generate lists of missed and canceled appointments in the PCC EHR Report Library, then use them to post missed appointment fees or to identify patterns of cancellation at your practice.
Build a Custom Report for Missed and Canceled Appointments
You can create custom reports to identify missed and canceled appointments.
Open the Report Library
Open the Report Library from the Reports menu in PCC EHR.
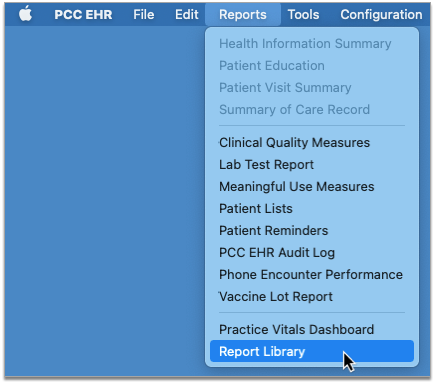
Open the Appointments Report
Once in the Report Library, select the “Appointment” category, then open the “Appointments” report.
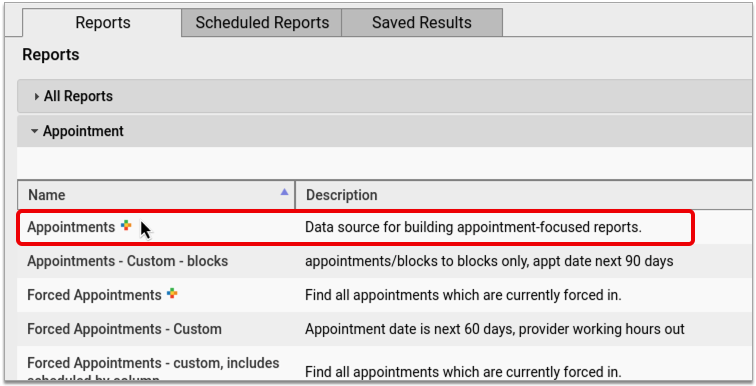
Customize the Appointments Report
In the Appointments report, click the “Customize” button at the bottom right of the window to begin setting up a custom report for missed and canceled appointments.
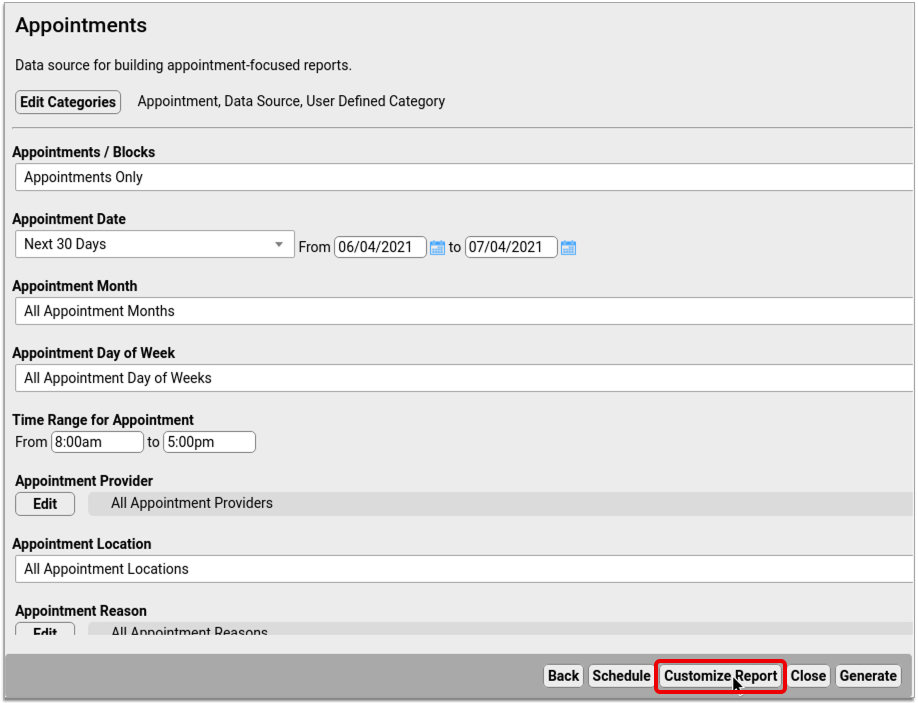
Set Up the Report to Find All Missed and/or Canceled Appointments
Set up a basic report that will allow you to find all missed and canceled appointments.
First, the report a unique title, description, and category so that you can find it again later.

Click the “Edit” button in the “Select Columns to Include” section, then select the columns you want to see on the final report. At a minimum, you should make sure to include the “Last Scheduling Action” column.
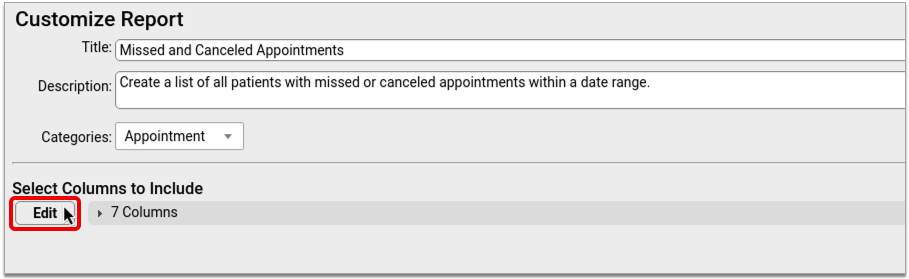
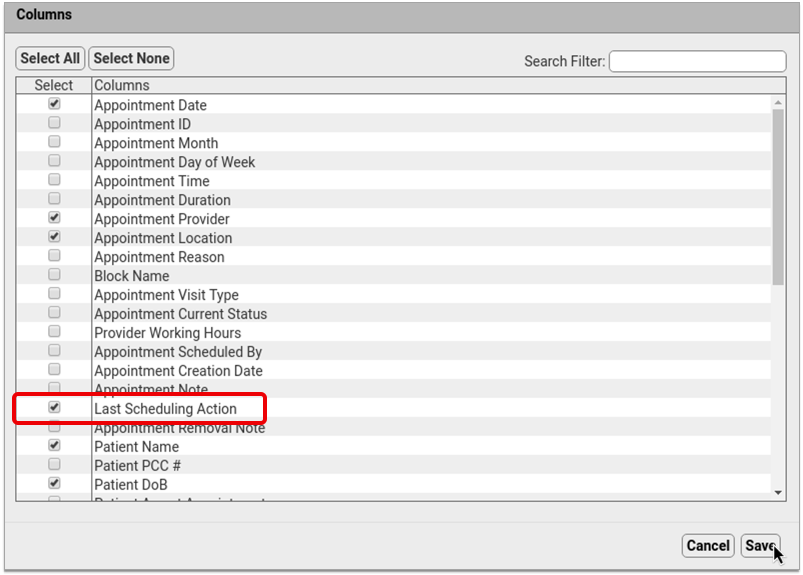
Once you have picked and saved the columns for your report, click the “Select Criteria” button and choose the report criteria. At a minimum, your report should include the “Appointment Date” and “Last Scheduling Action” criteria.
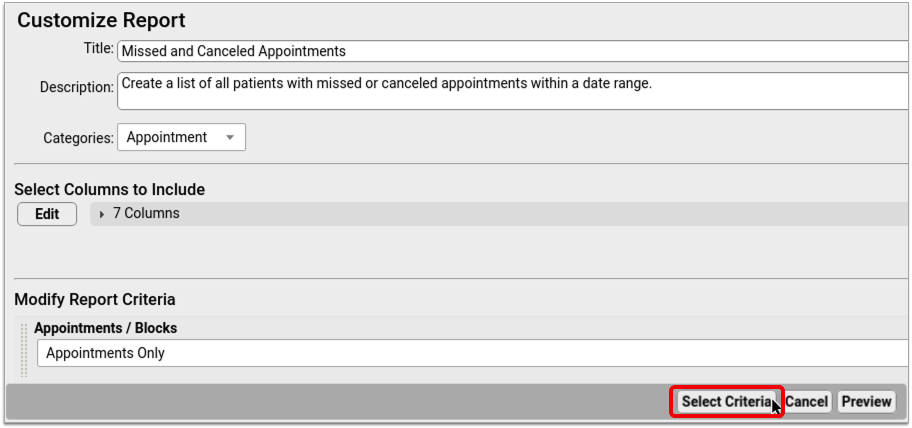
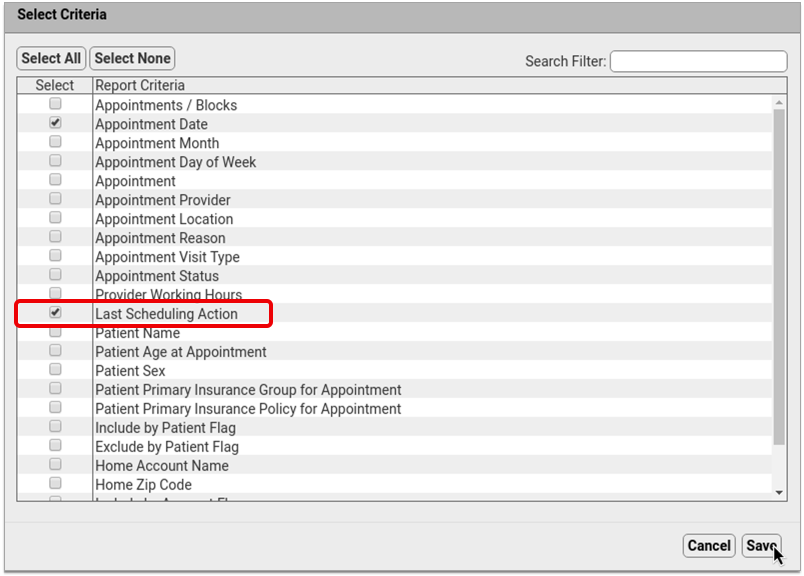
Once you select the criteria, set up their default values. These settings will be used as a default whenever you generate this report.

These criteria will allow you to find all missed and/or canceled appointments within a selected date range.
Add More Criteria for More Granular Reporting: You can include additional criteria in your report if you want to be able to filter the results in a more granular fashion. For example, if you want to be able to generate a list of all missed or canceled appointments for a particular provider, visit reason, or location, select those criteria from the list now to add them to your report settings.
Preview Your Custom Report and Adjust the Output
After setting up criteria for your custom report, click the “Preview” button to see how the report will look once generated.
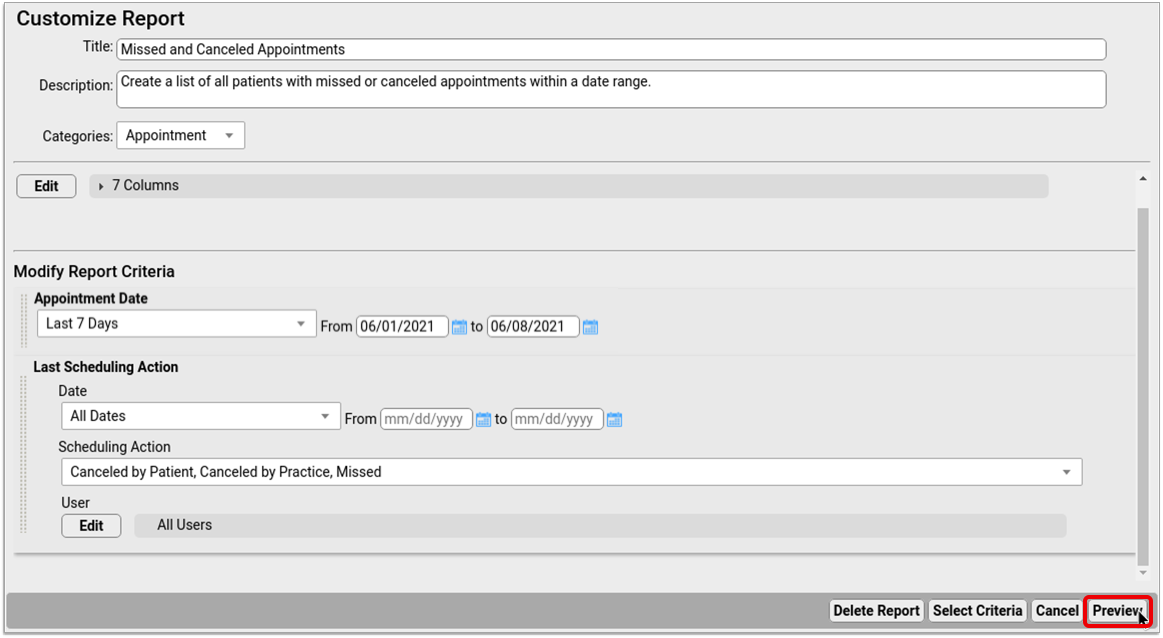
In the preview screen, open the “Columns” drop-down list and select whichever columns you want to display on your report by default. Be sure to include the column called “Last Scheduling Action”.
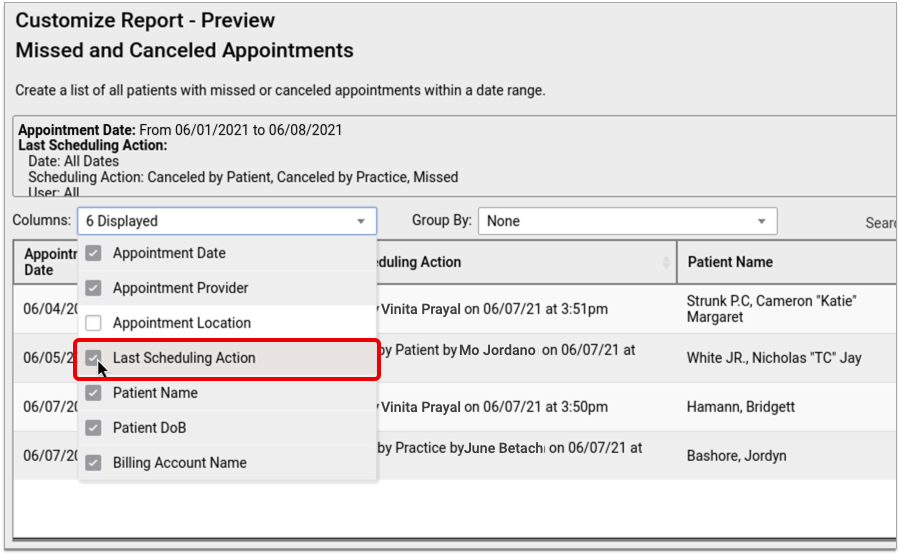
If you want to make other changes to the way your report looks when you generate it, do that now. You can click, drag, and drop columns to rearrange them, group your results, or re-sort the list by clicking on column headers.
The display settings you choose now will be the default for this report.
Save Your Custom Report
Click “Save As” to save your custom report.
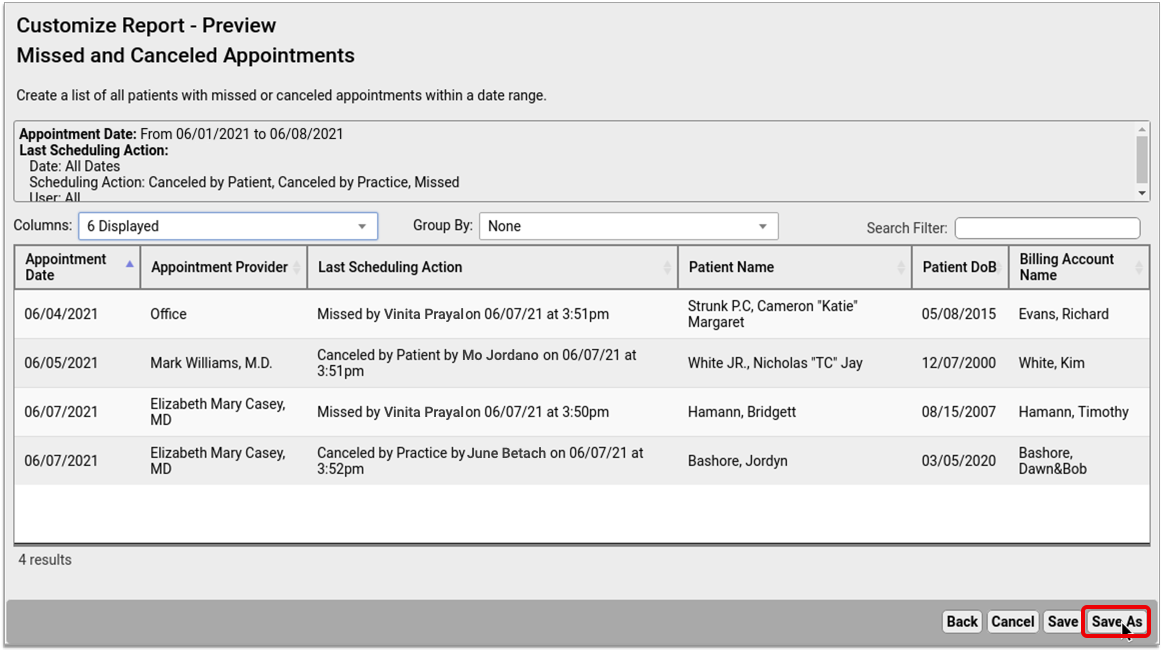
Generate Your Custom Missed and Canceled Appointment Report
Once you create a custom report for missed and canceled appointments, you can generate it at any time in the Report Library in PCC EHR.
Find Your Custom Missed and Canceled Appointments Report in the Report Library
In the Report Library in PCC EHR, find your custom report for missed and canceled appointments.

If you don’t know which specific category the report is in, you can find it under “All Reports”.
Generate the Report and Review the Results
In the report criteria screen, pick a date range of appointments to report on, then click the “Generate” button.
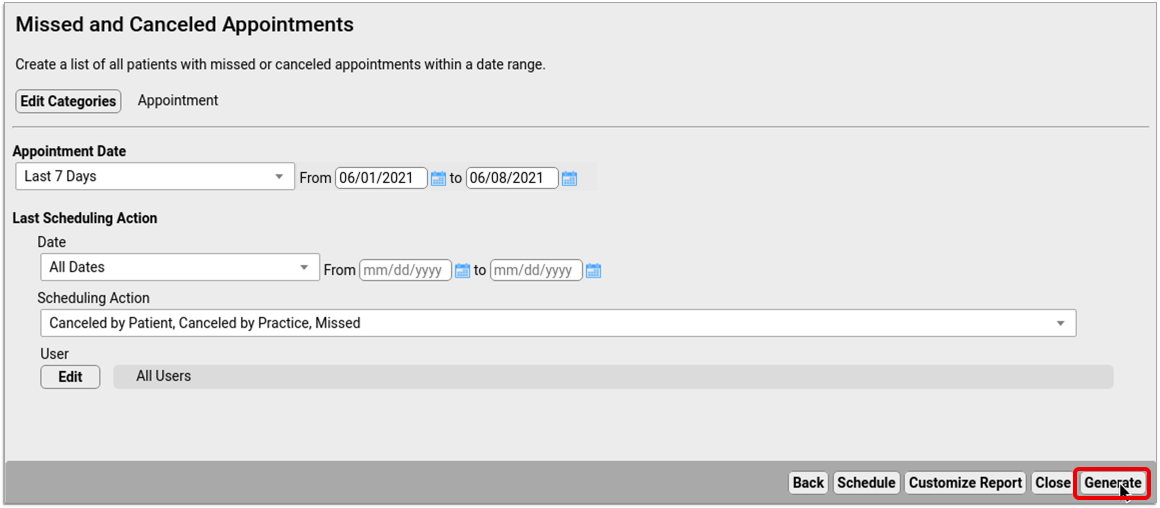
There might be a pause while the results generate. Once the results appear on the screen, check that the list contains the information you need.

You can sort on a certain column, reorder the columns, or group the results to suit your purpose.
If you need to change the report settings, click the “Back” button, make adjustments to the criteria, then re-generate the report.
Optionally Export the Results and Save Them to Your Workstation
Once you are happy with the way your report results are organized on the screen, you can export the list from PCC EHR and save it on your local workstation.
Click the “Export” button, then choose an output format.
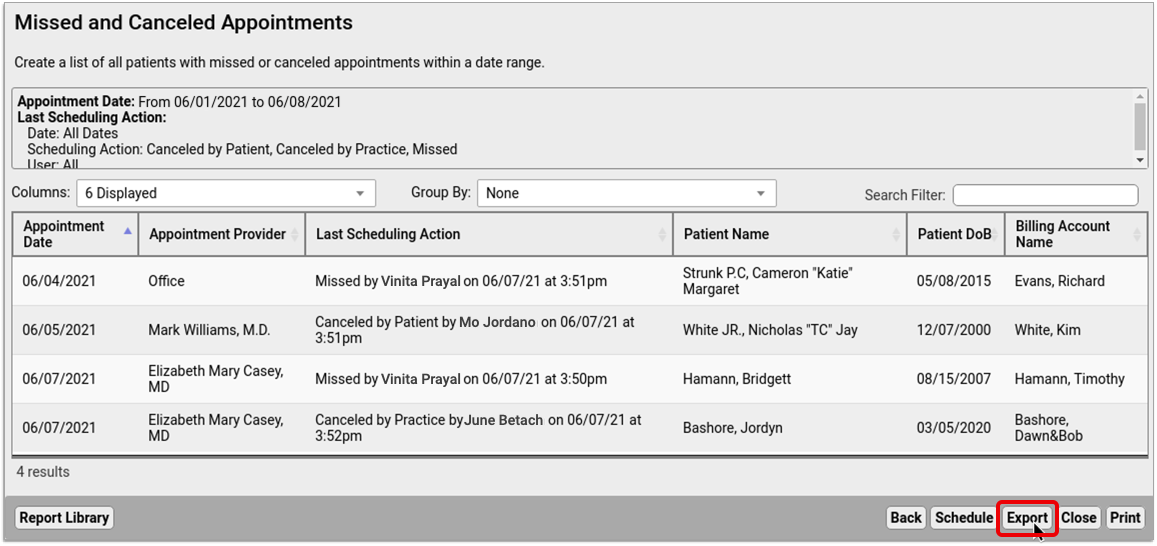
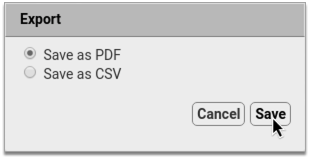
Click the “Save” button, then choose where to save the report file on your local workstation.
Optionally Print the Results
If you need to be able to scribble on the report and make notes in pencil or pen, you can print the list out of PCC EHR.
Click the “Print” button, then choose a printer.
Click the “Print” button to finish sending the report to your printer.
Optionally Schedule the Report to Run Again at a Later Date
If you like your report and plan to use it routinely, you can schedule it to run automatically at set intervals.
Click the “Schedule” button at the bottom of the report results window, then choose a name, the frequency with which you want to run the report, and the time of day at which you want it to generate.
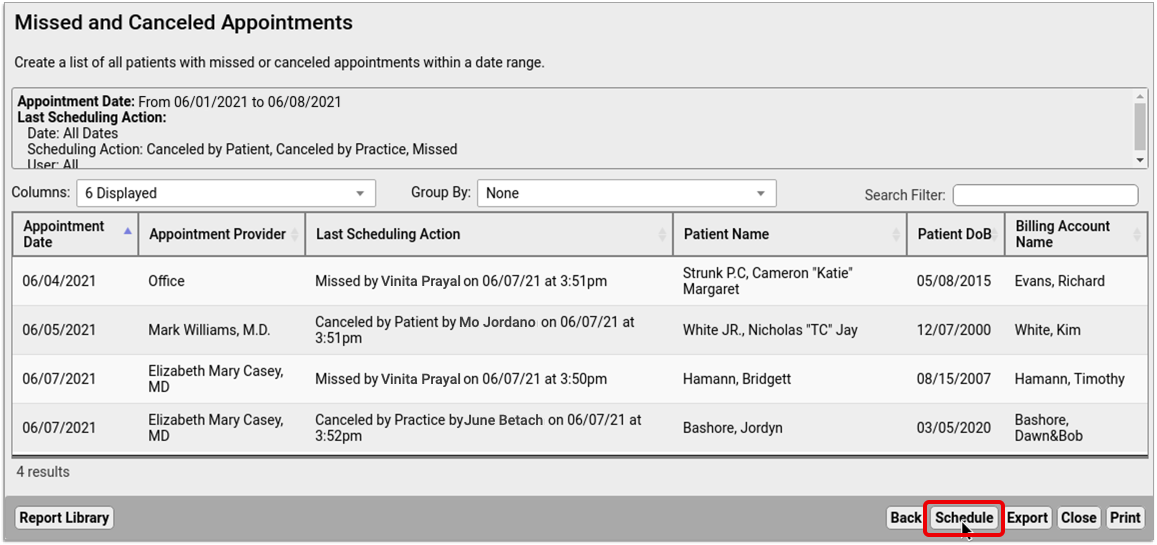
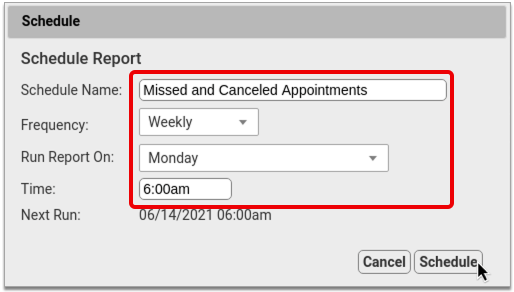
Click “Schedule” to finish scheduling the report to run at regular intervals. You can find the results of scheduled reports in the “Saved Results” tab of the Report Library.
April 2021 SNOMED-CT Update
On April 11, 2021, PCC updated the SNOMED-CT diagnostic terms on your practice’s PCC system to the latest code set.
PCC regularly updates your system’s ICD-10, LOINC, SNOMED-CT, NDC, RVU, VIS, and other standardized lists so you won’t encounter challenges when you chart, order a lab, interface with a care provider, or bill for a visit. (Your practice’s local system automatically updates your practice’s procedure codes.)
Read below to learn about changes to preferred terms that may affect searching, new allergies, common diagnosis descriptions that were removed from SNOMED-CT, and new additions to your practice’s quick search Favorites.
Changes to the Preferred Term for Common Descriptions
The April 2021 SNOMED-CT update changes some terms that are used at pediatric practices. Clinicians may need to type a different search word to find these descriptions than what they used before. For example, the spelling of “weal” has been changed to “wheal”, and “Adverse reaction to vaccine product” is now “Vaccine adverse reaction”.
Here is a table of common SNOMED-CT diagnosis descriptions that have new preferred terms. PCC identifies these as possibly requiring a different search term, or just being useful to know for awareness.
| New Preferred Term | Old Preferred Term |
| Bilateral infantile esotropia of eyes | Bilateral congenital esotropia of eyes |
| Bullous wheal | Bullous weal |
| Childhood granulomatous periorificial dermatitis | Facial Afro-Caribbean childhood eruption |
| Chronic irritant contact dermatitis of hands | Cumulative irritant contact dermatitis of hands |
| Contact dermatitis caused by chlorinated hydrocarbon | Contact dermatitis due to chlorocompound |
| Contact dermatitis caused by feces | Feces-induced contact dermatitis |
| Contact dermatitis caused by fiberglass | Fiberglass dermatitis |
| Contact dermatitis caused by poison primrose | Contact dermatitis due to primrose |
| Contact dermatitis caused by ragweed | Contact dermatitis due to ragweed |
| Contact dermatitis caused by saliva | Saliva-induced contact dermatitis |
| Contact dermatitis caused by urine | Urine induced contact dermatitis |
| Contact dermatitis of hand | Contact hand eczema |
| Decreased body mass index | Body mass index below normal parameters |
| Dermatosis in childhood | Dermatosis in a child |
| Erythema multiforme due to viral disease | Erythema multiforme caused by virus |
| Exanthem due to varicella | Exanthem due to chicken pox |
| Fetal disorder due to disease in mother | Fetal damage from disease in the mother |
| Increased body mass index | Body mass index above normal parameters |
| Infantile esotropia | Congenital esotropia |
| Infantile esotropia of left eye | Congenital esotropia of left eye |
| Infantile esotropia of right eye | Congenital esotropia of right eye |
| Infection caused by Paragonimus westermani | Infection by Paragonimus westermanii |
| Irritant contact dermatitis caused by ring | Ring dermatitis |
| Irritant contact dermatitis due to lip-licking | Lip-licking eczema |
| Irritant contact dermatitis of hand | Irritant contact hand eczema |
| Mass of head and/or neck | Mass in head or neck |
| Normal body mass index | Body mass index within normal parameters |
| Pervasive developmental disorder with disorder of intellectual development and absence of functional language with loss of previously acquired skills | Pervasive developmental disorder with disorder of intellectual development and abscence of functional language with loss of previously acquired skills |
| Psoriasis of scalp | Scalp psoriasis |
| Psoriasis with eczema | Psoriasis-eczema overlap condition |
| Swelling of ear | Swelling of ear structure |
| Vaccine adverse reaction | Adverse reaction to vaccine product |
| Wheal | Weal |
New Allergies of Interest to Pediatrics
The April 2021 SNOMED-CT update adds 14 allergies which may be of interest to pediatric clinicians.
| Acute allergic otitis media of left middle ear |
| Acute allergic otitis media of right middle ear |
| Allergic contact dermatitis caused by grease |
| Allergic contact dermatitis caused by oil |
| Allergic contact dermatitis caused by poison primrose |
| Allergic contact dermatitis caused by ragweed |
| Allergic contact dermatitis caused by soap |
| Allergic contact dermatitis caused by urushiol from Eastern poison ivy |
| Allergic contact dermatitis caused by urushiol from poison sumac |
| Allergic contact dermatitis due to jewelry |
| Allergic reaction caused by Hevea brasiliensis latex protein |
| Allergy to hair dye |
| Bilateral acute allergic otitis media of middle ears |
| Bilateral chronic allergic otitis media of middle ears |
Deprecated SNOMED Diagnosis Descriptions
The April 2021 SNOMED-CT update removes or replaces many codes common to pediatric practices. Your practice may want to take special note of them.
Here are the top codes used by PCC’s pediatric practices that were removed from the international SNOMED-CT diagnosis library in 2021. When practices had these codes available for one-click selection on a chart note protocol, PCC added a replacement. For other diagnoses, your providers can find related descriptions with a search, but you may want to plan ahead.
| Allergy to dairy food | 425525006 |
| Allergy to latex | 300916003 |
| Blood in feces symptom | 249624003 |
| C/O – cough | 272039006 |
| C/O – low back pain | 161894002 |
| C/O – postnasal drip | 162382001 |
| C/O nasal congestion | 272034001 |
| C/O: a rash | 162415008 |
| Fetal or neonatal effect of maternal problem unrelated to pregnancy | 206001006 |
| Knee pain | 30989003 |
| O/E – erythematous rash | 135888007 |
| O/E – expiratory wheeze | 162894004 |
| O/E – general eye examination | 162806009 |
| O/E – intoeing | 275864001 |
| O/E – itchy rash | 304386008 |
| O/E – pyrexia of unknown origin | 164288004 |
| O/E – rash present | 268911002 |
| O/E – rhinorrhea | 164184005 |
| O/E – speech delay | 391099000 |
| O/E-herpes labialis-cold sore | 163139004 |
| Tick bite without infection | 443930005 |
| Unilateral earache | 162358006 |
| Unilateral undescended testis | 268227001 |
New Favorites Available in Diagnosis Quick Search
The SNOMED-CT update adds 1710 diagnosis descriptions to your system.
In preparation for the update, PCC’s certified coder, Jan Blanchard, assembled a list of 314 new SNOMED-CT descriptions of interest to pediatricians. The update added these diagnoses, which include the COVID-19 diagnosis, to your practice’s default Favorites list for quick searching, unless your practice has specifically requested otherwise.
What is a diagnosis 'Favorites' list?: As you type or search in any diagnosis field, PCC EHR automatically searches a customizable list of Favorites. Use the Diagnosis Configuration tool to adjust your practice’s list of Favorites. You can also right-click on any diagnosis field in PCC EHR to search your system’s full SNOMED-CT diagnosis library.
| Acquired cryptorchidism | Acquired cryptorchidism of left testis | Acquired cryptorchidism of right testis | Acquired structural abnormality of pharyngotympanic tube following procedure |
| Acute allergic otitis media of left middle ear | Acute allergic otitis media of right middle ear | Acute COVID-19 | Acute mucoid otitis media of left middle ear |
| Adverse reaction to amoxicillin and/or clavulanic acid | Adverse reaction to ampicillin and/or floxacillin | Adverse reaction to COVID-19 antigen vaccine | Adverse reaction to COVID-19 mRNA vaccine |
| Adverse reaction to COVID-19 vaccine | Adverse reaction to sulfamethoxazole and/or trimethoprim | Allergic contact dermatitis caused by grease | Allergic contact dermatitis caused by oil |
| Allergic contact dermatitis caused by poison primrose | Allergic contact dermatitis caused by ragweed | Allergic contact dermatitis caused by soap | Allergic contact dermatitis caused by urushiol from Eastern poison ivy |
| Allergic contact dermatitis caused by urushiol from poison sumac | Allergic contact dermatitis due to jewelry | Allergy to hair dye | At increased risk of forced marriage |
| At increased risk of human trafficking | At increased risk of institutional abuse | At risk for medication error | Bilateral acute allergic otitis media of middle ears |
| Bilateral adhesive otitis media of middle ears | Bilateral cracked nipples | Bilateral distortion of visual image of eyes | Bilateral mucoid otitis media of middle ears |
| Bilateral swelling of ears | Bilateral swelling of wrist joints | Bilateral synovitis of joint of knees | Bilateral talipes calcaneovarus |
| Bilateral talipes equinovarus | Bilateral testicular agenesis | Blount disease | Body piercing |
| Breakthrough pain | Bronchial irritation | Bulimia nervosa in full remission | Bulimia nervosa in partial remission |
| Bursitis of left wrist | Bursitis of right wrist | Carbuncle of left axilla | Carbuncle of left lower limb |
| Carbuncle of left thigh | Carbuncle of right axilla | Carbuncle of right lower limb | Carbuncle of right thigh |
| Carrier of Staphylococcus epidermidis | Chronic papillomatous dermatitis due to contact with urine and/or feces | Chronic perichondritis of left external ear | Chronic perichondritis of right external ear |
| Chronic post-COVID-19 syndrome | Chronic rhinosinusitis | Chronic tubotympanic suppurative otitis media of left middle ear | Chronic tubotympanic suppurative otitis media of right middle ear |
| Cleft of left hard palate | Cleft of right hard palate | Complete cleft of left hard and soft palate | Complete cleft of right hard and soft palate |
| Conductive hearing loss of left ear | Conductive hearing loss of left ear with normal hearing on right side | Conductive hearing loss of right ear | Conductive hearing loss of right ear with normal hearing on left side |
| Congenital clinodactyly of finger | Congenital clinodactyly of little finger | Congenital dislocation of bilateral elbows | Congenital dislocation of joint |
| Congenital short ear | Congenital stenosis of male external urethral orifice | Congenital subluxation of left hip joint | Congenital subluxation of right hip joint |
| Congenital torsion of left ovary | Congenital torsion of right ovary | Contusion of head and/or neck | Dermatitis due to cat mite infestation |
| Dermatitis due to chicken mite infestation | Dermatitis due to dog mite infestation | Dermatitis due to exposure to man-made ultraviolet light | Dermatitis due to mouse mite infestation |
| Dermatitis due to northern fowl mite infestation | Dermatitis due to rabbit mite infestation | Dermatitis due to rat mite infestation | Developmental dysplasia of left hip |
| Developmental dysplasia of right hip | Distortion of visual image of left eye | Distortion of visual image of right eye | Does participate in outdoor sporting activities |
| Domestic abuse victim in household | Enlargement of left tonsil | Enlargement of right tonsil | Epidermal burn of left upper arm |
| Epidermal burn of right upper arm | Epidermal nevus of left lower eyelid | Epidermal nevus of left upper eyelid | Epidermal nevus of right lower eyelid |
| Epidermal nevus of right upper eyelid | Excessive intake of ascorbic acid | Excessive intake of calcium | Excessive intake of energy |
| Excessive intake of iron | Excessive intake of niacin | Excessive intake of phosphorus | Excessive intake of plant fiber |
| Excessive intake of potassium | Excessive intake of protein and protein derivative | Excessive intake of riboflavin | Excessive intake of thiamine |
| Excessive intake of zinc | Female genital Trichomonas vaginalis infection | Fissure of left nipple during lactation | Fissure of right nipple during lactation |
| Food security | Fracture of knee | Frequent attender of emergency room | Furuncle of left ankle |
| Furuncle of left forearm | Furuncle of left hand | Furuncle of left hip | Furuncle of right ankle |
| Furuncle of right forearm | Furuncle of right hand | Furuncle of right hip | Headache after cough |
| Hemiparesis of left side of face | Hemiparesis of right side of face | Hyperactive labyrinthine dysfunction of left inner ear | Hyperactive labyrinthine dysfunction of right inner ear |
| Hypersensitivity to SARS-CoV-2 mRNA vaccine | Immunization series incomplete | Inadequate intake of ascorbic acid | Inadequate intake of calcium |
| Inadequate intake of energy | Inadequate intake of fat and oil | Inadequate intake of iron | Inadequate intake of niacin |
| Inadequate intake of plant fiber | Inadequate intake of potassium | Inadequate intake of protein and protein derivative | Inadequate intake of riboflavin |
| Inadequate intake of thiamine | Inadequate intake of zinc | Indirect left inguinal hernia | Indirect right inguinal hernia |
| Infection of left nipple during lactation | Infection of right nipple during lactation | Injury of head and/or neck | Injury of muscle and tendon of lower leg |
| Injury of muscle of lower leg | Injury of shoulder and/or upper arm | Injury of tendon of lower leg | Injury of wrist and/or hand |
| Irritant contact dermatitis caused by chlorine in swimming pool | Irritant contact dermatitis caused by feces | Irritant contact dermatitis caused by grease | Irritant contact dermatitis caused by oil |
| Irritant contact dermatitis caused by saliva | Irritant contact dermatitis caused by urine | Irritant contact dermatitis due to concrete | Irritant contact dermatitis due to jewelry |
| Irritant contact dermatitis due to stoma | Irritant contact dermatitis of hand caused by grease | Irritant contact dermatitis of hand caused by oil | Irritant contact dermatitis of hand due to concrete |
| Itching of both hands | Lack of support for smoking cessation | Lesion of nasal cavity | Localized swelling of toe of left foot |
| Localized swelling of toe of right foot | Marfan syndrome type 1 | Mass of left axillary region | Mass of right axillary region |
| Middle ear effusion | Multisystem inflammatory syndrome in children | Neonatal conjunctivitis of left eye | Neonatal conjunctivitis of right eye |
| Neonatal disorder due to abnormal maternal blood chemistry | Neonatal disorder due to and following amniocentesis | Neonatal disorder due to and following fetal blood sampling | Neonatal disorder due to and following operative procedure on fetus |
| Neonatal disorder due to and following operative procedure on mother | Neonatal disorder due to and following sampling of chorionic villus | Neonatal disorder due to chronic maternal cardiovascular disease | Neonatal disorder due to chronic maternal respiratory disease |
| Neonatal disorder due to disease in mother | Neonatal disorder due to maternal disorder of urinary tract | Neonatal disorder due to maternal gestational edema and proteinuria without hypertension | Neonatal disorder due to maternal hypertension |
| Neonatal disorder due to maternal nutritional disorder | Neonatal disorder due to maternal obesity | Neonatal disorder due to maternal obesity with adult body mass index 30 or greater but less than 40 | Neonatal disorder due to maternal obesity with adult body mass index equal to or greater than 40 |
| Neonatal disorder due to maternal overweight | Neonatal disorder due to maternal periodontal disease | Neonatal disorder due to maternal renal disease | Neonatal disorder due to maternal respiratory disease |
| Neonatal disorder due to maternal traumatic injury | Neonatal spontaneous cerebellar hemorrhage | Neonatal vitamin B12 deficiency due to maternal vitamin B12 deficiency | Neural hearing loss of left ear |
| Neural hearing loss of right ear | No cells seen in urine via microscopy | Nondependent abuse of tobacco | Nonvenomous insect bite of gum |
| Nonvenomous insect bite of nose | Nonvenomous insect bite of scrotum | Not entitled to social services assistance due to income above limit | Onychia of finger of left hand |
| Onychia of finger of right hand | Onychia of left thumb | Onychia of right thumb | Otalgia of left ear |
| Otalgia of right ear | Pain in left abdominal lumbar region | Pain in left lumbar region of back | Pain in right abdominal lumbar region |
| Pain in right lumbar region of back | Pain of joint of knee | Pain of knee region | Pain of left breast |
| Pain of right breast | Performs social distancing | Premature baby less than 26 weeks | Rhinoconjunctivitis |
| Steroid-modified tinea infection of foot | Steroid-modified tinea infection of lower limb | Strain of muscle and tendon of lower leg | Strain of muscle of lower leg |
| Strain of tendon of lower leg | Superficial contusion of skin of thigh | Superficial foreign body in abdominal wall | Superficial foreign body in anus |
| Superficial foreign body in axilla | Superficial foreign body in back | Superficial foreign body in breast | Superficial foreign body in buttock |
| Superficial foreign body in cheek | Superficial foreign body in chest wall | Superficial foreign body in ear | Superficial foreign body in face |
| Superficial foreign body in flank | Superficial foreign body in groin | Superficial foreign body in gum | Superficial foreign body in hand |
| Superficial foreign body in interscapular region | Superficial foreign body in lip | Superficial foreign body in neck | Superficial foreign body in nose |
| Superficial foreign body in penis | Superficial foreign body in perineum | Superficial foreign body in scapular region | Superficial foreign body in scrotum |
| Superficial foreign body in trunk | Superficial foreign body in vagina | Superficial foreign body in vulva | Superficial foreign body of abdominal wall with infection |
| Superficial foreign body of ankle with infection | Superficial foreign body of anus with infection | Superficial foreign body of axilla with infection | Superficial foreign body of back with infection |
| Superficial foreign body of breast with infection | Superficial foreign body of buttock with infection | Superficial foreign body of cheek with infection | Superficial foreign body of chest wall with infection |
| Superficial foreign body of ear with infection | Superficial foreign body of elbow with infection | Superficial foreign body of face with infection | Superficial foreign body of finger with infection |
| Superficial foreign body of flank with infection | Superficial foreign body of foot with infection | Superficial foreign body of forearm with infection | Superficial foreign body of groin with infection |
| Superficial foreign body of gum with infection | Superficial foreign body of hand with infection | Superficial foreign body of hip with infection | Superficial foreign body of interscapular region with infection |
| Superficial foreign body of lip with infection | Superficial foreign body of lower limb with infection | Superficial foreign body of neck with infection | Superficial foreign body of nose with infection |
| Superficial foreign body of penis with infection | Superficial foreign body of perineum with infection | Superficial foreign body of scalp with infection | Superficial foreign body of scapular region with infection |
| Superficial foreign body of scrotum with infection | Superficial foreign body of shoulder with infection | Superficial foreign body of testis with infection | Superficial foreign body of thigh with infection |
| Superficial foreign body of toe with infection | Superficial foreign body of trunk with infection | Superficial foreign body of upper arm with infection | Superficial foreign body of vagina with infection |
| Superficial foreign body of vulva with infection | Superficial foreign body of wrist with infection | Superficial foreign body with infection | Superficial injury of gum |
| Superficial injury of scapular region | Superficial injury of scrotum | Superficial injury of skin of eyelid | Sustained viral response |
| Tenderness of left abdominal lumbar region | Tenderness of left lumbar region of back | Tenderness of right abdominal lumbar region | Tenderness of right lumbar region of back |
| Undescended left testicle | Undescended right testicle | Victim of forced sexual activity | Viral load increased |
SNOMED Codes Mapped to ICD-10 for Billing
The SNOMED-CT update includes new mappings to ICD-10 billing codes. Many previous mappings have been updated.
You may wish to review billing configuration for your diagnoses. You can open the Billing Configuration tool to configure which ICD-10 diagnoses are mapped to each SNOMED-CT description in PCC EHR. You can also use the snomedmap report to examine your practice’s diagnoses that may need updating.
Information Blocking in the 21st Century Cures Act FAQ
PCC created this FAQ to help pediatric practices learn about Information Blocking in the 21st Century Cures Act.
Watch PCC's Presentations on Information Blocking: To learn more, you can watch PCC’s Information Blocking presentation, or the April 2021 live Information Blocking Q&A session.
Consult Your Practice's Legal Counsel: PCC shares what we learn about pediatric industry issues and best practices, but we do not provide legal advice. For questions, consult your practice's legal counsel.
Contact PCC if you have questions about implementing solutions at your practice.
General Questions
What is Information Blocking?
Information blocking is defined in the 21st Century Cures Act. In summary, information blocking is “a practice that…is likely to interfere with, prevent, or materially discourage access, exchange, or use of electronic health information,” unless such practice is required by law (e.g., HIPAA), or it meets an exception established through federal rulemaking (42 U.S.C. § 300jj-52(a)(1)).
Does information blocking apply to me?
Yes, information blocking applies to physicians and practitioners. Information blocking applies to three types of “actors”: Certified health IT vendors, HIN/HIEs and health care providers, regardless of whether or not they use a certified product or participate in federal or state quality incentive programs.
ONC uses the Public Health Service Act definition of a health care provider to further define what which health care providers information blocking applies to. The Public Health Service Act health care provider definition includes licensed physicians and practitioners (physician assistant, nurse practitioner, and clinical nurse specialist). For more information, please see this Fact Sheet published by the ONC: Cures Act Final Rule: 2015 Edition Cures Update Overview (healthit.gov)
When do the Information Blocking guidelines go into effect?
Information blocking guidelines go into effect on April 5, 2021. There are also several milestone due dates for the various “actors”; they are outlined here: New Applicability Dates included in ONC Interim Final Rule (healthit.gov)
Do I need to be using a Certified EHR?
No. The information blocking regulations do not require actors to have or use health IT certified under the ONC Health IT Certification Program.
How does the Cures Act handle paper charts?
While the intent of the Cures Act is to increase the electronic exchange of health data through various means of interoperability, paper charts are okay to use. At the same time, using paper charts does not exempt one from complying with the Cures Act. When patient health data is requested, it needs to be fulfilled in an alternate manner, likely via paper copy or fax. It is recommended to review the Infeasibility and Content and Manner exceptions to ensure compliance.
What is the United States Core Data for Interoperability?
USCDI stands for the United States Core Data for Interoperability. The USCDI replaces the Common Clinical Data Set (CCDS).
USCDI Definitions:
- USCDI: a standardized set of health data classes and data elements for nationwide, interoperable health information exchange
- USCDI Data Class: an aggregation of various data elements by a common theme or use case
- USCDI Data Element: the most granular level at which a piece of data is represented in the USCDI for exchange
The USCDI will be updated through a transparent, collaborative process of public commenting and input on an annual basis.
What is Electronic Health Information (EHI) and am I required to provide to patients upon request?
Please see the ONC fact sheet that explains what Electronic Health Information (EHI) is, and the intent of its use: Understanding_EHI.pdf (healthit.gov). The Information Blocking regulation requires a response to fulfill requests, and EHI is the most common way to fulfill said requests. If you are unable to fulfill a request, please review the Information Blocking Exceptions.
When is Information Blocking allowed?
There are circumstances when information blocking is allowed. The ONC defined eight exceptions for information blocking. There are five exceptions for not fulfilling information and three exceptions that apply to information being fulfilled, but in a different, or certain way. Please see the Information Blocking Exceptions section for more information.
Exceptions for not fulfilling information:
- Preventing Harm
- Privacy
- Security
- Health IT Performance
- Infeasibility
Exceptions applying to information fulfilled in a different (or certain) but still acceptable way:
- Content and Manner
- Fees
- Licensing
Should I be updating my practice’s policies and procedures to address Information Blocking?
Yes. Three of the Information Blocking exceptions (preventing harm, privacy, and security) require a written policy. In addition to the required policies it is recommended to write and maintain an Information Blocking policy that includes protocols for sharing electronic and non-electronic health data.
PCC created a sample Electronic Health Information Access Policy. PCC does not provide legal advice. This policy is an example of what you may want to consider including in your own policy. Before you finalize a policy such as this, we recommend you consult your own legal counsel.
Should my practice have a written “data sharing” policy? What should it include?
Written policies are encouraged by the ONC, however a written policy is not automatically a safe harbor to prevent allegations of Information Blocking.
Information Blocking is a practice that is likely to “interfere with, prevent, or materially discourage access, exchange, or use of electronic health information.” Your practice’s policies should be written with this statement in mind.
For example, setting a standard 10 business day turnaround time to respond to requests for information (especially those that can be fulfilled electronically much faster) will likely constitute Information Blocking. Requests for patient data should be completed in an appropriate amount of time given the capabilities of the practice and the needs of the patient.
PCC created a sample Electronic Health Information Access Policy. PCC does not provide legal advice. This policy is an example of what you may want to consider including in your own policy. Before you finalize a policy such as this, we recommend you consult your own legal counsel.
What are examples of Information Blocking?
- Provider has capability to provide same-day access to EHI but takes several days to respond
- Provider organization charges a patient for their electronic data
- Requiring patient consent to exchange electronic health information for treatment where it is not required by law
- Certified health IT developer refuses to share technical information needed to export data
- Health information network/health information exchange charges additional fees to exchange data or refuses to exchange data with non-members
Portal Access
Do we need to enable portal access to our patients if they request access?
Yes, if a patient requests portal access, it must be granted if you have the portal enabled. Additionally, if your practice does not have the portal enabled it is strongly recommended that you do so. If you do not have it enabled, you may choose to use the infeasibility exception, however it is not wise to use this exception for an extended period of time if you do have the ability to enable it and have chosen not to.
Can we charge patients for portal access?
No, charging patients to electronically access their electronic medication information is prohibited.
What exactly is being shared on the portal?
PCC practices have the ability to configure what they share in the patient portal, including the following information: allergies, care plans, clinical instructions, diagnoses, documents, future appointments and date of last physical, growth charts, immunizations, labs, medications, orders, race, ethnicity, preferred language, patient sex, problems, smoking status, vitals, and personal balances.
Practices may continue to share what they normally do. There are no specific requirements to share more or less information in this rule. If a patient requests additional PHI via the portal or otherwise, practices need to be prepared to respond to requests. The request for additional PHI should be provided electronically when that is feasible, otherwise it should be fulfilled in an alternative format (e.g. paper).
Interoperability
Does my practice have to connect to a HIE/HIN?
The Information Blocking rule does not require practices to connect to a HIE/HIN, however other incentive programs or payers may require it. HIE/HINs are actors subject to the requirements of the rule themselves.
Does my practice have to submit data to registries?
The Information Blocking rule does not require practices to connect data registries, however other incentive programs, local or state laws, or payers may require it.
Patient Confidentiality
Do we have to make all of our lab results accessible to patients in the portal?
It is not a requirement of the rule to make all lab results accessible to patients in the portal, it is your choice to do so or not. If a patient requests their lab results via the portal and you do not provide them, this is information blocking. You must acknowledge and respond to all requests for electronic health information. If you are unable to fulfill them in the manner they are requested, or have an additional reason for not fulfilling the request, please refer to the information blocking exceptions for additional guidance within the ONC Information Blocking exceptions Fact Sheet.
Our clinicians store confidential information in various places in PCC EHR. Do we need to make all of those notes available to patients?
The information blocking rule does not supersede the HIPAA privacy and security rules. It is not a requirement of the rule to release all confidential information available to patients (or their guardians). Please refer to the ONC information blocking exceptions to understand more about the circumstances to withhold information.
The ONC FAQ includes a question and answer regarding patient confidentiality when the patient is a minor: Information Blocking FAQs (healthit.gov)
For more information about patient privacy and making certain items confidential, read the Patient Privacy Features article.
If a parent requests their child’s entire health record to be shared (electronically or via paper), am I required to share clinical notes from specialists or hospitals that were included in the patient’s chart?
Providers and practices should share patient data that is clinically relevant and has been requested (e.g. HIPAA minimum necessary rule). If this includes data from other practitioners, then it should be shared. Conversely, if the provider believes there is a risk of harm or security when sharing the patient’s data, they should review and apply the appropriate Information Blocking exception given the specific circumstances.
Information Blocking Exceptions
What are the Information Blocking exception requirements? Read below to learn more.
Disclaimer: For the full regulatory language, please refer to §171.200 – .205 and §171.300 – 303 included in the 21st Century Cures Act: Interoperability, Information Blocking, and the ONC Certification Program final rule located on the Federal Register here.
Preventing Harm
Objective: Blocking information is justified when it is in the public interest to protect a patient and other persons against unreasonable risks of harm.
Conditions:
- The actor must hold a reasonable belief that withholding information will substantially reduce the risk of harm
- The actor’s practice must be no broader than necessary
- The actor’s practice must satisfy at least one condition from each of the following categories: type of risk, type of harm and implementation basis
- The practice must satisfy the condition concerning a patient right to request review of an individualized determination of risk of harm
Examples:
- Risk of corrupt or inaccurate data being recorded or incorporated in a patient’s electronic health record
- Risk of misidentifying a patient or patient’s electronic health record
- Determination by a licensed health care professional that the disclosure of EHI is reasonably likely to endanger life or physical safety
- Reasonable belief that practice is necessary to directly and substantially reduce likelihood of harm
Privacy
Objective: This exception recognizes that if an actor is permitted to provide access, exchange or use of EHI under a privacy law, then the actor should provide that access, exchange or use. However, an actor should not be required to use or disclose EHI in a way that is prohibited under state or federal privacy laws.
Conditions: The actor must meet at least one of the following four sub-exceptions:
- If patient consent or authorization is not in place, the rule refers to this as a pre-condition
- If the health IT developer is not covered by HIPAA
- If the data being requested is addressed by the HIPAA privacy exception; examples include psychotherapy notes and information for a court proceeding
- If the patient requests to keep his or her information private
Examples:
- Patient has not agreed to share her information with a certain other provider or has not yet signed a HIPAA consent form.
Security
Objective: This exception is intended to cover all legitimate security practices by actors but does not prescribe a maximum level of security or dictate a one-size-fits-all approach.
Conditions:
- The practice must be directly related to safeguarding the confidentiality, integrity and availability of the EHI. It must be tailored to specific security risks, and it must be implemented in a consistent and non-discriminatory manner.
- The healthcare provider/organization must document its security policy
Examples:
- There is an active or known virus or ransomware attack
- An individual has been unable to prove their identity
- Request for EHI from a patient-facing application or website causes actor’s system to raise a malicious software detection alert
Infeasibility
Objective: This exception recognizes practical challenges to comply with a request for EHI.
Conditions: The actor must meet one of the following
Conditions:
- There is an event beyond the actor’s control, such as a natural or human-made disaster (public health emergency, public safety incident, war, terrorist attack, civil unrest such as a labor strike, telecommunication or internet service being unavailable, or act of military or government authority)
- A request cannot be technically met as requested (via a certain format)
- The actor is not able to understand the request because of patients’ requests to keep it private or to keep them safe
- The current circumstance makes fulfilling the request not possible
- The actor must provide a written response to the requestor within 10 business days of receipt of the request with the reason(s) why the request is infeasible
Examples:
- A natural disaster occurs such as a hurricane, earthquake, or tornado affects electricity and internet availability in an area for a week.
- A small physician practice with limited financial and technical resources may find it burdensome to accommodate requests from other providers to establish and maintain outbound interfaces from the practice’s EHR system that it neither needs for its own health care activities nor to comply with any regulatory requirements
Health IT Performance
Objective: This exception recognizes the need for health IT to be taken offline for system maintenance and improvements.
Conditions:
- Unavailability of health IT must be for no longer than necessary to achieve the maintenance or improvements (e.g. upgrade)
- Unavailability of health IT for maintenance or improvements must be implemented in a consistent and non-discriminatory manner
- Unavailability of health IT for maintenance or improvements must be agreed (e.g., advanced notice of system downtime for maintenance)
- An actor may take action against a third-party app that is negatively affecting the health IT’s performance
- For a period of time that is no longer than necessary
- Implemented in a non-discriminatory manner
- Consistent with existing service-level agreements, where applicable
Examples:
- Planned maintenance or improvements such as routine repairs, updates, or new releases
- Unplanned maintenance or improvements to respond to urgent or time-sensitive issues, which cannot wait for the occurrence of a pre-planned time period to implement the required maintenance or improvements
Content and Manner
Objective: This exception provides clarity and flexibility to actors concerning the required content (scope of EHI) of an actor’s response to a request to access, exchange or use EHI and the manner in which the actor may fulfill the request. Content is the what. Manner is the how.
Conditions:
- Content: Establishes the content an actor must provide in response to a request to access, exchange or use EHI in order to satisfy the exception.
- Until October 6, 2022, the EHI data must be provided (at minimum) represented in the United States Core Data for Interoperability (USCDI) standard
- On and after October 6, 2022 , the EHI definition is no longer limited to the EHI identified by the data elements represented in the USCDI
- Manner: Establishes the manner in which an actor must fulfill a request to access, exchange or use EHI in order to satisfy this exception. An actor may need to fulfill a request in an alternative manner when the actor is either:
- Technically unable to fulfill the request in any manner requested
- Cannot reach agreeable terms with the requestor to fulfill the request
- If an actor fulfills a request in an alternative manner, such fulfillment must satisfy the Fees Exception and Licensing Exception, as applicable.
Examples:
- Client requests connection to Commonwell; vendor is not connected to Commonwell, but can offer connection to CareQuality
- Request for EHI that is not able to be fulfilled electronically, therefore it is send using a PDF (or other) format
Fees
Objective: This exception allows actors to charge fees related to the development of technologies and services that enhance interoperability.
Conditions:
- Fees charged must:
- Be consistent
- Be reasonable related to the cost to us to provide access, enable exchange or use EHI
- Be nondiscriminatory
- This exception does not allow:
- A fee based on the electronic access by an individual patient, his or her personal representative, or another person or entity designated by that individual to access the individual’s EHI
- A fee to perform an electronic health information export for a patient or a client looking to change to a different EHR unless a fee has been already agreed upon
Examples:
- Provider or practice charging a fee for patient access to their health information electronically (is prohibited)
- Health care provider or practice imposing fees to exchange data with a hospital system they are not affiliated with, but does not charge fees for affiliated facilities (and vice versa)
Licensing
Objective: This exception allows actors to protect the value of their innovations and charge reasonable royalties
Conditions:
- Scope of Rights: The license must provide all rights to enable the access, exchange, or use of EHI and achieve the intended access, exchange or use of EHI via the interoperability elements
- Reasonable royalties are permissible
- Non-discriminatory terms: The terms and conditions must be based on objectively verifiable and uniformly applied criteria
- Non-disclosure agreement safeguards
Send CHADIS Questionnaires Directly Through the Patient Portal
When you schedule an appointment in PCC, your practice can automatically send patients and families CHADIS questionnaires through the patient portal. Results will show up right in the encounter’s chart note, like any order. You can use CHADIS questionnaires to gather important diagnostic, screening, and other valuable information in advance of an encounter.
CHADIS Required: CHADIS integration into PCC EHR requires that your practice has a CHADIS subscription. New or current CHADIS subscribers should reach out to CHADIS and PCC Support to begin using CHADIS with PCC EHR.
Watch Videos: You can watch a Preview CHADIS Integration video, as well as a live Spring 2021 PCC CHADIS Integration Q&A.
Configure CHADIS in PCC EHR
Before you can send CHADIS questionnaires to patients when you schedule, you need to connect your practice’s visit reasons to CHADIS visit types. Then your patients will receive the appropriate CHADIS questionnaires for their visit. Open Scheduling from PCC EHR’s Configuration menu and click on the CHADIS tab.
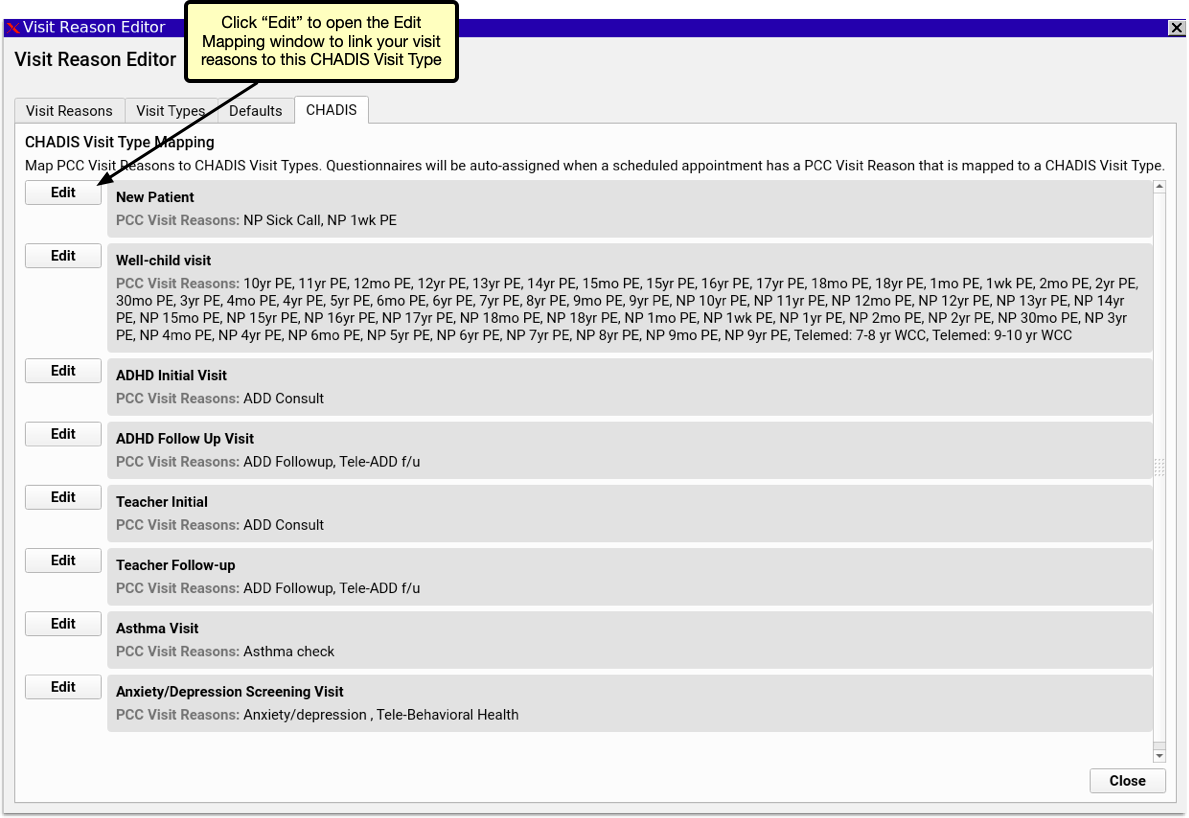
The CHADIS Visit Type Mapping includes a list of each CHADIS visit type and lists the PCC EHR visit reasons associated with each. Click the Edit button.
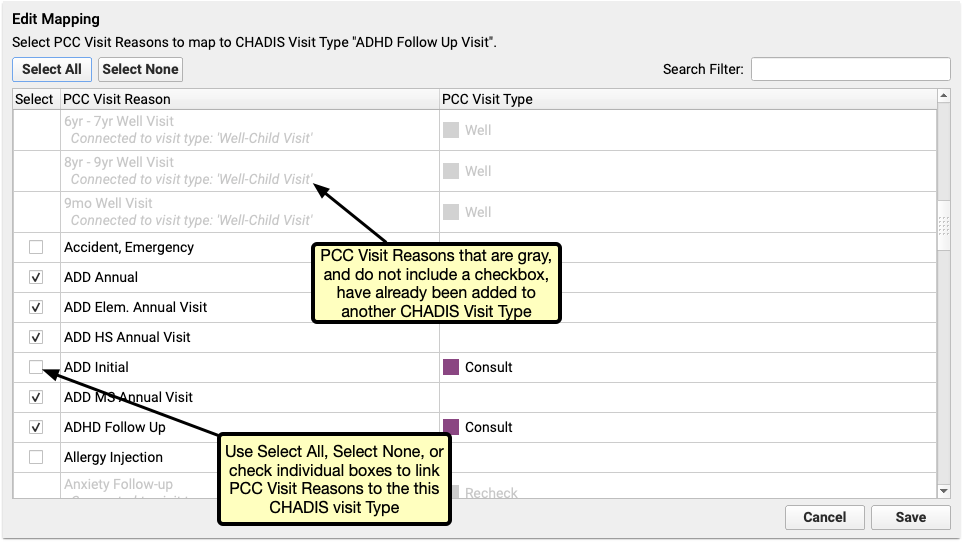
In the Edit Mapping window, select which of your Visit Reasons should be assigned to the selected CHADIS Visit Type. Multiple PCC Visit Reasons can be mapped to a single CHADIS Visit Type, but each PCC Visit Reason can only be mapped to one CHADIS Visit Type. PCC Visit Reasons that have already been mapped to a CHADIS Visit Type will be gray and cannot be selected in the Edit Mapping window if it is already mapped to a CHADIS Visit Type.
Schedule Visits to Send CHADIS Questionnaires
Once your visit reasons are linked to Visit Types, simply begin scheduling visits. PCC automatically registers your patients with CHADIS and the matching CHADIS questionnaires for the scheduled visit type will be generated by CHADIS 7 days prior to the visit. If the visit is scheduled for less than 7 days in the future, the questionnaires will be made available the day of scheduling.
When a new questionnaire is ready, the patient’s portal user will receive a Patient Portal notification that a questionnaire is waiting for them. When they log into the Patient Portal, they’ll find an orange button inviting them to start their questionnaires. Clicking the orange button opens the questionnaire on CHADIS’s website in a new browser window. If no visit is scheduled or no CHADIS questionnaires are pending, users can access CHADIS from the Patient Portal by clicking the CHADIS Home button.
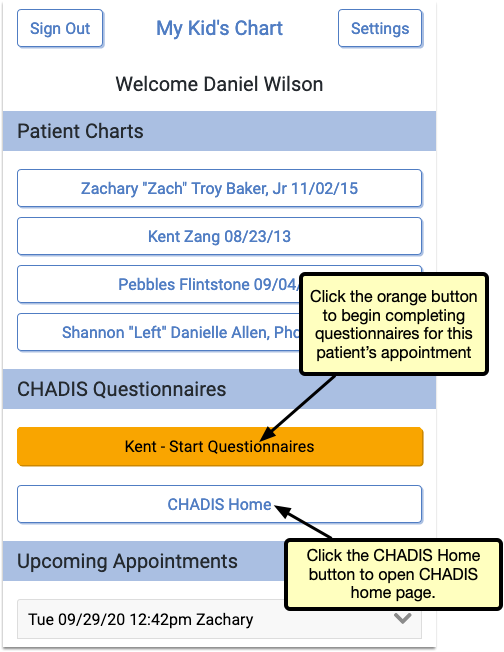
Add My Kid’s Chart to Your Home Screen
Follow the instructions in this article to add a My Kid’s Chart icon to your smart phone’s home screen.
My Kid’s Chart is the patient portal for your pediatrician’s office. You can access My Kid’s Chart from any web browser, and use it to access medical records, communicate with your pediatrician, pay your bill, and more. By saving a link to My Kid’s Chart on your smart phone’s home screen, your pediatrician will always be just one touch away. For details on how to use My Kid’s Chart, visit the My Kid’s Chart User Guide.
Add My Kid’s Chart to Your Apple iOS Home Screen
Open Your Web Browser
First, open your browser. My Kid’s Chart works in any browser; for this example, we’ll use Safari, the default browser for the iPhone.
Enter the URL for My Kid’s Chart
Enter the web address of your pediatrician’s patient portal, then go to the website. Contact your pediatrician’s office if you do not know the address.
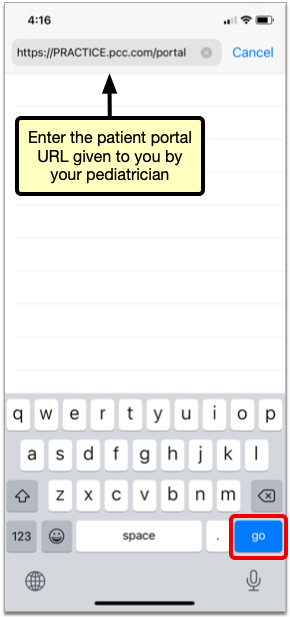
Add the Link to My Kid’s Chart to Your Home Screen
Tap the Action icon at the bottom of your screen (you may have to scroll down to make the Safari system icons appear), and then select “Add to Home Screen.”
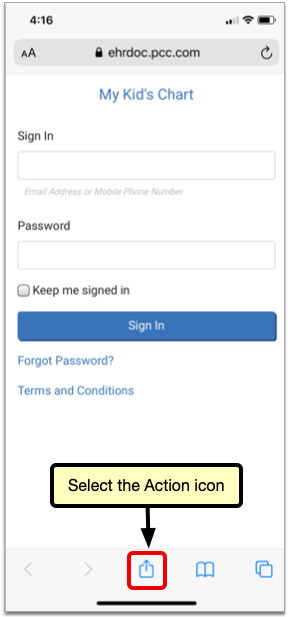
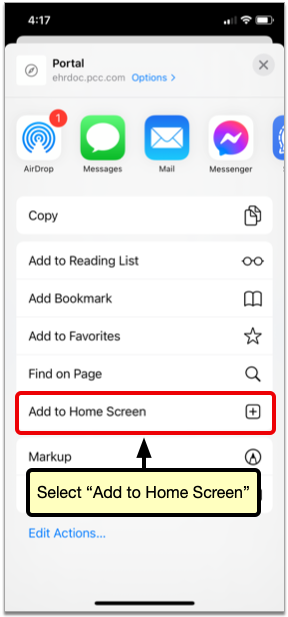
Name the icon anything you want (it will default to “Portal”) and tap “Add”.
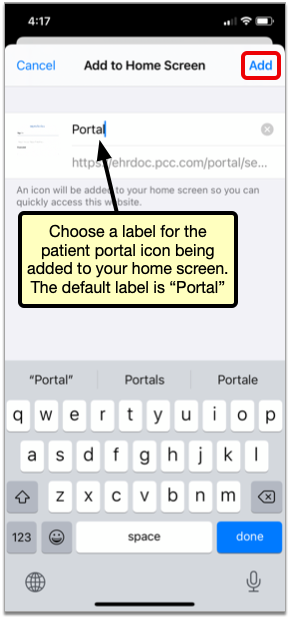
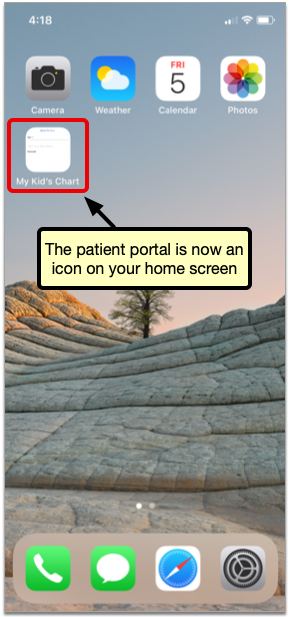
Add My Kid’s Chart to Your Android Home Screen
Open Your Web Browser
First, open your browser. My Kid’s Chart works in any browser; for this example, we’ll use Chrome, the default browser for Android devices.
Enter the URL for My Kid’s Chart
Enter the web address of your pediatrician’s patient portal, then go to the website. Contact your pediatrician’s office if you do not know the address.
Add the Link to My Kid’s Chart to Your Home Screen
Tap the action overflow icon in the top corner of your screen, and then select “Add to Home Screen.”

Name the link anything you want (it will default to “Portal”) and tap “Add”.
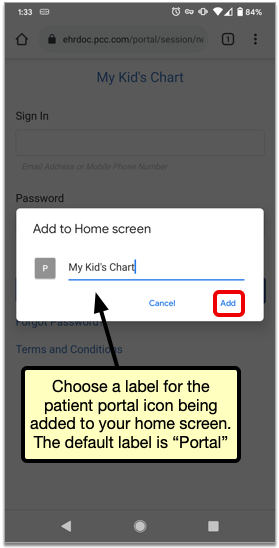
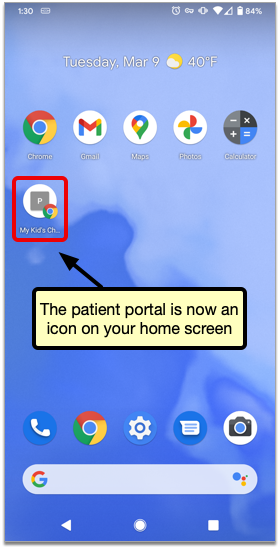
Look Up and Import Patient Immunization Records from Your Local Registry
If your practice is located in a state or municipality that has a bidirectional immunization registry interface with PCC, you can look up and import patient vaccine histories from your registry without ever leaving PCC EHR.
Watch the Video: Watch this video to learn how to check the registry for updates to your patient’s immunization record and import them into PCC EHR.
Get Started with Bidirectional Immunizations
A bidirectional immunization registry interface lets you see and import your patient’s immunization registry records without ever leaving PCC EHR.
Because each immunization registry has unique specifications and not all registries offer bidirectional functionality, bidirectional interfaces are only available with certain registries.
Contact PCC Support to learn if your office is eligible to establish bidirectional exchange with your local immunization registry.
If a connection is available right away, you will work with an implementation specialist to get the interface up and running. If a connection cannot be established right away, PCC will take note of your interest and let you know whether we expect to establish an interface with your registry in the future.
Retrieve and Import Patient Immunizations from the Registry
Once your practice has been configured for bidirectional exchange with your local immunization registry, you can begin using the Retrieve Immunizations feature to look up patients’ vaccine histories in the registry and import them into PCC EHR.
Open Your Patient’s Immunization History
Open the patient’s Immunization History in PCC EHR.
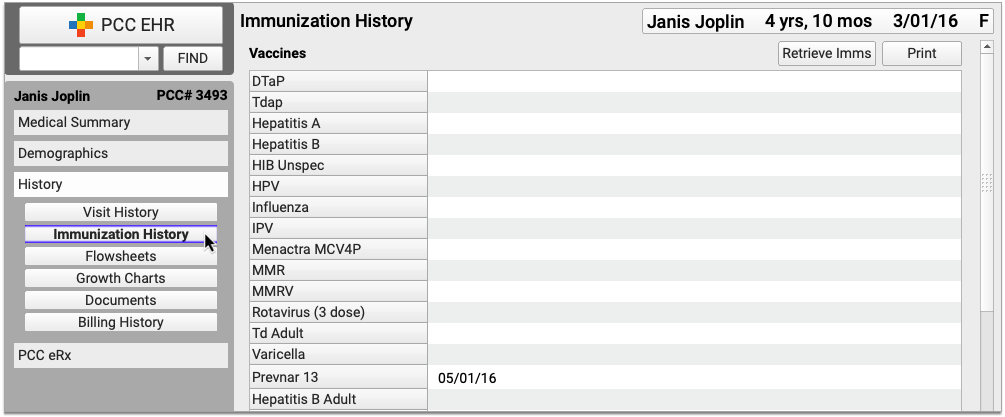
You can get to the Immunization History from the History section of the patient’s chart or within the Immunizations component if you’re in a visit protocol.
Click the “Retrieve Imms” Button
Click the “Retrieve Imms” button to request the patient’s immunization history from your state registry.

When you click “Retrieve Imms”, you may see an error. To learn more about the error types and resolutions, see Troubleshoot Retrieve Imms Errors.
Confirm the Patient Match
Use the demographic comparison in the “Retrieve Immunizations” window to confirm that the registry found the right patient.

Click “Next” to view the patient’s vaccine history.
You Can Only Proceed with a Unique Patient Match: If the registry finds several possible matches for your patient or finds no exact matches you will not be able to retrieve the patient’s vaccine history from the registry within PCC EHR. Close the Retrieve Immunizations window and try looking up the patient’s vaccine history directly on the registry website. To learn more about the different kinds of error messages and their causes, read Troubleshoot Retrieve Imms Errors below.
Review the Information Sent by the Registry
Review the vaccine history from the registry. Dates that are already in the patient’s chart appear in a black font, while new dates appear in an orange font. You can decide what to do with the new dates on the next screen.
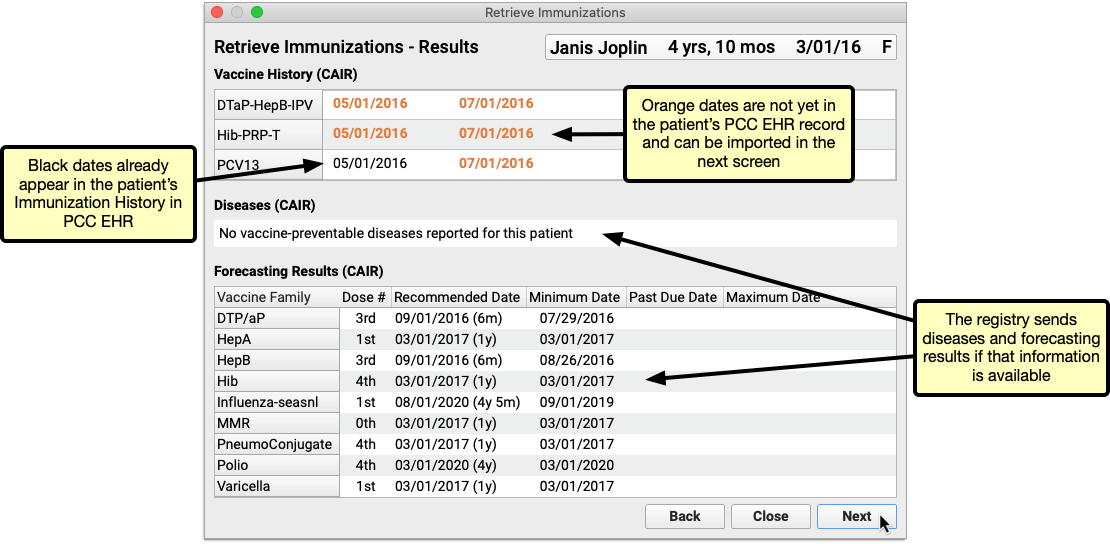
Click “Next” to begin importing new information from the registry into PCC EHR.
Immunization Registry Forecasting and Disease Data: Some registries send vaccine forecasting and/or vaccine-preventable disease data in addition to the patient’s vaccine history. You can view this information if the registry sends it, but you cannot import it into PCC EHR.
How Does PCC EHR Determine if a Vaccine is Already in the Patient's History?: For each immunization reported by the registry, PCC EHR checks to see if the associated CVX code and date already exist in the patient’s chart. If a registry immunization is reported with an NDC or CPT code instead of a CVX, PCC EHR attempts to convert it to CVX according to CDC guidelines before checking for an equivalent immunization in PCC EHR. If PCC EHR cannot convert a registry immunization to CVX, the immunization cannot be imported.
Select Vaccine Dates from the Registry to Import
Check the box beside the immunizations and dates you wish to import into the patient’s PCC EHR record. You can only import new entries from the registry; entries that already exist in the EHR are excluded from the import window, even if they have a different status in the registry than what is recorded in PCC EHR.
Once selected, immunizations from the registry are automatically mapped by CVX code to their equivalents in the EHR.
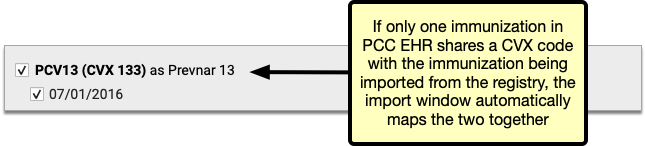
If a registry immunization has several equivalents in the EHR, all of the options are presented in a drop-down field in the import window. Review the options and manually select one to use for the import.
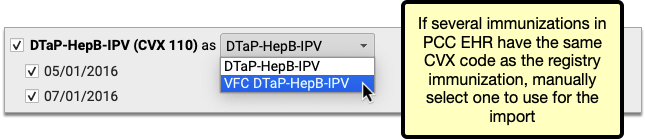
Sometimes new entries from the registry use CVX codes that are not configured in your PCC system. You must add the missing CVX codes to your immunization configuration in order to import these entries.
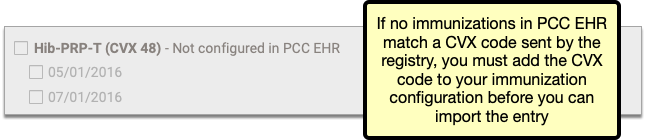
Contact PCC Support if you need help adding CVX codes to your immunization configuration.
Click “Import”
Once you have selected and mapped the immunizations you plan to import from the registry, click the “Import” button.
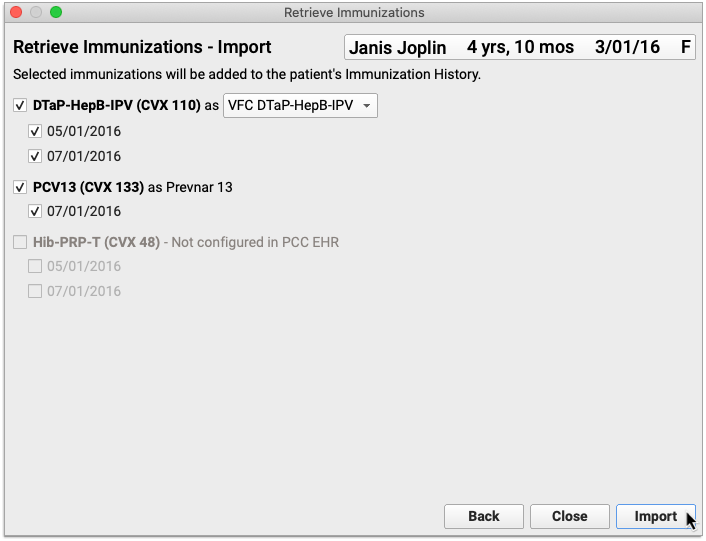
The information imports into PCC EHR and the Retrieve Immunization window closes on its own.
Review and Edit Imported Entries in the Patient’s Immunization History
Information imported from the registry appears immediately in the patient’s Immunization History in PCC EHR.
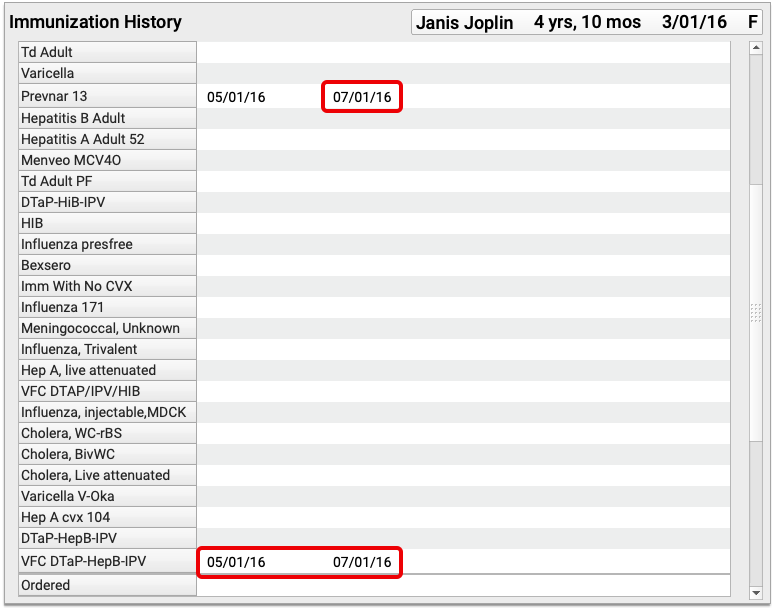
You can view details about the immunizations imported from the registry by editing the patient’s Immunization History.
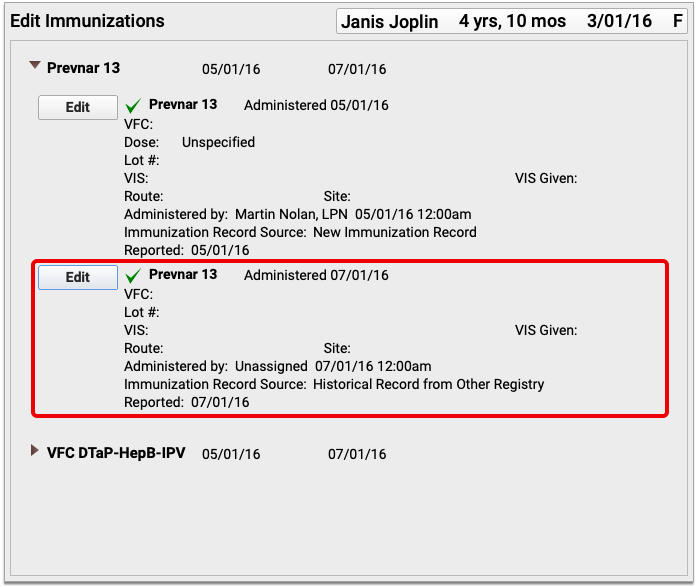
Historic immunizations imported from the registry are recorded in the patient’s chart with the source “Historical Record from Other Registry”. Imported entries display as Refused or Contraindicated when relevant, and can also include information about the vaccine dose, lot number, site, route, and funding source.
Troubleshoot Retrieve Imms Errors
When you click “Retrieve Imms” for a patient, you may see one of two errors:
-
No unique patient matches at (Your Registry): This error indicates that the immunization registry could not find a specific match for your patient, or that the registry has multiple possible records that might match your query and can not report a single, high-confidence match. Review the patient record and double-check common identifiers, like name and birthdate. If you cannot resolve the error, sign in to your registry’s online portal and look up the patient’s records there.
-
Immunizations Could Not Be Retrieved From (Your Registry): This indicates that the registry is down, there is a connection problem between your system and the immunization registry, or that something is wrong with your configuration. Temporary connection interruptions and outages are normal, as with any web service, and some immunization registries are more prone to service outages than others. The connection also relies on your practice’s network connection, so this error may appear because of a momentary problem within your practice’s network. Try again in a few minutes, and if the problem persists, check with your immunization registry to see if they are experiencing an outage. If you are experiencing an ongoing outage or connection problem, PCC can troubleshoot and confirm if the registry is down.
-
Immunizations Could Not Be Retrieved From (Your Registry) (Too many matches found): This indicates that the registry was unable to find a single patient who matched the criteria you sent, and therefore opted to send no records at all. You can try checking the patient’s demographics to make sure all of the fields are filled out, including Mother’s Maiden Name and the Multiple Birth Indicator if those fields are visible. If that does not resolve the issue, sign into the registry’s portal and use the information there to manually update the patient’s historic immunizations in PCC EHR.
When to Contact PCC Support: While PCC can’t solve connectivity problems, PCC can help you troubleshoot ongoing challenges with your immunization registry. Before you call, 1) identify the particular error message you are seeing, 2) find out if the error is for all patients or just one, 3) collect specific patient examples.
Current Connections
Bidirectional immunization registry connections are being rolled out one registry at a time and are currently available to practices in Alabama, Alaska, Arizona, Arkansas, California, Colorado, Connecticut, Delaware, Florida, Georgia, Hawaii, Idaho, Illinois, Indiana, Kansas, Kentucky, Louisiana, Maryland, Massachusetts, Michigan, Missouri, Mississippi, Nebraska, Nevada, New Hampshire, New Jersey, New Mexico, New York City, North Carolina, Ohio, Oklahoma, Oregon, Pennsylvania, Philadelphia, South Carolina, Tennessee, Texas, U.S. Virgin Islands, Vermont, Virginia, Washington, and Wyoming.
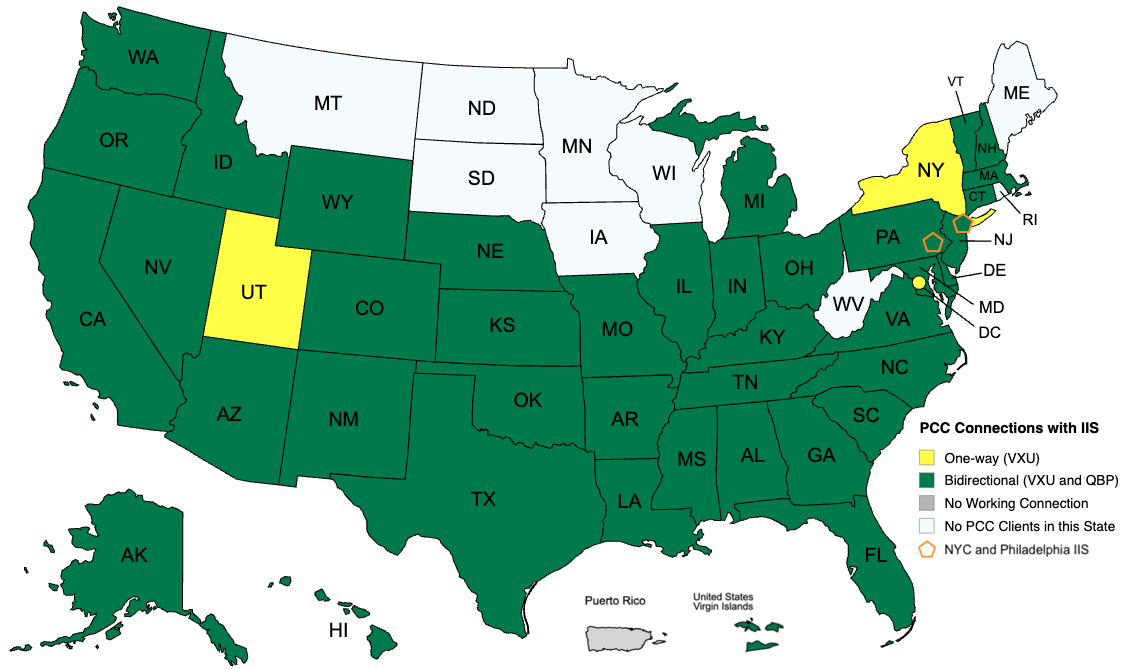
Point-in-Time Snapshot: The above map represents the status of PCC’s available immunization registry connections as of May 14, 2025 and does not guarantee completion of in-progress connections. For the most up-to-date information about the status of a particular immunization registry connection, contact PCC Support.
Contact PCC Support if you are interested in using this functionality once it becomes available in your area.
Configure Which PCC EHR Queues Appear for Each User
Your practice can define which PCC EHR queues will appear when a user logs in. For example, a staff member at the front desk may not need to see prescription renewals or signing. Their PCC EHR screen could look like this:
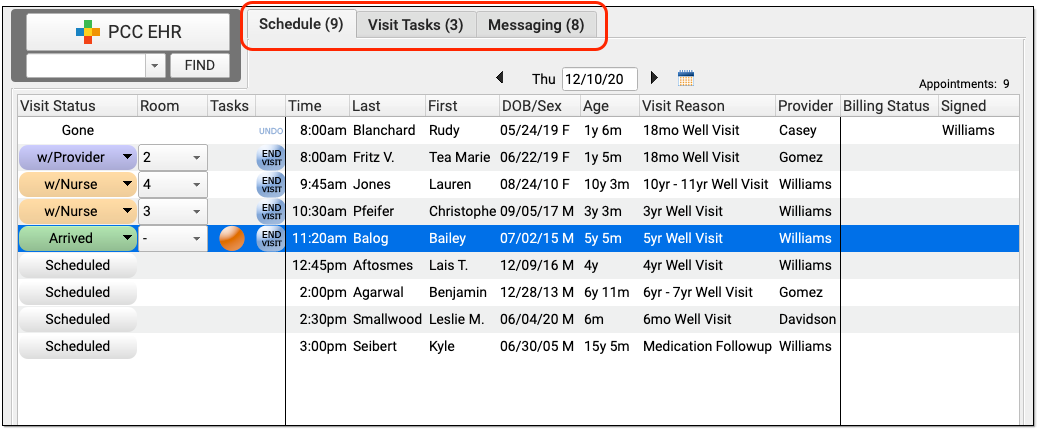
And a biller may only need to review today’s schedule and messages in order to post charges:
By fine-tuning which queues appear for each user role in your practice, you can make PCC EHR easier to use and you can control who has access to different functions in PCC EHR.
Configure User Roles to Display PCC EHR Queues
To adjust which queues are visible for each user at your practice, first open the User Administration tool and edit a user role.
Use one of your existing roles or create a new one. Double-click on the role to adjust permission settings.
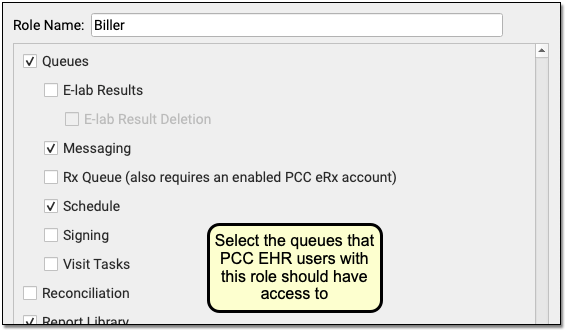
First, select “Queues” to make queues visible to the user role. Then select each queue that users with this role should have access to. Repeat this process for each role at your practice. If a user role should only have limited access, you can deselect all queues. Then the user will see a blank PCC EHR window.
As you design roles, remember that users can be assigned more than one. Each user will see all the queues available for any of their assigned roles. Also, note that the eRx Tasks queue only appears for users who have both a role with the queue permission and an enabled PCC eRx account.
Next, edit each user’s account and adjust their assigned roles.
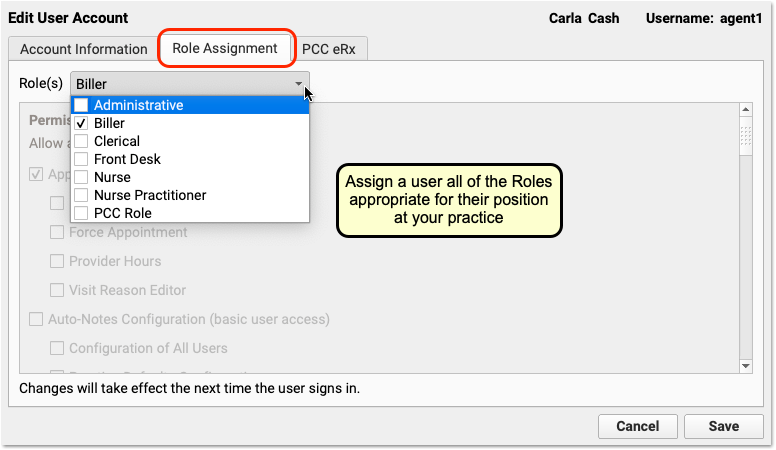
By fine-tuning which queues appear for each user role in your practice, you can make PCC EHR easier to use and you can control who has access to different functions in PCC EHR.
For a complete guide to defining and assigning Roles in the User Administration tool, read the main Set User Roles for Permissions and Security article.
COVID-19 Vaccines: Plan, Configure, Order, Administer, and Bill
You can use PCC EHR to order, administer, and track COVID-19 vaccines, either for pediatric patients or as part of a COVID-19 vaccine clinic for older patients. Read below to learn how to sign your practice up, plan for a vaccine clinic, configure your PCC system, and how to order, administer, and track COVID-19 vaccination.
Procedure Code Guidance: The procedure codes discussed in this article are intended only as examples. You should consult the AMA’s current CPT Coding Guide and work with your insurance payers to verify what codes you should report on claims. Your practice updates and maintains your billable procedure list, codes, and prices in the Procedures table in the Tables configuration tool on your PCC system.
Get Signed Up and Plan for COVID-19 Vaccinations
As of June 2022, pediatric practices are administering COVID-19 vaccines to adults, patients age 12 and up, patients age 5-11, as well as younger children. The Federal Government and President Biden have repeatedly announced that pediatric practices shall play a key role in the vaccination of young patients.
In 2021, PCC prepared this list of links for help “getting started”. While the situation has changed many time since, these resources may still be helpful!
-
Register to Administer COVID-19 Vaccines: If you haven’t already registered to administer the COVID-19 vaccine, you can find your state specific registration details at the AAP’s State COVID-19 Vaccine Provider Registration Resources page.
-
Evaluate Your Active Patient Population for Target Age Groups: Use PCC’s Report Library to estimate patient populations. For example, how many 5-11 year olds have visited your practice in the past three years? When planning a shot clinic, for example, don’t forget to consider children with birthdays in the upcoming months. Consider also contacting older patients who visit your practice: while families may receive vaccination elsewhere, your practice can help fill in the gaps.
-
Plan Your Practice's Vaccine Clinic: Develop a plan to administer the vaccine with your practice. Consider holding a vaccine clinic and also offering COVID-19 vaccination during regularly scheduled visits. PCC has documentation and a blog article about running mass vaccine clinics.
-
Communicate With Families: Use Broadcast Messaging to communicate your plan early to your patient families. This will help reduce phone calls to your office and encourage families to plan how and when they will get their children vaccinated.
-
Add Immunization Billing Codes and Orders to Your PCC System: Use the links and the procedures below to add billing procedures to your system and set up orders and chart note protocols for quick and easy administration. Once you have added your procedures with prices and names and adjusted your orders in PCC EHR, you can immediately begin ordering, administering, and billing for the vaccines. PCC Support can help you with every step of the process.
-
Contact PCC to Update Vaccine Tracking: Whenever you add a new immunization, contact PCC Support to configure new immunizations so they will track on a patient’s immunization record.
-
Create or Obtain a Consent Form: Your practice can create your own consent form, or there may be a standard one available from your state. PCC has heard from pediatricians who use the new Massachusetts COVID-19 Vaccine for 5-17 Years form and Oregon’s Pfizer Minor Consent Form.
-
Obtain VIS Forms (EUA Fact Sheets) at CDC.gov or through FDA: For COVID-19 vaccines in 2020-2023, there is no formal VIS form. Instead, manufacturers work with the CDC to provide Emergency Use Authorization Fact Sheets, or EUA. For example, in November of 2021, the FDA released Pfizer 12+ Fact Sheets and Pfizer 5-11 Fact Sheets. With each new vaccine approved for emergency use, there is an adjustment to the available EUA fact sheets.
Understand the Details and Codes for Each Vaccine
Before you set up any new vaccine in PCC’s system, you should review the details of the immunization. For example, you will need to know the manufacturer and their MVX code (such as PFR, for Pfizer), the dose amount, the CVX Code for the vaccine, the National Drug Code (NDC) for the vial, along with the CPT codes your practice will use for billing both the immunization and the administration. Your clinical staff will also want to review diluent information for administration and obtain VIS forms or “EUA” forms.
PCC's COVID-19 Vaccine Table: When the first COVID-19 vaccines rolled out, PCC created a table of available vaccines for each age group which included the information a pediatric practice needed to get started. From 2021 to April of 2023, we kept this table up-to-date when new vaccines were approved. We published this table on a short-term basis due to the importance of the issue and the rapid changes occurring. We’ve now removed it, and instead we recommend practices check codes, dosing amounts, NDC, and other details with official sources.
You can obtain more information from these resources:
- COVID-19 Vaccine Administration: Getting Paid: The AAP’s guide to COVID-19 vaccines as well as both product and administration billing codes.
- AAP’s COVID-19 Vaccine Chart:In 2022, the AAP began publishing their own COVID-19 Vaccine Coding Chart, and they continue to update it.
- COVID-19 Vaccine Related Codes at CDC.gov: The CDC’s table of COVID-19 vaccine information.
- Vaccine CPT and NDC Codes at AMA-assn.org: The AMA’s quick reference table.
- The AMA’s “Appendix Q”, which provides details on each vaccine.
Configure PCC EHR for COVID-19 Vaccines
Read below to learn how to add a COVID-19 vaccine to your PCC system. Contact PCC Support for assistance with any of these steps.
In addition to adding a vaccine that you will administer, you can use the steps below to add vaccines that your practice will track but will never administer.
See More About Adding an Immunization: For more screenshots and help with these configuration tools, see the main Add and Configure Immunizations in PCC reference article.
Create Immunization Entries in Your Practice’s Procedures Table
First, create procedure entries for the vaccine in the Proceduress table found in the Tables tool in the Configuration menu. If you’ve never done this before, contact PCC Support and we will walk you through the process.
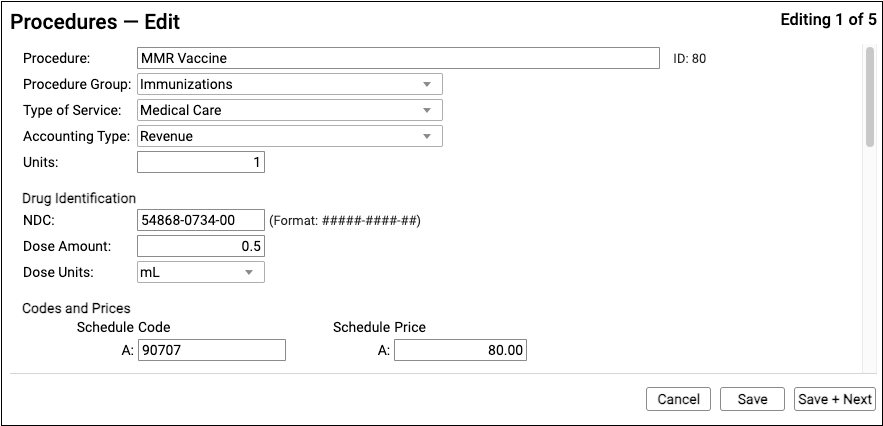
For a complete guide, read the main Add and Configure Immunizations in PCC EHR article.
-
Procedure Name: You can name procedures anything that will be useful for your practice. As there will be several different COVID-19 vaccines coming into use in 2021, PCC recommends a naming convention that identifies the manufacturer of the vaccine. If you will be administering two different dosages of the Pfizer vaccine (for example, 0.3ml for older patients), you may want to incorporate the dosage or age range into the title of the procedure.
-
Accounting Type: Billable procedures you perform in your practice should have an accounting type of “Revenue”.
-
Procedure Group: The Procedure Group field is a customizable value used for reporting purposes; it does not affect billing or how a procedure is ordered or completed. Select an appropriate Procedure Group, such as “Immunizations”.
-
TOS: The Type of Service should read “Medical Care” for all immunizations or medications you administer.
-
Units: Enter one (1) unit. The Procedures table lists the smallest, standard administered value for the vaccine.
-
NDC: Enter the National Drug Code for the COVID-19 vaccine. You can use the CDC’s informational table, but you should check the labeling on the vaccine vial itself when it arrives at your practice. You can also cross-reference the National Drug Code Library.
11 Digits From the Vial, Not the Box: You should enter the NDC code printed on the smallest administered dose, such as the specific tube, vial, or pouch that contains the vaccine or medication. This is sometimes referred to as the “Use” NDC. Do not use the NDC code printed on a box or carton that contains more than one dose, often referred to as the “Sale” NDC. The NDC code standard supports both 10 and 11 digit NDCs, and PCC recommends you use the 11 digit version.
-
Dose Amount and Dose Units: Enter the dose amount and dose units found on the vial, pouch, or tube that you administer. For example, the Pfizer COVID-19 vaccine is administered as 0.3 mL for older patients, so you would enter “0.3” and “mL”. The 5-11 vaccine is a 0.2mL dose. If you are administering different doses, you should set up different entries in your Procedures table.
-
Procedure Code or CPT: Use the CDC or AMA links to locate the billing procedure code and enter it in all schedules. PCC does not provide or distribute CPT codes, and cannot add this information to your system. Enter the same code for all schedules. If your practice has a schedule specifically configured for Medicaid billing, and your state Medicaid program requires a modifier, you can enter the full code + modifier in the code field for that schedule.
-
Price: Enter a price for the procedure in the fields for each schedule. In 2021, PCC expected most practices should enter a $0.00 price for COVID-19 vaccines, though your situation may vary. For example, CMS publishes a $0.01 price, and some payers may not be able to process $0.00 charges on claims. In general, procedure prices should be identical in all fields, though a practice can use different fee schedules for TOS payment or Medicaid vaccines (VFC). The examples in the image above are for illustration only and are not fee suggestions.
Add the New Immunization Administration Procedures to Your Procedures Table
Use the Procedures table in the Tables tool to clone an existing immunization administration procedure. Adjust the description and code for administration of the COVID-19 vaccine. Each administration for some COVID-19 vaccines have a unique code! Refer to the CDC or AMA resources to know the correct codes to add.
As of 2022, PCC expects most pediatric practices will need to track at least five or six different administration billing codes, including the first and second dose of the expected Pfizer 5-11 vaccine and administration and followup shots for the 12+ vaccine.
What should I charge for COVID-19 immunization administration?: We recommend you check with your payers to determine expected payment for COVID-19 vaccine administration codes. Note that Medicare presently pays $40 for each administration and some private payers or individual states may be paying more. The pediatric benchmark for procedure pricing in the U.S. is to charge above 180% of Medicare reimbursement amounts, which are publicly available per-relative value unit for each region.
Add Any Needed Immunization Manufacturers
Your system relies on an internal table to identify the manufacturers of each immunization. Prior to 2021, this table was relatively static as there were only a few major immunization manufacturers. Pfizers new vaccines changed this.
If you are administering vaccines from a new manufacturer, contact PCC Support and we can update your system’s internal table of manufacturers.
Create Entries in the Immunization and Disease Table
PCC Support will complete this step for you. Contact them at support@pcc.com or 1-800-722-1082.
The Immunization and Disease table handles how specific immunization procedures in your Procedures table align with vaccination and/or diseases. Contact PCC Support for assistance.
Configure Your System to Display the Vaccine and to Print It on Immunization School Forms
PCC Support will complete this step for you. Contact them at support@pcc.com or 1-800-722-1082.
Your Client Advocate or other PCC support team member will add the new vaccine to four “under-the-hood” configuration tables, work with you to make adjustments to your printable immunization school form(s), and work with you to test the configuration and make sure that the new vaccine appears correctly in PCC EHR.
Add a COVID-19 Immunization Order to Specific Chart Note Protocols
Use the Protocol Configuration tool to add the COVID-19 vaccine to the Immunizations component for specific chart note protocols.
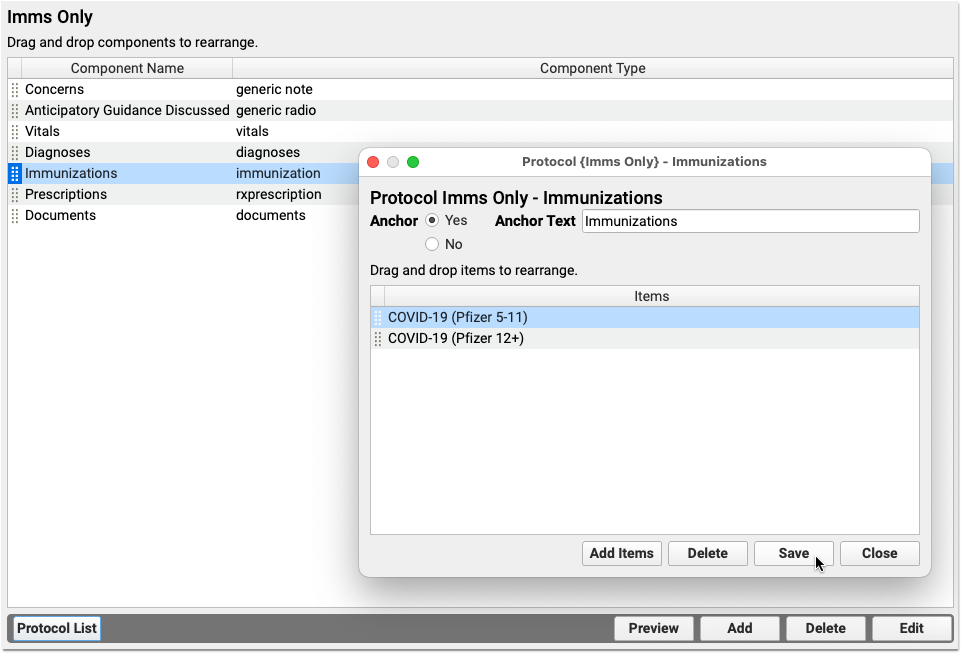
A clinician can always search and find any immunization order. You can save clinicians’ time by putting specific immunizations right on your practice’s chart notes, so they will be available with a single click.
Add Catch-Up Imms, Flu Shots, and More: The AAP recommends practices take advantage of every encounter to get patients caught up on immunizations and offer flu shots. As you adjust your protocols for a COVID-19 vaccine clinic, consider other components and immunizations you can add to help your clinicians during the visit.
Map Z23 and Billing Procedures to the COVID-19 Immunization Order
When a clinician clicks “Order” next to a COVID-19 vaccine, PCC EHR can automatically place diagnosis and procedure billing codes onto the encounter for billing. Whenever you add a new vaccine, use the Billing Configuration tool to map precisely which codes should be triggered by that order.
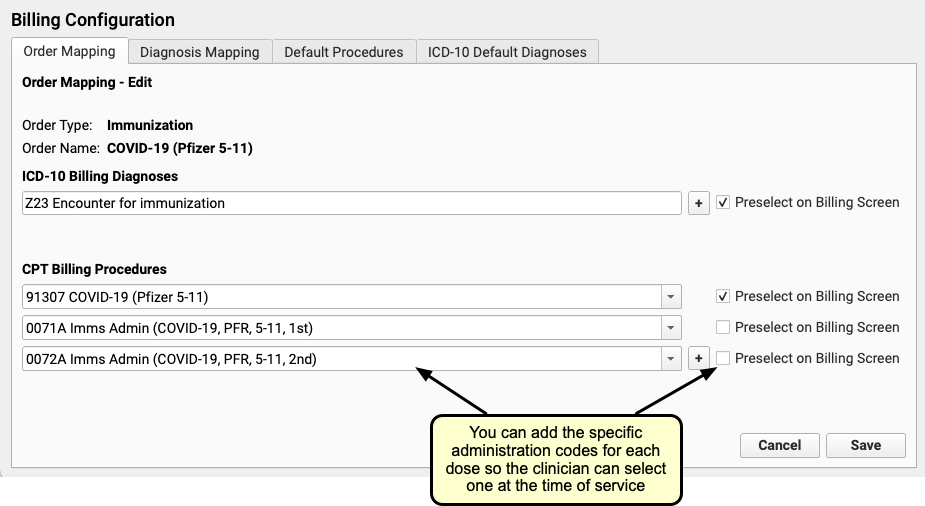
In the example above, the practice has mapped the COVID-19 (Pfizer, 5-11) immunization order to a Z23 diagnosis, a billing CPT code, and two specific immunization administration codes.
Customize How the Immunization Appears in the Patient’s Chart
Use the Immunization Configuration tool in PCC EHR to configure the order that immunizations appear in a patient’s Immunization History. Use the same tool to set whether or not the immunization will always appear in a patient’s chart or will only appear if they have had a dose.

Click and drag to rearrange how immunizations appear in a patient’s chart. Click the “Display” checkbox next to all immunizations you would like to appear in a patient’s Immunization History, even if they have never received a dose.
Always Display: In a patient’s chart, the Immunization History will display all immunizations that a patient has received. You can also configure an immunization to appear on every patient’s record, even if they have never received a dose. For example, since all patients should receive an IPV, most practices select “Display” next to “IPV” in the Immunization Configuration tool. In contrast, a practice might sometimes administer a cholera vaccine, but would only need it to appear in the patient’s record if a patient received it. They therefore would not check “Display” next to Cholera.
Create a COVID-19 Vaccination Pre-Registration Form in the Patient Portal
Your practice can create a pre-registration template in the patient portal, so parents can answer COVID-19 vaccine registration questions quickly and easily on their smart phone. You can use these forms to gather information ahead of a vaccine clinic, or send the form to families after they’ve schedule their appointment.
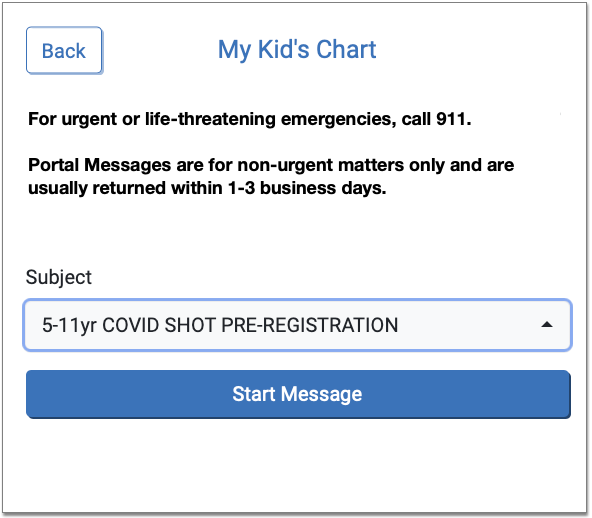
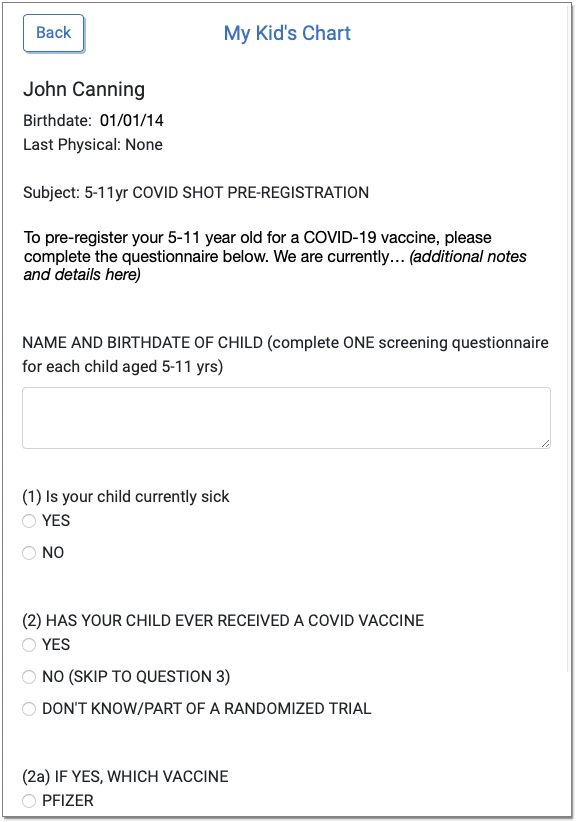
To learn about patient portal templates, read Configure Your Patient Portal Message Templates.
To see what other practices have done, download Portal Message Template – 5-11yr COVID Shot Pre-registration.
Add Incoming COVID-19 Vaccine Lots in the Lot Manager
When a vaccine arrives at your practice, add it to the Lot Manager in PCC EHR.
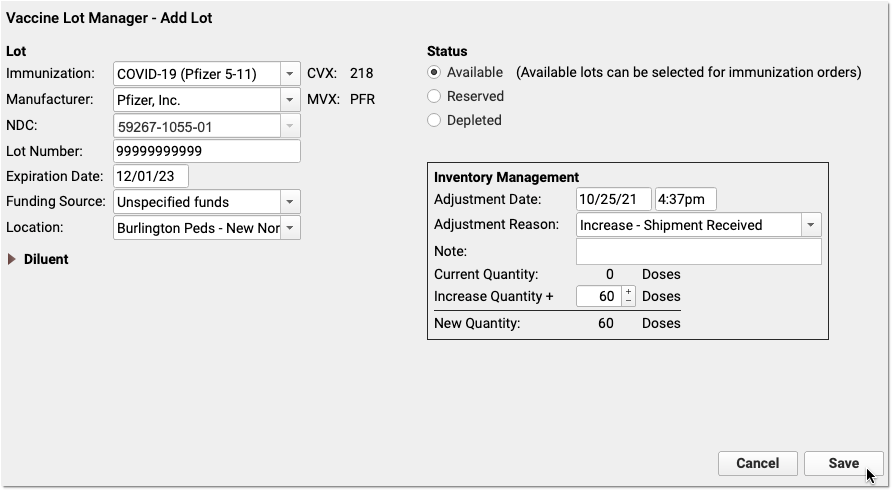
You can use a barcode scanner to enter information, or enter it manually. Use the documentation that accompanies the vaccine and/or the CDC links at the top of this article to learn more about dosage, diluent, and NDC code information for each vaccine. Note that cartons and vials have different NDC codes.
Order and Administer a COVID-19 Vaccine
Prior or during an encounter, use the Immunizations component on the chart note to order a vaccine.
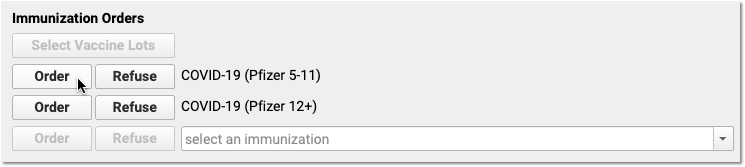

You can complete the order on the chart note, from the patient’s Outstanding Tasks component, or from the convenient orange orders indicator found on PCC EHR’s main schedule screen.
When you chart the administration of any immunization, you can select a lot, select which VIS/EUA Fact Sheet you provided, and then indicate that you administered the shot or that it was canceled or refused. PCC EHR will enter your practice’s default or most recent shot information for some fields.
Provide an EAU Fact Sheet Instead of a Vaccine Information Sheet (VIS)
In PCC EHR, you can indicate which VIS you provided to a patient. There are currently no VISs for COVID-19 vaccines. Instead, the CDC and FDA are working with vaccine manufacturers to prepare and share Emergency Use Authorization Fact Sheets to recipients. In PCC EHR, the EUAs will appear in the drop-down menu instead of the VIS.
-
-
CDC EUA Fact Sheets: Your practice can download the EUA Fact Sheets for all COVID-19 Vaccines on the CDC’s web site.
-
FDA's New 12+ and 5-11 Fact Sheets: In November of 2021, the FDA released Pfizer 12+ Fact Sheets and Pfizer 5-11 Fact Sheets.
-
Distribute EUA Fact Sheets as QR Codes: In addition to handing parents a printed copy of the EUA Fact Sheet, your practice can print and display QR codes. Parents can then use their smartphone camera to jump directly to the web site.
-
The CDC's COVID-19 Vaccine Handout: In addition to the EUA Fact Sheet, your practice may choose to distribute your own materials or the CDC’s What to Expect after Getting a COVID-19 Vaccine document. You can find this document on the CDC’s information pages for COVID-19 vaccines approved in the United States.
Bill for COVID-19 Vaccines
When your practice clicks “Order” next to a COVID-19 vaccine, your practice’s configured billing diagnoses and procedure codes will appear on the Bill screen automatically.
A clinician will see the codes when they prepare the encounter for billing.
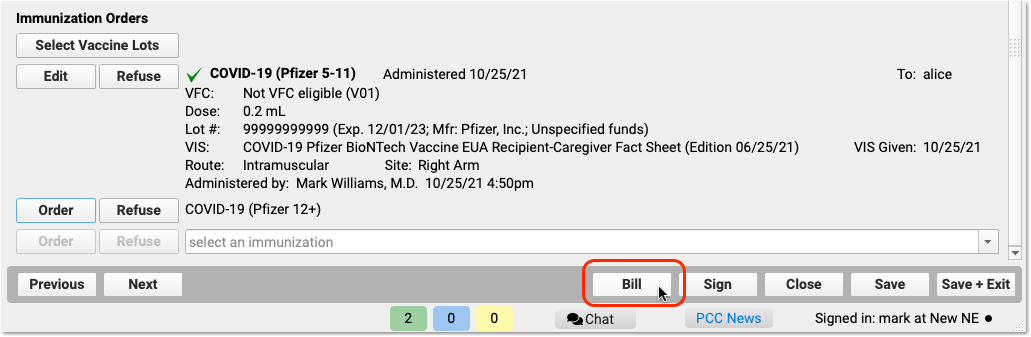
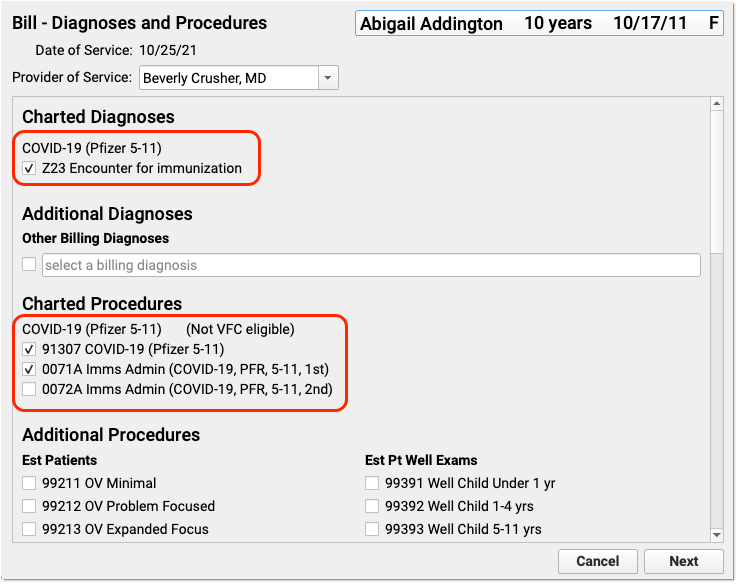
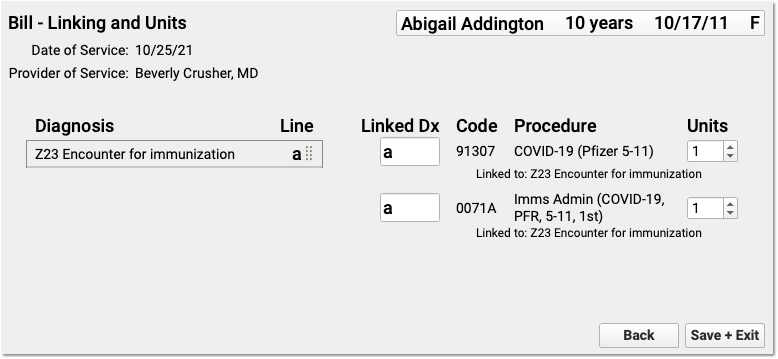
You can make any adjustments needed. (Note that the above example does not include a visit code or other billing codes that might be part of a typical encounter.)
After the clinician has made the encounter ready for billing, the biller can post the charges from the Schedule screen in PCC EHR.

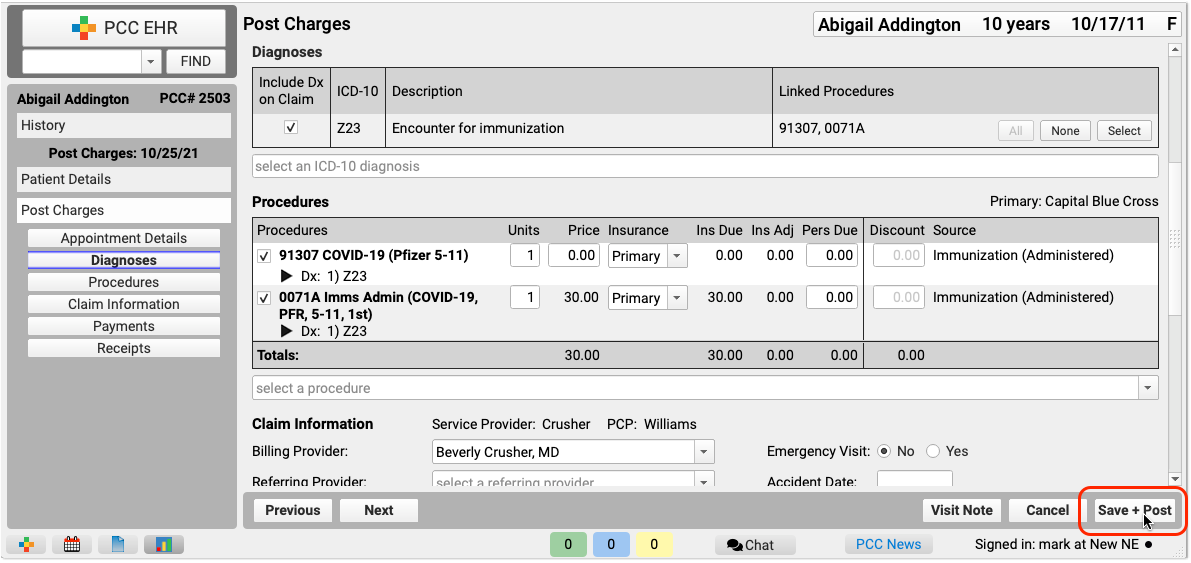
As they post charges, the biller can review and adjust patient information, along with the diagnosis and procedure codes.
What Billing Diagnoses and Procedures Do I Use for a COVID-19 Related Encounter?: While circumstances will vary, PCC has an overview of Coding and Billing for a COVID-19 Related Encounter.
Review and Understand COVID-19 Immunization Forecasting Details
As of 2022, PCC has observed that automated immunization forecasting for COVID-19 is inconsistent. There are numerous vaccines in play, each with different dosage rules. Federal and State governments may decide to advise clinicians to ignore some periodicity requirements, and those requirements are changing rapidly.
PCC is working with our immunization forecasting vendor to deliver updated forecasting as the schedules change. In the meantime, you may only see a COVID-19 line in the Immunization Forecasting component if a patient has (for example) received a first dose of a multi-dose vaccine. Long term, our immunization forecasting vendor plans to support all dose schedules for each approved vaccine.
Immunization Forecasting in PCC EHR
Can My Pediatric Practice Become a COVID-19 Vaccine Site for Adult Patients?
Many pediatric practices are working with their local health department in order to administer COVID-19 vaccines to both children and adults.
PCC has worked with practices to help them get set up, and you can read more at COVID-19 Vaccine: What Pediatricians Need to Know.
Become a Medicare Provider
If you plan to administer the COVID-19 vaccine to Medicare patients, or see Medicare patients for other reasons, you may decide to register as a Medicare provider.
The Federal Government is working to expedite the Medicare enrollment process in order to make sure more clinicians are able to see Medicare patients for COVID-19 related needs and/or to administer the COVID-19 vaccine. Clinicians need to enroll in Medicare in order to bill for encounters with Medicare patients.
You can learn about the expedited enrollment process here: CMS (https://www.cms.gov/files/document/provider-enrollment-relief-faqs-covid-19.pdf). Once a clinician is enrolled, they can see Medicare patients and administer the COVID-19 vaccine. After the pandemic, a clinician would have to complete the full enrollment process.
Medicare does not accept paper claims, and signing up for electronic claim submission with Medicare is a separate process. PCC’s EDI experts can assist you with setting up claim submission. This process has not been expedited in the same way as enrollment, and PCC anticipates initial claim submission could take up to a month.
Report on COVID-19 Vaccination at Your Practice
As of PCC EHR 9.4, coming to all practices in the third quarter of 2022, you can review your COVID-19 vaccination rates in the Practice Vitals Dashboard.
You can also use PCC EHR’s Report Library to create custom immunization and charge-based reports, and perform recalls to patients.
Submit COVID-19 Vaccines to Your State’s Immunization Registries
In all states and regions where PCC offers immunization registry connections, COVID-19 immunization data is included in your practice’s immunization registry submissions.
If you have a bidirectional connection with your immunization registry, COVID-19 vaccine information is included when you look up and import patients’ state immunization records.
If you are experiencing problems with your state registry and COVID-19 vaccine lookups, contact your state’s immunization registry vendor.
Submit Immunization Records to Registries
Look Up and Import Patient Records from Your Local Immunization Registry
Help Families Resubscribe to Broadcast Emails and Opt In to Text Messages From Your Practice
When a patient or their caregiver indicates that they did not receive your latest text (SMS) message or broadcast email, you can easily determine if it is because they have opted out of communication from your practice.
Look up the person’s phone number or email address in PCC EHR and see if an icon appears beside it.
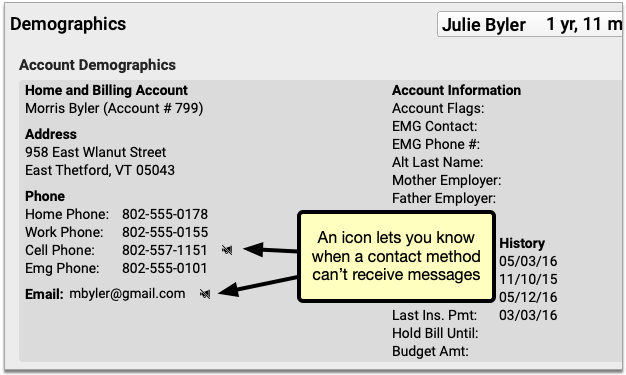
If you see an icon, it indicates that the contact method will not receive an email or SMS message from PCC EHR.
PCC EHR Does Not Contact Unsubscribed Emails and Opted-Out Phone Numbers: PCC EHR does not send broadcast messages to unsubscribed email addresses, nor does it send any kind of text message to opted-out mobile phone numbers, including broadcast messages, single text messages, and patient portal notifications.
![]()
Clicking that icon opens a window explaining the issue with that contact method and how to resolve it.
Unsubscribed Email Addresses
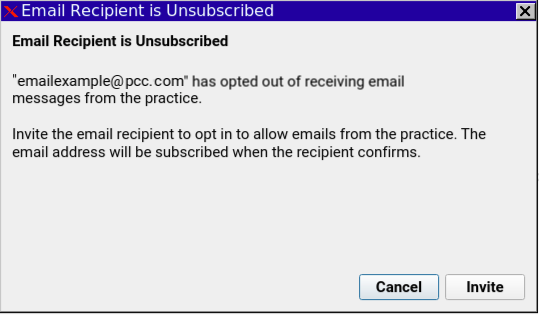
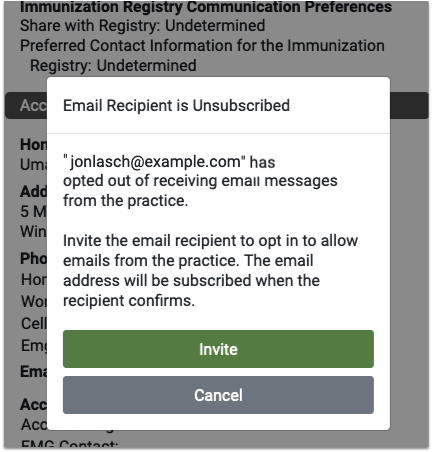
If a user has unsubscribed from receiving emails, they’ll receive no messages from PCC. Clicking the icon pops up a window with the option to send an invite email. Clicking the link in that email will resubscribe the email address to your emails.
Spam and Invalid Email Address
If the email address is not unsubscribed but still not receiving emails, then either the email address itself is incorrect, or the recipient has marked messages from Patient Portal or Broadcast Messaging as spam or junk. Broadcast Messaging and Patient Portal messages will not be sent to any addresses that have marked a previous messages as spam. The recipient must resolve the invalid spam complaint then use the resubscribe link from a previous PCC email.
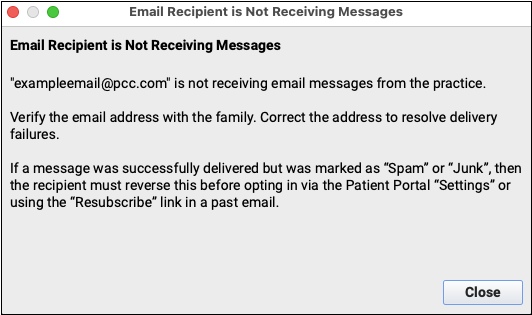

If the email address is not unsubscribed but still not receiving emails, you’ll find the option to correct any typo in the email address, or mark the email address as correct. Marking the address as correct does not guarantee the next message will send, but it clears the error and attempts to send future messages.
Invalid Phone Numbers
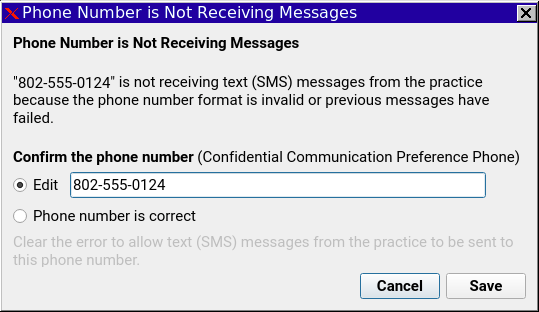
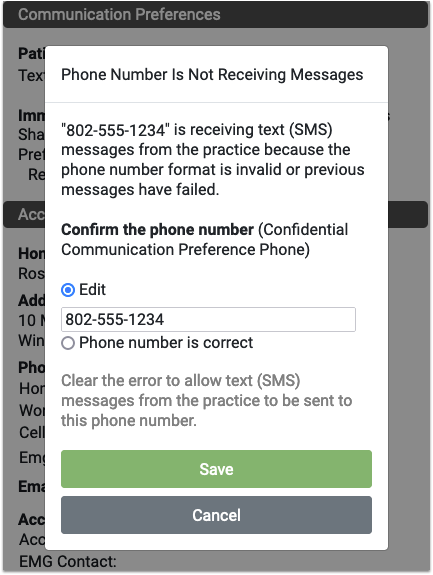
If the phone number is incorrect or formatted incorrectly, such as a missing area code, or it’s a landline and cannot receive SMS messages, you’ll have the opportunity to fix the number. Like the email above, marking the number as correct doesn’t guarantee the next message will go through.
Phone Number is Unsubscribed
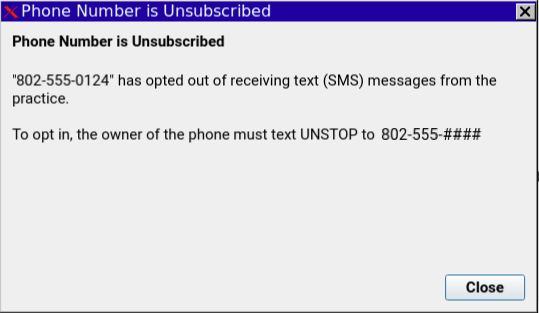
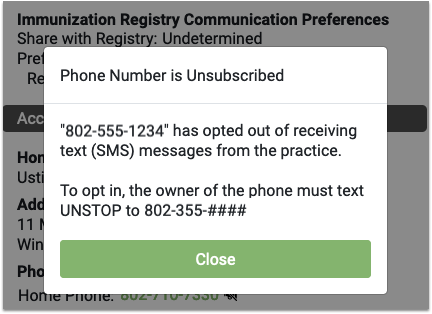
If the phone number has opted out of receiving text messages, the only resolution is for that user to text UNSTOP to the number displayed in the window.
Record Sexual Orientation and Gender Identity in a Patient’s Chart
Use PCC’s Sexual Orientation and Gender Identity components to securely record information in a patient’s chart. When a patient decides their gender identity is public, your practice can optionally display a patient’s pronoun and preferred name in the Appointment Book and elsewhere in PCC EHR.
Watch a Video: You can watch a video guide to these features: Record Sexual Orientation and Gender Identity.
Record Sexual Orientation in a Patient’s Chart
When your practice charts a patient’s sexual orientation, you can record the patient’s information in the Sexual Orientation component.
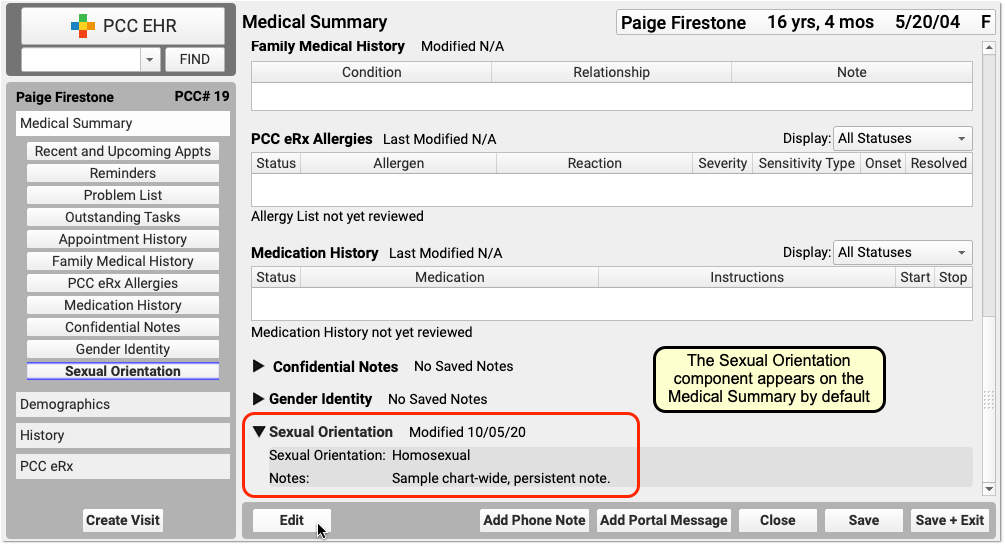

Your practice can add this chart-wide component to chart note protocols or anywhere you need it for your workflow.
Sexual Orientation is a Confidential Component: When you open a chart, the contents of this component are hidden. A clinician or other PCC EHR user must click the disclosure arrow to display the contents of the Sexual Orientation component. PCC EHR records that this information was accessed, and your practice can review who accessed the information in the PCC EHR Audit Log.
Record Gender Identity, Preferred Name, and Pronoun in a Patient’s Chart
Use the Gender Identity component to record a patient’s gender identity, preferred name, pronoun, and notes.
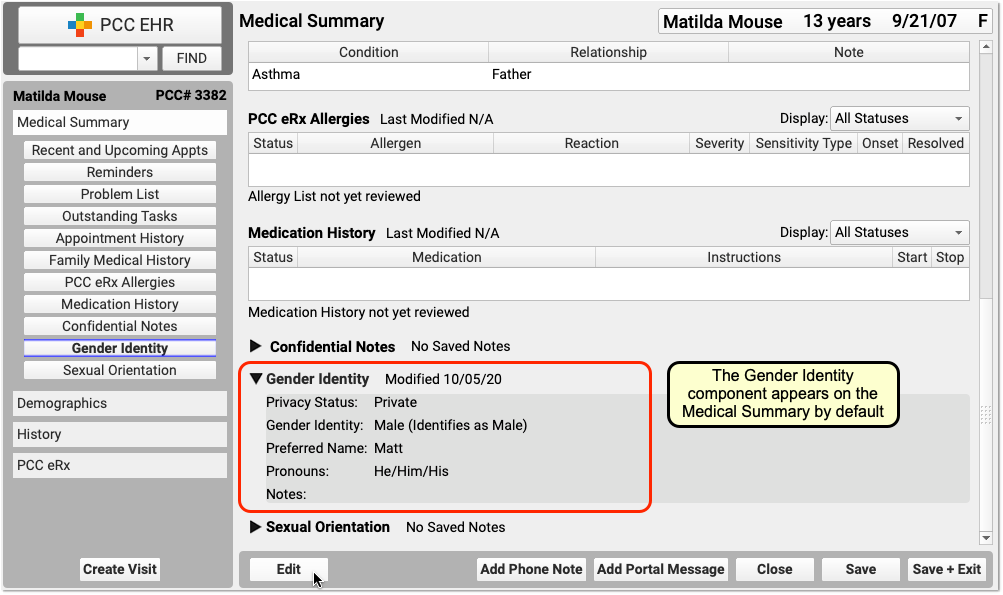
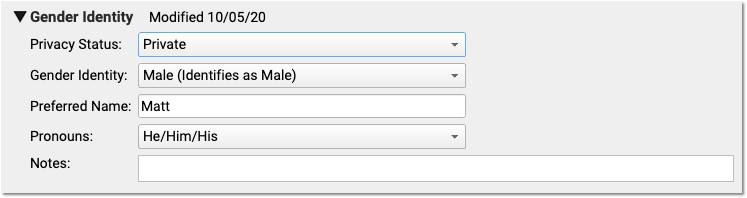
The component appears on the Medical Summary by default. Your practice can move it, remove it, and add this chart-wide component to chart note protocols or anywhere you need it for your workflow.
Patient information in this component is marked private by default. When private, the fields in the component are not visible anywhere in PCC EHR except in the Gender Identity component.
Gender Identity is a Confidential Component: When you open a chart, the contents of this component are hidden. A clinician or other PCC EHR user must click the disclosure arrow to display the contents of the Gender Identity component. PCC EHR records whenever this information was accessed, and your practice can review who accessed the information in the PCC EHR Audit Log.
Make a Patient’s Preferred Name and Pronoun Visible On Various Screens in PCC EHR
When a patient’s gender identity information is no longer private, select Public in the “Privacy Status” drop-down menu.
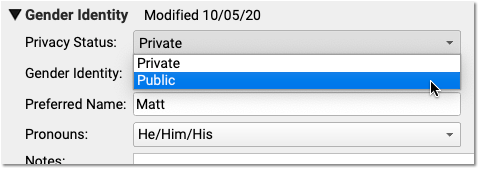
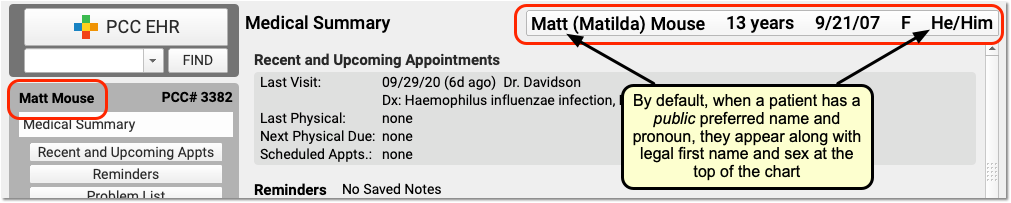
When Public is selected, PCC EHR and pocketPCC can display the patient’s preferred name and pronoun in the Patient Banner as well as in other places in PCC EHR.
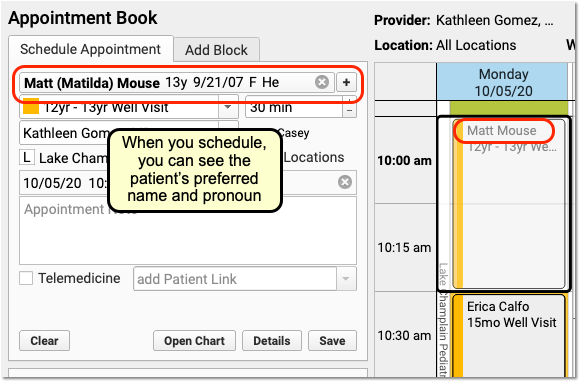
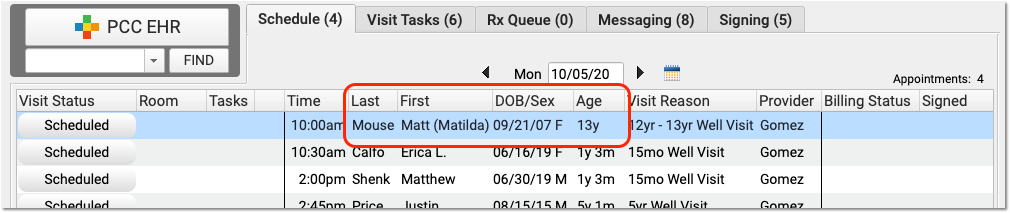
On the Appointment Book, for example, your staff will be able to see the patient’s preferred name and pronoun as they make an appointment. The preferred name can also appear on the Schedule screen and PCC EHR queues, except for the Rx Queue (which uses the patient’s legal name) and the E-lab Results queue (where a patient’s name is provided by a lab vendor). Your practice can find the patient by searching for either the preferred or legal name.
The patient’s preferred name can also appear at the top of forms and patient and family-facing reports that include the green name header. This includes the Patient Visit Summary:
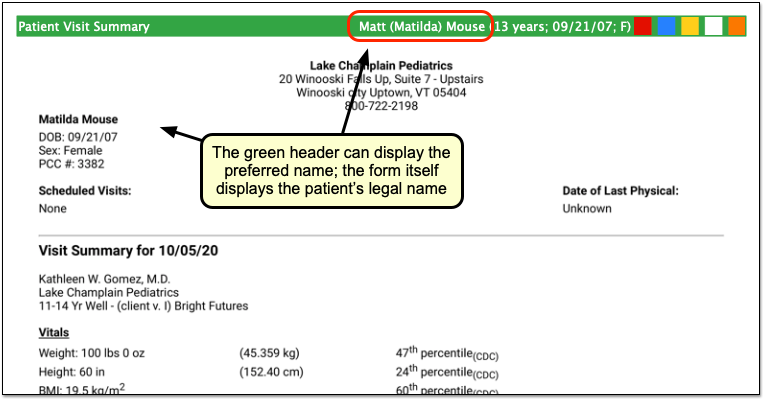
Note that the patient’s legal name and sex appear elsewhere on the form. Documents that can include the preferred name in the green header include: Care Plans, PDF versions of Continuity of Care Documents, Growth Charts, the Health Information Summary, Lab Order Details, the Patient Visit Summary, Summary of Care Record, and Visit and Billing History printouts.
Configure How Your Practice Displays Preferred Name and Pronoun
A patient’s preferred name and pronoun do not appear at all if their Gender Identity component is set to Private. Your practice can configure whether PCC EHR displays only a patient’s legal name, only the preferred name, or both the legal and preferred names when they are set to Public in a patient’s chart. You can also optionally turn off the preferred pronoun display.
Open Practice Preferences to review your options.
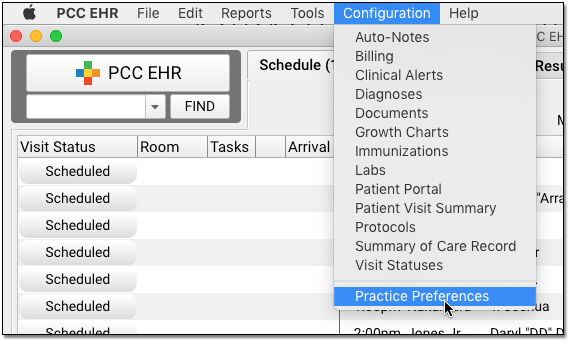
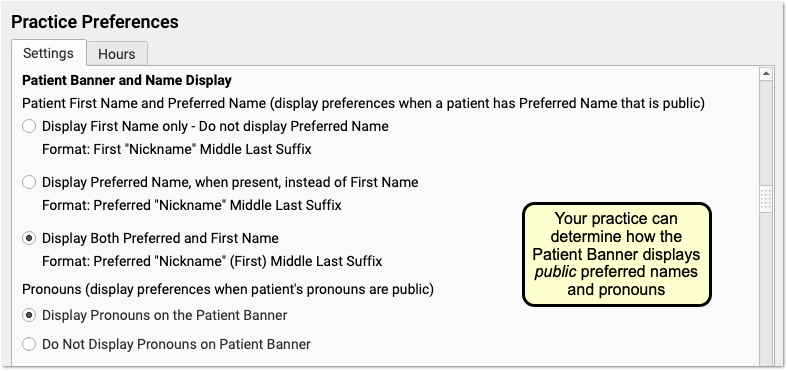
In addition to adjusting your practice’s display preferences, your practice may wish to change the location of the component. You can also adjust your practice’s existing workflows for patients. For example, if a patient’s preferred name was kept in the Nickname field in Demographics, you can use the Gender Identity component instead.
Other PCC EHR Tools to Support Patients: Some practices use a patient status flag, an entry in the Reminders component, or a Clinical Alert to inform clinical staff when a patient has gender identity information they should be aware of. For example, if a patient shares private information about their gender identity with a clinician, the practice may record that information in the confidential Gender Identity component. A flag and a corresponding Clinical Alert could inform clinical staff that they should review that component prior to the appointment.
Fall 2020 SNOMED-CT and ICD-10 Updates Add COVID-19-Related Issues and Other Diagnoses
On September 20th of 2020, PCC updated the SNOMED-CT diagnostic terms and the ICD-10 diagnosis billing codes on your practice’s system.
PCC regularly updates your system’s ICD-10, LOINC, SNOMED-CT, NDC, RVU, VIS, and other standardized lists so you won’t encounter challenges when you chart, order a lab, interface with a care provider, or bill for a visit. (Your practice’s local system automatically updates your practice’s procedure code validation, as well.)
In PCC EHR, clinicians enter diagnoses using SNOMED, which maps to ICD-10 billing codes for claims. We updated both of these codesets in order to provide you with the most up-to-date diagnostic language in the chart, and to support the 2021 edition of ICD-10, which takes effect for dates of service after 2020-10-01.
Read the sections below to learn about the updates, educational opportunities, and diagnosis codes and descriptions of particular interest to pediatricians.
Use 2021 ICD-10 Diagnosis Billing Codes, Including New COVID-Related Codes
The 2021 ICD-10 update includes new sections for COVID-19-related infections and vaping-related disorders. You can review the complete, updated guidelines in the CDC’s ICD-10-CM Official Guidelines for Coding and Reporting.
The new codes and guidelines take effect for dates of service starting on 10/1/2020. You can learn about the updates that are of most interest to pediatric practices by attending PCC Web labs held by Jan Blanchard (CPC, CPEDC). Missed a web lab? You can watch a recorded session as well.
In addition to COVID-19 and vaping-related guidelines and codes, Jan notes that the 2021 ICD-10 update includes more specificity for substance abuse codes, several adjustments to influenza coding, and new codes for reflux, headaches/face pain, and more. In the “curiosities” bucket, the update includes “Pedestrian on electric scooter and standing micro-mobility pedestrian conveyance (hoverboard, segway)” added to V00-V06.
Chart Diagnoses Mapped to Deprecated ICD-10 Billing Codes: Were there any 2021 code changes for items that your practice frequently bills? You can review your system configuration using the snomedmap report. While there were no major disruptions in the 2021 ICD-10 update, it’s always worth taking a look at your code mapping reports to head off any billing challenges.
Use the Latest SNOMED Diagnoses, Including New COVID-Related Descriptions
The SNOMED-CT update includes thousands of new descriptions for diagnoses, allergies, therapies, and procedures. It also updates thousands of text descriptions for diagnoses and their mapped ICD-10 billing codes. You can review information about the update on the National Library of Medicine website.
Review Your COVID-19 SNOMED to ICD-10 Mapping: As codesets continue to change in response to COVID-19, PCC recommends you review the diagnoses you use to chart and bill for COVID-19 issues. For example, this update includes a new recommended mapping of the Exposure to SARS-CoV-2 SNOMED description to the Z20.828 ICD-10 code. This mapping was not included by default in the previous SNOMED standard. You can double-check your practice’s diagnosis billing configuration in the Billing Configuration tool.
New COVID-19-Related Diagnosis Descriptions
The update includes 22 new diagnoses for the use of identifying when an issue is related to COVID-19. For example, there are new descriptions for otitis media and several new descriptions for respiratory distress and infections, pneumonia, bronchitis, and similar. For a complete guide to COVID-19-related descriptions, you can read the COVID-19 section of the SNOMED-CT International Release Notes.
| Acute bronchitis caused by SARS-CoV-2 |
| Asymptomatic SARS-CoV-2 |
| Acute hypoxemic respiratory failure due to disease caused by Severe acute respiratory syndrome coronavirus 2 |
| Acute kidney injury due to disease caused by Severe acute respiratory syndrome coronavirus 2 |
| Acute respiratory distress syndrome due to disease caused by Severe acute respiratory syndrome coronavirus 2 |
| At increased risk of exposure to Severe acute respiratory syndrome coronavirus 2 |
| Cardiomyopathy due to disease caused by Severe acute respiratory syndrome coronavirus 2 |
| Conjunctivitis due to disease caused by Severe acute respiratory syndrome coronavirus 2 |
| Dyspnea caused by Severe acute respiratory syndrome coronavirus 2 |
| Encephalopathy due to disease caused by Severe acute respiratory syndrome coronavirus 2 |
| Fever caused by Severe acute respiratory syndrome coronavirus 2 |
| Infection of upper respiratory tract caused by Severe acute respiratory syndrome coronavirus 2 |
| Lower respiratory infection caused by SARS-CoV-2 |
| Lymphocytopenia due to Severe acute respiratory syndrome coronavirus 2 |
| Myocarditis due to disease caused by Severe acute respiratory syndrome coronavirus 2 |
| Pneumonia caused by SARS-CoV-2 |
| Otitis media due to disease caused by Severe acute respiratory syndrome coronavirus 2 |
| Rhabdomyolysis due to disease caused by Severe acute respiratory syndrome coronavirus 2 |
| Sepsis due to disease caused by Severe acute respiratory syndrome coronavirus 2 |
| Severe acute respiratory syndrome coronavirus 2 detected |
| Severe acute respiratory syndrome coronavirus 2 not detected |
| Thrombocytopenia due to Severe acute respiratory syndrome coronavirus 2 |
New Favorites Available in Diagnosis Quick Search
The update adds 2043 diagnosis descriptions to your system. PCC added 245 of them to the “Favorites” quick search feature of all diagnosis fields in PCC EHR.
In preparation for the update, PCC’s certified coder, Jan Blanchard, assembled a list of 245 new SNOMED-CT descriptions of interest to pediatricians. The update added these diagnoses to your practice’s default Favorites list for quick searching, unless your practice has specifically requested otherwise.
What is a diagnosis 'Favorites' list?: As you type or search in any diagnosis field, PCC EHR automatically searches a customizable list of Favorites. Use the Diagnosis Configuration tool to adjust your practice’s list of Favorites. You can also right-click on any diagnosis field in PCC EHR to search your system’s full SNOMED-CT diagnosis library.
You can review the list of 245 new Favorite descriptions. Attend PCC’s monthly coding weblabs to learn more about the new descriptions and other coding topics.
Deprecated SNOMED Diagnosis Descriptions
The Fall 2020 SNOMED-CT update removes or replaces many codes common to pediatric practices. Your practice may want to take special note of them.
Here are the top 25 codes from PCC’s pediatric practices that have been removed from the SNOMED-CT diagnosis library in 2020. When these codes appeared for selection on a chart note protocol, PCC added a replacement if available. For other diagnoses, your providers can usually find new appropriate descriptions with a search, but you may want to plan ahead.
| Allergy to edible egg | 91930004 |
| Seborrhea | 86708008 |
| Sprain, ankle joint, lateral | 209532000 |
| Allergic reaction to insect bite | 213024000 |
| Dermoid cyst of skin | 276729007 |
| Hearing loss in right ear | 1091501000119106 |
| Pilonidal cyst with abscess | 85224001 |
| Allergic reaction, due to correct medicinal substance properly administered | 57302007 |
| Toxic erythema | 58767000 |
| Infective hepatitis immunization | 275849001 |
| Sprained finger/thumb | 287097007 |
| Adverse effect, due to correct medicinal substance properly administered | 45376003 |
| Pilonidal cyst without abscess | 76545008 |
| Adverse reaction to vaccine properly administered | 699017007 |
| Allergic reaction to bite and/or sting | 418484009 |
| Gastrointestinal allergy to food | 414314005 |
| Photosensitization due to sun | 258155009 |
| Sprain of toe joint | 262998001 |
| Angioedema of eyelids | 402405007 |
| Angioedema of lips | 402406008 |
| Adverse drug reaction resulting from treatment of disorder | 708809007 |
| Discharge of eye | 18628002 |
| Allergic reaction to systemically administered drug affecting oral mucosa | 702559001 |
| Facial seborrheic dermatitis | 402210009 |
SNOMED Codes Mapped to ICD-10 for Billing
The SNOMED-CT update includes new mappings to ICD-10 billing codes. Many previous mappings have been updated.
You may wish to review billing configuration for your diagnoses. You can open the Billing Configuration tool to configure which ICD-10 diagnoses are mapped to each SNOMED-CT description in PCC EHR. You can also use the snomedmap report tool to examine your practice’s diagnoses that may need updating.
Schedule Reports in PCC EHR
You can schedule reports to run in the future in PCC EHR.
Schedule a Report to Run Automatically
Use scheduled reports to automate recall lists, billing oversight reporting, and other workflows.
Select a Report
Open the Report Library and select the report you would like to schedule.

Set Report Filters and Click “Schedule Report”
Set up the Report Schedule
Choose a name for this scheduled report and the frequency at which you want it to run. You may want to schedule multiple instances of the same report with different filter settings, or to run on different schedules. Choose a name that will help identify which instance of a report this is.
Finish Scheduling the Report
Click “Schedule” to finish scheduling the report.
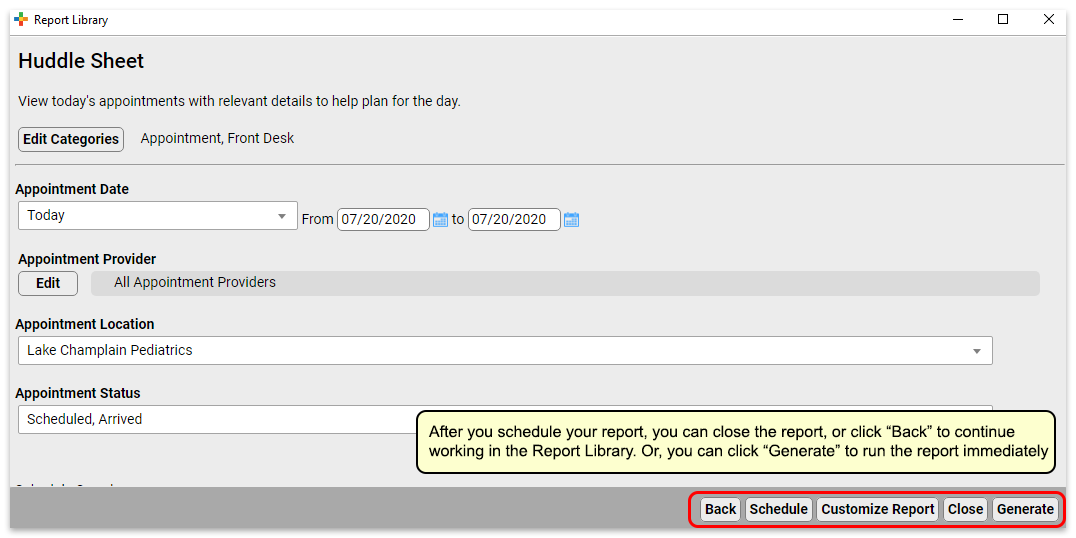
Your report is scheduled. If you’d like, you can click “View Results” to generate the report immediately or move on to other tasks.
Preview Results and Save Output Settings
What if you want to check the output of the report before you schedule it, or you want to save column and group by (subtotaling) settings with your output? You can schedule from the results page of a report, which will retain any column and group settings you configure.
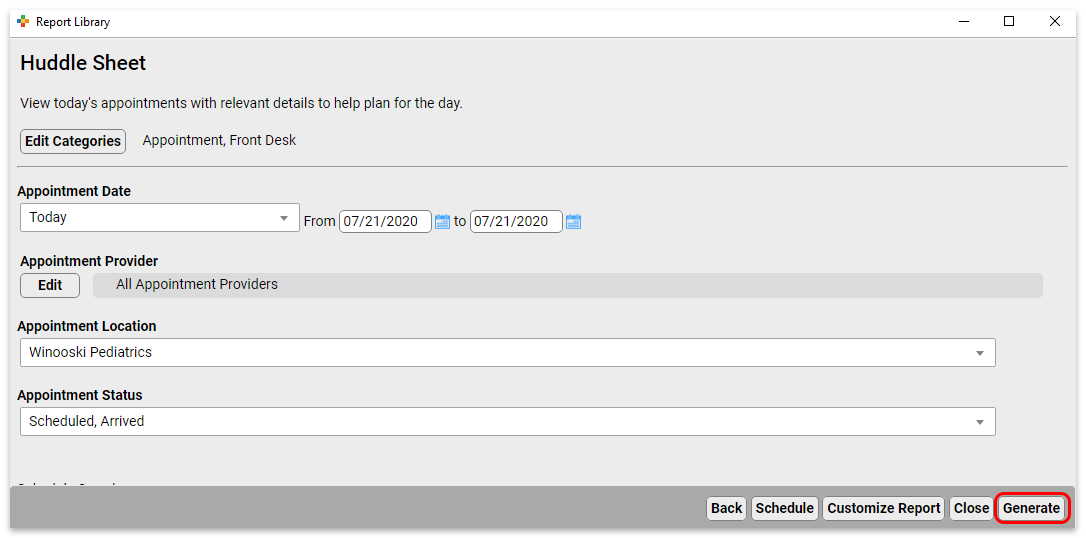
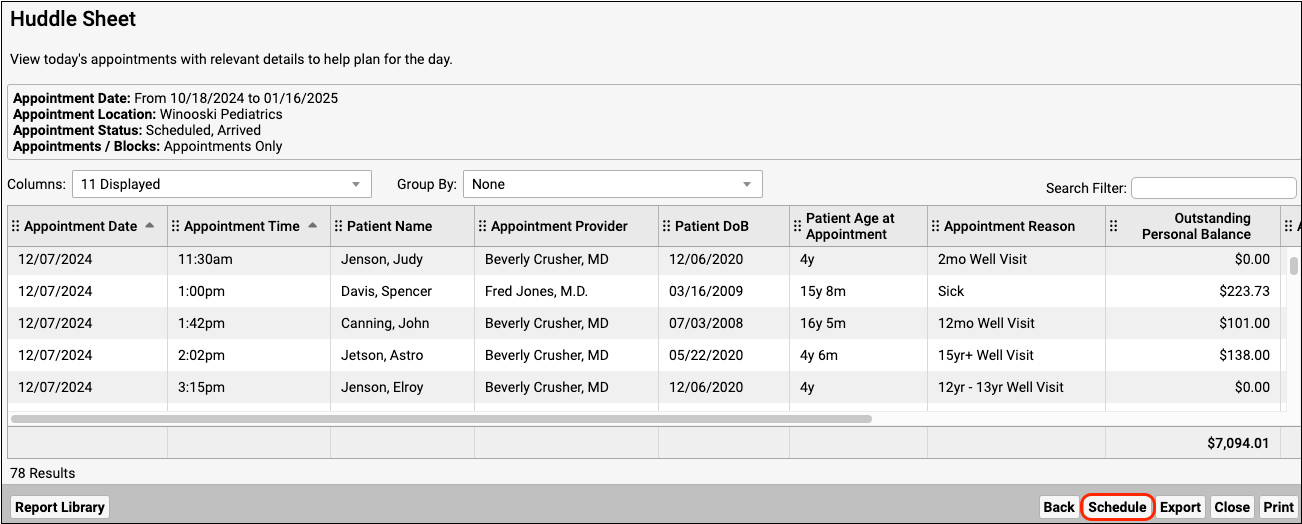
Reports scheduled in this manner will retain any column and group settings you configure here.
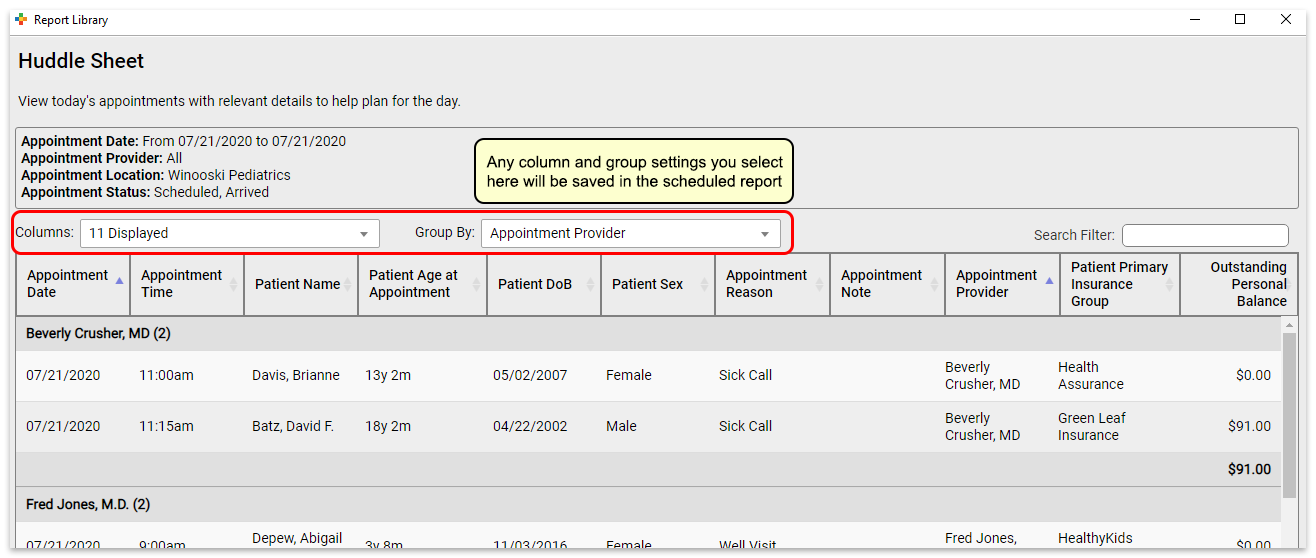
View Scheduled Report Results
You can view scheduled report results in the Saved Results tab.
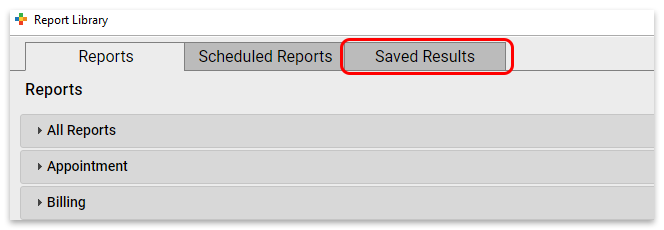
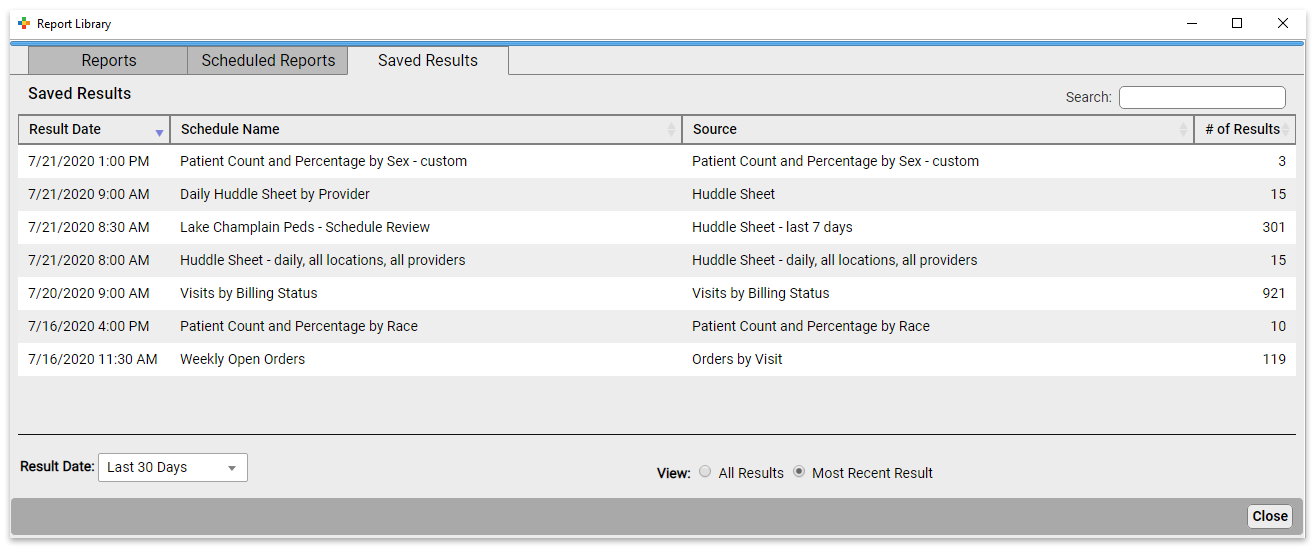
Here you can see the results for all scheduled reports.
You can see the date the report was run, the name of the schedule, the name of the source report the scheduled report was based on, and the number of results in the report.
To see reports that last ran more than 30 days ago, change the “Result Date” filter setting.
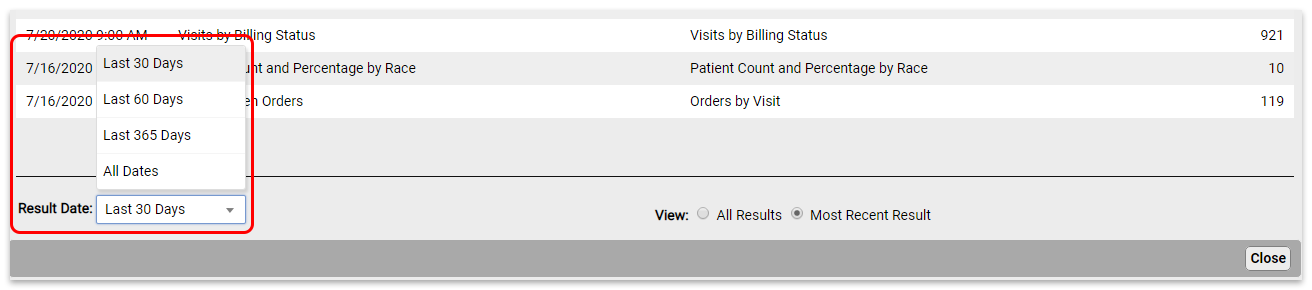
By default, you will see only the most recent results for each scheduled report. To see all results, change the “View” filter setting.
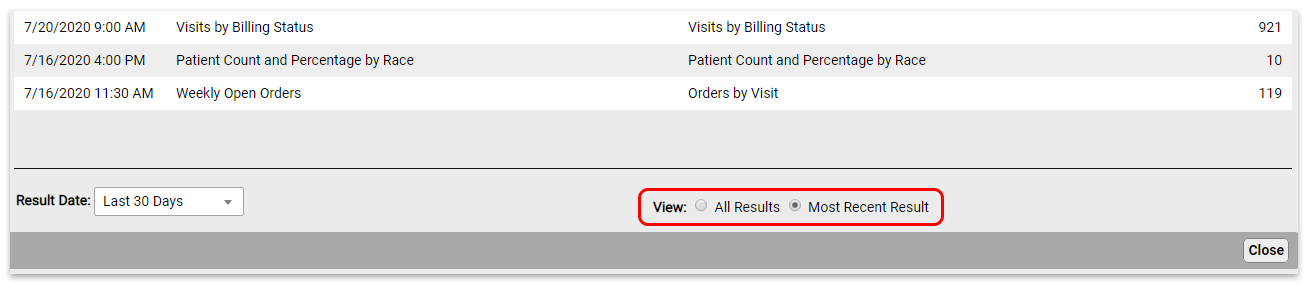
Click on the report you want to view to open the results.

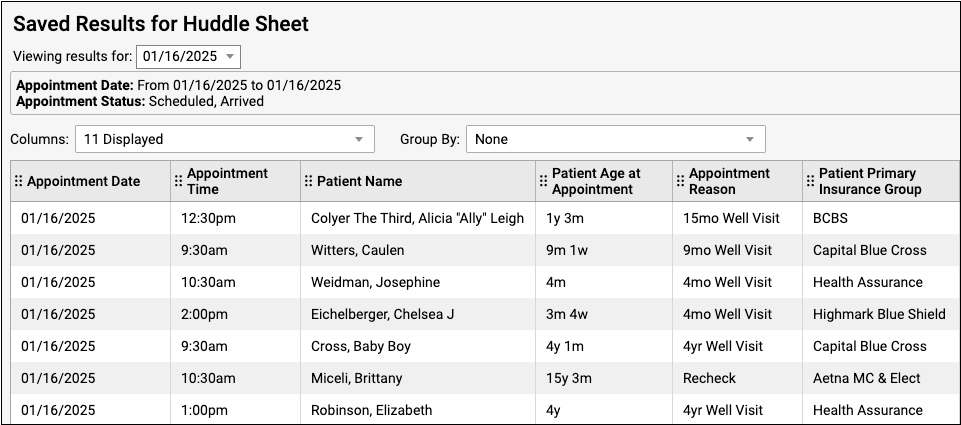
From here, you can export or print the results.
If a report has been run more than once, you can use the drop-down at the top of the report results to switch between results without going back to the Results tab.

Edit Scheduled Reports
To edit a report, click the Scheduled Reports tab. Here you can see all scheduled reports.
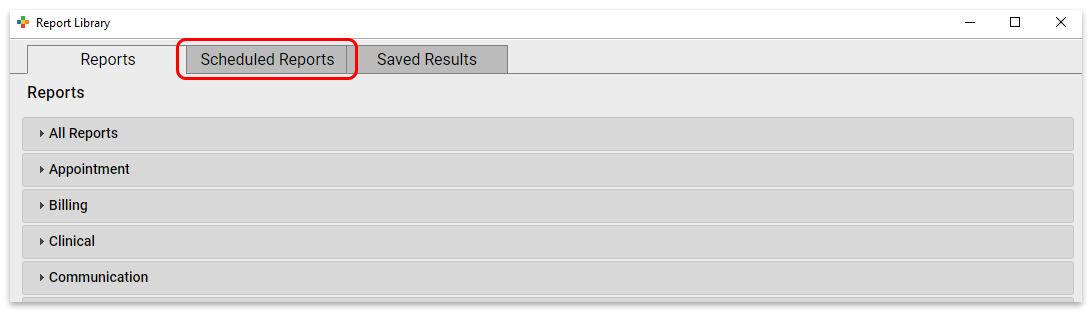
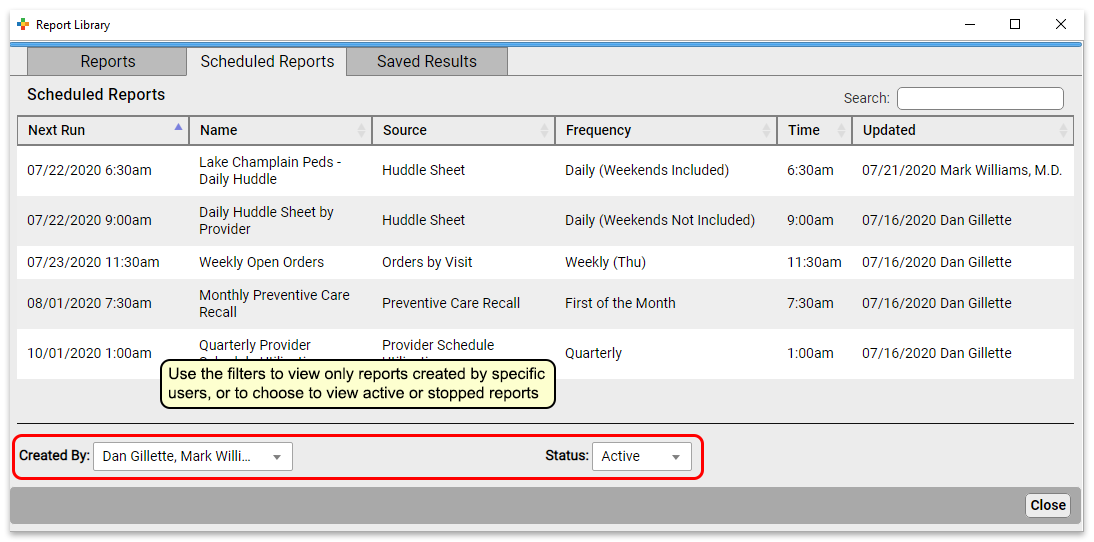
Click a report to edit it.
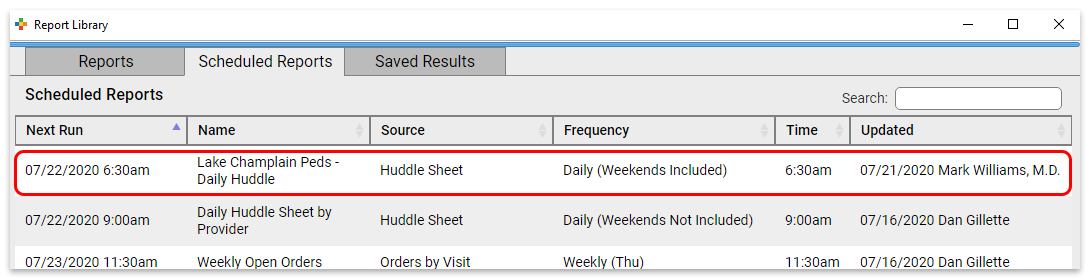
At the top of the report, you can change the schedule name, and the frequency and time the report will run. Below that, you can adjust the filter settings for all future runs of this report.
Click “Save” to save your edits. Or, if you’d like to make edits to the output formatting or to preview your report, click “Preview” to view report results.

Previewing Reports Takes Time: Previewing a report will run an instance of the report. If it’s a report that takes a long time to generate, this will take a while.
Stop and Start Reports
To stop a scheduled report from running, open it from the Scheduled Reports tab.
Click “Stop Schedule” to stop running the report.
Click “Save” to commit the change.
To start a previously stopped report, open it from the Scheduled Reports tab.
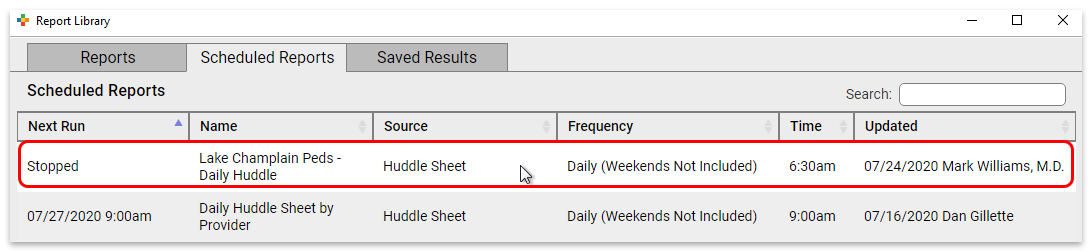
Click “Start Schedule” to activate the report.
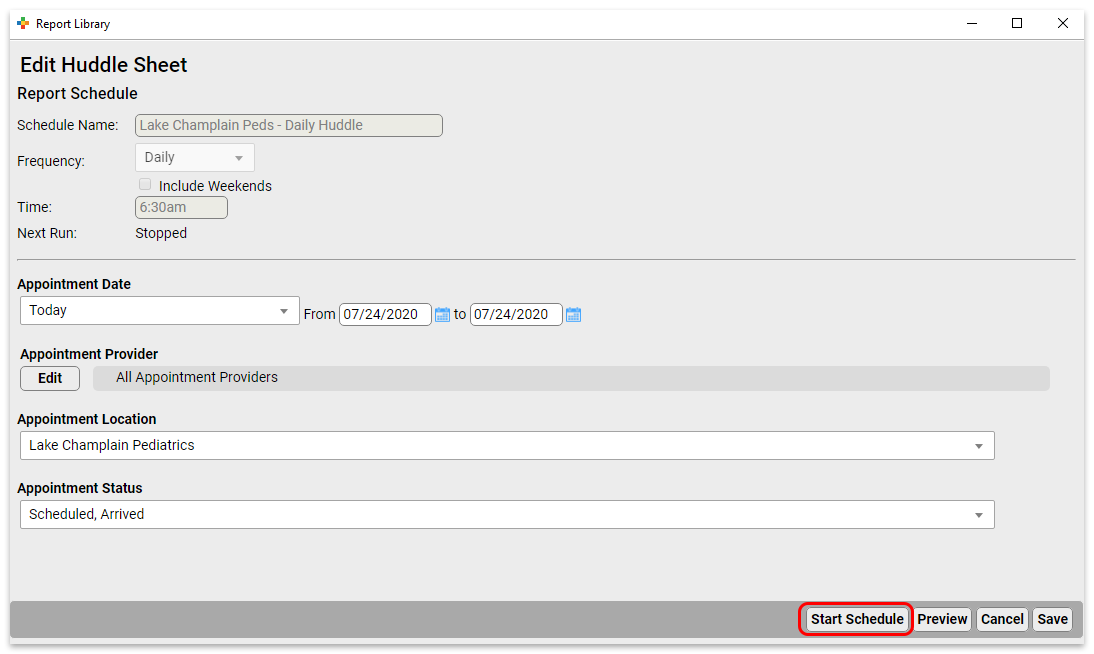
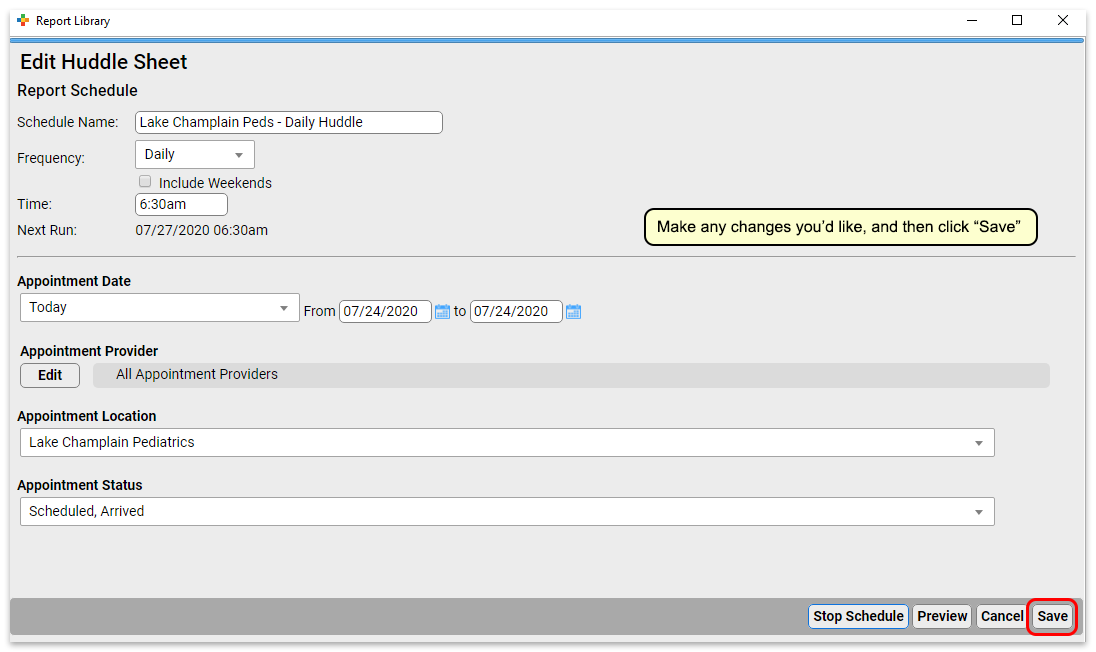
Make any adjustments you want to the name, frequency, and filters, and then save (or preview and save) the report.
Delete Scheduled Reports
To delete a scheduled report from the Report Library, open it from the Scheduled Reports tab.
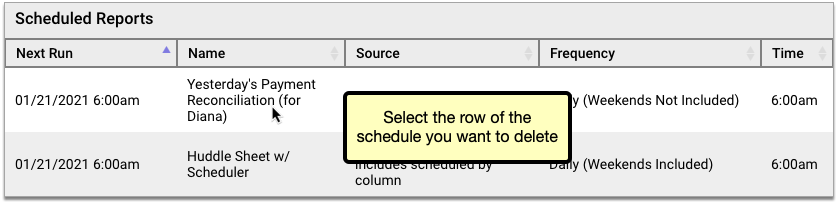
Click the “Delete” button, then confirm that you truly want to delete the schedule.

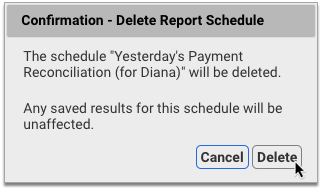
Deleted schedules are permanently removed from the Report Library and cannot be re-enabled. You can continue to view past saved results of deleted scheduled reports in the Saved Results tab of the Report Library.
Run a Pediatric Drive-Up Flu or COVID-19 Shot Clinic
Your practice can use PCC EHR to perform a shot clinic while also meeting COVID-19 safety protocols.
PCC has worked with several practices who are running “drive through” or “curb side” flu clinics. In addition to providing your families and communities with a vital service, by running a drive through flu shot clinic, you can prepare your practice for for participation in other vaccine clinics, such as expected upcoming vaccinations for COVID-19.
Learn More From the Experts: PCC spoke with several practices to draw together the ideas and tips below. We especially learned a lot from Dr. Jeanne Marconi, who delivered a seminar sharing her experience and expertise in running this kind of flu clinic. You can watch a recording of her seminar.
Check Out PCC's Blog Post: PCC posted a great guide to How to Open a Drive Thru Flu Clinic at a Pediatric Practice! It includes our notes below and so much more. Take a look!
Watch PCC Pediatric Flu Clinic Roundtable: In September of 2020, PCC hosted a Flu Clinic roundtable, talking about drive-thru strategies and more!
Pick a Location
If you’re reading this article, then your practice wants to run a vaccine clinic, but (especially during COVID-19), you do not want to do so in your physical office space. Where can you hold an outdoor, drive-thru flu shot clinic?
You may have a parking lot or other large enough area near your practice to support a drive-through clinic, or you may not. A local business might. Consider reaching out to banks, stores, and/or your local municipality to find a location.
If your practice does not own your parking lot, you may wish to take additional precautions or seek permission.
You may want to double-check your location’s general liability policy. It usually covers things that happen in your parking lot, even if you rent or lease your property. You may want to share your policy with your landlord, or connect with your insurance company to discuss the issue.
Prepare Things You Will Need
How will you maintain the cold-chain for your vaccines? Do you need traffic cones? What additional PPE will you need? And can you buy a tent from Walmart?
Some practices erect pop-up tents for checkin and administration stations. You’ll need to plan time for erecting and disassembling your tents. If there’s no rain, you might decide to skip the tent that day.
The CDC website hosts an excellent preparation checklist that covers the more serious issues, like vaccine storage, supplies, and rules around administration.
Plan for Safety
Your practice should plan the drive-up visit workflow to ensure safety. Ask yourself how you will “shepherd” cars, and where do they will wait when they pull in. Your location may have specific safety needs, and you will need to plan for traffic flow.
You should also make safety parameters clear to your families and all attendees. For example, instructing families that they should always stay in their car, and instruct staff to not approach a car until it has been placed in park.
You may need additional staff to help monitor and direct traffic so you are not blocking a major roadway.
Set Expectations and Get Your Staff On Board
You can hold a full, all-hands meeting: our practice is going to do a drive-thru flu clinic! Explain how this will help your families and your community. Every staff member plays a part, even if its just promoting the clinic at each contact point.
Dr. Marconi recommends having a “champion” on staff to be the point person, to help clarify and handle questions that come up. Offer food and other encouragement to your staff!
Pick a Date(s)
When will you host your drive-through flu shot clinic? You’ll need a date with adequate staff, and you’ll need to calculate how many patients or families you are likely going to be able to see.
Since you are looking for low traffic and wide open parking lots, a weekend date may work best.
Promote Your Drive-Thru Flu Shot Clinic
How will you get the word out?
Talk to families, use PCC’s Broadcast Messaging, and provide verbal reminders at every point of contact. Dig into social media, update your practice’s home page, Facebook, your phone hold announcement, and consider sending a press release to publications in your community.
Are you the first one in your community to offer this valuable service? Local media might help you promote the flu clinic, and/or report on it, which helps build your practice which in turn means you are better able to support your community.
Schedule Patients
How will you communicate your flu clinic “slot” availability to all patients and families? And how will they Schedule?
High volume visits mean that scheduling has to be easy. You can have families use of PCC’s portal message scheduling template so that families can pick a time or slot. You could also use a service like FullSlate, Calendly, or Acuity. These services create an online website for you so parents can easily sign up for an open slot.
Perform Pre-Visit Patient and Family Preparation
Your flu clinic will run best if you’ve worked with every family before the actual clinic. Send them the VIS beforehand, do pre-visit COVID-19 questions. When you speak with a family, always take the opportunity to do wellness questions, update information about patient chronic problem and care plan maintenance, and review their medications.
You can send the Influenza Vaccine VIS through PCC’s patient portal. You can also laminate a copy and hand it into the car at the time of service.
You can ask COVID-19 screenings ahead of time, or tell the family to expect them at the clinic. Remember to screen all occupants of the car at the time of service. Practices have developed alternative ways of asking kids COVID-19 screening tests, such as asking what they ate for breakfast and what it tasted like.
Use the Opportunity: You’ve got the family or patient on the phone? Use that opportunity to check in on all recall topics. Chronic disease management, updated immunizations, and more. You can schedule Telehealth and Well visits based on what you learn. You should also review and update demographics, verify insurance, and plan how they will pay! (Get credit card on file, for example.)
Plan For Payment
Many practices simply ask for “cash” payment for flu shots: for a non-office visit, occurring as fast as possible, billing insurance may not make sense for you.
Either way, your practice should work to make payment as touch-less and efficient as possible.
You can work with your financial services vendor to set up secure credit card on file, for example.
Set Up Your Intake Station and Your Shot Administration Station
To see patients quickly, you can have each car stop at two stations. First, an intake station for COVID-19 screening and prep, to help the family get ready (loosen clothes, set expectations), and to collect any forms. Next, the shot station, where the clinician should double-check the child’s age and consent, confirm the vaccine they believe they are receiving, administer the vaccine, confirm the patient appears well, and document that the vaccine was administered.
At each station, you’ll want signs (or hand-held posters) with “Stop Here” and “Put your Car in “P”ark!”. Someone should individually verify that a car is in park as they approach.
Have an Emergency Plan
Your practice already knows your emergency procedures when seeing patients at your practice. Take some time to review and update that plan for your drive-thru flu clinic.
If something goes wrong, or the patient has an emergency, everyone should know the plan. Who will call 911?
How Did It Go?
As with all new initiatives, things will go wrong. You’ll learn how to improve, what to do differently next time.
Send a survey to some patients or check in with families. Did it work? And ask your staff: They helped a huge number of patients in a short period of time! Congratulate and reward them for doing this.
Other Things We’ve Heard
Dr. Marconi shared that with practice and experience her staff can now manage to see 10 cars an hour. She uses a pre-check station, with 1 MA, followed by a shot station, with 1 staff. You can create multiple lanes as well.
We also learned from many PCC practices that a drive-thru clinic has a surprising bonus: kids are in their car seats, in familiar surroundings, and ready for what’s coming. Some administrations are harder in a car, but some are actually easier!
Your practice may also want to have a plan for “guest” flu shot customers. If someone is not a patient at your practice, how will you handle them? Schedule them for a new patient visit?
There are a number of great online resources for flu clinics and drive-thru flu clinics! Check out Sanofi’s resources, or the CPP Buying Group’s resources.
Code and Bill for E&M Office Visits
Upon completion of a sick visit encounter, a clinician selects an “Evaluation and Management” or E&M code. This is sometimes called the “office visit” level. E&M level selection is based on the clinician’s medical decision making or the amount of time spent on care for that patient on the calendar date of the encounter.
Procedure Code Guidance: The procedure codes discussed in this article are intended only as examples. You should consult the AMA’s current CPT Coding Guide and work with your insurance payers to verify what codes you should report on claims. Your practice updates and maintains your billable procedure list, codes, and prices in the Procedures table in the Tables configuration tool on your PCC system.
Why is E&M Code Selection Important to a Pediatric Practice?
E&M services make up a large percentage of the work you do as a pediatrician. They represent the cognitive work, information gathering, and decision making that goes into patient care. Because so much of the work you do falls under the umbrella of E&M, it’s vital that you code those services correctly. Many pediatricians under-code their encounters, resulting in significant lost revenue for their practice.
Documenting your encounters is not only important for continuity of care. It also supports collecting and retaining the revenue those services generate.
PCC’s E&M Coding Tool
PCC’s Jan Blanchard (CPC, CPEDC) developed a printable guide for E&M Coding.
2021 Transition Resources Archive
On January 1st, 2021, the guidelines for coding and billing an office visit changed significantly. PCC collected resources, created tutorials, and managed an FAQ at that time.
2021 Resource Guide: Some of the details below have changed since 2021. You should consult the current AMA CPT Coding Guide for the most up to date requirements and guidance. Reach out to PCC Support or attend a live PCC Billing Drop-In session to learn more.
How Do I Select an E&M Code for 2021 and Beyond?
For encounters that occur after December 31st, 2020, a clinician no longer uses history or physical exam performed during the encounter as criteria for code selection. Instead, they select a code based on either medical decision making or time spent practicing care for the patient on the day of the visit.
Here’s a brief explanation of how you select a billing code level for an “evaluation and management” or “Office Visit” after January 1st, 2021. These guidelines apply to common visit billing codes, such as 99212, 99213, 99214, or 99215, as well as to the selection of codes 99202 through 99205.
Select a Code Based on Medical Decision Making
You can base your visit level code on medical decision making, which is comprised of three elements:
-
Problems Addressed: The number of problems you addressed for the patient during the day of the encounter.
-
Items Reviewed: The tests, chart information, and other data you reviewed in relation to the problems addressed today.
-
Risk: The level of risk presented to the patient.
- 2021 Evaluation and Management Updates: What changed? This 15 minute video explains the new way of selecting E&M codes in context with how you coded sick office visits before.
- PCC’s 2021 E&M FAQ&A: Frequently asked questions, and a live Q&A about 2021 E&M leveling.
- 2021 E&M Workshop: A live workshop led by PCC, this session includes an overview of the changes and examples of real-world level selection.
- The Impact of 2021 E&M Coding Changes on Pediatrics: Learn about the E&M coding changes in context, and then hear PCC’s ideas about how these changes will affect the business of pediatrics.
- Pediatric Management Institute’s September COVID-19 Webinar: During the September 2020 session of the PMI’s ongoing webinar series, The Business Impact Of COVID19 On Pediatric Practices, this topic is covered along with other current topics. This recorded live webinar includes some additional Q&A.
- PCC Resources
-
Evaluate Your Practice's E&M Habits and Patterns: Your Practice Vitals Dashboard, available from within PCC EHR, provides a number of metrics, tools and recommendations related to E&M coding included on the “E&M Coding Distribution” measure.
-
Confessions of a Pediatric Practice Management Consultant: PCC’s Chip Hart runs a blog and podcast, covering many topics related to practice management, including E&M coding. You can find it here.
-
- Other Resources
- AAP FAQ: E&M 2021 coding questions and answers by the American Academy of Pediatrics.
- AAP MDM Grid: A direct link to the AAP’s chart which illustrates levels of medical decision making. It includes several useful examples. (AAP hosts this file here.)
- MDM Tracker: An online tool for selecting visit level based on medical decision making in 2021.
-
Where can I find PCC’s 2021 MDM Tool?Here it is: PCC’s 2021 E&M Coding Tool.
-
Where can I find the online MDM calculator Chip Hart shared?You can find it on the Confessions of a Pediatric Practice Management Consultant blog post entitled “Free E&M Medical Decision Making Calculator”.
-
Is fever a systemic symptom which can elevate a visit’s level?Sometimes. It depends on the patient’s presentation, and only when paired with an acute illness.
CPT defines systemic symptoms this way:
“Acute illness with systemic symptoms: An illness that causes systemic symptoms and has a high risk of morbidity without treatment. For systemic general symptoms, such as fever, body aches, or fatigue in a minor illness that may be treated to alleviate symptoms, shorten the course of illness, or to prevent complications, see the definitions for self-limited or minor problem or acute, uncomplicated illness or injury. Systemic symptoms may not be general but may be single system. Examples may include pyelonephritis, pneumonitis, or colitis.” (p12-14 2021 CPT Manual)Fever had become a mainstay of complexity expression in E&M documentation. In 2021, not all fevers meet the definition of a systemic symptom. AMA says that in cases where the fever is a “general symptom in a minor illness”, it is *not* systemic. So using it to express visit complexity becomes a case-by-case determination for 2021. Things like age and other risks will be determining factors that clinicians will have to consider when they decide this point.
-
Can we get points for both ordering and reviewing tests and labs in our MDM leveling?No. For any one test or lab, you may include *either* the ordering or reviewing done on the service date. To include both points would be “double dipping”.
Furthermore, the AAP has interpreted the AMA’s position to be that you may not consider tests performed in your office in your MDM level determination. This interpretation is under review.
-
Will documenting multiple diagnoses lead to a higher level of MDM?
Maybe. “Problems” are the units of determination for MDM. So, if you treat three problems in a visit, but there are five ICDs listed, the ICDs do not inherently support higher complexity leveling. Some ICDs are reported because they represent circumstances and/or problems which complicate care but which are not specifically addressed at that visit. Documenting the role that those existing problems play in your thinking could support assigning higher Problem values to what *is* addressed.
-
Can I really get credit every time a parent or guardian contributes history to a visit?Maybe. If you feel confident that the contribution they made is required for appropriate care to be rendered, yes. Document the reason for their perspective being necessary if it is not obvious. For example, little ones who can’t speak for themselves obviously require someone to give their history. But for teens, the necessity of another perspective in, say, behavioral or social concerns where objective input is valuable, document a statement to that effect and take the independent historian point(s).
-
If I spend time reviewing records from a different practice, even if they’re from a practice where I formerly practiced medicine, can I count that time toward my day’s total?Technically, I would say yes. If the patient is familiar to you, the review would likely not take very long, necessarily.
Follow Up Question: What if I am reviewing records at my practice that are “old”, say, greater than 3 yrs?
Answer: No, not the way requirements are currently written: “Review of prior external note(s) from each unique source.” Only records from sources outside your own organization can be considered external and valid for those points. -
How do Social Determinants of Health (SDoH) count toward MDM?Per CPT 2021, SDoHs are “Economic and social conditions that influence the health of people and communities. Examples may include food or housing insecurity.”
Per the Elements of Medical Decision Making grid published by AMA in CPT® Evaluation and Management (E/M) Office or Other Outpatient (99202-99215) and Prolonged Services (99354, 99355, 99356, 99XXX) Code and Guideline Changes, an example of Moderate risk of morbidity from additional diagnostic testing or treatment is “Diagnosis or treatment significantly limited by social determinants of health”. I interpret these references to suggest that any SDoH which significantly limits the patient’s ability to carry out the clinician’s plan meets the Level 4 risk requirement.
According to the U.S. Department of Health, Social Determinants of Health are economic and social conditions that influence the health of people and communities. Their examples include:
- Safe housing, transportation, and neighborhoods
- Racism, discrimination, and violence
- Education, job opportunities, and income
- Access to nutritious foods and physical activity opportunities
- Polluted air and water
- Language and literacy skills
Some of these may be reported using ICD codes found in “Persons with potential health hazards related to socioeconomic and psychosocial circumstances Z55-Z65”
- Z55 Problems related to education and literacy
- Z56 Problems related to employment and unemployment
- Z57 Occupational exposure to risk factors
- Z59 Problems related to housing and economic circumstances
- Z60 Problems related to social environment
- Z62 Problems related to upbringing
- Z63 Other problems related to primary support group, including family circumstances
- Z64 Problems related to certain psychosocial circumstances
- Z65 Problems related to other psychosocial circumstances
-
How will billing sick care that was rendered during a well visit be affected by the 2021 E&M changes?As a physical exam is not a consideration in leveling 2021 E&M visits, clinicians can now capture sick care for New Patient well visits, and can more easily level any visit that includes both sick and well care.
The new MDM focus on visit leveling represents less subjectivity in discerning which parts of a service were part of the well care and which were part of the sick care.
-
Do I need to document in the note the exact amount of time spent on each activity, or is it ok to just document total time?Full day totals are permissible, but I would feel better seeing at least time segments. Rough estimates for segments would do, but to expect that human brains can recreate a day’s worth of timed detail accurately for work that gets interrupted and broken up and then wrapped up after everyone else has gone home is a stretch which can be avoided.
-
Is there still a Level 1 visit for nurse-only visits?Yes, for established patients only, a Level 1 nurse visit can be reported using 99211. New patient level 1 code 99201 expires on 12/31/20 and is not reportable thereafter. This is due to the identical MDM requirements for both 99201 and 99202. By 2021 standards, 99201 becomes redundant to 99202.
-
If I continue to chart after hours, can I add that time for the purposes of leveling the visit?Yes. Caveat: The only after hours charting time (or any other clinical activity time) you may include in your billed time is the time spent *on the date of service*. If you chart any part of yesterday’s visit today, you may bill by time but you cannot include the time you spent today in the total you use for choosing your level. For example, if on Monday you see an established patient and spend 5 minutes reviewing records, 10 minutes in a visit, 5 minutes on a results call Monday night and 10 minutes charting on Tuesday morning, you may only bill a level 3 visit using Monday time: 5+10+5=20 minutes; Tuesday’s 10 minutes cannot count toward the leveling.
-
Will I get MDM data points for tests like rapid flu or rapid strep for which I also charge?Currently, no. The current interpretation of the relationship between awarding data points for tests and labs and paying for tests and labs is that they are mutually exclusive.
Discussions around this continue, but currently you should not expect to level using data points for test and labs you bill.
-
Are a CBC and differential counted as more than 1 lab? Or for example COVID-19/Flu/RSV combo - is that 1 test or 4 tests?It depends on the number of CPTs. If CBC and differential are one CPT, it is one data point for either ordering or reviewing. If the COVID-19/Flu/RSV combo is one CPT, one point is its data value.
-
Could I count one of several screenings towards data reviewed and bill for the other and not be double-dipping?This is not in the spirit of the requirement, but is still under discussion. Billing effects are impossible to explore here. The sheer variety of payers and policies means the outcome can not be predicted. Furthermore, carrier behavior makes predictions of future claim determinations little more than a guessing game.
-
Do I get credit if some historians are in office and others participate over facetime, phone, etc., for the same visit?Yes. There is no cumulative credit for historians, but if someone other than the patient is required to participate that requirement is met.
-
If you use a formal screen for SDoH that is scored and payable, then you can’t count that screening towards MDM, correct?Currently, that is correct.
-
Does pulse oximetry give a data point?I don’t know, and this question is more complex than it looks. The debate between clinicians about whether pulse ox is a vital sign is a factor. If you consider it a vital, it is not a test, and counting it as a data point is questionable. However, pulse ox has a billable CPT, so some may consider it a test.
Also, the question of whether in-house tests and labs may be used for data credit remains unanswered. I am undecided on this as yet and will count on the clinicians with whom I review encounters to help me arrive at a position on this point in future.
-
We do our huddle and "run the schedule" (i.e. review referrals, lab results, vaccines, and consult notes) the day *before*, not the day of! Can we count that time when leveling each of those encounters?No. Currently, the only “billable” time is that spent by the clinician for that patient on the service date.
-
Does 'undiagnosed new problem with uncertain prognosis' relate to when we don’t yet have a diagnosis, or does it mean a new previously undiagnosed problem that you identified at the visit?This phrase comes from a MDM requirement. Our interpretation is that it means a new problem for the patient that you have never seen before, and for which you are uncertain of the outcome.
CPT 2021 is light on guidance on this point. “Undiagnosed new problem with uncertain prognosis: A problem in the differential diagnosis that represents a condition likely to result in a high risk of morbidity without treatment. An example may be a lump in the breast…” The AAP offered an additional example of a potentially malignant lesion in the Feb 2020 issue of the Coding Newsletter.
-
If we bill for one Vanderbilt, could we then claim MDM credit for the ones from other sources?My sense of this is that doing so is *not* in the spirit of the guideline. Additionally, performing a service and not billing for it will run afoul of many insurance contracts. Also, please see above for information about Data credit for in-house labs and tests.
-
What about the hand-on-the-doorknob minor things that parents like to bring up? If there are enough of these, or significant ones, can I document them in a manner that might bump MDM up a level?
Example: Rash (insect bite) + been a little constipated (give some prune juice), been having stomach aches (few questions to make sure it’s nothing worrisome, asked to schedule another visit to evaluate further)…
Yes, but MDM is based on significance, not the number of problems. The total number of problems does not necessarily increase the credit you can claim for complexity in the Number and Complexity of Problems Addressed element. Rather, the most complex problem addressed (Minimal, Low, Moderate, High) in a given encounter typically represents the level of “problems addressed” which should be used for leveling. Exceptions include self-limited, minor problems (1 = Minimal while 2 = Low) and stable chronic illnesses (1 = Low, 2 = Moderate).
-
Can concussion be considered an acute complicated injury - a head injury that gave other systemic symptoms?Described that way, absolutely. Be sure to familiarize yourself with the AMA’s definition of Systemic Symptoms.
-
What is meant by 'risk'? The guideline only lists examples. Is there a way to determine risk on MDM without these examples? Is that purely a judgment call?Yes, this is a clinical judgment.
From the AMA: “Trained clinicians apply common language usage meanings to terms such as high, medium, low, or minimal risk and do not require quantification for these definitions (though quantification may be provided when evidence-based medicine has established probabilities). For the purposes of MDM, level of risk is based upon consequences of the problem(s) addressed at the encounter when appropriately treated. Risk also includes MDM related to the need to initiate or forego further testing, treatment, and/or hospitalization.”
-
If you send a kid to the Emergency Department, or for testing due to concern for appendectomy, does that discussion get you to a higher level of risk? Does discussion of a possible ER visit count?Not usually. If the decision is purely for testing consideration, meaning the tests could be done in another care setting without ready access to acute or surgical or inpatient care, I would *not* say that meets the spirit of the requirement.
From the AMA: “… decision about hospitalization includes consideration of alternative levels of care…Examples may include a psychiatric patient with a sufficient degree of support in the outpatient setting or the decision to not hospitalize a patient with advanced dementia with an acute condition that would generally warrant inpatient care, but for whom the goal is palliative treatment.”
-
Will PCC develop a software timer to capture clinician charting time?PCC is not currently developing a timer in PCC EHR. Our research mid-2020 about this feature found that users did not see enough value in having to activate a timer whenever they turned their attention to a particular chart.
For example, if PCC EHR automatically records your time with a chart open, you would be required to close and reopen every chart every time you were interrupted while charting in order for it to be accurate. If you had to actively click a button to stop and start a timer, it would be an ever-present timer that required their attention. Users shared this would be distracting at best and annoying at worst. Most users were happier to state their own estimates of how much time was spent, either in total or in segments to be used for totaling when they were sure services were complete for the whole day.
Select a Code Based on Time
You can base your visit level code selection on the total time that the rendering clinician spent on the patient that day. That can include the time the pediatrician spent before, during, and after the actual encounter.
Watch PCC 2021 E&M Coding Videos
These 2021 videos provide examples of how to level your E&M visits:
Configure PCC EHR to Support Your Clinicians and Billers for E&M Level Selection in 2021
Your practice can add fields to your chart note protocols in order to track time spent before, during, and after the encounter by the clinician. You can also track the number of problems addressed, items reviewed for the problems, and the level of risk present.
As an example, this sample chart note protocol includes components designed to quickly note problems, time and risk.
For help customizing your protocols, check out Configure Chart Note Protocols, and get in touch with PCC Support for assistance.
2021 Additional Resources and Guides
In the lead up to the 2021 transition, PCC published blog posts and other organizations published guides and online tools.
2021 Questions and Answers on Interpreting E&M Guidelines
PCC’s Jan Blanchard works with pediatric practices to help them interpret coding guidelines. Read below to see a selection of the 2021 E&M questions received at the time of the transition. These Q&As were last updated on 2021-01-08, so you should consult your AMA CPT Guide for more recent details.
Questions and Answers
Review an Encounter’s Billing History
Use the Billing History in a patient’s chart to see full details of what was billed for an encounter, what payments were collected, when claims were sent, acknowledged, and received, and more.
Video: Watch Work With a Patient’s Billing History to learn more.
Visit the Billing History
Click the “Billing History” button inside the History section of a patient’s chart to review the billing history for any encounter.
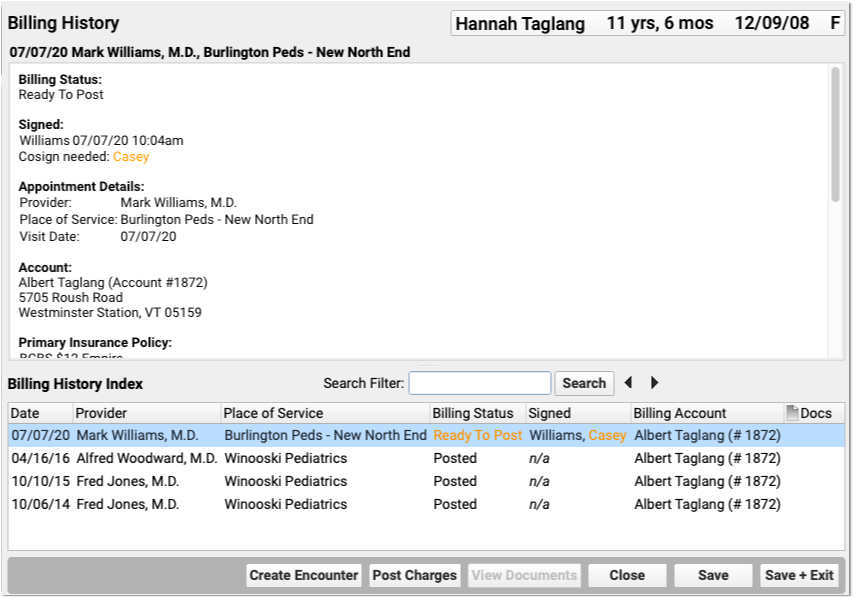
Office visits, telemedicine encounters, phone notes, portal messages, hospital charges, and administrative encounters that have been billed or may be billable appear in the index at the bottom.
When Do Encounters Appear in the History?: An appointment has a billing history entry as soon as an encounter’s status is set to “Arrived” or the patient is checked in. Phone notes and portal messages only have a billing history if the clinician clicked “Bill” and selected “Ready for Billing”. Hospital and administrative encounters appear after a user creates the encounter and posts the charges.
Review the Billing History for a Specific Encounter
Click on an encounter in the index to see details in the window above.

You can review encounter billing details, such as what diagnoses and procedures were posted, a payment history for the encounter, and a claim history for the encounter.
If an encounter still has the “Ready to Post” status, or has new items added to post, you can work with those encounters on this screen. Select the encounter and click “Post Charges” (or double-click on the encounter) to open up Post Charges.

Review Attached Documents: You can review any documents attached to an encounter in the Billing History section of the chart. For example, if a user attached a scanned insurance card, a hospital note, or other document to an encounter, you can double-click to open it.
Review Charge and Payment History for an Encounter
In the Procedures section of an encounter’s billing history, you can review charges for the encounter and a history of all payments.
For each charge, you can see personal payments, insurance payments, and adjustments.
If any unapplied (or “unlinked”) payments on an account are paying off charges, you will see the “Payment (Unapplied)” amount indicated for each charge and in the totals section.
In the Payments section, you can review all payments posted on the same date as the encounter. To configure which payment types appear in this section, contact PCC Support.
For each payment, you can review what charges the payment applies towards.
For more details about reviewing payment history, see Review Payment History and Edit Payments.
Review Claim History for an Encounter
When you need to understand when a claim was sent, acknowledged, paid, or resubmitted, use the Claim History found in the encounter’s Billing History.
The Claim History shows the lifecycle of all claims for the encounter, from submission to resolution. You can see when a claim was queued, held, delayed, processed, received by PCC’s clearinghouse, acknowledged by the payor, and more.
For each event, you can see the date, the event, and the insurance plan. When available in your system’s records, the component displays additional details, the claim ID, and the user who performed the action.
If an encounter was submitted multiple times, the claim history will show you each submission along with claim acknowledgements and other events.

Read Claim Files, Acknowledgements, and Other Responses for an Encounter
When you need to dig deeper into a problem claim, you may want to review the claim submission log, acknowledgement, or other electronic response from a payor. When an electronic record is available for a claim event, you can click on a link to open it.

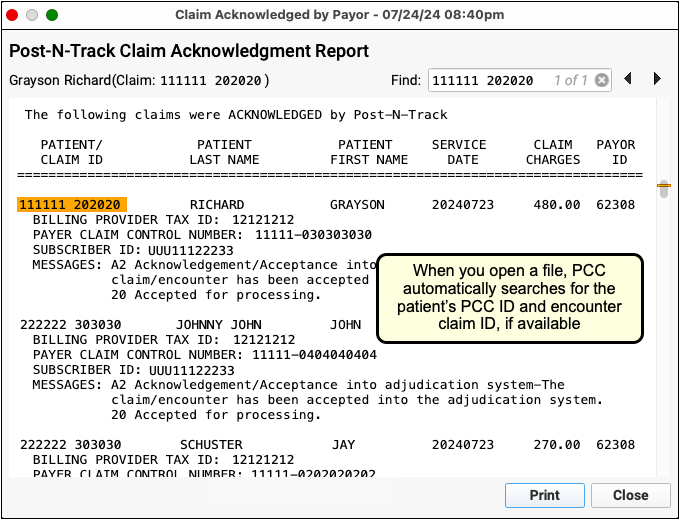
You can review the outgoing electronic claim file, claim acknowledgements, rejections, and most other responses for claims. (To review the ERA, use the Electronic Remittance Advice tool.)
Print an Encounter’s Complete Billing History
Select any encounter and click “Print” to print the billing history. It will include all charge, payment, and adjustment information along with details about the claim.
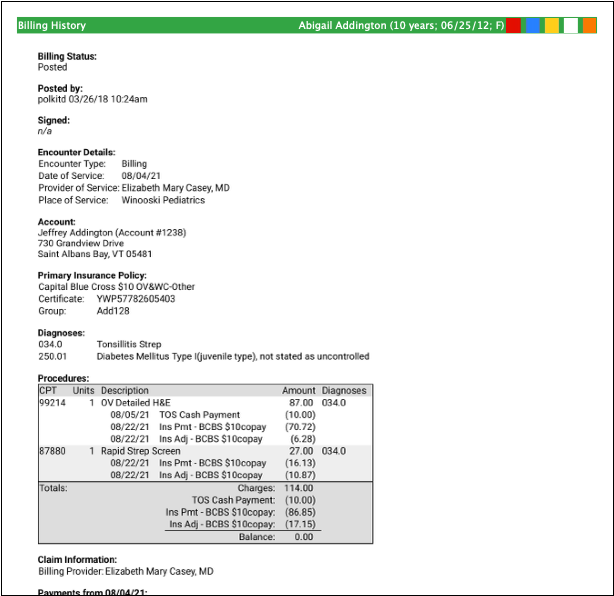
Edit Encounter Charges and Claim Details and Resubmit
If you need to edit the charges on an encounter or claim details, such as the place of service or additional information submitted with the claim, select and encounter and click “Edit Charges”.
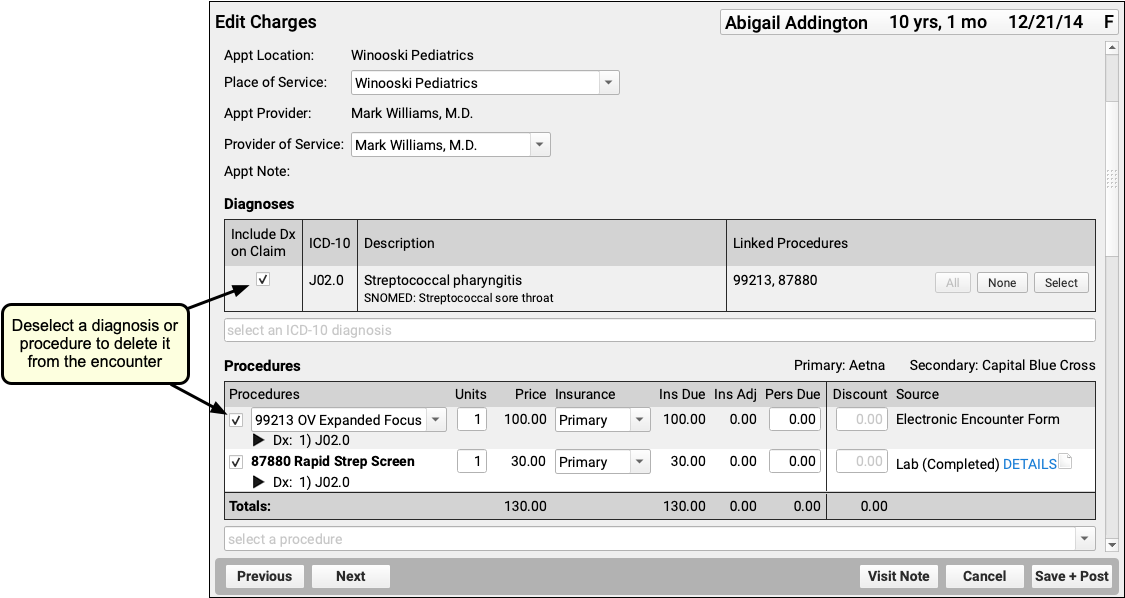
Read Edit Encounter Charges and Other Claim Information to learn more.
Other Ways to Review What Was Billed for an Encounter
In addition to the Billing History, there are two other ways to revisit the diagnoses and procedures for an encounter.
Open the Post Charges Workflow
You can reopen the Post Charges workflow after charges are posted. From there you can see what was posted and optionally add additional items to the claim. Reopen the Post Charges workflow from the patient’s Billing History as shown above or from the Schedule screen.
Click “Posted” or “New Items” on the Schedule screen to return to the Post Charges screen for an encounter your practice has already posted.

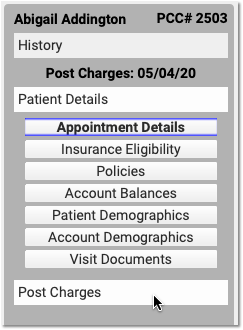
For information about the Post Charges window, read Post Charges and Check Out Patients in PCC EHR.
Review Diagnoses and Procedures on a Chart Note’s Electronic Encounter Form
You can also open a chart note’s “Bill” window and review the Electronic Encounter Form, which shows the selections originally made by the clinician.
Open the Patient Chart
Use the Find tool or double-click on an appointment to open a patient’s chart.
Click “Visit History”
Go to the Visit History section of the chart.
Find the Visit Date You Wish to Review
Use the list at the bottom to locate and select the visit you wish to review.
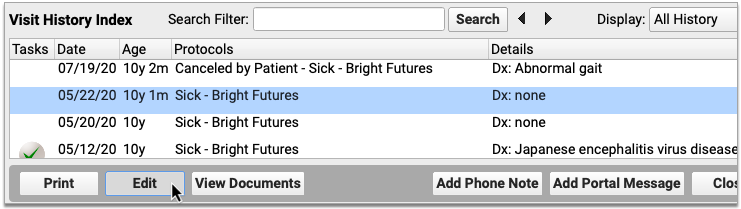
Double-Click or Click “Edit”
Click Edit to open the chart note. It will appear along with chart navigation buttons.
Click “Billed”
Click the “Billed” button at the bottom of the chart note to open the visit’s saved encounter form.
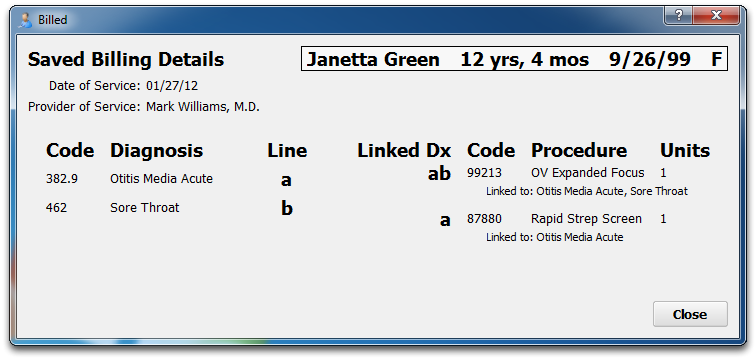
What Was Selected, Not What Was Billed: The Billed window retains a record of the procedures and diagnoses on the electronic encounter form, how they were linked, and how many units were indicated. After that information is made ready for billing, however, the biller can adjust that information when they post the charges and file the claim. The Billed window is a static record of what was made ready for billing by the clinician and does not reflect later changes.
Added After Posting: If a clinician added diagnoses or orders to the chart note after the visit was posted, those items will appear in a special section on the encounter form.
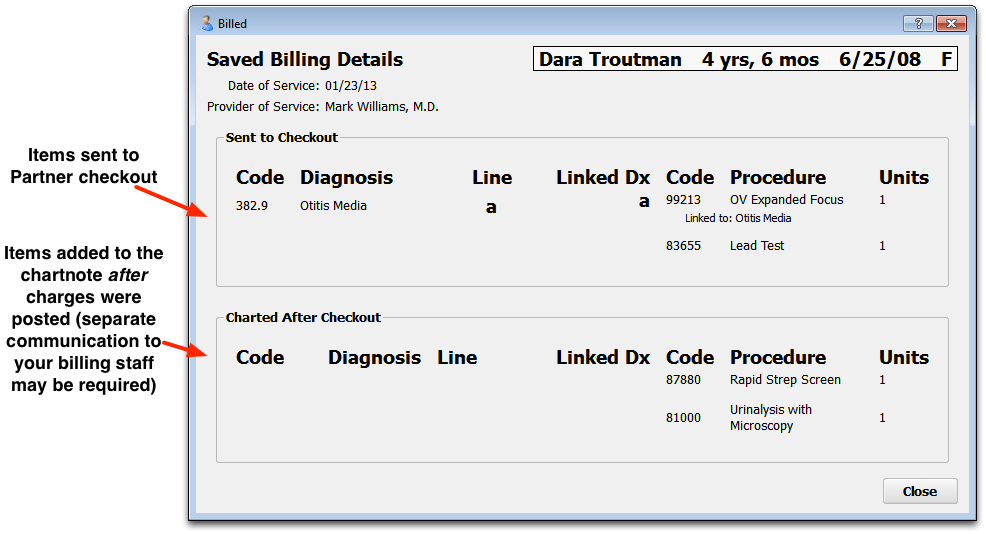
Look Up ICD-10 Codes for a Patient’s Diagnoses During an Encounter
If you are filling out a form or need the ICD-10 code billed for a patient’s diagnosis during an encounter, you can use the Diagnosis Flowsheet in a patient’s chart to quickly get the codes you need.
For more information, read the Look Up ICD-10 Codes for Referrals, DME, Requisitions, and Pre-Authorizations article.
Create a New Encounter
Billers typically post charges for appointments on the Schedule screen, or post charges for phone notes or portal messages from the Messaging queue. You can also create a new encounter in the Billing History section of a patient’s chart.
Click “Create Encounter” to post charges of any kind, without a scheduled appointment. For example, you may want to post a hospital encounter or administrative fees.
Post Hospital Charges
If your practice bills for hospital visits, you can post the charges in PCC EHR and queue up a claim. Read the procedure below to learn how.
Video: Watch Post Hospital Charges in PCC EHR to learn more.
Open the Patient’s Chart and Navigate to Their Billing History
When you are ready to post hospital charges for a patient, open their billing history and create a new encounter.
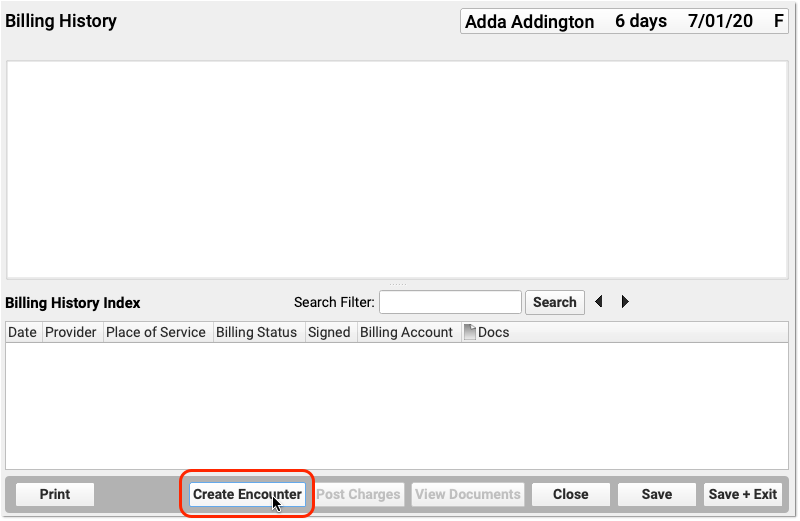
Select the Provider, Location, and Service Dates
PCC EHR will create a blank Post Charges encounter for billing. In the Encounter Details section, select a provider, a hospital location, and enter dates of service.
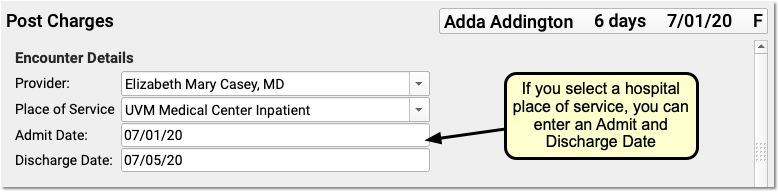
If you select an inpatient hospital location, PCC EHR will display Admit and Discharge fields for the encounter instead of a Service Date field. If the hospital visit was only a single day, you can leave the discharge field blank or enter the same date in both fields.
What If I Don't See the Location I Need, or I Don't See the Admit and Discharge Date Fields?: Your practice can customize your location list and specify which locations are for inpatient visits. Contact PCC Support for help customizing your billing locations.
Select Hospital Diagnoses and Procedures
Use the Diagnoses and Procedures components to search for and select charge information for the hospital encounter.
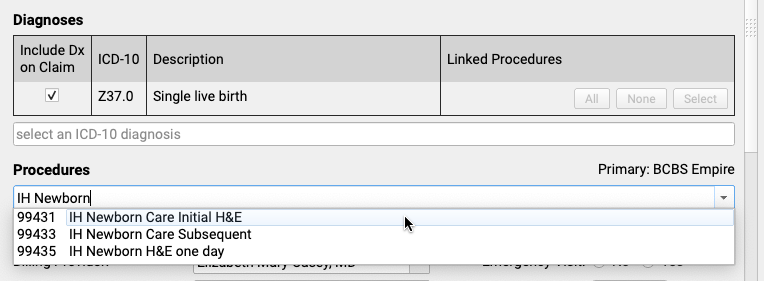
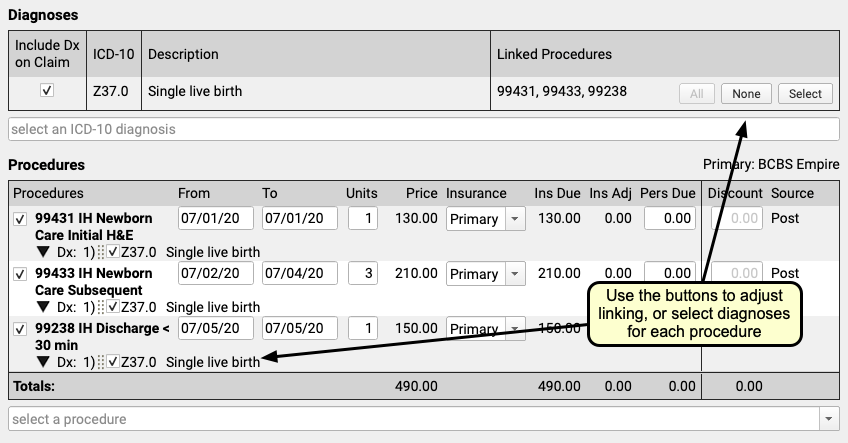
You can optionally enter from and to dates for procedures, or simply use a single date in the From field. You can set units, select insurance or self pay, adjust the personal due amount, and optionally add a discount. If a procedure has no defined price at your practice, you can edit the price field.
Remember to link the appropriate diagnoses with each procedure using the tools in either the Diagnoses or Procedures component.
Optional: Adjust Claim Information, Work w/ Personal Balances and Payments
You can use the Claim Information component to adjust the billing provider or other claim details. While you probably don’t have a personal payment on hand for a hospital visit, you can use the Payments component to review personal balances and enter discounts as well, if needed.
Click “Save + Post” and Review the Encounter
When you are finished entering hospital encounter and charge information, click “Save + Post” to save your work and queue up a claim.
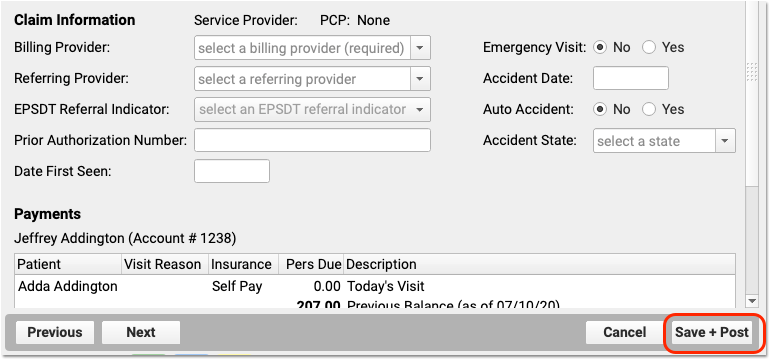
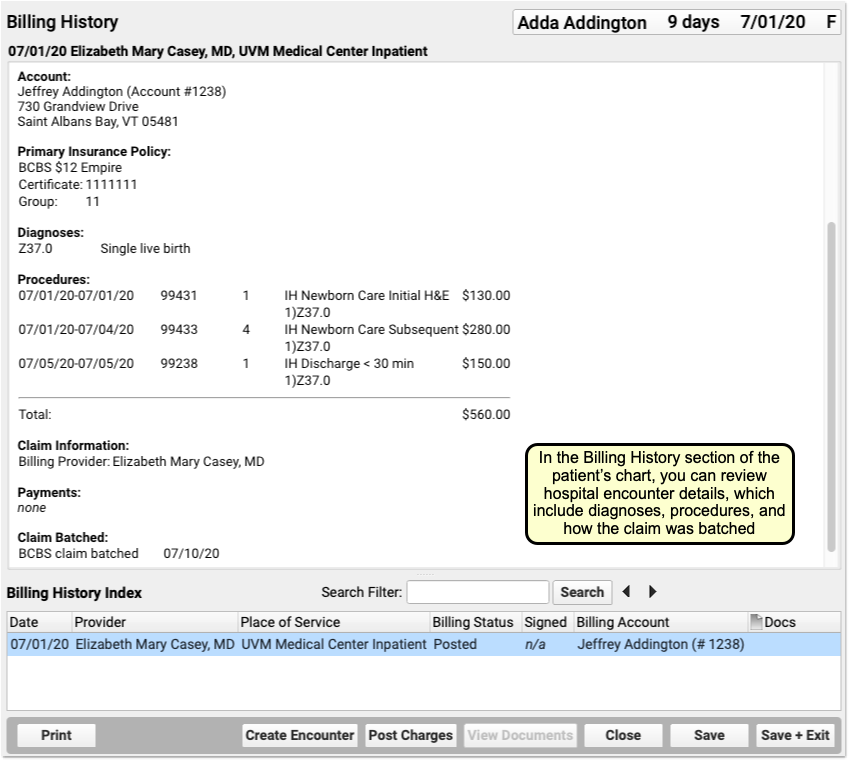
You can review hospital charges in the Billing History. They also appear in the patient’s Visit History.
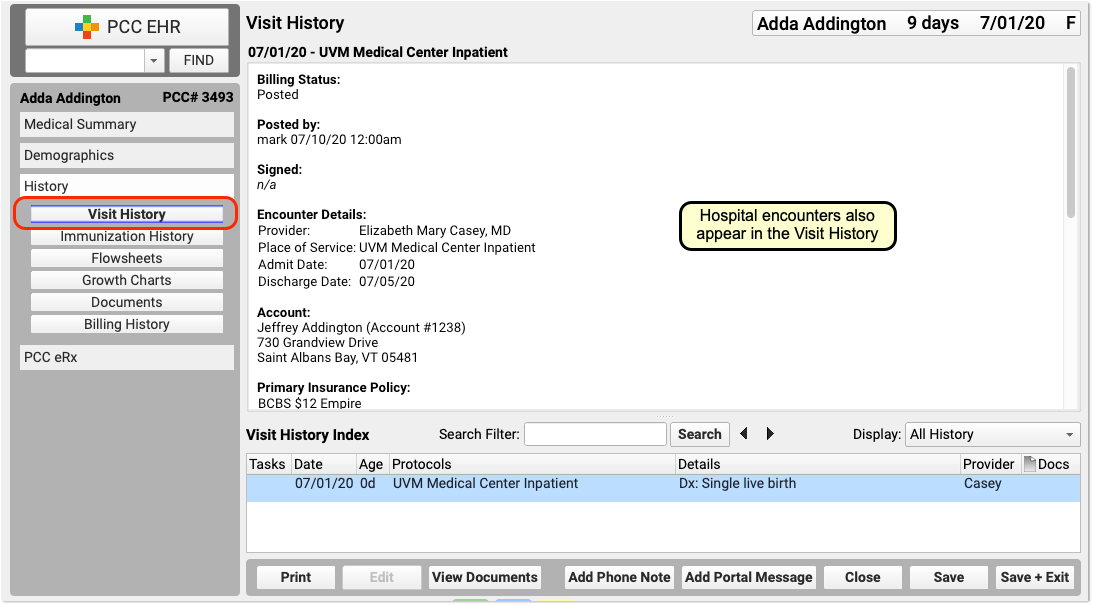
You can use the Search Filter field and the Display Filter drop-down menu in either History chart section to quickly find and review details about hospital encounters.
Optional: Import and Attach Documents
After you post a hospital encounter, you can attach a hospital note or other document to the encounter. Just select the hospital encounter when you import or edit a document.
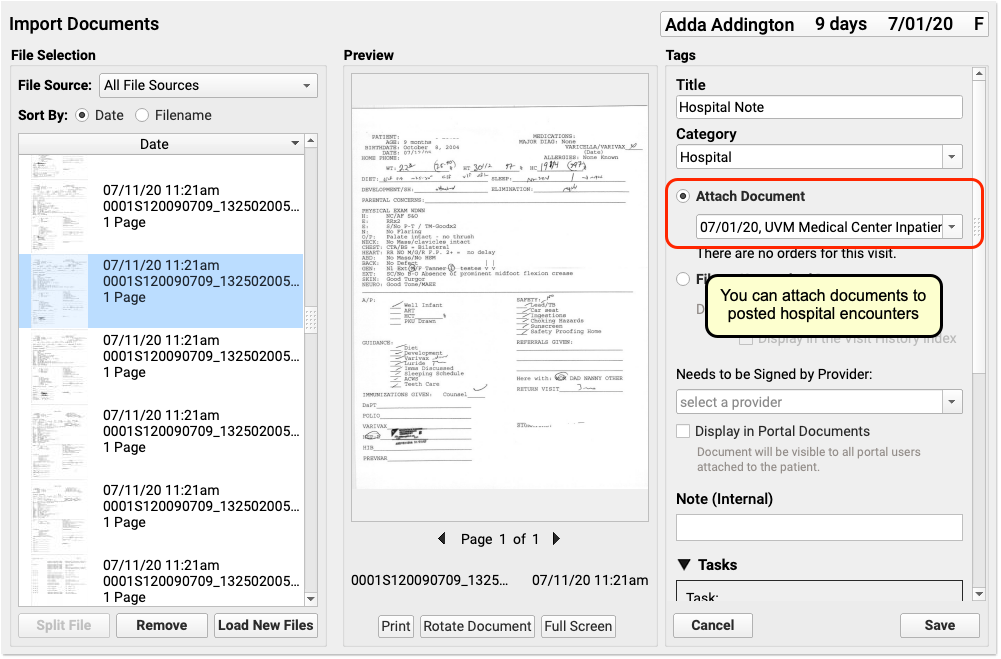

Delete a Hospital Encounter Posted in Error
If you post a hospital encounter to the wrong patient or need to delete it for another reason, return to the Billing History in the patient’s chart. Select the encounter and then click “Edit Charges”. Deselect all diagnoses and procedures from the encounter. When you click “Save + Post”, the encounter will be removed from the patient’s billing record.
Generate Patient Forms with Information from a Specific Encounter in PCC EHR
PCC Support can add forms to your PCC system that auto-insert patient vitals, provider signatures, and other information based on where you generate them in PCC EHR. These auto-insert fields are called variables.
If you need forms that auto-fill with information from a particular visit, phone note, or portal message, ask PCC Support to add encounter variables to your forms. Forms that include encounter variables pay attention to where you are generating them in PCC EHR, and insert information accordingly. If you generate a form with encounter variables from a visit note, the encounter variables populate with information from that visit. If you generate the same form from a generic place in PCC EHR, like a patient’s Medical Summary or the check-in ribbon, the encounter variables populate with information from the patient’s most recent visit.
There are encounter variables for patient vitals, provider of service, place of service, and provider signatures.
Contact PCC Support to get help creating and using form templates that include encounter variables.
Generate a Form with Details from a Specific Visit
Open the Visit in PCC EHR
Open the visit that contains the details you want to print on a form. It can be a visit that is currently in progress or a past visit.
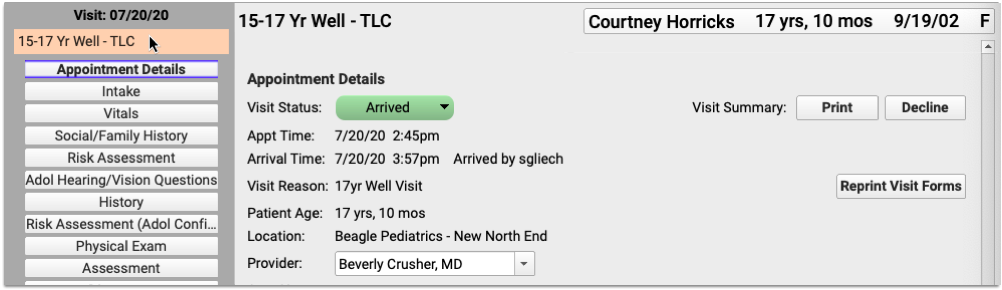
You can open visits from the Schedule screen in PCC EHR, or from the patient’s Visit History.
Generate a Form
Navigate to the Forms component within the visit.
Select the form template that includes encounter variables and generate it.
A preview of the form opens in a Document Viewer window.
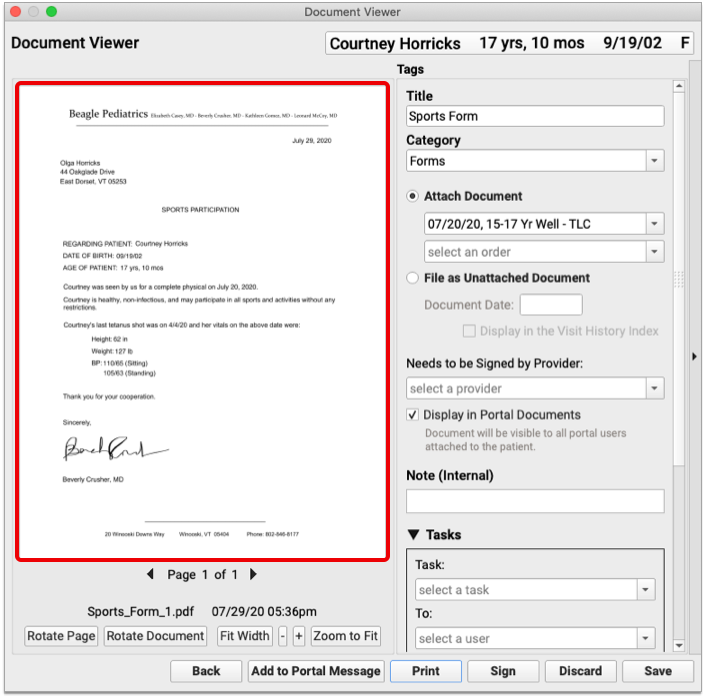
The encounter variables on the form populate with information from the visit where the form was generated.
No Forms Component? Add It to the Visit Protocol: You can only include visit-specific information on a form if you generate the form from that visit’s note, but not visit protocols contain a Forms component. You can add a Forms component to your visit protocols in the Protocol Configuration tool.
Save the Form
Review your form to make sure the auto-inserted details are correct. Then, save, print, or share it to the patient portal. You can also create tasks from it, or send it to a provider for signing.
Generate a Form with Details from a Phone Note or Portal Message Encounter
Open the Patient’s Chart
Search for your patient in PCC EHR or open their chart from the schedule screen.
Create a New Phone Note or Portal Message
Create a new phone note or portal message from the Edit menu.
You can also create a new phone note or portal message using the buttons displayed at the bottom of the Medical Summary, Demographics, and History sections of the patient’s chart.

Fill Out the Encounter Details
Choose a provider and location for the encounter, and fill out the encounter details.

Save the Encounter Details
Click “Save” to save the contents of the phone note or portal message. You must save the encounter details before they can appear on a form with encounter variables.
Do Not Exit the Encounter: Do not click “Save + Exit” at this stage. If you exit the phone note or portal message, you will not be able to generate a patient form within the encounter.
Generate a Form
Navigate to the Forms component within the phone note or portal message. Select the form template that includes encounter variables and generate it.

A preview of the form opens in a Document Viewer window.
The encounter variables on the form reflect information from the phone note or portal message where it was generated.
Save the Form
Review your form to make sure the auto-inserted details are correct. Then, save, print, or share it to the patient portal. You can also create tasks from it, or send it to a provider for signing.
Generate a Form With Details From a Patient’s Last Visit
When you generate a form template that includes encounter variables from a generic place in PCC EHR such as a patient’s Medical Summary or during check-in, the encounter variables populate with details from the patient’s last visit.
Learn More About Encounter Variables: For a list of encounter variables and to learn how to incorporate them onto your patient forms, contact PCC Support.
Post Administrative Fees Without an Appointment
When you post charges for an appointment, you can also add fees and payments. You can also collect copays right in the Patient Check-In tool in PCC EHR.
But what if there is no appointment? You may need to collect a fee or post other charges (and payments) that do not have an encounter. To do so, you can create an administrative encounter or “billing encounter”.
Create a Billing Encounter to Bill a Fee
To bill for a fee of any kind, visit the Billing History in the patient’s chart and click Create Encounter to record an administrative encounter.
Follow the procedure below to learn how.
Open a Patient’s Billing History
Open the patient’s chart, click on the History navigation button, and select “Billing History”.

Click “Create Encounter”
After optionally reviewing the patient’s current billing history, click “Create Encounter” to create a new administrative encounter.
Select a Provider
Select a provider for billing. Charges require a provider.
Optionally Adjust the Place of Service or Date
You can optionally change the Place of Service and Service Date for the administrative encounter.
Select the Fee’s Billable Procedure and Adjust the Procedure Details
Find and select a billable procedure in the Procedures component. Your practice keeps a customizable list of administrative fees in your system’s Procedures table.

Many practices leave the default price of administrative procedures blank. You can then enter the price as you post the charge. You can also adjust units, the responsible party for the charge (the patient’s insurance policy or “Self Pay”) and enter a time-of-service discount.
What About Diagnoses? Will a Fee Require One?: Normally, a procedure requires a diagnosis. However, you can post an administrative fee without a linked diagnosis. In your practice’s procedures table, you can define all of your various fees and optionally set their default amounts. Any procedure that has a billing code with fewer than five characters will not require a diagnosis when you post charges. For more information, read Edit Your Practice’s Prices and Billing Procedure Codes.
Optionally Enter a Payment
Optionally select a Payment Type and enter a payment. You can adjust the payment to apply toward’s the fee you are entering or past due balances.
You can optionally click “Add Payment” to add more payments.
Optionally Generate a Receipt
Click the “Generate a Receipt” checkbox to ask PCC EHR to print a receipt as soon as you save the charges.
You can also return to Post Charges for this encounter later and generate a receipt.
Click “Save + Post” and Review the Charges
Click “Save + Post” to save the charges. The new administrative encounter will appear in the Billing History.

On the Billing History, you can see full details of the encounter, including which user at your practice posted the charge, the fees that were posted, and any payments.
Will Administrative Fees Appear on the Chart's Visit History?: Hospital charges, telemedicine visits, and other clinical encounters appear on the patient’s Visit History. Administrative encounters, such as a forms fee, do not appear on the Visit History and only appear on the Billing History.
Delete an Administrative or Billing Encounter Posted in Error
If you post a fee or other administrative encounter to the wrong patient or need to delete it for another reason, return to the Billing History in the patient’s chart. Select the encounter and then click “Edit Charges”. Deselect all billing procedures (and diagnoses, if any) from the encounter. When you click “Save + Post”, the encounter will be removed from the patient’s billing record.
Post a Payment Without Creating an Encounter
The procedure above shows how to create a billing encounter and optionally post a payment.
You can also post a payment without an encounter.
Read Post Personal Payments and Write Off Charges or watch a tutorial video to learn how to post payments.