Install a Fujitsu fi-7160 Scanner for PCC EHR
PCC recommends the Fujitsu fi-7160 scanner because of its reliability and performance. Older models of the fi series, like the 6110, are acceptable alternatives. All scan settings are controlled through the included PaperStream software.
Contents
Install a Fujitsu fi-7160 Scanner for PCC EHR on Windows
Follow the steps below to install and configure a Fujitsu fi-7160 on a Microsoft Windows PC for use with PCC EHR.
Download the Scanner Driver and Application
Unplug Your Scanner
Unplug your scanner from your workstation before software installation. Fujitsu fi-7160 scanners plug into workstations with a USB cable.
Visit Fujitsu’s Downloads Page
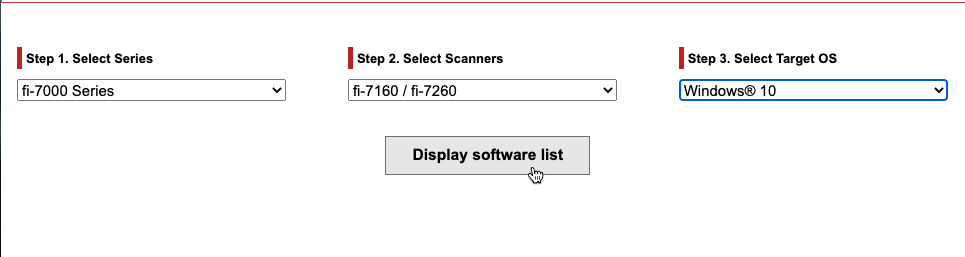
Open a web browser to Fujitsu’s fi Series downloads page (https://imagescanner.fujitsu.com/global/dl/).
Download the PaperStream IP Driver
Select your scanner’s series, scanner model, and your PC workstation’s operating system. Click “Display software list”.
Click “Download” next to PaperStream IP (TWAIN)
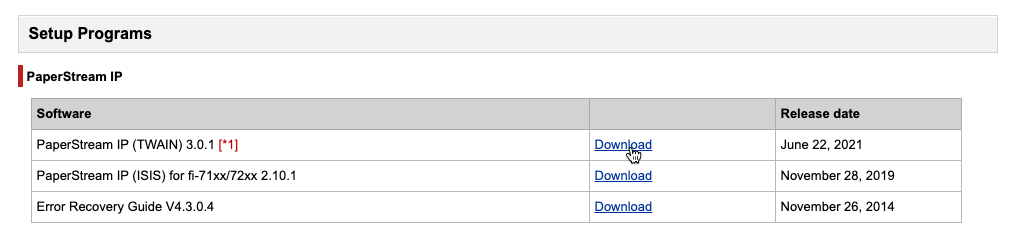
If the download does not begin automatically, click the “Download” link called PSIPTWAIN(version number).exe
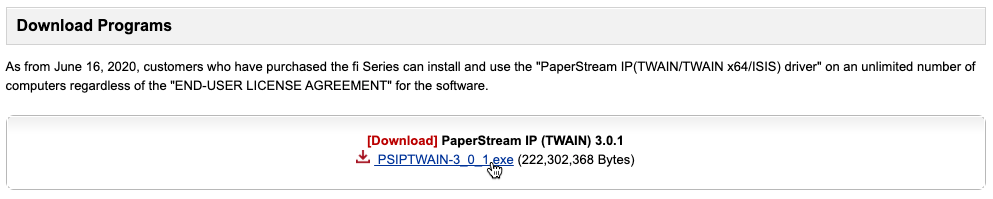
If prompted to run or save, select “Save”.
Download the PaperStream Capture Application
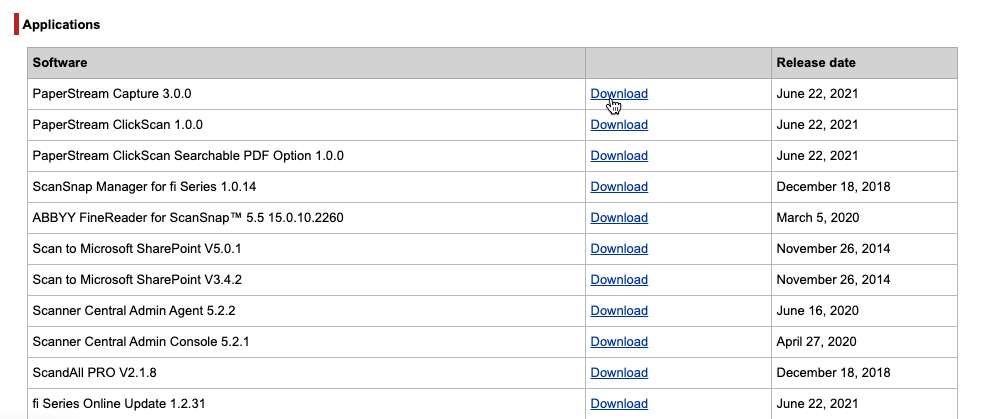
Click the “Back” button on your browser to view the previous page. In the applications section, click “Download” next to PaperStream Capture.
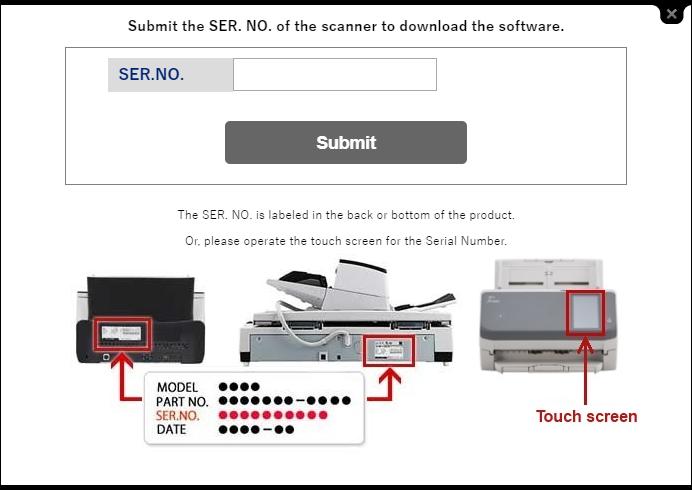
Enter your scanner’s serial number.
If the download does not begin automatically, click the “Download” link containing PSC(version number).exe. If prompted to run or save, select “Save”.
Install the Scanner Driver and Application
Launch the PaperStream IP Driver
Open your Downloads folder and launch the driver installer, PSIPTWAIN(version number).exe. If prompted to allow changes to this computer, select “Yes”. The installer will run a script to install necessary files, and then open a PaperStream IP Driver Setup window. Click “Next” to continue.
Install the PaperStream IP Driver
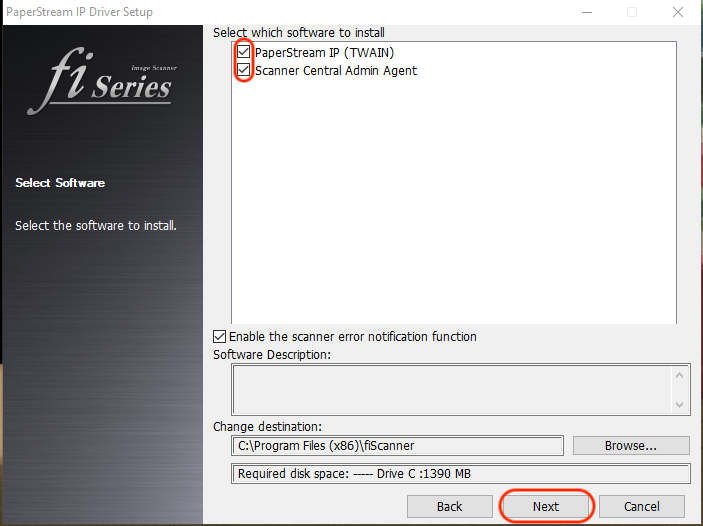
On the following screen, confirm that PaperStream IP and Scanner Central Admin are both checked, then click “Next”.
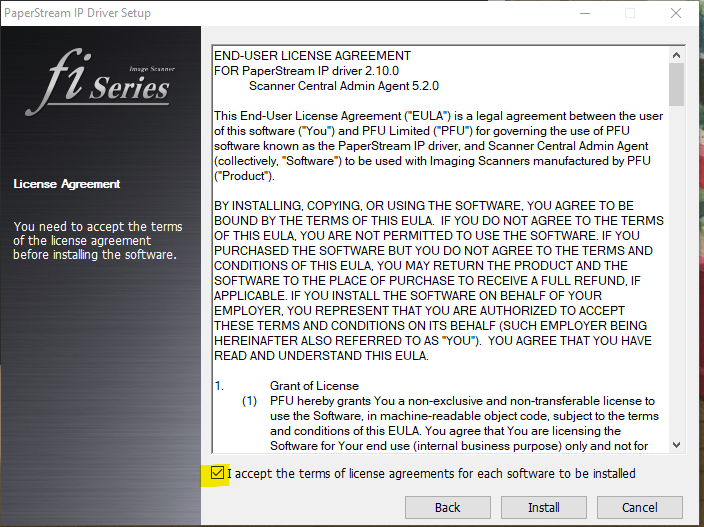
Read the agreement, check the “I accept…” box and click “Install”.
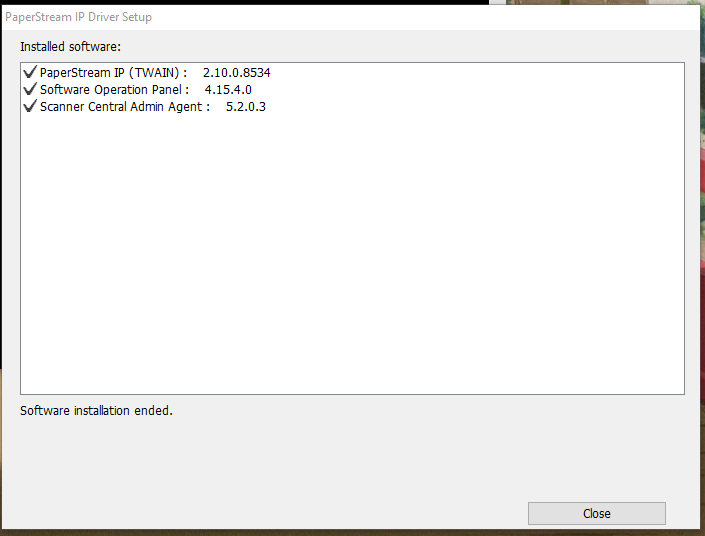
Installation may take several minutes. When complete, all three boxes (PaperStream, Software Panel and Scanner Agent) will be checked, and the “Stop” button will change to “Close”. Click “Close” to complete the driver installation.
Install PaperStream Application
Return to your Downloads folder and open the PaperStream application installer. You may be prompted to choose your language, and a PaperStream setup window will open.
- Check “I accept the terms…”
- Select “Basic (use basic functions with no limitations)”.
- Uncheck “Display sample profiles”.
- Uncheck “Show Welcome on startup”.
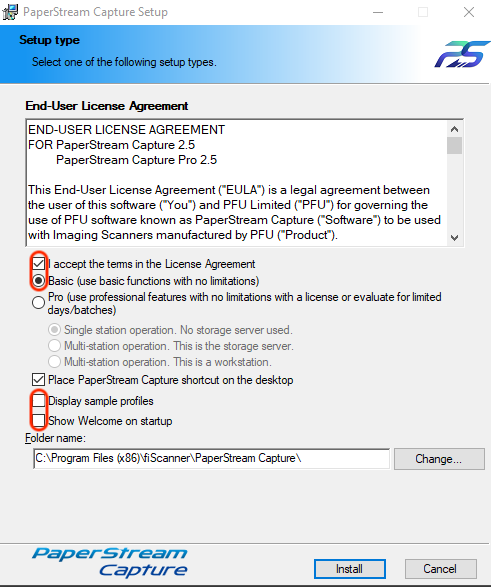
Click “Install”. When the installation is completed, click “Finish”. Click “OK” when prompted.
Configure Scanner Buttons
Plug in Your Scanner
PCC recommends that you plug your scanner into a USB 3.0 port for optimal speed.
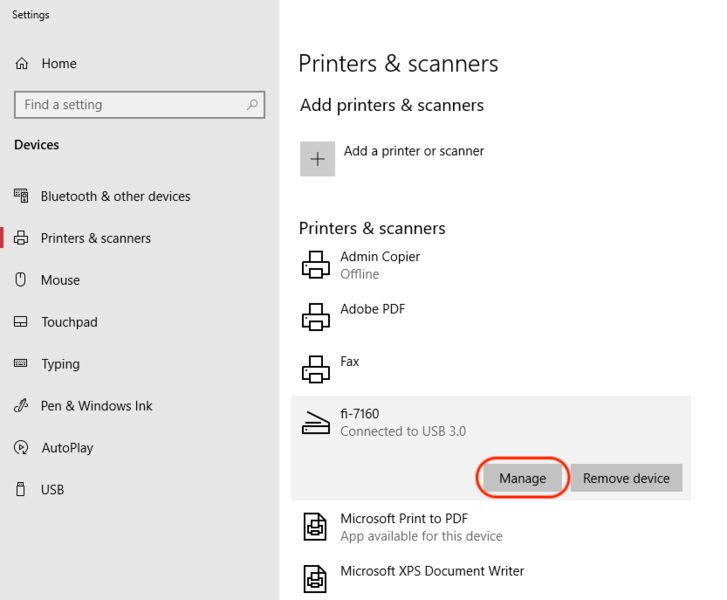
Open the Windows Printers & Scanners Settings Panel
Find and open the Printers & Scanners settings window from your Windows Start menu. The fi-7160 should appear on the list of added devices.
Select Scanner and Properties
Click the device once, then click the “Manage” button.
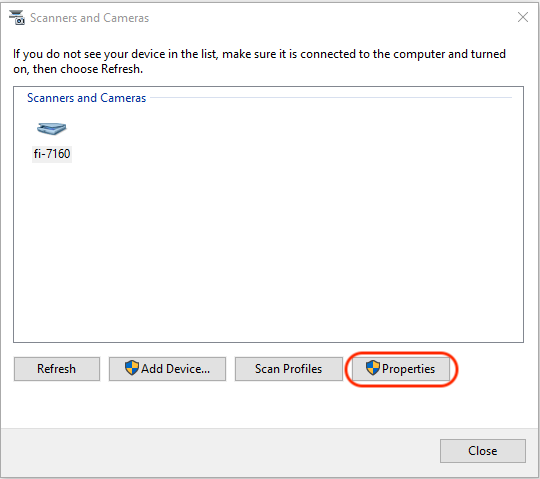
Next, click “Properties”.
Configure the Scan Button to Launch PaperStream Capture
Select the Events tab.

- Confirm that “Select an event:” is set to “Scan Button”.
- Select “Start this program:”
- Choose PaperStream Capture from the drop-down menu.
Now PaperStream Capture will run when the scan button is pressed on the physical scanner. Click “OK” to close this window.
Configure Scanner Profile and Destination
In this section you will configure the scanner’s settings and route the finished scans to PCC EHR.
Open the PaperStream Capture Application
Open the PaperStream Capture Application from the Start menu or desktop icon.
Create a Scanner Profile
Click the Lines menu next to the blue Scan button.
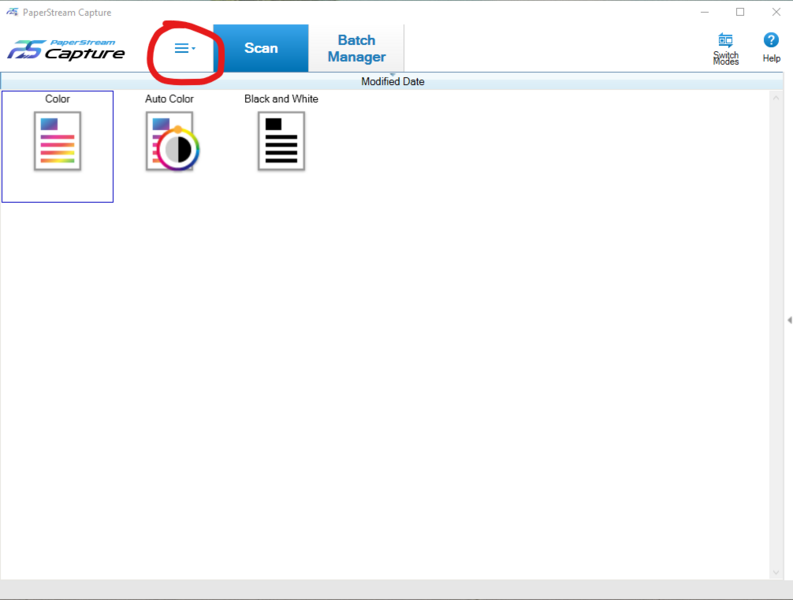
Select “Configure Profiles” from the drop-down options and click on the plus (+) button to add a scanner profile.

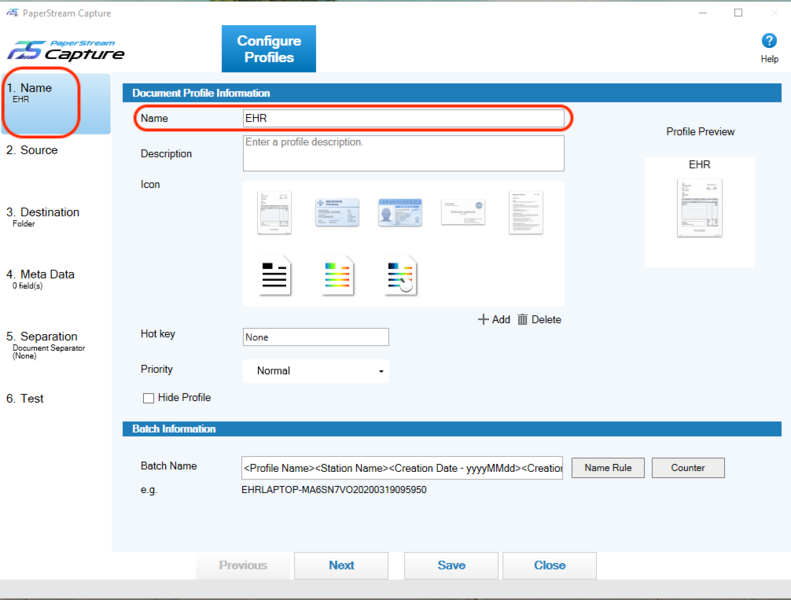
On the left menu select “1. Name” and add the Name “EHR”.
Confirm that PaperStream IP fi-7160 is in the Source Box
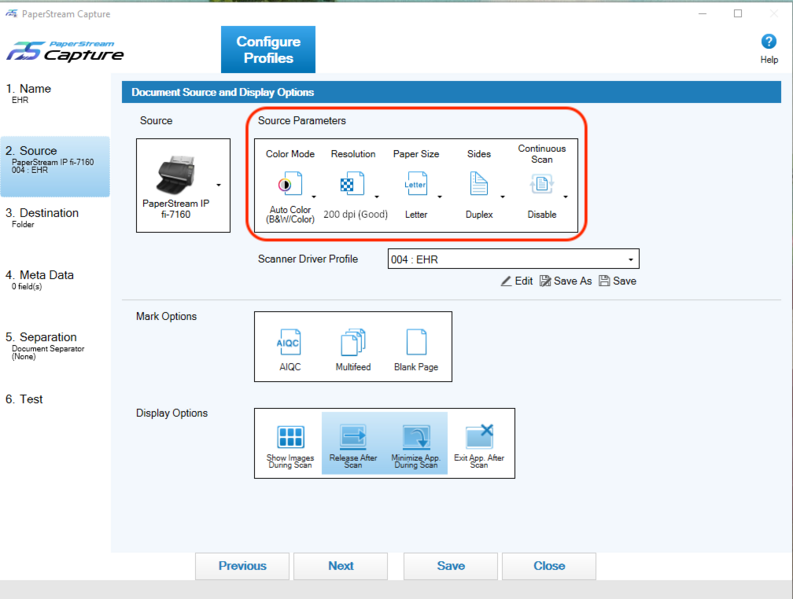
Select “2. Source” from the left menu. PaperStream IP fi-7160 should be visible in the “Source” box.

If the PaperStream IP fi-7160 is not in the “Source” box, there may be a problem with installation. Contact support at 1(800)722-7708 or support@pcc.com to troubleshoot the issue.
Configure Source Parameters
In the Source Parameters box, set the following:
- Color Mode: Auto Color
- Resolution: 200 dpi
- Leave the Paper Size, Sides, and Continuous Scan as defaults.
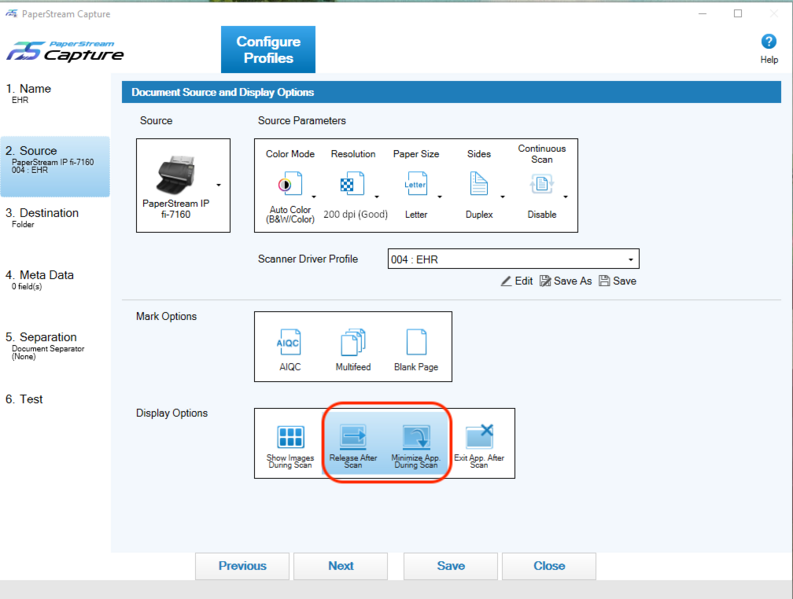
Configure Display Options
In Display Options, set the following:
- “Release After Scan”
- “Minimize App. During Scan”
- Do not select “Exit App After Scan”, as this can slow scanning time.
Leave Mark Options on the default settings.
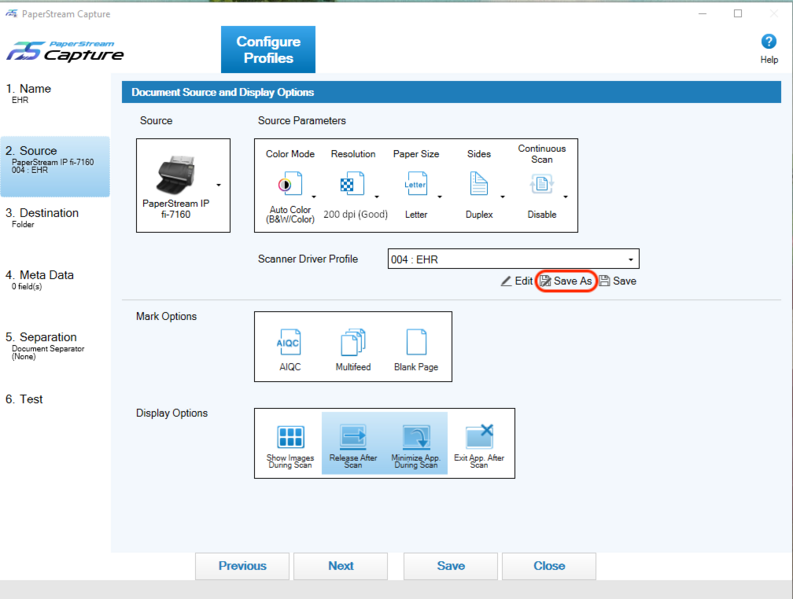
Save and Name Your Profile
Click “Save As” under the Scanner Driver Profile drop-down. Name this driver profile “EHR” at the prompt.
Configure Your Scanner Profile Destination
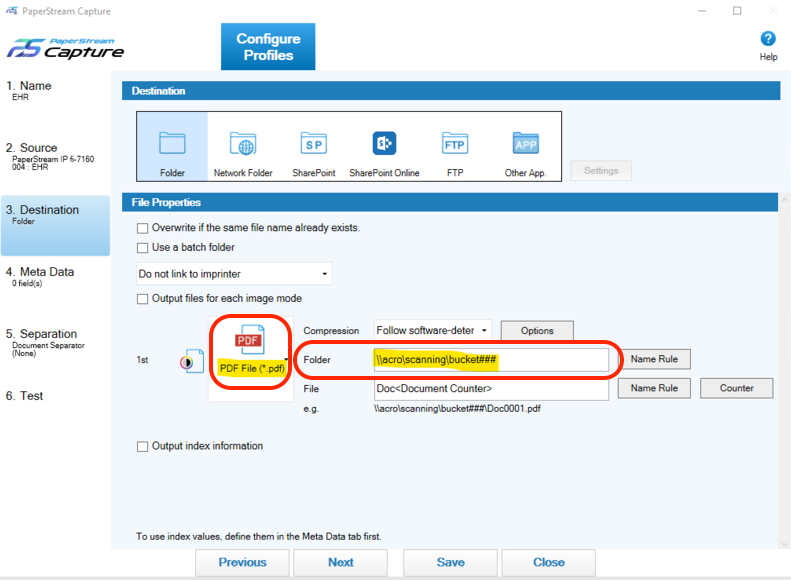
Select “3. Destination” on the left menu. Change the default TIF to a PDF.
In the Folder field, type: \\acro\scanning\bucket###. Replace “acro” with your PCC practice acronym and “###” with your chosen bucket number (bucket001, for example). Use only lowercase for the acronym, and backslash “\” as opposed to “/” forward slash.
Which Bucket?: To pick a bucket number, log in to PCC EHR, select Documents from the Configuration menu, visit the Import Documents tab, and choose a bucket from the “File Source” column. For more information on buckets, visit Configure Document Categories, File Sources, and Default Behaviors.
Save You Scanner Configuration
Click “Save”. If a warning pops up, click “Yes” and “Close”.
Return to the Main Screen
Click the “Back” button to return to the main screen.

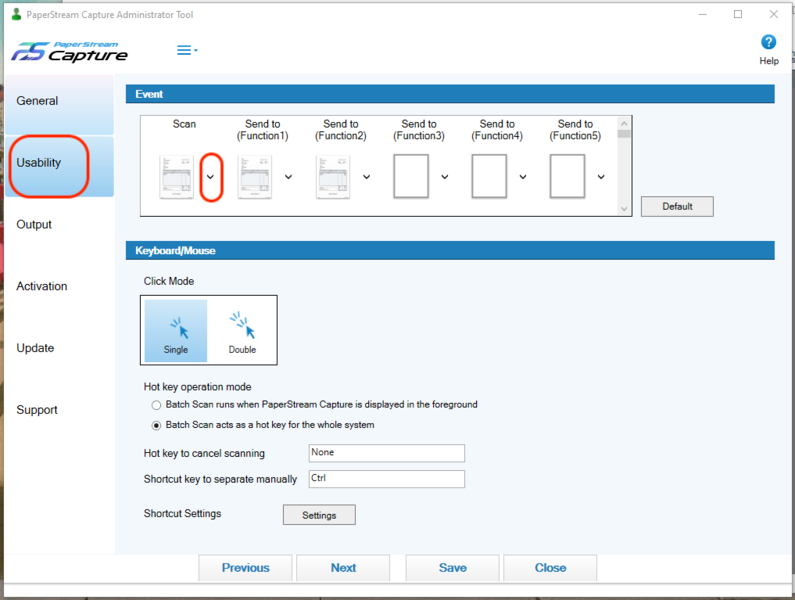
Map Your Scanner to the EHR Profile
Click the Lines menu and select the Administrator Tool. Select “Usability” from the left menu. Choose the “EHR” profile from the Scan drop-down.
Save Your Scanner Profile
Click “Save” and then “Close” to return to the main screen. Your EHR profile and rules are now set and you are ready to try a test scan.
Test Scanning a Document to PCC EHR
Follow the Fujitsu fi-7160 instructions to scan your first document. This first scan will be slow as the service is running for the first time.
When the scan completes, log into PCC EHR and navigate to Import Documents. The PaperStream application will flash orange on your toolbar as the scan is processed and the “Load New Files” button on the Import Documents screen will highlight yellow. Click the “Import Documents” button to load the scan into PCC EHR.
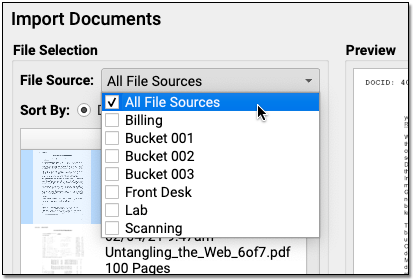
By default, you will see documents from all sources. You can change the File Source drop-down to select a specific bucket. Your scanner is now fully installed. For more information on importing documents, visit Attach a Document to a Patient’s Chart.