PCC 9.1 Release
In the fourth quarter of 2021, PCC will release version 9.1 of our electronic charting and practice management software to all PCC users.
PCC 9.1 brings personal payment posting to PCC EHR, dramatically improving several tools for billers. PCC 9.1 also introduces a pilot test of a new forms configuration tool, allowing you to create new forms quickly and easily in PCC EHR.
Watch a Video Series: Want to see PCC 9.1’s highlights in action? Watch the PCC 9.1 Release Video Series.
Implementation: PCC 9.1 includes features that require configuration and user-specific software training. Read about the features below and then review the PCC 9.1 Migration Considerations article.
Read below to learn more, and contact PCC Support for information about these new features or about any PCC product or service.
Contents
- 1 Post Personal Payments in PCC EHR
- 2 Write Off a Charge in PCC EHR
- 3 Enter and Review Account Notes in PCC EHR
- 4 Understand and Respond to Eligibility Errors
- 5 Experience Fewer Eligibility “False Positives”
- 6 Configure Your Locations to Reduce Service Facility Claim Errors
- 7 See Both Codes When a Payer Downcodes
- 8 Notify Portal Users When a New Document is Available
- 9 Pilot Test: Create and Manage Patient Forms in PCC EHR
- 10 Look Up and Import Immunization Records from Your State’s Registry
- 11 Securely Retrieve Patient Information from Hospitals and Other Practices
- 12 Use 2022 ICD-10 Diagnosis Billing Codes in PCC EHR
- 13 Use New Test Descriptions in the LOINC 2.70 Update
- 14 New and Updated Reports in PCC 9.1
- 14.1 Find Portal Users Who Have Unknown Relationships to Their Linked Patients
- 14.2 Customize Lab Test Reports to Meet Third-Party Requirements
- 14.3 Find Open Referrals (and Other Types of Orders) for Inactive, Transferred, and Dismissed Patients
- 14.4 See Patients’ Age at Last Visit on Reports
- 14.5 Discrete Columns for Name and Address Elements When You Export Reports to CSV Format
- 14.6 Sort Reports by Patient Age
- 14.7 Find Emancipated Patients Whose Healthcare Information Remains Visible to Other Portal Users
- 14.8 Easily Report on a 14-Day Date Range
- 15 Improved PCC EHR Release Deployment
- 16 A Better Way to Set Patients’ Immunization Registry Status
- 17 New and Updated Interfaces Available in PCC 9.1
- 18 Background Improvements to PCC eRx
- 19 Other Feature Improvements and Bug Fixes in PCC 9.1
Post Personal Payments in PCC EHR
When you want to post a payment from a family, or a stack of personal payments, use the Payments tool in PCC EHR.
Open Payments
Open the Payments tool from the Tools menu in PCC EHR.

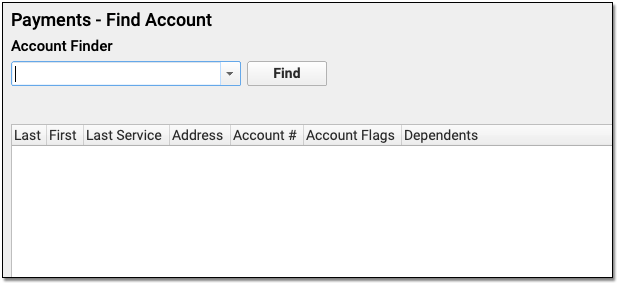
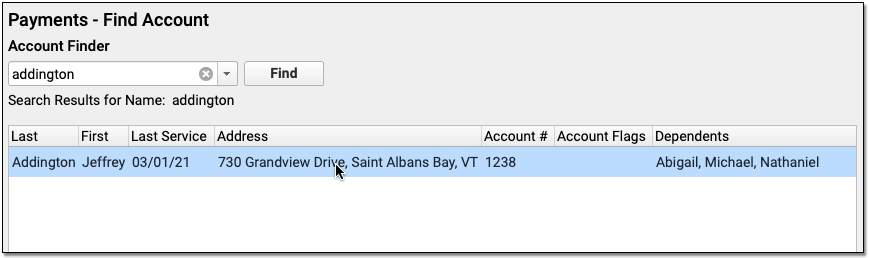
Find an Account
Find the billing account for the payment.
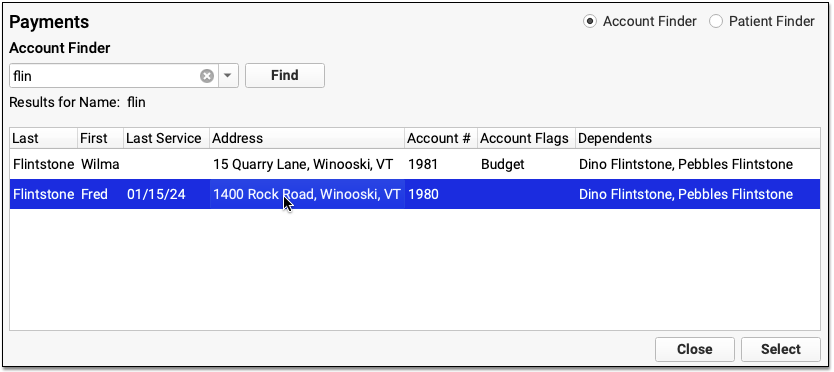
You can search by account name or use other search parameters, like an account phone number. The list of matching search results includes a Dependents column, to help you confirm that you have the right account.
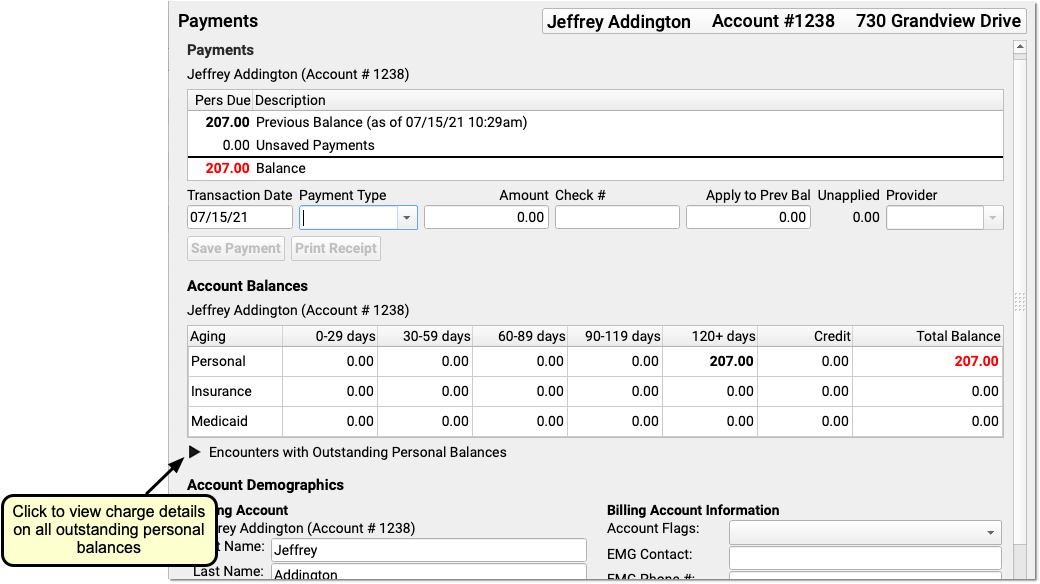
Optionally Review and Update Account Information
Before you enter payment information in the Payments component, you can optionally review and update account information.
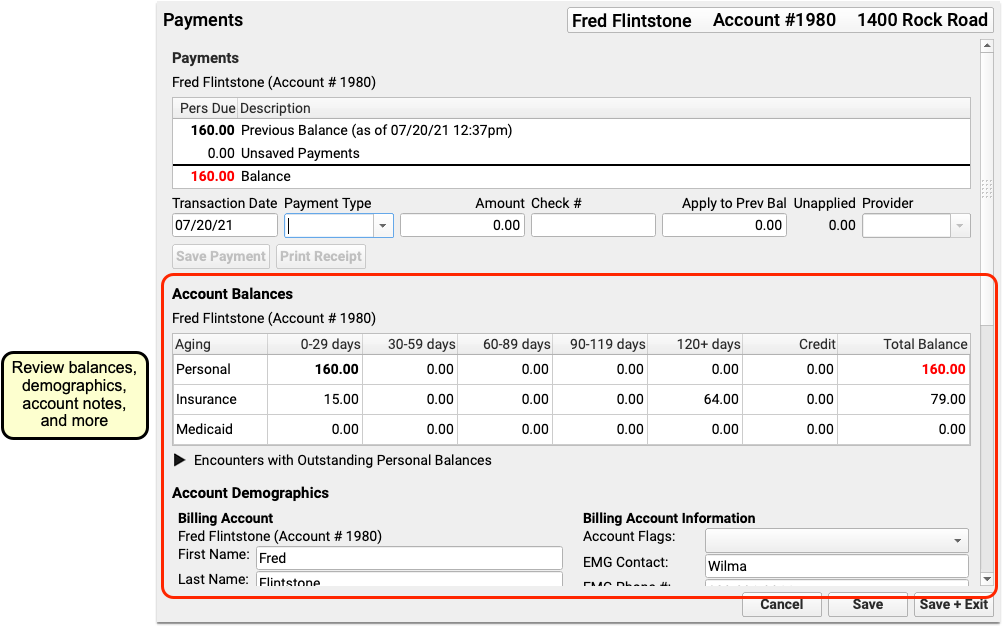
The Payments tool includes Payments, Account Balances, Account Demographics, and the Account Notes component so you can review balance details, update account information, and add notes about any billing issue with the family.
Enter Payment Information
Next, review and adjust the transaction date, select a payment type, and enter a payment amount.
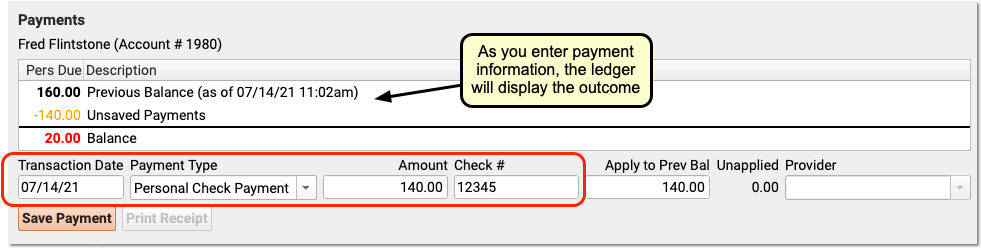
Enter a check number if applicable.
Save the Payment
Click “Save Payment” to save the payment and update the account’s balance.

Review Results and Optionally Add Another Payment
After you save a payment, you can see it in the ledger. Click the disclosure arrow to see how the payment was applied.
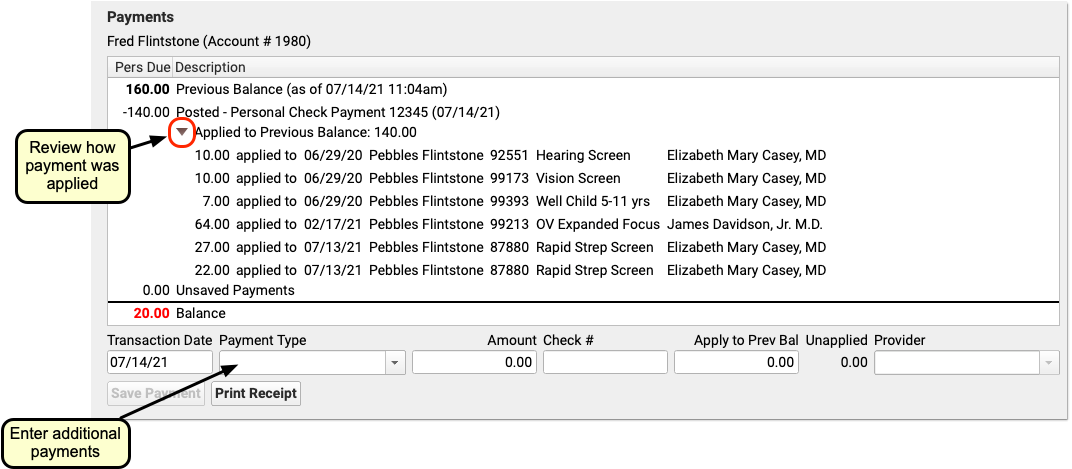
You can enter additional payments if (for example) the family used two different checks.
Print a Reciept
Click “Print Receipt” to print a receipt for the payment(s) you posted this session.
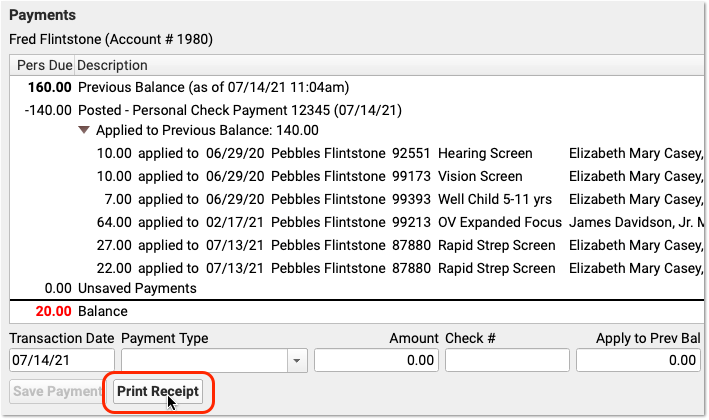
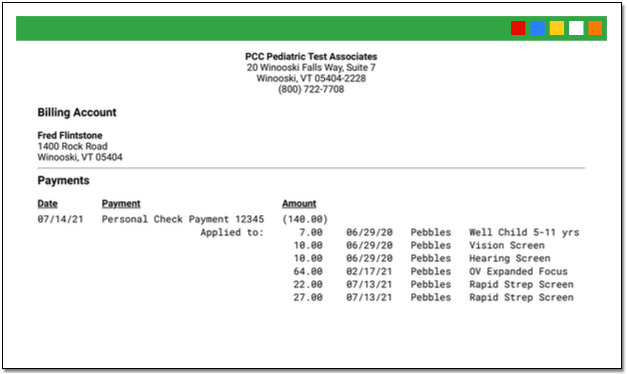
The receipt displays all payment information, along with helpful charge information for the family.
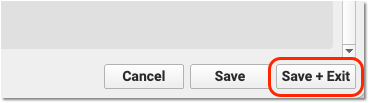
Save Changes and Continue to the Next Payment
Click “Save + Exit” to close the Payments window and save any additional changes you’ve made for the account. If you are posting a stack of personal payments, you can then immediately find the next account.
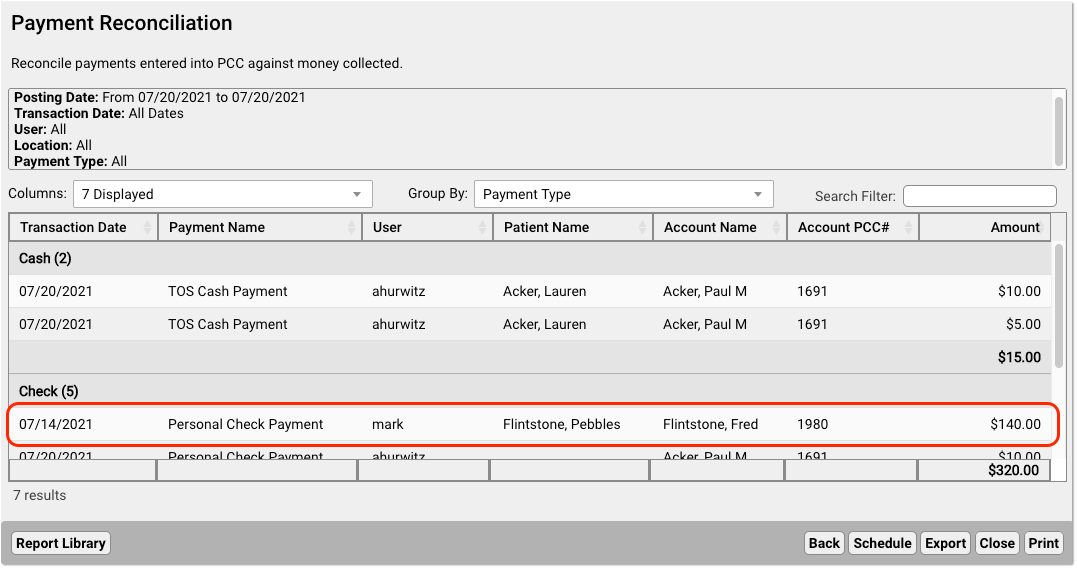
Review all Payments Posted
At the end of the day, run the Payment Reconciliation report in the PCC EHR Report Library to review all payments.
Optionally Indicate a Payment Should Not Be Linked
By default, a payment will link to the account’s oldest charges with a personal balance. You can optionally specify that only a portion (or none) of the payment amount should be applied.

If you change the amount of a payment to apply to charges (and therefore leave some or all of it unapplied), you can select a provider for reporting purposes.

Payments are normally linked to charges, which have an associated provider. If a payment is not linked to charges, you can indicate a provider manually.
Write Off a Charge in PCC EHR
When you want to write off a charge on an account in PCC EHR, use the Payments tool.
Open Payments
Open the Payments tool from the Tools menu in PCC EHR
Find an Account
Find the billing account for the charges you need to write off.
You can search by account name or use other search parameters, like an account phone number.
Optionally Review Account Information
In the Payments tool, you can review Account Balances, Account Demographics, and the Account Notes component so you can understand the charges and what you may need to write off.
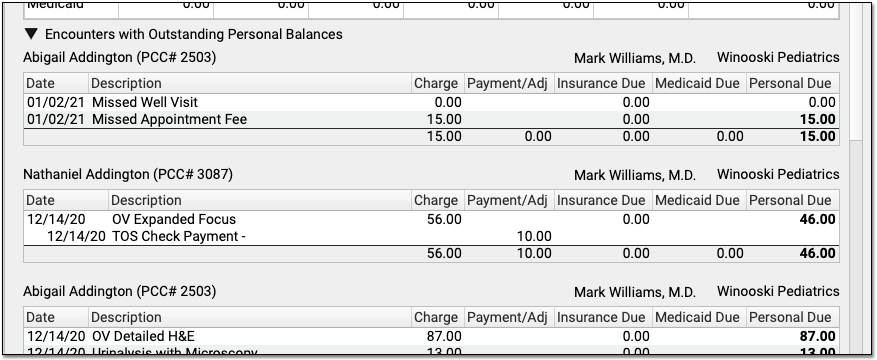
For an explanation of all outstanding personal balances, click the disclosure arrow below Aged Balances.
Enter Adjustment Information and Click “Save Adjustment”
Select your practice’s preferred Adjustment type for a write off in the Payment Type drop-down menu. Then enter an amount and click “Save Adjustment”.
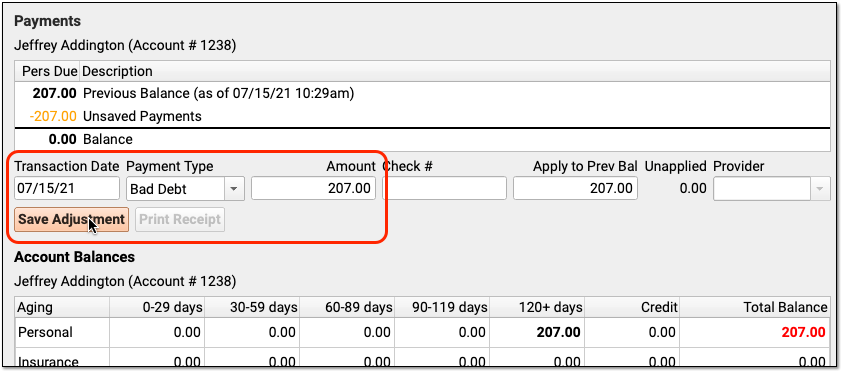
Optionally Review Results
PCC will automatically apply the adjustment to the oldest unpaid charge(s) on the account. Use the ledger to see the charges that the adjustment is applied towards.
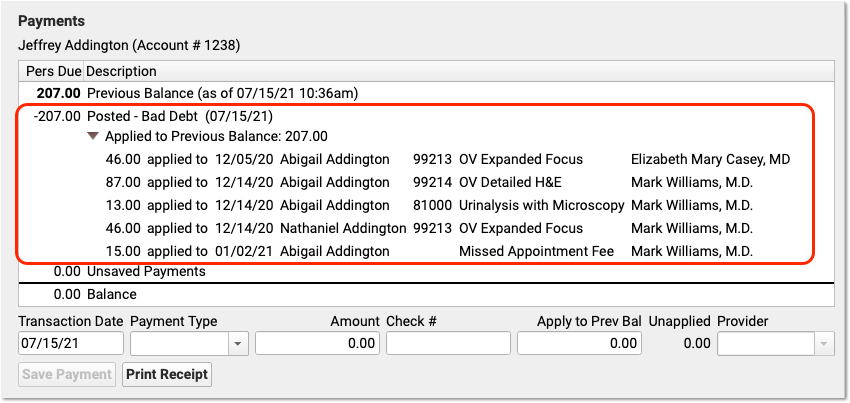
In an upcoming PCC release, you will be able to select specific charges when (for example) an older charge should remain due and the adjustment should apply to more recent charges.
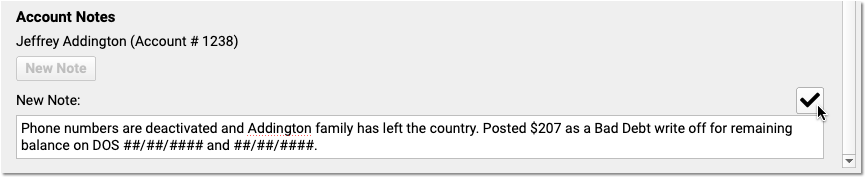
Enter an Account Note Explaining What You Did
It’s a good idea to add an account note explaining what balances were written off.

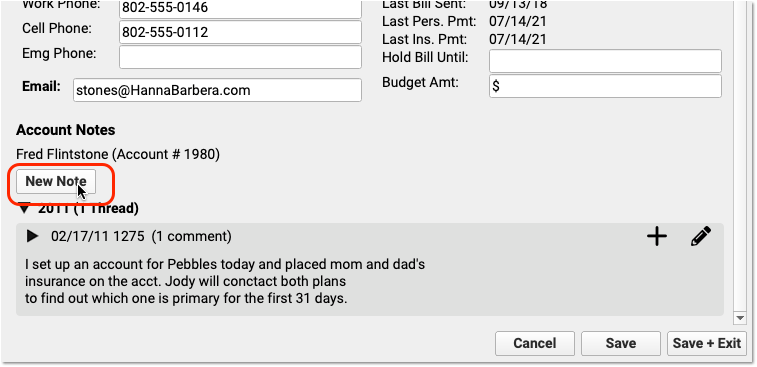
Enter and Review Account Notes in PCC EHR
When you wish to record details about an account or billing situation with a family, you can add an account note.
First, open the Payments tool and find the account.
Next, scroll down to the Account Notes component. It appears underneath Account Demographics.
Click “New Note” to create a new note.
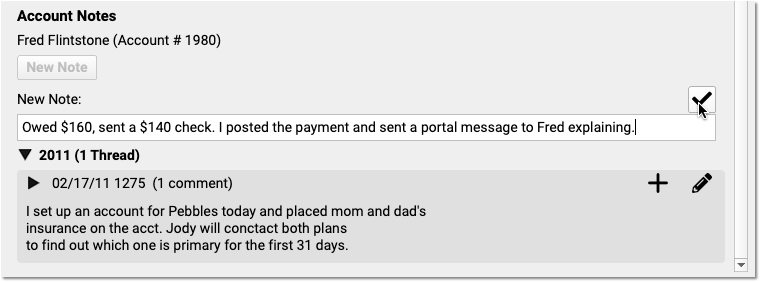
Click the checkbox to save your note.
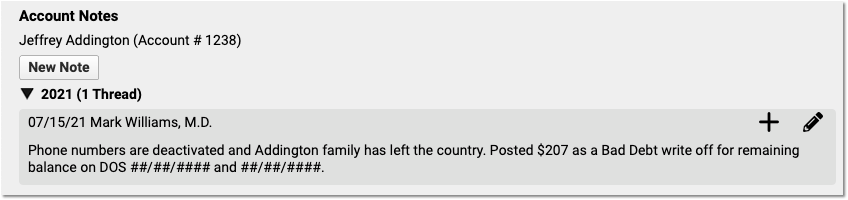
If you want to add something to your note later, click the pencil icon to edit a note.
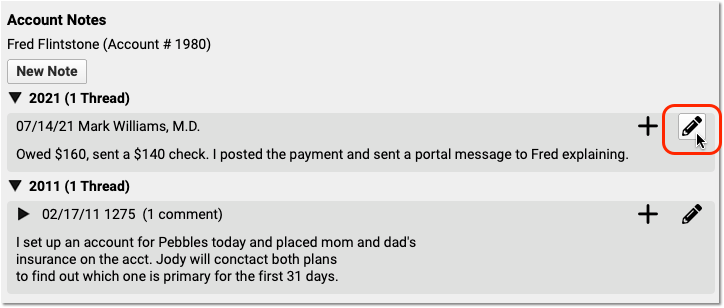

Do you have follow-up information about an existing note? Click the plus symbol (+) to add a follow-up note to an existing note.
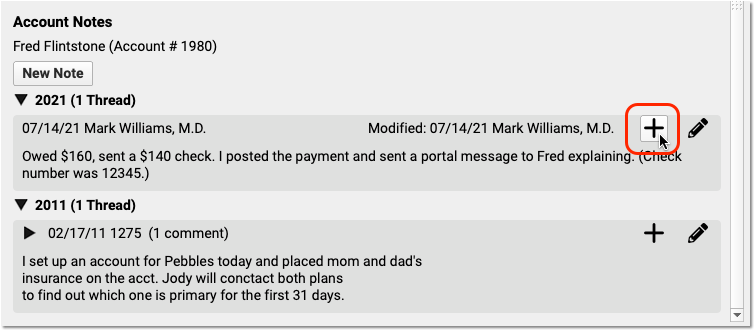

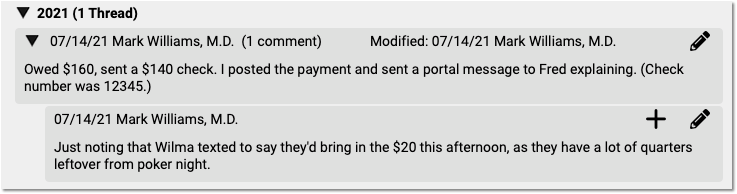
You can have multiple follow-up notes to track a billing issue as it continues.
Account Notes in PCC EHR vs. Partner: If your practice used the Account Notes features in the Partner Practice Management system, found in the Family Editor (fame), you may notice slight differences. For more details about transitioning between the two interfaces, read the PCC 9.1 Migration article.
Understand and Respond to Eligibility Errors
When automated insurance eligibility checking fails, PCC 9.1 explains precisely why, and gives you action steps to fix the problem.
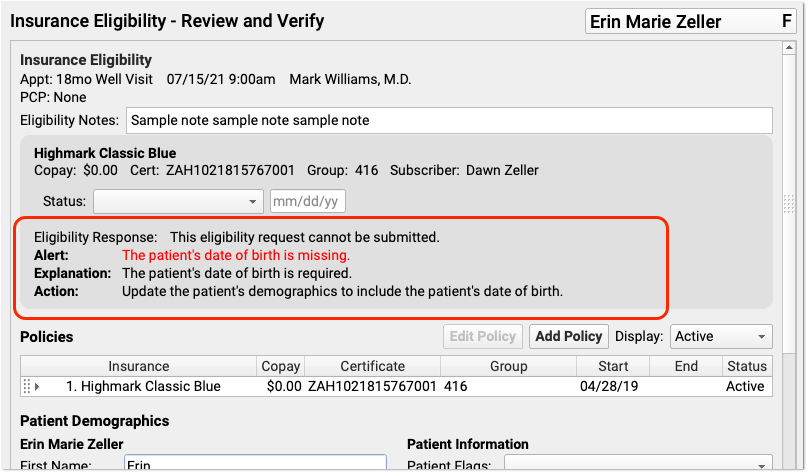
If the underlying issue is missing patient or policy information, you can quickly correct the problem and try again. If eligibility isn’t working due to underlying configuration, PCC EHR will provide you with useful information so you can contact PCC Support.

PCC EHR’s Insurance Eligibility tool summarizes errors, but it also provides access to the full payer response, when available. You can review the payer response to learn more.
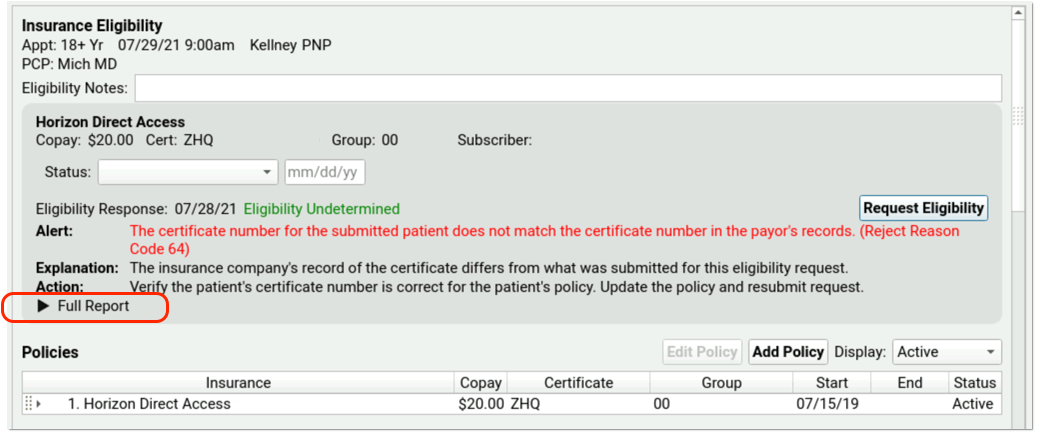
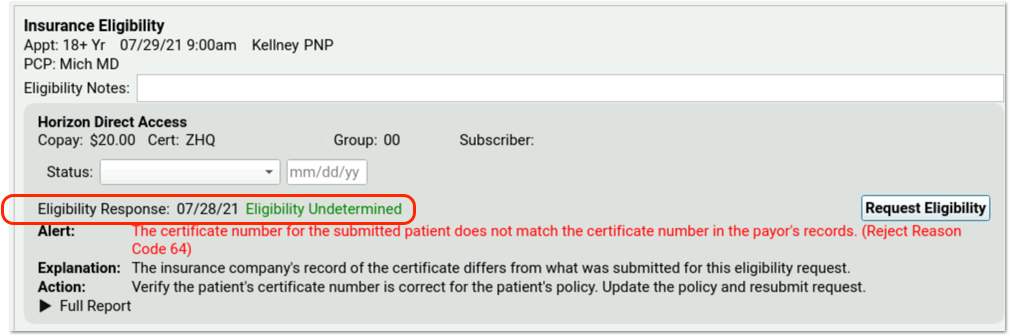
Experience Fewer Eligibility “False Positives”
PCC 9.1 improves the underlying intelligence of automated eligibility in PCC EHR. The Insurance Eligibility tool will more accurately indicate whether a patient’s policy status is Active, Inactive, or Unknown.
Prior to PCC 9.1, the default Insurance Eligibility result was Active. This worked well when a payer’s eligibility response followed a straightforward logic. However, eligibility responses can include both a status and a variety of additional codes. PCC’s automated eligibility now displays Unknown, or “Eligibility Undetermined” by default, which will increase eligibility accuracy, and provides details in the Full Report.
Do You Trust Eligibility in PCC EHR, or Do You Visit the Payer's Web Site?: PCC wants automated eligibility to be 100% reliable, the perfect tool to give your billers a heads up about upcoming encounters. If you encounter an eligibility status in PCC EHR that doesn’t match a patient’s status on a payer’s web site, please let us know so we can track down and correct the issue.
Configure Your Locations to Reduce Service Facility Claim Errors
If your practice bills for several facilities, such as when you have a multiple locations across town, you can now designate that a location is a subpart of your main billing location.
To make the change, edit the location in the Places of Service table in the Table Editor (ted) in your Practice Management window. Or, get PCC Support to make the change for you.

PCC will then automatically use the correct logic to include (or leave out) service facility location information based on electronic claim standards and your practice configuration.
See Both Codes When a Payer Downcodes
When an insurance payment can’t be posted automatically because of a rejection or other issue, your practice’s billers review the 835 ERA to find out what’s wrong and resolve the issue.
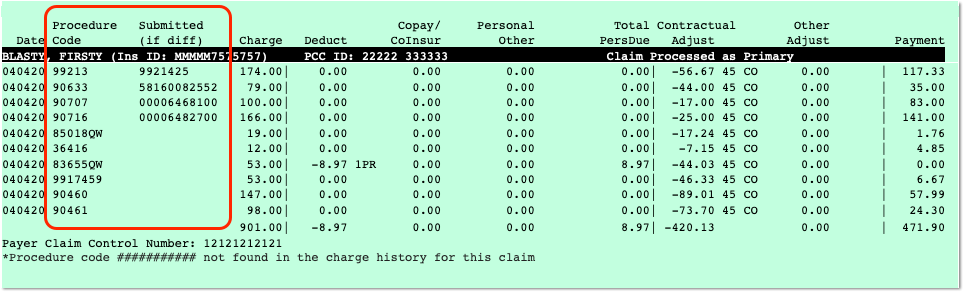
When PCC 9.1 displays an 835, you’ll now be able to see both the adjudicated code and the submitted code. That means that if a payer includes information about both the code you submitted and the code they paid on, you’ll see both. Payers sometimes reply to a charge by erroneously including the NDC code instead of the CPT code you used on the claim. When that occurs, the NDC code will appear in the Submitted column, as shown in the example above.
By reviewing both columns, billers can better understand what happened and take action to resolve the issue and post the payments and adjustments.
Notify Portal Users When a New Document is Available
Automatically notify your patients and families when you share a new document to the Patient Portal, to keep them informed and updated in real time.
When you add a new document to a patient’s chart, check the “Display in Portal Documents” box to automatically send a portal notification to the users associated with the patient you selected. If the patient has multiple portal users associated with their account, each portal user will receive the notification.


When the user signs into their patient portal, they’ll find the new document waiting.
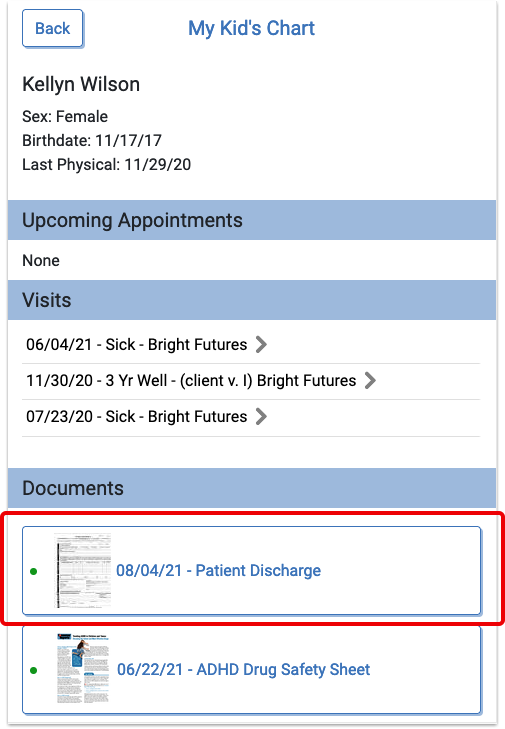
One Notification Per Patient, Per Hour: To avoid inundating your users with emails, a notification will only be sent for the first document uploaded to a patient in a 60 minute period. So if you upload multiple documents for one patient, that patient’s portal users will only receive one notification for the batch.
Pilot Test: Create and Manage Patient Forms in PCC EHR
Starting in PCC 9.1, you can optionally participate in a pilot test to create your own patient form letters in PCC EHR.
In the new Forms Configuration tool, you can create patient form letters that include variable fields for auto-inserting patient, account, and practice information.
The form letters you create during the pilot test will not replace your existing patient forms in PCC EHR until a time of your choosing in a future PCC release.
You should consider participating in the pilot test if you want early access to the tools for making your own patient form letters in PCC EHR and to tell PCC what would make them even better.
Get Started with Forms in PCC EHR
Notify your Client Advocate if you want to participate in the pilot test to create your own patient form letters in PCC EHR. Your Client Advocate will enable the Forms Configuration tool and help you prepare to use it as a pilot tester.
You can read more about how to get started with Forms Configuration in PCC EHR in the Migration and Implementation Considerations.
Create a Basic Text Form
Once your Client Advocate enables the Forms Configuration tool, you can start creating your own patient form letters in PCC EHR.
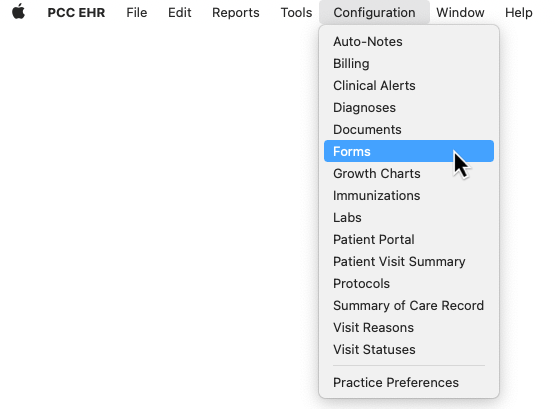
Open Forms Configuration
Click on “Forms” in the Configuration menu in PCC EHR to open the Forms Configuration tool.
Access Forms Configuration by Permission Only: Users can only access the Forms Configuration tool if they have permission to do so. You can grant users forms configuration access in the User Administration tool in PCC EHR.
Add a New Form
In Forms Configuration, click the “Add” button to create a new form.
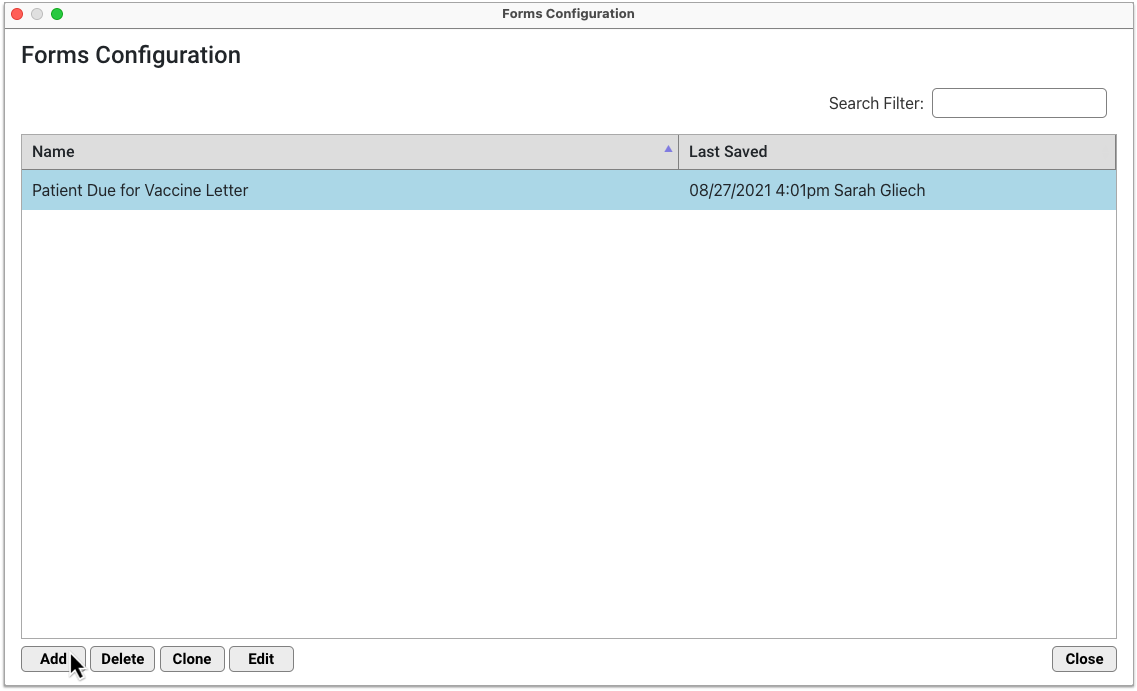
A blank form template opens in the window.
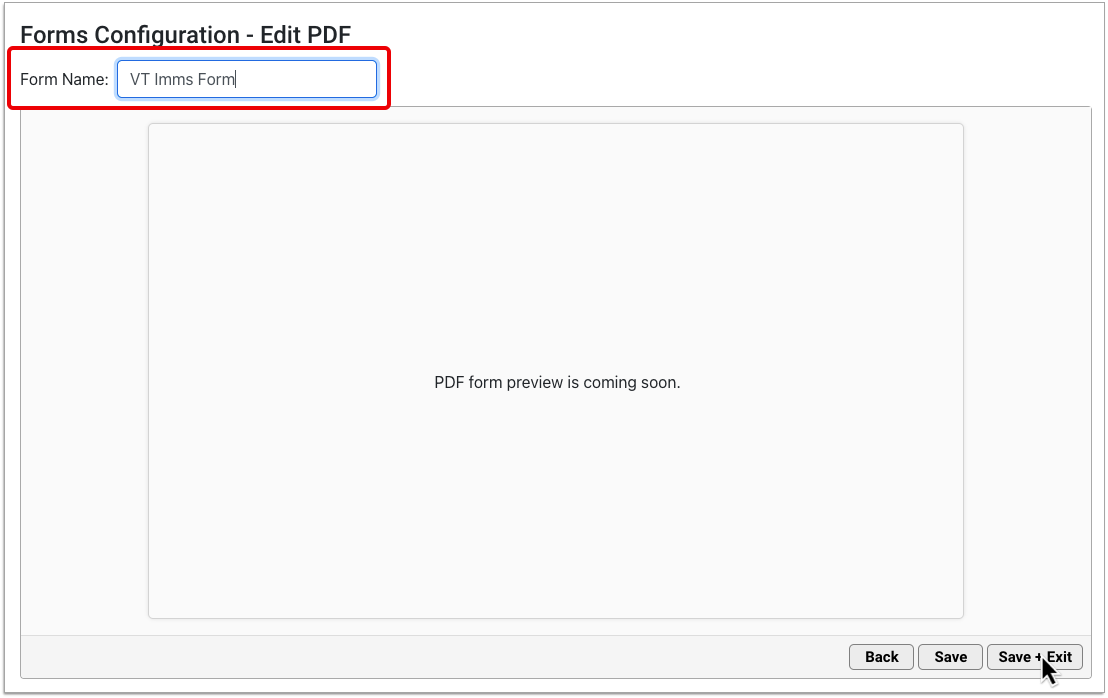
Give the Form a Name
Create a name for your form. In a future PCC release, this will be the name that users see in the Forms component in PCC EHR.
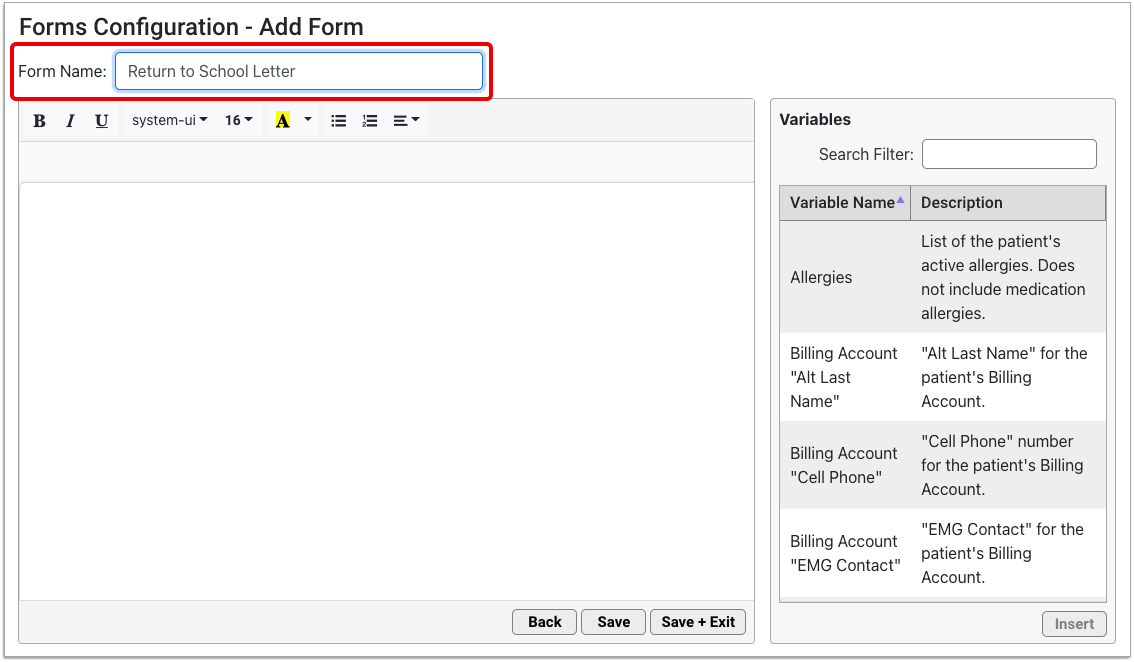
Pick a Unique Name: The form name must be unique. You cannot save a new form if it has the same name as another form in the Forms Configuration tool.
Compose Text
Compose the text of your form in the blank document template.
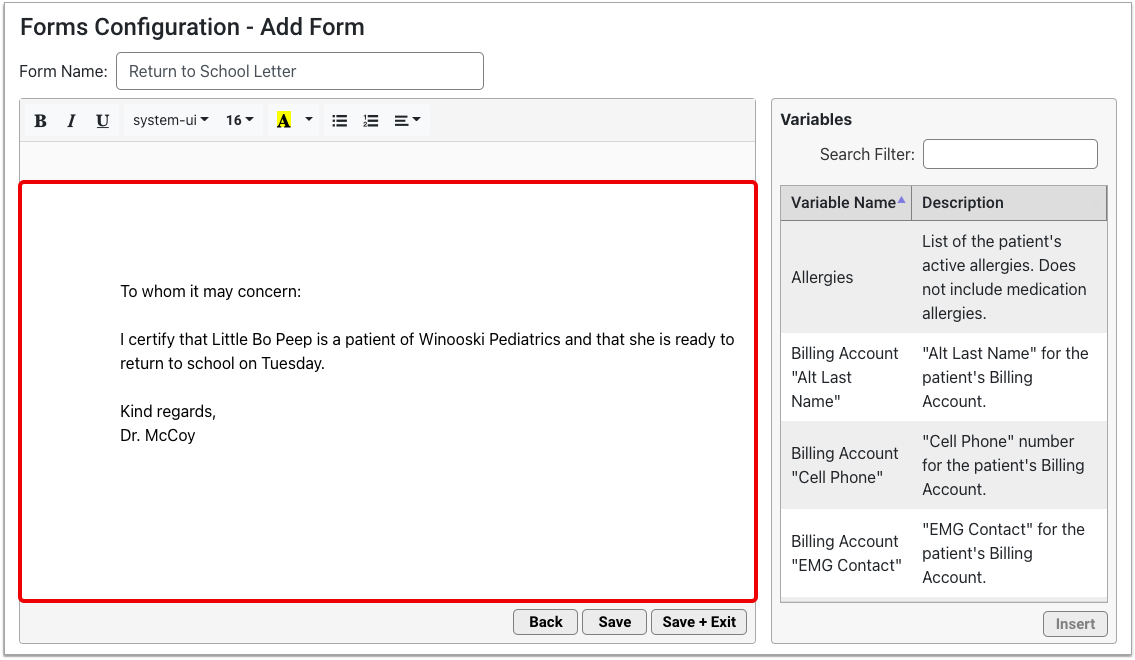
The document template represents a standard 8.5 x 11-inch page with 1-inch margins.
Automatic Page Breaks: When the content of your form exceeds the amount of space available on the page, the extra text automatically flows onto a new page.
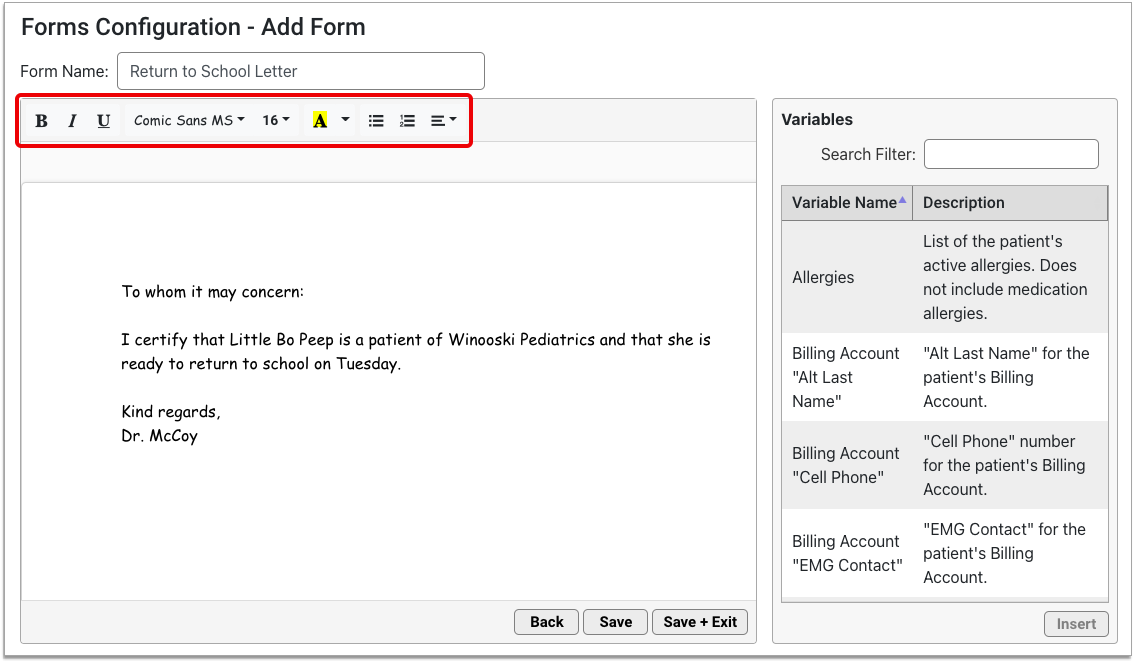
Customize the Style of the Text
Use the style options in the toolbar at the top of the window to customize the font, size, weight, color, and alignment of your text, or to insert a bulleted or numbered list.
Save Your Work
Click the “Save” button to save your new form.
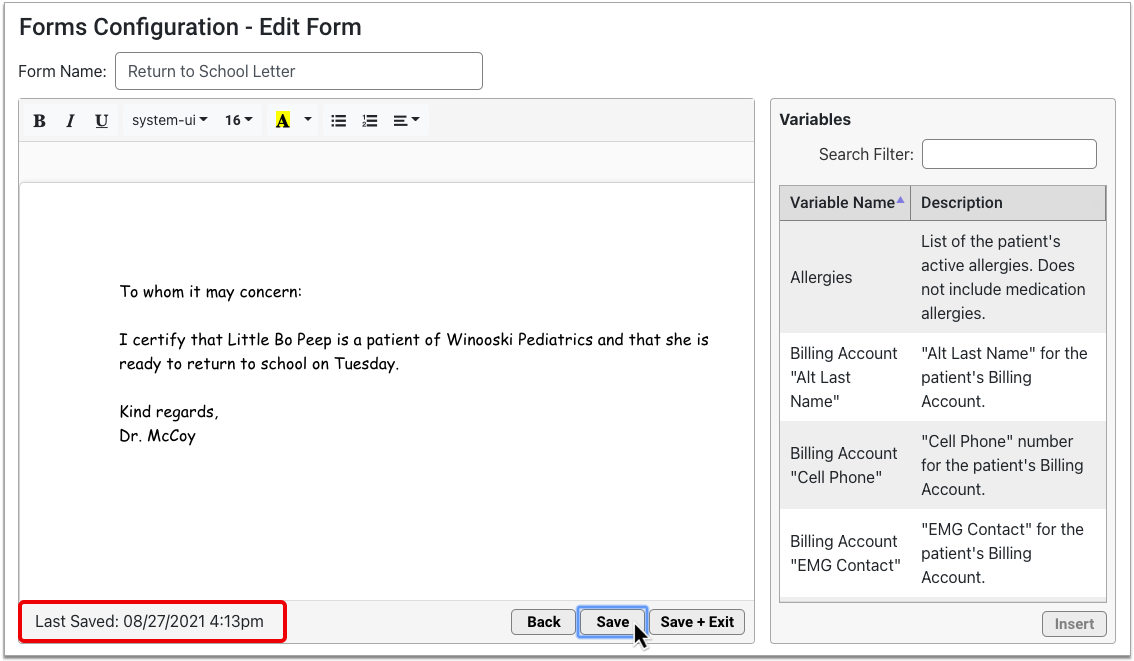
A “Last Saved” timestamp appears beneath your form in the editor window. The timestamp updates each time you save your form.
Close Your Form
When you have finished working, click “Save + Exit” to save and close the form.

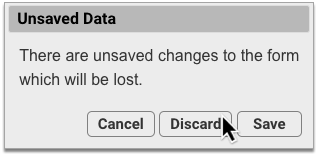
You can also click the “Back” button if you wish to discard your changes instead of saving them.
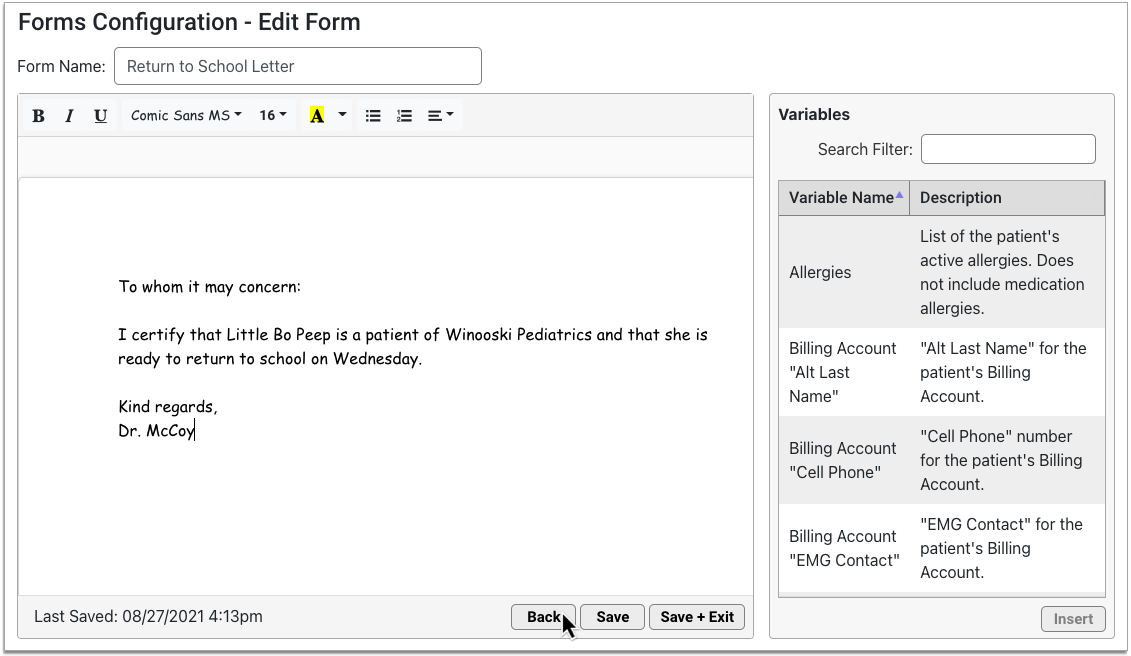
When you close a form, you return to the main screen of the Forms Configuration tool.
Work with Variables
You can include fields on your forms for auto-inserting patient, account, and practice information. These fields are called variables.
You can use variables to create generic form templates that will auto-complete with relevant details when you generate them for patients. You will be able to generate your new form letters for patients in a future PCC release.
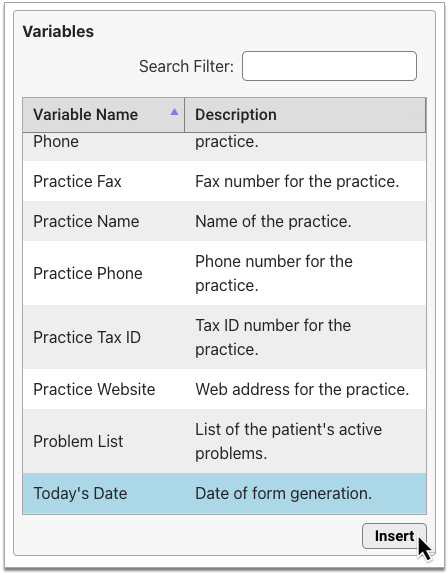
Get to Know the List of Variables
Edit a form in the Forms Configuration tool and locate the Variables pane to the right of the document canvas.
Review the list of variable names and descriptions to learn which kinds of information you can auto-insert onto forms.
In PCC 9.1, you can auto-insert:
- patients’ demographics, insurance policy details, last vaccination date, and allergies
- patients’ billing and home account addresses, demographics, and contact information
- patients’ next appointment details
- patients’ primary care provider details
- your practice’s physical and Web address, contact information, and tax ID
- today’s date
More variables will be added in future PCC releases.
Search the Variable List: You can search for specific terms within the Variables pane. As you type a search term, the list narrows to include just the variables with names or descriptions that match your search.
Variables Use Your Practice’s Naming Conventions: The variables available to you in the Forms Configuration tool reflect your practice’s unique names for phone numbers and custom demographics fields. For example, if your practice has a custom field for emergency contact information in patient demographics, you will see a corresponding variable for that custom field in the Forms Configuration tool.
Find a Variable to Insert
To insert a variable onto your form, first select it in the Variables pane.
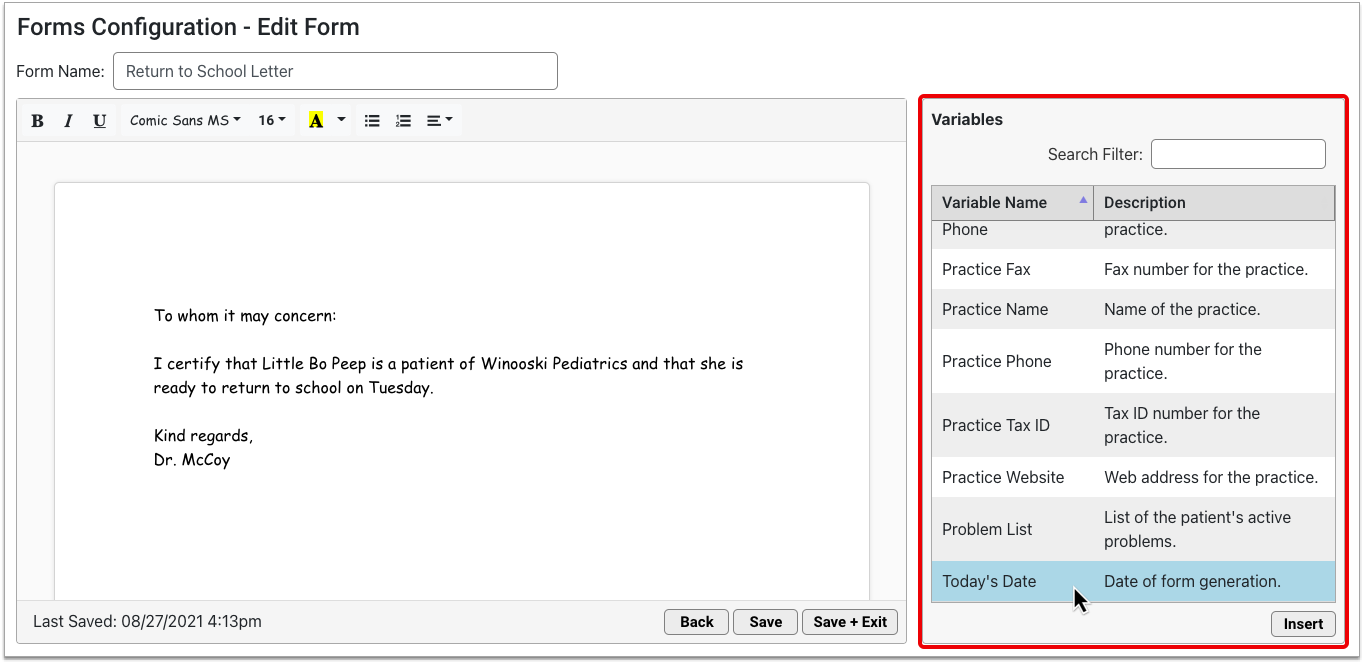
Place Your Cursor Where You Want to Insert the Variable
Position your cursor in the body of the form where you want to insert the selected variable.

Insert the Variable
With your cursor in position, double-click the selected variable to insert it, or click the “Insert” button at the bottom of the Variables pane.
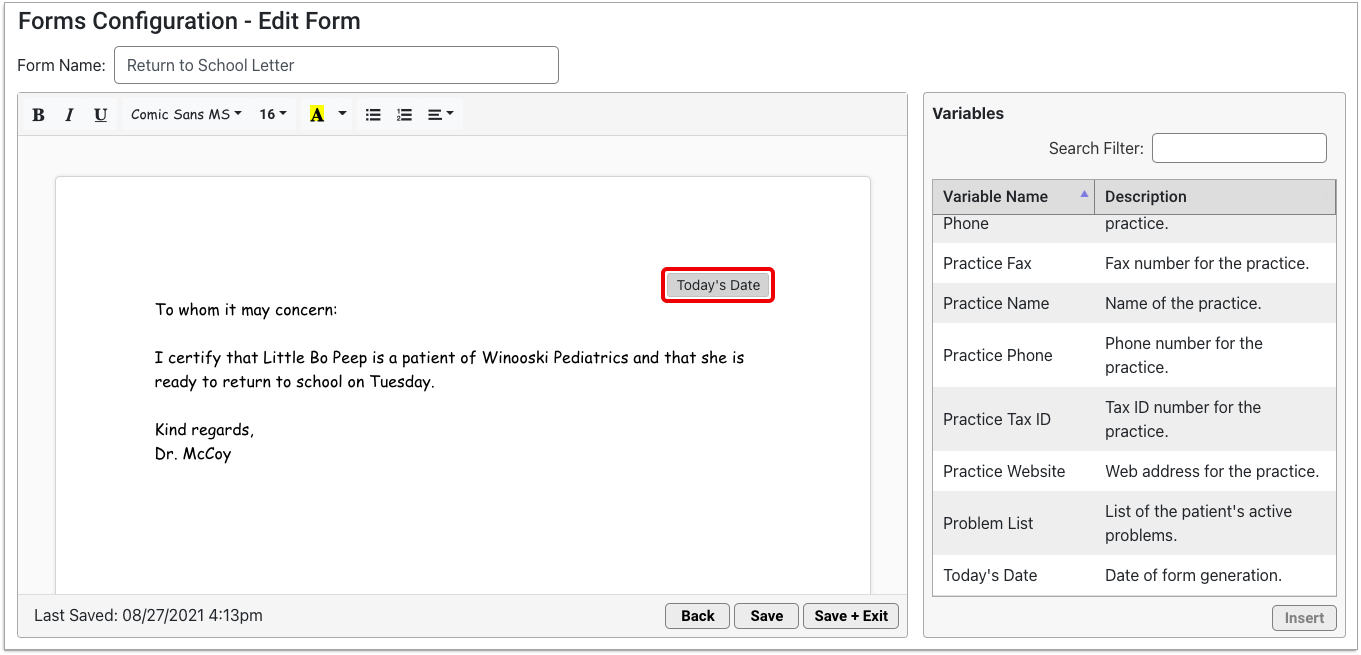
The variable appears on your form where the cursor was positioned.
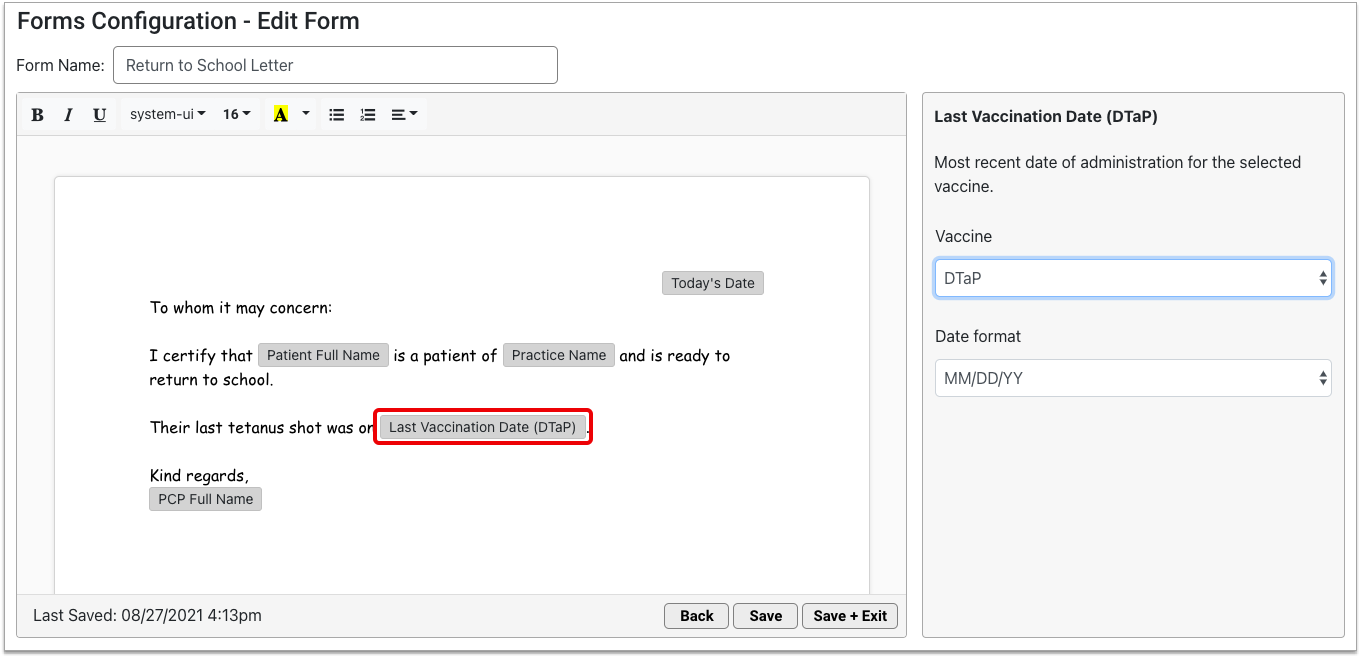
Configure the Variable Options
Click on the variable in the body of your form to view and configure its options. Once selected, the variable’s options appear in the Variables pane.
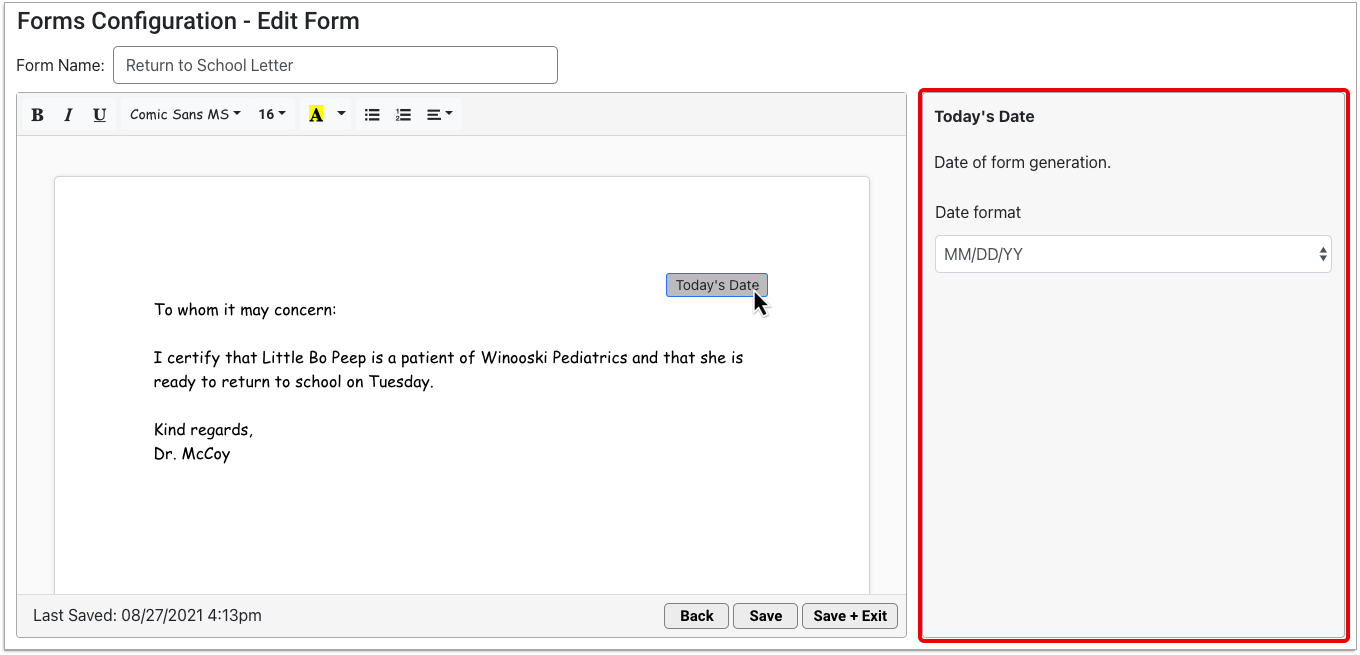
Some variables have formatting options. For example, you can choose how to format dates.
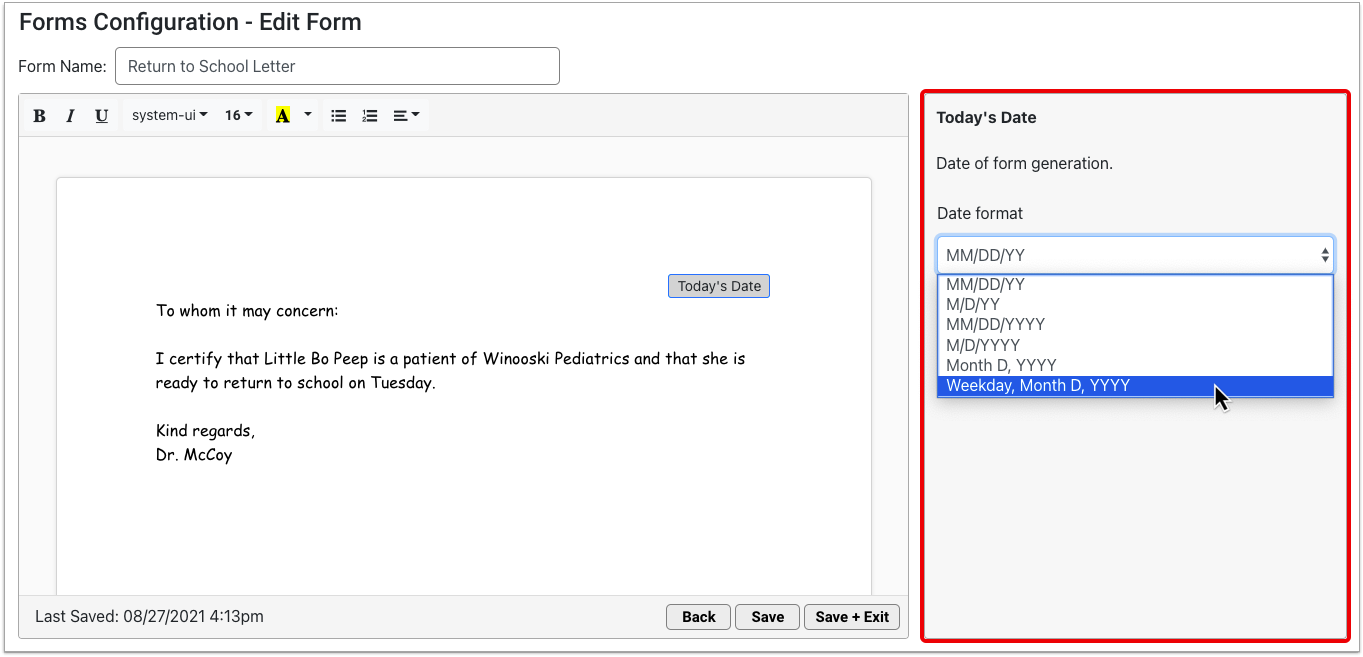
Other variables require you to make a decision before they can work. These variables turn orange as soon as you insert them onto your form, letting you know there is an action for you to take.

Click on the variable in the body of your form, then select one of the options from the orange-highlighted drop down list within the Variables pane.
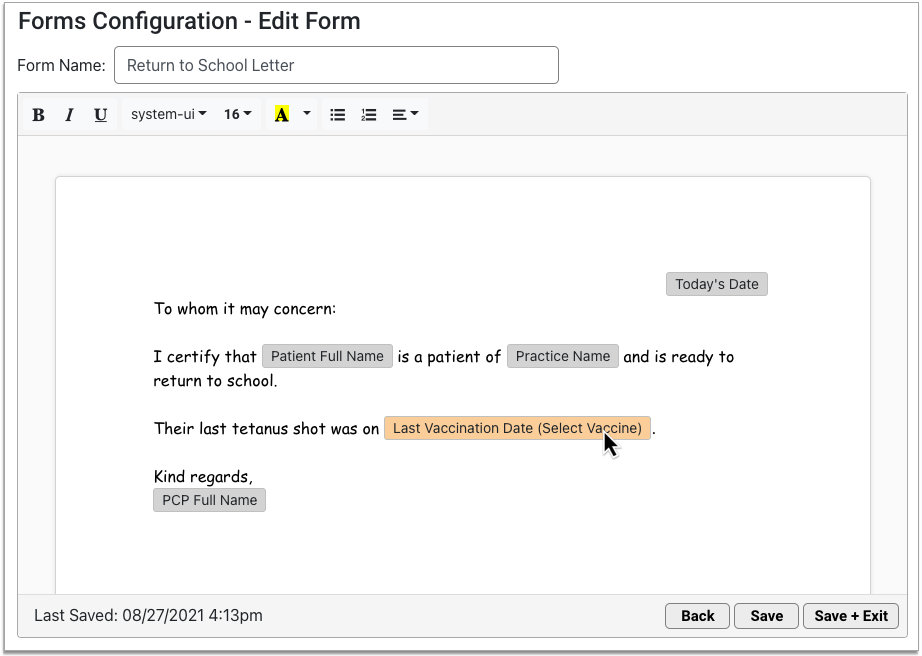
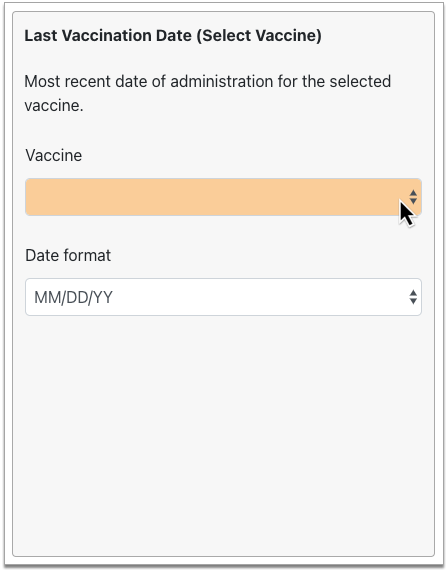
Once you take the required action, the orange highlight goes away and the name of the variable on your form updates to reflect your choice.
The way you configure each variable determines what kind of information it auto-inserts onto your form upon generation and the manner in which the information is formatted.
Coming Soon: Edit the Font Style of Variables: In a future PCC Release, you will be able to edit the font style of variables to match the surrounding text.
Work with Saved Forms
You can edit, delete, and clone saved forms on the main screen of the Forms Configuration tool. To work with a saved form, select it, then click the button for the action you want to take.
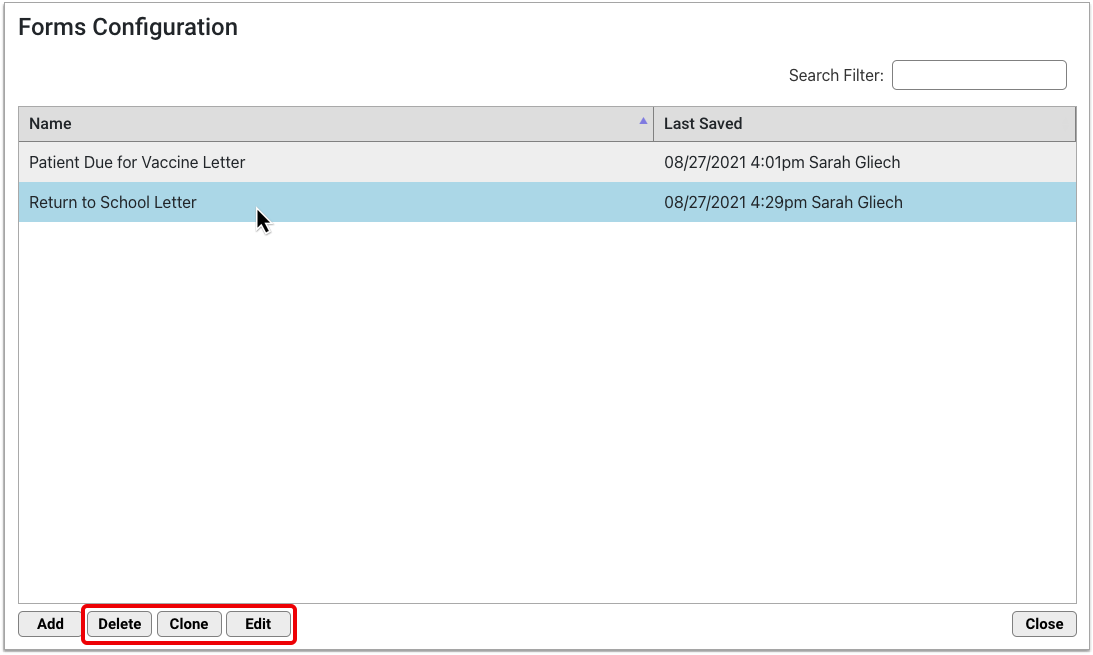
Edit
The “Edit” button allows you to make changes to a saved form. You can also double-click a form to open it for editing.
Clone
The “Clone” button makes a copy of a saved form and allows you to make changes to the copy. When you save a cloned form, the original form remains intact and the cloned version gets added to the Forms Configuration tool with the changes you implemented.
Delete
The “Delete” button allows you to permanently remove a form from the Forms Configuration tool.
Delete by Permission Only: Users can delete forms by permission only. You can set up user permissions in the User Administration tool in PCC EHR.
Work with PDFs
With help from PCC Support, you can upload PDF forms into the Forms Configuration tool.
You might need to do this if your state or local school district requires that you complete a particular form for patients at the beginning of a new school year.
PDF forms appear in Forms Configuration with an icon.
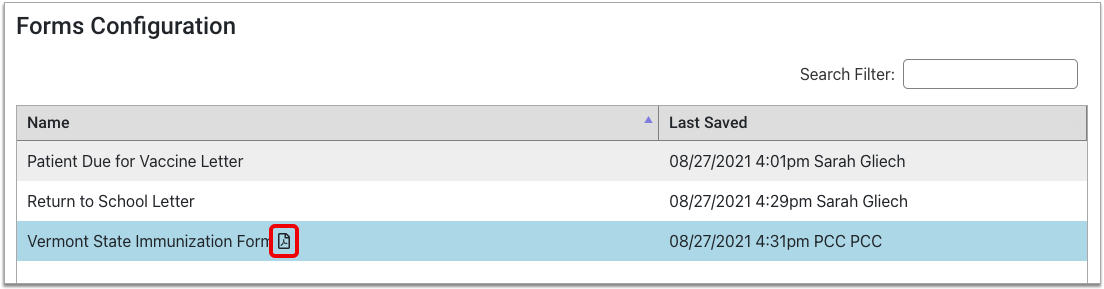
You can rename them without intervention from PCC Support.
Users with the right permissions can also delete PDFs from the Forms Configuration tool.
In a future PCC release, you will be able to view the contents of PDFs in the Forms Configuration tool, control which PDFs are visible in the Forms component in PCC EHR, and decide where PDFs appear in the Forms component list order.
What to Look Forward To
PCC 9.1 is the first of many PCC releases that puts the power to create and manage patient forms into your hands. In upcoming PCC releases, you will be able to:
- Preview your form letters as you build them to see what they will look like when you generate them for patients
- Generate your form letters for patients in PCC EHR
- Include images on forms
- Auto-insert provider signatures
- Auto-insert details from patient encounters, such as vitals
- Auto-insert complete address blocks
- Auto-insert patients’ siblings
- Create questions for users to answer while generating a form, and auto-insert their answers
- Set custom margins and page sizes
- Check spelling
- Recreate your letterhead in Forms Configuration
- Control which forms appear in the Forms component and in what order
…and more! Pilot tester feedback will steer the future development of the Forms Configuration tool in PCC EHR.
Tell PCC What You Think
If you decide to become a pilot tester, tell your PCC Client Advocate what you like about the Forms Configuration tool and what would make it more useful for your practice.
Your feedback will guide the development of the Forms Configuration tool in PCC EHR.
Look Up and Import Immunization Records from Your State’s Registry
Practices in California, Wyoming, Indiana, and Florida are now eligible to sign up for bidirectional connections with their state immunization registries.
With a bidirectional connection, you can look up vaccine records from your local immunization registry and import them into patients’ charts without ever leaving PCC EHR.

To read about how it works, check out Look Up and Import Patient Immunization Records from Your Local Registry.
Contact PCC Support to get started, or to let us know that you’re interested in establishing a bidirectional connection with your registry once it’s available in your region.
Securely Retrieve Patient Information from Hospitals and Other Practices
When you enable Clinical Document Exchange, you can exchange patient records securely and on-demand with other healthcare organizations right within PCC EHR.
Learn how it works and how to sign up in Securely Retrieve Patient Information from Hospitals and Other Practices.
Use 2022 ICD-10 Diagnosis Billing Codes in PCC EHR
During the PCC 9.1 release cycle, PCC updated your practice’s system with 2022 ICD-10 diagnosis billing codes.
The 2022 ICD-10 update includes additions and expansions to sections for neonatal screening findings (P09*), cough (R05*), pediatric feeding disorder (R633*), cannabis/cannabinoid related codes (T407*), and Social Determinants of Health (Z5*). The update also includes a new “Post COVID-19 condition, unspecified” code (U099).
The new codes and guidelines take effect for dates of service starting on 10/1/2021.
Here are some resources to help you learn about 2022 ICD-10:
-
CMS: You can review the complete, updated guidelines in the CDC’s 2022 ICD-10-CM Official Guidelines for Coding and Reporting.
-
Attend a Billing Drop-In Event: You can learn about the updates that are of most interest to pediatric practices by attending Monthly Billing Drop-In events hosted by PCC’s billing specialists. September’s Drop-In included a Code Updates presentation.
-
New and Updated ICD-10 Codes of Interest to Pediatricians: You can also review a list of new codes highlighted by PCC’s Jan Blanchard (CPC, CPEDC).
Chart Diagnoses Mapped to Deprecated ICD-10 Billing Codes: Were there any 2022 code changes for items that your practice frequently bills? After your update, you can review your system configuration using the snomedmap program in Partner. You can set what charted diagnoses (SNOMED-CT) map to your billing codes in the Billing Configuration tool in PCC EHR. While there were no major disruptions in the 2022 ICD-10 update, it’s always worth reviewing your code mapping to head off any billing challenges.
Use New Test Descriptions in the LOINC 2.70 Update
During the PCC 9.1 release cycle, PCC updated your practice’s system with LOINC 2.70, an update to the standard list of labs used to make tests interoperable between different systems.
PCC reviewed the updates to LOINC before the update: there will not be any disruption to labs your practice currently orders, and you shouldn’t need to take any action to see the effects of the patch.
The update includes over a thousand new terms and updates, including COVID-19 related issues and new lab tests such as LOINC Code 76098-2 (Respiratory Syncytial Virus RNA by isothermal nucleic acid amplification technology (NAAT)). You can read more details on the LOINC Release Notes web site.
Your practice can configure the tests for each of your lab orders in the Lab Configuration tool. For a quick guide on how to add a COVID-19 test or other lab order to your system, you can read Create a COVID-19 Test Lab Order.
New and Updated Reports in PCC 9.1
With each release, PCC improves upon the reports you can generate in PCC EHR. Here are the reporting updates for PCC 9.1:
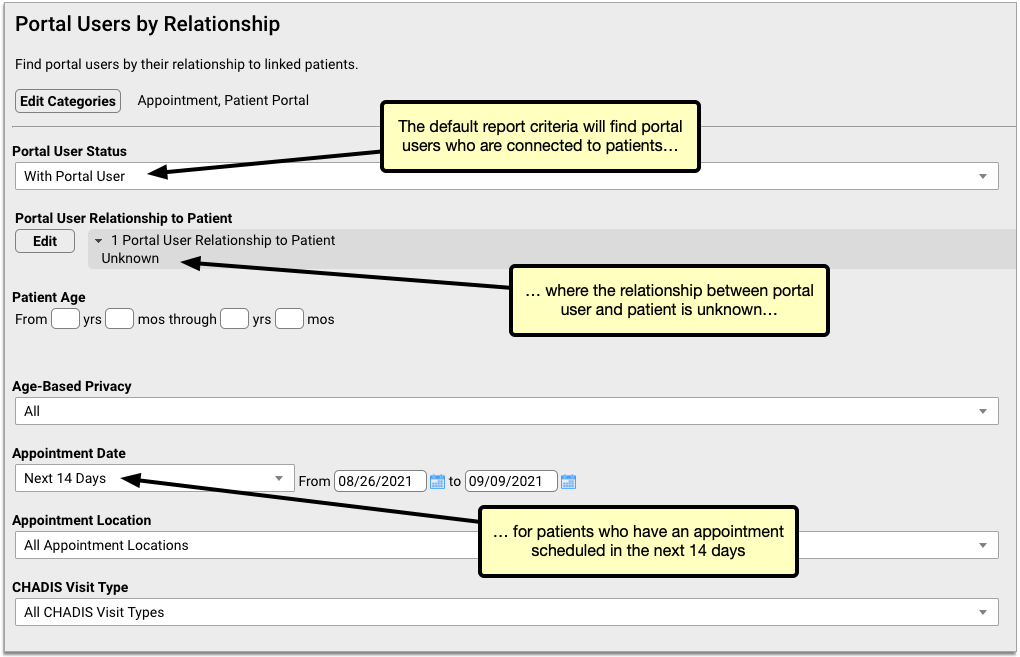
Find Portal Users Who Have Unknown Relationships to Their Linked Patients
Use the new Portal Users by Relationship report in PCC 9.1 to generate a list of portal users who have undefined relationships to their linked patients. Then, fix the undefined relationships to ensure that your patients and their family members get the right portal communications at the right times. This is especially important for practices who send CHADIS questionnaires to portal users ahead of patient visits.
In the Report Library in PCC EHR, open the Portal Users by Relationship report from the Appointment or Patient Portal category.

The default settings for the report will help you find patients with upcoming appointments who have an unknown relationship to their linked portal users.
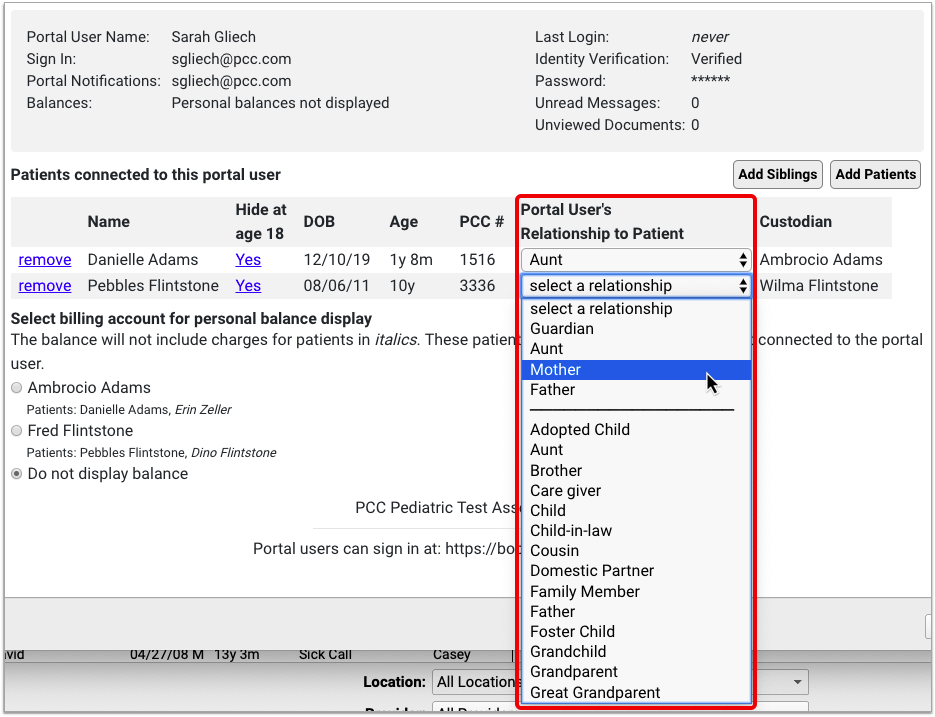
Once the report generates, you can use your findings to correct the undefined relationships in the Patient Portal Administration tool.
Open Patient Portal Administration from the Tools menu, then click on the Manage Portal User tab.
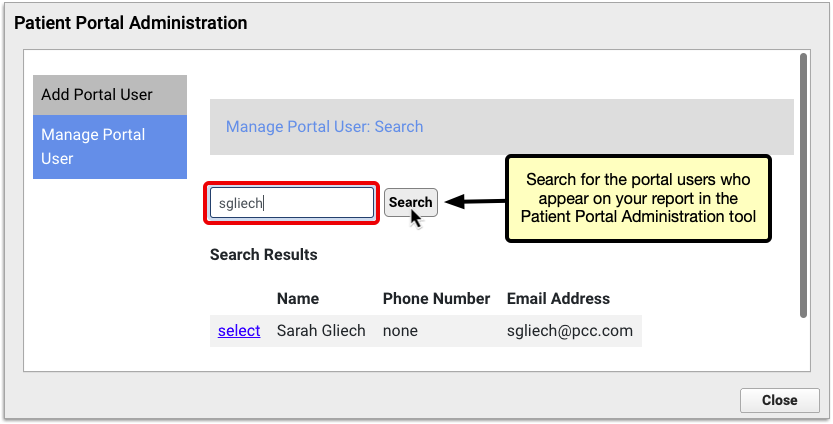
Search for the portal users on your list, then set up their relationships to their linked patients.
If the Portal User by Relationships report does not meet your needs by default, you can customize it to include different default filter settings (such as a date range that looks further into the future), more or fewer columns, or different criteria.
Filter by CHADIS Visit Type: Because the Portal Users by Relationship report is primarily intended for use in practices where CHADIS is enabled, it includes a filter for CHADIS Visit Type that allows you to limit the report results to patients who are scheduled for certain kinds of visits associated with CHADIS questionnaires. If you run the report to include “All CHADIS Visit Types”, the results will include all patients with unknown portal user relationships irrespective of CHADIS visit type.
Customize Lab Test Reports to Meet Third-Party Requirements
PCC 9.1 introduces the ability to generate, customize, and schedule test result reports from the PCC EHR Report Library.
The Test Result report in the Report Library improves upon the Lab Test Report, which is located in the Reports menu in PCC EHR. You can use the new Test Results report to share COVID test results and contact tracing information with your regional health agency.
Open the Test Results report from the Clinical category within the Report Library.

By default, the report includes lab test and facility information, patient and account contact information, and insurance policy details. Tests will display a CLIA number if performed at an in-house lab facility that is linked to an appointment location.

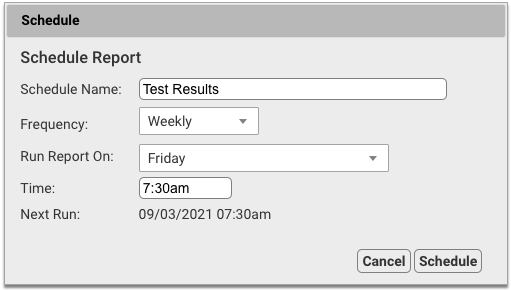
You can customize the report criteria, rearrange the columns, and schedule the report to run at regular intervals.
When you export the report results to CSV format, the elements of most names and addresses separate into discrete columns. This makes the export easier to work with in your favorite spreadsheet program.
Contact PCC Support if you need help customizing the Test Results report to meet specific reporting requirements for COVID or other test results.
Find Open Referrals (and Other Types of Orders) for Inactive, Transferred, and Dismissed Patients
In PCC 9.1, you can filter patient list and orders reports in the PCC EHR Report Library by patient flag and order status to find inactive, transferred, and dismissed patients who still have incomplete orders.
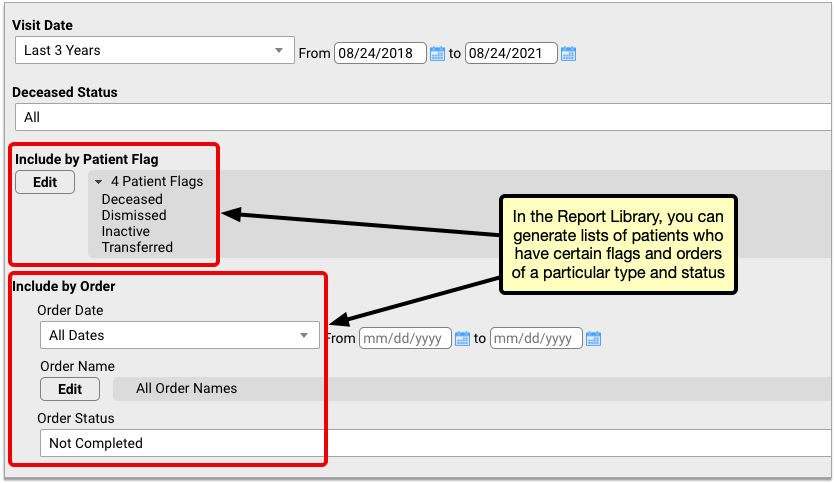
Edit the patient flag filter to include patients who are inactive, have transferred out, or were dismissed from your practice. Edit the orders filter to find orders with the status “Not Complete”. Generate the report.
You can use the resulting list to clear incomplete orders for inactive, transferred, and dismissed patients from your Visit Tasks queue.
Flexible Filters: There is more than one way to use the patient flag and order status filters on the patient list and order reports. Whenever you tackle a new reporting task, keep in mind that the patient flag and order status filters can be used in combination on a number reports.
See Patients’ Age at Last Visit on Reports
When you generate a Patient List in the Report Library in PCC EHR, you can optionally include a column that displays how old patients were at their last visit.

The Age at Last Visit column is also available on the Preventive Care Recall, Chronic Condition Recall, Patients Overdue for Weight Management, and Broadcast Messaging Patient List reports.
You can share this information with third party requesters or use it to perform practice-level analysis about how you deliver care to patients in different age groups.
Discrete Columns for Name and Address Elements When You Export Reports to CSV Format
Reports in the PCC EHR Report Library combine the elements of names and addresses into the same column.
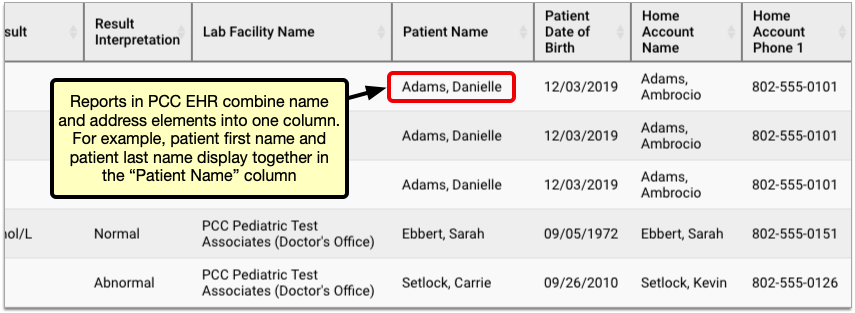
In PCC 9.1, the elements of most names and addresses separate into discrete columns when you export report results to CSV format.

Discrete columns for name and address elements make it easier to work with report results in your favorite spreadsheet program.
Not All Names and Addresses Split Out: You might notice that the names and addresses in certain columns on certain Report Library reports do not split out when exported to CSV format. The splitting function will be extended to all name and address types in a future PCC release.
Sort Reports by Patient Age
In PCC 9.1, you can sort report results according to patient age in the PCC EHR Report Library.
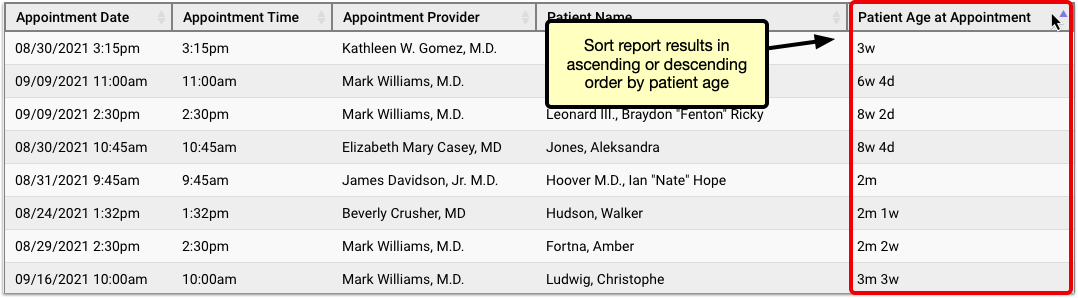
The patient age column now sorts logically in ascending or descending age order, rather than sorting strictly numerically. For example, in ascending order, patients who are 11 months old will now come before patients who are 1 year old.
Find Emancipated Patients Whose Healthcare Information Remains Visible to Other Portal Users
You can use the Portal Users by Relationship report in PCC 9.1 to find patients who have reached the age of emancipation and who continue to share health information with portal user accounts other than their own.
Open the Portal Users by Relationship Report
In the Report Library in PCC EHR, open the Portal Users by Relationship report from the Appointment or Patient Portal category.

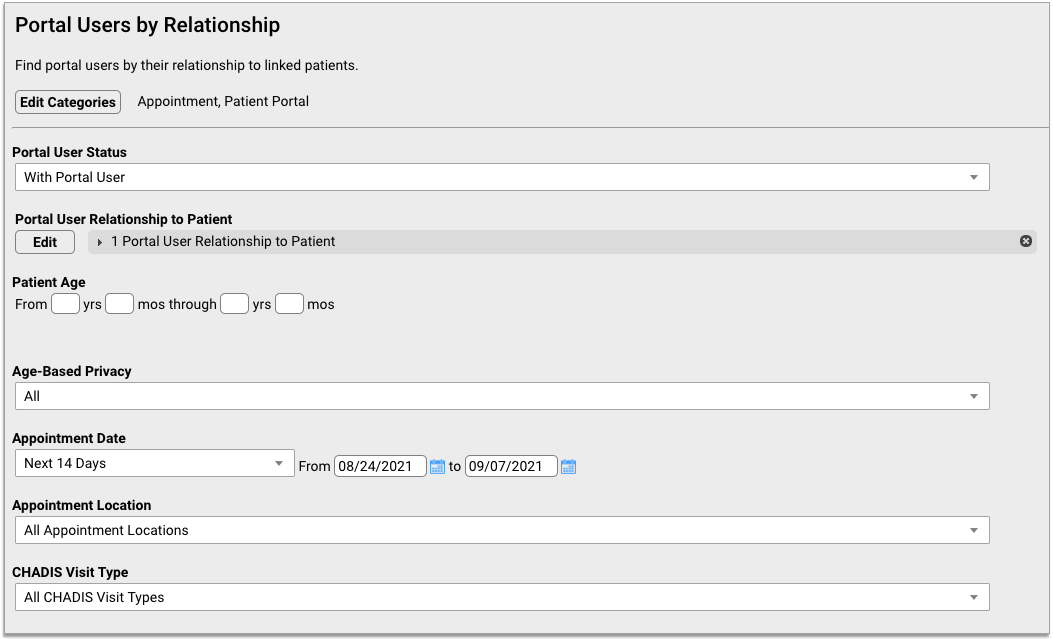
Edit the Patient Age Filter
In the report criteria, set the minimum age in the Patient Age filter to the age of emancipation in your locality.
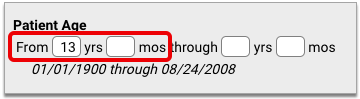
The age of emancipation in your region should be the same age at which your practice enables age-based privacy for patients who choose to hide their healthcare information from portal user accounts other than their own.
Edit the Portal User Relationship Filter
In the report criteria, edit the Portal User Relationship to Patient filter and select all relationships except “Self”.
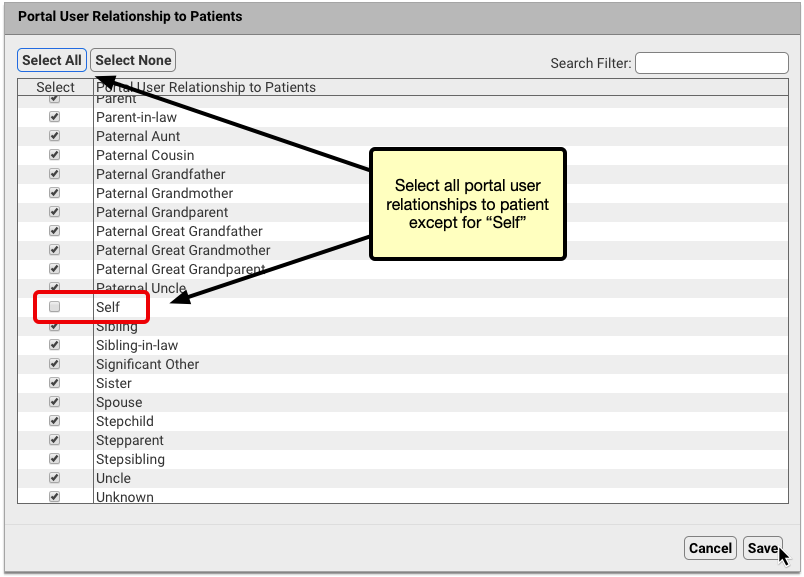
In order for this filter to work as intended, your practice must have relationships set up between portal users and the patients to whom they are connected.
Edit the Age-Based Privacy Filter
In the report criteria, change the Age-Based Privacy filter to “Disabled”.
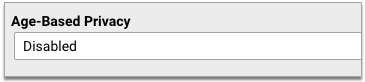
This setting allows you to find patients whose healthcare information is visible to other portal users.
Generate the Report
Generate the report. The results contain the names of patients who have reached the age of emancipation and continue to share their health information with portal user accounts other than their own.
Verify Your Patients’ Privacy Preferences
Speak with the patients on your list and affirm that their intent is to continue sharing their healthcare information with other portal users.
Update Age-Based Privacy Settings Based on Patient Preferences
You can change the age-based privacy setting for patients who would like to hide their information from other portal users in Patient Portal Administration.

Patients who opt to continue sharing their information with portal accounts other than their own past the age of emancipation should sign a release form.
Easily Report on a 14-Day Date Range
All reports in PCC EHR now include a fourteen-day date range option.
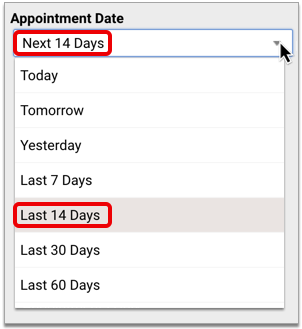
You can use this option to generate reports about patients who have visits in the next two weeks, or to identify encounter charges from the last two weeks that have yet to be posted.
The fourteen day date filter is available on default reports, custom reports, and scheduled reports.
Improved PCC EHR Release Deployment
During the release of a new PCC EHR update, the update cannot be completed if a user is logged in to PCC EHR, or if a user logs in during the deployment process. To ensure that you get the newest versions of PCC EHR without delay or interruption, users are now prevented from using PCC EHR while an update is in progress.
The login screen will include a message that maintenance is in progress.

If a user is already logged in when an update begins, they will be automatically logged out and will prevented from logging in again until the update is complete. After the update, the window will refresh and the username and password fields will reappear.
A Better Way to Set Patients’ Immunization Registry Status
Practices who are required by their immunization registries to include a patient status with vaccine record submissions can now set a patient immunization registry status under Communication Preferences.
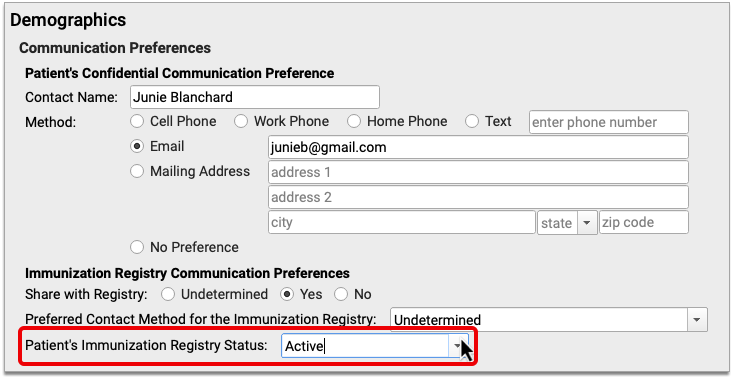
The patient immunization registry status field is only visible to practices who have it enabled in the Communication Preferences component.
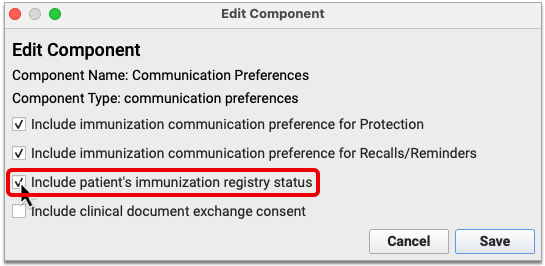
You should only enable the patient immunization registry status field if your registry requires you to send a patient status with vaccine record submissions. Contact PCC Support if you receive such a request. A PCC immunization registry support specialist will work with you to enable the field and make sure that your practice is using it the way your registry requires.
Immunization Registry Status is Not Connected to Patient Flags: Patient immunization registry status is used solely for the purpose of communicating patient status to a registry and is not tied in any way to patient flags in Practice Management and PCC EHR.
New and Updated Interfaces Available in PCC 9.1
With each release, PCC expands and updates direct connections, partnerships, and integrations with insurance payers, immunization registries, and more. Here are the clinical and financial interoperability updates for PCC 9.1:
-
New and Updated Clinical Interfaces: During the PCC 9.1 release cycle, PCC updated our immunization registry interfaces with Oregon (ALERTIIS), Florida (Florida SHOTS), and Louisiana (LINKS) to support state-specific requirements around COVID vaccine and VFC status reporting.
-
New Insurance Eligibility and Financial Interfaces: During the PCC 9.1 release cycle, PCC enabled real time insurance eligibility-checking for LA Medicaid, VA Medicaid, Optima Health Plan, Neighborhood Health Plan Rhode Island, Triple S, LA Healthy Blue, and NC Healthy Blue. PCC also updated eligibility configuration for Meridian Health, Harvard Pilgrim, and Cigna. PCC 9.1 also introduced claim interface improvements for Advocate Lutheran, Community Health Choice, PA Medicare, Cook Children’s Health, Parkland, AmeriHealth Caritas North Carolina, Healthy Blue North Carolina, IL Aetna Better Health, and Aetna Better Health PA..
If your practice would like to take advantage of these connections, or you have other interface needs, contact PCC Support.
Background Improvements to PCC eRx
Ahead of the PCC 9.1 release, your practice received an important, non-disruptive background update to PCC eRx which:
- Fixes common prescription errors related to frequency, dose form, quantity, and missing instructions that prevent you from e-prescribing
- Fixes the “Add New Medication” button so that you can prescribe new medications immediately after renewing existing medication entries
- Gives you the ability to view or adjust Dispense as Written (DAW) information for pending prescriptions on the Rx Queue, and fixes an issue where the DAW checkbox was sometimes being selected without user input
- Reduces possible confusion at the pharmacy by removing the generic epinephrine option mapped to brand-name only manual injector pens (Symjepi)
- Resolves issues surrounding saved prescriptions and stop dates, ensuring the calculated date is always present and, if selected, the “Use Stop Date” box is honored when editing a 3 month supply
- Gives you the ability to revert a pending 3 month supply prescription to a single month, and ensures that the set of 3 prescriptions remains linked by preventing individual processing
- Resolves unintended duplication in the PCC EHR Prescriptions component that resulted from editing three month supply prescriptions
- Picks up patients’ preferred pharmacy when you renew medications
Contact PCC Support if you have any questions about the improvements included in this update.
Other Feature Improvements and Bug Fixes in PCC 9.1
In addition to the features described above, PCC 9.1 includes these smaller improvements and squashed bugs.
-
Updated VIS, MVX, and CVX for the new VAXELIS Vaccine and More: PCC 9.1 includes updates to the list of supported immunization Vaccine Information Sheets, manufacturers, and product codes. Among other updates, PCC EHR now supports VAXELIS (CVX 146), a new vaccine that immunizes against diptheria, tetanus, pertussis, polio Hib (Haemophilus influenzae type b), and hepatitis B, developed in a partnership with Merck and Sanofi Pasteur (requiring a new manufacturer code, MSP). For help adding new immunizations to your PCC system, read Add, Update, and Configure Immunizations in PCC EHR and contact PCC Support.
-
New Vaccine Product Codes (CVX) Pending Approval of Pfizer SARS-COV-2 Vaccine for 5 through 11 Years of Age: You can begin to configure your PCC system for administrations of Pfizer’s tris-sucrose SARS-COV-2 vaccine formulations for ages 5 through 11 (CVX 218) and ages 12 and older (CVX 217) in anticipation of FDA approval for emergency use. Instead of vaccine information sheets (VIS), these vaccines will have emergency use authorization (EUA) sheets that you can share with patients and their families. PCC is preparing to assist practices with the configuration needed to carry out a mass SARS-COV-2 vaccination campaign. Until further communication is released, you can contact PCC Support to notify PCC of your intent to administer the vaccine and of your potential need for configuration assistance. For more information about these vaccines and the associated CVX, NDC, and CPT codes, please refer to the CDC’s web resources concerning COVID-19 vaccines.
-
CVX Code 207 for Moderna SARS-COV-2 Booster Dose: Per the CDC, the description of CVX code 207 has been updated pending FDA emergency use authorization to allow its use for a booster dose of the Moderna COVID-19 vaccine drawn from existing product vials.
-
Call PCC Before You Start Billing for COVID-19 Boosters (Third Shot): With a little custom configuration, PCC supports the procedure codes for billing third-dose boosters of COVID-19 vaccines. Call PCC Support to request the custom configuration before you begin billing for COVID-19 booster shots.
-
Use Apostrophes in Names on Claims: PCC’s claim processing now supports apostrophes in patient and account names. Names like D’Angelo and O’Hara will no longer cause claim errors.
-
More Information Sent to CHADIS: Gestational Age is now sent to CHADIS, so that CHADIS can calculate an adjusted age and better match questionnaires to patients up to three months old. Multiple birth information is also included with patient information, though CHADIS does not yet make use if it.
-
Reduce Claim Errors Related to Subscriber Relationship: Claims will use the relationship to subscriber entered for the patient’s specific policy first, and then use the relationship entered in the patient’s record if needed.
-
Improved Messages Queue Speed: The Messages queue in PCC EHR now caches information, speeding up how the queue refreshes. At large practices, this will lead to noticeable improvement on the Messages queue, and may result in improved performance elsewhere in PCC EHR.
-
Unable to Save Documents from Patient Education to the Chart: Under certain circumstances, sending patient education would create a blank document. PCC patched this problem to all clients mid-release.
-
Appointment Note Crash: While reviewing Appointment Notes on the Schedule screen, an automatic refresh of the screen could cause PCC EHR to crash. PCC 9.1 fixes this issue.
-
New Patient Sync Problems: When adding a new patient or modifying their date of birth, sometimes the records would not be adjusted in the Partner PM system right away. This update now happens more quickly.