Prepare for Pre-Check-In
Your patients and families can add, confirm, and update patient, billing and insurance information through the patient portal, ahead of their visit through Pre-Check-In
Contents
Considerations
There are a few conditions that may affect your decision to begin using Pre-Check-In in its current version:
- Pre-Check-In needs to be completed individually for each patient, so accounts with multiple patients with appointments on the same day will need to enter and confirm information multiple times
- The information requested fields cannot be edited or removed, and no additional fields can be added
- Pre-Check-In is available within Patient Portal seven days before an appointment, and a notification is sent to the Portal user two days before the appointment. This timeline cannot be changed
- Multiple Patient Portal users can complete Pre-Check-In. Use the Pre-Check-In Recipient component to allow additional portal users to complete Pre-Check-In.
- Accounts with a privacy-enabled patient can complete Pre-Check-In. Add privacy-enabled patients in the Pre-Check-In Recipient component. Use the relationship of “Self” when creating a portal account for a privacy-enabled patient. Only the patient should have the relationship of “Self.”
Prerequisites
Appointment Book
Pre-Check-In requires PCC’s Appointment Book. If your practice still uses SAM, PCC’s original scheduling tool, or another scheduling method, it is necessary to transition to the Appointment Book before using Pre-Check-In. To begin using Appointment Book, contact PCC support.
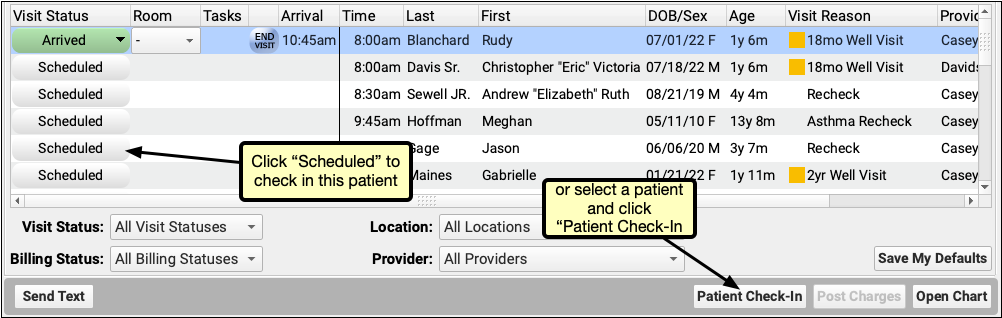
Check Patients in Through PCC EHR
Ensure that your front-desk staff are using PCC EHR’s check-in feature. Updated information submitted through Pre-Check-In is found there, and can be reviewed and imported before or when the patient arrives for their visit.
Patient Portal
Pre-Check-In is completed through PCC’s Patient Portal. Each patient scheduled for an appointment needs a Patient Portal account associated with their billing account to receive Pre-Check-In notifications and to complete the Pre-Check-In process.
If your practice is already using Patient Portal, existing Patient Portal billing accounts need to be linked to EHR accounts. Use the “Add” button in PCC EHR’s demographics component to link the EHR account to the matching person’s Patient Portal account or create a new Patient Portal account as needed.
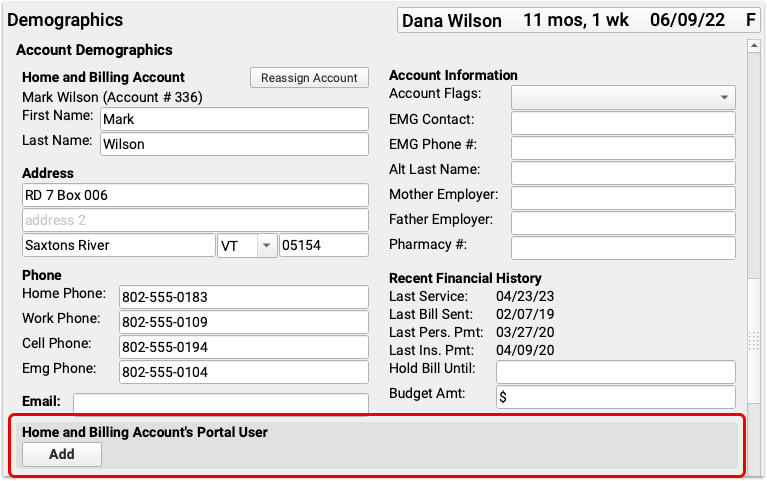
For more information on managing Patient Portal accounts, click here.
Add Additional Pre-Check-In Users
If needed, add additional Pre-Check-In users, so multiple patient portal users can complete Pre-Check-In for each patient.
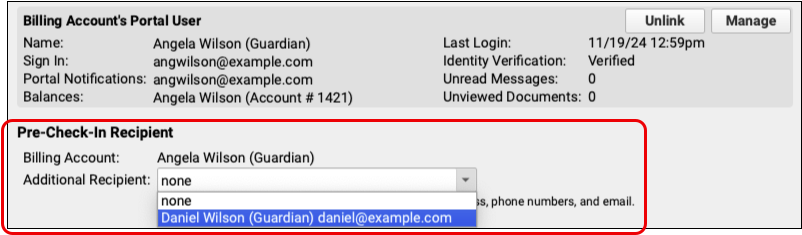
The Pre-Check-In Recipient component in each patient’s demographics includes a drop-down menu listing all patient portal users linked to the selected patient.
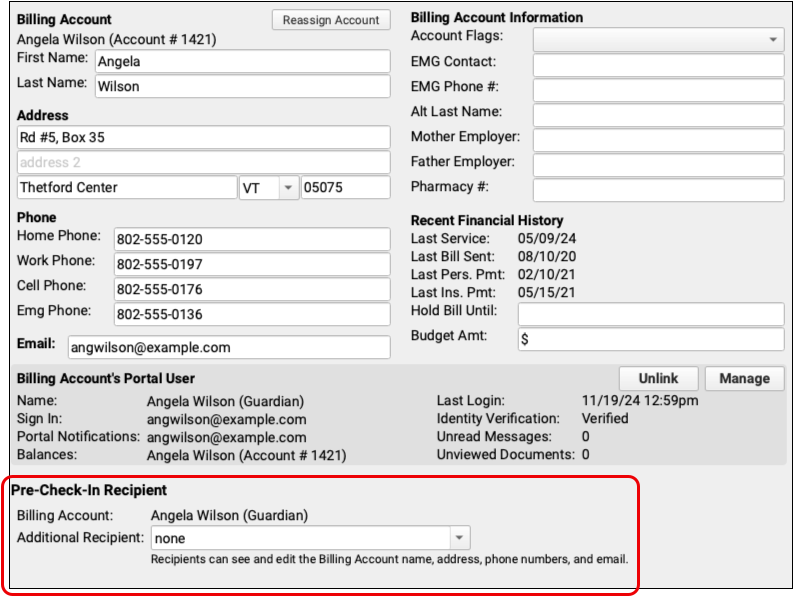
Select an patient portal user linked to this patient to receive the Pre-Check-In notification and option to complete Pre-Check-In.
Once a user begins Pre-Check-In, the additional user will be notified that Pre-Check-In is in progress on the patient portal home page.
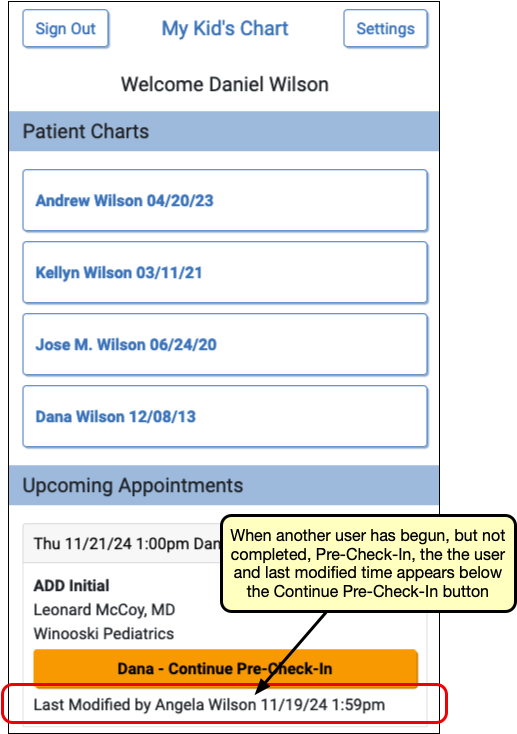
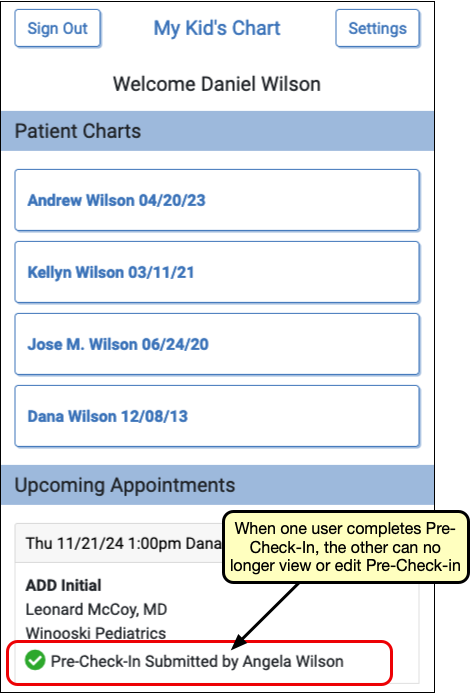
Any Pre-Check-In recipient can continue Pre-Check-In, but once any user submits Pre-Check-In, check-in is complete, and ready to be reviewed and imported in PCC EHR.
Review Your Practice Workflow
Phone Numbers and Phone Number Labels
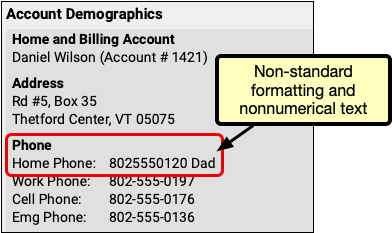
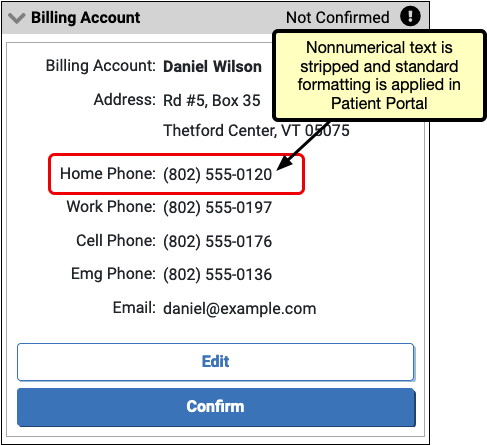
Make sure you’re only using the phone number fields for numerical phone numbers. Any other text, such as “ex” to record an extension, for example, will be stripped out of the information presented during Pre-Check-In. When a user updates or confirms a phone number during Pre-Check-In, the updated, or re-formatted version will overwrite any existing text or phone number in PCC EHR.
Account Demographics phone number labels are customizable and managed through the Practice Management window in PCC EHR. The labels are visible in Patient Portal during Pre-Check-In. Ensure that they are appropriately labeled and that they will make sense to your patients and families if they need to update any numbers you have on file. If you need help adjusting phone labels, contact PCC support.
Notifications
Review how you communicate with patients and families in advance of a visit. A notification to complete the Pre-Check-In process is sent two days before the scheduled visit. Consider how this additional notification fits into your overall patient communication. If you use Notify, Broadcast Messaging, CHADIS, and Pre-Check-In, that could result in a flood of reminders and messages prior to an appointment. Consider adjusting your Notify or Broadcast Messaging usage to let the Pre-Check-In notification serve as an additional reminder.
If someone in your office manually makes appointment reminder calls, use that opportunity to remind patients and families to complete Pre-Check-In.
Eligibility
Users can submit updated insurance information through Pre-Check-In. Be prepared to review any Pre-Check-In results when checking Insurance Eligibility before a visit, so you can ensure that you have the most up-to-date insurance information for each patient.
Adjust the Appointment Book – Patient Details Protocol
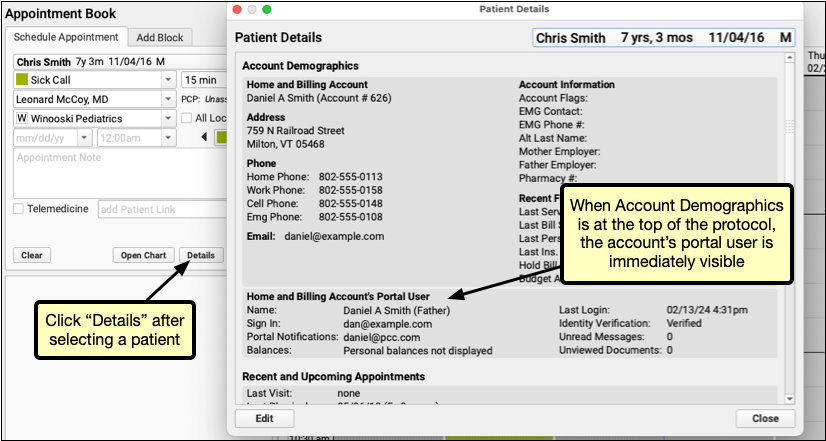
Adjust the Appointment Book – Patient Details Protocol so you can quickly check if a patient has a Portal User associated with their billing account during scheduling.
Open the Protocol Tool in PCC EHR’s configuration menu and select Appointment Book – Patient Details under “Chart-wide Builders”. Move the Account Demographics component to the top of the protocol, so it will be immediately visible when you click the Details button in the Appointment book.
Check For Patient Portal Accounts During Each Interaction
Your practice need not have 100% of your billing accounts linked to patient portal accounts to use pre-check-in, but the more you have the more effective and useful pre-check-in will be. Take advantage of your interactions with patients and families to ensure that as many as possible have a patient portal account assigned to their billing account.
With the Account Demographics component at the top of the Appointment Book – Patient Details Protocol you can quickly check if a portal user is linked while scheduling an appointment and can create or link an existing patient portal account during the call.
Patients and families without a patient portal account will not be able to complete pre-check-in, so they’ll need to check-in when they arrive at your office. That’s an easy reminder to check their billing account and portal user so they’ll be able to use pre-check-in for their next visit.
Prepare to Configure Pre-Check-In
You will not be able to complete the following steps until Pre-Check-In is enabled for your practice, but by making some decisions in advance, you’ll be able to quickly complete Pre-Check-In configuration when it is available.
Visit Reasons
Determine which of your practice’s visit reasons should trigger Pre-Check-In. When Pre-Check-In is turned on, all visit reasons will automatically be set to trigger Pre-Check-In. This may not be ideal for your practice. Consider in advance which visit reasons should not use Pre-Check-In. For example, you may not want parents to go through Pre-Check-In for a Newborn Hospital Visit or Immunization Only visits.
Insurance Card Document Category
When Pre-Check-In is enabled, a new document category called “Pre-Check-In Insurance Cards” is automatically created. By default, insurance card images submitted through Pre-Check-In are added to this category. If you already have an insurance card category, or prefer to create a category with a different name, a different category can be selected through the Document Administration tool in PCC EHR’s Configuration menu.

For a walk-through of managing Pre-Check-In documents, click here.