Configure PCC EHR for Telemedicine Encounters
Read the sections below to learn how to configure PCC EHR for telemedicine encounters.
Read or Watch a Telemedicine Procedure in PCC EHR: How will your front desk, clinicians, and billers perform telemedicine in PCC EHR? Before you dive into the configuration options below, read or watch Schedule, Chart, or Bill a Telemedicine Encounter in PCC EHR (watch video, read article).
Contents
- 1 Create Telemedicine Visit Reasons for Scheduling
- 2 Select Your Telemedicine Vendor
- 3 Configure Telemedicine Links for Your Providers and Patients
- 4 Add New Visit Statuses to Help Manage Telemedicine Visits
- 5 Create a Telemedicine Visit Protocol
- 6 Add Telemedicine Procedure Codes and Prices to Your PCC System
- 7 Update Your Electronic Encounter Form w/ Telemedicine Billing Codes
- 8 Configure Your Practice’s Telemedicine Places of Service
Create Telemedicine Visit Reasons for Scheduling
When you schedule, perform, or bill a telemedicine visit, it should be clear to everyone at your practice that the encounter is happening remotely.
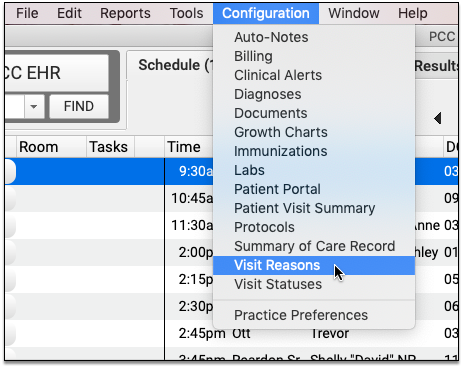
Open the Visit Reasons Editor from the Configuration menu and create one or more visit reasons for telemedicine.
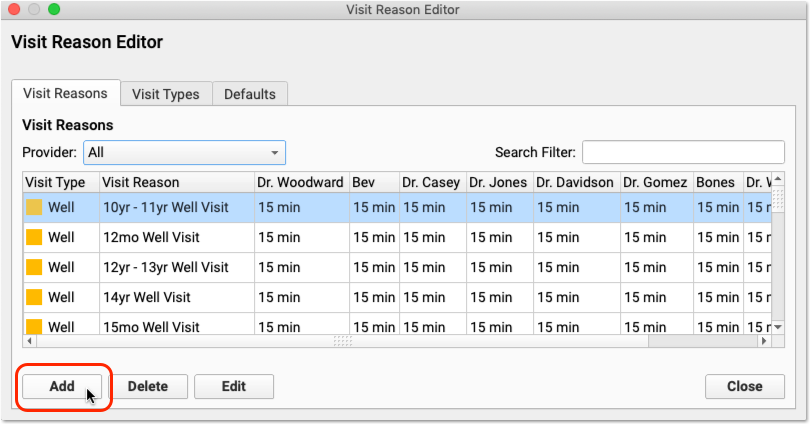

Click “Add” to create a new visit reason. You can name the visit reason, indicate the Visit Type (for helping schedulers pick appropriate times), set whether your practice should print paper forms for the visit, and set both a default duration and optional specific default durations for each clinician.
If your practice commonly performs sick visit and ADHD telemedicine visits, you could create a visit reason (and an accompanying chart note protocol) for each type of visit.
Select Your Telemedicine Vendor
Your practice can choose from a wide range of telemedicine vendors.
PCC has done some research and developed a list of telemedicine vendor options that we believe can provide efficient, safe, and reliable interactions with your patients and families.
Once you’ve chosen a vendor, your practice will need to figure out your workflow for connecting to visits.
Configure Telemedicine Links for Your Providers and Patients
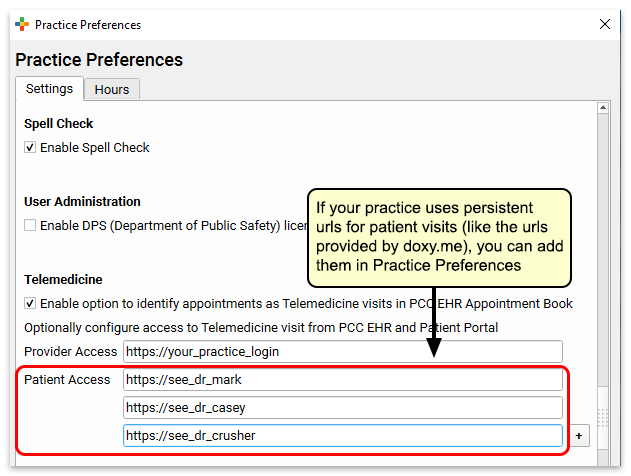
If everyone in your practice is using the same tool, and the vendor supports it, you may have a persistent set of URL web addresses that patients and providers can use to connect.
You can enter those addresses in Practice Preferences.
If you have persistent links for patients, you can enter them in the Patient Access fields
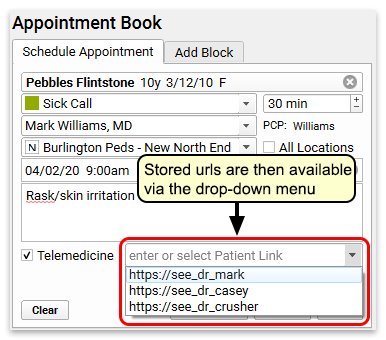
Your practice can then quickly select a link when they schedule or edit appointments.
If you have a persistent link for provider access, you can enter it in the Provider Access field.
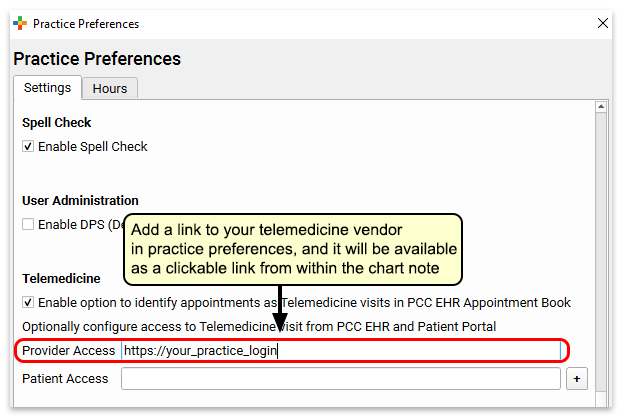
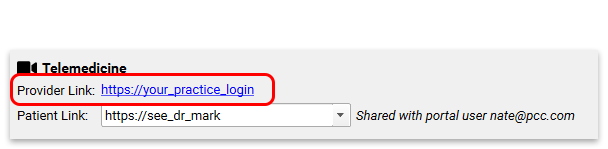
Both the provider and patient links will appear at the top of the chart note protocol for a telemedicine visit.
Add New Visit Statuses to Help Manage Telemedicine Visits
The Visit Status on the Schedule screen (and the Visit Status counters in the lower-right corner of your screen) help your practice track what’s going on with all of today’s encounters.
Your practice can create one or more custom Visit Statuses to help understand the status of telemedicine encounters.
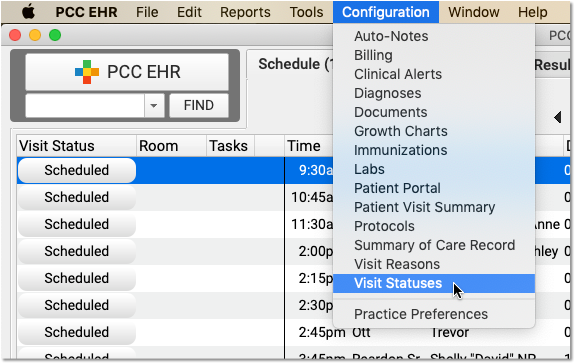
Open Visit Status Configuration from the Configuration menu and create one or more visit statuses for telemedicine.
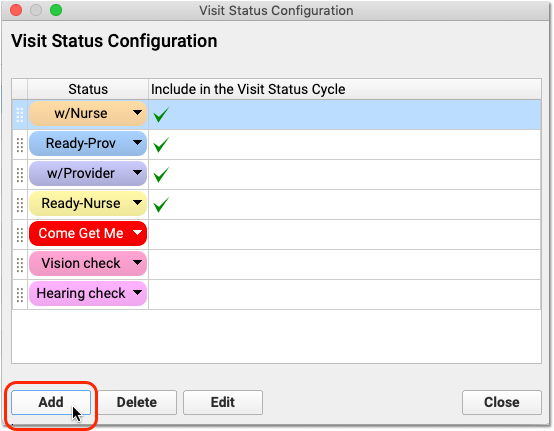
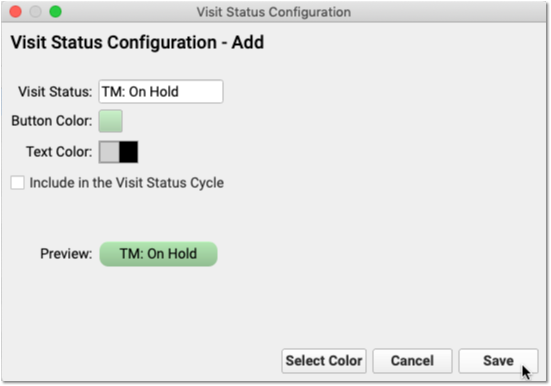
Your practice can use visit statuses so everyone at your practice can know who is on hold, who’s connected, and who is waiting for the provider to join the video chat.
Create a Telemedicine Visit Protocol
In PCC EHR, you can create and customize chart note protocols for different visit types. PCC recommends you create a “Telemedicine Sick” protocol, along with other telemedicine-based protocols you expect to schedule. You can then have that protocol appear automatically for Telemedicine visits.
You can include any typical component in your chart note protocol, and you may want to create custom components or new orders that relate specifically to the types of services that will occur as a result of a telemedicine visit.
To learn how to create and customize a Telemedicine protocol, and find out what other pediatricians are making, read Create a Telemedicine Chart Note Protocol.
Add Telemedicine Procedure Codes and Prices to Your PCC System
Before you can code and bill for telemedicine procedures, you need to add those procedures to your PCC system, along with codes and your practice’s prices.
Create a Telemedicine Procedure Group
If you create a telehealth or telemedicine procedure group, you can easily report on telemedicine A/R and income. You should perform this step first so you can select the group when you create new procedures.
Open the Tables Tool and Select Procedure Groups
Open the Tables tool from the Configuration menu. Then select the Procedure Groups table.
Click “Add”
Enter Procedure Group Information
Give the new procedure group a name and an abbreviation, determine the order it should appear on screen, and indicate “Yes” to display totals for the new group in PCC reports.
Save the New Procedure Group
For more help in setting up new procedure groups, contact PCC Support.
Add Telemedicine Procedures, Codes, and Prices
Next, add new telemedicine procedures to your PCC system. Include codes (with modifiers, if appropriate) and prices.
What procedures are currently in use? Your practice may need to consult with insurance payers to understand how to code for telemedicine procedures. You should refer to your CPT manual for up-to-date coding information.
During the pandemic, PCC published a Guide to COVID-19 Billing Codes, which includes descriptions of different types of telemedicine visits and how to code for them. PCC also created a Telemedicine Timing reference sheet.
Other Examples:
-
Telephone Service Codes: Use the time-based 99441-99443 for Telephone E&M performed by a MD, DO, NP, or PA. Use 98966-98968 for A&M performed by a RN or MA.
-
Realtime Audio/Video Visit Codes: Use 99211-95 through 99215-95 for live or “synchronous” telemedicine services with realtime audio and video. Note that some payers use a -GT modifier instead of -95 for asynchronous communication (sending and receiving video messages).
As always, these codes are provided only as examples and are not recommendations. Refer to the AMA’s CPT guide to select the correct codes.
Read Edit Your Practices Codes and Prices to learn how to add new billing procedures to your PCC system.
Update Your Electronic Encounter Form w/ Telemedicine Billing Codes
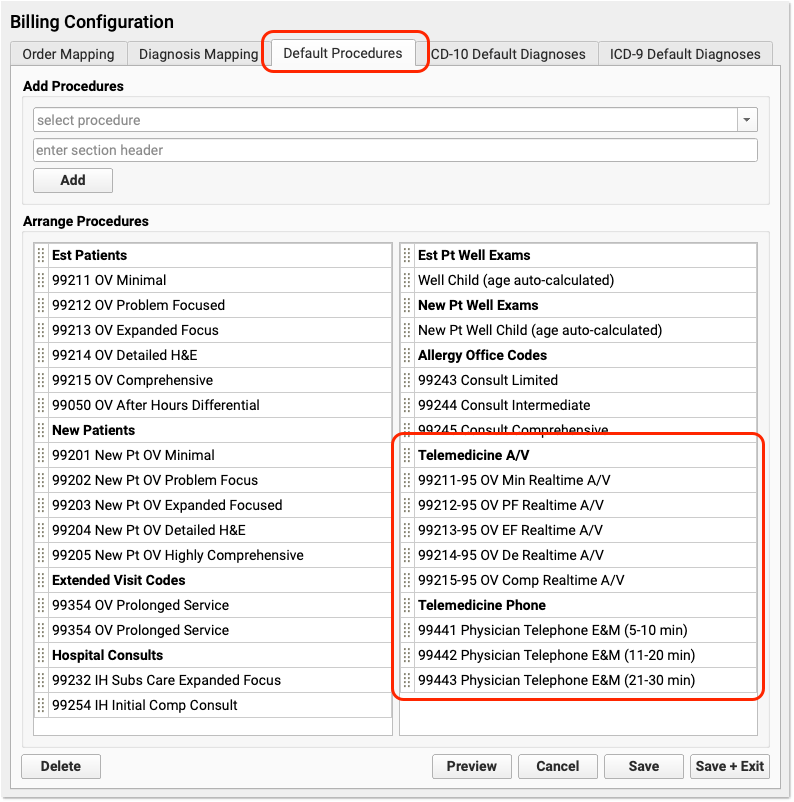
When your clinician is ready to make a visit “Ready for Billing”, they’ll need the right visit codes easily available for a telemedicine visit.
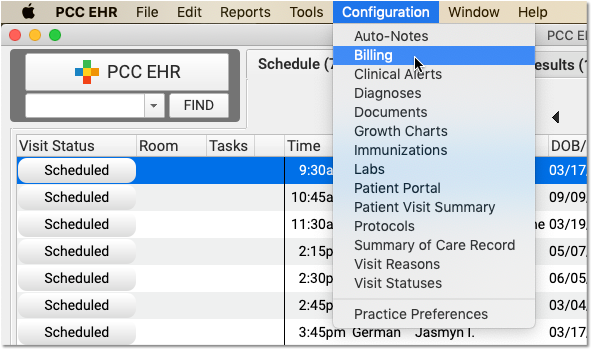
Open Billing Configuration under the Configuration menu and add procedures (and optionally diagnoses) to your practice’s Electronic Encounter Form.
Configure Your Practice’s Telemedicine Places of Service
When you submit a claim for a telemedicine encounter, you need to include a different Place of Service code than for a standard office visit. For example, an “in-office” visit appears on claims with a place of service code of 11, and telemedicine encounters typically need an 02 or a 10.
In PCC EHR, you can schedule all of a provider’s time in your real-world, office locations. You can configure your system with additional telemedicine places of service and automatically select them when billing for telemedicine encounters. When needed, your biller can change the place of service as they post charges or later in the patient’s Billing History.
Which POS Codes Are Used for Telemedicine Encounters?
CMS defines these two telemedicine place of service (POS) codes:
- POS 02: Telehealth Provided Other than in Patient’s Home
Descriptor: The location where health services and health related services are provided or received, through telecommunication technology. Patient is not located in their home when receiving health services or health related services through telecommunication technology.
- POS 10: Telehealth Provided in Patient’s Home
Descriptor: The location where health services and health related services are provided or received through telecommunication technology. Patient is located in their home (which is a location other than a hospital or other facility where the patient receives care in a private residence) when receiving health services or health related services through telecommunication technology.
For more details, you can review the full CMS Place of Service Code Set.
Create Telemedicine Places of Service for Your Physical Locations
To ensure that the correct location codes appear on your claims, your practice should schedule telemedicine encounters to a telemedicine location. Contact PCC Support for help setting up places of service on your PCC system.
For example, PCC Support can create a “Main Office Telehealth (Home)” place of service with the POS 10 code for claims. If you perform telemedicine encounters when the patient is at another medical facility, PCC Support can create another location for POS 02 encounters.
As with other claim requirements, check with your carriers to determine billing requirements. For example, some payers may require an 11, 10, or 02 place of service code for telemedicine visits, depending on circumstances. PCC can also help you configure schedules so the correct place of service always appear on every claims.
Set Default Billing Places of Service for Telemedicine Encounters
When you schedule a telemedicine visit, use your real-world physical office location in the Appointment Book. Then your doctors can see their whole schedule, and your practice can see what’s happening that day at a glance.
When it’s time to bill, as noted above, payers typically require a special telemedicine place of service on the claim. It’s cumbersome to manually switch the place service each time you post telemedicine visit charges. To make posting easier, you can set a default billing place of service for telemedicine encounters for each of your scheduling locations. Follow the procedure below to learn how.
Open Practice Preferences
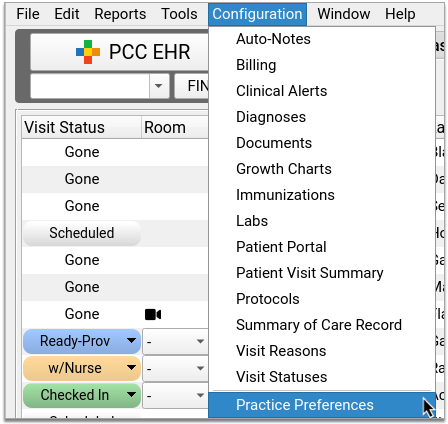
Click on the Configuration menu and select “Practice Preferences”.
Find Telemedicine Place of Service Mapping
Scroll down the page until you find Telemedicine Place of Service Mapping.
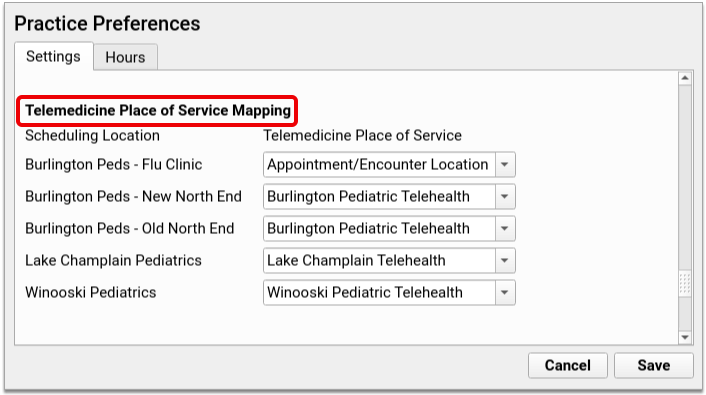
Link Your Scheduling Locations to a Telemedicine Place of Service
Open the Telemedicine Place of Service drop-down next to each of your Scheduling Locations. For each location, pick a default billing place of service for telemedicine visits.
If you don’t want to bill telemedicine visits using a special place of service, use “Appointment/Encounter Location” as the Telemedicine Place of Service default.
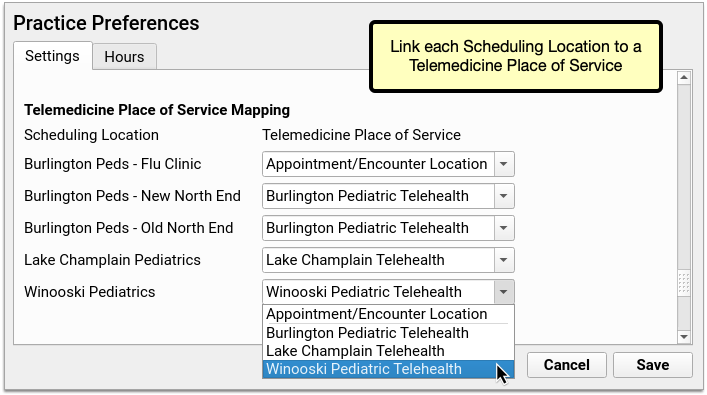
The drop-down will show you all of the places of service in your PCC system configured with a HIPAA claim code of either “02” or “10”, which are telemedicine place of service codes.
Log Out and Back In
Log out and back into PCC EHR to load the new settings.
Post Telemedicine Visit Charges in PCC EHR
When you post telemedicine visit charges in PCC EHR, the billing place of service will default to the Telemedicine Place of Service you set in Practice Preferences for that scheduling location.
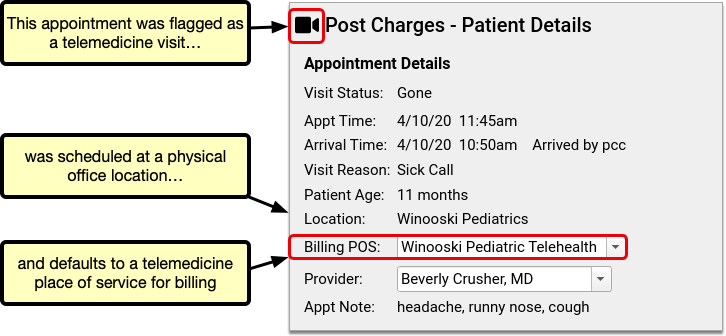
Use the Billing POS drop-down if you need to change the billing place of service on the fly for a particular visit.
If you encounter a billing problem with a telemedicine encounter, you can also change the place of service later and queue up a new claim using the Edit Charges feature of the Billing History in the patient’s chart.