Add and Configure a New Clinician in your PCC System
When you add a new clinician to your practice, use the procedures below to ensure that all PCC functions will work correctly.
Let PCC Know: Parts of this process require PCC Support to make changes to your system. Let us know that you’re planning to add a new clinician so we can make the necessary accommodations. Contact PCC Support at 1-800-722-7708 or support@pcc.com.
Contents
- 1 Enroll the Clinician with Insurance Payers
- 2 Provide Training Materials
- 3 Add a New User Account
- 4 Add a Provider Group
- 5 Add the New Clinician to the Provider Table
- 6 Create Claim Holds
- 7 Configure the Clinician’s Prescribing Role
- 8 Contact PCC Support
- 9 Configure Your New Clinician’s Schedule
- 10 Customize Chart Note Protocols
- 11 Set Up Auto-Notes and Snap Text
- 12 Set a pocketPCC Security Question
- 13 Optional: Add the Clinician to Chat Groups
- 14 Optional: Set a Portal Display Name
- 15 Optional: Sign in to PCC Email
- 16 Optional: Authorize Work from Home Access
- 17 Optional: Upload a Signature
- 18 Optional: Update Notify
- 19 Optional: Sign Up for PCC Community and PCC News
- 20 Optional: Create a Login for the PCC Support Portal
Enroll the Clinician with Insurance Payers
Contact your payers and enroll your new clinician. This is sometimes called “credentialing” a provider with the payer, or taking steps so that they are “participating” with the payer.
You will not be able to submit claims until the new clinician is enrolled.
Provide Training Materials
It’s never too early to start training your new clinician. Use PCC’s full New User Training for Clinicians outline, or customize it to suit your needs.
Add a New User Account
Add the individual to your PCC system in User Administration. Use PCC’s Add a New PCC User Account to create a user account.
When re-enabling a user, make sure their EHR and Practice Management usernames are the same.
Adding a Non-Clinical User?: Create the user account and select an appropriate role using the instructions outlined here: Add a New PCC User Account.
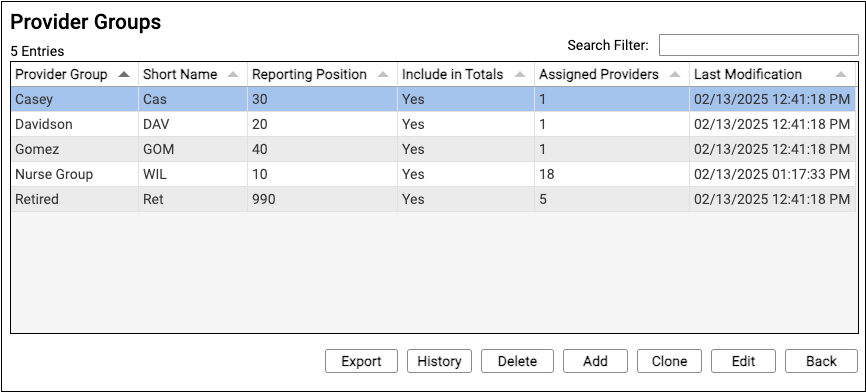
Add a Provider Group
Provider groups are used for reporting purposes. In most situations, you should create a new group for each new clinician.
Your office may have special reporting considerations for nurse practitioners, medical assistants, and other clinicians. You can set up individual groups, or a single, “Nurse” group depending on your needs.
Use the Tables tool in PCC EHR to edit your practice’s Provider Groups table.
For help with the Tables tool, see Edit Your Practice’s Configuration Tables.
Add the New Clinician to the Provider Table
After you’ve created a new provider group, you can add the new clinician to your tables and assign them to the group. Follow the procedure below to learn how.
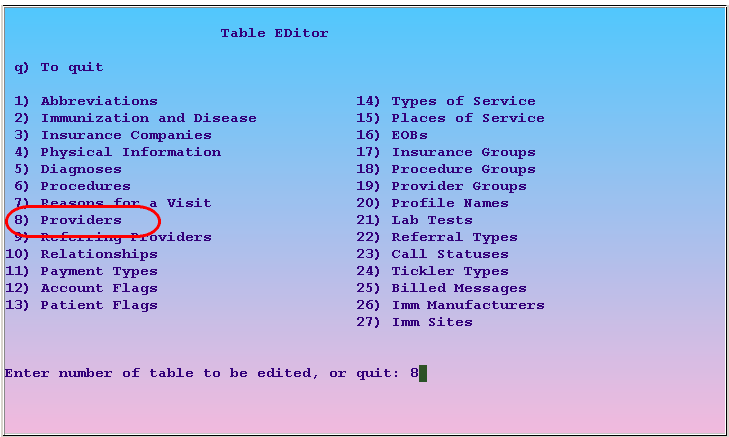
Open the Providers Table
From the list of tables in the Table Editor, found in your Practice Management window, select table #8, Providers.
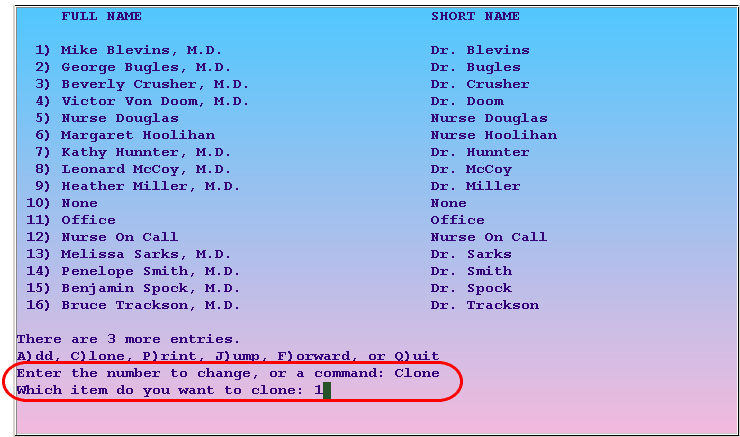
Add or Clone an Existing Provider
Press A or C to add or clone an entry, enter the number of an equivelant clinician at your practice, and press Enter.
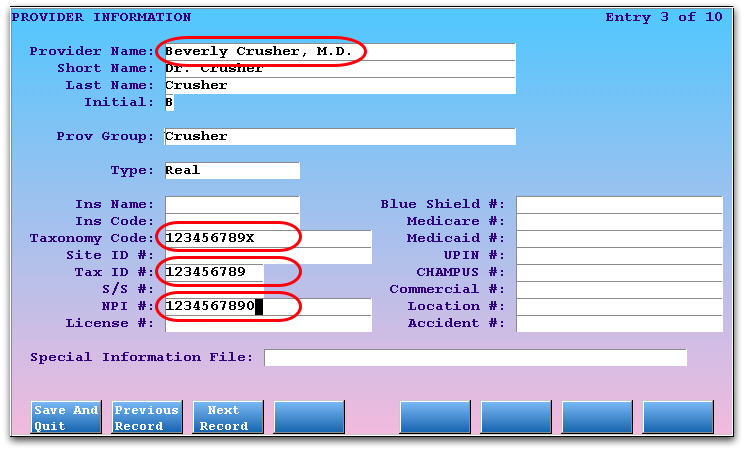
Edit Names, ID#s, and Additional Clinician Information
Fill out the fields for your new clinician. Pay special attention to fields used for claim submission and reporting, as described below.
-
Provider Group: The “Provider Group” field should match the group you created in the procedure above, or another existing group.
-
Type: By default, clinicians have a Type of “Real”. If you are adding a PA or another clinician that sees patients but is not used on the claim, you can set the Type to “Not Real.” When the biller posts charges for that clinician, PCC EHR will ask them to manually select a Billing Provider.
-
Initial: Be sure and select a unique “Initial” for your provider. If you have more than 26 providers, you can use upper and lower case letters.
-
Required ID Fields for Claim Submission: The Clinician’s Tax ID, NPI, and Taxonomy Code are required for claim submission.
-
Taxonomy Code: When you enter a taxonomy code, you can use an asterisk (*) to search and select from a list. The taxonomy code for a pediatrician (208000000X) includes a run of six zeroes, which is easy to enter incorrectly.
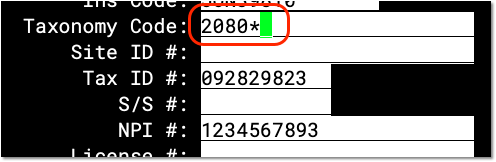

When you are finished, press F1 – Save and Quit.
Add the Clinician’s PCC EHR Username to the Provider Entry
Enter the clinician’s PCC EHR user information into the “EHR User” field.
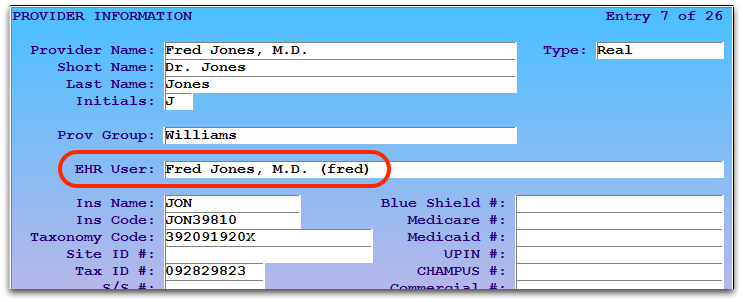
To get the most accurate entry, type a few letters of the clinician’s EHR username, then type “*” and press “Tab”. The closest EHR username match will automatically populate in the EHR User field.
Log Out and Log Back In
Log out of PCC EHR and close the login window. Log back in to sync your provider’s new information.
Create Claim Holds
If a clinician is not yet credentialed with payers, you can create claim holds to prevent certain claims from being submitted. A claim hold prevents claims from going out for specific dates of service, billing providers, places of service, and insurance plans.
Read Hold Claims to learn more.
Configure the Clinician’s Prescribing Role
Define the clinician’s PCC eRx prescribing role and permissions in the User Administration tool. To learn how, read Set Up PCC eRx User Access.
If the clinician will be prescribing controlled substances, review EPCS: How to Enroll Prescribers and Prescribe. The clinician’s NPI and DEA must be present in User Administration to order a fob.
Contact PCC Support
If you have not done so already, now is a good time to let PCC know that your practice is adding a clinician. Contact PCC Support (802-846-8177 or 800-722-7708, support@pcc.com) so that we can update your notification messages, assist with special claim configurations, adjust provider scheduling groups, and facilitate eRx EPCS setup.
Configure Your New Clinician’s Schedule
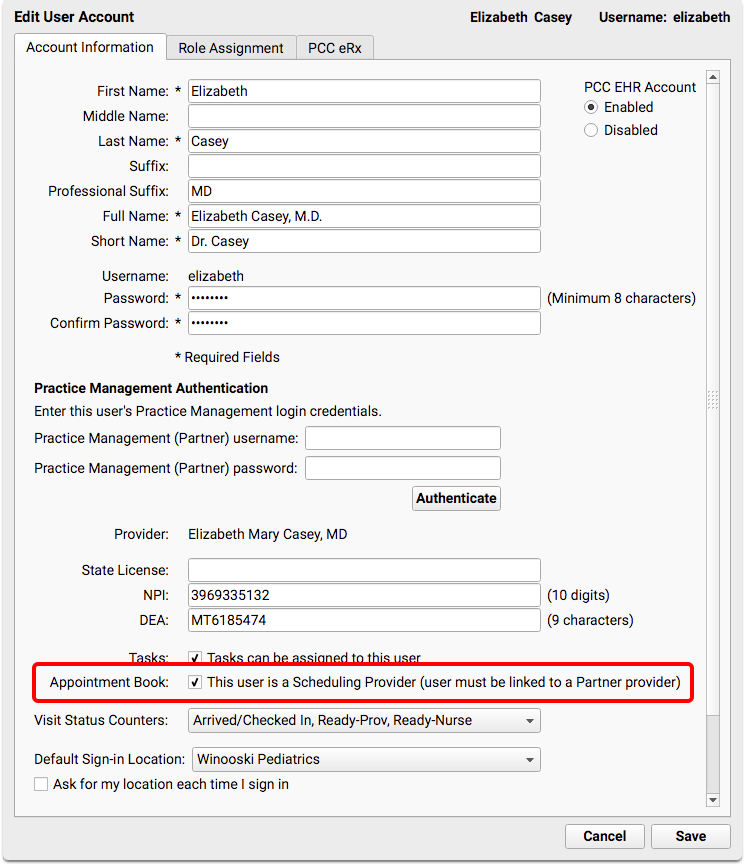
Allow Scheduling in User Administration
Indicate that your new clinician can be scheduled for appointments.
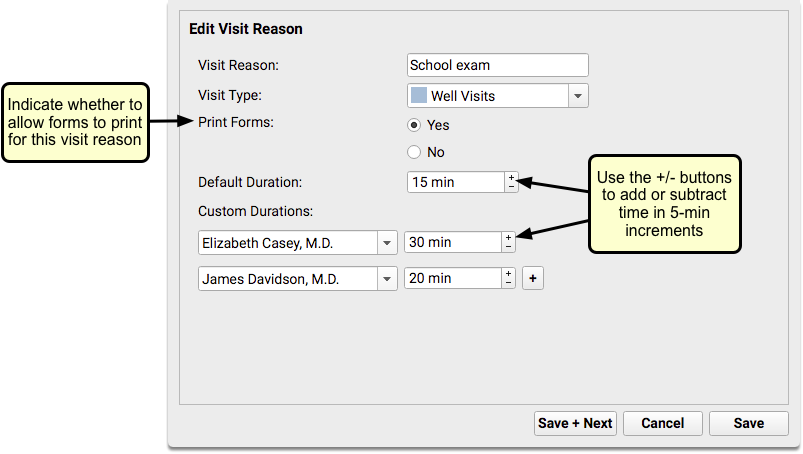
Configure Visit Reason Lengths
Enter default visit reason lengths for the new clinician in the Visit Reason configuration tool.
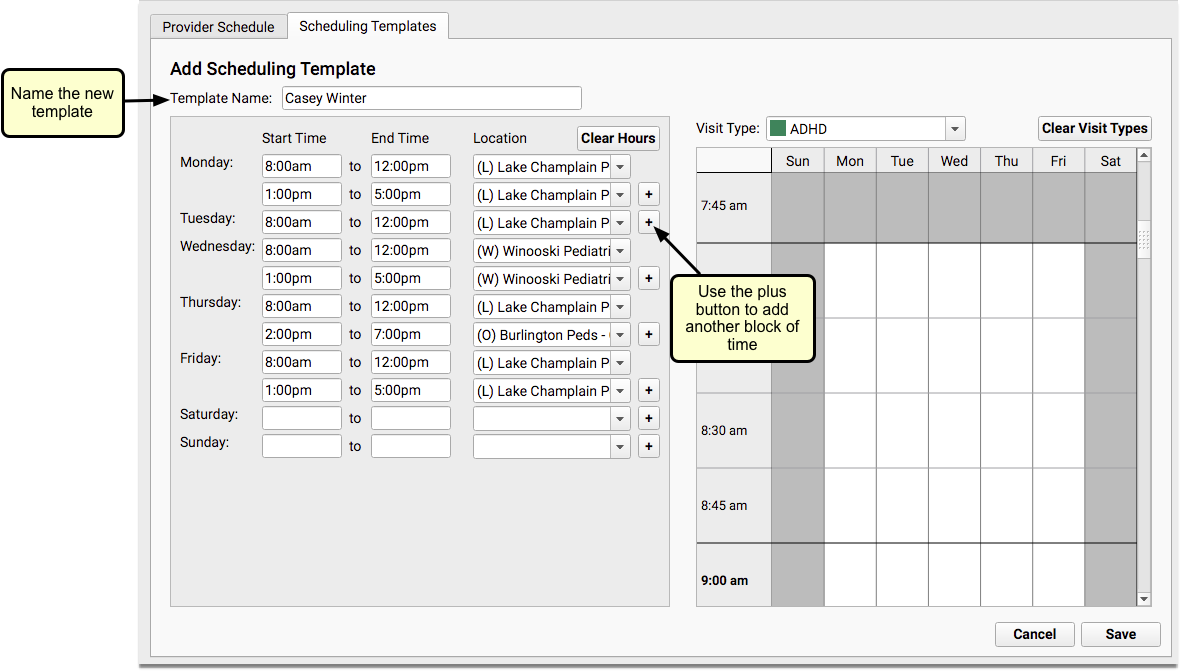
Create a Scheduling Template
Create at least one Scheduling Template for the new clinician in the Provider Hours tool.
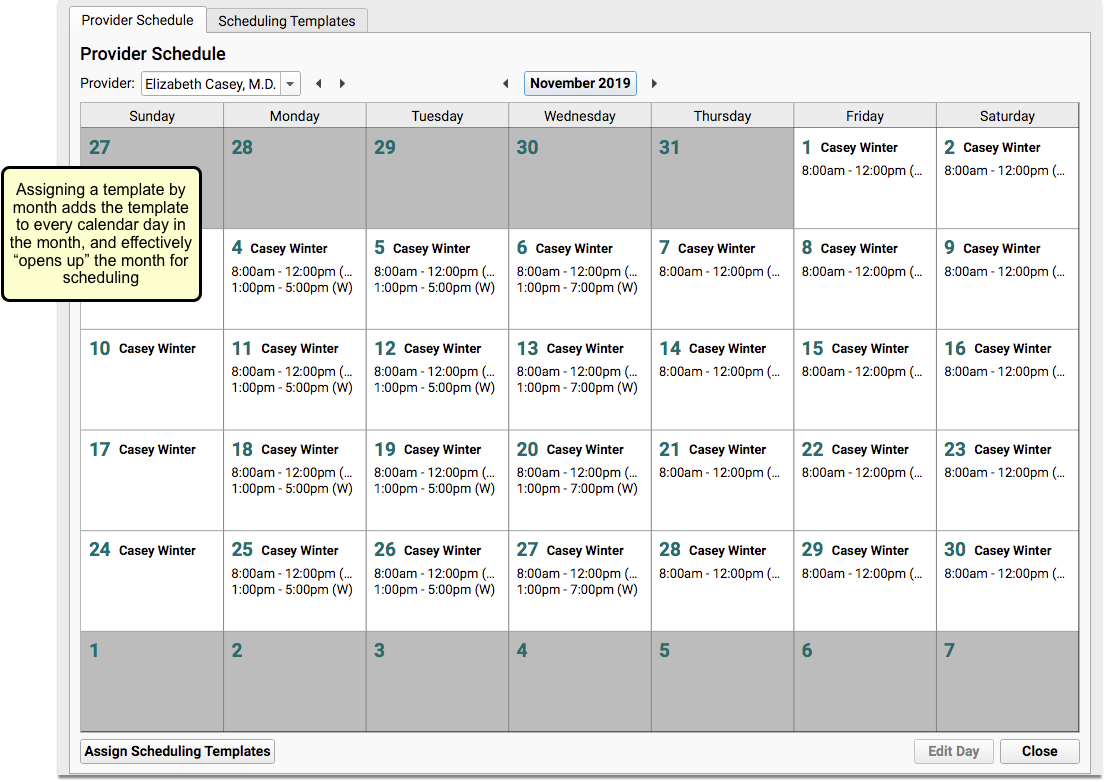
Assign a Scheduling Template
Assign your new clinician’s scheduling template in the Provider Hours tool.
Log Out and Back In
Log all the way out, then reopen PCC EHR to pick up the new information.
To learn more about how to configure these features, visit Appointment Book Configuration.
New Clinician Not Displaying on the Schedule?: To troubleshoot, check the following: 1. Is the provider present in the Providers table, with their EHR User populated? 2. Is the Scheduling Provider checkbox in User Administration checked? 3. Does the provider have hours in their schedule template? 4. Have you logged all the way out and back in, closing and reopening the login window? Contact PCC Support for assistance.
Customize Chart Note Protocols
Use PCC EHR’s Protocol Configuration tool to assign existing protocols, and/or duplicate and customize protocols for different visit reasons.
Visit Configure Chart Notes and PCC EHR Components to learn more.
Set Up Auto-Notes and Snap Text
Clinicians can create their own entires for frequently-typed notes.
Read Insert Standard Text in a Chart Note Field, and Expand Short Text into Common Phrases to find out more.
Set a pocketPCC Security Question
Your new clinician can use the My Account tool to review and adjust their pocketPCC security question. They will need your practice’s pocketPCC login URL to access pocketPCC.
For more information, read Get Started in pocketPCC
Optional: Add the Clinician to Chat Groups
Use the Chat Groups tab in User Administration to add your new clinician to relevant existing chat groups, or create new groups. To find out more, read Chat with Groups of Users
Optional: Set a Portal Display Name
In the new clinician’s User Administration entry, select the name that will display in the portal for your new clinician.
Optional: Sign in to PCC Email
Clinicians can access their PCC-provided email service using the steps in this article: Read Your PCC Email with Roundcube.
Optional: Authorize Work from Home Access
Practices can give remote access to clinicians with the User Administration tool. For more information, read Authorize Users for PCC SecureConnect.
Optional: Upload a Signature
Clinicians who want an electronic signature on file can upload their signature image in the Forms tool. Signatures should be written using a black pen on white unlined paper and scanned at a high resolution. Learn more here: Configure Provider Signatures for Patient Forms.
Optional: Update Notify
If your practice uses Notify to automatically remind patients and families of upcoming appointments, your providers’ names can be included in those messages. To ensure that Notify runs smoothly and correctly identifies your new clinician, contact PCC support in advance of the clinician’s start date to provide the new clinician’s name and a phonetic spelling of the name.
Optional: Sign Up for PCC Community and PCC News
When there are important service updates, PCC reaches out to someone at your practice by calling or e-mailing as well as by posting on PCC Community.
Your new clinician can sign up to follow important PCC news announcements and connect with other practices that use PCC’s software and services through the PCC Community site: https://community.pcc.com/
PCC Community is a Great Place to Get Answers: In addition to providing notifications from PCC, PCC Community also includes PCC Talk, an online forum where pediatric practices ask questions and help one another with issues facing their practice. For more information, watch the Get Started with PCC Community and PCC Talk video.
Optional: Create a Login for the PCC Support Portal
Your clinician can ask questions and review their tickets at https://support.pcc.com