Print Lab Specimen Labels
You can easily print specimen labels for labs that are configured for specimen collection.
Video: Watch Print Lab Specimen Labels to see this feature in action.
Find the Patient’s Open Lab Orders
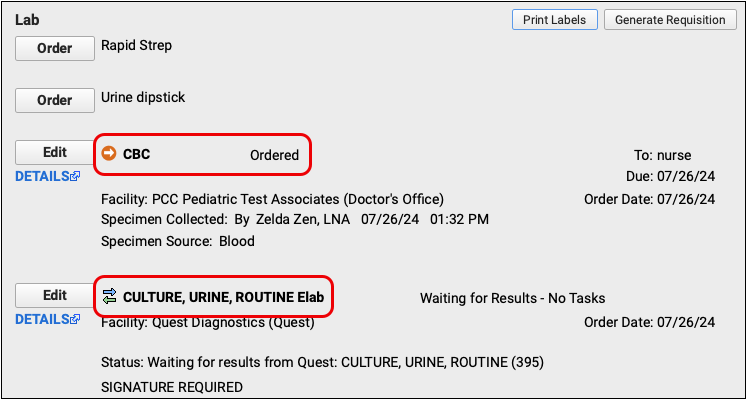
Open the patient’s encounter and find their open lab orders.

Click “Print Labels”
Click the “Print Labels” button to create labels for all lab orders in the encounter that require specimen collection.

Preview the Labels
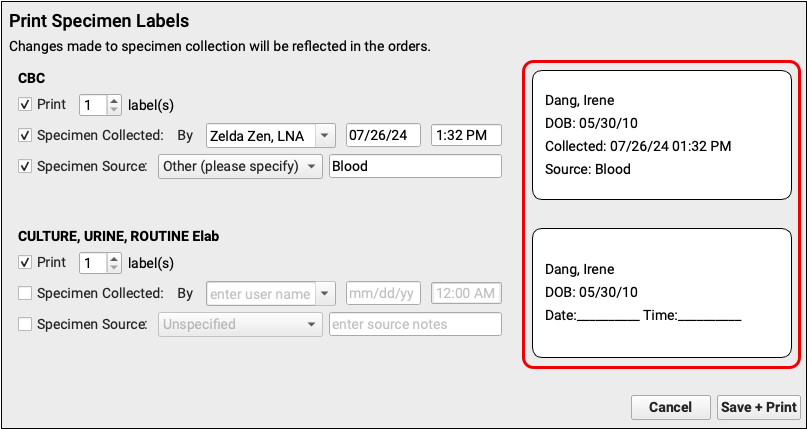
Use the label previews to see which labels will print and how they will look. Use the options on the screen to adjust the format as necessary.

Labels Only Generate for Lab Orders that Require Specimen Collection: You can only print labels for lab orders that are configured to require specimen collection. To learn how to configure labs for specimen collection, read Step 3 of Create or Edit a Lab Order
Optionally Adjust the Number of Labels to Print
You can adjust the number of labels to print for each lab order.

To prevent a label from printing altogether, deselect the “Print” checkbox.
Optionally Adjust Specimen Collection and Source Information
Specimen collection details recorded for any given lab order appear on the corresponding label by default. You can optionally edit those details on the label preview screen.

To clear specimen collection details from the lab order and exclude them from the label, deselect the “Specimen Collected” and “Specimen Source” checkboxes. When no specimen collection details are recorded on the lab order or included on the label, PCC EHR leaves space to handwrite a collection date and time.

To record a custom specimen source or prompt someone to write one in by hand, select the “Specimen Source” checkbox and change the drop-down to “Other (please specify)”.

Changes to Specimen Collection and Source Reflect on Lab Orders: If you edit the specimen collection and source details on the Print Labels screen, the changes save to the lab orders in the patient’s encounter as soon as you click “Save + Print”.
Print the Labels
Click the “Save + Print” button to print the labels.

PCC EHR automatically searches for a printer that is set up to print 2-1/8” x 1” labels or similar. Confirm that the correct printer is selected and that the orientation is set to landscape, then click the “Print” button to finish printing the labels.
Compatible Printers and Labels
PCC has tested this functionality with DYMO 450 and 550 label printers and 30336 (2-1/8” x 1”) and 30252 (3-1/2″ x 1-1/8″) labels.
Other printers and label sizes may work.
To learn more about which equipment is compatible with your PCC system, read Hardware Guide: Your Personal Computer and Equipment.
