Manage Your EPCS Account, Tokens, and Password
After registering for electronic prescribing for controlled substances (EPCS), you can manage your EPCS account and authentication tokens in the Exostar Account Management tool. You can also reset your EPCS password with help from an eRx Administrator.
Contents
Open Exostar Account Management
Use the Exostar Account Management tool to add a new token to your EPCS account, remove or resync an existing token, or manage your backup phone number.
Open the Rx Queue
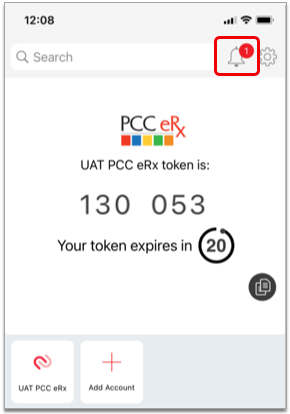
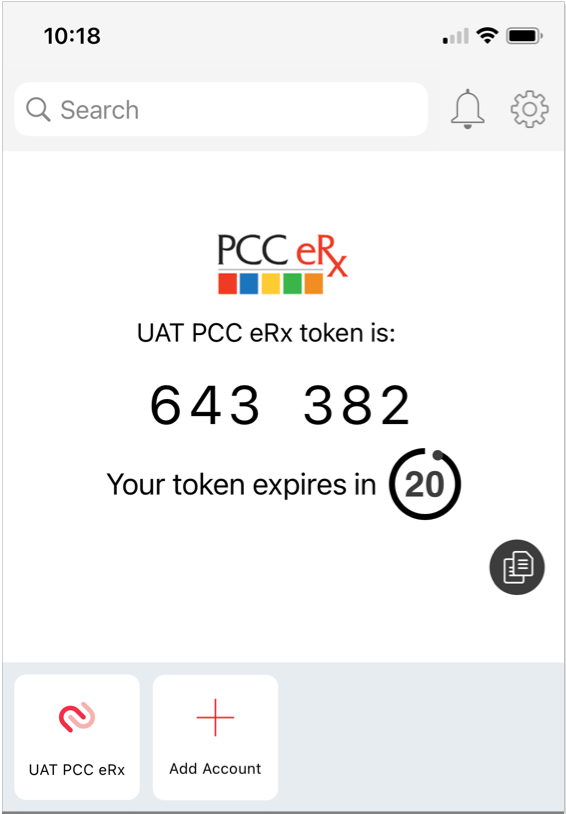
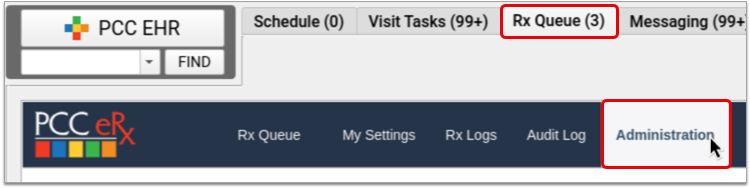
Click on the Rx Queue tab in PCC EHR to open PCC eRx.

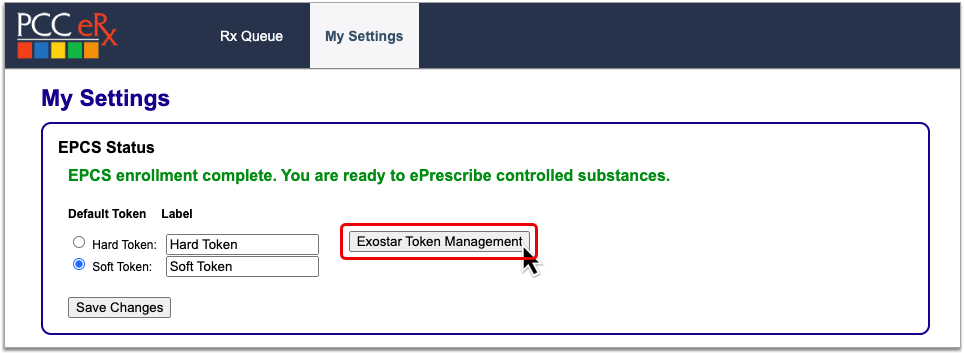
Go to My Settings
Click on the “My Settings” link in the top navigation bar to open your personal PCC eRx settings.

Open Exostar Account Management
Click on the “Exostar Account Management” button on the EPCS tab of the My Settings page to access your Exostar account details.
Read on to learn which actions you can take within Exostar Account Management.
Resync Your Hard Token
When PCC eRx stops accepting one-time passwords from your hard token, you can try resyncing it to restore your ability to use it as a factor of authentication for EPCS.
Grab Your Hard Token
Get your hard token in hand. You will need it to complete the resync.
Open Exostar Account Management
Click the “Exostar Account Management” button on the My Settings page in PCC eRx.
Resync Your Token
Find the Hardware Token (One-Time Password) card within your Exostar account settings and click the “Resync your token” link.

Enter Two One-Time Passwords from Your Hard Token
Press the button on your hard token to generate a one-time password, then enter it into the field labeled “One-time password 1”.
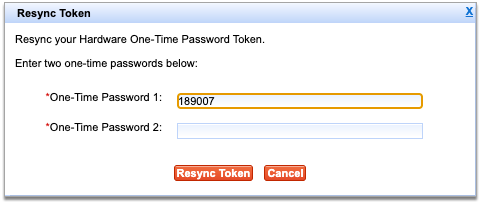
Press the button a second time to generate another password, then enter it into the field labeled “One-time password 2”.
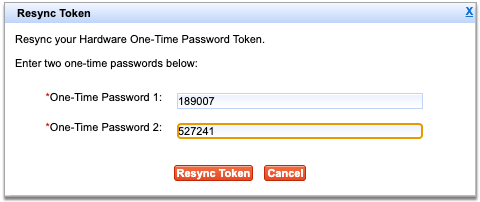
Both fields are required to resync your token.
Finish Resyncing Your Token
Click the “Next” button after entering both passwords to finish resyncing your token.
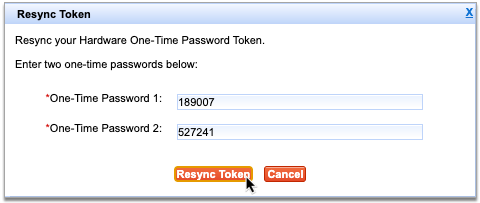
If you receive an error message, try again, double-checking that both passwords have been entered correctly.
After resyncing, try sending an electronic prescription for a controlled substance to see if it has been restored. If resyncing does not restore use of your hard token, contact PCC Support.
Remove a Lost or Broken Token
If you lose access to one of your tokens, deactivate and remove it from your EPCS account so that you can add back a functional replacement.
Open Exostar Account Management
Click the “Exostar Account Management” button on the My Settings page in PCC eRx.
Check That You Have a Backup Phone Number for Your Exostar Account
Check that you have a Phone-Based (One-Time Password) backup phone number connected to your Exostar account. If you do not, set one up now before moving on to the next step.
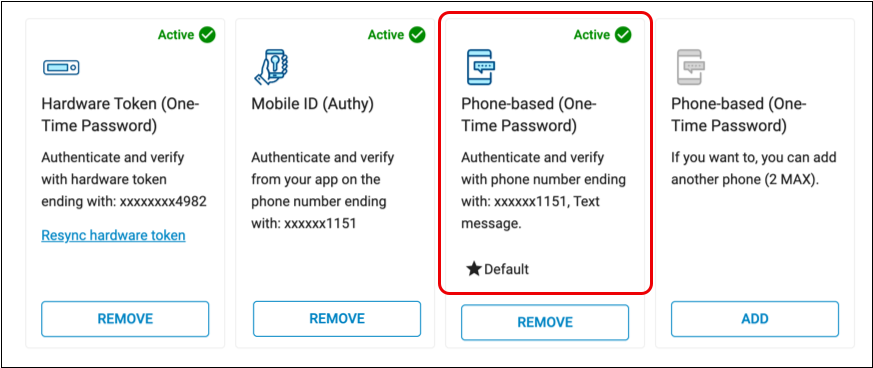
A backup phone number ensures continued access to your Exostar account if neither a hard nor soft token is accessible, functional, or connected to your account.
Click “Remove” on the Lost or Broken Token
Click the “Remove” button on the token you need to remove.

To remove your hard token, click “Remove” on the Hardware Token (One-Time Password) card. To remove your soft token, click “Remove” on the Mobile ID (Authy) card.
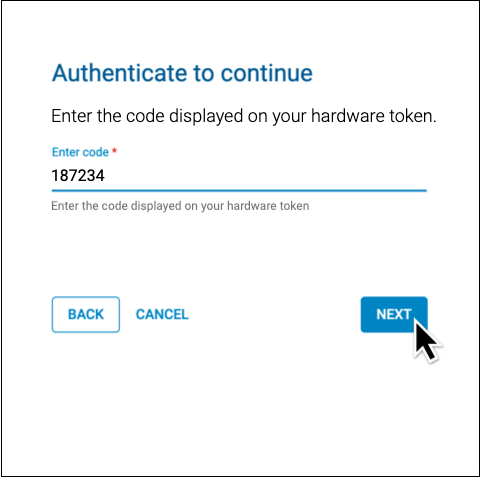
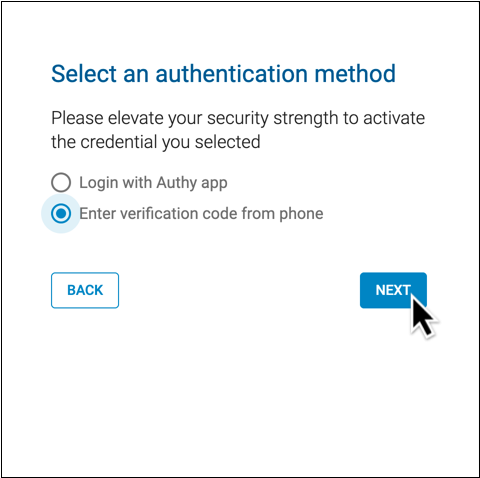
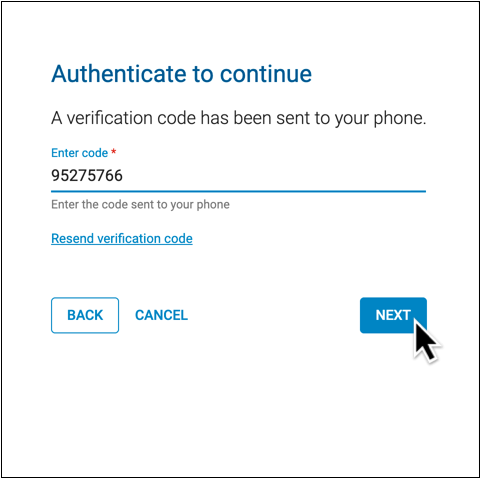
Authenticate Your Identity
Choose a method to authenticate your identity, then click “Next”.

Enter the code from the method you selected.
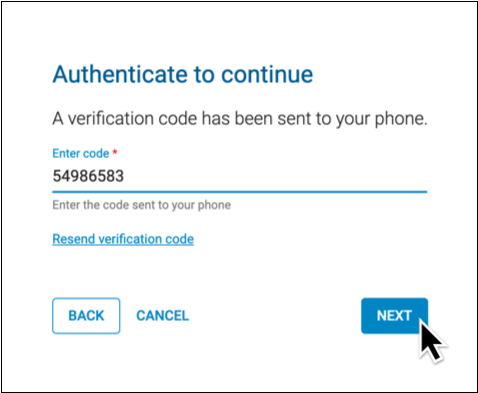
You can authenticate using a code generated by your hard token, your PCC eRx soft token in the Authy app, or with a code sent to your phone by call or text.
Not Prompted to Authenticate?: That’s okay! You only need to authenticate once per session while working in Exostar Account Management. You may not be prompted to authenticate if you already proved your identity while taking another action in Exostar Account Management.
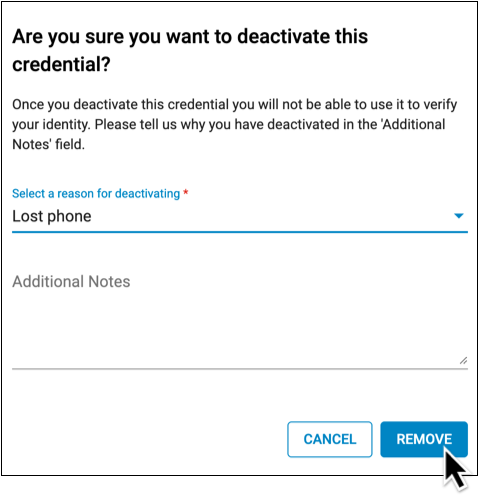
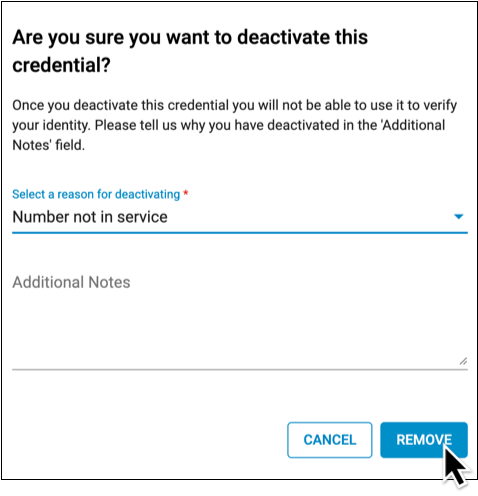
Record the Reason for Removing the Token
Document your reason for removing your token.

Click “Remove”
Click the “Remove” button to finish removing your token.
After you remove a token, you can add back a replacement for it.
Add a New or Replacement Token
You can use the Exostar Account Management tool to add a new or replacement token to your Exostar account. This is useful when you need to replace a lost or broken hard token, set up a soft token using a new cell phone number, or configure a soft token for the first time after having skipped that step in the EPCS registration process.
Add a New or Replacement Soft Token
Set up your smartphone as a factor of authentication for EPCS.
Grab Your Smartphone
Get your smartphone in hand. If you haven’t already, install the Authy app.
Open Exostar Account Management
Click the “Exostar Account Management” button on the My Settings page in PCC eRx.
Add or Activate a Mobile ID
Find the Mobile ID (Authy) card within your Exostar account settings.
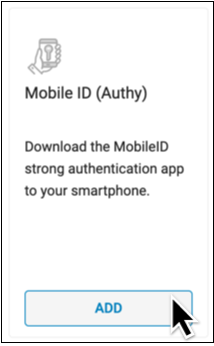
Click the button at the bottom of the card. It will say “Add” or “Activate” depending on the status of your Exostar account.
If the button says “Remove” you already have a soft token linked to your account. Follow the steps to remove your current token before proceeding any further.
Authenticate Your Identity
Choose a method to authenticate your identity, then click “Next”.
Enter the code from the method you selected.
You can authenticate using a code generated by your hard token, or with a code sent to your phone by call or text.
Not Prompted to Authenticate?: That’s okay! You only need to authenticate once per session while working in Exostar Account Management. You may not be prompted to authenticate if you already proved your identity while taking another action in Exostar Account Management.
Enter Your Phone Number and Email Address
Enter the phone number associated with your smartphone and the email address that you used to register for EPCS.
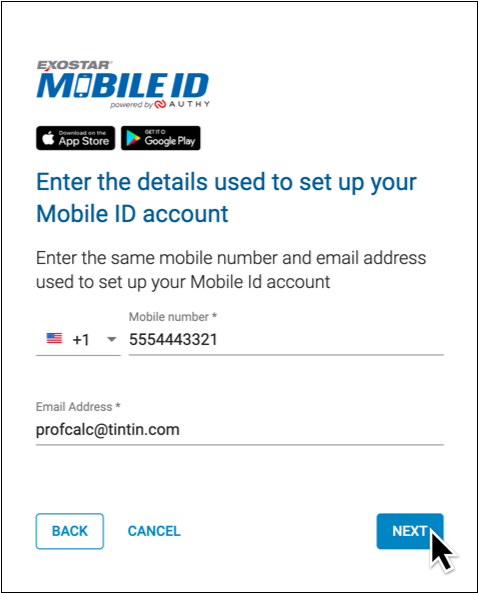
Click “Next” to proceed.
Tap the Authy Notification on Your Smartphone
Pick up your smartphone and tap the push notification from Authy to open the app.
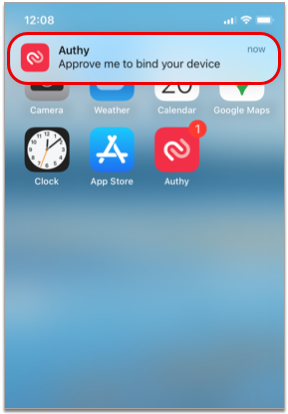
No Notification? Open the App Manually: If you have the Authy app installed but do not receive a push notification, open Authy manually instead by tapping the app icon on your home screen.
Don’t Have the Authy App? Download it Now: If you do not have the Authy app installed on your smartphone, you will receive a text message with a download link instead of a push notification. Open the text message, click on the link, and install the Authy app before moving on to the next step.
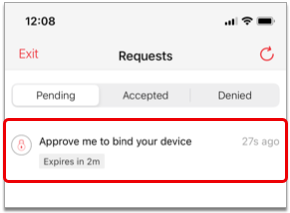
Tap the Notification Icon in the Authy App
Tap the notification bell icon in the Authy app.
The red counter on the notification bell indicates that you have a new request to add a token.
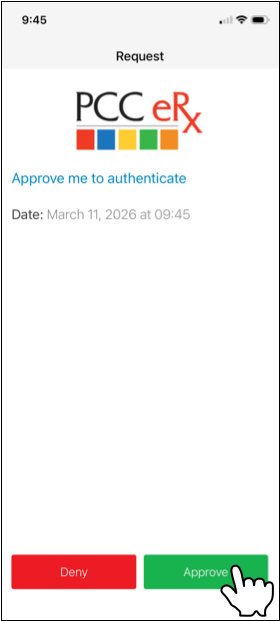
Approve the Pending Request
Tap the pending request from PCC eRx to approve it. Then, tap the green “Approve” button to confirm.
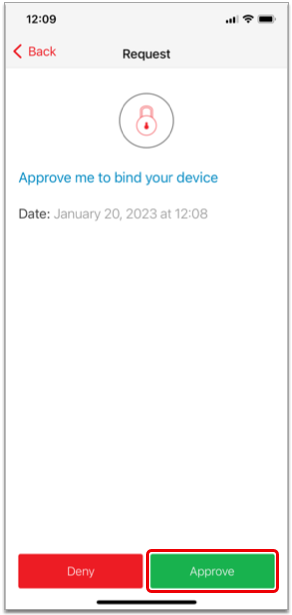
Once you approve the pending request, your smartphone becomes registered as a soft token for EPCS in PCC eRx.
Request Timeout: If the pending request from PCC eRx times out before you have a chance to approve it, tap “Exit” in the top left corner of your phone screen, click the “Verify with Mobile ID code” link in PCC eRx, then enter a one-time password from your smartphone to finish the registration process.
No Notification? Finish Set Up Manually: If the notification bell in the Authy app does not display a red counter but you can see the PCC eRx soft token on your screen, click the “Verify with Mobile ID code” link in
PCC eRx, then enter a one-time password from your smartphone to finish the registration process.
Once registered, your soft token is bound to your identity, phone number, and device. Only you may use it as a second factor of authentication when sending electronic prescriptions for controlled substances from PCC eRx.
Add a Replacement Hard Token
Add a hard token as a factor of authentication for EPCS. If you already have a hard token, try resyncing it before setting up a new one.
Order New Hard Tokens from PCC: If your practice needs to order new hard tokens, contact PCC Support. PCC orders hard tokens from Exostar at no cost to you. Once ordered, Exostar ships hard tokens directly to your practice, generally in less than two weeks.
Grab Your New Hard Token and Your Smartphone
Get your new hard token and your smartphone in hand.
You will need your hard token in order to register it as an authentication method for EPCS.
You will need your smartphone in order to authenticate that you are authorized to make changes to this account.
Open Exostar Account Management
Click the “Exostar Account Management” button on the My Settings page in PCC eRx.
Add a Hardware Token
Find the Hardware Token (One-Time Password) card within your Exostar account settings.

Click the “Add” button at the bottom of the card.
If the button says “Remove” you already have a hard token linked to your account. Follow the steps to remove your current token before proceeding any further.
Authenticate Your Identity
Choose a method to authenticate your identity, then click “Next”.
Enter the code from the method you selected.
You can authenticate using a code generated by your PCC eRx soft token in the Authy app, or with a code sent to your phone by call or text.
Not Prompted to Authenticate?: That’s okay! You only need to authenticate once per session while working in Exostar Account Management. You may not be prompted to authenticate if you already proved your identity while taking another action in Exostar Account Management.
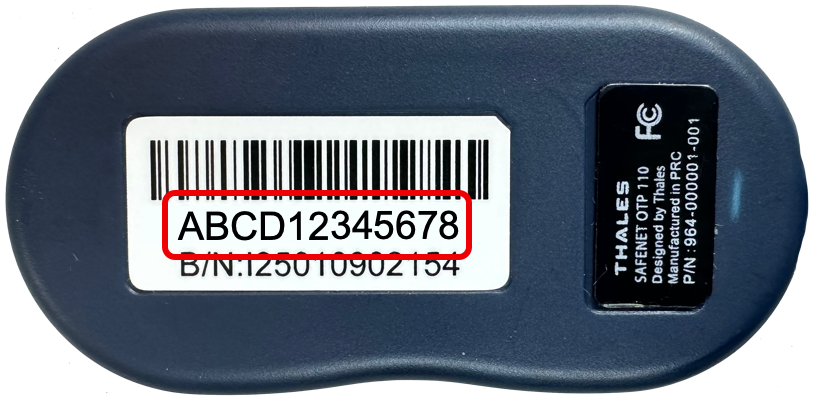
Enter Your Hard Token’s Serial Number
Enter the serial number from the back of your hard token into PCC eRx.
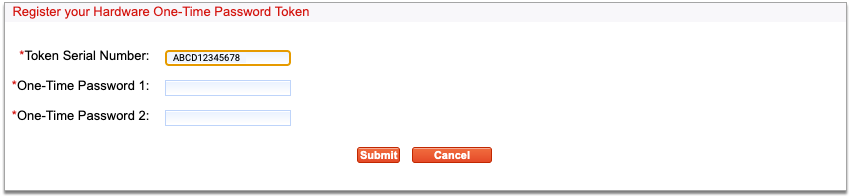
Enter Two One-Time Passwords from Your Hard Token
Press the button on your hard token to generate a one-time password, then enter it into the field labeled “One-Time Password 1”.
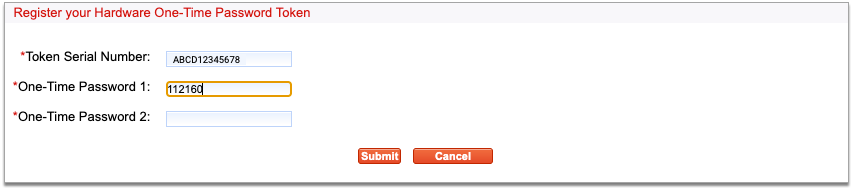
Press the button a second time to generate another password, then enter it into the field labeled “One-Time Password 2”.
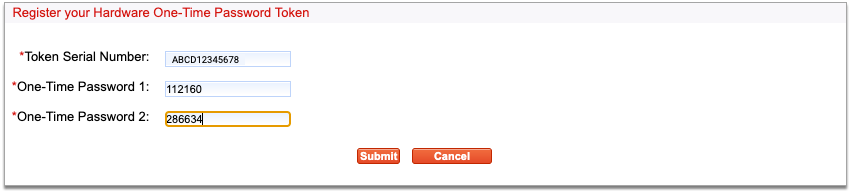
Both fields are required to add your token.
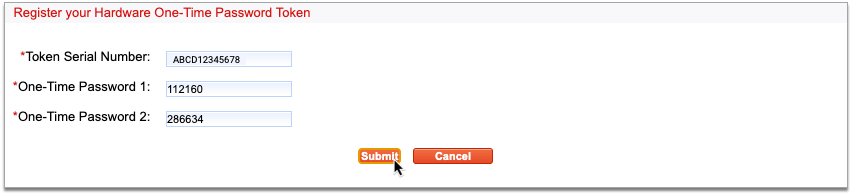
Click “Next”
Click the “Next” button to finish registering your hard token.
Once registered, your hard token is bound to your identity. Only you may use it to validate your identity when sending electronic prescriptions for controlled substances from PCC eRx.
Manage the Backup Phone Number for Your Exostar Account
You can set up a phone number as a backup authentication method for your Exostar account in case you lose access to both your hard and soft tokens. While you cannot use the backup phone number to send prescriptions for controlled substances, you can use it to authenticate in Exostar Account Management so that you can add new tokens back to your account and resume prescribing.
PCC recommends setting up at least one phone number when you register for EPCS, but you can update your backup phone number settings at any time in Exostar Account Management.
Add a Backup Phone Number
You can add one or several phone numbers as backup authentication methods for your Exostar account. You can use these phone numbers to authenticate and unlock the other actions in Exostar Account Management, which is especially useful if you lose access to both of your EPCS tokens and want to set up new ones without having to go through the Exostar identity proofing process a second time.
Open Exostar Account Management
Click the “Exostar Account Management” button on the My Settings page in PCC eRx.
Add a Backup Phone Number
Find the Phone-Based (One-Time Password) card within your Exostar account settings.

Click the “Add” button at the bottom of the card.
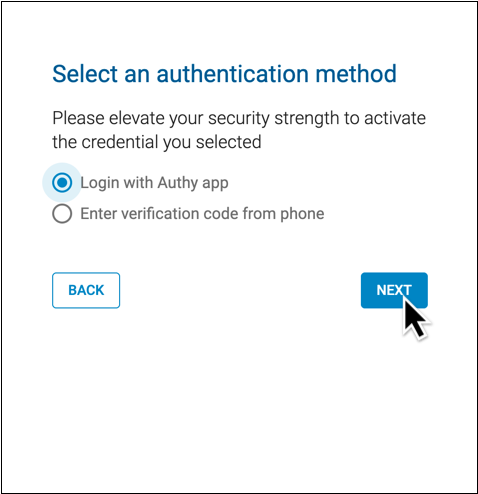
Authenticate Your Identity
Choose a method to authenticate your identity, then click “Next”.
Enter the code from the method you selected.
You can authenticate using a code generated by your hard token or your PCC eRx soft token in the Authy app. If you already have a backup phone number connected to your account, you can use that to authenticate, too.
Not Prompted to Authenticate?: That’s okay! You only need to authenticate once per session while working in Exostar Account Management. You may not be prompted to authenticate if you already proved your identity while taking another action in Exostar Account Management.
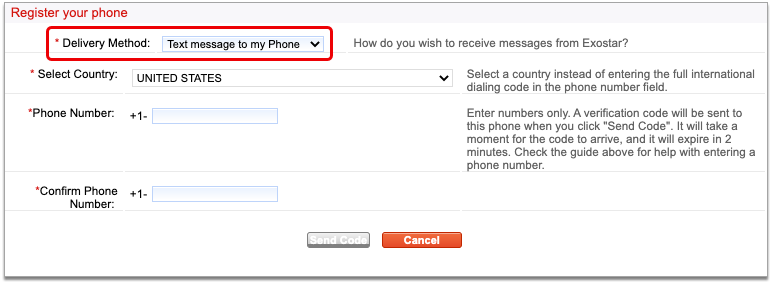
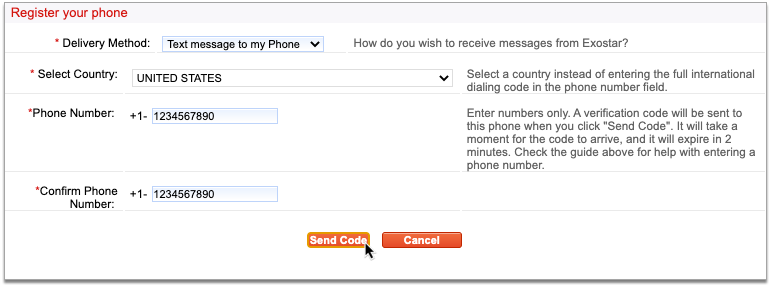
Enter Your Phone Number and Choose a Delivery Method
Enter your phone number and choose whether you would like to be contacted by voice or text.
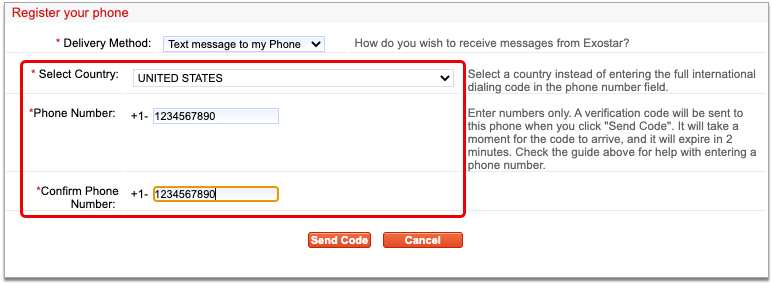
This phone number and delivery method will be used to receive verification codes from Exostar.
Click “Next” to proceed.
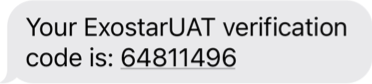
Receive the Verification Code from Exostar
Wait for a call or text from Exostar with your verification code.
Enter the Verification Code on Your Computer Screen
Type the verification code into the field on your computer screen.
Click “Next” to finish adding your backup phone number.
Resend Code: If you do not receive a code, check that you entered your phone number correctly. Once confirmed, click “Resend verification code” and wait to receive a different code. If you do not receive a code after a second attempt, contact PCC Support for assistance.
You can add up to three backup phone numbers to your Exostar account.
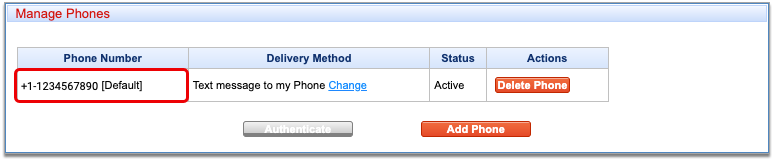
Remove a Backup Phone Number
You can remove old backup phone numbers from your EPCS account.
Open Exostar Account Management
Click the “Exostar Account Management” button on the My Settings page in PCC eRx.
Click “Remove” on the Phone Number to Delete
Click the “Remove” button on the Phone-based (One-Time Password) card that lists the phone number you would like to delete.
Authenticate Your Identity
Choose a method to authenticate your identity, then click “Next”.
Finish verifying your identity using your selected method.
You can authenticate using a code generated by your hard token, your PCC eRx soft token in the Authy app, or a valid backup phone number connected to your Exostar account.
Not Prompted to Authenticate?: That’s okay! You only need to authenticate once per session while working in Exostar Account Management. You may not be prompted to authenticate if you already proved your identity while taking another action in Exostar Account Management.
Select a Reason for Removal
Use the drop-down to select the reason you are removing your backup phone number.

Provide additional detail if desired.
Finish Removing the Number
Click the “Remove” button to finish deleting this backup phone number.
If you deleted the only backup phone number listed on your Exostar account, add a new one right away to ensure that you will be able to unlock your account settings in Exostar Account Management even if you lose access to both of your EPCS tokens.
Reset Your EPCS Password
If you lost or forgot your EPCS password, ask an eRx Administrator at your practice to help you reset it.
eRx Administrator Steps
First, an eRx Administrator resets the prescriber’s password.
Open PCC eRx Administration
On the Rx Queue tab in PCC EHR, click “Administration”.
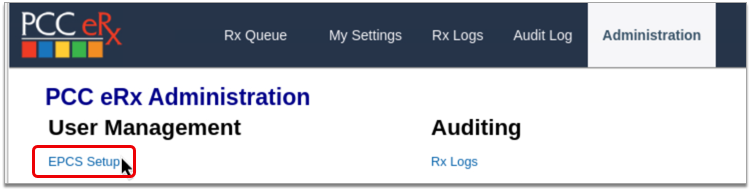
Open EPCS Setup
Click on the “EPCS Setup” link.
Find the Prescriber
Search for the prescriber by last name.

Edit the Prescriber
Click the “Edit” link on the prescriber’s account.
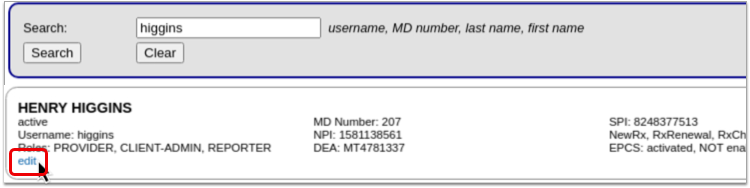
Reset the Prescriber’s Password
Click the “Reset EPCS Password” button.
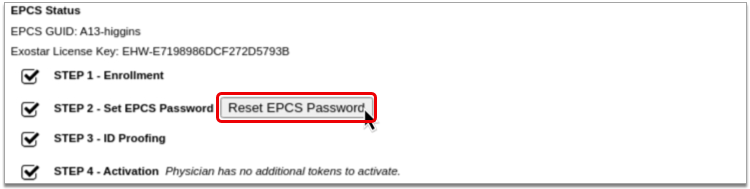
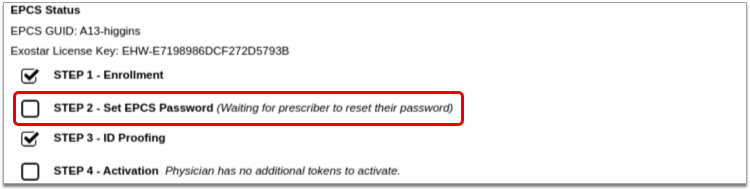
The screen updates with a message showing that the prescriber can reset their password.
Prescriber Steps
Next, the prescriber chooses a new password.
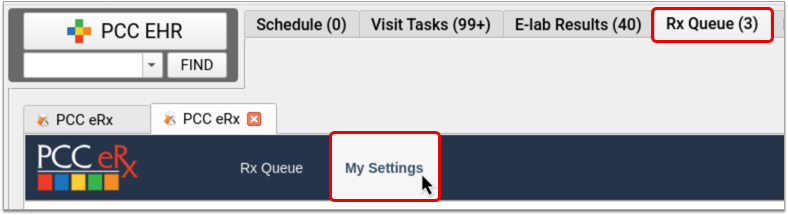
Open My Settings in PCC eRx
On the Rx Queue in PCC EHR, click “My Settings”.
Create a New EPCS Password
Click the “Set up my EPCS password” button, then create a new password that meets all of the criteria.

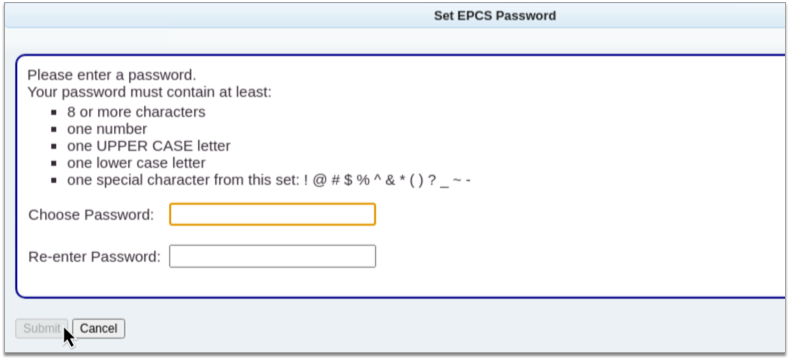
Click “Submit”
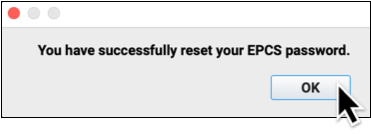
Click the “Submit” button to save your new password.

Never Revoke Your EPCS Account
Never Revoke Your Account: Never click the “Revoke OTP account and all credentials” button in Exostar Account Management. If you believe you might need to take that action, contact PCC Support first.