Schedule a Patient
Use the Appointment Book in PCC EHR to schedule appointments, review and make changes to providers’ schedules, and place scheduling blocks.
Watch a Video: You can learn how to schedule a patient by watching Schedule a Patient in the Appointment Book and Schedule for Providers Across Multiple Locations.
Contents
- 1 Schedule an Appointment
- 2 Open the Appointment Book
- 3 Review the Appointment Book, Provider’s Schedules, and Locations
- 4 Schedule Appointments: Use Visit Types and the Availability Finder
- 5 Schedule Siblings or Multiple Patients Simultaneously
- 6 Schedule a Telemedicine Appointment
- 7 Appointment Book Feature Reference
- 7.1 Open the Appointment Book Automatically
- 7.2 Scale the Appointment Book to See More of Your Day
- 7.3 Color-Code Your Schedule by Visit Type
- 7.4 Find Siblings When You Schedule
- 7.5 Smart Scheduling Features
- 7.6 Multiple Schedulers Can Work Simultaneously
- 7.7 Dynamic Use of Available Time Prevents Over-Booking
- 7.8 See Overbooked Time Slots At-A-Glance
- 7.9 See Patient and Account Alerts As You Schedule
- 8 Prevent Scheduling Using Patient and Account Flags
- 9 Remove or Cancel an Appointment
- 10 Reschedule an Appointment
- 11 Edit Appointment Details
- 12 Place a Scheduling Block
- 13 Review Appointment History
Schedule an Appointment
For a simple overview of scheduling in the Appointment Book, use the following steps.
Open the Appointment Book
Click on the Appointment Book icon to open the Appointment Book.

Find the Patient
Type the patient’s name, phone number, or other details into the Patient Name field to search for a patient.
If you’re looking for a recently accessed patient or their sibling, you can select their name from the drop-down list.
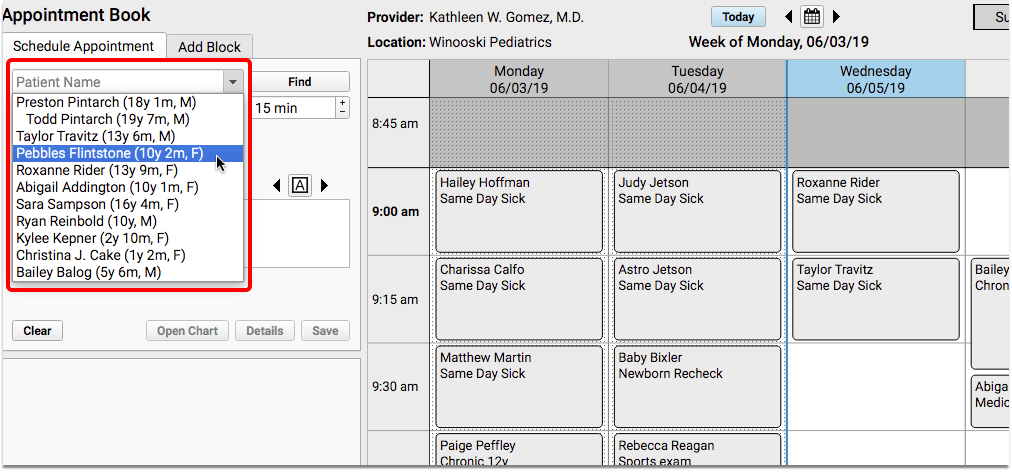
Siblings appear on the list for easy access. If you are scheduling for a patient who has never been to your practice before, you may need to add the patient and family account to your system.
Review and Update Patient Details
Click on the patient’s name to review basic information, such as recent vitals, gender identity details, and their primary care provider.
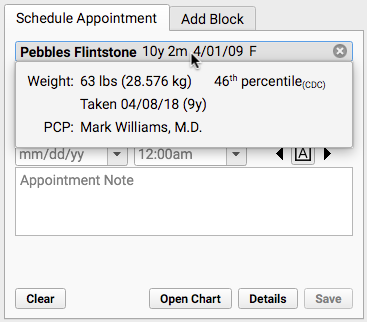
Depending on your practice’s configuration, the Patient Details window may open automatically when you find a patient. You can also click the “Details” button to open it. Use the customizable Patient Details ribbon to verify and update items in the patient’s chart as you schedule.
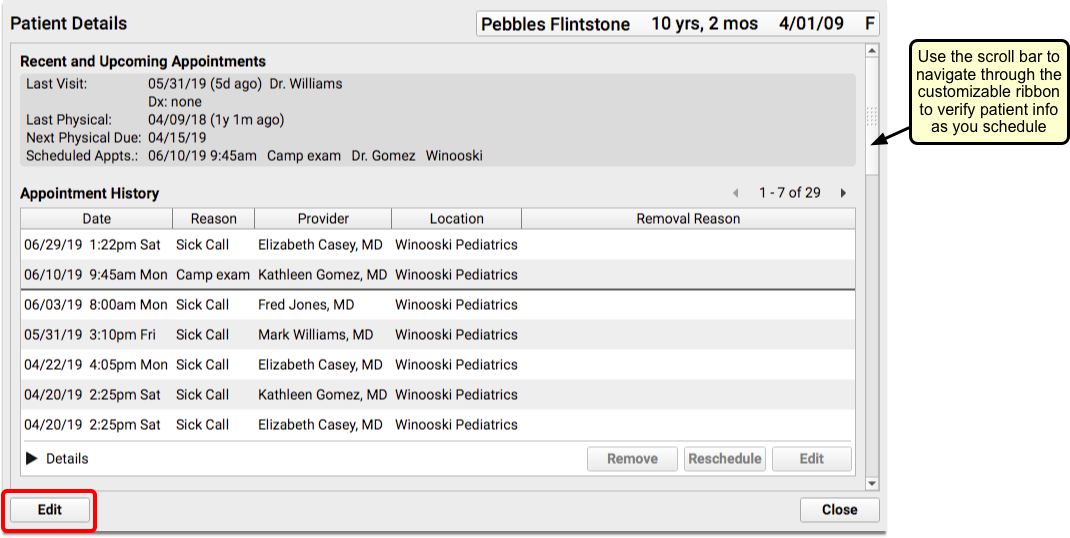
Click “Edit” to add or edit information.
You can update insurance information and then check the patient’s eligibility (based on today’s date).

Select a Visit Reason
Your practice’s default visit reason will appear in the Visit Reason field. You can type or select a different visit reason.
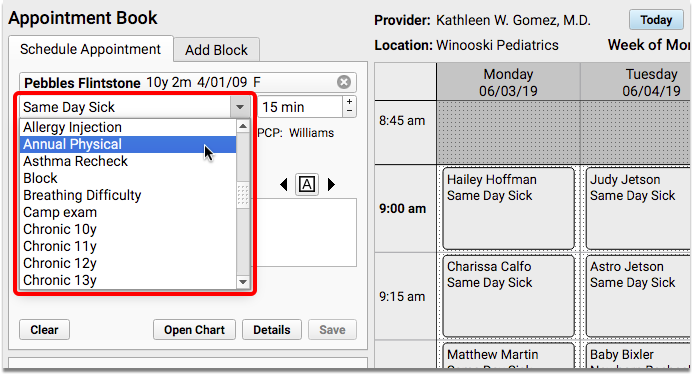
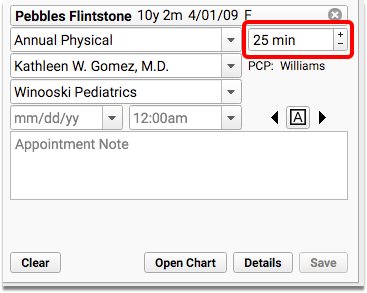
The clinician’s configured visit length will appear next to the reason.
Select Location and Provider
The Appointment Book remembers which location and provider you last scheduled for and defaults to those settings. You can select a different provider and/or location at any time during the scheduling process.
Find an Open Time in the Schedule
Click anywhere on the grid to pick an appointment time.
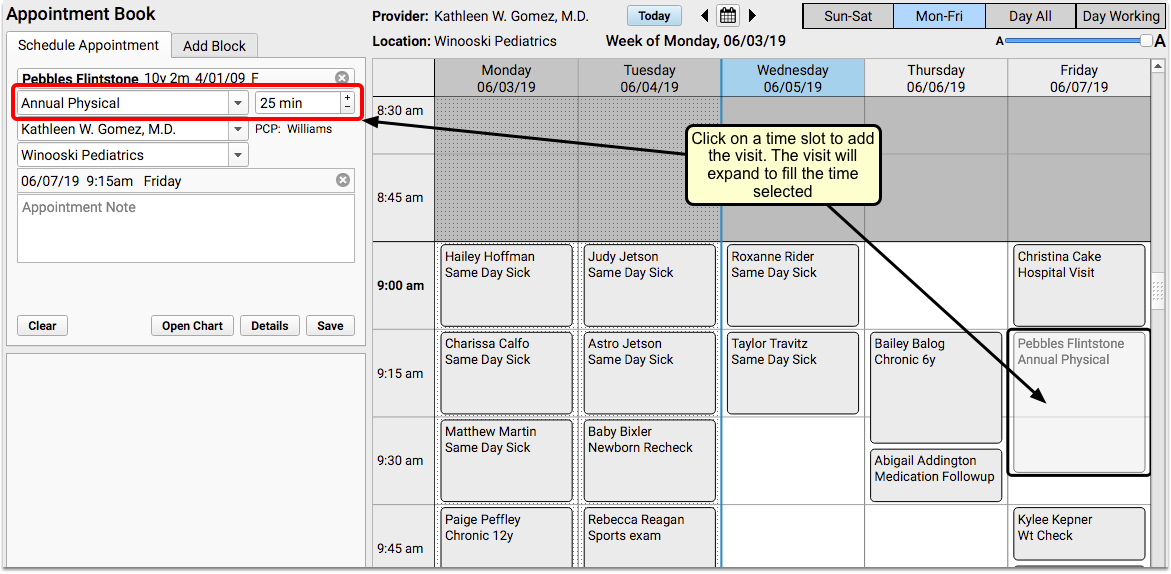
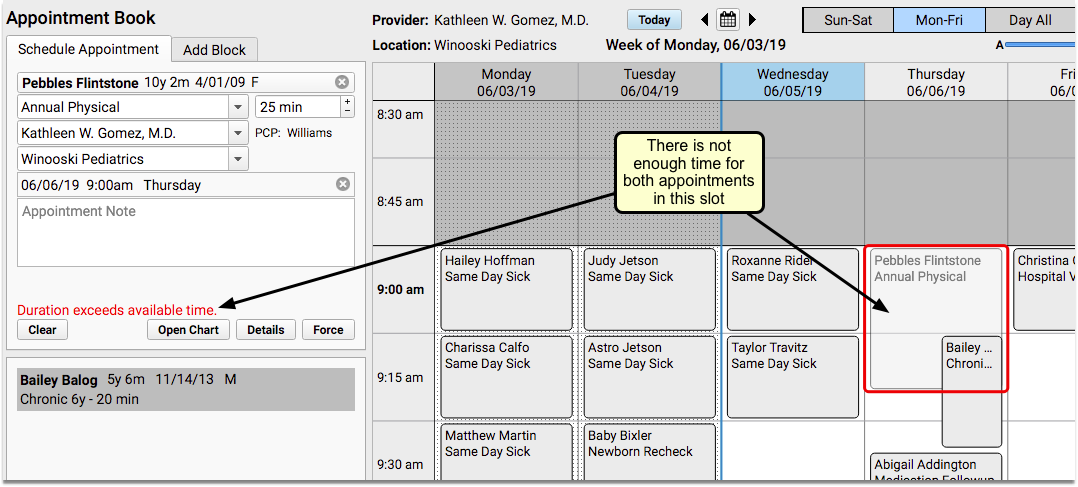
If there’s an obstacle in the calendar, an error message will display in the scheduling panel.
Enter an Appointment Note
Optionally enter notes about the appointment in the Appointment Note field. Appointment notes will be available on the Schedule screen, the top of the chart note, and anywhere your practice works with the encounter.
Save the Appointment
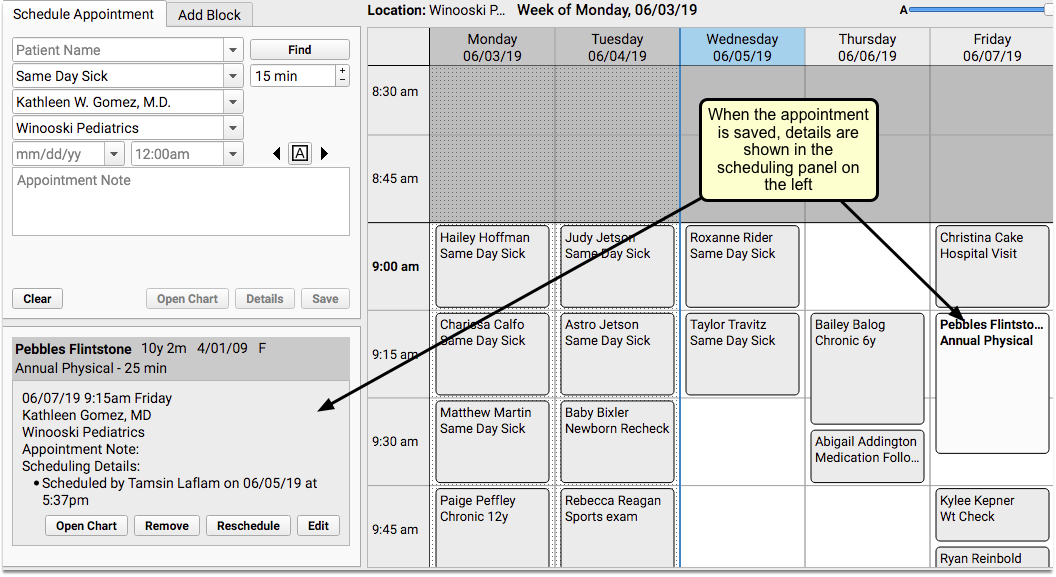
Click “Save” to confirm the appointment. The details of the new appointment will be shown on the left side of the screen.
Open the Appointment Book
Open the Appointment Book with the Appointment Book icon at the bottom of your PCC EHR window.

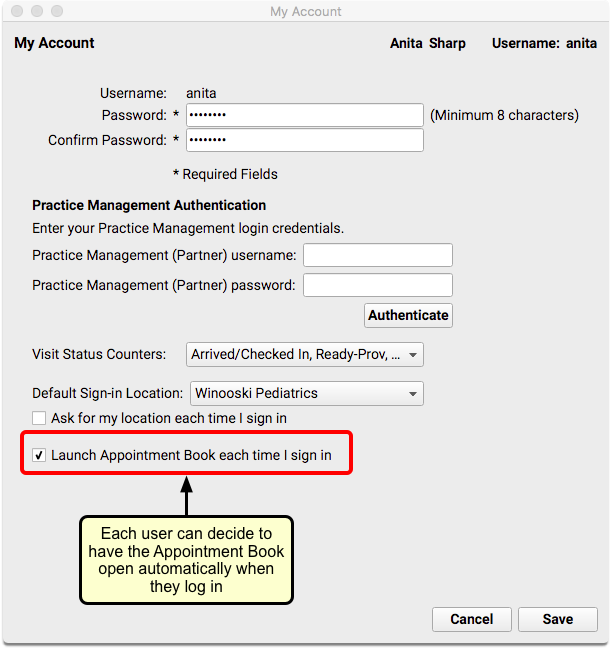
You can also select the Appointment Book from the File menu. You can also use the My Account tool to configure the Appointment Book to open as soon as you log in.
Review the Appointment Book, Provider’s Schedules, and Locations
Days in the past are shaded with a dotted pattern, which appears much like a curtain over the days. Today’s column will include a blue header, and a blue line will appear down the left side of the day, clearly dividing the past from the present.
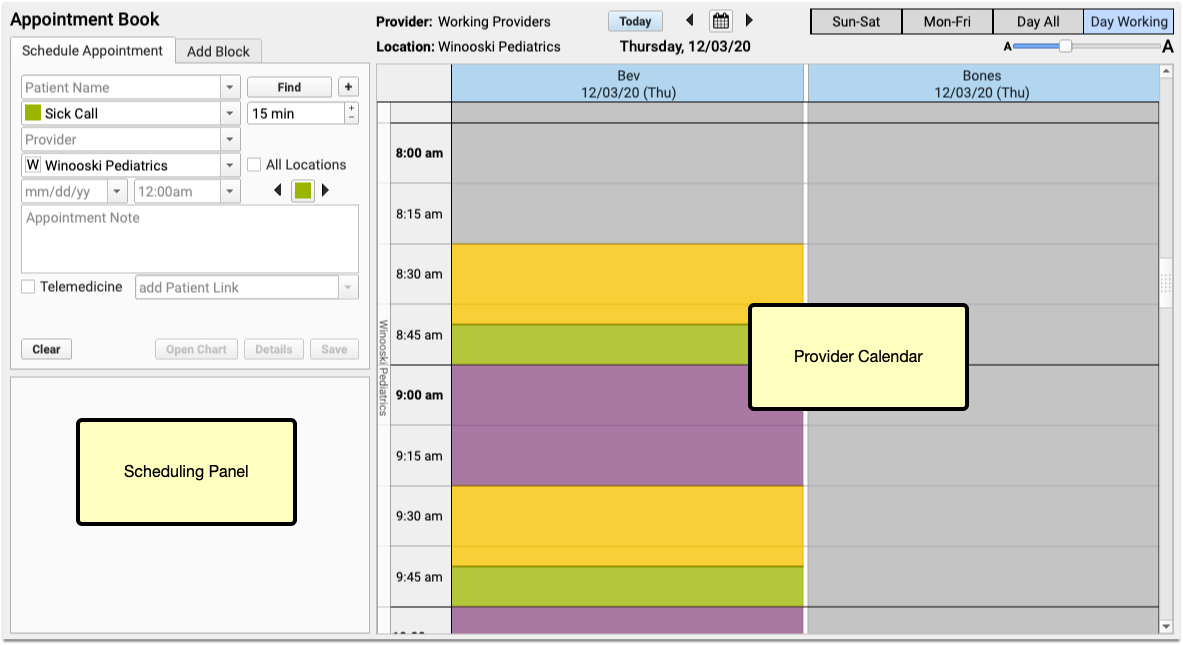
If your practice chooses to assign Visit Types, you may see color-coded guidance on the calendar to help schedulers see when certain types of appointments should be scheduled. You may also see colored stripes on the left of scheduled visits, indicating the actual visit type.
When you click on a time slot in the calendar that has open space, the Appointment Book will assume that you are attempting to schedule, and will select the available appointment space.
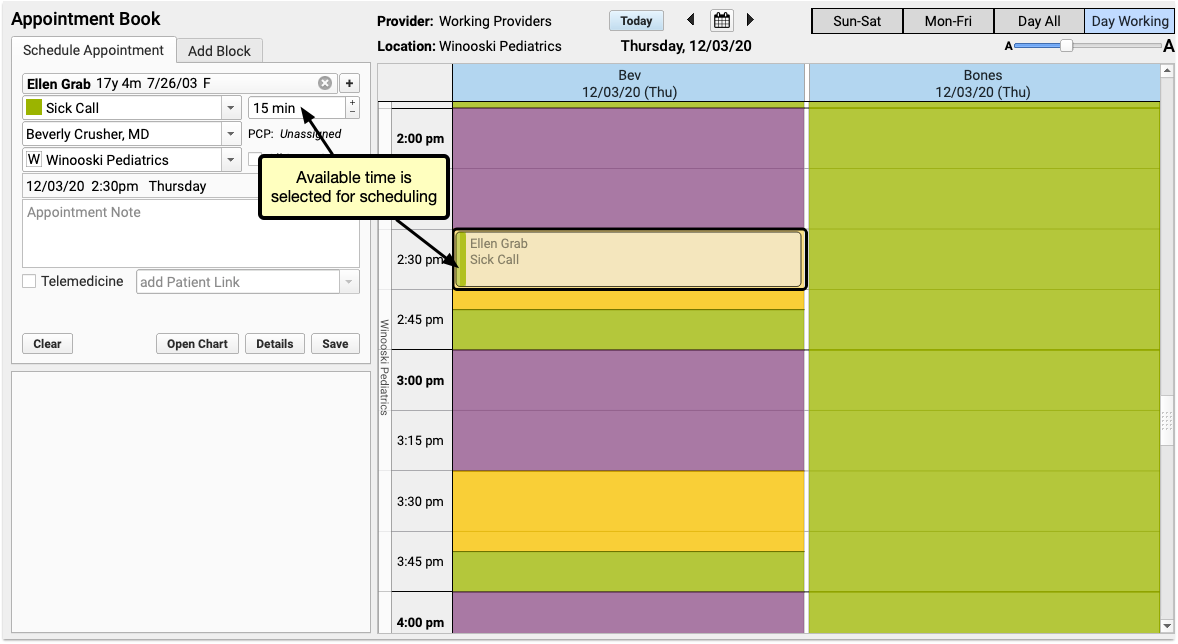
If the selected time slot has space for multiple appointments, the already-scheduled appointments will appear stacked, accordion-style, on the left side of the screen.
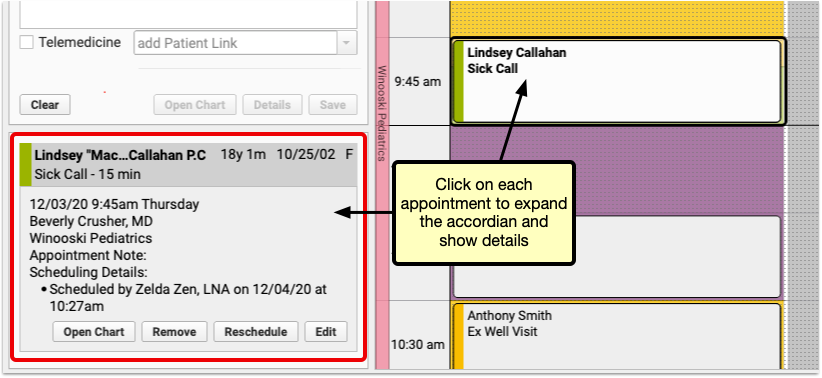
You can click on each scheduled appointment, either in the accordion or on the appointment grid to see details for that appointment.
View Multiple Providers’ Schedules
When a patient needs an appointment right away, it’s helpful to see availability for all of your providers at one time.
View Schedules Only for Providers Who Are Working on a Single Day
When you’re trying to schedule a visit, but your practice has several providers who work in different locations, use the “Day Working” view to see only providers who are scheduled to work for the selected day and location.
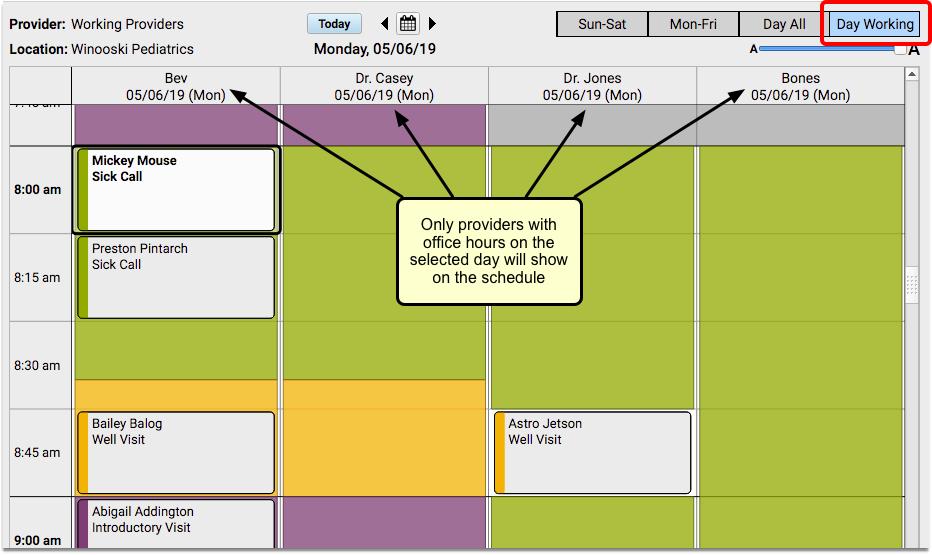
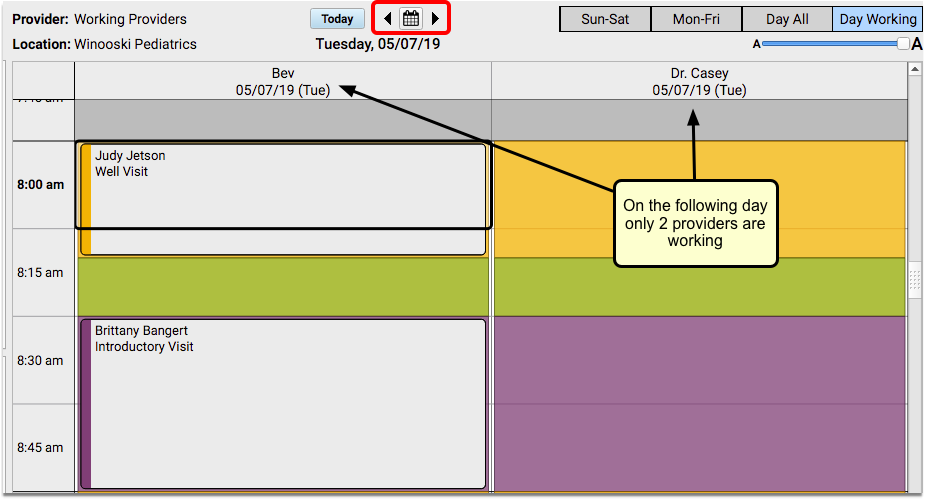
You can navigate through the calendar day by day and you will still see only the providers who are available at that location on the given day.
If you prefer to see all providers, regardless of their availability, use the “Day All” view.
View Schedules for All Providers
Click on the “Day All” button to see all of your providers, regardless of where they are working on a given day.
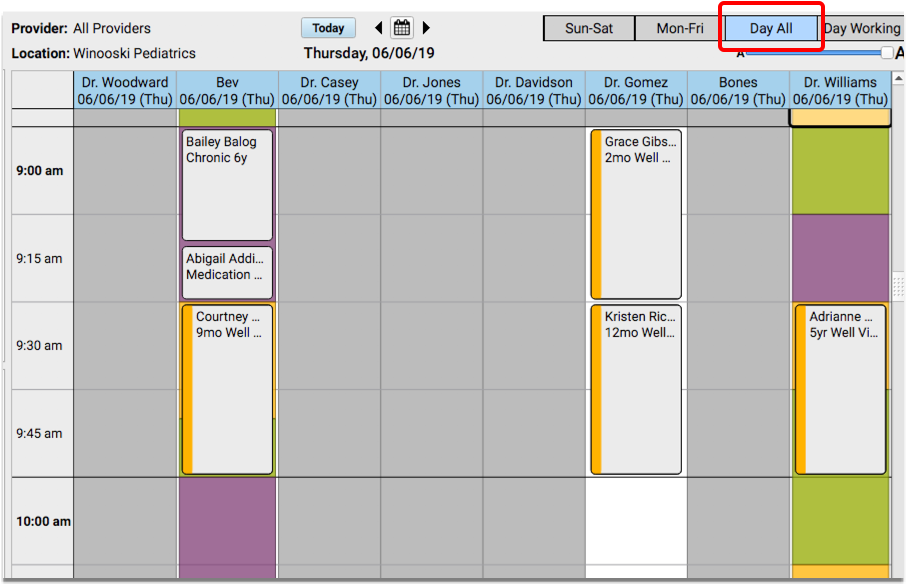
If you don’t already have a day selected, the current day will be displayed.
View Multiple Locations Simultaneously
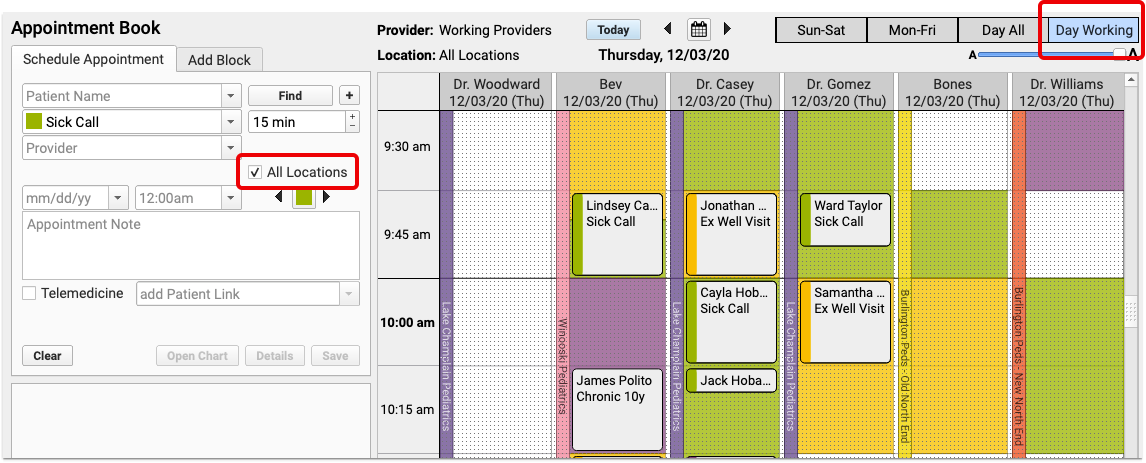
If your practice has multiple locations, the Appointment Book will include color-coded location banners and an “All Locations” checkbox by default, to make it easier to differentiate between your scheduling locations at a glance.
When you need to schedule for a provider who works in multiple locations, you can click the “All Locations” checkbox to show all practice locations where the selected provider has appointment availability.
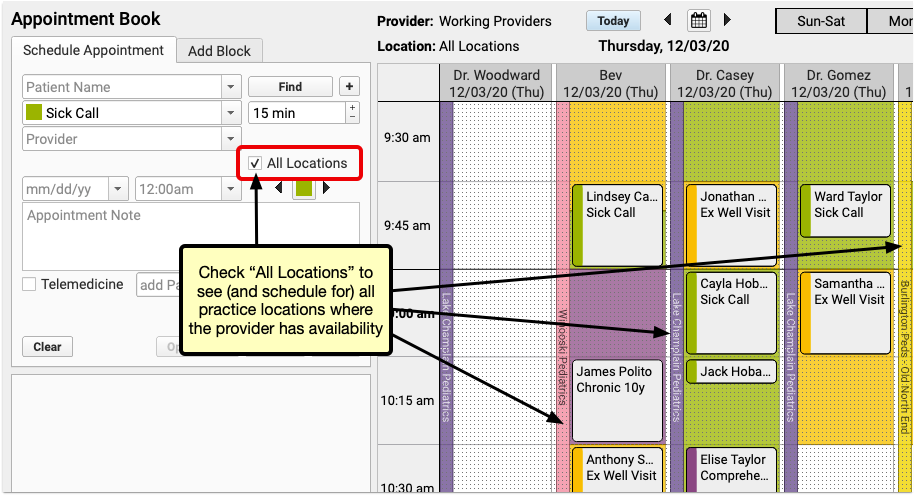
You will be able to see and schedule appointments for the provider on one screen, regardless of where they are working that day.
Turn Off Default Locations: Location banners and the “All Locations” checkbox are enabled by default if your practice has more than one scheduling location. If you prefer not to use either of these features, you can turn them off in the Practice Preferences configuration tool.
If you are scheduling in the Day Working view, and “All Locations” is selected, you will see all providers who are working that day, regardless of their location. The location banner will display which office they are working in throughout the day.
Care Center Locations: If your practice uses care centers, schedulers will only see the locations within their own care center.
Customize Locations: You can assign colors to your locations in the Practice Preferences tool.
Schedule Appointments: Use Visit Types and the Availability Finder
What time is the first available sick visit for Dr. Casey today? When is the first available well visit slot after the patient’s well visit due date?
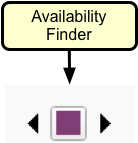
You can use the Availability Finder tool to find the next open time slot for a specific Visit Type.
You can also use the Select Appointment Date & Time window for a more visual approach.
Note: Your practice will need to have Visit Types configured, as well as color-coded templates for your providers, to use the following features.
Search for the Next Open Time Slot for a Specific Visit Type by Color
When you select a visit reason in the Schedule Appointment panel, the Availability Finder color swatch will display the same visit type color.
Note: If your practice does not use Visit Types, or does not color code provider scheduling templates, you can change the default setting for your availability searches to look for any open time slots.
You can use the Availability Finder arrows to jump to the next open time slot for that visit type.
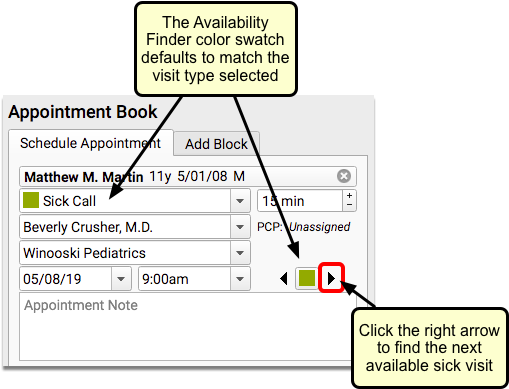
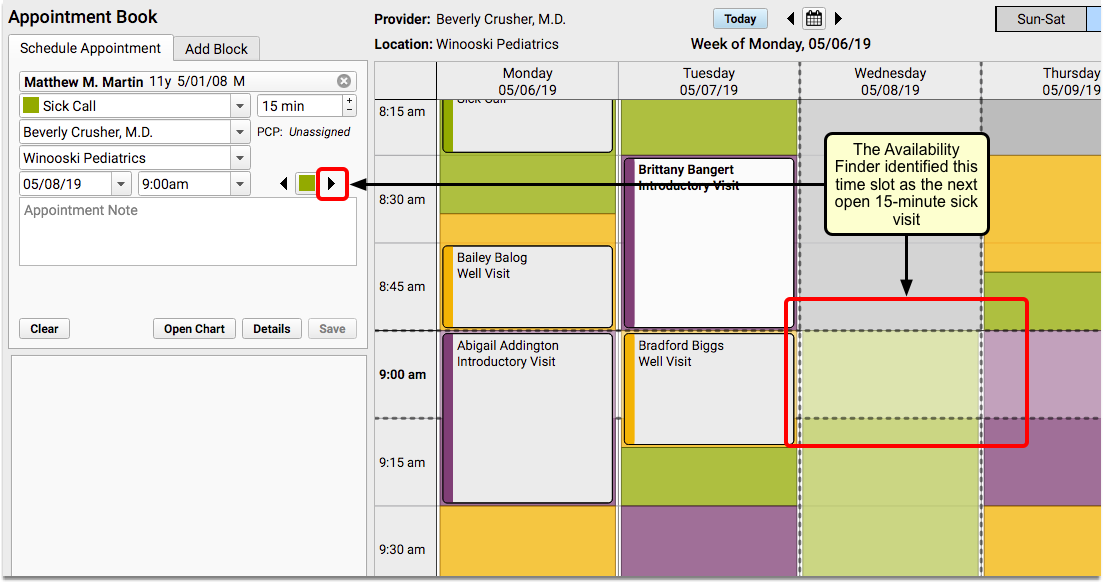
In the above image, the user clicked the right arrow, and the Appointment Book automatically selected the next available sick time.
You can click to select that slot, enter an Appointment Note, and click “Save” to schedule. Or, you can continue clicking the right arrow to see additional open time slots with that visit type.
What about well visits? When you schedule a well visit, you typically start looking after the patient’s next physical due date, or whatever date in the future you want to begin the search.
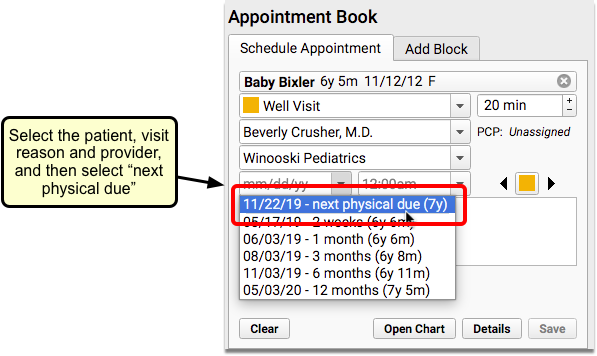
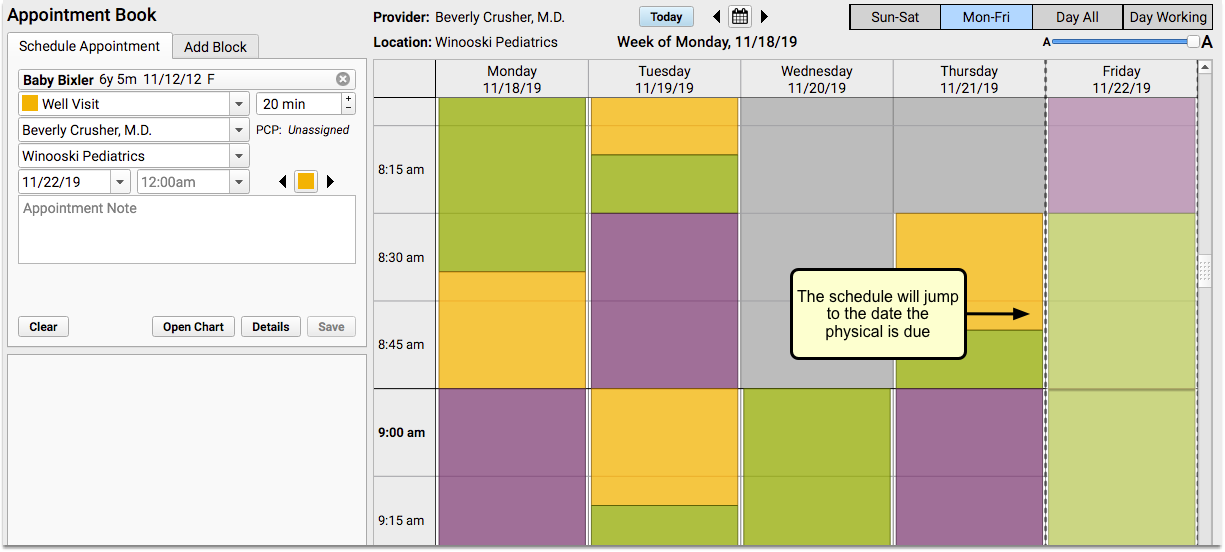
The Appointment Book will jump to that date. Then you can use the right arrow to find the first open Well Visit time.
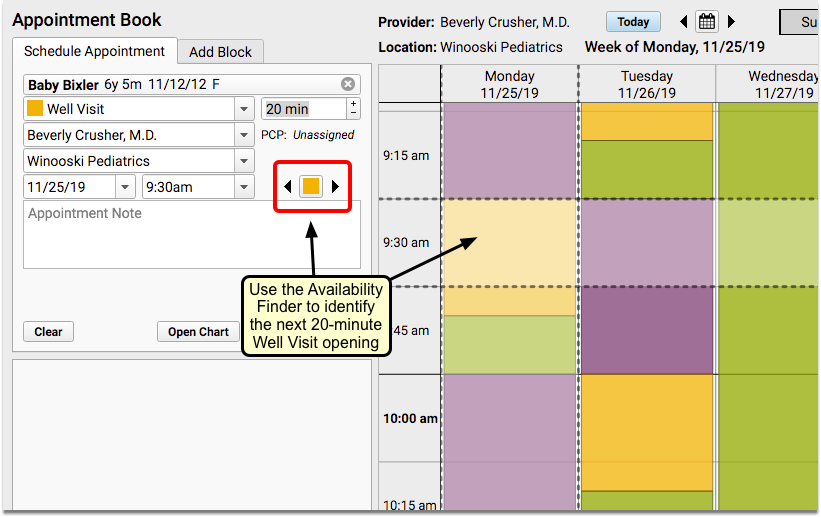
If you don’t want the first appointment found, continue to click the right arrow to find the next opening. The Appointment Book will continue on to the next day and scroll the screen for you, or even flip to the next week. You can use the left arrow if you want to go back to the last offered time slot.
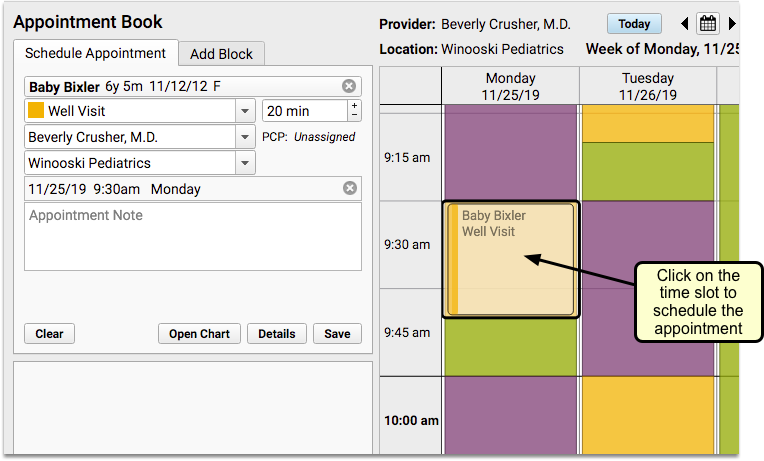
When you find the date and time you want, click on the time slot to begin scheduling.
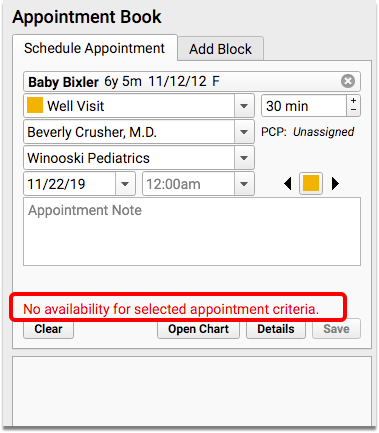
None Available: If there are no available appointments for the selected criteria, you’ll see a temporary message in the scheduling panel, which will disappear after a few seconds.
If you need to open up the search to include other visit types, you can click on the color swatch to reveal a drop-down selection of other visit types.
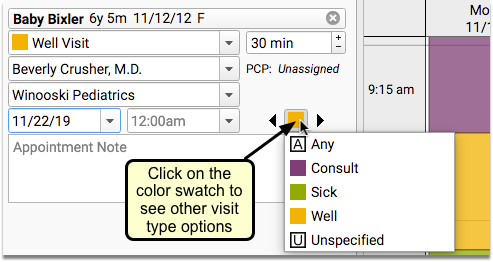
What Are Those Weird Looking Visit Types?: Use the “A” visit type to ignore the color swatch and find the next open slot for any of your visit types. Select “U” to look only for open time on the schedule with no assigned visit type.
Use the Select Appointment Date & Time Window to See All Available Visit Slots For Any Day
While clicking arrows to jump to the next available time slot can be handy, sometimes you want to see a broader view of open slots on your practice calendar.
Use the Select Appointment Date & Time window to see available time slots for a selected Visit Type, over the next six months.
Click on the Calendar icon to open the Select Appointment Date & Time window.

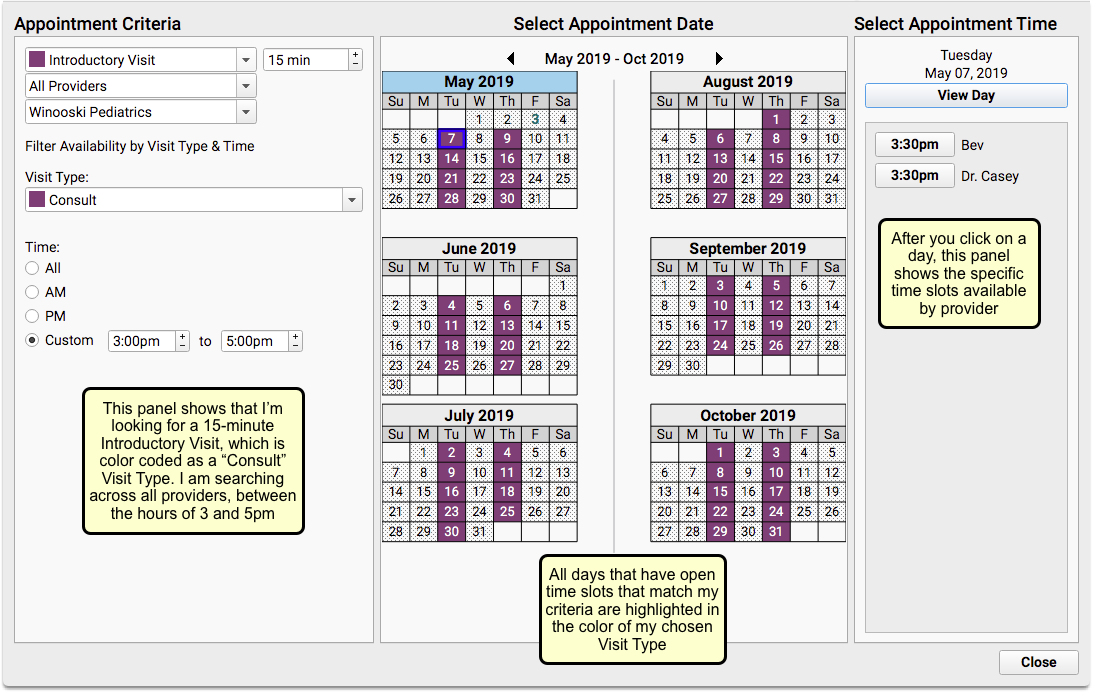
When you need to find an opening for a sick or well visit (or any visit type), you can adjust the criteria within the Appointment Criteria panel on the left. You can set a different provider, location, or visit type.
The Select Appointment Date panel in the center will show every day that includes availability matching your selected criteria. Days with availability will be highlighted in the color matching the Visit Type you selected. Days that are shaded with a dotted pattern have no time slots that match your criteria.
Click on a day within one of the calendars to see appointment availability, by provider, in the Select Appointment Time panel on the right.
When you find an open time slot that works for you, click the time button to return to your schedule.
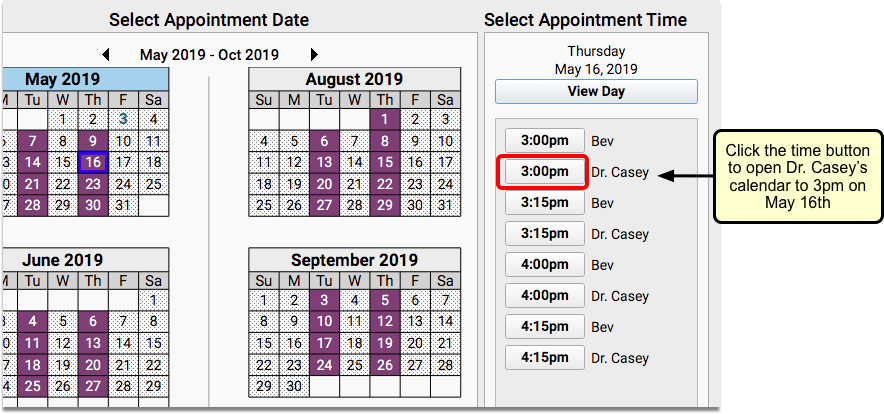
The Appointment Book will open to your chosen date and time for the provider selected.
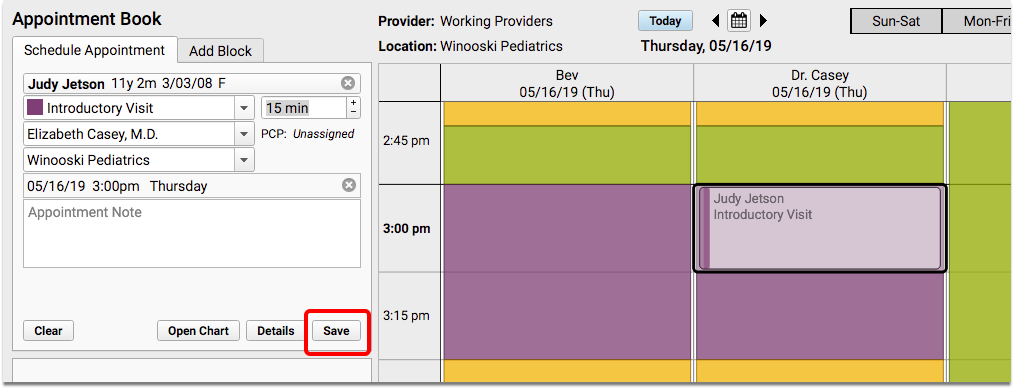
You can make changes in the scheduling panel if you need to, and then click “Save” to confirm the appointment.
Use the “All Locations” Feature in the Select Appointment Date & Time Window
When you select “All Locations” within the Select Appointment Date & Time window, you can view provider availability across all of your locations, six months at a time.
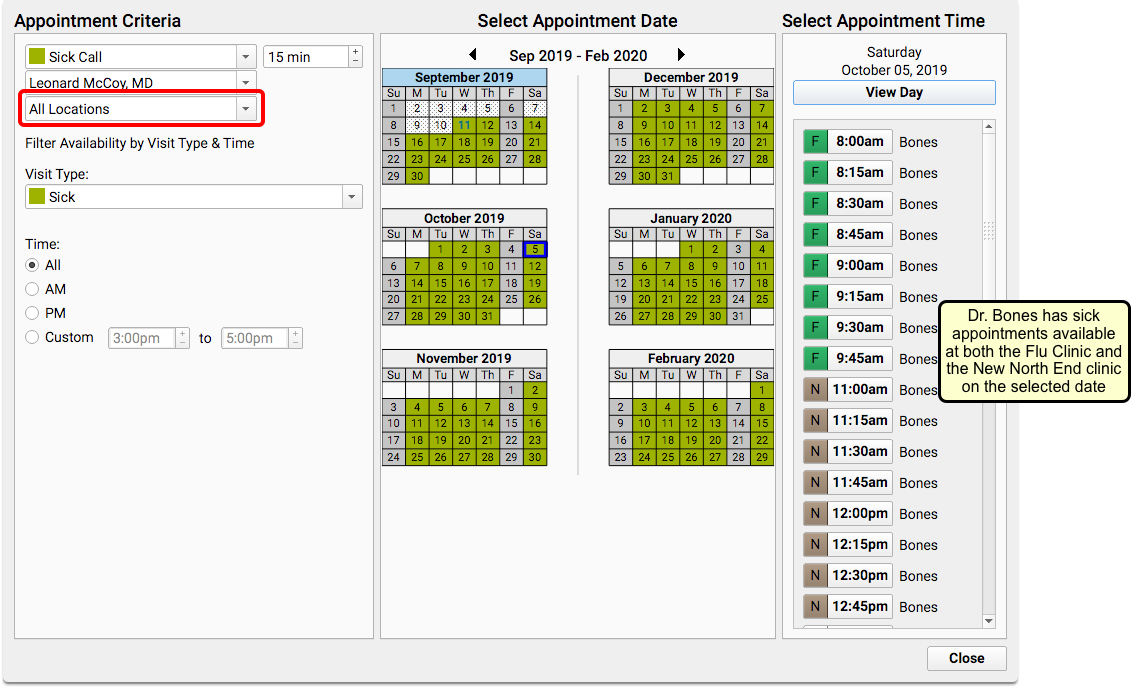
The Select Appointment Time panel on the right will include color swatches and location abbreviations to indicate which location has availability.
Schedule Siblings or Multiple Patients Simultaneously
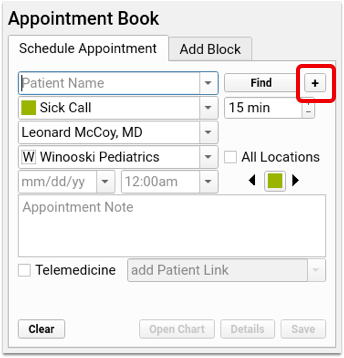
When searching for a patient, click the plus button to the right of the search box to open the Schedule Multiple Appointments window.
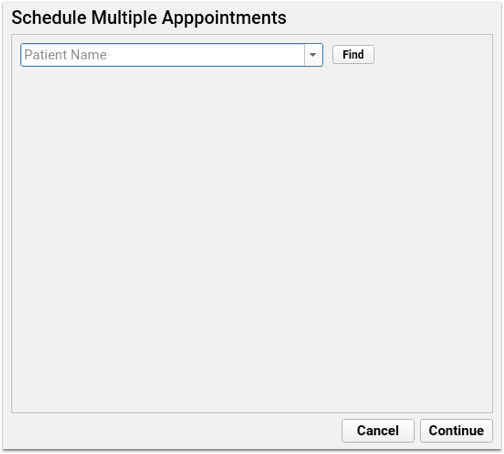
On the Schedule Multiple Appointments window you have the option to select multiple patients: find your first patient, select your visit reason, and enter any appointment notes. As you select each patient, another patient name search box will appear, and you can then search for another patient—either a sibling of the first patient, or any other patient.
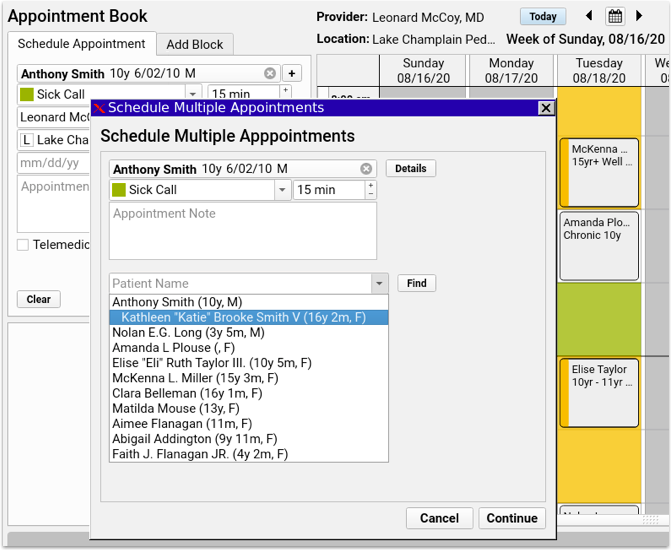
Every time you add a patient, a new patient name search box will appear below for the next patient. Enter as many patients as you need, then click “Continue”.
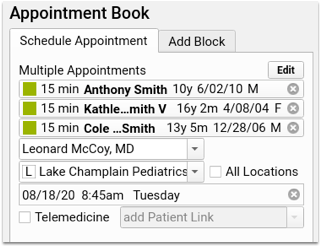
Each patient appears in the schedule appointment panel, and you can select an available time slot exactly as you would with a single patient. If there’s not enough space available for all appointments, the block of appointments appear with a red border, indicating the overlap with existing appointments.
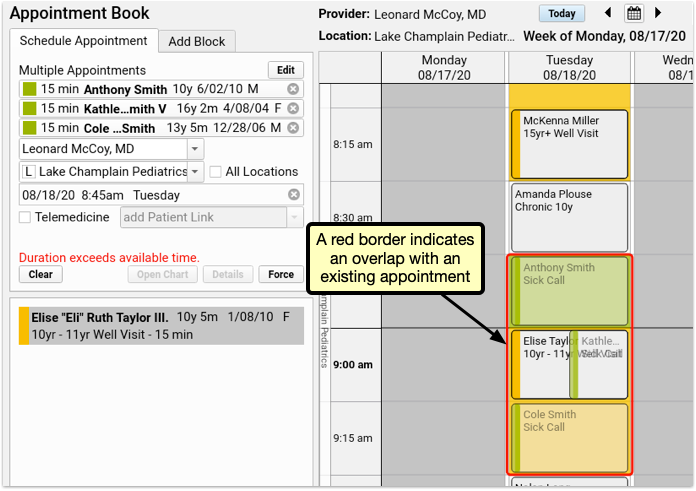
If your user account has permission to force in appointments, you can click Force to save all appointments despite the overlap.
Select a different time slot, where all the appointments fit, and you’ll be able to save without forcing in the appointments.
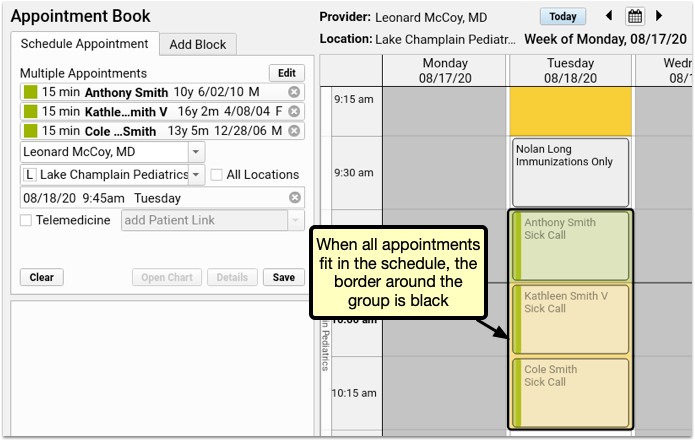
After scheduling multiple appointments, each can be edited, rescheduled, or canceled individually, just like any other appointment.
Schedule a Telemedicine Appointment
You can indicate that an appointment is telemedicine and optionally enter connection information for the appointment.
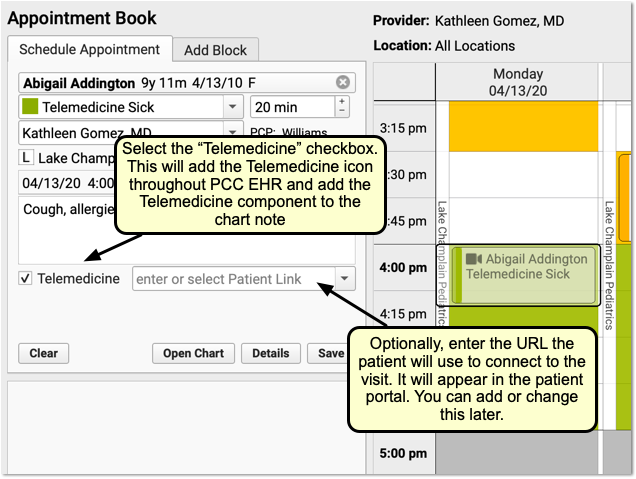
For a complete guide to scheduling and completing telemedicine appointments in PCC EHR, see Schedule, Chart, and Bill a Telemedicine Visit in PCC EHR.
Appointment Book Feature Reference
The Appointment Book includes several built-in features to keep your practice’s scheduling going smoothly and efficiently.
Open the Appointment Book Automatically
Users can choose to have the Appointment Book launch automatically every time they log in.
Set individual preferences in the My Account tool from the File menu.
Scale the Appointment Book to See More of Your Day
Adjust the scale slider in the upper-right corner of the Appointment Book to adjust how much of the day appears on your screen.
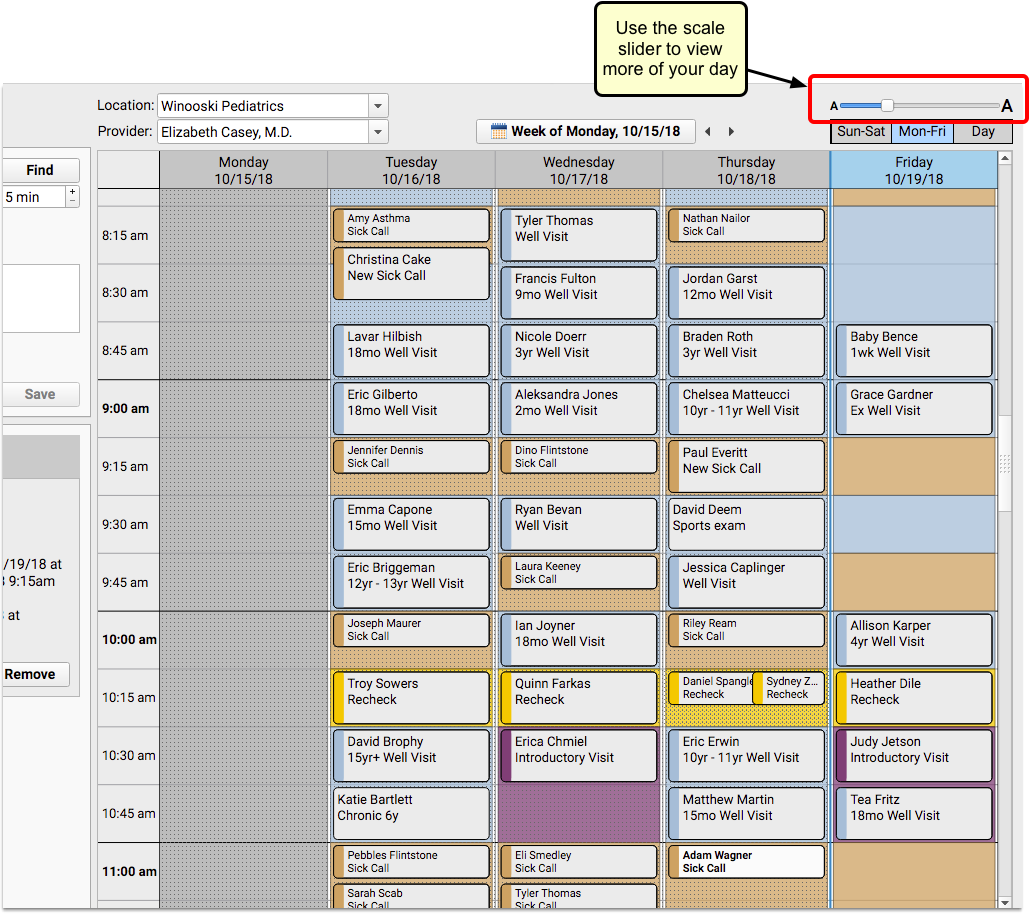
You can “zoom out” to see more of the day and find open time slots.
PCC EHR will remember your preferred scale, even if you log out.
Color-Code Your Schedule by Visit Type
On a busy schedule, you need to save time slots for sick visits and other types of visits that are scheduled late. You may also want to let schedulers know that some visit types need to be scheduled with specific providers or only on certain days.
If your practice chooses to use color-coded visit types, the Visit Reason drop-down field in the Schedule Appointment panel will include color swatches next to each reason that is part of a designated visit type.
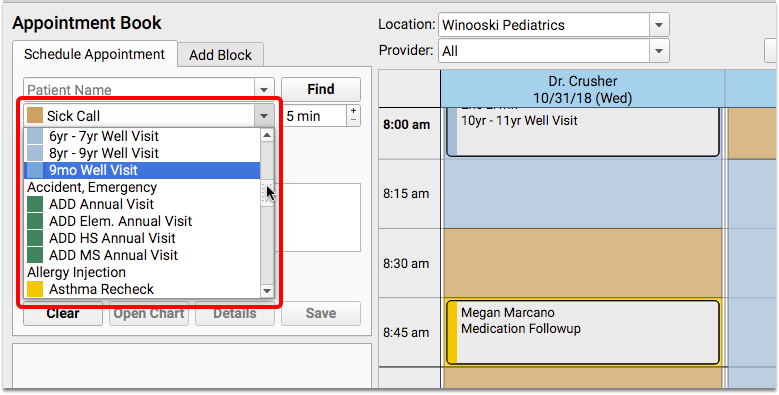
This will help schedulers to find a time slot on the appointment grid that matches the color of the visit type they are scheduling.
Your practice can include color blocks on your scheduling templates to give guidance to schedulers about where to place certain types of visits. In addition, visit bubbles display a stripe down the left to show the visit reason color of the actual visit, whether it matches the guidance in the background or not.
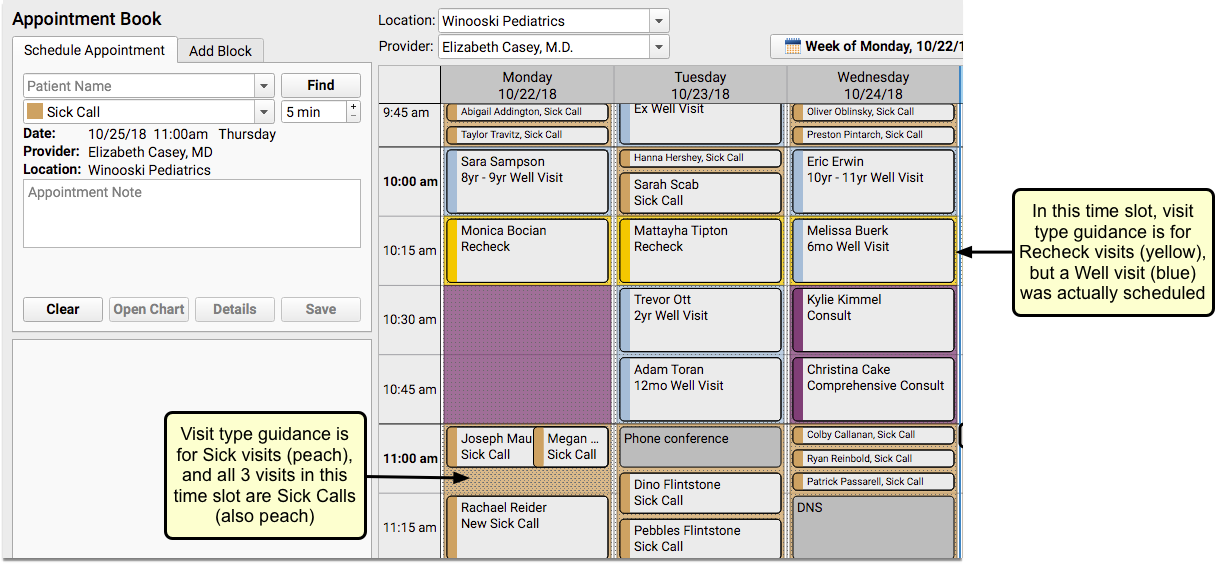
Users will not be prevented from placing appointments of one visit type on a time slot reserved for a different visit type.
For details about using color coding to set up visit types and for help with assigning visit type guidance to scheduling templates, read the Appointment Book configuration article on learn.pcc.com.
Find Siblings When You Schedule
How often do parents ask to schedule siblings for back-to-back appointments? The Appointment Book makes it faster and easier to schedule multiple family members simultaneously, as it includes a sibling list for the most recently searched for patient.
The list will be indented beneath the patient’s name, and can include up to ten siblings, sorted by age – youngest to oldest.
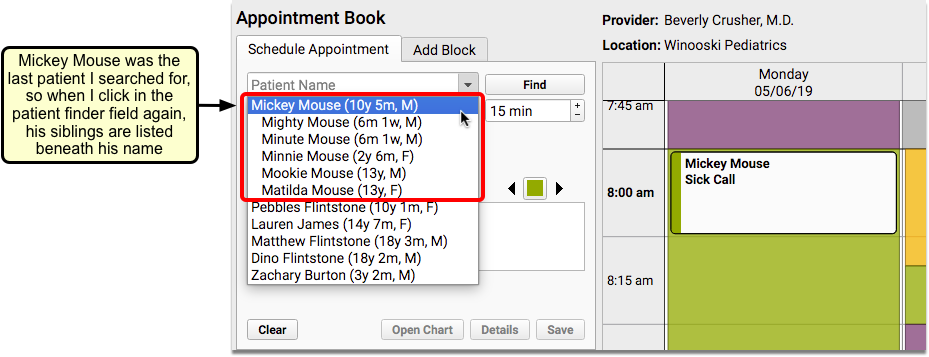
Siblings are defined as patients who share either a home or billing account.
Workflow Tip: Using this feature combined with the Availability Finder can help streamline your family scheduling process. For example, if you are scheduling two siblings for a sick visit, and your sick visit time slot is 15 minutes, you can search for the next available 30-minute sick visit. When you find one that works for the family, change the appointment to 15 minutes, and schedule one sibling right after the other.
Smart Scheduling Features
Often when scheduling, parents don’t ask for a specific date, but will inquire what you have tomorrow, or in two weeks, or three months. You can use smart scheduling terminology when searching the calendar at your practice. Alternatively, you can use the calendar browsing feature to jump to future dates for visual scheduling.
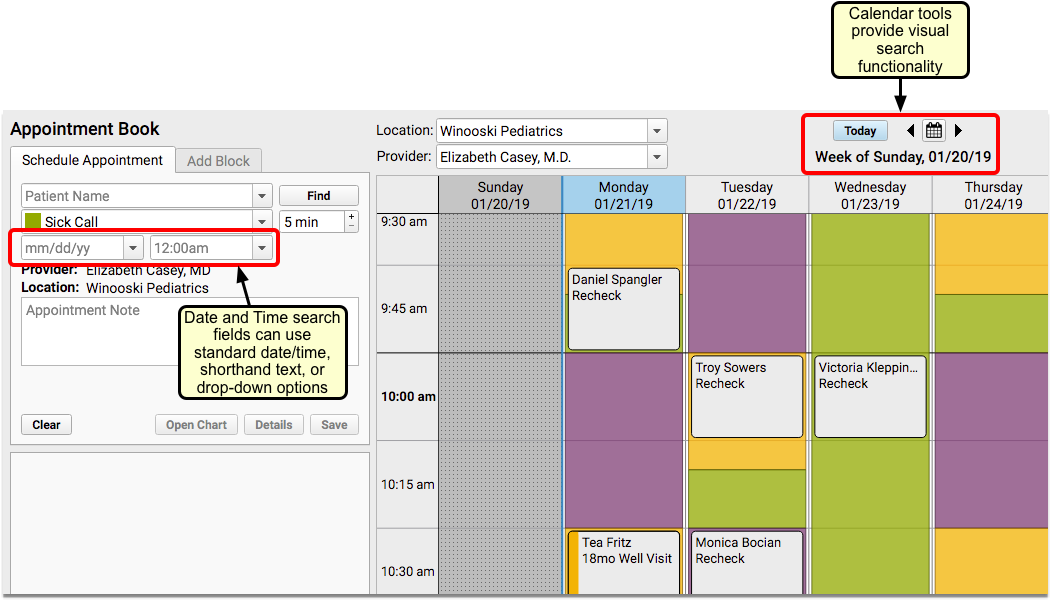
Enter Dates and Times to Search for Appointments
The date and time search boxes offer a few different ways to search for appointments. You can enter a specific date, use the drop-down options, or enter shorthand text. For example, you could enter the first three letters of a month, the letter “T” for today, or “2 weeks”, and the date that corresponds with your search command will appear.
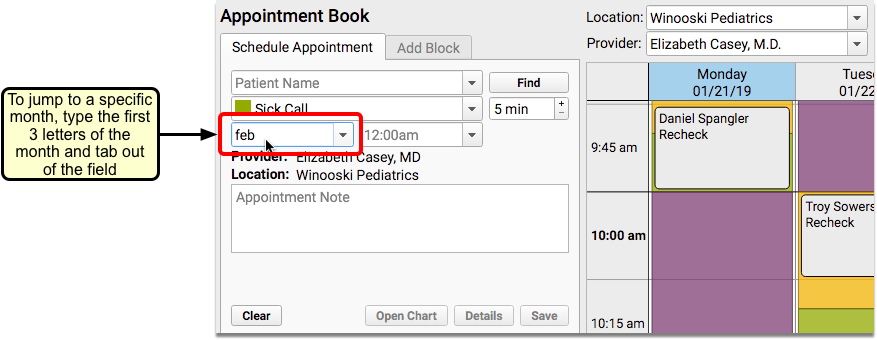
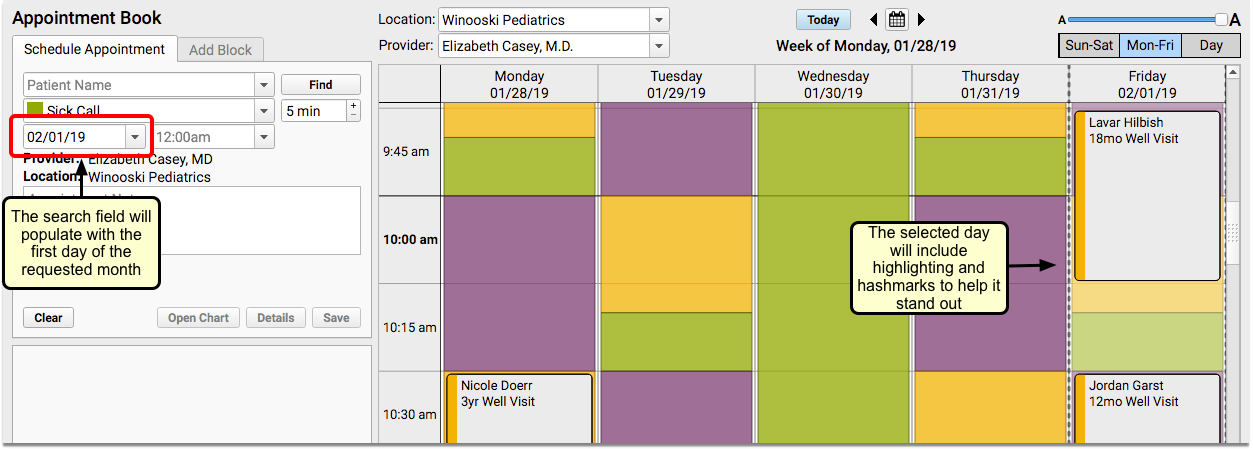
The calendar will use hashmarks and highlighting to focus the date and time selected in the search fields.
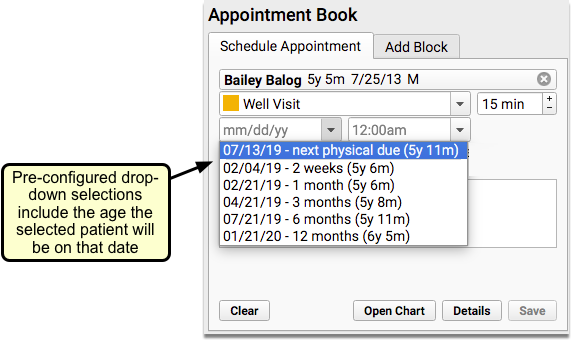
You can select from pre-configured drop-down options in both the date and time fields. For example, if you have a patient selected and choose the “next physical due” option, the date that they are due for a physical, as well as the age they will be on that date will populate the date field.
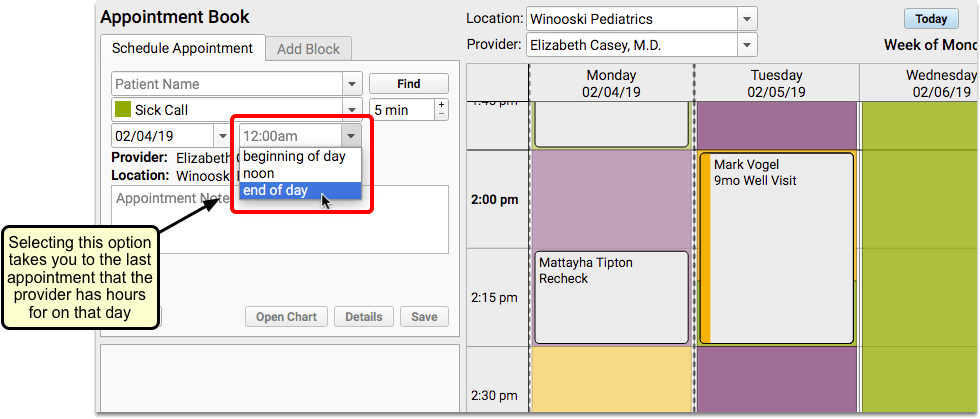
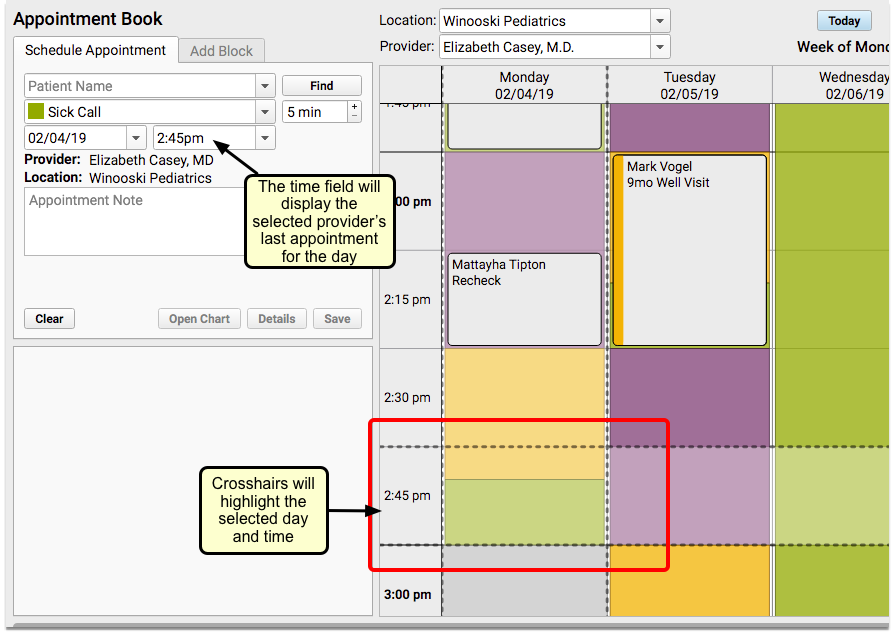
If you select “beginning of day” or “end of day” in the Time search field, you will be taken to the first or last time slot that the provider has hours that day.
Use the Availability Finder to Search by Visit Type
You can use the Availability Finder tool to find find the next open time slot for a specific Visit Type.

When you choose your visit reason, the Availability Finder will default to the Visit Type that matches the visit reason selected when scheduling.
Click on the right arrow to jump to the next open time slot for that visit type.

You can also click on the left arrow to go backward.
Use Calendar Search Window to Jump to Any Day
If you prefer a more visual approach to scheduling, you can use the calendar window to schedule. This will show you six months into the future, making it easy to find the day you need.

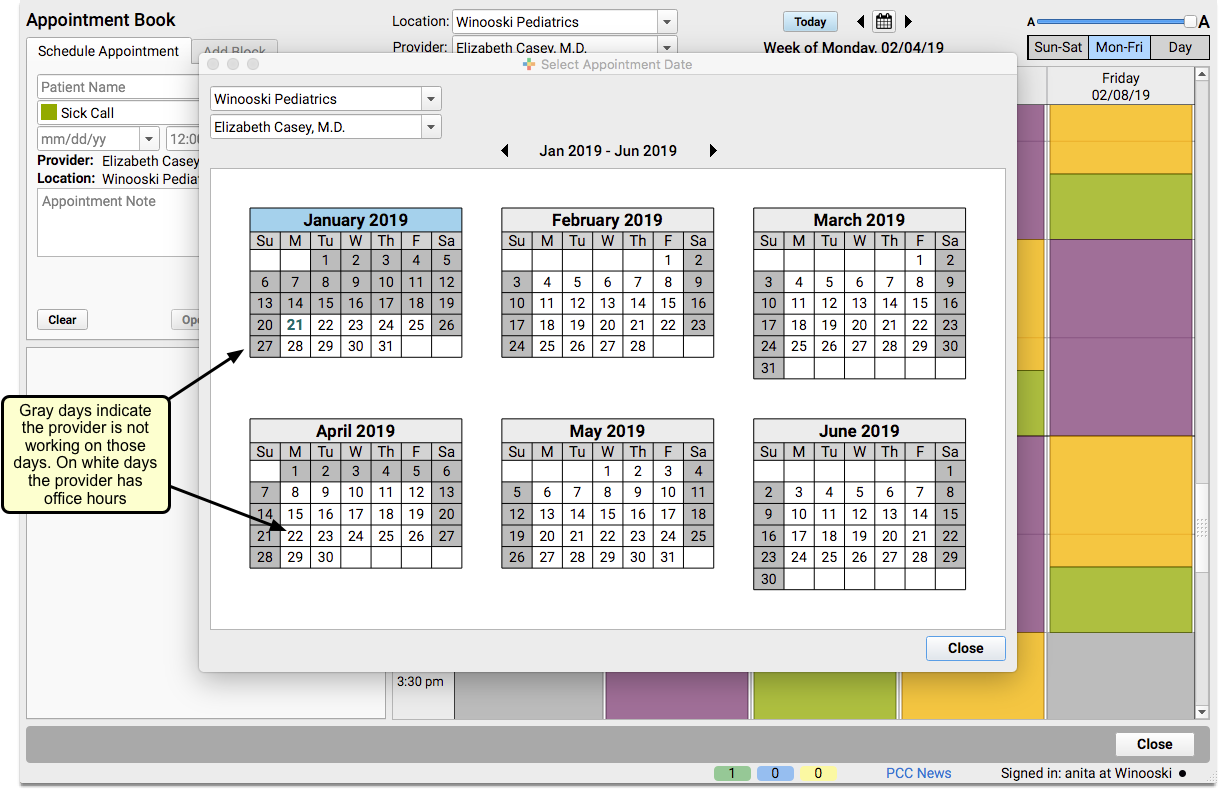
The calendar shows you the provider hours for the selected provider and location. Click on any day within the search window to jump to that day in the Appointment Book.
Multiple Schedulers Can Work Simultaneously
As you schedule in PCC EHR’s Appointment Book, you will be able to see other users who are setting up appointments at the same time.
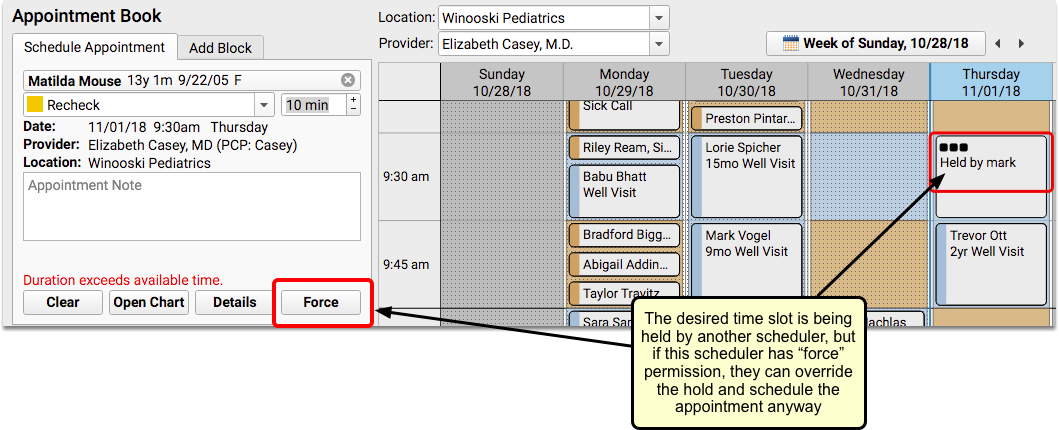
If another scheduler has selected a time slot on the calendar, it will appear on your screen with an ellipsis and the name of the scheduler.
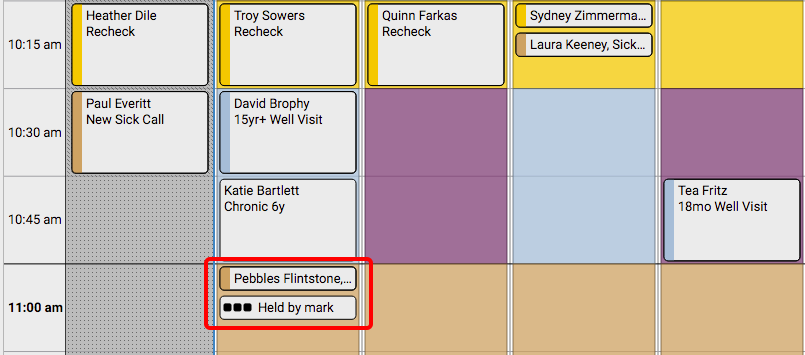
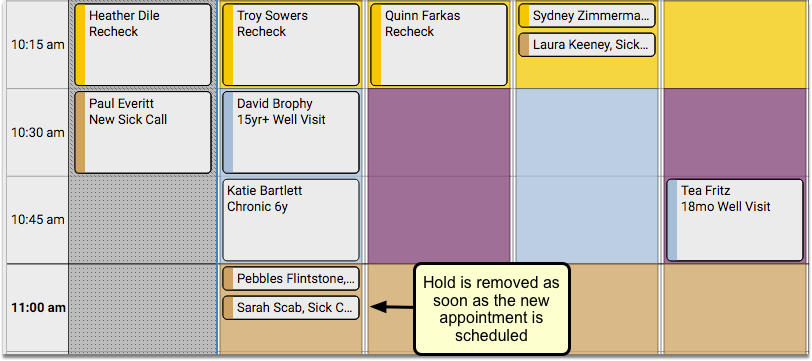
Only the specific amount of time needed for the length of the appointment will be held. For example, if a 5-minute visit is being scheduled within a 15-minute time slot, other schedulers will be able to use the remaining 10 minutes simultaneously.
If you hold a time slot, the Appointment Book will continue to hold it if you open the patient’s chart, visit another tab, or perform another action. As long as the time slot remains selected, the Appointment Book will hold the time for you.
If you want to free up the cell you are holding, or if you are in the Appointment Book but do not wish to hold a specific cell, you can click the “Clear” button.
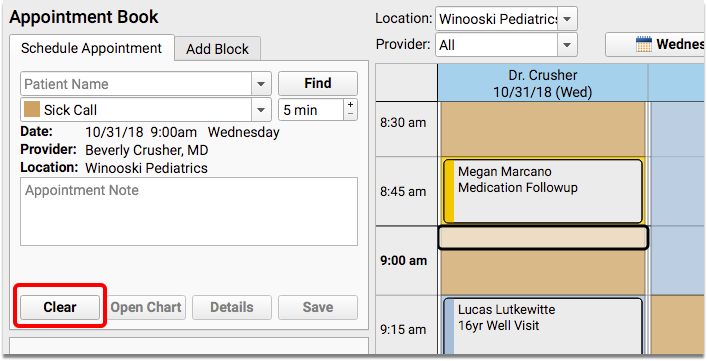
If you have permission to force in appointments, you can override your co-worker’s hold on a time slot.
Dynamic Use of Available Time Prevents Over-Booking
The Appointment Book will automatically accomodate longer appointments and, if necessary, fill time into the next cell.
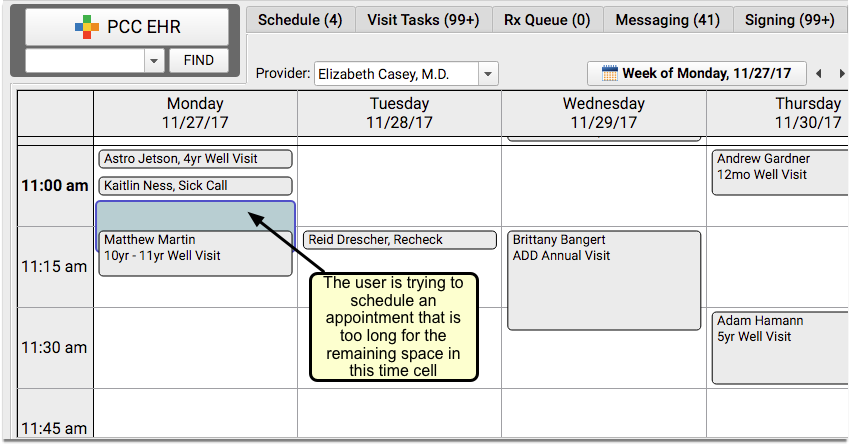
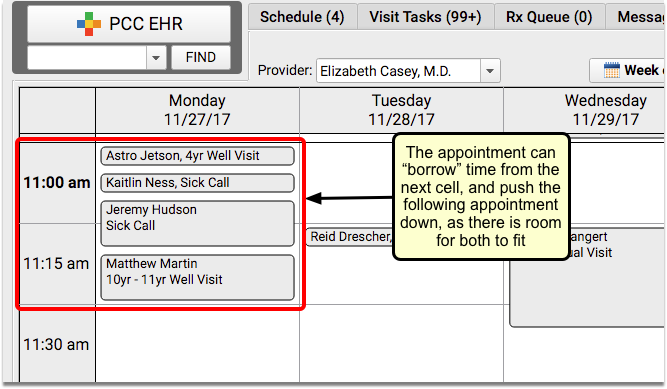
Appointments will only borrow from the next time slot if there is sufficient time available. It will never change the start time of other appointments.
See Overbooked Time Slots At-A-Glance
If there is no room to push longer appointments into the next cell, you will need to have “force” permission to overbook a cell.
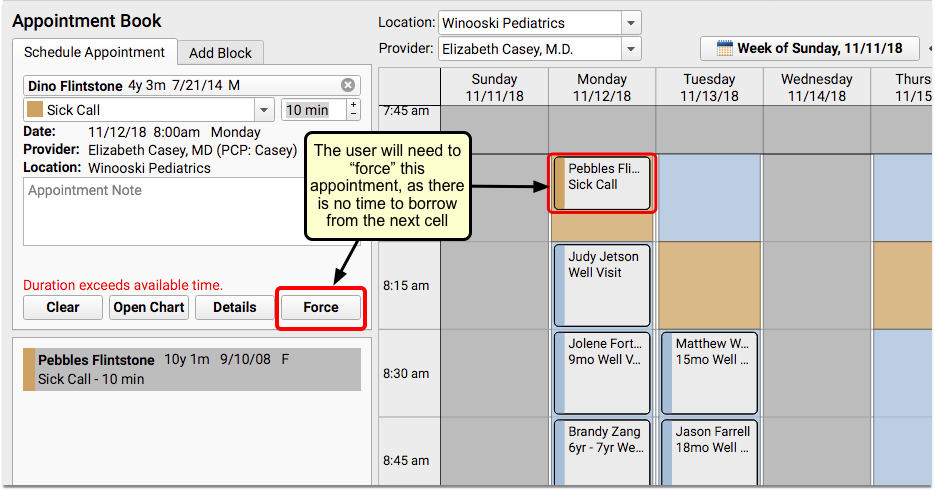
Overbooked appointments will stack side-by-side or one on top of the other. When a timeslot is overbooked or double-booked, you’ll see a patterned background indicating that the time is overstuffed.
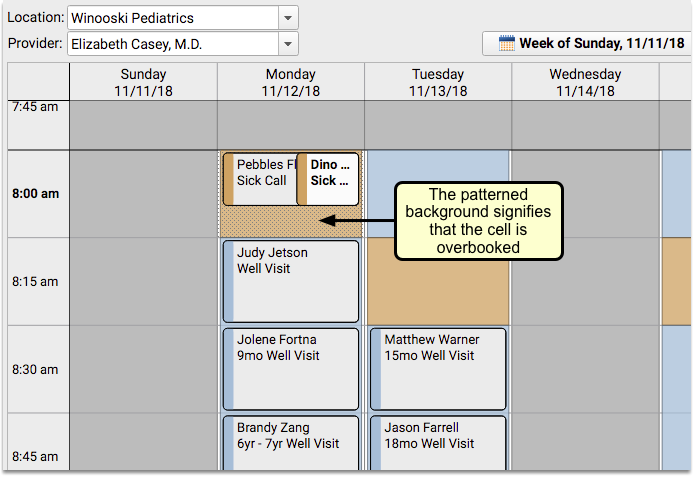
You can use this visual indicator to quickly understand all the places where the day will be extra busy.
See Patient and Account Alerts As You Schedule
PCC’s Appointment Book can alert you to any important patient or account statuses, right after you select the patient to schedule. Your front desk staff will know immediately whether to schedule the patient, or if something else needs to happen first.
When you find a patient in the Appointment Book who meets the criteria for a scheduling alert, the alert will appear over the scheduling screen as soon as you select that patient.
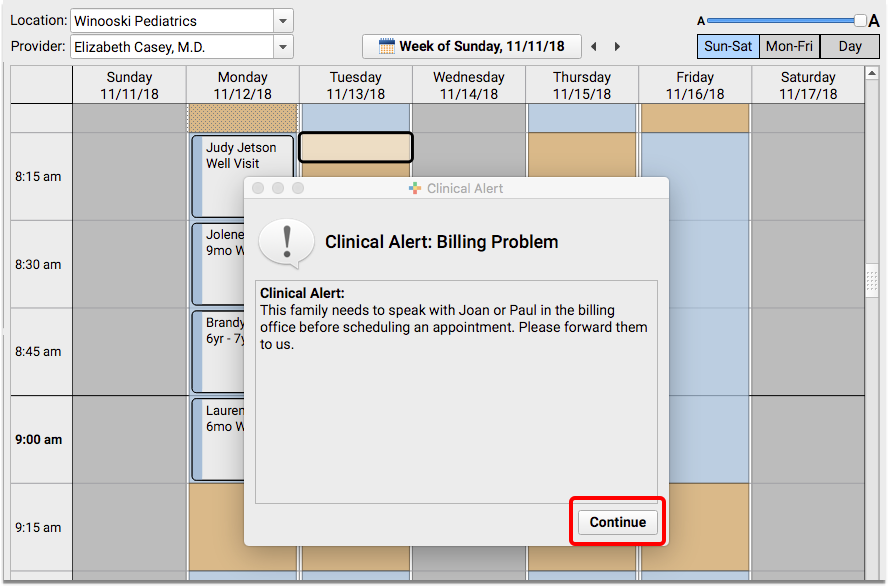
You can click “Continue” to ignore the alert and schedule the appointment.
Prevent Scheduling Using Patient and Account Flags
Prevent patients and accounts from being scheduled by assigning patient or account flags. In PCC EHR’s Scheduling Configuration window’a Preferences tab, select which flags should prevent scheduling by clicking Edit for either Account or Patient Flags, and checking the box for each flag that should prevent scheduling.
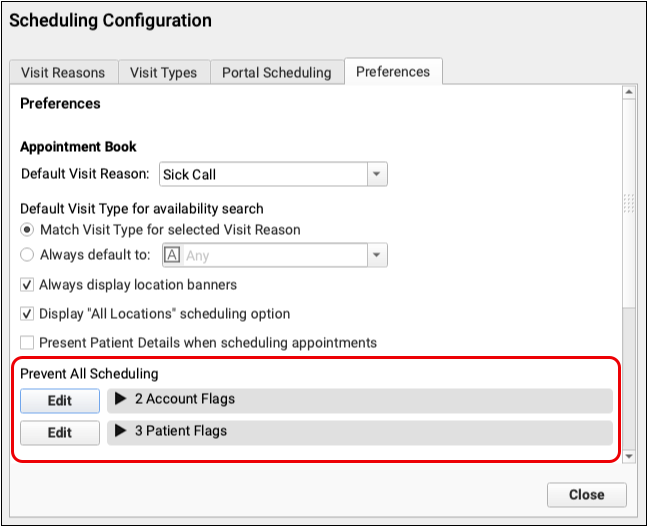
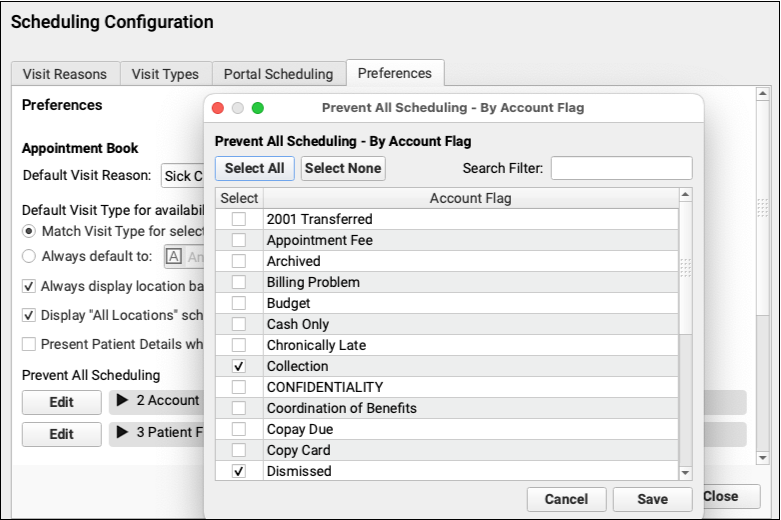
Any patient or account with one of those flags cannot be scheduled in the future.
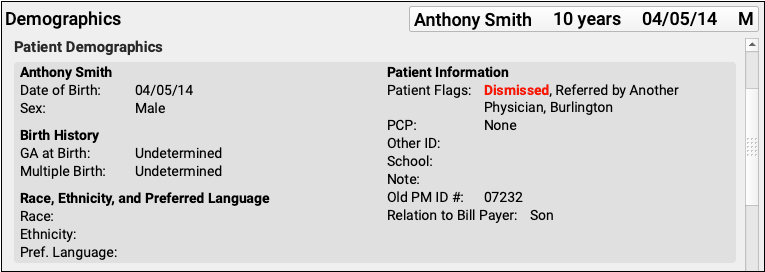
Flags that prevent scheduling are highlighted red in PCC EHR’s patient and account demographics components.
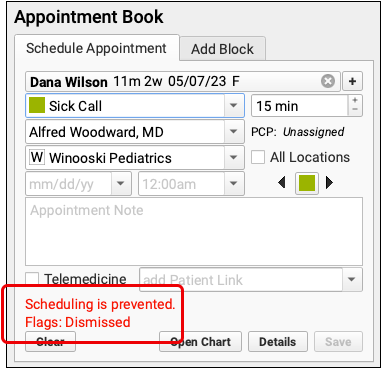
When you attempt to schedule a patient with any of your selected schedule-preventing patient or account flags, you will be unable to proceed with scheduling. Red text indicates that flags are preventing scheduling, and which flags are responsible.
When you schedule multiple appointments, any patients with a schedule-preventing flag will also be indicated with red text.
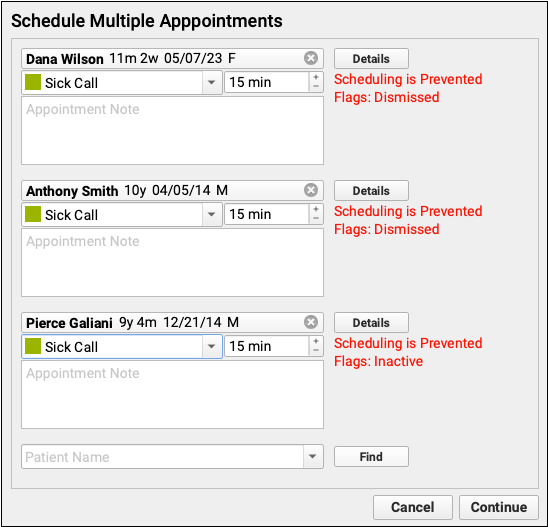
Any patients with the selected flags cannot be scheduled. Patients with appointments scheduled before adding a flag will remain on the schedule, but cannot be re-scheduled. Users with permission to force appointments cannot schedule patients with schedule-preventing flags.
Create New Flags: To edit or create patient and account flags, use the Tables tool. See Use Custom Flags for Scheduling, Alerts, and Reporting to learn more.
Remove or Cancel an Appointment
When you need to cancel an appointment, select it within the calendar grid and click “Remove”.
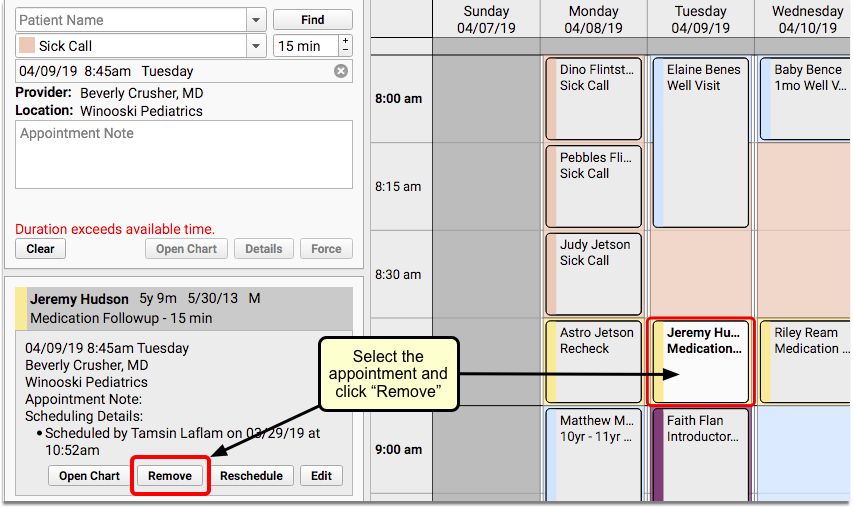
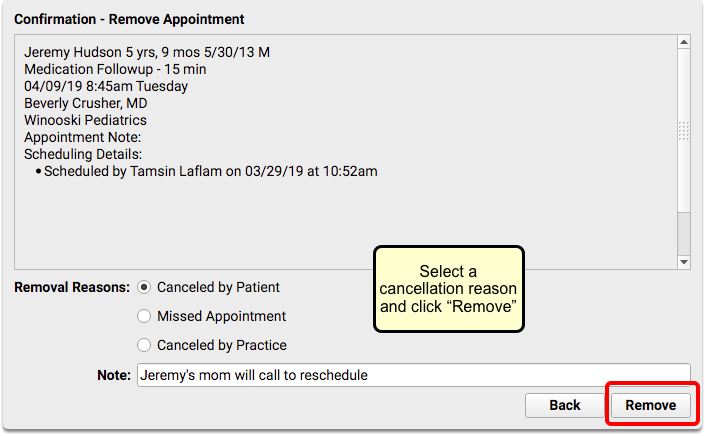
Select a reason that the appointment is being canceled and click “Remove”.
Reschedule an Appointment
When you need to change the date and/or time of an appointment, select it within the calendar grid and click “Reschedule”.
The appointment will move to the “Reschedule Appointment” tab.
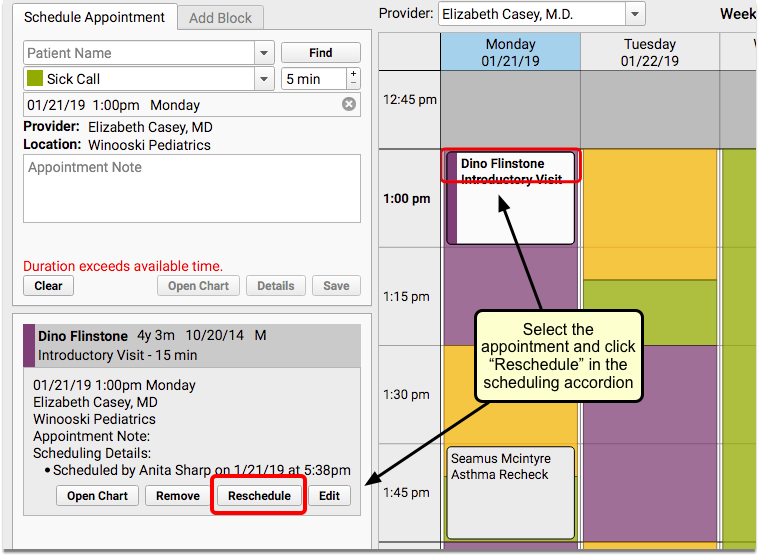
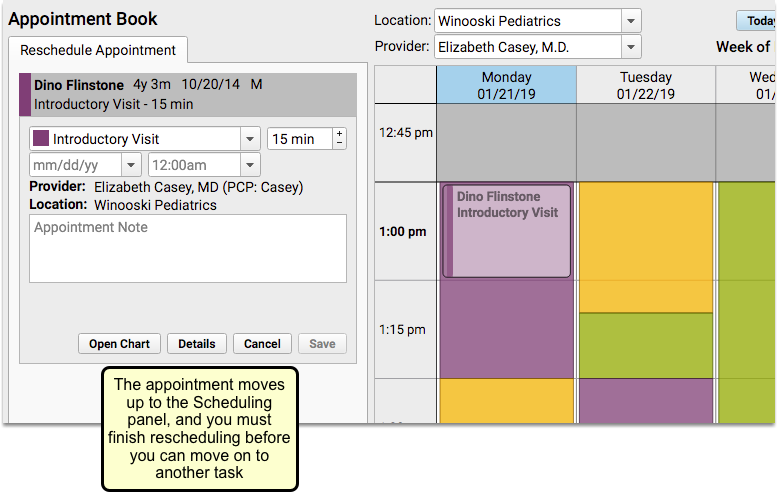
Select a new appointment time and click “Save” to continue.
Edit Appointment Details
Sometimes you need to edit appointment details without changing the appointment time. For example, a well visit might turn into a sick visit, or the length of an appointment could need to be extended.
You can make changes to the details of an appointment that has already been scheduled in the Appointment Book, without having to reschedule it.
Click “Edit” to change the visit reason, duration, and/or the appointment note.
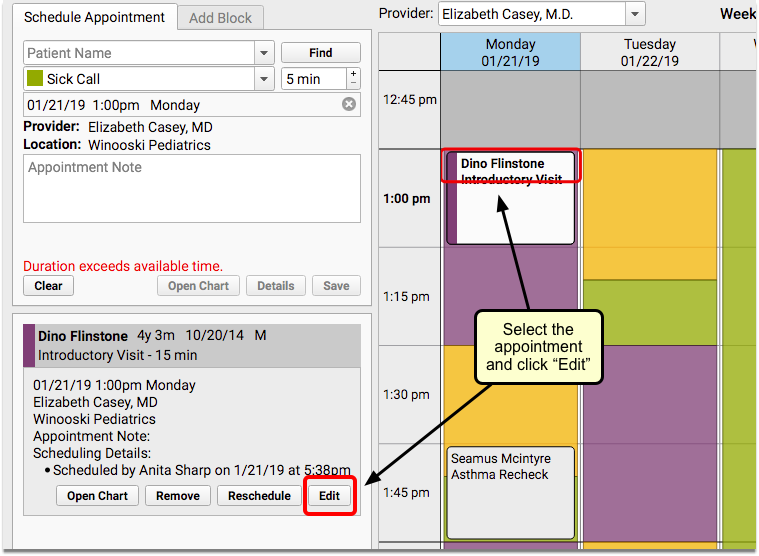
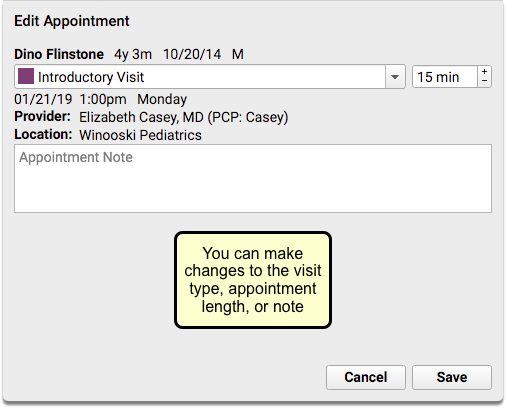
Make changes in the Edit Appointment window and click “Save” to continue.
Place a Scheduling Block
Click the Add Block tab to work with scheduling blocks. You can create a block just as you would schedule a patient.
First, enter a title in the Block Reason field or select a previously used reason from the drop-down, and then select the length of time for the block.
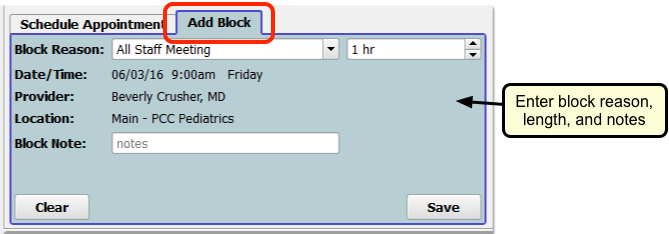
Select the area of the calendar to block out and click “Save”.
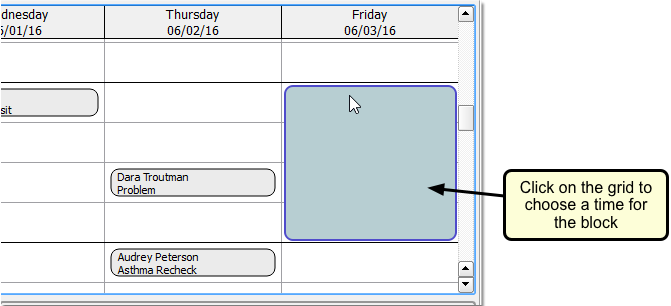
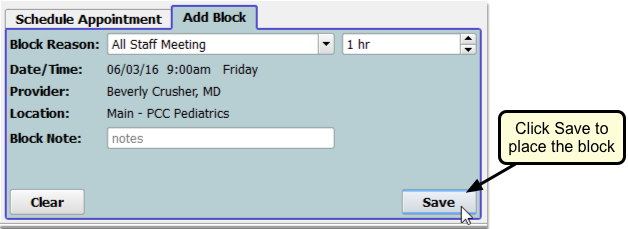
What About Changes to the Doctor's Schedule?: You can block time anywhere on the schedule for a single day. To change a provider’s schedule for a day or manage their available time, use the Provider Hours configuration tool.
Review Appointment History
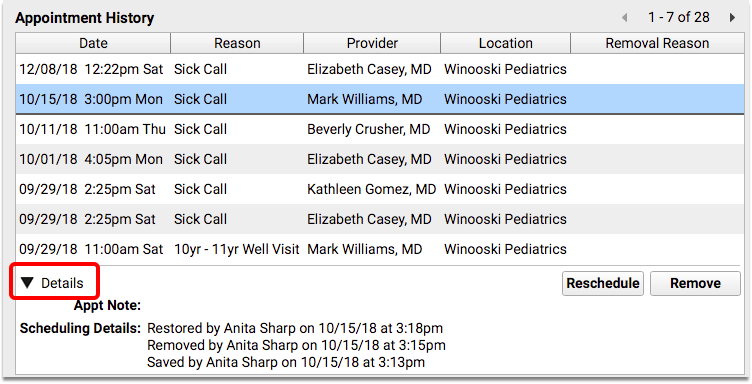
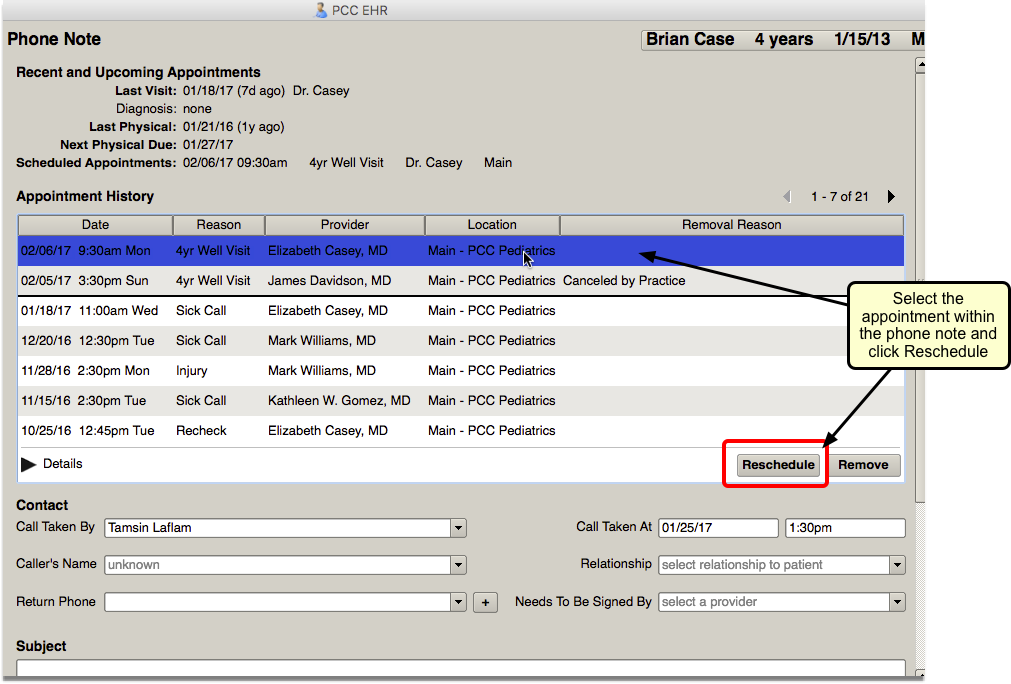
The Appointment History component displays all of a patient’s appointments and includes tools for making changes.

Your practice can add the Appointment History component to your Medical Summary, as well as chart and phone note protocols.
You can review a patient’s past appointments while charting, and can click to reschedule or remove upcoming appointments.
For example, you may have taken a call and opened a new phone note indicating the patient needs to reschedule. While recording the phone note, you can select the appointment on the Appointment History component and click “Reschedule”. PCC EHR will open the Appointment Book to the scheduled time. You can work with the family to choose a new time and/or clinician for the appointment.
Un-Cancel a Canceled Appointment
You can use the Appointment History component to reverse appointment cancelation.
Highlight the canceled appointment and click the new “Restore” button.
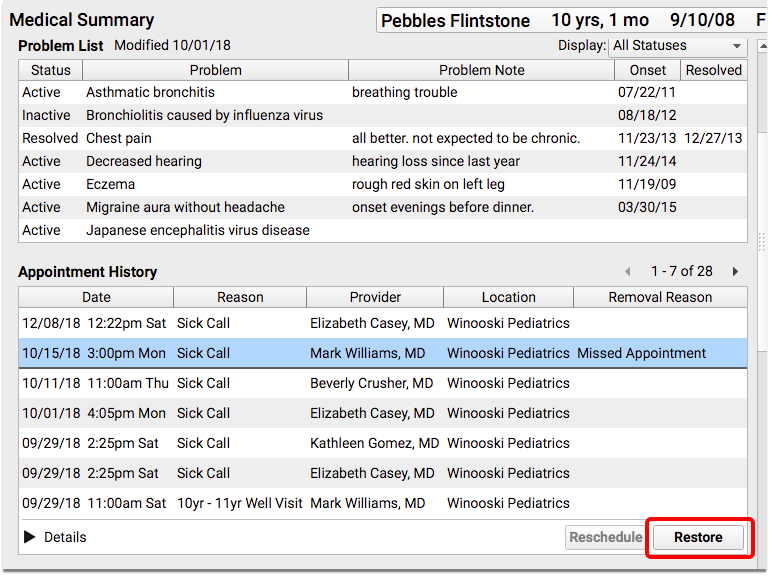
The “Restore” button replaces the “Remove” button when a canceled appointment is selected.
The Details option in the component will show that the appointment was removed and restored.
