Send and Receive Direct Secure Messages
When you need to send a secure message to another provider, or a hospital needs to send you patient records, you can use Direct Secure Messaging–a communication technology used to exchange private medical information. You can send your message, along with a Summary of Care Record, directly to a specialist, another pediatrician, or other healthcare provider.
Read the procedures below to learn how to exchange Direct Secure Messages with other healthcare providers.
Setup and Configuration Needed First: Before you can send and receive Direct Secure messages, your practice must activate the feature and you must register an account. Read Get Started with Direct Secure Messaging to learn how.
Watch the Video: Watch Send, Receive, and Reconcile Direct Secure Messages to learn how to send, receive, and reconcile direct secure messages on your PCC system.
Contents
Send a Direct Secure Message to Another Healthcare Provider
Read the steps below to learn how to send a message, along with a Summary of Care Record (C-CDA), using Direct Secure Messaging.
Open a Chart and Select the Summary of Care Record Report
When you wish to send a Direct Secure Message, first open a patient’s chart.
Then select the “Summary of Care Record” from the Reports menu.

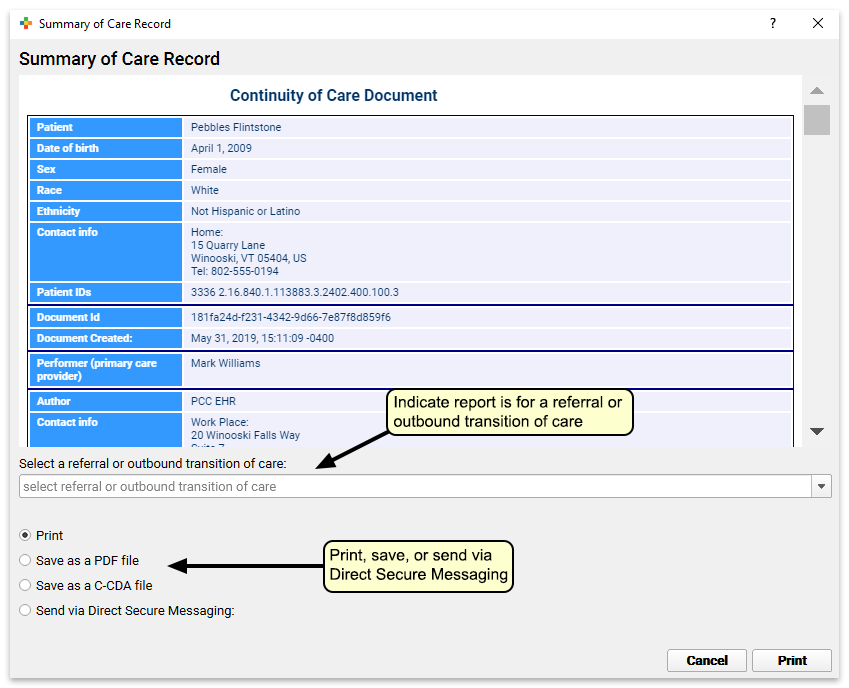
Optional: Indicate Whether the Message is For a Referral or Transition of Care
On the report’s criteria screen, you can indicate whether or not you are creating the record for a referral or transition of care.

Transition of Care For Meaningful Use: If you have indicated that the record is being created for a referral or transition of care, PCC EHR will track that you have generated the C-CDA document and it will update your Meaningful Use reporting totals.
Optional: Limit Record to a Specific Encounter
When you are sending a Direct Secure Message for a referral, you can select a specific referral and optionally limit the record you send to information from that referral encounter. Choose the specific referral order from the selection pull-down menu.
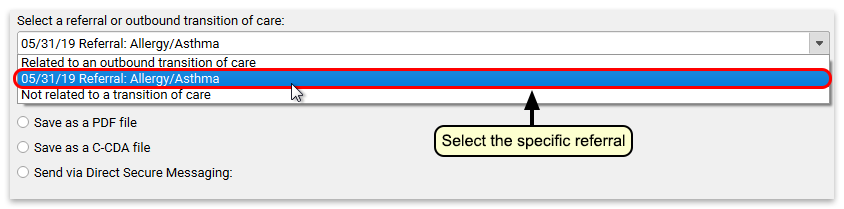

The Summary of Care Record transmitted with the Direct Secure Message will be limited to procedures, orders, and vitals noted for that given encounter date. (Along with the patient’s Problem List, insurance policies, and some other chart information not specific to a particular encounter.) Optionally, you can deselect the “Limited to the referral encounter” check box, and the Summary of Care report will generate the patient’s complete C-CDA with all available patient information.
Select ‘Send via Direct Secure Messaging’
Click “Send via Direct Secure Messaging” and then click “Send to…” to indicate you wish to send a Direct Secure Message.

Enter a Direct Address, or Search for One
Enter the care provider’s Direct Address (not their e-mail address) into the “To” field. Optionally, you can search by provider or practice name.
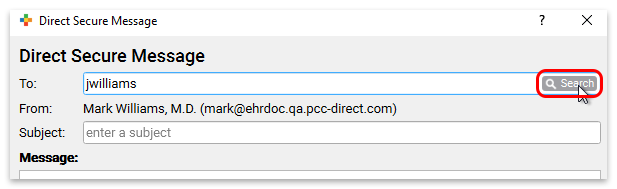
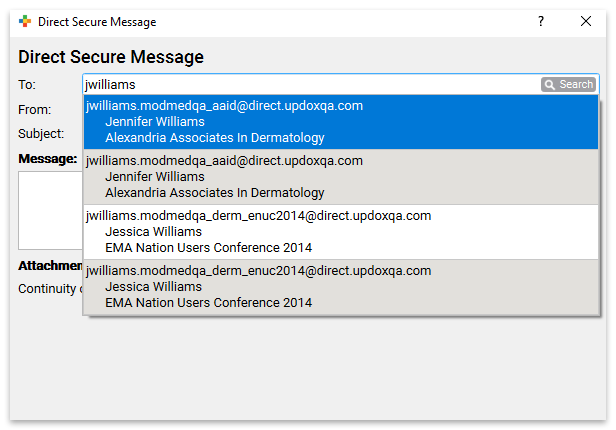
You will see more results if a user at your practice is registered with the DirectTrust network (learn how). PCC EHR also displays search results from contacts your practice has entered into the Professional Contact Manager–those results will appear at the top of your search.
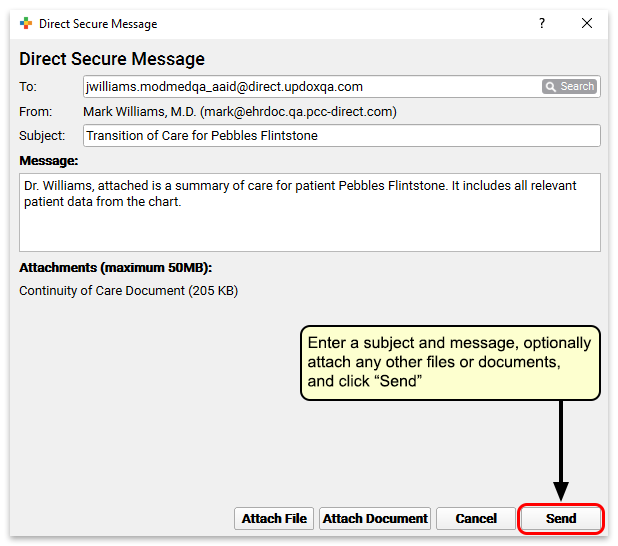
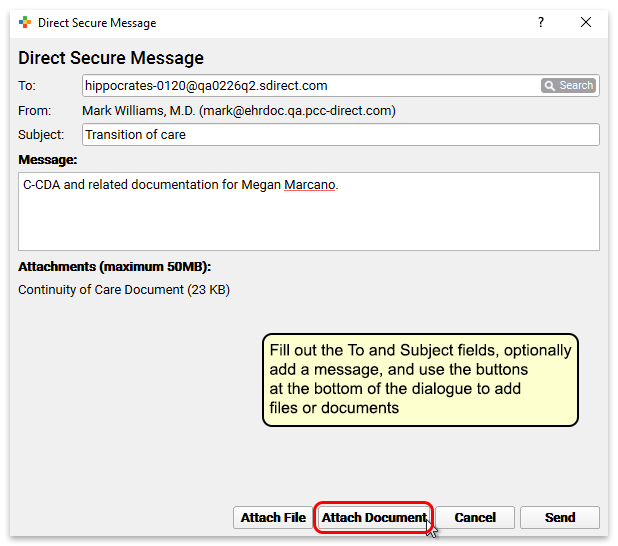
Type a Subject and a Message, and Click “Send”
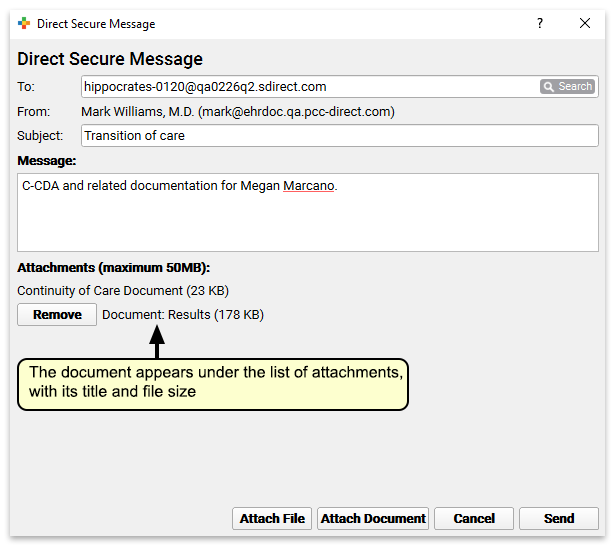
Finally, enter an explanatory subject and message text for your Direct Secure Message. Optionally, you can attach files or documents from your workstation or from the patient’s chart. When you are finished, click “Send” to send the message along with the patient’s care record.
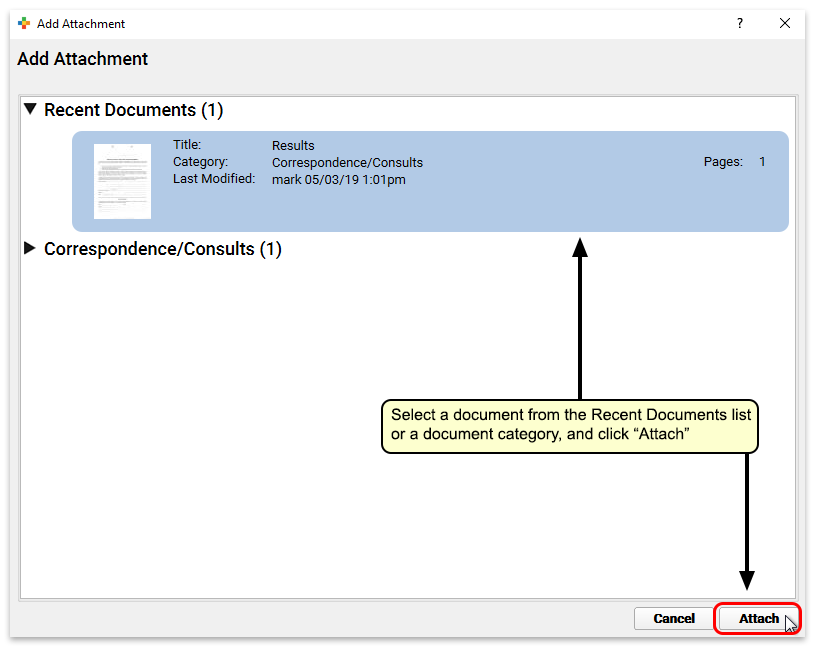
Attach a Patient Document to a Direct Secure Message
You can use the “Attach Document” button to attach any documents associated with the patient to a Direct Secure Message.
Attach a File to a Direct Secure Message
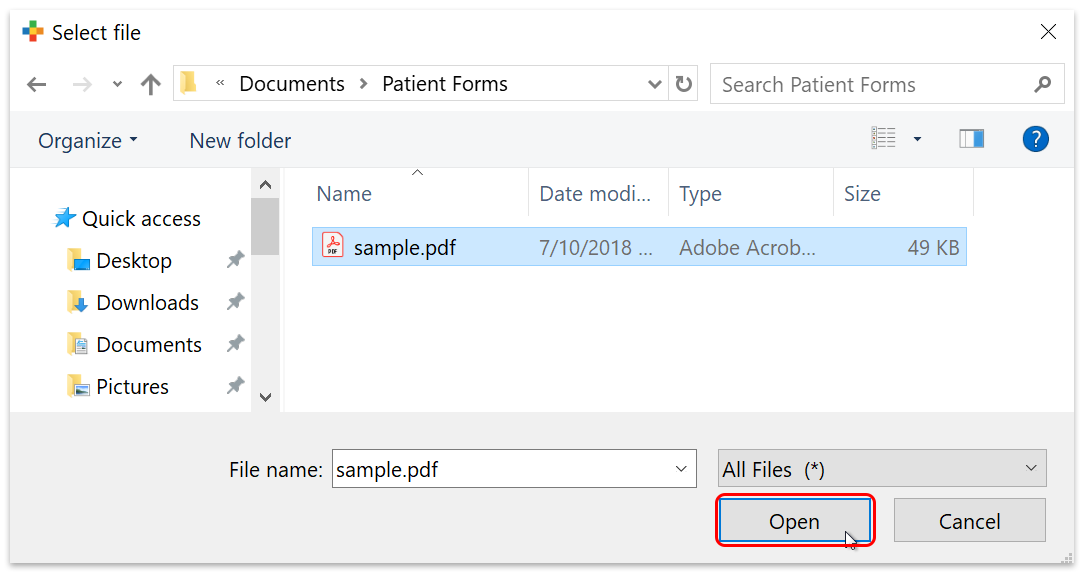
Use the “Attach File” button to attach any file from your workstation to the message.
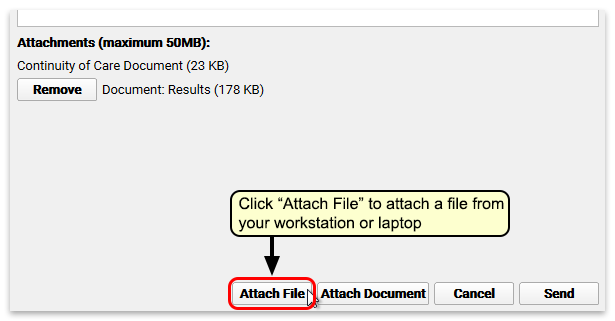
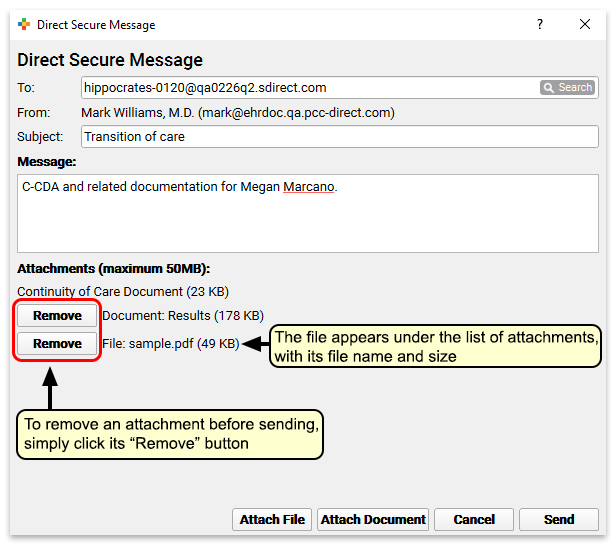
Size Limit and Removing Attachments: Before you send the document you have the option to remove any attachments you may have selected. Direct Secure Messages have a 50MB size limit; if you try to send a message that is too big, you will be prompted to remove attachments.
Receive a Direct Secure Message and Add It to a Patient’s Chart
Once your practice has activated Direct Secure Messaging (learn how), other medical practices can send Direct Secure Messages to users at your practice. Those messages can include transition of care C-CDA attachments and other documents.
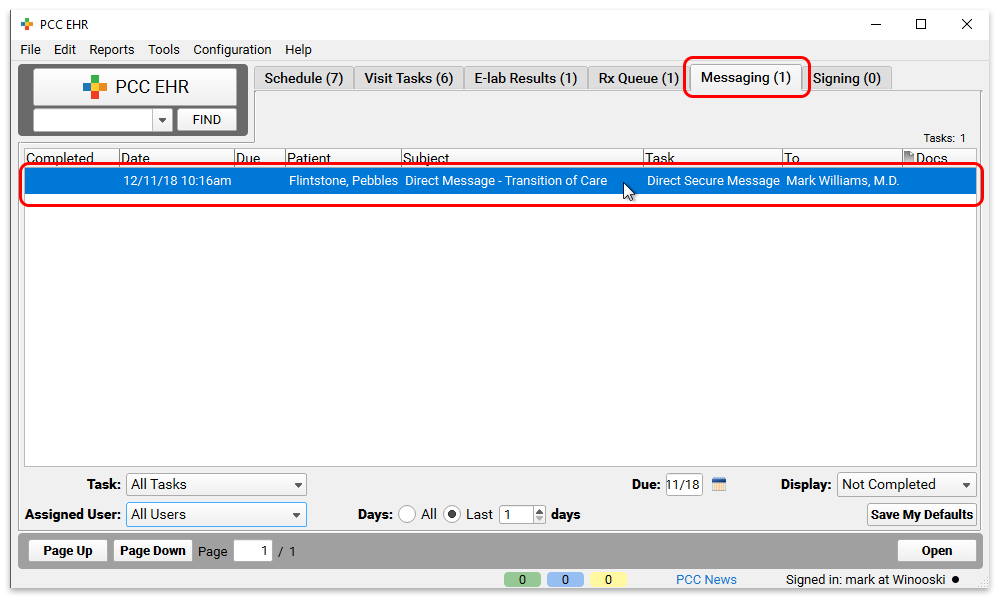
When a Direct Secure Message arrives, it will appear on the Messaging queue. Double-click on a message to review it and associate it with a patient chart.
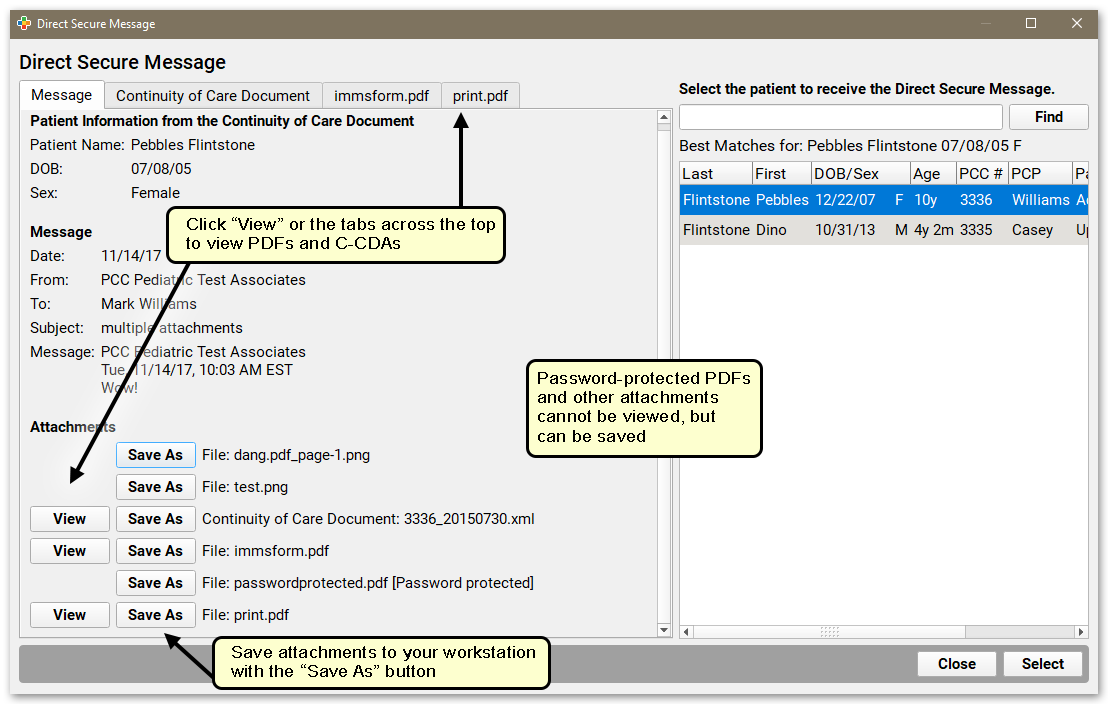
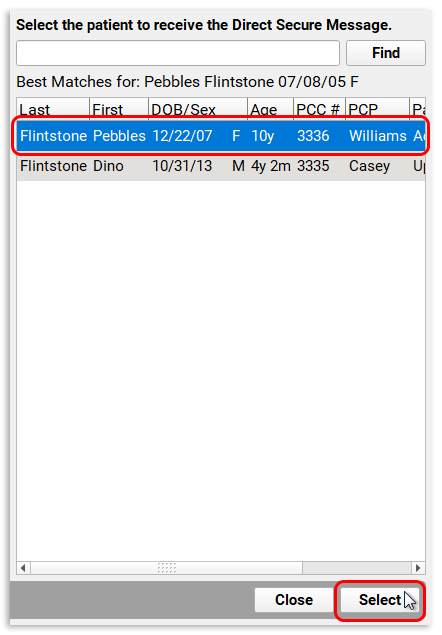
Similar to the process for importing an electronic lab result, you can review message information, including patient name, birthdate, and sex, and message details, if available. You can view PDF, Continuity of Care documents, and the contents of zipped attachments, and optionally save any attachments to your workstation. Use the panel on the right to associate the message with a patient’s chart. In most cases, PCC EHR does the work for you and suggests a matching patient. Otherwise, you can search for any patient.
Click “Select” to place the Direct Secure Message into the patient’s chart.
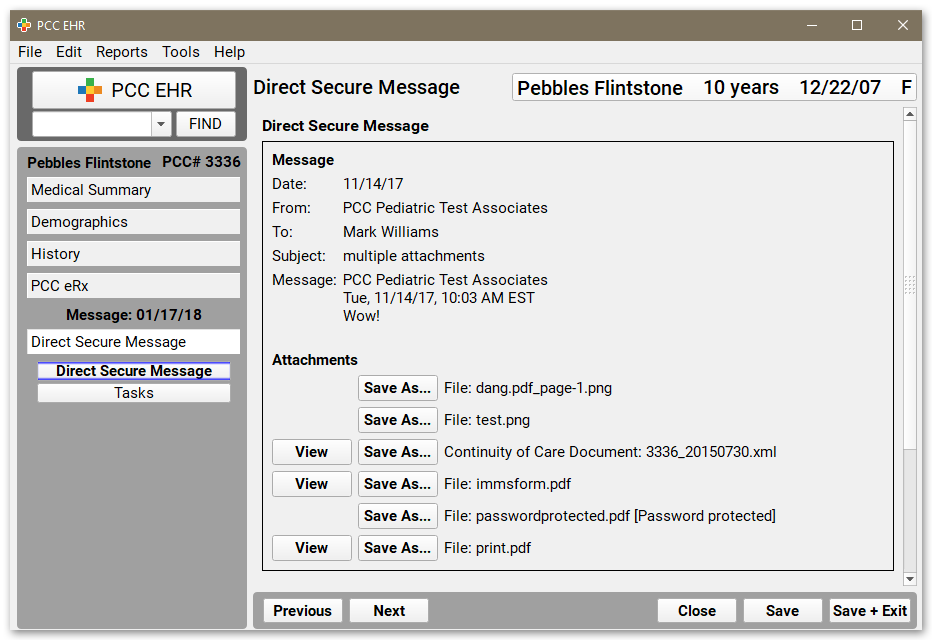
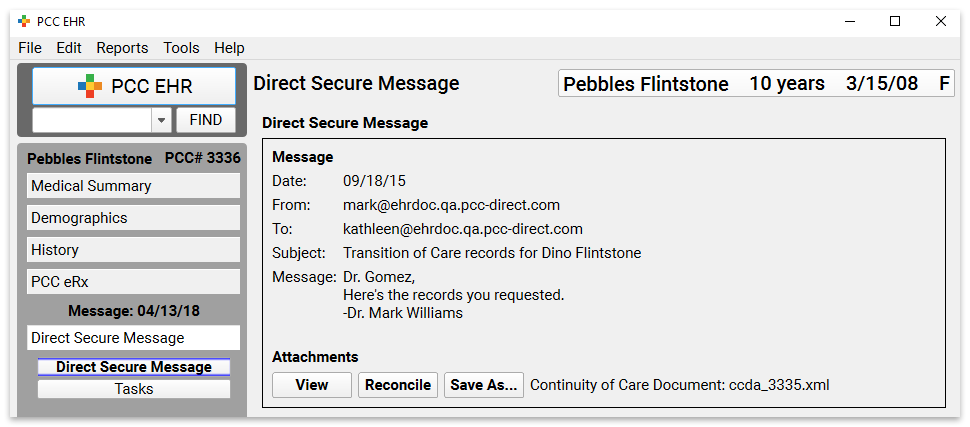
After you click “Select”, PCC EHR will open the Direct Secure Message as it appears in the patient chart. You can see the full message details and any attachments.
Add a Custom Summary to a Direct Secure Message
After a Direct Secure Message is placed in a patient’s chart, you can optionally write your own summary of its contents. Custom summaries appear in place of the message subject in the patient’s Visit History.
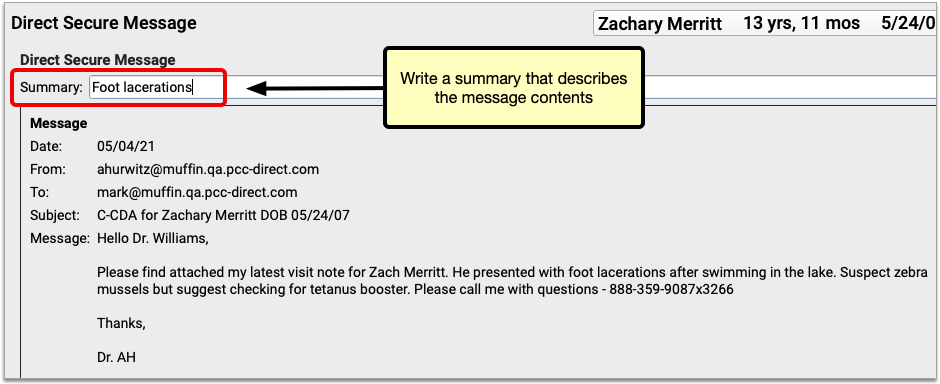

You can edit the summary of a Direct Secure Message at any time.
Review and Work With a Direct Secure Message
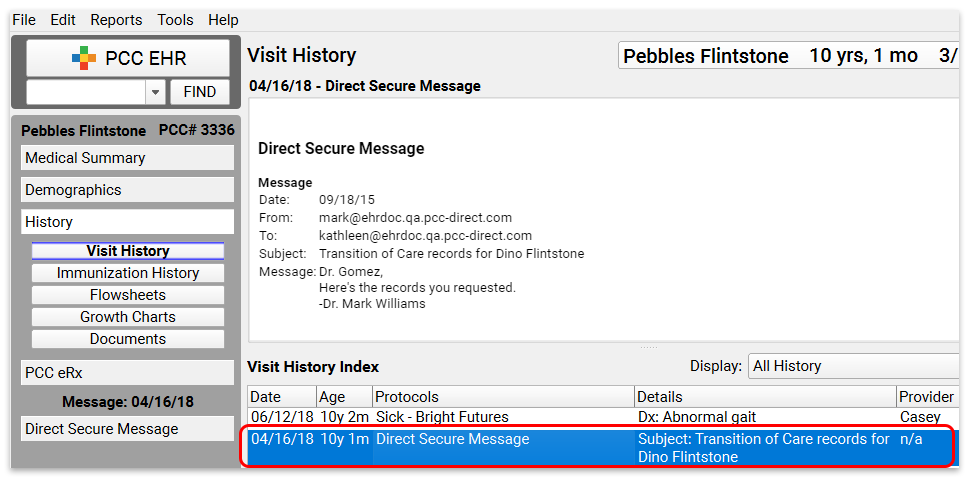
After a Direct Secure Message is placed in a patient’s chart, it appears in the Visit History. You can review it as you would a chart note or phone note.
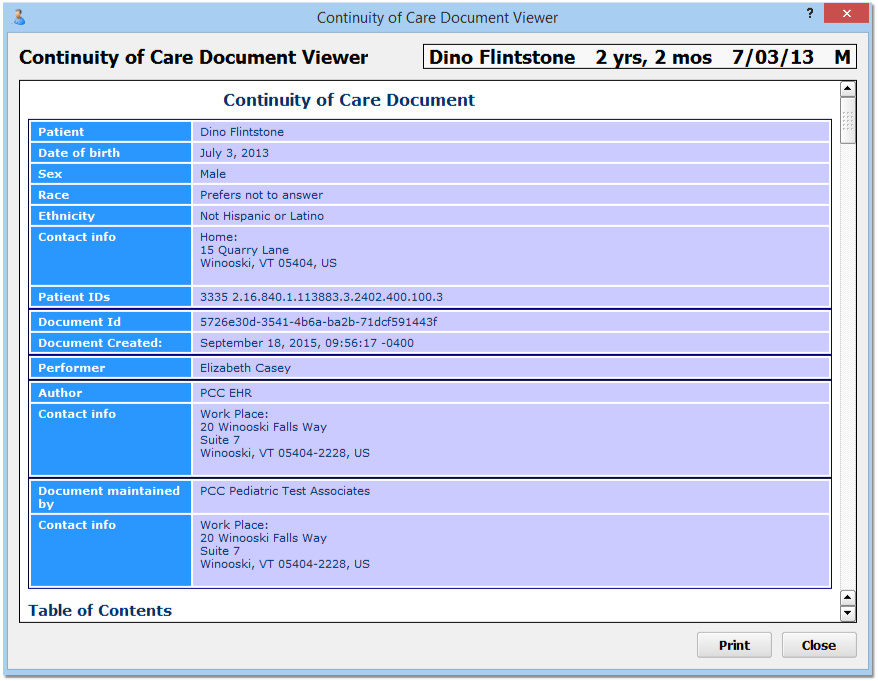
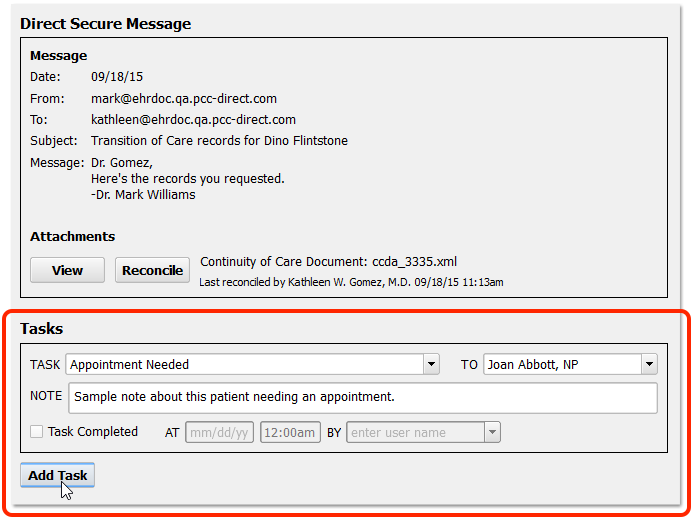
As you review a message, you can click to open message attachments and create and complete tasks. For example, you can click “View” to view a C-CDA document or other attachment.

You can also create a task for any user so they can follow up on the message.
Reconcile a C-CDA Document
If a Direct Secure Message includes a transition of care document in C-CDA format, you can import any Problems, Medication Allergies, and Medications from the C-CDA document into the patient’s chart record.
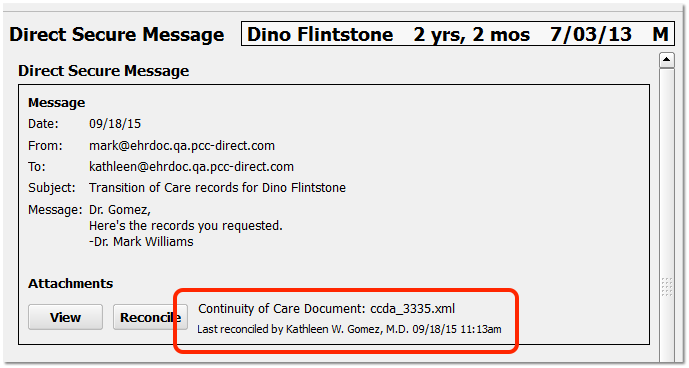
When you see an incoming C-CDA in a Direct Secure Message, you can click “Reconcile” to review and import patient data.

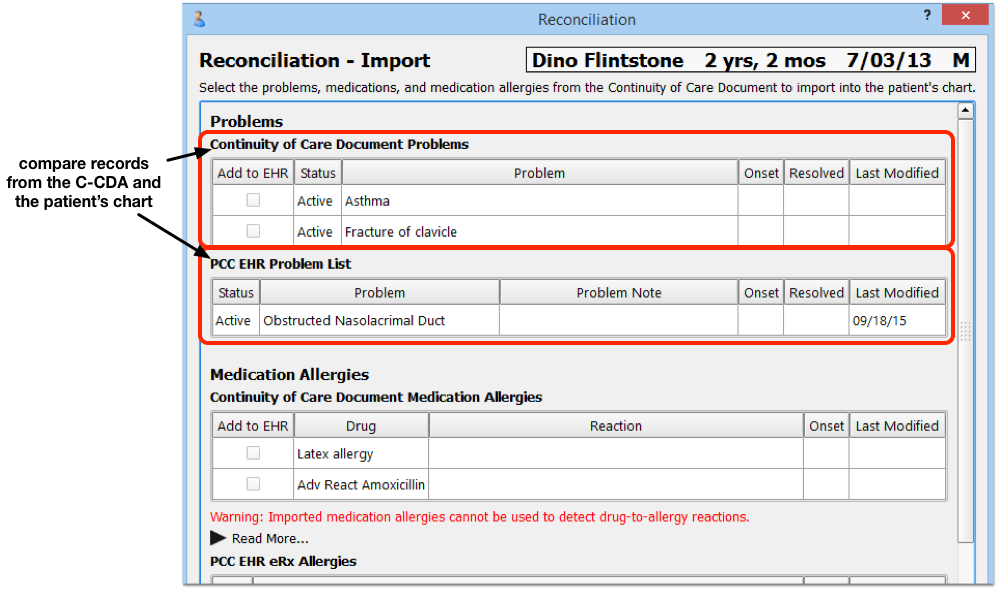
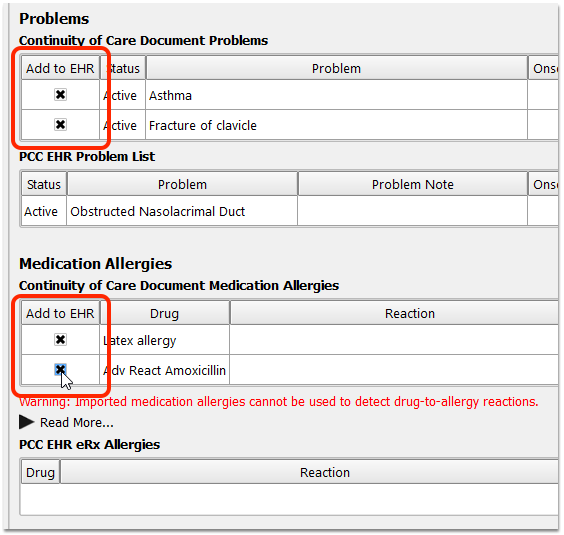
On the “Reconciliation – Import” screen, you will see three sections: Problems, Medication Allergies, and Medications. In each section, you will see both the information in the C-CDA and the information that is already in the patient’s chart. When you want to import information, select it in the “Add to EHR” column.
After you have reviewed each section (Problems, Medication Allergies, and Medications) and selected any items you wish to add to the patient’s chart in PCC EHR, click Next.
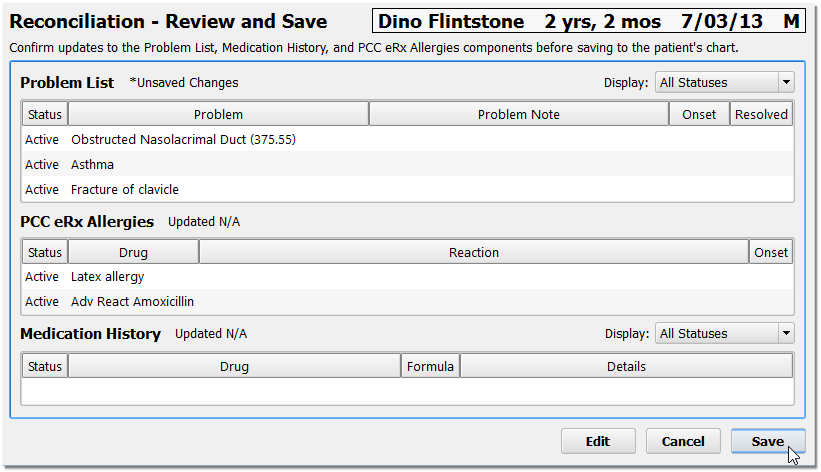
On the “Reconciliation – Review and Save” screen, you can review what the final result of the patient’s record will be. You will see what the patient’s new Problem List, PCC eRx Allergies, and Medication History will display after the import is complete.
Optionally, Click Edit: You can click “Edit” and modify the items on these lists before saving. If you have a duplicate entry, for example, you may want to edit and combine notes or delete an item.
Click “Save” to save your changes and import the data. You can also click “Cancel” to close the C-CDA without making any changes to the patient’s chart.
Last Reconciled: PCC EHR tracks when a user clicked the “Reconcile” button, whether or not they decided to import data to the chart. You will see a “Last Reconciled” attribution on the Direct Secure Message as well as in the patient’s Visit History. You can revisit the message and choose to reconcile the C-CDA data with the patient chart again at any time.
Check Imported Medications and Medication Allergies in PCC eRx
When you reconcile and import medications and medication allergies from a C-CDA, PCC eRx attempts to match each drug description with a known item in its database. Where a match is found, drugs are added to the Allergies and Medication History components in PCC eRx in such a manner that they participate in drug safety checking. Where no match is found, drugs are added as free text. Free text entries are denoted by a pill bottle icon with a question mark and do not participate in drug safety checking.
In order to facilitate the safest possible e-prescribing, PCC recommends that you check for free text entries after reconciling a C-CDA and recreate them as items that can participate in drug safety checking. Use the “Add New Allergy” button in the Allergies component to recreate medication allergies imported as free text. Use the “Add Hx Med” button in the Medication History component to recreate medications imported as free text.
Once you have recreated imported free text entries as items that are able to participate in drug safety checking, you can delete the original free text versions from the patient’s record.
Remove a Direct Secure Message from the Incorrect Patient’s Chart
If you accidentally attach a Direct Secure Message to the wrong chart, you can un-attach it and send it back to the queue.
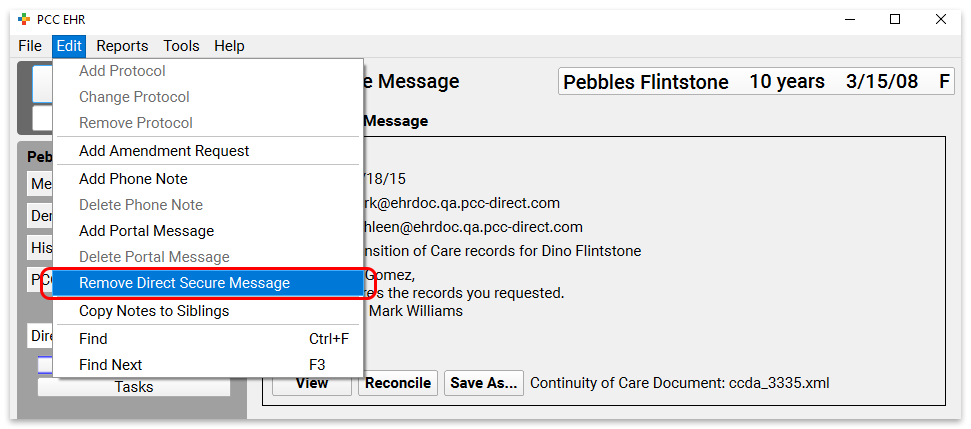
From the Visit History, double-click to open a Direct Secure Message.
While viewing the Direct Secure Message protocol, select “Remove Direct Secure Message” from the Edit menu and then click “Remove”.
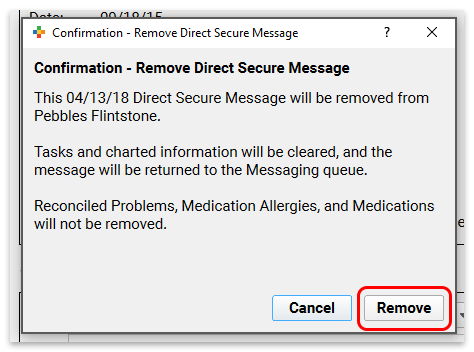
Reconciled Items: If your practice reviewed the Direct Secure Message and reconciled Problems, Medication Allergies, or Medications, they will not be removed by the above process.
The Direct Secure Message will now appear back in the messaging queue, where you can import it to the correct patient’s chart.
Patients and Families Can Send Direct Secure Messages in the Patient Portal
Once your practice has activated Direct Secure Messaging, your patients and families can use the patient portal to send their own visit summary directly to other physicians and medical practices. They can use your practice’s Direct Secure Messaging connection to send the visit summary directly to another Direct Secure Messaging user.
When users want to save or send a visit summary in C-CDA format, they first select the patient and visit from their history.
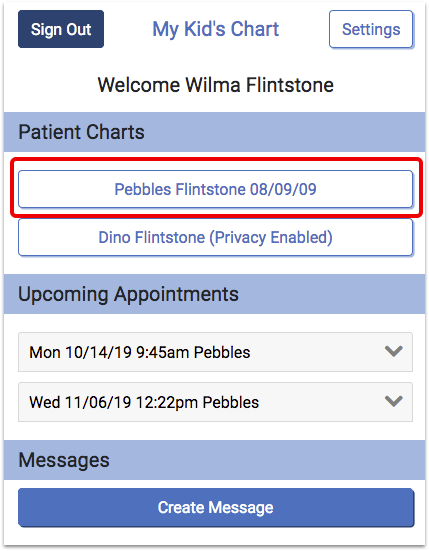
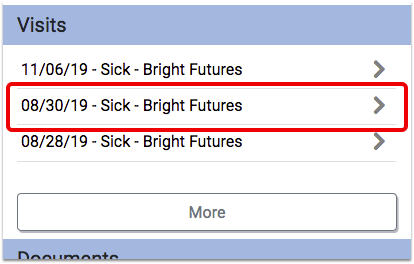
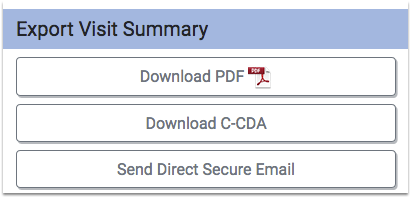
At the bottom of the visit, they can choose to download or send the visit summary.
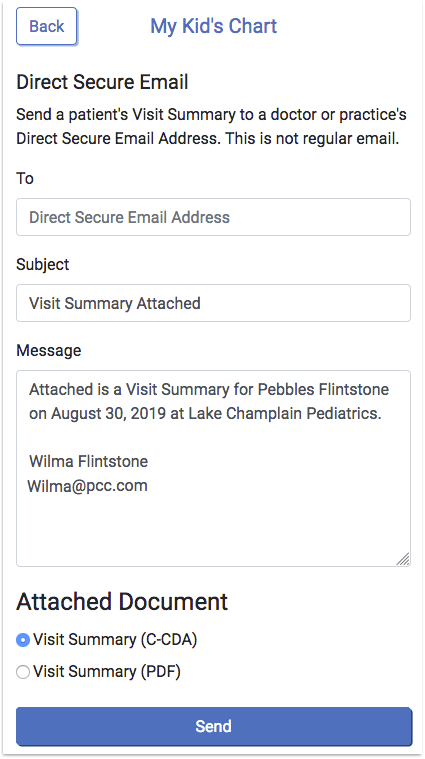
On the Direct Secure Email screen, the user can enter the Direct Secure Messaging address provided by the recipient. For example, a specialist might provide a parent with an address for the purpose of sending a visit summary directly to them.
After they enter an address, the user can optionally edit the default subject and message. Next, the user can choose whether to attach a C-CDA or PDF, and click “Send” to send the message and visit summary.
Direct Secure Messaging Required: Portal users can only send Direct Secure Messages if your practice has activated Direct Secure Messaging. Additionally, until a user at your practice registers with the DirectTrust Network, parents and families can only send messages to physicians and other practices within the Updox network. For more information, read the Get Started with Direct Secure Messaging article.