
Set Up Self Scheduling for Vaccine Clinics
Planning an event-style vaccine clinic (in-office or drive-through)? Getting ahead of the rush for flu season? This guide will help you set up portal self scheduling for your upcoming vaccine appointments.
Contents
- 1 Pick a Practicewide Self Scheduling Approach
- 2 Decide on Schedule and Location Options
- 3 Plan Your Clinic
- 4 Configure Self Scheduling for Your Vaccine Clinic
- 4.1 Optionally Create a Vaccine Clinic Location
- 4.2 Optionally Create a Provider Group
- 4.3 Create One or More Vaccine-Only “Provider(s)”
- 4.4 Create One or More Clinic Visit Type(s)
- 4.5 Create One or More Vaccine-Only Visit Reason(s)
- 4.6 Map Your Visit Reasons to Vaccine Protocols
- 4.7 Build Your Clinic’s Scheduling Template
- 4.8 Configure Vaccine-Only Self Scheduling
- 4.9 Enable Portal Scheduling
- 4.10 Test Your Configuration
- 5 Other Clinic Workflow Considerations
Pick a Practicewide Self Scheduling Approach
When configuring portal self scheduling, your practice will need to decide how you want portal users to be able to schedule their appointments.
There are two main methods of control for portal self scheduling:
- You can designate (or “paint-in”) periods of times when self scheduling is available by Visit Type.
- You can allow portal users to schedule any available slot that matches their chosen Visit Reason.
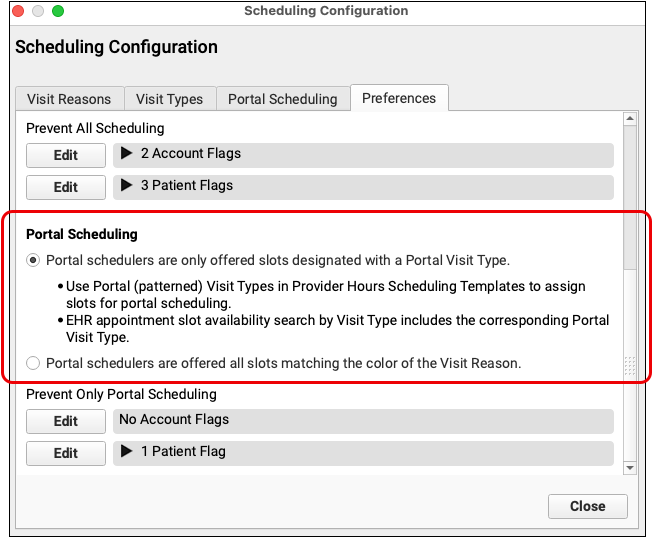
The ideal approach for your practice will depend on your current scheduling workflows and preferences.
If you change these options after enabling self scheduling, it will affect all previously scheduled appointments.
To learn more about these self scheduling configuration options, read Configure Self Scheduling or reach out to PCC Support for assistance.
Visit Types Required: Portal self scheduling uses Visit Types in the Appointment Book. If your practice has not set up Visit Types, configure your Visit Types before enabling portal self scheduling.
Decide on Schedule and Location Options
Are you a small practice looking to fill your nurse’s schedule or a large practice with multiple locations that are all hosting a flu clinic? Will you have one, two, five, or more vaccine-only treatment rooms? You can create vaccine-only columns or “fake providers” in the Appointment Book and sort them into vaccine clinic locations to make it easier to review your schedules during flu season.
Vaccine-Only Schedule Options
The right configuration approach for your practice will depend on the volume of patients and staffing plans for your event-style vaccine clinic. Here are three methods for scheduling vaccine visits and clinics at your practice.
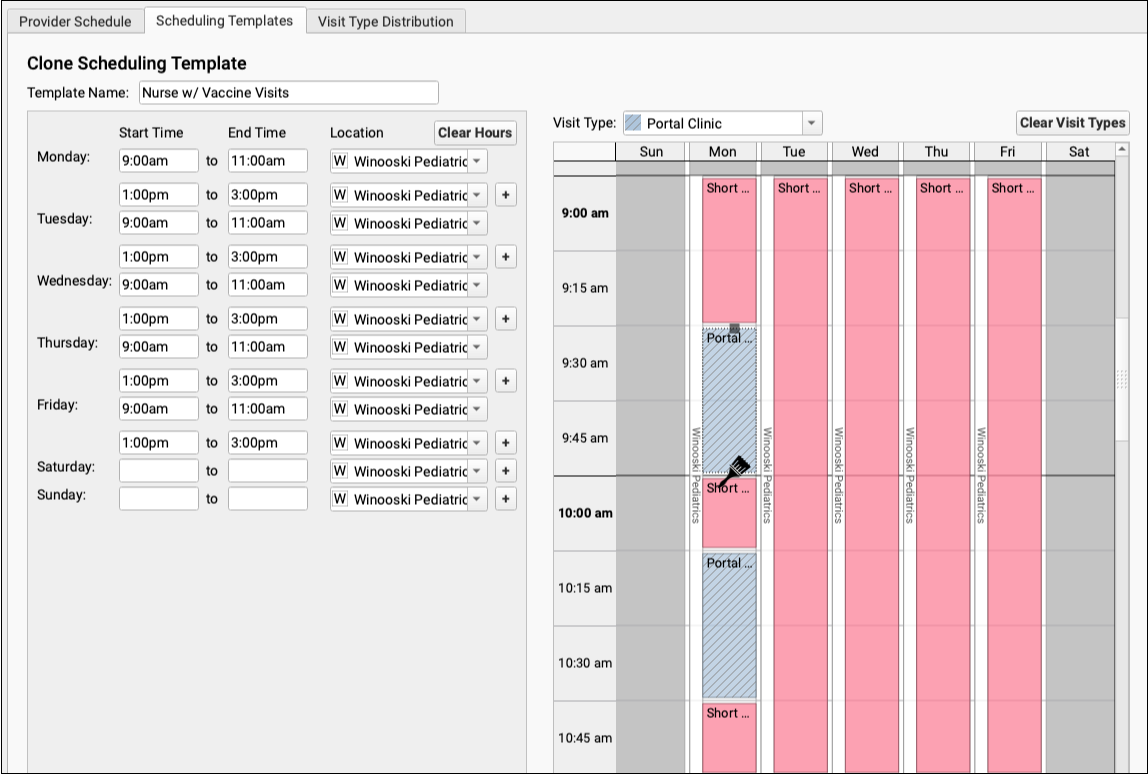
Use Your Current Schedule: If your practice plans to fill your clinicians’ schedules with vaccine-only visits, you don’t need to make new vaccine-only columns in the Appointment Book. Depending on your practicewide self scheduling approach (painting in vs. open by visit reason), you can either paint in the vaccine-only visit types for self scheduling right on the existing clinicians’ schedules or use a vaccine-only visit reason to achieve the same goal. See below for details.
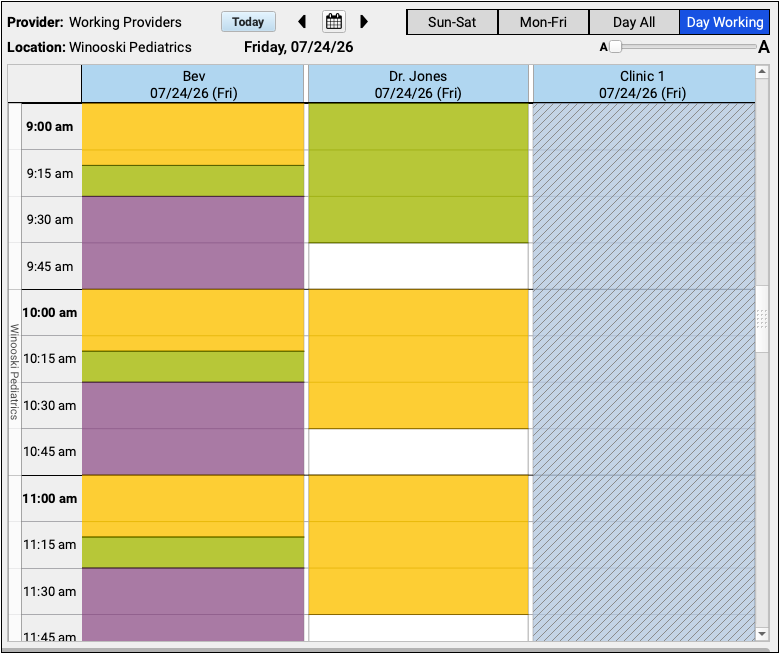
Add a Vaccine-Only Option: If your practice does not want your clinicians’ schedules filled with vaccine-only visits, but you’re not doing a full-on clinic, you can create a new Vaccine-Only scheduling column in the Appointment Book. This specialized vaccine-only column will display in the Appointment Book like a provider’s schedule. You can then fill in that column’s template with your vaccine-only visit types or visit reason, based on whichever practicewide self scheduling approach you’re using.
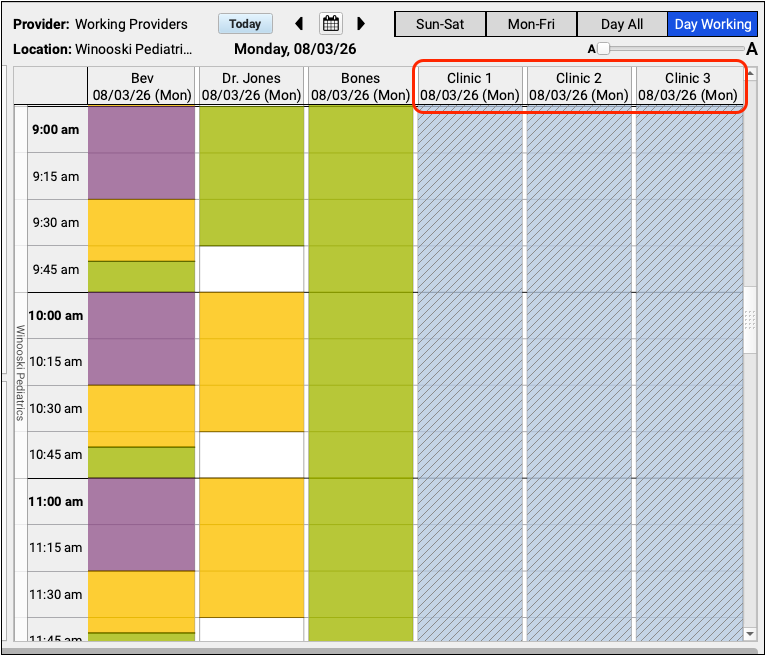
Configure a Multi-Room Clinic: When you’re planning a fast-paced vaccine clinic that will use many rooms at the same time, you can create scheduling columns in the Appointment Book for each room that will be available. These specialized vaccine-only columns will display in the Appointment Book as though each room is a provider’s schedule. You can then fill in that column’s template with your vaccine-only visit types or visit reason, based on whichever practicewide self scheduling approach you’re using.
Set the Provider of Service: Whenever you create a vaccine-only provider column in the Appointment Book, your billing staff must update the Provider of Service at the top of the EEF during billing to keep billing and productivity reporting accurate. See Other Clinic Workflow Considerations below for more information.
Vaccine Clinic Location Option
This article covers configuration for on-site vaccine clinics that are held at, or billed through, the practice’s main office location(s). Practices of any size can add vaccine-only columns to their schedules, as described in the steps below. However, adding lots of new columns to a busy schedule can be cumbersome.
If your schedulers find it difficult to read multi-patient appointment fields or dislike scrolling across a broader-than-usual schedule during your clinic weeks, you can create an event-style “Vaccine Clinic Location” that is a clone of your main office location, but that displays just your vaccine-only visits. Bear in mind that cloning your location does not change your billing setup, and is not a recommended workflow for expanding your practice or moving your office to a new location.
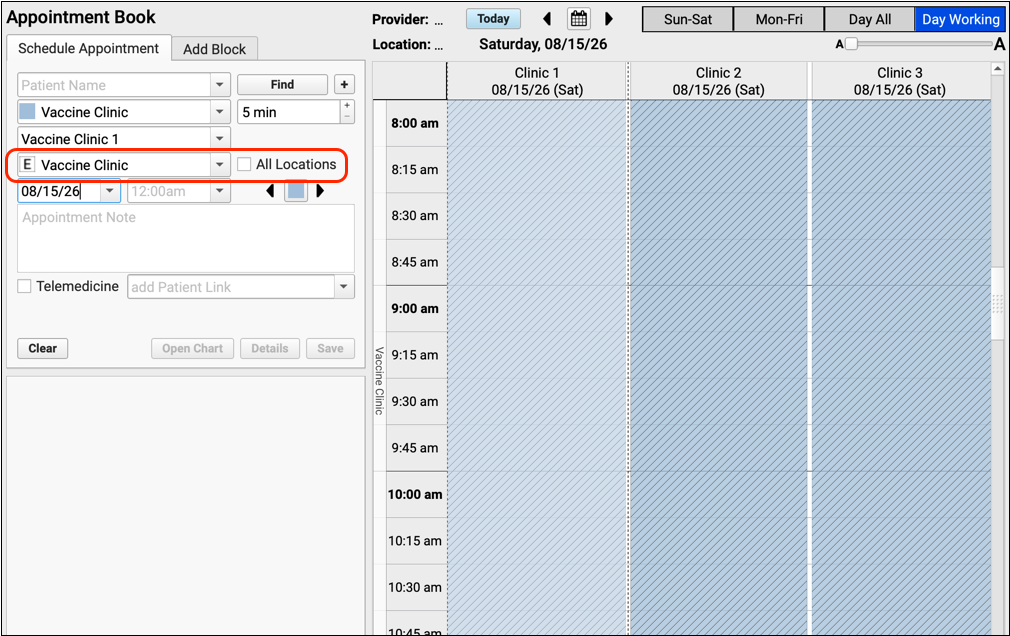
When in doubt, contact PCC Support or work with your Client Advocate to ensure your configuration suits your practice’s needs.
Plan Your Clinic
Before you start configuring, make a plan for your vaccine clinic. Among your other plans, consider the following:
- How many vaccine clinic appointments do you expect to see per hour or increment of time?
- How many rooms (or lanes in the parking lot) will be used for the clinic?
- How many staff members will administer the vaccines?
- Which vaccines will be available?
- Which staff members will sign for the visit?
- Which clinician will be selected as the Provider of Service when billing for the visit? This decision affects both billing and reporting, read Same Day Clinic Workflows below to learn more.
Compiling this information before you begin will make the configuration process smoother for you, and it will improve your vaccine-only billing and reporting experience as well.
Example Plan: Your practice is hosting a vaccine clinic from 8:00 a.m. – 3:00 p.m. on the next three Saturdays and Sundays. There will be three treatment rooms available for use, with one clinician available for consultations. Three nurses per shift will administer Flu, Covid, or both vaccines. Other types of vaccines are available by request, but not schedulable by portal users. Each patient’s appointment will take roughly five minutes. For this situation, you would make three vaccine-only schedule columns in the Appointment Book.
You could optionally separate these columns into their own view in the Appointment Book as an event-style Vaccine Clinic Location.
Additionally, you would create scheduling templates in the areas where self scheduling is permitted, and associated the appropriate visit reasons and visit types.
The steps detailed below will take you through the entire process for configuring your vaccine clinic for self scheduling. If you run into any challenges, please contact PCC Support for assistance at 800-722-7708 or open a ticket at support@pcc.com.
Configure Self Scheduling for Your Vaccine Clinic
The following steps will guide you through setting up self scheduling for your multi-room vaccine clinic. If you have any questions along the way, don’t hesitate to ask PCC.
Optionally Create a Vaccine Clinic Location
Contact PCC Support for assistance creating a new place of service for your vaccine clinic.
Once you have a new place of service for your clinic, choose your clinic location when you configure provider hours for your new vaccine-only provider(s). This makes your clinic schedule display for the new location on the Schedule screen and in the Appointment Book. See the Build Your Clinic’s Scheduling Template section below to learn more.
Not Recommended for New Billing Locations: This section describes how to use a Vaccine Clinic location to address schedule readability in the Appointment Book and is not the recommended workflow for adding a new billing service facility location. If you are planning on adding a new place of service or billing service facility, please contact PCC as soon as possible.
Optionally Create a Provider Group
For the sake of reporting, your practice may wish to create a “Vaccine” provider group. Or your practice may decide to put the vaccine-only providers under a catch-all provider group, such as “Office”.
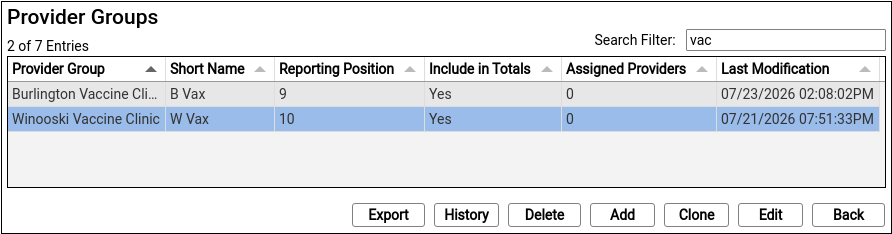
Multi-location practices or care centers that have generic “flu clinic” providers at certain locations may wish to create a location-specific provider group and assign the “flu clinic” provider to that location-specific provider group.
Learn more about how to create a new Provider Group in the Tables tool in the Add and Configure a Clinician article.
Create One or More Vaccine-Only “Provider(s)”
For a multi-room clinic, your practice can create multiple new providers and provider groups in User Administration.
Create Clinic Provider(s) in the User Administration Tool
Create a new user in User Administration.
- Make sure the EHR User field is populated. Check over the EHR User field carefully, as it cannot be changed after the user is created. While your staff will not log in as this user, it is still important to create a secure password for this user.
- Leave the NPI and other ID fields blank, as this user will not be able to bill in the usual way. (Your staff will select a Provider of Service during billing.)
- Make this provider a Scheduling User by checking the checkbox “This user is a Scheduling Provider” checkbox.
- Your new user does not need a role
- Your new user will not be assigned tasks.
- Your staff will not be signing in as this user.
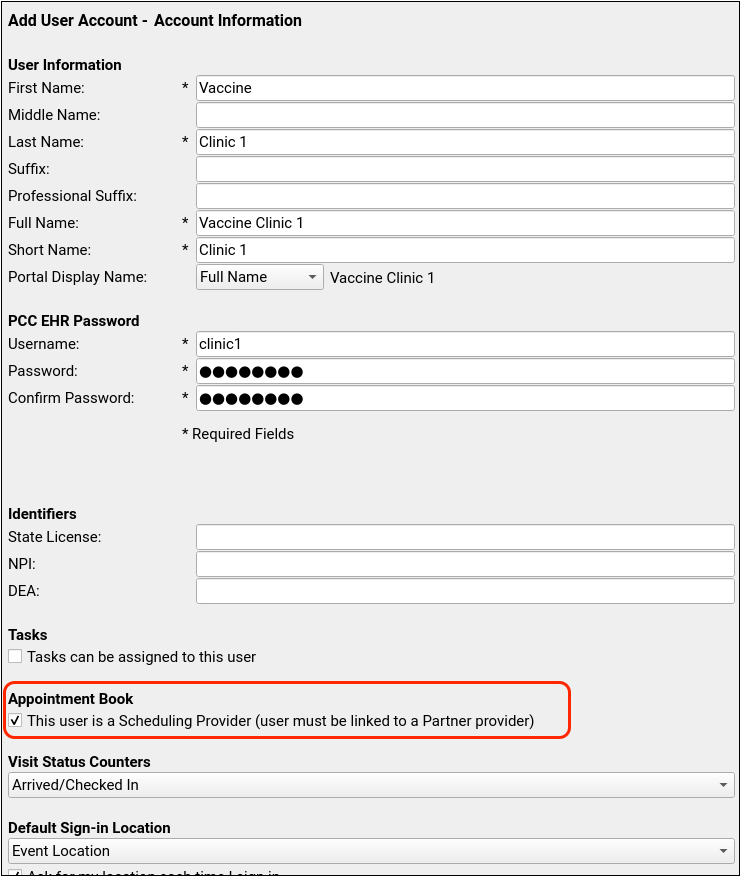
Make as many users as you need for your clinic.
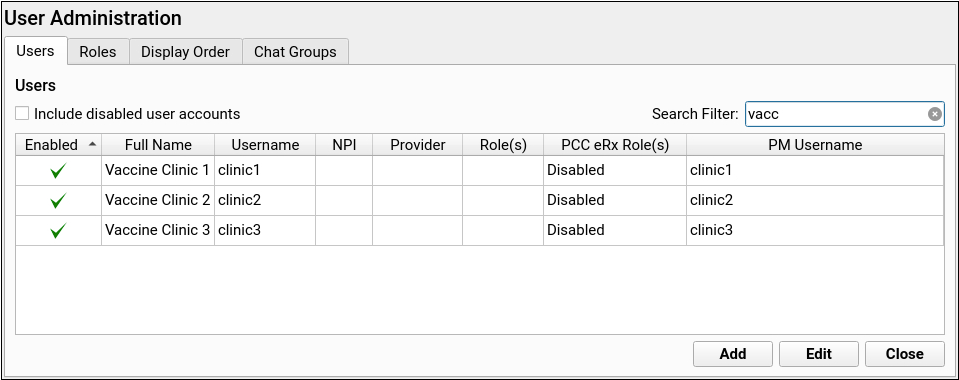
For more information and specific steps for adding a user, read this Add a User article.
Add Clinic Provider(s) in the Providers Table
Create the new provider(s) in the Providers Table.
- Ensure each new scheduling provider has a matching EHR User field.
- Mark this user as Not Real, as you will not be billing for this user.
- Optionally assign a vaccine-only provider group.
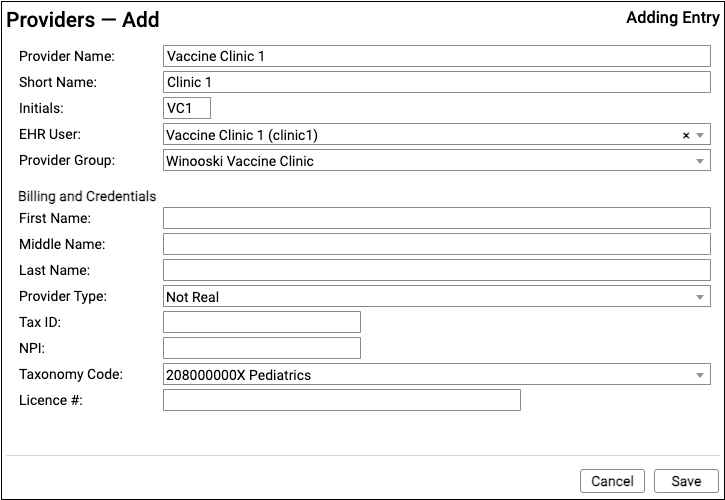
For instructions on how to add a new provider in the Provider’s table, read the Add and Configure a New Clinician article.
Optionally Repeat Steps 1 and 2
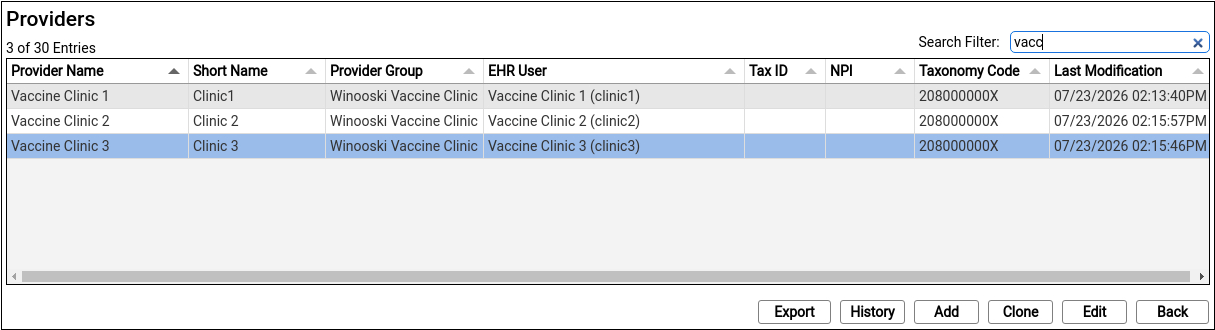
Repeat the last two steps for each of your clinic rooms or lanes (e.g., “Clinic Room 1,” “Clinic Room 2”) You can clone the first entry and change the name and EHR User field to match your clinic plans.
Log Out and Back In
Fully lout of PCC EHR. Be sure to close the login pop-up. Then log back in to see your new providers in Provider Hours and in the Appointment Book.
Create One or More Clinic Visit Type(s)
Still in Scheduling Configuration, select the Visit Types tab and create at least one Visit Type for your vaccine clinic. Portal Self Scheduling requires at least one associated visit type.
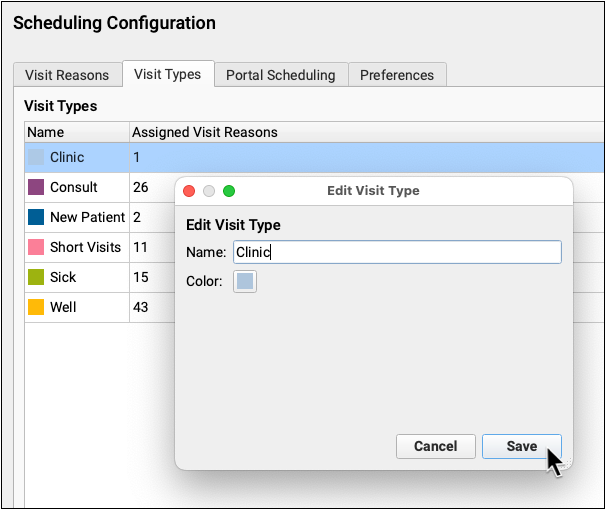
To learn more about how to create new visit types, read the Configure the Appointment Book article.
Create One or More Vaccine-Only Visit Reason(s)
Open the Configuration menu and select Scheduling. In the Visit Reasons tab, create at least one Visit Reason for your vaccine clinic. Families will select visit reasons in the portal when they self schedule. The portal display name is the name the portal user will see when scheduling their visit.
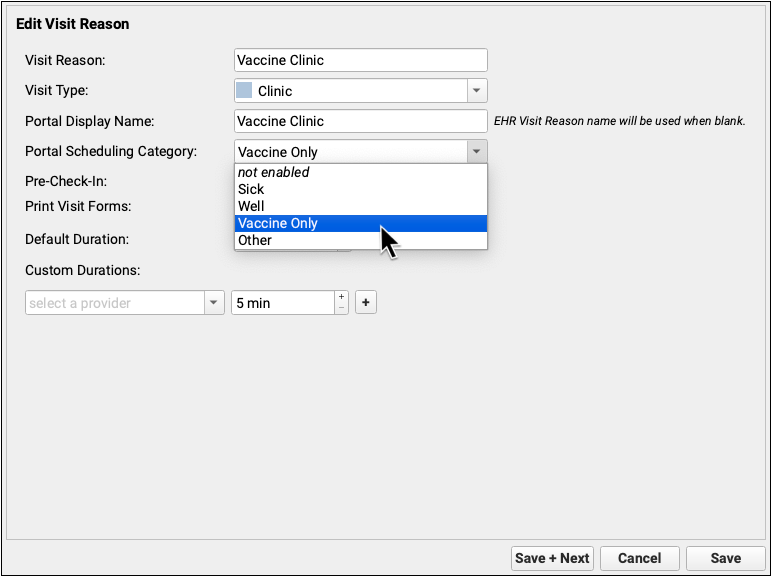
If your practice uses the “paint-in by Visit Type” self scheduling approach, you can use one or more Vaccine Clinic visit reasons to paint into your schedule template.
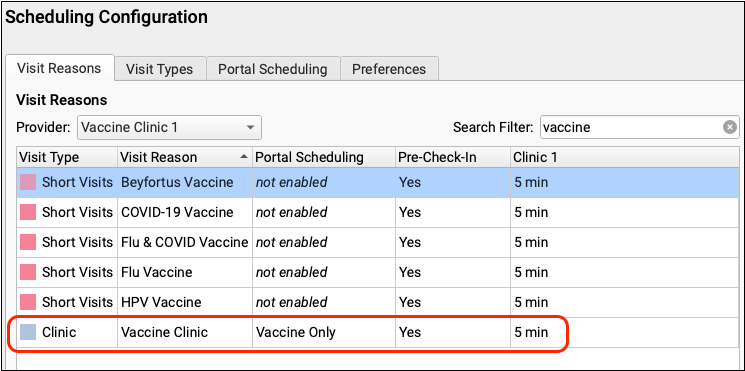
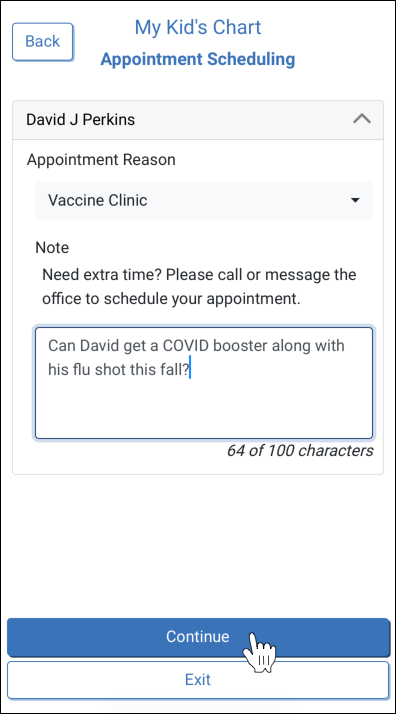
That way, patients and families can choose just one visit reason (Vaccine Clinic) and specify in the notes which vaccines they would like to receive at their appointment.
If your practice uses the “open per Visit Reason” self scheduling approach, consider making multiple visit reasons that align with each of the vaccines your clinicians will be administering during the clinic.
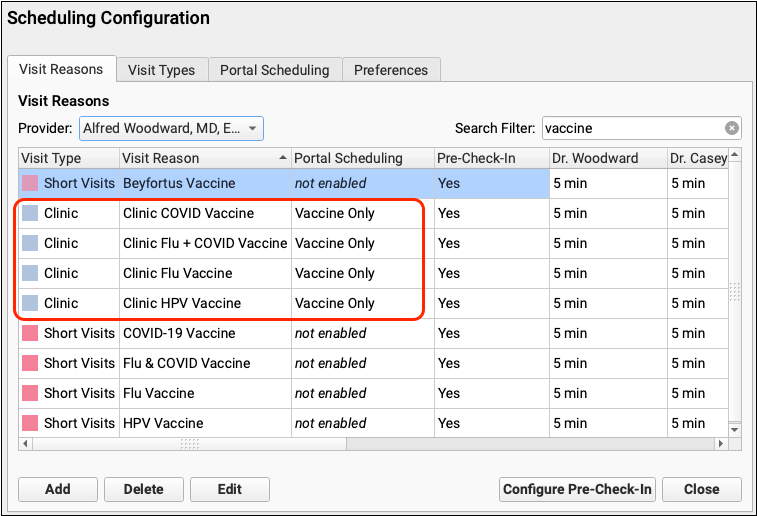
This way, patients and families can choose their visit reason by the type of vaccine when scheduling in the portal.
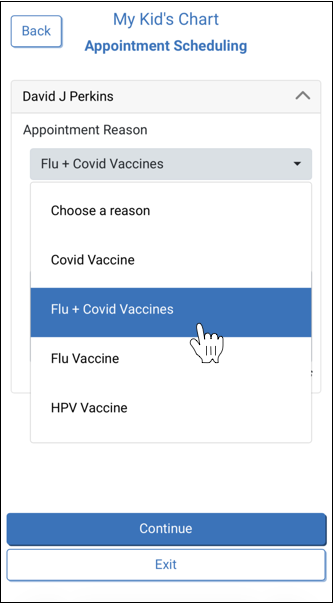
Be sure to give these visit reasons an appropriate portal-scheduling Visit Type so that portal users will be offered appointments with the matching color on your scheduling template.
To learn more about how to create new visit reasons, read the Configure the Appointment Book article.
Map Your Visit Reasons to Vaccine Protocols
Use Protocol Configuration to map your vaccine visits to the new Visit Reasons you created for your clinic.
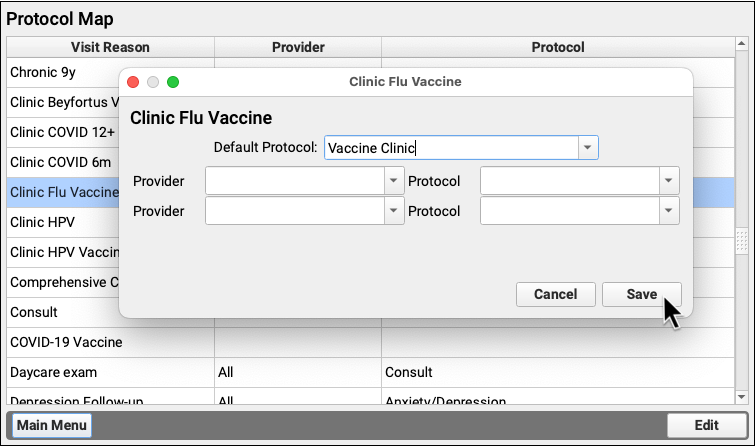
To learn more about working with protocols in PCC, read the Protocol Builder Reference and associated articles.
Build Your Clinic’s Scheduling Template
Next build a provider hours template and set up your clinic calendar. The steps below are a summary.
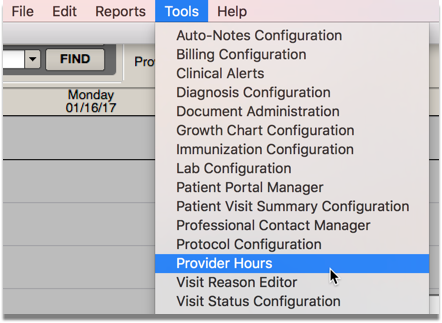
Open Scheduling Templates in the Provider Hours Tool
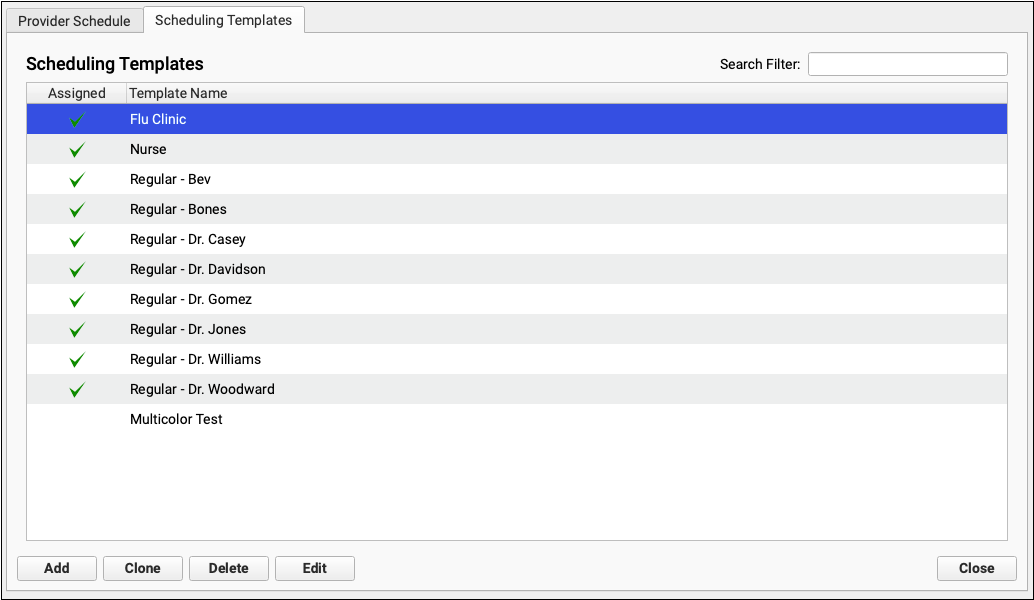
Open provider hours and navigate to the Scheduling Template tab.
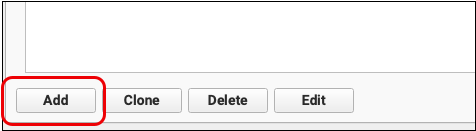
Create a New Template
Click “Add” to create a new template for your clinic hours.
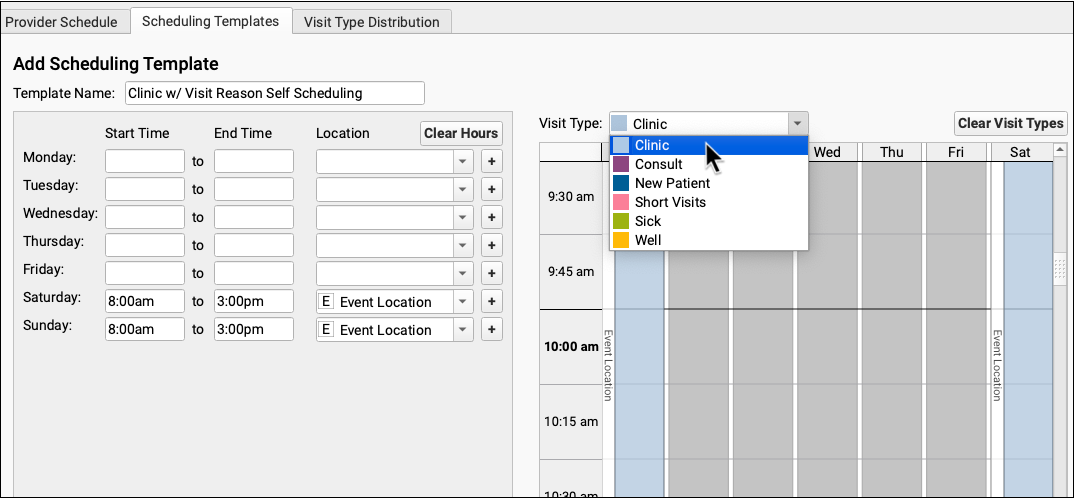
Set Visit Types
Portal scheduling relies on the color-coded Visit Types in your Appointment Book for both approaches to self scheduling. If you are using the “open per Visit Reason” approach, paint your schedule by the general visit type.
If your practice’s self scheduling approach is to designate specific areas of the schedule when portal users can book appointments, paint your template with the specific Portal Visit Type color for your clinic.
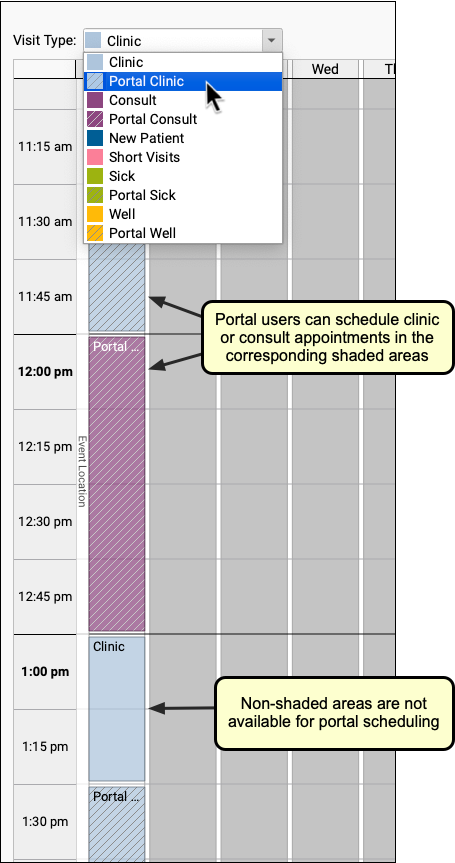
If a slot is left blank, or white, the portal will not offer an appointment at that time.
Add Your Clinic Template to the Calendar
Navigate to the Provider Schedule tab. Select your new provider(s) and use the Assign Scheduling Templates button to apply your new templates to the specific days of your clinic.
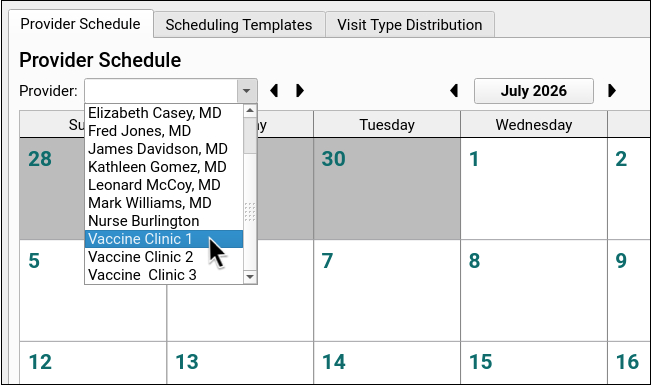

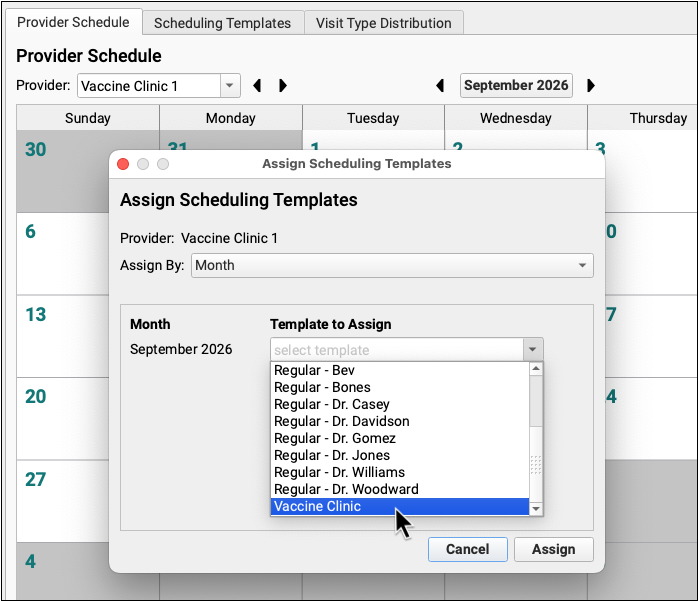
For more detailed guidance on how to do each of these scheduling template steps, read the Configure the Appointment Book article.
Configure Vaccine-Only Self Scheduling
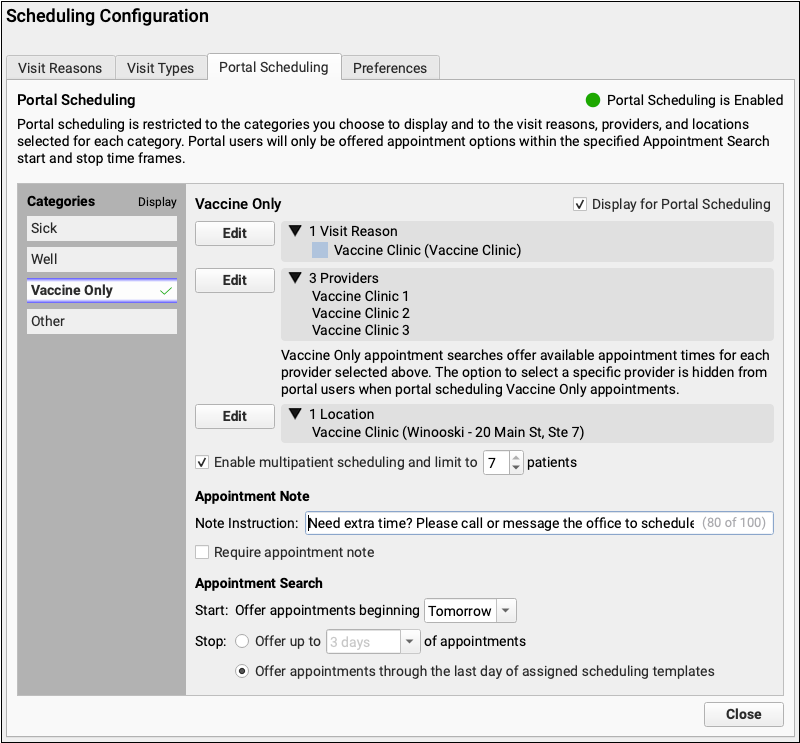
Self scheduling configuration for vaccine clinics is very similar to sick and well visit configuration. Now that your clinic columns and template exist, configure how they display in the portal.
Open Scheduling Configuration
Go to the Configuration menu, open the Scheduling tool.
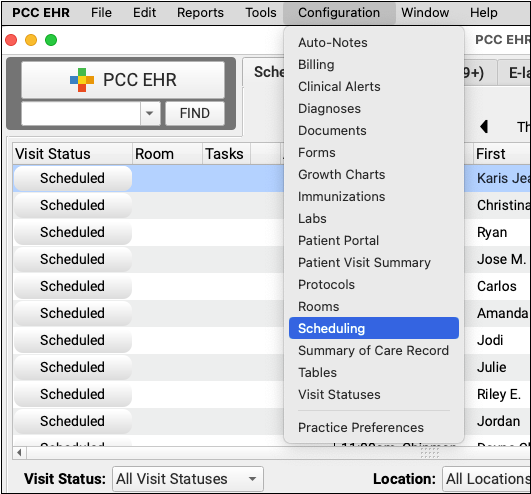
Choose and enable a Category
Select the Portal Scheduling tab and pick a category.
- The Vaccine Only category is designed for vaccine clinics and imms-only visits because portal users do not need to choose a provider for appointments in this category.
- The Other category is typically used for consults and behavioral health visit reasons. If you decide to use the Other category, portal users will be prompted to select a provider, such as “Vaccine Clinic 1”.
Click the “Display for Portal Scheduling” checkbox to enable this category for portal scheduling.
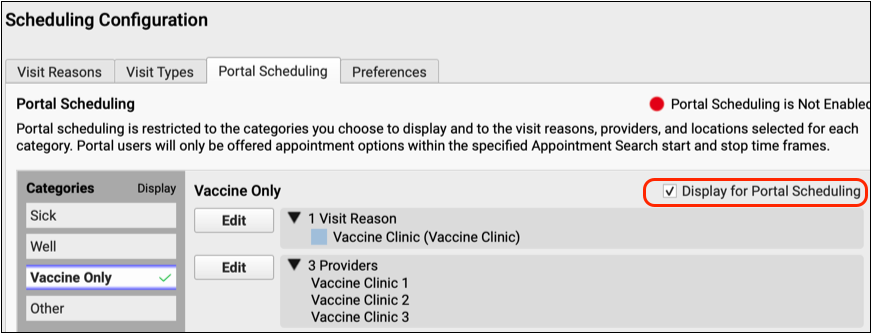
Already Using the Vaccine Only Category?: If your practice is already using the Vaccine Only category for non-clinic appointment scheduling, just be sure to name your clinic Visit Reasons to indicate that the appointments are for a clinic rather than a regular appointment. As long as your unique clinic Visit Reasons, and the linked Visit Type, have their own naming convention and matching color, portal users can easily choose clinic or non-clinic visits when self scheduling. Alternatively, your practice can remove all Clinic Visit Reasons once your clinics are done for the season.
Configure Category Settings
Configure your category using the new clinic Visit Reasons, clinic Providers, and optional clinic Location. Choose when your practice will offer clinic appointments and enter an appointment note prompt. Don’t forget to enable multi-patient scheduling!
-
Select Clinic Visit Reasons: Click “Edit” and select the specific Visit Reasons that you configured for your clinic. (e.g., “Clinic Flu Vaccine”).
-
Select Clinic Providers: Click “Edit” and select the specific vaccine-only providers that you configured for your clinic. The portal will look across all providers to find available times.
-
Select Locations: Click “Edit” and select your clinic location(s). If you worked with PCC support to create a separate location for your clinic, select that location.
-
Turn on Multi-Patient Scheduling: Make sure to check the box to enable multi-patient scheduling and set a maximum number of patients. This allows a parent to book back-to-back or simultaneous appointments for all their kids together.
-
Optionally Prompt and Require Appointment Notes: Enter a message to families and optionally require an appointment note for the self scheduled appointment.
-
Set When to Start and Stop Offering Appointments: Control how early or last-minute you want families to self schedule for your flu clinics with the Appointment Search settings.
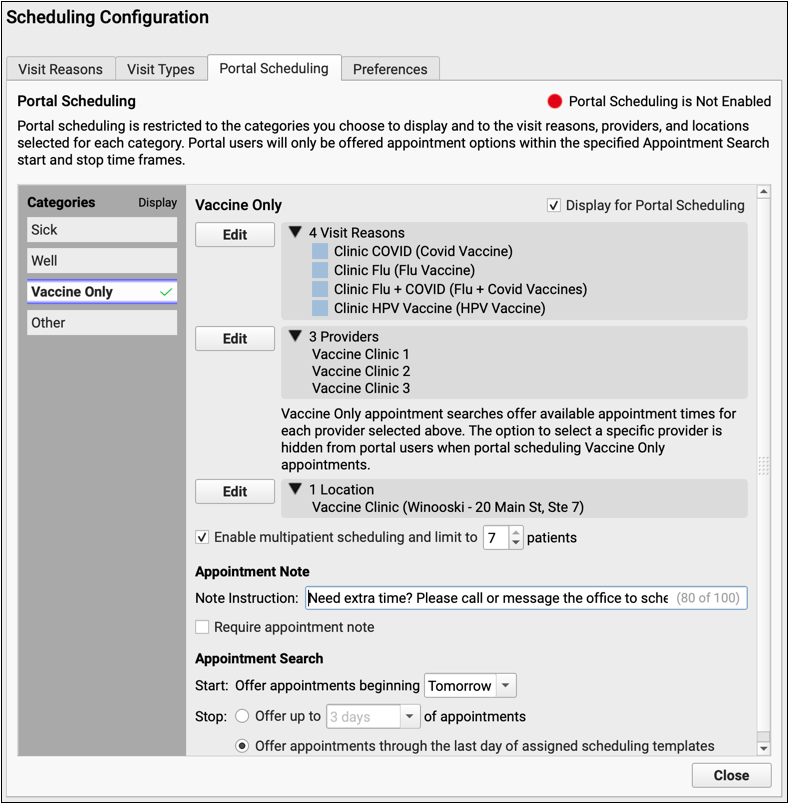
For a full guide on self scheduling configuration, read the Patient Portal Self Scheduling article.
Enable Portal Scheduling
Navigate to Patient Portal Configuration and scroll down to the Portal Scheduling section. When you’re ready to test out your configuration, check the Enable Portal Scheduling checkbox.
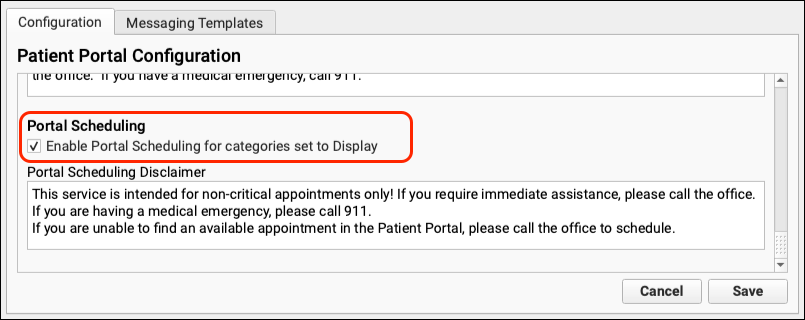
Once this checkbox is checked, and at least one portal scheduling category is enabled, a parent can log into the portal, click “Schedule Appointment,” select “Vaccine Clinic,” and the portal will automatically show them the available slots for each Visit Reason across your clinic schedule.
Test Your Configuration
Create a test patient and make sure everything works like you want it to.
- Log in to the portal and review how the clinic options appear for your portal user.
- Try scheduling for the different options you created.
- Review how these appointments look on the schedule screen.
- Review how these appointments look in the appointment book.
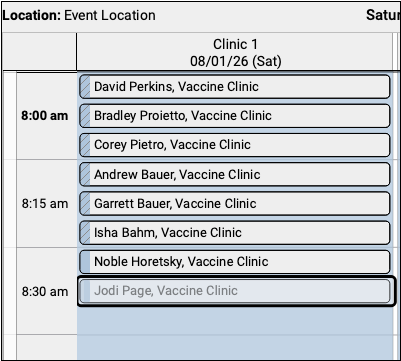
Adjust your settings or call PCC with questions.
Other Clinic Workflow Considerations
Vaccines cannot be billed out to vaccine-only providers, such as “Clinic 1,” so your billing staff will need to set the correct provider and location when billing the visit.
Set the Provider of Service for Billing and Reporting
Once the visit is ready to bill, your staff will need to correct the Provider of Service field in the Bill – Diagnoses and Procedures window on the EEF or Superbill. Which provider should you choose?
-
Primary Care Provider (PCP): If your practice runs productivity reports for vaccine administration based on PCP, set the Provider of Service field to match the patient’s PCP.
-
Clinician On Site: If the clinician on site at the clinic is considered the Provider of Service at your practice, set the Provider of Service field to match the clinician on site that day.
-
Signing Clinician: If your practice has a specific signing workflow for vaccine-only clinics, set the Provider of Service field to be the clinician who is going to be signing the vaccine-only encounters

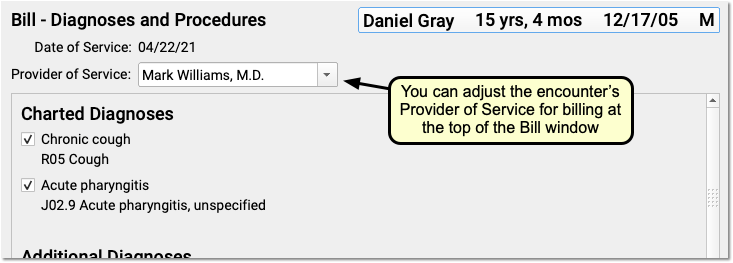
Sign Vaccine-Only Visits Quickly in pocketPCC
If you have many vaccine-only encounters to review and sign, try signing them in pocketPCC. The Signing Queue in pocketPCC allows you to review and sign straightforward, vaccine-only visits faster than the Signing Queue in PCC EHR, which is designed for in-depth chart note review.
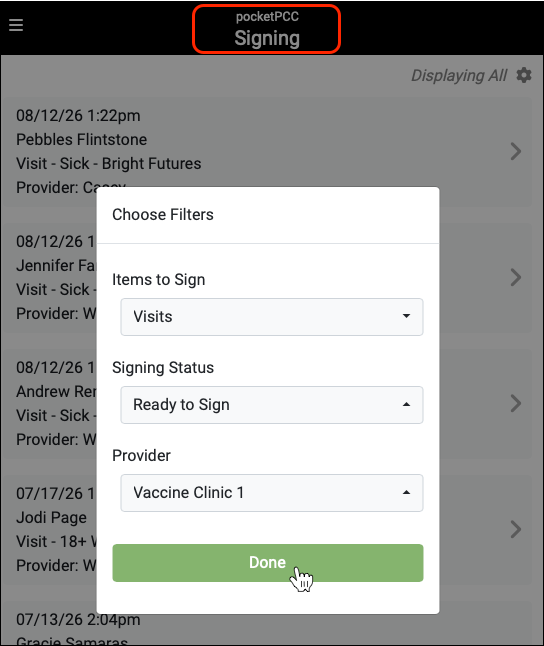
To learn more about how to sign in pocketPCC, read the Sign Notes and Documents in pocketPCC article.
Force Appointments as Needed
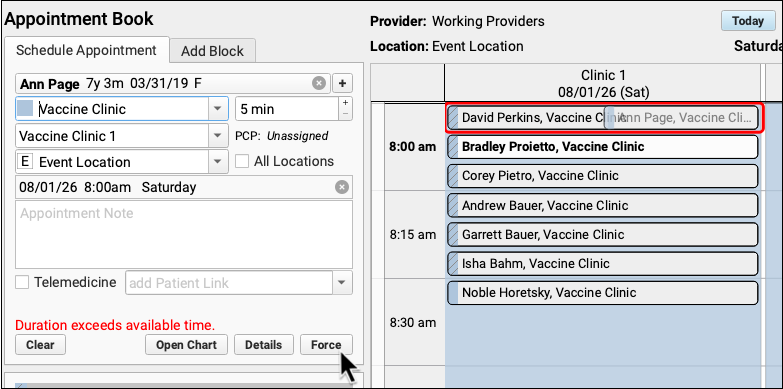
If you still want an even more packed schedule after adding as many scheduling columns as you wanted and allowing multiple patients to self-schedule, you can manually force appointments into the schedule so that the Appointment Book matches the speed of your practice’s clinic workflows.
Report on Portal-Scheduled Appointments
When you need to see all the appointments that were scheduled via the patient portal, open the Appointments by Scheduling User report in the Report Library, and select the “Portal” option in the Appointment Scheduling Method filter.
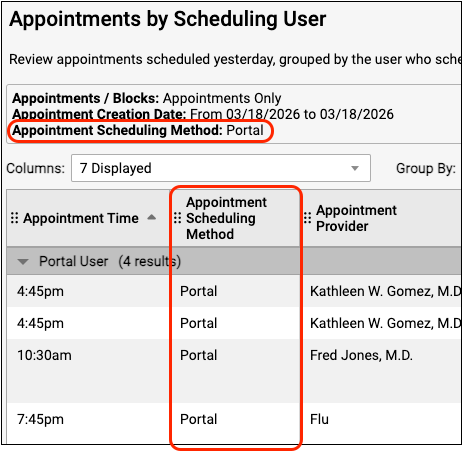
Filter on the Portal type of scheduling method to see report results limited to only those appointments scheduled through the portal.
For more information on how to run and customize reports, read these articles: Run Reports in the PCC EHR Report Library and Create a Custom Report.
Contact PCC: If you’ve completed all these steps and have questions or need assistance, please reach out to PCC Support at (800-722-7708) or open a ticket by emailing support@pcc.com.