PCC 10.4 Release Manual
Contents
- 1 Portal Scheduling
- 1.1 Schedule More Visit Categories in PCC’s Patient Portal
- 1.2 Customize Portal Scheduling Time Ranges
- 1.3 Enable Portal Scheduling by Care Center
- 1.4 Use Patient and Account Flags to Prevent Scheduling in the Patient Portal
- 1.5 Schedule Multiple Patients Simultaneously
- 1.6 Find Exactly the Right Appointment in Patient Portal
- 2 Billing
- 2.1 Respond to Claim Rejections
- 2.2 Follow Up on Unpaid Encounters with Insurance Balances
- 2.3 Handle Claim Responses That Can’t Be Autoposted
- 2.4 Reverse and Repost: Takeback Only Part of an Insurance Payment
- 2.5 Work Personal Balances in PCC EHR
- 2.6 Review an Account History
- 2.7 Access Billing Information in the Patient’s Chart
- 2.8 Edit Encounter Details While Working on a Stuck Claim
- 2.9 Configure Clinician Billing Identifiers: Tax ID, NPI, and Taxonomy Codes
- 3 Prescribing
- 3.1 Use Snap Text in PCC eRx
- 3.2 Adjust Your PCC eRx Text Size
- 3.3 Register for EPCS with a Selfie
- 3.4 Prescribe a 2-Month Supply of Controlled Substances
- 3.5 Resend Any Prescription from Prescription History
- 3.6 Queue Resends for Prescribers to Approve
- 3.7 Resend Any Part of a 3-Month Supply
- 3.8 See an NDC on Every Prescription
- 3.9 Set a Preferred Drug Name and NDC
- 3.10 Concerta Woes Begone
- 3.11 Other eRx Goodies
- 4 Features for Everyone at Your Practice
- 4.1 Show or Hide Inactive Patients in Patient Search Results
- 4.2 Find and Use Snap Texts Quickly
- 4.3 Customize Your Flags for Alerts, Scheduling, and Reporting in PCC EHR
- 4.4 Save Documents to an Account
- 4.5 Configure and Generate Account Forms in PCC EHR
- 4.6 Find Only Your Care Center’s Patients
- 4.7 Review Encounter Details in pocketPCC
- 5 Other Updates and Patch Notes
Portal Scheduling
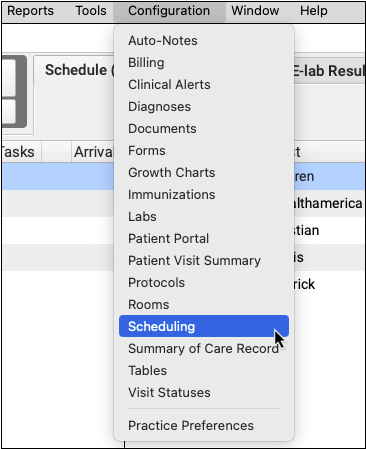
Configuration Menu Change: PCC 10.4 consolidates all scheduling configuration into a single tool. What was formerly the “Visit Reason Configuration” is now “Scheduling Configuration”. Visit Reasons, Visit Types, Portal Scheduling, Appointment Book Preferences, and Preventing Scheduling with Patient and Account flags are all available under Scheduling Configuration.
Schedule More Visit Categories in PCC’s Patient Portal
Portal Scheduling includes two new scheduling categories, so your patients and families can schedule the appointments they need: Other and Vaccine.
The Other category can be used for any visit reason not covered by the Well or Sick categories, such as behavioral health or depression visits.
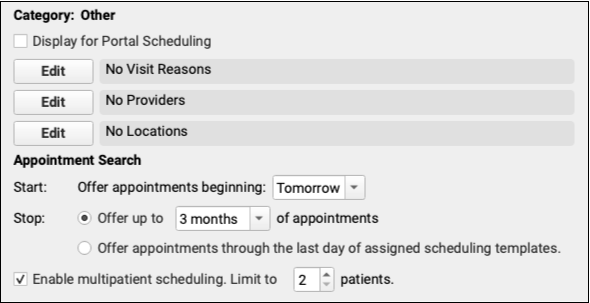
Enable the Other category by checking “Display for Portal Scheduling”. Select which visit reasons fall under the Other category, then select the providers and locations that handle those visit reasons.
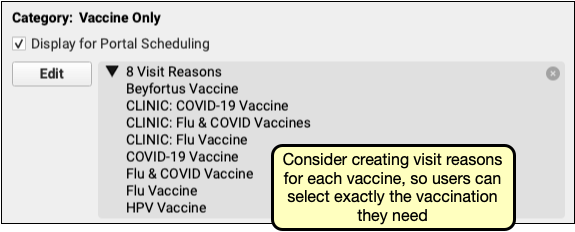
The Vaccine Only category is available for portal scheduling of vaccine-only appointments. Check “Display for Portal Scheduling, then select which visit reasons, providers, and locations apply to your vaccine-only visits.
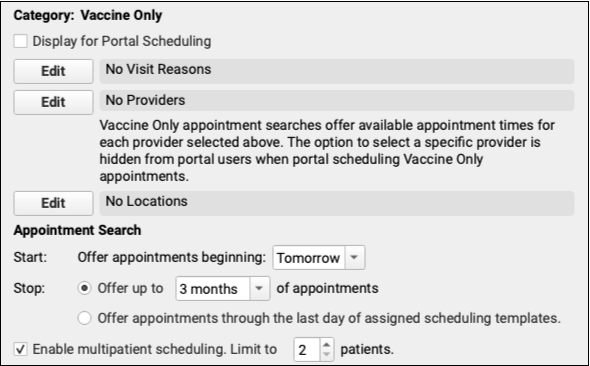
Consider how your practice schedules for Vaccine Only appointments to ensure Portal Scheduling lines up with your needs. Some practices may find it helpful to create a separate visit reason for each vaccine, such as a COVID Vaccine visit or a Flu Vaccine visit.. Other practices may find that a general Vaccination visit reason combined with an appointment note is enough.
After selecting each of the appropriate reasons, providers, and locations for vaccine scheduling and enabling the category, users will be able to schedule through the patient portal.
Unlike the Well, Sick, and Other categories, the Vaccine Only category does not offer users the option to select a provider when scheduling. Instead, all matching time slots for providers you added to the Vaccine Only category are offered, as if the user selected “All Providers”.
Review Your Portal Scheduling Disclaimer: After configuring the new categories, be sure to review the text of your Portal Scheduling disclaimer to ensure that it’s still accurate.
Customize Portal Scheduling Time Ranges
Take greater control of self scheduling in PCC’s patient portal by customizing the range of dates and times available for each Portal Scheduling Category.
Use the Scheduling Configuration tool to set the range of dates and times offered to your patient portal users when they schedule visits within each category.
The Sick, Other, and Vaccine Only categories can be set to offer appointments beginning the day of scheduling, “Today,” or the following day, “Tomorrow.” If “Today” is selected, indicate how soon appointments should be offered, from 10 minutes to 3 hours .
The Stop option limits how far in the future appointments will be offered, from 1 day to 18 months into the future. Alternately, allow the patient portal to offer appointments through the end of your assigned schedule.

The start date for a Well Visit uses the patient’s Next Physical Due date. If that due date is in the past or is blank, portal scheduling will offer appointments beginning on the current or following day, depending on your choice here. By default, “Offer appointments through the last day of assigned scheduling templates” is selected for the Well Category upon release of PCC 10.4.
Enable Portal Scheduling by Care Center
If your practice uses PCC EHR’s Care Centers option, each of your care centers can decide independently if they want to make patient portal scheduling available to their patients.
Click the “Edit” button under “Care Centers Offering Portal Scheduling” in the Scheduling Configuration tool. Select which care centers allow scheduling through the patient portal.
After selecting one or more care centers, only patients assigned to those centers can be scheduled through the patient portal. Patients assigned to care centers not offering portal scheduling will appear in gray text with the note “Please Call to Schedule”.
Use Patient and Account Flags to Prevent Scheduling in the Patient Portal
Assign account or patient flags to prevent patients from being scheduled through the patient portal.
In PCC EHR’s Scheduling Configuration tool, open the Preferences tab. Click the “Edit” button for the Account or Patient flags and select any flag that should prevent a patient from being scheduled through the patient portal.
Flags already checked under “Prevent All Scheduling” will not be available to select, since preventing all scheduling already prevents patient portal scheduling.
Patients with a flag checked under “Prevent Only Portal Scheduling” can be scheduled through the Appointment Book but not through the patient portal. If a user attempts to schedule a patient with one of your selected flags, the patient cannot be selected and will be marked “Please Call to Schedule”.
Schedule Multiple Patients Simultaneously
Use multipatient scheduling and allow your patient portal users to schedule multiple patients simultaneously and group their appointments together without the need to call your office.
By default, multipatient scheduling is enabled for each scheduling category and is set to a maximum of two patients. In Scheduling Configuration’s Portal Scheduling tab, enable or disable multipatient scheduling using the checkbox under each scheduling category. When enabled, select a maximum number of patients that can be simultaneously scheduled.
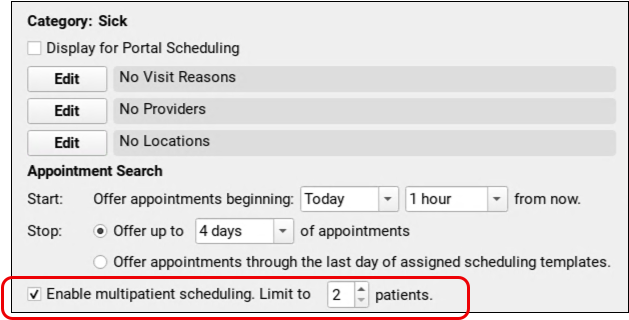
While scheduling in the patient portal, after selecting the first patient, users can add another patient by clicking “Add Another Patient” up to the maximum number of patients set for the category.
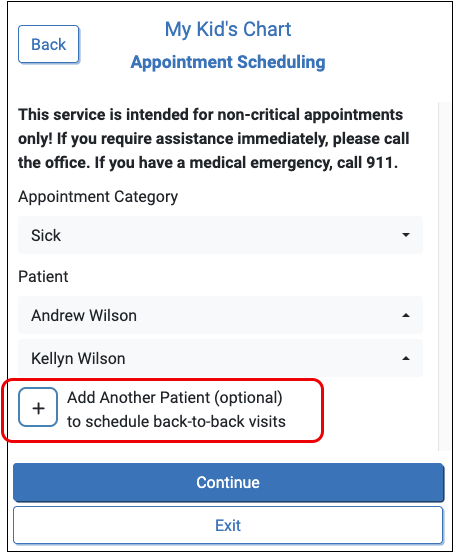
The visit reason type for each patient must match. After selecting a visit reason for the first patient, the remaining patients will be limited to visit types color coded to match the first selected visit reason.
After the portal user selects a provider and location, the patient portal will then search for available, adjacent, appointment slots with enough space for all selected patients.
Review Your Disclaimer: After configuring multipatient scheduling, be sure to review the text of the Patient Portal Scheduling disclaimer to ensure that it’s still accurate.
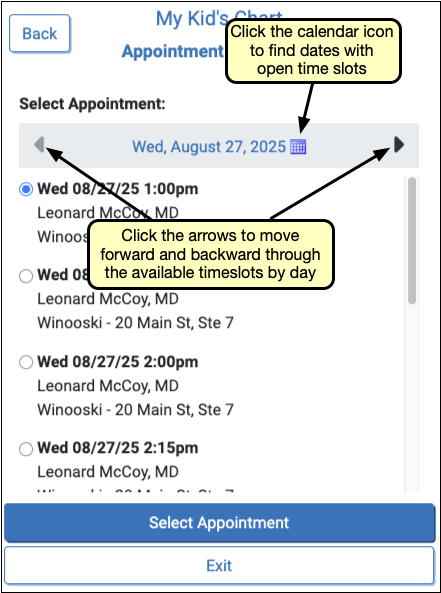
Find Exactly the Right Appointment in Patient Portal
Your patients and families can now find the perfect appointment time slot without endless scrolling.
After a portal user selects a patient, visit reason, provider and location, the patient portal displays the first day of available appointments. Portal users can browse through available appointments by clicking the arrow to the left or right of the date, or use the calendar icon to jump directly to any date with available appointment slots.
Billing
Respond to Claim Rejections
If unaddressed, rejected claims result in lost revenue. Use the Rejected Claims worklist to review and respond to every claim rejection sent to your practice.
To review claim rejections sent to your practice from payors and clearinghouses, open the Insurance Balances tool and visit the Rejected Claims tab.
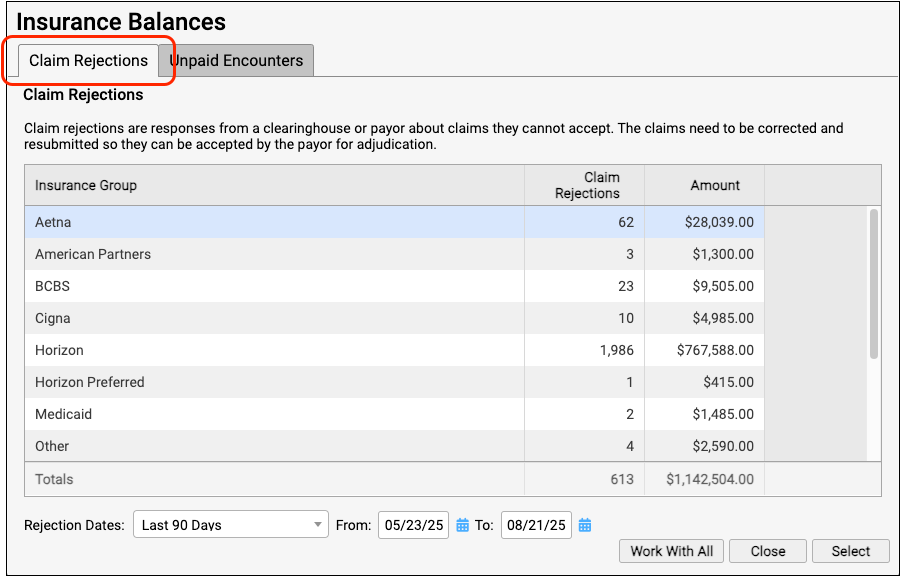
The Claim Rejections overview summarizes unaddressed rejections sent to your practice. Totals are aged and shown for each insurance group.
Double-click on a single insurance group or click "Work With All" to view the rejections worklist.

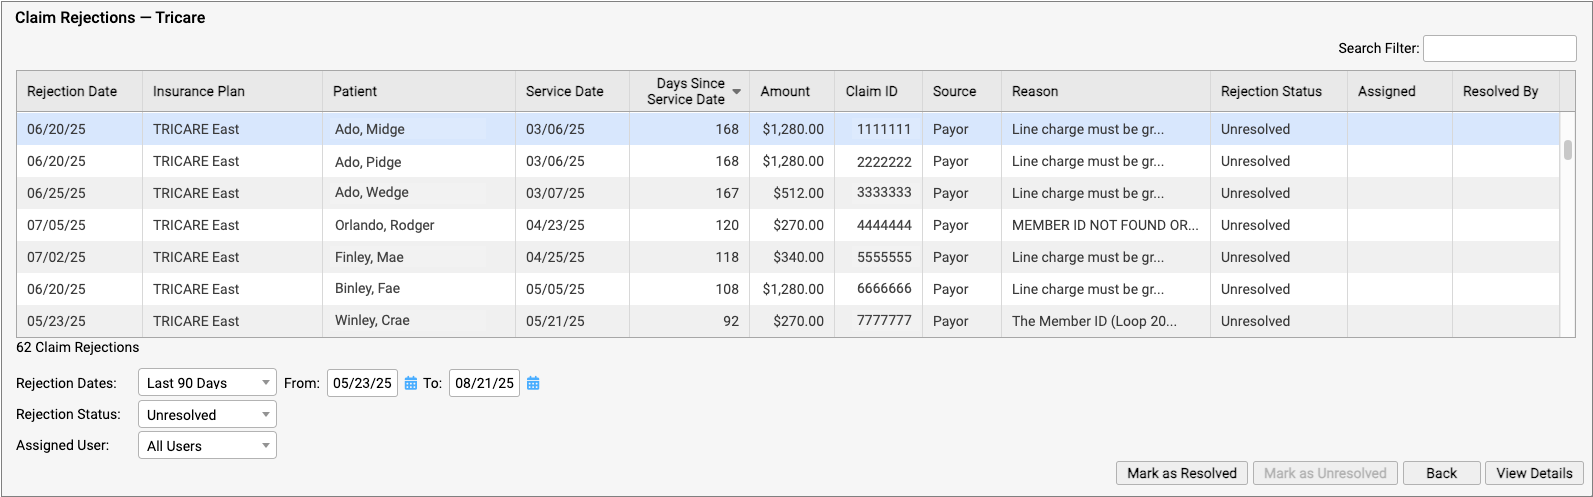
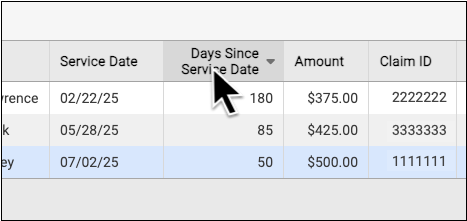
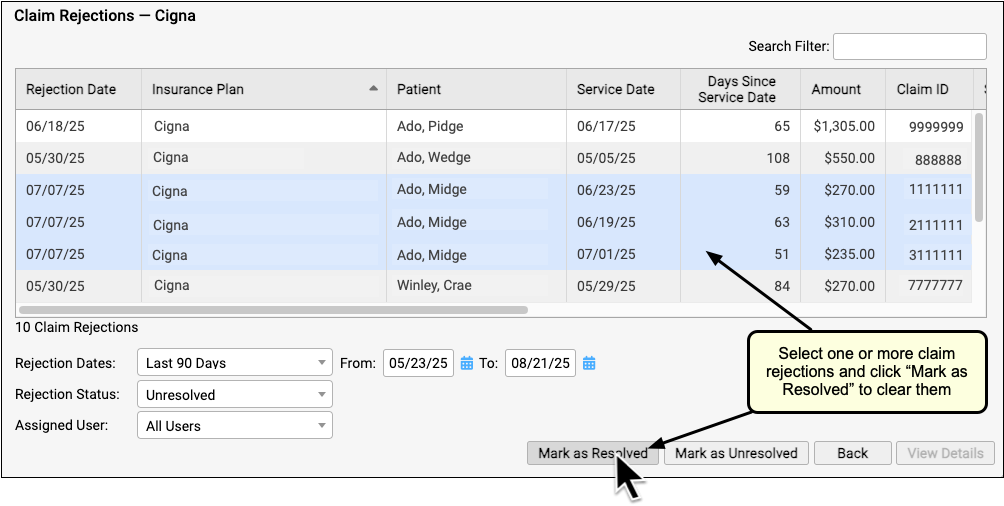
For each rejection, you can see key details about the rejection and the claim, including the number of days since the date of service and the rejection reason. You can also see a Rejection Status (which defaults to "Unresolved") and whether the rejection is assigned to a user and who resolved it.
You can filter the list to isolate rejections you need to work on. You can select an age or enter a date range, limit the list to resolved or unresolved rejections, or filter by assignee. You can enter a search term in the Search Filter field to find rejections based on a patient name or claim ID, for example.
You can also sort the list by any column, making it easy to target rejections based on age or the amount on the claim.
If you are certain a rejection or rejections are now resolved, you can select them and click "Mark as Resolved".
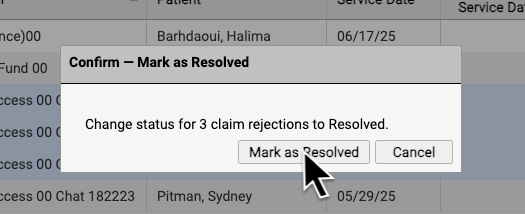
By reviewing and resolving every claim rejection sent to your practice, you can ensure that no claims slip through the cracks.
Each Rejection is a Point-in-Time Response: Rejections are similar to email messages or other incoming communication. Your practice might handle a billing problem for an encounter using a different tool, and an encounter's balance may already be paid off. The rejection from the payor remains on the Rejected Claims worklist for your review until you mark it as resolved.
Troubleshoot a Specific Rejection
Double-click on a rejection to review more details.

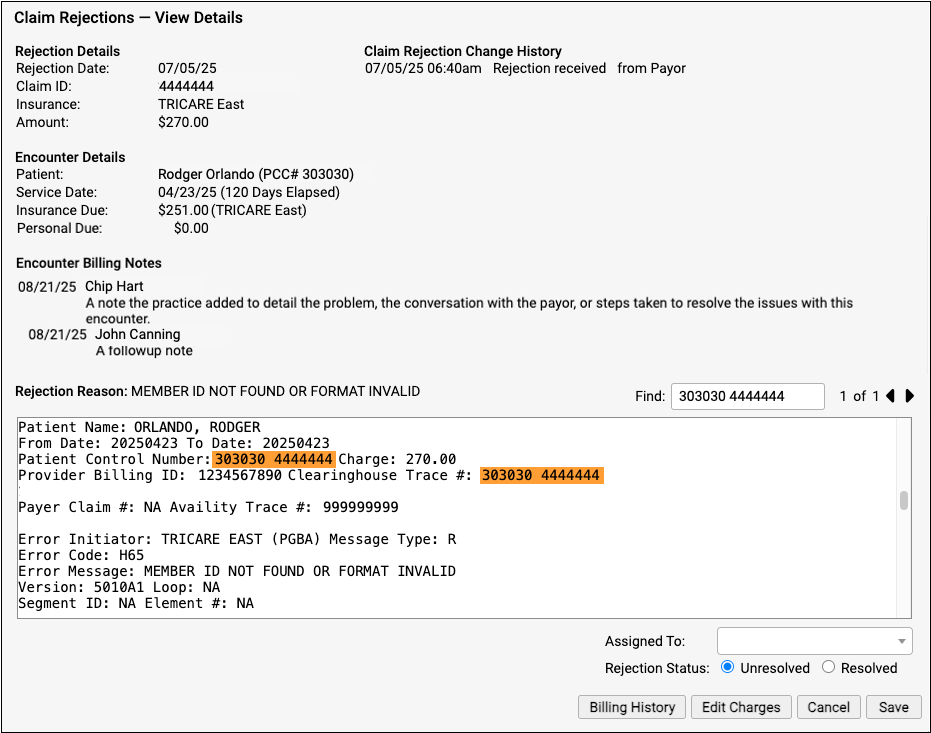
The Claim Rejections - View Details screen provides information and tools that will help you understand and respond to the rejection.
-
Rejection Details: The Rejection Details section indicates when your PCC system received the rejection, the claim ID indicated by the payer, the plan, and the amount on the claim.
-
Encounter Details: The Encounter Details section shows the patient, their date of birth, their member ID, the date of service, and how much is currently due from insurance and the family. If the "Insurance Due" amount is now $0.00, the rejection may already be resolved or else your practice may have changed the responsible party for the charges.
-
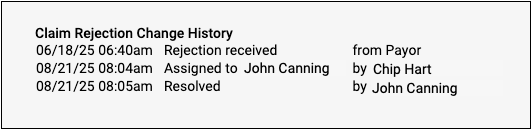
Claim Rejection Change History: Any time anyone at your practice assigns or changes the status of this claim rejection, it is logged in the Claim Rejection Change History.
-
Encounter Billing Notes: If you or someone at your practice has entered encounter billing notes (sometimes called "visit billing notes" or "oops notes"), the Encounter Billing Notes section will display those notes. If you’ve contacted the payor and submitted a claim multiple times, you can review your practice’s notes to better understand the history of the rejection.
-
Rejection Reason: When your PCC system receives the rejection from the payor or clearinghouse, it attempts to extract a reason summary from the data. That summary is listed on the screen as the "Rejection Reason", and the complete rejection data file is shown so you can review it.
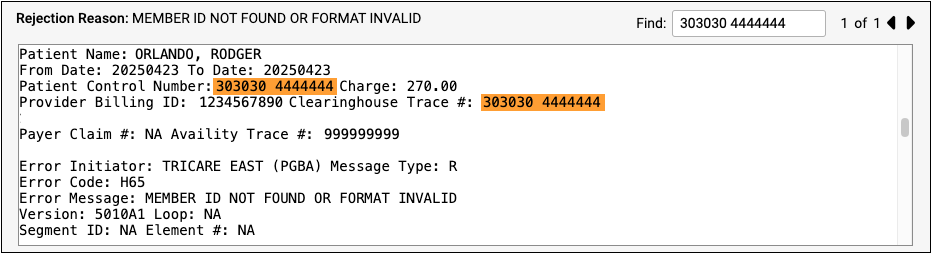
Different payors and clearinghouses send different types of electronic communication. A single file may include responses to many different claims, so the search field of the Rejection Reason is automatically filled with the Claim ID, making it easier to navigate the electronic file from the payor. If the claim ID appears multiple times in the electronic file, you can use the Find field's next and previous buttons to review the details.
Assign a Rejection to a User or Mark It as Resolved
You can optionally assign a rejection so it can be addressed later by yourself or another person at your practice.
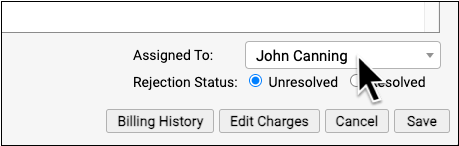
When you are finished addressing a rejection, click "Resolved" to change its status.
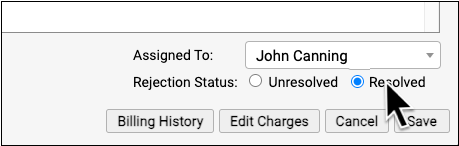
PCC EHR tracks whenever a rejection is assigned or resolved and displays a log in the Claim Rejection Change History at the top of the screen.
Is the Claim Rejection Resolved?: If you mark a rejection as "Resolved" without resubmitting or filing an appeal, your practice may not receive payment. If you queued up a new claim, you can resolve the original rejection. If the payor rejects the replacement claim, a new rejection (with a new claim ID) will appear on the Rejected Claims worklist. Your practice can also catch rejected claims by reviewing all unpaid encounters on the Unpaid Encounters tab.
View More Encounter Details and the Encounter’s Claim History
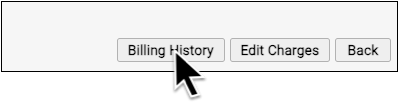
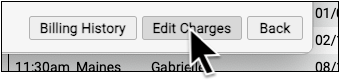
After reviewing the rejection, you may want to dig deeper into claim history, payor responses, and additional encounter information. Click “Billing History” to review more encounter details.
If you need to edit some aspect of the encounter and then optionally file a new claim, click “Edit Charges”.
For more details and examples, read Respond to Claim Rejections.
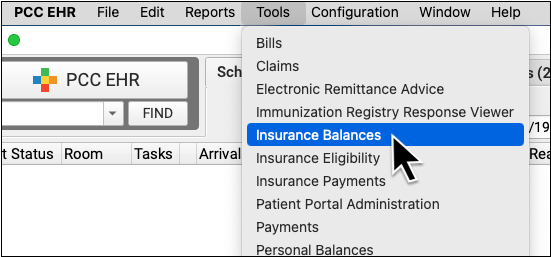
Follow Up on Unpaid Encounters with Insurance Balances
How can you track your practice’s insurance A/R, know where your money is, and make sure payers respond to your claims? Use the Unpaid Encounters worklist in the Insurance Balances tool to follow up on unpaid claims.
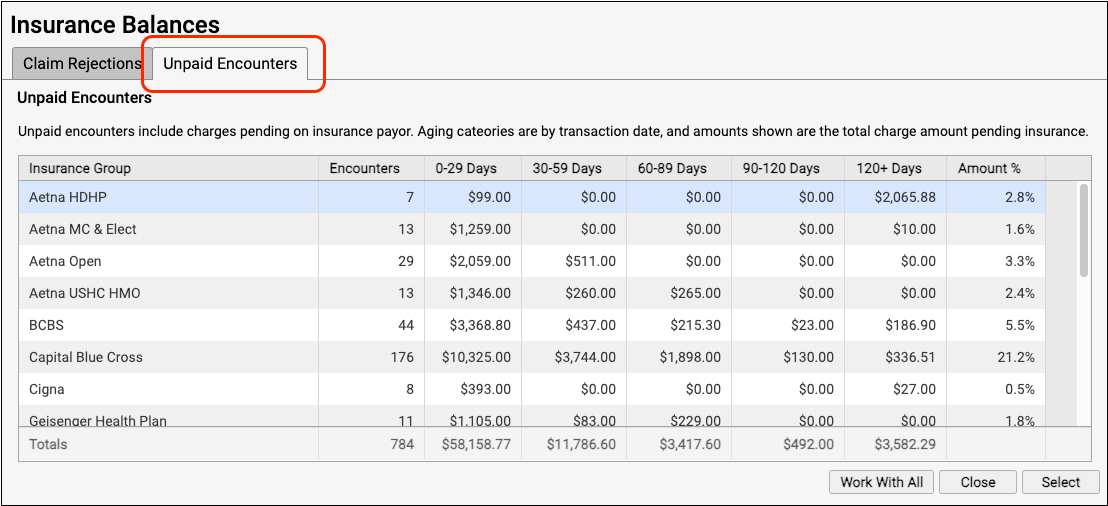
The Unpaid Encounters overview shows you total insurance balances, for each payor, aged from the date of service.
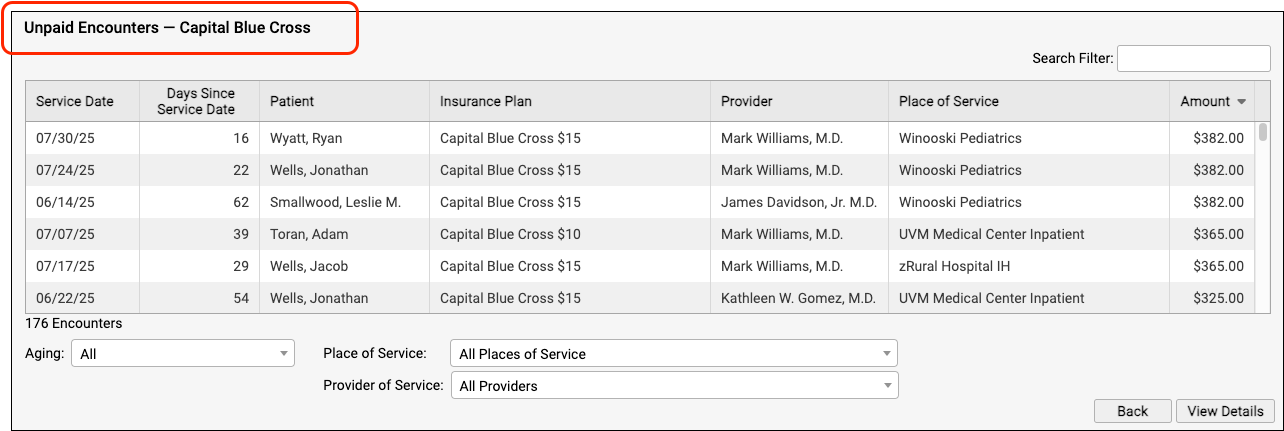
Double-click on a single insurance group or click "Work With All" to see unpaid encounters with charges pending insurance.

Jump to an Aging Category: You can optionally double-click on a specific aging category for a specific insurance group.

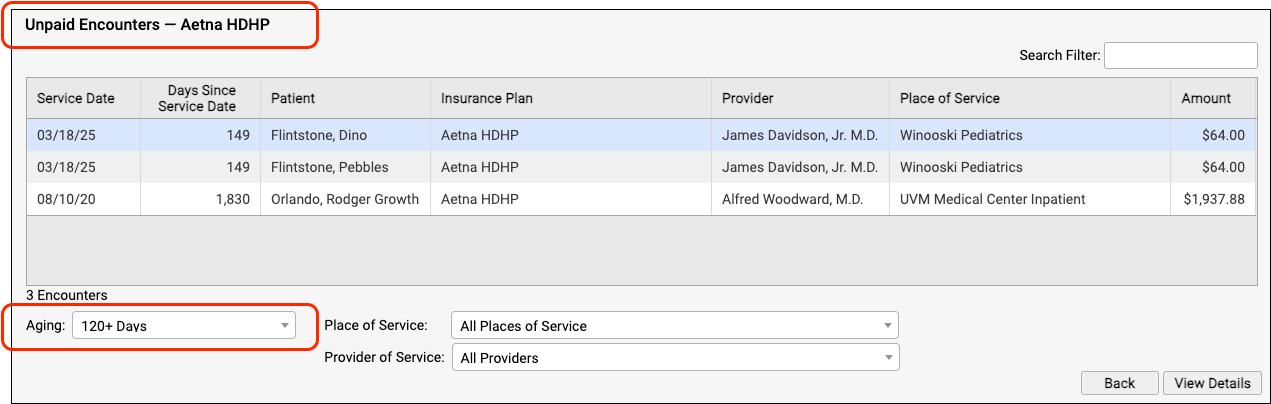
On the Unpaid Encounters worklist, you can see the date of service, the number of days since the date of service, the patient, the specific insurance plan, the provider of service, the place of service, and the amount due.
You can filter the list to isolate the specific unpaid claims that you need to work on. You can specify an aging category, a place of service, a provider of service, the billing encounter status, and the assigned user.
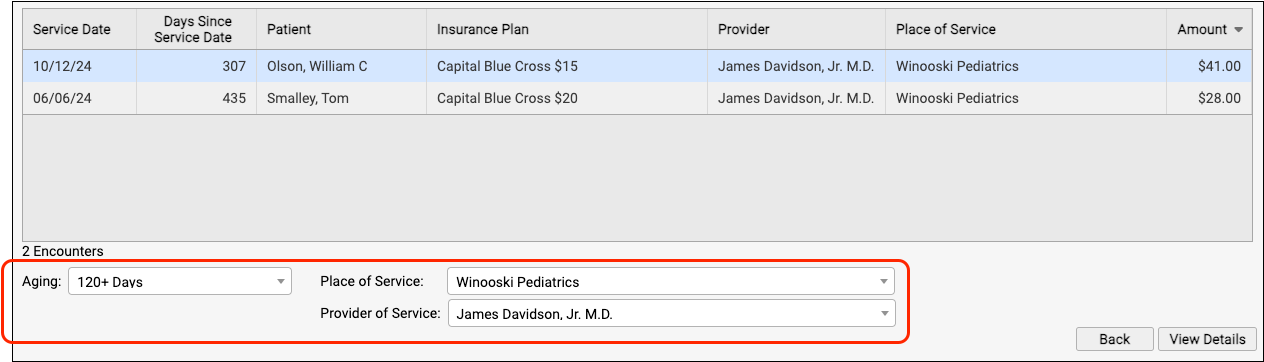
You can click on the header of any column to sort the encounters and use the Search field to filter the list down to a search term. By using these tools you can find specific groups of encounters or work down the list in a particular order.

By monitoring your practice's insurance A/R on the Unpaid Encounters worklist, you can stay on top of your receivables and ensure that no claims slip through the cracks.
Troubleshoot a Specific Encounter
Double-click on an encounter to see more details.

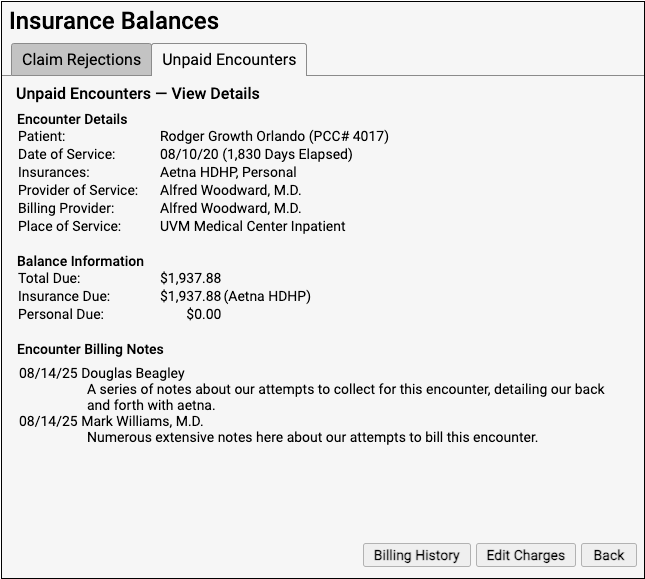
You can review encounter details, current balance information, and any billing notes your practice has entered about the encounter.
To dig deeper into claim history, payor responses, and additional encounter information, click “Billing History”.
If you need to edit some aspect of the encounter and then optionally file a new claim, click “Edit Charges”.
For more details and examples, read Work on Unpaid Encounters with Insurance Balances.
Handle Claim Responses That Can’t Be Autoposted
Sometimes your PCC system can't automatically post something found on an ERA. Maybe the family paid for an encounter already, the payor changed the procedures on the claim, or your practice made changes to the encounter after you sent the claim. Your practice can also create your own posting exceptions, if you wish all responses from a certain payor with a certain CARC to be held back.
After you autopost ERAs, use the Posting Exceptions worklist in the ERA tool to address each claim response that was not autoposted.
Process ERAs
Open the Electronic Remittance Advice tool and process ERAs.
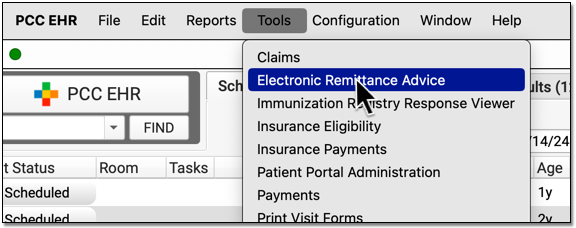
Exceptions are added to the Posting Exceptions worklist whenever you process an ERA that contains something that could not be autoposted or that matched your practice's custom posting exceptions.
Review Unposted ERA Responses
Click on the "Posting Exceptions" tab to review claim responses that could not be autoposted.

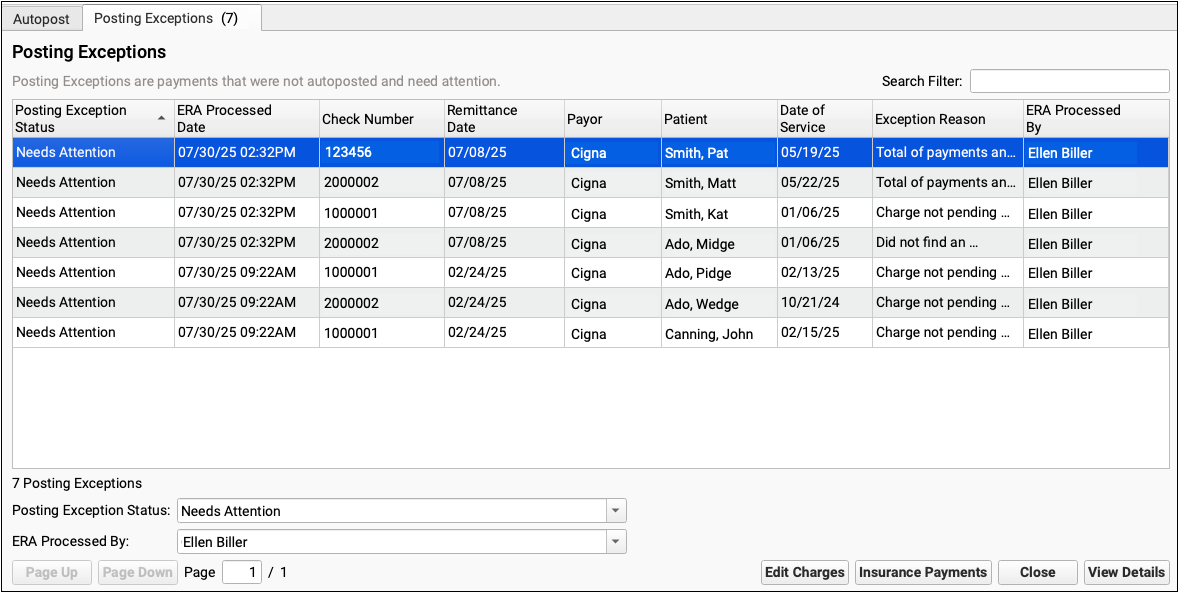
For each encounter, you can see the status, the date the ERA was processed, the check number, the remittance date from the ERA, the payor, the patient, the date of service, the exception reason, and the user who processed the ERA.
You can click column headers to sort the list, search, or use filters at the bottom to find specific encounters you wish to work on.
Posting Exception Status: By default, each ERA response that cannot be autoposted is assigned a posting exception status of "Needs Attention". By filtering by this status, you can isolate the encounter responses that still need to be addressed.
Work On a Posting Exception
Double-click on a posting exception to review more details and address it.


The Posting Exceptions - View Details screen includes the full ERA section that wasn't autoposted, encounter details, and billing tools.
Understand Why Payments Cannot Be Autoposted
To understand the full story of what's happened with an encounter and why the ERA couldn't be autoposted, you can review the section of the ERA that pertains to the encounter.
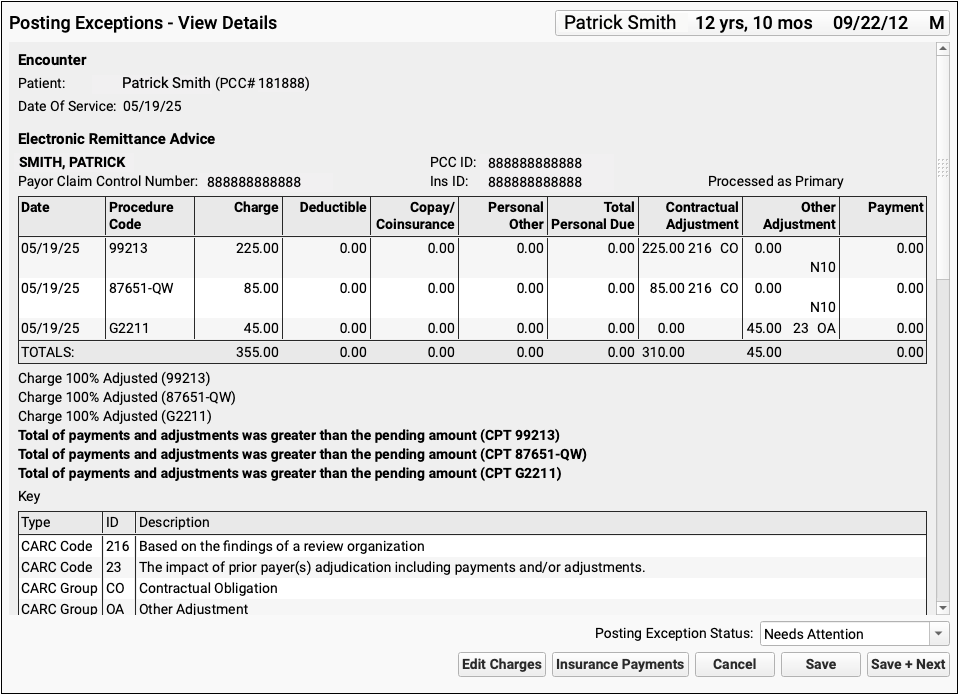
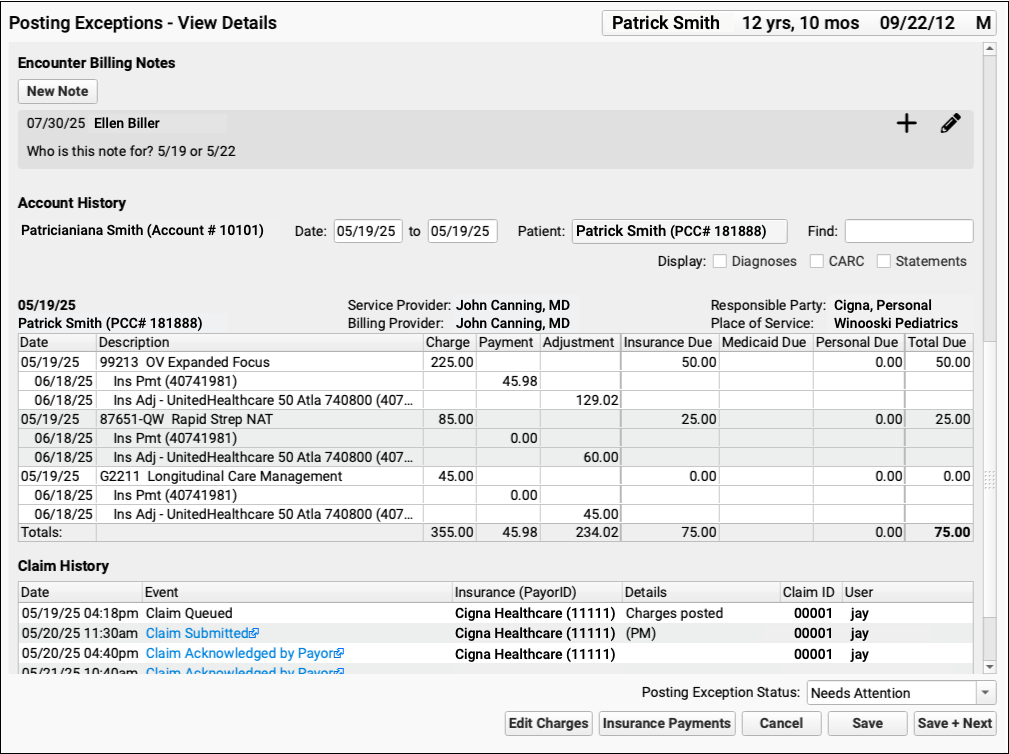
Scroll down to review the Encounter Billing Notes, Account History, and Claim History sections to review what's happened with the encounter so far.
If PCC EHR Can't Find the Encounter: If a payor sent you an ERA response that doesn't match an encounter that your practice billed, some of these billing-related components will not appear.
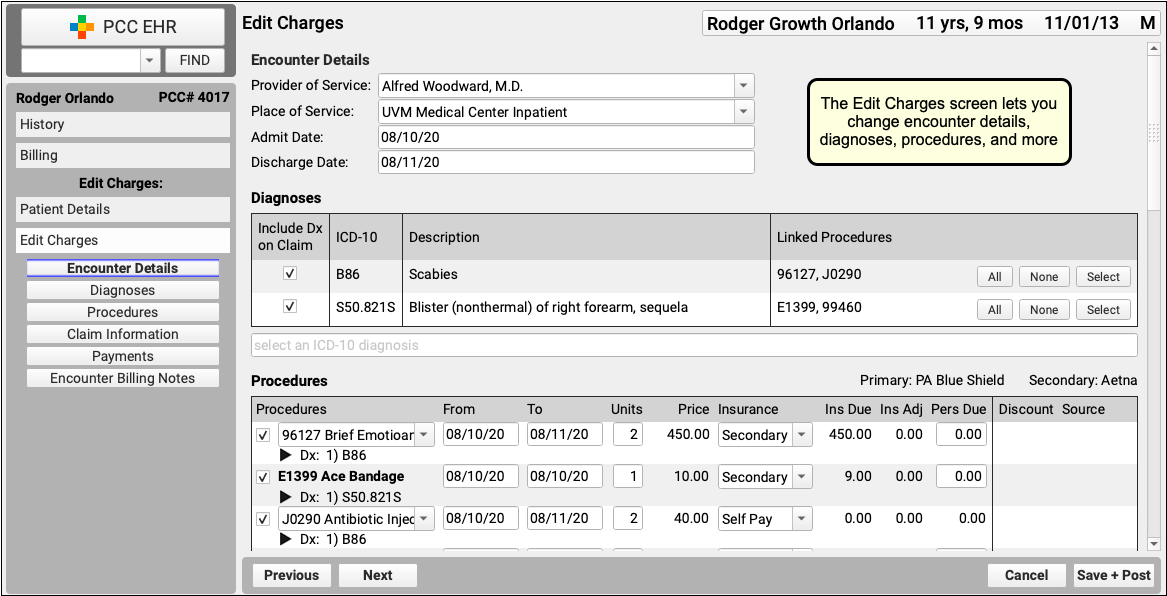
Edit Charges and Other Encounter Details
You may need to edit something about the encounter in order to post the payor's response. Click "Edit Charges".

On the Edit Charges screen, you can edit diagnosis and charge information, change the responsible party for charges, and more.
For more information about using Edit Charges, read Edit Encounter Charges and Other Claim Information and Resubmit a Claim.
Manually Post the ERA or Edit Insurance Payments
When you are ready to post the ERA manually click "Insurance Payments".

If the encounter can be identified, the Insurance Payments tool will open to the payment screen and you can manually post details from the ERA.
You can also use the Insurance Payments tool to edit previously posted payments, perform takebacks, and more.
Add a Note About the Exception's Resolution
After you've taken action to address a posting exception, you can optionally add a new encounter billing note.
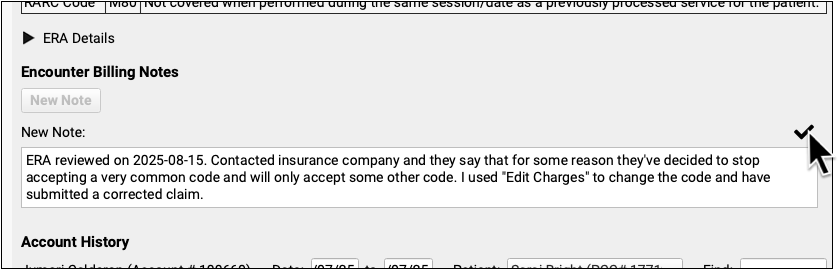
By adding a note, you'll have a record of what happened if there are more issues with the encounter later.
Update the Exception's Status
After you address an exception (or discover it is invalid and safe to ignore), update the exception's status.
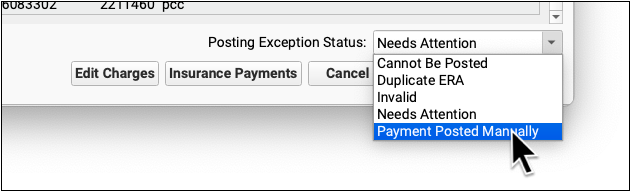
When you update the status, you mark the posting exception to indicate it cannot be posted, is a duplicate, is invalid, or has now been addressed manually. This will remove it from the default Posting Exceptions worklist. Later, you can revisit resolved exceptions using the Posting Exceptions Status filter on the worklist.
For more information about autoposting and manually posting insurance payments, read Post Insurance Payments and Adjustments.
Reverse and Repost: Takeback Only Part of an Insurance Payment
When a payor sends a reversal (or a “takeback”), they negate the entire adjudication of the claim and provide new payment and adjustment amounts for the encounter.
However, the payor’s new ERA often only changes the reimbursement for a single procedure. PCC 10.4 makes it much easier to post the reversal and then immediately post the updated adjudication on the claim. You only need to change payments and adjustments that the payor changed, and you don’t have to re-enter amounts that stayed the same.
First, find the payment on the Insurance Payments History tab and reverse it.
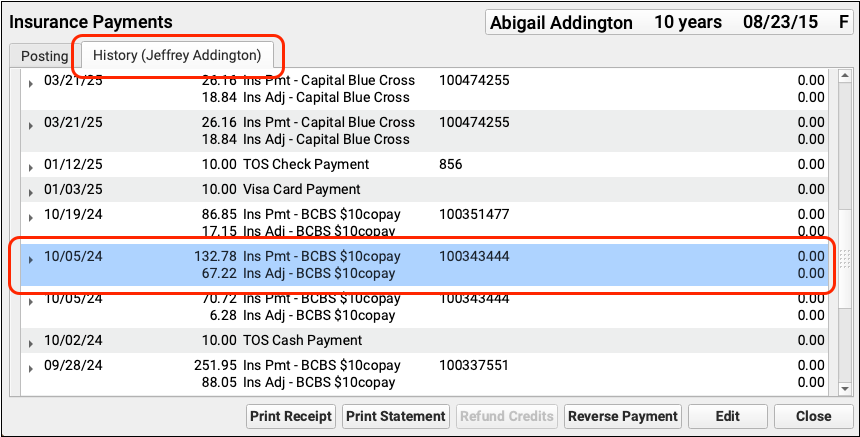
When you save the reversal, you can immediately repost the payment.
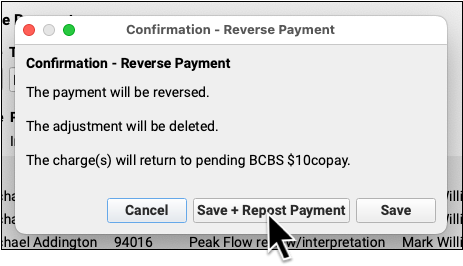
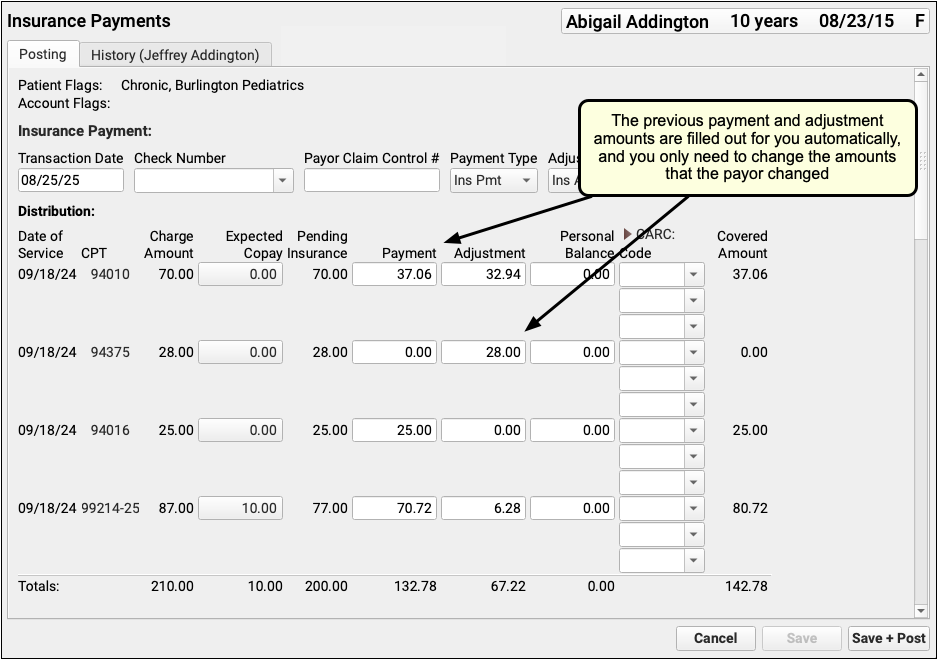
The previous payments and adjustments will be entered for you, and you only need to enter those values that the payor changed on the updated ERA.
To see the complete takeback procedure, read Reverse an Insurance Payment (Post a Takeback).
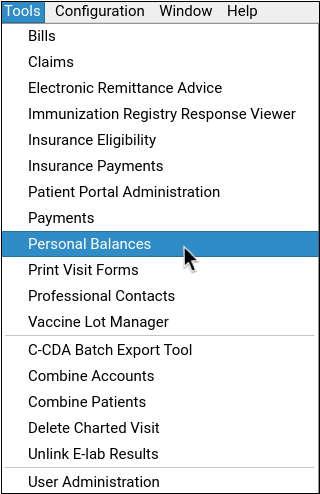
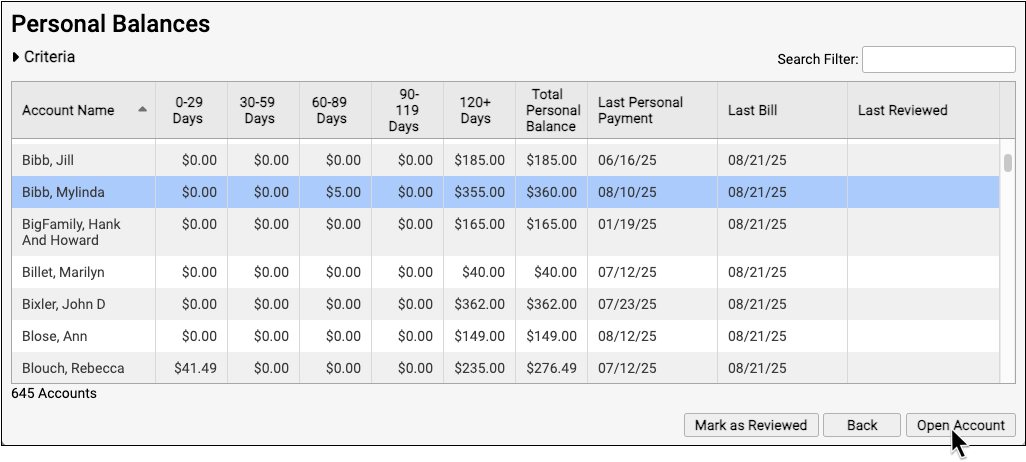
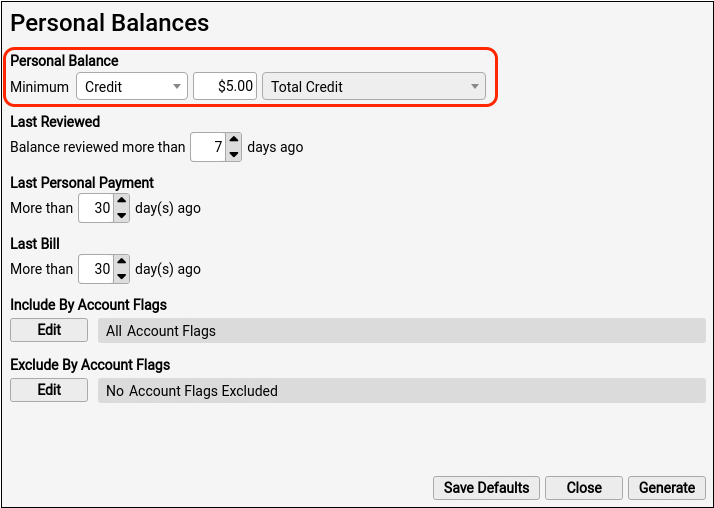
Work Personal Balances in PCC EHR
When you need to find accounts with outstanding personal balances, create a worklist in the Personal Balances tool.
Open the Personal Balances Tool
Open the Personal Balances tool from the Tools menu.
Set Your Balance Criteria
Select “balance”, and set the minimum value that you want to work with.
You can filter by how recently the balance was reviewed in this tool, as well as last personal payment, and last bill dates.
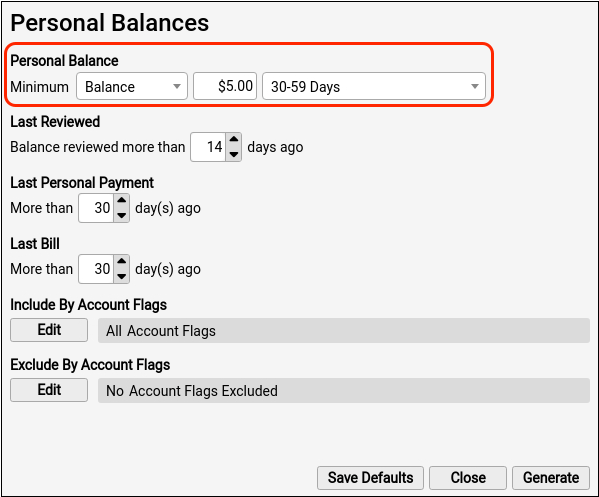
You can optionally include or exclude by account flag to further refine your criteria.
Generate Your Worklist
Click “Generate” to see the account list filtered by your selected criteria.

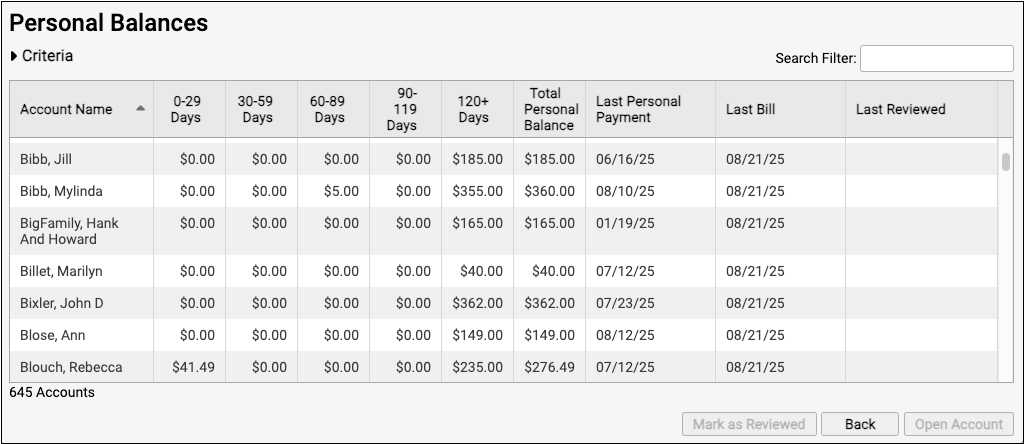
The generated balance worklist displays the account name, current balance, billing date ranges, total personal balance, last personal payment, last bill dates, and how recently the balance was reviewed in this tool.
Open an Account
To work with an account in more detail, select an account row and either click the “Open Account” button, or double-click on the row. This will open the selected account in the Payments tool.
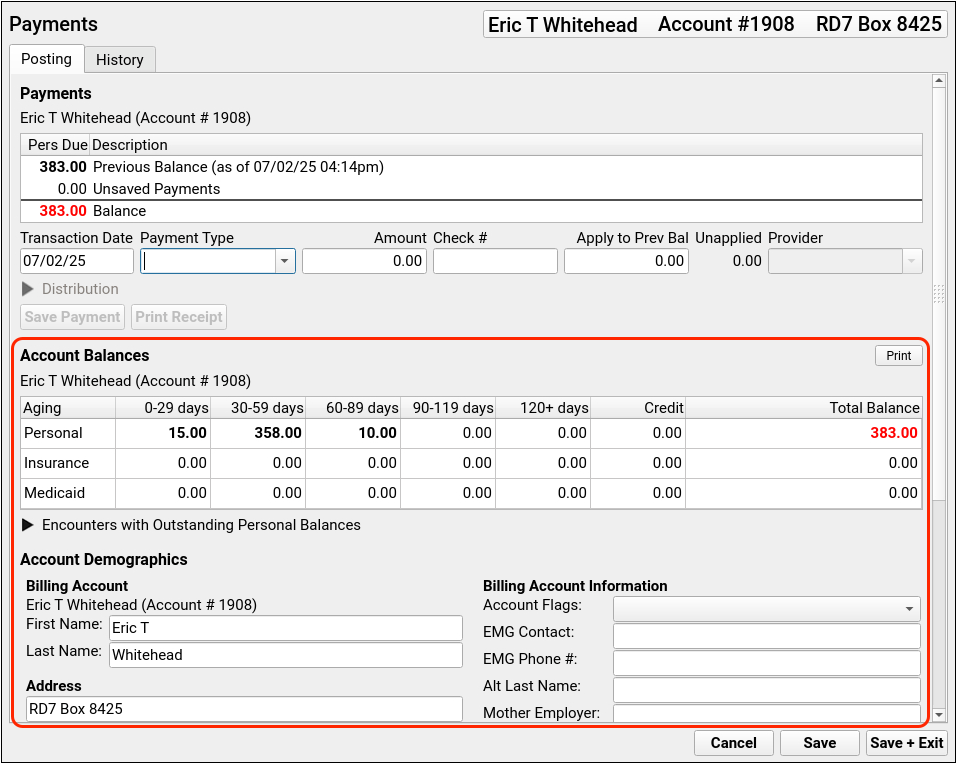
You can review balance details, update account information, and add notes about billing topics within the Payments tool.
To learn how to post personal Payments and adjustments, read Post Personal Payments and Write Off Charges.
Optionally Generate an Account Form
If you need to send a past due letter or policy document to an account holder, you can optionally use the Account Forms component in the Payments tool to generate or print an account form.
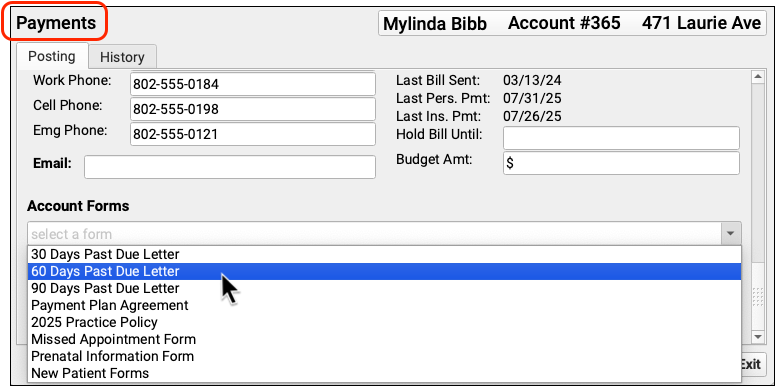
Forms Configuration Tool Only: Practices must enable the Forms Configuration tool to make use of the Account Forms component.
Return to Your Worklist
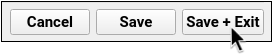
Click “Save + Exit” in the Payments tool to return to your worklist.
Mark an Account as Reviewed
When you are finished reviewing an account, select the account row and click “Mark as Reviewed”. This will sign and date the account entry on your worklist.

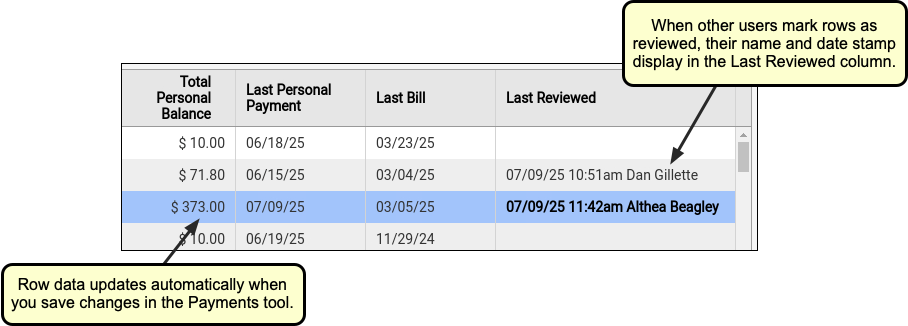
Reviewed items will remain on the worklist until the next time you generate your worklist with the same criteria.
If you accidentally mark the incorrect account, you can revert your reviewed signature with the “Revert Last Reviewed” button.
Revert Limited by Session: You can only revert last reviewed entries within your current session. If an entry’s font is bold, you can revert it.
For more information about the Personal Balances tool, read Work Outstanding Personal Balances in PCC EHR.
Work Outstanding Personal Credits
To generate a list of accounts with credits, select “Credit” when setting your criteria.

The generated credits worklist displays account name, credit amount, last date of service, last bill date, and last reviewed date.
You can open or mark row items as reviewed in credit worklist, just like in the balances worklist.
Set Permissions for Personal Balances
After receiving the PCC 10.4 update, open User Administration and give your billers access to the Personal Balances tool. Users with access to the User Administration tool will automatically have access to the Personal Balances tool.
To learn more about setting user permissions, read Set User Roles for Permissions and Security.
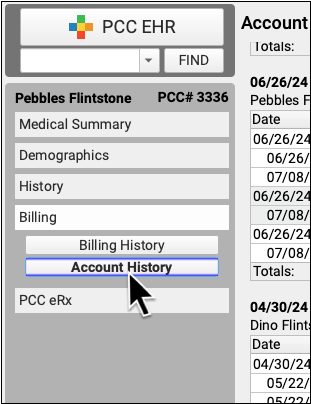
Review an Account History
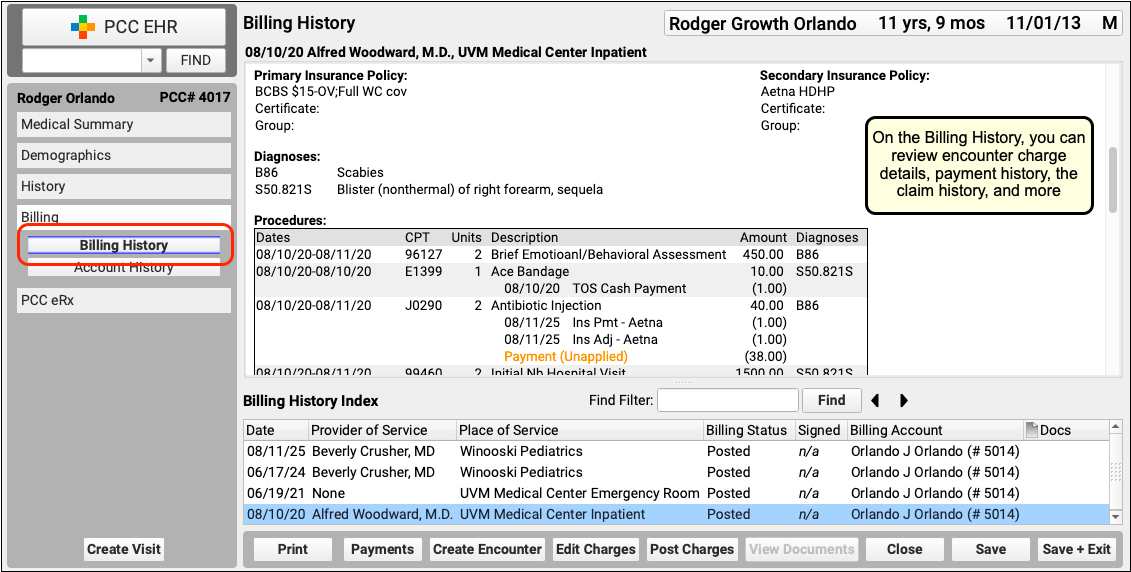
When you need to troubleshoot a billing issue for an account, or a family asks for an annual account record, use the Account History in the patient’s chart.
Open the Billing section of a chart and click “Account History”.

The Account History for a patient shows their billing account’s Account Balances component at the top. Then it shows the complete billing history of all encounters for that family.
Review the Details of an Encounter
For each encounter on a family’s history, you can see all billing details, including the patient, providers, current responsible party, place of service, and a table of charges.
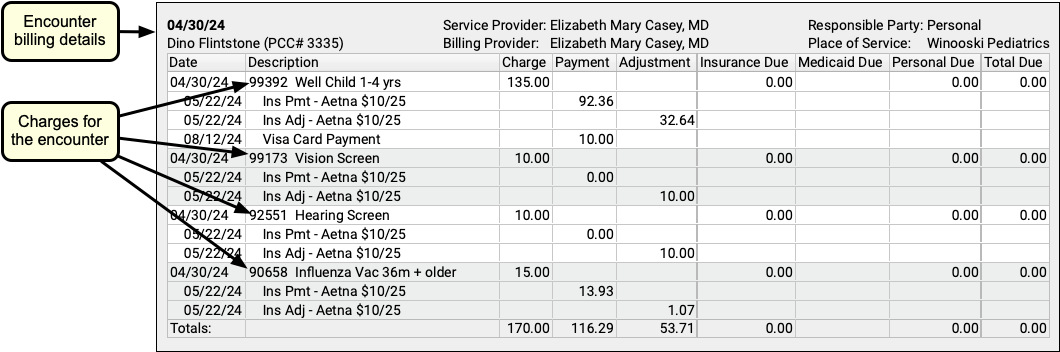
For each charge, you can see the date of service, the billing code and description, as well as the charge and due amounts.
As insurance payers respond and payments are posted against a charge, payments and adjustments will appear chronologically beneath each charge with the transaction date.

Understand Unapplied Payments
The Account History is primarily organized by encounter and sorted by date of service. However, if there is an unapplied payment on an account, it will be treated as its own encounter and appear by itself, with a description of any charges it currently pays towards.
When an unapplied payment pays for part or all of a charge, it also appears in orange in the history of that charge.

As a best practice, most offices link all payments directly to charges. Use the Payments tool to link an unapplied payment.
Filter, Search, and Display Additional Details on an Account History
Sometimes the default account history doesn’t show you exactly what you need. Use the filters and options at the top to view an account history for a specific date range or for a specific dependent.
You can also use the Find field to quickly locate a diagnosis, procedure, or any text in the Account History. As you type in search text, the Account History reduces to show only encounters that contain that text.
Finally, you can display additional information on an account history: diagnoses, CARC codes and descriptions, and each time a charge has appeared on a personal statement.

You can use these additional details to understand the purpose of an encounter, to show the reason for an adjustment, or to find out if your practice has generated a bill yet for a specific encounter.
You can turn these optional details on or off at any time. They will persist as your personal preferences when you view any account’s history.
By filtering, searching, and displaying optional information, you can hone in on exactly the details you need to review in the account’s history, or prepare the account history for sharing with the family.
Print an Account History for a Family
When a family wants detailed account records, use the Account History.
Billing Codes and Descriptions Include Confidential Information: When you print or export billing records, including receipts, bills, and histories, the output includes procedures and diagnoses from patient encounters. These codes and descriptions may reflect clinical information that was marked confidential in the chart.
Enter a date range and click “Print”.

The printed account history will reflect your selected options.
For example, if the family needs an account history for a single patient, you can select that patient and then click “Print”. You can also search for a particular diagnosis and then print an account history of all encounters featuring that diagnosis.
Access Billing Information in the Patient’s Chart
When you need to research a billing-related issue in a patient’s chart, visit the new “Billing” chart section.

The Billing section of the chart contains two powerful tools:
-
Billing History: The Billing History includes detailed billing information for each encounter, including diagnoses, charges, all payments, claim history, encounter billing notes, and more.
-
Account History: The Account History provides a ledger of all encounters and transactions linked to the patient’s billing account. You can filter and search the history in different ways, display additional information, and generate a printable history for the family.
Edit Encounter Details While Working on a Stuck Claim
As you review a stuck claim on the “Needs Correction” tab in the Claims tool, you can now click to open the Edit Charges tool and make changes to what appears on the claim.
For example, if a claim can’t go out because of an insurance problem, you can use Edit Charges to update policy information, adjust responsible party for the charges, and queue up a new claim. The tools in Edit Charges also let you review eligibility, add an encounter billing note, and more.
Configure Clinician Billing Identifiers: Tax ID, NPI, and Taxonomy Codes
To get paid, every claim needs a Tax ID, an NPI, and a taxonomy code. Use your practice’s Providers table in the Tables tool in PCC EHR to add or update these identifiers for your clinicians.
Open the Providers Table in the Tables Tool
Open the Tables tool from the Configuration menu and select the Providers table.
Review Provider Information
For each clinician at your practice, you can see their name, Provider Group, their linked PCC EHR user ID, and the three key billing identifiers: Tax ID, NPI, and Taxonomy Code.
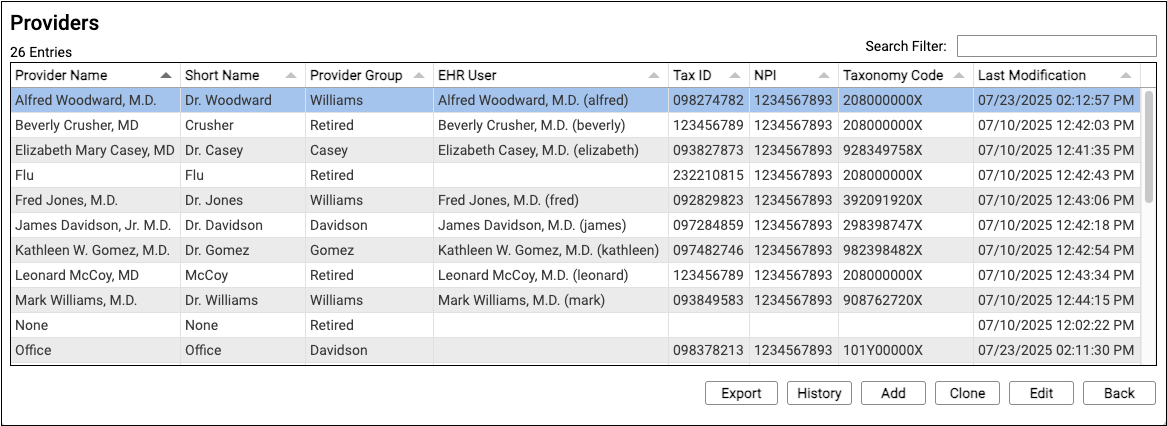
Edit a Provider Entry
Double-click on a provider to review their details.

Adding a New Clinician?: You can also use "Clone" or "Add" to create a new entry. To learn more about working in the Tables tool, see Edit Your Practice's Configuration Tables.
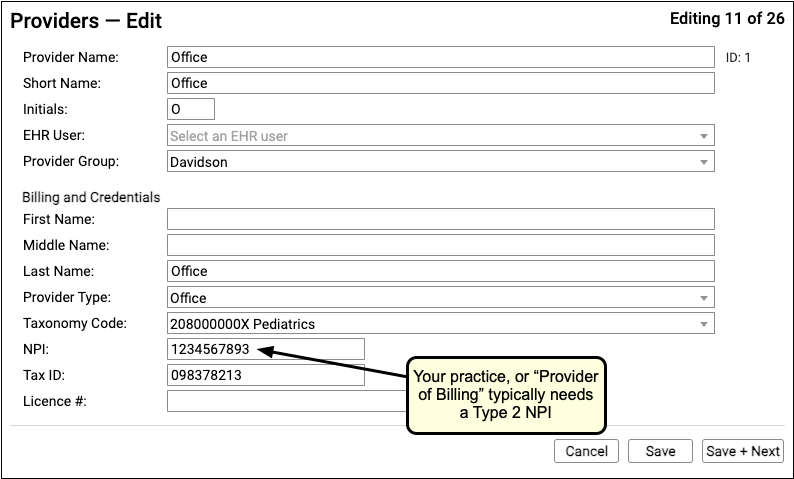
Adjust Clinician Information
In the top section, you can adjust the provider's display names, initials, associated PCC EHR user, and reporting Provider Group.

In the Billing and Credentials section, configure how the clinician should appear on claims. The key identifiers used to process claims are the clinician's name (first, middle, last), their taxonomy code, their NPI, and your practice's Tax ID.
Save Your Changes
When you are finished updating clinician details, click "Save".
Review Your Practice or "Office" Provider
By default, the "Office" provider in your Providers table is used as the "Provider of Billing" on an insurance claim. You should double-check that it is accurate, and contains your practice's ten-digit Type 2 NPI and nine-digit Tax ID.

Optional: Configure Custom (Per Insurance Company) Identifiers
In rare cases, an insurance company may require a unique identifier beyond the NPI, Tax ID, or Taxonomy Code for the clinician or the practice. Contact PCC Support for help with special payor configuration needs.
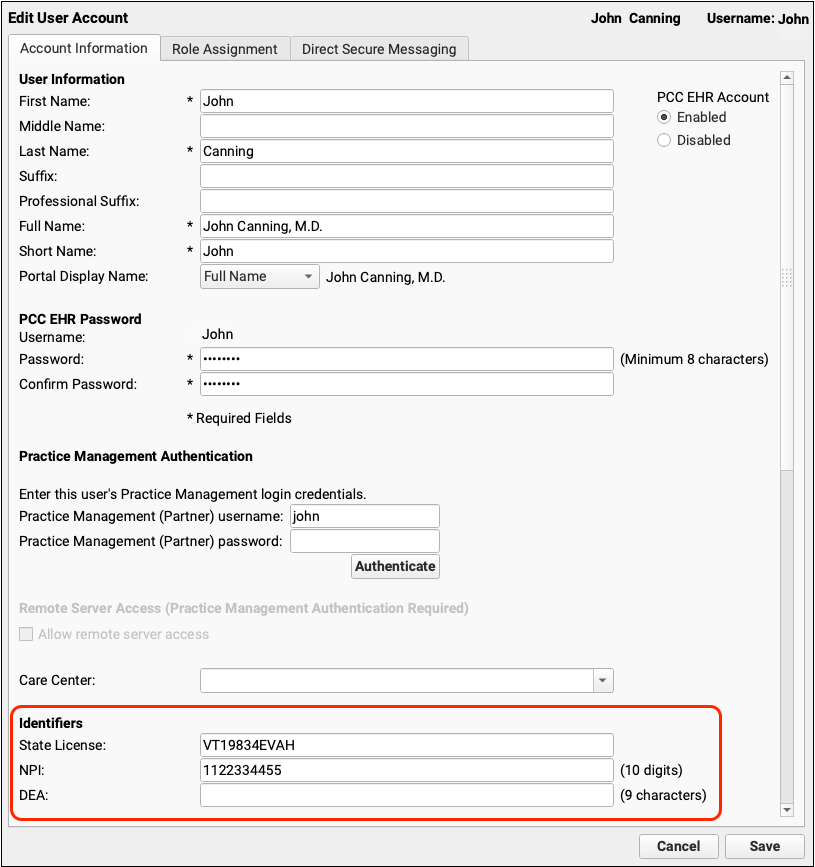
Add NPI Numbers and Other Identifiers to PCC EHR User Accounts
The NPI numbers and other details in the Providers table are used on claims to indicate your clinician's credentials. Clinical and prescribing activity in PCC EHR is also recorded with an NPI number.
Use the User Administration tool to review the PCC EHR user accounts for your clinicians. Add NPIs and other identifiers that affect prescribing and reporting on clinical services.
For more information, read Configure Clinician Billing Identifiers: Tax ID, NPI, and Taxonomy Codes.
Prescribing
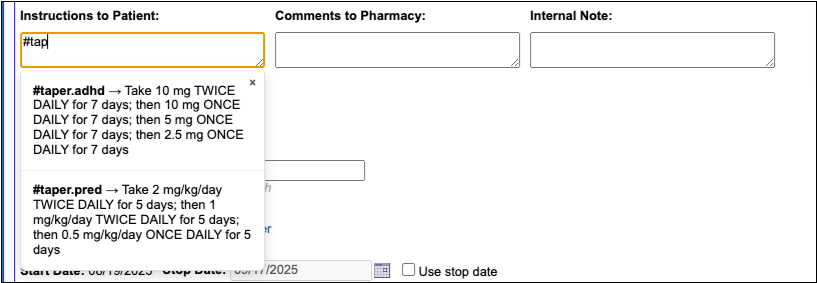
Use Snap Text in PCC eRx
Use Snap Text shortcuts to quickly enter taper instructions and other common e-prescribing phrases whether you are prescribing from your computer or your phone.
Create Prescribing-Themed Snap Texts
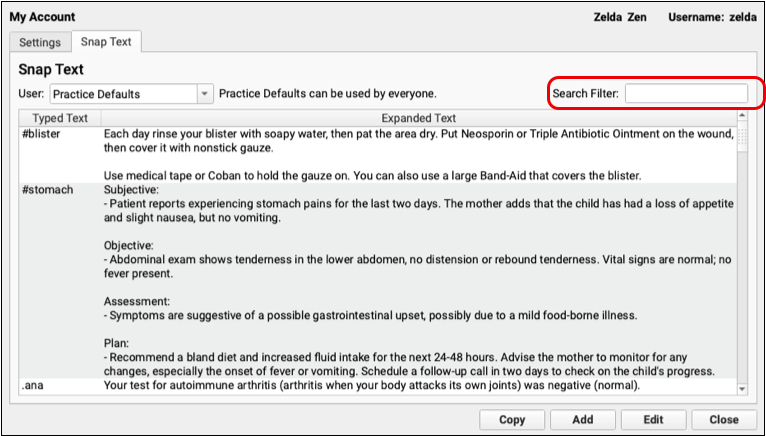
Open My Account from the File menu in PCC EHR, then click on the Snap Text tab.
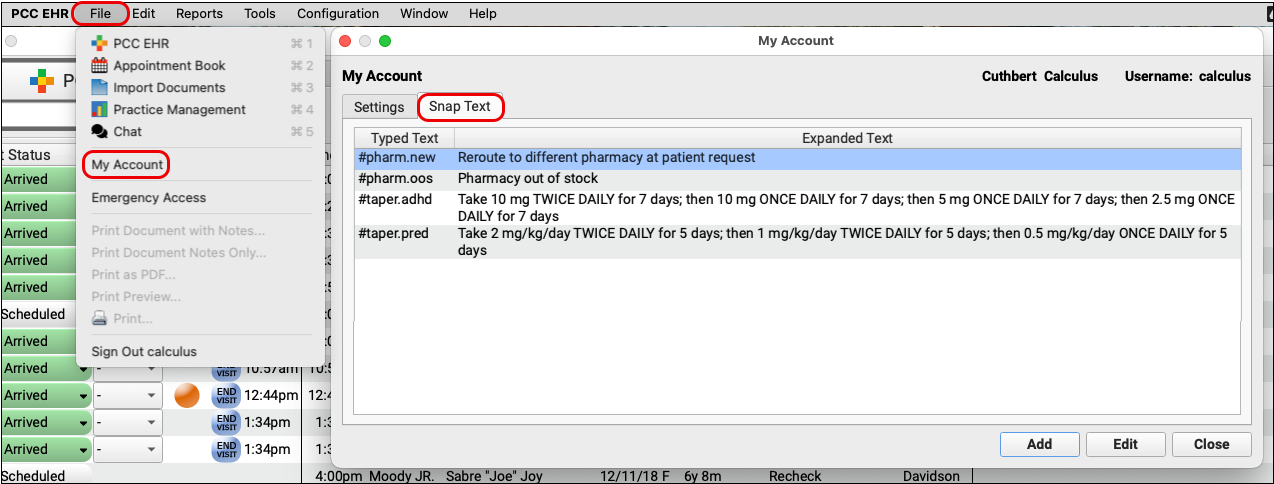
Add Snap Texts for common or complex e-prescribing phrases, such as taper instructions, speech therapy prescriptions, reasons for resending a prescription, or reasons for overriding a safety warning.
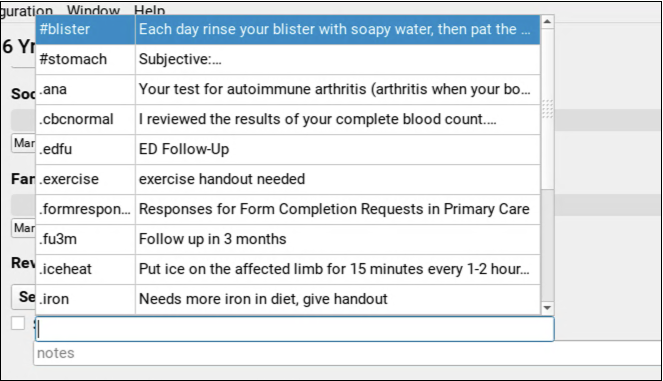
Start Typing to Search Your Snap Texts in PCC eRx
When you type in a field in PCC eRx that accepts Snap Text, PCC eRx automatically searches your shortcuts and phrases for items that match what you’re typing.
Snap Text is available in PCC eRx whether you are signed into PCC EHR on your computer or working in pocketPCC on your phone or tablet.
Insert Your Phrase
Select your phrase from the search results to insert it.
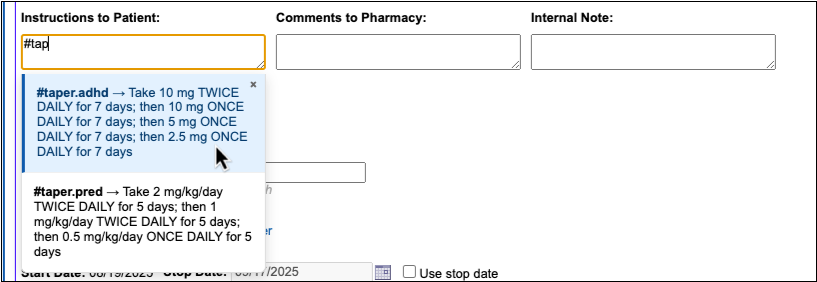

You can also insert a phrase by typing out the entire shortcut and hitting the Enter key.
Where You Can Use Snap Text in PCC eRx
Six fields in PCC eRx accept Snap Text:
- the Instructions to Patient field on prescriptions
- the Comments to Pharmacy field on prescriptions
- the Internal Note field on prescriptions
- the Resend Reason field when queueing up a prescription to be resent
- the field to record your reason for overriding a safety checking alert
- and, the field to record your reason for deleting a medication from your patient’s history
These fields let you know that they accept Snap Text as soon as you click or tap on them to start typing.

To learn more about how to configure and use Snap Text throughout PCC EHR, read Expand Short Text into Common Phrases in PCC EHR.
Adjust Your PCC eRx Text Size
You can change the text size in PCC eRx to make it more readable.
Open the My Settings page in PCC eRx and click on the Text Size tab.


Use the slider to increase the text size. A sample sentence shows what the text looks like at each size.

When the size is just right, click “Save”. This setting only changes the text size in PCC eRx for you, not other users.
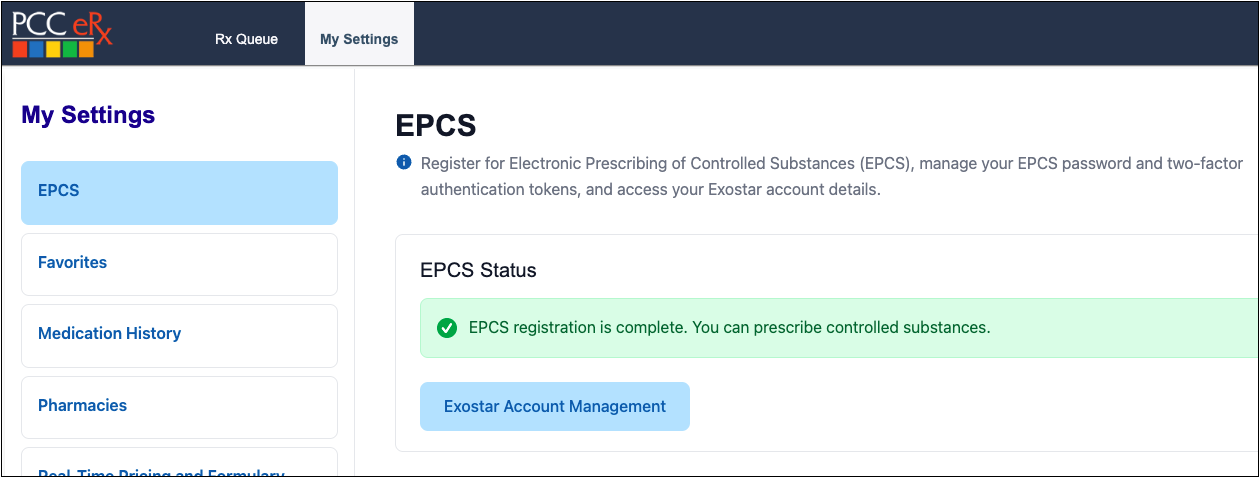
Register for EPCS with a Selfie
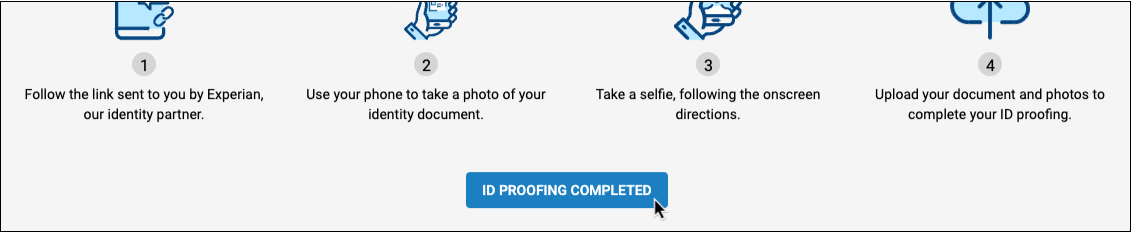
Clinicians can complete identity proofing for prescribing of controlled substances (EPCS) by snapping a selfie and a picture of their driver’s license. This replaces the portion of the registration process that previously required users to answer questions based on their Experian credit history.
During the Identity Proofing step, Exostar prompts the registrant to enter their cell phone number, then texts them a link.
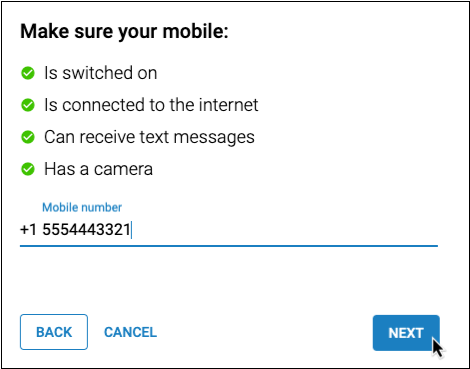
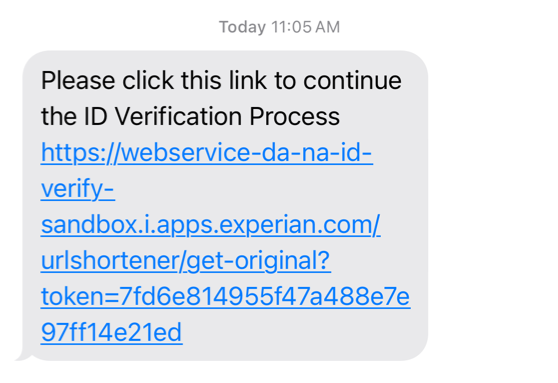
The registrant taps the link in the text message and is prompted to take a photo of their identity document, then take a selfie.
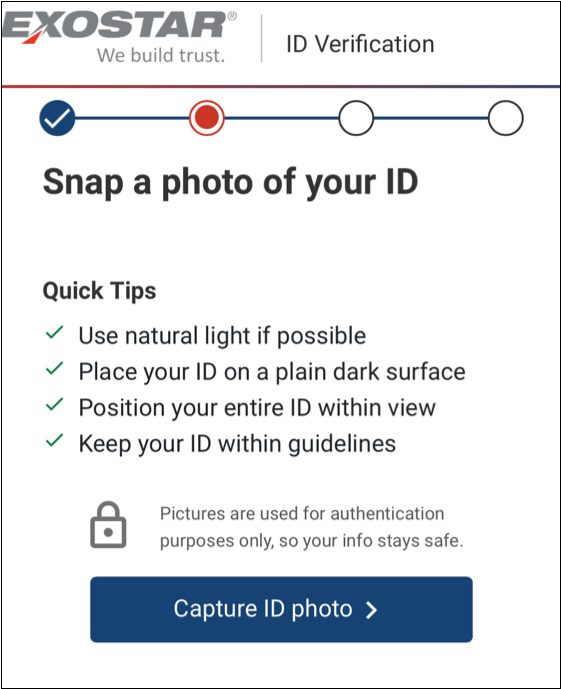

Once successful, the registrant clicks the “ID Proofing Completed” button on their computer screen to move on to the next step of the EPCS registration process.
This new identity proofing method will be offered to all new EPCS registrants. Prescribers who have already registered for EPCS will not be required to go through identity proofing a second time.
To learn about the whole EPCS registration process from start to finish, read Register for EPCS.
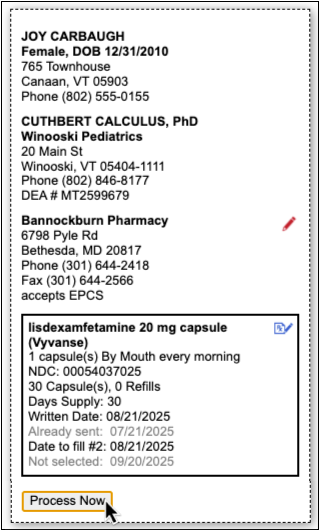
Prescribe a 2-Month Supply of Controlled Substances
If you want to prescribe more than 30 days of a controlled behavioral medication but a 3-month supply is too much, you can prescribe a 2-month supply instead.
Start a Controlled Substance Prescription
In PCC eRx, start your patient’s controlled substance prescription.
Check the 3-month Supply Checkbox
Check the Create 3 month supply checkbox to start a multi-month supply.
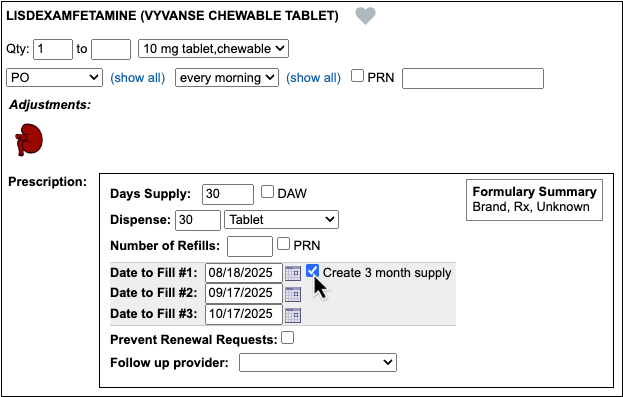
Clear Date to Fill #3
Clear out the date in the Date to Fill #3 field.
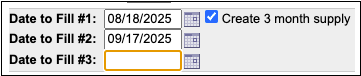
Finish Prescribing
Click “Process Now” to sign and send the supply to the pharmacy.
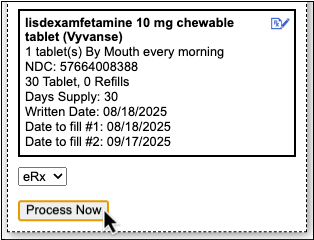
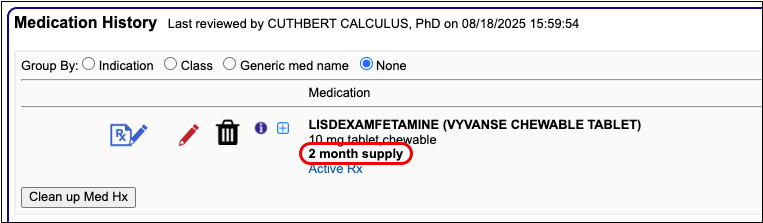
2-month supply prescriptions appear in your patient’s history with a 2-month supply label.
To learn more about 2- and 3-month supply prescriptions, read Prescribe Controlled Substances (EPCS).
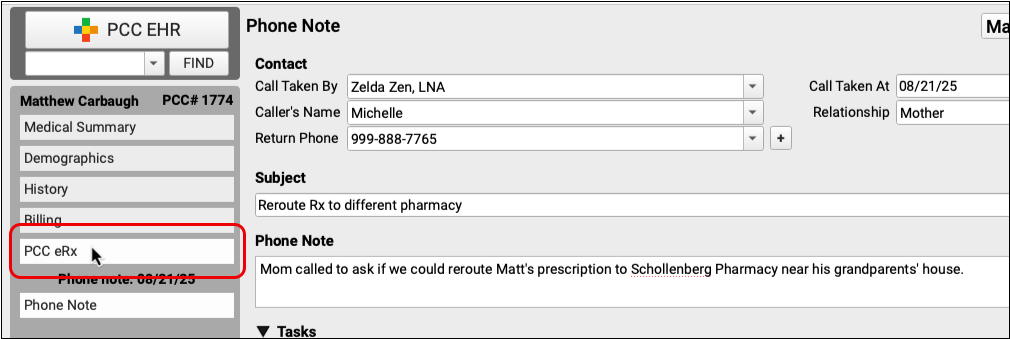
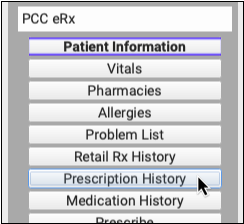
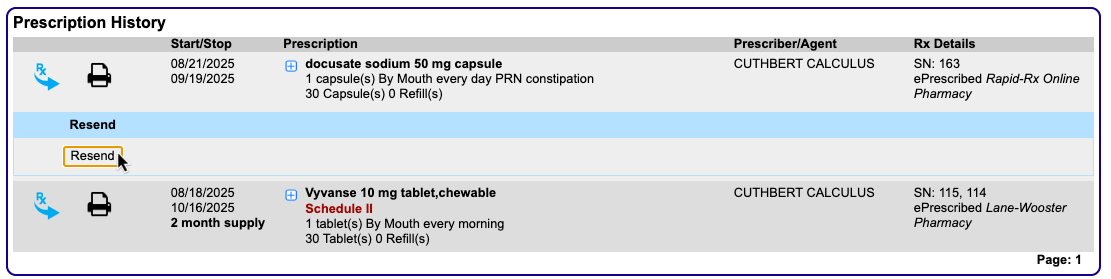
Resend Any Prescription from Prescription History
When a patient asks you to resend a prescription, you can do so right from the portal message or phone note you already have open instead of hunting through the patient’s history for the visit where you wrote the original prescription. The window for resending a prescription, no matter where you are resending it from in the patient’s chart, is seven days past the last sent date.
Open PCC eRx in the Patient’s Current Encounter
Click on the “PCC eRx” anchor button to open PCC eRx in whichever of the patient’s encounters you happen to be working.
Go to the Prescription History Section
Click on the “Prescription History” anchor button to jump to the patient’s Prescription History.
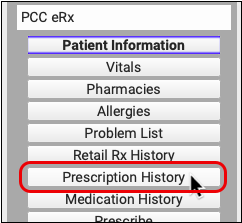
Prescription History lists all of the prescriptions your practice has written for this patient.
Find the Prescription to Resend
Find the prescription that needs to be resent.
Click the Blue Plus [+] Sign
Click the blue plus [+] sign next to the prescription that needs to be resent.

Click the “Resend” Button
Click the “Resend” button to modify the prescription details or reroute it to a different pharmacy.
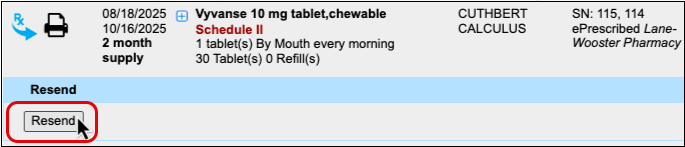
When you process a resend, it cancels the original prescription, notifies the pharmacy, and replaces the original prescription with a new version that contains your changes.
You can resend prescriptions for up to seven days. If you need to modify or reroute a prescription past that point, PCC recommends manually canceling the original and writing a new one from scratch. To learn more about resending prescriptions, read Resend a Prescription.
Queue Resends for Prescribers to Approve
Instead of searching through a patient’s history to cancel and manually prepare new versions of prescriptions that need to be modified or rerouted to a different pharmacy, clinical staff can use the “Resend” button to queue up changes for a prescriber’s approval.
Open PCC eRx for the Patient
Click the “PCC eRx” anchor button.
Jump to Prescription History
Click on the “Prescription History” anchor button to jump to the patient’s Prescription History.
Find the Prescription to Resend and Click the Blue Plus [+] Sign
Find the prescription that needs to be resent and click the blue plus [+] sign.

Click “Resend” and Make Changes to the Prescription
Click the “Resend” button and make the appropriate changes to the prescription. You can choose a different pharmacy or modify details like the dose amount, dispense quantity and form, and patient instructions.
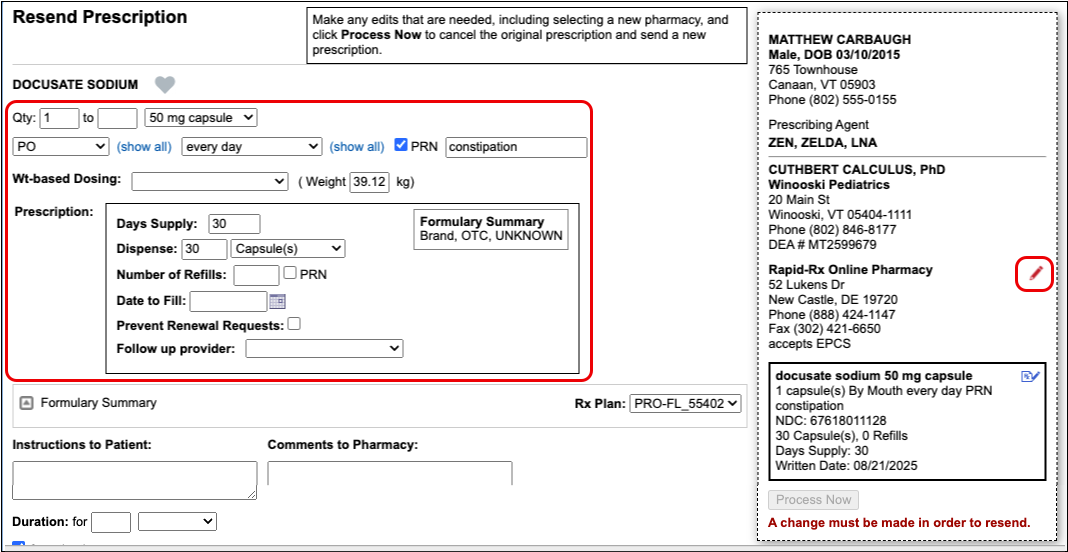
Even if you aren’t qualified to make the required changes yourself, you can queue this prescription for the prescriber’s approval with a note about what needs to change.
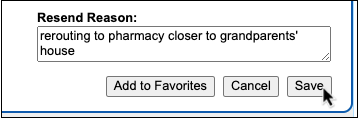
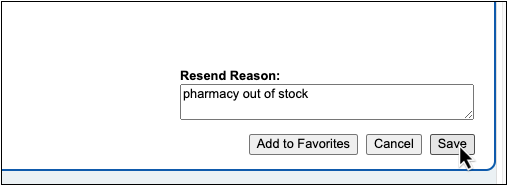
Enter a Resend Reason
Leave a note in the Resend Reason field to let the prescriber know why a change was needed, what changes you made, or which changes the prescriber needs to make before finalizing the resend.


A resend reason is required in order to save and queue the prescription for the prescriber’s approval.
Save and Queue the Resend
Click the “Save” button to save and queue the resend for the prescriber’s approval.
Pending resends appear at the top of prescribers’ Rx Queue for quick review and processing.

Where Can Staff Find the Resend Button?
The “Resend” button appears in both Prescription History and in the Review & Sign section of the encounter where the original prescription was written. Staff can use the “Resend” button in either place to queue up changes for a prescriber’s approval. To learn more about resending prescriptions, read Resend a Prescription.
Resend Any Part of a 3-Month Supply
When the pharmacy runs out of your preferred controlled behavioral medication on the second month of a patient’s 3-month supply, you can resend that prescription—or any part of the supply—to a different pharmacy.
Find the 3-Month Supply Prescription in PCC eRx
Open PCC eRx in the patient’s chart, go the Prescription History section, and find the 3-month supply prescription that you need to resend.

Click the Blue Plus [+] Sign, then Click “Resend”
Click the blue plus [+] sign next to the prescription, then click the “Resend” button.
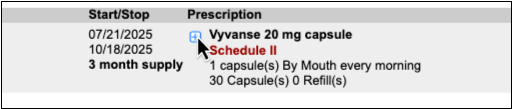
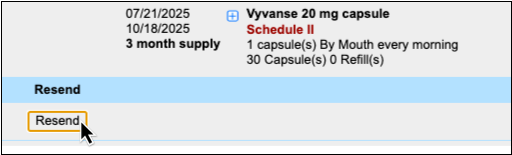
You can also find the “Resend” button in the Review & Sign section of the encounter where you wrote the original prescription.
Select the Part of the Supply to Resend
Select the prescription(s) in the supply that you need to resend.
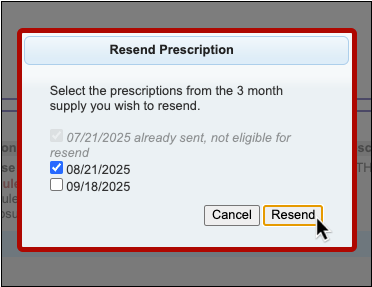
You can resend prescriptions up to 7 days after their dates to fill. Prescriptions that are past the 7-day window cannot be resent.
Change the Pharmacy
Edit the pharmacy and change it to the one where the patient would like their prescription(s) rerouted.
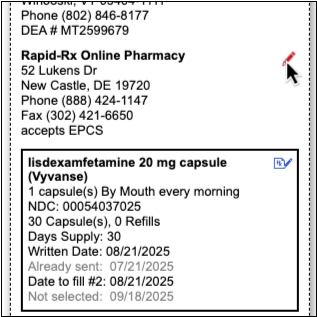
Finish Resending the Prescription(s)
Click “Process Now” to sign and send the prescription(s).
If you need to queue the resend for a prescriber’s approval, scroll below the “Process Now” button, enter a Resend Reason, and click “Save”.
How to Resend a 3-Month Supply with Different Prescription Details
If you need to modify details such as the dose amount, dispense form, or patient instructions, you must select all three prescriptions in the supply to be resent. If the 7-day window for this has passed, cancel the remaining prescriptions in the supply and write a new supply from scratch.
You can also follow these steps to resend prescriptions in a 2-month supply.
To learn more about resending prescriptions, read Resend a Prescription.
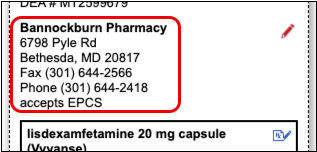
See an NDC on Every Prescription
The NDC that PCC eRx sends with prescriptions now appears plainly where you can see it.
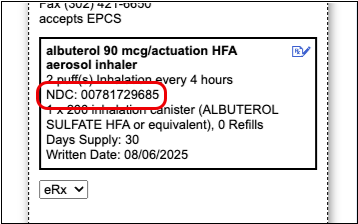
The NDC appears on the preview that shows exactly what the pharmacy will receive when you send the prescription.
Set a Preferred Drug Name and NDC
Optionally edit the drug name and NDC that will go to the pharmacy with your prescription.
Click the blue edit icon next to the drug name on the prescription preview.
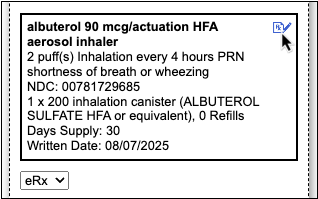
Select your preferred name and NDC from a list of appropriate alternatives for the drug.
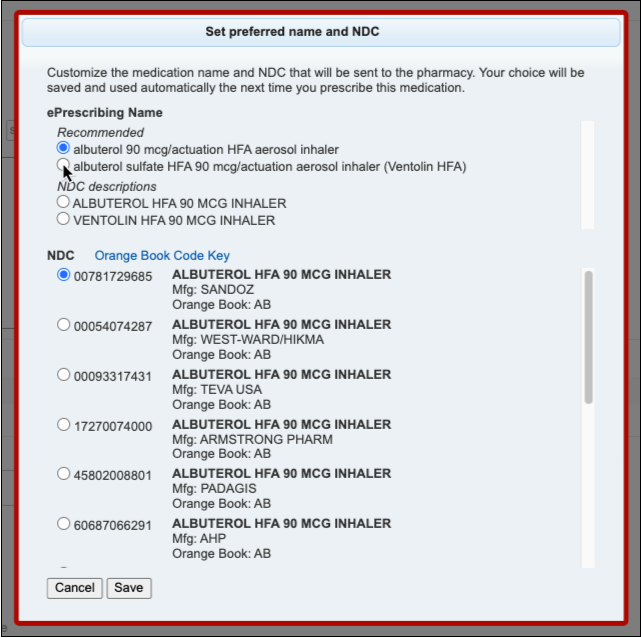
PCC eRx will remember your preferences the next time you prescribe the same drug and strength. If you queue a prescription for somebody else to send, the prescription will reflect their name and NDC preferences.
Concerta Woes Begone
In PCC 10.4, prescriptions for generic Concerta are sent to the pharmacy with a more representative name and NDC so pharmacists have better information about what to dispense.
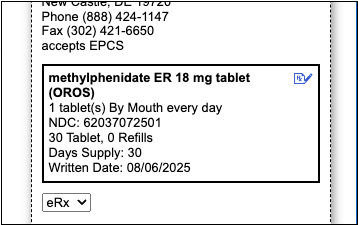
The updated name and NDC represent a product that is bioequivalent to Concerta, which has an osmotic pump release mechanism. The new default NDC is AB-rated in the Orange Book.
Other eRx Goodies
Get more out of PCC eRx with a fresh new look for the My Settings page, more options to customize your prescribing experience, fewer errors, and a bold green status to let you know when prescriptions successfully make it to the pharmacy.
New Safeguards to Prevent Accidental Resends
PCC 10.4 introduces safeguards to prevent users from accidentally resending multiple identical prescriptions to the same pharmacy.
A new status appears next to sent prescriptions in the Review & Sign component to make it easier to tell which ones were successfully delivered to the pharmacy. When you do need to use the “Resend” button to fix or reroute a prescription, PCC eRx will require you to make a change to the prescription details or pharmacy before you can process it.
Fewer eRx Errors
The work to minimize errors that disrupt your prescribing workflows continues in PCC 10.4. Changes to medication-specific dose form logic reduces bothersome error messages and improves communication with the pharmacy. These fixes specifically target:
- cefdinir 300mg capsules
- desmopressin nasal sprays
- diazepam nasal spray (Valtoco)
- hyoscyamine 0.125mg disintegrating oral tablets
- lactobacillus acidophilus 10 billion cell capsules
- lidocaine 4% patches (OTC)
- medroxyprogesterone acetate injectable (Depo-Provera)
- omalizumab auto-injectors (Xolair)
- semaglutide subcutaneous pen injectors (Wegovy)
- vancomycin oral solution
- and oral chewable gummies and tablets, including Flintstones Complete and Complete (Iron)
A Fresh Look for My Settings
The My Settings page in PCC eRx gets a fresh look to help you find settings more easily and understand the impact of changing them.
Hide Real-Time Pricing and Formulary Alternatives by Default
If the prescription alternatives suggested by your patient’s pharmacy benefit manager (PBM) force you to scroll each time to reach the Instructions to Patient box, you can use a new setting to hide them by default.
Open the My Settings page in PCC eRx and click on the Real-Time Pricing and Formulary tab. Change your Alternatives Display setting to “Hide alternatives by default”, then click “Save”.
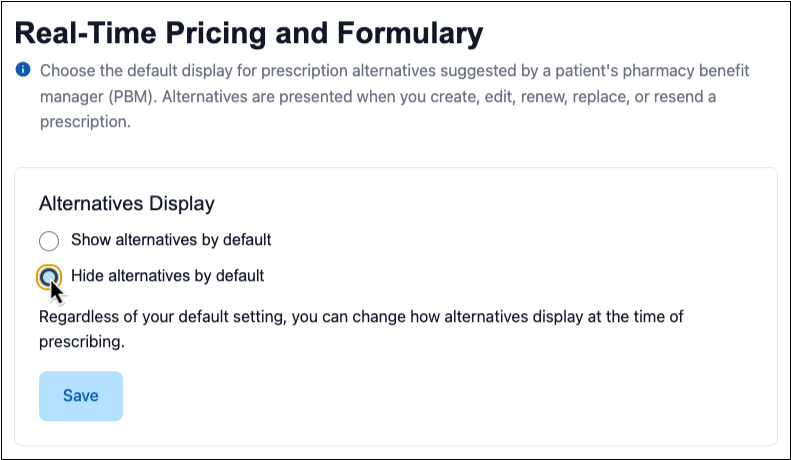
Regardless of your default setting, you can change how prescription alternatives display at the time of prescribing.
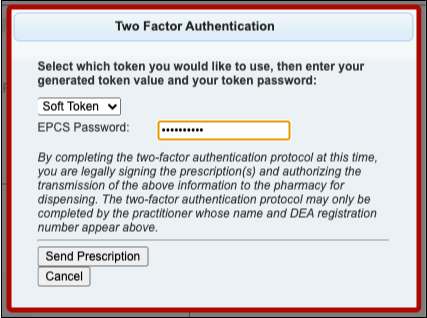
Use Enter to Submit Your EPCS Password
When you enter your password to send a controlled substance prescription, you can use the Enter key to submit it and move on to the final authentication step.
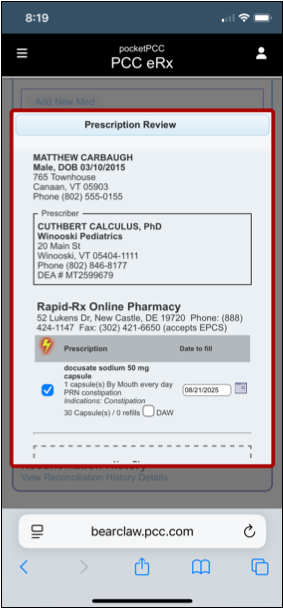
A Better Prescription Review Window on Mobile
When you finalize and send pending prescriptions from the Review & Sign component in pocketPCC, you can see all of the prescription and pharmacy details in one place without having to scroll from side to side.
Features for Everyone at Your Practice
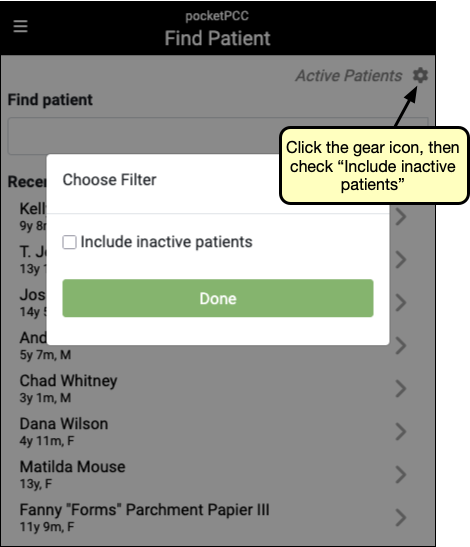
Show or Hide Inactive Patients in Patient Search Results
Beginning in PCC 10.4 inactive patients are hidden in patient finder search results in PCC EHR and pocketPCC. Use the “Include inactive patients” option to reveal inactive patients.
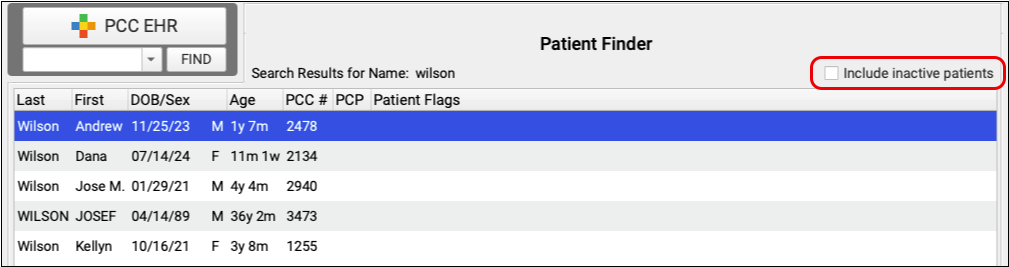
Checking “Include inactive patients” reveals the inactive patients in your search results. When a user checks “Include inactive patients” it will remain checked, even after exiting PCC EHR, until the user unchecks it.
Review Your Patient and Account Flags: Patients with a Patient Flag or an Account Flag that marks a patient as inactive will not appear in search results. Review your Patient and Account flags configuration to ensure that flags with the option “Patients assigned this flag are inactive” should be used to determine patient inactivity.
PocketPCC also filters out inactive patients by default when searching. Use the gear icon on the upper right of pocketPCC search results to show inactive patients. Like PCC EHR, pocketPCC remembers your preference and will include inactive patients until you uncheck the box again.
Find and Use Snap Texts Quickly
There’s no need to remember anything from your long list of Snap Texts. With a single click, or a few keystrokes, you can select exactly the text you need and insert it directly into a chart note.
Anywhere you use Snap Texts you can open a list of your Snap Texts by typing Ctrl+Shift+. or, on a Mac, command+Shift+.. You can also right-click or control-click and select “Insert Snap Text” to open the list of snap texts. Select one, or begin typing to search both the short and expanded text columns.
To quickly edit existing Snap Texts, use the new Search Filter field in My Account’s Snap Text tab to find specific text within the typed or expanded texts.
Customize Your Flags for Alerts, Scheduling, and Reporting in PCC EHR
When a patient has an unusual scheduling need, or a diagnosis or other issue that requires attention, you can add a patient flag to their record. You can also flag family accounts that need to speak to the billing office and customize report output using flags. Custom status flags help your practice handle unique needs.
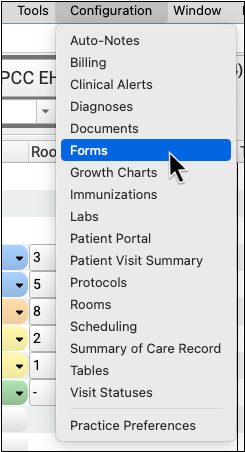
When you want to review and customize your practice’s flags, open the Tables tool in the Configuration menu.
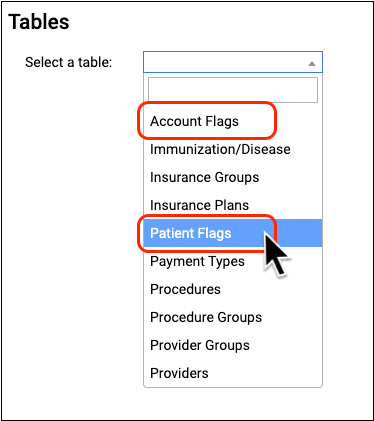
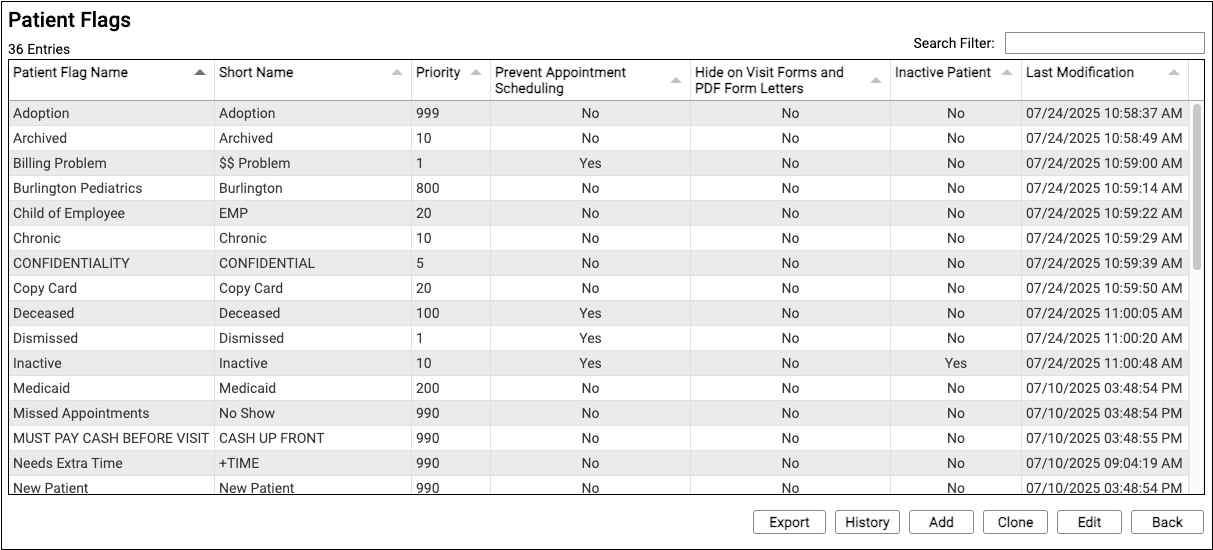
For each flag, you can see the names, sort order priority, and whether or not the flag has certain effects on PCC EHR behavior, such as scheduling, preventing bills from being generated, and more.
Double-click on a flag to edit it, or click “Clone” or “Add” to create a new flag. To learn more about using the Tables tool, read Edit Your Practice’s Configuration Tables.

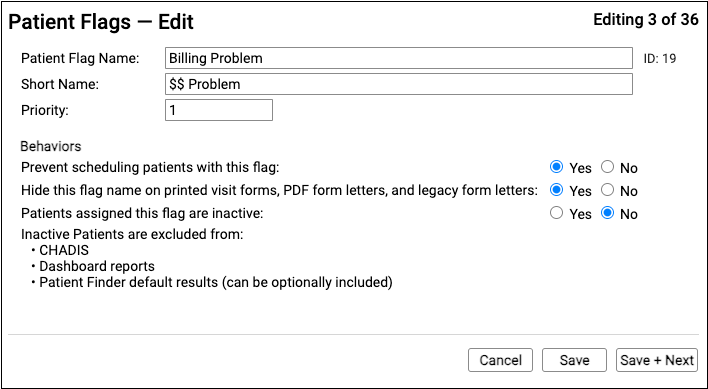
Caution: As with every configuration table, remember that when you make changes you are changing the flag wherever it appears in your system. Do not delete, write over, or change the name of a flag. Instead, clone a flag or create a new one.
When you edit or enter details for a status flag, you can change its name and how it will affect different features and services in PCC EHR.
Read Use Custom Flags for Scheduling, Alerts, and Reporting to learn more.
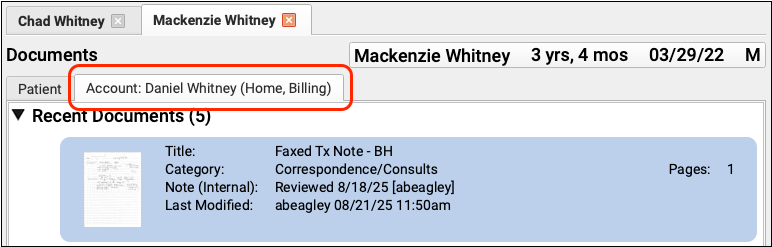
Save Documents to an Account
Your practice can now save imported billing letters and policy documents to a family or account holder, rather than to a patient.
In Import Documents, select “Account” in the Find area to find an account for your document.
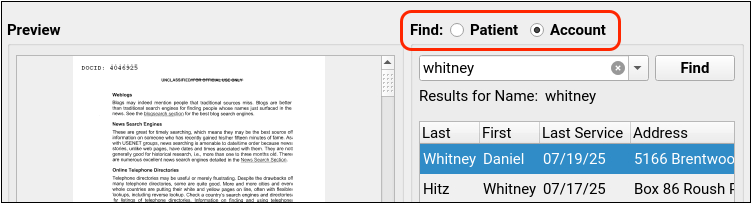
Once you have saved an account document, you can find it in the Documents section of a patient’s chart, under the account holder’s tab.
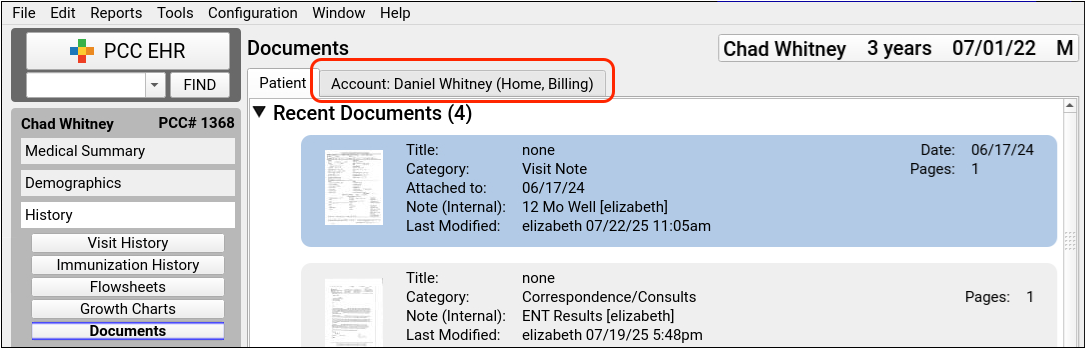
Account documents are shared by all patients attached to the account.
No Account Document Reporting: The Document Modification report in the Report Library does not include account documents with the PCC 10.4 release.
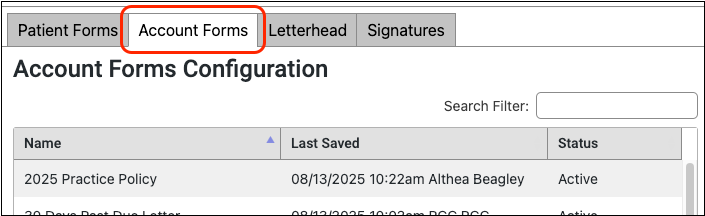
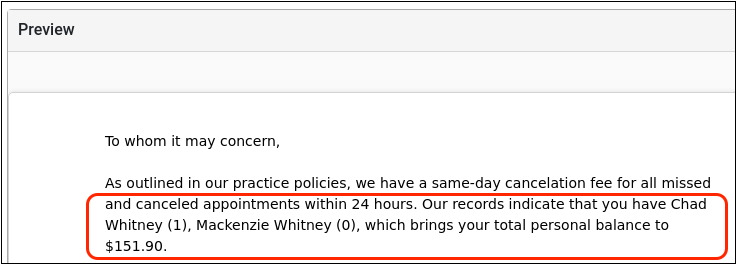
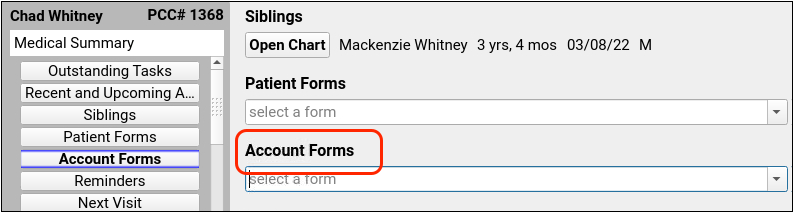
Configure and Generate Account Forms in PCC EHR
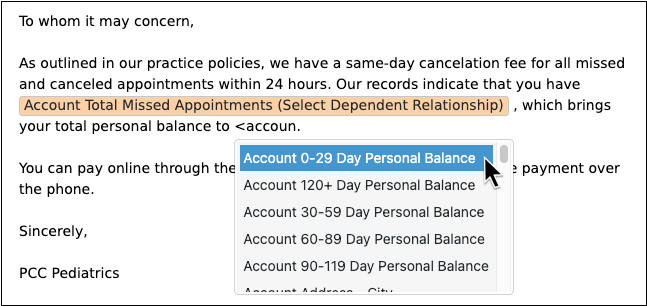
You can now create and save billing letters for a family or an account holder from within a patient’s chart or protocol. PCC 10.4 introduces the new Account Forms component along with specialized variables for account forms.
Forms Configuration Tool Only: Practices must enable the Forms Configuration tool to use Account Forms. To learn about how to enable the Forms Configuration tool, read Switch to the Forms Configuration Tool
Just like with patient forms, you can create and configure account forms with variables in the Forms Configuration tool.
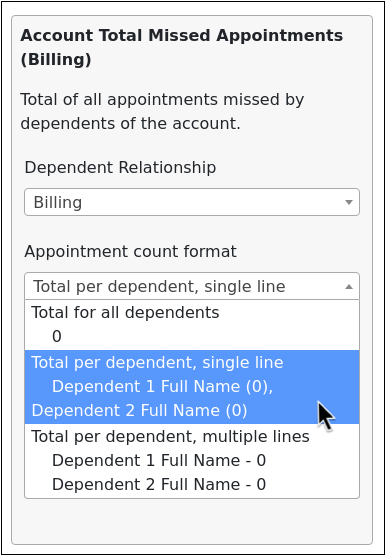
Account form configuration includes several new variables, such as total canceled appointments, personal balances split out by aging ranges, and total missed appointments.
To find out more about how to work with form variables, read Configure Forms in PCC EHR.
The new missed appointments variable allows you to show the total number of visits missed by the family and you can choose a format for the appointment counts: as a total, or split out by dependent.
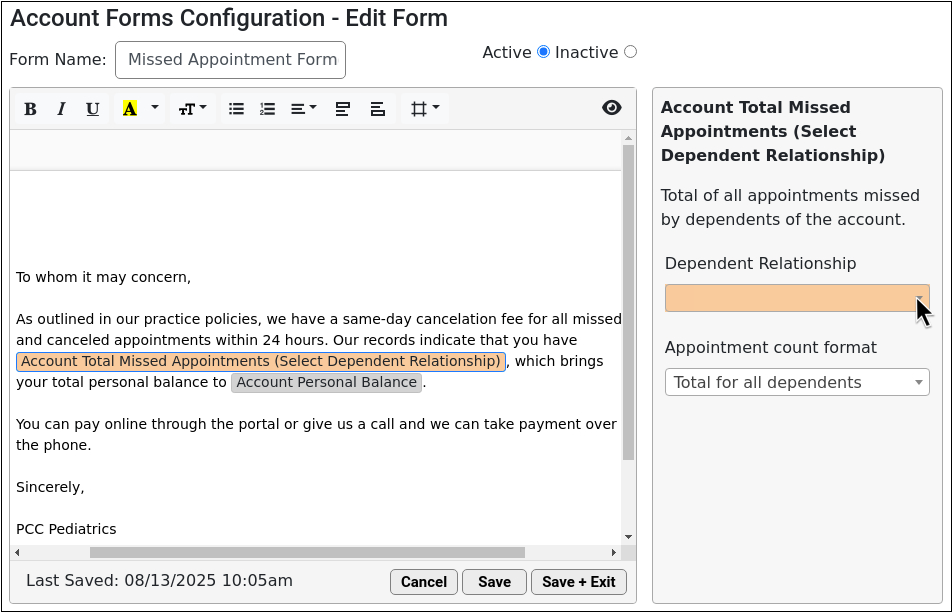
If you have switched to the Forms Configuration tool, the Account Forms component will appear in the Medical Summary and Demographics sections of the patient’s chart as well as the Payments tool upon receipt of the PCC 10.4 update. You can add this new component to any protocol.
If you are interested in learning more about the Forms Configuration tool, and what your practice needs to do to make the switch, you can read Switch to the Forms Configuration Tool and reach out to PCC Support for details.
The existing Forms component is now Patient Forms on all PCC EHR systems.
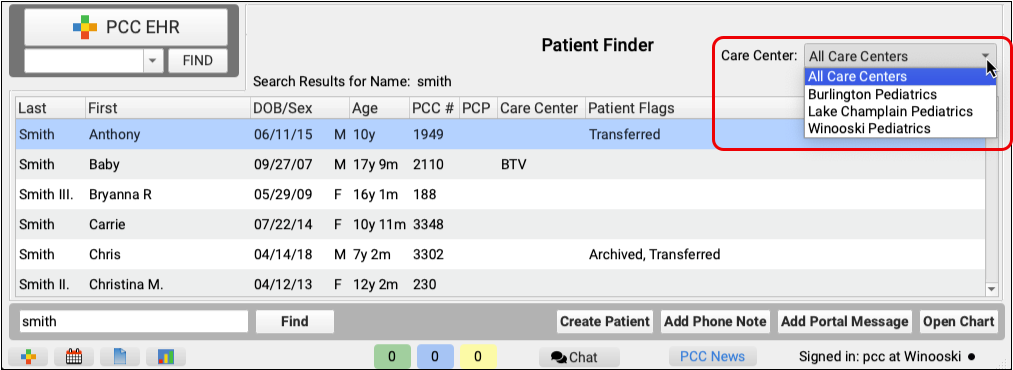
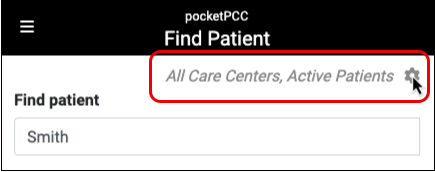
Find Only Your Care Center’s Patients
Care Centers can limit their patient finder results to show only patients assigned to a single care center.
In PCC EHR, select a Care Center from the drop-down menu and the search results will refresh and display only patients assigned to your selected Care Center.
In pocketPCC, use the gear icon on the top right of pocketPCC’s patient search results to open the search filters window and select a care center. If a PCC EHR user has a care center assigned to their account, patient search use that assigned care center by default.
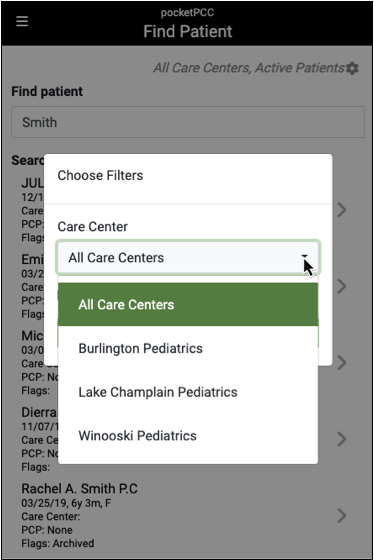
Patients who are not assigned to a care center will appear in searches for each care center.
Review Encounter Details in pocketPCC
The Encounter Details component now displays in PocketPCC across six encounter types, so you can quickly see important details of each encounter.
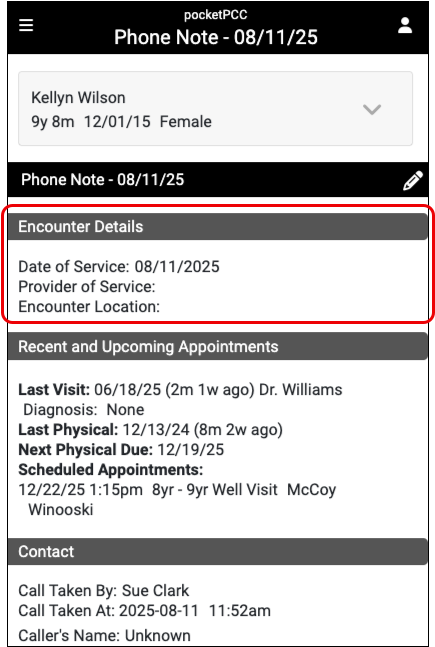
You can find Encounter Details in pocketPCC in these six encounter types:
- Phone Notes
- Portal Messages
- Unsolicited E-Lab Results
- E-Lab Results
- Orders Follow-Up
- Unsolicited CHADIS Results
Other Updates and Patch Notes
Read below to learn about other update news, patches, and bug fixes.
Update Your Windows 10 Workstations
Microsoft is ending support for the Windows 10 operating system, so PCC will soon be ending support for this operating system too. PCC 10.4 is the last version of PCC EHR that will run on Windows 10.
In PCC 10.4, the PCC EHR login screen on Windows 10 workstations displays a notice about needing to update the operating system by the first quarter of 2026.
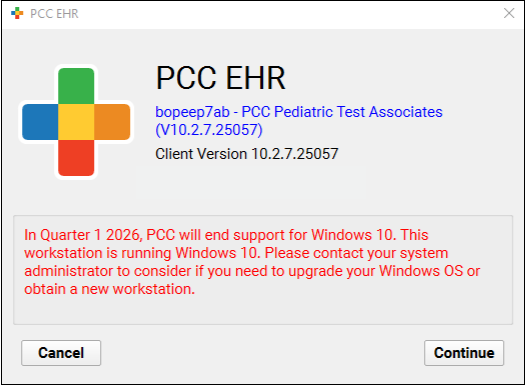
Future versions of PCC EHR introduced in 2026 will only run on Windows 11 or higher.
Faster Diagnosis Searching
When searching for a diagnosis, your results will appear more quickly as you type.
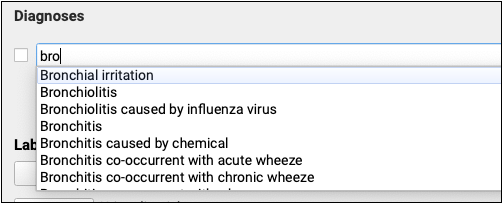
PCC 10.4 includes multiple under-the-hood optimizations to diagnosis searching.
Shorter Install Time on macOS
PCC 10.4 introduces improvements under the hood to shorten the time to install PCC EHR on Apple Macintosh workstations.
No More PHP Errors on PCI Audits
Credit card processors and other vendors may conduct PCI audits at your practice to ensure that your information technology infrastructure is secure and complies with their privacy practices. Recently these audits have been finding that one of the programming languages used in PCC EHR, PHP, is not on the most recent patch version.
PCC 10.4 introduces an automated process to keep PCC EHR’s PHP version up to date. This under-the-hood change will improve the security of your PCC system and reduce the number of findings on PCI audits.
Translated Vaccine Information Sheets
The American Academy of Pediatrics updated a number of Vaccine Information Sheets to add Spanish translations. These translations are linked in the Connected Content field at the top of each Vaccine Information Sheet.
Code Updates
PCC updates your system to support coding, billing, and vaccine configuration in line with changing guidelines. During the PCC 10.4 release cycle or with the PCC 10.4 update, we updated your system to support the following.
-
SNOMED-CT: During the PCC 10.3 and 10.4 release period, PCC updated all practice systems to support the 2025 SNOMED-CT update, which included over 1600 new diagnosis, allergy, and family history descriptions. There were some updates to common pediatric diagnoses, including a change of “Exercise induced asthma” to “Exercise induced bronchospasm” and “Weight loss” to “Weight decreased”. If your practice used the “Follow-up in outpatient clinic” SNOMED description, you should note that it has been deprecated without a replacement.
-
ICD-10 2026: PCC 10.4 updates your system to support the CDC’s 2026 ICD-10 update. New codes and guidelines are valid for dates of service starting on October 1st, 2025. Updates of interest to pediatrics include additional specificity for Type 2 diabetes, inflammation of the eyelid, pelvic and perineal pain, and nausea and vomiting. For more information, visit CMS.gov’s ICD-10 page. You can also learn more about the new codes by watching PCC’s Pediatric Billing Drop-In recording for August 2025.
Bug Fixes
PCC 10.4 includes some notable squashed bugs.
-
Better Handling for Uncommon Immunization Registry Responses: To prevent PCC EHR from crashing, PCC 10.4 introduces better handling for uncommon registry response codes indicating that patient records could not be retrieved. This logic was specifically introduced to handle “Patient data restricted” responses from the California Immunization Registry (CAIR), but will cover any case where the registry responds with something unexpected.
-
See Reason for Referral Details on Summary of Care Records: PCC released a non-disruptive background patch in April 2025 to ensure that referral orders appear with the appropriate status in the Reason for Referral section of Summary of Care (outbound C-CDA) records generated in PCC EHR.
-
Correctly Filter Results in the Immunization Registry Response Viewer: PCC 10.4 fixes the “No Errors or Warnings” Response Severity filter in the Immunization Registry Response Viewer. Now, selecting that filter will appropriately update the view to show only responses that do not contain errors or warnings.
-
Edit Insurance Payments Without Queuing Up a Claim: In some situations, editing an insurance payment would lead to a new claim being queued up for submission. This will no longer occur.
-
Improved Editor for Billing Messages: In some situations, editing your practice’s custom aging-based messages that appear on bills could result in freezing or unusual behavior due to non-ASCII characters or configuration issues. PCC 10.4 replaces the text editor and prevents these issues.
-
More Accurate Visit Reporting: PCC 10.4 allows EHR users to more accurately monitor how many immunization, COVID testing, telemedicine, and telephone visits were done over a period of time. These are now classified in an appropriate category, and not as miscellaneous visits.
-
Improved Dashboard Security: PCC 10.4 includes an update to Practice Vitals Dashboard infrastructure to improve security.
-
Missed or Canceled Appointments Do Not Appear in the Patient Portal: In the patient portal, missed or cancelled visits that contained charted information appeared in Visit History. In PCC 10.4 those visits will no longer appear in the patient portal.
-
Portal Message Documents No Longer Cause Crashes: PDF documents and thumbnails attached to portal messages could be improperly displayed or cause the EHR to crash. This has been resolved and all PDF documents and thumbnails should display without error or crash.
-
Blocked Phone Numbers Are Correctly Indicated in Logs and Charts: Phone numbers that opted out of Broadcast Messaging by replying “STOP” did not appear in the Broadcast Message Details Log, nor did the blocked icon appear alongside the phone number in patients’ charts. This has been corrected, and all opted-out phone numbers are recorded.
-
Visit Components Appear in pocketPCC: Certain visit components available for review and editing in PCC EHR were not displayed when editing the visit in pocketPCC. This has been resolved and all components now appear.
-
Inactive Patients No Longer Sync to CHADIS: Patients marked with the Inactive flag were being unnecessarily synced to CHADIS. PCC 10.4 has corrected this error, and inactive patients will no longer be synced.
-
Patient Flags Prevented Editing Appointments: Appointments for patients with a flag that prevents scheduling could not be edited. This issue has been resolved and only scheduling is prevented. Edits such as appointment notes, duration and visit reason can be edited.
-
Flowsheets for Lab Tests and Orders Display Correctly: Lab test and lab order flowsheets appeared blank for patients with long histories. The cause of this display error has been corrected and flowsheets will display all lab tests and orders as expected.
-
Appointment Removal Notes Restored to Appointment History:
Appointment removal notes that included any special character would not appear in the Appointment History. This issue has been resolved and those notes are now available in Appointment History.
-
Capitalized Portal User Email Addresses Will Not Cause Log In Failures: When patient portal users were created using email addresses as the sign-in method, entering the email address in all capital letters would prevent the user from logging in. This has been corrected, and capitalization now does not matter when creating a patient portal user.