Create Worklists of Unpaid Claims (insaging, inscoar)
You can use PCC’s tools to work on claims with errors, rejections, and denials.
But what if a problem is fixed, but the claim wasn’t resubmitted? Or what if an insurance payor simply never responds? Are some insurance payers regularly failing to pay you in a timely fashion?
You may need specialized tools to find claims that slipped through the cracks and work down your practice’s insurance A/R.
Contents
Review a Summary of Your Practice’s A/R By Payor (insaging)
Run the Insurance Company Aging Report (insaging) to review an aged summary of your practice’s outstanding charges broken down by insurance group.
You can find out which carriers owe you the most money and how old those balances are. The insaging report is also a quick way to see your total A/R, and it will help you determine which insurance carriers need follow-up attention. For example, if you know that an insurance company comprises a large portion of your outstanding receivables, yet only represents a small fraction of your patient population, you may use that information the next time you review the payor’s contract.
Run and Review the insaging Report
You can find the insaging report in your Practice Management windows.
From the opening configuration screen, press F1 – Generate Report to view the report. (For report configuration options, see below.)
Here is a sample insaging output:
Insurance Company Aging Report                         Generated on 06/01/00
By Transaction date, As of 05/31/00
All Providers
                Current   30 – 59   60 – 89  90 – 119      120+     Total Perc
                   ————————————————————
Personal           3,515     9,410    12,994     9,408    24,342    59,671  32%
Other              7,357       777       399         0         0     8,534   4%
Anthem               361       230         0         0         0       591   0%
Aetna              3,392     2,011         0         0         0     5,403   2%
Aetna/HMO          2,542       171       105         0         0     2,818   1%
Affordable         1,185       497       171         0         0     1,853   1%
BCBS               4,652     1,024       385         0         0     6,062   3%
CIGNA              9,016     1,228       466     1,736     1,846    14,294   7%
HARRIS             1,544     1,015       215        24         0     2,798   1%
HUMANA             5,056       855        89     2,973     1,363    10,336   5%
Medicaid             829        41         0         0         0       870   0%
ONE Health         1,089       782        51         0         0     1,922   1%
PHCS               8,089     2,716       336         0         0    11,142   6%
  .                    .         .         .         .         .         .   .
  .                    .         .         .         .         .         .   .
  .                    .         .         .         .         .         .   .
UNITED             5,897       793       331     3,370     1,685    12,076   6%
                   ————————————————————
Total             69,922    26,034    18,421    20,323    47,055   181,757
Percentage           38%       14%       10%       11%       25%
Total Aging                                                        181,757
Personal Credits across entire practice                             57,127
Medicaid Credits across entire practice                                  0
                                                                ———-
Total A/R                                                          124,629
Your practice’s total outstanding balances are shown with one row for each insurance group. The columns split each insurance group’s total into aging categories. The report includes a “Personal” insurance group for outstanding personal charges.
For each group, insaging lists the outstanding A/R that is “Current” or less than 30 days old, 30-59, 60-89, 90-119, and over 120 days old. The total outstanding balance and the percentage of your practice’s total A/R are also listed. At the bottom of the report, you can see the “Total Aging” A/R, along with the total outstanding personal and Medicaid credits (if any).
Use the insaging report to:
-
Evaluate Insurance Companies: If you compare the “Percent” of total A/R column with the percentage figures in the activity report, you will see when an insurance group’s percentage of your total outstanding receivables does not line up with its percentage of your office’s workload. Comparing how hard you have to work to get paid against how many patients you actually see can help you identify “good” and “bad” payors.
-
Target a Group that Requires Further Attention: After identifying a payor with a large or particularly old A/R, you can run the Insurance Company Accounts Receivable (inscoar) report to review all the outstanding claims for that insurance group.
Configure and Customize insaging
You can change how the insaging report ages receivables, recalculate aging to a different date, limit the report to a specific provider, and make many other changes.
Here is the options screen you will see when first running insaging:

-
Aged How?: By default,
insagingcalculates the age of your A/R by the “Transaction Date.” You can setinsagingto age by “Posting Date”, which is when each charge was entered into your system. This will change the amounts in the report’s aging categories if your office often posts visits long after they occur. Finally, you can choose to age by “Payor Date,” which ages by the date each balance became the current carrier’s responsibility. For example, charges that have recently been forwarded to a secondary insurance will appear as “Current” even though the visit occurred months ago. -
Aged as of what date?: Since aging calculations involve every charge on your system, they are performed each night and stored in a “Nightly File”.
insaginguses the previous evening’s Nightly File by default. You can tellinsagingto regenerate a file representing unpaid charges aged to any date you prefer. Once you have regenerated an aged nightly file, you can select that report again by choosing the “Use Existing File…” option. -
Destination: Choose whether you want to view the report on your screen, mail it to your e-mail inbox, or print it on a specified printer.
-
When To Run: Run the report “Right Now” and have your terminal wait for the job to finish, run it “In The Background” so you can go on and do other things at the same time, or schedule the job to run “Later At” a specified time. This option was useful on older computer systems (pre-2003) and should no longer be needed.
-
Generate...: You can include charges for all providers, or select individual providers or a provider group. PCC can help you set up any provider group you would find useful for A/R Analysis. All credits are assigned (by default) to the Office provider. If this provider is not included when the report is run, then no credits will be reported.
Understanding and Configuring Insurance Groups
The insaging report tallies charges by the plan they are pending. Charges that do not pend an insurance company are totaled in the Personal line of the report.
If you see a blank line in the middle of the insaging report, there is an insurance group with no assigned plans in your practice’s Insurance Groups table.
Use the Tables tool to review the plans your practice bills. You can sort by group and make changes to improve reporting, and as needed you can edit the Insurance Groups table to create new groups and make reporting more informative. For example, you may want to consolidate two insurance groups with very few plans and little activity, or you may choose to break up an insurance group if it represents a large portion of your business and you want to track it more closely. For more help creating and organizing insurance groups for reporting purposes, contact PCC Support.
Create a Worklist of Unpaid Claims (inscoar)
While you can use PCC EHR’s many workflow tools to address claims with errors, rejected claims, and denied claims, you may want to work with a list of all unpaid claims, regardless of billing status. To work claim-by-claim on your practice’s unpaid, pending charges, use the Insurance Company Accounts Receivable (inscoar) report.
The inscoar report includes an optional interactive mode, which allows you to research billing history, make changes, and then resubmit claims all from the same screen.
You can find the inscoar report in your Practice Management window.
Run and Review the inscoar Report
From the configuration screen, press F1 – Generate Report.

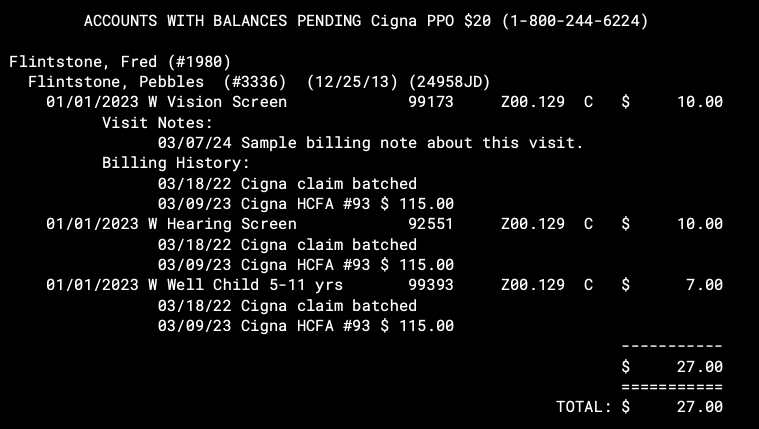
Based on your selected criteria, the report displays every encounter with an unpaid insurance balance. The encounters are sorted by the insurance company to which their charges are pending. inscoar shows you the insurance company’s name and phone number. With each account name, you can see the family’s insurance ID number and group number. The patient name, procedure dates, names, codes, and primary diagnoses codes are all shown, along with the outstanding balance information.
You can use the information on the report to contact the payor or the family and take action to resolve the issue.
Notes and Billing History: If there are any Encounter Billing Notes, they will appear under the first charge for that visit. If there is any billing history, it will appear under each charge. If a claim was generated, you will see a billing message with batch information and the total original amount of the claim.
Configure and Customize inscoar
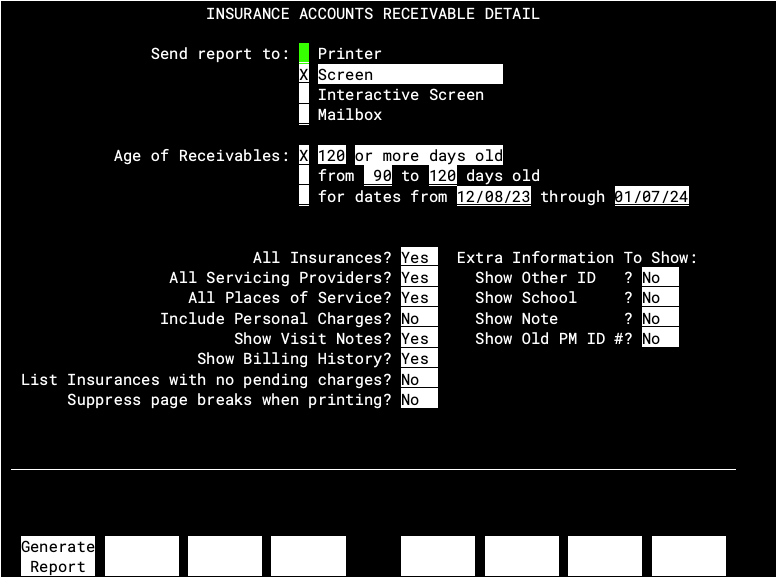
You can choose the age of receivables you wish to review, limit the report by insurance company, provider, or place of service, and make many other configuration choices that change the output of inscoar. Here is the options screen you will see when first running inscoar:

Output Options for inscoar
-
Send report to:
You can view the
inscoarreport on the computer screen, print it out, or have it sent to your e-mail inbox. You can also view the report as an “Interactive Screen,” which allows you to work on the charges as you review them.
Criteria Options for inscoar
-
Age of Receivables:
You can limit the
inscoarreport to only those charges that are over a certain age, those that within a certain age range, or those that occurred during a specific date range. Using these options, you could, for example, choose to view only insurance charges that are nearing the end of a particular carrier’s timely filing limit. -
All Insurances?
If you enter “No,” you will be prompted to select insurance plans or groups that you wish to view. Otherwise, you will see all insurance plans that have outstanding charges.
-
All Servicing Providers?
If you enter “No,” you will be prompted to select providers or provider groups for which you wish to view charges. The default of “Yes” will run the report for all providers that have any outstanding charges.
-
All Places of Service?
If you enter “No,” you will be prompted to select the place of service for which you wish to view charges. The default of “Yes” will run the report for all places of service for which there are outstanding charges.
-
Include Personal Charges?
Change this item to “Yes” if you wish to view all charges, regardless of whether they pend an insurance carrier or are the guarantor’s responsibility. In this way, you could analyze personal charges at the same time as insurance charges.
Formatting Options for inscoar
-
Show Visit Notes?
Change this item to “No” if you do not wish to view Visit Notes. A visit note is added to charts in the Correct Mistakes (
oops) program. -
Show Billing History
Change this item to “Yes” if you want the date the charges were batched or submitted, along with other billing messages, to show in the report. This may be useful when dealing with old charges that have been resubmitted several times.
-
List Insurances with no pending charges?
inscoarcan create a list at the bottom of the report of insurance plans that meet your criteria but do not currently have any outstanding charges pended to them. Keep this option as “No” to suppress the list. -
Suppress page breaks when printing?
Change this field to “Yes” if you wish to print the report in one long section. By default,
inscoarprints different insurance plans to different pages for your convenience. -
Extra Information To Show:
Use these settings to show the information from the four boxes in the Patient Editor (
notjane) on the report. For example, if your office stores insurance ID# information in one of those boxes, it may be useful to have that information on yourinscoarreport.