Automatically Charge Billing Fees for Overdue Accounts
Does your practice levy a fee when an account balance goes over 90 days? Whenever you generate personal bills, you can automatically charge your practice’s billing fee for overdue balances.
Video: Watch Automatically Charge Billing Fees for Overdue Accounts to learn more.
Contents
Configure Automatic Billing Fees for Your Practice
A billing fee can be an important part of collecting from a delinquent account, but it is essential that you only charge accounts that meet your practice’s criteria as established in your financial policy. Use the Billing Fees tab in the Bills tool to configure criteria for your automatic billing fee and to turn billing fees on or off.

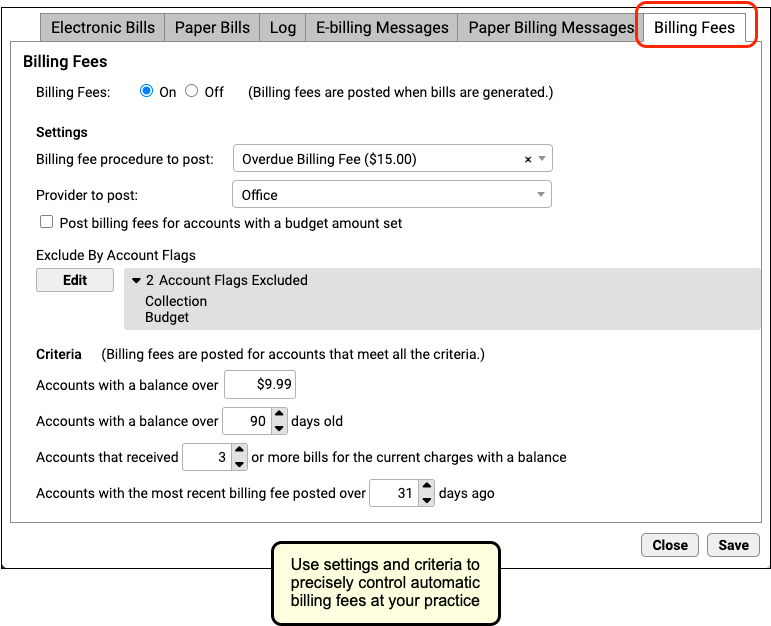
You can fill out the settings and then use the “Billing Fees” toggle switch at the top to turn automatic billing fees on or off for your practice. Remember to click “Save” after making any changes.
The reference list below defines how each setting and criteria will control how automatic billing fees work at your practice.
-
Billing fee procedure to post: Select the charge that will serve as your practice’s billing fee. This charge will work like other charges and fees at your practice. You can create a new custom fee and designate its price in the Procedures table in the Tables tool. Whenever you generate bills, PCC will post the fee for any account that matches your specific criteria and use the procedure you specified as the charge.
-
Provider to post: If your practice always uses a provider for all charges, you can select that specific provider. Otherwise, choose “Office”.
-
Post billing fees for accounts with a budget amount set: By default, if an account has an amount in their “Budget” field, found in Demographics, they will not receive an automatic billing fee. If you would like those accounts to also receive a fee, check this box.
-
Exclude by Account Flag: You can exclude accounts from billing penalties by adding a status flag and then excluding by that flag. For example, your practice may decide that if a family is turned over to collections, they should no longer receive an automatic billing fee. In that case, you would exclude by the status flag “Collections”.
-
Accounts with a balance over: Your practice can designate the minimum balance for which an account would receive an automatic billing fee.
-
Accounts with a balance over # days old: Your practice can designate the minimum age of balances that would trigger the automatic billing fee.
-
Accounts that received # or more bills for the current charges with a balance: How many bills does your practice send to an account before you begin charging a billing fee?
-
Accounts with the most recent billing fee posted over # days ago: If the account continues to not pay their bill, will you charge an additional late billing fee every month? Enter the minimum number of days before another fee should be assessed.
What About Deceased Patients: Charges for patients who are deceased will not be used as criteria for determining whether or not the family gets a bill. If your practice wishes to charge billing fees for a deceased patient or add any other fees to other accounts, you can do so by creating an administrative encounter from the Billing History section of a patient’s chart.
Switching How You Generate Fees: If your practice previously used forms and custom configuration to automatically charge a billing fee, you should fully switch to the Bills tool and use only one method to charge fees. When you transition, PCC recommends you generate bills using a consistent billing cycle (for example, 30 days) to ensure families are not billed two fees.
Run Bills and Charge a Fee
Once configuration is complete and the “Billing Fees” toggle switch is set to “On”, automatic fees will be assessed whenever you run bills.
Open the Bills Program
Open the Bills tool from the Tools menu.
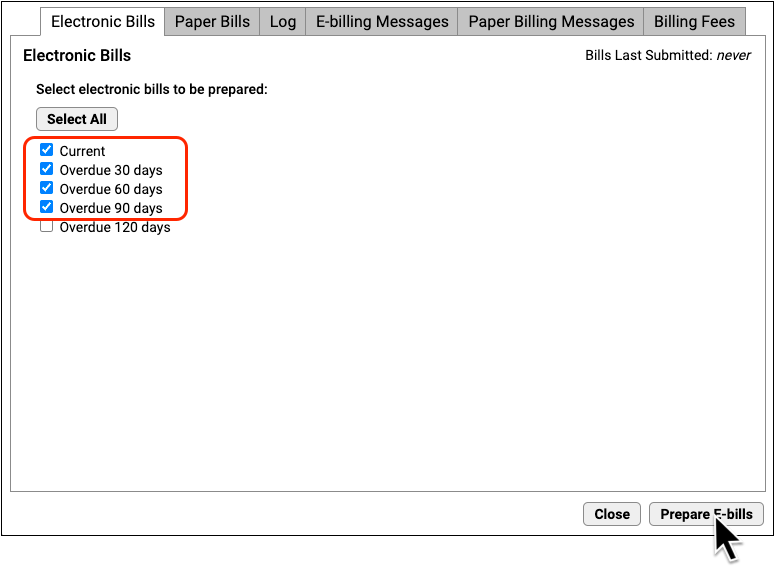
If you send out bills to a third-party vendor for processing, use the “Electronic Bills” tab. Otherwise, choose “Print Bills”.
Select Age of Bills to Send and Click “Prepare Bills”
Indicate which bills you wish to generate, based on age of the oldest balance on the bill. Then click “Prepare E-bills” or “Prepare Bills”.
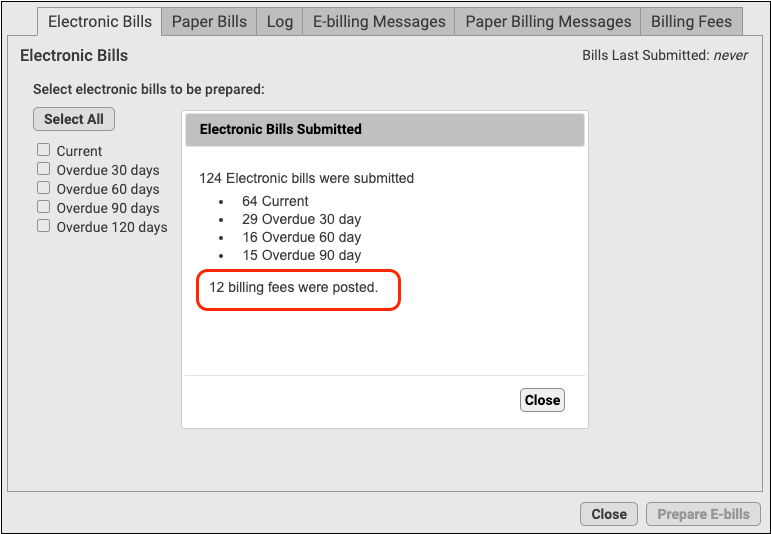
Review Prepared Totals
The Bills program will show you how many bills were prepared for each category.
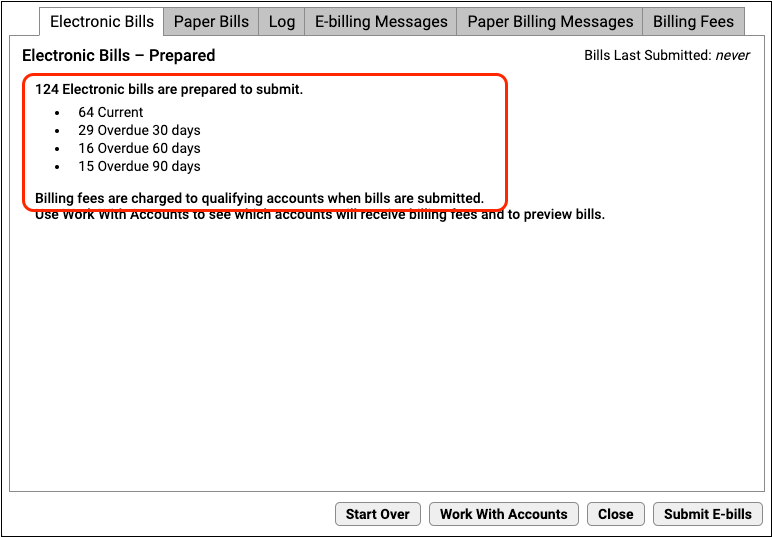
If your practice charges automatic billing fees for overdue accounts, you will see a reminder.
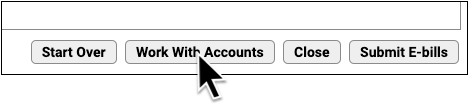
Optionally Work With Accounts, Especially Accounts That Will Be Charged a Fee
Click “Work With Accounts” to review all accounts that will receive a bill.
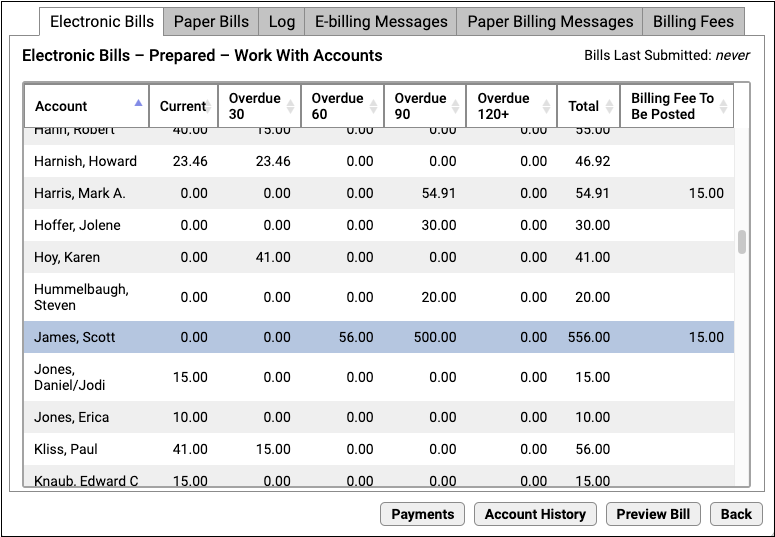
You can review the list and identify accounts that will receive a billing fee. You can sort by the “Billing Fee To Be Posted” column to see all accounts affected. To dig deeper, you can select an account and click “Payments” or “Account History” to review account details, contact the family, and even collect payment over the phone in order to avoid the billing fee.
If You Work With Accounts, You Will Next Re-Prepare: If you use the Work With Accounts screen, the Bills program will prompt you to Start Over and re-prepare bills, as total amounts due may have changed.
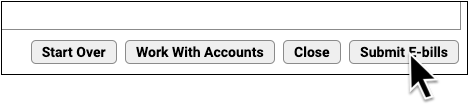
Submit or Print Bills
Click “Submit E-Bills” or “Print Bills” to run bills. Late fees will be applied to the account as the bills are generated.
Bills Tool or the Personal Balances Tool: If you prepare and send bills using the Personal Balances tool instead of the Bills program, it will also add your practice’s custom billing fee.
Optionally Check the Log
On the Log tab, you can review which accounts received a billing fee.
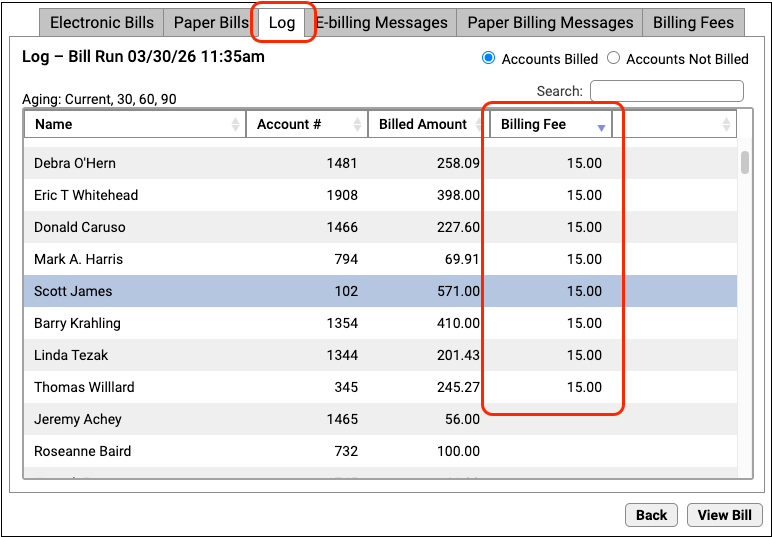
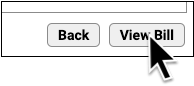
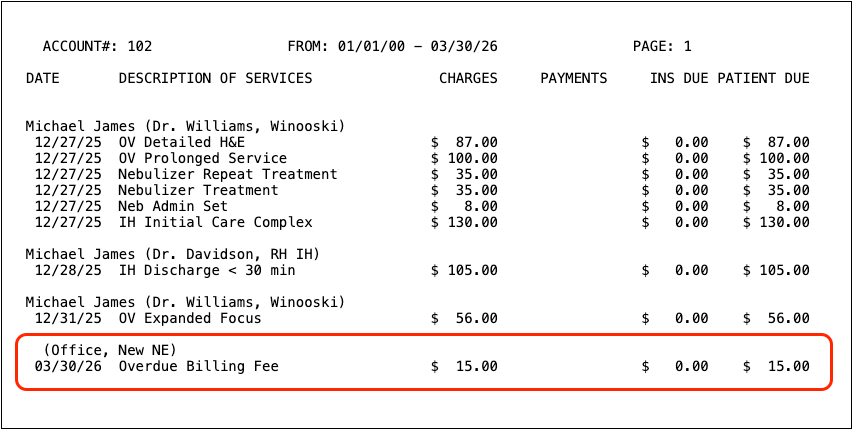
You can also click “View Bill” to see the bill with the fee.
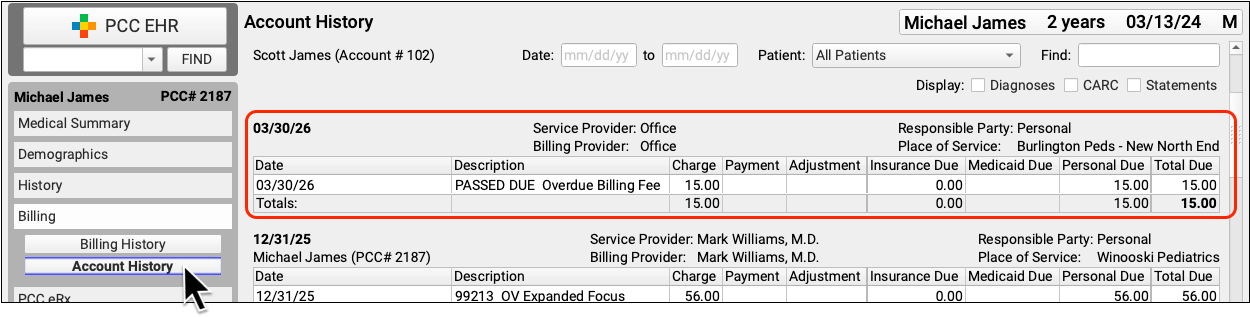
Optionally Review Fees in the Account’s History
To see the fee in the context of the account’s other encounters, open a patient’s chart. Billing fees appear on the Account History.
Additionally, billing fees appear as an administrative encounter in the Billing History.
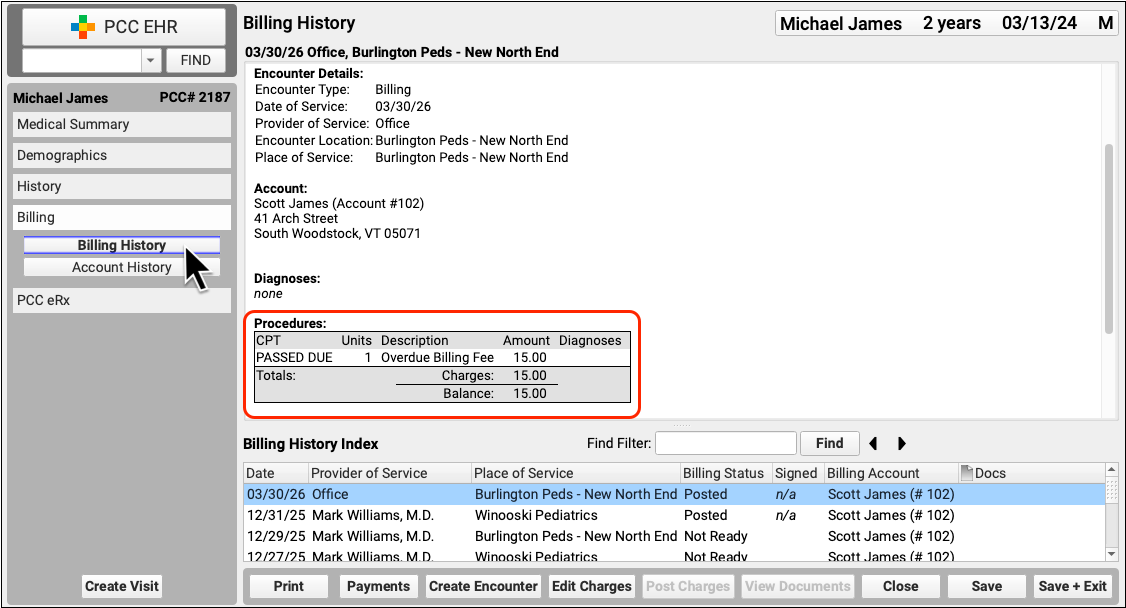
Delete a Fee Posted in Error
If a fee was posted in error, you can use "Edit Charges" to remove it, just as you would remove other charges from an encounter.

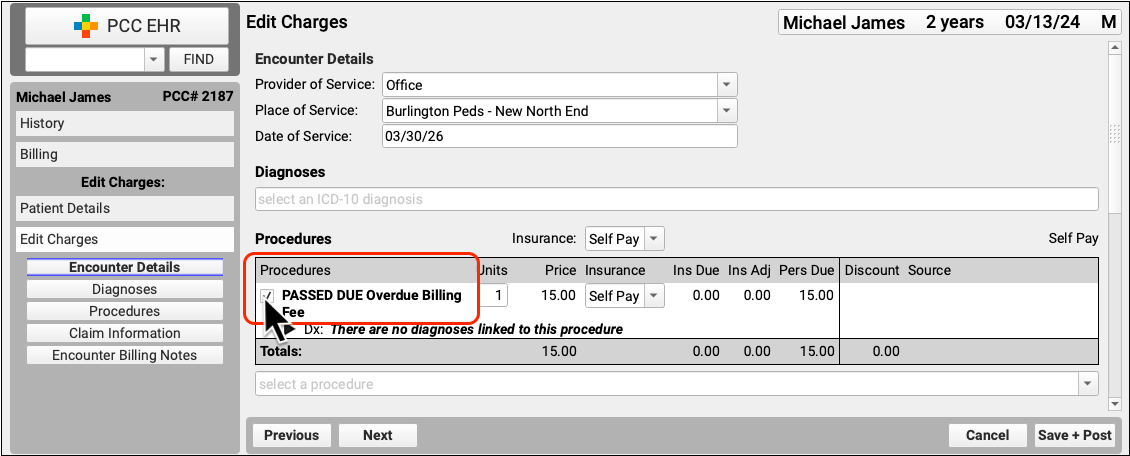
Deselect the charge to mark it for deletion. If your practice uses multiple charges or diagnosis codes, deselect all that should be removed. Then click "Save and Post".
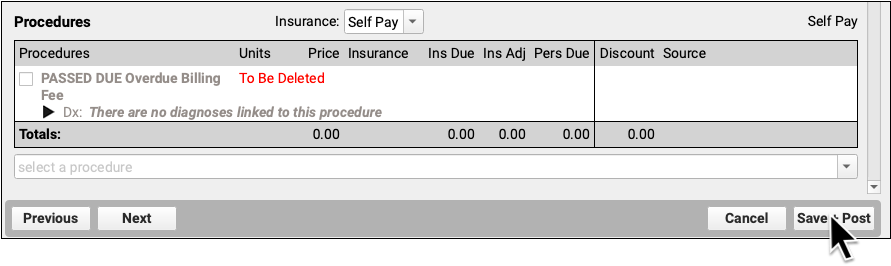
If all charges are removed from the administrative encounter, the encounter will be removed from the patient's billing record.