PCC 11.1 Release Manual
Contents
- 1 Clinical
- 1.1 More Transcription Options for PCC Scribe
- 1.2 Chart Sibling Visits with PCC Scribe
- 1.3 View Scribe Templates Before You Copy
- 1.4 Stop Playing the Prior Auth Guessing Game
- 1.5 Get More Reliable Retail Rx History Results
- 1.6 Take Action Before PCC eRx Infrastructure Updates
- 1.7 View Appointment Durations in pocketPCC
- 1.8 Rearrange the Order of Lab Tests With A Few Clicks
- 2 Scheduling & Front Desk
- 3 Insurance Billing
- 3.1 Prevent Billing Problems with a Required Policy Start Date
- 3.2 Guaranteed Valid IDs Leads to More Reliable Patient Eligibility
- 3.3 Process Multiple ERAs at Once
- 3.4 Pick from Paid Claims When Posting an Insurance Payment
- 3.5 Change the Insurance Payor as You Post a Payment
- 3.6 Use Overpayments to Keep Track of Insurance Credits
- 3.7 Print Form Letters While Posting Insurance Payments
- 3.8 See DOB and Member ID as You Work on an Unpaid Encounter
- 3.9 See ERAs and Statements with a Single Click
- 3.10 See All Payment History Details with a Single Click
- 4 Personal Billing
- 5 System Administration
- 6 Code Updates and Other Improvements
- 6.1 2026 ICD-10 Update
- 6.2 PCC Scribe Upgraded to New LLM Version
- 6.3 Open the Report Library Faster
- 6.4 Turn Off Attachments in Replies to Portal Messages Sent from Your Practice
- 6.5 Improved Image Information in pocketPCC
- 6.6 Clearer Labeling for Visits in Patient Portal
- 6.7 0.8 mL Dose Option for Vaccines
- 6.8 AAP Updates in Patient Education
- 6.9 Bug Fixes
Clinical
More Transcription Options for PCC Scribe
Use pocketPCC on any device to transcribe audio for PCC Scribe. This is useful if you can’t connect to a microphone within PCC EHR, or if you just want flexibility in your workflow.
Video: To see these features in action, watch Transcribe Visits for PCC Scribe in pocketPCC.
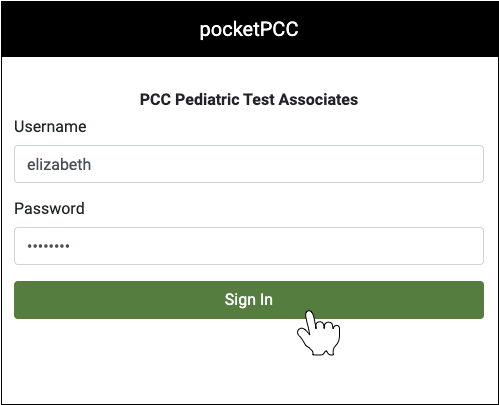
Log into pocketPCC
Log into pocketPCC on your phone, tablet, or laptop.
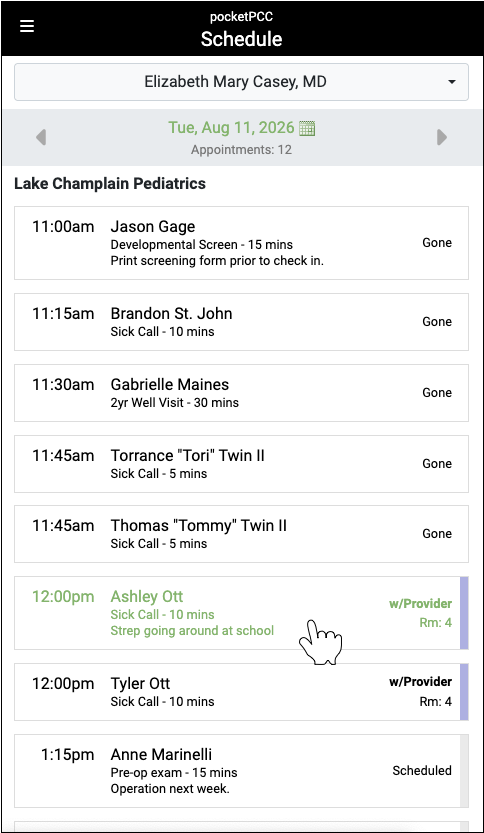
Open Your Patient’s Chart
Use the Schedule screen or the Find Patient option to open your patient’s chart.
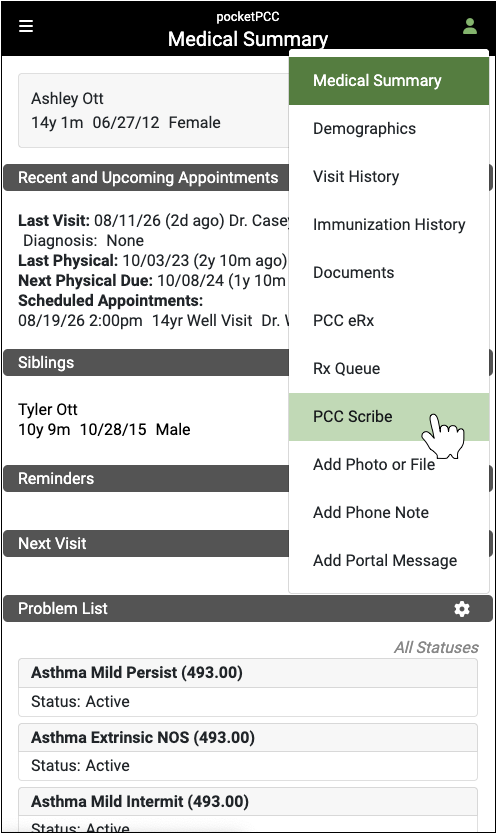
Open PCC Scribe
Select “PCC Scribe” from the righthand menu.
Transcribe the Visit
Verify that the right encounter is selected on the PCC Scribe screen, then tap the green button to start transcribing.
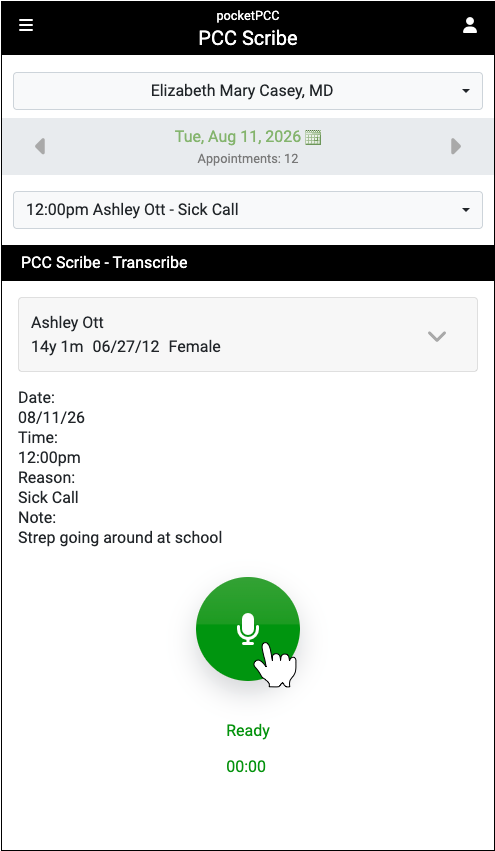
The button turns red to indicate that transcription is active, and PCC Scribe uses your device’s default microphone to transcribe the visit.
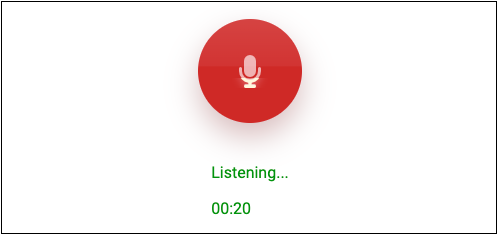
See When Transcription is In Progress Across Devices: Any time transcription is in progress in pocketPCC, you can see that activity on the patient’s visit in PCC EHR. When transcription is active in PCC EHR, you can see that activity on the patient’s visit in pocketPCC.
Stop Transcribing
Tap the red button to stop transcribing. You can start and stop as many times as necessary.
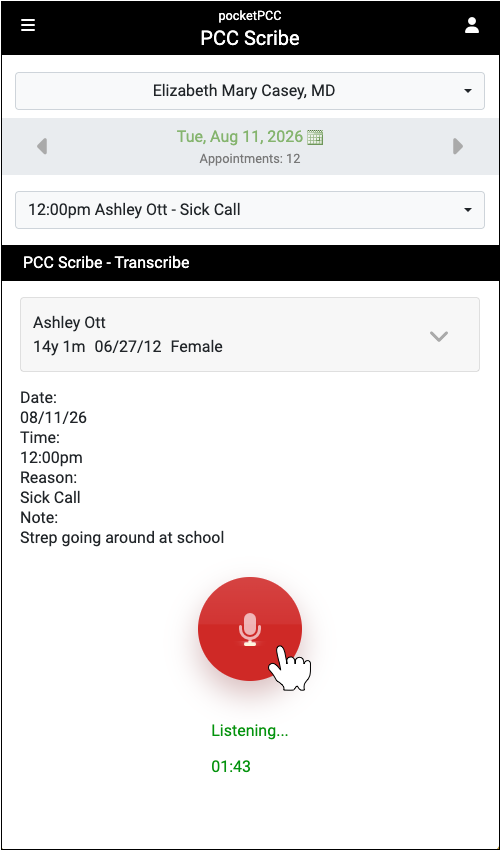
Optionally Jump to Your Next Patient
If you want to continue on to transcribing your next patient encounter, use the encounter drop-down to jump to it directly.
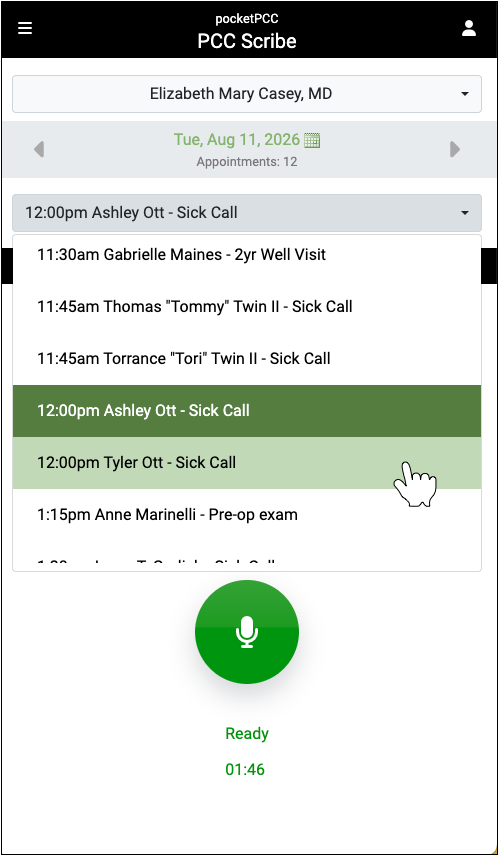
To view a transcript created with pocketPCC or to generate a draft chart note, open the Scribe tool within the patient’s visit in PCC EHR.
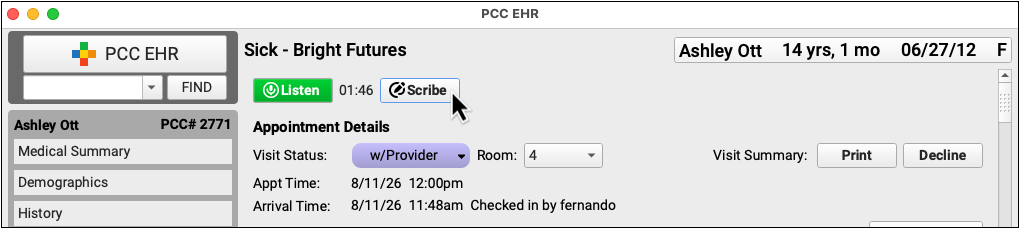
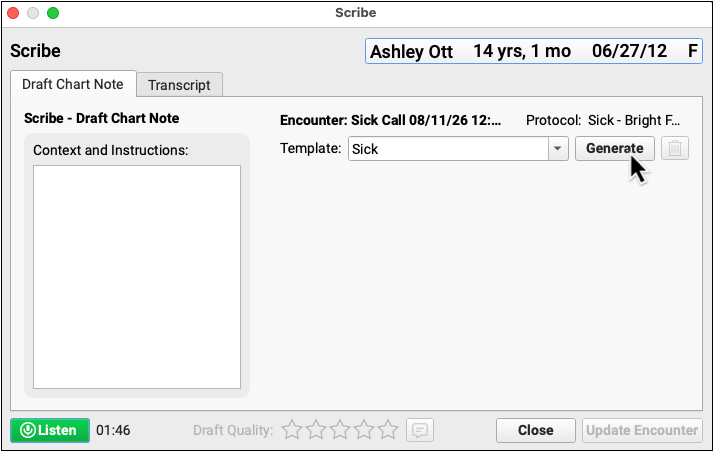
To learn more about PCC Scribe, visit the PCC Scribe page.
Chart Sibling Visits with PCC Scribe
When the whole family enters the exam room, the focus of the visit often jumps between siblings in no particular order. With PCC Scribe, you can transcribe the entire visit on one chart, then generate a unique note for each patient in just a few clicks.
Video: To see these features in action, watch Chart Sibling Visits with PCC Scribe.
Sibling Relationship Required: This workflow is for patients who share a Home or Billing Account in PCC EHR and appear in each others’ Siblings component.
Same Visit Date and Provider Required: This workflow is for sibling visits conducted on the same day with the same provider.
Start Transcribing the Visit on One Patient’s Chart
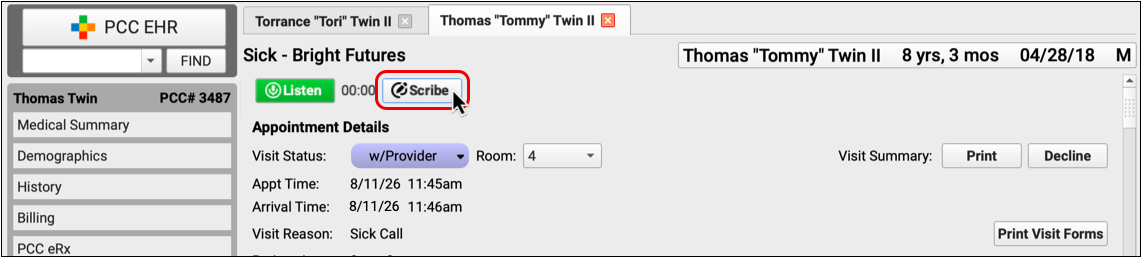
Open today’s visit for one of the patients in the exam room, then click the “Listen” button to start transcribing.
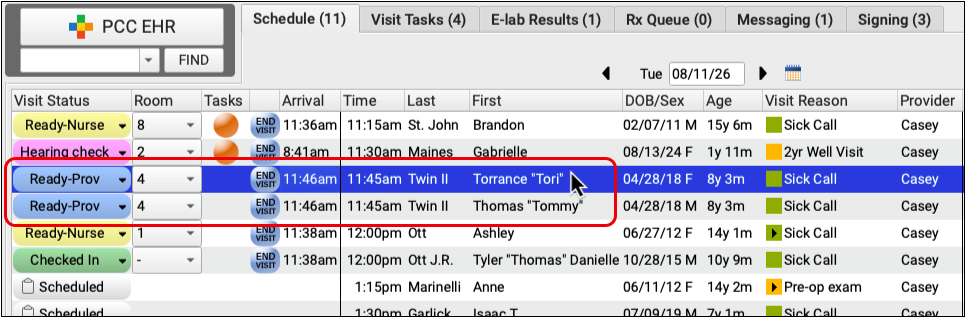

Conduct the Visit with All Patients
Leave PCC Scribe running on the original chart while you conduct the entire family visit, moving around sibling charts as needed.
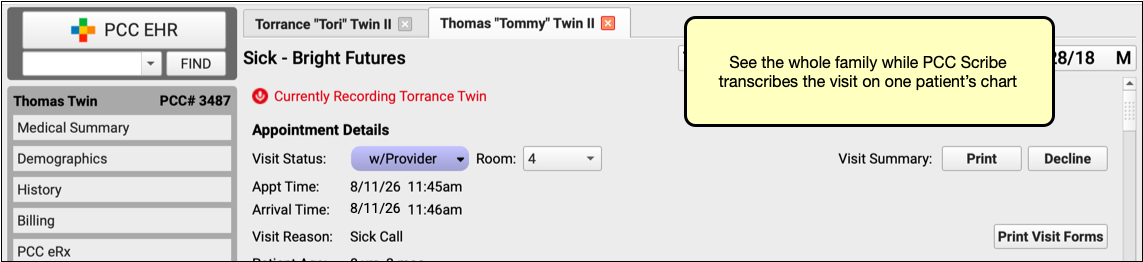
Import the Visit Transcript into the Other Patients’ Charts
When the visit is over, go into each patient’s chart, open the Scribe tool, and import today’s visit transcript.
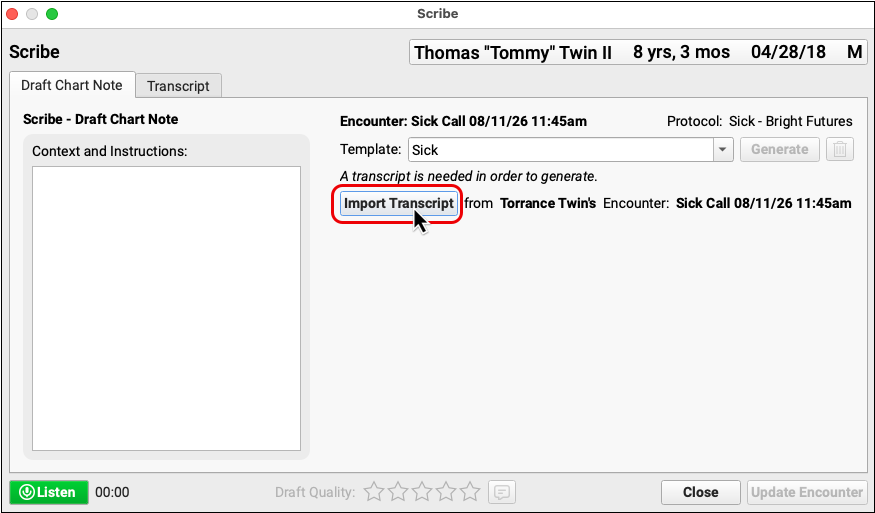
You can optionally add to the imported visit transcript by clicking the “Listen” button.
Import Only Available When No Other Transcript Exists: If a visit already has a transcript, you cannot import one from a sibling’s encounter.
Generate a Chart Note
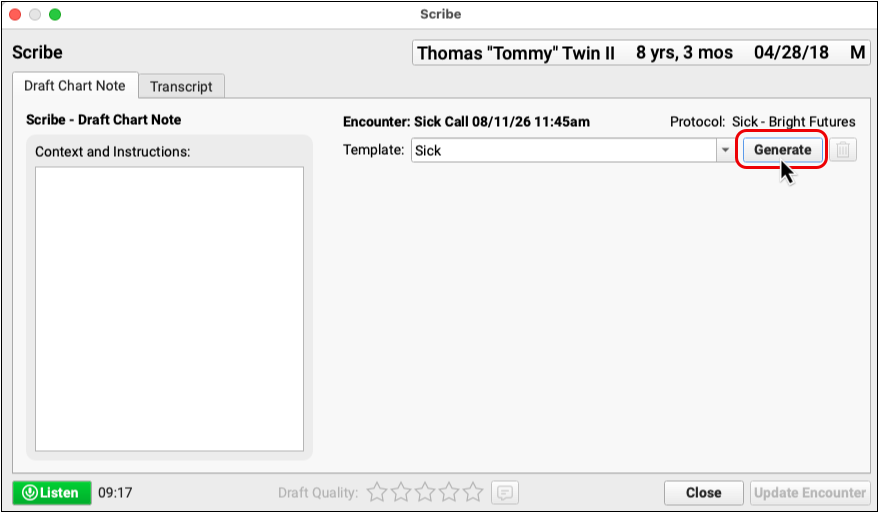
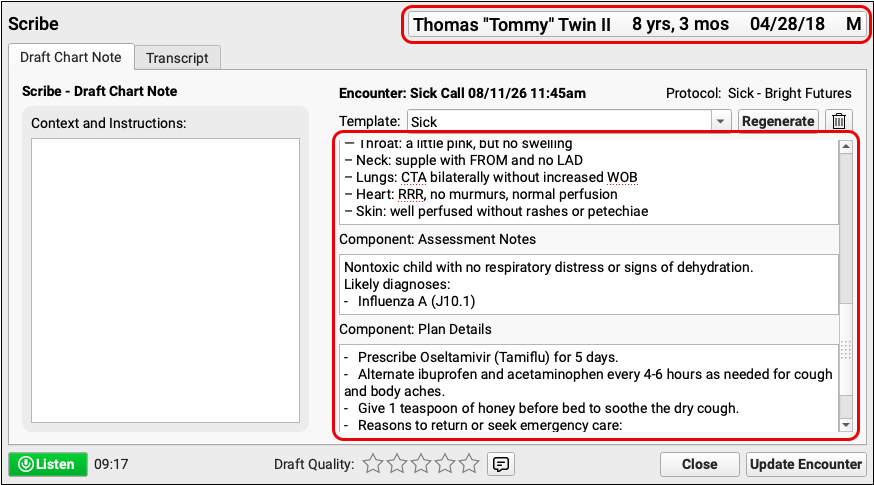
After importing the visit transcript, you can generate a draft chart note. PCC Scribe automatically creates a note that is focused on the patient whose chart you are in.
Review and Edit the Note
Review the note for accuracy and completeness. If the first draft needs refinement, use the Context and Instructions box to prompt PCC Scribe to focus on the right patient, then click “Regenerate” to get a new draft.
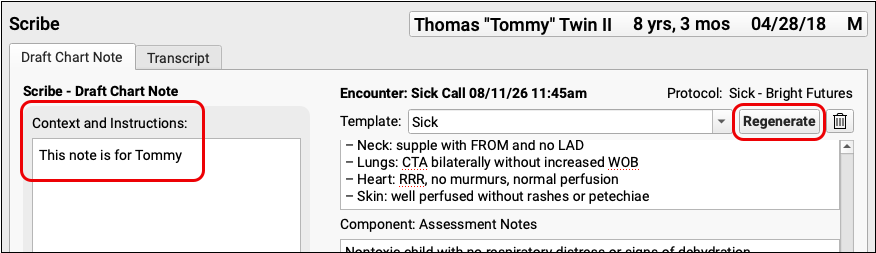
Save Your Work
Once the draft note is satisfactory, click the “Update Encounter” button to save it to the patient’s chart.
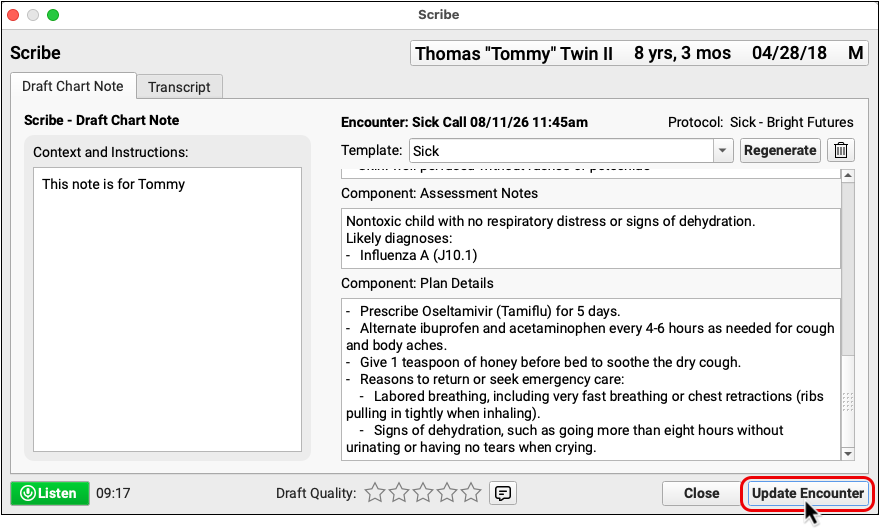
Repeat this for each patient seen during the encounter.
To learn more about PCC Scribe, visit the PCC Scribe page.
View Scribe Templates Before You Copy
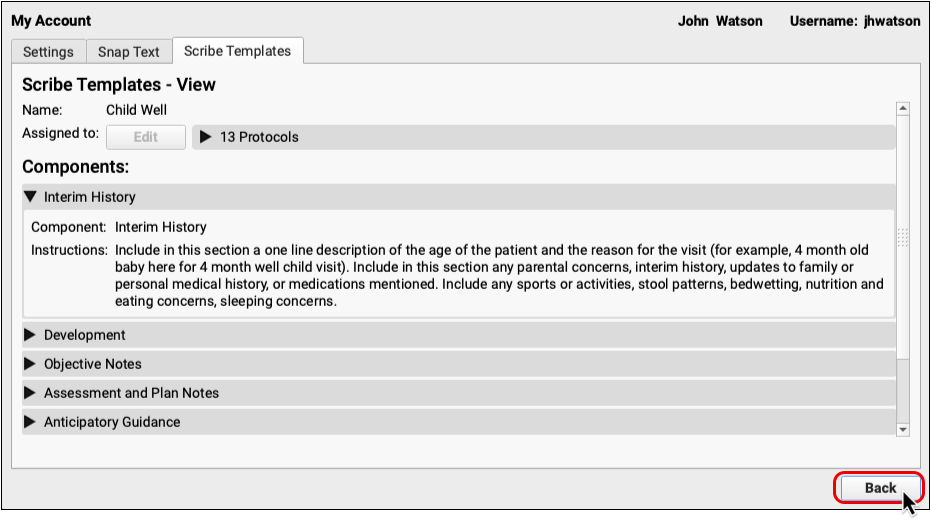
Before you copy a colleague’s Scribe template to your own account, you can preview the contents.
Video: To see these features in action, watch View a Colleague’s PCC Scribe Templates.
Open Your Scribe Templates
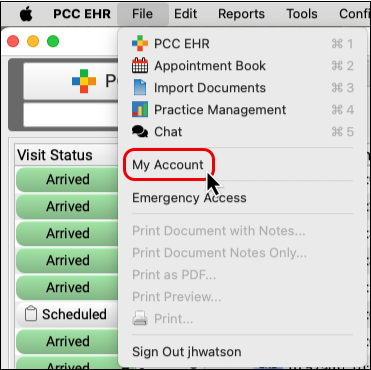
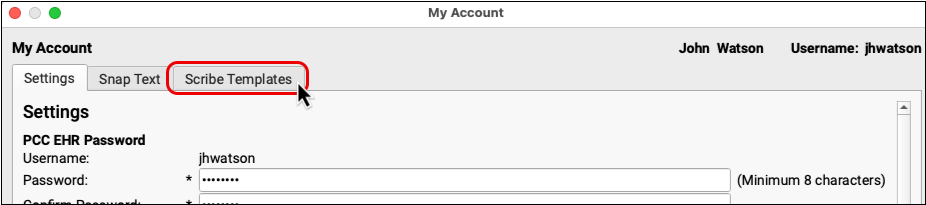
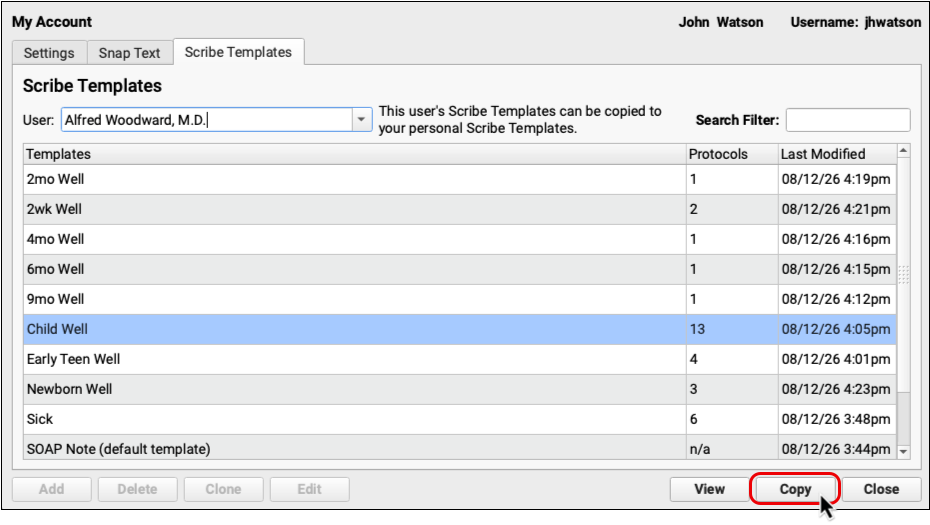
Select My Account from the File menu, then click on the Scribe Templates tab.
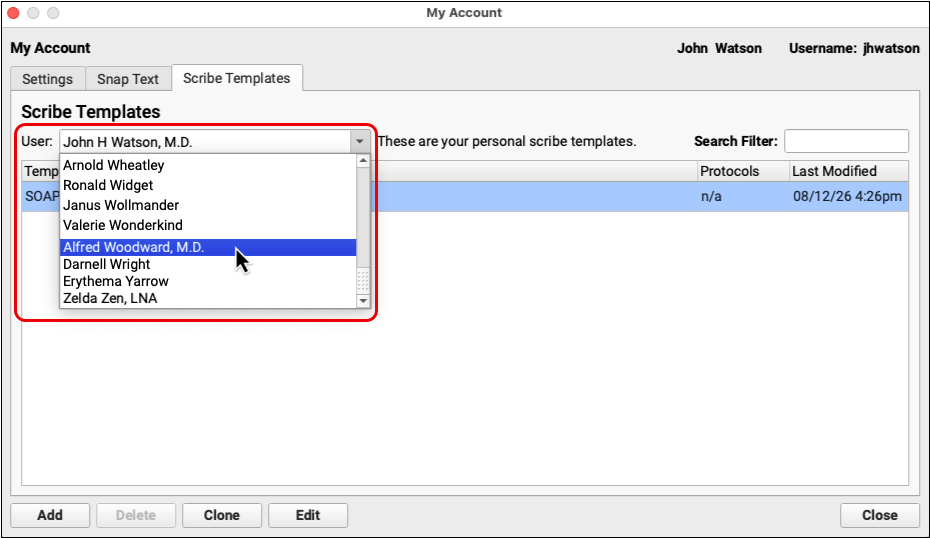
Select the User
In the User field at the top of the window, select the name of the person whose templates you want to view.
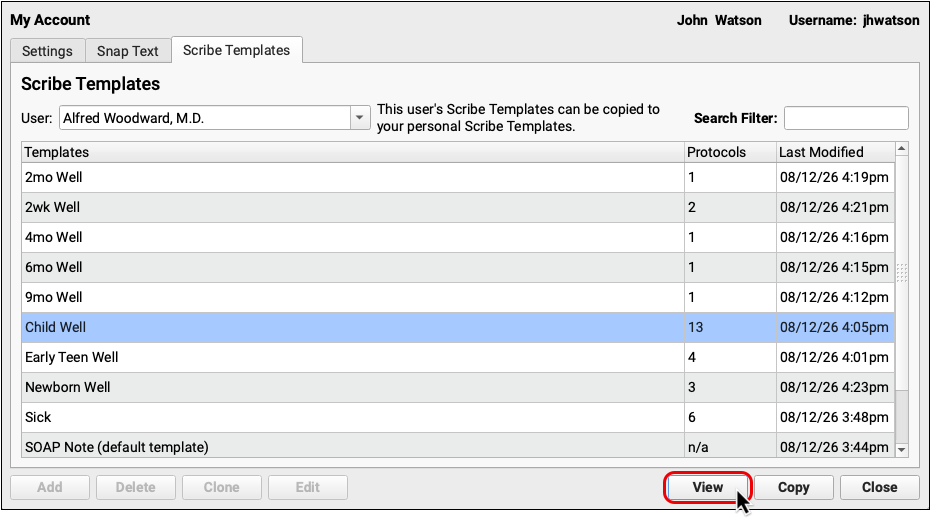
View a Template
Highlight the template you want to view, then click the “View” button.
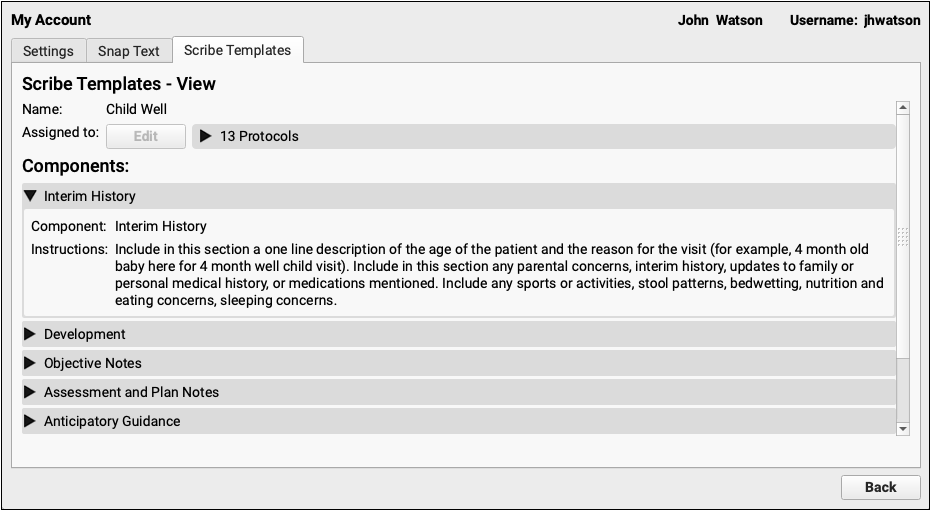
Viewing can help you decide which templates to copy to your account, or prevent the need to copy altogether.
Actions You Can Take While Viewing a Template
You can optionally copy text when viewing a template.
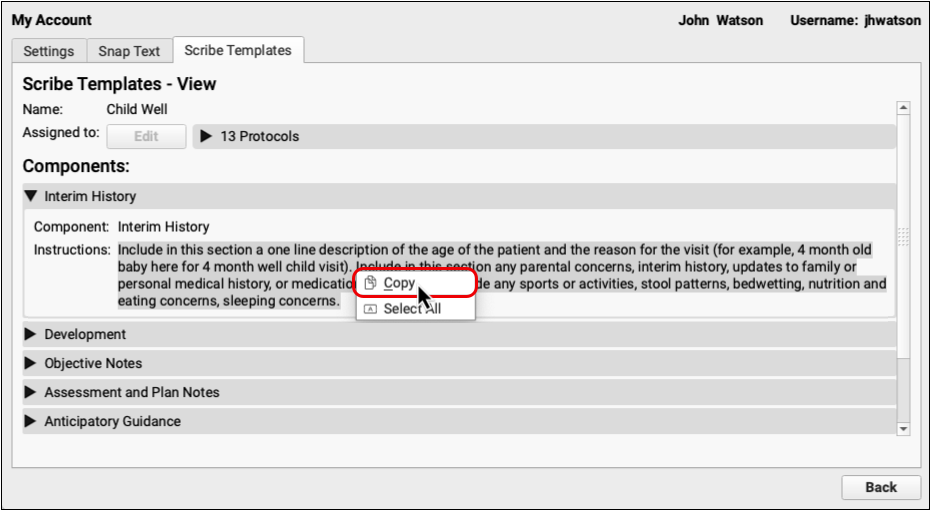
To copy the entire template to your account, click the “Back” button, then click “Copy”.
To learn more about PCC Scribe, visit the PCC Scribe page.
Stop Playing the Prior Auth Guessing Game
Prescription benefit managers (PBMs) don’t always provide a reliable response when PCC eRx asks whether prior authorization is needed, leaving patients in the lurch when they get to the pharmacy. PCC 11.1 fills the gaps with predictive insight that gives reliable direction at the point of prescribing.
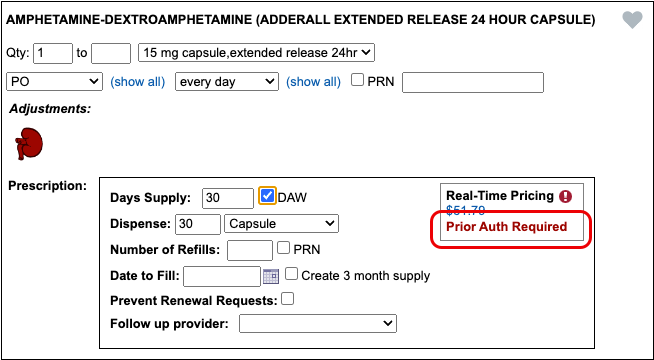
When the PBM indicates that prior authorization is definitively needed, PCC eRx displays that information in the Real-Time Pricing details for the prescription.
In cases where the PBM response is more ambiguous, PCC eRx uses a combination of statistically significant de-identified historical data points to calculate the likelihood that prior authorization will be needed. Hover over the predictive status to see the likelihood.
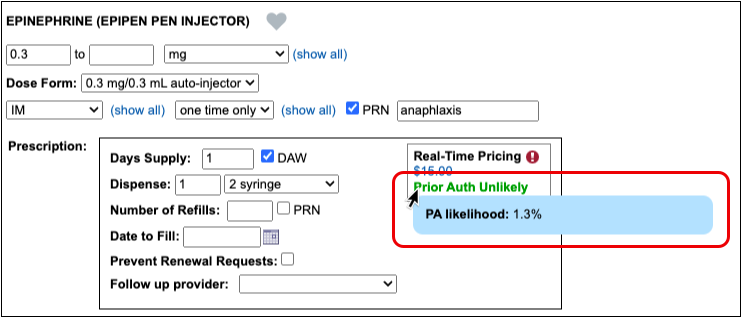
There are three predictive statuses:
-
Prior Auth Unlikely: Data shows that prior authorization is rarely required for this kind of prescription (0-5% likelihood).
-
Prior Auth May Be Required. Confirm with Plan: Data shows that prior authorization is sometimes required for this kind of prescription, and you should contact the plan to confirm (5-80% likelihood).
-
Prior Auth Likely: Data shows that prior authorization is usually required for this kind of prescription (80-99% likelihood).
You can use these statuses to guide your decision about whether to initiate a prior authorization before your patient gets to the pharmacy and is blocked from filling their prescription.
Get More Reliable Retail Rx History Results
The retail prescription history query was being interrupted when clinicians moved on to other charting tasks before results were returned.
Now when you click the “Query Retail Rx History” button, PCC eRx processes the entire request in the background so that you can keep charting while the data comes in.
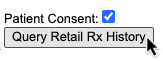

Retail Rx History is a service that queries retail pharmacies in the Surescripts network for prescriptions filled by your patients. Use it to find out which additional medications your patients may be taking.
To learn more, read Import a Record of Prescriptions Filled by Retail Pharmacies.
Take Action Before PCC eRx Infrastructure Updates
The latest standard data format for electronic prescriptions, mandated by the National Council for Prescription Drug Programs (NCPDP), will be implemented when your office updates to PCC 11.1.
This will render outstanding items on your Rx Queue unusable and trigger a revalidation of prescribers’ DEA license numbers.
What You Need to Do
By 9 p.m. Eastern time the night before your PCC 11.1 update, you should:
-
Address Important Rx Queue Items: Process pending prescriptions, review and sign agent prescriptions, and respond to relevant renewal requests, errors, and change requests.
-
Ensure Your DEA License is Current and Valid: If you have put off renewing your DEA license or know that it usually expires in September or October, verify its status and renew it if needed.
What Will Happen During the Update
During the PCC 11.1 update:
-
PCC Will Clear the Rx Queue: Items remaining on the Rx Queue will be cleared during the update and you will no longer be able to see or respond to them.
-
Prescribers with Invalid DEA Licenses Will Be Notified of Expiry: If your DEA license number is invalid at the time of the update to PCC 11.1, PCC will notify you that it needs to be renewed. While an expired DEA license number will not prevent you from prescribing in PCC eRx, PCC encourages you to renew at your earliest convenience.
If you have questions about either of these requirements, contact PCC Support straight away.
View Appointment Durations in pocketPCC
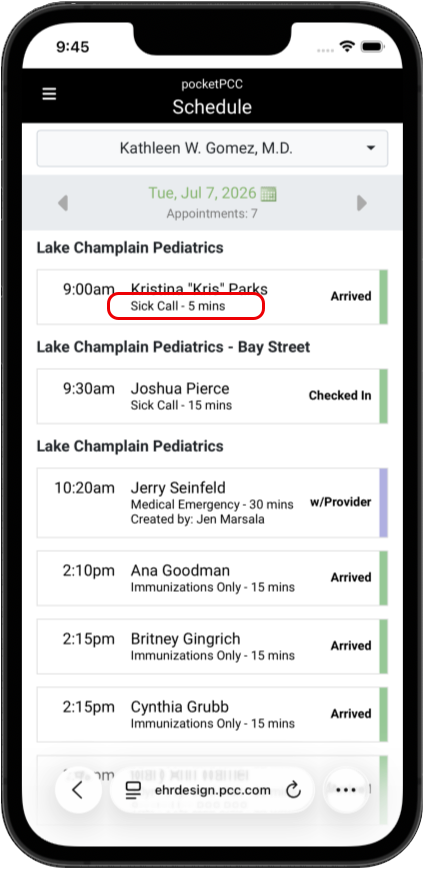
The Schedule screen in pocket PCC now includes more information about each visit, so you can review your whole day at a glance.
Each appointment now includes the scheduled visit length alongside the visit type.
Rearrange the Order of Lab Tests With A Few Clicks
Video: To see these features in action, watch Reorder Tests in a Lab Order.
The sequence of tests matters, and now your practice can review and rearrange lab tests with a few clicks. So when a LOINC code is deprecated, or a lab test has been added in the wrong order, you can fix your in-office labs quickly, without the monotony of rebuilding the entire lab.
The Lab Orders tab in Lab Configuration is streamlined and simplified. Tests appear as a list of titles so you can skim through and find a test with minimal scrolling. Click the triangle icon to the left of each title to open the test and review or edit the details. To remove a test, click the trash can icon on the right of each line. 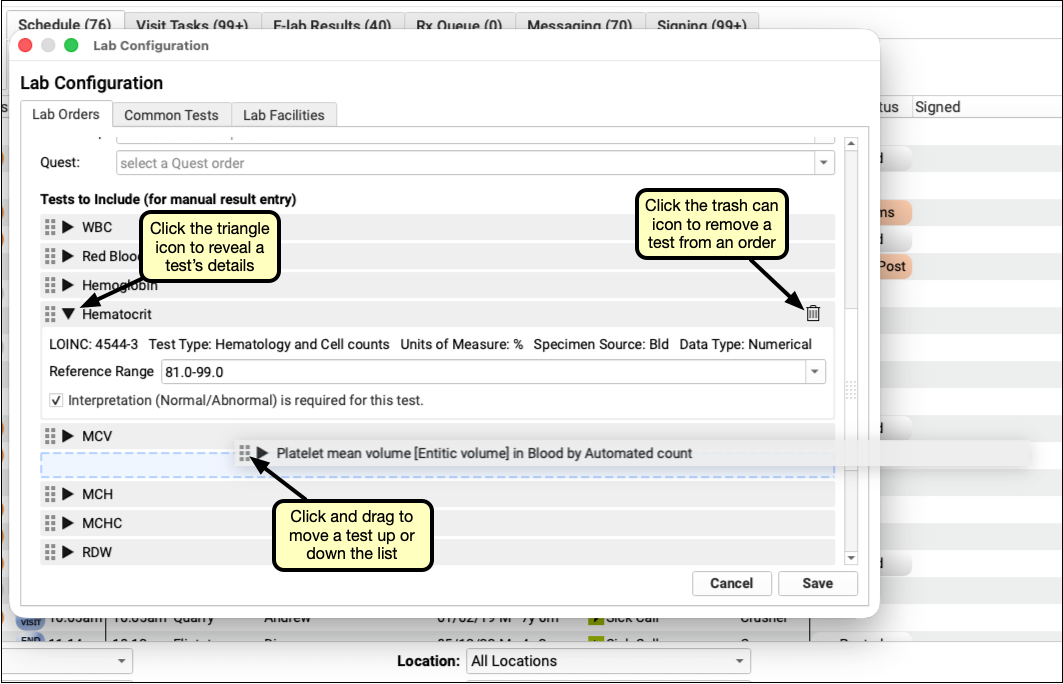
After adding a new test, or to move an incorrectly placed lab test, click a line and drag to rearrange the order of labs. Click save. The new order of tests will be reflected wherever it appears in your visit protocols.
Scheduling & Front Desk
Families Can Cancel Appointments from Patient Portal
Video: To see these features in action, watch Cancel Appointments in the Patient Portal.
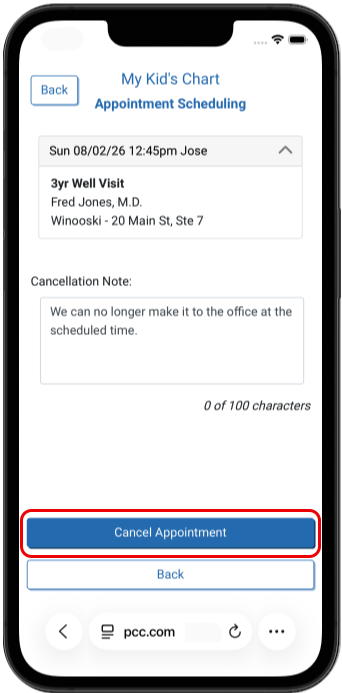
Reduce no-shows, save your front desk work, and make managing appointments easier for everyone. Your patients and families can now cancel appointments from the patient portal.
When enabled, patient portal users have a “Cancel Appointment” button beneath each upcoming appointment. While canceling, portal users can optionally include a cancellation note.
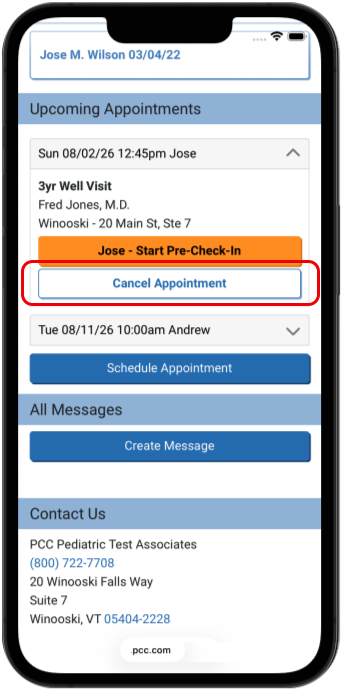
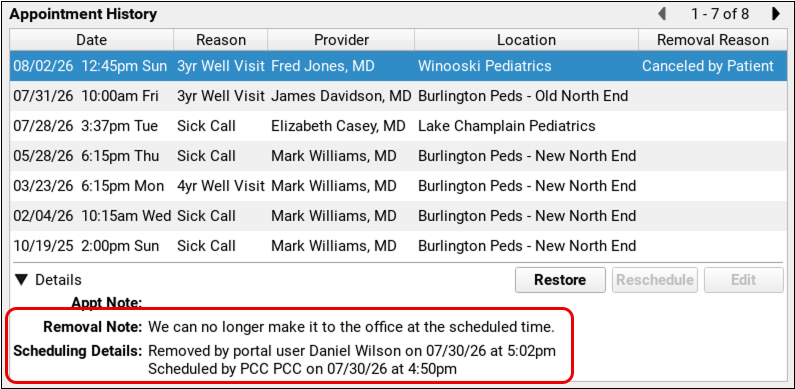
When a patient portal user cancels an appointment, the Appointment History Details displays the patient portal user who cancelled the appointment, along with a timestamp and the removal reason.
Canceling appointments from the patient portal is configured through the Patient Portal Configuration tool in PCC EHR’s Configuration menu. Check “Allow portal users to cancel appointments” in Patient Portal Configuration. When checked, portal users will have the option to cancel any upcoming appointment at any time.
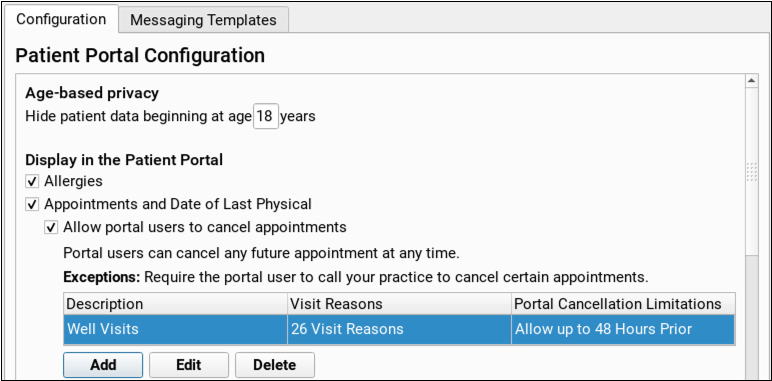
You can prevent selected visit reasons from being canceled, or limit how close to the scheduled time an appointment can be cancelled. For detailed instructions on creating and managing patient portal cancellation exceptions, visit Cancel Appointments in the Patient Portal.
Find Appointments Canceled by Portal Users
To review and follow up on appointments that were canceled by portal users, use the Appointments Canceled via Patient Portal report in the Report Library. For more complex portal cancellation reporting needs, you can customize any Appointment report and add both the Appointment Cancellation Method and the Appointment Removal Date fields.
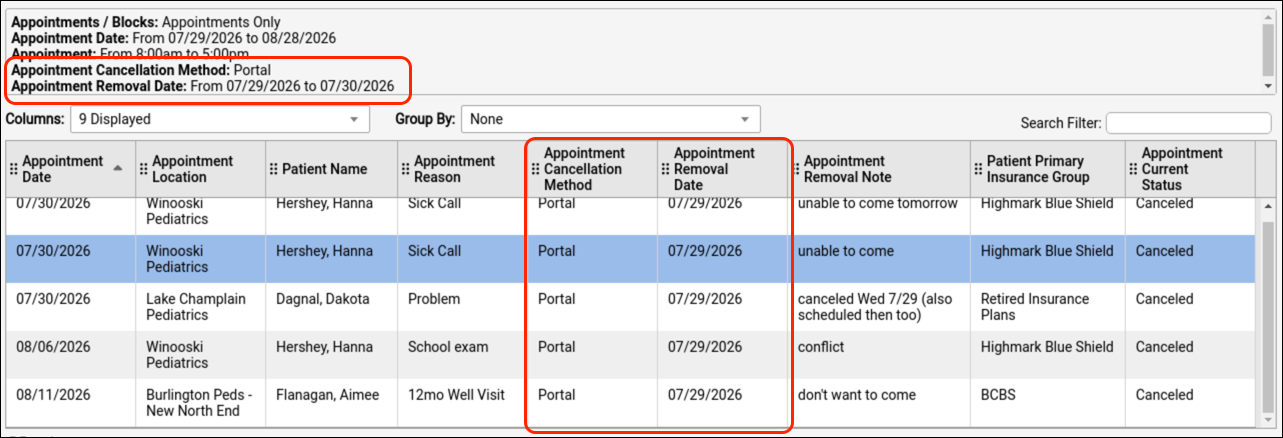
For instructions on how to create a custom report with these fields, read Cancel Appointments in the Patient Portal.
Families Can Sign Forms During Pre-Check-In
Video: To see these features in action, watch Sign Documents During Pre-Check-In
Speed up your check-in process and save your front desk time by adding signable forms to Pre-Check-In so your families can read and sign documents before their visit.
For any visit reason configured to include signable documents, patient portal users will find a new section called “Documents” during Pre-Check-In.
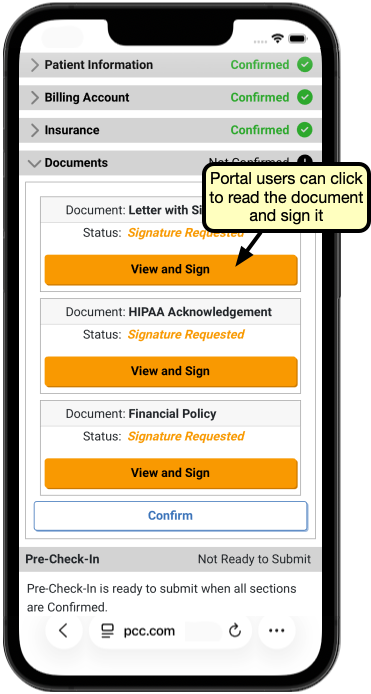
Users can tap “View and Sign” button to open the document for review. The option to sign appears at the bottom.
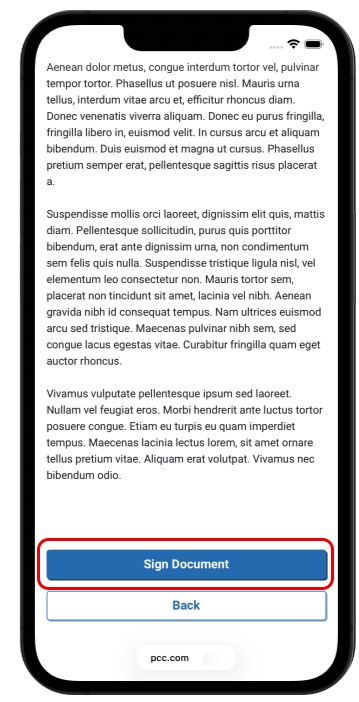
The “Sign” button opens a pop-up with a field for the user to sign with a fingertip, or to type their name. If a portal user decides not to sign a document, they can click “Back” to close the document and return to Pre-Check-In.
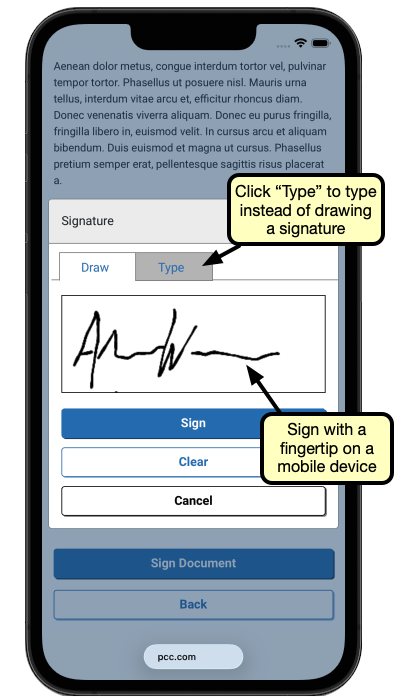
After drawing or typing a signature, portal users will click “Sign” to apply their signature to the document. After signing, the user will be returned to Pre-Check-In to continue.
Users are not required to sign a document to complete Pre-Check-In. The Documents section can be confirmed and submitted without signing every document.
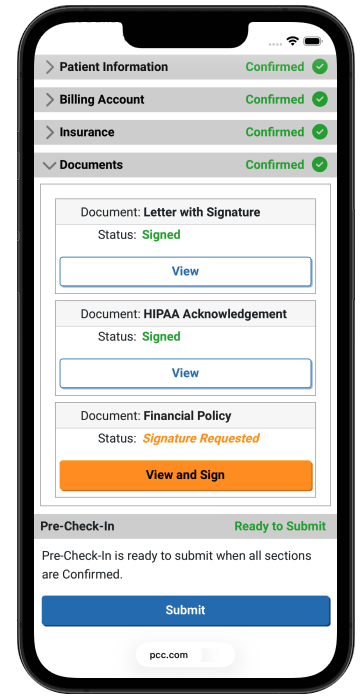
If a portal user chooses to submit Pre-Check-In without signing a document, the option to sign remains available until one hour after the scheduled visit time, so patients and families can sign during the visit.
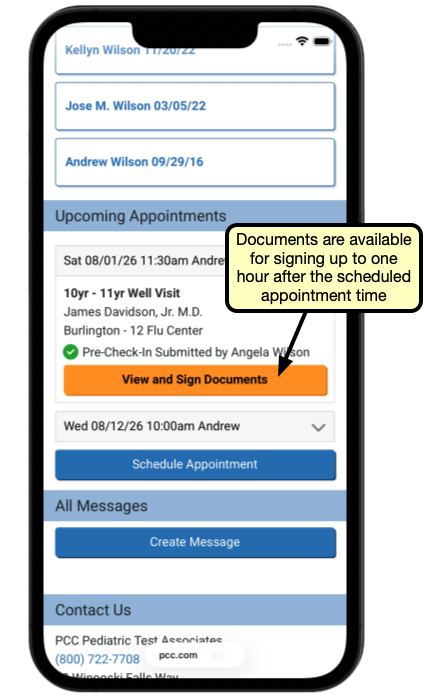
Documents appear during Check-In in a component titled “Pre-Check-In Documents” where they can be reviewed or printed.
Signed forms submitted during Pre-Check-In are saved to the Documents section of the patient’s chart under the category selected during configuration. Patient forms are saved under the patient’s Documents, and account forms are saved to the home or billing account,depending on the selection made during configuration.
If a document has not been signed “Signature Required” and the Print button appear in orange. Your front desk can print the document, from Check-In and have the patient or family sign it, or they can re-open Pre-Check-In and sign the document from their mobile device.

For information about managing your practice forms visit Create and Manage Forms. For additional and detailed information on managing Pre-Check-In and signing forms, visit Configure Pre-Check-In.
Insurance Billing
Prevent Billing Problems with a Required Policy Start Date
Patient policy records in PCC EHR now require a start date, which will lead to fewer billing problems and less time wasted by your practice.
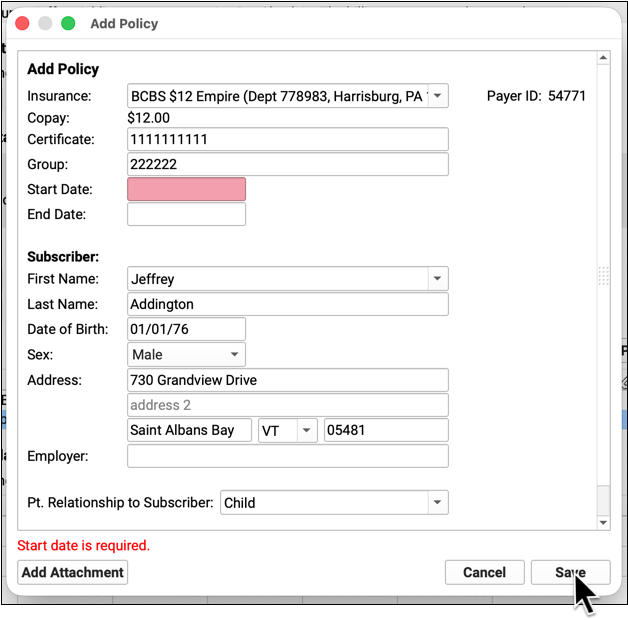
By requiring a start date, your practice can always know whether or not a payor is responsible for encounters on a specific date of service. This can be especially important when you address a rejection or resubmit a claim. PCC EHR will require a start date for all policies added or edited after the PCC 11.1 update.
Guaranteed Valid IDs Leads to More Reliable Patient Eligibility
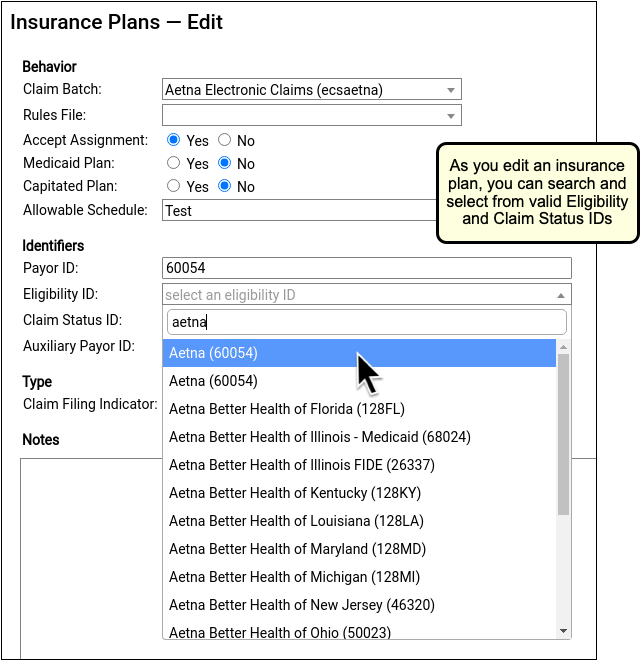
You can now select from a list of valid eligibility IDs, improving your access to eligibility information, which in turn leads to more reliable revenue for your practice.
PCC EHR can automatically check insurance eligibility, but only if the policy’s eligibility ID matches the payor’s. When you add or edit a policy on your PCC system, you can now select from a list of valid eligibility IDs.
Process Multiple ERAs at Once
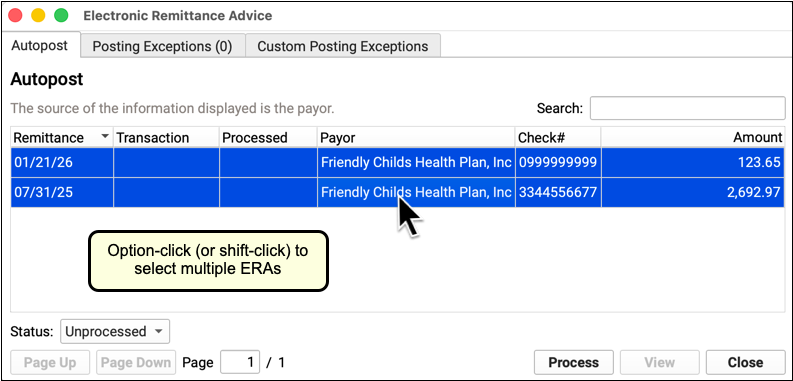
Power through your autoposting by quickly posting a large batch of incoming checks. You can select multiple ERAs and process them all with just a few clicks.
In the Electronic Remittance Advice tool, use option-click or shift-click to select multiple unprocessed ERAs.
Then click “Process”.
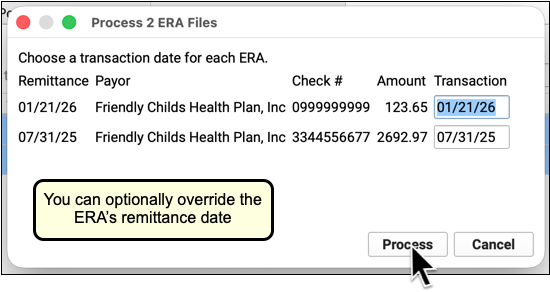
You can optionally indicate a custom transaction date for each ERA, or leave it as the ERA’s remittance date. Then click “Process” to continue.
After Processing: After your selected ERAs are processed, you can open each one to review special cases. Any remittance that could not be autoposted, from any of the ERAs, will appear on the Posting Exceptions tab.
Pick from Paid Claims When Posting an Insurance Payment
If you need to manually enter remittance information, but the encounter’s charges are paid off or no longer pend insurance, you can now select from all encounters.
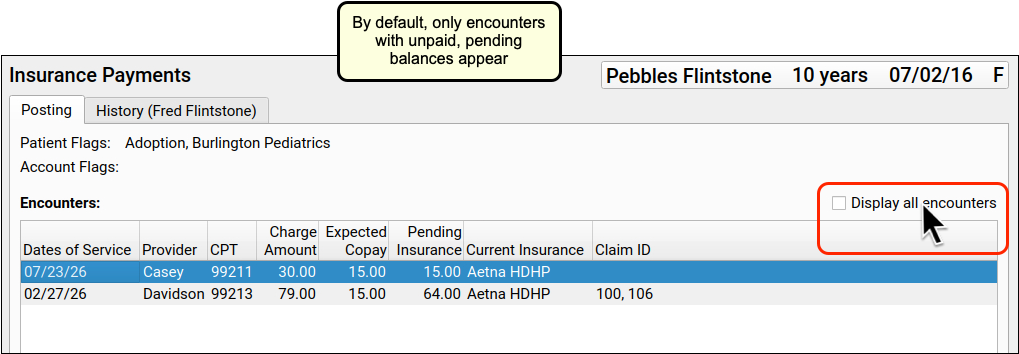
By default, only encounters with an unpaid, pending balance appear in the Insurance Payments tool. Click “Display All Encounters” to reveal encounters that are not pending insurance.
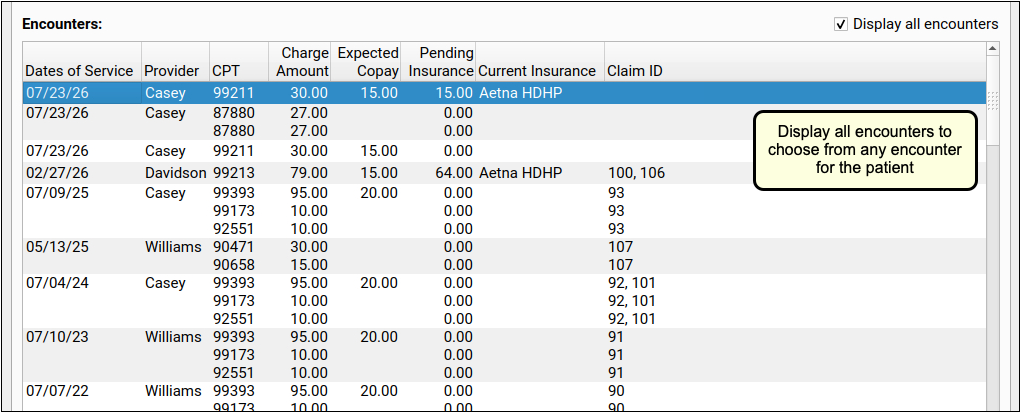
You can then pick from any encounter on the patient’s record and post payments (or overpayments) for the charges.
All Charges for an Encounter Now Appear in Insurance Payments: After you select an encounter, all charges for that encounter will appear for payment and adjustment posting. Prior to PCC 11.1, only charges with an amount due pending insurance would show. This improvement allows you to consider the encounter as a whole and optionally post overpayments.
To see the complete manual posting of insurance payments, visit Post Insurance Payments.
Change the Insurance Payor as You Post a Payment
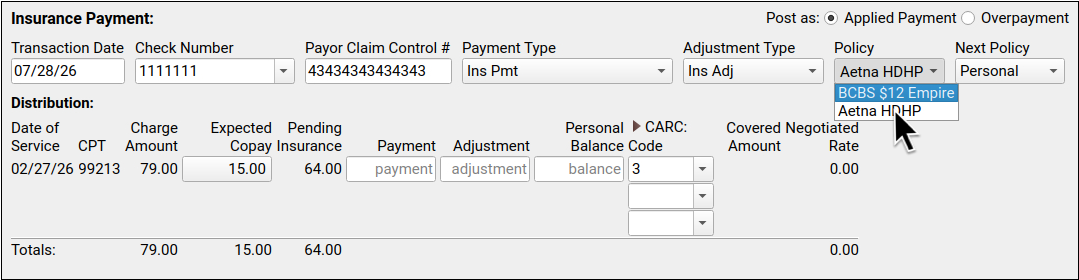
Did you receive an unexpected payment? Maybe you have a second payment from the original payor, even though the charge currently pends to a secondary policy or Medicaid? You can now switch the source of payment as you manually enter payment and adjustment details.
On the Insurance Payments posting screen, use the Policy drop-down field to select who sent the payment.
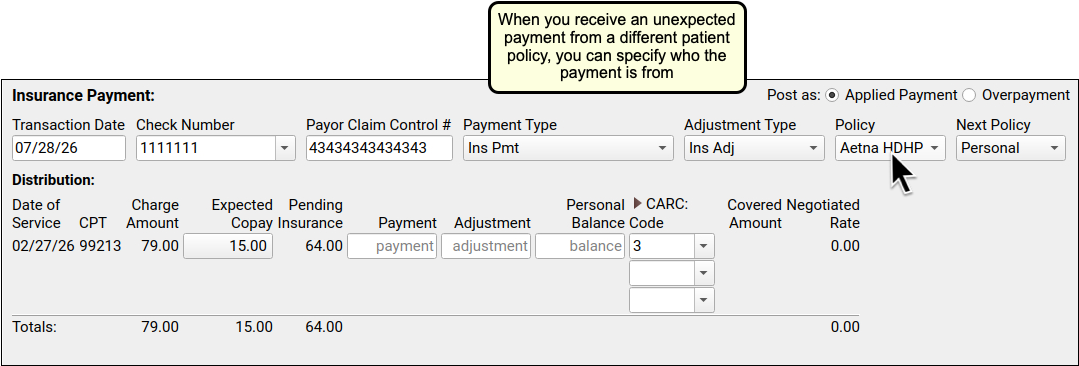
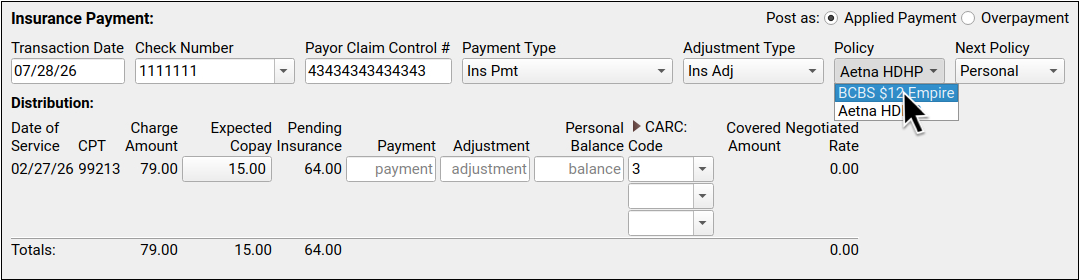
When you save the payments and adjustments, they will be attributed to your selected policy.
To see the complete manual posting of insurance payments, visit Post Insurance Payments.
Use Overpayments to Keep Track of Insurance Credits
Sometimes you need to track an insurance payment without applying it towards an encounter’s balance. You might receive a duplicate payment, need to resubmit a claim without showing a payment, or a payor might pay more than the amount due on a charge.
Use the Insurance Payments tool to enter an overpayment or change an existing payment into an overpayment. You can associate an overpayment with an encounter, along with adjustment information, without directly applying it towards the balance. Then you can track insurance credits on the account without interrupting the rest of the billing process. Later, you can easily reverse the payment (if you receive a “takeback”) or apply the payment to the encounter.
Post an Overpayment
Read the procedure below to learn how to post an overpayment.
Open the Insurance Payments Tool
Select Insurance Payments from the Tools menu.
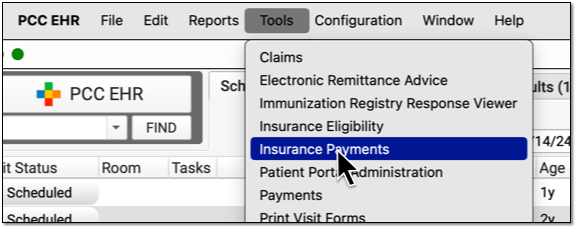
You can also jump to the Insurance Payments tool from other screens, like Unpaid Encounters and Posting Exceptions.
Find the Patient
Use a Claim ID or find the patient by name to review a list of their encounters.
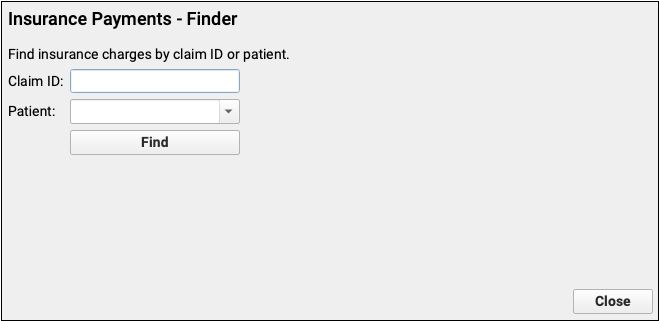
If you enter a Claim ID, you can jump directly to the payment screen.
Select an Encounter
If you found the patient by name, next select the correct encounter from the list of the patient’s encounters. Double-click on an encounter to open it.
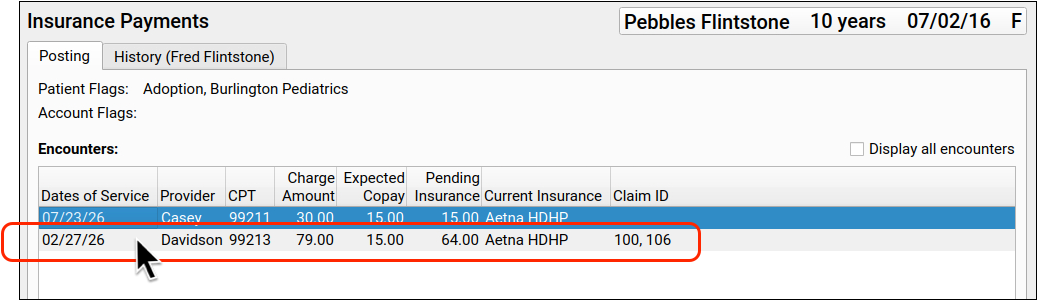
If the payment is for an encounter that is already paid off or no longer pends insurance, check the “Display all encounters” checkbox to include encounters for which there are no pending charges.
Select the Policy
Before you enter payment amounts, indicate the payer who made the payment by selecting a policy. The responsible party is selected by default, but an overpayment might arrive from any of the patient’s active policies.
Indicate that the Payment is an Overpayment
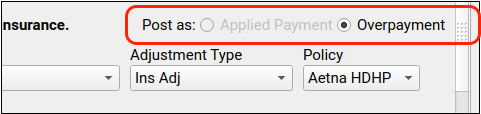
If the encounter has no unpaid charges pending insurance, the “Overpayment” checkbox will be selected for you. When there’s nothing due, a new payment must be an overpayment.
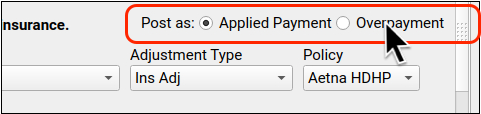
If there is a pending balance for the encounter, but you still wish to post a payment that will not apply towards that balance, select “Overpayment” manually.
Enter Remittance Information, Including Payments, Adjustments, and CARC Details
Review and update the transaction date, check number, and claim ID. Then enter the payment and adjustment amounts along with CARCs from the ERA or EOB.
As overpayments are frequently reversed or need to be reapplied later, it’s useful to enter all adjustment and CARC information, and not just the payment amount. As with the payment amount, these “informational” adjustments will not affect the balance.
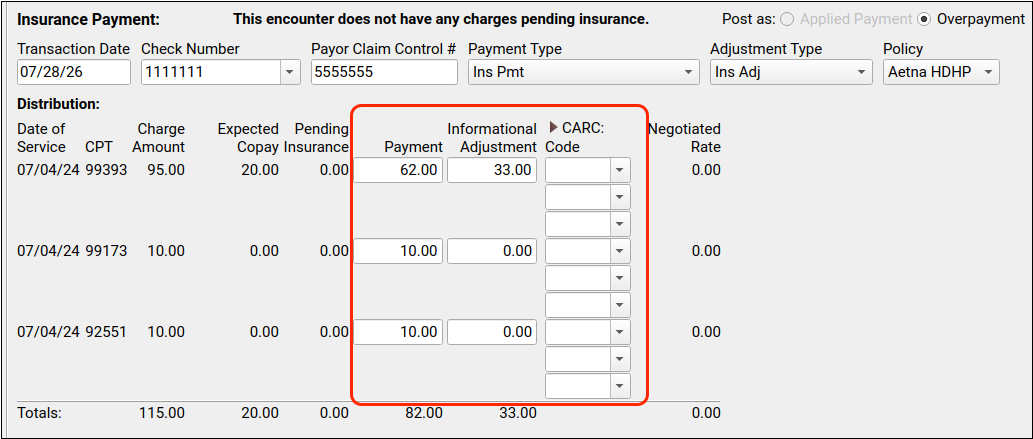
What is an 'Informational Adjustment?': Just like payments, adjustment information for an overpayment will not affect the balance due in any way. So why post the adjustments at all? You may need to review the adjustments that the payer indicated for each charge, especially if the payment ends up being applied later on. Adjustments posted with overpayments will appear on histories and billing records as “Informational Adjustments”.
Optionally Review Family Information and Enter Notes
As always, you can use other components on the Insurance Payments posting screen to better understand the history and issues with the claim.
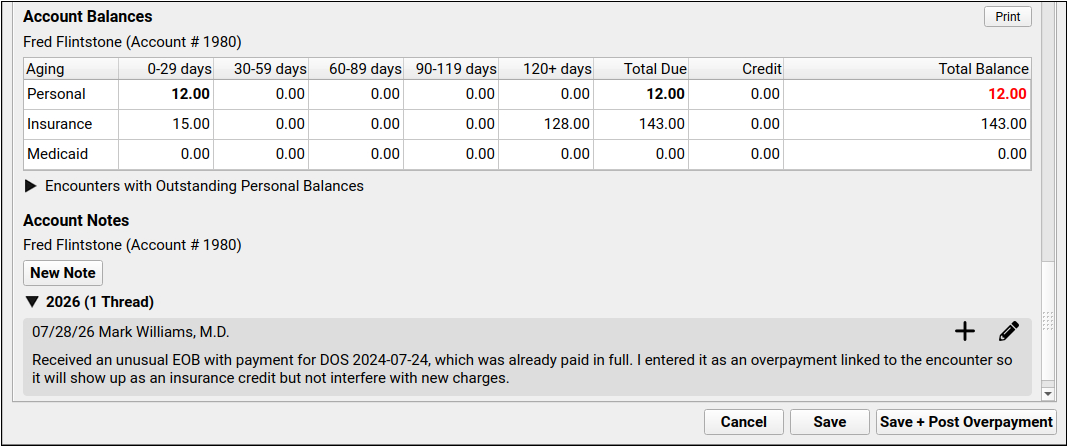
You can also enter a note in the Account Notes component to record the circumstances of the overpayment.
Click “Save + Post Overpayment”
Save your payment and any changes to the account.
Review What You Posted
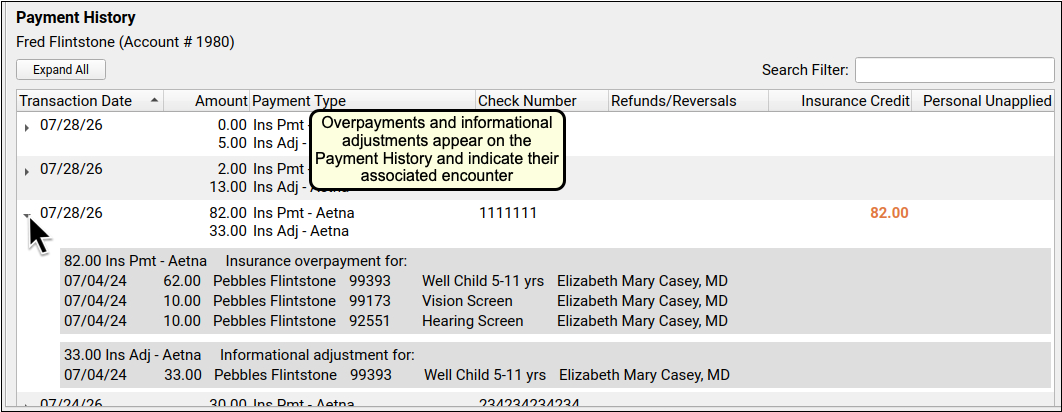
The Payment History tab will display posted overpayments and informational adjustments. You can click a disclosure arrow to view associated charges. The overpayment and informational adjustment will not affect the balance on those charges.
The Account Balances component will indicate that there is an insurance credit on the account, which is separate from the insurance balance.

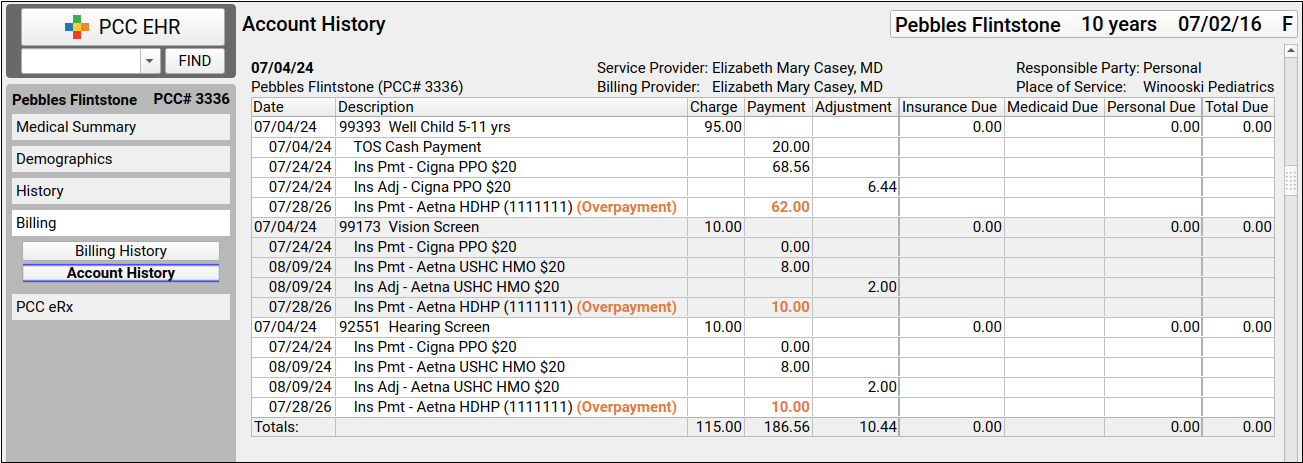
You can also see details of the overpayment in the account history found in the patient’s chart.
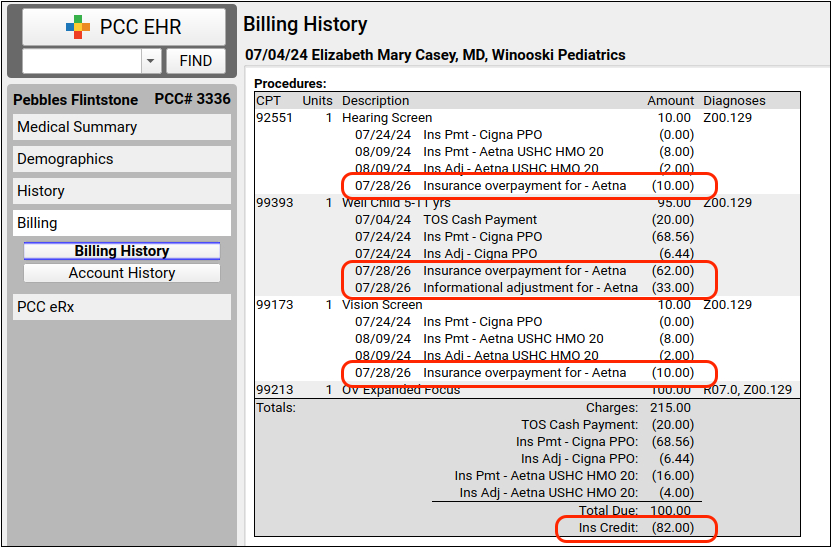
Overpayments and the resulting insurance credit amount are also included in the encounter’s billing history.
Change a Payment into an Overpayment, Reverse an Overpayment, Turn an Overpayment into an Applied Payment, and More
In addition to creating an overpayment, you can edit any insurance payment and turn it into an overpayment. You can do this whenever you need to unlink an insurance payment from an encounter, but still need to keep track of it on the patient’s record.
Later, if an overpayment is taken back, you can reverse it in the Insurance Payments tool just as you would reverse any other payment. You can also edit an overpayment and turn it into an applied payment.
What About Unlinked Insurance Payments and Overpayment Accounts?: Your practice may currently unlink insurance payments and leave them waiting on a family’s account, where they become personal credits. Other practices use overpayment “holding accounts” instead, removing payments from the patient record. Overpayments in the Insurance Balances tool are a new method of tracking unapplied insurance payments that deprecates both of these methods. To learn more, read the PCC Fall 2026 Overpayment Implementation Notes in the overpayments manual.
To learn more about insurance overpayments, read Use Overpayments to Keep Track of Insurance Credits.
Print Form Letters While Posting Insurance Payments
As you post insurance payments, you can quickly access the Forms component and generate form letters for accounts.
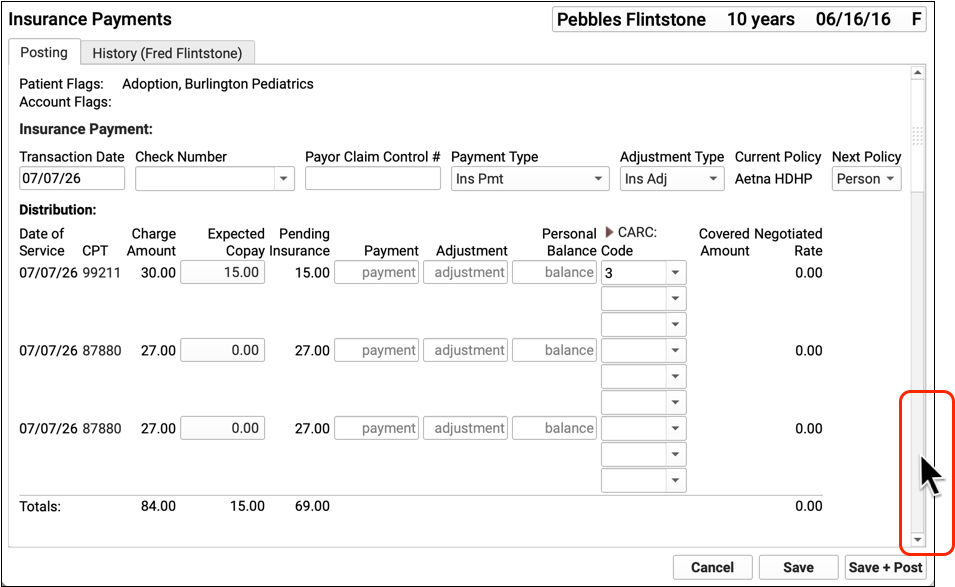
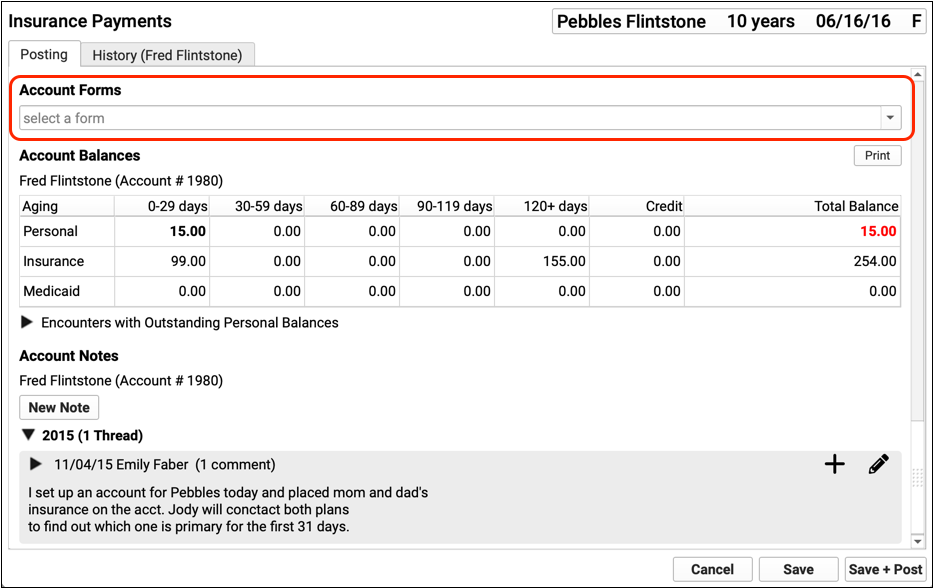
Forms can be printed or sent out in a new portal message. For more information, read Generate Forms in PCC EHR.
To see the complete manual posting of insurance payments, visit Post Insurance Payments.
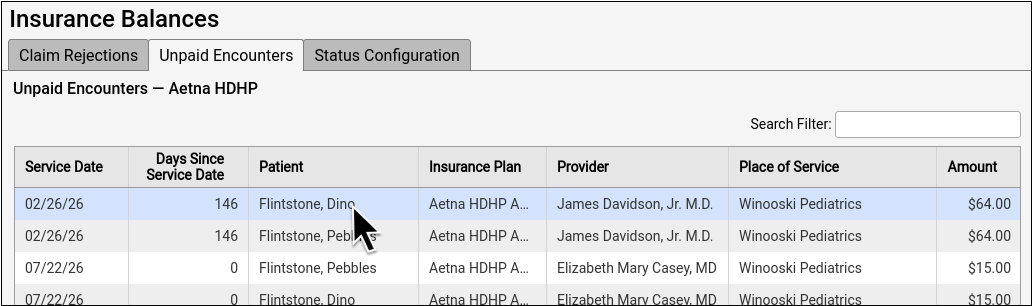
See DOB and Member ID as You Work on an Unpaid Encounter
As you work on an unpaid claim, you can use the date of birth and member ID to verify the patient.
These identifiers appear when you open an encounter from your Unpaid Encounters worklist.
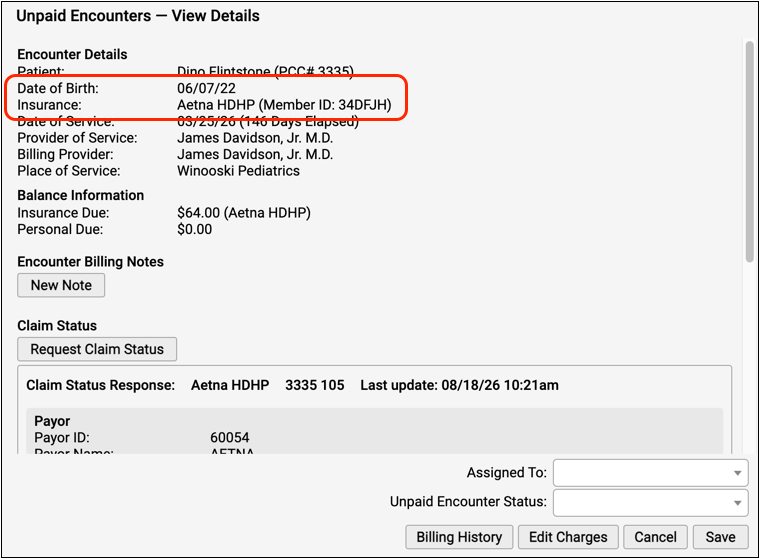
If you are contacting the payor for an update, you’ll have this crucial identifier information ready.
See ERAs and Statements with a Single Click
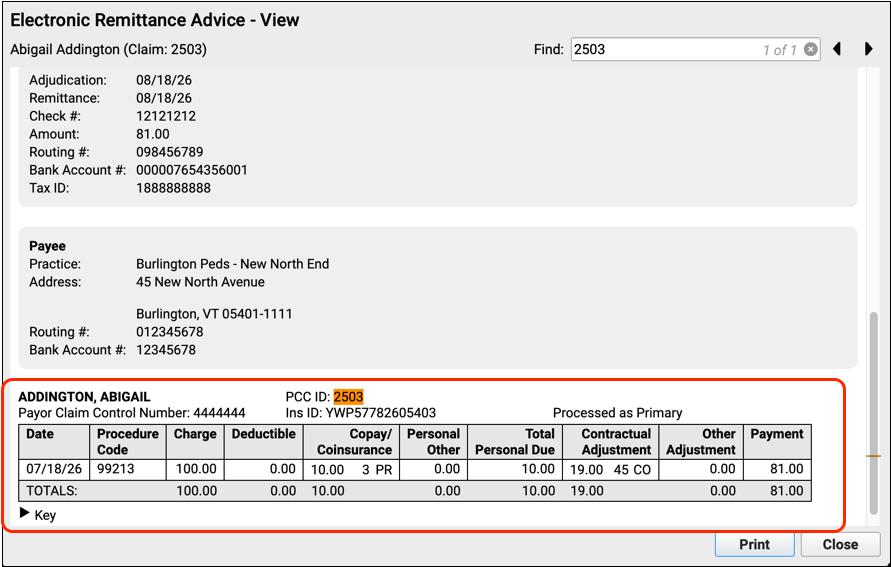
Do you need to better understand a payment or see the family’s bill? On the Account History, you can open an ERA or a statement with a single click.
To open an ERA, simply click on an insurance payment.
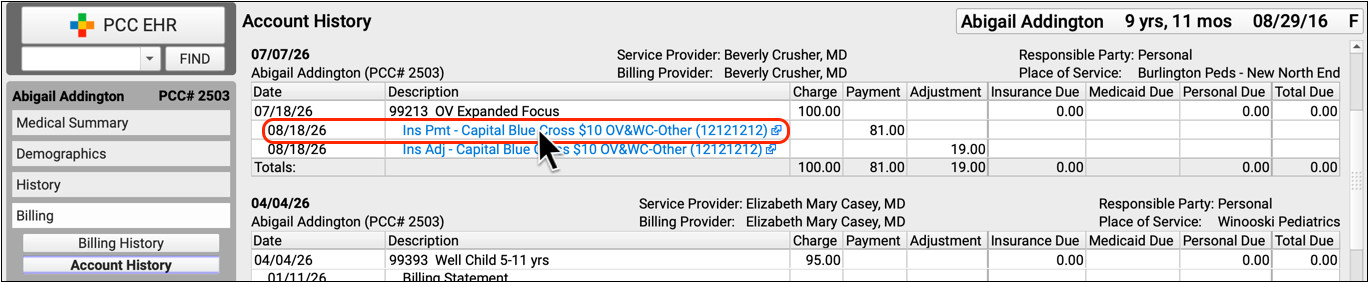
To read what appeared on a paper bill, click on a Billing Statement entry in the history.
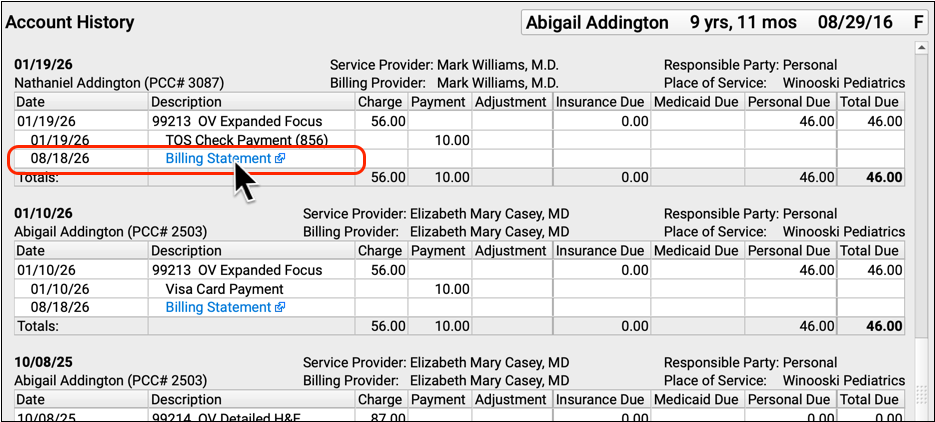
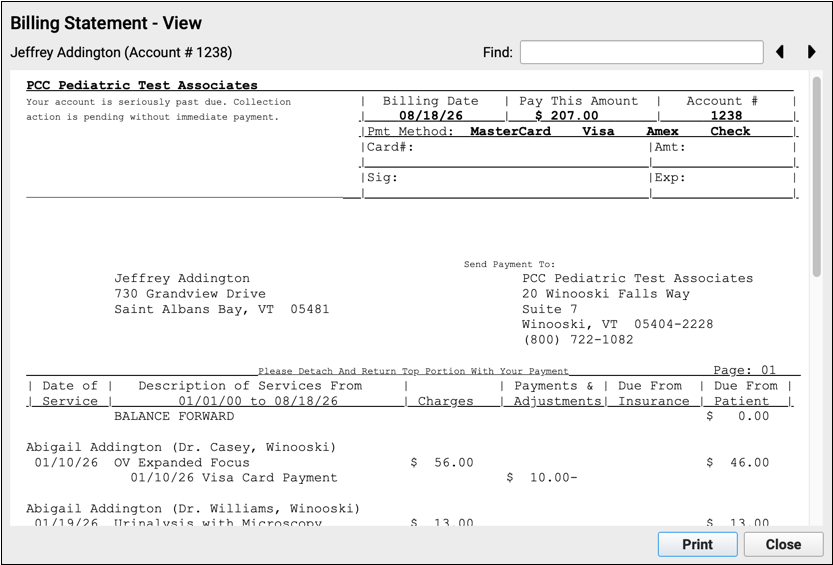
Quick access to the payor’s ERA or the actual text of a bill sent to the family will help you more quickly understand and resolve billing problems.
See All Payment History Details with a Single Click
Are you hunting for a specific payment that paid off an encounter? In Payment History, you can expand the list of charges for all payments with a single click.
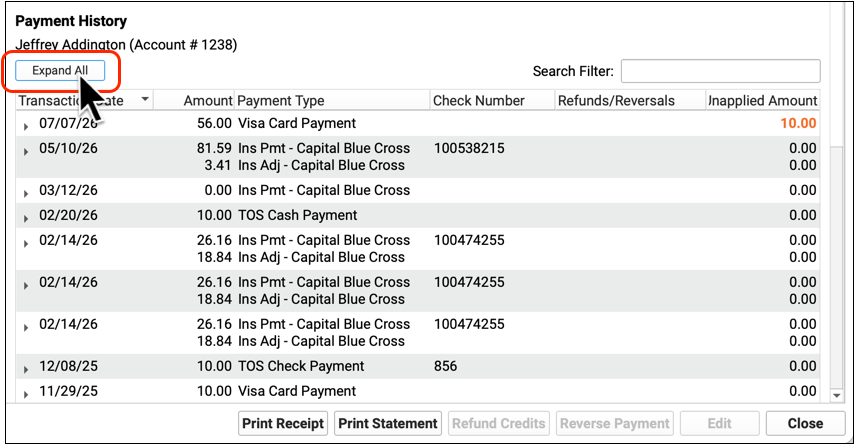
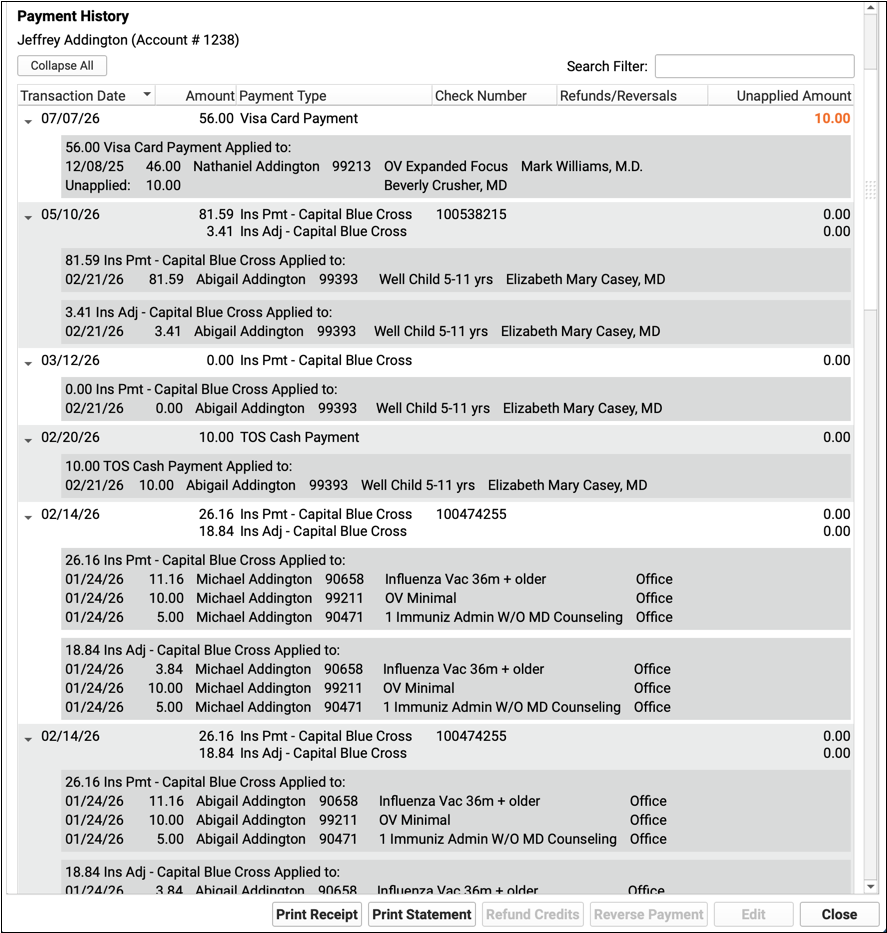
If you’re trying to find a payment that needs editing or reversing, you’ll be able to quickly spot it based on encounter charges.
Personal Billing
Distribute Today’s Payment Towards Past Charges During Patient Checkin
As you enter a payment during check-in, you can distribute some or all of it towards specific past charges. Your practice’s front desk can allocate the payment correctly, which saves your practice time and reduces confusion later.
As you enter the payment, you can allocate it towards any charges that have a personal amount due.
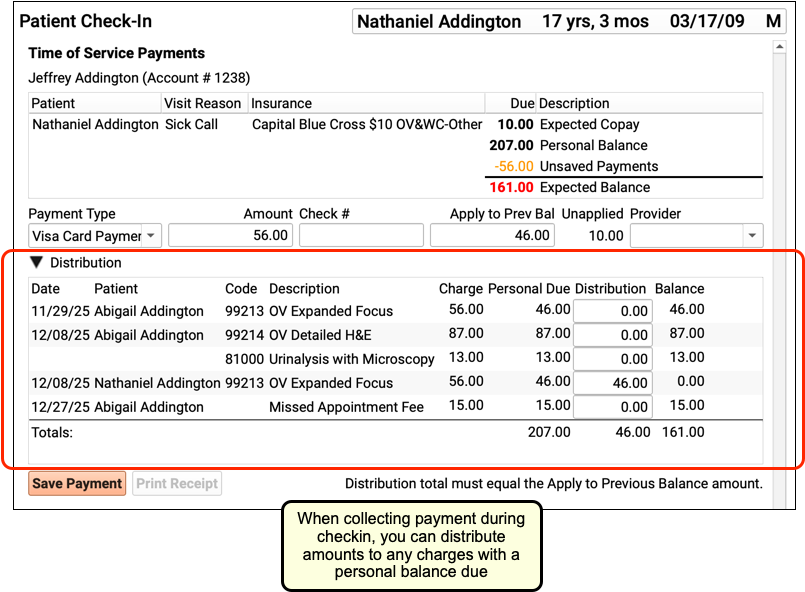
When you click “Save Payment”, PCC will immediately apply the payment towards the past balances. The unapplied amount for today’s copay will be applied when the biller posts charges for today’s encounter.
To learn more, read Check In a Patient or Post Charges for an Encounter.
Print Form Letters for a Group of Accounts
Do you need to generate practice policy documents, 120+ day balance letters, or other custom form letters for a group of accounts? Use the Personal Balances tool to find accounts based on your criteria and then print form letters for them.
Open Personal Balances
Open the Personal Balances tool from the Tools menu.
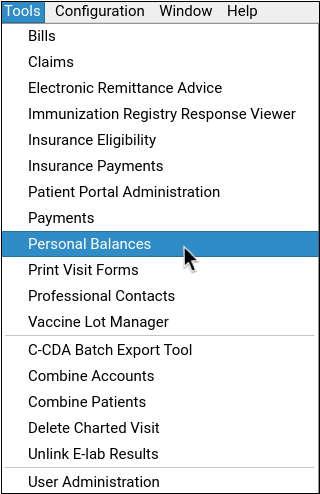
Select the Criteria for Accounts
Adjust the criteria to build a list of accounts that should receive the form letter.
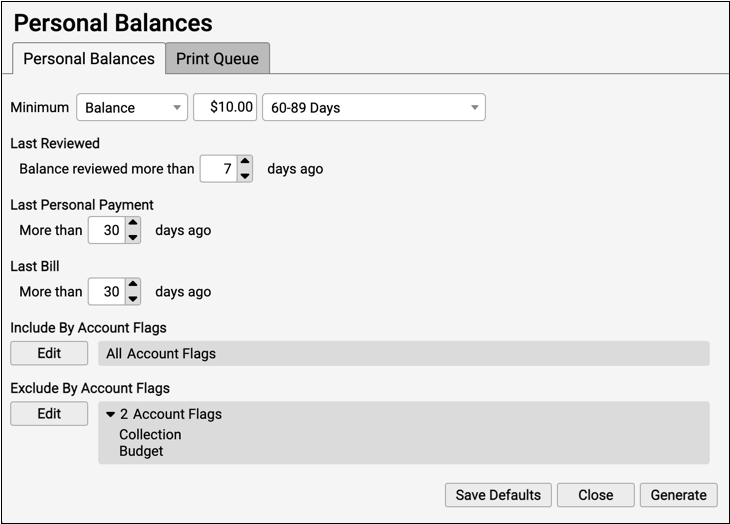
For example, you may wish to send form letters for accounts with 120+ day overdue balance of at least $25.
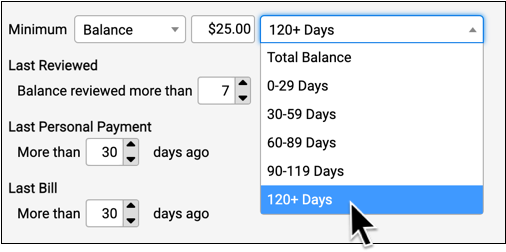
You can also include or exclude accounts by status, and more.
Click Generate and Review the List of Accounts
Click “Generate” to produce a list of accounts that match your criteria.
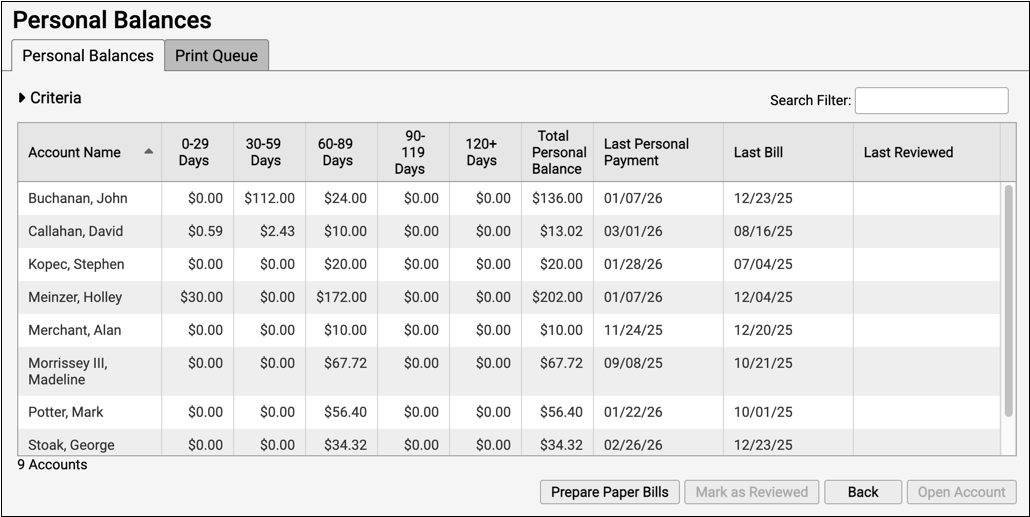
You can sort and search the list to ensure it contains only your intended recipients.
Optionally, Work With Accounts, Post Payments, and More
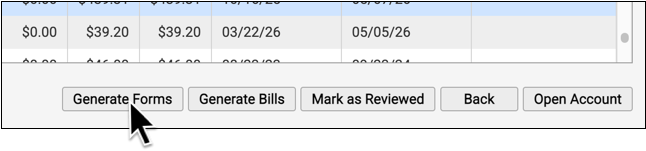
Before you generate the form letter, you can select an account and click “Open Account” to review more details, including a list of outstanding charges, in the Payments tool.
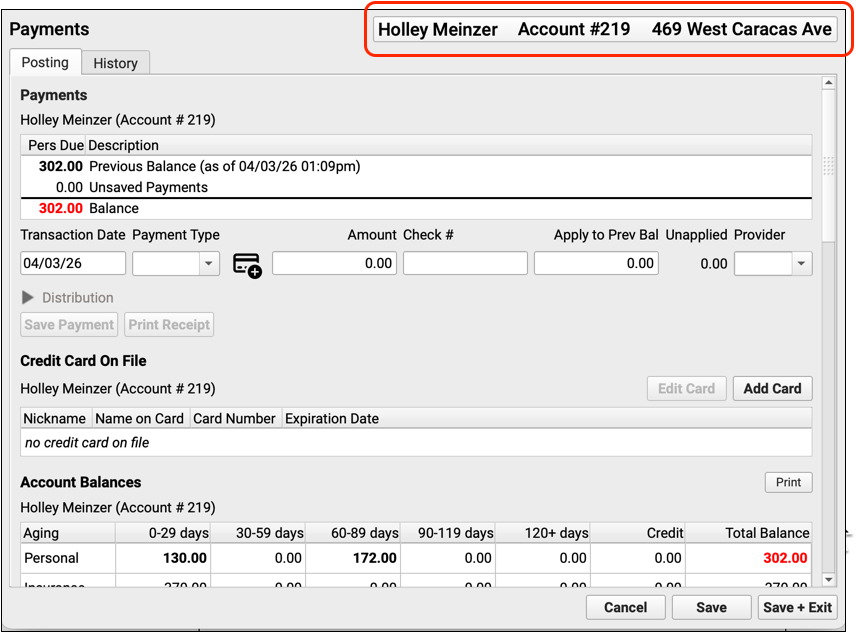
Instead of sending them the letter, you might decide to contact the family and handle an issue over the phone. After working with the account, you can return to Personal Balances and recreate the list of accounts that need a form letter.
Click “Generate Forms”
When you are ready to generate a form letter for the accounts listed, click “Generate Forms” .
Select the Form and Generate
Select the form letter you wish to generate.
Optionally change the document category in the chart where a copy of the form will be saved.
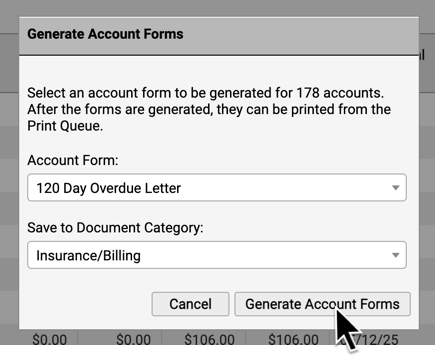
Click “Generate Account Forms” to continue.
PCC EHR will create the form letters and add the finished batch of letters to the Print Queue.
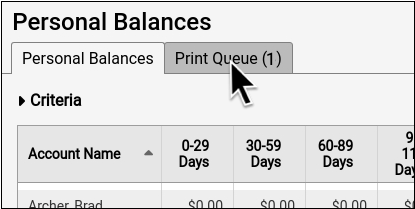
Visit the Print Queue
When a batch of forms is ready to print, you will see a waiting print job on the Print Queue tab. Visit the Print Queue to view the prepared forms and print them.
Select the Prepared Batch of Forms and Print
Select the batch of prepared forms and click “Print” to send them to your printer.
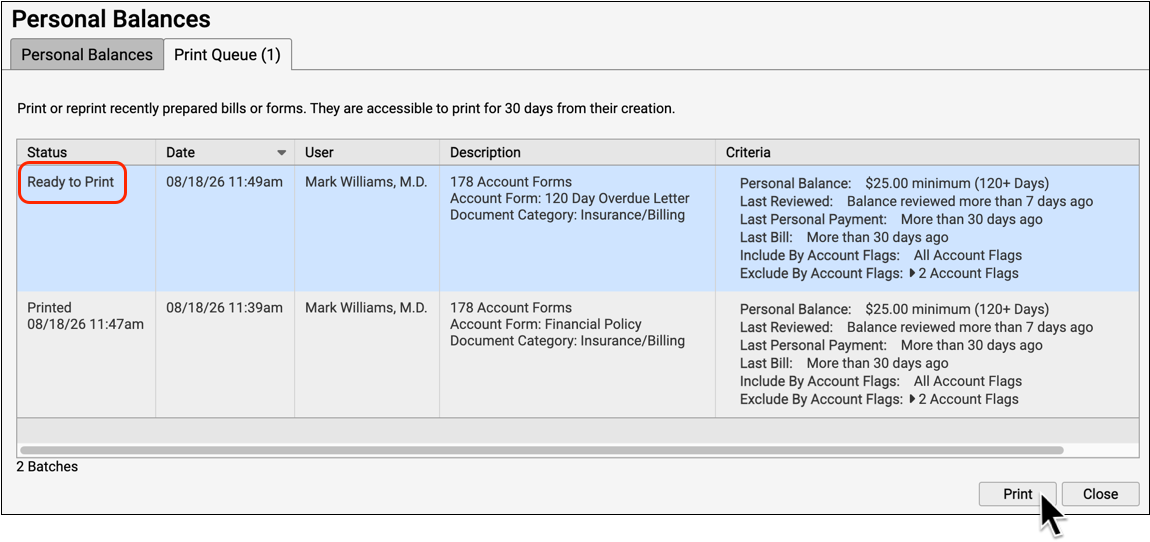
Did We Generate a Form for This Account?: You can review account forms sent to a family in the designated category of the Documents section of a patient’s chart.
System Administration
Update Your macOS Ventura 13 Workstations
Apple has ended support for the macOS Ventura 13 operating system, so PCC is ending support for this operating system too. With the update to PCC 11.1, users whose workstations are on the macOS Ventura 13 operating system will not be allowed to install the new version of PCC EHR.
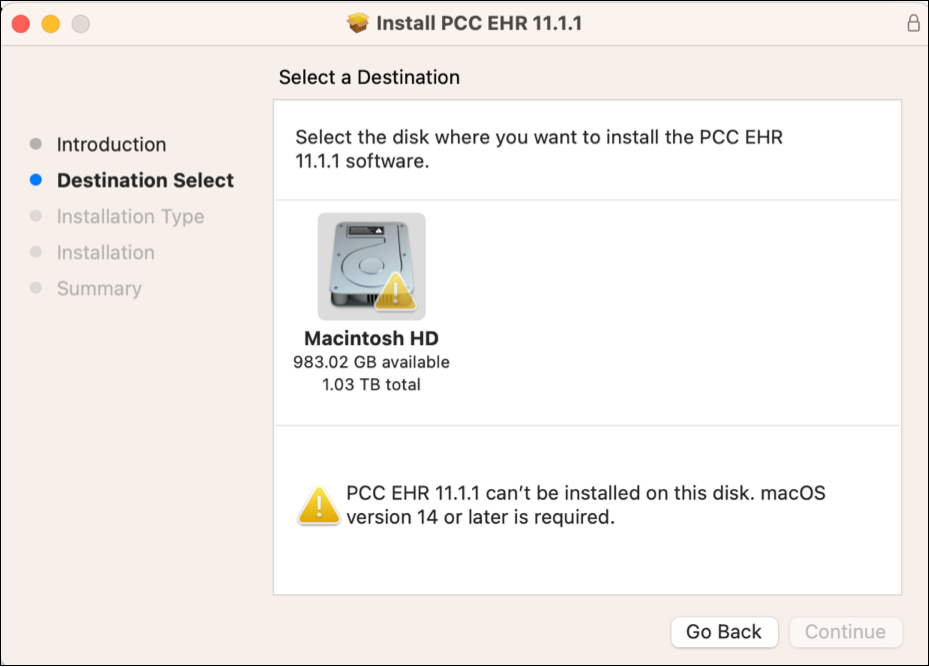
To run PCC EHR after the PCC 11.1 update, upgrade your workstation’s operating system to macOS Sonoma 14 or higher.
Update Your Windows 2016 Terminal Server
Microsoft will end support for the Windows Server 2016 operating system, so PCC is ending support for this operating system too. With the update to PCC 11.1, users who access PCC EHR via a Windows 2016 terminal server will see a message indicating that this is the last version of PCC EHR that will support their operating system version.
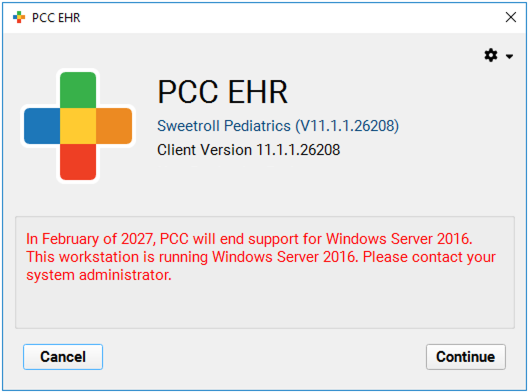
Please contact your local IT provider for assistance upgrading your practice’s terminal server to a supported operating system version (Windows 2022 or higher).
Code Updates and Other Improvements
2026 ICD-10 Update
During the PCC 11.0 to 11.1 release period, PCC updated all practice systems to support CMS’s 2026 ICD-10 update. New codes and guidelines are valid for dates of service starting on October 1st, 2026. For more information, visit CMS.gov’s ICD-10 page. To learn about updates of specific interest to pediatric practices, attend one of PCC’s upcoming Pediatric Billing Drop-Ins.
PCC Scribe Upgraded to New LLM Version
The large language model (LLM) used for PCC Scribe was upgraded to a new version on Monday, August 24th, 2026. The change was automatically applied for all PCC Scribe users.
The new version offers PCC Scribe an even better ability to follow template instructions.
Templating Tips
Regardless of the LLM version, it can take a few tries to create templates that result in great PCC Scribe output.
If you aren’t totally satisfied with your draft chart notes, try these time-tested templating tips:
-
Write instructions like you are speaking to a person: Use clear, full sentences and descriptive language. Plain, conversational instructions help PCC Scribe understand what you expect in each section.
-
Separate distinct note sections into different components: While you can design a template that packs everything into a single component, PCC Scribe yields more accurate notes when sections (like HPI, Exam, or Plan) are split into individual EHR components.
-
Use the Context and Instructions box for real-time tweaks: Save your permanent templates for general visit structure. Use the visit-specific Context and Instructions box for one-off details like specific name spellings, brand-name medications, or quick diagnoses.
Open the Report Library Faster
Find the reports you need faster and more easily with a new category layout in the Report Library.
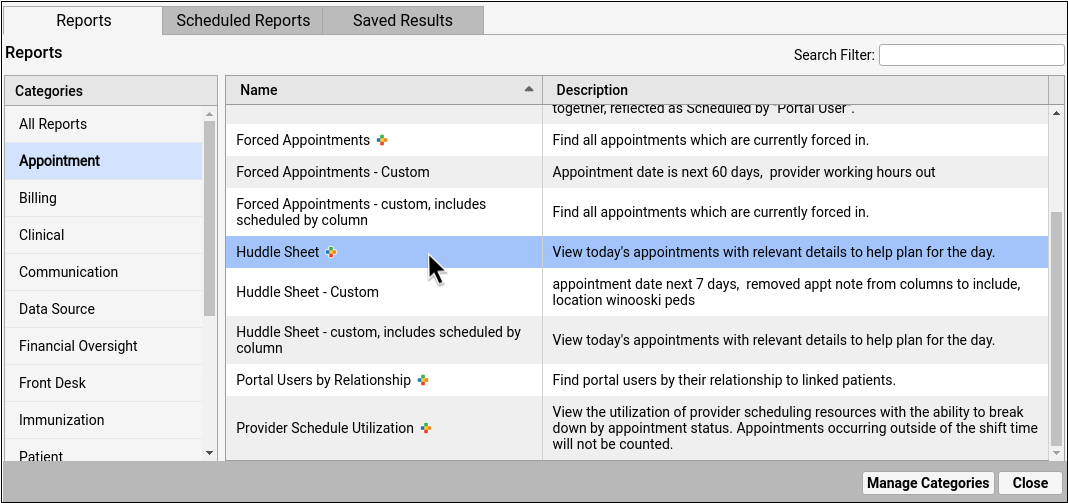
Select a report category on the left, and scroll or search the list to find the report you want.
Turn Off Attachments in Replies to Portal Messages Sent from Your Practice
Patient Portal Configuration now includes additional control over when attachments can be added to a portal message.
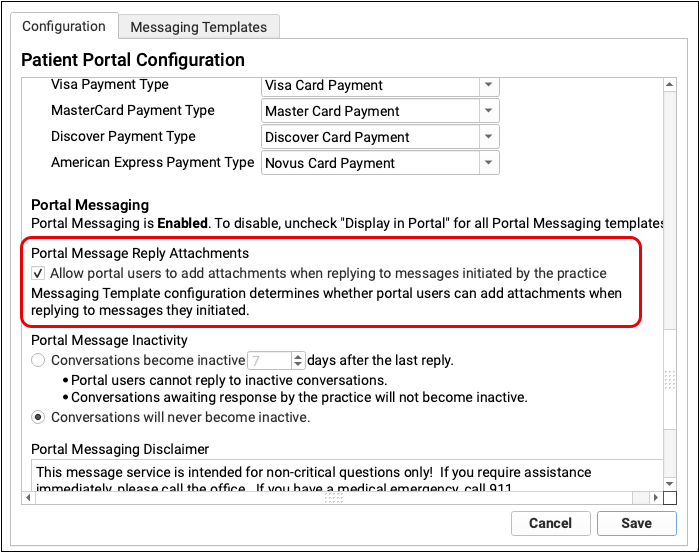
By default, patients can add attachments when replying to a message sent by your practice. Uncheck the box labeled “Allow portal users to send attachments when replying to messages initiated by the practice” to remove the option to add an attachment to a reply.
Improved Image Information in pocketPCC
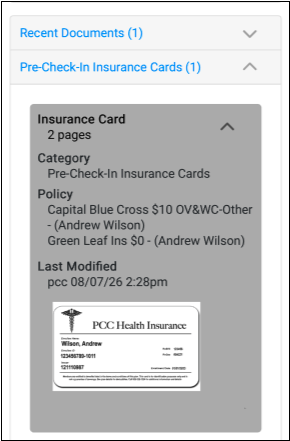
When an insurance card is uploaded during Pre-Check-In and viewed in pocketPCC, insurance policy data is now included with the rest of the document’s information. The text has been reformatted to make it easier to read, with bold headings for each section.
Clearer Labeling for Visits in Patient Portal
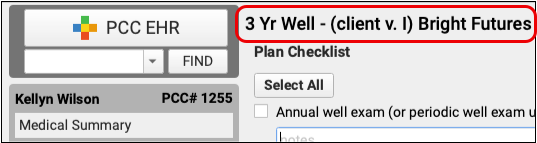
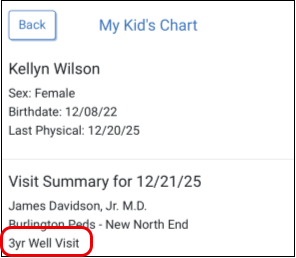
In the patient portal, visits are now labeled only with the Visit Reason or Portal Display Name in the Visits component and Visit Summary.
0.8 mL Dose Option for Vaccines
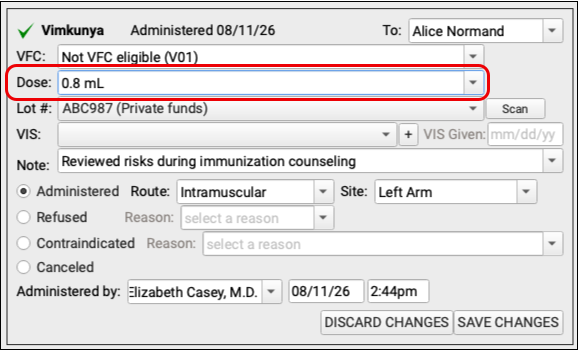
You can now select 0.8 mL from the Dose drop-down when ordering immunizations in PCC EHR.
AAP Updates in Patient Education
Since PCC’s Spring 2026 Release the American Academy of Pediatrics has released several updates that are now available in PCC EHR’s Patient Education library. This includes updates to the Schmitt Pediatric Care Advice library, more than 30 new handouts, and new translations to Spanish and other languages.
Bug Fixes
PCC 11.1 includes some notable squashed bugs.
-
When Scheduling in Patient Portal, the Availability Finder Would Suggest Unavailable Time Slots: When scheduling through the patient portal, the Availability Finder would occasionally offer appointment times that were not actually available. Patient portal scheduling will now only offer open timeslots.
-
Incorrect Patient Portal Messaging Timestamps: The “Read by” timestamp on patient portal messages displayed a time earlier than the message was sent. Messages now show the correct read by time.
-
Document Thumbnail Orientation in pocketPCC and Patient Portal Does Not Match PCC EHR: When a document was rotated manually in PCC EHR, that orientation was not reflected in pocketPCC or the patient portal. Document thumbnails will now match across all platforms.
-
Documents Downloaded from pocketPCC and Patient Portal Do Not Retain Manually Updated Page Sequences or Orientation: When a document had been adjusted in PCC EHR to correct page sequence or orientation, those changes were not reflected when the document was downloaded from pocketPCC or the patient portal. Documents will now download as displayed.
-
Error When Adding Phone Notes in pocketPCC: An error message would appear when adding a phone note in pocketPCC for patient portal user accounts that include an invalid email. In PCC 11.1, phone notes will be saved regardless of the invalid address.
-
Patient Portal Sign In Fails When Hyphens are Removed: It was possible to use the Manage Portal User option in PCC EHR to remove the hyphens from a patient portal user’s sign in phone number, which would prevent the user from logging in. Hyphens will now be automatically added to numbers in the Sign In field.
-
Mark as Reviewed in Visit History Does Not Display The Most Recent User and Timestamp: Clicking “Mark as Reviewed” in a visit component would not be reflected in the Visit History. All “Last Reviewed” dates will now match as expected.
-
Appointment Book Calendar Availability Tool Selects the Incorrect Time: A certain sequence when scheduling an appointment using the Calendar Availability tool in the Appointment Book would cause an appointment to be scheduled on the selected date, but the incorrect time. In PCC 11.1 the date and time selected in the Calendar Availability Tool will be reflected in the appointment details.
-
Paper Claims Not Appearing in Claim History: Under certain circumstances, generating a paper claim would not be reflected in the Claim History for the encounter. Claim printing (single or batch) now always appears in the history.
-
Incorrect Confirmation Window when Editing a Reversal: When saving changes to an insurance reversal, the confirmation screen for posting a new one appeared. Editing a reversal will no longer display the wrong confirmation window.
-
Charge Amount Set to $0.00: When submitting a corrected claim, if a user performed some steps in PCC EHR and some in the Practice Management suite, it was possible to overwrite charge information and cause a charge’s price to be set to $0.00. Improvements in PCC 11.1 will prevent this from happening.
-
Wrong ERA Appearing in the Insurance Payments Tool: If a user remained in the Insurance Payments tool after fixing a Posting Exception, and began to work with a different patient, the previous ERA would continue to appear. The ERA component in the Insurance Balances tool will now refresh without needing to close the window.
-
Incorrect Amounts on Printed HCFAs: Under certain circumstances, a user could generate a paper HCFA in a way that ignored payments applied from the primary insurance, resulting in inaccurate totals on the claim form. This can no longer occur.
-
Missing Attribution on Encounter Billing Notes: When a practice used both PCC EHR and the Practice Management suite, in some cases Encounter Billing Notes would not display the user who entered the note. The username will now appear regardless of how the note was entered.
-
'Cancel' Button Does Not Cancel PCC Scribe Note Generation: When PCC Scribe users clicked the “Cancel” button to stop a draft chart note from being generated, the action had no affect. The “Cancel” button now appropriately cancels draft chart note generation.
-
Microphone Not Passing Audio to PCC Scribe on Windows 11 Workstations: PCC Scribe could not detect audio coming through the microphone on Windows 11 workstations unless the “Audio Enhancements” setting was turned off. PCC Scribe can now detect microphone input on Windows 11 workstations regardless of the status of the “Audio Enhancements” setting.