PCC 10.2 Release Manual
Contents
- 1 Patient Portal
- 2 pocketPCC
- 3 Billing
- 3.1 Print a Single Account Statement in PCC EHR
- 3.2 Record Encounter Billing Notes
- 3.3 Record the Payor Claim Control Number for Claim Responses from Payers
- 3.4 Edit Encounter Charges
- 3.5 Resubmit a Claim
- 3.6 Edit Your Practice’s Configuration Tables
- 3.7 Edit Your Practice’s Procedures and Prices
- 3.8 Edit the Insurance Plans on Your PCC System
- 3.9 Other Billing Improvements
- 4 Reporting
- 5 Clinical
- 6 Immunizations
- 7 Other Updates and Patch Notes
Watch Video Demos: Want to see PCC 10.2’s highlights in action? Watch the PCC 10.2 Overview and Video Series.
Implementation: PCC 10.2 includes features that require configuration and user-specific software training. Read about the features below and then review the PCC 10.2 Migration Considerations article.
Read below to learn more about the improvements, and contact PCC Support for help with any PCC product or service.
Patient Portal
Families can now self scheduling in the patient portal, and more than just one family member can now respond to pre-check-in.
Patients and Families Can Self-Schedule in the Patient Portal
Streamline your scheduling and reduce appointment requests with Patient Portal Scheduling. Your patients and families can now schedule themselves through the Patient Portal with just a few clicks.
Configure Portal Scheduling: Portal Scheduling is available upon release of PCC 10.2, but requires configuration before using. Visit PCC 10.2 Migration Considerations to learn how to enable, configure, and manage Portal Scheduling.
When enabled, portal users will find a “Schedule Appointment” button on the patient portal home page.
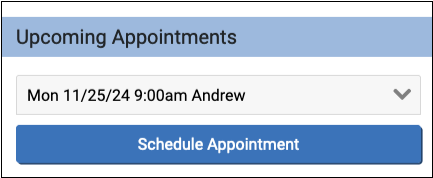
Portal users will select a patient and visit category to schedule. All portal scheduling visits are categorized into either sick or well visit category.

Patients with privacy enabled or who have a status flag that prevents scheduling will be unselectable and marked with “Please Call to Schedule”.
The portal user will select a visit reason, provider, and location, then click “Find Appointments”
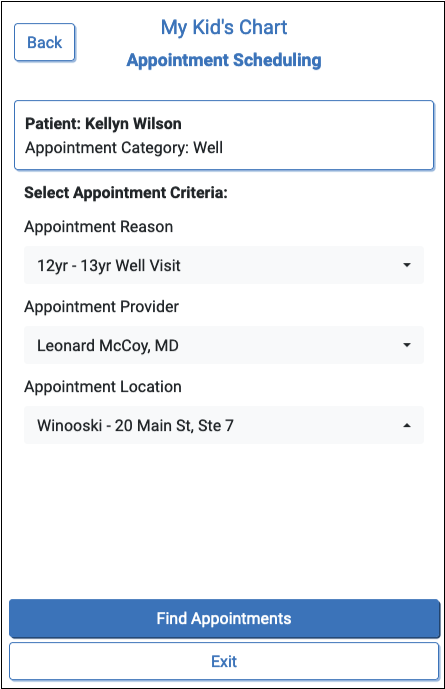

The portal will offer all available appointments that match the visit category, provider, and location.
When searching for a sick appointment, portal scheduling shows all open time slots beginning one hour in the future through three days in the future.
When searching for a well appointment, if the patient has a next physical due date listed in their chart, the appointments offered will begin on that date. A patient without a physical due date will be offered time slots for the next day through the following three months.
When the portal user selects an appointment they’ll have an opportunity to review their selections and schedule the appointment.
Finally, after scheduling, the portal user can add an appointment note.
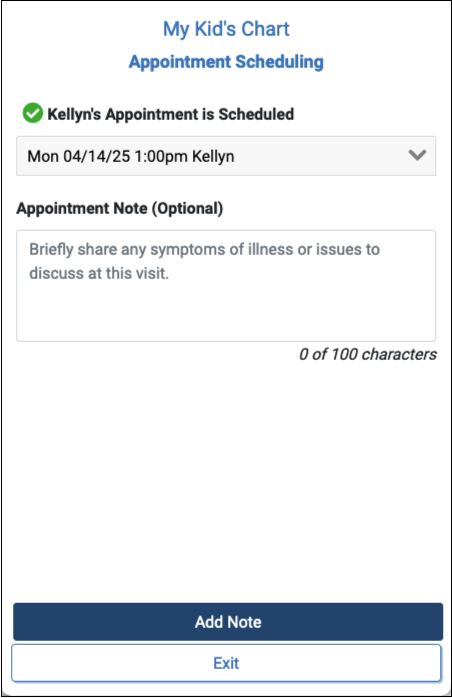
The appointment immediately appears in the Appointment Book and on PCC EHR’s Schedule queue, where it can be reviewed, rescheduled and managed just like any other appointment.
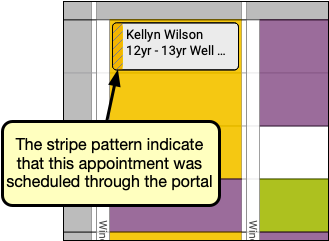
Portal scheduled appointments are marked with a stripe pattern in the Appointment Book and in PCC EHR’s Schedule queue.
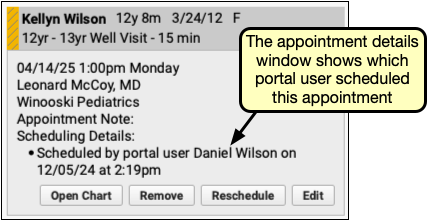
Report Appointments by Scheduling User
Your practice can review appointments created through Portal Self Scheduling with the new Appointments by Scheduling User report in the Appointment category. This report collects appointments with an Appointment Creation Date of “yesterday” by default. Appointments made through patient portal Self Scheduling are grouped together as scheduled by “Portal User”.
Add Additional Pre-Check-In Users
Get the most out of Pre-Check-In by allowing additional users to complete a patient’s Pre-Check-In, so you can ensure that your patients and families can complete Pre-Check-In promptly and conveniently.
PCC 10.2 adds a new component called Pre-Check-In Recipient in each patient’s demographics component. In edit mode, it includes a drop-down menu listing all other patient portal users linked to this patient.
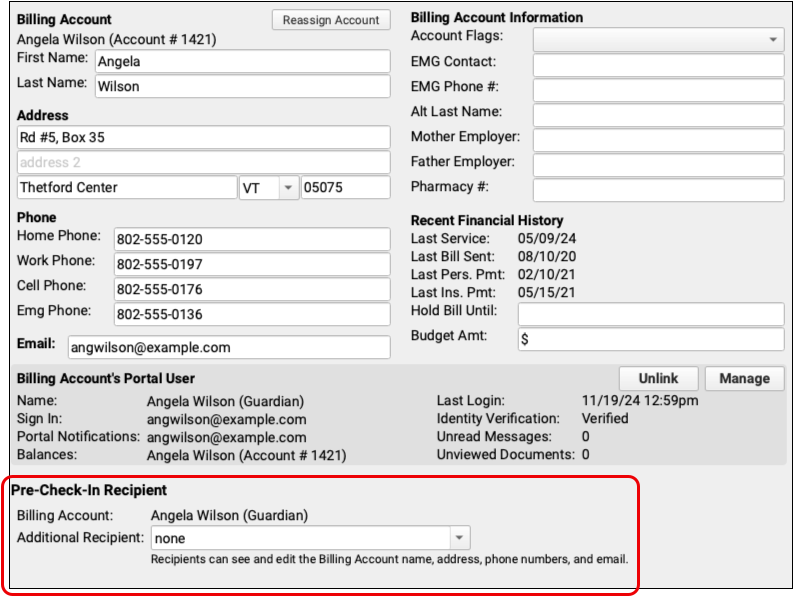
Select an patient portal user linked to this patient to receive the Pre-Check-In notification and option to complete Pre-Check-In.

Once a user begins Pre-Check-In, the additional user will be notified that Pre-Check-In is in progress on the patient portal home page.
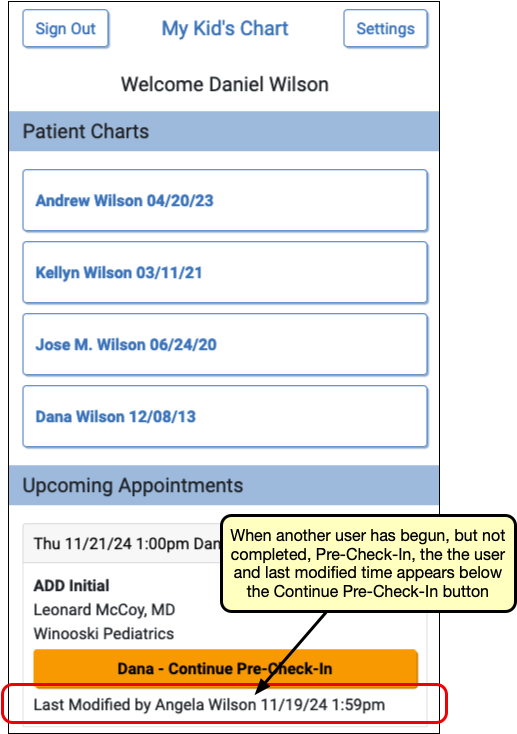
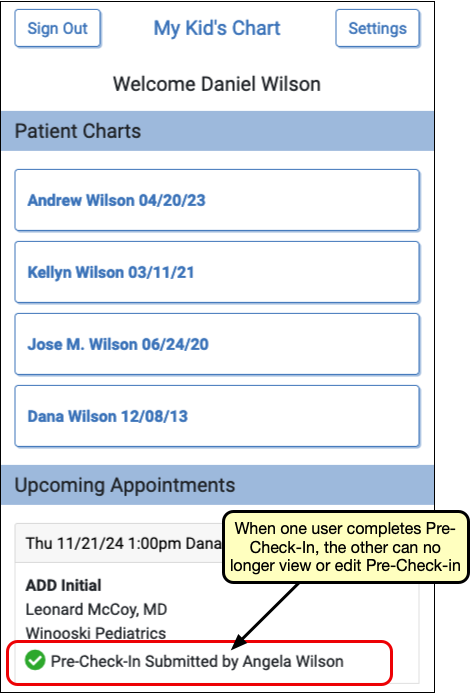
Any Pre-Check-In recipient can continue Pre-Check-In, but once any user submits Pre-Check-In, check-in is complete, and ready to be reviewed and imported in PCC EHR.
pocketPCC
Clinicians can now prescribe medications on their mobile device and quickly preview documents attached to charts.
Prescribe from Your Phone
When you’re away from your primary workstation, you can use pocketPCC on your mobile device or tablet to create and send new prescriptions, process pending prescriptions, review medication histories, manage patient pharmacies, and more.
Log In to pocketPCC
Type in your practice’s pocketPCC URL into the web browser on your mobile device or tablet, then log in using your PCC username and password.
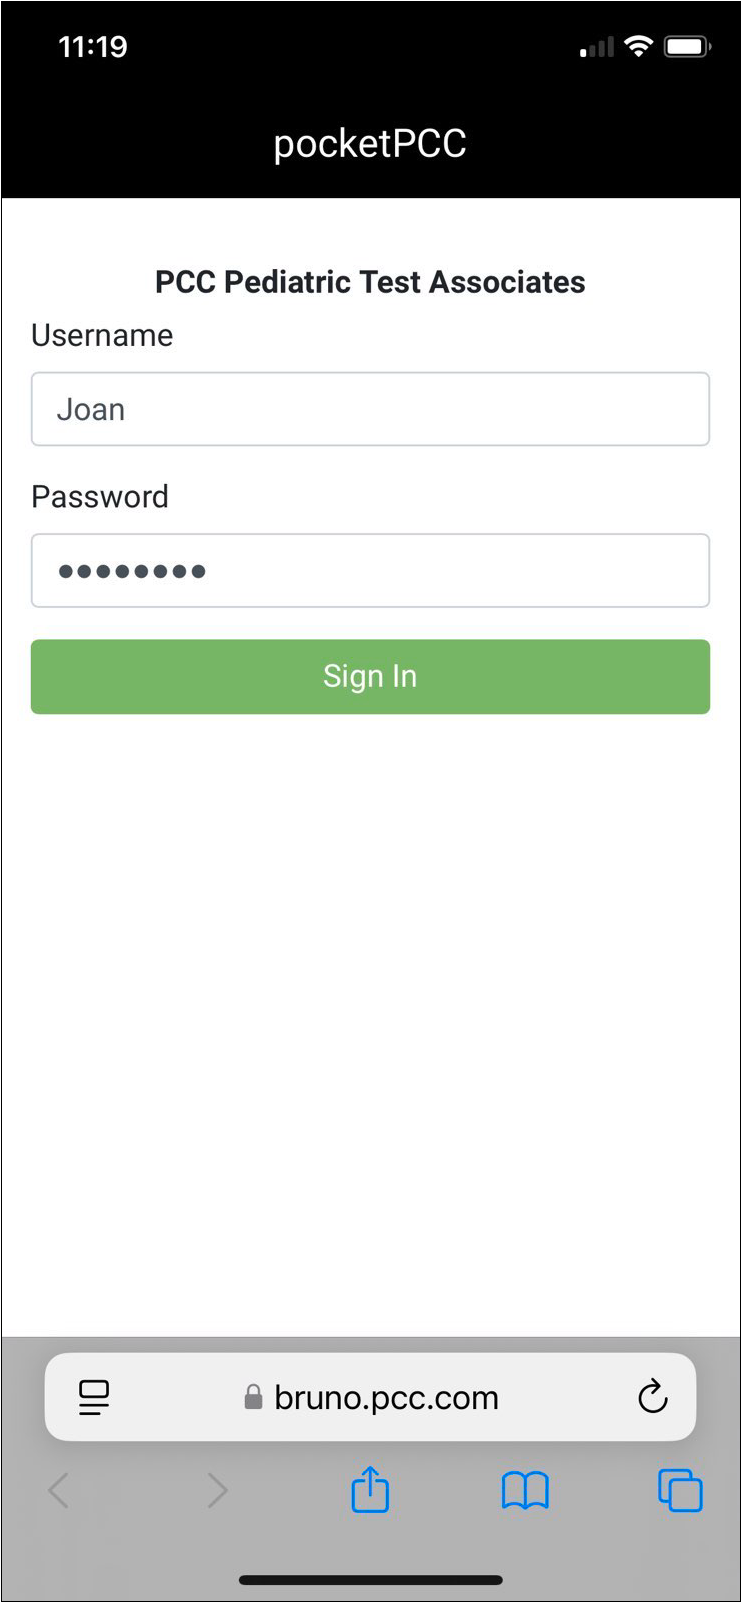
Your Practice’s pocketPCC URL: Your practice’s pocketPCC URL is https://ACRO.pcc.com/pocketpcc, where ACRO is your practice’s PCC acronym. For example, if your practice’s PCC acronym is ‘wp’, your pocketPCC URL is https://wp.pcc.com/pocketpcc. If you need help, ask your practice administrator or contact PCC Support.
By Permission Only: pocketPCC access is controlled by a user role permission in PCC EHR. If you have trouble logging in to pocketPCC, ask your practice administrator for help or contact PCC Support.
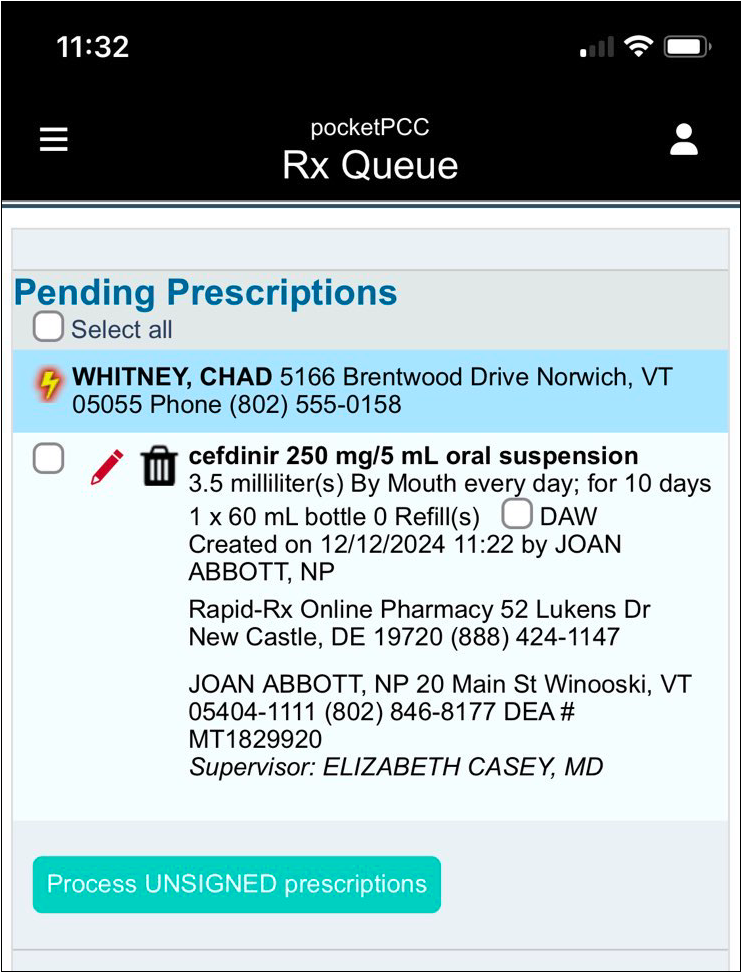
See All Pending Prescriptions on the Rx Queue
To see a list of all pending prescriptions at your practice, tap the menu icon in the top left corner of the screen and select “Rx Queue”.
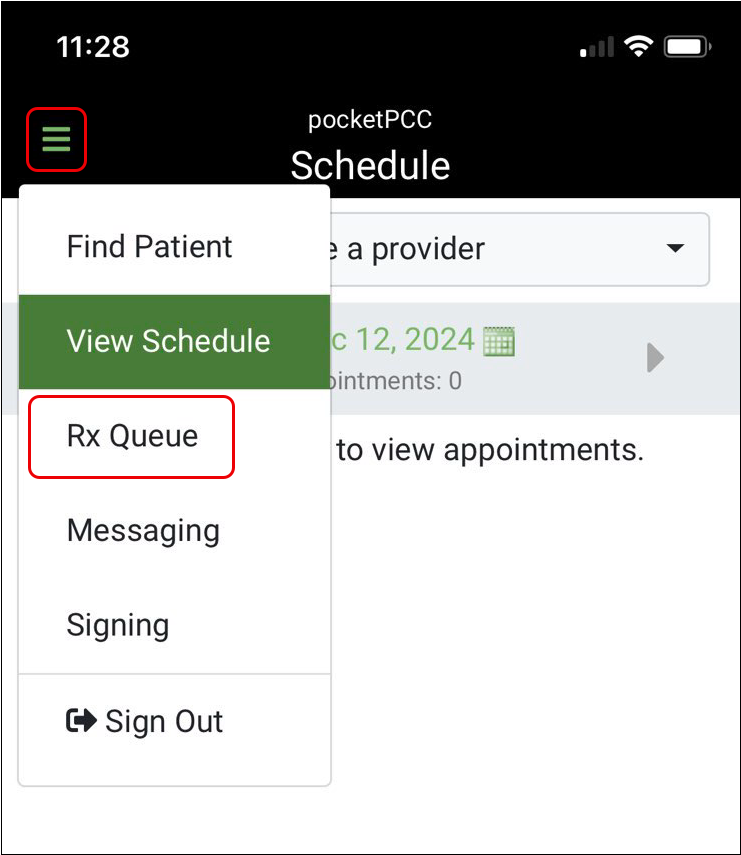
Here you can view, edit, and process pending prescriptions.
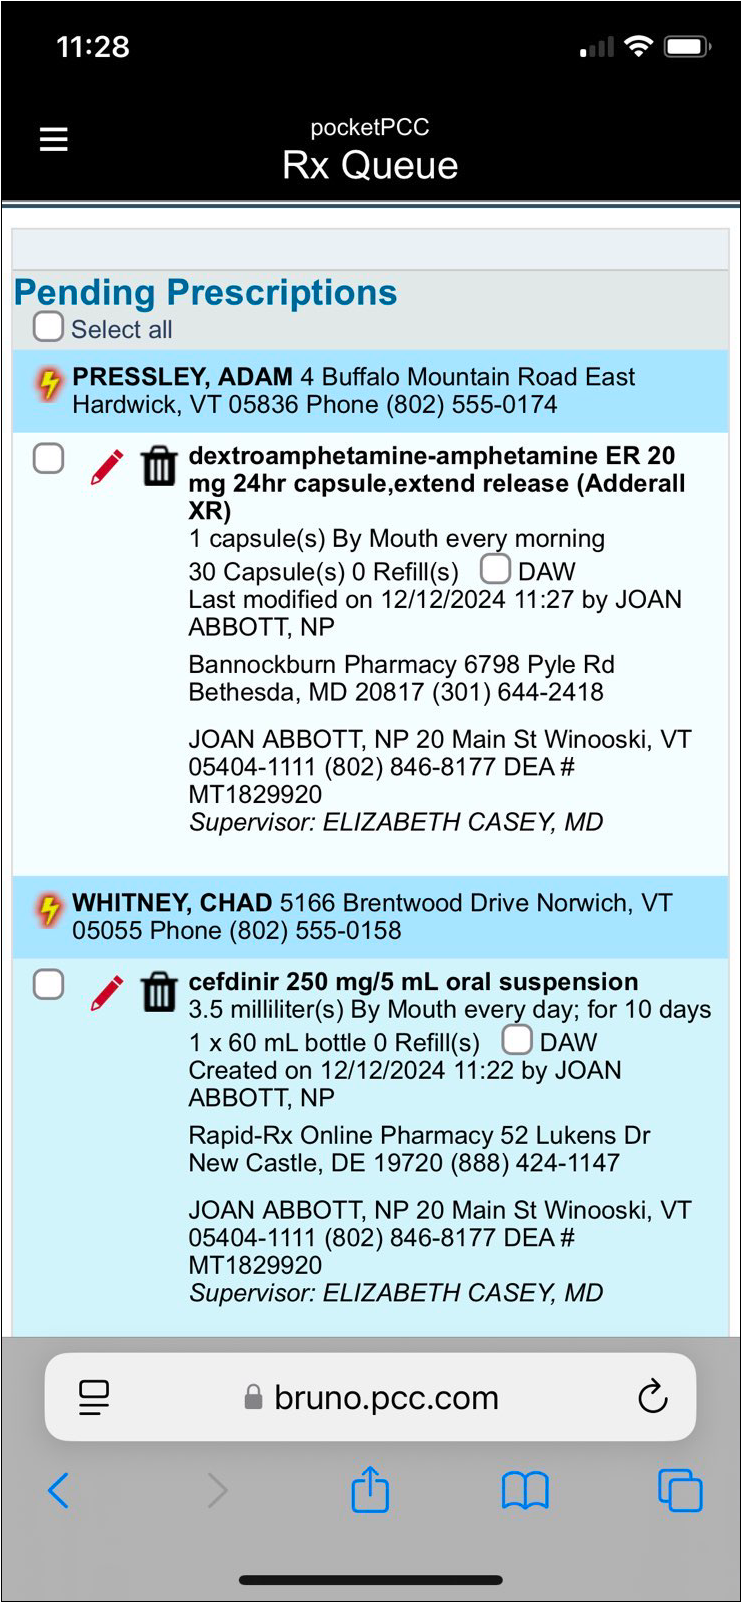
For now, the Rx Queue in pocketPCC only shows pending prescriptions and cannot be filtered by patient, provider, or location.
Create a New Prescription and More in Your Patient’s Chart
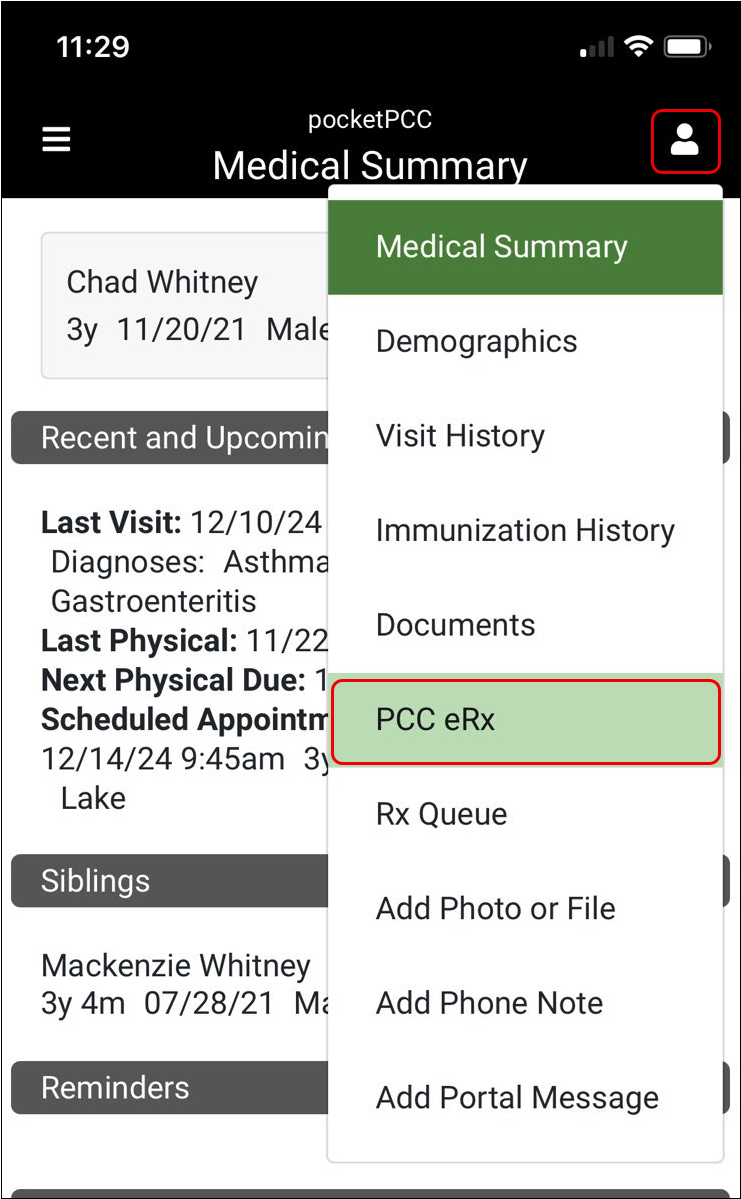
To create a new prescription or take another action in PCC eRx for one of your patients, open their chart in pocketPCC. Then, tap the menu in the top right corner of the screen and select “PCC eRx”.
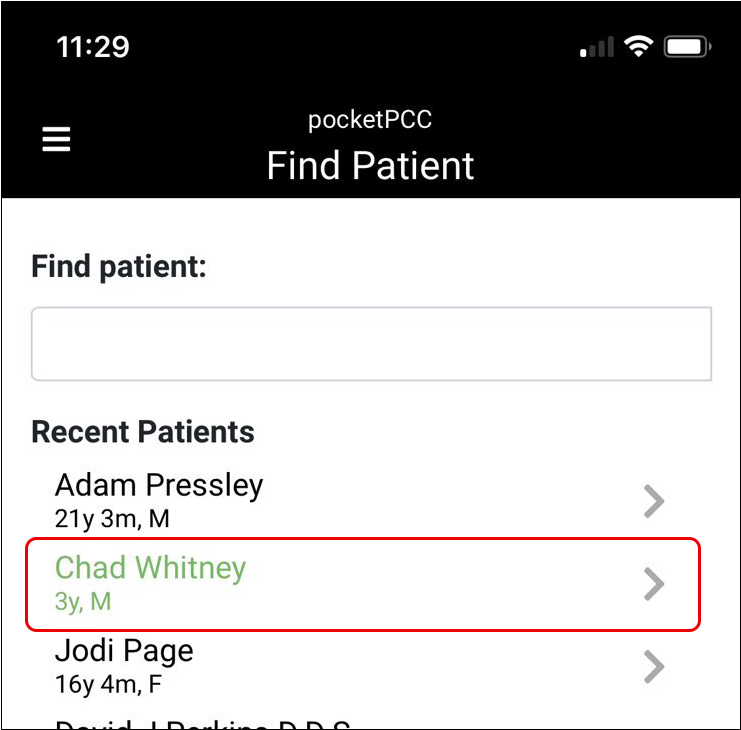
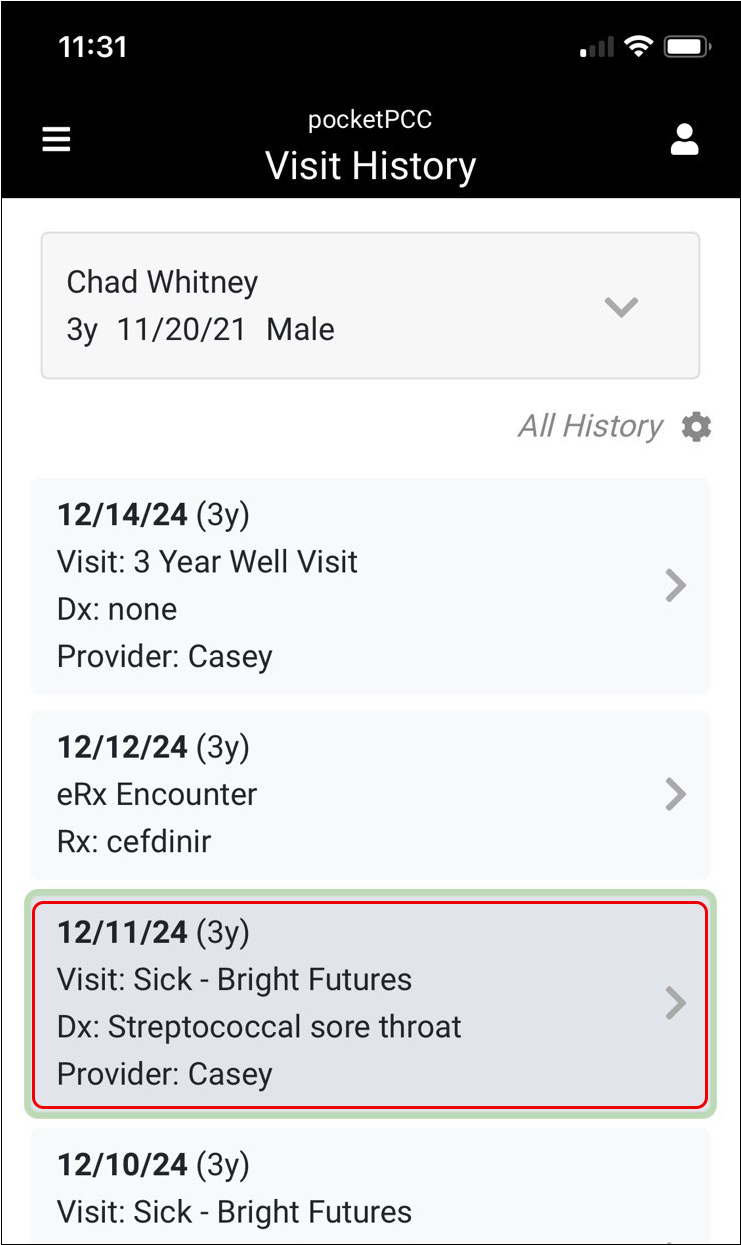
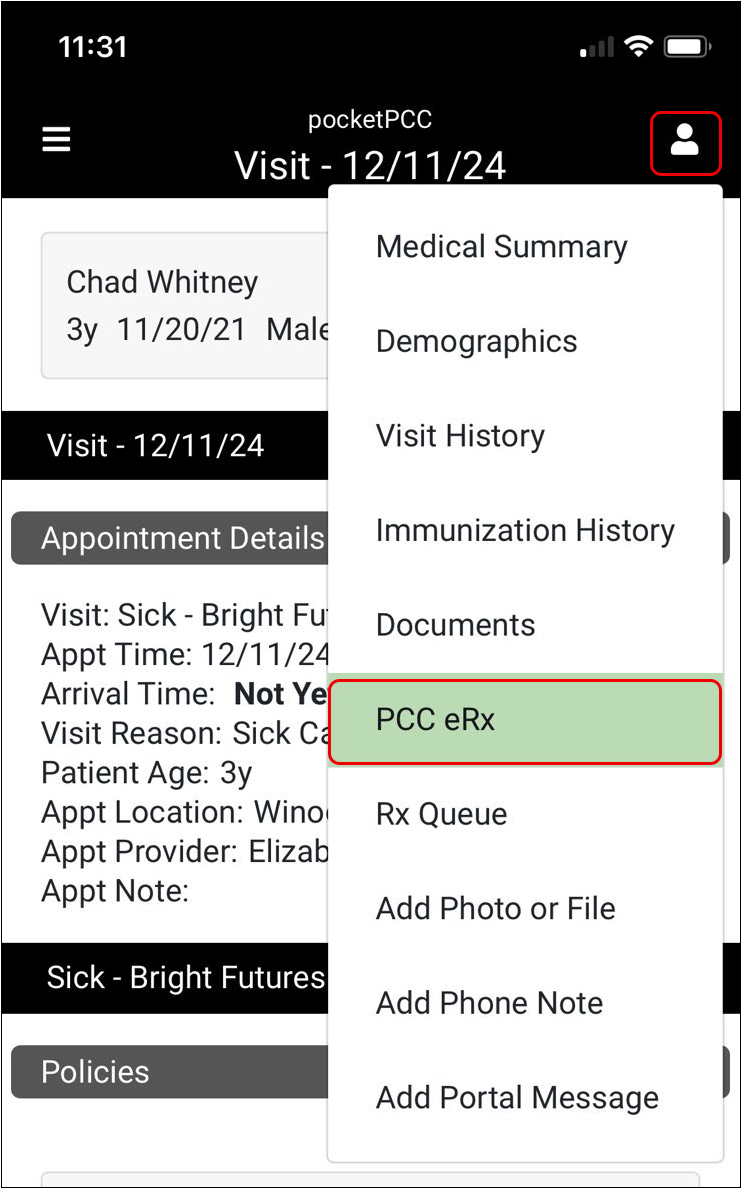
If you need to see the eRx details for a particular encounter, open the encounter from the patient’s Visit History, then open PCC eRx.
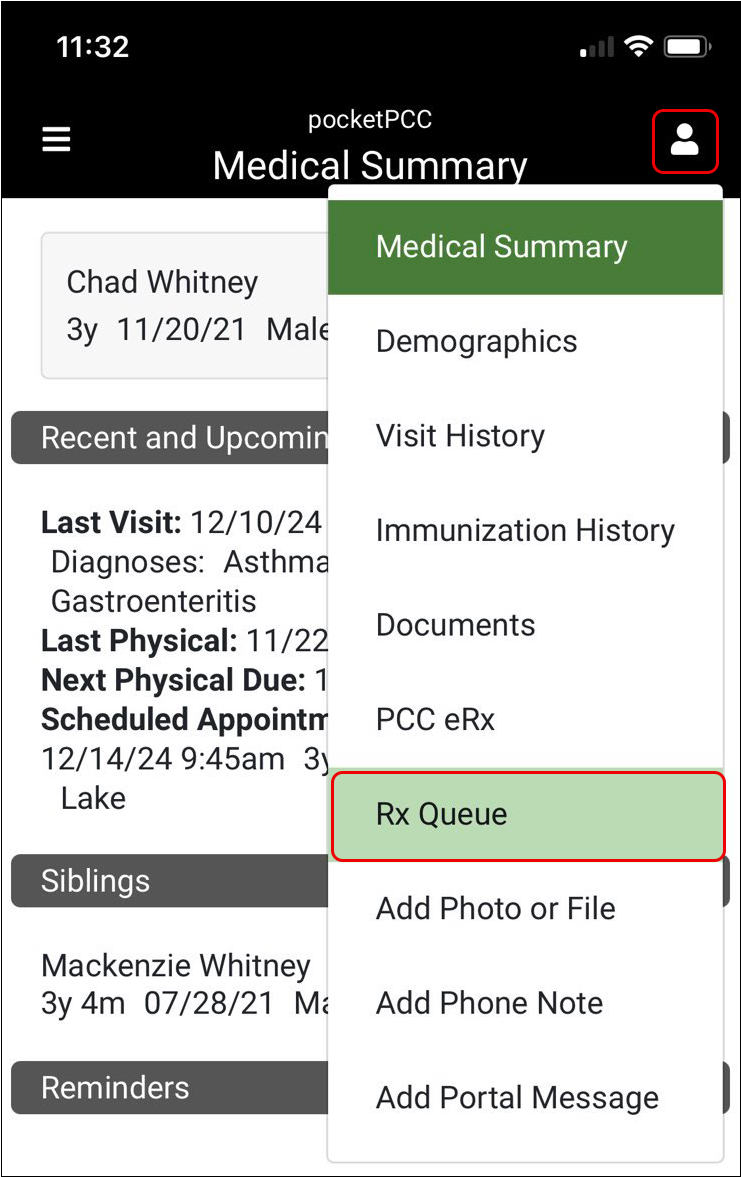
If the patient has pending prescriptions, you can view, edit, and send them from the Rx Queue within their chart.
Use Your Hard Token for EPCS: You can send electronic prescriptions for controlled substances (EPCS) from pocketPCC, but you must use your hard token instead of the Authy app for two-factor authentication. To learn more, read the PCC 10.2 Migration Considerations.
How is PCC eRx Different in pocketPCC?: With a few exceptions, PCC eRx in pocketPCC works the same as in PCC EHR. Learn the differences in the PCC 10.2 Migration Considerations article.
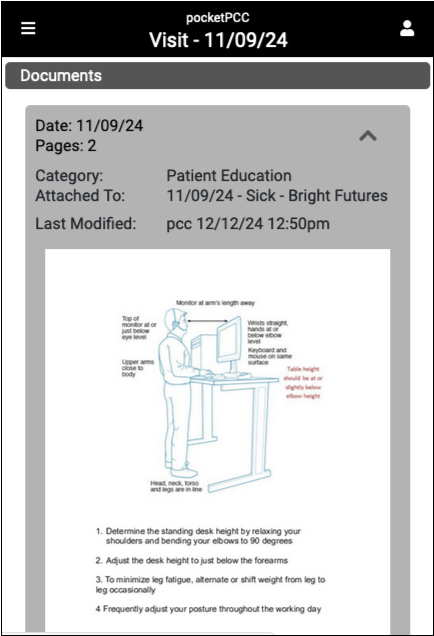
Preview Documents In pocketPCC
Quickly review documents and images in pocketPCC without the need to download the file.
When reviewing documents in any component where documents are referenced within pocketPCC, a thumbnail preview and the document’s details are now available.
Billing
PCC 10.2 includes new tools for personal bills, billing notes, editing charges and resubmitting claims, and editing your practice’s under-the-hood configuration tables. We also granted several important feature requests we received from billers.
Print a Single Account Statement in PCC EHR
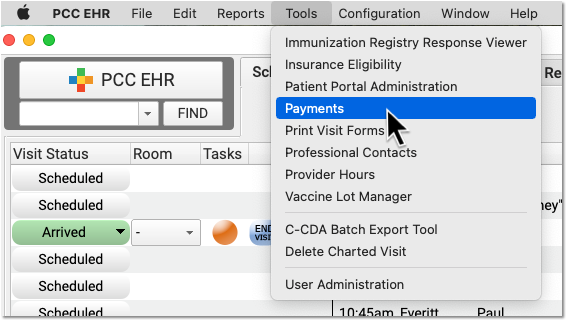
When you need to generate a single bill for an account, open the Payments tool, find the family, and click “Print Statement”.
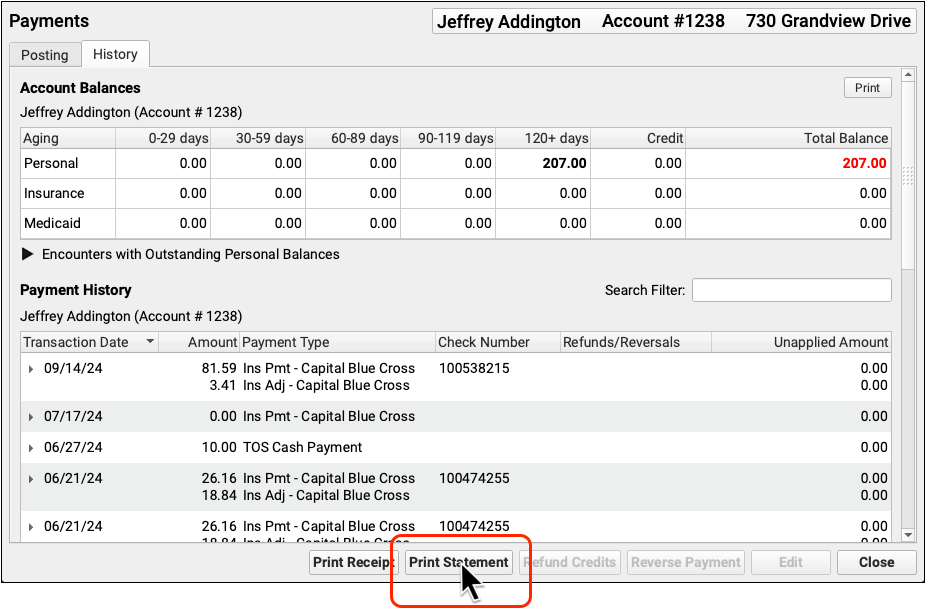
If your practice’s custom paper bill includes room for an account note, you can enter one and it will appear on the bill.

You can print the bill or use your workstation’s print window to save it as a PDF.
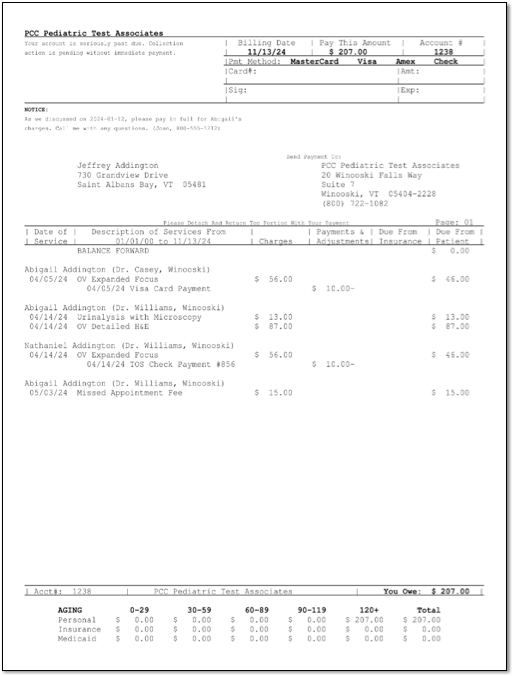
Printing a statement updates the family’s “Last Bill Sent” date. If your practice uses a billing cycle (such as 28 days), then when you next run bills, a new bill will not be generated within the cycle unless the family has new charges. For more information, read Generate Personal Account Bills.
Custom Message Tips: The custom message you enter when you generate a single statement is not saved; it appears only on the bill you are generating. Your practice can use Snap Text to define useful re-usable custom messages for bills. Use the Bills tool to define your age-based practice-wide billing messages that appear on every bill.
My Bill Looks Different: The single bill form printed from PCC EHR is not the same format as bills printed by a third-party printing service. The “Print Statement” button prints the default paper bill form on your PCC system.
Record Encounter Billing Notes
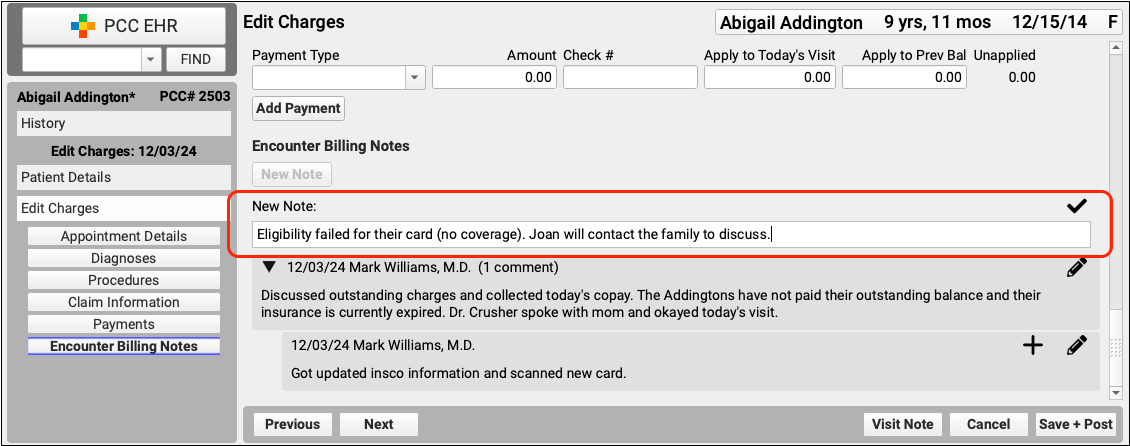
As you bill for an encounter or troubleshoot problems with a claim, you can keep encounter-specific notes that are attached to the billing history of the encounter.
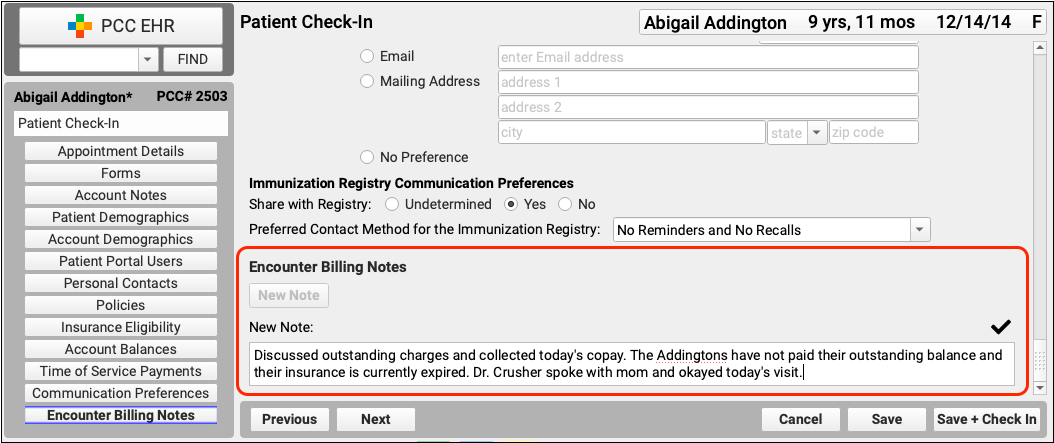
During patient check-in, your front desk can use the Encounter Billing Notes component to enter notes.
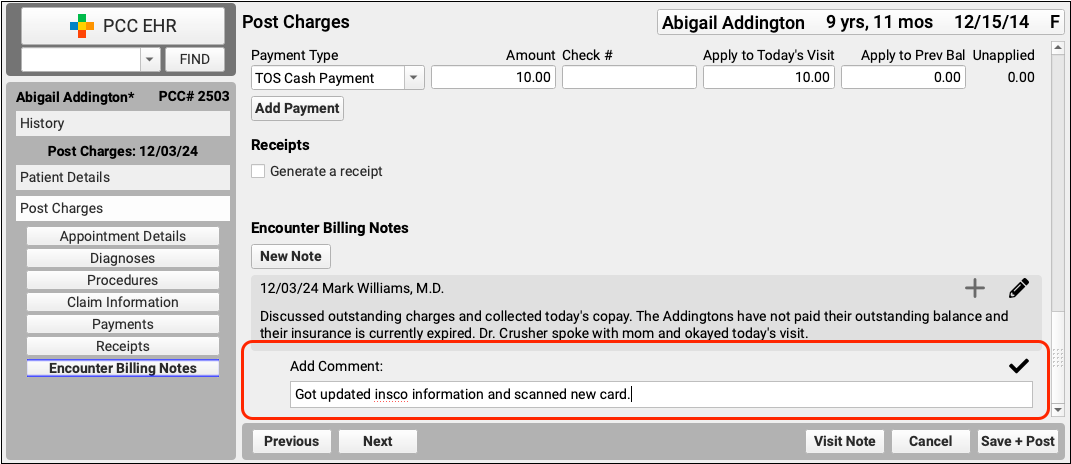
When posting charges, your biller can add a new note or a follow-up note.
Later, you can review encounter billing notes in the Billing History section of the patient’s chart.
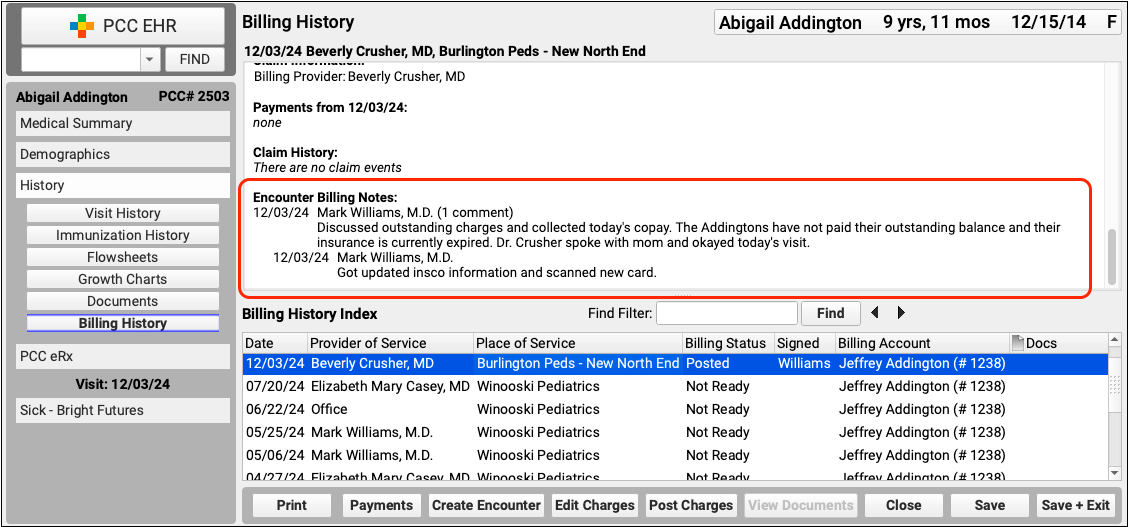
Click “Edit Charges” to add new or follow-up notes to the encounter.

Encounter-Specific Billing Notes or General Account Notes?: In addition to Encounter Billing Notes, your practice can also use Account Notes to track ongoing concerns with a family. Encounter Billing Notes are specific to an encounter, Account Notes are not.
Record the Payor Claim Control Number for Claim Responses from Payers
Whether autoposting an ERA or posting an EOB manually, PCC EHR can store the Payor Claim Control Number for easy access when you need to resubmit claims or communicate with the payer.
-
Record the PCN Automatically: When you process an ERA in the Electronic Remittance Advice tool, PCC EHR will automatically record the Payor Claim Control number for each response to each encounter.

-
Enter a PCN Manually: When you manually post the payer’s response in the Insurance Payments tool, you can enter the Payor Claim Control number along with the check number.
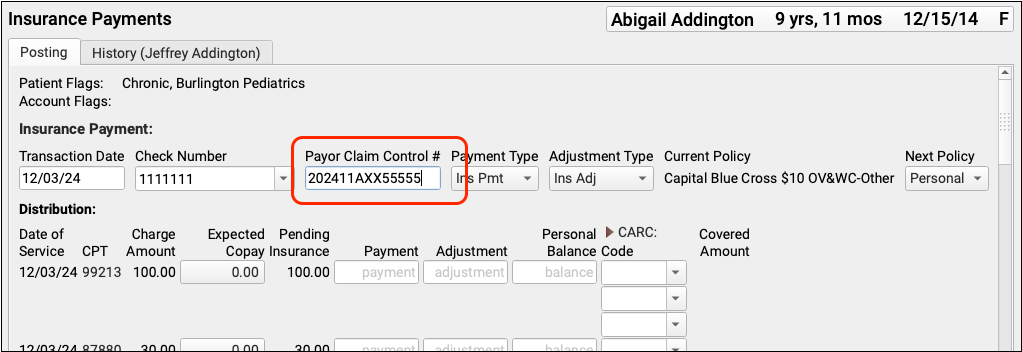
Recording the Payor Claim Control Number for every claim response makes it available when you need to contact the payer to discuss an issue or resubmit a claim, void a claim, or file a corrected claim.
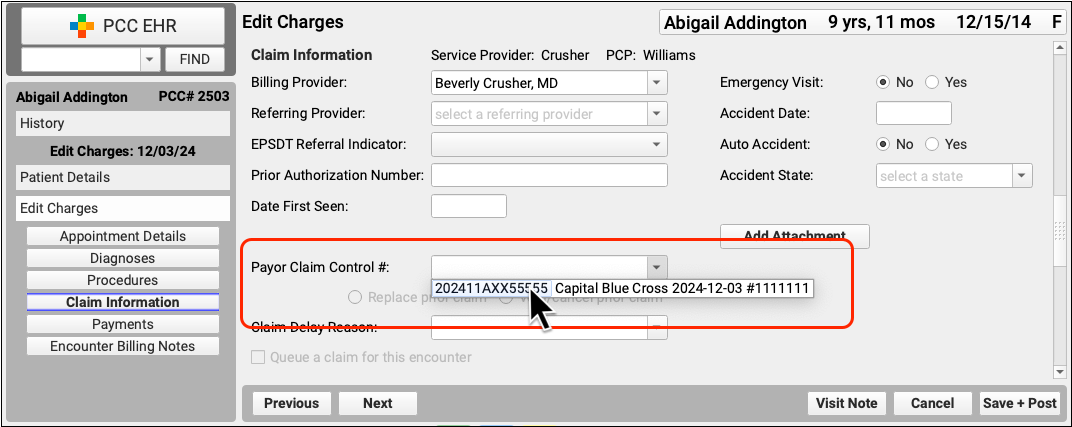
For example, when you use Edit Charges to resubmit a claim, you can quickly pick from a list of claim control numbers recorded for the encounter.
What's a Payor Claim Control Number?: A Payor Claim Control Number (PCN) is a unique identifier assigned by payers to a given claim for a given encounter. Your practice uses the PCN when communicating with the payer about the claim. Insurance payers issue a PCN when they adjudicate a claim and send you an ERA or EOB. The number is also known as the Claim Control Number (CCN) and is called the Original Reference Number (ORN) on a paper claim. Medicare claims refer instead to an Internal Control Number (ICN) or Document Control Number (DCN).
Edit Encounter Charges
When you need to edit the charges for an encounter and related claim information, click “Edit Charges” from the Billing History section of the patient’s chart.
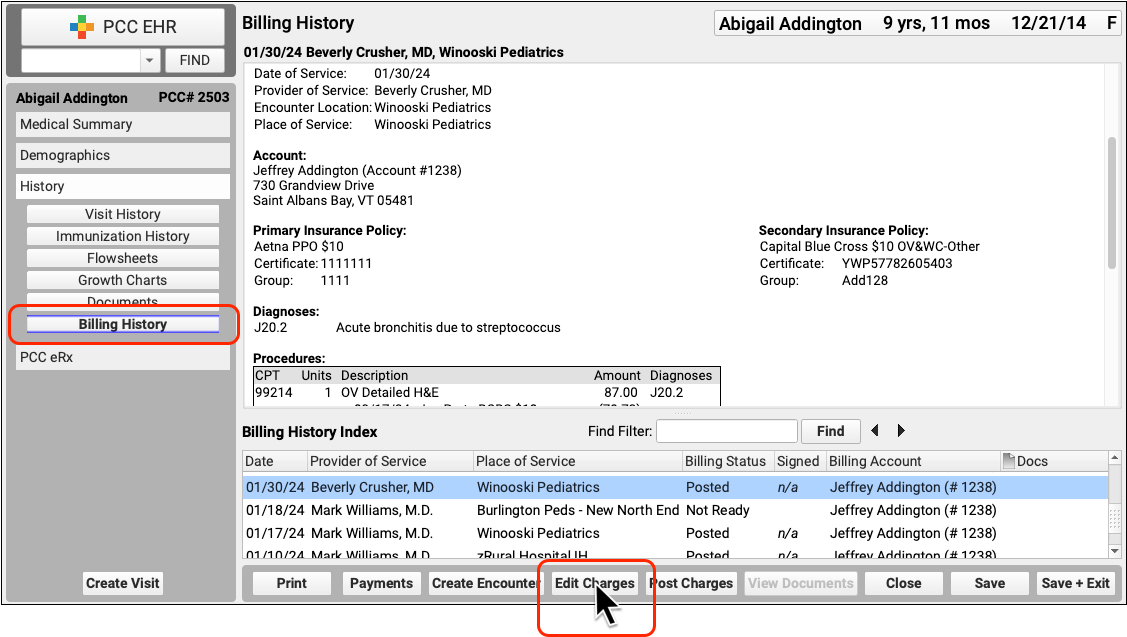
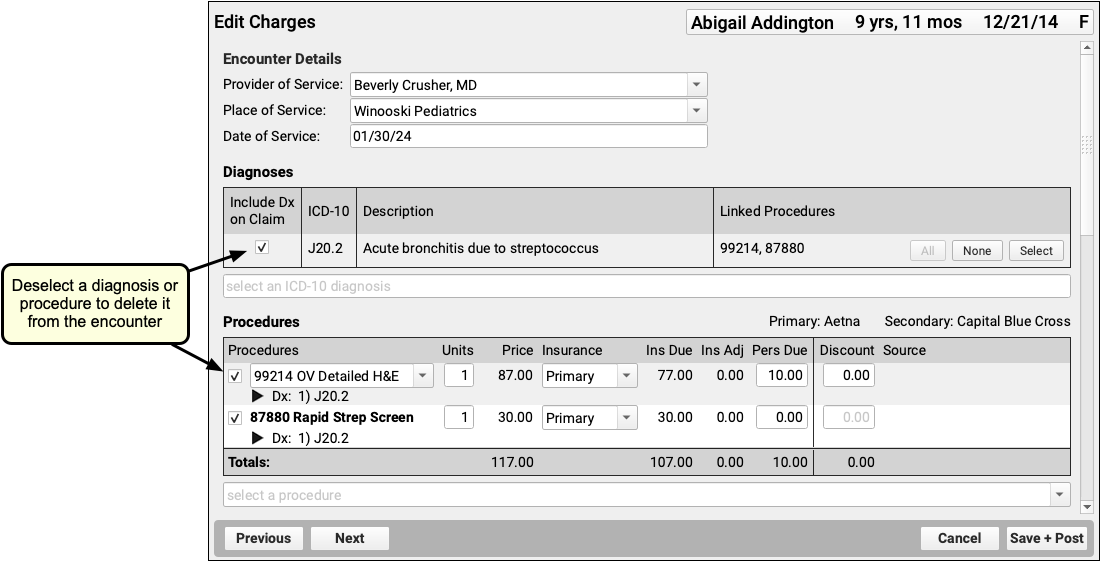
On the Edit Charges screen, you can modify all charges and encounter information. Use the search field in the Diagnoses or Procedures components to add additional diagnoses or procedures and adjust linking. To delete a diagnosis or procedure, deselect it. Changes will apply only to the encounter’s billing history and to future outgoing claims, they will not affect what was charted for the visit.
You can also use the Procedures component to pick a code modifier, change the responsible party for a charge, or update the personal due (or copay) amount for each charge.

Below the charges, you can use the Claim Information section to enter other details that may appear on a claim.
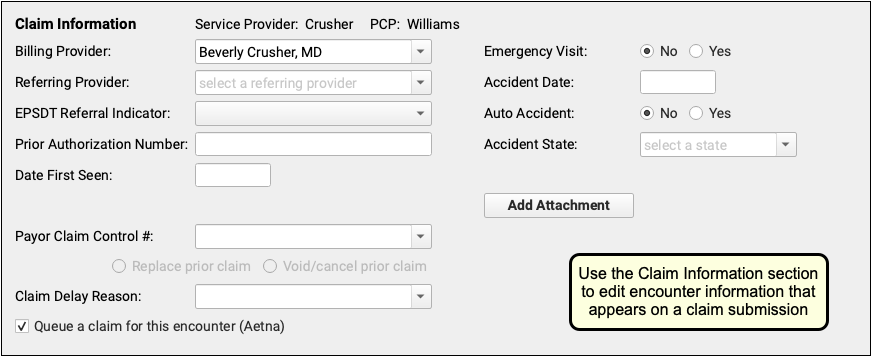
To learn more about the Claim Information fields, read the new Resubmit a Claim procedure below or the Edit Encounter Charges and Resubmit Claims guide.
When you click “Save + Post” to save your changes to an encounter, PCC EHR will queue up a new claim by default if one is needed. You can manually set whether or not to queue up a claim using the checkbox at the bottom of Claim Information section.

Processing Queued Claims Will Remove Duplicates: When you first post the charges for an encounter, PCC EHR automatically queues up a claim. When you edit the encounter and make changes, you can safely queue up another claim. When you submit claims, PCC EHR automatically evaluates multiple queued claims for the same encounter and only submits the most up-to-date information on a single outgoing claim. However, if you are resubmitting a claim or filing an appeal, there are additional steps. See the procedure below.
Resubmit a Claim
When you need to resubmit a claim, file an appeal, or send a corrected claim, use the Billing History in the patient’s chart to add claim resubmission information to the encounter and queue up a new claim.
Select the Encounter
In the patient’s Billing History, select the encounter that may need a new claim.

Review Encounter Details and Claim History
Use the sections of the Billing History to understand why the claim may need to be resubmitted.
For example, the Procedures section displays all payments and adjustments applied to the charges and the outstanding balance.
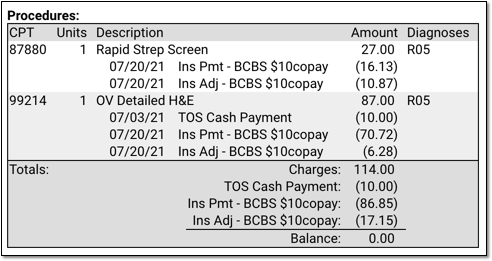
You can also use the Claim History section to review the history of every claim for the encounter.

You can click on a link to see more details of each event. In addition, you may find it helpful to open the Electronic Remittance Advice tool and search for the indicated check number to research the payer’s response.
Click “Edit Charges”
When you’ve determined that a corrected claim, updated claim, or appeal is needed, click “Edit Charges”.

Update the Encounter and Charge Information
Use the components on the Edit Charges screen to edit encounter and charge information that appears on a claim. For example, you may need to adjust the provider, place of service, or encounter date. You can also add or remove diagnoses and procedures.
Update the Responsible Party for Each Charge
Who are you submitting a claim to? Review and set the assigned responsible party for each charge.

For each charge, you can select any policy that is active for the patient on the encounter’s date of service. If necessary, you can click on the “Patient Details” navigation button to update the patient’s policies.
Update Other Claim Information
Use the Claim Information section to adjust the billing provider, accident information, attachment information, or other details.

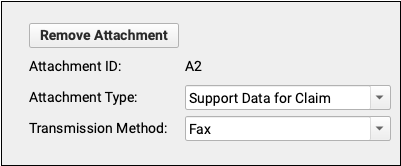
For example, if you need to fax an attachment to the payer, click “Add Attachment” to add an attachment ID and attachment information to the claim.

Enter the Payor Claim Control Number
If a payer has already received a claim for this encounter, you must enter the Payor Claim Control Number (PCN). If PCC received an ERA or you entered the PCN manually, you can select it from a drop-down menu in the Claim Information section. Otherwise you can enter it manually.


By default, when you enter a PCN, you are sending a replacement (or “corrected”) claim. You can instead send a claim void request to the payer. Under the hood, these options adjust the Claim Frequency Code for the outgoing claim to be either 7 (Replacement of prior claim), or 8 (Void/cancel prior claim).
Optionally, Select a Claim Delay Reason
When needed, select a Claim Delay Reason to include on the claim.
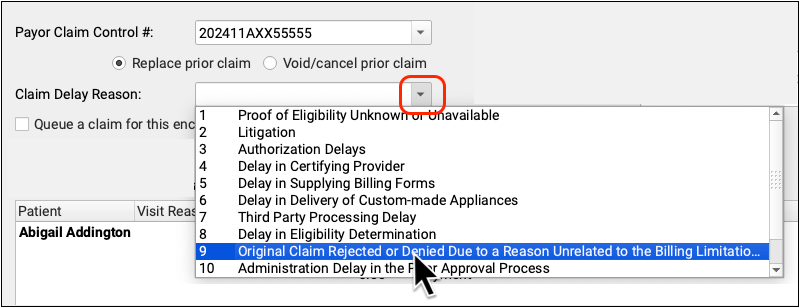
The Claim Delay Reason “9 Original Claim Rejected or Denied…” is commonly used when filing corrected claims or appeals. A PCN is always required in those circumstances, and PCC EHR will remind you if you forget to enter one.
Review the “Queue a Claim” Checkbox
Before you click “Save + Post”, double-check that the “Queue a claim” option is checked (if desired) and that it indicates the correct payer. If you’ve added new charges or made other changes that suggest a new claim is needed, PCC will automatically select the “Queue a Claim” checkbox, but the final choice is up to you.

Next to the checkbox, you can see the payer configuration settings (or “batch”) that PCC will use to format the claim. If it looks incorrect, double-check that you have assigned the charges to the correct policy in the Procedures component.
Save Your Changes and Queue Up a Claim
Click “Save + Post” to save your changes to the encounter. If the “Queue a claim” checkbox is selected, this will also queue up a new claim.

What If I Queue Up Two Claims For the Same Encounter?: When you process and submit claims, PCC will review all queued claims and combine duplicates. It will use the most recent claim’s information.
Submit Claims
Use the Claims tool in the Tools menu to process and submit your outgoing claims. For more information, read Submit Claims.
Edit Your Practice’s Configuration Tables
Use the Tables tool to edit the underlying configuration tables used by your PCC system.
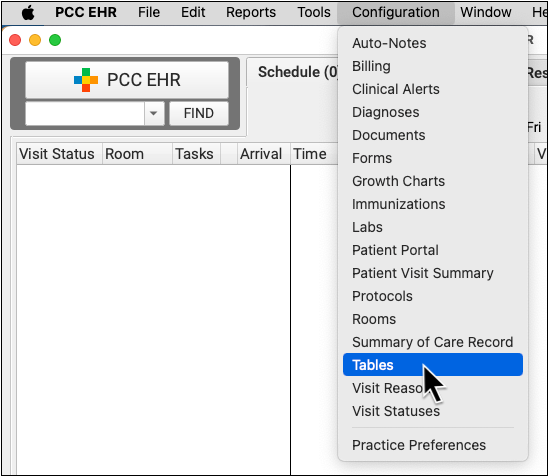
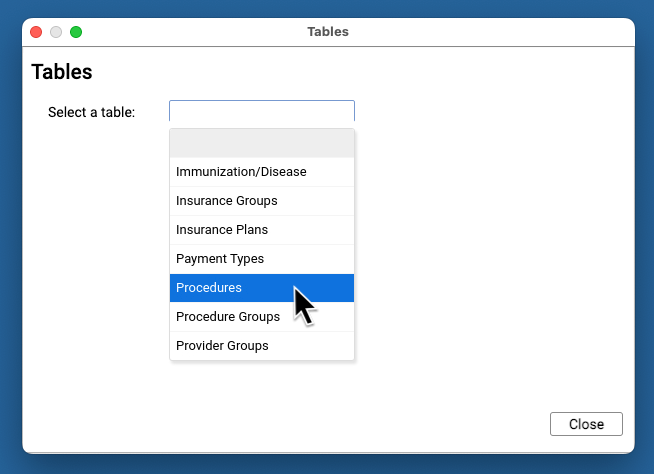
Open the Tables tool from the Configuration menu.
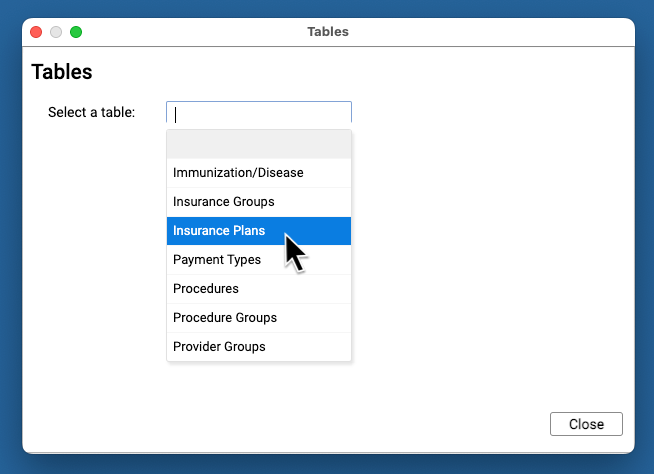
Select a table to review it and make changes.
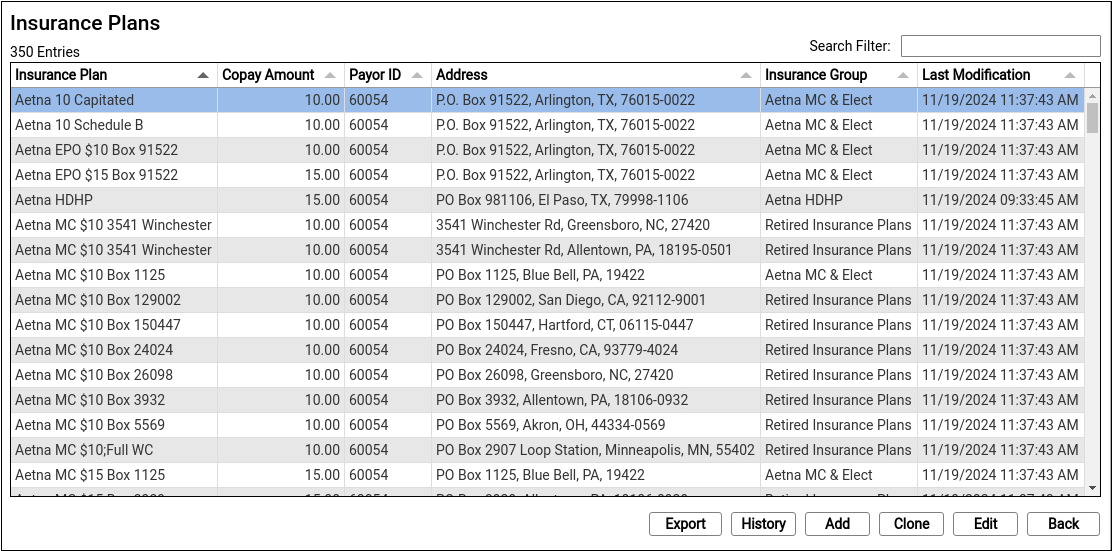
As you review a table, you can search for entries and sort by columns to find items. You can click “Export” to export a comma-separated-value (CSV) file of the entire table for use in a spreadsheet. Select any entry and click “History” to review all changes to the entry.
To make changes, double-click on an entry or select an entry and click “Edit”. To add a new entry, select an existing entry and click “Clone” or click “Add”. Cloning an existing entry instead of adding one from scratch can reduce errors.

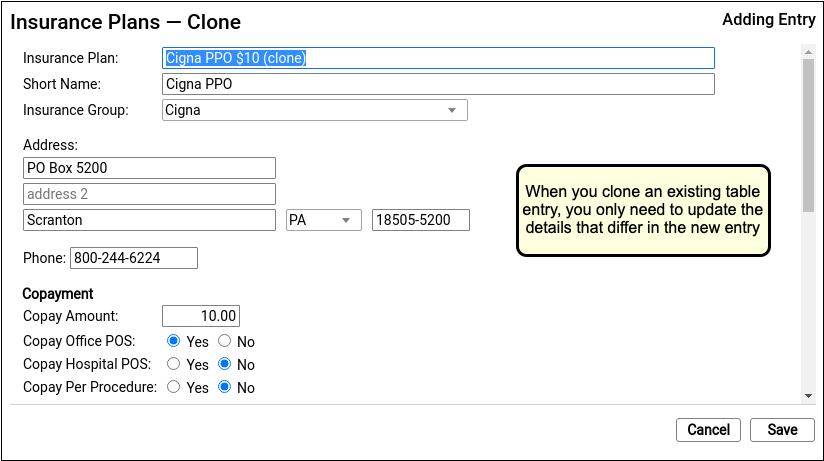
After you create or edit a table entry, click “Save”.
Retiring, Deleting, or Replacing a Table Entry: For most tables, you should never delete or “write over” the contents of a table entry. Altering table entries may change historical information in patient records. If you wish to retire an entry and make it less visible, you can place a tilde (~) at the beginning of the name to sort it to the bottom of the list alphabetically. Use PCC’s other configuration and administrative tools when you need to remove an option from PCC’s software, and contact PCC Support if you need assistance.
Edit Your Practice’s Procedures and Prices
Use the Procedures table in the Tables tool to update your practice’s billing procedures, codes, and prices.
Open the Procedures Table
Open the Procedures table in the Tables tool in PCC EHR.

Review Your Existing Procedures
The Procedures table contains all of your practice’s billable procedures, charges, fees, as well as adjustment offsets used by your PCC system.
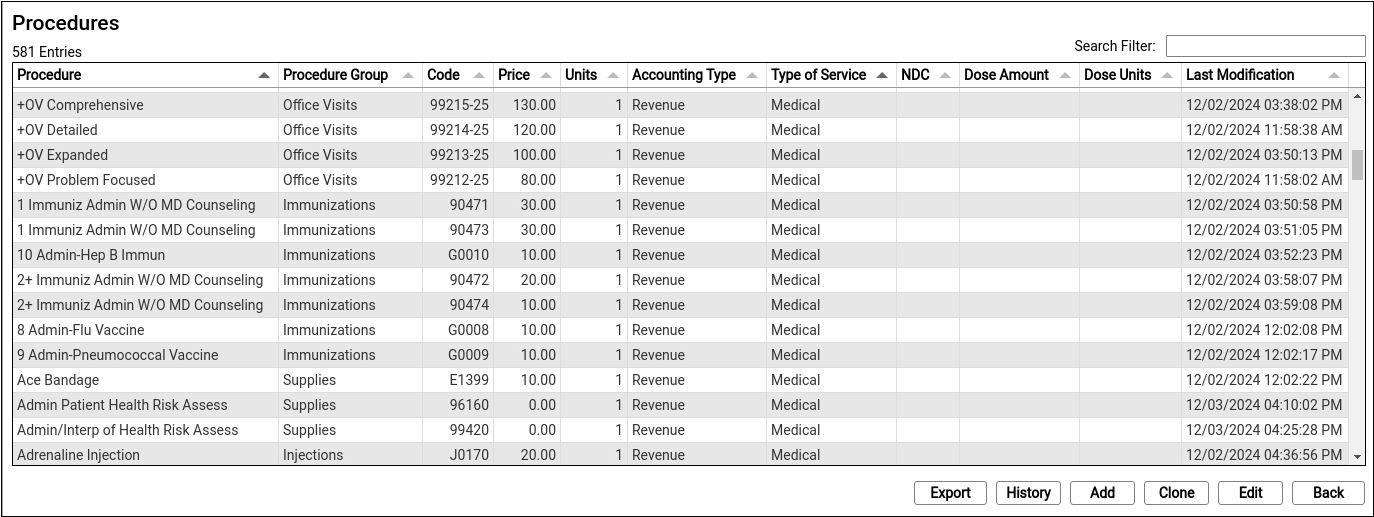
Double-click on an entry to open and edit the details of a procedure.
You can search for specific procedures and sort the list by different columns. Click “Export” to download a comma-separated-value (CSV) file of the entire table for use in a spreadsheet. Click on an entry and then click “History” to see a record of all changes made to a procedure.
Clone or Add a New Procedure
Select an entry and click “Clone” to add a new procedure based on an existing one.

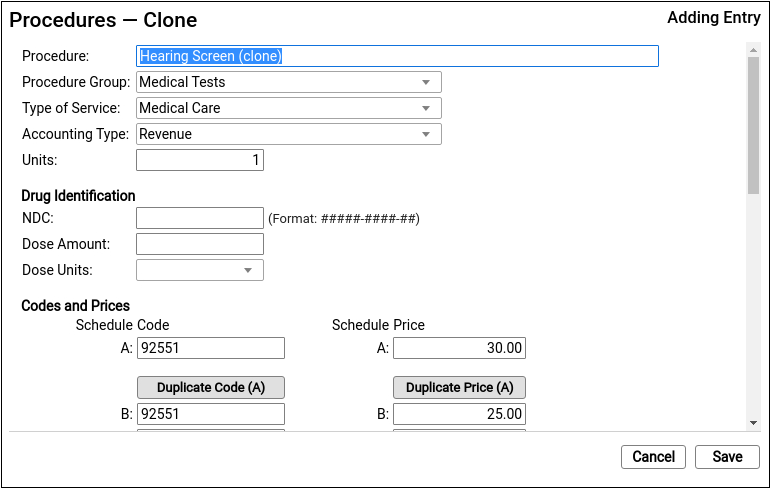
It’s easiest to start by cloning a similar procedure. You can also click “Add” to create a new entry from scratch.
Do Not Overwrite or Erase the Name of an Existing Procedure: Never edit and overwrite an existing procedure entry, as this may affect your billing history. Even if a procedure has been retired and replaced with a new CPT code (for example), always clone and create a new entry.
Update the Cloned Procedure’s Name, Group, Type of Service, and Units
At the top of the screen, update the procedure’s name and basic information that indicates how the new procedure entry will be used.

If you cloned an existing procedure, these fields will be filled out for you. For a typical billable procedure, the Type of Service will be “Medical Care” and the Accounting Type will be “Revenue”. For a complete reference, read Edit Your Practice’s Procedures and Prices.
Optional: Update Medication Fields
If the procedure is an immunization, injection, or a drug you administer at your practice, enter the NDC and dosage information that will appear on the claim.

Enter the NDC code for the smallest administered dose; use the code found on the vial, not the box or carton. Read Add and Configure Immunizations for more tips on filling out these fields.
Enter the Billing Code
Enter the procedure billing code in the procedure code field for Schedule A. Then click “Duplicate Code (A)” to populate the alternative code schedules.
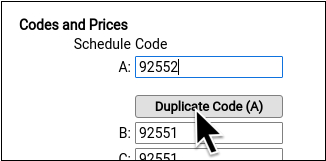
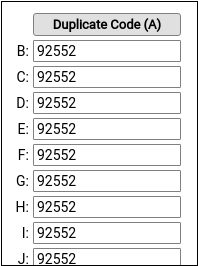
Under rare circumstances, your practice might enter different codes, or a code with a modifier, in different schedules for particular insurance payers. Read Edit Your Practice’s Procedures and Prices to learn more.
PCC does not provide or distribute CPT billing codes, and the example above is for illustration only.
Enter Your Price for the Procedure
Enter your practice’s price for the procedure in the Schedule A Price field. Then click “Duplicate Price (A)” to populate the alternative price schedules.
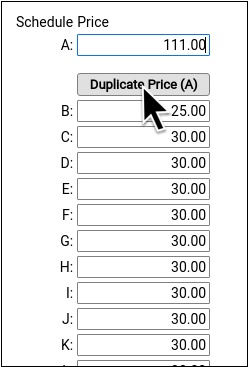
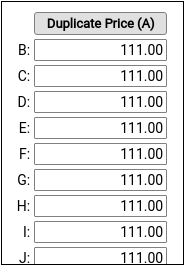
Under rare circumstances, such as when using the same procedure for both medicaid and non-medicaid immunizations, your practice might use an alternate fee schedule for particular insurance payors. Read Edit Your Practice’s Procedures and Prices to learn more.
PCC does not provide pricing recommendations, and the example above is for illustration only.
Save Your Changes
Click “Save” to save your changes.
Configure Orders, Billing, and Chart Notes
After you add or update a billing procedure on your PCC system, you may want to take these additional steps:
-
Contact PCC to Complete Immunization Configuration: If you are adding a new immunization to your PCC system, contact PCC Support. Read Add and Configure Immunizations to learn more.
-
Update Your Practice's Orders: When you link a procedure billing code to an order, PCC EHR will automatically add it to the encounter when the clinician clicks “Order”. Read Configure Order Billing, Diagnoses, and the Bill Window to learn more.
-
Add New Orders to Chart Notes: When you add a new procedure and configure a new order on your PCC system, you may want to add the order to chart notes. When you make an order a default on a chart note protocol, the clinician can create the order and add the billable procedure to the encounter with a single click. Read Configure Protocols to learn more.
-
Update the Bill Window: You can edit your practice’s Bill window, a.k.a. “the electronic encounter form”, to make it easy to select a common procedure or fee when a clinician codes an encounter.
Other Items in the Procedures Table: In addition to billable clinical procedures, the Procedures table includes your practice’s adjustments, fees, refunds, and any accounting item that would increase an account’s balance or offset a payment. Read Edit Your Practice’s Procedures and Prices to learn how to configure these types of procedures.
Edit the Insurance Plans on Your PCC System
Use the Insurance Plans table in the Tables tool to update the plans on your PCC system.
When a parent brings in a new insurance card, you can update their insurance policies easily. If a plan is entirely new to your practice, or is an existing plan with a new address, copay amount, or payer ID, use the procedure below.
Open the Insurance Plans Table
Open the Insurance Plans table in the Tables tool in PCC EHR.


Review Your Existing Insurance Plans
The Insurance Plans table contains all of your practice’s plans.

Double-click on an entry to open and edit the details of an insurance plan.
You can search for specific plans and sort the list by different columns. Click “Export” to download a comma-separated-value (CSV) file of the entire table for use in a spreadsheet. Click on an entry and then click “History” to see a record of all changes made to a plan.
Clone a Plan
When you’re ready to add a new plan, select an existing entry and click “Clone”.

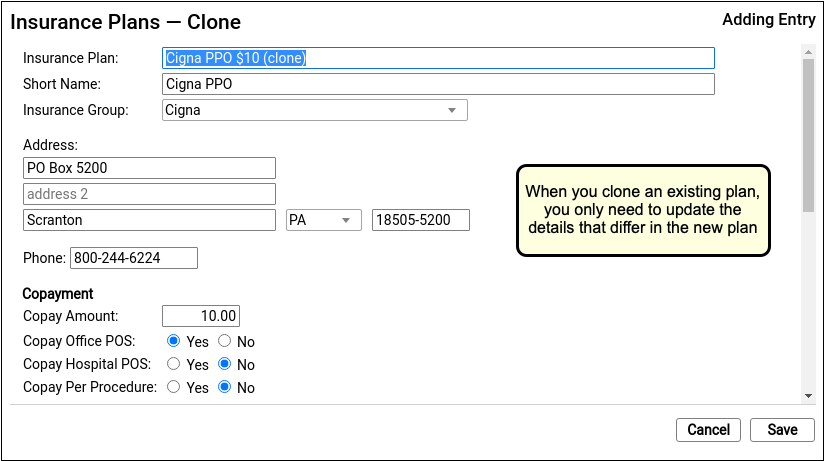
It’s easiest to start by cloning a similar plan and then updating plan details.
Do Not Overwrite or Erase the Name of an Existing Plan: Never edit and overwrite an existing insurance plan, as this may affect your billing history. Even if a plan has been retired and replaced with a new plan, always clone it to add a new entry.
Optional: Add a New Plan
If you can’t find a plan to clone, click “Add” to create a new entry from scratch.

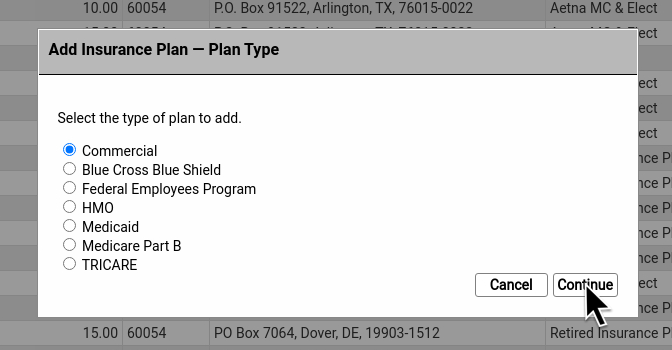
Then select a plan type.
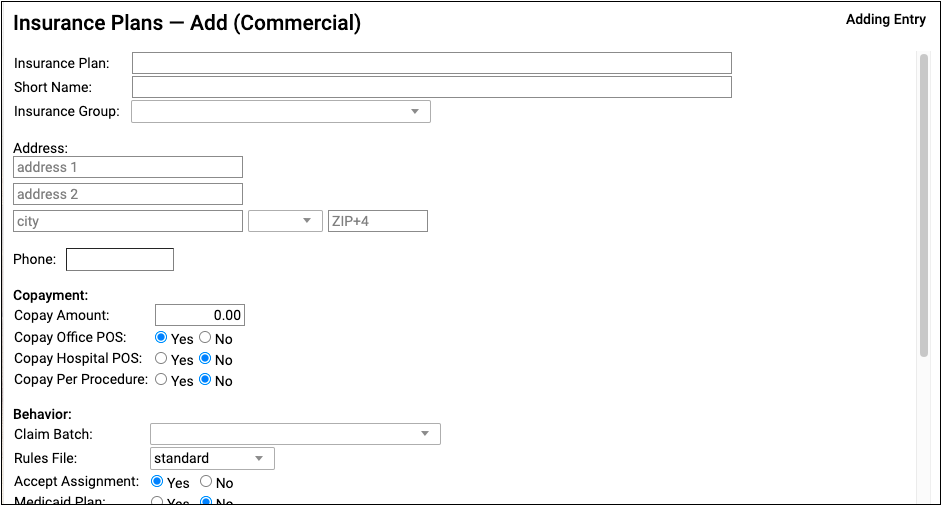
Update the New Plan’s Name and Basic Information
At the top of the screen, review and update the plan’s name and other information that will be used when adding the policy to a patient’s record or submitting claims.
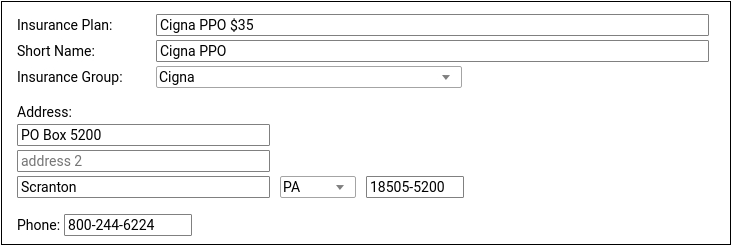
For ease of identification, PCC recommends including the plan’s copay in the Insurance Plan field.
Update Copay Information
Enter the plan’s default copay amount for office visits and define any unusual copay rules used for billing.
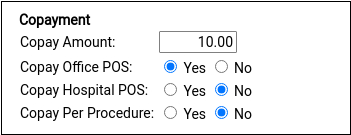
Insurance plans with a copay typically require it for office visits but not for hospital encounters and not per-procedure. Most plans do not charge a copay for well visits, which is controlled with the rules file in the Behavior section described in the next step.
Update Claim Batch and Other Billing Behaviors for the Plan
If you cloned an existing plan, this section may be filled out for you. Otherwise, select claim processing options that will control how your PCC system will handle charges and claims for this policy. Contact PCC Support for assistance.
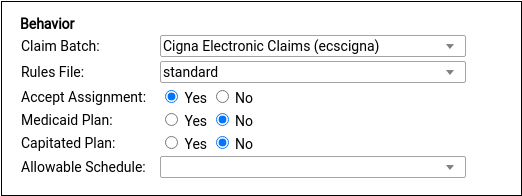
Under most circumstances, select a claim batch that matches the payor and select the “standard” rules file, as shown. The standard rules file puts all medical procedures on the claim and charges a copay, if the plan has one, for office visit procedures. For more information on these options, read Add an Insurance Plan to Your PCC System.
Update Payor ID and Other Identifiers
If you cloned an existing plan, this section may be filled out for you. Otherwise, update the Payor ID and other identifiers used to route claims and submit eligibility requests.

The plan’s Claim Filing Indicator will be inherited from the plan you cloned or else set for you based on the plan type you selected after you clicked “Add”. For a reference to each of these options, read Add an Insurance Plan to Your PCC System.
Optional: Enter Notes
Enter notes about this specific plan for later reference.

Notes are unique per-plan table entry.
Save Your Changes
Click “Save” to save your changes and add the plan to your system.

Add the Policy to Patient Records
After you add a new plan to your PCC system, you can add it to patients’ policy records.
If you have already posted charges for an encounter, you can then edit that encounter in the Billing History, make the new plan responsible for those charges, and queue up a new claim.
Learn More About Each Field: For a complete reference to each field in the Insurances table, with details and recommendations to prevent claim errors, read Add an Insurance Plan to Your PCC System.
Other Billing Improvements
Here are some of the other small-but-wonderful feature enhancements and biller wishes granted in the PCC 10.2 update.
Automatic Default State for Accident-Related Encounters
When you indicate that an encounter is related to an accident, PCC EHR will automatically enter the state of your practice’s office or care center location.


A missing state on an accident-related claim is a common cause of claim rejections. You can adjust the value manually if the accident occurred in a different state.
PCC 10.2 Prevents Special Characters from Creating Claim Errors
Many payers are unable to process claims with special characters, such as ñ,í,è, and ü, leading to errors, claim rejections, and delayed payment. When processing outgoing claims, PCC 10.2 will replace these and other special characters with letters that comply with the X12 Basic Character Set that all payers are required to support.
Similarly, if a claim submission contains an emoji or other unrecognized character, PCC’s claim processing will now remove it. This new filtering will not change the patient or family’s information on your system, it will only alter the claim.
Use the Enter Key as You Manually Enter Insurance Payments
When you need to manually enter an insurance payment from an EOB, the numeric keypad on an extended keyboard makes the process easier. In PCC 10.2, you can press Enter in the Insurance Payments tool to advance to the next field.
Track Payment Reversals and Refunds Back to the Original Provider
When an ERA includes a takeback, or you post a payment reversal or refund manually, PCC EHR will now associate the accounting adjustment with the original provider of the payment.

Prior to PCC 10.2, posting a refund, write-off, or takeback would create an adjustment procedure associated with provider “None” when the full payment amount was adjusted off. While this was accurate (these payments were no longer associated with charges or a provider), some pediatric practices wish to ensure that all accounting activity is associated with a specific provider. As of PCC 10.2, the original provider of the originally linked charge will be used for the adjustment. Reports that show detailed transaction logs for providers will now associate refunded or reversed payments and the associated adjustment with the original provider.
Write Off Account Credits
When an account credit or insurance overpayment has languished and will not be refunded, your practice may decide to write it off and treat it as revenue.
When you need to write off a credit, open the Payments tool for the account and click “Refund Credits”.

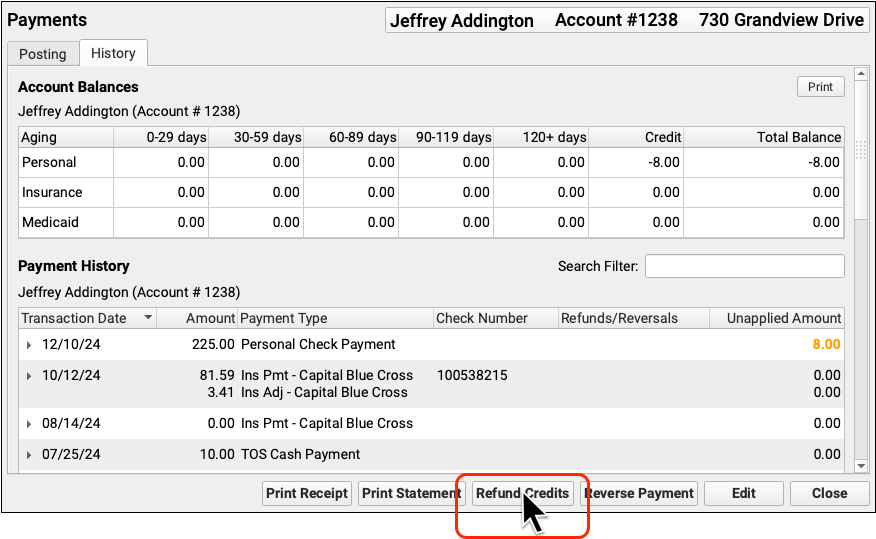
Select the “Credit Write-off” refund type and enter the amount to write off. Then click “Save”.


In the account’s payment history, you’ll see the credit write-off associated with any payment that was partially or fully written off.

Configure Your Credit Write-Off Adjustment: If your practice has never written off a credit, you may need to add a write-off offset procedure to your procedures table. To learn how, read Edit Your Practice’s Procedures, Codes, Adjustments, and Prices.
Reporting
PCC 10.2 includes three new reports and many behind-the-scenes upgrades to the Report Library.
Report on Adjustment Trends in the Report Library
In PCC 10.2, practices can review adjustment trends over time with the new Payments and Adjustments by Payment Type report. The report displays the volume and type of adjustments that your practice made over a period of time.
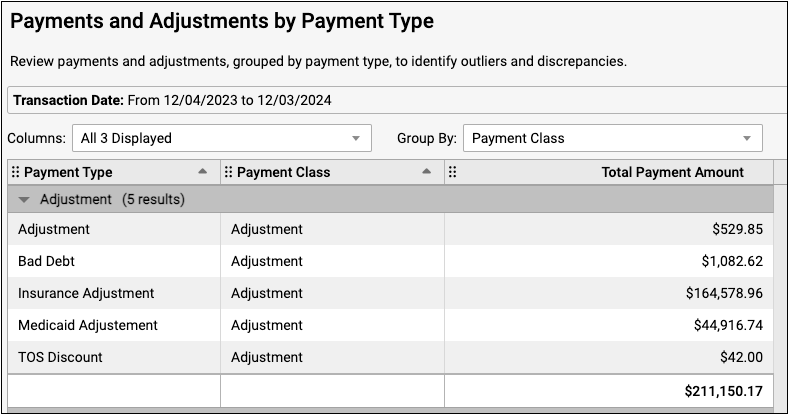
You can reference this report when you audit billing and collections, do accounting preparation, or assess your practice’s adjustment policies.
Read Report on Adjustment Trends in PCC EHR for more information on how to work with this report.
Review Access to Financial Reports: Users with permission to manage categories in the Report Library can edit the Financial Oversight category and uncheck roles to remove access. See Restrict Access to Reports in the Report Library for more information.
Report on Deviations from Your Contract Fee Schedules
Use two new reports in PCC 10.2 to evaluate insurance overpayments and underpayments. If your practice has contract fee schedules (also known as allowables or allowed amounts) configured on your system, you can now report on them in the Report Library. These two reports compare payments received against your contract fee schedule, which is useful when you are preparing for payer contract negotiation or planning for potential insurance takebacks.
Contract fee schedules must be configured prior to running these reports.
Evaluate Overpayments
The Allowable Overpayments by Insurance Group report lets you review insurance payments that were above contracted amounts in order to identify potential takebacks or fee schedules that need to be updated.
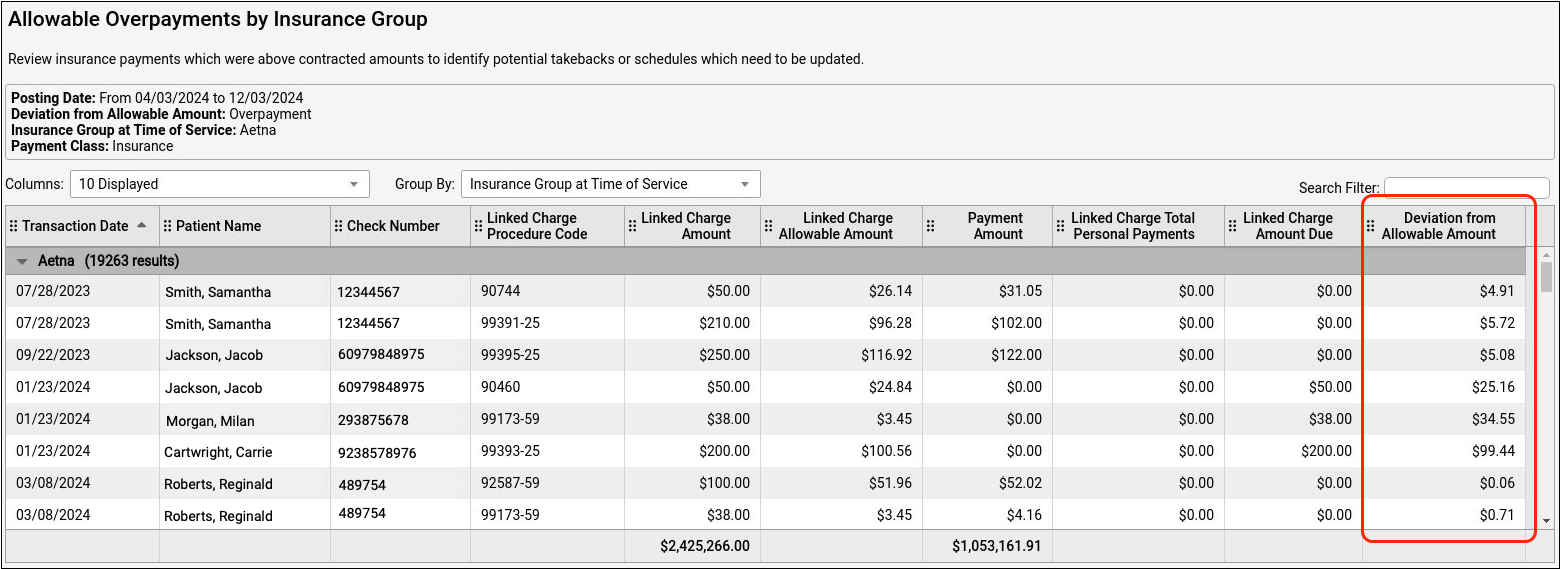
Positive numbers indicate an overpayment, and could signal an upcoming insurance takeback.
Evaluate Underpayments
The Allowable Underpayments by Insurance Group report lets you review insurance payments that were below contracted amounts in order to identify payer errors.
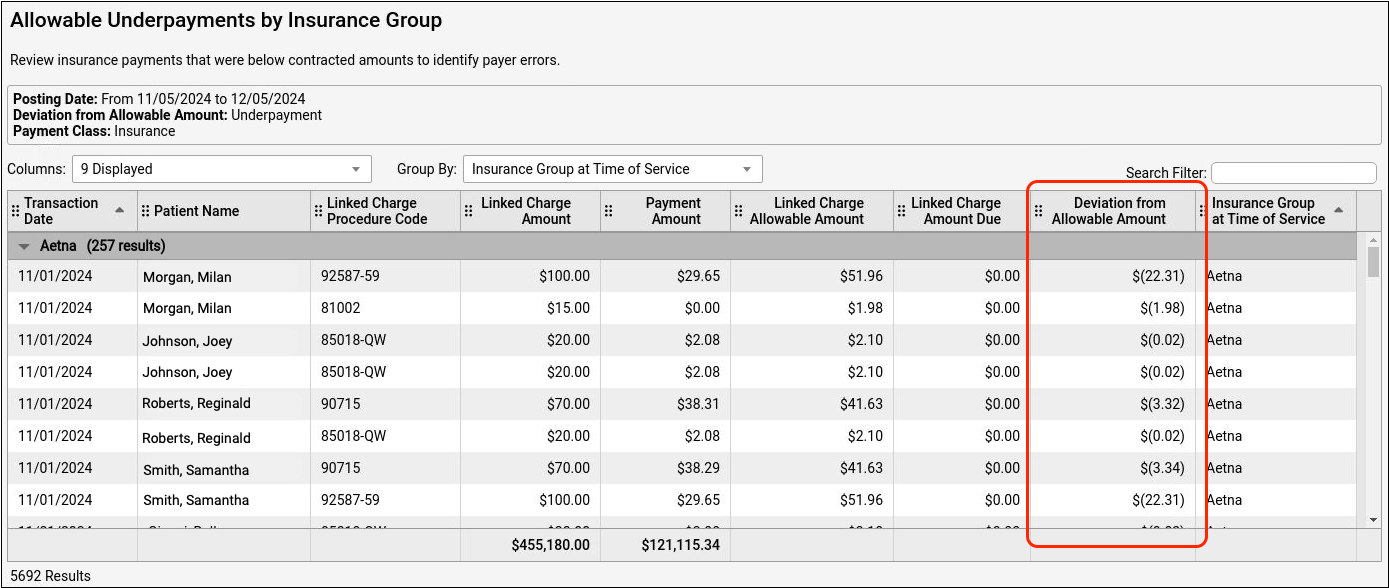
Negative numbers are designated by parentheses and indicate underpayments. Your practice may wish to follow up with the insurance company about underpayment trends.
Customize Underpayment and Overpayment Reports
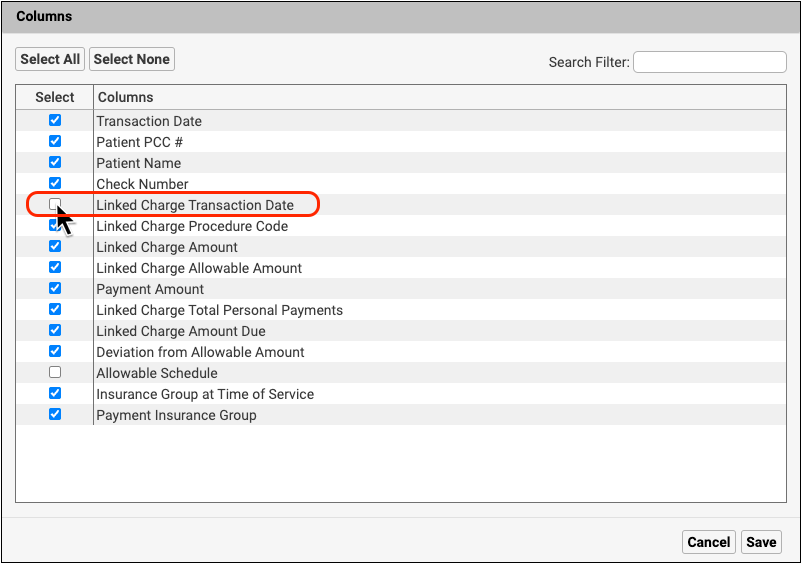
You can add the payment transaction date, allowable schedule, and other criteria, when you customize these reports.
To add the date of service (the day the patient came in to the office) to your report output, select “Linked Charge Transaction Date” when customizing the report.

Report Library Improvements
PCC 10.2 includes significant behind-the-scenes product stability upgrades and sets the groundwork for further improvements to the Report Library. You may notice some changes in the speed, look, and feel of the Report Library.
Improved Report List Navigation and Searchability
Report list navigation and searching is easier and more efficient with the PCC 10.2 improvements.
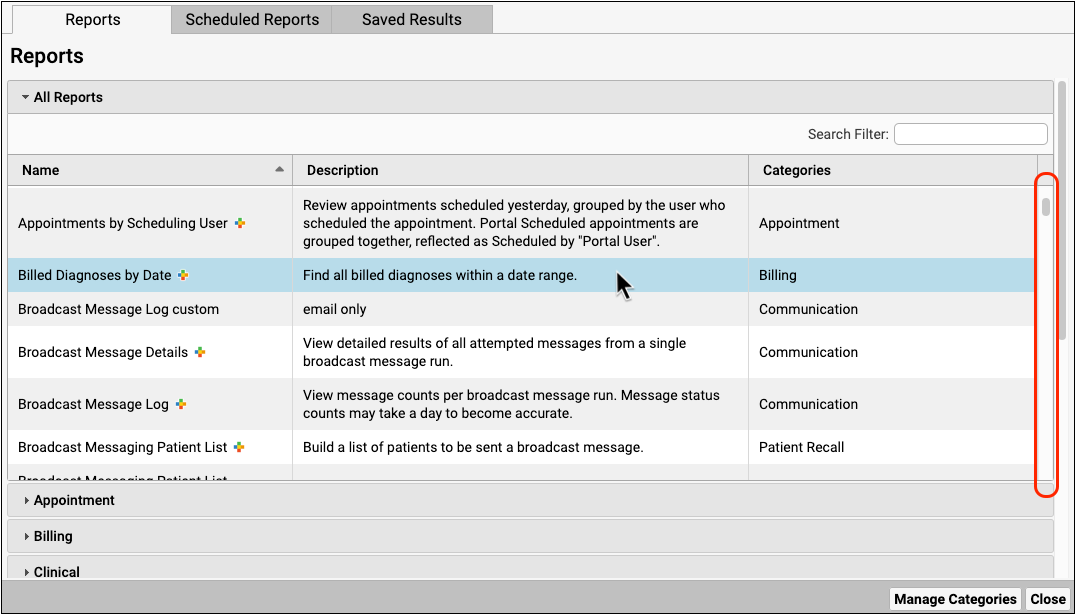
- Report lists are scrollable within their category so that you can see your chosen category while locating a specific report.
- A row highlight follows your cursor in the report list and throughout the Report Library for improved readability.
- Searching in the report list only searches report names for improved efficiency.
Improved Report Output Adjustment
PCC 10.2 gives you more control over the report output, allowing you to sort and display the most pertinent data.
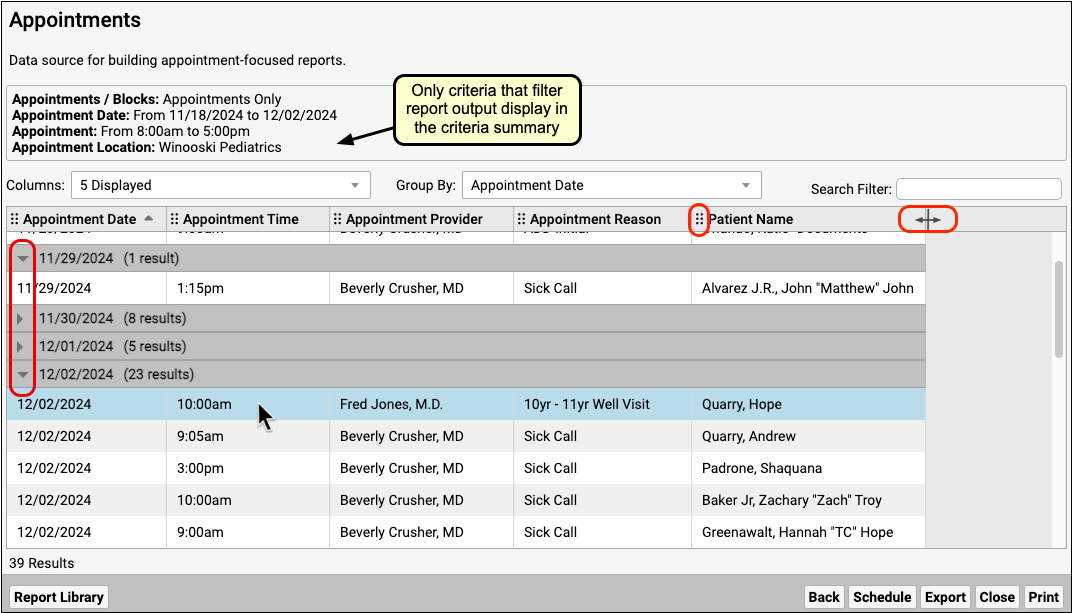
- Only the criteria that filter the report are present in the criteria summary so that you can more easily identify which criteria are affecting your report.
- You can adjust column width and collapse grouped rows to display the most pertinent data.
- A new icon highlights the ability to rearrange the order of columns.
- You can now do multi-level sorting on grouped reports.
Improved Report Output Searchability
Your report output is more searchable after PCC 10.2.
-
- You will experience fewer delays while performing searches.
- Search results are easier to read with a more compact display.
- A tally of your search results out of the total results allows you to understand your search term in context.

Improvements to Printing and Exporting
Your printed and exported reports are more cohesive after the PCC 10.2 update.
- Only the criteria that filter the report are present in the criteria summary so that you can more easily identify which criteria are affecting your report.
- Row groups that are collapsed on the report output will display as collapsed in the printed report or PDF export so that the printout matches what you see on your screen.
- Exporting and printing automatically resizes your text so that all columns fit on the PDF or printed page. To maintain readability, PCC recommends exporting to CSV rather than PDF when exporting more than twenty columns.
- Grand totals remain aligned with the columns after exporting or printing.
Improvements to Saved Reports
PCC 10.2 introduces improvements to your saved reports.
- Reports that are run, or scheduled and run, after PCC 10.2 will display in the new format.
- You can preview scheduled reports in the Scheduled Reports tab to see your old reports in the new format.
- The new default view for the Saved Results tab shows the most recent results.
Old Saved Results Only Export in CSV Format: Old scheduled reports that were run and saved before the PCC 10.2 are only available for export in CSV format. To learn more, read PCC 10.2 Migration Considerations.
Report on Weight at Last Visit
PCC 10.2 adds patient last visit weight to Patient List reports in the Report Library. This information allows practices to anticipate required vaccine volume when ordering vaccines dosed by weight, such as Beyfortus.
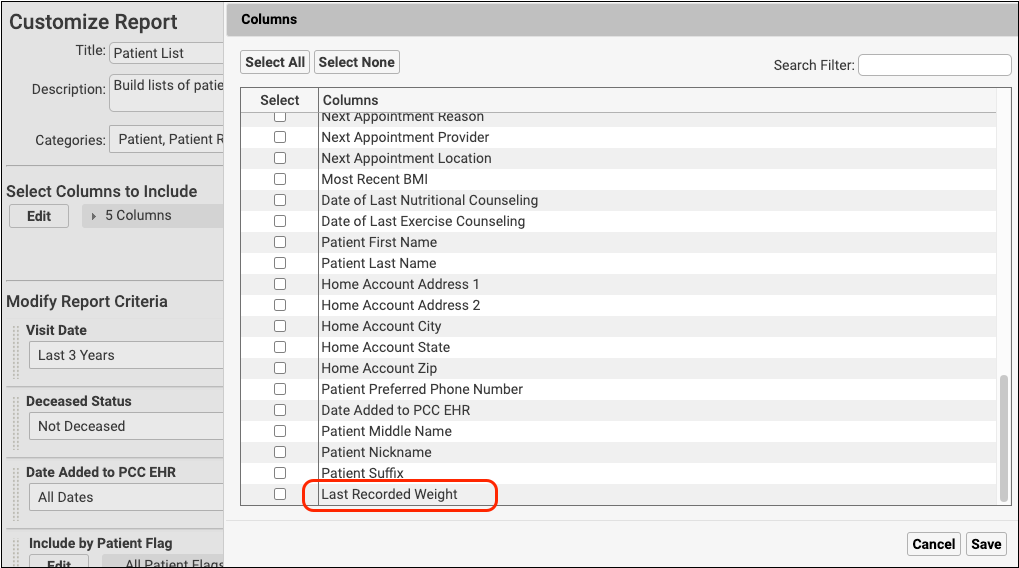
Dashboard Infrastructure Improvements
PCC 10.2 optimizes Practice Vitals Dashboard queries and underlying infrastructure for faster and more reliable page display.
Clinical
PCC 10.2 includes a new per-order flowsheet, AAP blood pressure percentiles, improvements to the chart export tool, and more.
Review Test Results Over Time in Flowsheets
The new “Lab Orders” tab displays the result of each test within an order, so you can easily compare results over time for lab tests that are commonly ordered together.
Tests are grouped by LOINC codes, so in-house tests appear in the same row as matching vendor tests. Click the blue lab order name at the top of the column to open the order details.
Use the drop-down menu on the upper right to filter the order list.
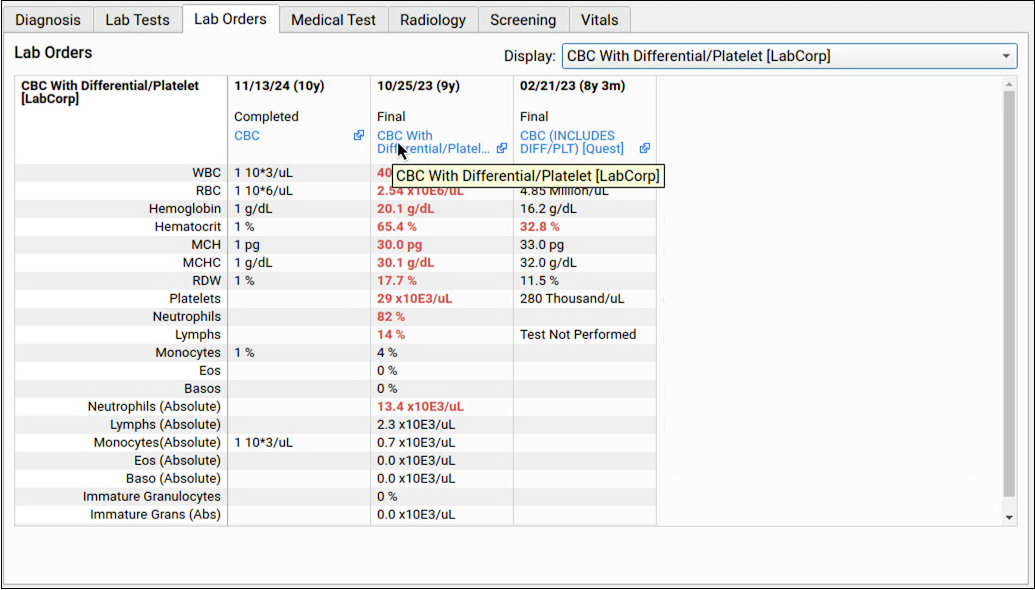
Results that are outside of the reference range appear in red text. Hovering the mouse pointer over the result will show the reference range, so you can find all the data you need without leaving the flowsheet.

Likewise, hover over the date to see if it represents an Order Date or a Specimen Collection Date.

Generic in-house lab orders without an associated LOINC code cannot be linked to elabs or discrete in-house orders.
Confidential orders are marked with a red lock icon, and hovering your mouse pointer over the lock shows “Not Released to Patient”.
AAP Blood Pressure Percentiles
Beginning in PCC 10.2, PCC EHR calculates blood pressure percentiles using the AAP’s updated normative tables from 2017. Encounters created before PCC 10.2 will not be changed. Their blood pressure vitals will retain their calculation based on the 2005 NIH guidelines. An “(NIH)” label appears next to historical vitals. Percentiles calculated using the AAP tables are labeled “(AAP)”.
Chart Export Improvements
PCC 10.2 adds more controls to the Chart Export tool, makes it run faster, and improves the consistency of exported information.
-
Optionally Include Phone Notes with Patient Chart Exports: Choose whether to include phone notes and all associated clinical data when you export a patient’s chart. Chart exports exclude phone notes by default.
-
Better Handling of Clinical Data Associated with Portal Messages During Chart Exports: When you export a patient chart, it will only include documents and other clinical data associated with portal messages when portal messages are included in the export.
-
See Refused and Contraindicated Lab Orders in Chart Export Results: The chart export file “results.csv” will include refused and contraindicated lab orders, just like the “chart.pdf”, “chart.html”, and “ccda.xml” export files.
-
Spend Less Time Exporting Charts: Changes under the hood improve the speed of chart exports so that you can move on to other tasks sooner.
-
Cancel Stalled Exports and Resume Work in PCC EHR: When a chart export is taking too long, you can cancel it and resume work in PCC EHR.
Retrieve and Save TIFF Files from Other Healthcare Organizations
When you use the Clinical Document Exchange (CDE) feature to query partner health care organizations for patient records, you can now retrieve and save TIFF image files.
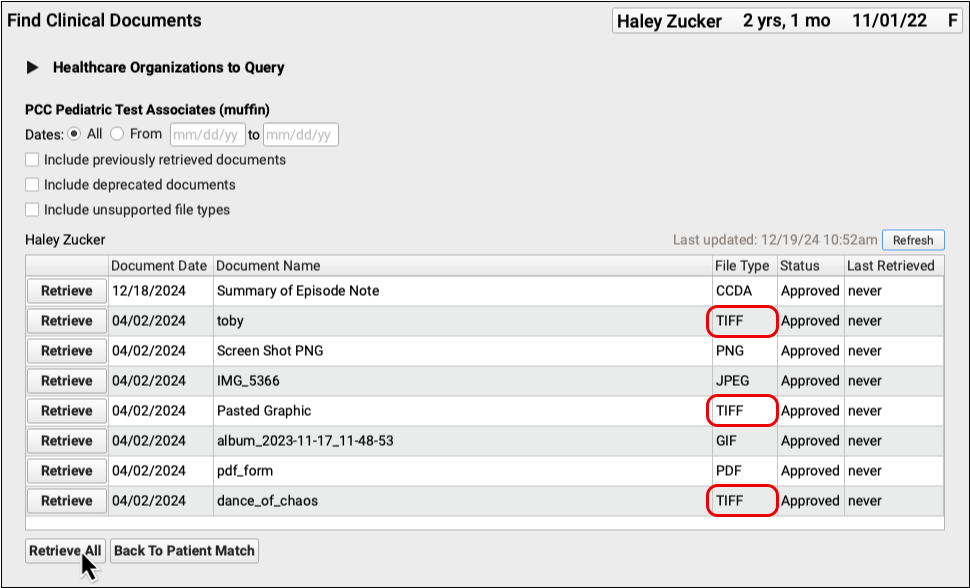
Known Issue: A known bug in PCC EHR prevents users on Macintosh workstations from viewing certain TIFF files in the Document Viewer. A fix is in development.
Better PCC eRx Application Error Handling
PCC 10.2 improves application error handling in PCC eRx.
When you encounter an application error, PCC eRx provides a message with an error code. When you close the error message, PCC eRx automatically reloads your session.
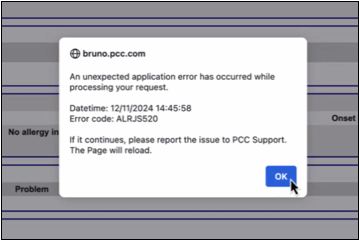
In most cases, reloading the session will resolve the error and allow you to continue working. In cases where reloading does not resolve the error, you can send a screenshot of the error message to PCC Support for fast help resolving the underlying issue.
Immunizations
During the PCC 10.2 release cycle, PCC improved the accuracy of vaccine recall reporting in the PCC EHR Report Library, added RSV recommendations to the immunization forecaster, and enhanced automatic reporting to several immunization registries.
New Immunization Registry Connections in Texas, Hawaii, and Massachusetts
In PCC 10.2, practices in Texas, Hawaii, and Massachusetts can retrieve patient records from their state immunization registry at the click of a button in PCC EHR.
These states join a growing list of bidirectional immunization registry connections.
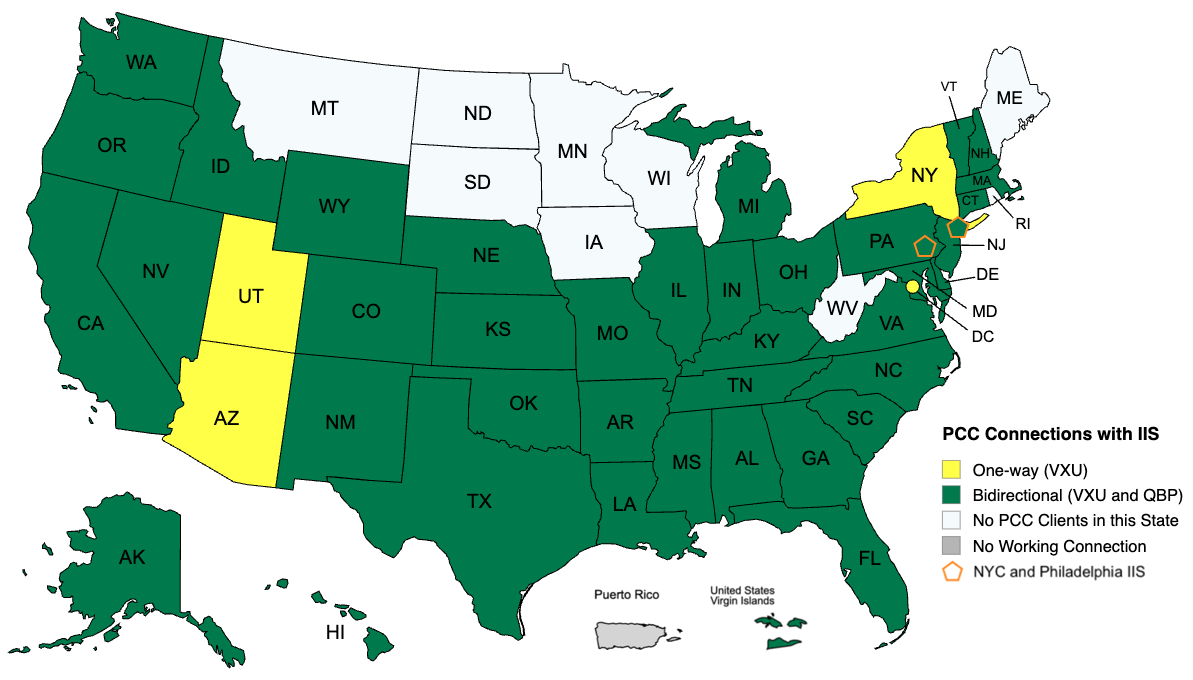
For a complete list of bidirectional immunization registry connections and to learn more about how to look up and import patient records from your registry, read the full guide.
Point-in-Time Snapshot: The above map represents the status of PCC’s available immunization registry connections as of the PCC 10.2 release date and does not guarantee completion of in-progress connections. For the most up-to-date information about the status of a particular immunization registry connection, contact PCC Support.
Improvements to Nightly Registry Submissions
In response to changing specifications, PCC 10.2 improves automatic reporting to immunization registries in several states.
-
Indiana: Nightly submissions to CHIRP, the Children and Hoosiers Immunization Registry Program, will include a vaccine funding source, updates to vaccine administration details, and changes in vaccine administration status.
-
Oklahoma: Nightly submissions to OSIIS, the Oklahoma State Immunization Information System, will report nothing when patient ethnicity is set to “Prefers not to answer” and will report “Other race” when patient race is set to “Prefers not to answer”.
-
California: Nightly submissions to CAIR, the California Immunization Registry, will include the administering provider’s professional suffix.
More Accurate Vaccine Recall Reporting
Prior to PCC 10.2, patient immunization forecasts only updated on chart open. Because users do not have to open charts in order to complete immunization orders, some patient immunization forecasts were inaccurate until the next time their charts were opened. The PCC EHR Report Library sometimes presented these inaccurate forecasts on vaccine recall reports.
In PCC 10.2, a new background process regularly checks for new vaccine administrations and updates patient immunization forecasts accordingly. This improves the accuracy of vaccine recall reports.
Immunization Forecasting Patch Adds RSV Recommendations
On November 7, 2024, PCC updated your system with a new version of the Immunization Calculation Engine (ICE) by HLN Consulting, which underpins PCC’s Immunization Forecasting component.
The latest update included these changes:
-
DTP: Added a minimum recommended age of 7 years in the DTP 5-dose series when the Six by Seven rule applies.
-
RSV: Added support for a new RSV Vaccine Group and the RSV Infant Series (seasonal series for infants younger than 8 months of age), as well as for RSV vaccines: CVX 303, CVX 304, CVX 305, CVX 306, CVX 307, CVX 314, CVX 315, CVX 326. This brings the recommendations in PCC EHR in line with the latest ACIP routine recommendations for infants.
-
Zoster: Updated the implementation to use a 56-day minimum interval (rather than a 28-day minimum interval), to recommend Zoster CVX 187 after CVX 121 or CVX 188.
Other Updates and Patch Notes
Read below to learn about other update news, patches, and bug fixes.
Update Your macOS 10, macOS 11, and macOS 12 Workstations
PCC 10.2 will not work on macOS 10.14 (Mojave) and macOS 10.15 (Catalina). The next PCC release, PCC 10.3, will not work on macOS 11 (Big Sur) or macOS 12 (Monterey).
PCC recommends that Macintosh users running any of the above operating systems update their computers to at least macOS 13 (Ventura).
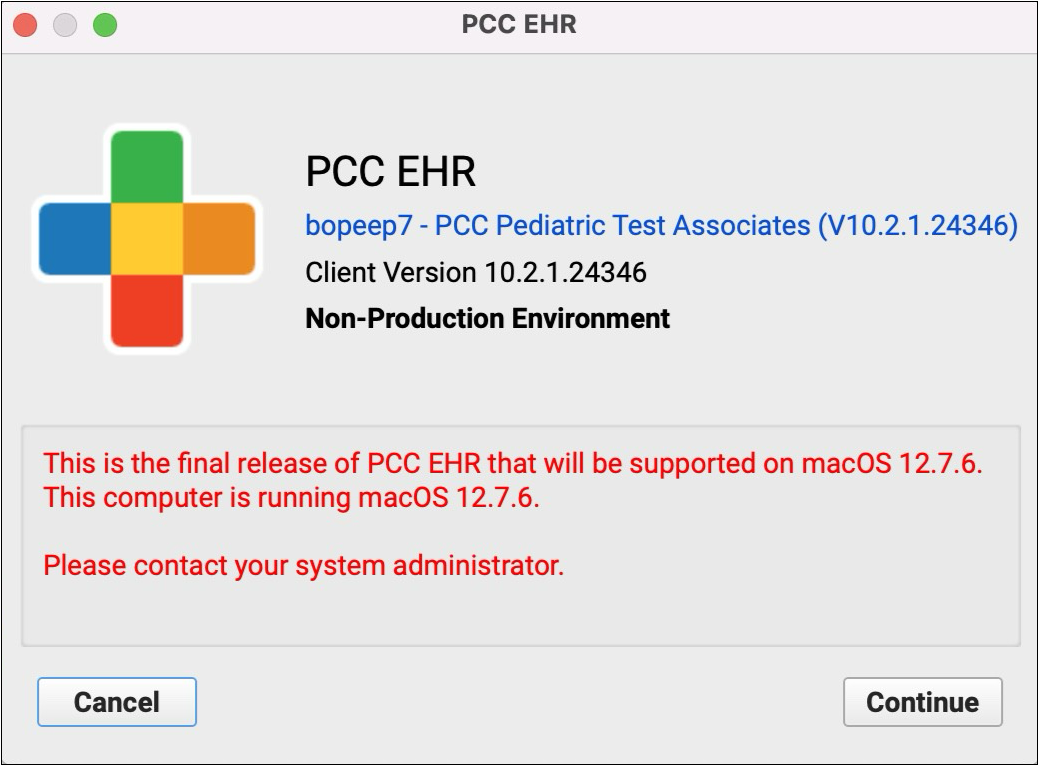
macOS 10.14 and 10.15: On workstations running macOS 10.14 or 10.15, the PCC EHR login screen instructs users to update the operating system in order to continue using PCC EHR.
macOS 11 and 12: On workstations running macOS 11 or macOS 12, the PCC EHR login screen informs users that PCC 10.2 is the last release that supports their operating system version. These users should update their workstations to macOS 13 or higher as soon as possible to avoid disruption.
Contact your system administrator for help updating your workstation to macOS 13 or higher.
Bug Fixes
PCC 10.2 includes some notable squashed bugs.
-
Practice Vitals Dashboard EDI Page Missing EHR Claims Tool Data: Claims sent electronically from PCC EHR appeared in the incorrect section of the Practice Vitals Dashboard. They now appear in the correct section.
-
Custom Reports Not Displaying Columns Selected After First Save: In the report library, columns selected after an initial save during customization were not available to display in the preview. This is fixed, and all columns selected during customization are available to display in the final report.
-
Options Obscured in Category Drop-down: Selecting only one report category when customizing reports narrowed the category drop-down so that some options did not display. The category drop-down is fixed, and will now display all options.
-
Billing Diagnoses by Date Report Inaccurately Displaying Insurance as Personal: The Billing Diagnoses by Date report inaccurately displayed patient insurance as Personal in the Insurance at Time of Service column. This is fixed and patient insurance now displays accurately.
-
CSV Exports Displaying All Criteria: CSV exports displayed headings for all criteria, regardless of whether they were used on the report. This is fixed and now unselected criteria do not display in the exported report.
-
Something Went Wrong Error in Bills: When launching the PCC EHR Bills tool or editing messages that appear on personal statements, some practices could see a “Something went wrong” error. PCC 10.2 corrects the issues that caused this error.
-
Reversals Deleting Payments: Under certain circumstances, when a payer’s ERA only partially reversed a payment, auto-posting the ERA could sometimes result in a deleted payment. PCC 10.2 prevents this from occurring.
-
Users Locked Out of the Claims Tool: Opening the PCC EHR Claims tool while another user prepared claims could sometimes lock a user out of the tool. This problem was fixed for all practices by a mid-release patch.
-
macOS 15 Users Unable to Retrieve Imms: The macOS 15 operating system has a new way of managing under-the-hood certificates and authentication keys. This change was causing issues for users in PCC EHR when attempting to retrieve patient immunizations from a connected registry. PCC 10.2 fixes this issue.
