PCC 9.7 Release
On July 30, 2023, PCC will release version 9.7 of our electronic charting and practice management software to all PCC practices.
Watch a Video Overview and Demos: Want to see PCC 9.7’s highlights in action? Watch the PCC 9.7 Overview and Video Series.
Implementation: PCC 9.7 includes features that require configuration and user-specific software training. Read about the features below and then review the PCC 9.7 Migration Considerations article.
Read below to learn more about the improvements, and contact PCC Support for help with any PCC product or service.
Contents
- 1 Forms
- 2 Clinical Workflow
- 2.1 Unlink E-lab Results from a Patient or Encounter
- 2.2 New CDC 2 to 20 Years Extended BMI-For-Age Growth Charts
- 2.3 View Patient Records Sent as Zipped Attachments to Direct Secure Messages
- 2.4 View Multiple C-CDAs Attached to the Same Direct Secure Message
- 2.5 Distinguish Between Past and Future Encounters in Visit History
- 2.6 Retrieve Immunizations from Missouri and Oklahoma Registries
- 2.7 Automatic CDC Vaccine Code and VIS Updates
- 2.8 New Dose Option for Rotarix
- 3 Patient Engagement
- 4 Insurance Billing
- 5 eRx
- 6 Reports
- 7 Other Updates and Improvements
Forms
For a complete guide about how to use the Forms Configuration tool in PCC EHR, read Create and Manage Forms in PCC EHR. Read on to learn about new features and improvements in PCC 9.7.
Generate Standard Forms with Encounter Variables
You can create forms in the Forms Configuration tool in PCC EHR that auto-fill with patient vitals and other encounter-specific details. When generating forms that have encounter variables, users can select which encounter to reference.
To add an encounter variable to a form, open the form in the Forms Configuration tool, then search for the variable you want to add.
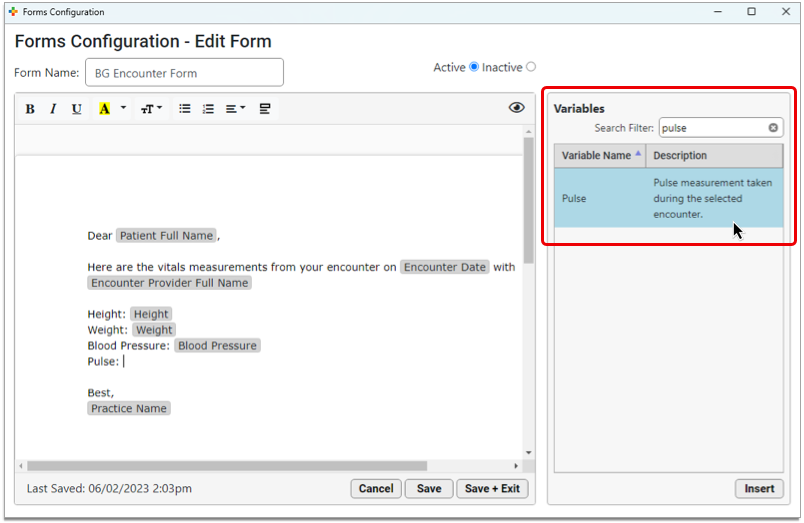
Insert the variable onto the form, then save and exit.
How Can I Tell What's an Encounter Variable?: Descriptions in the Variables pane say when a variable pulls from a selected encounter.
To generate the form for a patient, select it from the Forms component in PCC EHR.
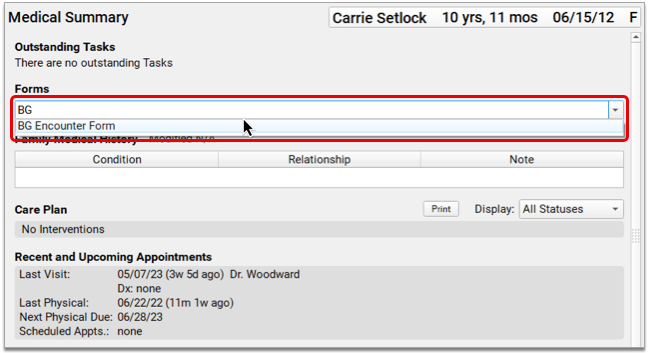
In the window that prompts you to fill out the form, select the encounter that the form should reference.

The form defaults to referencing the encounter where it was generated. If the form was generated from the Medical Summary or outside of an encounter, the encounter defaults to the patient’s most recent. In both cases, you can choose a different encounter date.
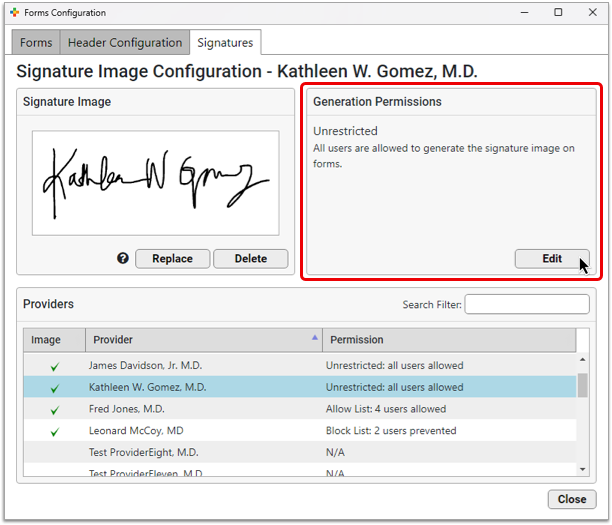
Configure Provider Signatures for Forms
You can upload provider signatures, set permissions for who is allowed to generate them, and include them on patient forms in the Forms Configuration tool in PCC EHR.
Your practice will need to be live with the Forms Configuration tool to take advantage of this functionality. Learn how to enable the Forms Configuration tool in Switch to the New Forms Solution in PCC EHR.
Existing Signatures: If your practice already has signatures on forms configured by PCC Support, those signatures will link to the correct provider in the new tool following the update. You’ll just need to open the Signature Image Configuration tool once so it links the signatures.
Access Signature Configuration
You can access the Signature Image Configuration in the Forms Configuration tool.
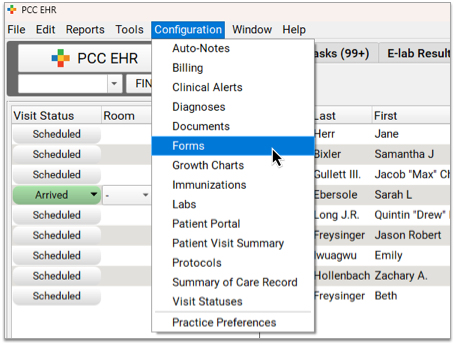
Open the Forms Configuration tool from the Configuration menu in PCC EHR. Then, click on the Signatures tab.

You must have the Signature Image permission in order to view and access the Signatures tab within Forms Configuration. To learn how to configure the Signature Image permission read PCC 9.7 Migration Considerations.
Add a New Signature Image
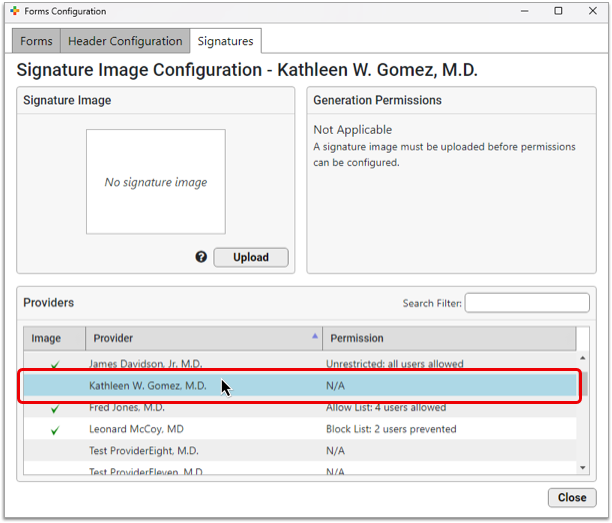
Select a provider from the list to configure their signature.
Click the “Upload” button in the Signature Image pane.
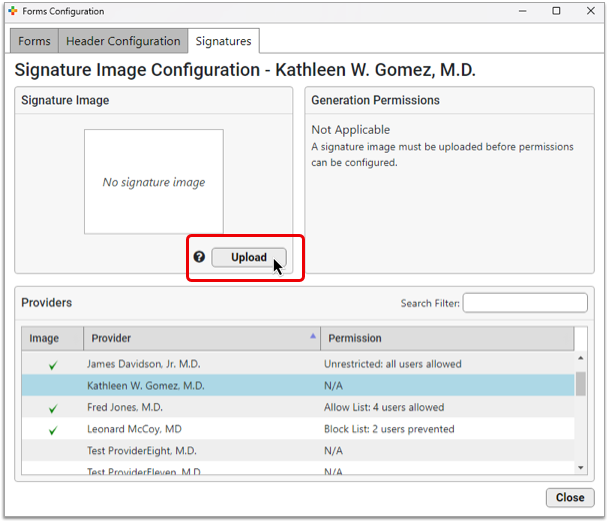
How to Get a High-Quality Scan: Signatures should be written using a black pen on white unlined paper and scanned at a high resolution.
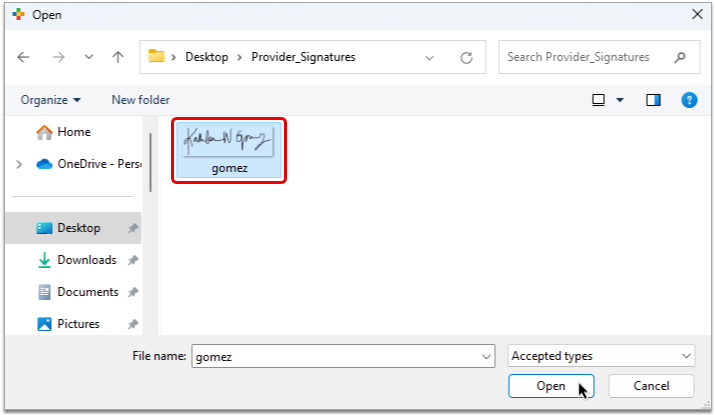
Select the scan file from your computer and click “Open”.
The signature appears in the Signature Image pane as it will display on patient forms.
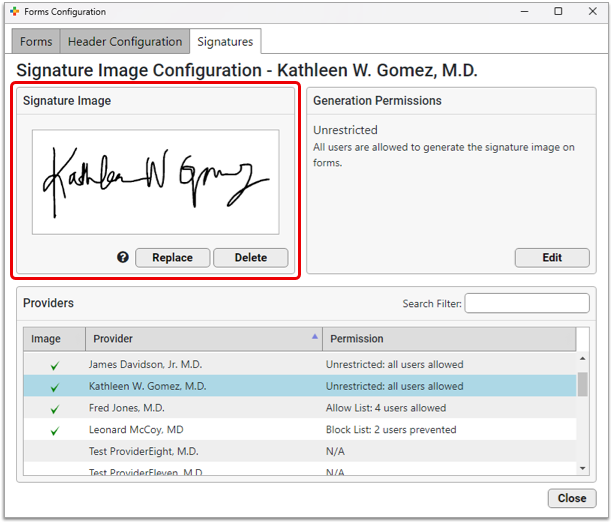
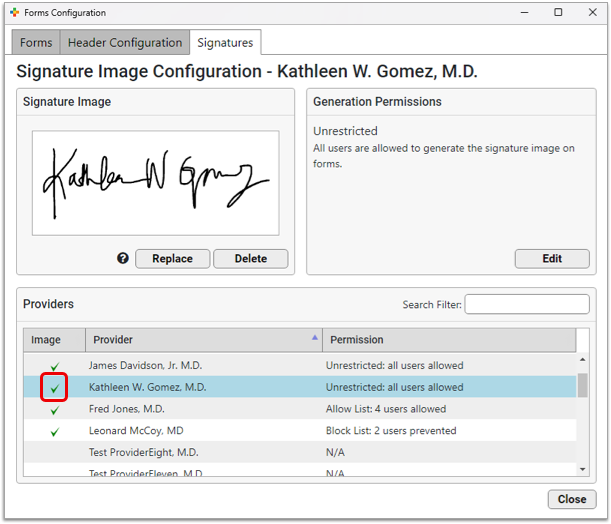
Once you upload a signature image for a given provider, a green check mark appears beside their name on the Signatures tab.
You can replace the image or delete it if you need to make changes.
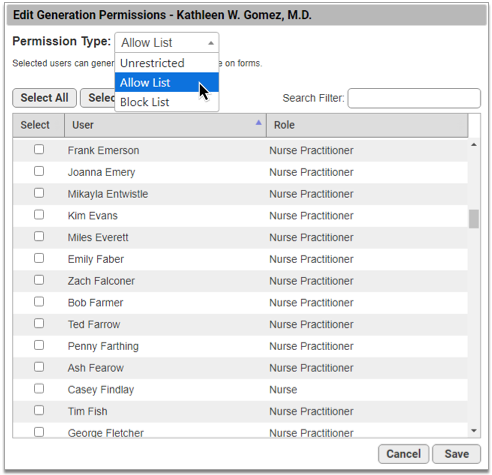
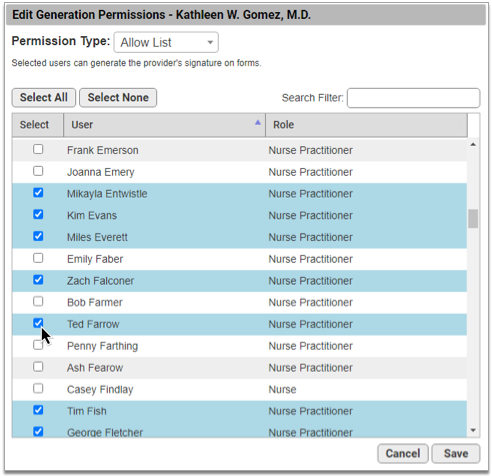
Set Signature Generation Permissions
You can control which users are allowed to generate a given signature on patient forms. By default, all provider signatures are set to “Unrestricted”, meaning any user at your practice can generate them on forms.
Select a provider from the list, then click the “Edit” button in the Generation Permissions pane.
Use the drop-down menu to adjust the Permission Type.
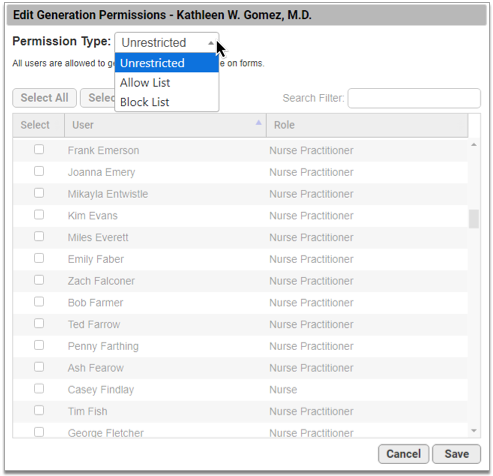
There are three permission types:
-
Unrestricted: Any user can generate the signature on patient forms.
-
Allow list: Only selected users can generate the signature.
-
Block list: Selected users cannot generate the signature.
The type you select determines who can generate the provider’s signature on forms.
To create a list of authorized users, choose “Allow List” from the Permission Type drop-down, then select the users who may generate the provider’s signature on patient forms.
If you want to create a list of unauthorized users, choose “Block List” from the Permission Type drop-down, then select the users who are not permitted to generate the provider’s signature on patient forms.
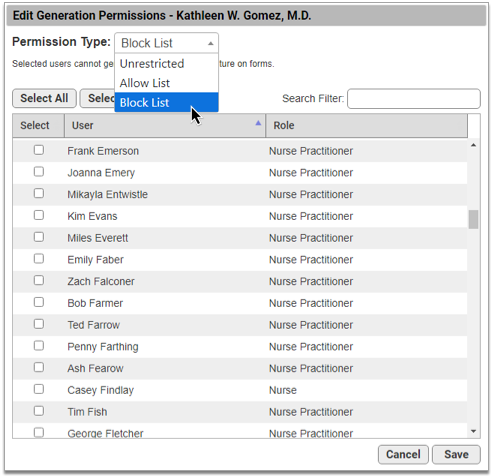

Once you have finished updating the permissions, click the “Save” button to return to the Signature Image Configuration overview.
Switching Permission Types: Switching between permission types clears out all user selections.
Generate Signatures on Standard Forms
When you generate a form in PCC EHR that is configured to include a signature, you can select the correct provider on demand. Learn about creating forms in Create and Manage Forms in PCC EHR.
In a patient’s chart, navigate to the Forms component and select your form from the drop-down.

PCC EHR will open a prompt for the form with any variables that require user input. Find the Signature drop-down and select the provider whose signature should appear on the form.

If the provider has a signature image configured, the image will appear on the form.
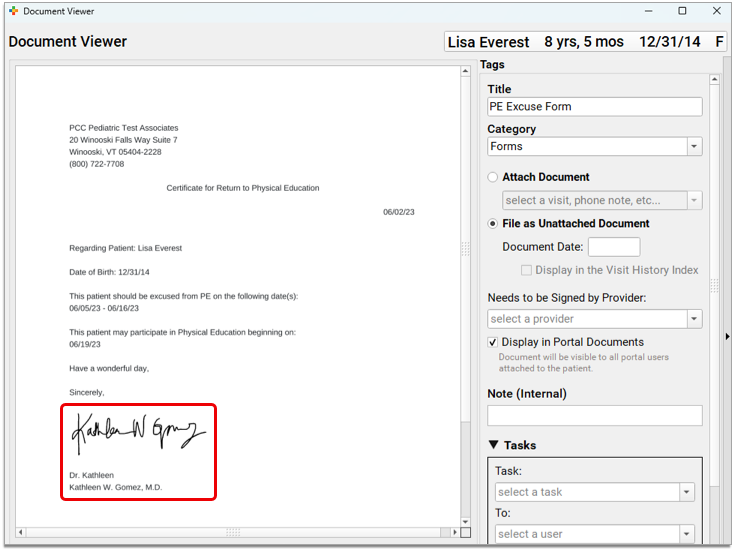
If the provider has no signature image configured, the space on the form stays blank to accommodate a wet signature.
Blocked Users: Users who do not have permission to generate the selected provider’s signature will be presented with this warning: “This provider’s signature image will not appear on the form (permission not granted).”
Use Special Characters on Standard Forms and in Form Responses
Once your practice has enabled the new Forms Configuration tool, you can include special characters on forms and in form responses.
Use special characters to accurately represent names and non-English words on your patient forms.

Which Special Characters Can I Use?: You can use the following special characters, among others, on standard forms and in form responses:
Á á É é Í í Ó ó Ú ú Ü ü Ñ ñ ¿ ¡ « »
Use Snap Text in Form Responses
You can use Snap Text to quickly and consistently fill out forms in PCC EHR.
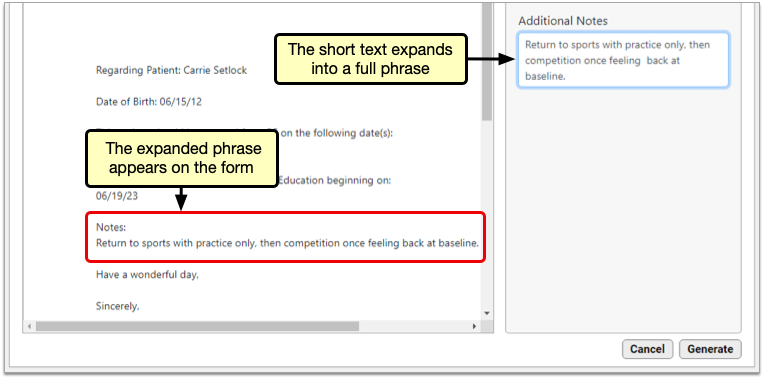
To use Snap Text to fill out a form, generate the form in PCC EHR and type your short text into the relevant response fields.
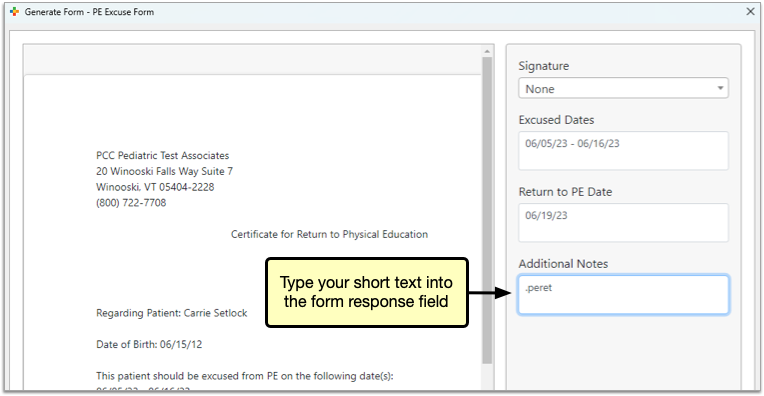
The expanded phrases appear on the generated form.
To learn how to create new Snap Text, read Expand Short Text into Common Phrases in PCC EHR.
Clinical Workflow
From e-labs to growth charts, PCC 9.7 includes updates to important charting functions.
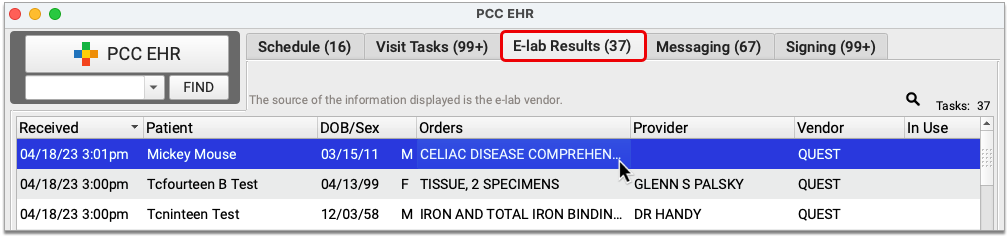
Unlink E-lab Results from a Patient or Encounter
You can unlink electronic laboratory results that were attached to the wrong patient or encounter and send them back to the E-lab Results queue.
Watch the Video: Watch how to unlink an e-lab result and return it to the E-lab Results queue in Unlink an E-lab Result from a Patient’s Record.
Open the Unlink E-lab Results Tool
Open the Unlink E-lab Results tool from the Tools menu in PCC EHR.
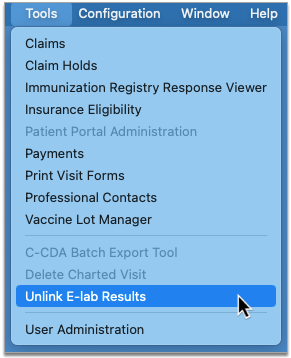
By Permission Only: Users must have a role that has the “E-lab Result Unlinking” permissions in order to access the Unlink E-lab Results tool. You can configure user roles and permissions in the User Administration tool in PCC EHR.
Find the Result to Unlink
In the Unlink E-lab Results tool, find the result that needs to be unlinked. Use the Imported Date Range and Search Filter fields to focus your search.
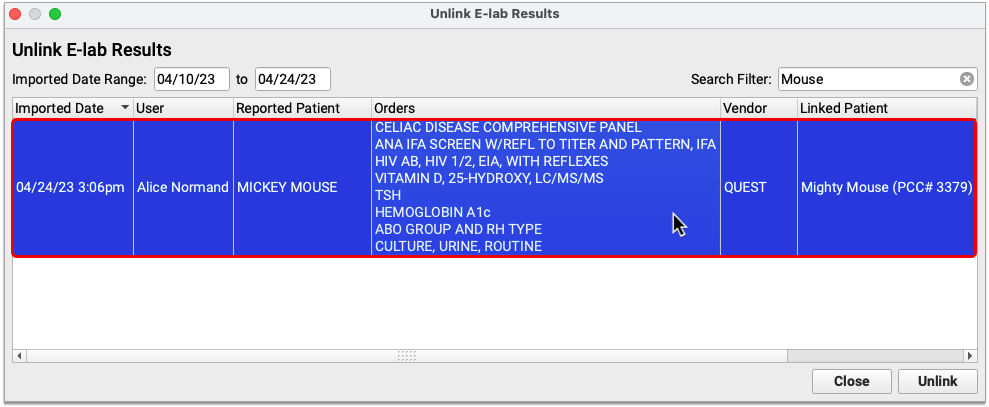
You can use the Search Filter to search by the patient name reported in the e-lab result, the user who linked the result to a patient in PCC EHR, the test orders included in the e-lab result, the name of the laboratory that ran the tests, the name of the patient who was linked to the result, the date of the encounter that the result was attached to, or the name of the protocol that the result was attached to.
Unknown User: If the user who linked a lab result displays as “Unknown”, it indicates that the result was imported prior to your practice receiving PCC 9.7. All e-lab results received and linked to patients after PCC 9.7 will be attributed to the user who did the linking.
Select and Unlink the Result
Once you find the result that needs to be unlinked, select it from the list then click the “Unlink” button.
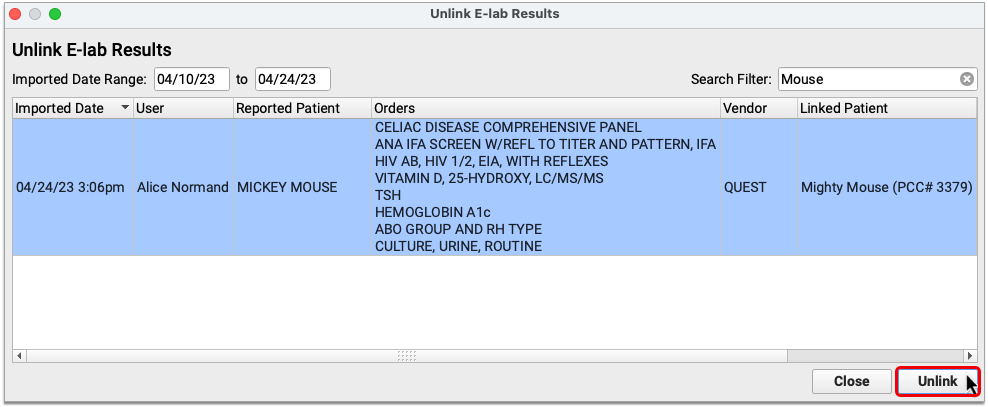
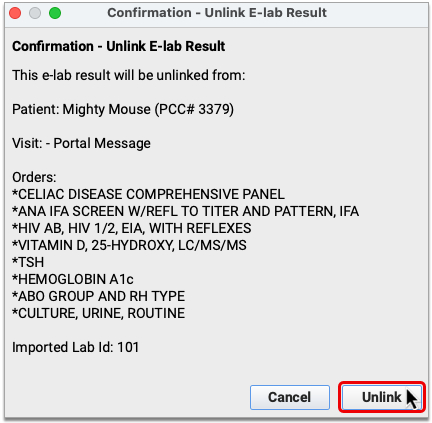
Confirm your selection, then close the Unlink E-lab Results tool.
Relink the E-lab Result to the Correct Patient and Encounter
Unlinked e-lab results return to the E-lab Results queue in PCC EHR, where they can be relinked to the correct patient and encounter.
Learn how to link e-lab results to patients and encounters in Manage Incoming E-lab Test Results.
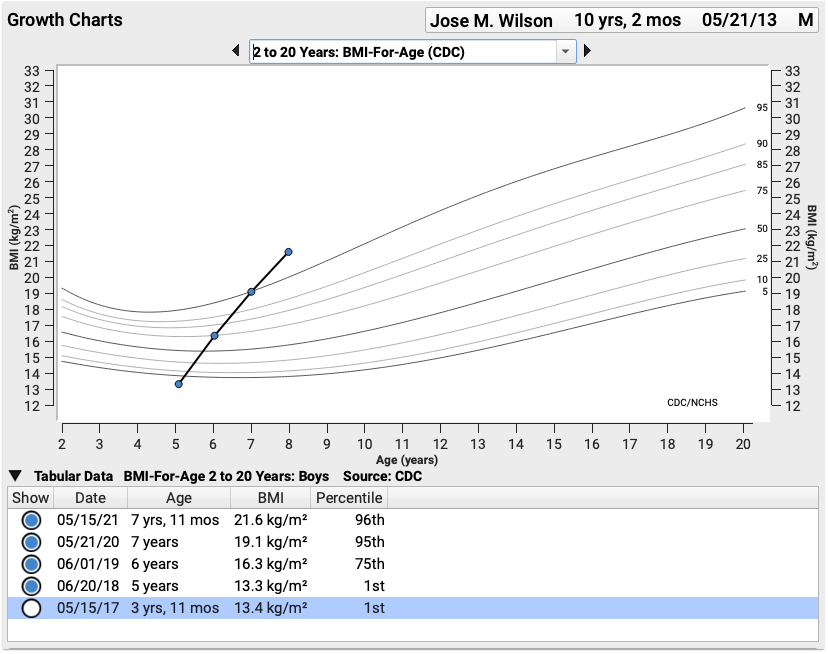
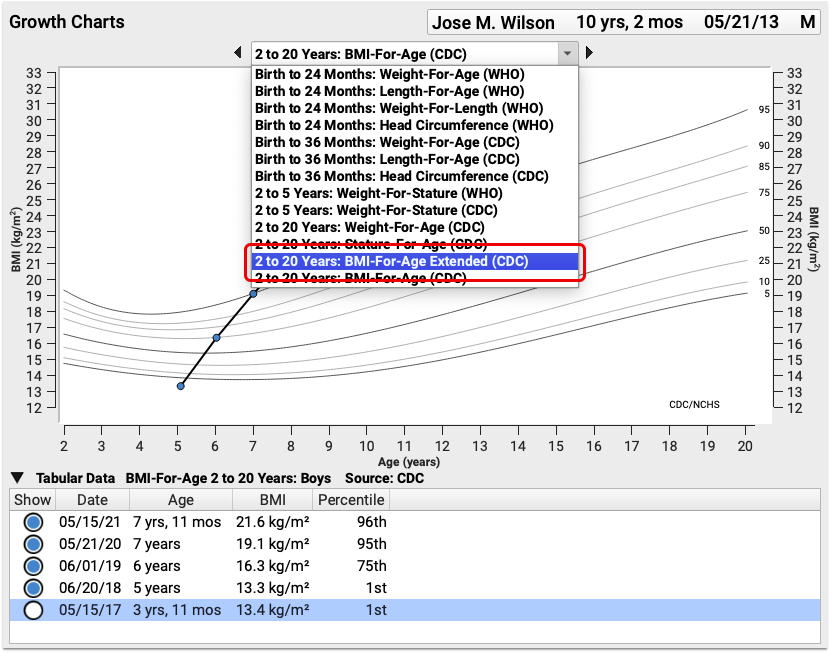
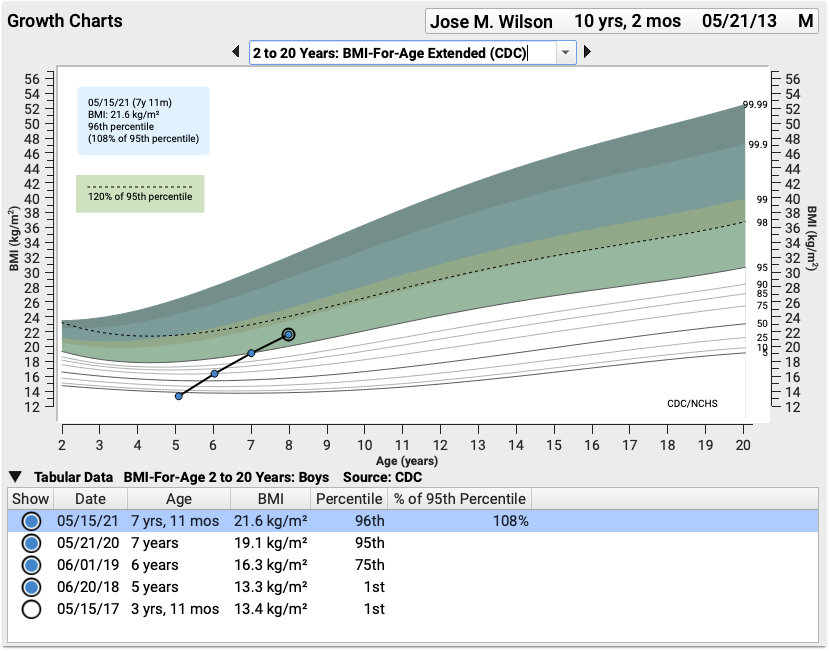
New CDC 2 to 20 Years Extended BMI-For-Age Growth Charts
PCC EHR 9.7 includes a newly developed CDC BMI Growth Chart for patients with a BMI above the 95th percentile range. This new chart is available alongside the CDC – 2 to 20 Years BMI-For-Age for any patients with a charted BMI above the 95th percentile.
The Growth Chart Configuration tool indicates this newly available option with the note “extended chart displays when BMI >95 percentile and is not available in patient portal.”

When, in a visit, a patient’s weight is charted it will appear as a data point on the BMI-For-Age growth chart as usual.
If a charted BMI is above the 95th percentile, the 2 to 20 Years: BMI-For-Age Extended (CDC) chart is available in the drop-down menu above. Selecting it displays the patient’s data on the extended chart.
The extended chart shows a wider range of BMIs, and is color coded by sex. The dash line shows where 120% of the 95th percentile appears on the chart.
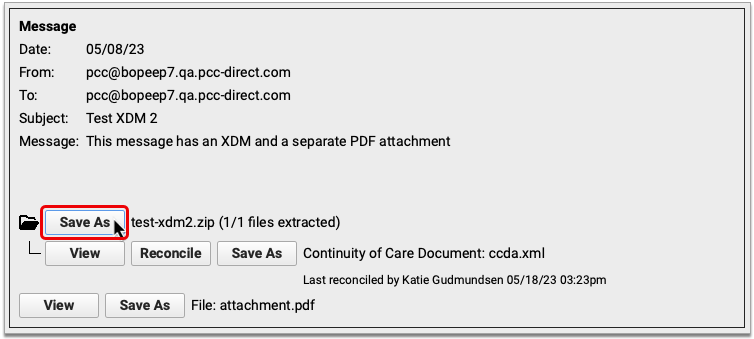
View Patient Records Sent as Zipped Attachments to Direct Secure Messages
You can view and save patient records sent to your practice as zipped attachments to Direct Secure Messages.
Zipped attachments are compressed folders. When attached to Direct Secure Messages, they typically include continuity of care (C-CDA) documents or PDFs with patient information. PCC EHR extracts C-CDAs and PDFs from zipped attachments so that you can easily view and reconcile them.

When you open a Direct Secure Message that has a zipped attachment, you can see the total number of files contained in the attachment and how many are C-CDA documents or PDFs that were able to be extracted.
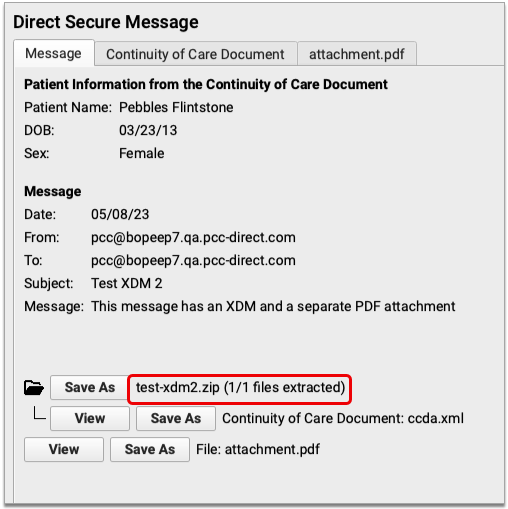
You can view the extracted C-CDA documents and PDFs or save them to your workstation. When you connect the Direct Secure Message to a patient, you can reconcile any C-CDA documents it contains.

If you want to view the rest of the files in the zipped attachment, you can save the whole folder to your workstation and open it in your file browser.
To learn more about how to work with Direct Secure Messages, read Send and Receive Direct Secure Messages.
View Multiple C-CDAs Attached to the Same Direct Secure Message
When you open an inbound Direct Secure Message that has multiple C-CDA attachments, you can preview all of those C-CDAs before attaching the message to a patient.
Distinguish Between Past and Future Encounters in Visit History
When reviewing a patient’s Visit History, or importing a document, a line now appears between dates in the past and dates in the future, so you can more easily find the correct appointment.

Retrieve Immunizations from Missouri and Oklahoma Registries
Practices in Missouri and Oklahoma can retrieve patient records from their state immunization registry at the click of a button in PCC EHR.

Practices in these states are also configured for automatic submission to their registry.
These states join a growing list of regions enabled for bidirectional immunization registry exchange with PCC (shown in green below).
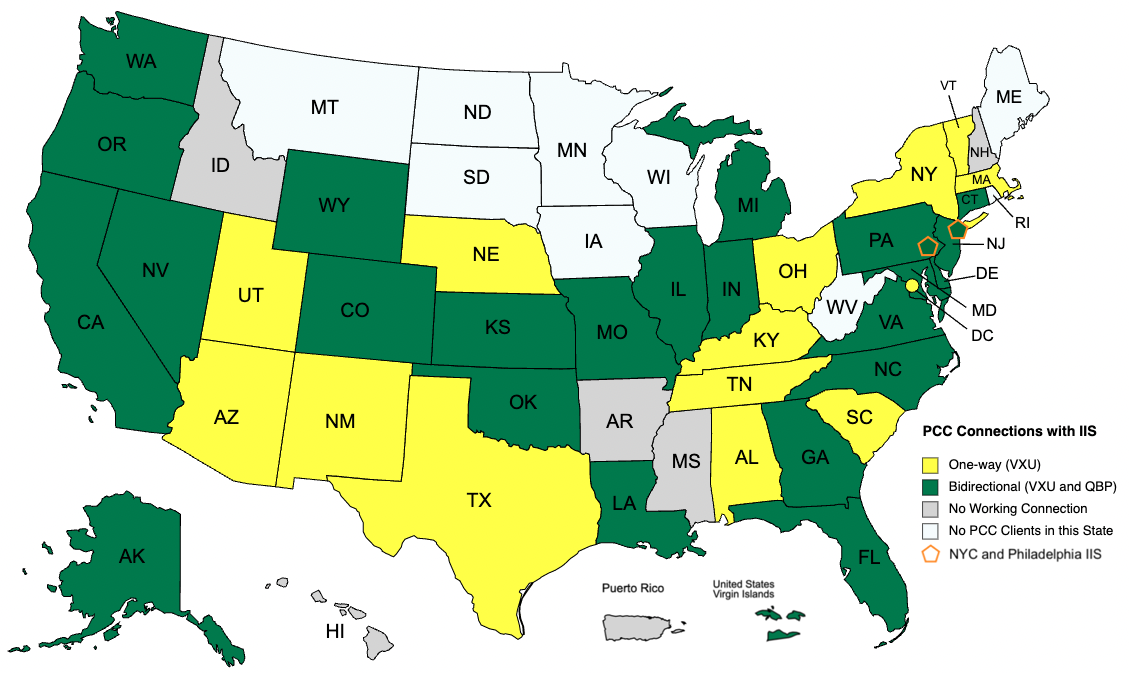
For a complete list of bidirectional immunization registry connections and to learn more about how to look up and import patient records from your registry, read the full guide.
Point-in-Time Snapshot: The above map represents the status of PCC’s available immunization registry connections as of the PCC 9.7 release date and does not guarantee completion of in-progress connections. For the most up-to-date information about the status of a particular immunization registry connection, contact PCC Support.
Automatic CDC Vaccine Code and VIS Updates
As of PCC 9.7, your practice’s PCC server will automatically update important vaccine information from the CDC.
When the CDC makes changes to the official MVX or CVX codes, or to the VIS or NDC lists for vaccines, your system will automatically retrieve the latest versions and make them available to your PCC tools.
-
MVX: The Manufacturers of Vaccines list published by the CDC.
-
CVX: The Vaccine Administered list published by the CDC.
-
VIS: The Vaccine Information Statements list published by the CDC, which also includes EUA or Emergency Use Authorization information statements.
-
NDC Crosswalk Tables: The National Drug Code crosswalk tables published by the CDC.
These codes ensure your ability to accurately track vaccines that you order, administer, bill, and submit to immunization registries and other third parties. For example, when a new Vaccine Information Statement is released, you’ll immediately be able to indicate that you are using it inside an immunization order. When a new immunization is announced, you will be able to get started with the configuration right away.
New Dose Option for Rotarix
PCC 9.7 adds a 1.5ml dose option for Rotarix oral vaccine so that you can accurately record when you administer it to a patient.
Patient Engagement
PCC 9.7 includes new features that help you connect and communicate with patients and families.
Connect Patient Portal Accounts to PCC EHR Accounts
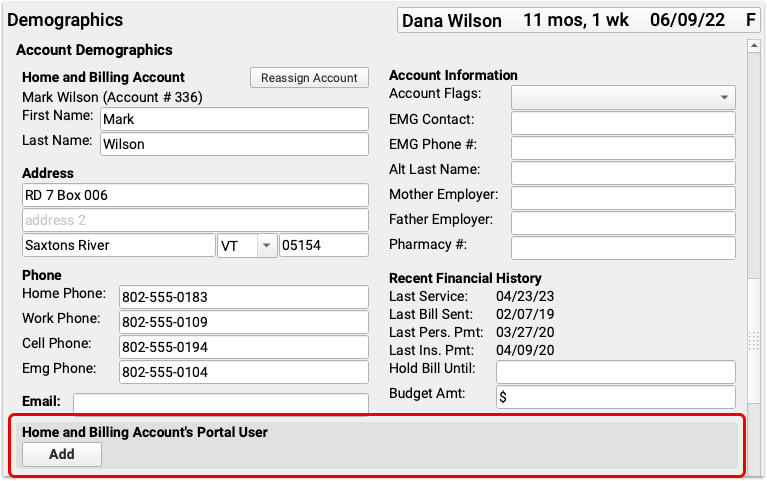
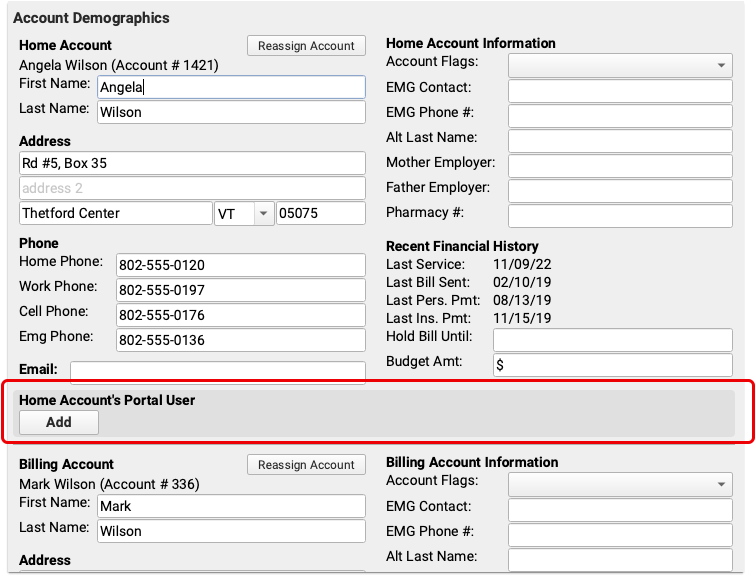
PCC EHR 9.7 introduces a new section to the Account Demographics component. With it, you can link patient portal accounts to your patients’ Home and Billing Accounts. With EHR accounts linked to portal accounts, you can be sure you’re getting information from the correct source.
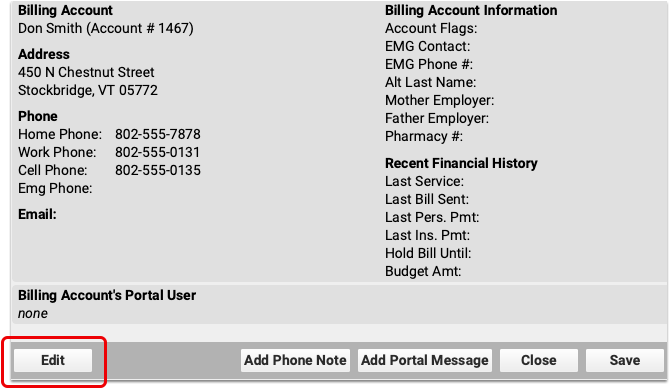
To add and manage portal users for Home and Billing Accounts, visit the Account Demographics and click “Edit.”
Connect an Existing Portal User
If there are one or more patient portal accounts already connected to this patient, the Add button will open a window where you can either select from the existing users connected to this patient, or create a new user for this PCC EHR account.

Selecting an existing user and clicking Continue will link the selected pre-existing user to the account.

EHR Account Names Including Two People
Take care when matching EHR accounts to Patient Portal accounts. When linking a home and/or billing account to an existing Patient Portal account, if a Patient Portal account’s name differs from the EHR home and/or billing account, the Patient Portal account will be changed to match the EHR account.

Multiple Names in EHR Accounts: PCC recommends your practice avoid using two names in an account, such as “Jack & Jill Smith” and instead select a single person as a home and/or billing account. Additional parents or guardians should be added as Personal Contacts and given their own Patient Portal account linked to the patient.
Create and Connect a New Portal Users
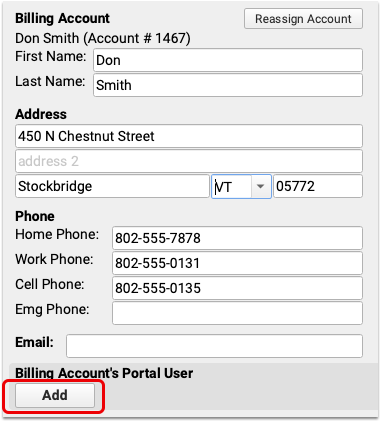
If no portal users are linked to an account, an “Add” button is available. Click “Add” to select a portal user to link to this account.
The Add button creates a new patient portal user for the selected account. The portal user’s name is filled in automatically. Select a phone or email address to use as the Portal Sign-In. The phone or email you select here will be used to sign in to the patient portal.
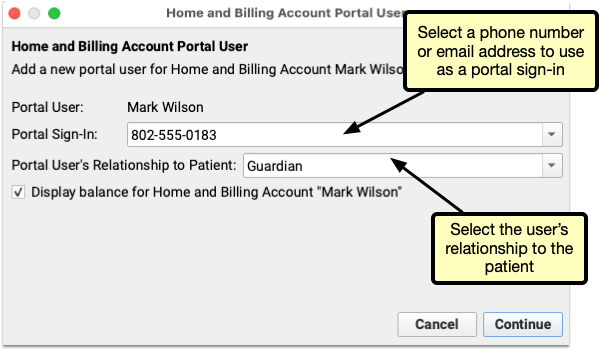
Click “Continue” to create the user.
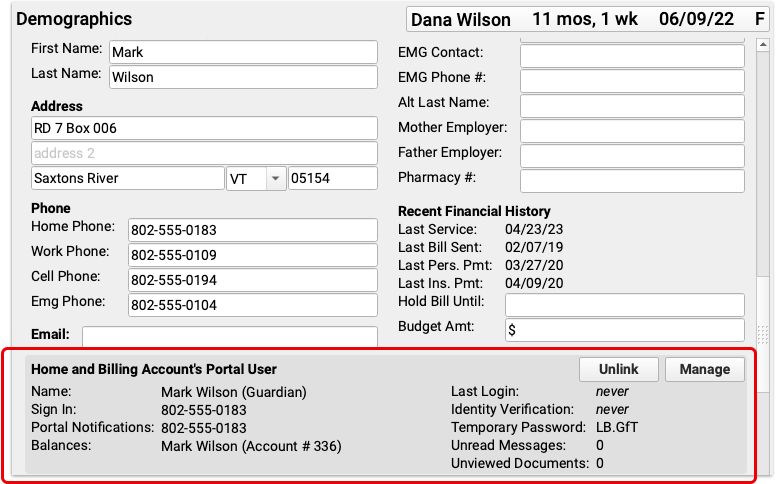
The portal account you selected appears in Account Portal User section. If needed, use the Unlink button to remove the portal user from this account.
Managing Portal Users
If a patient has separate Home and Billing accounts, each has its own Patient Portal User option, and each needs to be managed independently.
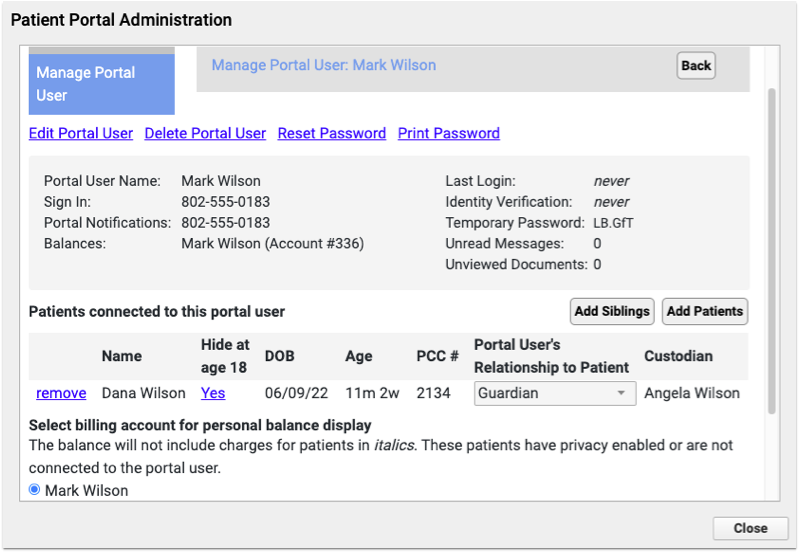
To make changes to the portal user, such as changing a relationship, sign-in, or password, click the “Manage” button in the Account Portal User field. The manage button opens the Patient Portal Administration tool where you can manage users and connect patients as usual.

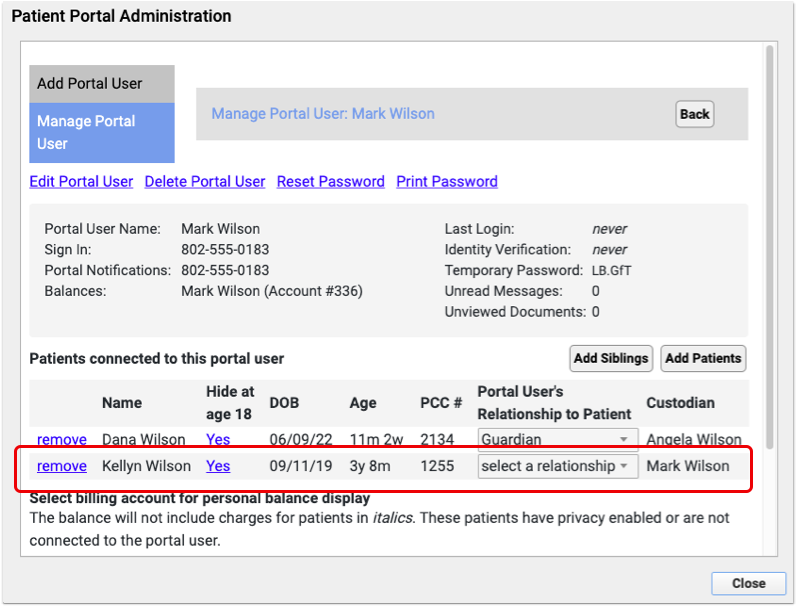
Linking Accounts for Patients with Siblings
In some cases siblings will share a Home or Billing Account, but not be connected to the same patient portal user.
The Account Portal User section will indicate this situation with the text “Patient… is not connected to this account’s portal user. Manage portal user to add this patient”.

Clicking Manage will open the Patient Portal Administration and automatically connect this patient to the portal user.

Move CHADIS Results to a Different Encounter
When a patient misses or cancels an appointment after completing CHADIS questionnaires, you can move those CHADIS results and orders to another encounter, so that no results are lost, and no users need to repeat any questionnaires.
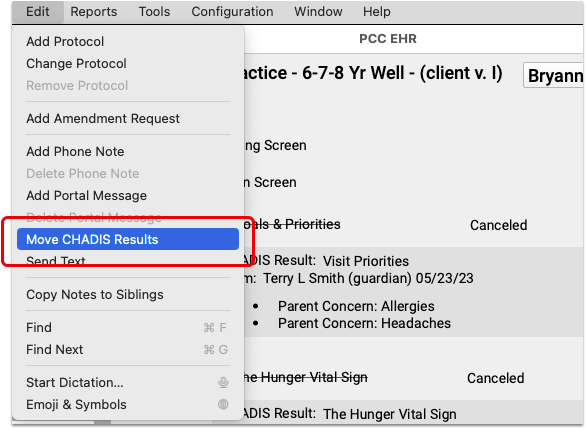
PCC EHR 9.7 includes a “Move CHADIS Results” option in the Edit menu, available when viewing a visit that includes CHADIS orders and results.
Selecting “Move CHADIS Results” opens window with a drop-down menu including the patient’s visits and the option to create a new Unsolicited Chadis Results encounter.
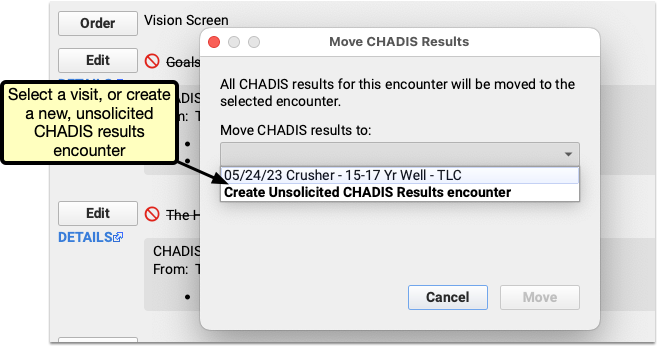

After making your selection and clicking move, you’ll have the opportunity to confirm your choice, or click “Back” to return to the previous visit selection window.
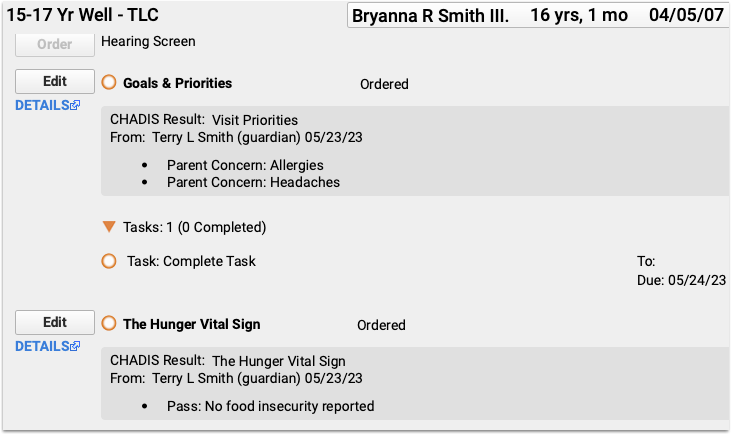
Once you confirm your selection by clicking “Move” the orders and results will appear in the visit you selected.
Delete Charted Visits Containing CHADIS Results
When an appointment including a CHADIS questionnaire order is missed or canceled, it can now be deleted using the Delete Charted Visit tool.
Insurance Billing
PCC 9.7 includes new features for working on claims that can’t be submitted and an all-new tool for posting insurance responses in PCC EHR.
Work on Claims that Cannot Be Submitted
After you process and submit claims, you can use the Needs Correction tab in the PCC EHR Claims tool to work on claims that are not yet ready to be submitted.

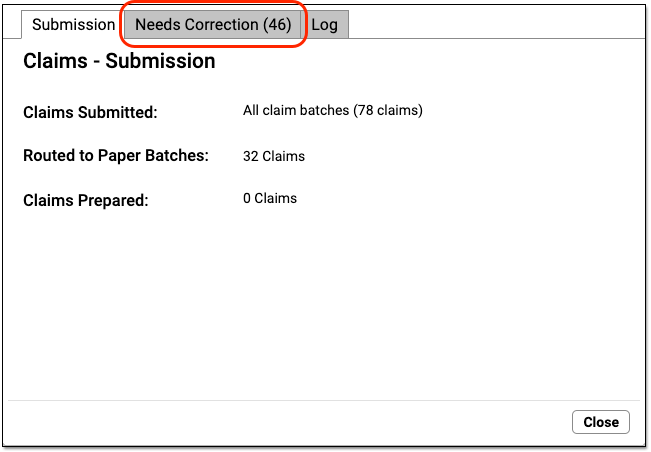
When PCC processes your claims, it may discover that a certificate number is missing, the policy is not active for the date of service, or another error prevents a claim from going out. These claims will appear on the Needs Correction tab.
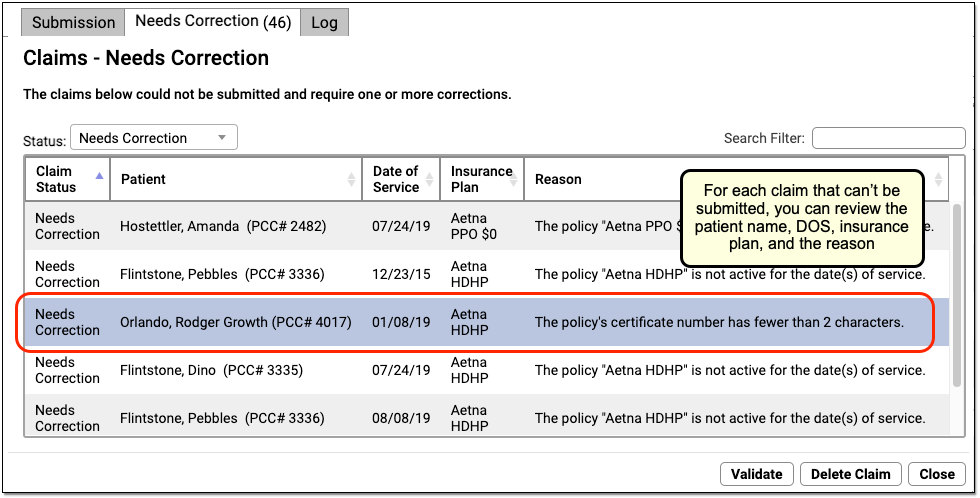
For each claim, you can review the patient, the date of service, the insurance plan, and the reason the claim could not be submitted. You can use the Search Filter field to find specific claims or issues affecting multiple claims.
Use tools in PCC EHR and Practice Management to correct these claim problems.
Reprocess and Submit
After you fix a claim problem, you can reprocess and submit claims on the Submission tab. Clean claims will be processed and sent, and the Needs Correction tab will refresh with any new issues that need your attention.
Delete a Claim
If you fix an issue and need to generate a new claim for an encounter, you may need to delete the old claim. For example, if you need to generate a claim for a different insurance policy, you can select the old claim from the Needs Correction tab and click “Delete Claim”.
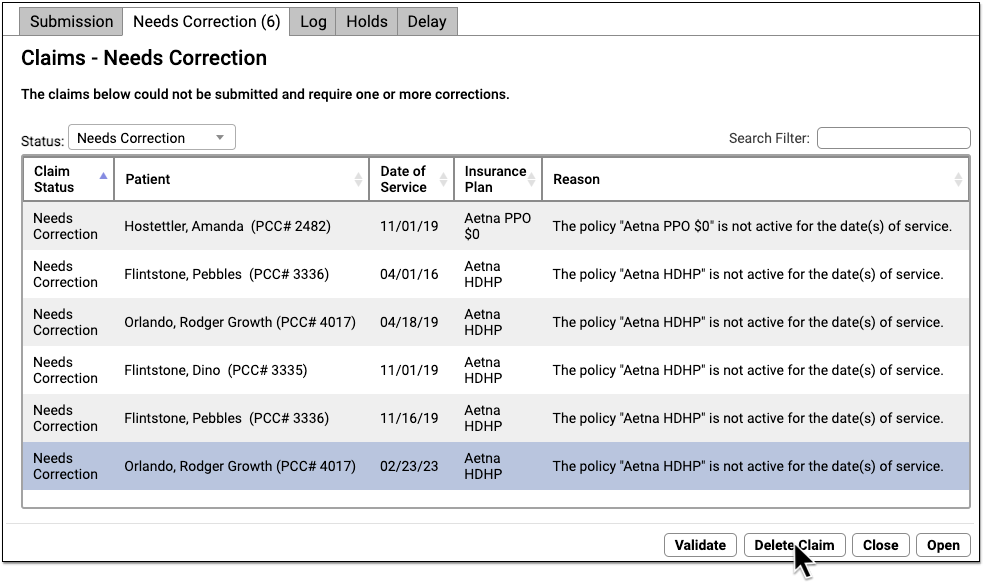
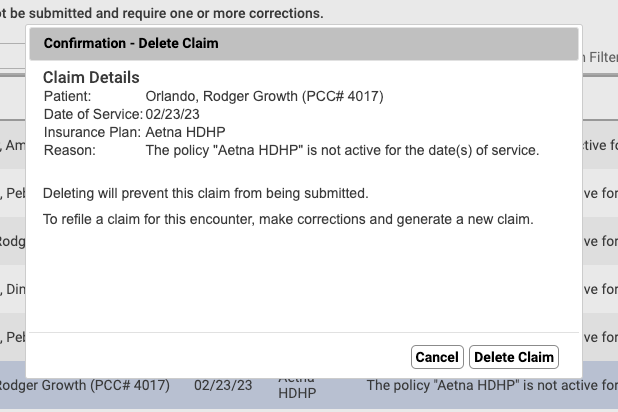
Deleting a claim on the Needs Correction tab will only remove the claim. The charges will remain on the account. Use the Correct Mistakes (oops) tool to create new claims for charges.
Use Improved Claim Error Descriptions
When you review claims that cannot be submitted, PCC 9.7’s improved claim error reasons will help you understand and resolve problems faster.

PCC 9.7 improves the wording of Needs Correction reasons to eliminate ambiguity and better explain why a claim can’t be submitted. This update also improves claim validation in order to better align with requirements, such as ID number length.
The updated reasons appear in both the Needs Correction tab and the Logs tab in the Claims tool in PCC EHR.
Understand and Fix Claim Problems: For a list of all possible claim problems that prevent claims from being submitted, and how to fix them, see the Claim Error Reference article.
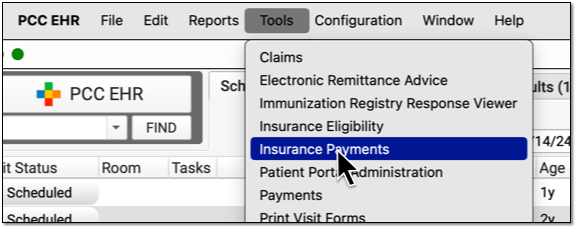
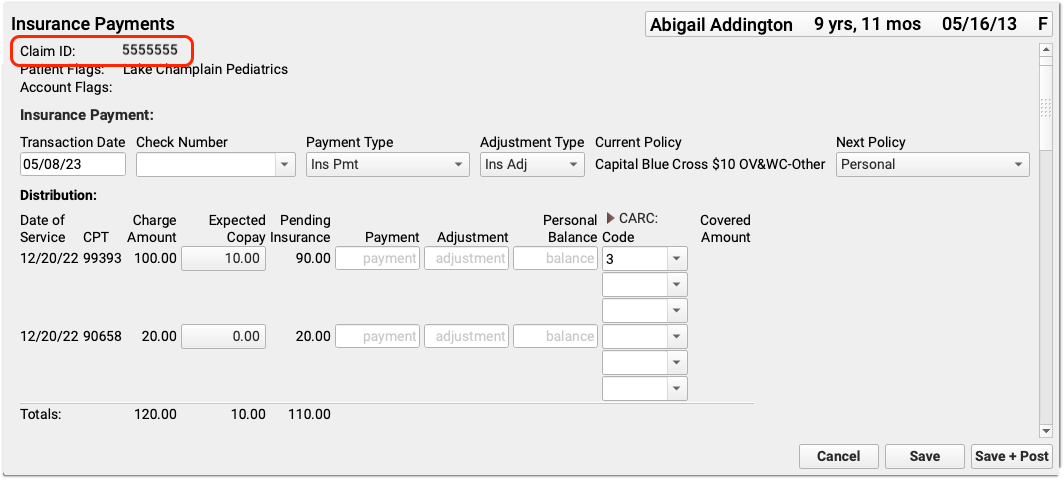
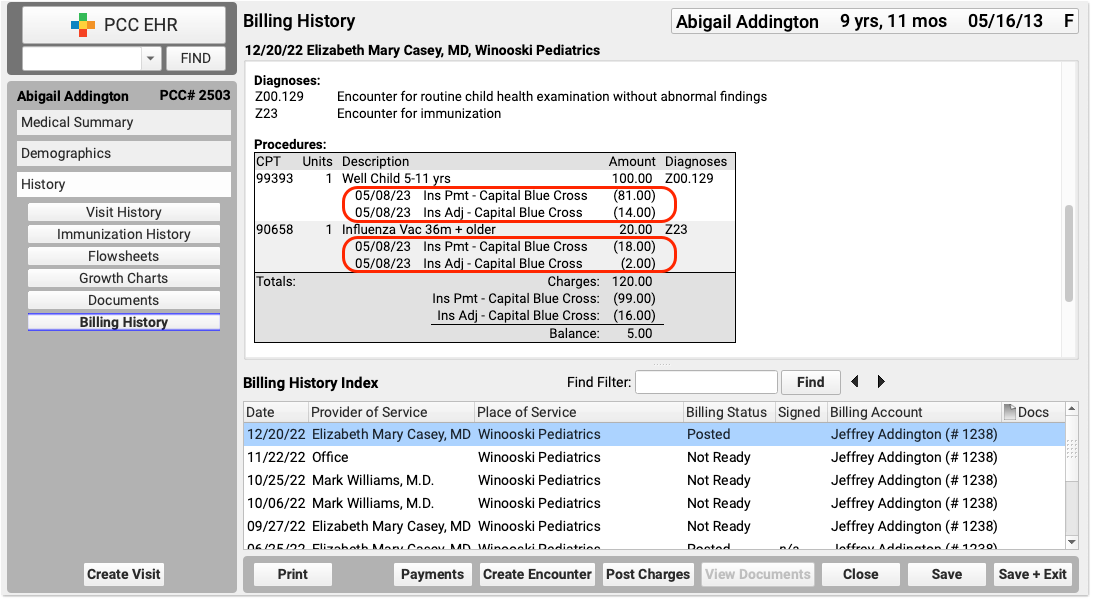
Post Insurance Payments and Adjustments in PCC EHR
Use the Insurance Payments tool in PCC EHR to manually post payments, adjustments, and CARC information. Many ERAs can be posted automatically, but when a payor sends a paper EOB or an ERA with an unusual denial or adjustment, you can enter details manually while also reviewing and updating patient information.
Open Insurance Payments
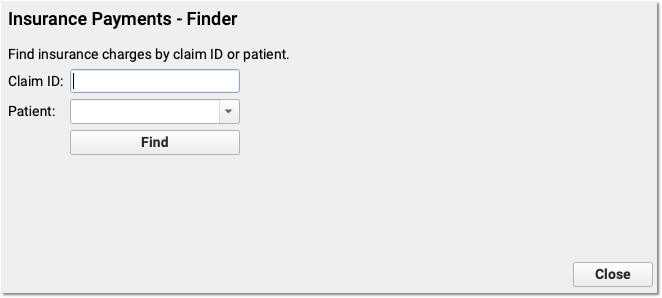
Open the Insurance Payments tool from the Tools menu in PCC EHR.
Enter the Claim ID
Enter a claim ID. When you press Enter or click “Find”, PCC EHR will find all charges from that claim that have a balance pending insurance.
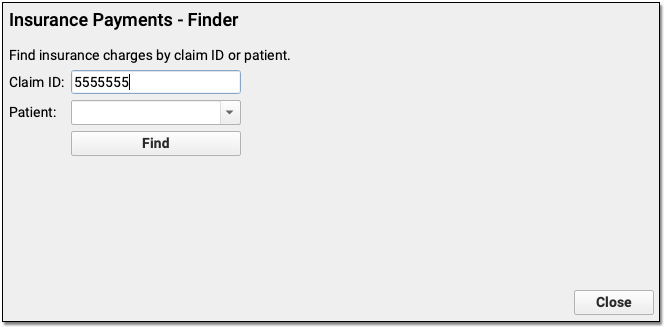
Optional: Find a Patient and Select an Encounter
If you don’t have a claim ID, you can first find a patient and then select an encounter.
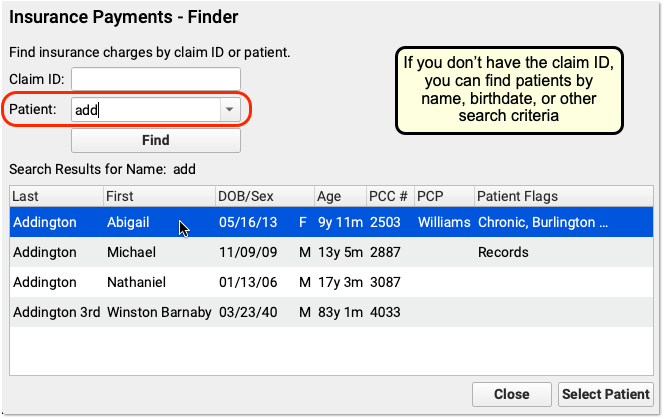

After you find a patient, PCC EHR will display all encounters with charges that have an amount due pending insurance. Double-click on an encounter to select it.
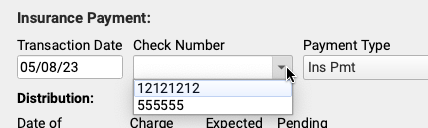
Enter a Check Number and Optionally Review Other Transaction Details
Whenever you post payments, enter a check number.

You can also use the fields at the top of the screen to: review patient and account flags, adjust the transaction date, change the payment or adjustment types, double-check that the payment came from the current policy, and change the next responsible party for any remaining amount due.
PCC EHR remembers your work with recent check numbers. You can select from the last ten numbers you used.
By default, PCC EHR posts payments and adjustments as “Ins Pmt” or “Ins Adj”. You can also select a custom payment or adjustment type.
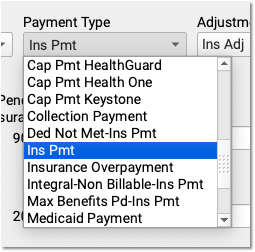
Enter Payment and Adjustment Amounts
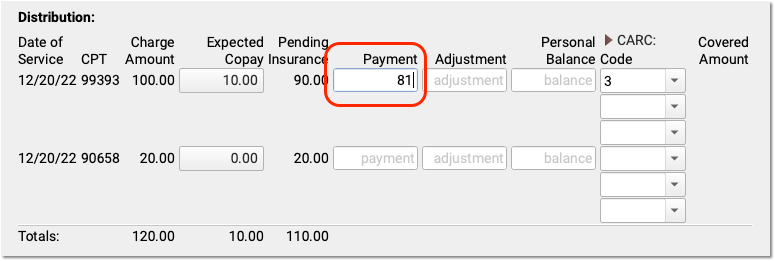
For each charge on the encounter, enter the payment or adjustment amount found on the payor’s response.
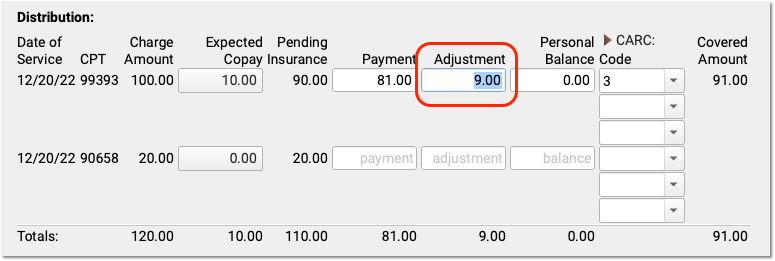
When you enter a payment amount and press Enter, PCC EHR will automatically calculate the likely adjustment amount. If the ERA indicates that the remaining balance is not adjusted off, you can make changes. You can also enter a remaining balance amount, and PCC EHR will recalculate the amounts for each field.
Optional: Change the Expected Copay Amount
Sometimes a claim is submitted with the wrong copay amount. The payor may respond with less or more than expected, and indicate the correct copay amount. You can change the expected copay for any charge as you enter payments and adjustments.
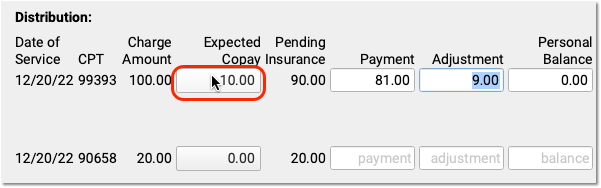
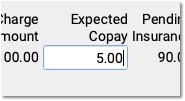

Automatic Calculation and Payment Relinking: When you change the expected copay, PCC EHR recalculates the adjustment amount on the screen for you. Also, if the family already paid the copay, then when you save and post, PCC EHR will automatically apply that payment correctly and (if appropriate) credit the account. For example, if a parent already paid $10 and now only $5 is expected, the remaining $5 will be a credit on their account.
Enter CARC Codes, Groups, and Amounts
As you enter payments and adjustments, you can also add Claim Adjustment Reason Code (CARC) information.
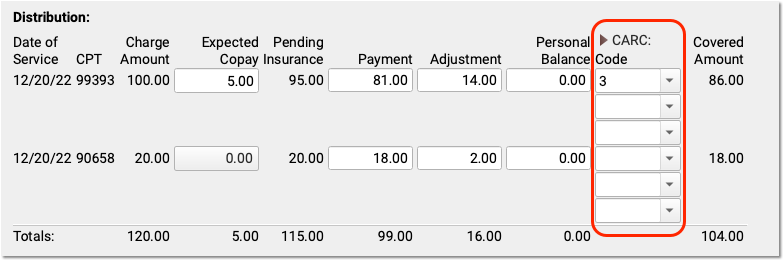
Payors use CARC codes, groups, and amounts to explain the adjudication of a claim. This information can be important for families as well as when you need to submit a secondary (or tertiary, etc.) claim.
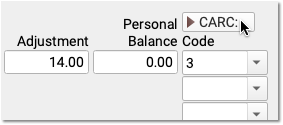
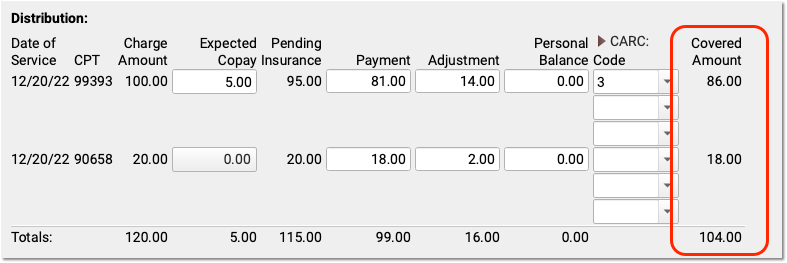
When the next responsible policy is “Personal”, PCC EHR displays only the first CARC field by default, as shown above. If the patient has additional policies, however, then three Code, Group, and Amount columns will appear by default. You can click the CARC field label disclosure arrow to show or hide these extra CARC fields at any time.
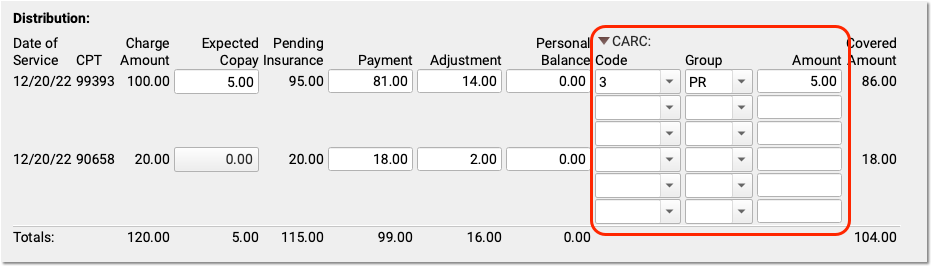
Automatic Copay CARC: If a copay is expected for a charge, PCC EHR automatically adds the CARC code “3” for “Co-payment amount”, with a Group code of “PR” and the amount of the expected copay as the adjustment amount.
You can enter additional CARCs, and even search for a CARC adjustment using text from the adjustment reason, which typically appears in the payor’s response.
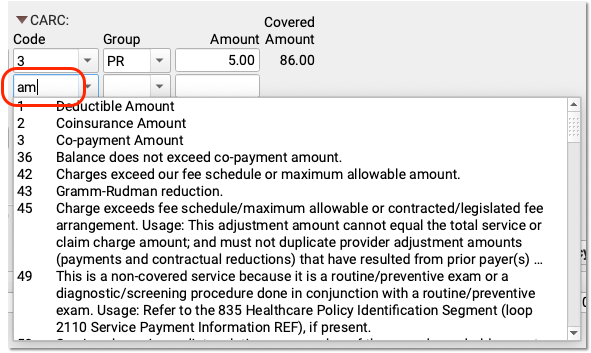
CARC Adjustments and Insurance Payments May Not Exceed the Charge Amount: CARCs explain adjustments. For that reason, the CARC amounts for a charge cannot exceed the original charge amount minus payments. PCC EHR will prevent you from entering more than the total possible amount, as that could result in a rejected claim from a secondary payor.
Optional: Review Covered Amount and Negotiated Rate
After you enter payments and adjustments, you can see the amount of the charge that the payor adjudicated as “covered” in the Covered Amount column. This displays the original charge amount minus adjustments.
If your practice tracks insurance contracts in PCC, and you’ve entered allowable amounts for these procedures for this insurance, then you will also see a “Negotiated Rate” column to the right.
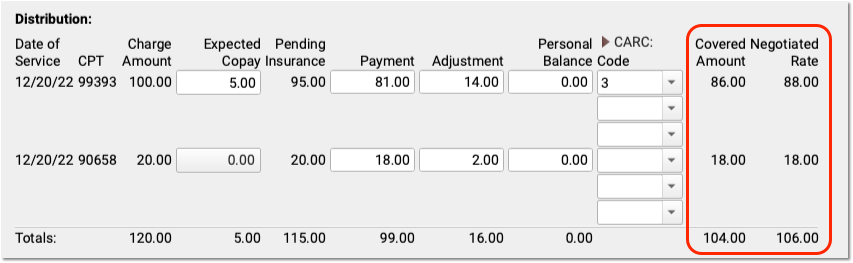
You can quickly compare the Covered Amount with your practice’s Negotiated Rate.
Optional: Review and Update Policies, Account Demographics, and More
As you enter payments and adjustments, you can scroll down to review patient policies, patient and account demographics, account balances, and account notes.
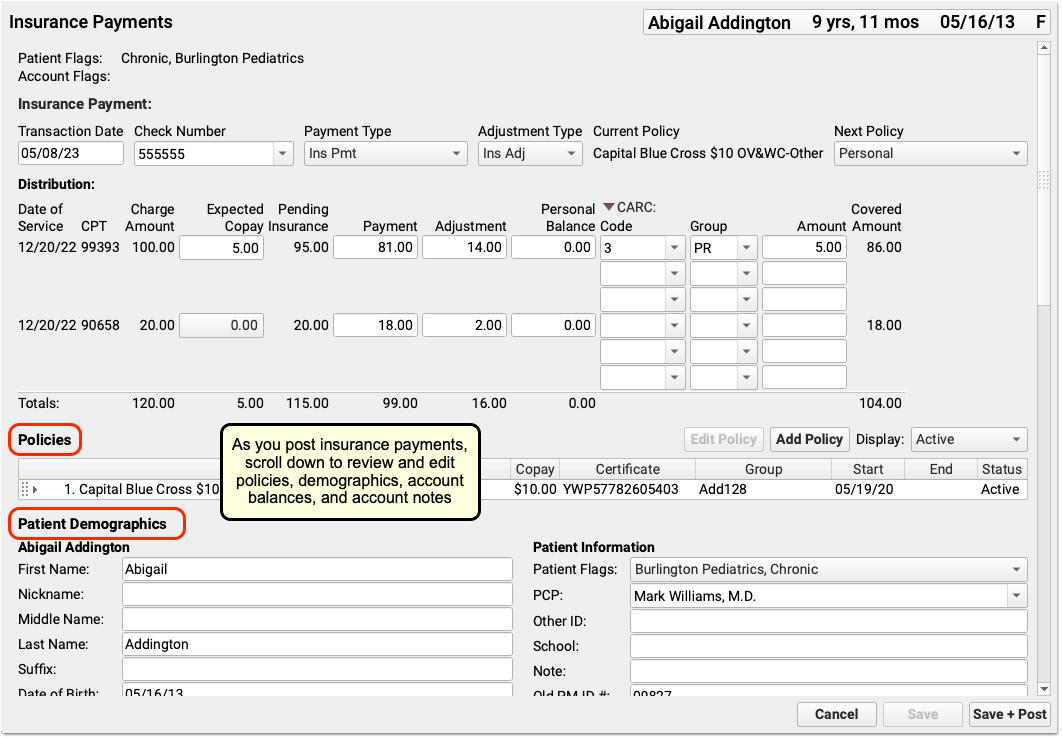
Use these components to update the patient’s policies, contact the family, or add a note explaining issues with the encounter.

As you work, click “Save” to save patient and account demographics. Policy changes and Account Notes save automatically, but changes to other fields won’t be saved until you click “Save” or “Save + Post”.
Double-Check the Next Policy
Is there a remaining amount due on the charges for this encounter? Before you save and post payments and adjustments, PCC recommends you double-check the next policy, which indicates the next responsible party for these charges.
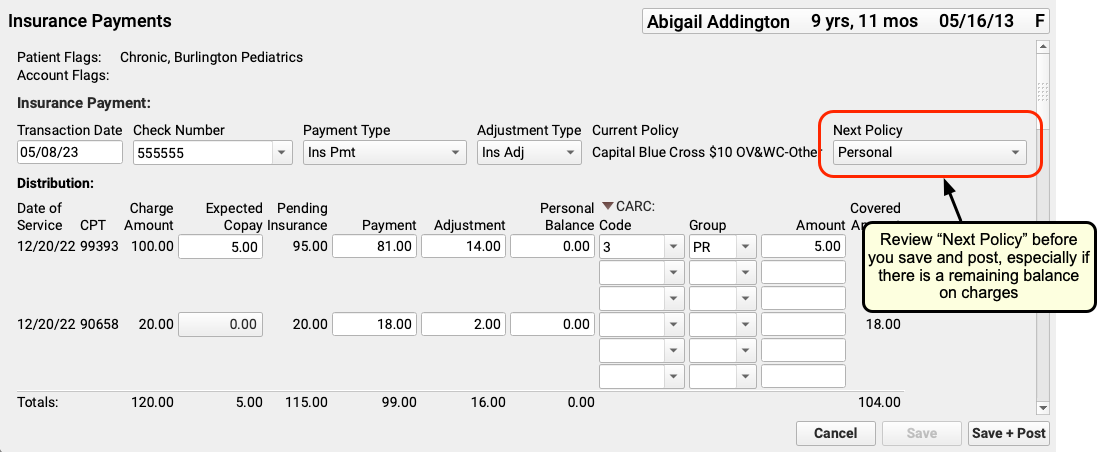
If the next policy is a payor, then PCC will automatically queue up a claim when you save and post your payments and adjustments. If it is “Personal”, then the remaining amount will become a personal balance.
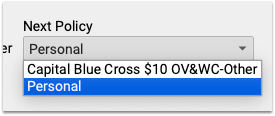
You can change the next policy. For example, if you added a new patient policy to the Policies component, you can select that new policy. When you save and post, PCC EHR will queue up a claim for the remaining encounter balances.
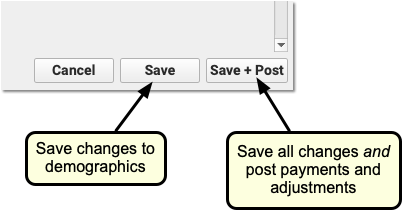
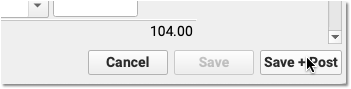
Click “Save + Post”
When you click “Save + Post”, PCC enters the payments and adjustments into your system, saves any changes you made to demographics, updates balances, and queues up a claim for the next insurance if appropriate.
PCC EHR will return you to the first screen of the Insurance Payments tool so you can continue on to the next encounter.
Review Posted Insurance Payments and Adjustments
After you post insurance payments and adjustments in PCC EHR, where do they appear?
You can review the history of all charges for an encounter in the Billing History section of a patient’s chart.
You can also review all payments for an account in the History tab of the Payments tool.

Additionally, PCC includes reports for reviewing what you posted, examining insurance reimbursement trends, and more.
eRx
PCC 9.7 includes new pharmacy configuration options and drug choices in PCC eRx.
Automatically Update Patients’ Default Pharmacy
You can configure how PCC eRx updates a patient’s default pharmacy when you add a new entry to their Pharmacies list. This setting is user-specific, meaning it only affects your experience in PCC eRx.
To configure the default pharmacy setting, open PCC eRx and go to the My Settings tab.

Scroll down to the Pharmacies section. The first group of radio buttons governs how PCC eRx updates a patient’s default pharmacy when you add a new pharmacy to their Pharmacies list.
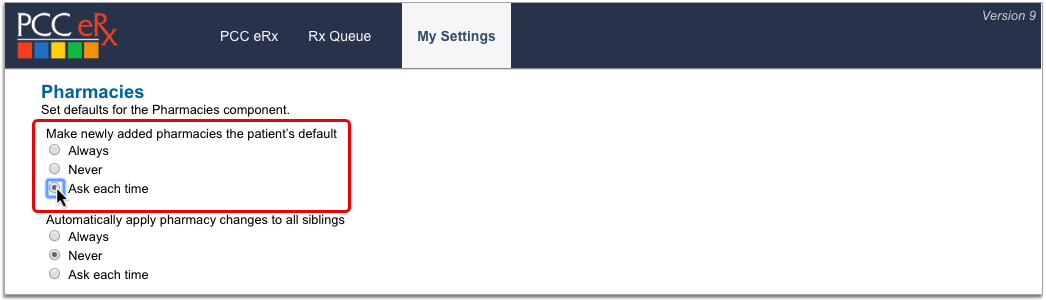
Choose the option that supports your preferred workflow:
-
Always: Automatically make the new pharmacy the patient’s default.
-
Never: Never make the new pharmacy the patient’s default.
-
Ask each time: Receive a prompt to make the new pharmacy the patient’s default.
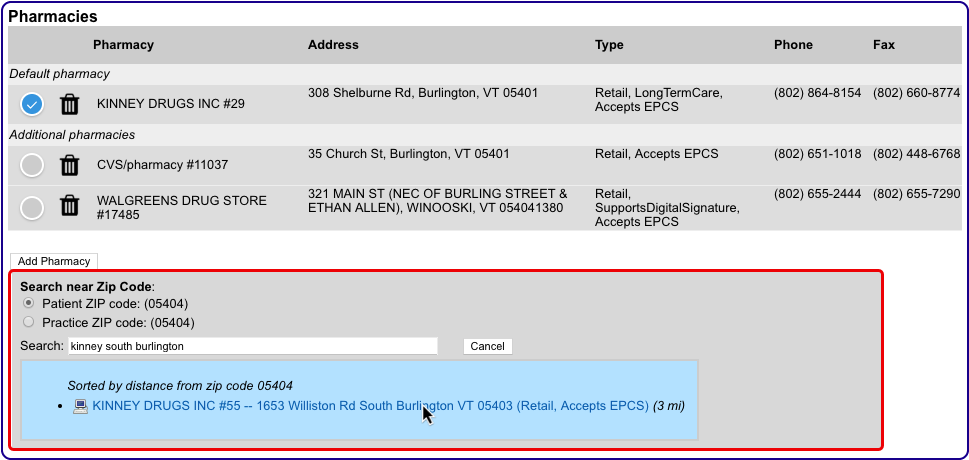
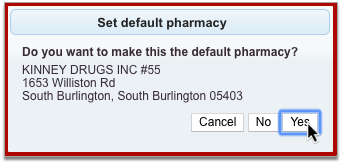
Your default pharmacy setting only applies when you add a new pharmacy to a patient’s list using the “Add Pharmacy” button in the Pharmacies component. The pharmacies you add while prescribing or finalizing a prescription are not governed by this setting and never update the patient’s default.
Prescriptions Always Start Out Using the Default Pharmacy: Regardless of your default pharmacy setting, prescriptions always start out using your patient’s default pharmacy. If you add an additional pharmacy to your patient’s Pharmacies component for one-time use then start a prescription, you will need to change the pharmacy on that prescription from the patient’s default to the recently added entry. This is consistent with the way prescriptions and pharmacies functioned prior to PCC 9.7.
Update Siblings’ Pharmacies Simultaneously
You can configure PCC eRx to update the pharmacies for all siblings when you make changes for one. This setting is user-specific, meaning it only affects your experience in PCC eRx.
To configure the sibling pharmacy setting, open PCC eRx and go to the My Settings tab.

Scroll down to the Pharmacies section. The second group of radio buttons governs what happens when you update the pharmacies of a patient who has siblings.
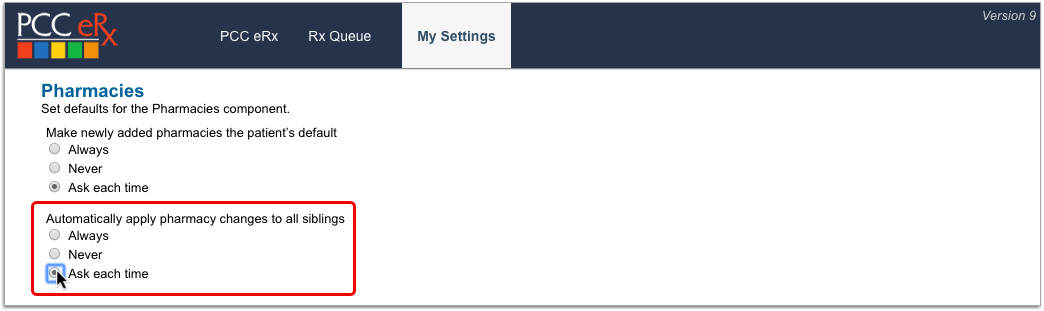
Choose the option that supports your preferred workflow:
-
Always: Automatically apply pharmacy updates to all siblings.
-
Never: Never apply pharmacy updates to siblings.
-
Ask each time: Receive a prompt to apply pharmacy updates to siblings.
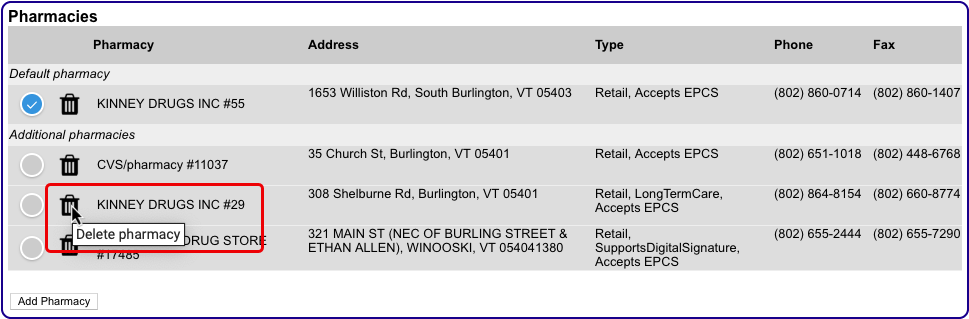
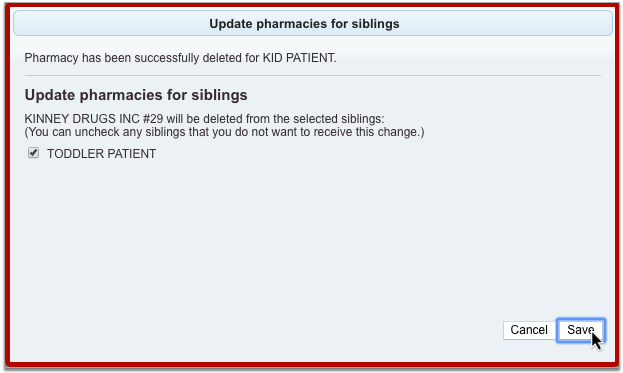
The sibling pharmacy setting only applies when you update pharmacies in the Pharmacies component. The pharmacies you add while prescribing or finalizing a prescription are not governed by this setting and never get added to siblings’ charts.
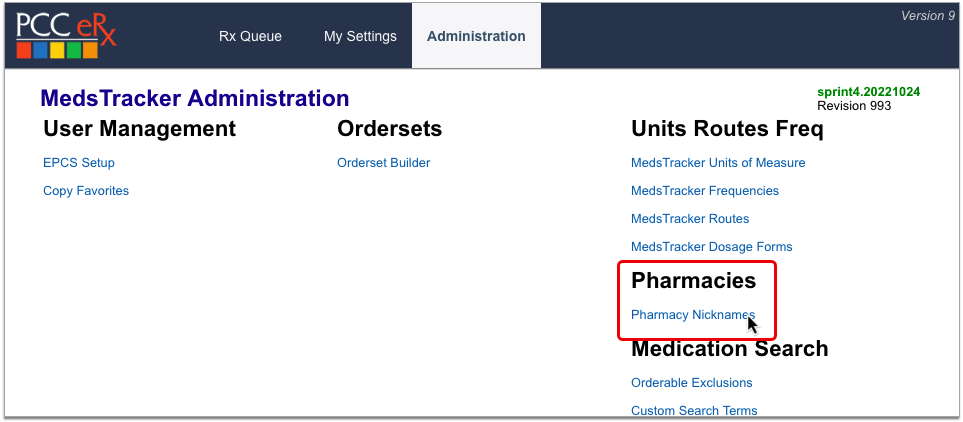
Create Searchable Pharmacy Nicknames
Users with Administration privileges in PCC eRx can set up practice-wide, searchable nicknames for pharmacies that are otherwise tricky to find.
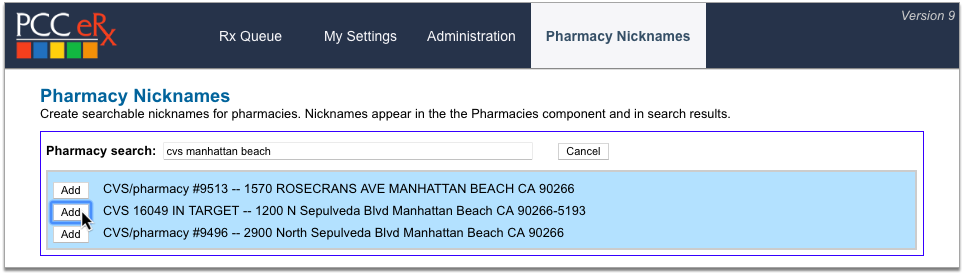
In PCC eRx, click the Administration tab. Then, click the “Pharmacy Nicknames” link.
In the Search field, type the name of the pharmacy you want to nickname, then click the “Add” button beside it.
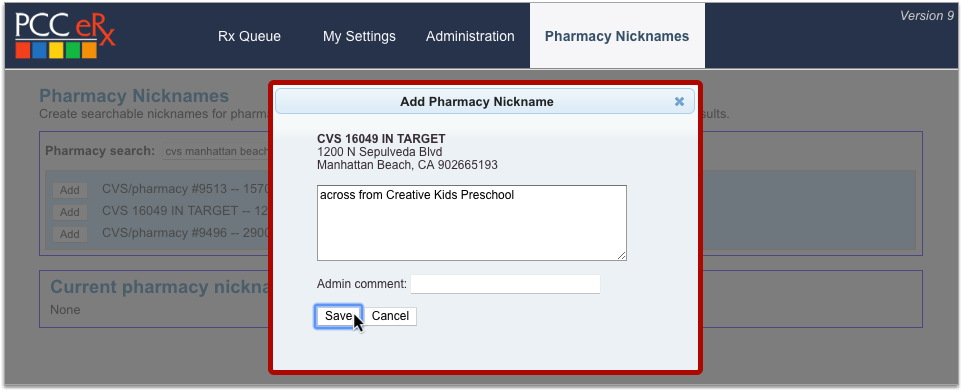
Create a nickname for the pharmacy, optionally leave an internal note explaining the purpose of the nickname, then click “Save”.

Pharmacy nicknames display anywhere you can see and search for pharmacy information in PCC eRx.

You can edit and delete pharmacy nicknames on the Pharmacy Nicknames configuration page. Click the “X” icon to delete a nickname or the pencil icon to edit.
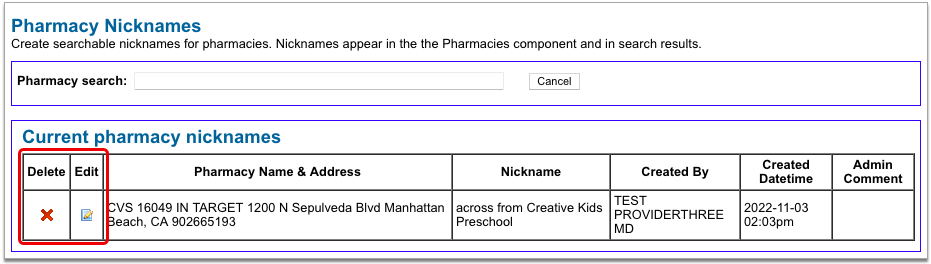
You can also edit a pharmacy nickname by searching for the pharmacy in the search field at the top of the configuration page and clicking the “Edit” button beside it.

Avoid Using Special Characters: For an optimal experience, avoid using special characters in pharmacy nicknames. Nicknames that contain special characters such as double quotes (“), ampersands (&), angle brackets (<>), and at signs (@) cannot be found by those characters in the pharmacy search field and may become difficult to edit once saved.
New Drug Options in PCC eRx
A routine update to First Databank’s drug database in May 2023 supported your ability to continue prescribing Poly-Vi-Flor drops and added new entries for Poly-Vi-Flor chewable. The update also added entries for several other in-demand items, such as Daybue and the EndeavorRx video game.

As a result of the update, you might need to delete your old Poly-Vi-Flor favorites and create new ones.
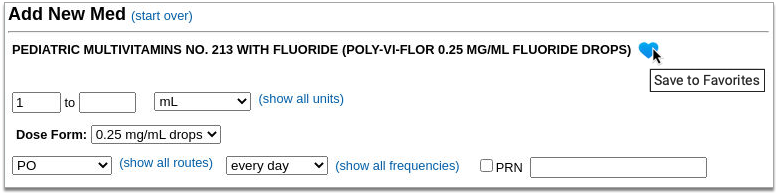
Similarly, you might need to write fresh Poly-Vi-Flor prescriptions instead of renewing entries already in patients’ Medication and Prescription Histories.
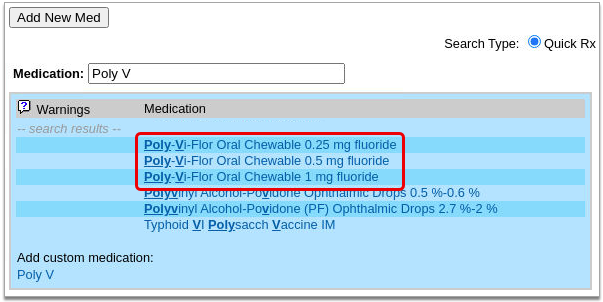
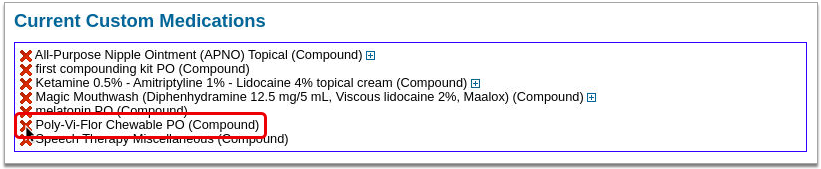
If you have a custom medication item for Poly-Vi-Flor chewable, delete it and start future prescriptions from the standard entry in the drug search results.
To learn more about how to prescribe in PCC eRx, read Prescribe Medications.
Reports
PCC 9.7 introduces a tool for auditing chats at your practice, new reporting features that will help you meet PCMH reporting requirements, and improved report printing.
Review Chat Logs in PCC EHR
Track your staff’s usage of PCC EHR’s Chat messages to review communication between your team members and investigate policy violations. PCC 9.7 introduces a new Chat Log feature within PCC EHR’s Audit Log.
Owing to PCC EHR’s chat potentially containing sensitive information, the Chat Log report is a separate permission from the Audit Log in PCC’s User Administration tool. To access the Chat Log you’ll need to add Chat Log permission to the appropriate user role.
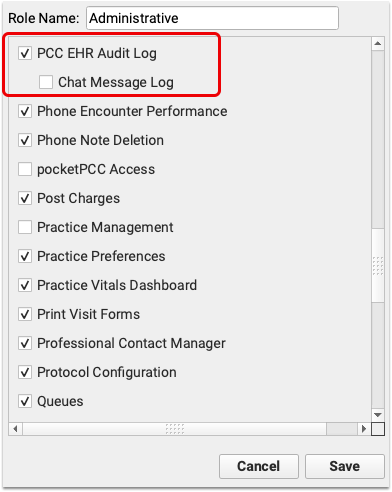
When logged in as a user with the above permission enabled, the Chat Message Log is a separate tab within the PCC EHR Audit Log.

Select a range of dates, and one or more users. Be careful when selecting date ranges and users, as this report pulls the full text of all chats within the selected date range for each selected user, so chat log results can quickly get very large.
Once you’ve narrowed down your report filters, click “Run” to run the report.
The results are listed, by default, oldest to newest, so you can read the results as a conversation, from the top to the bottom. Each conversation can be collapsed or expanded using the arrow to the left.
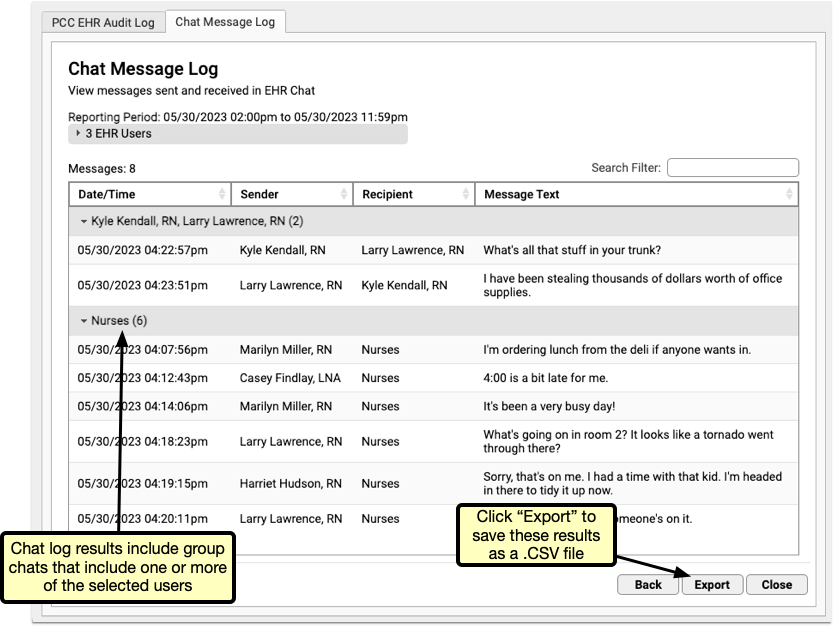
When multiple users are selected, results will include all interactions between two or more of the selected users.
Selecting Multiple Users: When more than two users are selected, Chat Message Log results will include all interactions between two or more of the selected users. If a group chat includes two users you selected and a third you didn’t, that group chat will be included in the results.
Report on More Order Statuses
In PCC 9.7, you can use additional statuses to filter and sort orders-based reports in the PCC EHR Report Library.
With the exception of immunization orders, you can filter orders on reports by Refused, Canceled, and Contraindicated in addition to the Complete and Not Completed statuses.
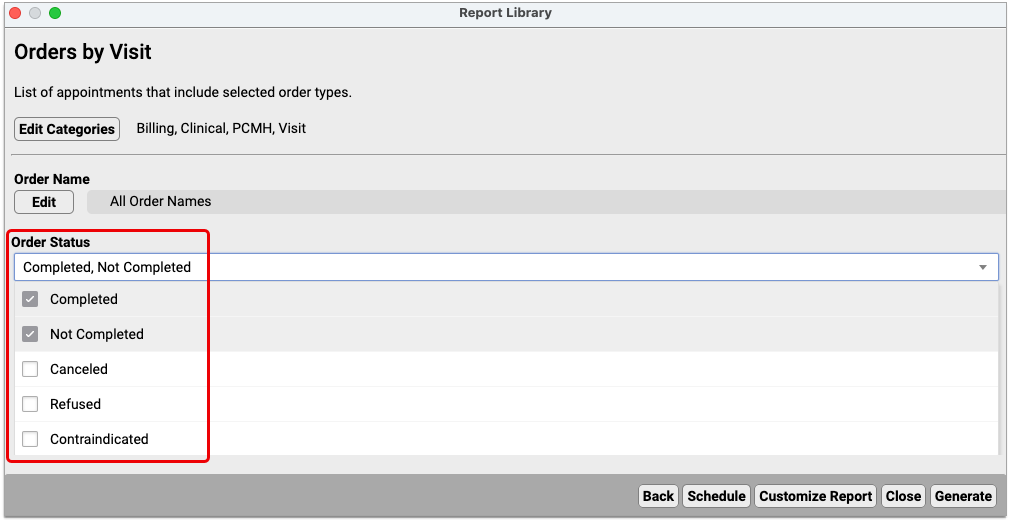
Reports that allow you to report on orders include the standard Orders, Orders by Visit, Broadcast Messaging Patient List, Chronic Condition Recall, Patient List, Patients Overdue for Weight Management, and Preventative Care Recall reports and their custom versions.
More granular order status reporting supports your practice’s ability to meet Patient-Centered Medical Home (PCMH) recognition requirements.
Report on Gender Identity and Sexual Orientation in Aggregate
If your practice documents patients’ gender identity and sexual orientation, you can report on that data in the PCC EHR Report Library without compromising patients’ confidentiality.

The Patient Count and Percentage by Gender Identity and Patient Count and Percentage by Sexual Orientation reports provide an aggregate view of how your patients self-identify. These reports support your practice’s ability to meet Patient-Centered Medical Home (PCMH) recognition requirements.
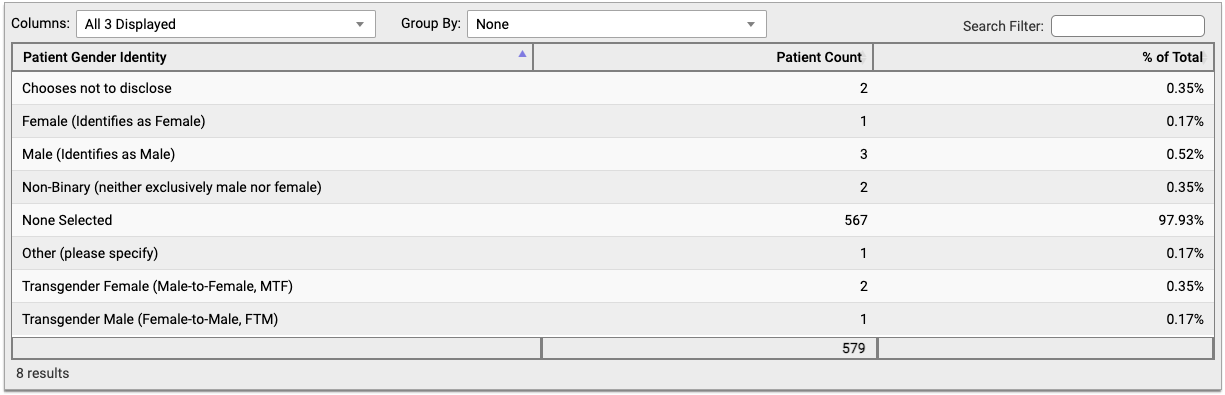
The new reports take measures to de-identify patients by reporting only aggregate results. The counts and percentages are based on the actual number of patients who self-report a particular identity. It is not possible to report on individual patients’ gender identity or sexual orientation in the PCC EHR Report Library.
To learn more about documenting gender identity and sexual orientation in PCC EHR, read Record Sexual Orientation and Gender Identity in a Patient’s Chart.
Smarter Page Orientation When Printing Reports
When you print a report from the PCC EHR Report Library that has nine or more columns it will automatically orient in landscape format. Reports with eight or fewer columns will orient in portrait format. This orientation will automatically be set within your workstation’s print dialog window.
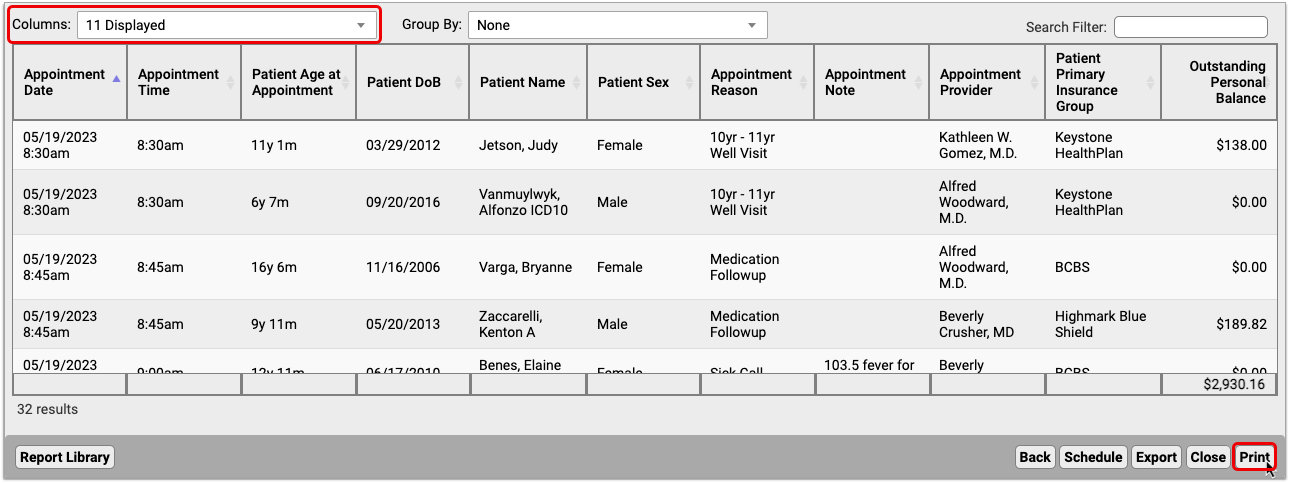
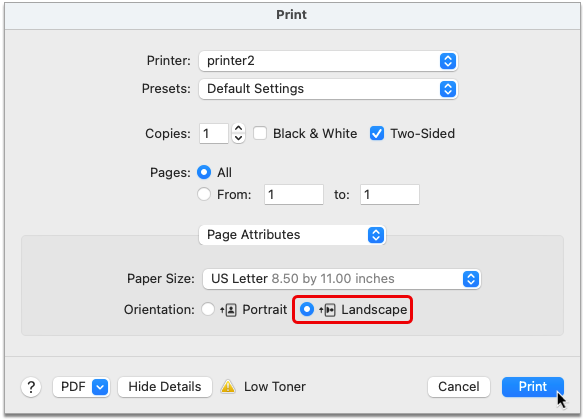
You can optionally switch away from the suggested page orientation. Please note that changing the page orientation may result in shrunken report output that does not optimally fit the printed page.
If you include too many columns on your report in either page orientation, some of them may be cut off from the printed output, depending on the width of the columns. For reports with significantly more than nine columns, double-check that the printed output includes all of the same information you can see on your screen. If some of the information is cut off, consider hiding one or more columns to adjust the output to fit.
Other Updates and Improvements
PCC 9.7 includes other notable updates and improvements.
COVID-19 Vaccine Codes and Other Billing Code Updates
PCC updates your system to support coding and billing in line with changing guidelines. During the PCC 9.7 release cycle, we updated your system to support new COVID-19 vaccine codes and new ICD-10 codes.
-
Addition of 0174A: In early April, PCC updated all client systems to support the billing of 0174A, the administration of the bivalent Pfizer COVID-19 vaccine as a booster for patients between 6 months and 4 years of age. PCC updated your practice’s claim validation lists for the new code.
-
New 2023 ICD-10 Codes: In early April, CMS issued an update to the 2023 ICD-10-CM. The update added 42 ICD-10 codes, including diagnoses for financial abuse, maltreatment, neglect, health literacy, a patient’s physical environment, financial hardship, and more. PCC updated your practice’s ICD-10 list. The new codes and guidelines are valid for dates of service starting on April 1st. You can learn more about the new codes by watching May’s Pediatric Billing Drop-In recording.
-
Addition of More Bivalent COVID-19 Administration Codes: In late April, the FDA removed EUA for monovalent COVID-19 vaccines and expanded authorization for bivalent vaccines. This resulted in new administration billing codes (0171A, 0172A, 0151A, 0121A, 0141A, 0142A). These codes are retroactively available to April 18th. PCC updated your practice’s claim validation lists for the new codes.
Other Feature Improvements in PCC 9.7
-
Under-the-Hood Improvements to the Summary of Care Record: In order to help your practice meet third-party requirements, PCC 9.7 adds billed ICD-10 codes and the patient’s primary care provider’s taxonomy code and tax ID to summary of care records generated in PCC EHR. These new pieces of information are not visible in the human-readable summary of care, but are included in the underlying message that gets transmitted to recipients.
-
More Descriptive Error Message When Your Immunization Registry Finds Too Many Patient Matches: A more descriptive error message makes it clear when you cannot retrieve a patient’s records because your immunization registry found too many patient matches. Learn how to resolve this and other immunization retrieval errors in Look Up and Import Patient Immunization Records from Your Local Registry.
-
View Claims Logs Tab Without Closing the Tool: After you process and submit claims, you can now immediately review the submission in the Logs tab of the Claims tool in PCC EHR.
-
Payments on Receipts in Chronological Order: When you use the Payments tool in PCC EHR to generate a receipt that shows more than one payment, the payments will now always appear in chronological order by transaction date.
-
2023 May VIS and EUA Updates: In May, PCC updated the Vaccine Information Sheets (VIS) list on your practice’s PCC system to the latest code set. This update included changes to the EUAs listed for COVID-19 vaccines as well as the VIS listed for Pneumococcal Conjugate and Hepatitis B Vaccine.
-
Update to North Carolina BCBS Claim Status Reporting: North Carolina BCBS changed their Electronic Claim Audit Report, causing claim statuses to not appear correctly in PCC’s software. PCC fixed this problem and patched the solution to all affected clients during the PCC 9.7 release cycle.
Bug Fixes in PCC 9.7
PCC 9.7 includes some notable squashed bugs.
-
Truncated Dispense Quantities on Prescriptions: Prior to PCC 9.7, the dispense quantity value on prescriptions was being truncated at the decimal mark, which sometimes resulted in prescriptions for an incorrect amount or a nonstandard package size. This was especially noticeable with 6.7- and 8.5-gram albuterol inhalers, whose dispense quantity values were being truncated to 6 and 8 grams respectively. PCC 9.7 fixes this issue. Dispense quantity values now retain their decimals.
-
Page Hangs after Deleting an eRx Favorite: Prior to PCC 9.7, the My Settings page in PCC eRx did not refresh after deleting a favorite, causing it to appear as if PCC eRx was “stuck” on the deleting screen. In PCC 9.7, the page refreshes properly after you delete a favorite and you can carry on with your work.
-
Dispense Quantity Recalculates on Prescriptions Started from Favorites: When you prescribed from a favorite prior to PCC 9.7, the saved dispense quantity value was recalculated according to dose and days supply. When you prescribe from a favorite in PCC 9.7, the prescription reflects the dispense quantity value that was saved in the favorite.
-
Error When Creating an eRx Favorite from a Pending Prescription: Prior to PCC 9.7, an asynchronous error would occur when attempting to save a favorite while editing a prescription that was pending on the Rx Queue. This is fixed in PCC 9.7 and you can create a favorite while editing a pending prescription on the Rx Queue.
-
'Ampule' Displays in Certain Prescription Views Instead of the Appropriate Unit of Measure: A patch introduced in October 2022 ensured that prescribers would continue to be able to write prescriptions for bags, bottles, boxes, containers, cartridges, devices, inhalers, pen syringes, packs, syringes, tubes, and vials. This was achieved by mapping these units of measure to an NCPDP-compliant term before transmission. While prescriptions that use this mapping have been transmitting to pharmacies with an accurate, compliant term for dispense unit of measure, certain views in PCC eRx, including renewal requests, have erroneously been displaying “ampule” as the unit of measure instead. This has been fixed in PCC 9.7 and all prescription views now display the dispense unit of measure that was actually transmitted to the pharmacy.
-
Erroneous Missing Dose Warning on Weight-Based Prescriptions: In rare cases, weight-based prescriptions that listed a dose would nevertheless show the warning “Medication is incomplete. Dose is missing.” This is resolved in PCC 9.7.
-
Slow Loading Times in Patient Portal: Families encountered longer than usual loading times within the Patient Portal. PCC identified the cause of this long load time and corrected it with a patch during the 9.7 release cycle.
-
Incorrect pocketPCC Metric Percentile Calculation: When using pocketPCC, entering a patient’s weight in metric would display an incorrect percentile calculation. This has been corrected and the correct percentile now appears.
-
Incorrect Payment Tool Access Permissions: In PCC 9.7, permission to access the Payments tool from within a patient’s chart will be controlled by the same user role permission as accessing the tool from the Tools menu.
-
Personal Payments Failing to Appear on Reports: In some circumstances, a personal payment posted in PCC EHR would not appear on certain Practice Management payment-based reports when they were filtered to show only personal payments. PCC 9.7 corrects this issue.
-
Problems When Tabbing in an Immunization Order: The PCC 9.6 update changed the tab sequence inside immunization orders, which caused some fields to be skipped when a user pressed the tab key to move from field to field. PCC 9.7 corrects this issue.
-
External Cause Diagnoses Could Lead to Claim Issues: When an External Cause diagnosis (W, X, Y, or V code) was linked to a ‘Same’ procedure, and that procedure became the first charge on a claim, the claim could fail to process and require a PCC support call. PCC 9.7 corrects this issue by maintaining the order of charges so the Same procedure is not first.
-
Unable to Clone Protocols: In PCC 9.6, users were unable to clone protocols in the Protocol Configuration tool. PCC 9.7 corrects this issue.