The oops Charge History Screen
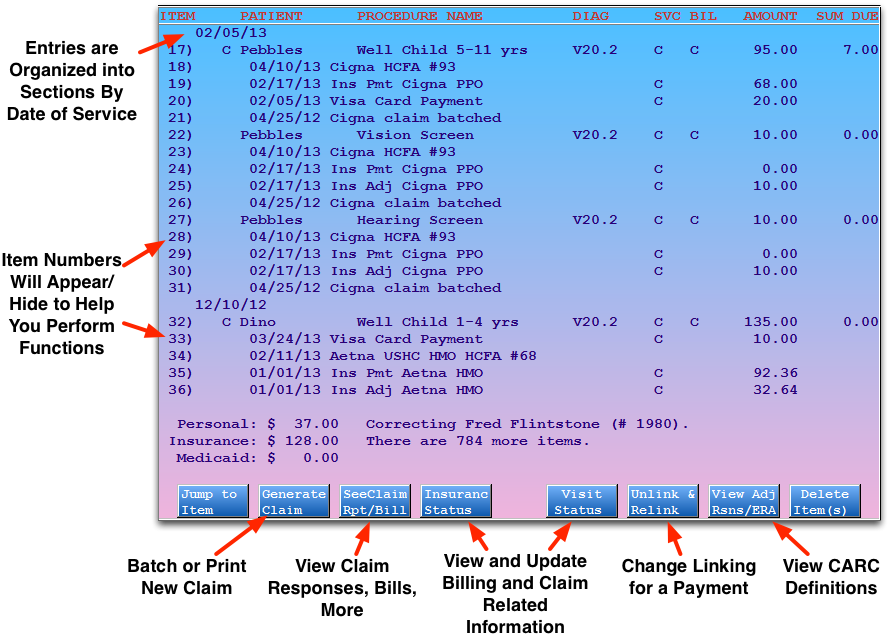
The main screen in oops shows a history of account transactions. The most recent transactions appear at the top. Charges are grouped by date of service. Claim submission history, billing messages, and payments all appear beneath the charges to which they are linked. Every item has a line number for quick selection.
Contents
Press Page Up or Page Down to scroll through the history. You can also use the up and down arrow keys to scroll ten lines or the right and left arrow keys to scroll up or down line-by-line.
Enter Item Numbers: When entering items numbers for different actions in oops, such as batching a claim or changing insurance status, you can either type in each of the numbers separated by spaces or commas, like “1 2 3 4 5 6” or “1,2,3,4,5,6”, or you can use a range, such as “1-6”. You can also combine these methods: “1,3-5”.
Jump to Information on a Claim: Press C and enter a claim number to jump to the section of the history that pertains to that claim.

Understand Charge and Visit Details in oops
Charges in oops are grouped by date of service. Each charge shows the patient name, procedure name, diagnosis code, provider initials, amount charged, and amount due. Since all items in oops have a number line at the left, you can easily select specific charges with which to work.

Charge Status Indicators
You may see several letters or an asterisk (*) between the date of the charge and the patient’s name. These indicate basic insurance status information about the charge:

The letter A indicates that the charge is flagged as an accident. Accident information will appear on the insurance claim. Press [fkey title=’F5′ subtitle=’Visit Status’ display=’inline’ /], enter the number of the charge, and then press Page Down to review or change the accident information.
The letter P indicates that some portion of the charge is currently pending an insurance company. Once the charge has been fully paid off or no longer pends an insurance company, the P will disappear.
The letter C indicates that the charge has a copay charge linked to it. The C appears whether the copay has been paid off yet or not. Copays are not procedures, they generally occur as part of the amount due for an office visit or physical procedure.
An asterisk (*) indicates that the charge currently pends a Medicaid policy.
Providers
The Correct Mistakes program displays the provider initials for both the Servicing and Billing providers.
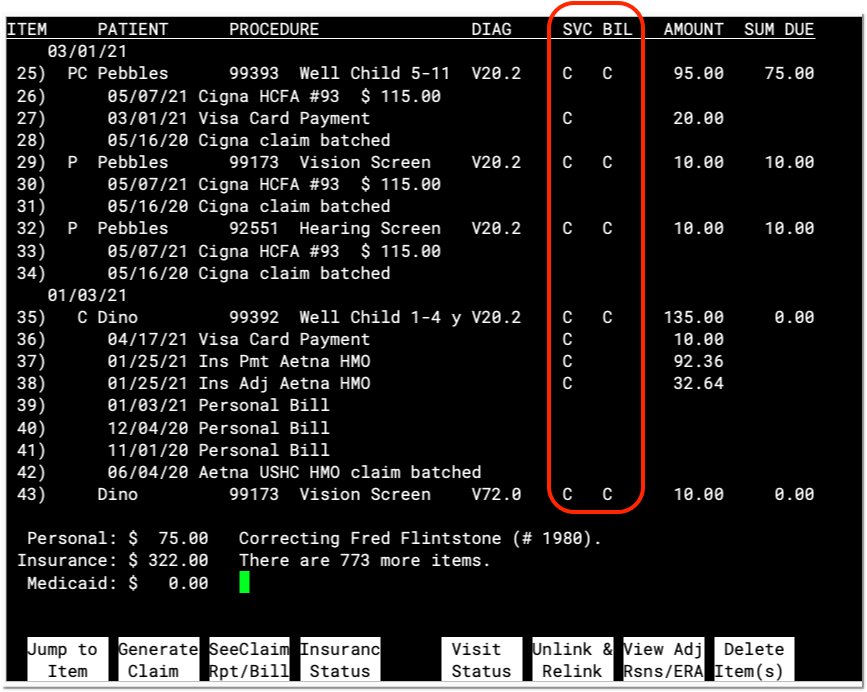
Press [fkey title=’F5′ subtitle=’Visit Status’ display=’inline’ /] and enter one or more charge numbers to learn more information.
Read Billing History Messages
In addition to charge and payment information, oops displays billing messages and other important data. For example, you will see entries indicating when a claim was sent, when an electronic clearinghouse received a claim, and when a personal bill was generated.

In the example above, the charge was sent by ECS to ProxyMed (a claim clearinghouse) and then to USHC on 4/26/05. A USHC insurance payment and adjustment were posted in [link href="../PostInsurancePayments/ManualPostingReference/ClaimsPostPipIntro.htm"]pip[/link] on 5/24/05, and a personal bill (for the unpaid copay amount) was printed on 6/15/05. Note that the USHC check number is also shown.
More Information: Additional information or a full report may be available for some billing messages. Press [fkey title=’F3′ subtitle=’See Claim Rpt/Bill’ display=’inline’ /] and enter the item number to read the full report, if available. Read Review Electronic Claim Responses in oops for an example.
E – Toggle Billing History: With all the different steps a claim passes through, your oops screen can get very cluttered. Press E to hide billing history notes. The oops listing will collapse and show you only charge and payment information. Press E again to reveal the billing information. To increase the number of visible lines in oops, you could also learn about making your Partner window bigger by reading Larger Partner Windows.
Review Payments and Adjustments in oops
Payments and adjustments appear in oops with information similar to charges: a description, a date, a provider, and an amount. The description includes the payment type, and may include a CARC code that explains the payment or adjustment. Payments and adjustments appear underneath the charge they are applied towards, so you can review the full history of the charge as a series of events.
CARC Codes
The numbers that sometimes appear with payments and adjustments are the Carrier Adjustment Reason Codes.
Partner reads these codes directly from your ERAs. You can also enter them manually if you use the Post Insurance Payments (pip) program.

You can use the CARC codes to help research and understand why a certain payment occurred.
Press [fkey title=’F7′ subtitle=’View Adj Reasons’ display=’inline’ /] and enter an item number to read a description of the codes.


For more information on what CARC codes mean and how they work in Partner, read CARC Codes in Partner.
Split Payments
If a single payment is applied to more than one charge, it will be indicated using item numbers:
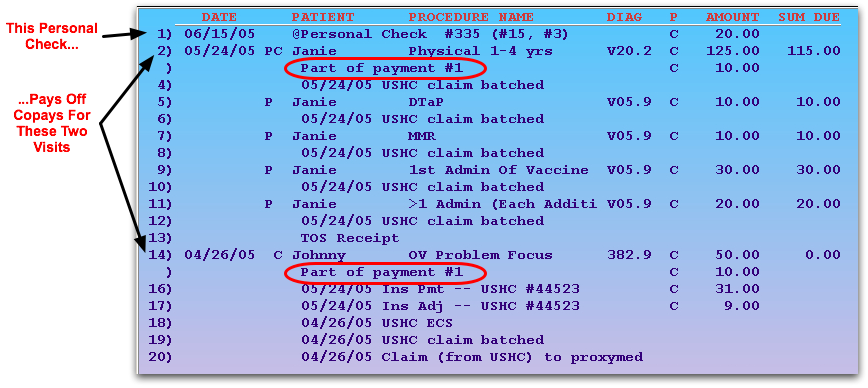
The numbers listed with the payment indicate which charges the payment pays off. The 6/15/05 payment shown above at number 1 is applied to both the physical copay charge on 5/24/05 as well as the OV Problem Focus copay charge on 4/26/05.
Unlinked Payments
If a payment is not applied to any charge, it is called an “open-item” payment or “unlinked”. Open-item payments appear after charge entries and may not have dates in front of them. Linked payments appear underneath the charges they pay off and have posting dates in front of them.
Partner calculates both open-item and linked payments towards an account’s final balance. If a family pays you $50, for example, and you post it without applying it towards a charge, their account will still reflect the payment. However, it will be difficult for you to research how the unlinked money is applied, and sorting out the account’s charges will be more difficult. You should use [fkey title=’F6′ subtitle=’Unlink & Relink’ display=’inline’ /] to link any open payments. You should also link every payment when it is first posted in pam.
Read Post Personal Payments to learn how to post a personal payment or adjustment against a charge.
Function Keys on the Charge History Screen in oops
From this screen, you can perform (or begin) the following actions:
Press F1 and enter an item number or a date. You will be taken to that item/date in the history.
Press F2 and enter charge item numbers to batch a new claim or print a HCFA form immediately. Separate item numbers with a space.
[fkey title=’F3′ subtitle=’See Claim Rpt/Bill’]
Press F3 and enter an item number to see more information about a billing message item. For example, you can use F3 to read the full response from a payor, read the text of a personal bill, or see the raw data file of a claim.
Read the Electronic Claim Responses section for an example.
[/fkey]
Press F4 and enter charge item numbers to view the Insurance Status screen. On the Insurance Status screen, you can change the responsible party of a charge or modify the copay amount. Whenever you change insurance status, you should batch the updated charges for resubmission or print a new claim.
Press F5 and enter charge item numbers to view the Visit Status screens. On the Visit Status screens, you can view and change diagnosis and other HCFA specific information related to a charge, such as billing provider, referring provider, authorization numbers, accident dates, etc.
[fkey title=’F6′ subtitle=’Unlink & Relink’]
Press F6 and enter an item number of a payment to unlink or relink it. You might want to do this when cleaning up an account balance problem.
Next, oops will summarize the payment(s) you selected, and allow you to relink it to another charge, or leave the payment unlinked.
For an example of relinking a payment, Relink a Payment
[/fkey]
[fkey title=’F7′ subtitle=’View Adjustment Reasons / ERA’]
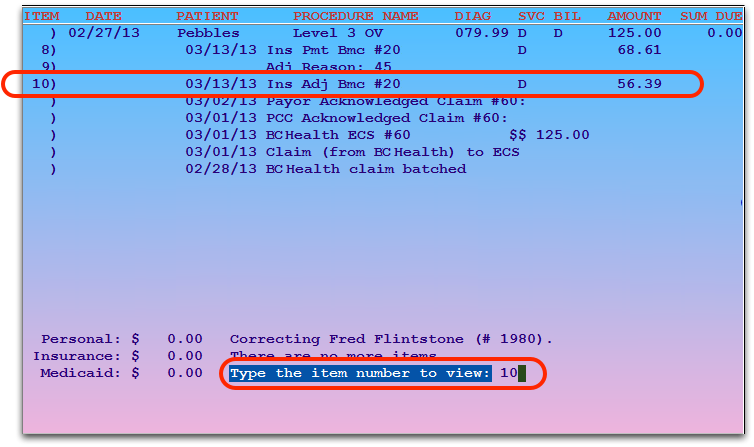
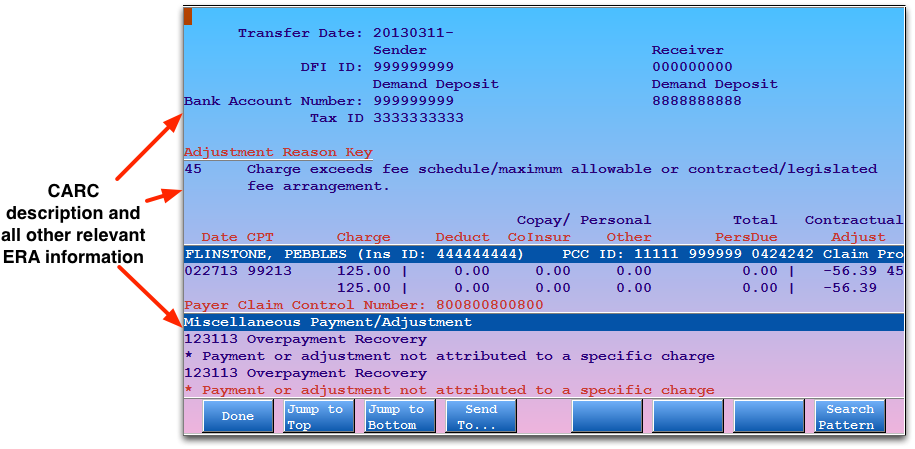
Press [fkey title=’F7′ subtitle=’View Adj Rsns/ERA’ display=’inline’ /] and enter an item number to read a description of the codes.


If you select an item with associated ERA information, Partner will display the relevant ERA section.
[/fkey]
Press F8 and enter item numbers to delete items from the account history. You will be asked to confirm your choices before they are deleted. Once deleted, items can not be retrieved. Partner keeps a log of which user deleted an item and how that action affected the account’s balance. You can review this log by running the daysheet or dsscan programs. Contact PCC for more assistance.
