Recaller Output Reference
After selecting criteria or restoring a saved Recaller report, use the Output screens to specify what you will generate with the Recaller results. You can create patient lists, form letters, mailing labels, or a subtotal report.
After selecting an output type and a sorting method, press [fkey title=’F1′ subtitle=’Process’ display=’inline’ /] to proceed to additional output questions or the final output selection screen.
Details on each section of the Output screen and options, along with information about the additional questions or screens for each output type, appear in the reference below.
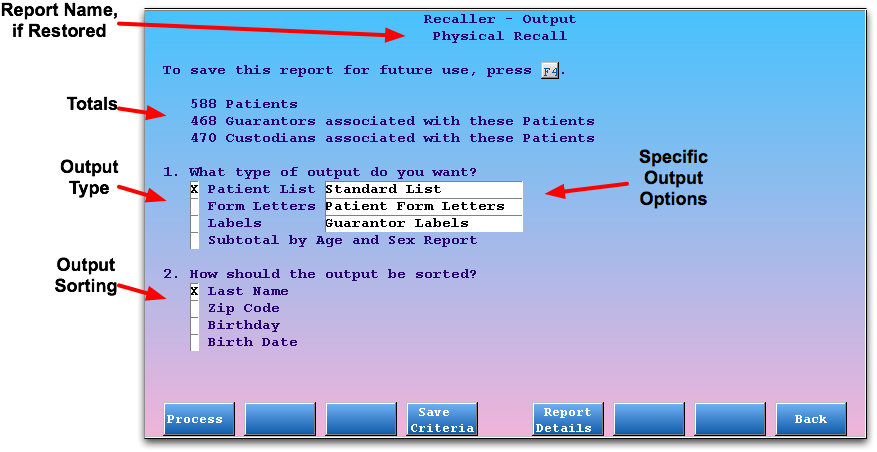
Totals
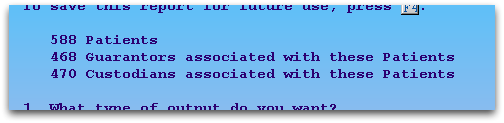
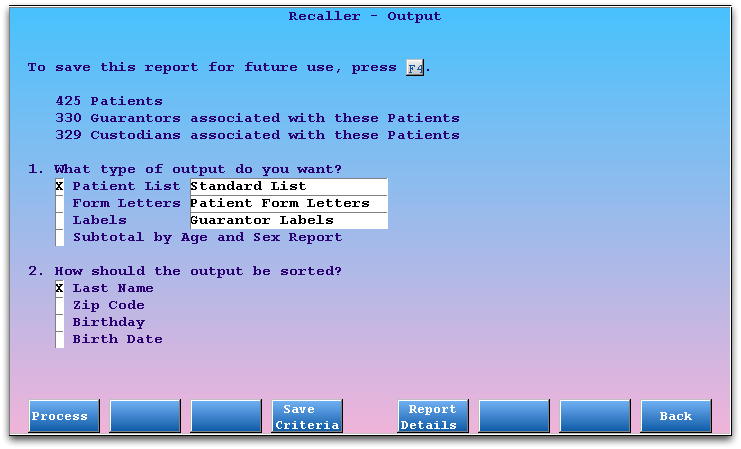
The top section of the screen indicates report totals. Since the Recaller finds patients by both patient and family characteristics, it lists patient, guarantor, and custodian totals. These numbers will differ because some families have more than one patient meeting your recall criteria, and patients may have different custodians and guarantors.
Recaller Output Types
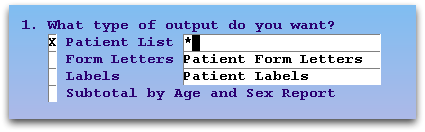
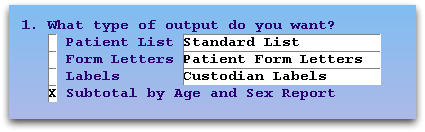
The first question on the Output screen asks what type of report output you wish to generate.

Patient Lists
A patient list includes basic information about each found patient. You might use a patient list to contact a list of patients by phone, or export the list to another program or an auto-calling system.
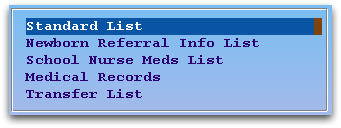
After checking off “Patient Lists”, use the asterisk (*) to select the specific patient list.
Customize Patient Lists: Patient lists work just like form letters, described below, except that they use only a line or two for each patient.. You can create a patient list using waffle, including any text and patient or account variables. PCC Support can move your custom lists from the form letter section to the list section.
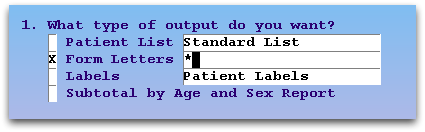
Form Letters
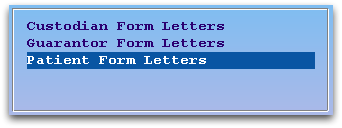
You can output a form letter for each patient found in your Recaller results. Select the Form Letters option, and then choose which list of form letters to select from.
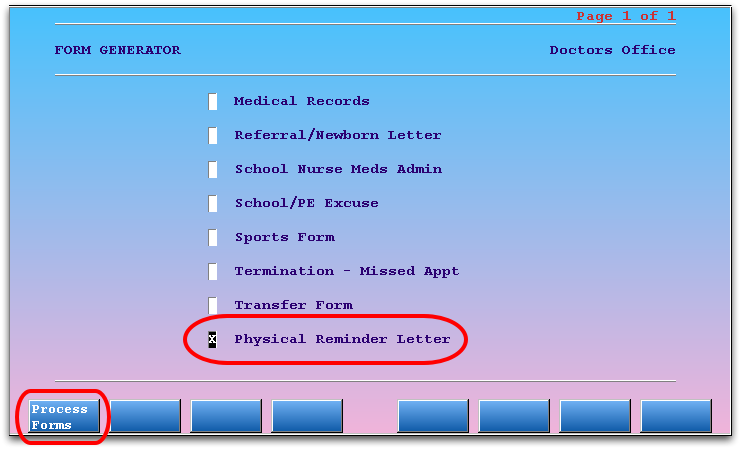
When you press [fkey title=’F1′ subtitle=’Process’ display=’inline’ /], the Recaller will prompt you to choose a specific form letter and may ask you form-letter specific questions.
Custom Form Letters: You can create, edit, and share form letter templates using the waffle program.
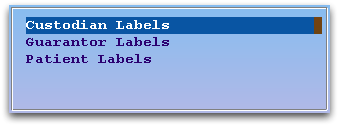
Mailing Labels
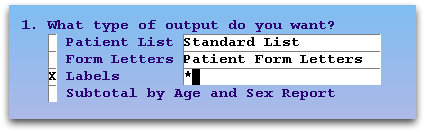
You can create printable labels, formatted to standard Avery sizes or your own custom label. Select the Labels output, and then indicate whether you want one label for each patient, custodian, or guarantor.
When you press [fkey title=’F1′ subtitle=’Process’ display=’inline’ /], the Recaller will prompt you to select or design your label.
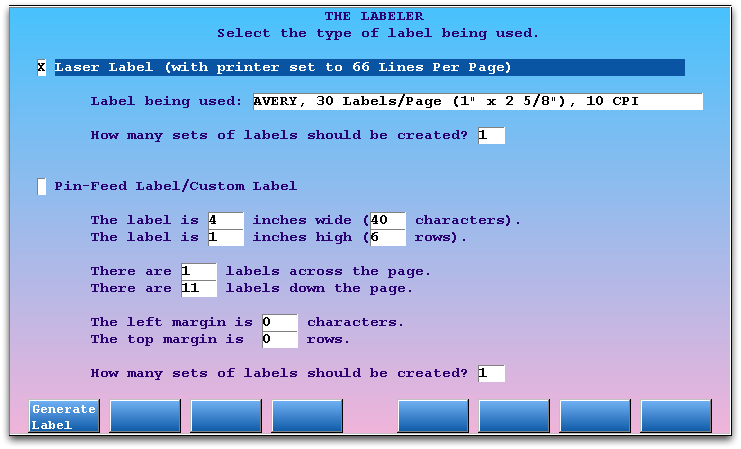
Laser Labels: Select the Laser Labels option, select your Avery label, and put the labels in your printer’s drawer or manual feed. Note that your printer should be configured to 66 lines per-page. PCC Support configures all printers to 66 lines per-page during our installation visit to your office, but you may want to create a test recall with only a few patients before printing a large batch.
Pin-Feed or Custom Labels: Select the Pin-Feed Labels option, enter your label dimensions, and load the labels into your printer.
Multiple Sets: If you need two or more copies of each label, enter a number for the “How many sets of labels should be created?” question under the Laser Labels or Pin-Feed Labels sections.
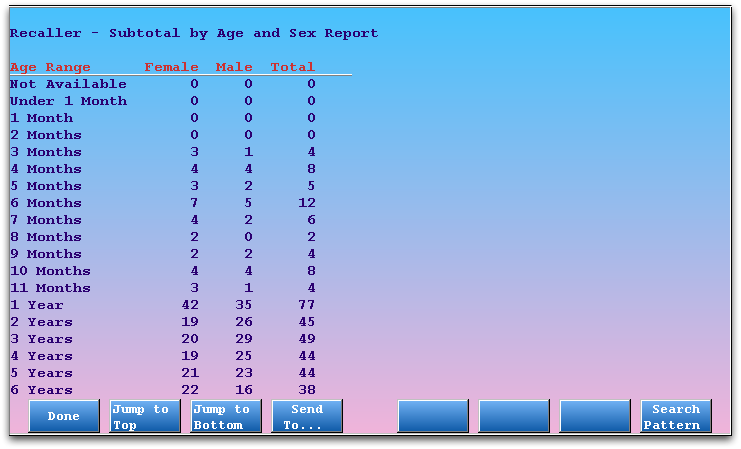
Subtotal By Age and Sex Report
Sometimes, instead of contacting a list of patients, you may wish to view detailed totals of the patients found by your Recaller criteria. Select the Subtotal By Age and Sex Report and press [fkey title=’F1′ subtitle=’Process’ display=’inline’ /].
Recaller Sorting Options
After selecting your output type, you can indicate a sorting method. You can sort the output, whether it is a list or a stack of form letters, by last name, zipcode, birthday or birth date.
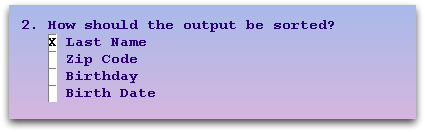
Birthday or Birthdate?: If you are printing physical reminders or birthday cards, you may want to sort the patient list by their birthday, regardless of the year of their birth. If you are generating other materials, by age, you may wish to sort patients by actual birthdate, including the year.
Output Selection
After choosing an output, pressing [fkey title=’F1′ subtitle=’Process’ display=’inline’ /], and answer any additional questions. The Recaller will display the standard Partner Output Selection screen.
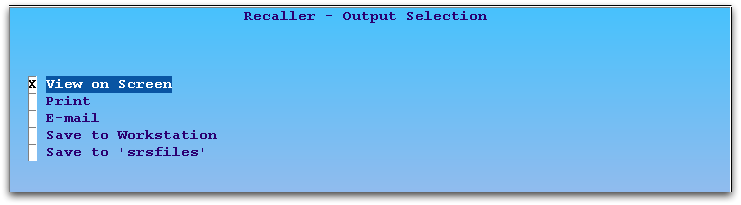
You can view the results on the screen, send them to a specific printer or e-mail address, or save the results to a computer or the srsfiles program. You could also review items on the screen first, and then press F12 or F4 to return to these options and send the output to the printer.
For more information about the Partner default Output Selection screen, read Report Destination Selection.
Recall Patients for Physicals
Reminding patients and families about their physicals is good for your patients and good for your practice. The Recaller can produce phone lists, form letters, and mailing labels for patients who are overdue for a physical or have a physical due date coming up soon. For more information on using the Recaller, read the Recaller Quickstart.
Read the steps below to learn how an office could recall for physicals.
Add Physical Due Date Criteria
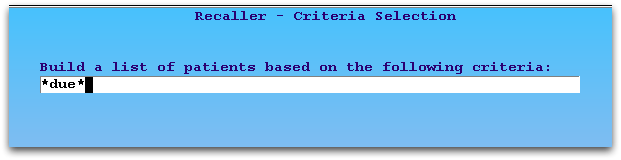
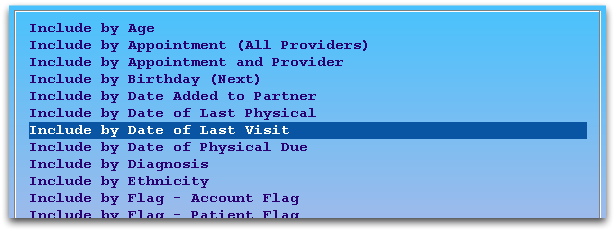
After running the Recaller, select the “Include by Date of Physical Due” for a physical criteria. You can search for it by entering “*due*”, as shown.
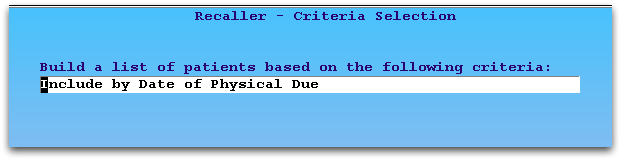
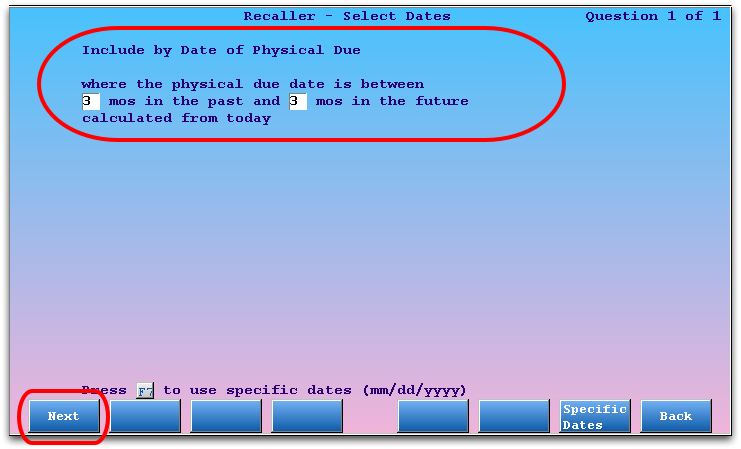
Enter a date range that will include patients who have recently missed their physical due date and/or those for whom the time for a physical is approaching.
Note: A patient’s next-due physical date is set, based on your office’s custom physical schedule, whenever they are billed for a Well Child procedure. You can also change a patient’s physical due date in the Patient Editor (notjane).
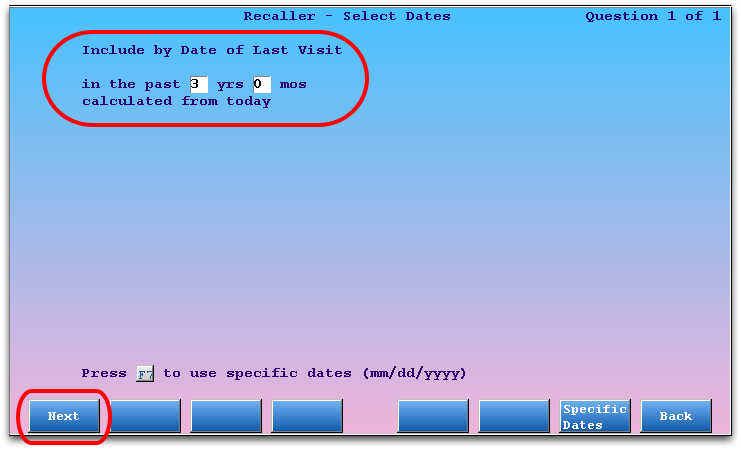
Add Last Visit Date Criteria to Find Active Patients
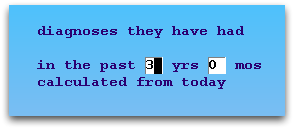
Use the Last Visit criteria to limit your recall to active patients, those who have visited your practice in the past three years or so.
Add Account and Patient Flag Criteria to Exclude Removed Patients
Use the two “Exclude by Flag” criteria to remove Inactive, Dismissed, Deceased, or other sets of patients or accounts that you do not want to include in your recall.
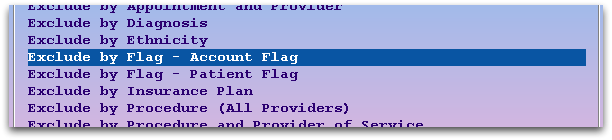
You can also use the Exclude by Flag criteria to remove patients and families who have asked not to be contacted. Read Exclude Patients From Recaller and Notify to learn more.
Add Exclude by Appointment Criteria to Avoid Patients with Upcoming Appointments
Since you don’t want your Recaller output to include patients who already scheduled an upcoming physical, select the “Exclude by Appointment” criteria. Then enter a date range and select all physical visits.

Optional: Add Additional Criteria
You may also choose to limit your well child recall to certain geographical locations (by zip code), primary care physician, or other criteria.
Optional: Review Criteria
At any time, press [fkey title=’F5′ subtitle=’Report Info’ display=’inline’ /] to review the specific details you have entered for each criteria in your recall.
Press [fkey title=’F1′ subtitle=’Done’ display=’inline’ /] to continue.
Optional: Save Your Physical Recall for Later Use
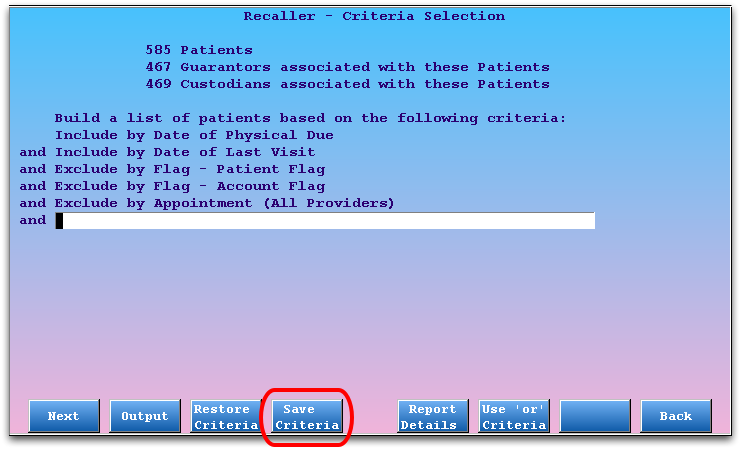
You can save and restore your criteria settings for a report so you will not have to rebuild them whenever you run a physical recall. Press [fkey title=’F4′ subtitle=’Save Criteria’ display=’inline’ /] from the criteria screen, enter a name, and press F1.
For a complete guide to re-using Recaller report sets, read Saving and Restoring Recaller Settings.
Select Output, Finish Recall
Press [fkey title=’F2′ subtitle=’Output’ display=’inline’ /] and select your output. You can produce custom form letters, mailing labels, or a simple contact list. For a complete guide to Recaller output, read the Recaller Output Reference.
Quickstart: Recalling Patients
You can use recaller to find and contact patients who need flu shots, patients due for physicals, or any other subset of your patient population. Running recaller works the same way regardless of your goal. Follow the procedure below.
Well Visit Recalls and Saving Report Criteria: More detailed guides to running a physical visit recall or saving and restoring report settings are available.
Run the Recaller
You can run recaller from the Patient/Account Reports window or by typing recaller at a command prompt.

Enter a Criteria to Build a List of Patients
Your patient database includes thousands of patients. Enter one or more criteria that will determine which patients to recall. For a list of possible criteria, enter an asterisk and press Enter.

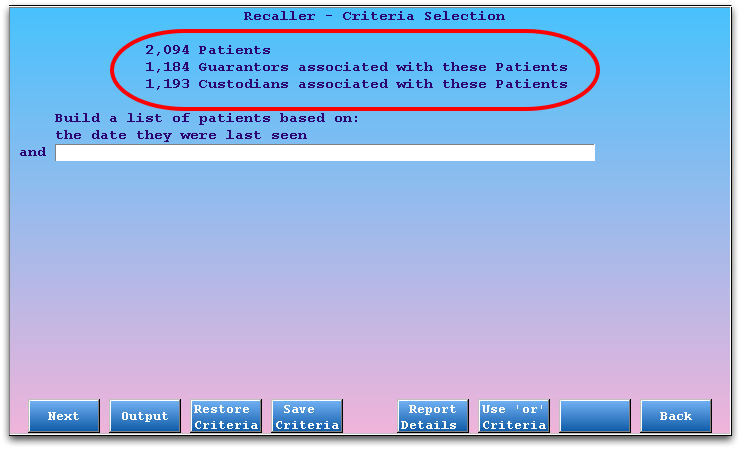
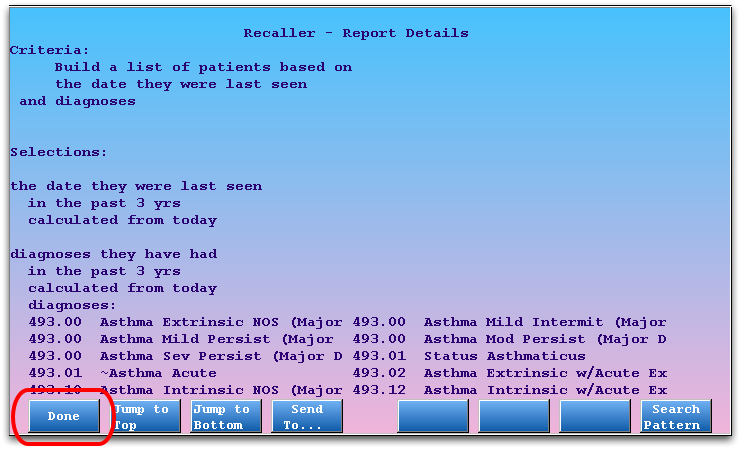
For the example above, the user needs to see all patients who have visited the practice in the past three years, a common way of displaying all “active” patients. They will therefore limit by the patient visit date criteria.
All Patients?: If you want to work with all patients in your database for some reason, enter no criteria and press [fkey title=’F2′ subtitle=’Output’ display=’inline’ /] to continue to the output selection screen. You can skip down to Step 8, below.
Press [F1 – Next]
Press F1 to add the criteria to your report and proceed to select specific details.

Enter Criteria Details
For each criteria item you select, recaller will ask you for details. You will see one or more screens asking you to clarify the criteria.
In our example, the user wishes to review a list of active patients, so they will enter a range of the past three years. The user could also press [fkey title=’F7′ subtitle=’Specific Dates’ display=’inline’ /] to find patients who had visited for a specific date range.
After answering the criteria questions, press [fkey title=’F1′ subtitle=’Next’ display=’inline’ /].
Review Patient Totals
After you have entered criteria details, Partner will return you to the first recaller screen. At the top, you can see the current account and patient totals, based on your criteria so far.
Optional: Add More Criteria
You can add multiple criteria for a more refined recall list. Add a criteria in the “and” fields by using the asterisk (*). Then press [fkey title=’F1′ subtitle=’Next’ display=’inline’ /] and answer questions to enter recall criteria details.
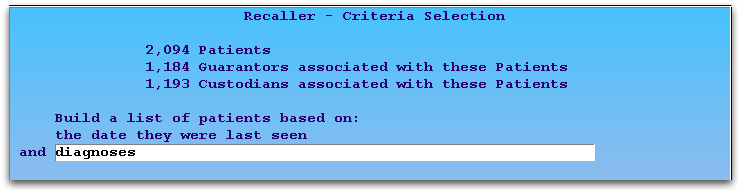
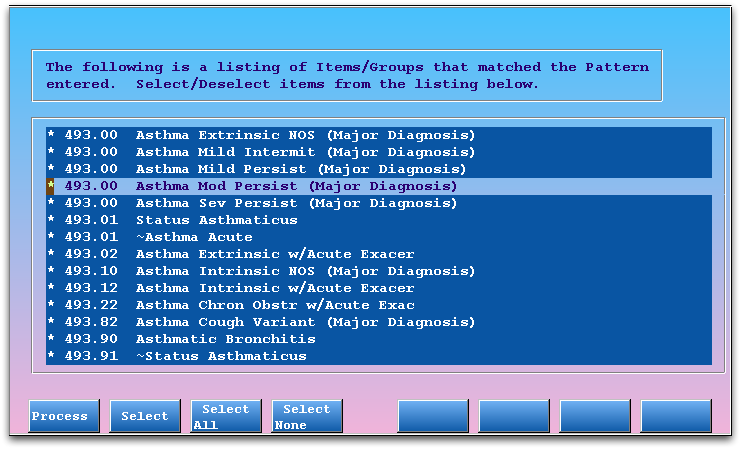
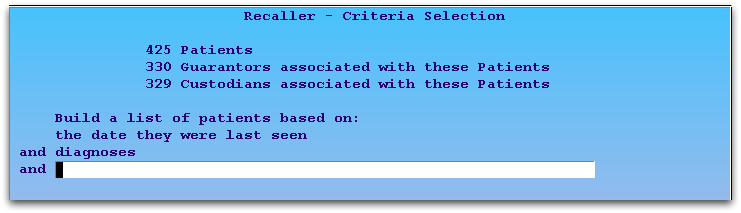
As you add additional criteria, the size of your recall list will shrink as the number of patients who meet all the criteria reduces. In the above example, the office now knows they have 425 patients who have had some kind of asthma diagnosis billed within the past three years.
Note: In the above example, the user wishes to limit the list of active patients to those who have had an asthma diagnosis of any kind. When entering diagnoses, they used the [fkey title=’F6′ subtitle=’List By Pattern’ display=’inline’ /] function. For more information on all recaller criteria and the tools for entering criteria details, read Recaller Criteria Reference at https://learn.pcc.com.
Optional: Review Criteria Details
At any time, press [fkey title=’F5′ subtitle=’Report Details’ display=’inline’ /] to review the details of your selected criteria.
Press F1, or F12 to return to the criteria list screen.
Press [F2 – Output] to Continue
Once you have finished selecting your criteria, press F2 to visit the Output screen.

Select Output
Use the first output selection question to choose what the Recaller should produce. The Recaller can create patient lists, form letters, labels, or a special age and sex subtotal report.
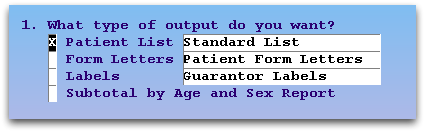
For the first three options, you can use an asterisk to select the specific style of patient list or form letter or label category. Some options, such as form letters or labels, will prompt you for details after you press [fkey title=’F1′ subtitle=’Process’ display=’inline’ /].
For a guide to all available output formats, read the Recaller Output Reference.
Select Sorting Option
Select whether your lists, form letters, or other output should be sorted by Last Name, ZIP code, Birthday, or Birthdate.
Birthday or Birthdate?: If you are printing physical reminders or birthday cards, you may want to sort the patient list by their birthday, regardless of the year of their birth. If you are generating other materials, by age, you may wish to sort patients by actual birthdate, including the year.
Press [fkey title=’F1′ subtitle=’Process’ display=’inline’ /] to Continue
Choose Output Destination
On the Output Selection screen, choose whether to send your resulting output to the screen, printer, e-mail, or file. Then press [fkey title=’F1′ subtitle=’Process’ display=’inline’ /] to continue.
Review Results, Optionally Select New Output
The default output is a patient call-back list, with custodian information, on the screen:
Press F12 or F4 to select a different output. Press F12 twice to return to the Criteria screen and add or change recall criteria.
Save and Restore Recaller Settings
You can save, and later restore, complex sets of report criteria for the Recaller. The Recaller has a wide range of criteria, with thousands of possible criteria combinations. After setting up a recall report, you may wish to save the criteria. When you return to the Recaller later, you can restore your old criteria, tweak any slight adjustments (such as a date range or type of patient to recall), and re-run the output.
Relative Dates: Many of the Recaller’s date-specific criteria use relative dates. For example, if you use the “Last Visit Date” criteria, the report will calculate for the number of days from whatever date you run the report. Since relative dates will keep your reports current and accurate, many types of reports can be saved and restored.
Save a Recaller Report
After entering your report criteria, press [fkey title=’F4′ subtitle=’Save Criteria’ display=’inline’ /] and enter a name and description to save your report.
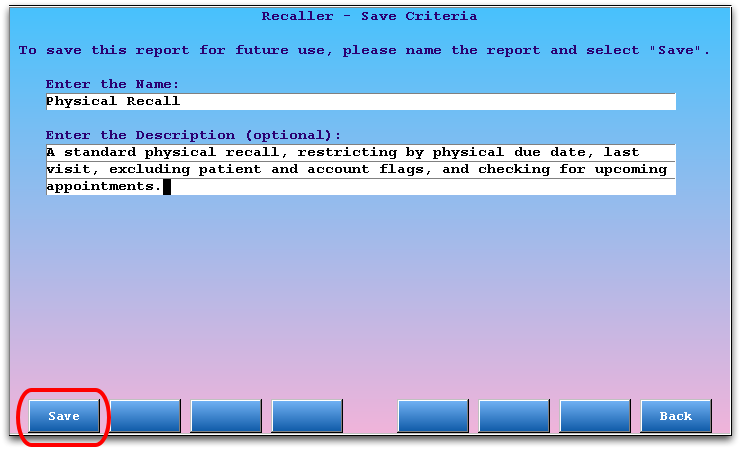
Press [fkey title=’F1′ subtitle=’Save’ display=’inline’ /] to save your report.
Restore a Recaller Report
Press [F3 – Restore Criteria] to restore a set of Recaller criteria.
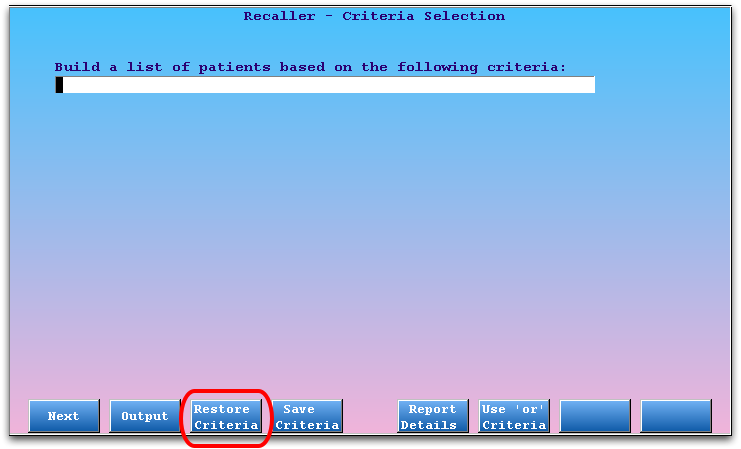
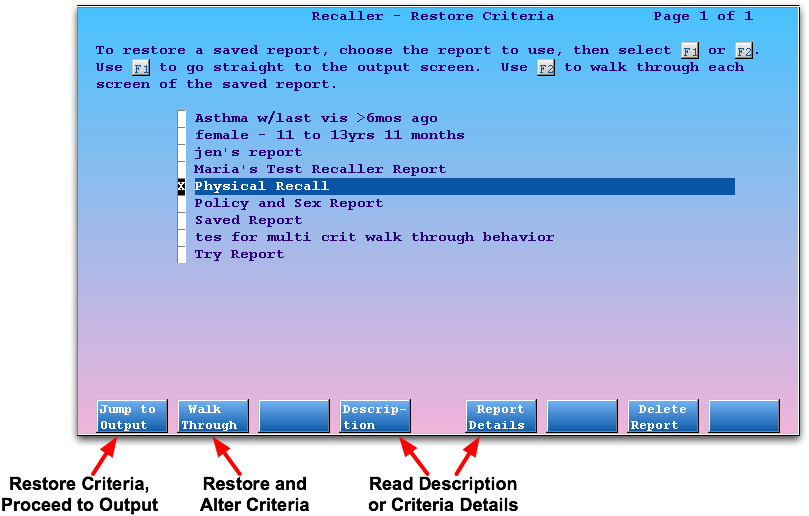
Arrows for the two options, one is “Restore Recall Criteria, Jump to Output”, “Restore and Review/Alter Criteria”
Choose from your list of criteria and then press [fkey title=’F1′ subtitle=’Jump to Output’ display=’inline’ /] to proceed to the report’s output.
Which Report Did I Want, Again?: If you have trouble discerning the report you wish to restore, you can select one and press [fkey title=’F4′ subtitle=’Description’ display=’inline’ /] to review the description or [fkey title=’F5′ subtitle=’Report Details’ display=’inline’ /] to read the details of the criteria settings.
Walk-Through Instead: If you want to restore a report and then tweak it, making slight changes to the criteria used for the recall, press [fkey title=’F2′ subtitle=’Walk Through’ display=’inline’ /] instead of F1. You will see the list of the recall’s criteria. You can then use [fkey title=’F1′ subtitle=’Next’ display=’inline’ /] to walk through each criteria and adjust dates or selected items.
Delete Old Reports: Select any Recaller report on the Restore Criteria screen and press [fkey title=’F8′ subtitle=’Delete’ display=’inline’ /] to delete it.
Video: The Recaller
The Recaller is a powerful tool for creating lists of patients and contacting them. Click below to watch a training video.
Your Office's Criteria Options: This video teaches complete Recaller functionality, including creating reports and handling output. Partner adds new features and tools every month, so there may be new criteria available in the Recaller at your office.
End Another oops Session
The Correct Mistakes (oops) program is a powerful account history editor, so only one person can use it to edit the same account at a time. Sometimes, you may need to close another user’s oops screen for a particular account, perhaps because a user closed their screen without quitting. In Partner 4.7, when you run oops for a family that is already being edited, you have the option to close the other user’s screen.
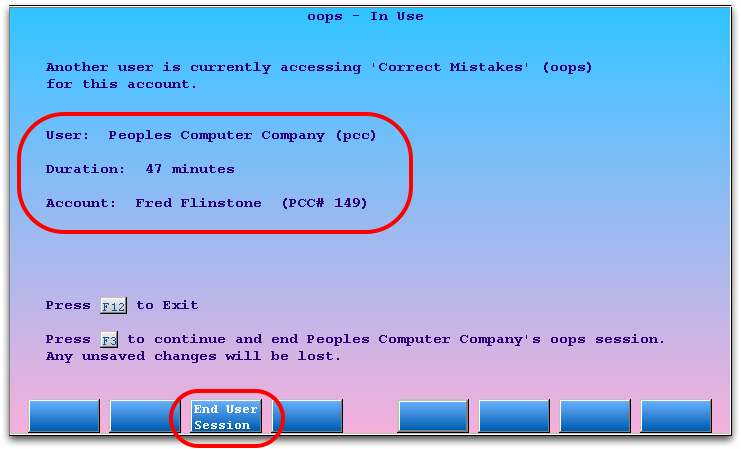
You can review the user who is editing the account and see how long their screen has been open. Press [fkey title=’F3′ subtitle=’End User Session’ display=’inline’ /] to close the user’s oops session. The user’s last completed actions are safe, as oops saves each major action as you perform it. However, you should double-check the account to make sure that any outstanding work is complete, such as claims that you may need to re-batch.
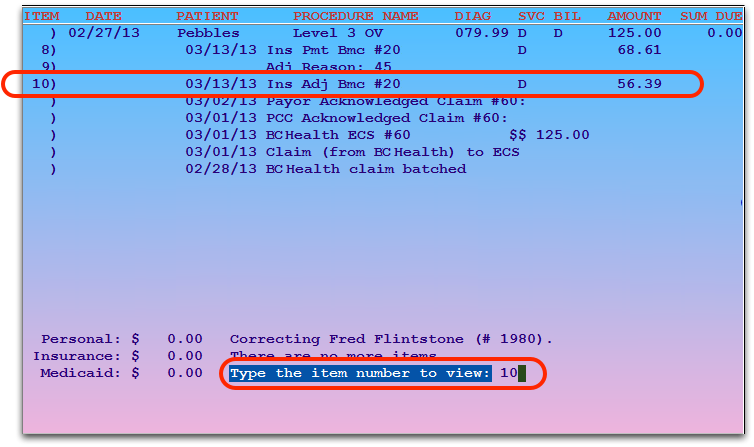
The oops Charge History Screen
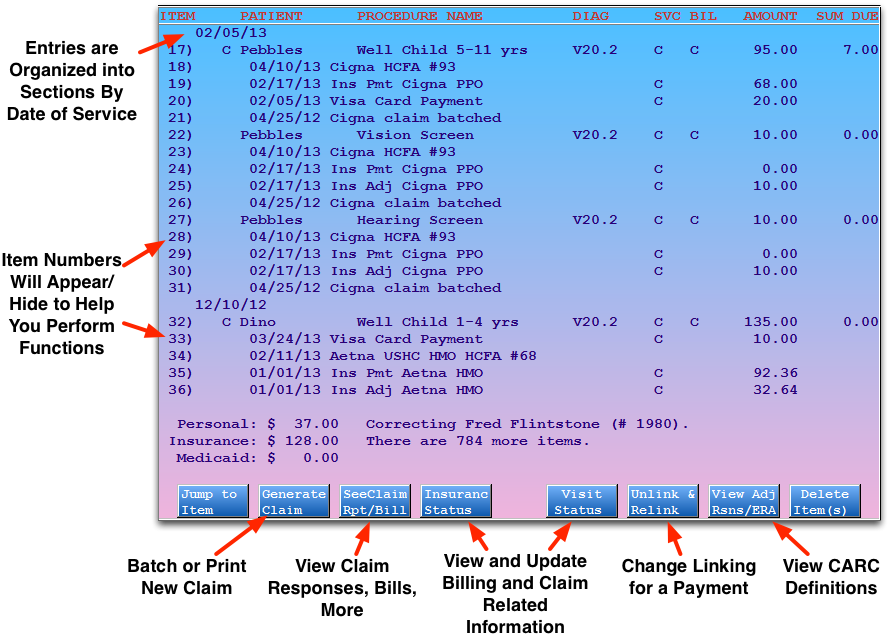
The main screen in oops shows a history of account transactions. The most recent transactions appear at the top. Charges are grouped by date of service. Claim submission history, billing messages, and payments all appear beneath the charges to which they are linked. Every item has a line number for quick selection.
Navigate the oops Charge History
Press Page Up or Page Down to scroll through the history. You can also use the up and down arrow keys to scroll ten lines or the right and left arrow keys to scroll up or down line-by-line.
Enter Item Numbers: When entering items numbers for different actions in oops, such as batching a claim or changing insurance status, you can either type in each of the numbers separated by spaces or commas, like “1 2 3 4 5 6” or “1,2,3,4,5,6”, or you can use a range, such as “1-6”. You can also combine these methods: “1,3-5”.
Jump to Information on a Claim: Press C and enter a claim number to jump to the section of the history that pertains to that claim.

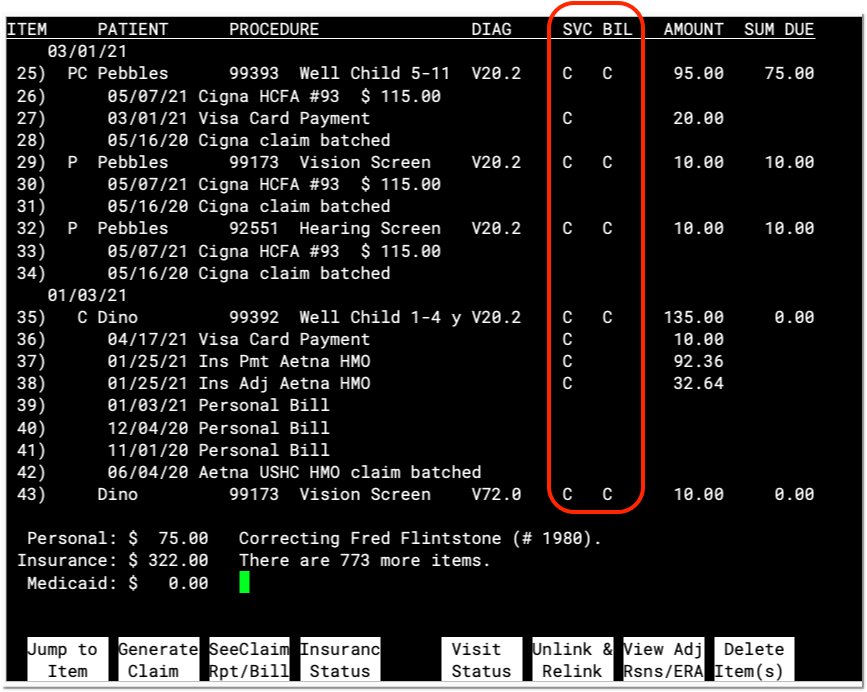
Understand Charge and Visit Details in oops
Charges in oops are grouped by date of service. Each charge shows the patient name, procedure name, diagnosis code, provider initials, amount charged, and amount due. Since all items in oops have a number line at the left, you can easily select specific charges with which to work.
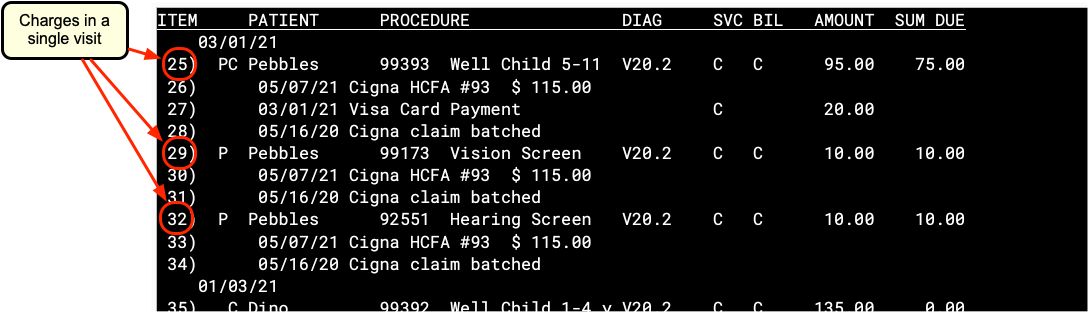
Charge Status Indicators
You may see several letters or an asterisk (*) between the date of the charge and the patient’s name. These indicate basic insurance status information about the charge:
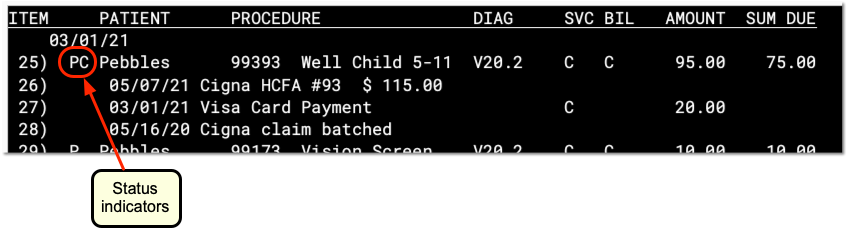
The letter A indicates that the charge is flagged as an accident. Accident information will appear on the insurance claim. Press [fkey title=’F5′ subtitle=’Visit Status’ display=’inline’ /], enter the number of the charge, and then press Page Down to review or change the accident information.
The letter P indicates that some portion of the charge is currently pending an insurance company. Once the charge has been fully paid off or no longer pends an insurance company, the P will disappear.
The letter C indicates that the charge has a copay charge linked to it. The C appears whether the copay has been paid off yet or not. Copays are not procedures, they generally occur as part of the amount due for an office visit or physical procedure.
An asterisk (*) indicates that the charge currently pends a Medicaid policy.
Providers
The Correct Mistakes program displays the provider initials for both the Servicing and Billing providers.
Press [fkey title=’F5′ subtitle=’Visit Status’ display=’inline’ /] and enter one or more charge numbers to learn more information.
Read Billing History Messages
In addition to charge and payment information, oops displays billing messages and other important data. For example, you will see entries indicating when a claim was sent, when an electronic clearinghouse received a claim, and when a personal bill was generated.

In the example above, the charge was sent by ECS to ProxyMed (a claim clearinghouse) and then to USHC on 4/26/05. A USHC insurance payment and adjustment were posted in [link href="../PostInsurancePayments/ManualPostingReference/ClaimsPostPipIntro.htm"]pip[/link] on 5/24/05, and a personal bill (for the unpaid copay amount) was printed on 6/15/05. Note that the USHC check number is also shown.
More Information: Additional information or a full report may be available for some billing messages. Press [fkey title=’F3′ subtitle=’See Claim Rpt/Bill’ display=’inline’ /] and enter the item number to read the full report, if available. Read Review Electronic Claim Responses in oops for an example.
E – Toggle Billing History: With all the different steps a claim passes through, your oops screen can get very cluttered. Press E to hide billing history notes. The oops listing will collapse and show you only charge and payment information. Press E again to reveal the billing information. To increase the number of visible lines in oops, you could also learn about making your Partner window bigger by reading Larger Partner Windows.
Review Payments and Adjustments in oops
Payments and adjustments appear in oops with information similar to charges: a description, a date, a provider, and an amount. The description includes the payment type, and may include a CARC code that explains the payment or adjustment. Payments and adjustments appear underneath the charge they are applied towards, so you can review the full history of the charge as a series of events.
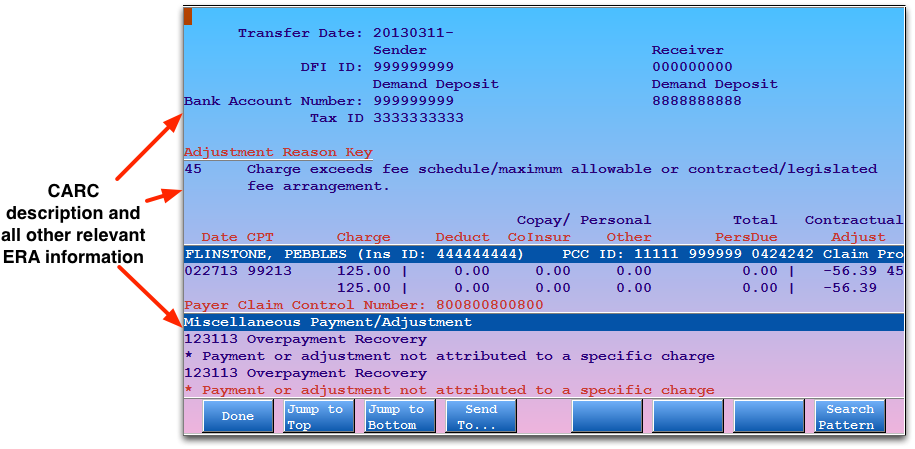
CARC Codes
The numbers that sometimes appear with payments and adjustments are the Carrier Adjustment Reason Codes.
Partner reads these codes directly from your ERAs. You can also enter them manually if you use the Post Insurance Payments (pip) program.
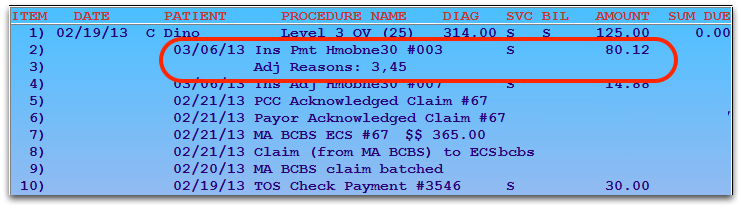
You can use the CARC codes to help research and understand why a certain payment occurred.
Press [fkey title=’F7′ subtitle=’View Adj Reasons’ display=’inline’ /] and enter an item number to read a description of the codes.


For more information on what CARC codes mean and how they work in Partner, read CARC Codes in Partner.
Split Payments
If a single payment is applied to more than one charge, it will be indicated using item numbers:

The numbers listed with the payment indicate which charges the payment pays off. The 6/15/05 payment shown above at number 1 is applied to both the physical copay charge on 5/24/05 as well as the OV Problem Focus copay charge on 4/26/05.
Unlinked Payments
If a payment is not applied to any charge, it is called an “open-item” payment or “unlinked”. Open-item payments appear after charge entries and may not have dates in front of them. Linked payments appear underneath the charges they pay off and have posting dates in front of them.
Partner calculates both open-item and linked payments towards an account’s final balance. If a family pays you $50, for example, and you post it without applying it towards a charge, their account will still reflect the payment. However, it will be difficult for you to research how the unlinked money is applied, and sorting out the account’s charges will be more difficult. You should use [fkey title=’F6′ subtitle=’Unlink & Relink’ display=’inline’ /] to link any open payments. You should also link every payment when it is first posted in pam.
Read Post Personal Payments to learn how to post a personal payment or adjustment against a charge.
Function Keys on the Charge History Screen in oops
From this screen, you can perform (or begin) the following actions:
Press F1 and enter an item number or a date. You will be taken to that item/date in the history.
Press F2 and enter charge item numbers to batch a new claim or print a HCFA form immediately. Separate item numbers with a space.
[fkey title=’F3′ subtitle=’See Claim Rpt/Bill’]
Press F3 and enter an item number to see more information about a billing message item. For example, you can use F3 to read the full response from a payor, read the text of a personal bill, or see the raw data file of a claim.
Read the Electronic Claim Responses section for an example.
[/fkey]
Press F4 and enter charge item numbers to view the Insurance Status screen. On the Insurance Status screen, you can change the responsible party of a charge or modify the copay amount. Whenever you change insurance status, you should batch the updated charges for resubmission or print a new claim.
Press F5 and enter charge item numbers to view the Visit Status screens. On the Visit Status screens, you can view and change diagnosis and other HCFA specific information related to a charge, such as billing provider, referring provider, authorization numbers, accident dates, etc.
[fkey title=’F6′ subtitle=’Unlink & Relink’]
Press F6 and enter an item number of a payment to unlink or relink it. You might want to do this when cleaning up an account balance problem.
Next, oops will summarize the payment(s) you selected, and allow you to relink it to another charge, or leave the payment unlinked.
For an example of relinking a payment, Relink a Payment
[/fkey]
[fkey title=’F7′ subtitle=’View Adjustment Reasons / ERA’]
Press [fkey title=’F7′ subtitle=’View Adj Rsns/ERA’ display=’inline’ /] and enter an item number to read a description of the codes.
If you select an item with associated ERA information, Partner will display the relevant ERA section.
[/fkey]
Press F8 and enter item numbers to delete items from the account history. You will be asked to confirm your choices before they are deleted. Once deleted, items can not be retrieved. Partner keeps a log of which user deleted an item and how that action affected the account’s balance. You can review this log by running the daysheet or dsscan programs. Contact PCC for more assistance.
Review Electronic Claim Responses in oops
When Partner receives an electronic claim response from the insurance payor or the claim clearinghouse, a one-line message is added to oops. Here are two examples:

If the claims were sent through the Copario (MedAvant, ProxyMed) or Emdeon claim clearinghouses, you can review a more detailed response report from within the oops program. Press [fkey title=’F3′ subtitle=’See Claim Rpt/Bill’ display=’inline’ /] and then select any billing response item that begins with “Payor Response” or that indicates a rejection or acceptance.
Example 1
In the example below, you can see that the electronic claim clearinghouse (ProxyMed) sent several messages to Partner regarding William Amis’s visit on 01/06/06.
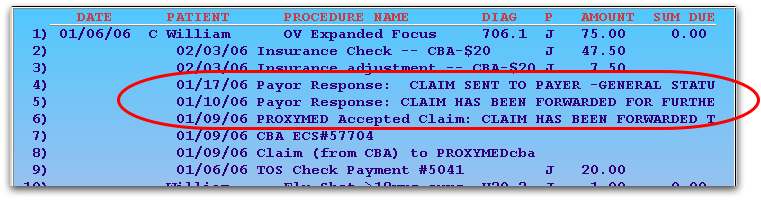
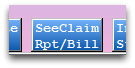
To read the full electronic report, press [fkey title=’F3′ subtitle=’SeeClaim Rpt/Bill’ display=’inline’ /] and then select any entry beginning with “Payor Response” or “PROXYMED Accepted Claim”:

Partner will open the relevant ECS report and display portions related to this patient that are on that report:
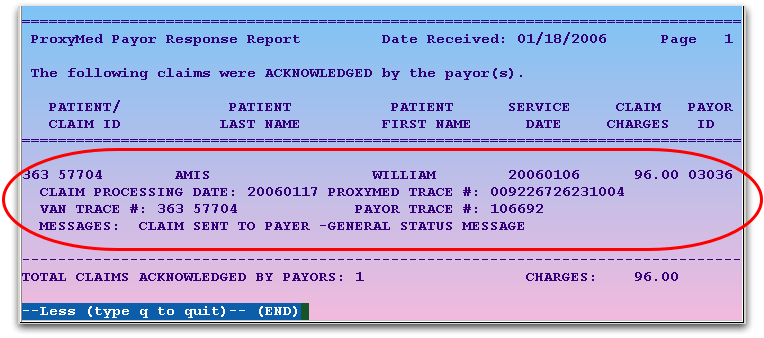
In the above example, the claim was accepted.
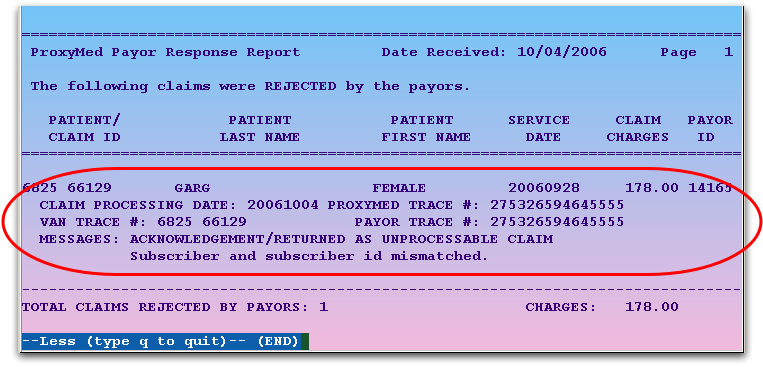
Example 2
You can also review information about a rejected charge. In the next example, Female Baby Garg’s immunization administration charge was rejected by the MVP insurance company:

To find out why the claim was rejected, press [fkey title=’F3′ subtitle=’See Claim Rpt/Bill’ display=’inline’ /], enter the number next to the rejection, and press Enter:

Partner will display the segment of the report related to the patient, and you can read all the information that the insurance company (or claim processor) returned:
Using this feature, you can read your ECS reports from within the oops program. You can also read ECS reports in your e-mail or through the ecsreports program.
The Patient Recaller
The Patient Recaller (recaller) is a report that can create custom call lists, form letters, and mailing labels for your patients and families. You can create custom searches using thousands of possible criteria combinations, and the Recaller will help you contact those different groups of patients.
Use the Recaller to find the right patients and then print out physical reminders, flu shot announcements, or immunization recalls. You can also use the Recaller to do quick research and reporting on your patient populations.
Exclude Patients from Recaller and Notify
Patients and families may request that you do not call them or send them e-mails with appointment reminders or recall reminders.
Your office can use status flags to keep track of patients and families that do not want to receive reminders. You can then configure the Patient Recaller (recaller) and the Patient Notification Center (notify) to automatically exclude them from recalls and notifications.
Read the procedure below to learn one way of ensuring that patients do not receive unwanted auto-calls or mailings.
Create “Do Not Contact” Status Flags
Use the Table Editor (ted) to create status flags for patients or accounts that do not wish to receive reminders.
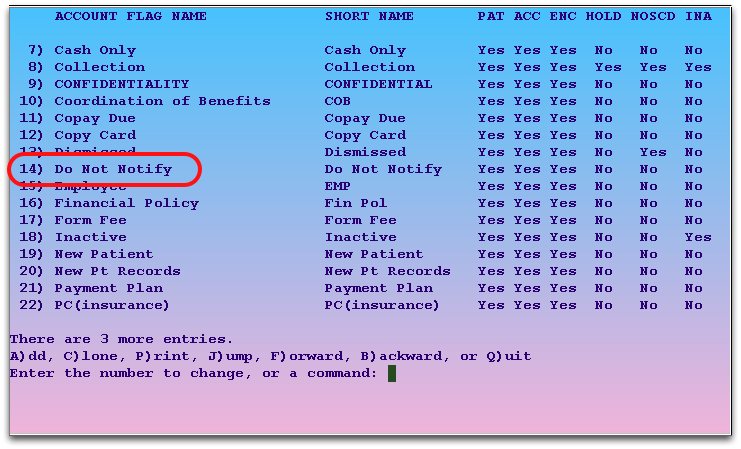
For example, you might create a “Do Not Notify” status flag in the Patient Flags and/or Account Flags tables. You could also create more specific, per-reason “Do Not Notify” or “Do Not Recall” status flags.
Add Flags to Patients and Accounts
Whenever a patient or family requests that they no longer receive notifications or recall announcements, add the appropriate flag in the Patient Editor (notjane) or Family Editor (fame). You can also update status flags during the checkin process.
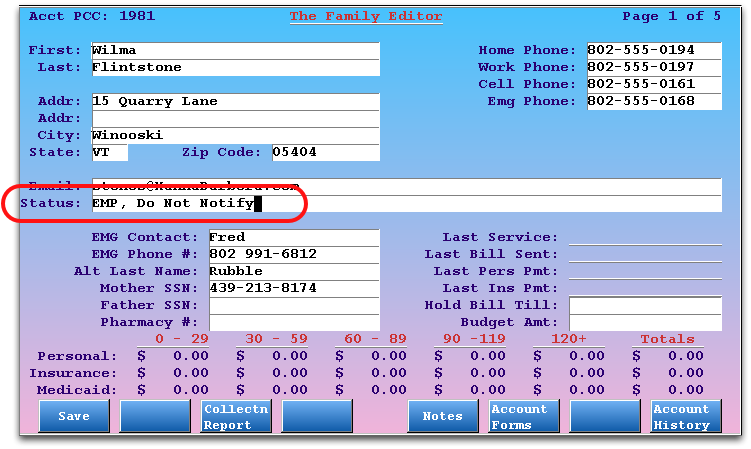
Tips: You can use the asterisk (*) in the status field to find the flags you need. If you need to add multiple status flags to a patient or account, separate them with commas (,).
Add Status Flags to Your Recaller and Notification Criteria
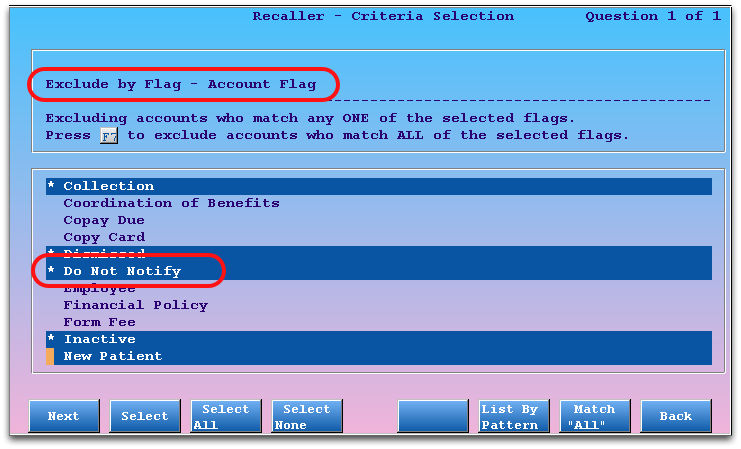
In recaller or notify, use the “Exclude by Flag – Patient Flag” and “Exclude by Flag – Account Flag” criteria to exclude your Do Not Notify or other status flags.
Create an Appointment Reminder Notification
Follow the procedure below to edit or create an Appointment Reminder notification in the Patient Notification Center (notify).
Before You Start: Before working with notifications, read the overview help article on the Patient Notification Center. The notify program requires registration and configuration, and researching your notification options before you begin will make the tool more useful to your practice.
Then, follow these steps:
Run notify
You can run the Patient Notification Center by typing notify at a command prompt. PCC Support can also add the program to your Partner windows.
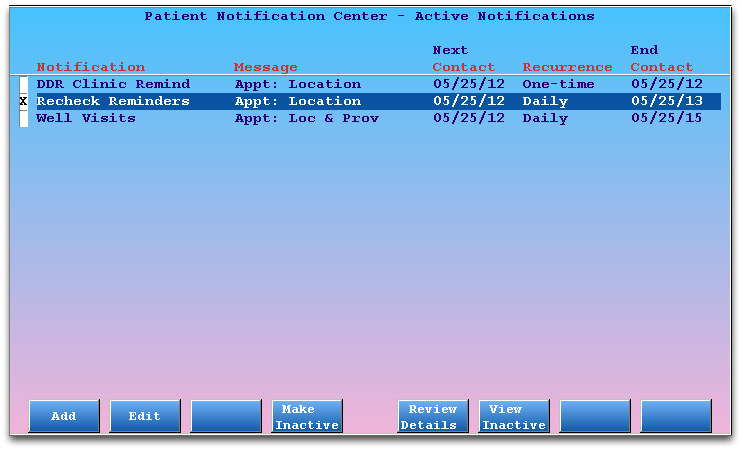
Review Your Notifications
The first screen of notify displays all of your current, active notifications.

You can see each notification’s name, a summary of the notification type, when the contact will go out next, whether the notification is recurring or one-time, and when the notification will expire.
Old Notifications?: Press [fkey title=’F4′ subtitle=’Make Inactive’ display=’inline’ /] to expire a notification and turn it off. You can also press [fkey title=’F6′ subtitle=’View Inactive’ display=’inline’ /] to jump to a list of inactive, or past notifications. You could then edit an inactive notification, change details using the tools described below, and make it active again.
Press [F1 – Add Notification]
Press F1 to create a new notification.
If you wish to edit an existing notification, select it and press F2.
Select an Appointment Reminder Message Type
Enter an asterisk (*) and choose a message type from the pull-down menu.
You can choose to send appointment notifications with or without the physician’s name.
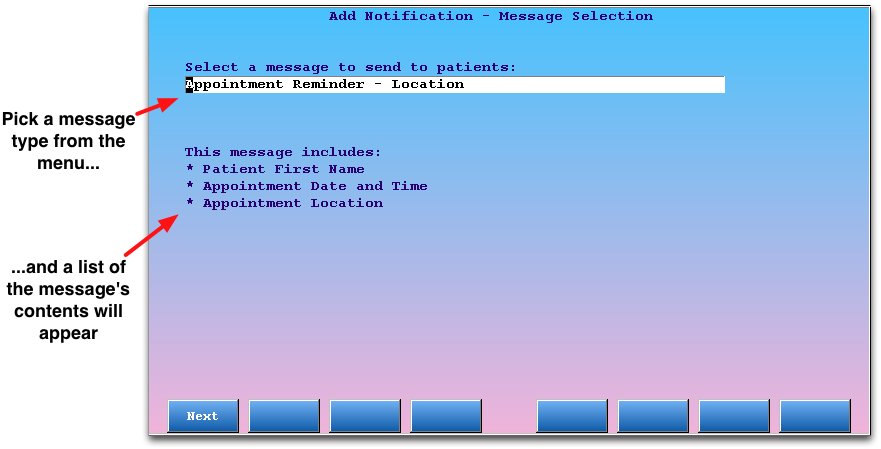
After selecting a message type, you will see a summary of the message’s contents.
Press F1 to continue.
Select How Far in Advance to Notify
How far in advance of a patient’s appointment should the reminder be sent? Enter a number of days.
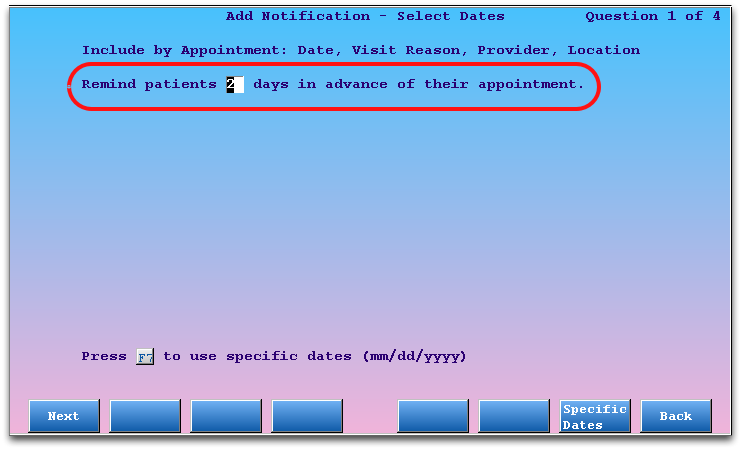
Press F1 to continue.
Select Visit Reasons
Should all well visit reasons receive this notification? What about sick visits, or rechecks? Select all the visit reasons that should trigger the appointment reminder you are creating.
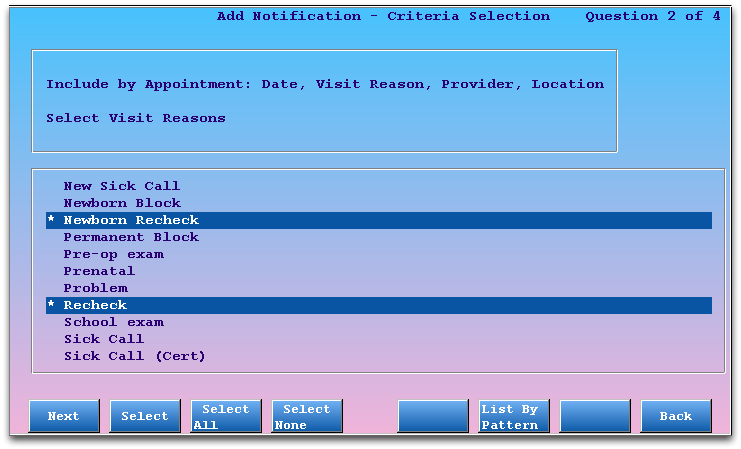
You can also press [fkey title=’F3′ subtitle=’Select All’ display=’inline’ /], and then use F2 to deselect visit reasons that should be excluded.
Press F1 to continue.
Specify Physicians
Select all physicians whose scheduled patients should receive reminders.
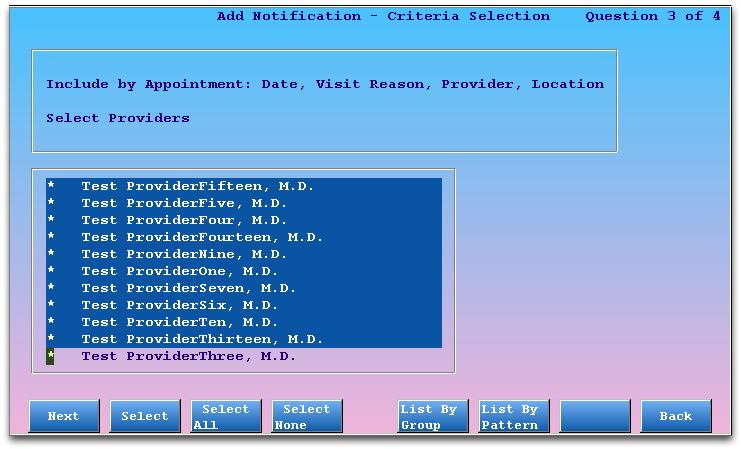
You can press [fkey title=’F3′ subtitle=’Select All’ display=’inline’ /], and then use F2 to deselect physicians who’s appointments should be excluded.
Press F1 to continue.
Note: Partner uses the scheduled physician for the appointment. You can also limit by primary care physician later on in the steps below.
Select Scheduling Locations
Select all scheduling locations for appointments that should receive reminders.
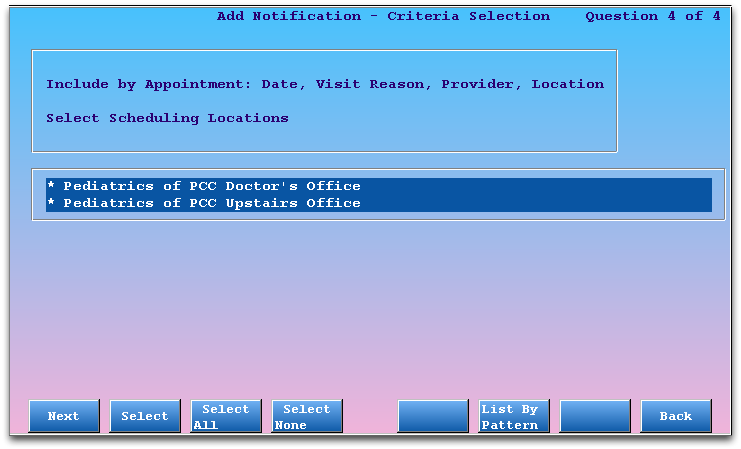
Press F1 to continue.
Exclude by Patient Status Flag
Select any patient flags that should block a reminder from being sent to the patient.
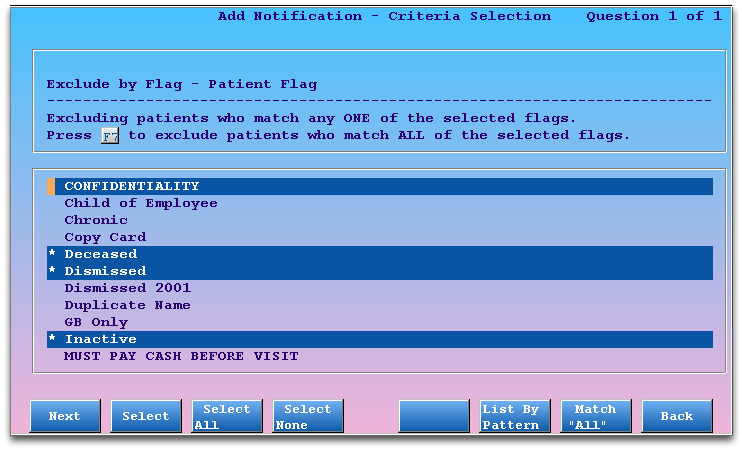
Any flags that are already configured to exclude patients from reports will already be selected for you. You can select or deselect any status flag to control who will not receive notification messages. Read Exclude Patients from Recaller and Notify to learn more.
Press F1 to continue.
Optional: Add Additional Criteria
If you would like to limit your reminder list by primary care physician, insurance plan, a billed diagnosis, an account flag, or some other criteria, use the asterisk to select that criteria and then press F1 to define it.
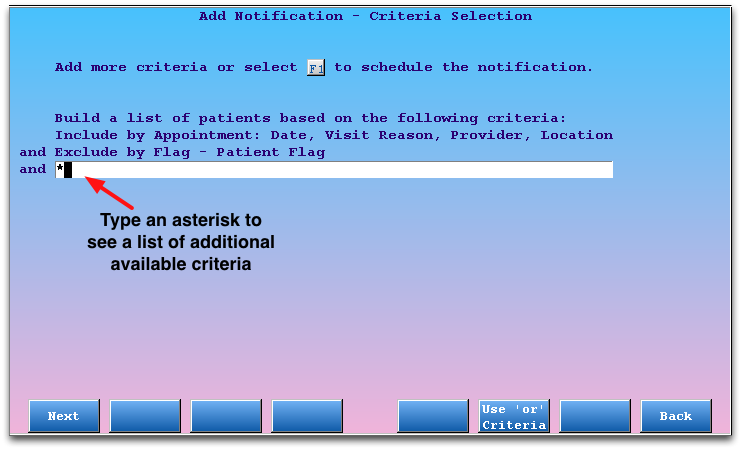
If you do not need additional criteria, press F1 to continue.
Indicate One-Time or Recurring Notification
Select whether this notification is a one-time notification or a recurring notification, and then choose related delivery options.
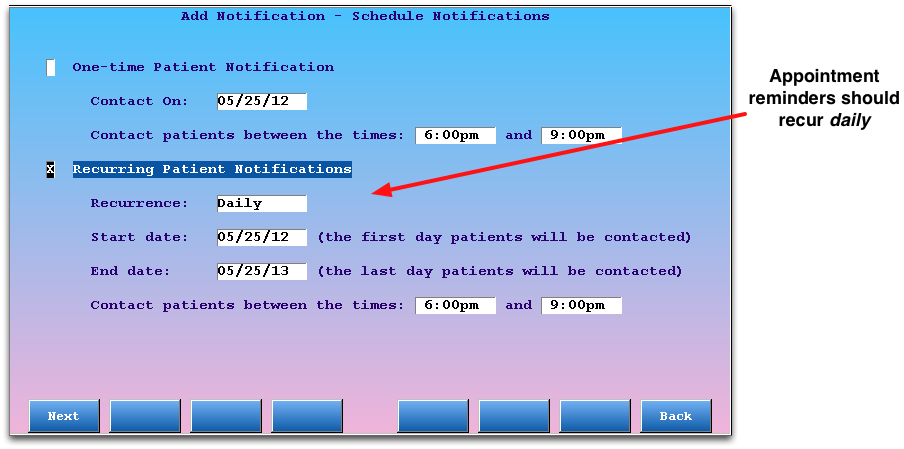
If you select a One-Time Patient Notification, enter an exact date and a time of day for the notification. Note that TeleVox needs at least a three-hour advance warning and a three-hour window for delivery. Therefore, create your notification early in the day if you wish to send it on the same date.
If you select Recurring Patient Notifications, you can set the notification to be daily, weekly, or yearly, and enter start and end dates for activating the notification.
Appointment Reminders Should Recur, and Recur Daily: Most offices interested in using notifications for appointment reminders will want to create a recurring, daily notification. Then, all patients who meet your criteria and have upcoming appointments will receive a reminder. If an appointment reminder is not recurring or not daily, some patients will not receive reminders.
Optional: Specify Delivery Method
Next, you can specify the preferred delivery method for the notification.
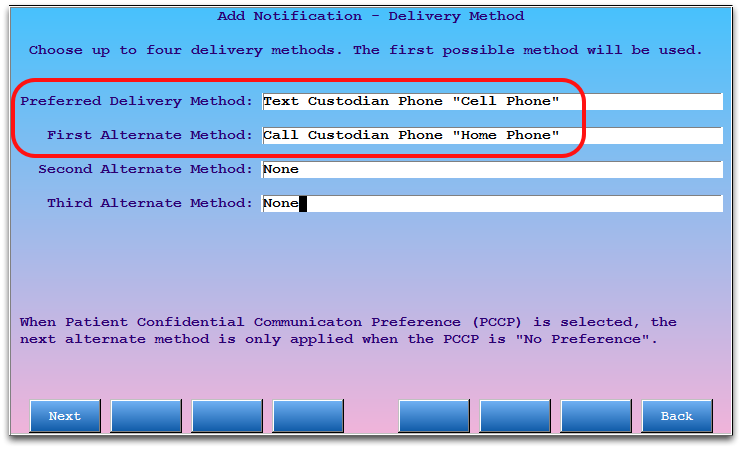
Enter up to four possible delivery methods. Partner will send the first valid method it finds to TeleVox.
By default, Partner looks for a patient confidential communication preference. If the patient’s preference is set to “No Preference”, then Partner will use the first available phone number in the Custodian account. This default delivery method behavior can be defined in the Patient Notification Center section of the Configuration Editor (ced).
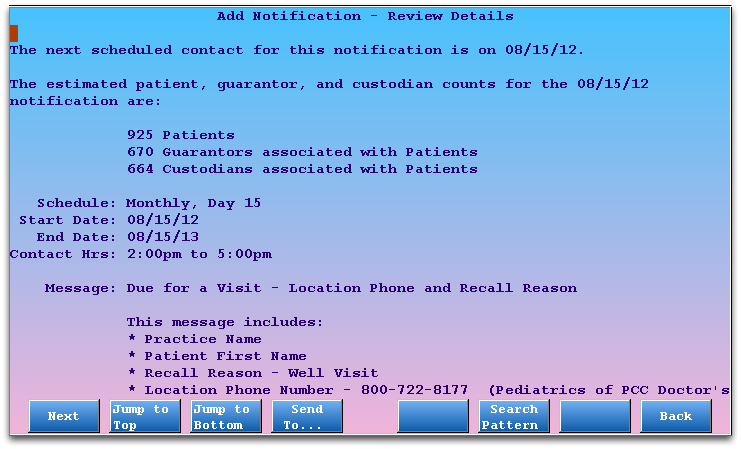
Review Details
Review the details for your notification.
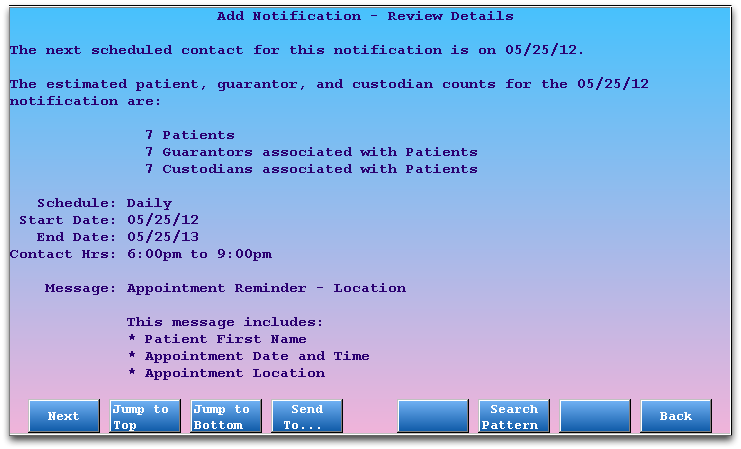
The details include an estimated number of contacts made. This estimate may or may not be useful when you create recurring notifications, as unusual circumstances or your office’s schedule might make the numbers seem low.
Press F1 to continue, or F8 to step back through notification settings.
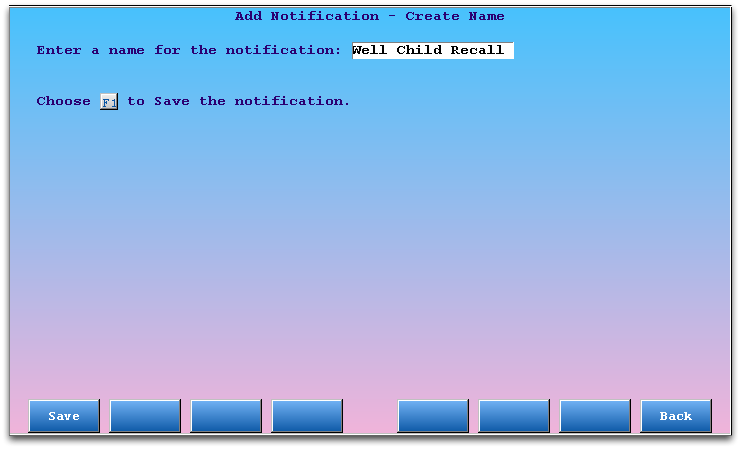
Name Your Notification
Give your notification a name.
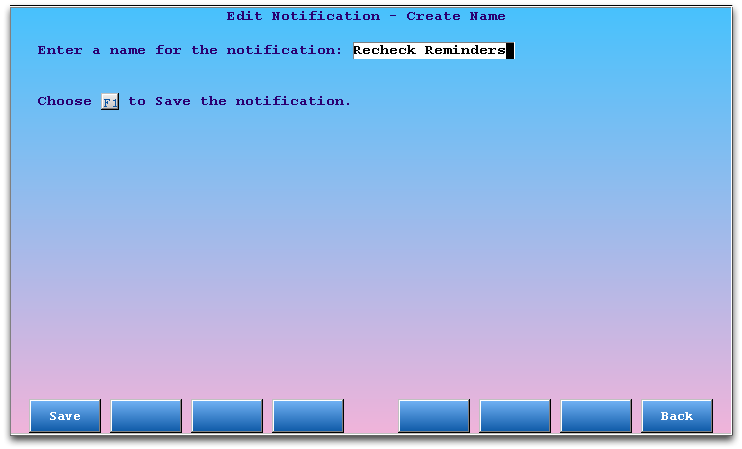
For ease of use later, you may want to name your notification based on its criteria. For example, your “Well Visit” or “Asthma Recheck” reminder.
Press F1 to save your new notification and return to the main screen.
Optional: Review and Edit Your Notification, or Make it Inactive
From the main screen, select your notification and press [fkey title=’F2′ subtitle=’Edit’ display=’inline’ /] to make changes.
You can also press [fkey title=’F4′ subtitle=’Make Inactive’ display=’inline’ /] to deactivate your reminder, or [fkey title=’F5′ subtitle=’Review Details’ display=’inline’ /] to look at the settings and options for a notification.
Create a “Due for a Visit” Notification
Follow the procedure below to edit or create a “Due for a Visit” notification in the Patient Notification Center.
Before You Start: Before working with notifications, read the overview help article about the Patient Notification Center. The notify program requires registration and configuration, and researching your notification options before you begin will make the tool more useful to your practice.
Then, follow these steps:
Run notify
You can run the Patient Notification Center by typing notify at a command prompt. PCC Support can also add the program to your Partner windows.
Review Your Notifications
The first screen of notify displays all of your current, active notifications.
You can see each notification’s name, a summary of the notification type, when the contact will go out next, whether the notification is recurring or one-time, and when the notification will expire.
Old Notifications?: Press [fkey title=’F4′ subtitle=’Make Inactive’ display=’inline’ /] to expire a notification and turn it off. You can also press [fkey title=’F6′ subtitle=’View Inactive’ display=’inline’ /] to jump to a list of inactive, or past notifications. You could then edit an inactive notification, change details using the tools described below, and make it active again.
Press [F1 – Add Notification]
Press F1 to create a new notification.
If you wish to edit an existing notification, select it and press F2.
Select a “Due for a Visit” Message Type
Enter an asterisk (*) and choose a message type from the pull-down menu.
You can choose to deliver “Due for a Visit” notifications with or without the recall reason (well visit, etc.).
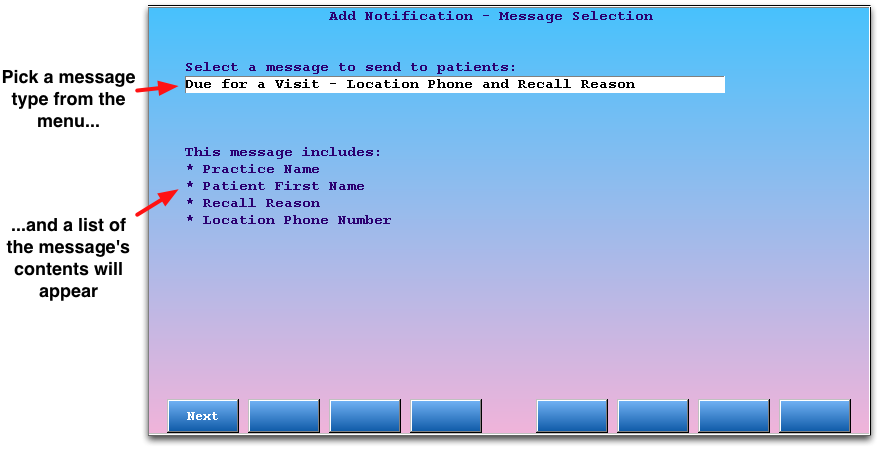
After selecting a message type, you will see a summary of the message’s contents.
Press F1 to continue.
Select Location Phone and Recall Reason
Choose an office phone number and a recall reason from the two pull-down menus.
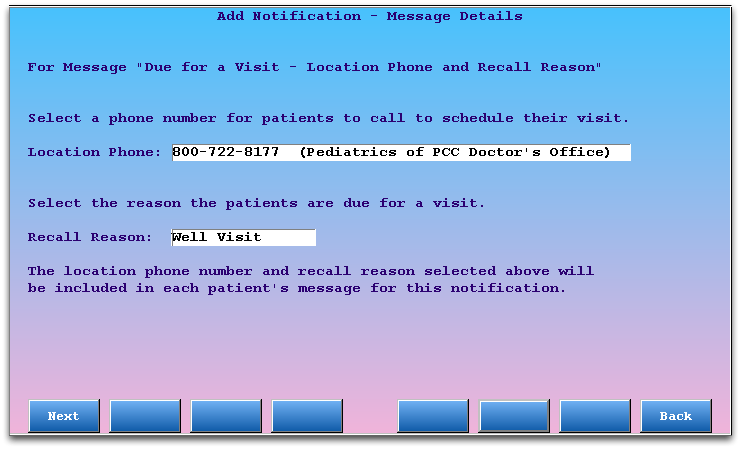
Press F1 to continue.
Scheduling Locations, Recall Reasons: Available location phone numbers are based on your practice’s place-of-service configuration in the Table Editor (ted). The recall reasons are a pre-defined list of available reason types, as designed by PCC and TeleVox to preserve patient confidentiality:
- Well Visit
- Follow Up Visit
- Medication Check
- Vaccination
- Flu Vaccination
Exclude by Patient Status Flag
Select any patient flags that should block this “Due for a Visit” reminder from being sent to the patient.
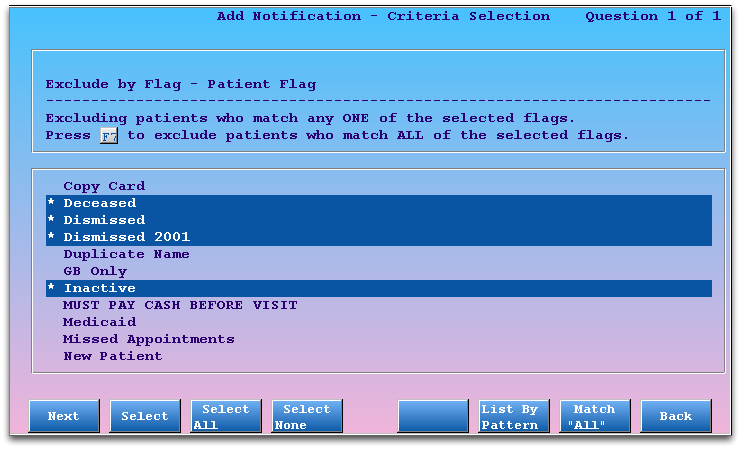
Any flags that are already configured to exclude patients from reports will already be selected for you. You can select or deselect any status flag to control who will not receive notification messages. Read Exclude Patients from Recaller and Notify to learn more.
Press F1 to continue.
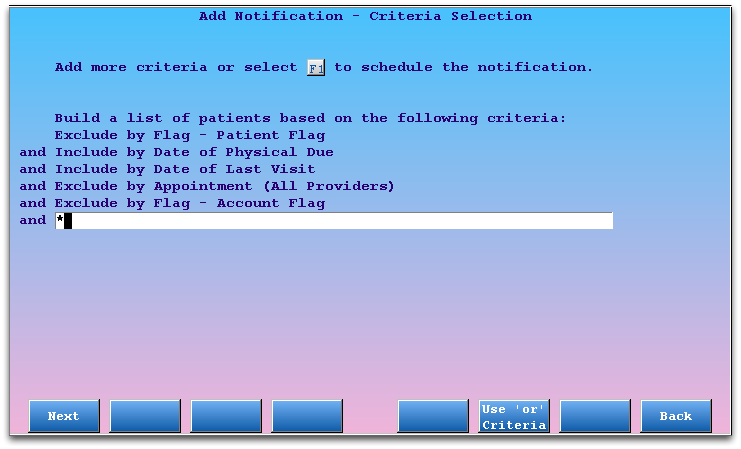
Add Additional Recall Criteria
Enter an asterisk and select additional criteria to shape the perfect patient recall for the recall reason you have selected.
For each criteria you select, the Patient Notification Center will guide you through a series of questions. Make your selection and press F1 to step through each option.
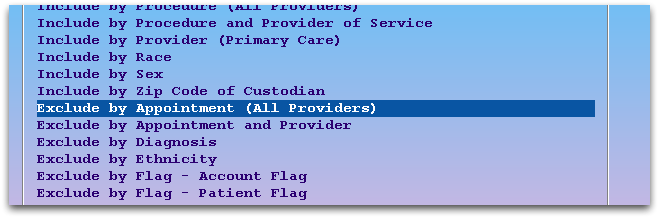
PCC's Recommended Well Child Recall: Your office can work with the available criteria to create and save the perfect recurring “Due for a Well Child” notification. PCC typically recommends the following criteria.
-
Include by Date of Physical Due: By including all patients whose next physical is due in the next month, or was due in the past two years, your notification will go out to all patients who need a physical according to your records.
-
Include by Date of Last Visit: Including by date of last visit for the past three years is a handy way to leave out patients who have not visited your practice in a long time and should be considered inactive for the purposes of patient recall.
-
Exclude by Appointment (All Providers): If a patient has an upcoming appointment with any provider, you don’t want to auto-call them with a reminder to schedule an appointment.
-
Exclude by Flag - Account Flag: The Patient Notification Center automatically guides you through excluding by patient flags, but you may have account flags that should also cause the patients to be left off the contact list.
-
Your Custom Criteria: In addition to the ideas above, you may choose to limit this specific Due for a Visit notification to certain geographical locations (by zip code), primary care physician, or other criteria.
For help understanding how to enter these criteria, read the Recall Patients for Physicals article.
Indicate One-Time or Recurring Notification
Select whether this notification is a one-time notification or a recurring notification, and then choose related delivery options.
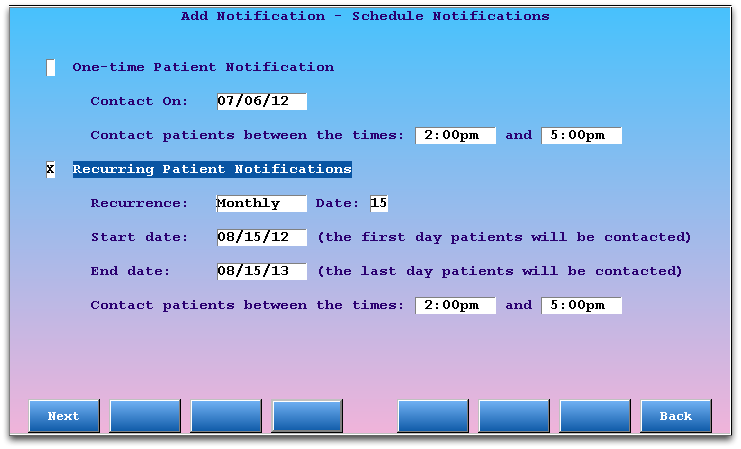
If you select a One-Time Patient Notification, enter an exact date and a time of day for the notification. Note that TeleVox needs at least a three-hour advance warning and a three-hour window for delivery. Therefore, create your notification early in the day if you wish to send it on the same date.
If you select Recurring Patient Notifications, you can set the notification to be daily, weekly, monthly, or yearly, and then enter start and end dates for activating the notification. In the example above, my practice has decided to send the notification monthly.
Recurring Due for a Visit Reminders vs. One-time: If your office only performs a major “Due for a Visit” recall once or twice a year for physicals, flu shots, or another visit reason, then the “One-time” option may meet your needs.
However, if you set up a monthly recurring reminder, you can be certain that all patients will receive a reminder to call and schedule a physical. If you use PCC’s recommended Well Child recall criteria and a monthly recurring reminder, for example, patients will receive a reminder once a month until they schedule a checkup or request they no longer be contacted. (You can remove patients from the notification contact list using a custom patient or account flag and including that flag in the exclude-by-flag criteria.)
Optional: Specify Delivery Method
Next, you can specify the preferred delivery method for the notification.
Enter up to four possible delivery methods. Partner will send the first valid method it finds to TeleVox.
By default, Partner looks for a patient confidential communication preference. If the patient’s preference is set to “No Preference”, then Partner will use the first available phone number in the Custodian account. This default delivery method behavior can be defined in the Patient Notification Center section of the Configuration Editor (ced).
Review Details
Review the details for your notification.
The details include an estimated number of patient and family contacts. This estimate may or may not be useful when you create recurring notifications, as unusual circumstances or your office’s schedule might make the numbers low.
Press F1 to continue, or F8 to step back through notification settings.
Name Your Notification
Give your notification a name.
For ease of use later, you may want to name your notification based on its criteria. For example, your “Well Child” or “Fall Flu Clinic” recall.
Press F1 to save your new notification and return to the main screen.
Optional: Review and Edit Your Notification, or Make it Inactive
From the main screen, select your notification and press [fkey title=’F2′ subtitle=’Edit’ display=’inline’ /] to make changes.
You can also press [fkey title=’F4′ subtitle=’Make Inactive’ display=’inline’ /] to deactivate your reminder, or [fkey title=’F5′ subtitle=’Review Details’ display=’inline’ /] to look at the settings and options for a notification.
Review the Notification Log and Canceled Appointments
Partner records details whenever the Patient Notification Center prepares and sends a batch of patient notifications. If you use notify‘s patient response features, Partner also records whether the patient confirmed or canceled the appointment when they received the notification.
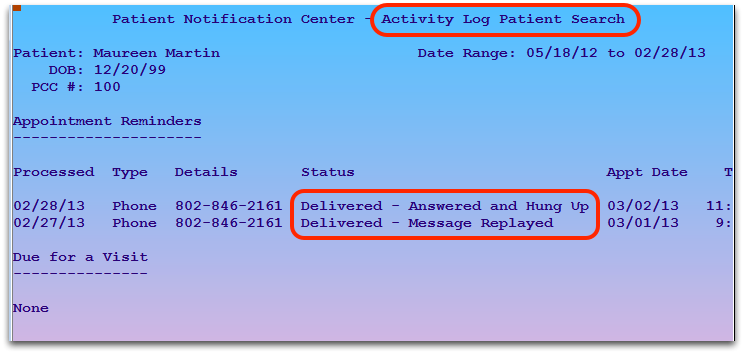
You can use notify‘s Activity Log (notifylog) to review your practice’s log of notifications, research why a notification was not sent, review any responses to appointment notifications, and see a list of all notifications for a specific patient or family.
Press [fkey title=’F8′ subtitle=’View Log’ display=’inline’ /] from within the Patient Notification Center, or type notifylog at a command prompt, to view the Activity Log.

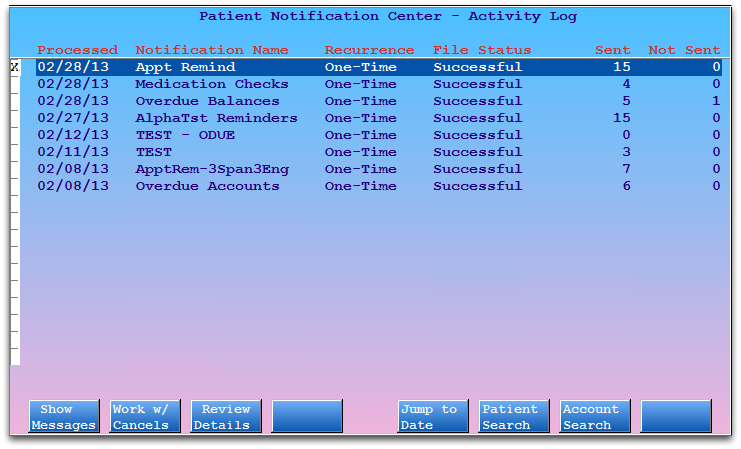
The Activity Log displays a list of every time Partner prepared and sent notifications, sorted by date. You can quickly see all of the notification batches that were sent successfully, and review how many patient notifications were sent or not sent to the TeleVox system.
Review the Log and Status Results
Use the arrow keys to select a notification and press [fkey title=’F1′ subtitle=’Show Messages’ display=’inline’ /] to review the status of each message inside the notification batch.
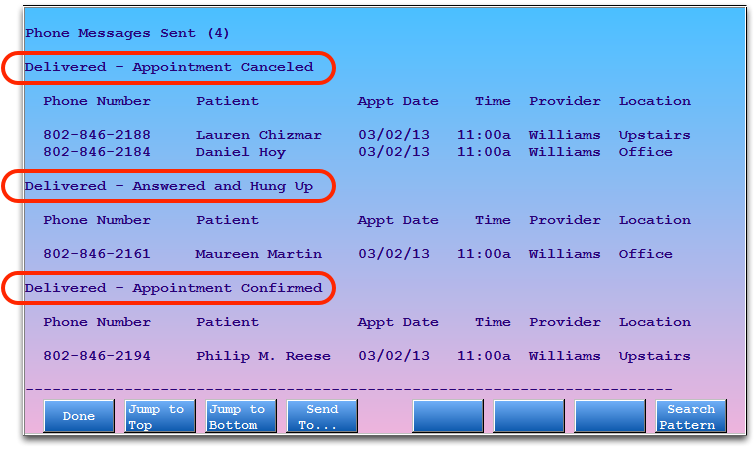
Messages are sorted into delivery categories, such as “Phone Messages” and “E-Mail Messages”.
Within each category, cancellations always appear first, at the top, followed by notifications that were delivered or have other statuses, such as “Delivered – Answered and Hung Up”.
Work With Cancellations
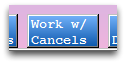
Instead of looking at all responses, you can work with a list of cancellations. Select a notification and press [fkey title=’F2′ subtitle=’Work w/ Cancels’ display=’inline’ /] to view all cancellations that came from that notification.
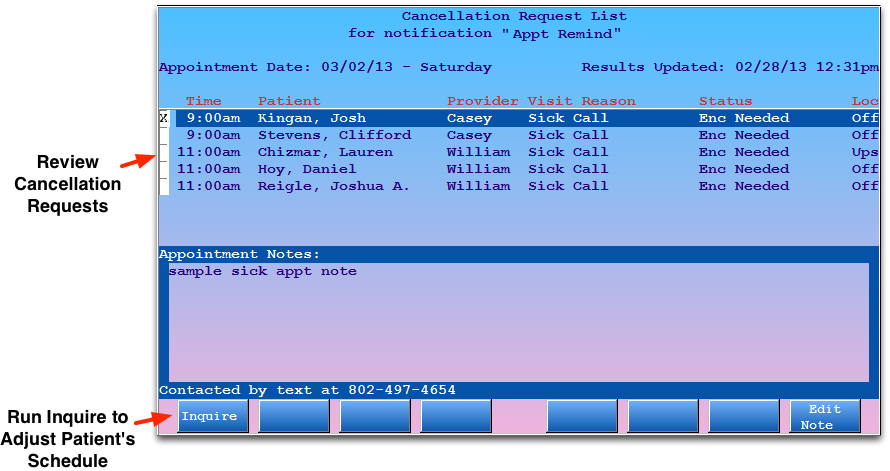
You can work down the list, and press [fkey title=’F1′ subtitle=’Inquire’ display=’inline’ /] to jump into inquire and reschedule or revise the patient’s schedule. If your office allows patients and families to automatically cancel their appointment, you can use the list to review those cancellations.
Configure Auto-Cancel Options
Partner can either store cancellation requests for your review, or automatically cancel a patient’s appointment.
A question in the Patient Notification Center section of the Configuration Editor (ced) asks if you want to “Automatically mark appointments canceled when patients choose the option to cancel from their Appointment Reminder Message.”
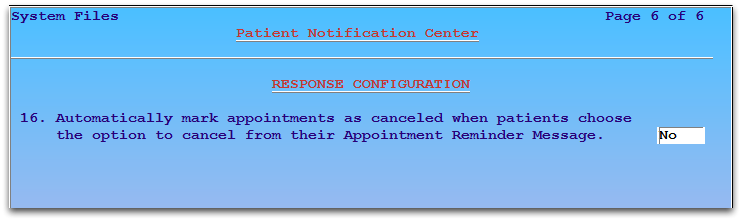
If that question is set to “Yes”, your patients can use their phone or a text message to cancel their appointments, in addition to queuing up a response in notifylog. In the inquire program you will see “Canceled on ##/##/## by pcc” for appointments canceled in this way.
Review Notification Details
Select a notification and press [fkey title=’F3′ subtitle=’Review Details’ display=’inline’ /] to review the settings of the notification. If you are unsure why certain patients were or were not included in the notification, it may help to review those settings.
Review Responses for a Specific Patient or Account
You can use the Patient or Account search features in notifylog to quickly find all responses for a particular family or patient. Open notify log and press [fkey title=’F6′ subtitle=’Patient Search’ display=’inline’ /] or [fkey title=’F7′ subtitle=’Account Search’ display=’inline’ /].
After finding a patient or account, you can see all notifications and any confirmations or other responses.
If a patient doesn’t show up for an appointment, for example, you could use the search tools to see if they received or responded to a notification.
The Patient Notification Center
The Patient Notification Center (notify) is a powerful tool for contacting patients and families. You can set up recurring or one-time notifications, and PCC will deliver messages to your patients automatically through our partnership with TeleVox, either by phone call, text message, or e-mail.
The Patient Notification Center currently supports appointment reminders, “Due for a Visit” notifications, and account balance notifications. For example, you can create a notification that automatically contacts patients three days before their appointment and tells them the date, time, location and physician (optionally) of the appointment. Or, you could create a set of criteria for physicals or other visit types and automatically remind patients to call and schedule an appointment. Finally, you can send a balance notification to all families with certain aged balances.
Getting Started
Contact PCC Sales to get started. The Patient Notification Center uses a TeleVox interface, which requires a setup fee and per-contact fees. Our sales and support teams can help you understand the features, the cost, and help you decide if it is a good match for your needs. Next, we’ll register you with TeleVox.
Once you are signed up, PCC Support will work with you to configure your Partner system for the Patient Notification Center. We’ll help you pick options, such as preferred languages.
Finally, you’ll use the Patient Notification Center (notify) program to schedule your notifications and select criteria and options for notification messages.
What Do Notification Messages Sound or Look Like?
Phone Calls
Here are the voice messages for various notification types. These messages are created by TeleVox and are not customizable.
| Appointment Reminder w/ Clinician’s Name | Hello. This is the office of Dr. James Smith at Pediatric Associates calling to remind Johnny of an appointment at 9:00am on May 15th, 2012. |
| Appointment Reminder w/o Clinician’s Name | Hello. This is Pediatric Associates calling to remind Johnny of an appointment at 9:00am on May 15th, 2012. |
| Due For a Visit Notification w/ Recall Reason | Hello, this is Pediatric Associates calling with a reminder that Johnny is due for a <recall reason>. Please call us at 800-722-1082 to schedule an appointment. We look forward to hearing from you soon |
| Due For a Visit Notification w/o Recall Reason | Hello, this is Pediatric Associates calling with a reminder that Johnny is due for a visit. Please call us at 800-722-1082 to schedule an appointment. We look forward to hearing from you soon |
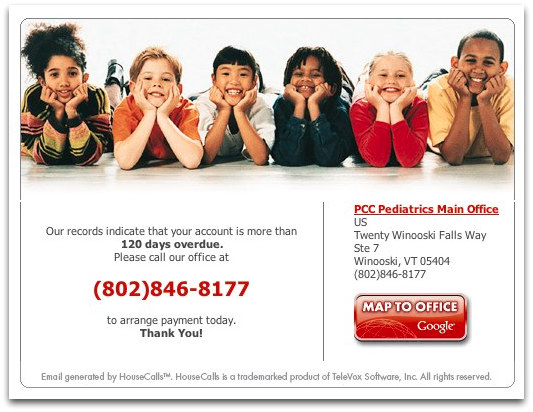
| Account Balance Notification | Hello this is Pediatric Associates calling. Our records indicate that your account is more than 60 days overdue. Please call our office at 800-722-1082 to arrange payment today. Thank you! |
Responding to an Appointment Reminder: If a person answers the phone and hears the message live, they will have an opportunity to press numbers to confirm the appointment, repeat the message, or cancel the appointment. If an answering machine or voicemail answers the phone, an additional message will play instead:If you need to cancel or reschedule this appointment, please call us during normal business hours at 800-722-1082.
Visit-Based Trailer Messages: Although message text is not customizable, appointment reminders can include a trailer message based on the visit reason for the appointment. For example, if you are reminding a patient about a physical visit and you wish them to arrive twenty minutes early, you can now tell them that with a brief message at the end of the notification. Contact PCC Support for help setting up a visit-based trailer message.
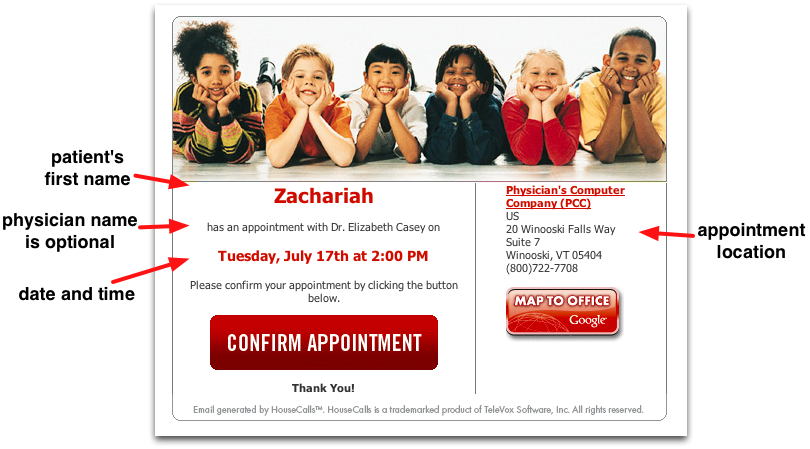
E-Mails
When the patient has indicated they would prefer e-mail communication, or your notification is configured for e-mail delivery, this is the e-mail template for an appointment reminder:
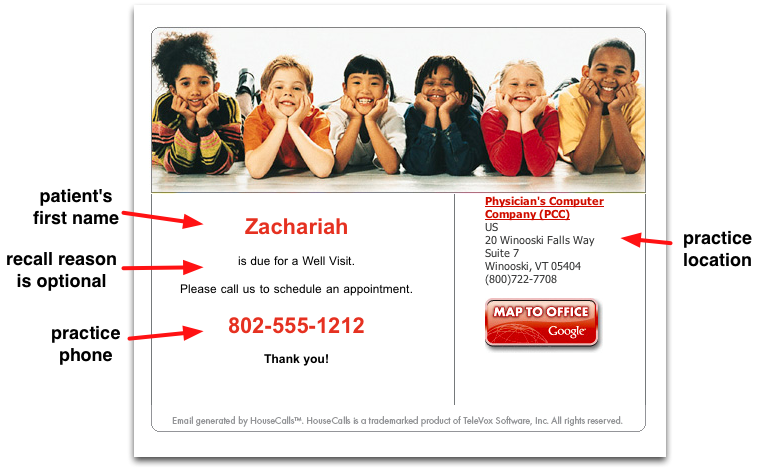
The e-mail template for a Due for a Visit notification differs slightly.
The e-mail template for an account balance notification is similar:
Practice Location: If you have more than one location, you can indicate a different practice phone number in the body of the message. You can only show one official practice address on the right-hand panel, however, unless you have more than one TeleVox account. If you need to show different addresses, work with PCC Support to discuss your options.
Text Messages
When the patient has indicated they would prefer text message communication, or your notification is configured for text message delivery, this is the standard text message for an appointment reminder:
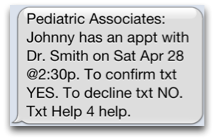
A “Due for a Visit” notification would read, “Pediatric Associates: Johnny is due for a Well Visit. Please contact us at 800-722-1082 to schedule an appt.”
If your practice uses a trailer message (such as a reminder to come to the office early), it would appear after the receiver texted confirmation of the appointment.
Which Notification Delivery Method is Used?
When your notification is processed, Partner uses TeleVox to contact your patients by phone, e-mail, or text message. How does it know which delivery method to use?
Default Settings
By default, Partner looks for a patient confidential communication preference. If the patient’s preference is set to “No Preference”, then Partner will use the first available phone number in the Custodian account. This default delivery method behavior can be defined in the Patient Notification Center section of the Configuration Editor (ced).
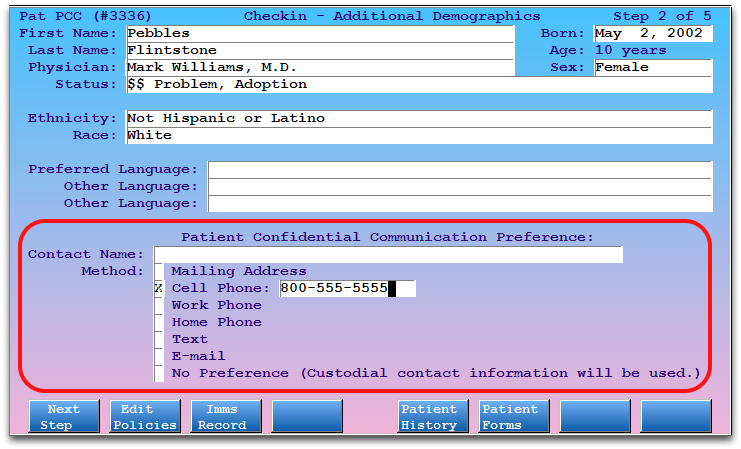
Your office can collect a patient’s phone, e-mail, or text message preference in the Confidential Communication Preference section of Patient Checkin (checkin), the Patient Editor (notjane), or the Demographics section of the patient’s chart in PCC EHR.
Custom Delivery Method
When you create or edit a notification, you can also specify the preferred and alternate delivery methods. For example, you could tell Partner to send TeleVox instructions to text message the Custodian’s cell phone number, if available, and otherwise to call the home number.
Notification Features and Options
Once your registration is complete and PCC Support has activated the features on your system, you are ready to create your first patient notification.
General Options
-
One-Time, or Recurring?: If you wish, you can use the Patient Notification Center to create a single, one-time notification to patients, based on their upcoming visits. Or, you can design a recurring, “always active” notification.
Most offices interested in using notifications for appointment reminders will want to create a recurring, daily notification. Then, all patients who meet your criteria and have upcoming appointments will receive a reminder. If an appointment reminder is not recurring or not daily, some patients will not receive reminders.
-
What Patients to Include?: You can limit appointment notifications to certain visit reasons, physicians, or other criteria. For example, you may decide to only send reminders for Well visits, because missed Well visits are more costly and disruptive to your practice’s schedule. Or, you may want to send appointment reminders for some physicians but not for others.
-
What Patients to Exclude?: When you create some notifications, you can indicate which patient or account status flags should cause the patient to be excluded from receiving notification messages. For appointment notifications, for example, the
notifyprogram will automatically suggest you exclude based on flags that are already configured to indicate an inactive patient, but you can select or deselect any flag in order to control who receives notification messages. Read Exclude Patients from Recaller and Notify to learn more. -
What Delivery Methods to Use?: As described above and in the how-to procedures, you can specify the preferred delivery method (e-mail, phone, or text message) and the preferred data source (custodian account, guarantor account, patient account), for each notification.
Appointment Reminder Options
What kind of appointment reminders do you wish to send? Before you jump in, your office should consider the following useful options.
-
Include the Physician's Name, or Not?: All appointment reminders include the date, time, and location of the appointment. You can elect to include or exclude the scheduled physician’s name in the reminder.
-
How Early to Remind?: When creating an appointment reminder notification, you can decide how many days in advance to send appointment notification reminders to the patients.
-
Can the Receiving Person Confirm or Cancel the Appointment?: PCC can help you configure notification response features. Then when a family receives an appointment reminder message, they can press a button to confirm or cancel their appointment. Your office can have Partner automatically cancel those appointments or merely receive the cancellation request for later review and rescheduling. Contact PCC Support to discuss these options.
“Due for a Visit” Options
-
Include the Recall Reason, or Not?: Your Due for a Visit notification can include a recall reason, such as “Well Visit”, or not. Recall Reasons are a pre-defined list designed by PCC and TeleVox to preserve patient confidentiality:
- Well Visit
- Follow Up Visit
- Medication Check
- Vaccination
- Flu Vaccination
-
Recall Criteria: The Patient Notification Center uses the same criteria options as the Patient Recaller. When creating a Due for a Visit notification, you can remove patients who already have a scheduled appointment, limit the age range, or divide recalls up by primary care physician, geographical region, or other criteria.
Account Balance Options
-
What Balance Range Triggers a Notification?: Your Account Balance notification can be limited to balances over $5.00, for example, or any amount you specify.
-
What Aging Categories?: Will you send notifications as soon as balances are more than 30 days overdue, or wait for 60? 90? The Patient Notification Center uses the same criteria options as the Patient Recaller. When creating a Due for a Visit notification, you can remove patients who already have a scheduled appointment, limit the age range, or divide recalls up by primary care physician, geographical region, or other criteria.
-
Restrict By Flag: You can use account status flags to ensure that certain accounts do not receive notifications, or set up a specialized notification that is only sent to accounts with certain status flags..
After considering the above details, you are ready to create a notification.
Read the step-by-step Create an Appointment Reminder Notification or Create a “Due for a Visit” Notification guides to learn about the notify program and create a notification.
Other Considerations and Useful Options
Custom Message Text: Notification message text is not customizable. However, you can add a “trailer” message to be played at the end of a phone message (or texted upon confirmation of the appointment).
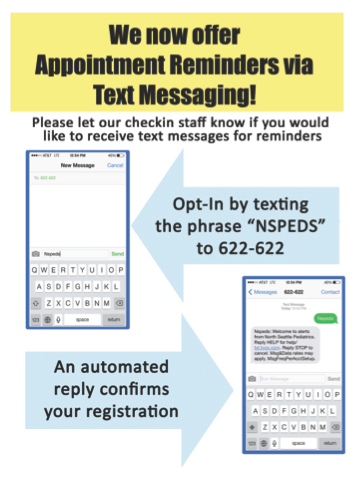
Patients and Families Must "Opt In" To Receive Text Messages: In order to receive text messages, patients or families must text your practice’s Organizational Key to a special TeleVox number: 622622. During your registration process, be sure and note your Organizational Key, and then consider posting instructions or telling families how to opt in so they can receive text messages.
Family Messaging Options: The Patient Notification Center can use TeleVox to automatically delivery reminder messages to all patients with scheduled appointments. But if a family has more than one sibling scheduled for an appointment on the same day, they might receive two messages in a row to the same phone number. Optionally, you can call PCC Support and ask for the “Family Messaging” option. We will adjust TeleVox settings so families will only get one message a day, a reminder for the first patient. All other patients with appointments later that day for that family will not receive a reminder.
New Clinicians?: When you add a new physician or other scheduling provider to your practice, be sure and contact PCC Support so they can be added to your configuration for the Patient Notification Center.
Area Codes are Required: For telephone notifications to work, the numbers in your patient and family records must be 10 digits long. If an account only lists a seven-digit phone number, the Patient Notification Center will not send the information to Televox.
Patient's Confidential Communication Preference Can Stop Delivery: The patient’s confidential communication preference is the first default delivery method. If a patient has a mailing address or invalid entry listed, Partner will honor that request and TeleVox will not deliver the notification to any alternate delivery method. If the patient has “no preference” selected, Partner will use any available alternate delivery method configured for each notification. You can override this behavior by configuring a notification so that it goes directly to a guarantor or custodian delivery method, or you can change your practice’s defaults in the Patient Notification Center section of the Configuration Editor (ced).
FCC Auto-Call Guidelines: There must be an appointment or other clinical reason to contact a patient. You can not use auto-call features or the Patient Notification Center for marketing purposes.
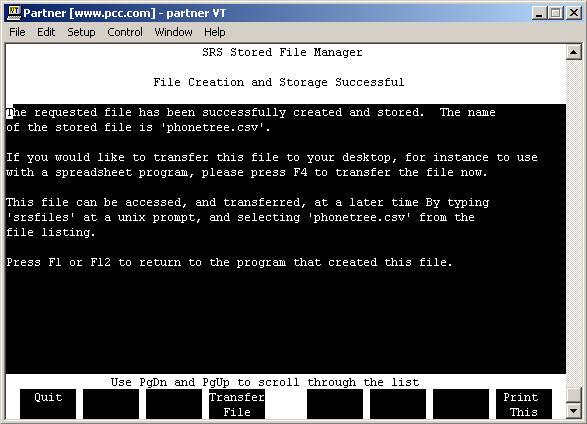
Export Patient Lists for PhoneTree
PhoneTree is a vendor that can automatically contact your patients by phone. The instructions below will show you how to create a list of patients and transfer them to your PC for use with the PhoneTree program.
Note: PCC’s Patient Notification Center can help you setup reoccurring notifications and then manage and send them for you with TeleVox. The instructions below are for finding and exporting patients manuallyfor the PhoneTree system.
Create the PhoneTree Patient List
First, use Partner’s phonetree program to create a list of upcoming appointments.
Run phonetree
Type phonetree at a command prompt or select the phonetree program from your Partner windows.
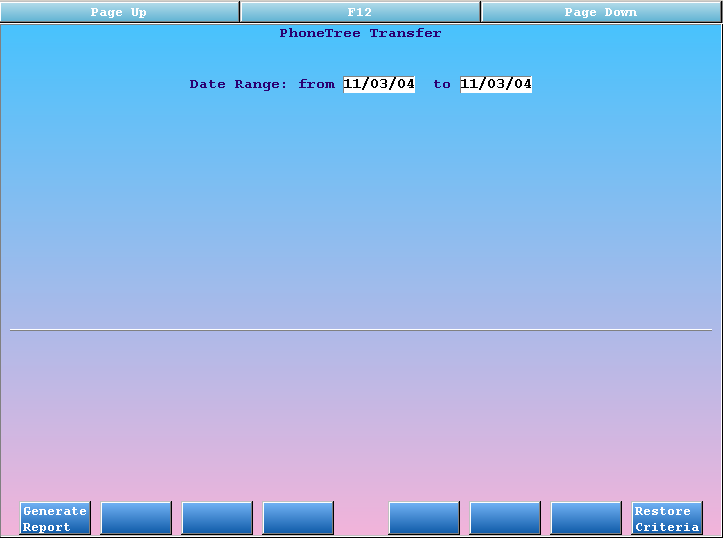
Input Date
Enter a date range for appointments that need reminder phone calls. PhoneTree will call all the patients scheduled to come in between these two dates. The default range is all the appointments for today, but you can send a week’s worth of appointments at once if you wish.
Review/Add Criteria
On the next screen, review the restriction criteria. The default settings collect all appointments for the date range entered that are either waiting for an encounter form or already have one printed. That means that canceled, deleted, missed, or posted visits will not be included in the list.
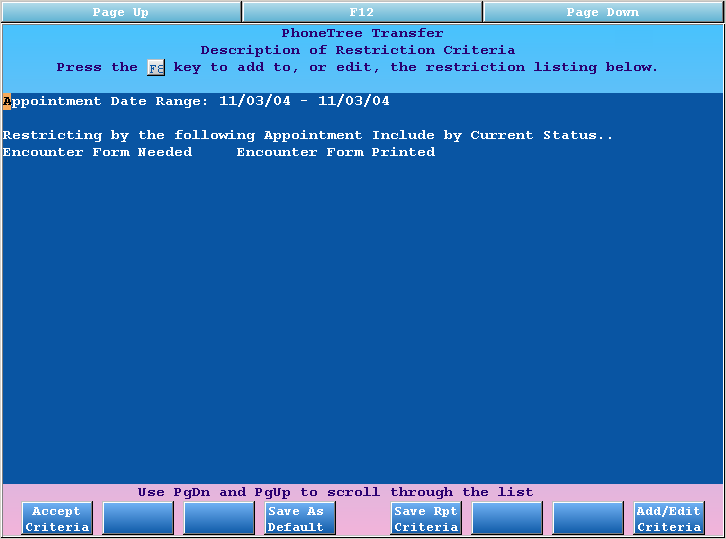
Press [fkey title=’F8′ subtitle=’Add/Edit Criteria’ display=’inline’ /] if you want to change the default settings or limit the list of appointments further. See the “Customize the Output” section below for an example.
Press F1
Press [fkey title=’F1′ subtitle=’Accept Criteria’ display=’inline’ /] to run the report and collect appointment information.
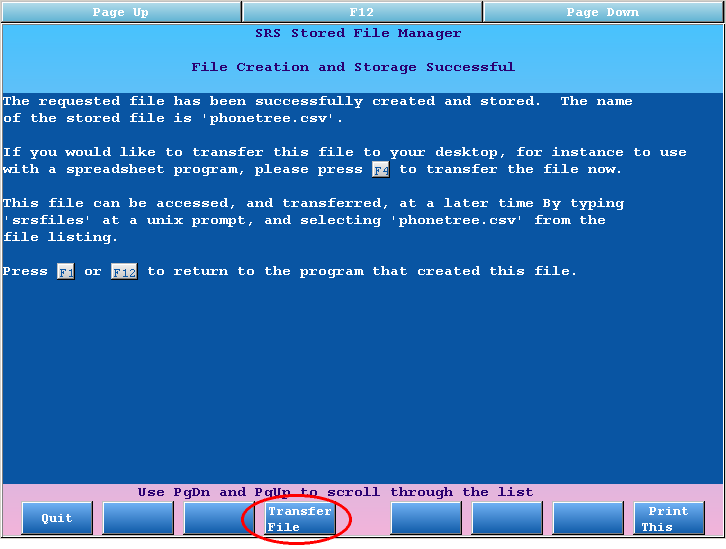
When phonetree finishes creating the list, it will prompt you to begin the file transfer.
Transfer PhoneTree List
After creating a list of patients for PhoneTree calls, the next step is to transfer the list of patients and appointments to the automated telephone system on your PC. The transfer process is different for users of AniTa and TeraTerm.
AniTa Transfer Instructions
AniTa uses the “YModem” protocol to transfer files to your PC. Once transferred, PhoneTree can read the list and make the needed phone calls.
Trouble Transferring: Some users report problems during file transfer. If the instructions below fail to transfer your PhoneTree file, even after rebooting your computer, consider switching to TeraTerm for creating and transferring your file. For help setting up TeraTerm, contact PCC Support at 1-800-722-1082.
Follow these steps to transfer the list:
Press F4
Press [fkey title=’F4′ subtitle=’Transfer File’ display=’inline’ /] to begin the transfer process.
View Instructions
You will see a list of instructions describing how to perform the transfer. You can read the instructions to learn more about the process.
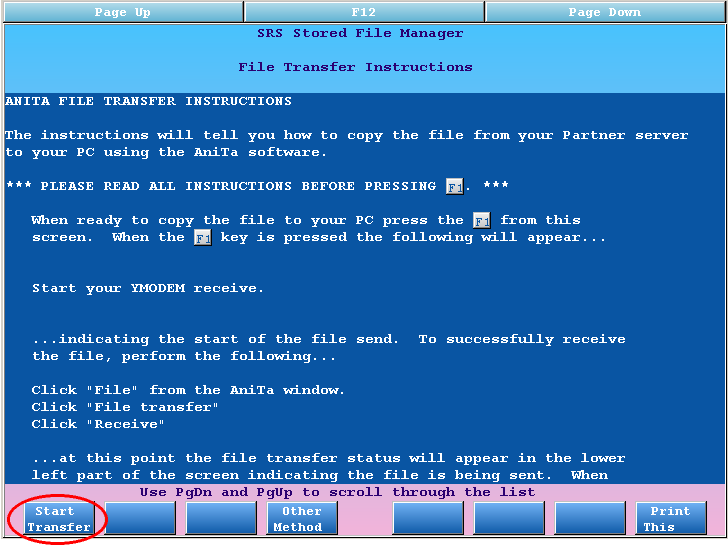
Press F1
When you are ready to transfer the file, press [fkey title=’F1′ subtitle=’Start Transfer’ display=’inline’ /]. You will see the following message:
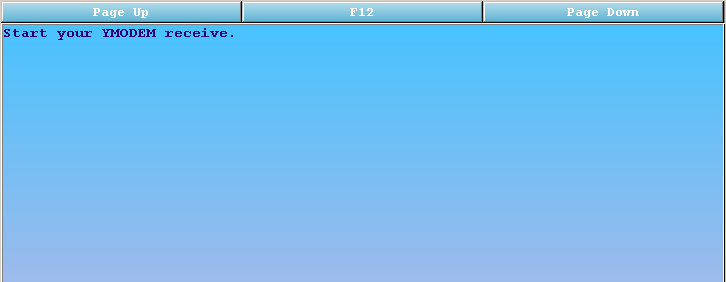
Start File Transfer
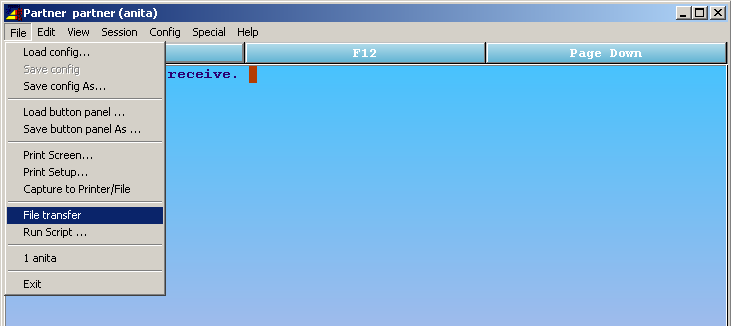
Click on the “File” menu and select “File Transfer”.
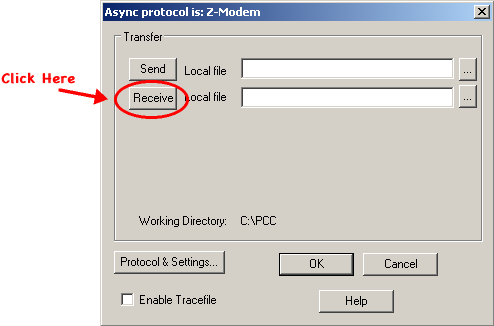
Click “Receive”
In the window that opens, click the “Receive” button to start the transfer.
Once the transfer has finished, you can find the phonetree.csv file in the C:PCC directory on your PC. Your automated phone system can retrieve it from that folder.
TeraTerm Transfer Instructions
TeraTerm uses the “ZModem” protocol to transfer files to your PC. Once transferred, PhoneTree can read the list and make the needed phone calls. Follow these steps to transfer the list:
Press F4
Press [fkey title=’F4′ subtitle=’Transfer File’ display=’inline’ /] to begin the transfer process.
View Instructions
You will see a list of instructions for performing the transfer. You can read the instructions to learn more about the process, including how to change the directory in which the file will be saved.
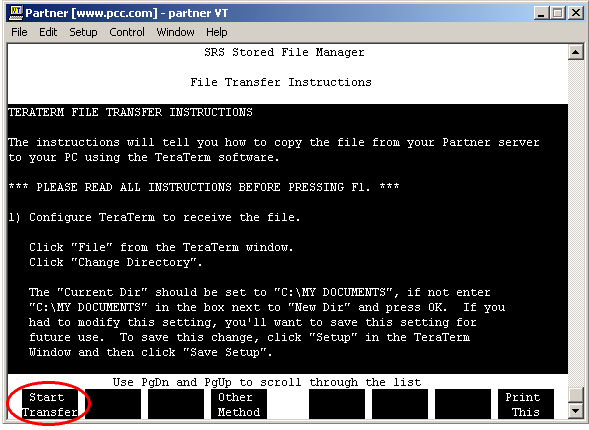
Press F1
When you are ready to transfer the file, press [fkey title=’F1′ subtitle=’Start Transfer’ display=’inline’ /]. You will see the following message:
Begin Transfer
Click on the “File” menu and select “Transfer”, “ZMODEM” and “Receive”, as shown below:

After the transfer is completed, you can find the phonetree.csv file in the TeraTerm directory (C:Program FilesTTERMPRO). Your automated phone system can retrieve it from that folder.
Filter Patients for PhoneTree
Do you have a list of patients who do not wish to receive phone call reminders? Perhaps you only send out reminders for certain visit reasons? While you are running phonetree, you can add restrictions to limit which patients your telephone system will call.
Press F8
From the “Description of Restriction Criteria” screen, press [fkey title=’F8′ subtitle=’Add/Edit Criteria’ display=’inline’ /] button.
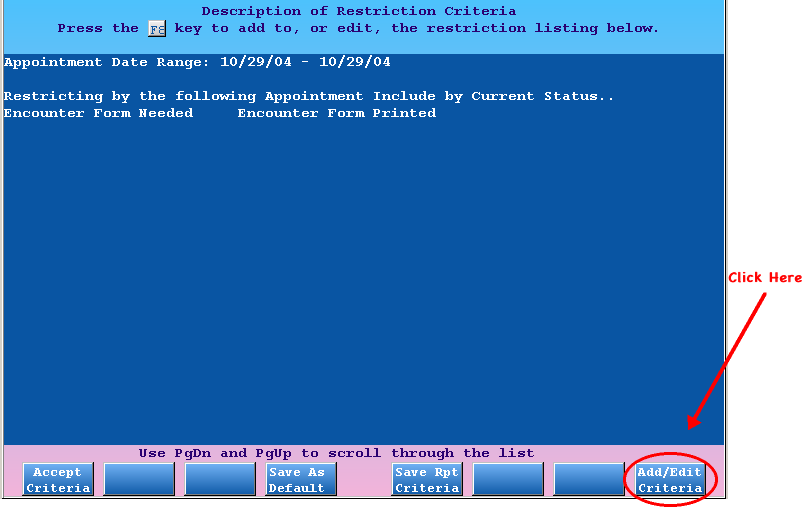
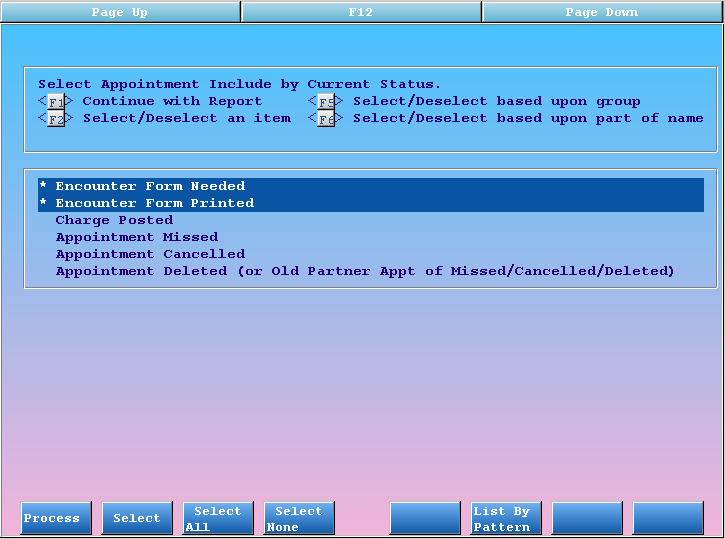
Select Additional Criteria
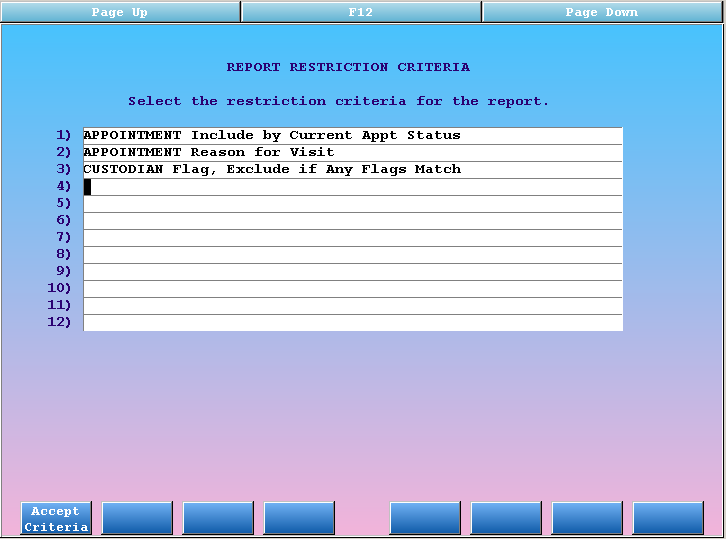
The default criteria is by appointment status. Canceled visits or visits that have charges posted will not require a phone call. In the example below, we added the additional criteria of visit reason and custodian status flags:
After selecting the criteria, press [fkey title=’F1′ subtitle=’Accept Criteria’ display=’inline’ /] to continue.
Verify Appointment Statuses to Include
Next, verify the appointment statuses to be included. The default behavior is usually correct:
Press F1 to continue.
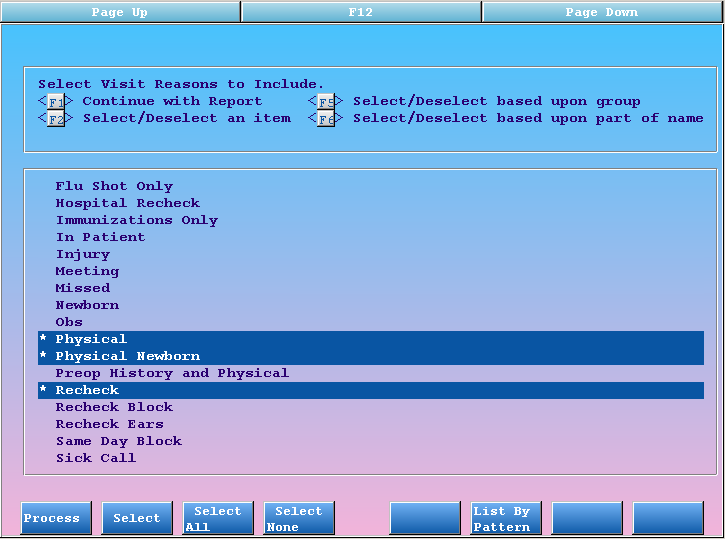
Specify Behavior for Each Criteria
Next, specify behavior for the other criteria you added. You will be shown one screen for each criteria. The examples below show both the visit reason and “Custodian – Exclude by flag” criteria screens. First, we select visit reasons:
Press F1 in between each criteria screen to move on to the next one. In the image below, we set which Custodian Status Flags to exclude from our list:
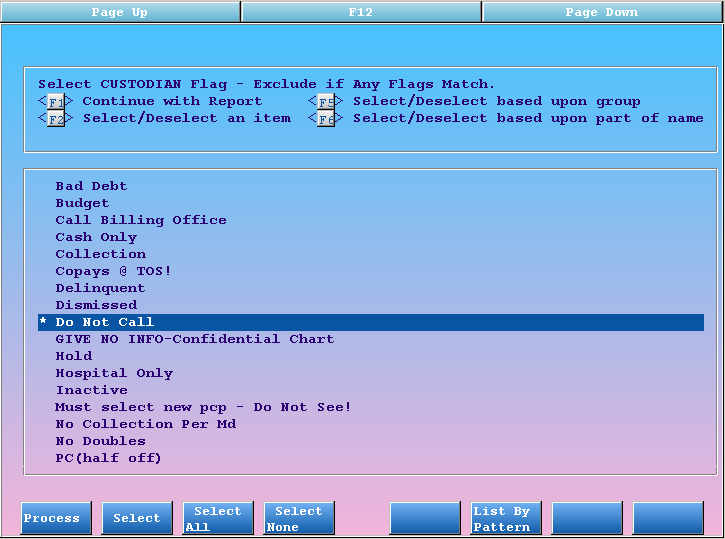
Press F1 again to process your selection.
Review Your Selections and Run the Report
Back on the Restriction Criteria screen, check your work to make sure you have selected appropriate criteria. Press [fkey title=’F4′ subtitle=’Save As Default’ display=’inline’ /] to save your choices as a new default. You can also press [fkey title=’F5′ subtitle=’Save Rpt Criteria’ display=’inline’ /] to save these settings as a criteria set that you can later retrieve from the date selection screen.
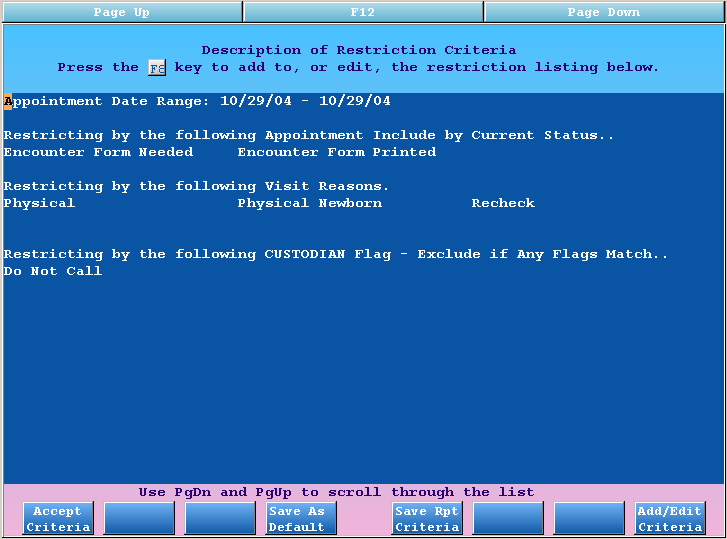
Press [fkey title=’F1′ subtitle=’Accept Criteria’ display=’inline’ /] to continue running your report.
Read More: The PhoneTree program uses the same report engine as the Smart Report Suite (srs). To learn more about the criteria functions, read the Smart Report Suite guide.
Other Phone Vendor Integration Options
Partner’s built in Patient Notification Center interfaces with TeleVox and manages automatic notifications.
However, you can also use Partner to export a simple list of patients and their contact information for any of several different phone vendors. PhoneTree, TeleVox, and other vendors provide services to make automatic calls (or e-mails or text messages) to patients.
Read one of the examples below to learn how to find and export patient data for a phone vendor.
Or, read about Partner’s Patient Notification Center to find out how Partner can do more of the work for you automatically.
Export Patient Lists for TeleVox
TeleVox is a vendor that can automatically contact your patients by phone, text, or e-mail. The instructions below will show you how to create a list of patients and transfer them to your PC or directly to TeleVox.
Note: PCC’s Patient Notification Center can help you setup reoccurring notifications and then manage and send them for you. The instructions below are for finding and exporting patients manually for TeleVox.
After performing the steps below, you can use the TeleVox program on your PC or the TeleVox web site instead of the Patient Notification Center.
Create the TeleVox Patient List
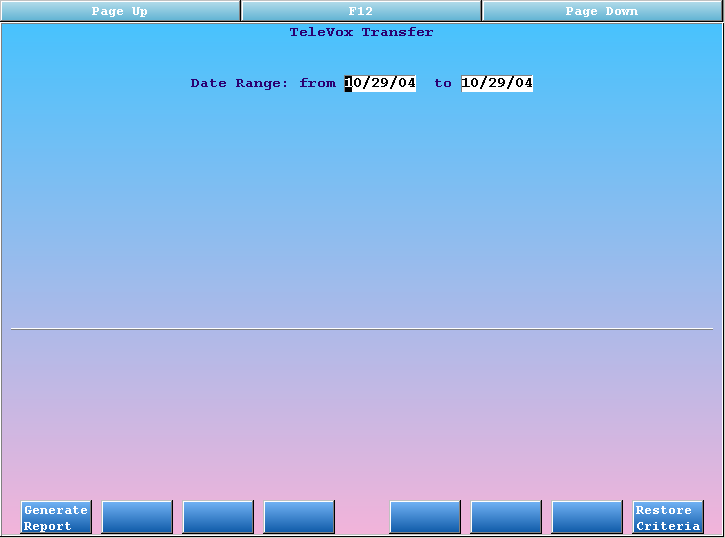
First, use Partner’s TeleVox Transfer (televox) program to create a list of upcoming appointments.
Run televox
Type televox at a command prompt or select the televox program from your Partner windows.
Input Date
Enter a date range for appointments that need reminder phone calls. Televox will call all the patients scheduled to come in between these two dates. The default range is all the appointments for today, but you can send a week’s worth of appointments at once if you wish.
Review/Add Criteria
On the next screen, review the restriction criteria. The default settings collect all appointments for the date range entered that are either waiting for an encounter form or already have one printed. That means that canceled, deleted, missed, or posted visits will not be included in the list.

Press [fkey title=’F8′ subtitle=’Add/Edit Criteria’ display=’inline’ /] if you want to change the default settings or limit the list of appointments further. See the “Customize the Output” section below for an example.
Press F1
Press [fkey title=’F1′ subtitle=’Accept Criteria’ display=’inline’ /] to run the report and collect appointment information.
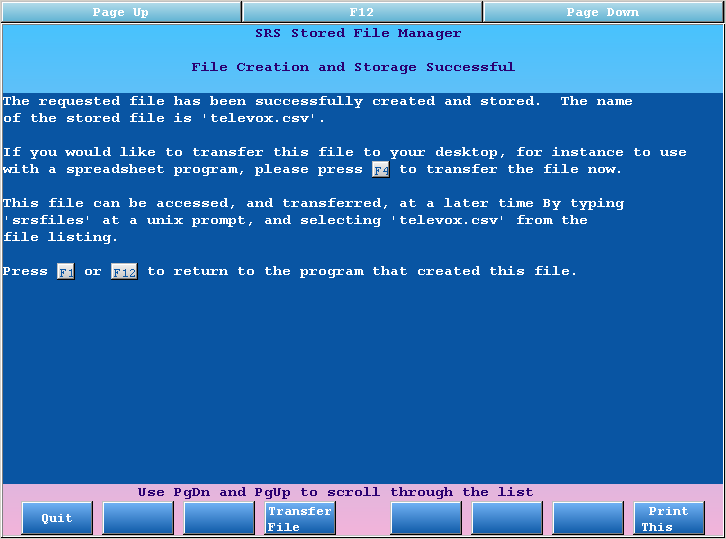
When televox finishes creating the list, it will prompt you to begin the file transfer.
Transfer the Televox List
After creating a list of patients for Televox calls, the next step is to transfer the list of patients and appointments to the automated telephone system.
There are three different methods. You can transfer the file directly to Televox, transfer it to your PC using AniTa, or transfer to your PC using TeraTerm. If you transfer the files to your PC, you can then use the TeleVox software to finish uploading the information to their Web site.
Transfer Data Directly to TeleVox
If you obtain an ssh username and password from the TeleVox company, PCC can configure an automatic transfer of patient and appointment data. This is the simplest method of running TeleVox. Contact PCC support for further assistance.
AniTa Transfer Instructions
AniTa uses the “YModem” protocol to transfer files to your PC. Once transferred, Televox can read the list and make the needed phone calls.
Trouble Transferring: Some users report problems during file transfer. If the instructions below fail to transfer your Televox file, even after rebooting your computer, consider switching to TeraTerm for creating and transferring your file. For help setting up TeraTerm, contact PCC Support at 1-800-722-1082.
Follow these steps to transfer the list:
Press F4
Press [fkey title=’F4′ subtitle=’Transfer File’ display=’inline’ /] to begin the transfer process.
View Instructions
You will see a list of instructions describing how to perform the transfer. You can read the instructions to learn more about the process.
Press F1
When you are ready to transfer the file, press [fkey title=’F1′ subtitle=’Start Transfer’ display=’inline’ /]. You will see the following message:
Start File Transfer
Click on the “File” menu and select “File Transfer”.
Click “Receive”
In the window that opens, click the “Receive” button to start the transfer.
Once the transfer has finished, you can find the televox.csv file in the C:PCC directory on your PC. Your automated phone system can retrieve it from that folder.
TeraTerm Transfer Instructions
TeraTerm uses the “ZModem” protocol to transfer files to your PC. Once transferred, Televox can read the list and make the needed phone calls. Follow these steps to transfer the list:
Press F4
Press [fkey title=’F4′ subtitle=’Transfer File’ display=’inline’ /] to begin the transfer process.
View Instructions
You will see a list of instructions for performing the transfer. You can read the instructions to learn more about the process, including how to change the directory in which the file will be saved.
Press F1
When you are ready to transfer the file, press [fkey title=’F1′ subtitle=’Start Transfer’ display=’inline’ /]. You will see the following message:
Begin Transfer
Click on the “File” menu and select “Transfer”, “ZMODEM” and “Receive”, as shown below:
After the transfer is completed, you can find the televox.csv file in the TeraTerm directory (C:Program FilesTTERMPRO). Your automated phone system can retrieve it from that folder.
Filter Patients for TeleVox
Do you have a list of patients who do not wish to receive phone call reminders? Perhaps you only send out reminders for certain visit reasons? While you are running televox, you can add restrictions to limit which patients your telephone system will call.
Press F8
From the “Description of Restriction Criteria” screen, press [fkey title=’F8′ subtitle=’Add/Edit Criteria’ display=’inline’ /] button.
Select Additional Criteria
The default criteria is by appointment status. Canceled visits or visits that have charges posted will not require a phone call. In the example below, we added the additional criteria of visit reason and custodian status flags:
After selecting the criteria, press [fkey title=’F1′ subtitle=’Accept Criteria’ display=’inline’ /] to continue.
Verify Appointment Statuses to Include
Next, verify the appointment statuses to be included. The default behavior is usually correct:
Press F1 to continue.
Specify Behavior for Each Criteria
Next, specify behavior for the other criteria you added. You will be shown one screen for each criteria. The examples below show both the visit reason and “Custodian – Exclude by flag” criteria screens. First, we select visit reasons:
Press F1 in between each criteria screen to move on to the next one. In the image below, we set which Custodian Status Flags to exclude from our list:
Press F1 again to process your selection.
Review Your Selections and Run the Report
Back on the Restriction Criteria screen, check your work to make sure you have selected appropriate criteria. Press [fkey title=’F4′ subtitle=’Save As Default’ display=’inline’ /] to save your choices as a new default. You can also press [fkey title=’F5′ subtitle=’Save Rpt Criteria’ display=’inline’ /] to save these settings as a criteria set that you can later retrieve from the date selection screen.
Press [fkey title=’F1′ subtitle=’Accept Criteria’ display=’inline’ /] to continue running your report.
Read More: The televox program uses the same report engine as the Smart Report Suite (srs). To learn more about the criteria functions, read the Smart Report Suite guide
Recaller Criteria Reference
When you run the Recaller, you begin by adding one or more criteria to limit the output. The criteria determine which patients will be part of your recall.
How do each of the Recaller criteria work? What would each one be useful for? The catalog of criteria options below explains the purpose and effect of each criteria, as well as how to fill them out.
Introduction: How Do I Find and Select Criteria for a Recall?
Selecting and Searching for Criteria: You can use an asterisk to see a list of all available criteria. Criteria are listed in alphabetical order, separated into “Include by” and “Exclude by” lists.

You can also search for a criteria by surrounding a search term with asterisks (i.e., enter “*due*” to search for criteria with the word “due” in the description).
You can add several different criteria, building a more and more refined list of patients for your recall. For examples of selecting and entering criteria, read the Recaller Quickstart or the Recall Patients for Physicals help articles.
Age
Select the age criteria in order to limit your recall according to patient’s age or date of birth.
When you select the age criteria, the Recaller will prompt you to enter an age range.
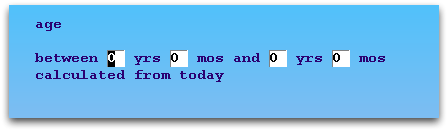
Optionally, you can press [fkey title=’F7′ subtitle=’Specific Dates’ display=’inline’ /] to enter a birth date range.
Uses: The age or birth date criteria can create a list of all patients of a certain age. You could use this criteria to recall certain patient age groups for flu shots or other services.
Appointments
Select an appointment criteria to include or exclude patients based on appointments in the Partner scheduler, either for any provider or a specific provider.
When you select an appointment criteria, the Recaller will prompt you for an appointment date range and a visit reason or reasons.
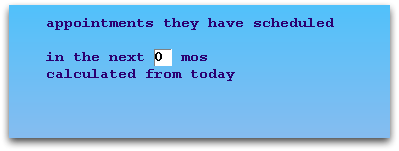
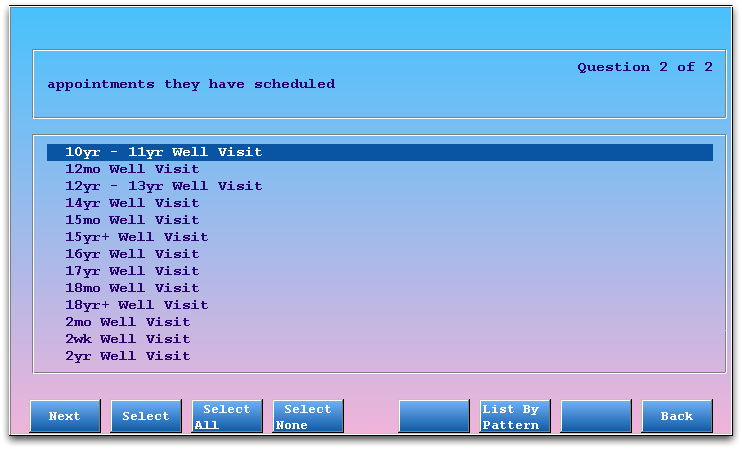
Use Select All: You may only care about a patient’s appointment date, regardless of the visit reason. Note that you can use the Select All function on the Visit Reason screen to remove that item from the Recaller’s filtering.
Uses: An appointment-based recall helps you exclude patients with scheduled appointments from physical reminders. You could also find all patients who are scheduled for a certain visit reason.
Appointments (or Procedures) By Provider
You may wish to see a list of all patients who have had certain procedures or appointments with a specific provider or providers. Use the “By Provider” criteria in the lists.
These criteria work like the procedures and appointments criteria, described in the sections above, except that the Recaller will also ask you to specify which providers should cause the patient to be included or excluded from the recall.
Uses: You can use these criteria to create a list of all the patients a certain provider performed a Well Child diagnoses for, or find out how many recheck visits are in the schedule for a certain nurse.
Birthday (next)
Use the upcoming birthday criteria to find patients with birthdays occurring within a specified future time frame.
When you select this criteria, the Recaller will ask you how far forward it should look when collecting birthdays.

Optionally, you can press [fkey title=’F7′ subtitle=’Specific Dates’ display=’inline’ /] to enter a birthday date range.
Uses: You could use this criteria to send birthday cards.
Date Added to Partner
Select the Partner date criteria to recall patients based on when they were added to the Partner system.
When you select this criteria, the Recaller will prompt you to enter a time frame.
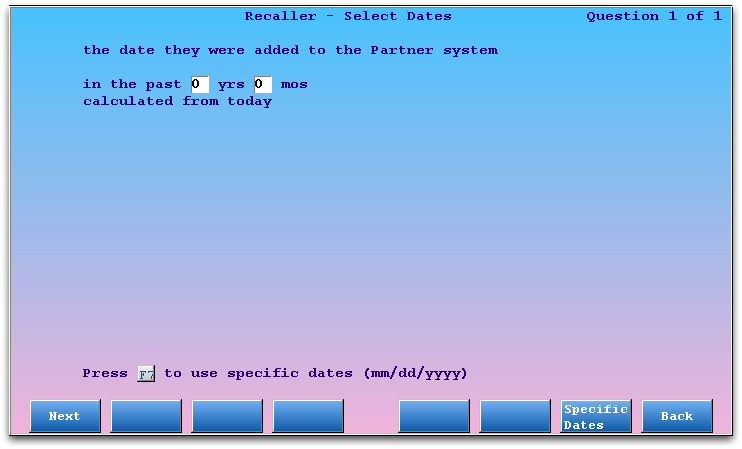
Optionally, you can press [fkey title=’F7′ subtitle=’Specific Dates’ display=’inline’ /] to choose a precise date range.
Uses: This criteria can help you find new patients or families, regardless of their visit history. You could create a list of all patients added to your Partner system in the past year. During a data conversion from another billing system, this recall criteria could list precisely those patients added to your system on a certain day.
Date of Last Physical
You can build a list of patients based on the date of their last physical.
After selecting this criteria, the Recaller will ask you to input a range of time within which the patient’s last physical must have occurred to be included in the recall.
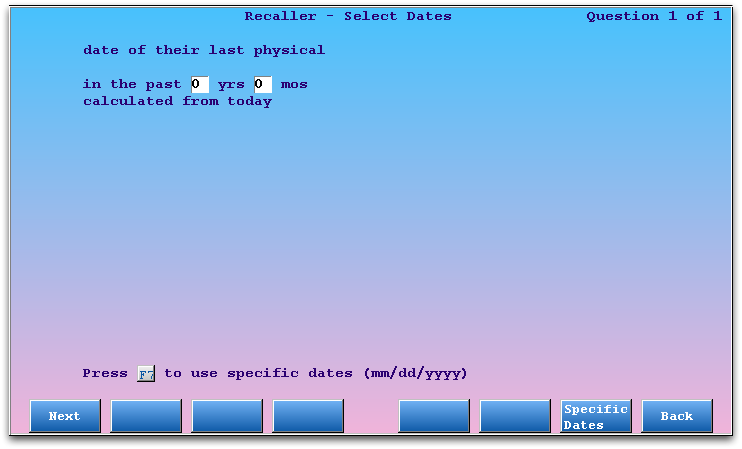
Optionally, you can press [fkey title=’F7′ subtitle=’Specific Dates’ display=’inline’ /] to enter a specific date range instead of a time relative to today.
Date of Last Visit
Select the patient’s last visit date criteria in order to limit your recall to all patients who were seen within a specified time frame.
When you select this criteria, the Recaller will prompt you to enter a length of time to search for past patient appointments.
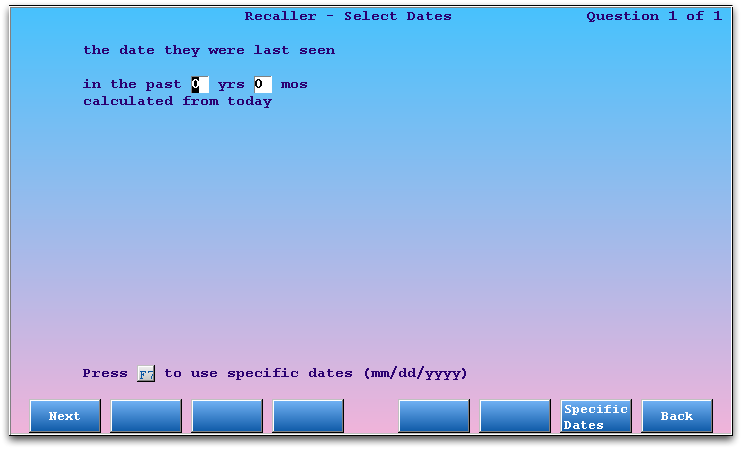
The Recaller will run a search relative to today (the time you run the report) and include patients with visits in that time period. Optionally, you can press [fkey title=’F7′ subtitle=’Specific Dates’ display=’inline’ /] and enter a precise date range.
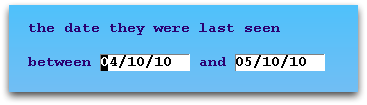
Uses: The visit date criteria is often used to limit a recall to active patients, as determined by those who have visited your practice within the past three years. You could also use it to create a list of patients whose last visit was several years ago so that their charts may be archived.
Date of Physical Due
Select the physical due date criteria in order to limit your recall according to a patient’s physical schedule.
When you select the physical due date criteria, the Recaller will prompt you to enter a time frame for when the patient’s next physical is due. Keep in mind that this may include both patients who are overdue for a physical or will be due for one soon.
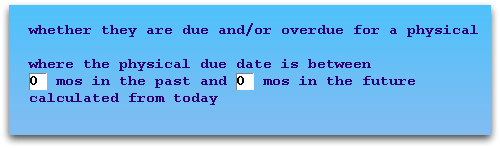
Note: Partner enters a “Due Date for Next Physical” into a patient’s record when their guarantor is billed a Well Child procedure during checkout. It uses a customizable physical schedule for your office, originally based on the AAP’s recommendations. Run the Patient Editor (notjane) to see any patient’s next physical due date.
Uses: The physical criteria can help you find all patients who are overdue for a physical or have a physical due during the coming months. You can use the Recaller to print mailing labels for reminder postcards.
Diagnoses
Select a diagnoses criteria to include or exclude patients who have received certain diagnoses.
When you select a Diagnoses criteria, the Recaller will prompt you to select a date range and then a diagnosis or diagnoses.
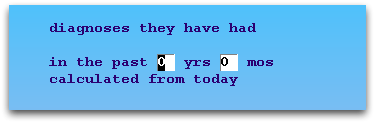
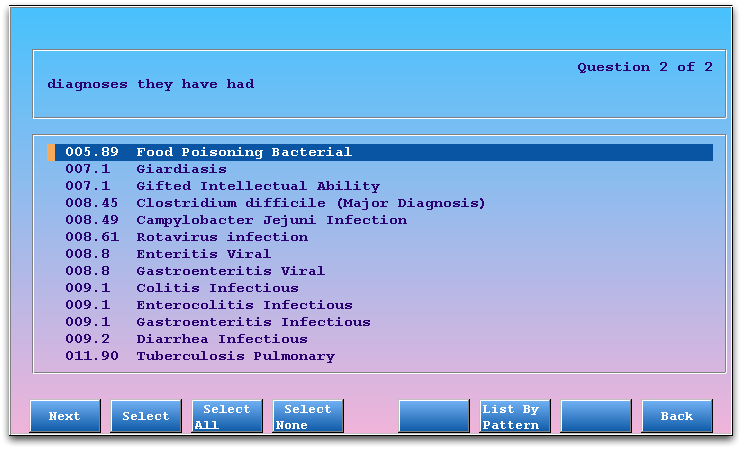
Uses: A diagnoses recall is ideal for finding all asthma patients, all ADD patients, or all patients suffering from any other diagnoses, in order to remind them of services or opportunities. You could also run a recall using a list of diagnoses to remind high-risk patients of a flu clinic.
Ethnicity, Race
Use the ethnicity and/or race criteria to limit your recall to specific ethnicity or race, based upon the U.S. Federal Government’s standard values.
The Recaller will ask you to select races/ethnicity to include or exclude.
Note: Race and ethnicity are stored in the Patient Editor (notjane) or in the Demographics section of the patient’s electronic chart. These criteria will only be useful if your practice collects this information.
Flags, Account or Patient
Select one of the four status flag criteria to filter Recaller results by patient or account status flags. You can include or exclude by patient or account flags.
When you select any of the status flag criteria, the Recaller will prompt you to select the flags.
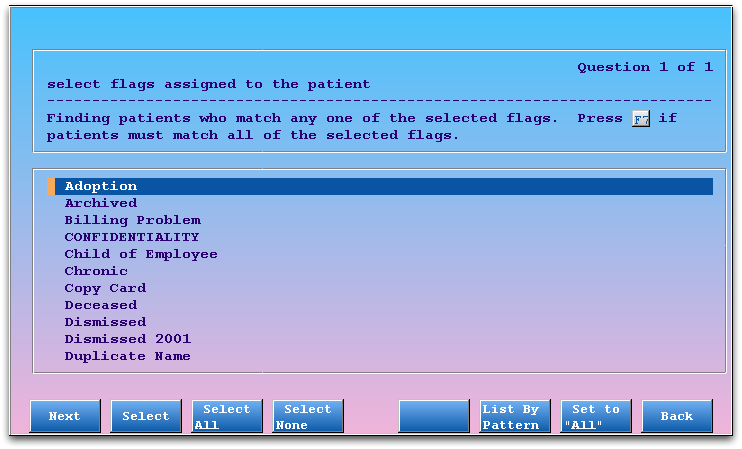
Any, or All?: By default, when you are including patients by flag, any of the selected flags will cause them to be included in the recall. When you are excluding by flag, the Recaller will knock them out of the recall if they have any one of the selected flags. You can change these default behaviors by pressing [fkey title=’F7′ subtitle=’Set to All/Any’ display=’inline’ /]. For example, if you want to recall patients who are both Special Needs and Referred, you would select both flags and then press F7 to indicate that patients needed all flags to be included in the recall.
Auto-Selected: You may notice that certain status flags are already marked for exclusion by default. You can set the default behavior for excluding flags in the Table Editor (ted).
Uses: Status flags are used to categorize and mark accounts and patients for a wide variety of reasons, any of which may be a good reason to recall a patient or exclude them from a recall. If a patient record is flagged deceased, dismissed, or transferred, for example, you would want to exclude them from a physical reminder recall. You could also use the Recaller to send a form letter to all accounts flagged “Collection”, or to exclude all families that have asked not to receive recall messages.
Insurance Plan
Select an insurance plan criteria in order to limit your recall to all patients who have (or do not have) specific insurance plans.
When you select an insurance plan criteria, the Recaller will prompt you to select a plan or group of plans.
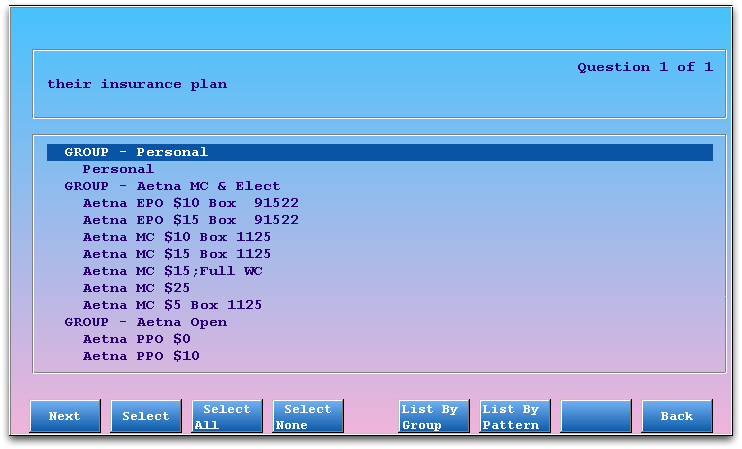
Use function keys at the bottom of the screen to select individual plans, all plans, deselect all plans, list and select plans by insurance group, or search for a plan.
Uses: You may need to contact all families under a certain insurance plan to inform them of a change in policy or that you are dropping the plan. You may wish to inform your patient population of a new service, but only inform patients with insurance policies that permit the service.
Procedures
Select a procedure criteria to find or exclude patients who received (were billed for) certain procedures.
When you select a procedures criteria, the Recaller will prompt you to select a date range and a procedure or procedures.
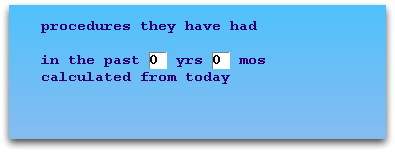
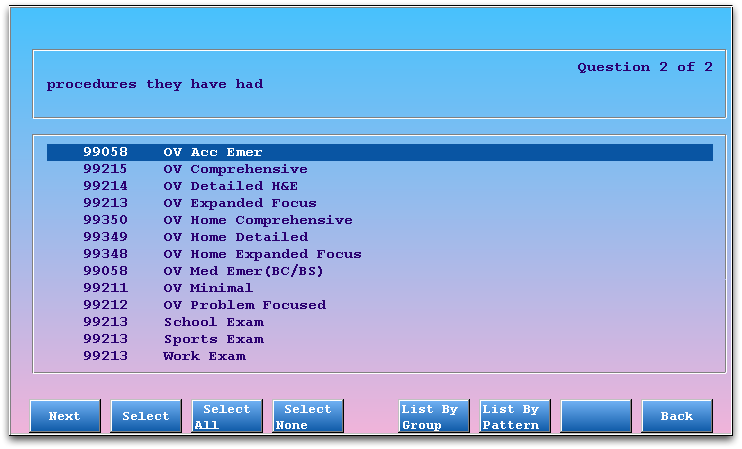
Uses: A procedure recall is ideal for performing an immunization recall when you discover a bad immunization lot. You could also combine the exclude procedure criteria with the “Patient’s Date of Birth” criteria to find all patients of a certain age who have not received a specific immunization or other recommended procedure.
Provider (Primary Care)
Select the primary care provider criteria to include only a specific provider’s (or providers’) patients in a recall.
When you select this criteria, the Recaller will prompt you to select providers or provider groups.
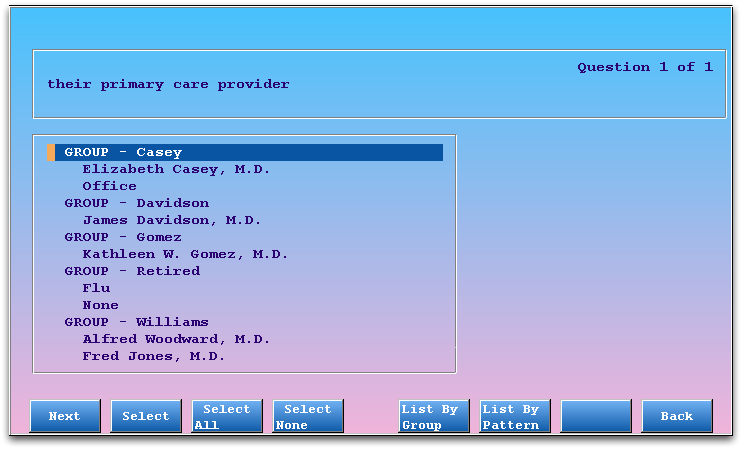
Note: Primary care provider information is stored in the Patient Editor (notjane). This criteria will only be useful if your practice assigns this information.
Uses: Add this criteria to limit your recall to a subset of your providers. You may need to inform all of a provider’s patients that a physician has new office hours or that he or she is retiring.
Sex
Select the sex criteria to find only male or female patients.
When you select the sex criteria, the Recaller will prompt you to select male or female patients.
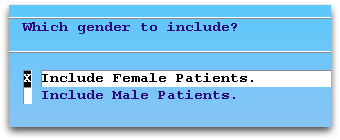
Uses: You can limit any recall, for any reason, to one gender or the other. You could use the sex criteria to send Gardasil information, for example.
ZIP Code of Custodian
Select the ZIP code criteria to find patients living in a certain area.
When you select the ZIP code criteria, the Recaller will prompt you to enter a ZIP code or ZIP code range.

Uses: A ZIP code recall could help you notify families and patients of regional issues, such as a new office location or new city and state ordinances.
Remind, Recall, and Contact Patients
Partner has built in tools for contacting patients and families automatically, by form letter, phone, e-mail, or text message.
The Patient Recaller
The Patient Recaller (recaller) is a report that can create custom call lists, form letters, and mailing labels for your patients and families. You can create custom searches using thousands of possible criteria combinations, and the Recaller will help you contact those different groups of patients.
Use the Recaller to find the right patients and then print out physical reminders, flu shot announcements, or immunization recalls. You can also use the Recaller to do quick research and reporting on your patient populations.
You can learn more in the Patient Recaller section of this help guide.
The Patient Notification Center
The Patient Notification Center (notify) is a powerful tool for contacting patients and families. You can set up recurring or one-time notifications, and PCC will deliver messages to your patients automatically through our partnership with TeleVox, either by phone call, text message, or e-mail.
The Patient Notification Center currently supports appointment reminders, “Due for a Visit” notifications, and account balance notifications. For example, you can create a notification that automatically contacts patients three days before their appointment and tells them the date, time, location and physician (optionally) of the appointment. Or, you could create a set of criteria for physicals or other visit types and automatically remind patients to call and schedule an appointment. Finally, you can send a balance notification to all families with certain aged balances.
You can read a complete guide in the Patient Notification Center section of this help guide.
TeleVox, VoiceGate, PhoneTree, and Other Contact Systems
Partner’s built in Patient Notification Center uses TeleVox and manages notifications.
However, you can also use Partner to export a list of patients manually and use the phone vendor of your choice.
Partner includes some simple programs that collect and export patient contact information. The output works for TeleVox, PhoneTree, VoiceGate and other auto-call systems.
You can learn how to export patient lists for phone vendor systems in the Other Phone Vendors section of this help guide. For help getting started, or to find out if your auto-call vendor of choice is available, contact PCC Support at 800-722-1082.
Form Letters
For more information about creating and editing form letters, read the Form Letters article.