Requeue Large Numbers of Claims and Resubmit
When a clearinghouse fails to process and acknowledge your claims, or claims for a specific payor or date range fail, you may need to create and submit new claims for a large number of encounters. You can use PCC’s under-the-hood Resubmit Claims (maketags) program to queue up new claims for encounters.
Maketags is a Power Tool: Only use maketags in those rare cases when you need to resubmit a large number of claims based on a date of service or other criteria. You can create a new claim for any single encounter by opening the Billing History in the patient’s chart and clicking “Edit Charges”. See Resubmit a Claim.
Video: Watch Requeue Large Numbers of Claims to learn more.
Contents
Why would you need to find and resubmit a large batch of claims?
- You have used the wrong tax ID number for the last three weeks of claim submissions. You received the rejections, you corrected your tax ID, and now you need to resubmit every claim from the last three weeks.
- You have been working with an insurance company that has denied claims improperly. They have asked you to resubmit all claims for visits by their patients between January and October of last year.
- You have billed a procedure using the wrong procedure code. After you correct the code in the Procedures table, you need to find every claim that had this procedure code and resubmit.
- You submitted claims to a claim clearinghouse or payor, but never received an acknowledgement or response.
Use the Billing History section of the patient’s chart to resubmit single claims. Use maketags when you need to queue up claims for a large number of encounters.
Find Encounters and Create New Claims (Basic)
Follow the procedure below to create new claims for encounters.
Have You Fixed the Problem?: The maketags program does not address outstanding billing problems and will not increase revenue. Before you recreate a large number of claims, you should understand why claims were rejected (or need correction) and adjust your configuration or use other PCC tools to work on unpaid claims. Contact PCC for help.
Run Resubmit Claims (maketags)
Run the maketags program from your Practice Management windows.
Select Criteria
Use the criteria options to tell maketags which charges you need to resubmit.
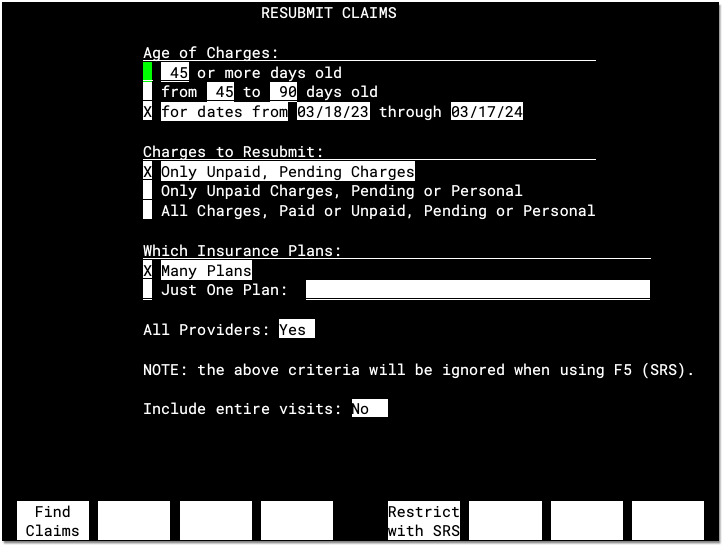
Include Entire Visits?: When the Resubmit Claims tool finds encounters matching your criteria, do you wish to resubmit only the unpaid charges or all charges for each encounter? If the “Include Entire Visits” question is set to No, then only procedures that meet your chosen criteria will appear on the new claims. If the question is set to “Yes”, then all charges for the matching encounters will appear on the resulting claims.

Press F1 – Find Claims
If a criteria option requires more information, you will be asked to make additional selections.
Review Total and Optionally Review List of Encounters
You will see the total number of encounters that match your criteria.
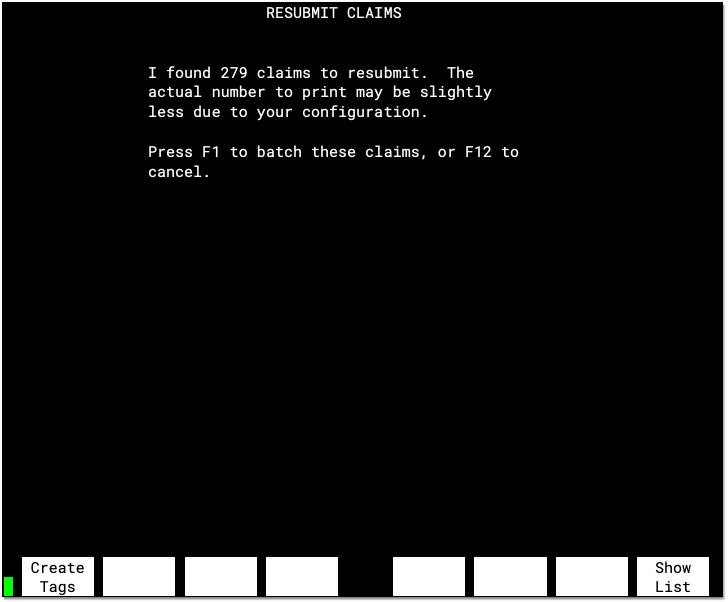
Press F8 – Show List to review or print the list of encounters that maketags found.
Press F1 – Create Tags to Create New Claims
After the claims are batched, you can prepare and submit your practice’s claims.
Find Encounters and Create New Claims (Advanced)
Do you need to resubmit all claims with a certain billing status, procedure, place of service, or for accounts with a specific status flag? Use the “Restrict with SRS” function to create more detailed custom restrictions.
Override Criteria: When you use the “Restrict with SRS” function, all of the criteria you specify on the first screen will be overridden by the advanced restriction options you select using the SRS screens as described below.
Follow the procedure below to create new claims for encounters based on SRS criteria options.
Run Resubmit Claims (maketags)
Run the maketags program from your Practice Management windows.
Indicate Whether or Not to Include the Entire Visit
When the Resubmit Claims tool finds encounters matching your criteria, do you wish to resubmit only the unpaid charges or all charges for each encounter? If the “Include Entire Visits” question is set to No, then only procedures that meet your chosen criteria will appear on the new claims. If the question is set to “Yes”, then all charges for the matching encounters will appear on the resulting claims.
Press F5
Press F5 – Restrict with SRS.
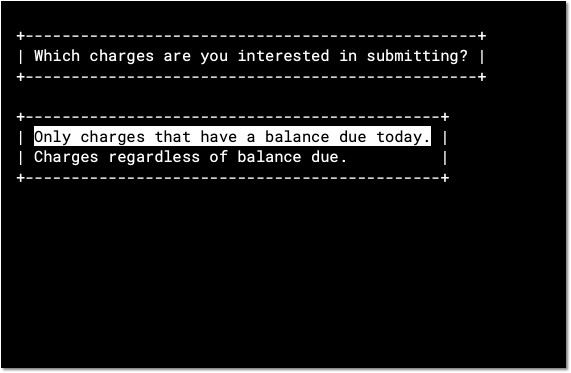
Indicate Whether to Include Charges Regardless of Balance
Indicate whether to include only charges with a balance due or all charges regardless of the balance.
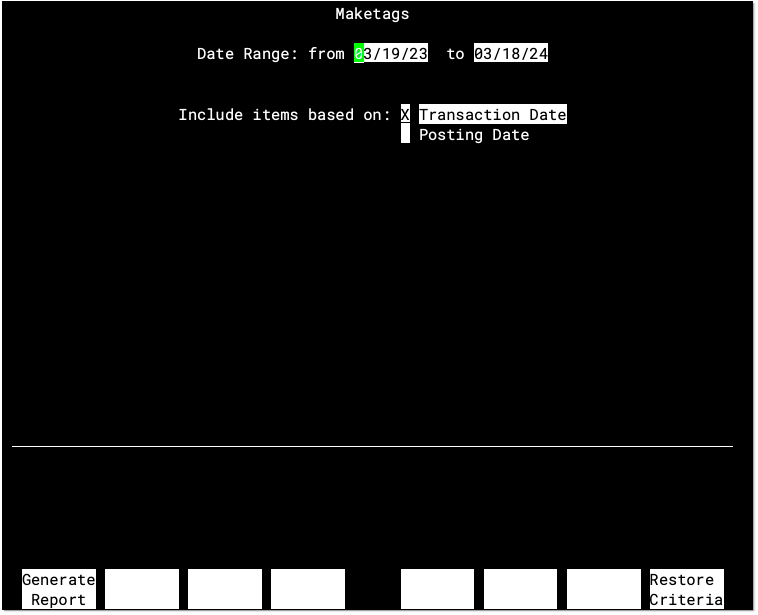
Enter a Date Range
Enter a date range within which PCC will search for encounter charges to resubmit. Indicate whether to use the date of service (“Transaction Date”), or the posting date. Press F1 – Generate Report to continue.
Select Insurance Plans
Next, specify the insurance plans for which you need to create new claims.
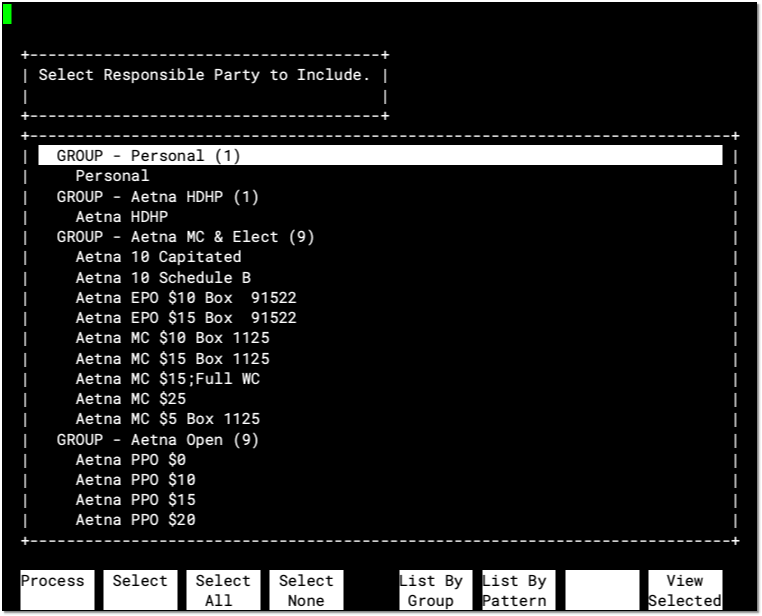
Press F2 – Select to select individual plans, press F5 – List By Group to quickly select a group of plans, or select by the pattern of your choice using F6 – List By Pattern. Press F3 – Select All to include all insurances and all personal charges.
After you finish selecting plans, press F1 – Process to continue.
Create Claims for Charges Pending Personal?: Do not select “Personal” unless you want to create new claims for encounter charges that are currently pending the patient or family.
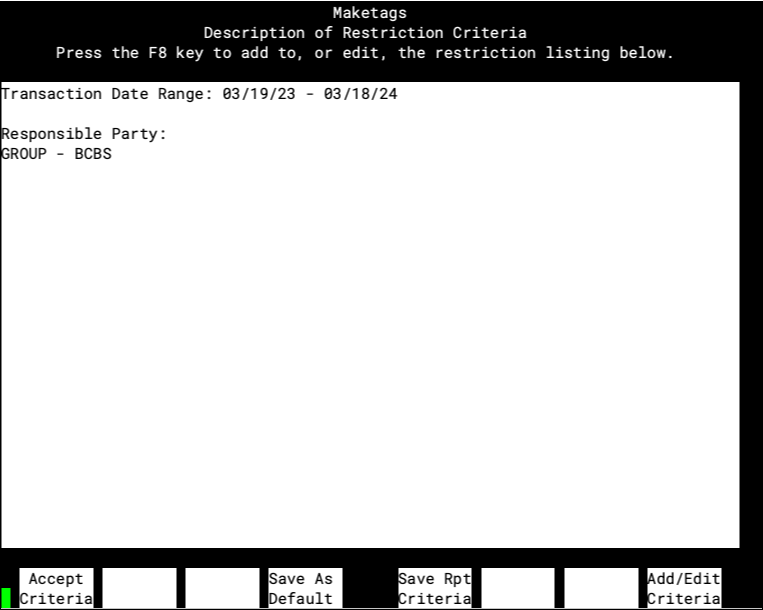
Review Criteria
Review your chosen search criteria.
Optional: Select Additional Criteria
If you wish to restrict by billing status, provider, place of service, or another criteria, press F8 – Add/Edit Criteria. Then add as many criteria as you need.
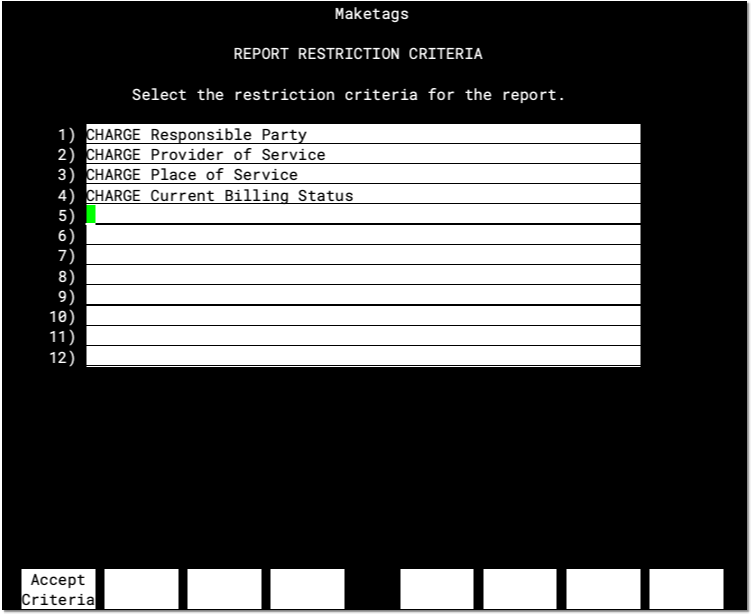
You can use the asterisk (*) symbol to view a list of available criteria.
Press F1 – Accept Criteria to continue.
Optional: Enter Restriction Details for Additional Criteria
For every criteria, PCC will ask you for specific details. Select your desired criteria from each screen and press F1 – Accept Criteria to continue.
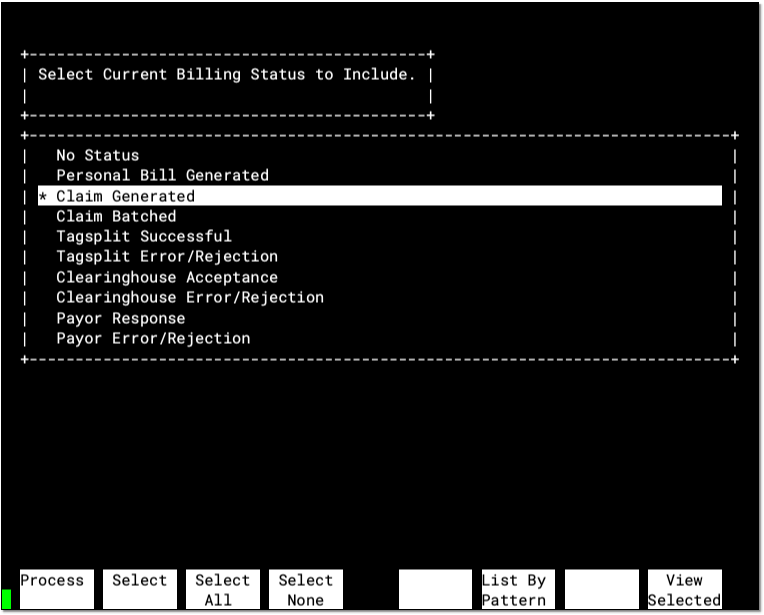
In the example above, the user added the “Current Billing Status” criteria to the report, and selects the status of “Claim Generated”. By using this criteria, you can find all encounter charges for which a claim was submitted but never acknowledged.
Review and Accept Criteria
Once you have added all of your restrictions, press F1 – Accept Criteria to accept your criteria. Your PCC system will gather encounter charges based on the criteria you specified.
Review Results and Queue Up New Claims
Once you have added all of your restrictions, press F1 – Accept Criteria to accept your criteria. Your PCC system will gather encounter charges based on the criteria you specified.
Review Total and Optionally Review List of Encounters
You will see the total number of encounters that match your criteria.
Press F8 – Show List to review or print the list of encounters that maketags found.
Press F1 – Create Tags to Create New Claims
After the claims are batched, you can prepare and submit your practice’s claims.
Save Frequently Used Criteria: As with other srs-based reports, maketags criteria can be saved and reused. If you commonly rebatch claims for one particular insurance or procedure, for example, you may want to save the detailed report criteria you entered and restore it the next time you need to resubmit claims. After entering your criteria the first time, press F5 – Save Rpt Criteria on the summary screen. When you next need that same criteria, press F8 – Restore Criteria from the first srs criteria screen.
Resubmit Claims Criteria Reference
Read below to learn more details about the criteria options shown on the first screen in the Resubmit Claims (maketags) tool.
SRS Reporting Ignores These Criteria: If you use F5 – Restrict with SRS, the criteria options in this reference will be ignored.
Rebatch Charges by Age or Date Range

Use the “Age of Charges” options to select charges of a certain age. You can enter an age range, in days, using one of the top two options. Or, you can input a specific date range.
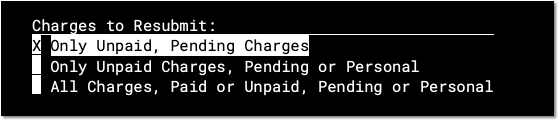
Rebatch Charges by Paid and Insurance Status
Under most circumstances, you only want to recreate claims if they are unpaid and still pending an insurance company. You may occasionally need to create batches for an entire insurance company, regardless of whether or not there is an outstanding balance. Use these settings to select which charges, based on pending and paid statuses, maketags will batch:
Rebatch Charges by Insurance Plan
If you select “Just One Plan,” you can choose the insurance plan of the claims you wish to resubmit on the first screen:

If you leave the default of “Many Plans” selected, however, maketags will ask you to select the insurance plan or plans when you press
F1 – Generate Report
.

Press Page Down, Page Up, or the up and down arrow keys to select the desired plan and press F2 – Select to mark it. If you want to submit claims from all insurance plans, press F3 – Select All.
Press F1 – Process after you have selected all the needed plans.
Use Groups: Select the “Group” heading at the top of a list of plans to select the entire group. You can also press F5 – List By Group to view all of your insurance groups. By selecting groups instead of individual plans, you can very quickly pick out the different insurance companies whose claims you need to resubmit.
List By Pattern: Press F6 – List By Pattern to search for a word or number, such as “Aetna” or a PO Box number. You can then select plans from the list of results.
Rebatch Charges by Provider
You can sort and resubmit charges for all providers or for specific providers. This comes in handy if you use the wrong provider ID# for a period of time and you need to resubmit all the claims from that time.
Change the “All Providers” field to “No” and press F1 – Generate Report to select a specific provider.

On the provider selection screen, use the arrow keys and press F2 – Select to pick providers or provider groups. Then press F1 – Process to continue.