PCC 8.15 Release
In the first quarter of 2021, PCC will release version 8.15 of our electronic charting and practice management software to all PCC users.
PCC 8.15 includes group chat, improved user management, COVID-19 vaccine support, improvements to preparing an encounter for billing, and much more!
Watch a Video Series: Want to see videos about the updates in this release? Watch the PCC 8.15 Release Video Series.
Implementation: PCC 8.15 includes features that require configuration and user-specific software training. Read about the features below and then review the PCC 8.15 Migration Considerations article.
Read below to learn more, and contact PCC Support for information about these new features or about any PCC product or service.
Contents
- 1 Chat With Groups in Your Office
- 2 Configure Which PCC EHR Queues Appear for Each User
- 3 Manage All Usernames and Passwords in PCC EHR
- 4 Configure, Order, Administer, and Track COVID-19 Vaccines in PCC EHR
- 5 Prepare an Encounter for Billing More Easily
- 6 Update an Encounter’s Billing Provider Separately from the Scheduled Appointment Provider
- 7 Apply Past Credits When You Post Charges in PCC EHR
- 8 Review and Fix Invalid ICD-10 Codes When You Post Charges
- 9 Help Families Resubscribe to Broadcast Emails and Opt In to Your Practice’s Text Messages
- 10 See if a Patient or Family Member Read Your Patient Portal Message
- 11 More Easily View Portal Message Attachments in pocketPCC
- 12 Quickly Find Recently Added Documents in pocketPCC
- 13 Pick From Your Last 10 Patients When You Import Documents
- 14 See Clinical Measures for Each of Your Office Locations in the Dashboard
- 15 Delete Scheduled Reports
- 16 Report More Easily on Hospital and Billing-Only Encounters
- 17 Other Report Library Improvements
- 18 Coming Soon: Look Up and Import Immunization Records from Your State’s Registry
- 19 Continued Pilot Test: Send CHADIS Questionnaires to Families in the Patient Portal
- 20 Continued Pilot Test: Securely Retrieve Patient Information from Hospitals and Other Practices
- 21 Other Feature Improvements and Bug Fixes in PCC 8.15
Chat With Groups in Your Office
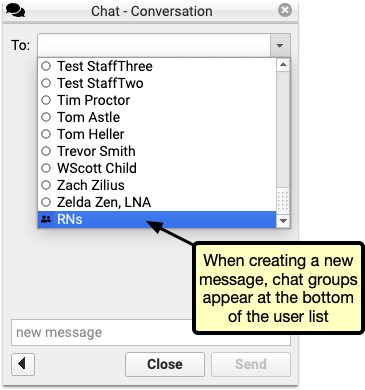
When you want to chat with a group of PCC EHR users at your practice, select a chat group and enter your message.
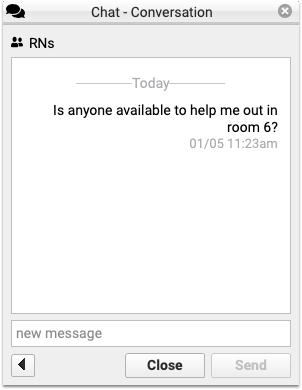
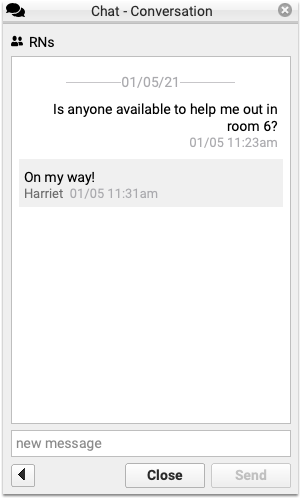
The message appears to the whole group, and any replies will be marked with the replying user’s name.
Set Up Your Practice's Chat Groups: You can create and edit chat groups through the User Administration tool. See PCC 8.15 Migration Considerations to learn how.
Configure Which PCC EHR Queues Appear for Each User
Your practice can define which PCC EHR queues will appear when a user logs in. For example, a staff member at the front desk may not need to see prescription renewals or signing. Their PCC EHR screen could look like this:
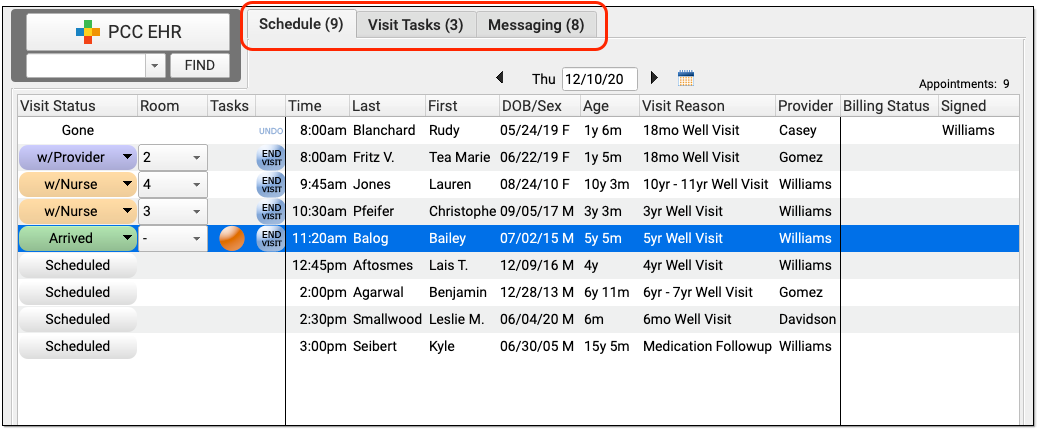
And a biller may only need to review today’s schedule and messages in order to post charges:

Use the User Administration tool to define which roles will see each PCC EHR queue.
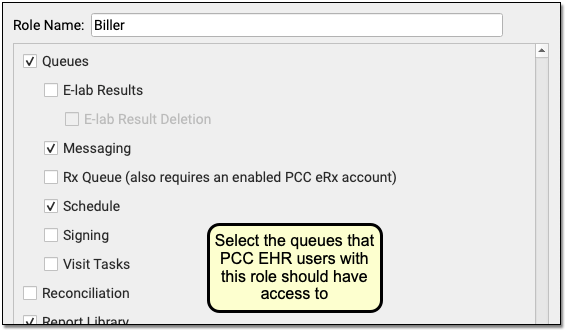
Read the PCC 8.15 Migration and Implementation guide to learn more.
By fine-tuning which queues appear for each user role in your practice, you can make PCC EHR easier to use and you can control who has access to different functions in PCC EHR.
All Users Will Still Have Access After the PCC 8.15 Update: Configurable queues are brand new! The PCC 8.15 update won’t hide any queues. When users log in after the update, they will see the same queues they have always seen. After the update, your practice’s office manager or system administrator can configure roles for your users, and also set expectations about the change. If you need help, contact PCC Support.
Manage All Usernames and Passwords in PCC EHR
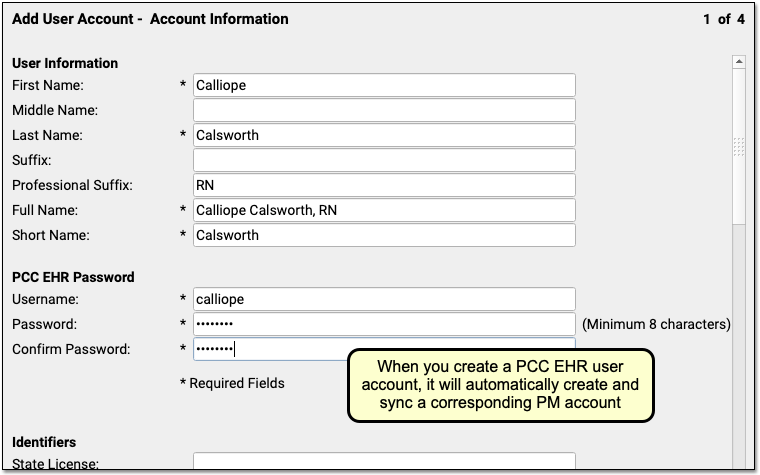
PCC 8.15 automatically syncs authentication between PCC EHR and the Practice Management window. Your practice can use PCC EHR’s User Administration tool to manage user accounts for all PCC products.
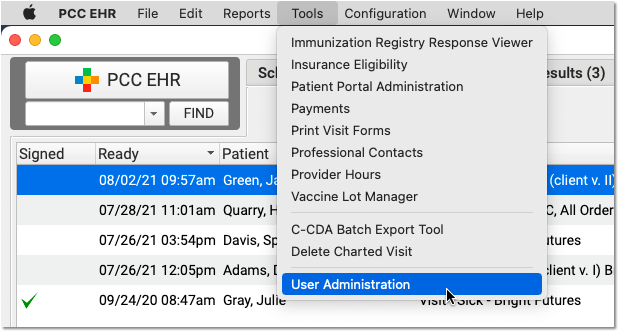
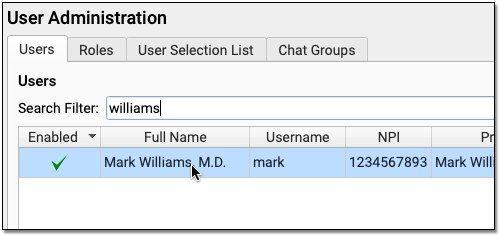
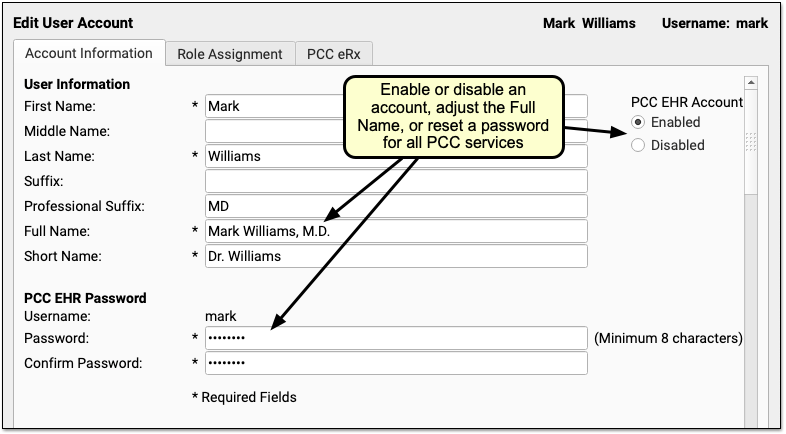
When you enable or disable an account, adjust a Full Name, or change a password, the changes will affect all of PCC’s products for the user, including both Secure Connect access, PCC email accounts, and the Practice Management window.
When you create a new user account, PCC EHR will automatically create accounts and sync the authentications that each user needs.
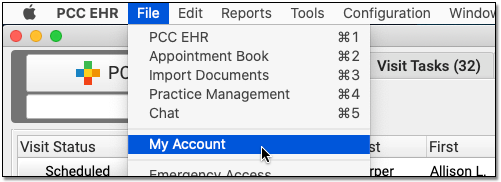
If a user updates their own password in PCC EHR, that will automatically update their password for all PCC products.

The new “one stop shopping” for user account administration in PCC 8.15 will save time and reduce username and password problems, especially for your staff who access both PCC EHR and the advanced billing tools found in the Practice Management window.
Prepare for Password and Username Updates: While the password and username transition will be seamless for most users at your practice, there are special circumstances which may lead to confusion after the PCC 8.15 update. Please have your practice’s system administrator take a look at the Prepare for Username and Password Updates Across PCC Products and Services section of the PCC 8.15 migration article.
Configure, Order, Administer, and Track COVID-19 Vaccines in PCC EHR
In December and January, PCC applied several updates to your system to support COVID-19 vaccines. The PCC 8.15 software update includes further adjustments to improve COVID-19 vaccine support. Your practice can configure, order, administer, and track all available COVID-19 vaccines in PCC EHR.
For a complete guide, read COVID-19 Vaccines in PCC EHR: Configure, Order, Administer, and Track.
Here’s a list of the related updates that arrived during the PCC 8.15 release cycle:
-
CVX and MVX for Pfizer, Moderna, Janssen and AstraZeneca Vaccines: Mid-release updates to your system added CVX codes 208 and 207 for Pfizer-BioNTech and Moderna COVID-19 vaccines. PCC 8.15 adds CVX 212 and 210, for Janssen (J&J) and AstraZeneca. The MVX table is also updated to support new codes for Pfizer-BioNTech, Janssen, and AstraZeneca (PFR, JSN, and ASZ).
-
VIS Entries for Pfizer, Moderna, Janssen and AstraZeneca: There are no VIS forms for the COVID-19 vaccines. In their place, the CDC has worked with manufacturers to provide EUA Fact Sheets. PCC added VIS table entries for the EUA Fact Sheets for both the Pfizer-BioNTech and Moderna COVID-19 vaccines to all practice systems in a mid-release patch. PCC 8.15 adds entries for Janssen (J&J) and AstraZeneca EUA Fact Sheets for their COVID-19 vaccines.
-
0.3mL Dosage Support for Pfizer COVID-19 Vaccine: PCC 8.15 adds support for a 0.3mL dose in vaccine record keeping, which is the dosage used for the Pfizer-BioNTech COVID-19 vaccine. Prior to this update, the vaccine could be recorded with an “unspecified” dose. After the update, your practice may want to adjust your configuration and update those records if you administered any Pfizer-BioNTech COVID-19 vaccines.
-
Immunization Forecasting for Pfizer and Moderna COVID-19 Vaccines: PCC’s Immunization Forecasting partner, STC, updated the underlying schedule logic to support both the new Pfizer-BioNTech and Moderna mRNA vaccines, when identified by the 208 and 207 CVX codes.
-
Immunization Forecasting with an Unspecified COVID-19 Vaccine: Your practice can optionally add a “COVID-19 (Unspecified)” vaccine to your system, using CVX 213, in order to record a shot on a patient’s record when you do not know the specific vaccine. A recent STC update to Immunization Forecasting logic allows for that vaccine to be valid. For example, an unspecified COVID-19 vaccine can report as valid for Dose 2 of a vaccine schedule that began with a Pfizer-BioNTech or Moderna vaccine. (Note that an unspecified vaccine entry should not used to record immunization administration.)
-
Vaccine Family 33 for Immunization Forecasting: PCC 8.15 adds the vaccine code family of 33, for COVID-19, to the underlying data structure for immunization forecasting. This allows Immunization Forecasting to display a line and label for COVID-19 forecasting.
Details on Forecasting for COVID-19: PCC 8.15 will not forecast an expected or missing immunization for COVID-19 until a patient has received a first dose in a two-dose series. Additionally, we expect Immunization Forecasting for COVID-19 vaccination to change in the coming year. Recent updates to your system lay the groundwork for forecasting, but COVID-19 forecasting results at this time may not produce the expected result.
Prepare an Encounter for Billing More Easily
PCC 8.15 includes two improvements to how your clinicians prepare encounters for billing in PCC EHR. Linked codes from orders and the consolidation of duplicate diagnoses will save time and reduce errors.
Automatically Link Diagnoses and Procedures From Orders
When you create an order for a patient, the correct diagnoses and procedures can now appear linked when you prepare the encounter for billing.
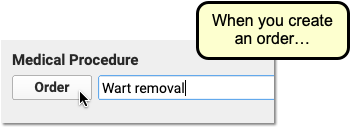
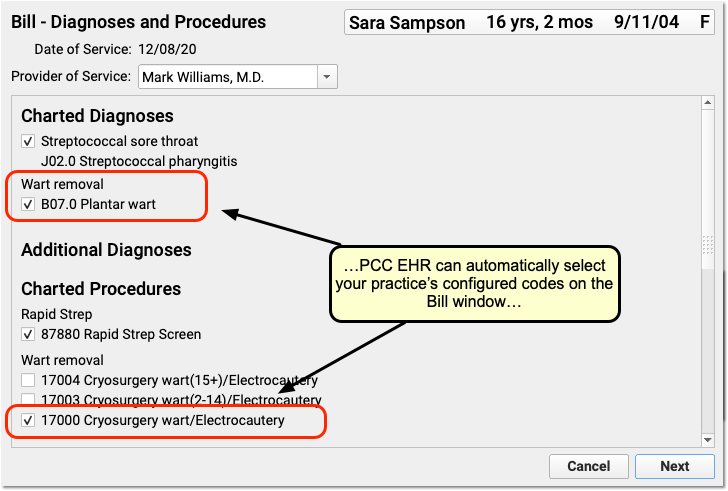
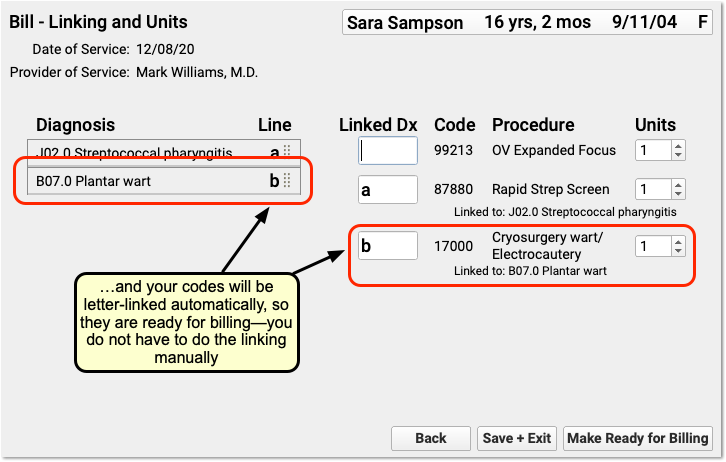
When a user creates an order in PCC EHR, it can automatically add diagnoses and procedures to the Bill window (also called the electronic encounter form). For example, you might configure a Wart Removal order to add both a plantar wart diagnosis and a cryosurgery procedure code for billing. In PCC 8.15, these codes will automatically be linked and ready for charge posting.
Billing codes for diagnoses and procedures are based on your practice configuration. Once you’ve set up your orders, both your clinician and biller will save time, as they will not need to manually indicate which diagnoses correspond to the billing procedures for the order.
Configure Your Orders: Your practice can configure exactly which diagnoses and procedures are triggered for each order. Use the Billing Configuration tool to add diagnoses and procedures to orders. Use the Protocol Configuration tool to specify which orders appear on each chart note.
No More Duplicate Diagnoses on the Bill Screen
When you prepare an encounter for billing, you will no longer see duplicate diagnoses from orders. For example, when your practice orders multiple immunizations, PCC EHR will consolidate the Z23 diagnosis into a single entry.
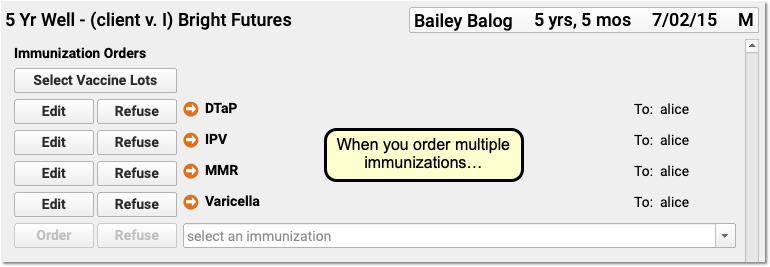


In the Bill window, all orders that have the same configured diagnosis will appear on a single line. Based on your practice’s configuration, the diagnosis will also be automatically linked to the procedure codes you use to bill each order.
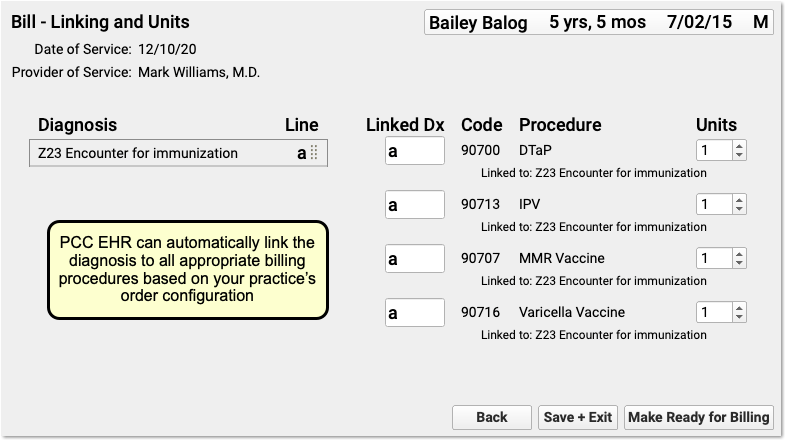
If the clinician needs to link an additional procedure or make other changes, they can spot the diagnosis more quickly and link it without the confusion of seeing duplicate entries.
After the clinician clicks “Make Ready for Billing”, Post Charges in PCC EHR will also deduplicate and only display the diagnosis once, making it easier for the biller to review details and post charges.
Deduplication is Only in PCC EHR: If your practice still uses the post charges tool in the Partner Practice Management system, sometimes called chuck or checkout, billers may still see a diagnosis multiple times. The older charge posting program does not deduplicate diagnoses.
Update an Encounter’s Billing Provider Separately from the Scheduled Appointment Provider
In PCC 8.15, you can schedule an appointment for one provider and then easily select a different provider for billing. Your practice could potentially use different clinicians when you schedule, see the patient, and bill for an encounter.
When you need to change the scheduled appointment provider for an encounter, you can adjust it in the Appointment Book, or right at the top of the chart note:
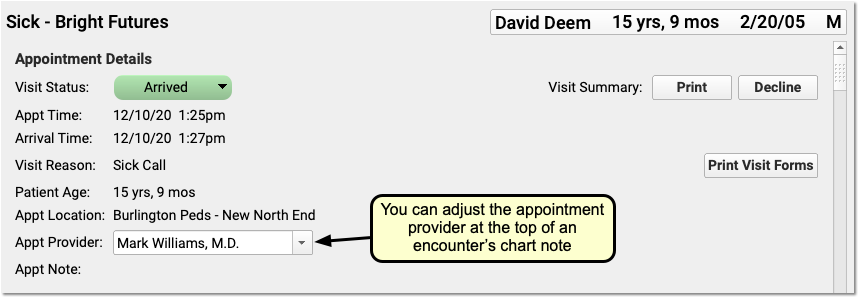
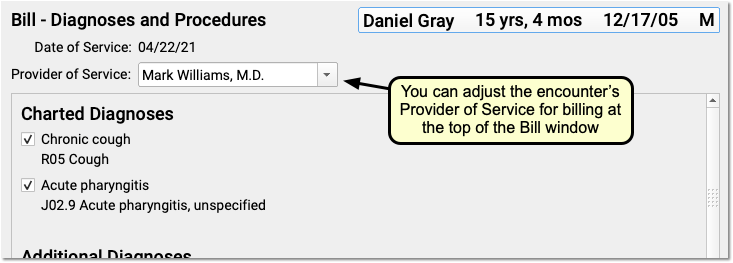
When you need to select a different billing provider, you can make that change at the top of the Bill window (the electronic encounter form) when you prepare the encounter for billing.

Alternatively, the biller can make that adjustment later, when they post charges.

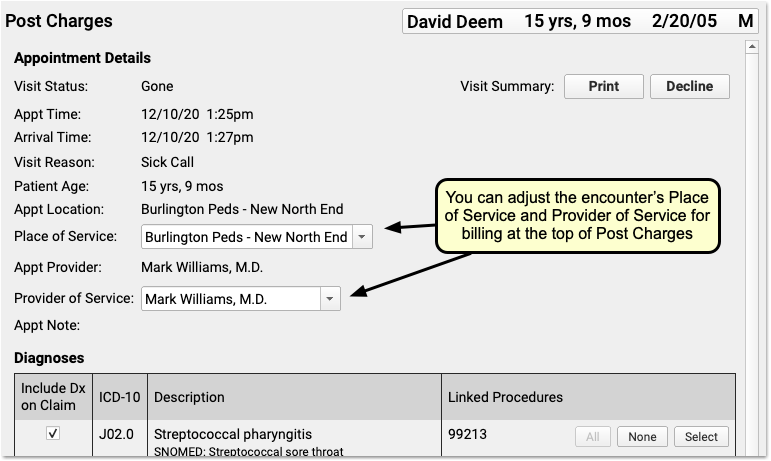
You can change the billing provider without changing the scheduled appointment provider. PCC EHR’s records will display both the Appointment Provider and the Provider of Service in the patient’s Billing History.
When Would I Need to Change the Provider for an Encounter?: Your practice might schedule a stand-in “Flu” provider in the Appointment Book. Then on the day of the encounter, you might change the scheduled clinician for the appointment to Nurse John, who gives the patient the flu shot. Afterwards, when you prepare the encounter for billing, you might define the supervising Provider of Service as the credentialed M.D., Dr. Williams. PCC supports these and other workflows, and in PCC 8.15 you can more easily adjust the provider of service while not altering the appointment provider.
Apply Past Credits When You Post Charges in PCC EHR
When you post charges, PCC EHR will display any credits on the patient’s Billing Account in the Payments component.

By default, the full credit will be applied towards any personal (non-insurance) charges for today. Optionally, you can adjust the amount you wish to link to today’s charges.

You might do this in order to apply only the amount of a copay, for example, or if only part of the credit should be applied.
When you are finished reviewing charges and payments, click Save and Post. PCC EHR will link the payment from the past directly to the charges that have a personal amount due.
Review and Fix Invalid ICD-10 Codes When You Post Charges
When you post charges, and an ICD-10 code is expired (or not yet in effect), PCC EHR will warn you and prevent posting. The diagnosis will appear in red text and include an explanation in parentheses. For example, this screenshot was taken in December of 2020:
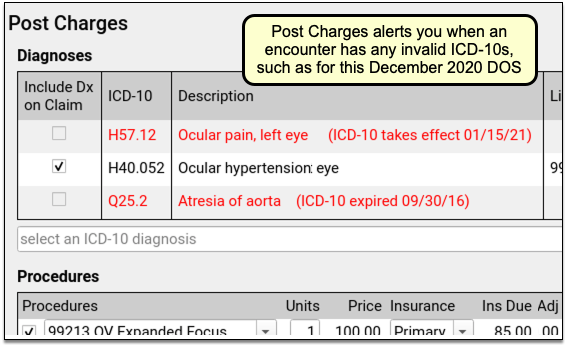
PCC EHR will not allow you to post charges with diagnoses that are invalid for the date of service. You can immediately add the correct code into the Diagnoses component, link and post the charges, and queue up a claim.
Fix Your Diagnosis Configuration: If an invalid ICD-10 appears on the Post Charges screen, you can fix the problem so it doesn’t appear again. For example, you might have an order that is configured to trigger the old diagnosis, or an expired ICD-10 might be manually mapped to a SNOMED description. You can fix these issues in the Billing Configuration tool. In Billing Configuration, you can only map ICD-10 diagnoses that are valid or will be valid in the future; expired ICD-10s are not available for mapping.
Help Families Resubscribe to Broadcast Emails and Opt In to Your Practice’s Text Messages
When a patient or their caregiver indicates that they did not receive your latest text (SMS) message or broadcast email, you can easily determine if it is because they have opted out of communication from your practice.
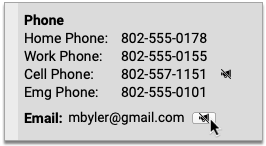
Look up the person’s phone number or email address in PCC EHR and see if an icon appears beside it.
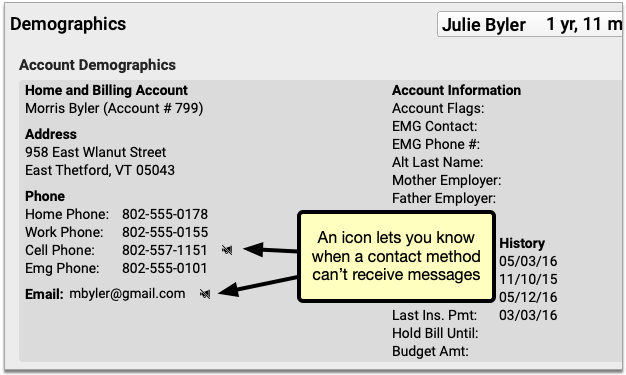
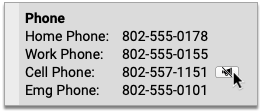
If you see an icon, it indicates that the contact method has been opted out of communication from your practice.
Unsubscribed Email Addresses Still Receive Portal Notifications: Patients and families who unsubscribe from your practice’s broadcast emails are still able to receive email portal notifications.
Opted-Out Phone Numbers Cannot Receive Any Text Messages from Your PCC System: Patients and families who opt their phone numbers out of text messages from your practice cannot receive any kind of text message sent from your PCC system, including broadcast messages, single text messages, and patient portal notifications.
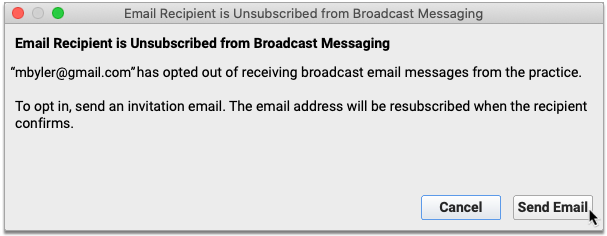
Click the icon to learn how you can help the person opt back in to communication from your practice.
If the contact method is an email address, you can send a resubscribe email.
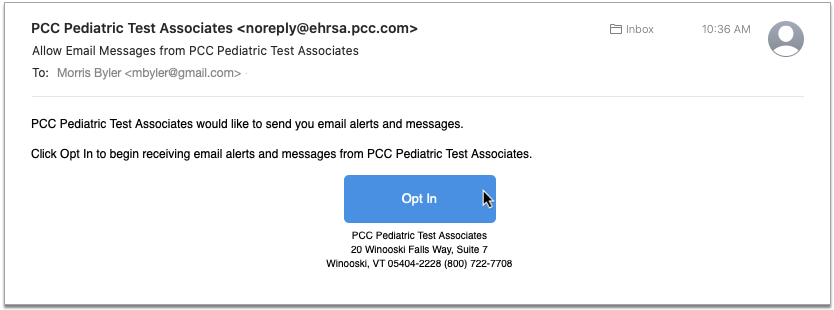
The recipient must open the email and click the “Opt-In” button in order to complete the process.

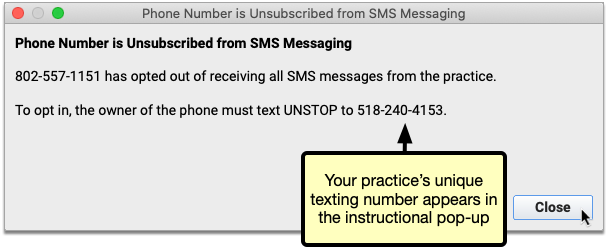
If the contact method is a mobile phone number, the person whose number it is must text “UNSTOP” to your practice’s texting number. You can find your practice’s texting number in the instructions that pop up when you click the icon beside the opted-out number.
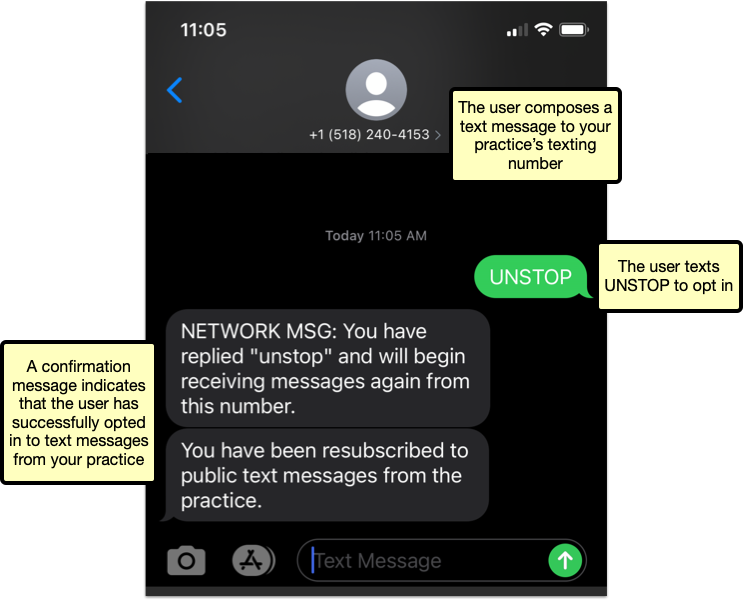
As soon as the person texts the word “UNSTOP” to your practice’s texting number, they receive confirmation that they have opted back in.
The icon in PCC EHR disappears once a contact method can receive messages again.
Where Does My Practice’s Texting Number Come From?: A text messaging number is automatically assigned to your practice by the telecommunications vendor PCC works with to provide broadcast messaging services. It is not possible to alter or customize this number.
Portal Users Can Opt In Mobile Phone Numbers from the Patient Portal
Portal users see a message in the patient portal if their phone number cannot receive portal notifications. They can click “Edit Notification Settings” to correct the issue.
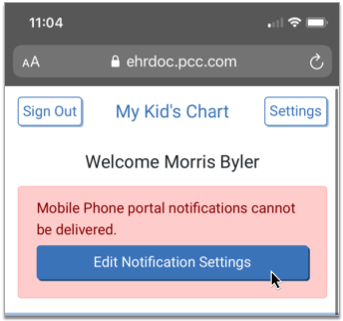
The button brings the user to the Edit Account page.
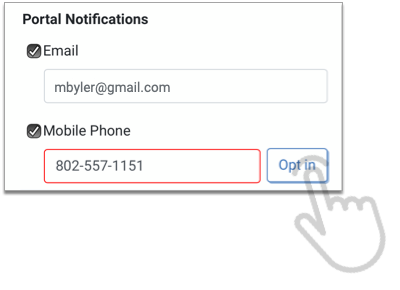
A message at the top of the page explains why the opted-out phone number cannot receive notifications and how to fix it. The opted-out phone number is highlighted in red at the bottom of the page.
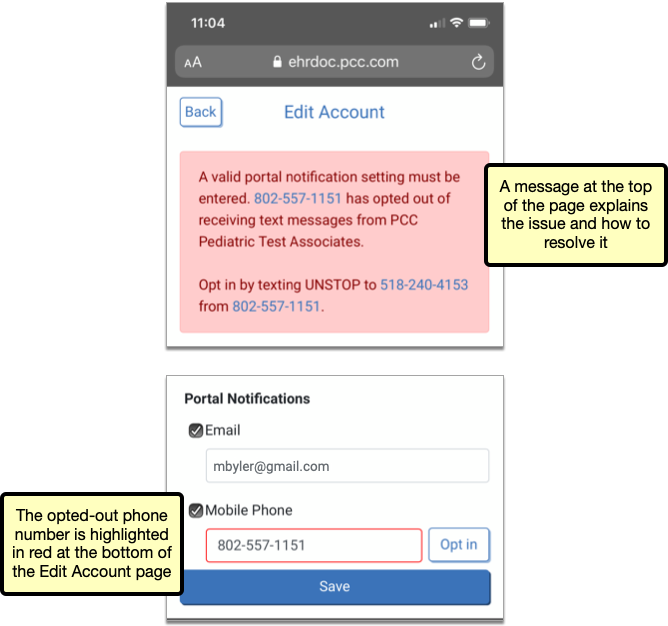
If the user is signed into the portal on their phone, an “Opt in” button appears beside the opted-out number. When tapped, the “Opt in” button automatically composes a text message to your practice with the word “UNSTOP” in the body.
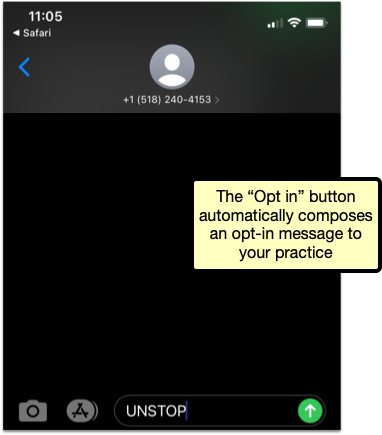
Once the person opts the phone number in, they can once again receive text messages from your practice, including portal notifications.
Portal users can find opt-in instructions in the My Kid’s Chart User’s Guide.
Opt In the Right Device: Users should only resubscribe via the “Opt in” button if they are signed in to the portal on the mobile device associated with the unsubscribed phone number.
Some Contacts Intentionally Opt Out of Text Messages: Contacts who intentionally opt out of text message communication from your practice should remove opted-out numbers from their portal notification settings.
See if a Patient or Family Member Read Your Patient Portal Message
Learn exactly when your patients and families read your portal messages, so you can be sure you’re reaching them.
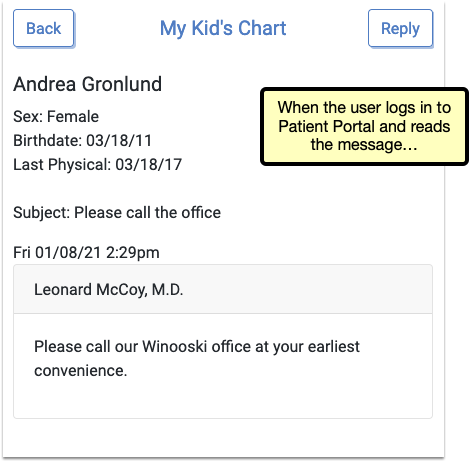
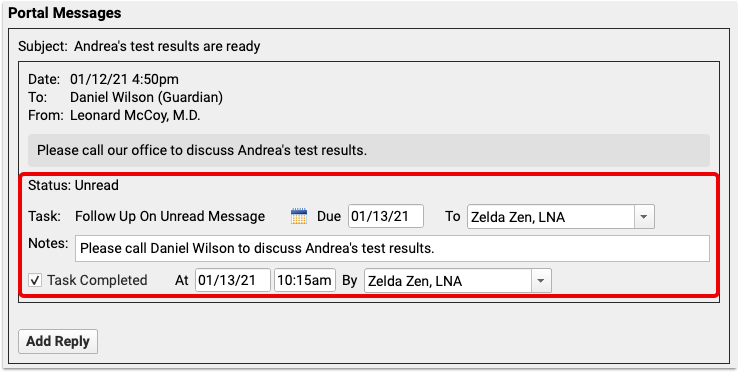
When you review a patient’s Portal Messages in PCC EHR, check the “status” line for each portal message. When the recipient opens a Patient Portal message, the status updates from “Unread” to “Read” with a timestamp of exactly when the message was opened, and which user opened it.
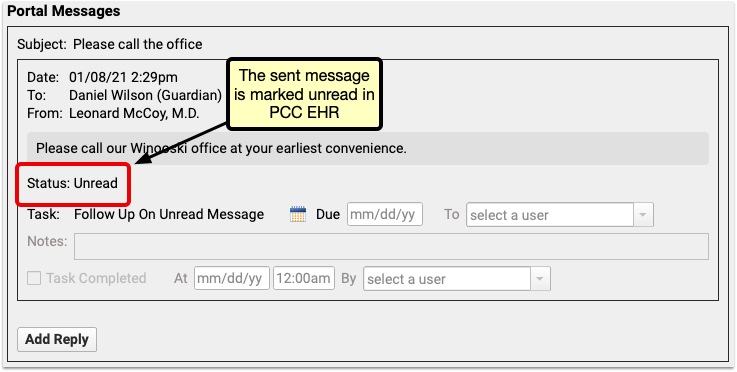
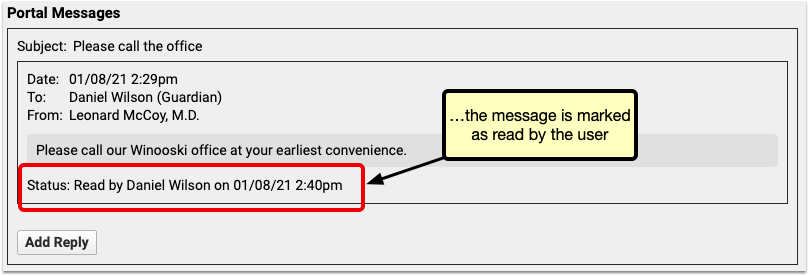
Make sure your message is received by assigning a follow-up task. Unread messages include the option to create a new “Follow Up On Unread Message” task. This new task type can be assigned to a user, but will also automatically be marked as completed if the message recipient reads the message before the assigned user marks it as completed.
More Easily View Portal Message Attachments in pocketPCC
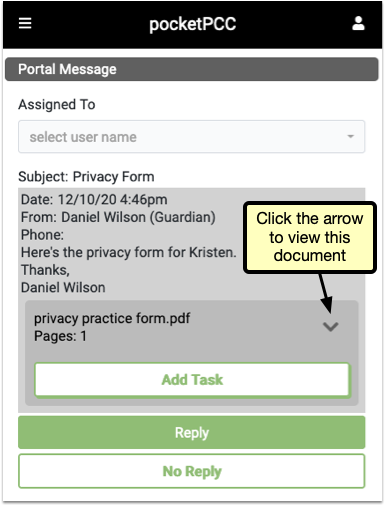
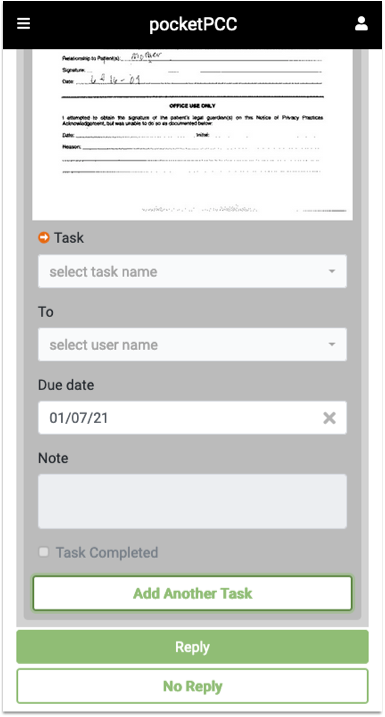
Use pocketPCC to review attachments sent to your office via the Patient Portal to stay in complete contact with your patients from anywhere.
When you view a portal message in pocketPCC, any attachments appear below the message text. Click the arrow to the right of the file name to hide or show the attachment.
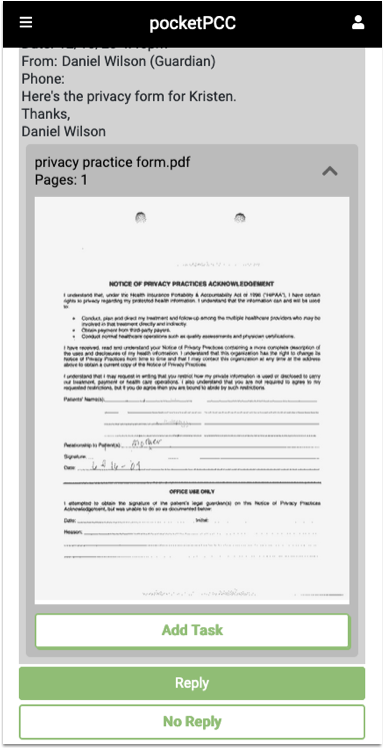
Click the arrow again to hide the image.
Click “Add Task” to create a new task associated with this document.
Quickly Find Recently Added Documents in pocketPCC
PCC 8.15 changes how documents are sorted and managed within pocketPCC, bringing it in line with PCC EHR, so you can quickly find a patient’s most recent documents.
The Recent Documents category appears at the top of each patient’s Documents and includes the five documents most recently added for the selected patient. Each document can also be found under its own category.
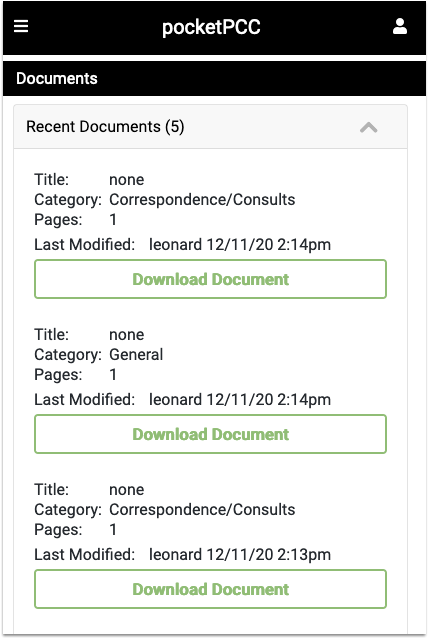
Likewise, within each document category, documents are sorted by date, with the most recent documents at the top of the list, so you can find the documents you’re looking for quickly.

Pick From Your Last 10 Patients When You Import Documents
When you need to import documents to a recent patient’s chart, you can now select from the last 10 patients in the Import Documents window.
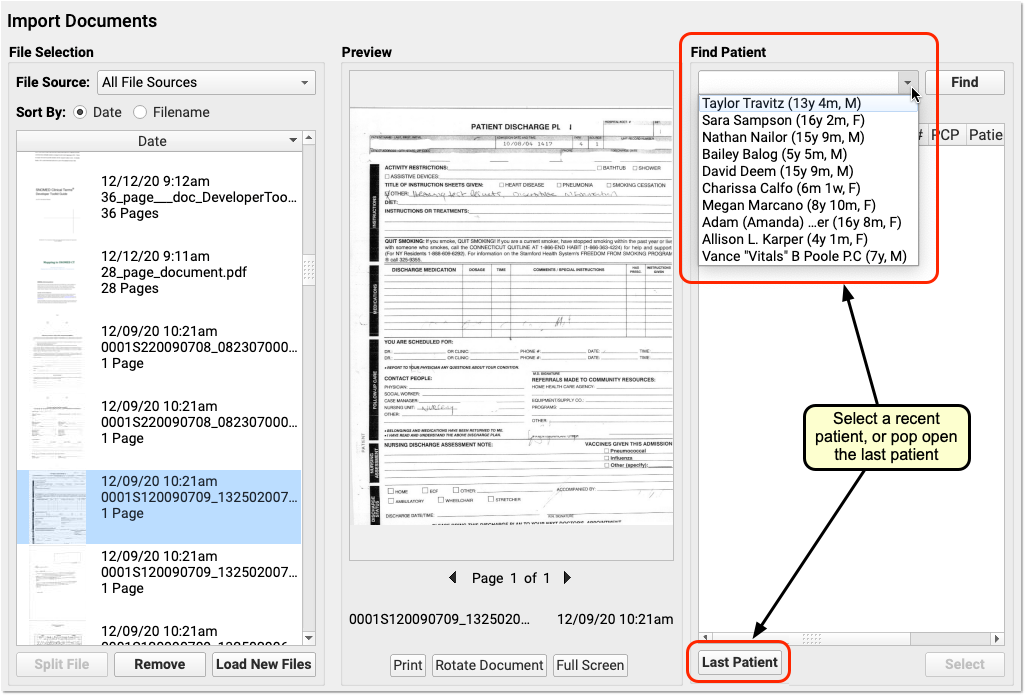
In addition to the quick “Last Patient” button, you can now easily pick from any patient you worked with recently.
The last 10 patients menu now appears wherever you search for patients—in Import Documents, but also in the PCC EHR Audit Log, the Delete Charted Visit window, the Immunization Registry Message Viewer, and more.
See Clinical Measures for Each of Your Office Locations in the Dashboard
The Practice Vitals Dashboard helps you monitor the health of your entire pediatric practice at a glance.
In PCC 8.15, multi-location practices can drill down even further to measure how well each specific location delivers patient care.
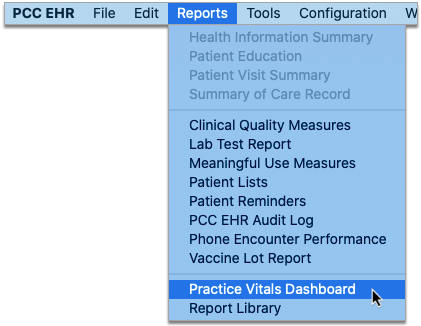
Launch the Practice Vitals Dashboard from the Reports menu in PCC EHR.
A new label in the top-right corner of each page tells you which location the data on the page is for.
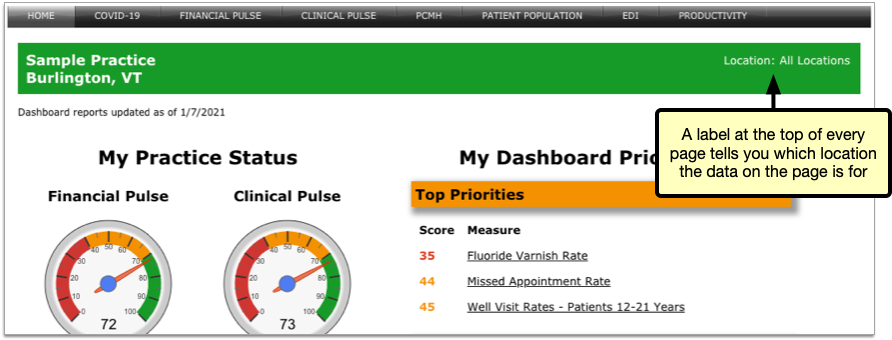
On pages that have location-specific data, the location label turns into a drop-down list and you can select the location you want to view.

When you change the location filter, the page automatically refreshes and updates the measures and benchmark calculations with data specific to your selection.
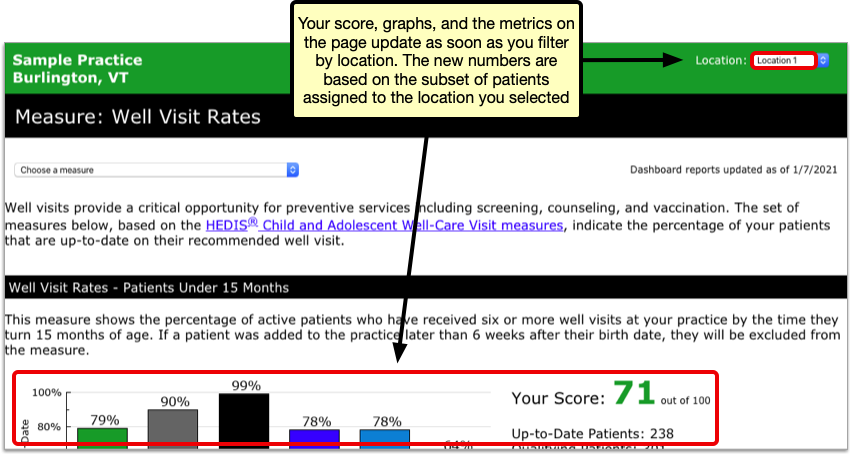
Location-specific calculations are based on the patients who are assigned to the location that is selected. At most, each patient at your practice is represented only once in location-specific data sets for each measure.
How Are Patients Assigned to Office Locations for Dashboard Measure Calculations?: Patients who have had a well visit are assigned to the location of their last well visit. Patients who have never had a well visit are assigned to the location of their most recent office visit. Patients who have had neither a well visit nor an office visit are excluded from location-specific data sets.
You can filter all Clinical Pulse and PCMH measures by location, except for weight assessment and counseling measures and the measures for influenza immunization rates.
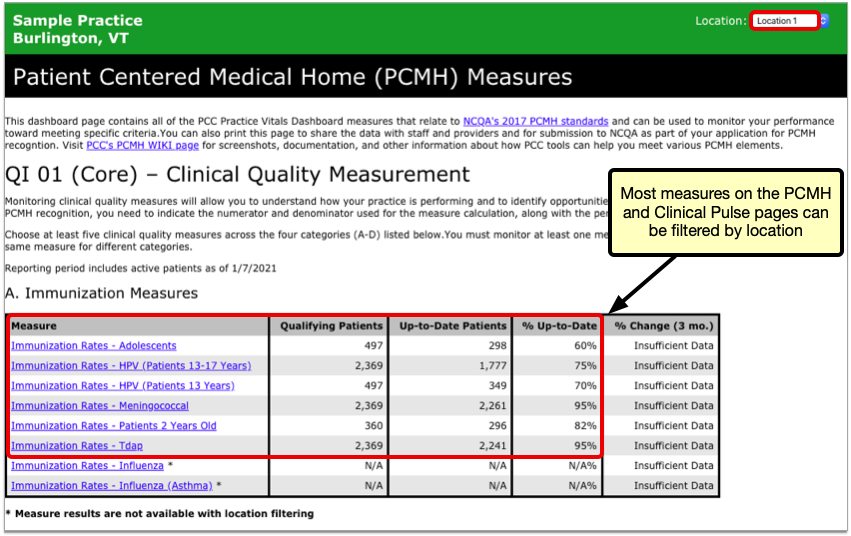
When navigating between pages that have location-specific datasets, the Dashboard remembers the last location you selected.
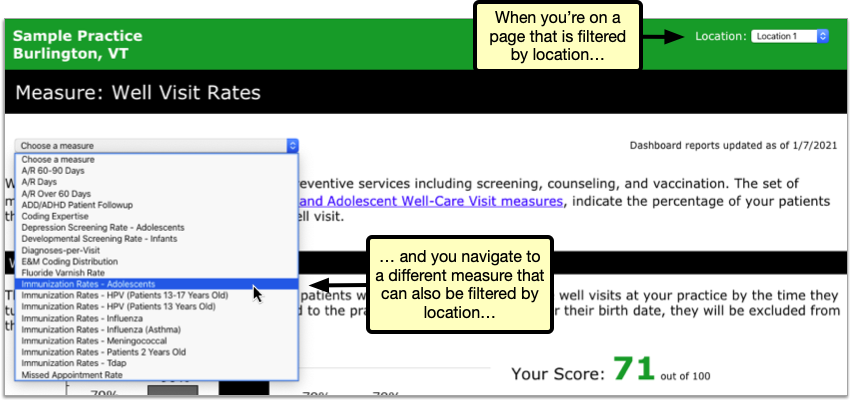

Location-specific Dashboard measures can help you understand if a location needs extra help in the clinic or is providing particularly good care to patients.
Practices working toward Patient-Centered Medical Home (PCMH) recognition can also use location-specific datasets in the Dashboard to attest to the fact that they are meeting program benchmarks.
Contact your PCC Client Advocate for help interpreting information in the Practice Vitals Dashboard, including data about specific practice locations.
Delete Scheduled Reports
Clean up your list of scheduled reports in PCC EHR by deleting those you no longer need.
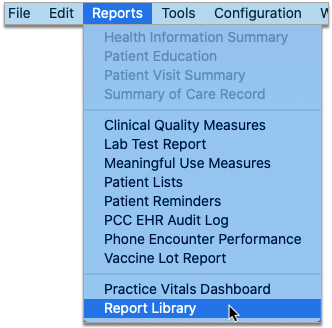
Open the Report Library from the Reports menu, then click the Scheduled Reports tab.

Select a schedule you never plan to use again, then click the Delete button.

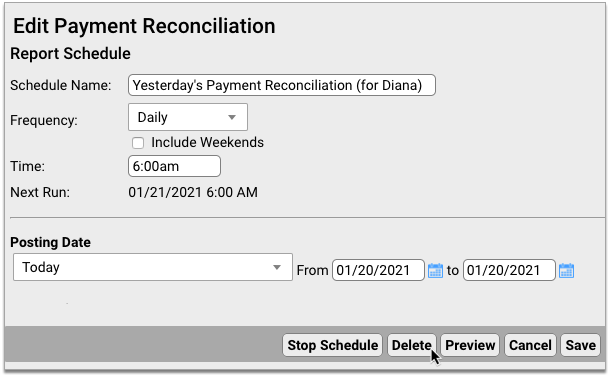
Deleted scheduled reports are permanently removed from the Report Library and cannot be re-enabled. If you want to temporarily disable a scheduled report, try stopping it instead.
You can continue to view past saved results of deleted scheduled reports in the Report Library in the Saved Results tab.
Only Users With Permission Can Delete: The ability to delete scheduled reports is restricted to users who have permission to do so. You can set this permission in User Administration.
Report More Easily on Hospital and Billing-Only Encounters
Improvements in the PCC EHR Report Library make it easier to report on hospital and billing encounters.
Find Hospital Visits and Billing-Only Encounters by Billing Status
The Encounters by Billing Status report can now include hospital and billing encounters.
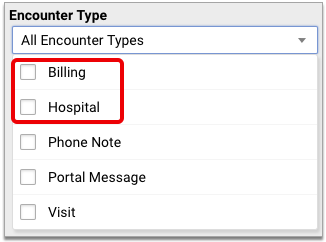
When building your report, you can use the Encounter Type filter to include or exclude hospital and billing encounters from the results.
You can also use the Location filter to include or exclude encounters that occurred at hospital locations.
Report on Diagnoses Billed for Hospital Visits
The Billed Diagnoses by Date report can now include hospital encounters.
You can include or exclude hospital encounters from the report using the Location filter on the report criteria screen.
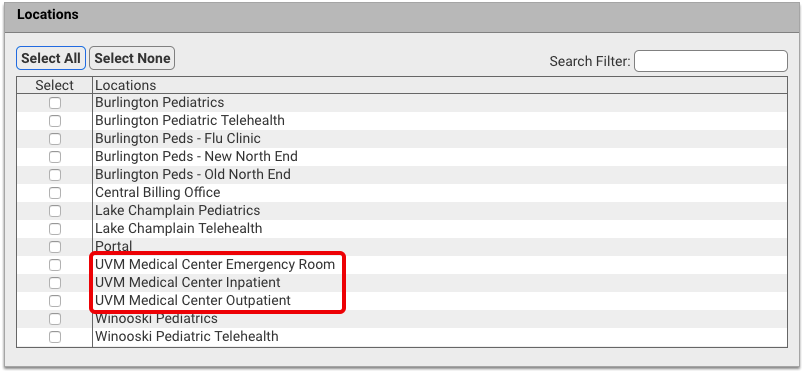
When you run the report for all locations, the results include hospital encounters.
Other Report Library Improvements
PCC 8.15 tweaks and tunes the Report Library to make it an even more powerful tool for your practice.
-
See When You Last Reviewed Care Plans: The date of last review for care plans has been added to the Care Plans by Date report. This change helps all practices track the progress of care plans more closely, and especially helps offices working toward PCMH recognition.
-
Filter and Sort Care Plan Reports by Patient Flag: You can now filter and sort by patient flag in the Care Plans by Date report. This change is most useful if you want to exclude inactive patients from the report so that you can focus on active patients with care plans.
-
When You Delete a Custom Report, See If It Is Scheduled: When you delete a custom report that was used as the basis for scheduled reports, the Report Library notifies you of the schedules before deleting the report. You can use this information to decide if you want to keep the report in place or delete it anyway. If you choose to delete it, the associated schedules will also be deleted.
-
No More Canceled and Missed Appointments When Reporting by Billing Status: The Encounters by Billing Status report now excludes canceled and missed appointments, allowing you to focus on the visits which did occur and might need some biller or clinician follow-up.
-
More Locations When Reporting By Billing Status: As of PCC 8.15, the Location filter for the Encounters by Billing Status Report allows you to select both scheduling and non-scheduling locations.
-
Navigate the Report Library More Quickly: Performance improvements introduced in this release result in a Report Library that loads screens faster and smoother than before.
Coming Soon: Look Up and Import Immunization Records from Your State’s Registry
When a new patient joins your practice or an established patient comes in after a hiatus, you want to be sure you have the most complete and up-to-date version of their immunization history.
PCC 8.15 gives pilot practices the ability to look up and import vaccine records from their local immunization registry without ever leaving PCC EHR.
If you are interested in using this feature once a connection has been established with your registry, speak with PCC Support.
Open the Patient’s Immunization History in PCC EHR
Open a patient’s chart in PCC EHR and navigate to the Immunization History.
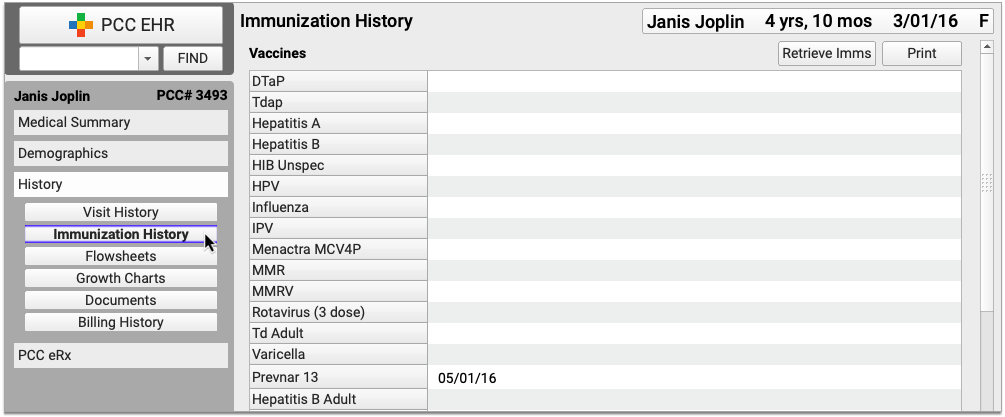
You can get to the Immunization History from the History section of the chart or within the Immunizations component if you’re in a visit protocol.
Click the “Retrieve Imms” Button
Click the “Retrieve Imms” button to request the patient’s immunization history from your state registry.

Confirm the Patient Match
The registry searches its records for your patient and PCC EHR asks you to confirm that it found the right person.
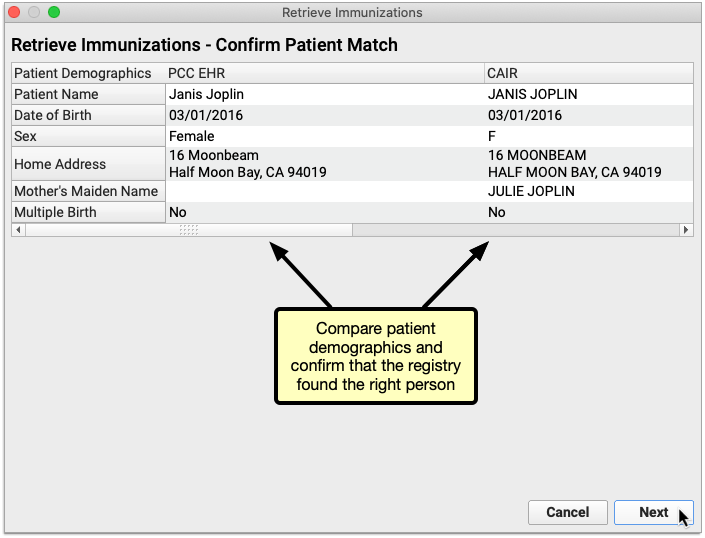
Once you confirm that the registry found the right patient, click “Next” to view the patient’s vaccine history.
You Can Only Proceed with a Unique Patient Match: If the registry finds several possible matches for your patient or finds no exact matches you will not be able to retrieve the patient’s vaccine history from the registry within PCC EHR. Close the Retrieve Immunizations window and try looking up the patient’s vaccine history directly on the registry website.
Review the Information Sent by the Registry
Review the vaccine history from the registry. Information that is already in the patient’s chart appears in a black font, while new information from the registry appears in an orange font. You can decide what to do with the new information on the next screen.
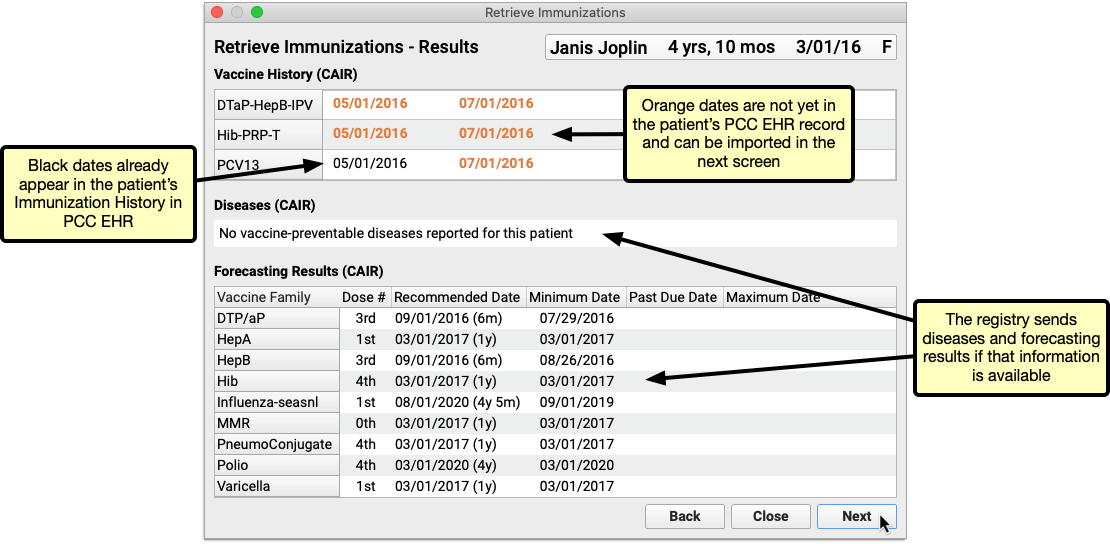
Click “Next” to begin importing new information from the registry into PCC EHR.
Immunization Registry Forecasting and Disease Data: Some registries send vaccine forecasting and/or vaccine-preventable disease data in addition to the patient’s vaccine history. You can view this information if the registry sends it, but you cannot import it into PCC EHR.
How Does PCC EHR Determine if a Vaccine is Already in the Patient's History?: For each immunization reported by the registry, PCC EHR checks to see if the associated CVX code and date already exist in the patient’s chart.
Import New Vaccine History Information from the Registry into PCC EHR
Select the immunizations and dates you wish to import from the registry into the patient’s PCC EHR record. You can only import new entries from the registry; entries that already exist in the EHR are excluded from the import window.
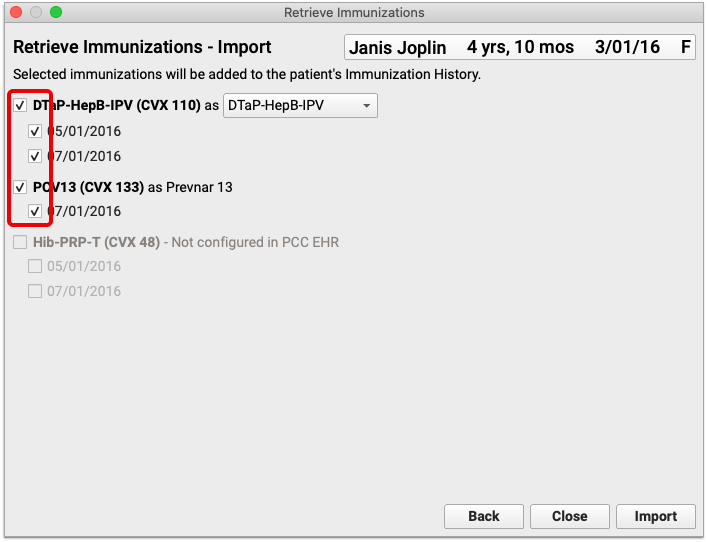
Once selected, immunizations from the registry are automatically mapped by CVX code to their equivalents in the EHR.

If a registry immunization has several equivalents in the EHR, all of the options are presented in a drop-down field in the import window. Review the options and manually select one to use for the import.

Sometimes new entries from the registry use CVX codes that are not configured in your PCC system. You must add the missing CVX codes to your immunization configuration in order to import these entries. Contact PCC Support if you need help adding CVX codes to your immunization configuration.

Once you have selected and mapped the immunizations you plan to import from the registry, click the “Import” button.
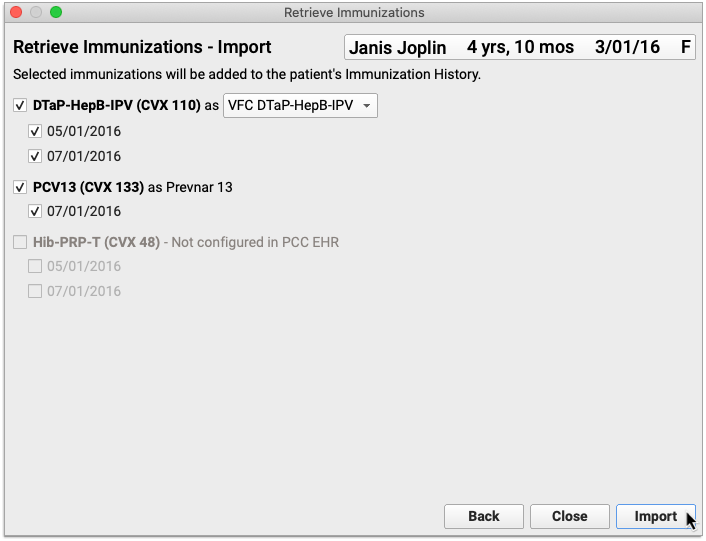
The information imports into PCC EHR and the Retrieve Immunization window closes on its own.
View and Edit Imported Entries in the Patient’s Immunization History
Information imported from the registry appears immediately in the patient’s Immunization History in PCC EHR.
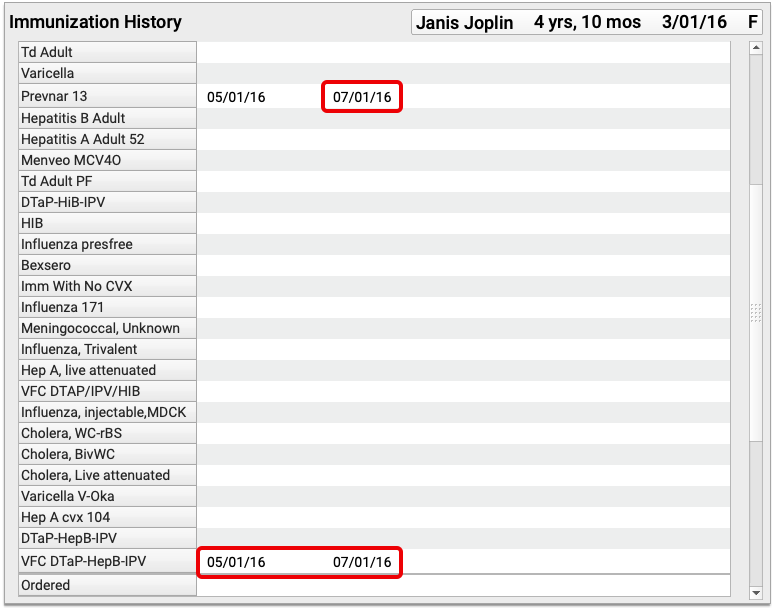
You can view details about the immunizations imported from the registry by editing the patient’s Immunization History.
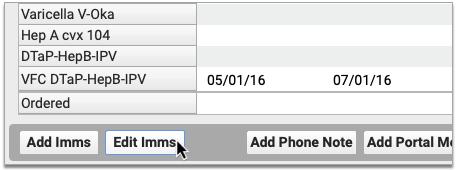
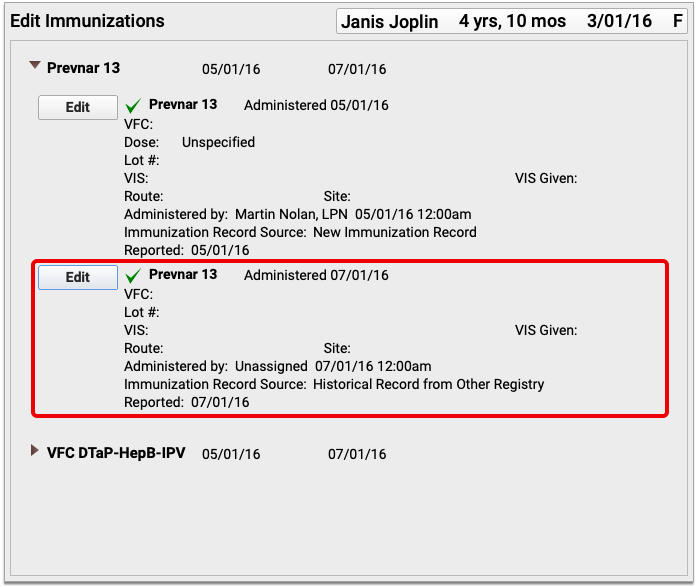
Historic immunizations imported from the registry are recorded in the patient’s chart with the source “Historical Record from Other Registry”. The imported entries can also include information about the vaccine dose, lot number, site, route, and funding source.
You can edit or delete an imported immunization just like any other item in the patient’s Immunization History.
Continued Pilot Test: Send CHADIS Questionnaires to Families in the Patient Portal
PCC continues piloting the integration of CHADIS questionnaires into PCC EHR and PCC’s Patient Portal. If your practice is part of our pilot testing, your Patient Portal now links directly to CHADIS, so your portal users can get started on their patient’s CHADIS questionnaires as soon as their appointment is booked.
Coming Soon: CHADIS integration into PCC is currently in pilot testing and not yet available to all PCC clients. Stay tuned for additional functionality and the wide release. CHADIS integration into PCC EHR requires that your practice has a CHADIS subscription.
Continued Pilot Test: Securely Retrieve Patient Information from Hospitals and Other Practices
Do your patients see other doctors? Do you wish you could retrieve records from those providers on demand?
Pilot testers can request and securely retrieve their patients’ records from other healthcare organizations right within PCC EHR. This is the latest addition to PCC’s Clinical Document Exchange functionality.
To retrieve a document, click “Find Clinical Documents” within the History section of the patient’s chart.
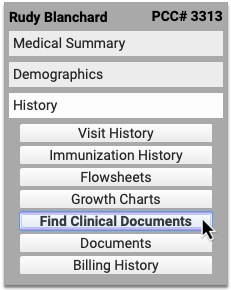
Select one or several healthcare organizations to query, then search for your patient within their records. If you find matches for your patient, you can then see if the organizations have clinical documents to share, and retrieve any you wish to view and save to PCC EHR.


You can set up default healthcare organizations to query for each of your patients, and also decide if certain organizations (such as local hospitals or urgent care clinics) should be queried for all patients.
Users need special permissions in PCC EHR in order to request patient records from other organizations. All PCC EHR users can view retrieved documents after they have been saved in patients’ charts.
How do I Participate?
Although it is not yet possible to sign up to securely retrieve your patients’ records from other healthcare providers, you can prepare for the feature by becoming a Clinical Document Exchange Responder.
Clinical Document Exchange Responders allow other healthcare organizations who participate in the Carequality interoperability framework to retrieve their patients’ records for treatment purposes. In order to eventually be able to initiate records requests, you must first enroll to respond to requests from others.
To become a Clinical Document Exchange Responder, contact PCC Support.
Learn About Clinical Document Exchange
Is Clinical Document Exchange secure? How does it work? Which organizations can I query for my patients’ records? Find answers to all of these questions and more in the PCC Learn article about Clinical Document Exchange.
Other Feature Improvements and Bug Fixes in PCC 8.15
In addition to the features described above, PCC 8.15 includes these smaller improvements and squashed bugs.
-
Delete Hospital and Administrative Fee Billing Encounters: When you use Correct Mistakes (
oops) to delete all diagnoses, procedures, payments and adjustments for a hospital encounter or other charge that does not have an appointment, PCC EHR will automatically remove that encounter from the Billing History and the Visit History sections of the patient’s chart. -
Diagnoses and Procedures Remain Available in Post Charges: When you need to delete and repost charges, or return and finish posting additional items for an encounter, the Post Charges workflow will continue to display all of the diagnoses and procedures originally added to the encounter.
-
2021 RVU Values for Reporting: During the PCC 8.15 release cycle, PCC updated all practices with RVU values for 2021. This updates many reports, such as the RVU-Per-Visit measure in the Practice Vitals Dashboard.
-
0.3ml Dose Amounts: PCC EHR now supports the recording and tracking of immunizations that require a 0.3ml dose.
-
Additional COVID-19 Terms Available as Diagnoses: Among other updates in support of charting COVID-19 related encounters, the PCC 8.15 update adds three SNOMED situations to the standard Diagnosis favorites list so they can be used as diagnoses: Suspected disease caused by severe acute respiratory coronavirus (mapped to B97.21), History of disease caused by Severe acute respiratory syndrome coronavirus (mapped to Z86.19), and Disease caused by Severe acute respiratory syndrome coronavirus 2 absent (mapped to Z03.89).
-
See If PocketPCC or the Patient Portal is Being Updated When You Sign In:
Users who try to sign in to PocketPCC or the patient portal while PCC is updating your software to a new release will be notified that an update is in progress and that they should try again later.

Users who are signed in to PocketPCC or the patient portal when an update begins will be logged out the next time they take an action. They will be redirected to a page explaining that an update is underway. Any unsaved work will be lost.
