PCC 11.0 Release Manual
Contents
- 1 Clinical
- 2 Practice Administration & Oversight
- 2.1 Open a Patient’s Chart from Your Report Results
- 2.2 Spellcheck Your Form Letters
- 2.3 Report on Even More Clinical Quality Measures (CQM) in the Report Library
- 2.4 Find Patients with Medicaid as Secondary Insurance
- 2.5 See All Appointments Scheduled by Portal Users
- 2.6 Find Which Medicaid Patients Are Due for Their Second Dose
- 2.7 Account for Vaccine Administration by Clinician
- 2.8 Demonstrate the Impact of the Late VFC Vaccine Shipments
- 2.9 Visit Type Distribution Report
- 2.10 View Documents and Patient History During Check-In
- 3 Insurance Billing
- 3.1 Edit Policies More Quickly and Easily
- 3.2 Find a Patient’s Primary Insurance Group on the Schedule Screen
- 3.3 Report on Insurance at Date of Service for Ready-to-Post Encounters
- 3.4 Print Batches of Paper Claims
- 3.5 Prioritize Your A/R with Custom Encounter Statuses
- 3.6 Real Time Claim Status Improvements and Fixes
- 3.7 Autoposting Will Not Update Copay Amount When There’s a Secondary Policy
- 3.8 Reconcile Insurance Checks that Include Reversals
- 3.9 Prevent Autoposting of Reversals
- 3.10 Recognize Claim-Level Adjustments More Easily
- 4 Personal Billing
- 5 System Administration
- 6 Code Updates and Other Improvements
Clinical
Chart Hands-Free with PCC Scribe
PCC Scribe is a powerful tool for increasing your sense of connection in the exam room and reducing documentation burden. PCC Scribe transcribes while you tend to your patient, then creates a draft chart note for you to review, edit, and insert into the patient’s visit protocol. Use of PCC Scribe is completely optional and available for a fee.
Open the Visit
Open your patient’s visit.

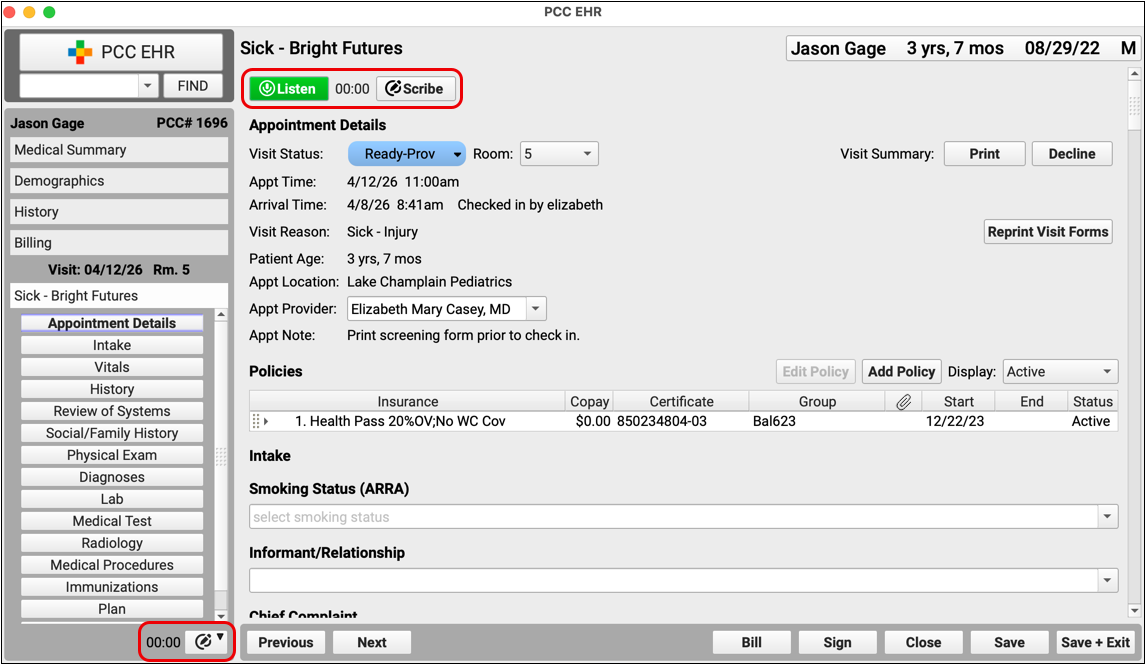
PCC Scribe controls appear at the top of the visit and in the bottom left corner of the open chart.
Begin Listening
Click the “Listen” button to start PCC Scribe.

PCC Scribe will transcribe everything it hears as you conduct your visit.
Stop Listening
Click “Stop” when you want PCC Scribe to stop listening.

You can start and stop as many times as you want.
Open the Scribe Tool
Click the “Scribe” button to open the full PCC Scribe tool.

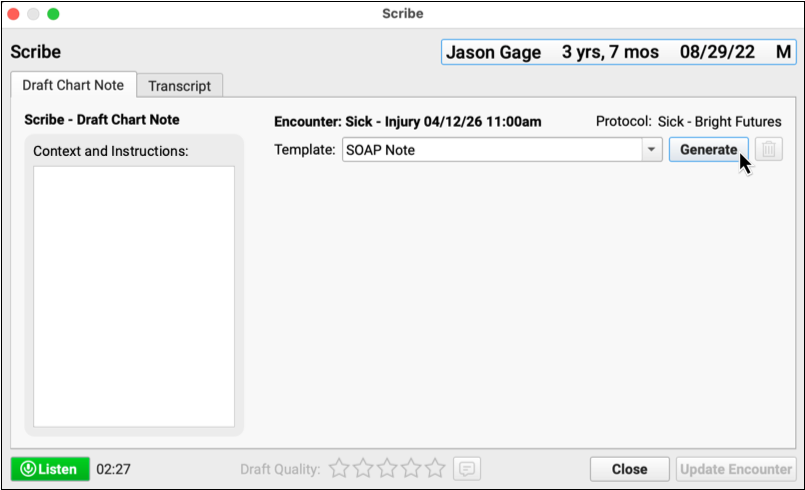
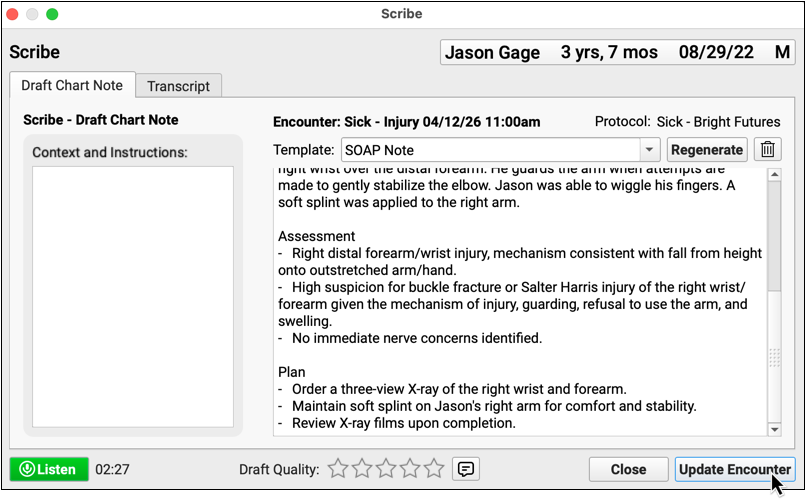
Generate a Draft Chart Note
Click the “Generate” button to create a draft chart note from the visit transcript. The draft chart note will be formatted according to your selected template.
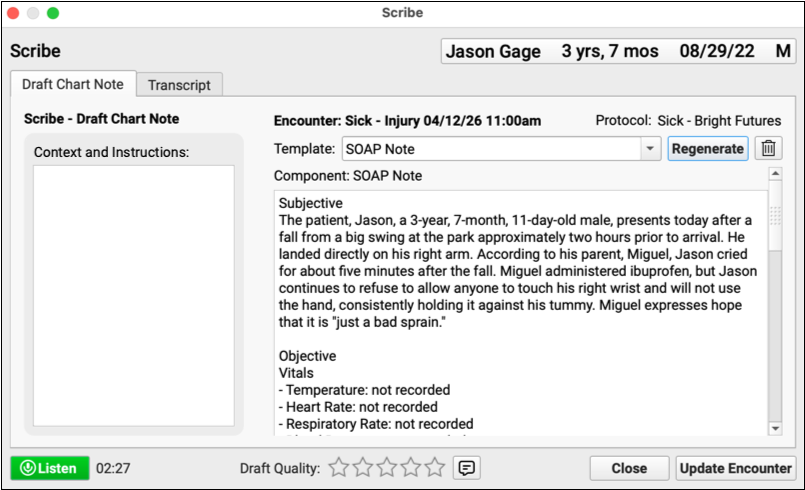
Review and Edit the Draft Chart Note
Carefully review the draft chart note generated by PCC Scribe and make edits as necessary.
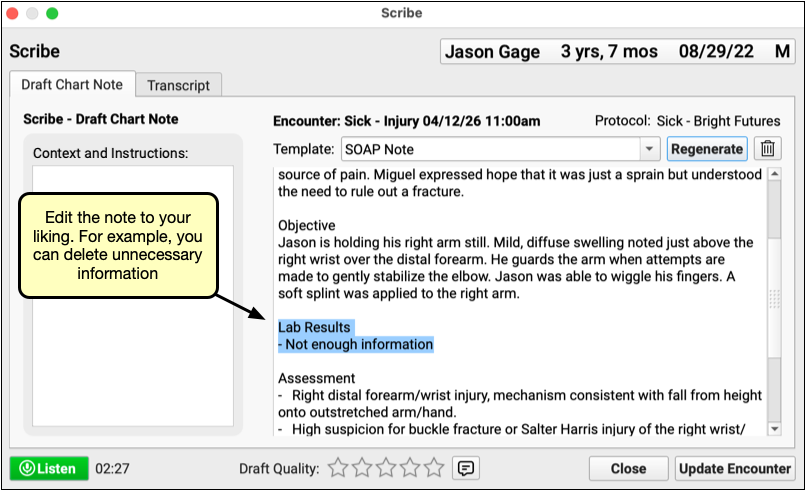
Import the Note into the Visit
Click “Update Encounter” to import the draft chart note into your patient’s visit protocol.
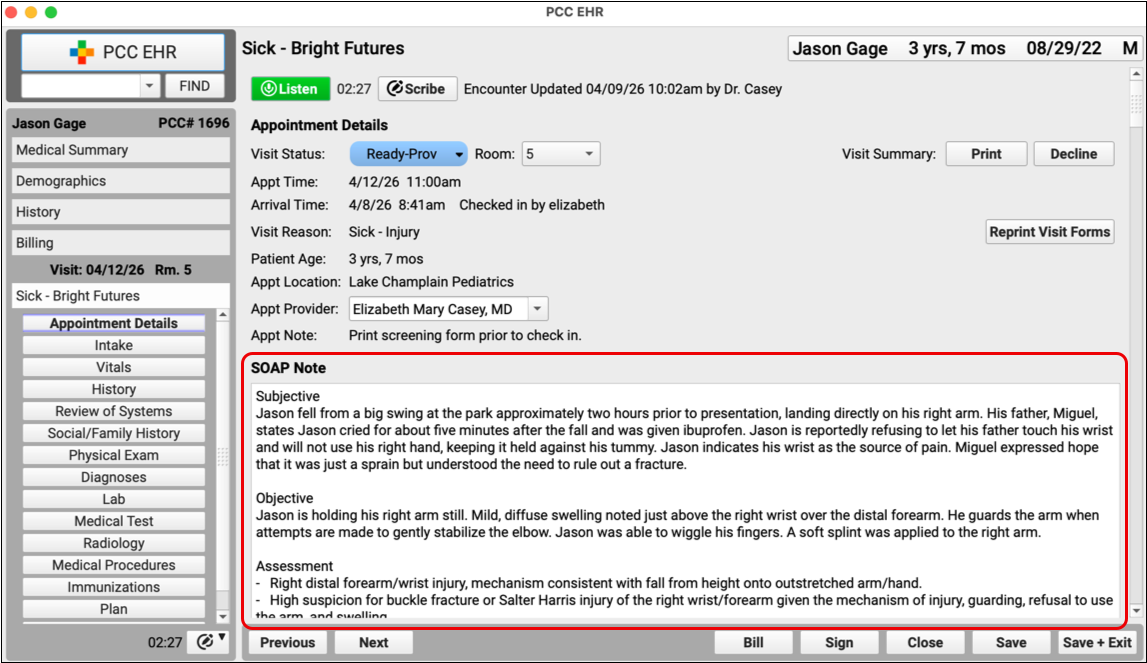
The note appears in your patient’s chart under your name and behaves just like any other chart update. You can continue to make edits after the note has been imported.
Congratulations, you just scribed your first note!
There is a lot more to learn about PCC Scribe. Explore everything you need to know about how to get started with, configure, use, and make your own templates for PCC Scribe.
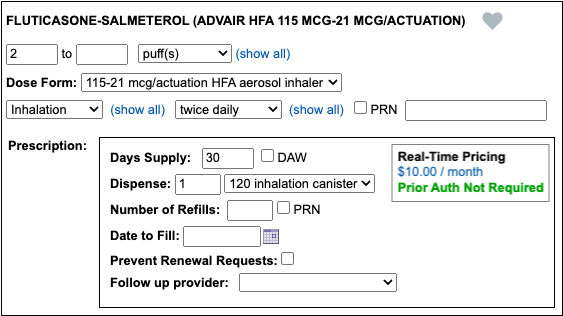
Prescribe the Covered Inhaler on the First Try
If you have been frustrated when PCC eRx and the pharmacy disagree about the coverage status for certain inhalers, rejoice! PCC 11.0 fixes how PCC eRx queries for inhaler coverage details so you can get a better idea of whether prior authorization is needed before your prescription goes to the pharmacy.
Practice Administration & Oversight
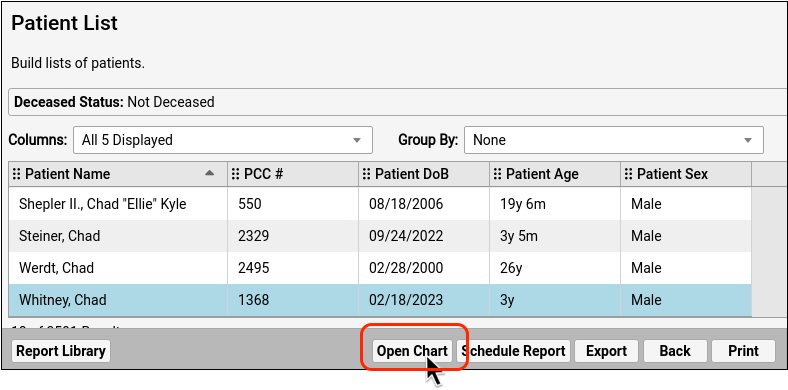
Open a Patient’s Chart from Your Report Results
With the PCC 11.0 release, many reports in the Report Library now contain an Open Chart button. To open the patient’s chart from your report results, highlight a row and click the “Open Chart” button.
The following reports open to the patient’s Medical Summary:
- Broadcast Messaging Patient List
- Care Plan by Date
- Chronic Condition Recall
- Orders by Visit
- Patient Diagnoses by Date
- Patient List
- Patients Overdue for Weight Management
- Preventive Care Recall
The following reports open to the Demographics section:
- Appointments
- Appointments by Scheduling User
- Forced Appointments
- Huddle Sheet
- Patients by Portal Users
And the following reports open to the Immunization History section:
- Immunization Administration Details
- Overdue Vaccine Recall
- Patient Immunization Administration Summary
If you have unsaved chart notes already open on your main PCC EHR screen when you click the “Open Chart” button, you will be prompted to save or discard your work before the new chart is opened.
When you are previewing a custom report, save the report to access the Open Chart button.
Spellcheck Your Form Letters
PCC 11.0 introduces spellcheck in standard forms.
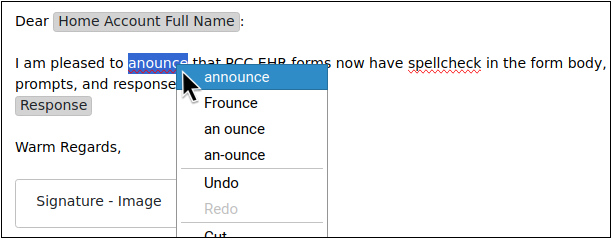
While editing forms, you will now see a red underline below each misspelled word.
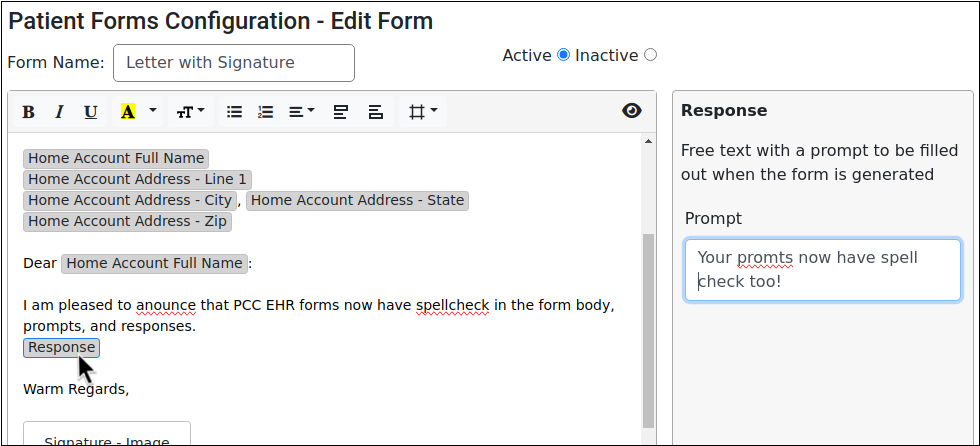
You can correct the error manually, or right click on the word for spelling suggestions.
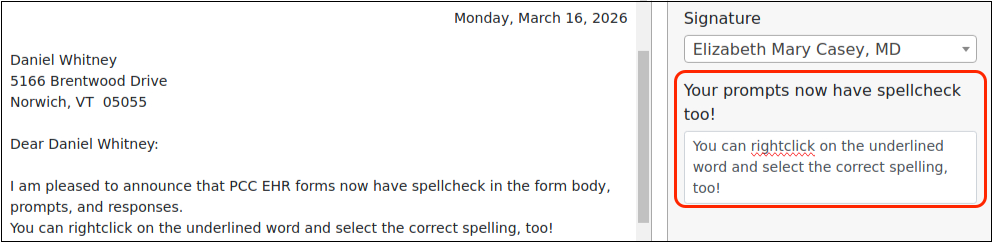
When you generate a form in the patient chart, the form will only underline spelling errors in areas where you can correct them, such as when adding a response.
Report on Even More Clinical Quality Measures (CQM) in the Report Library
PCC 11.0 adds three more reports that help you collect data for meeting clinical quality measures. When you need to collect data for your PCMH certification, use these reports to find the information you need.
For general instructions on how to run CQM reports in the Report Library, read Report on Clinical Quality Measures. For information on how to configure your orders to maximize the benefit of these reports, read How to Chart for Clinical Quality Measures.
Report on Appropriate Testing for Pharyngitis
The Appropriate Testing for Pharyngitis report follows the CMS146 specifications, and calculates the percentage of patients between three and eighteen years of age who were diagnosed with pharyngitis or tonsillitis, were prescribed an antibiotic within three days, and received a Group A strep test.
You can run this report by location and use the default criteria settings to get your numerator, denominator, and exclusions.
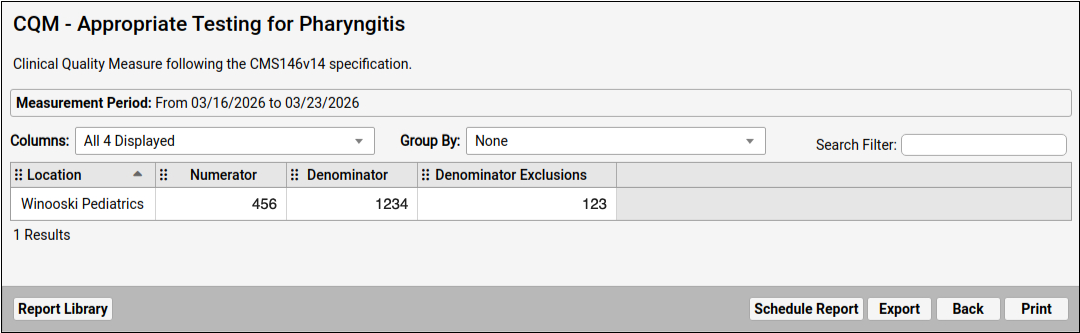
ionsFor configuration best practices and dataset details for this report, read How to Chart for Pharyngitis Measures.
Report on Appropriate Treatment for Children with Upper Respiratory Infection (URI)
The Appropriate Treatment for Upper Respiratory Infection report follows the CMS154 specifications and calculates the percentage of encounters for patients three months of age and older with a diagnosis of Upper Respiratory Infection (URI) that did not result in an antibiotic order.
You can run the report by location and use the default criteria settings to get your numerator, denominator, and exclusions.
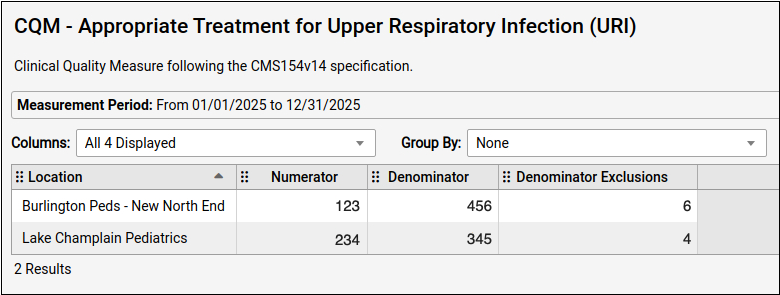
For configuration best practices and dataset details for this report, read How to Chart for Upper Respiratory Infection Measures.
Report on Documentation of Current Medications
The Documentation of Current Medications report follows the CMS68 specifications, and calculates the percentage of patient visits for which the clinician documented a review of current medications.
You can run the report by location and use the default criteria settings to get your numerators, denominator, and exceptions.
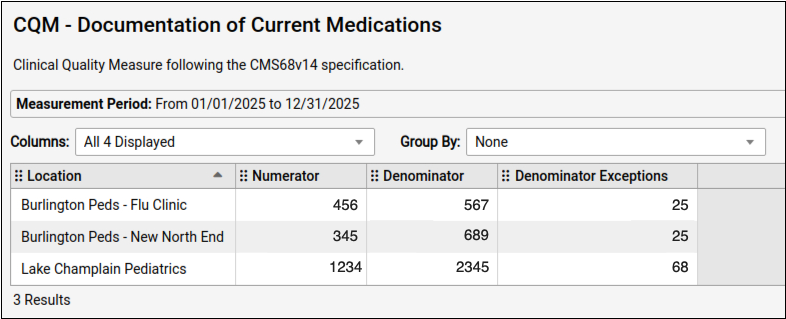
For configuration best practices and dataset details for this report, read How to Chart for Current Medication Measures.
Find Patients with Medicaid as Secondary Insurance
You can now use Patient List reports to identify patients with specific insurance, such as Medicaid, as their secondary insurance. Custom Patient List reports have a new Secondary Insurance filter and column.
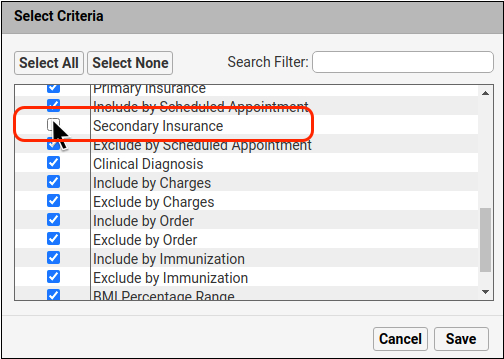
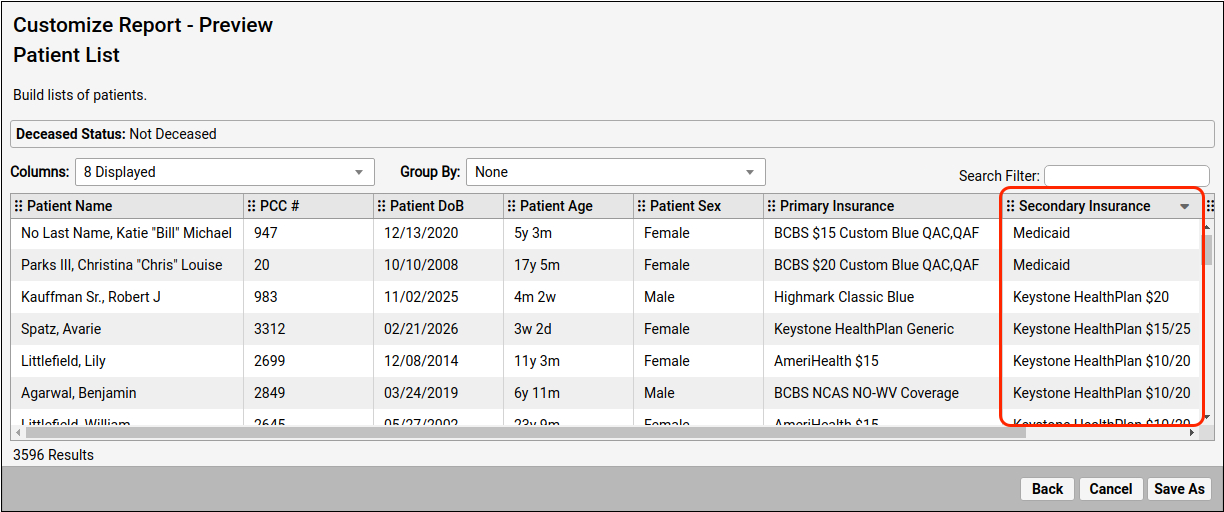
The filter and column that used to be named “Patient Insurance” are now called “Primary Insurance”.
See All Appointments Scheduled by Portal Users
When you need to see all the appointments that were scheduled via the patient portal, open the Appointments by Scheduling User report in the Report Library, and select the “Portal” option in the Appointment Scheduling Method filter.
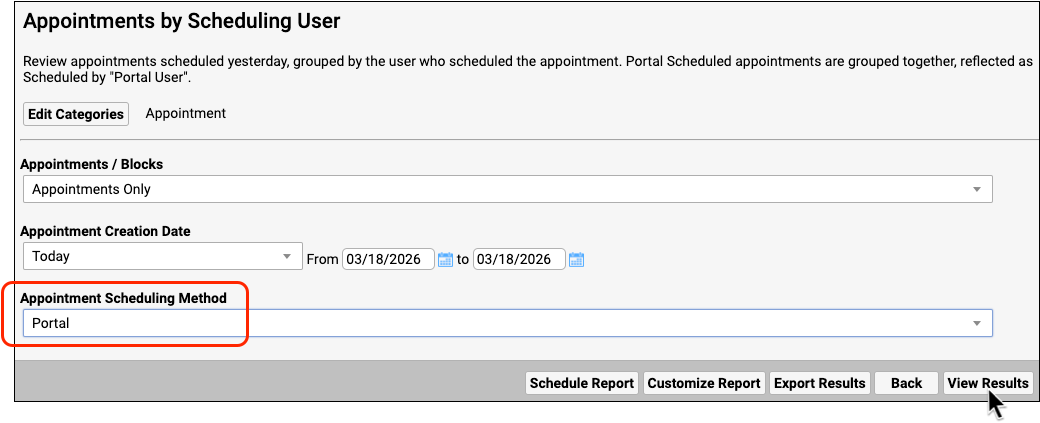
When you have selected all of your criteria, click “View Results”.
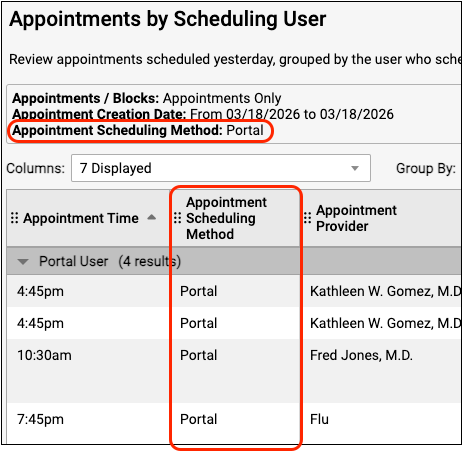
Reports are limited to appointments scheduled through the portal.
Find Which Medicaid Patients Are Due for Their Second Dose
When you need to find out which patients, with which insurance, are ready for their next dose of vaccines, run the Patient Immunization Administration Summary report and use the Current Primary Insurance column to find the information you need.
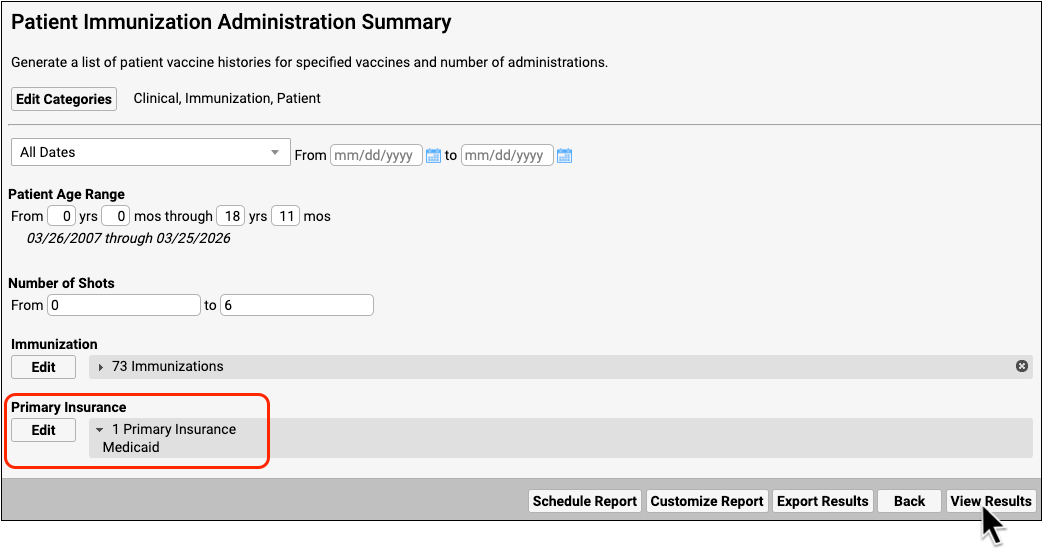
When you have selected all of your criteria, click “View Results”.
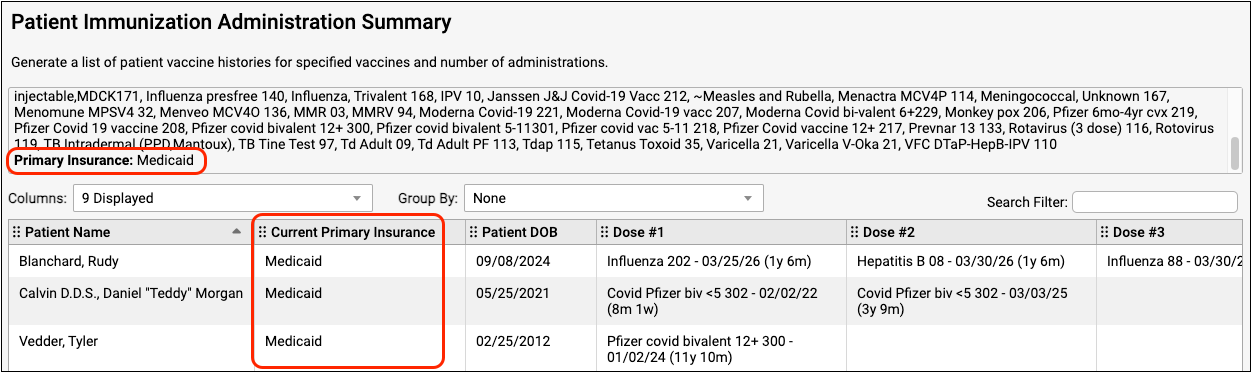
The report results display the new Current Primary Insurance filter, so that you can recall the patients who are ready for their next dose.
Account for Vaccine Administration by Clinician
Some practices attribute vaccines to the provider of the encounter rather than to the staff member who administered the vaccine. PCC 11.0 introduces a new filter in the Immunization Administration Details report to help your practice find the provider of the encounter associated with administered vaccines.
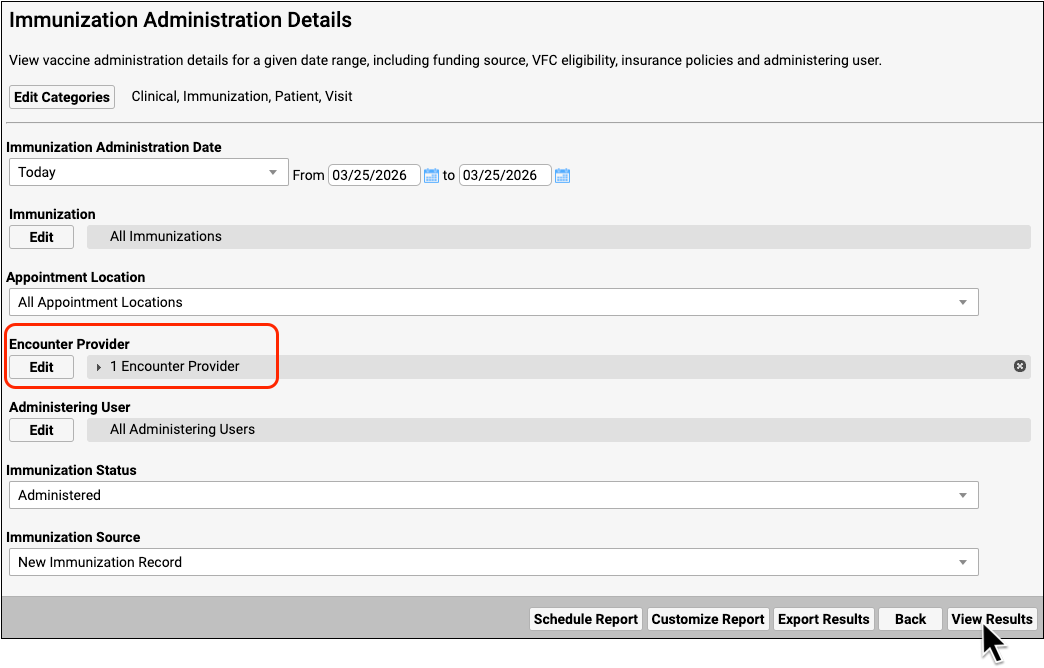
When you have selected all of your criteria, click “View Results”.
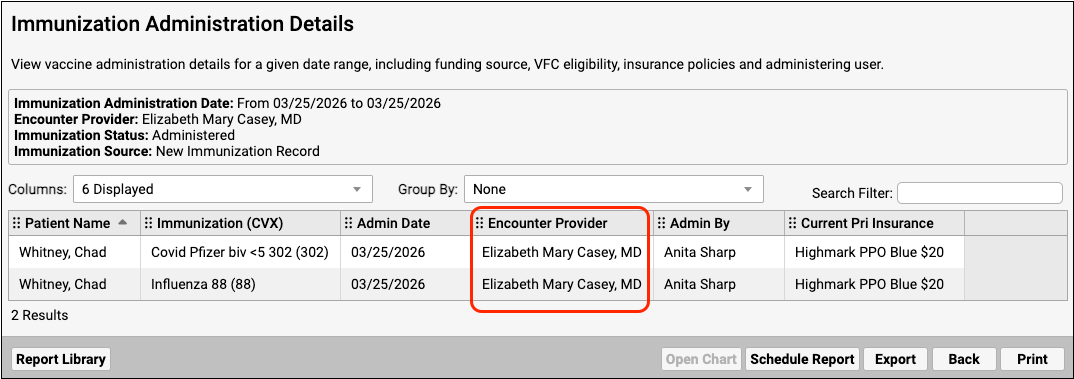
The report results will display the new Encounter Provider column. This is the clinician who saw the patient during the visit.
Demonstrate the Impact of the Late VFC Vaccine Shipments
How many private vaccines did your practice administer to VFC-eligible patients? When VFC shipments are late, build a record of how many administered vaccines could have been VFC stock.
Use the new VFC Eligibility Status and Funding Source filters in the Immunization Administration Details report to find the information you need.
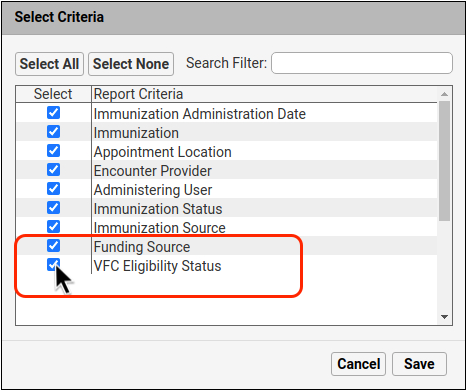
When you have selected all of your criteria, click “View Results” to see your report results.
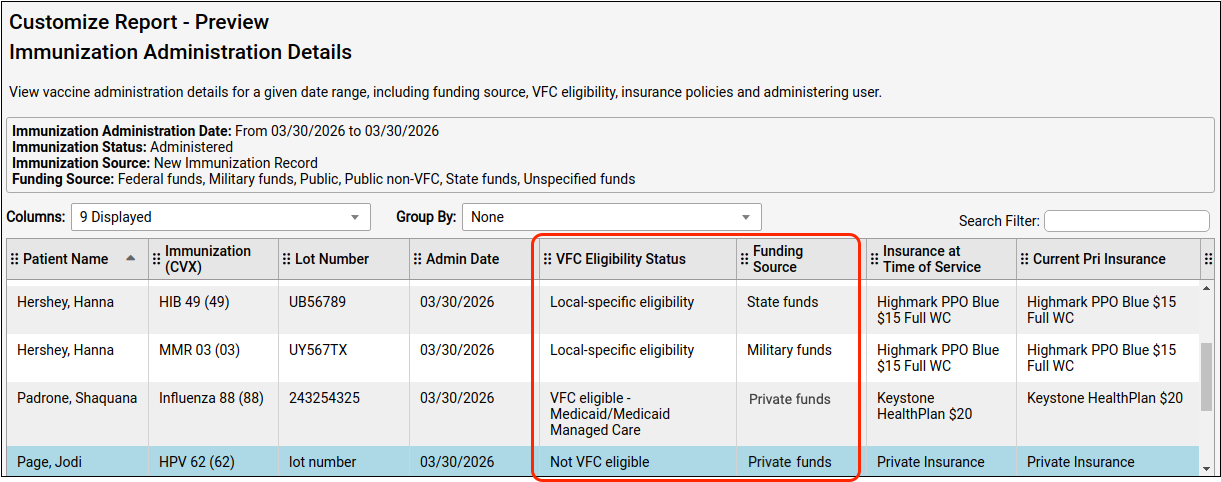
The report results display the new Funding Source and VFC Eligibility Status columns so that your practice can track the administration of private vaccines to VFC-eligible patients.
Visit Type Distribution Report
Make sure your practice has enough time slots assigned for sick, well and other visit types. PCC EHR’s Provider Hours tool includes a new Visit Type Distribution report. The Visit Type Distribution report counts time slots assigned to each visit type. The report does not count scheduled appointments or available time slots, only the color and visit type on each provider’s calendar.
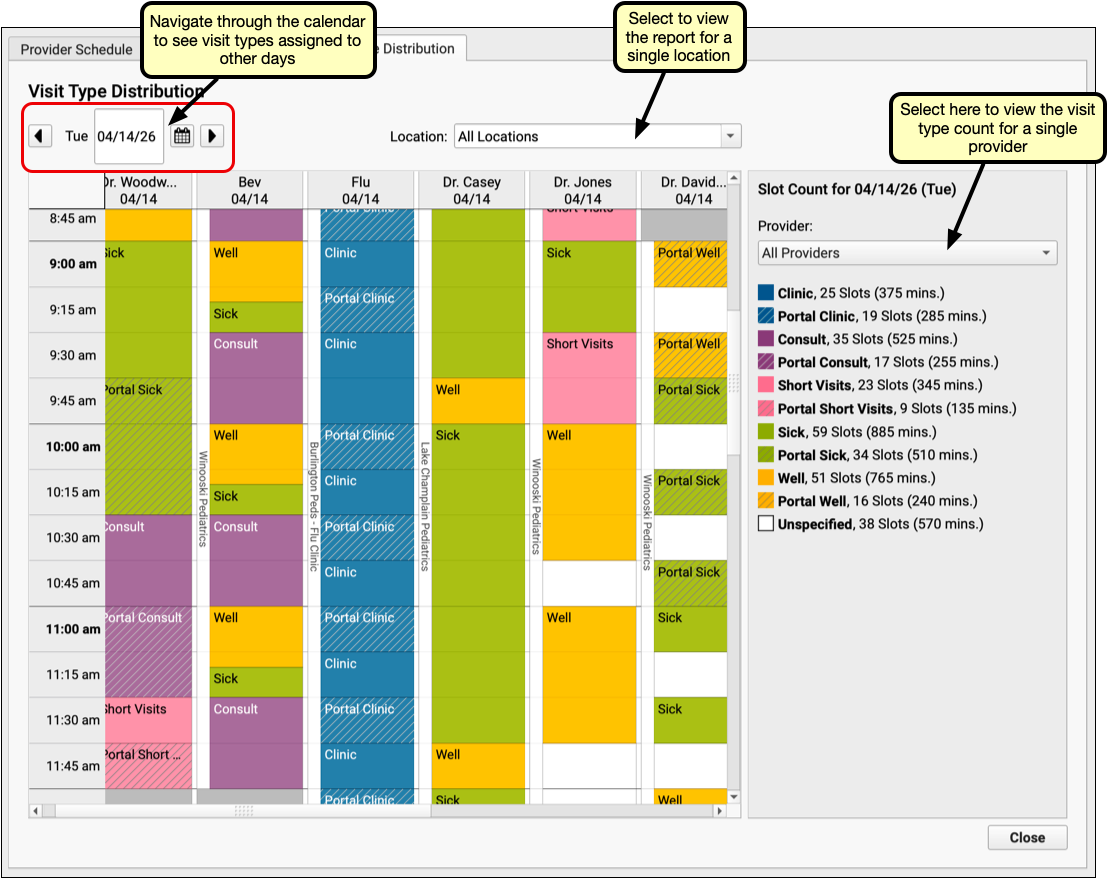
Open PCC EHR’s Provider Hours tool from the Tools menu, and click the Visit Type Distribution tab. By default, the report displays today’s date, for all locations and providers. The right column, called “Slot Count” shows the color, visit type, number of assigned time slots, and time count of those minutes. The default view includes all providers. Use the drop-down menu above to limit the report to a single provider.
The calendar on the left shows each provider’s visit types for the day. If your practice has multiple locations, use the location drop-down menu to view just one.
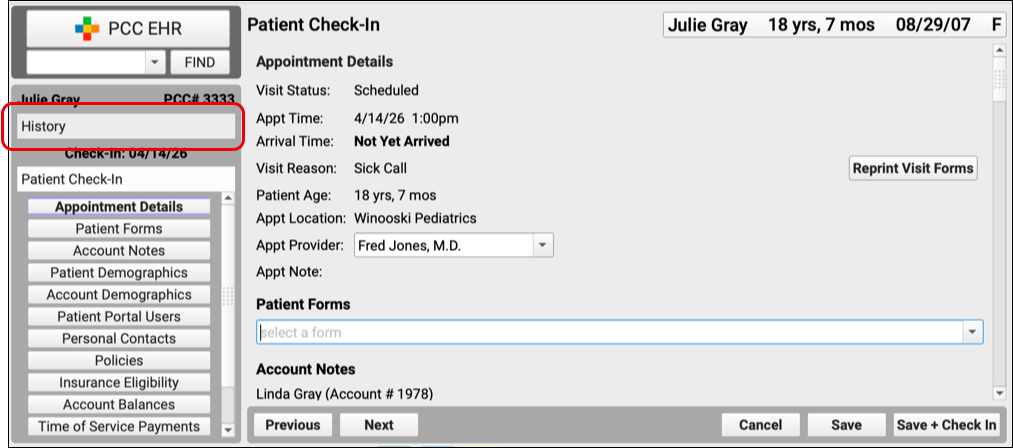
View Documents and Patient History During Check-In
Find all the information you need about a patient, right when you need it. Check your patients’ documents, insurance forms, visit history, and immunization records, all without navigating away from patient check-in.
The History Chart Section now appears alongside Patient Check-In. Click through each component to view and edit patient information, and return to Patient Check-In to continue.
Insurance Billing
Edit Policies More Quickly and Easily
You can now edit policies without needing to enter a protocol’s edit mode, and you can type in the member ID and other data while a scanned card is open on your screen.
To add or edit a policy, just use the buttons in the Policies component.

You no longer need to click “Edit” in the lower-left corner of the screen.
As you edit a policy, you can open a scanned card image and continue to enter policy details.
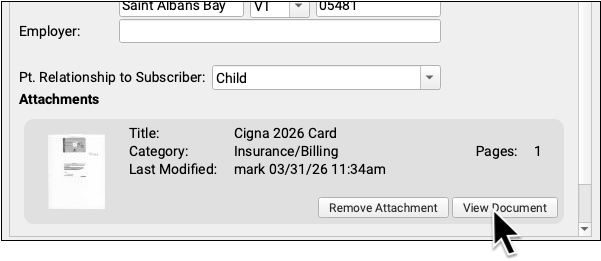
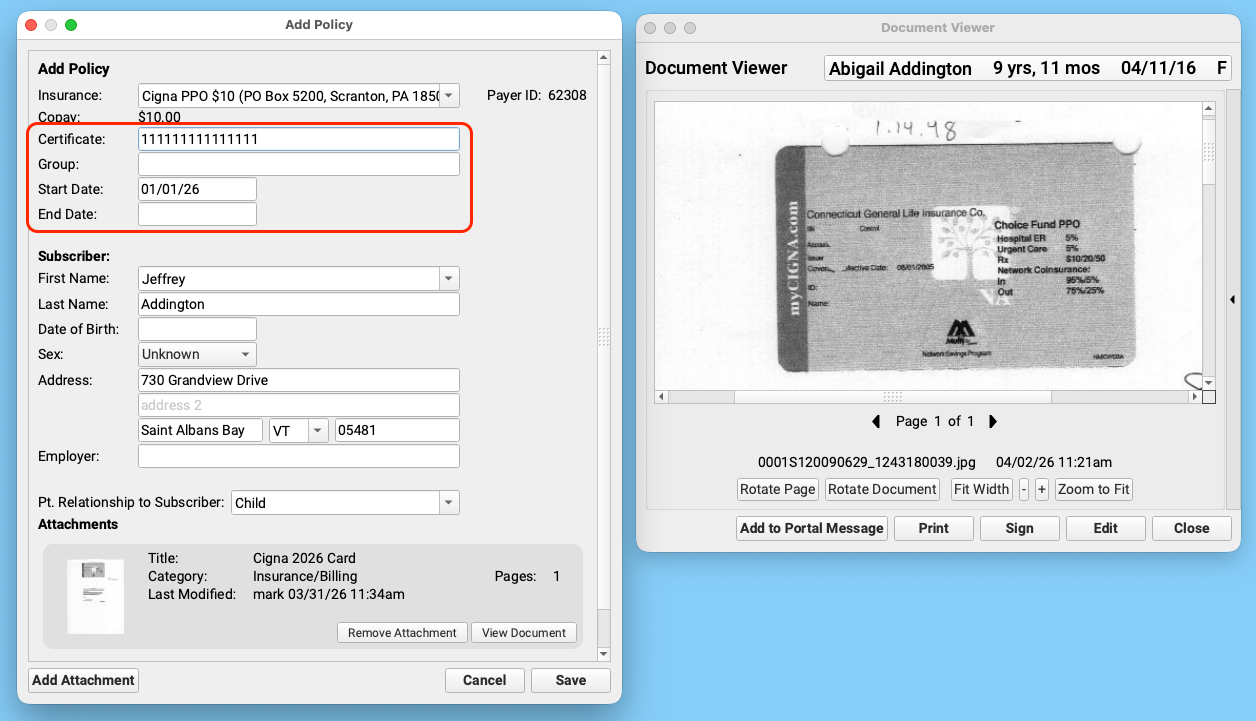
This allows you to more easily update the member ID and other insurance information.
Find a Patient’s Primary Insurance Group on the Schedule Screen
Use the Schedule screen in PCC EHR to see a patient’s current primary insurance group so that your billers can prioritize which encounters to post first.
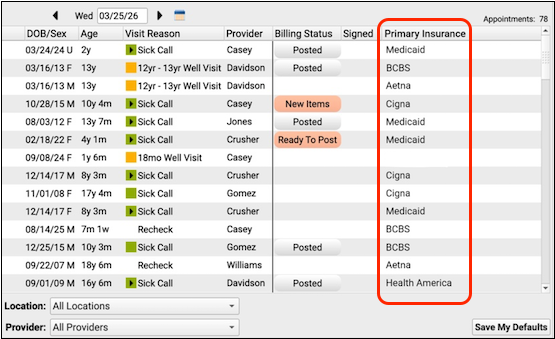
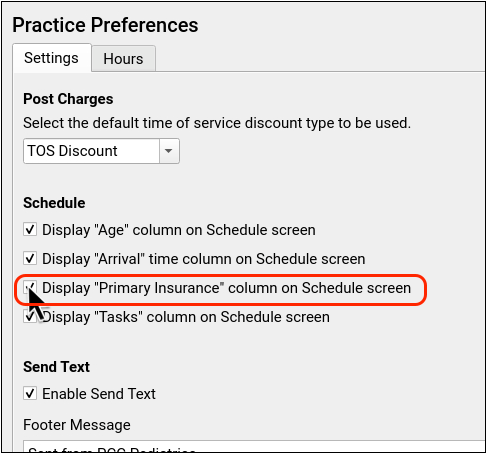
The Primary Insurance column on the Schedule screen displays the short name for the insurance group associated with the patient’s primary insurance plan, and is optionally available for the whole practice. Go to Practice Preferences in the Configuration tool and select “Display ‘Primary Insurance’ column on Schedule screen” to enable this column.
You can change the short name that displays on the schedule screen in the Insurance Group table editor. To learn more about working with insurance groups, read Edit the Insurance Plans On Your PCC System.
Changes to the patient’s current insurance, such as expiring or switching policies, are reflected on the Schedule screen.
Report on Insurance at Date of Service for Ready-to-Post Encounters
When you are catching up on posting and you need to find a patient’s insurance for a particular date of service, run the Encounters by Billing Status report and use the new Primary Insurance at Date of Service filter to find the insurance plan associated with the patient’s policy on the date they were seen at your practice.
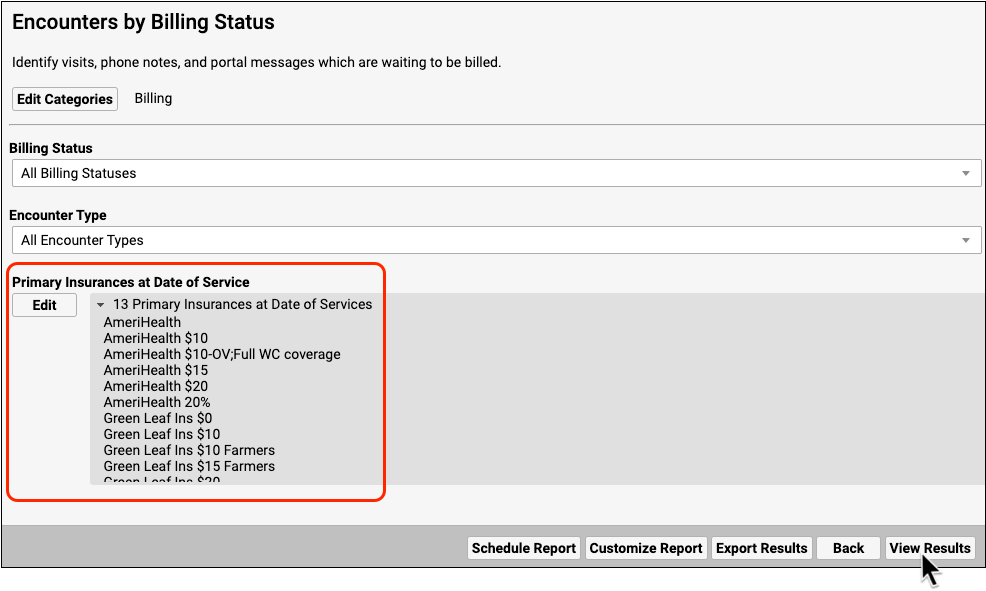
When you have selected all of your criteria, click “View Results”.
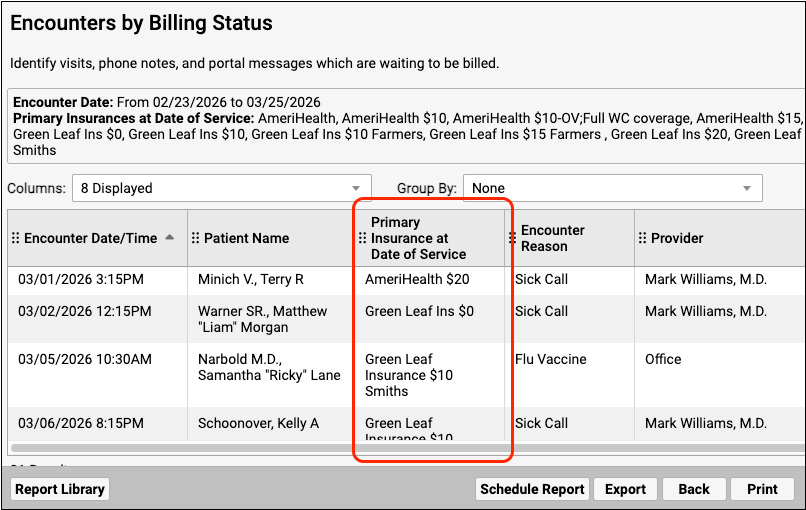
The report results display the new Primary Insurance at Date of Service column, so that you can easily prioritize your posting.
Print Batches of Paper Claims
As you submit electronic claims, unusual payor situations may require some claims be printed. Use the Claims tool to print batches of claims that are routed to paper.
Open the Claims Tool
Open the Claims tool from the Tools menu.

Route Claims to Paper By Preparing and Submitting Electronic Claims
Before printing paper claims, process and submit your electronic claims. Click “Prepare Claims”, review the results, and then click “Submit Claims” to send out electronic claims.
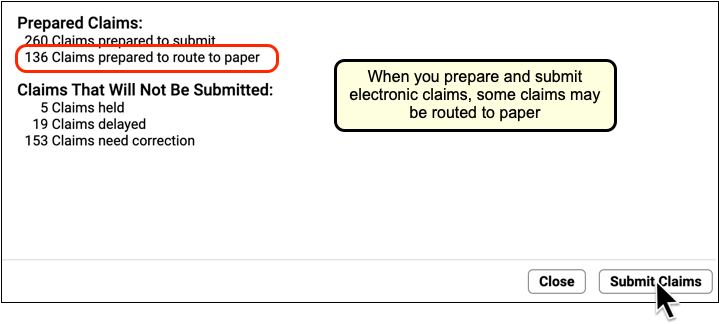
If any claims require printing on a paper HCFA form, based on your practice’s claim configuration, they will be routed to a paper batch during this step.
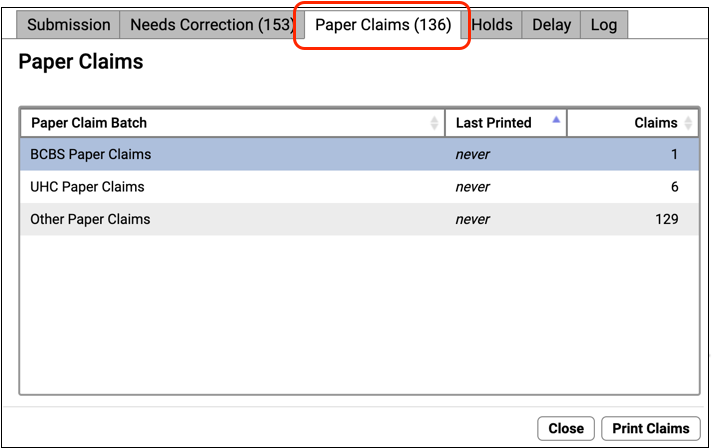
Visit the Paper Claims Tab and Review Batches to Print
Click “Paper Claims” to see a list of insurance batches with claims waiting to be printed.
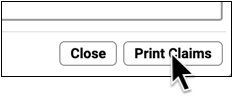
Select a Batch and click “Print Claims”
Select one of the insurance batches and click “Print Claims”.

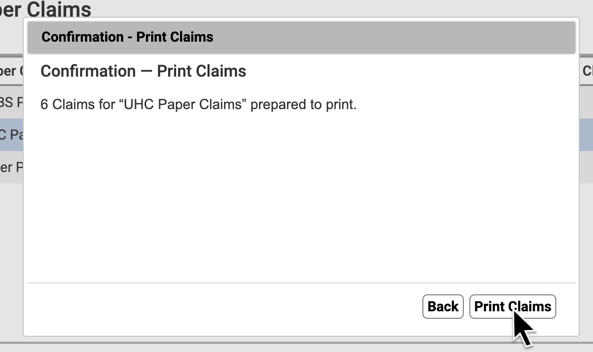
Put Claim Paper into Your Printer and Confirm
Ensure that HCFA claim forms are in your printer and click “Print Claims” to continue.
Optionally Review Log of Printed Claims and Reprint
You can review a record of all claims generated by your office, either electronically or on paper, on the Log tab.
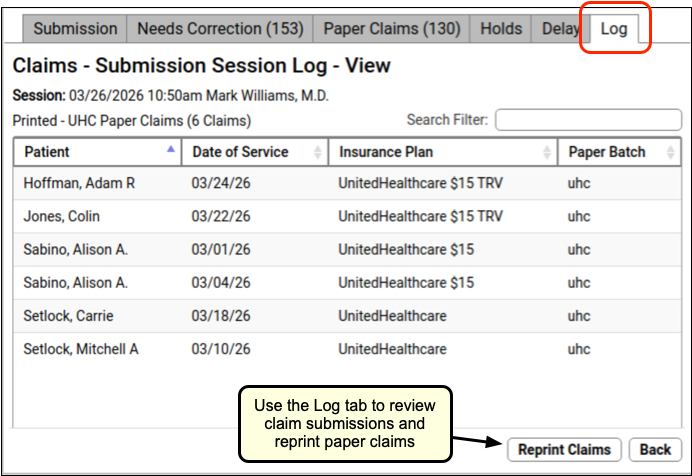
If you need to reprint a batch of paper claims, you can do so by viewing the log and clicking “Reprint Claims”.
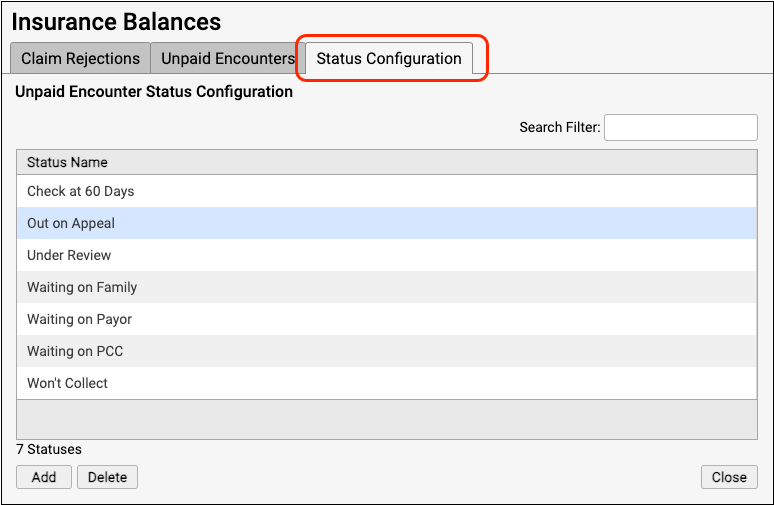
Prioritize Your A/R with Custom Encounter Statuses
Do you want to track all claims that are out on appeal? Or create a worklist of unpaid encounters that you need to check on weekly? Your practice can organize and prioritize your unpaid encounters with custom encounter statuses. You can use those statuses to track your accounts receivable in a way that best suits your workflow.
Read the procedure below to learn how to create a custom encounter status and assign it to unpaid encounters.
Navigate to the Status Configuration Tab
Click on the Status Configuration tab in the Insurance Balances tool.
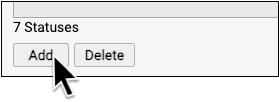
Add a Status
Click “Add” to create a new encounter status.
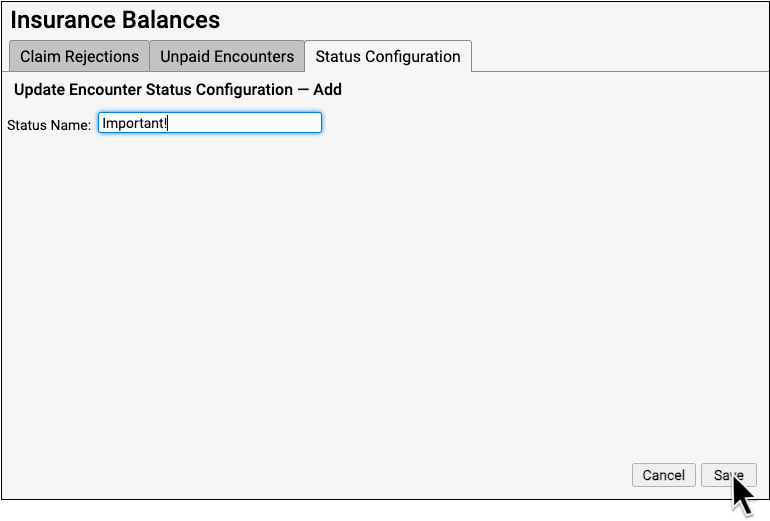
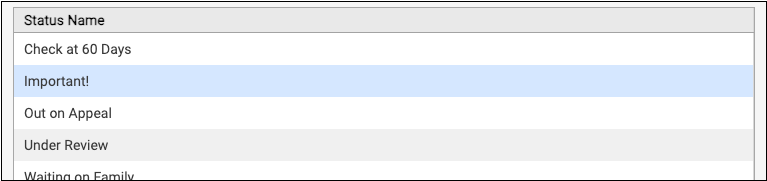
Name Your Status and Save It
Give your new status a name and click “Save”.
Assign the New Status to Encounters
Return to the Unpaid Encounters tab and assign the status to appropriate encounters.
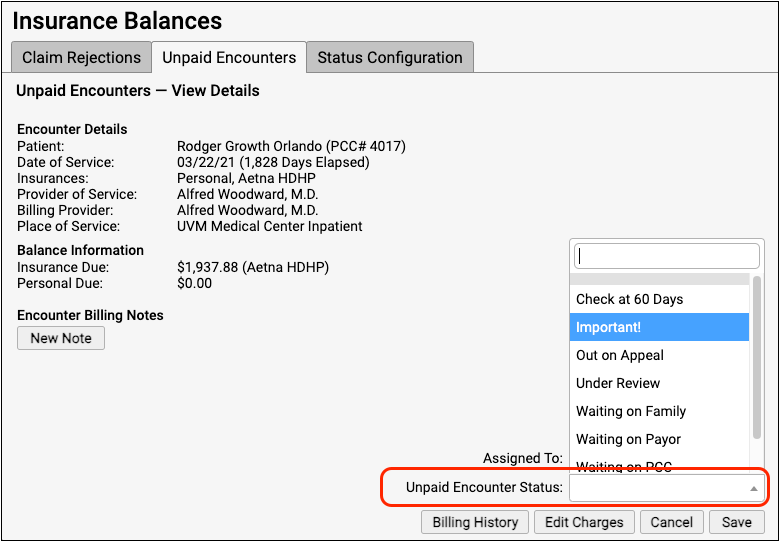
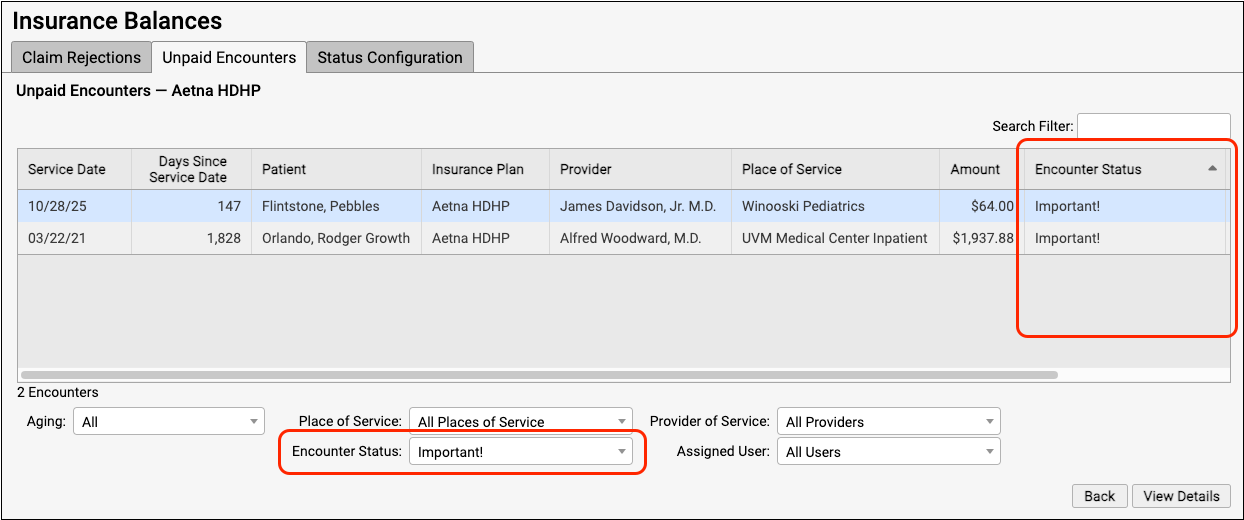
Sort and Filter Your Unpaid Encounters Worklist
On the worklist, click on the Encounter Status column to sort the encounters by status. Use the Encounter Status filter to isolate exactly the claims that you need to work on.
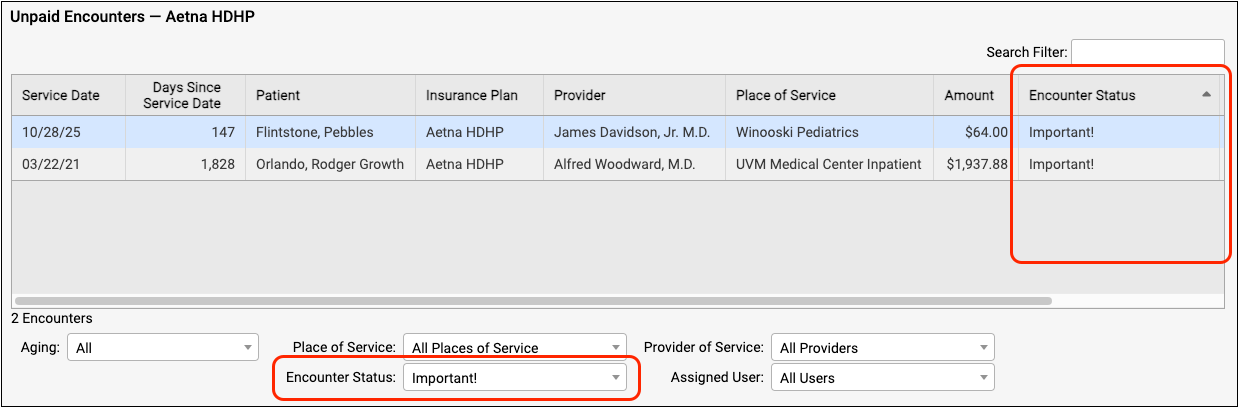
As your practice’s needs change, custom encounter statuses can help you organize unpaid encounters so you can make sure no claims slip through the cracks.
Delete Statuses: If you create a status by mistake or your practice no longer uses a status, you can select it and click “Delete”. You cannot delete PCC EHR’s default statuses (Waiting on Family, Waiting on Payor, etc).
Real Time Claim Status Improvements and Fixes
In PCC 10.5, PCC introduced the “Request Claim Status” button in the Insurance Balances tool, allowing billers to instantly query a payor for claim information.
As practices started using the new claim status feature, they provided great feedback and reported in when something didn’t go as expected.
Between PCC 10.5 and 11.0, PCC made numerous improvements to how provider NPIs were transmitted. We also added connections to more payors, fixed problems with missing claim IDs, and solved a bug related to patient middle names!
Be sure and give claim status in the Insurance Balances tool a try, and let us know how it works for you.
Autoposting Will Not Update Copay Amount When There’s a Secondary Policy
In PCC EHR 11.0, when you autopost an ERA for an account that has a subsequent policy, PCC EHR will refrain from updating the copay amount. You can safely autopost your ERAs without unintentionally charging the family a copay.
When a patient has secondary insurance coverage, some practices assign them a $0 copay version of their primary policy. That way, when the ERA comes in for the primary insurance, the balance due is queued up to the secondary policy. However, when you autopost ERAs, PCC EHR usually reads the payor’s required copay and updates the charge to match. In most situations, this is a great feature, as it corrects any incorrect copay amounts and charges the required amount. When the patient has a secondary or other subsequent coverage, however, you want the copay due to the patient to remain $0.
Reconcile Insurance Checks that Include Reversals
In PCC 11.0, you can associate reversals with check numbers and then use improved payment reports to better reconcile insurance checks that include reversals (takebacks).
Autopost Incoming ERAs
When you autopost an ERA containing a reversal, PCC EHR will associate the check number with the refund used for the reversal.
Optionally Manually Post Reversals
If instead you manually post reversals, you can indicate the check number as you enter the reversal in the Payments tool.
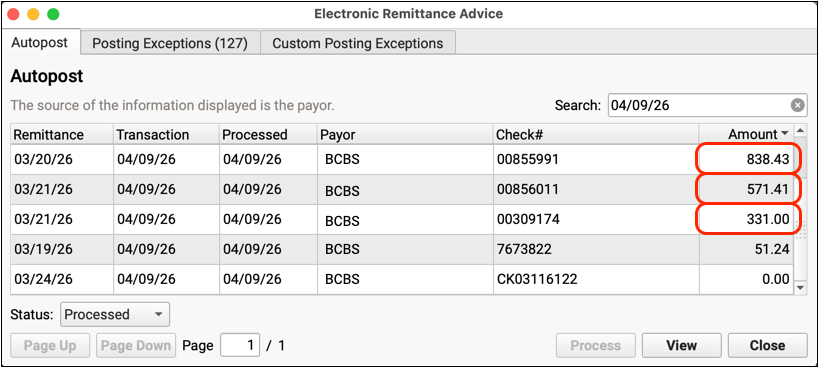
See Your Check Totals in the ERA Tool
In the ERA tool, you can view processed ERAs and see the total amount of each check sent to you by the payor. That total includes payments and refunds (such as reversals or takebacks).
Compare to the Payment Totals by Check Number Report
The Payment Totals by Check Number report provides a list of totals which match the amounts in the ERA tool.
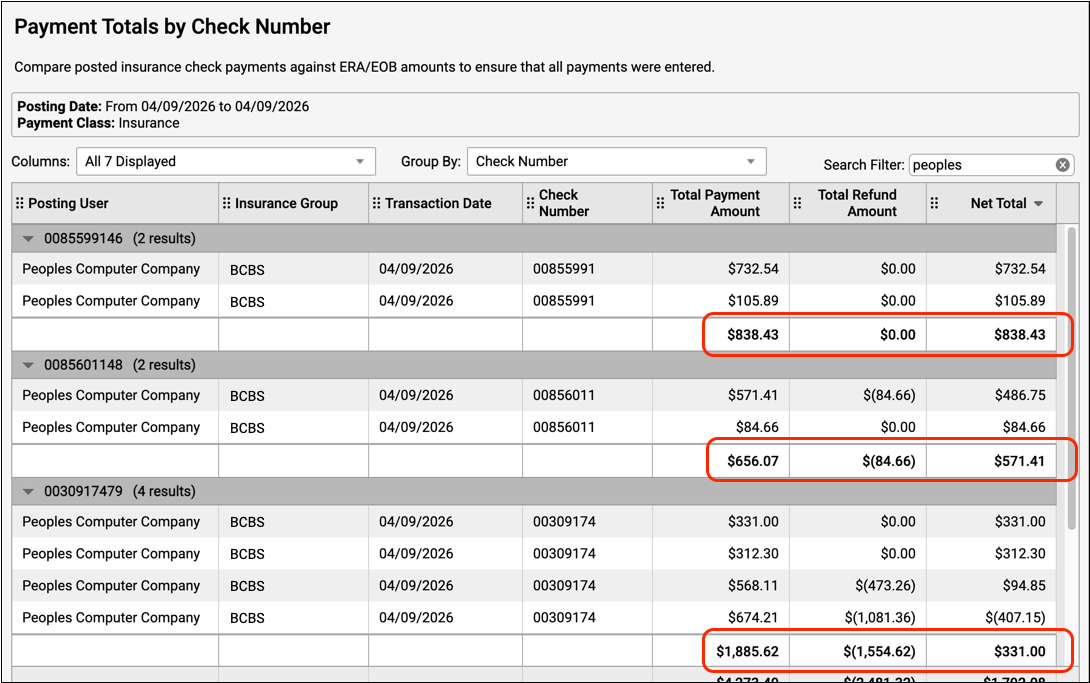
Did everything post properly? By using this report, and grouping by check number, you can ensure that the posted amounts match the checks. Reversals and other unusual adjustments are totaled in the Total Refund Amount column.
Dig Deeper With the Payment Details by Check Number Report
When you need to dig deeper and track down a discrepancy, the Payment Details by Check Number report includes everything posted and displays reversals in a Refund Amount column.
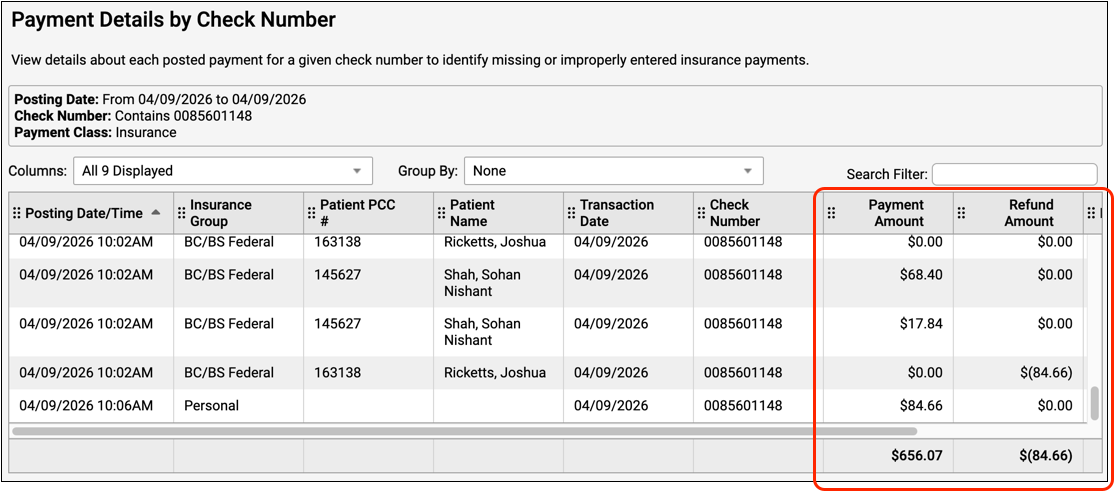
You can review each individual post and better understand how a reversal or other refund impacted the total amount on the check.
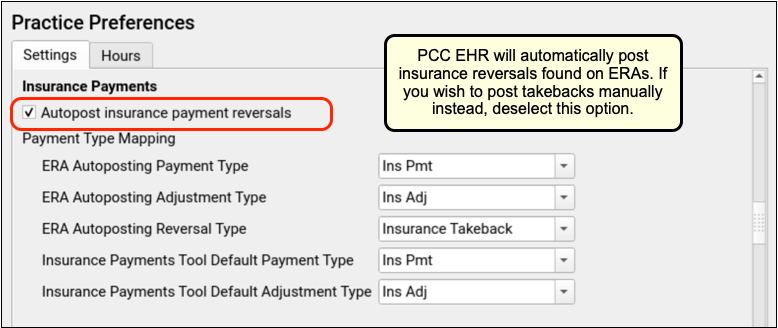
Prevent Autoposting of Reversals
If your practice wishes to handle all insurance reversals (takebacks) manually, you can turn off autoposting for those responses.
Use the Practice Preferences configuration window to toggle autoposting of reversals off or on.
Recognize Claim-Level Adjustments More Easily
You can now see claim-level adjustments more clearly on an ERA.
When a payor uses an ERA to reduce the copay due, they might take that amount out of the check. How can you spot these unusual claim-level adjustments? They aren’t payment amounts, and they aren’t really adjustments to a charged amount either.
PCC EHR 11.0 totals any claim-level adjustments with their own descriptive line in the summary of an autoposted ERA.
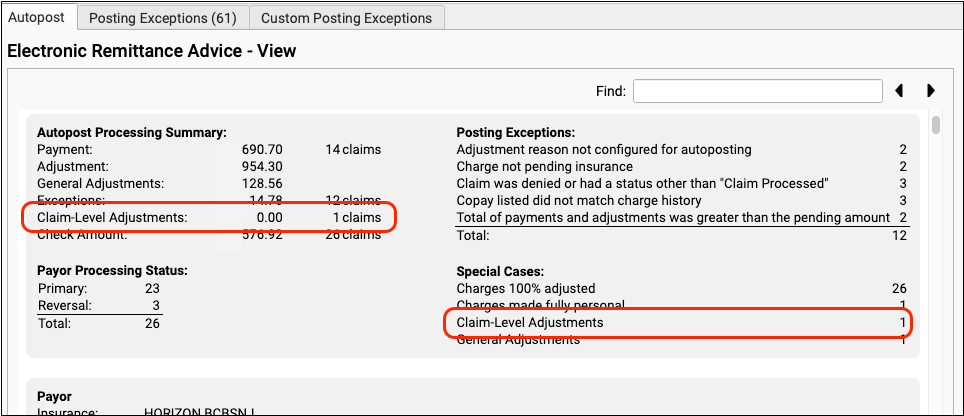
You can also use the Special Cases filter to jump directly to responses on the ERA that include a claim-level adjustment.

When you need to understand why a check amount doesn’t match the total amounts to post, reviewing exceptions and claim-level adjustments can quickly help you solve the payor’s puzzle.
Personal Billing
Credit Card on File: Faster, Easier Account Payments
Instead of sending a bill, keep your families’ credit cards on file so you can process outstanding balances as soon as insurance payers respond.
Add an Account’s Credit Card
At the front desk, or whenever you are working with a family, you can use the Payments component to add the account’s credit card information.
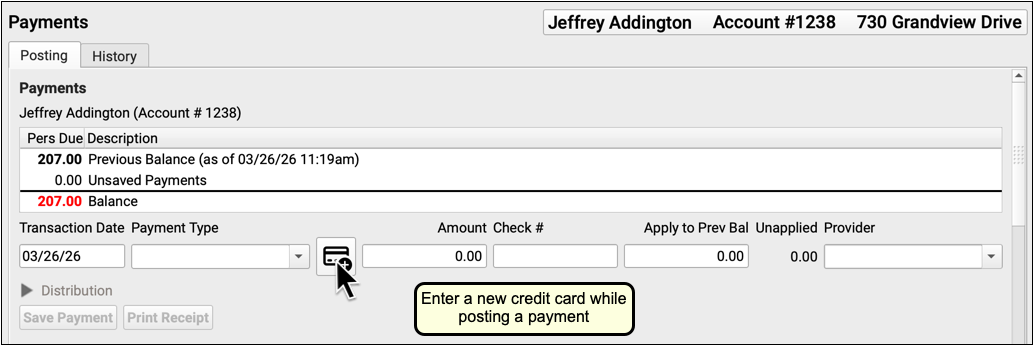
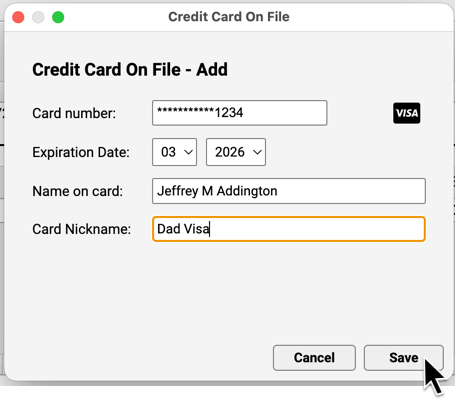
Credit card numbers are stored through an encrypted connection to a third party and are not kept on your PCC system.
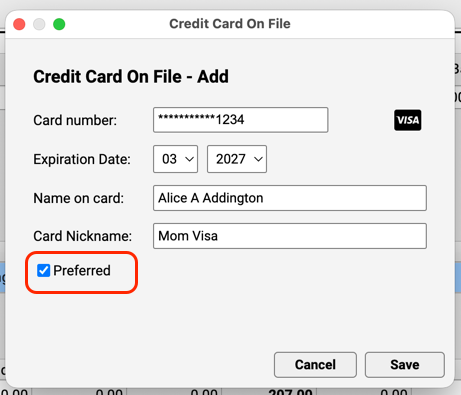
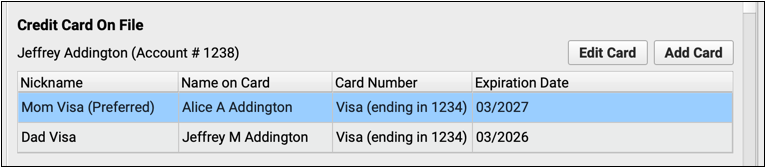
You can also add a card and manage all credit cards for a family in the Credit Card On File component. When a family has more than one credit card, you can designate one of them as preferred.

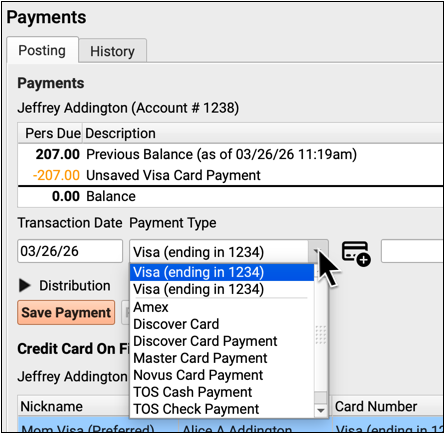
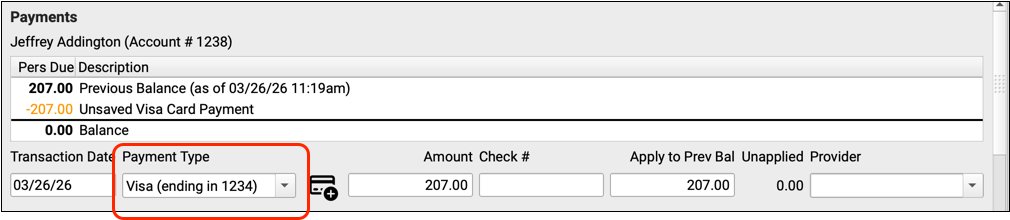
Post a Payment with a Credit Card on File
Once you’ve recorded credit card information for a family, it will be immediately available whenever you enter personal payments. Active cards will appear at the top of the Payment Type options. The preferred card will appear first.
Set Up CCOF For Your Practice
Follow the steps below to get started with credit card on file at your practice.
Establish an ISV Merchant Account with Payment Pros
Credit card on file requires an ISV merchant account with PCC’s payment processing partner, Payment Pros.
Contact Payment Pros at https://www.paymentpros.net or info@paymentpros.net to create an account.
If you already have a merchant account with Payment Pros, reach out to them to migrate your existing merchant account to an ISV merchant account.
Payment Pros will provide you with a merchant ID, an access URL, a username, and a password.
How Does an ISV Account Differ from a Traditional Merchant Account?: An ISV or Independent Software Vendor account allows PCC to exchange credit card tokens with Payment Pros on your behalf. Credit card numbers are never stored on your PCC system.
Open Practice Preferences
Open the Practice Preferences configuration tool from the Configuration menu.
Enter Your Merchant ID and Credentials
Enter the information provided to you by Payment Pros, including your CardPointe merchant ID and username and password. The vendor URL will appear for you automatically.

PCC EHR will automatically validate the account when you finish entering the username and password.
Optionally Add Additional Merchant Accounts
If your practice has more than one merchant account, you can enter credentials for multiple accounts. Click “Add Merchant Account” to add a new one.
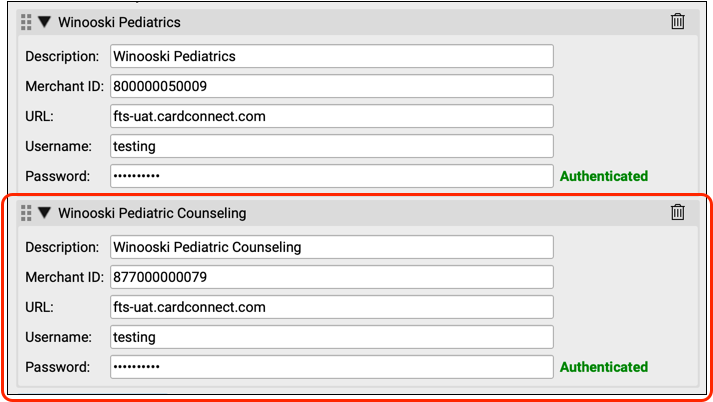
You can return to Practice Preferences at any time and click the trash icon to remove an account.
Define Payment Types for Tracking and Reporting
How will credit card on file payments appear in your records? Use the Credit Card on File section of Practice Preferences to designate payment types for credit card on file payments.
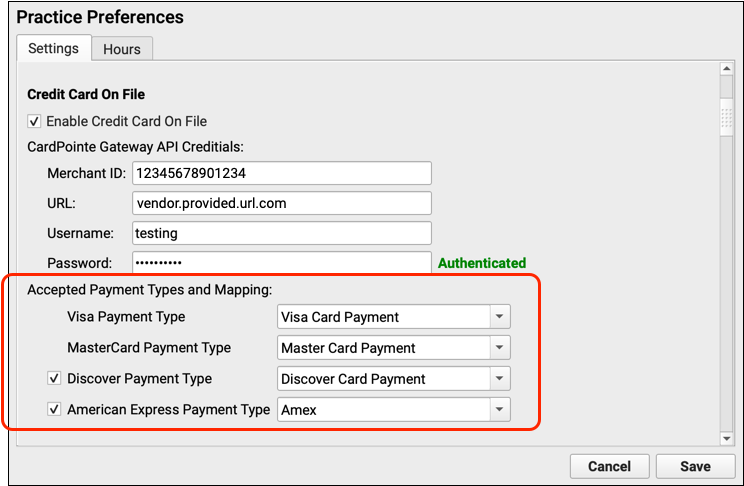
In addition to Mastercard and Visa, indicate whether or not your practice accepts Discover and American Express.
Create New Payment Types: To create new payment types, clone and rename existing types in the Payments table in the Tables tool.
Turn On Credit Card on File for Your Practice
After you have entered credentials and choosen payment types, you can click “Enable Credit Card On File” to turn on the service for your practice.
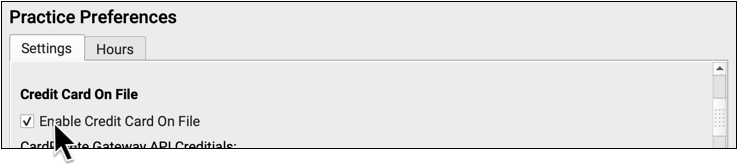
In addition to Mastercard and Visa, you can select whether your practice accepts Discover and American Express.
When you have finished entering credentials and choosing payment types, you can
Test Your CardPointe Connection
After completing the above steps, test your credit card on file connection by adding a card to an account and processing a credit card payment. Report any problems to Payment Pros, and contact PCC Support if you need additional assistance.
Print Bills for Any Group of Accounts
Do you need to generate bills for all accounts with a specific status? Or customize your billing run for overdue accounts? Use the Personal Balances tool to create bills for any group of accounts, based on your criteria.
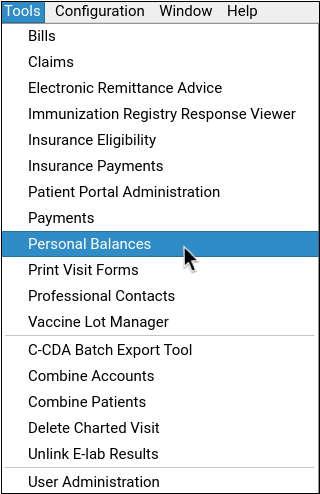
Open Personal Balances
Open the Personal Balances tool from the Tools menu.
Select the Criteria for Bills You Need to Print
Adjust the criteria in order to select those accounts for which you need to send bills.
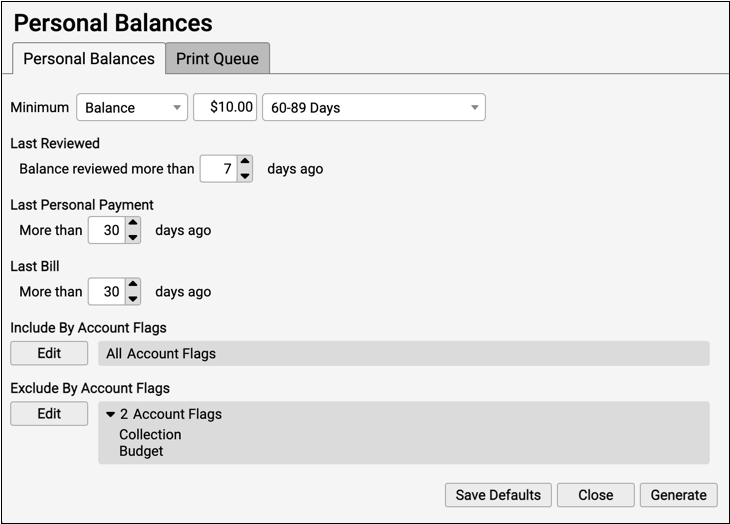
For example, you may wish to print your practice’s 60-90 day overdue bills.
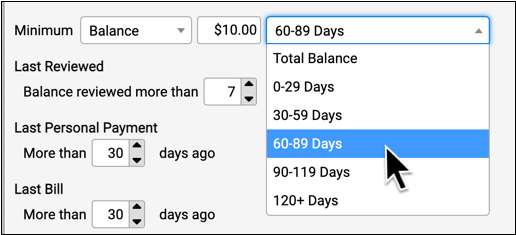
You can also indicate a minimum balance, select accounts by account status, and more.
One Bill a Month: In order to prevent sending a family a bill more often than once a month, you can use the “Last Bill” setting to indicate the number of days that need to have passed for an account to be included on the list.
Click Generate and Review the List of Accounts
Click “Generate” to produce a list of accounts that match your criteria.

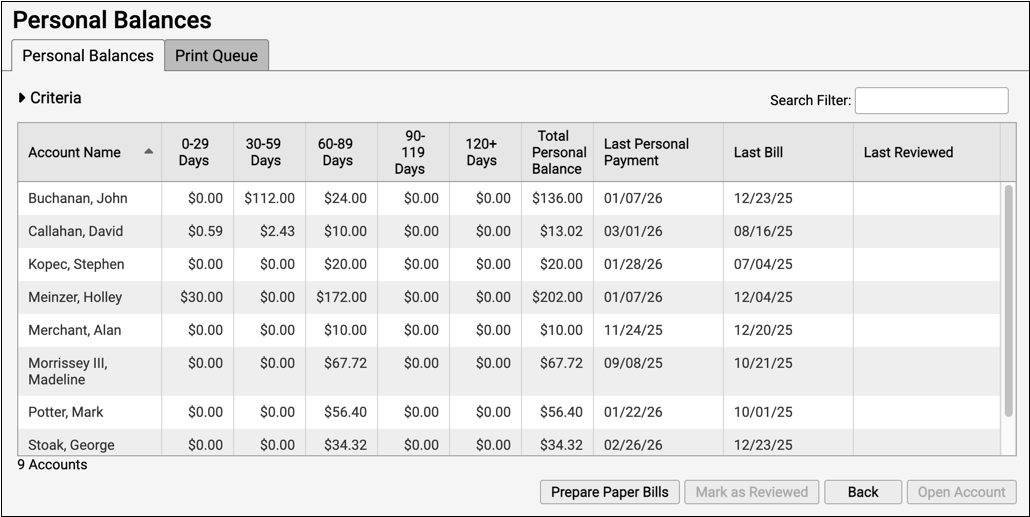
You can sort and search the list to review the accounts and make sure you wish to print a bill for them.
Optionally, Work With Accounts, Post Payments, and More
Before you generate bills, you could select an account and click “Open Account” to review more details, including a list of outstanding charges, in the Payments tool.
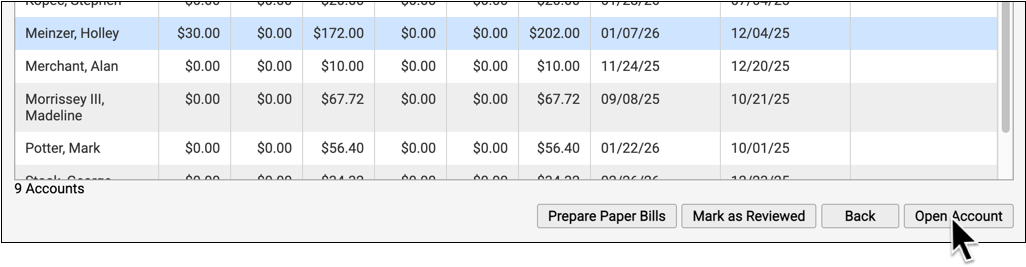
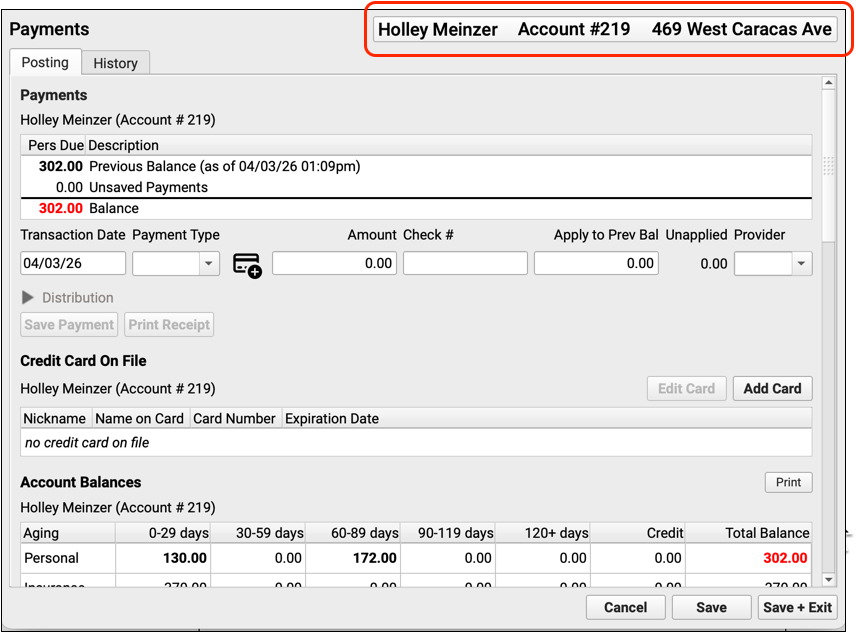
You might decide to contact the family about their balance and post a payment. After working the account, you can return to Personal Balances and recreate the list of accounts that need a bill.
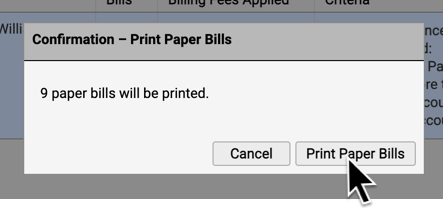
Click “Prepare Paper Bills”
When you are ready to generate bills for the accounts listed, click “Prepare Paper Bills” .

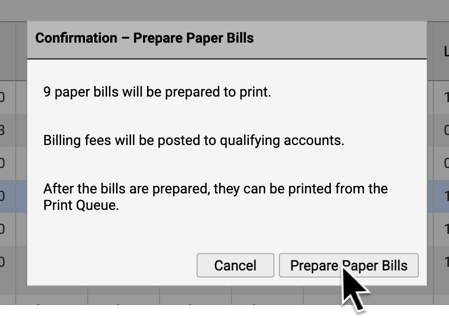
Review the expected number of bills and click “Prepare Paper Bills” to continue. PCC EHR will create the bills, post an automatic billing fee (if your practice uses one and accounts match the criteria), and add the finished batch of bills to the Print Queue.
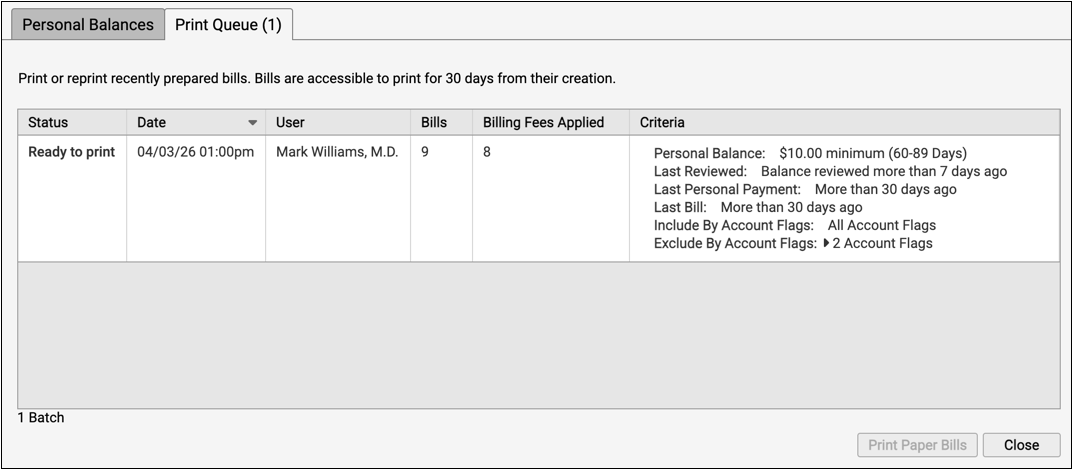
Visit the Print Queue
When your system is finished preparing bills, you will see there’s a batch waiting to be printed on the Print Queue tab. Visit the Print Queue to view prepared bills and print them.
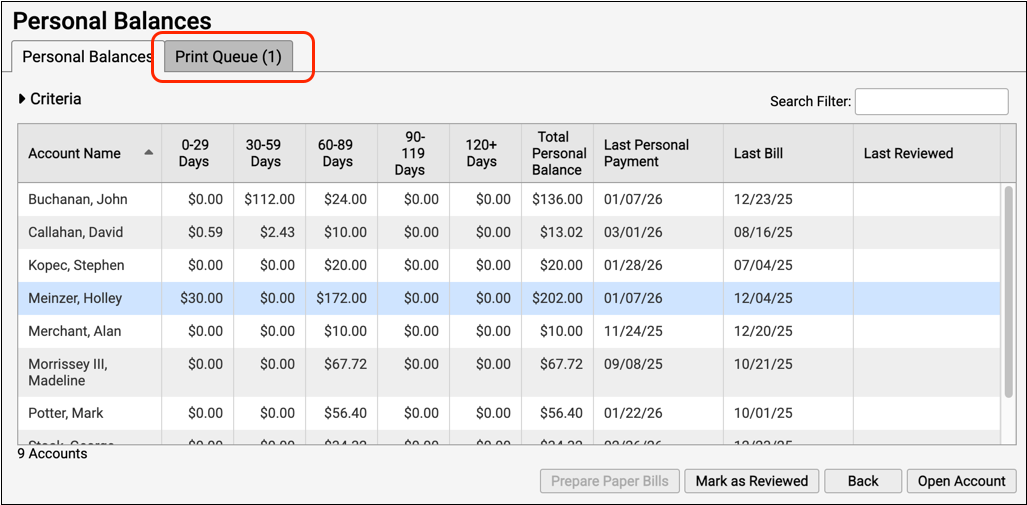
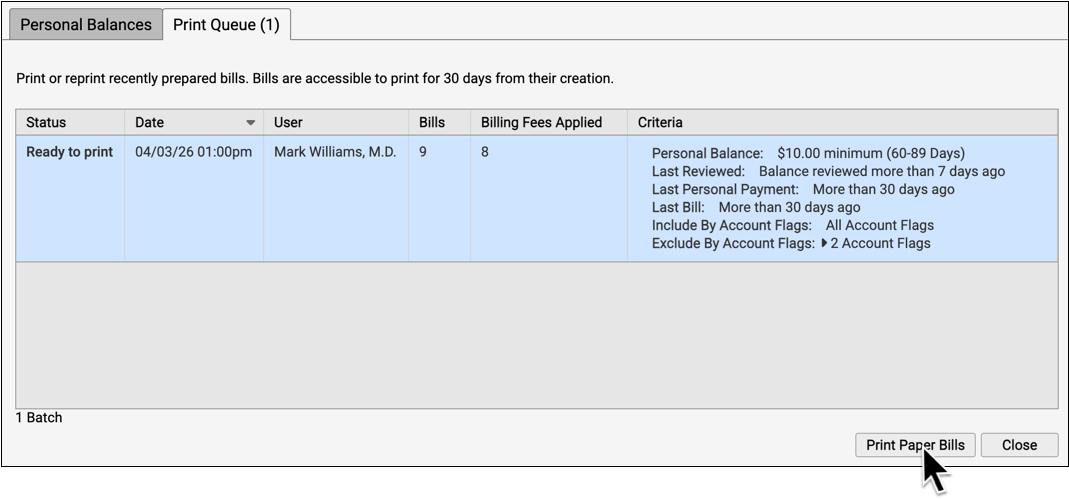
Select the Prepared Bill Batch and Print
Select a batch of prepared bills and click “Print Paper Bills” to send them to your printer.
Did We Print a Bill for This Account?: Bills generated manually through Personal Balances do not show up in the Log tab of the Bills tool. Instead, you can review whether an account received a bill in the Account History (for any dependent patient) as well as by checking the Last Billed date for the account, found in Demographics.
Automatically Charge Billing Fees for Overdue Accounts
Does your practice levy a fee when an account balance goes over 90 days? Whenever you generate personal bills, you can automatically charge your practice’s billing fee for overdue balances.
Activate and Configure Automatic Billing Fees for Your Practice
A billing fee can be an important part of collecting from a delinquent account, but it is essential that you only charge accounts that meet your practice’s criteria as established in your financial policy. Use the Billing Fees tab in the Bills tool to configure criteria for your automatic billing fee and to turn billing fees on or off.
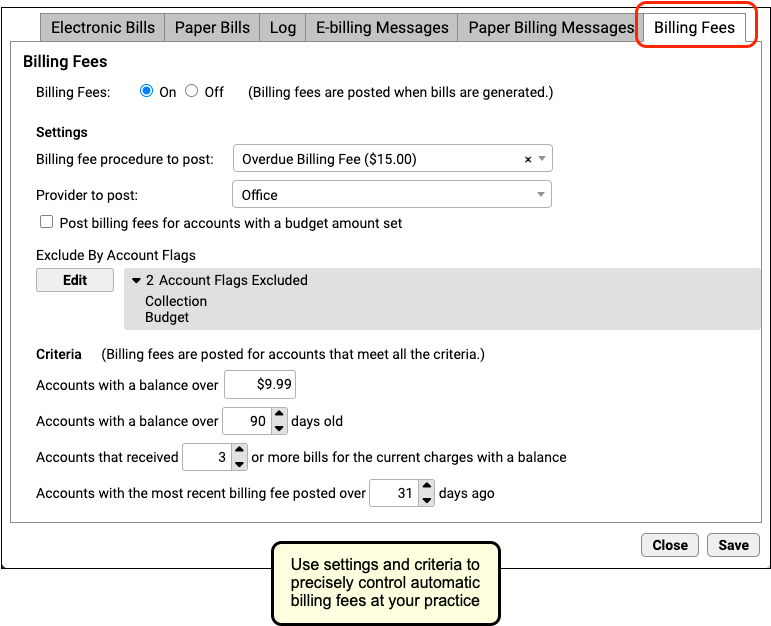
You can fill out the settings and then use the “Billing Fees” toggle switch at the top to turn automatic billing fees on or off for your practice. Remember to click “Save” after making any changes.
The reference list below defines how each setting and criteria will control how automatic billing fees work at your practice.
-
Billing fee procedure to post: Select the charge that will serve as your practice’s billing fee. This charge will work like other charges and fees at your practice. You can create a new custom fee and designate its price in the Procedures table in the Tables tool. Whenever you generate bills, PCC will post the fee for any account that matches your specific criteria and use the procedure you specified as the charge.
-
Provider to post: If your practice always uses a provider for all charges, you can select that specific provider. Otherwise, choose “Office”.
-
Post billing fees for accounts with a budget amount set: By default, if an account has an amount in their “Budget” field, found in Demographics, they will not receive an automatic billing fee. If you would like those accounts to also receive a fee, check this box.
-
Exclude by Account Flag: You can exclude accounts from billing penalties by adding a status flag and then excluding by that flag. For example, your practice may decide that if a family is turned over to collections, they should no longer receive an automatic billing fee. In that case, you would exclude by the status flag “Collections”.
-
Accounts with a balance over: Your practice can designate the minimum balance for which an account would receive an automatic billing fee.
-
Accounts with a balance over # days old: Your practice can designate the minimum age of balances that would trigger the automatic billing fee.
-
Accounts that received # or more bills for the current charges with a balance: How many bills does your practice send to an account before you begin charging a billing fee?
-
Accounts with the most recent billing fee posted over # days ago: If the account continues to not pay their bill, will you charge an additional late billing fee every month? Enter the minimum number of days before another fee should be assessed.
What About Deceased Patients: Charges for patients who are deceased will not be used as criteria for determining whether or not the family gets a bill. If your practice wishes to charge billing fees for a deceased patient or add any other fees to other accounts, you can do so by creating an administrative encounter from the Billing History section of a patient’s chart.
Switching How You Generate Fees: If your practice previously used forms and custom configuration to automatically charge a billing fee, you should fully switch to the Bills tool and use only one method to charge fees. When you transition, PCC recommends you generate bills using a consistent billing cycle (for example, 30 days) to ensure families are not billed two fees.
Run Bills and Charge a Fee
Once configuration is complete and the “Billing Fees” toggle switch is set to “On”, automatic fees will be assessed whenever you run bills.
Open the Bills Program
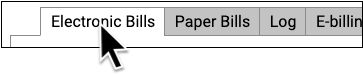
Open the Bills tool from the Tools menu.

If you send out bills to a third-party vendor for processing, use the “Electronic Bills” tab. Otherwise, choose “Print Bills”.
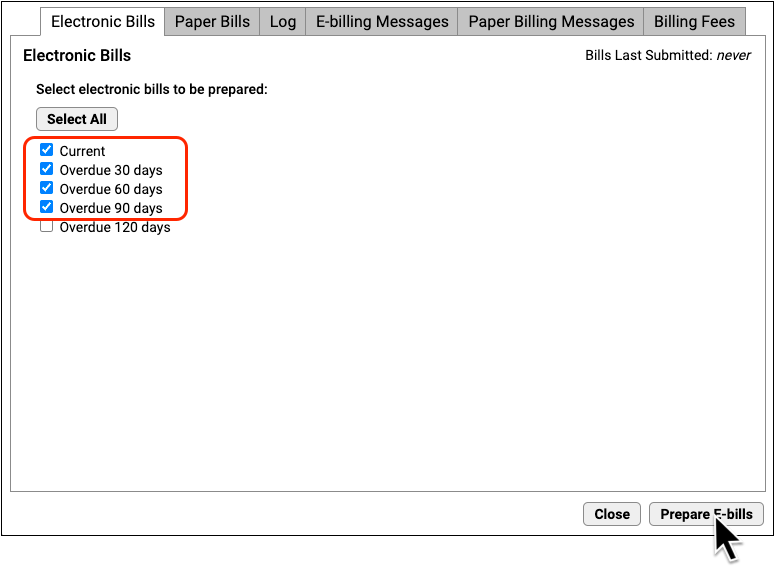
Select Age of Bills to Send and Click “Prepare Bills”
Indicate which bills you wish to generate, based on age of the oldest balance on the bill. Then click “Prepare E-bills” or “Prepare Bills”.
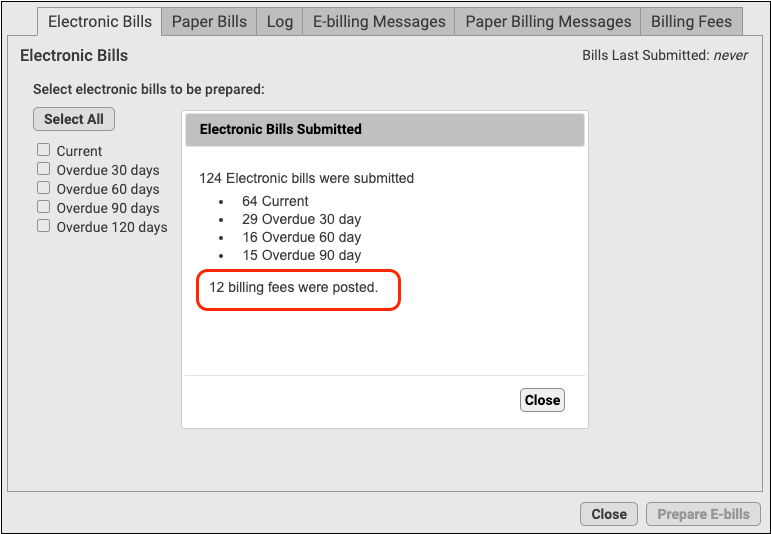
Review Prepared Totals
The Bills program will show you how many bills were prepared for each category.
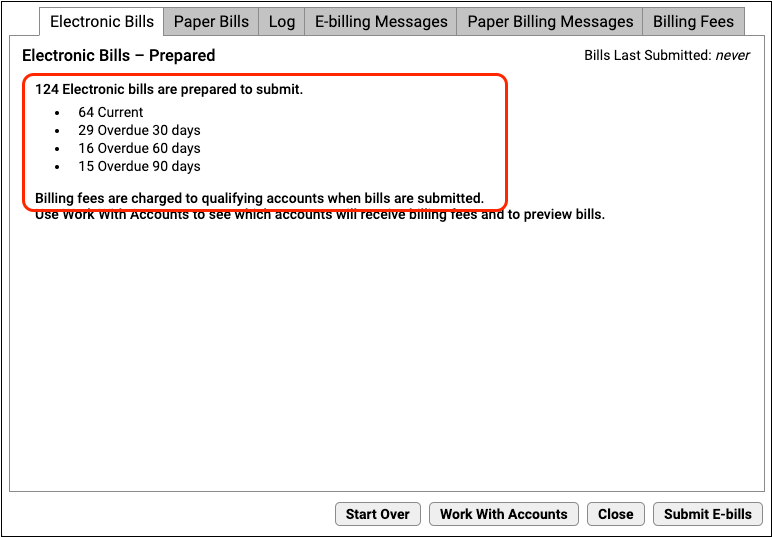
If your practice charges automatic billing fees for overdue accounts, you will see a reminder.
Optionally Work With Accounts, Especially Accounts That Will Be Charged a Fee
Click “Work With Accounts” to review all accounts that will receive a bill.
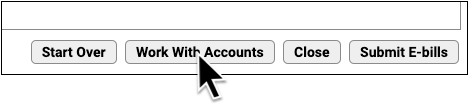
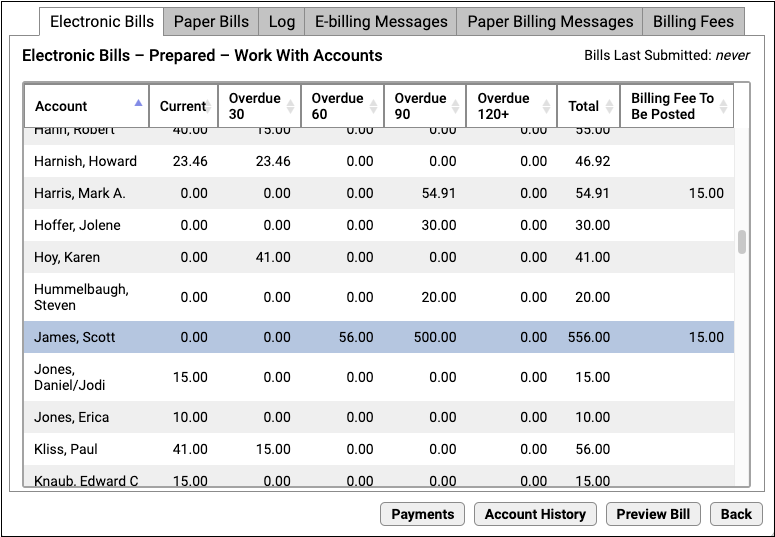
You can review the list and identify accounts that will receive a billing fee. You can sort by the “Billing Fee To Be Posted” column to see all accounts affected. To dig deeper, you can select an account and click “Payments” or “Account History” to review account details, contact the family, and even collect payment over the phone in order to avoid the billing fee.
If You Work With Accounts, You Will Next Re-Prepare: If you use the Work With Accounts screen, the Bills program will prompt you to Start Over and re-prepare bills, as total amounts due may have changed.
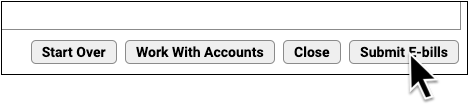
Submit or Print Bills
Click “Submit E-Bills” or “Print Bills” to run bills. Late fees will be applied to the account as the bills are generated.
Bills Tool or the Personal Balances Tool: If you prepare and send bills using the Personal Balances tool instead of the Bills program, it will also add your practice’s custom billing fee.
Optionally Check the Log
On the Log tab, you can review which accounts received a billing fee.
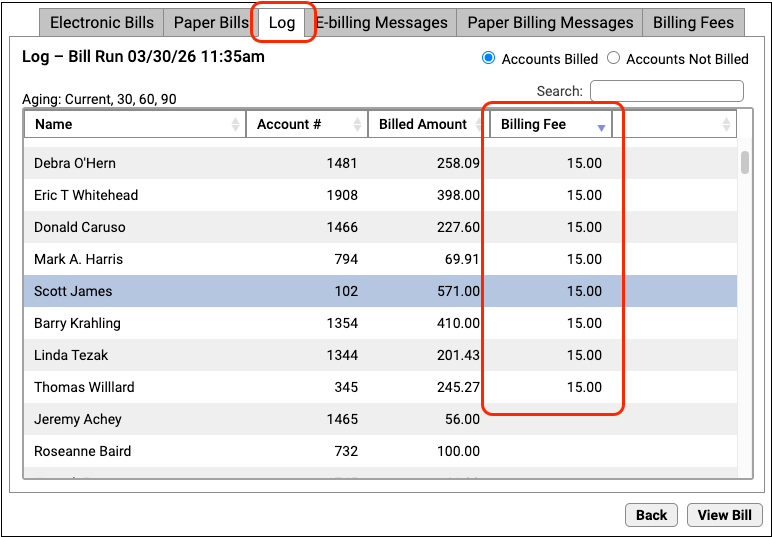
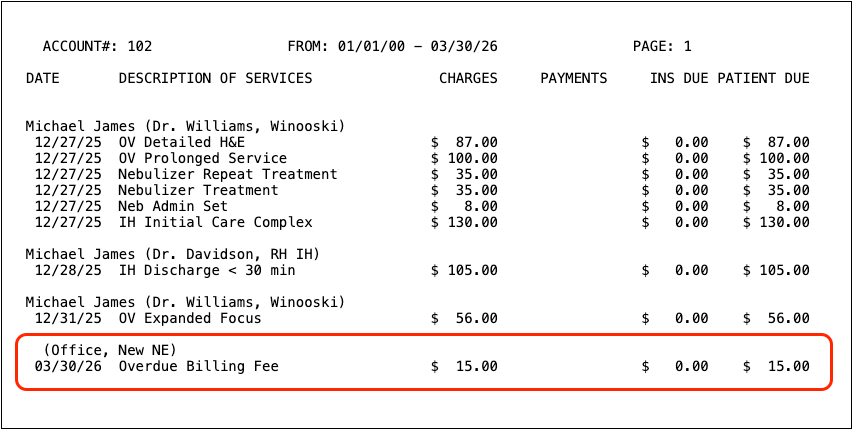
You can also click “View Bill” to see the bill with the fee.
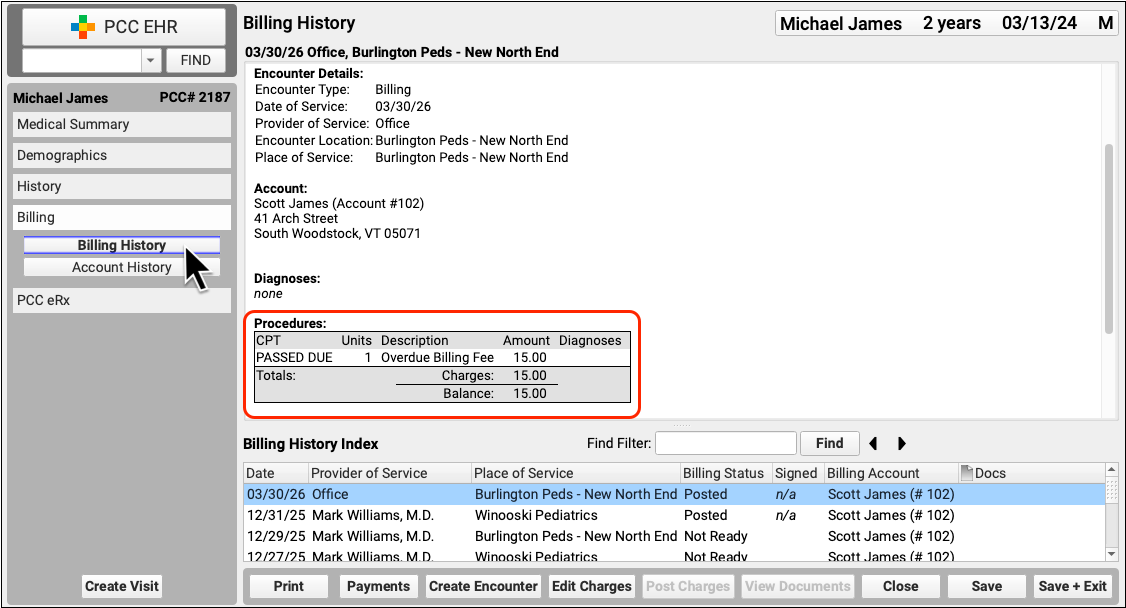
Optionally Review Fees in the Account’s History
To see the fee in the context of the account’s other encounters, open a patient’s chart. Billing fees appear on the Account History.
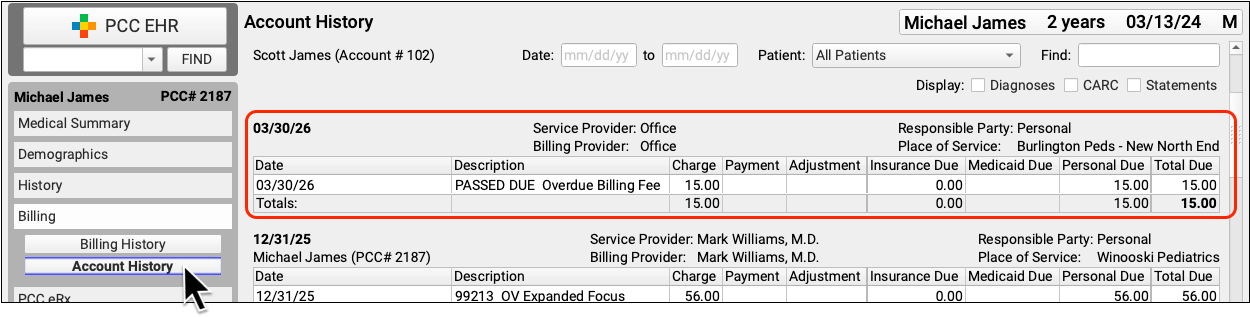
Additionally, billing fees appear as an administrative encounter in the Billing History.
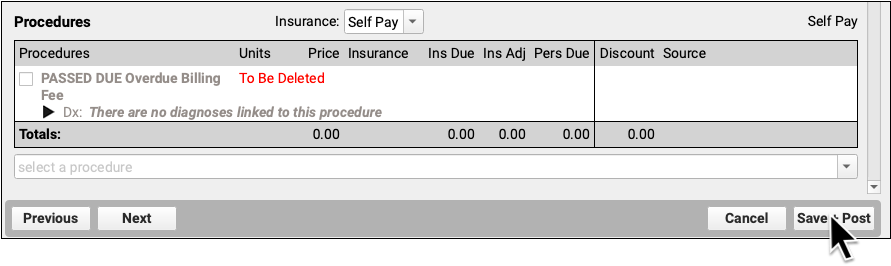
Delete a Fee Posted in Error
If a fee was charged in error, you can click “Edit Charges” to remove it, just as you would remove other charges or fees from an encounter.

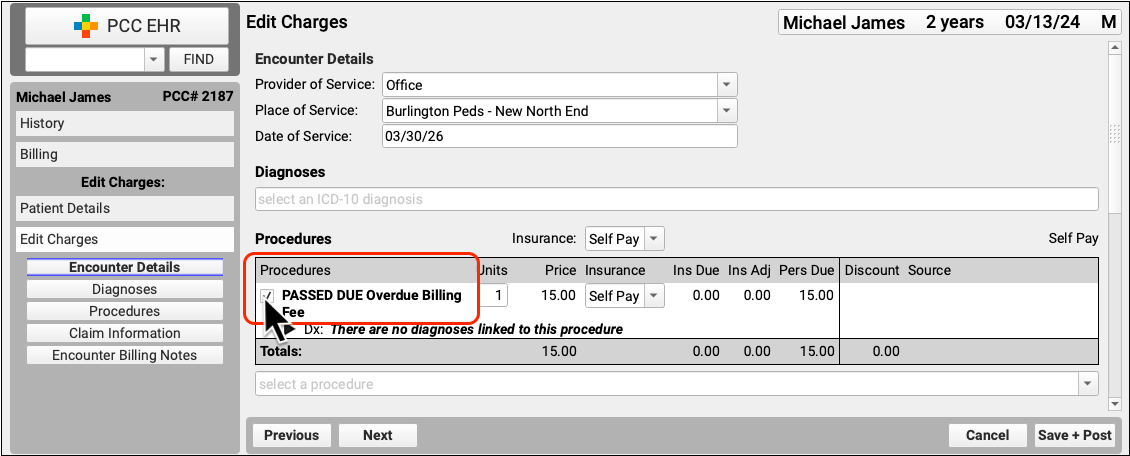
Deselect the charge to remove it from the administrative encounter. Then click “Save and Post”.
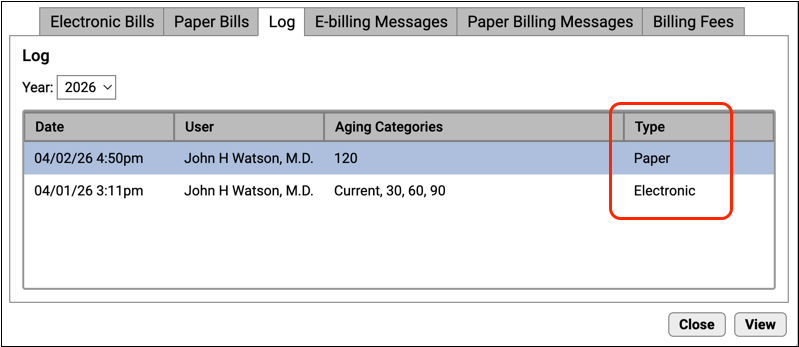
Distinguish E-bills and Paper Bills in the Log
The Log in the Bills tool now clearly defines whether a personal bill run was sent out to a vendor or printed in-house.
System Administration
Prepare to Update PCC EHR on Windows Without an Admin Password
General deployment Mondays will soon be easier for Windows users: PCC 11.0 is the last release that Windows workstations will require an administrator password to update PCC EHR.
New installations will still require a password, and they will have a slightly different workflow. While running the installer, users will be presented with two options.
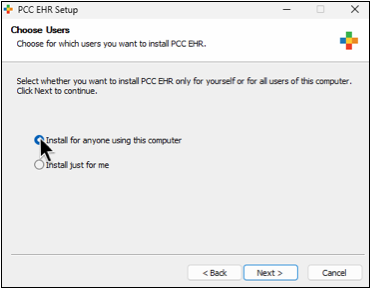
- The default option, “Install for anyone using this computer,” is modeled after how PCC has historically installed updates. Choosing this option requires the workstation’s administrator password.
- The per-user option, “Install just for me,” does not require the admin password, and will run all future updates for only one workstation user. When each user logs into the workstation, they will be prompted to run the PCC EHR update for themself.
PCC EHR will remember your choice and run future updates with the method you chose, without requiring an administrator password. To change your installation choice, you can uninstall and reinstall PCC EHR to make a different choice.
For full installation steps, read Install and Configure PCC EHR on a New Computer.
Install PCC EHR More Easily
When installing PCC EHR on a new computer, you can now more easily enter your practice’s server information.
After you install PCC EHR, you can immediately launch the application. From the login screen, click on the gear icon to enter your practice’s server information.

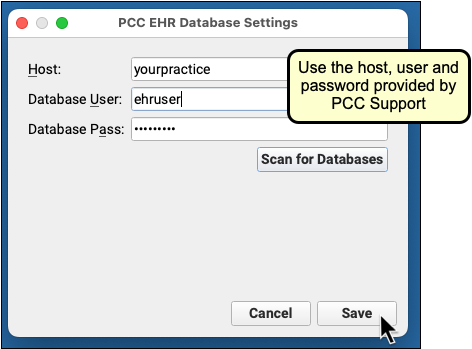
When you save this information, it will set the configuration for the user currently logged in to the workstation.
If you wish to set the PCC EHR server information for all users on a workstation, click the down arrow and select that option.
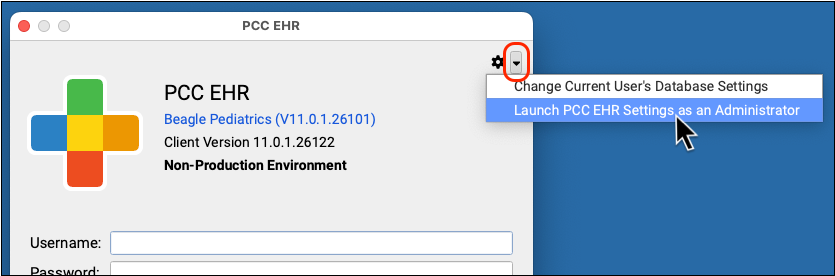
You will be prompted to enter an administrator password.
Update Your macOS 13 and Windows 10 Workstations
Protect your data, and your staff, by always keeping your workstation operating systems up to date.
When a manufacturer stops providing security updates for an operating system, PCC ends support as well.
macOS
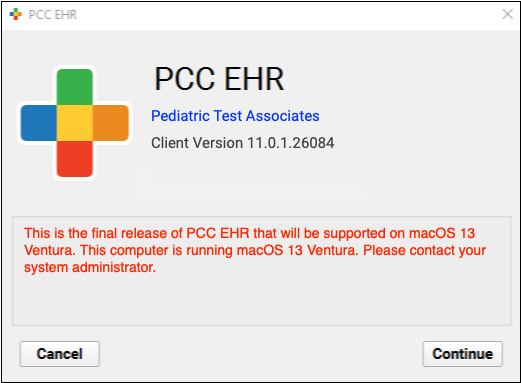
Apple has stopped providing security updates for macOS 13 Ventura. As a result, PCC 11.0 is the final version that will run on macOS 13 Ventura. In anticipation of this change, PCC 11.0 will display a notice on the login screen instructing users to contact their system administrator.
PCC 11.1 will only run on macOS 14 Sonoma or higher.
Windows
Microsoft has ended support for Windows 10, so PCC has ended support for this operating system, too. PCC EHR no longer runs on Windows 10 workstations. Terminal servers running Windows 10 are the only exception.
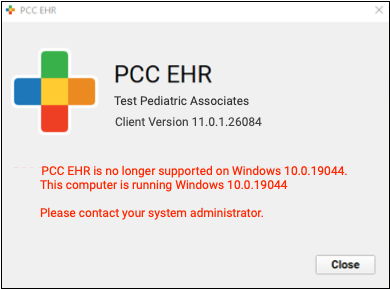
Contact your system administrator to update or replace your Windows 10 workstation. You can use PCC EHR on Windows 11 or higher.
For more information, read Hardware Guide: Your Personal Computer and Equipment.
Code Updates and Other Improvements
March 2026 SNOMED-CT Update
During the PCC 10.5 to 11.0 release period, PCC updated all practice systems to support the March 2026 SNOMED-CT diagnostic term update.
This update deprecates some terms in use by pediatricians, such as “Concussion with no loss of consciousness”, “Exposure to communicable disease”, and “Premature infant”.
If your practice has a deprecated diagnosis configured to appear on a chart note, the mid-release patch added a replacement term if one is defined in the SNOMED update. For example “Premature infant” has been replaced by “Preterm infant less than 37 completed weeks gestation”.
For other deprecated diagnoses, your clinicians can find replacement descriptions with a search. For example, the deprecated “Concussion with no loss of consciousness” is now broken out into “Concussion injury of brain” and/or “No loss of consciousness”.
In preparation for the update, PCC’s certified coder, Jan Blanchard, assembled a list of 361 new SNOMED-CT descriptions of interest to pediatricians. The mid-release patch added these diagnoses to your practice’s default “quick search” Favorites list, unless your practice has specifically requested otherwise.
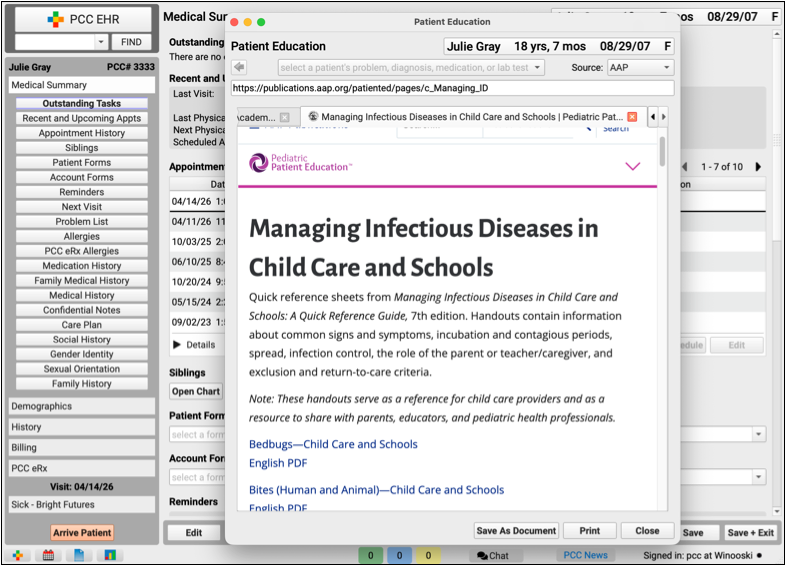
New Infectious Diseases Patient Education Collection
A new collection of quick reference sheets are available in PCC EHR’s Patient Education Library. In a March 20th 2026 update, the American Academy of Pediatrics added Managing Infectious Diseases in Child Care and Schools. The collection includes handouts on symptoms, spread, management and other useful references for a wide range of infectious diseases.
This new collection is available in Patient Education, under the Handouts By Collection menu.
Clinical Interoperability Improvements
PCC 11.0 improves and adds connections with labs, immunization registries, and state departments of health.
-
Send the Ordering Provider's Professional Suffix to CAIR: Immunization messages sent to the California Immunization Registry now include the professional suffix of the ordering provider.
-
Lead and Respiratory Illness Results Reporting to Connecticut Department of Public Health: PCC 11.0 establishes channels for reporting lead, influenza, COVID, and RSV results to the Connecticut Department of Public Health.
-
Additional Interpretation Codes for Abnormal Lab Results: PCC 11.0 can accept and display a wider range of interpretation codes for abnormal lab results.
Bug Fixes
PCC 11.0 includes some notable squashed bugs.
-
Unable to Select Expired Policies in Edit Charges: Under certain circumstances, it was not possible to pend charges to an expired plan in Edit Charges. This has been corrected, and you can now select any policy that was active for the date of service.
-
Unexpected Exceptions: When the policy could not be identified, a response on an ERA could sometimes incorrectly qualify for a custom posting exception. This problem was resolved and patched to all client systems in March 2026.
-
Rejections Without Information: When charges were deleted from an encounter, the old claim could still appear on the Claim Rejections worklist, though it would no longer display the patient, service date, or number of days since service date. A mid-release patch fixed the issue so the information will appear for new claim rejections going forward.
-
Hard to Read Bills: Under some circumstances, the text of bills in the Log tab of the Bills tool would include printer command codes. This issue has been corrected, and bills are now much easier to read in the log.
-
Rebatched to a Different Plan: In some circumstances, when a claim was first queued up for one payor and then the policy was corrected and a claim was queued up for the correct payor, the charge could be processed for the first payor and not the updated one. This will no longer occur.
-
Blank Pages When Printing: Printing a HCFA in PCC EHR could sometimes generate a blank page. This no longer occurs.
-
Submit Claims In Use Error: When a practice’s name ended with a punctuation mark or a space, claim submissions could stop, and opening the Claims tool could return an “In Use” alert. This problem was resolved and patched to all clients in February 2026.
-
Prepare Claims Button: After navigating between tabs, the Prepare Claims button would sometimes not respond unless clicked multiple times. This issue has been resolved.
-
Providers Table Freeze: Due to an unusual character in a taxonomy list, cloning or adjusting provider information could cause the Tables tool to crash. This no longer occurs.
-
Claims Not Submitting: Certain unusual insurance configuration settings could cause a claim to not be processed for certain payors. This issue has been resolved.
-
Test Results Report Failed to Load: Intermittently, the Test Results report in the Report Library failed to load. This has been fixed, and report loading is now consistent.
-
Deleted Appointments Not Included in Last Scheduling Action Column: A defect was introduced with PCC 10.5 in which appointment reports in the Report Library did not display deleted appointments when filtered by the Last Scheduling Action column. PCC 11.0 corrects this issue.
-
Care Center Filter Limiting by Location Instead of by Care Center: The Care Center filter in four Report Library reports was incorrectly filtering by location. This has been fixed, and the Care Center filter is now working as designed.
-
Dashboard Linking to Out-of-Date Articles: The Practice Vitals Dashboard linked to outdated content on PCC Learn. PCC 11.0 includes updates to a variety of links, pointing users to more updated information.
-
Portal Message Templates Remain Assigned to Disabled PCC EHR user Accounts: Patient Portal messages that are automatically assigned to an EHR user account, continued to be assigned to disabled user accounts. PCC has corrected this error. Future patient portal messages will not be assigned to disabled users, and disabled EHR users have been removed from existing message templates.
-
Portal Messaging Templates Allowed Attachments When Replying: The option to include an attachment was available when replying to a patient portal message even when the portal messaging template did not include the General Attachments component. This bug has been resolved, and the “Attach a Photo or PDF” button only appears when the General Attachments component is included in the template.
-
Disabled PCC EHR User Accounts Remain in Chat Groups: Disabled PCC EHR user accounts could not be removed from chat groups without re-enabling the EHR user first. In PCC EHR 11.0 disabling a user account automatically removes them from chat groups. This update removes disabled accounts from existing chat groups.
-
Disabled PCC EHR User Accounts Still Assigned to Tasks: If an order’s task was last assigned to a PCC EHR user account that has since been disabled, PCC EHR would automatically assign the task to the disabled users. This has been resolved. If the last assigned user account has been disabled, the task will be unassigned when ordering.
-
Appointment Book Shifting Intermittently: The Appointment Book would, for certain users and situations, refresh and change the schedule view without user interaction. This has been corrected and The Appointment Book will display correctly.
-
Incorrect Care Center Phone Number in Patient Portal Scheduling: Patient portal scheduling would display the practice’s phone number instead of the selected Care Center’s phone number when no appointments were available. This bug has been corrected and the correct care center’s phone number will now appear.
-
Additional Columns Appear on the Signing Queue: The Signing Queue would occasionally display additional columns until the user logged out and in again. This has been resolved and the Signing Queue now appeara as expected.
-
Photographs from pocketPCC and Patient Portal Have the Wrong Orientation: Certain photographs uploaded through pocketPCC and the patient portal would appear rotated 90 degrees. All images will now upload with the correct orientation.
-
CHADIS Questions Display Out of Sequence: Vanderbilt questionnaires displayed results in PCC EHR in a different order than the questionnaire itself. Questionnaires now appear in the same order in PCC EHR as they do in CHADIS. Vanderbilt questionnaires received prior to this update have been corrected.
-
PCC EHR Chat Window Variability: Intermittently, the PCC EHR Chat window would move or resize itself without a user’s action. The Chat window will now remain at its set size and position unless intentionally moved by the user.
-
Visit Forms Not Printing for Self-Scheduled Appointments: Visits scheduled through PCC’s patient portal self-scheduling did not trigger visit forms. The cause of this error has been found and corrected. All visit forms will be generated as expected.
-
Filtering the Problem List or Allergies Displays No Results in pocketPCC: In pocketPCC, if a user selected any option other than “All Statuses” in the Problem List or Allergies, nothing would display. Both lists now display as expected when filtered in pocketPCC.
-
Document Categories Beginning with a Number Would Not Expand: When viewing patient documents in pocketPCC, document categories that began with a number would not expand to reveal the list of documents. This has been fixed, and all categories will expand in pocketPCC.
-
Pre-Check-In Status Icon Missing in EHR: Privacy enabled patients who have their own portal account and are selected as alternate recipients for Pre-Check-In, would cause the clipboard Pre-Check-In status icon to not appear in PCC EHR. In PCC EHR 11.0 the clipboard icon will appear for all visits using Pre-Check-In.
-
The Appointment Book’s Time Column Displays Incorrectly: The time column in the Appointment Book would not display the first digit or not display the time at all. PCC EHR 11.0 corrects this error and the time column will appear completely at all times.
-
Overlapping Appointment Sizing Incorrectly: When long appointments overlapped, the Appointment Book would display the overlapping appointment bubbles at the incorrect size. All appointments will now be the correct size.
-
Incorrect Default Block Length for Care Centers: When Care Centers are enabled, the default block length would match the practice default, instead of the length set for each Care Center. This has been fixed, and the default block length will now match the Care Center setting.
-
Long Snap Texts Caused PCC EHR to Crash: PCC EHR would crash when using the drop-down menu to add a long snap text to a generic text field that already contained a large block of text. This has been corrected, and long snap texts will not cause a crash.
-
Medication History and PCC eRx Allergies Displayed Incorrectly on Chart Notes: The display filter settings for the Medication History and PCC eRx Allergies components did not limit the view on chart notes when viewed from the Signing queue or the Visit History. Now, the display filter settings for these components will be respected on chart notes.