Post Insurance Payments and Adjustments
With PCC, you can automatically post most insurance payments and adjustments sent to your practice as an ERA.
Next, if part of a payor’s response requires attention or you receive a paper EOB, you can manually post payments and adjustments.
Video: Watch Autopost ERAs, Handle Claim Responses that Can’t Be Autoposted, and Manually Post Insurance Payments to learn more.
Contents
- 1 Post Payments and Adjustments
- 2 Review Posted Insurance Payments and Adjustments
- 2.1 Review Special Cases on Posted ERAs
- 2.2 Review an Autoposted ERA For Specific Adjustment Reasons
- 2.3 Prove Out and Audit Insurance Payments By Check
- 2.4 Review an Account’s Payment History
- 2.5 Review an Encounter’s Payment History
- 2.6 Review a Complete Account History for a Family
- 2.7 Review Insurance Payment Totals and Other Trends
- 3 Edit Posted Insurance Payments and Adjustments
- 4 Insurance Posting Reference
Post Payments and Adjustments
Automatically Post ERAs
Most ERAs that arrive on your PCC system do not require direct manual attention. Follow the steps below to autopost your incoming insurance payments and adjustments that arrive on an electronic remittance advice (ERA).
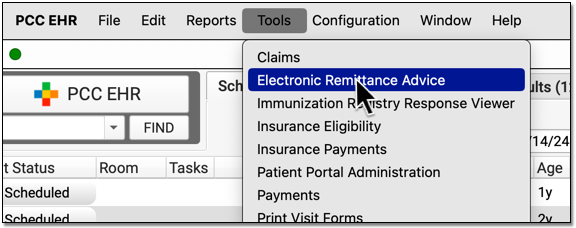
Open the Electronic Remittance Advice Tool
Open the ERA tool from the Tools menu.
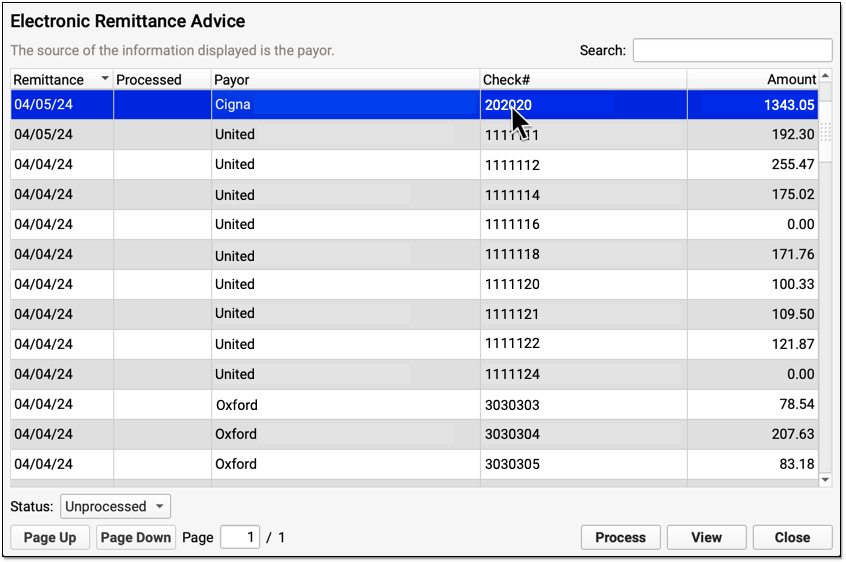
Select an ERA
Click on an any unprocessed ERA in the list. You can sort by a column, search, or use the Status filter at the bottom of the window to find unprocessed ERAs.
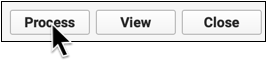
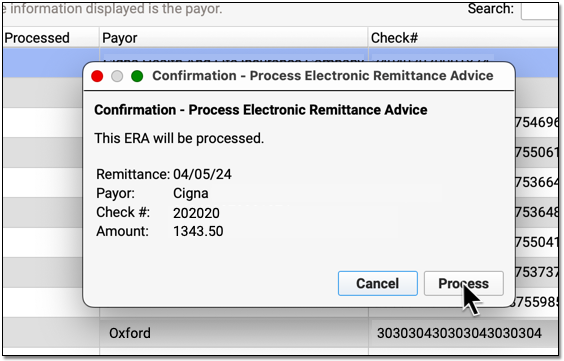
Click "Process"
Click "Process" to begin processing the ERA.
Optional: Enter a Transaction Date
When you autopost an ERA in PCC EHR, you can optionally override the payor’s remittance date and enter a different transaction date.
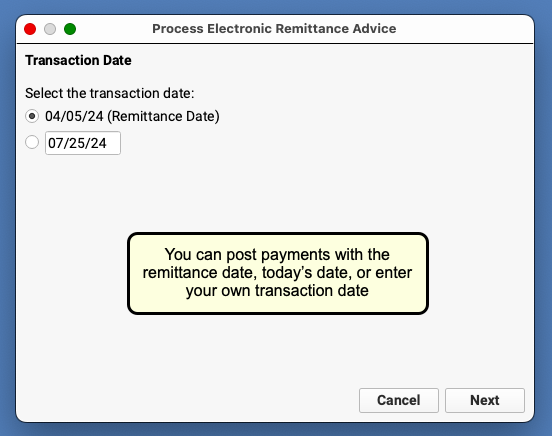
You can accept the default (the Remittance Date found on the ERA), select today's date, or enter a custom date.
Click "Next" to set the transaction date and continue. When PCC EHR enters the payments and adjustments from the ERA into your system, it will use the transaction date that you indicated.
Review Your Selections and Click "Process"
Double-check that you have selected the correct ERA and indicated the correct transaction date for payments and adjustments. Then click "Process".
Review Posting Results and Special Cases
After processing is complete, PCC EHR will open the ERA for you to review.
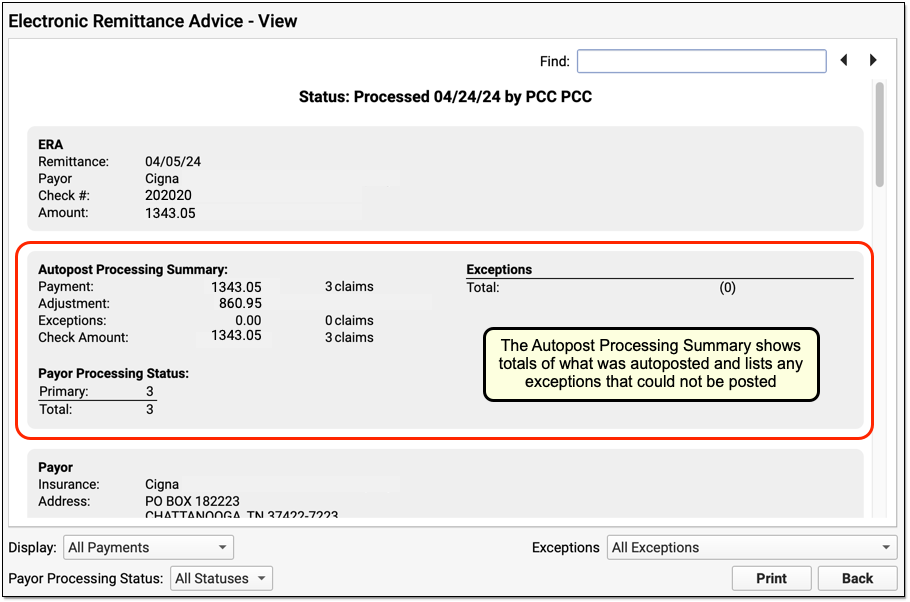
You can use the Autopost Processing Summary section to see totals, payor processing status, posting exceptions, and special cases. For most ERAs, there will be no (0) posting exceptions, as shown above. However, there may be items that PCC EHR did not post automatically.
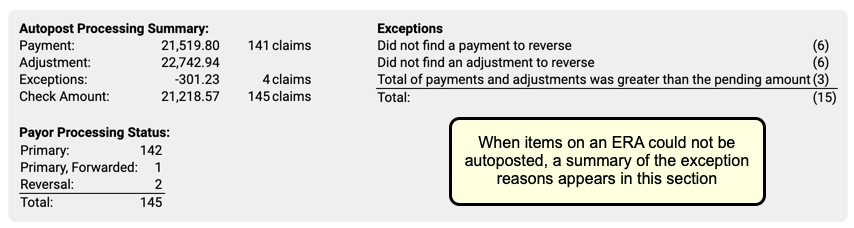
Use the Posting Exceptions worklist tab to address all payor responses that did not autopost. You may also need to address denials, unusual adjustments, and other special cases. Review your processed ERA and identify any situation that may require manual posting, an appeal, or other action.
Handle Claim Responses That Were Not Autoposted
Sometimes your PCC system can't automatically post something found on an ERA. Maybe the family paid for an encounter already, the payor changed the procedures on the claim, or your practice made changes to the encounter after you sent the claim. Your practice can also create your own posting exceptions, if you wish all responses from a certain payor with a certain CARC to be held back.
After you autopost ERAs, use the Posting Exceptions worklist in the ERA tool to address each claim response that was not autoposted.
Process ERAs
Open the Electronic Remittance Advice tool and process ERAs.
Exceptions are added to the Posting Exceptions worklist whenever you process an ERA that contains something that could not be autoposted or that matched your practice's custom posting exceptions.
Review Unposted ERA Responses
Click on the "Posting Exceptions" tab to review claim responses that could not be autoposted.

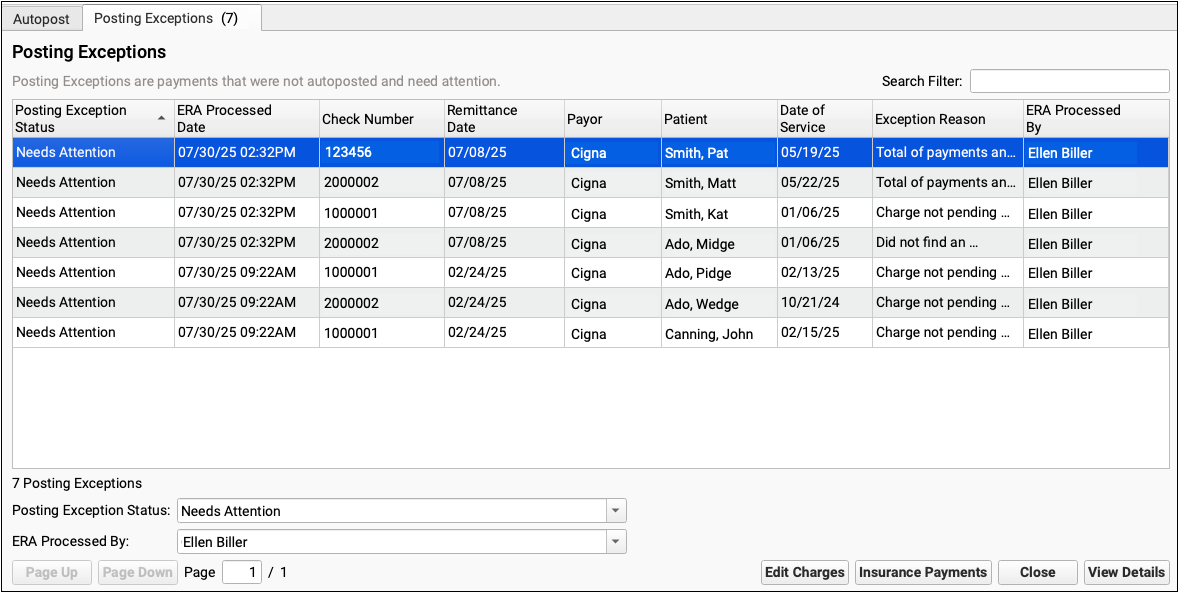
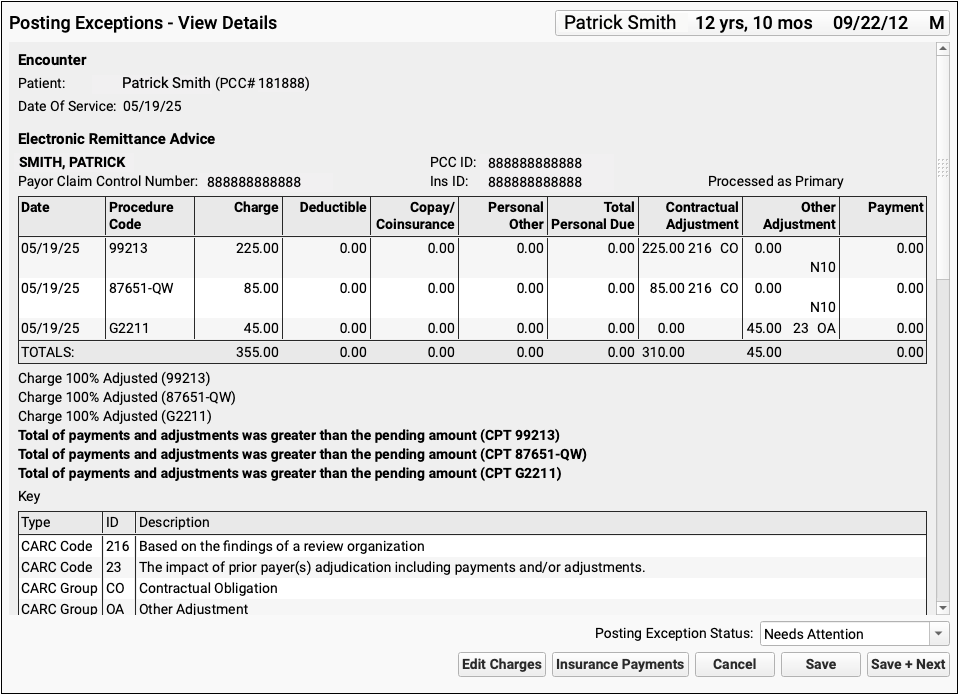
For each encounter, you can see the status, the date the ERA was processed, the check number, the remittance date from the ERA, the payor, the patient, the date of service, the exception reason, and the user who processed the ERA.
You can click column headers to sort the list, search, or use filters at the bottom to find specific encounters you wish to work on.
Posting Exception Status: By default, each ERA response that cannot be autoposted is assigned a posting exception status of "Needs Attention". By filtering by this status, you can isolate the encounter responses that still need to be addressed.
Work On a Posting Exception
Double-click on a posting exception to review more details and address it.


The Posting Exceptions - View Details screen includes the full ERA section that wasn't autoposted, encounter details, and billing tools.
Understand Why Payments Cannot Be Autoposted
To understand the full story of what's happened with an encounter and why the ERA couldn't be autoposted, you can review the section of the ERA that pertains to the encounter.
Scroll down to review the Encounter Billing Notes, Account History, and Claim History sections to review what's happened with the encounter so far.
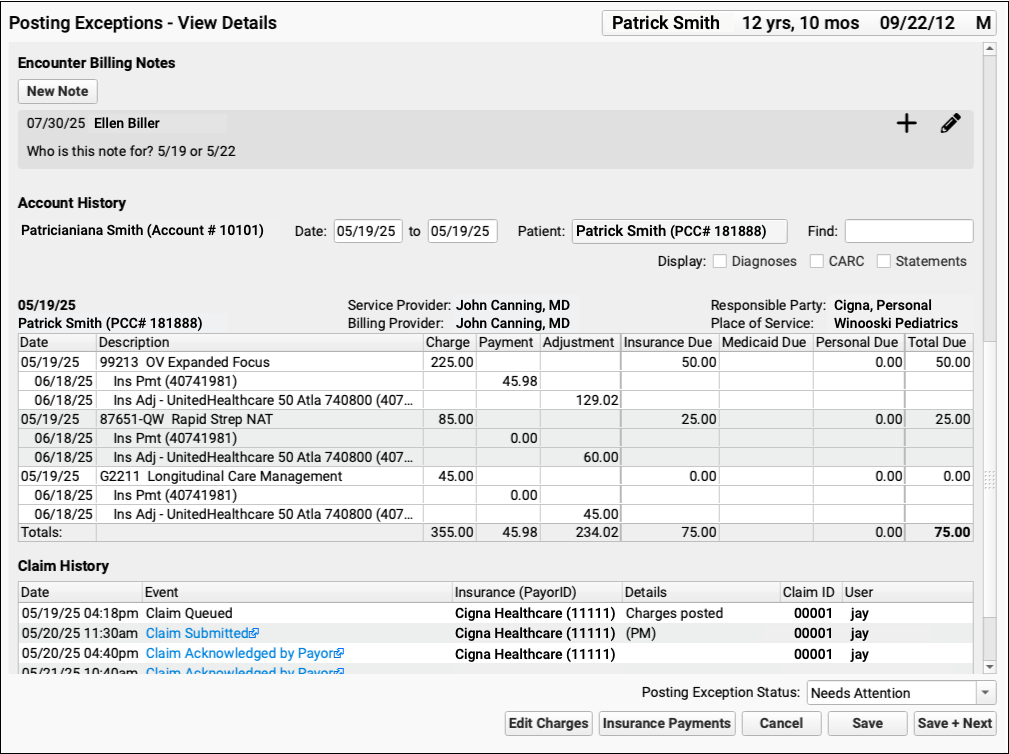
If PCC EHR Can't Find the Encounter: If a payor sent you an ERA response that doesn't match an encounter that your practice billed, some of these billing-related components will not appear.
Edit Charges and Other Encounter Details
You may need to edit something about the encounter in order to post the payor's response. Click "Edit Charges".

On the Edit Charges screen, you can edit diagnosis and charge information, change the responsible party for charges, and more.
For more information about using Edit Charges, read Edit Encounter Charges and Other Claim Information and Resubmit a Claim.
Manually Post the ERA or Edit Insurance Payments
When you are ready to post the ERA manually click "Insurance Payments".

If the encounter can be identified, the Insurance Payments tool will open to the payment screen and you can manually post details from the ERA.
You can also use the Insurance Payments tool to edit previously posted payments, perform takebacks, and more.
Add a Note About the Exception's Resolution
After you've taken action to address a posting exception, you can optionally add a new encounter billing note.
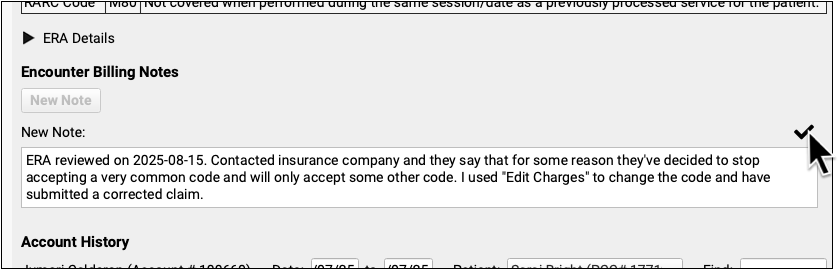
By adding a note, you'll have a record of what happened if there are more issues with the encounter later.
Update the Exception's Status
After you address an exception (or discover it is invalid and safe to ignore), update the exception's status.
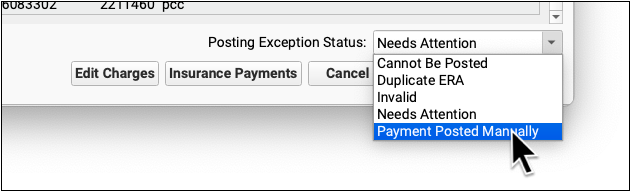
When you update the status, you mark the posting exception to indicate it cannot be posted, is a duplicate, is invalid, or has now been addressed manually. This will remove it from the default Posting Exceptions worklist. Later, you can revisit resolved exceptions using the Posting Exceptions Status filter on the worklist.
Manually Post Insurance Payments and Adjustments
Use the Insurance Payments tool to manually post payments, adjustments, and CARC information. Many ERAs can be posted automatically, but when a payor sends a paper EOB or an ERA with an unusual response, or you have configured certain responses as exceptions, you can post the payment and adjustment details manually.
Video: Watch Manually Post Insurance Payments and Adjustments to learn more.
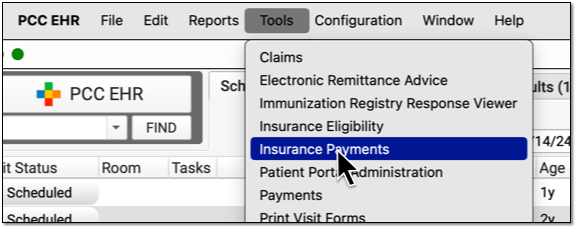
Open Insurance Payments
Open the Insurance Payments tool from the Tools menu.
You might also reach the Insurance Payments tool from another workflow, such as the Posting Exceptions worklist or while performing a reversal from the Payments tool.
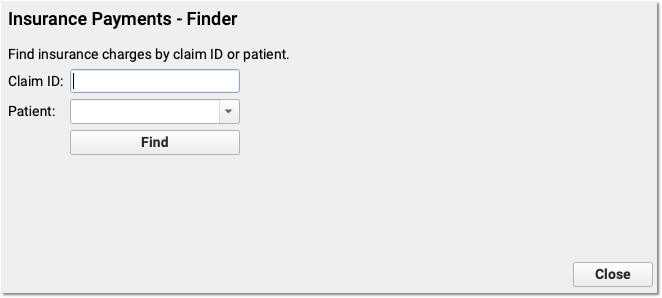
Optional: Enter a Claim ID
Enter a claim ID for which you wish to post payments. When you press Enter or click “Find”, PCC EHR will find all charges from that claim that have a balance pending insurance.
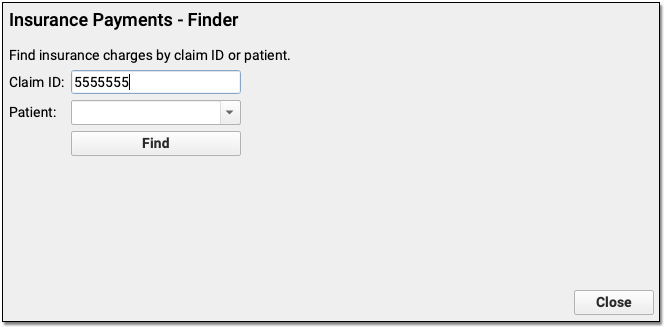
Optional: Find a Patient and Select an Encounter
If you don’t have a claim ID, you can first find a patient and then select an encounter.
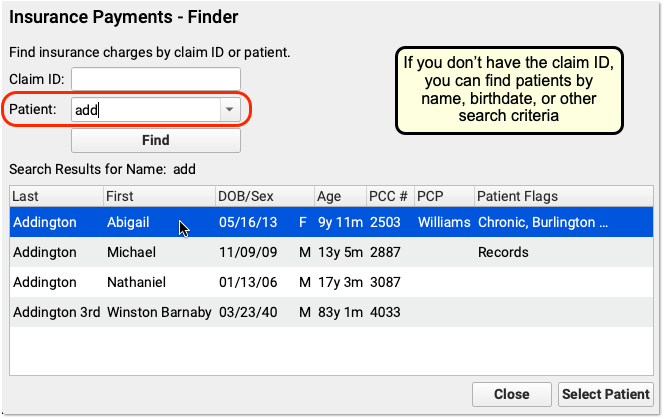

After you find a patient, PCC EHR will display all encounters with charges that have an amount due pending insurance. Double-click on an encounter to select it.
Optional: Review Payment Histories
As you work with a patient or an encounter in the Insurance Payments tool, you can click on a payment history tab to review all past payments.
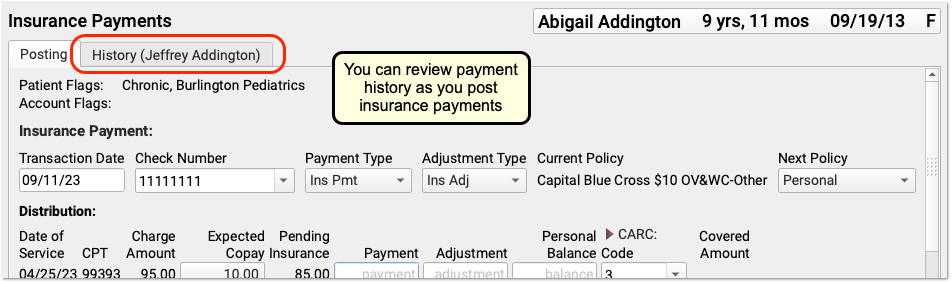
If a patient has had more than one billing account while at your practice, you may see more than one History tab.
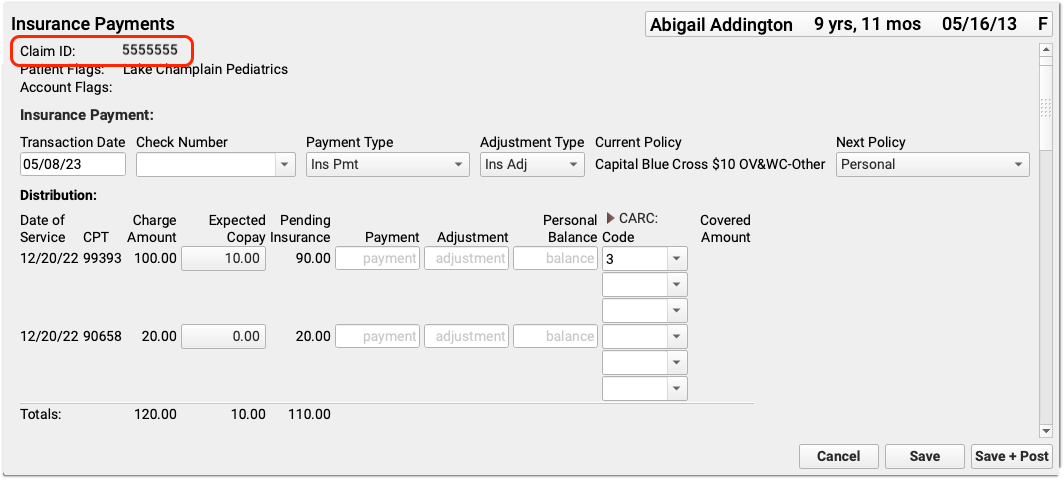
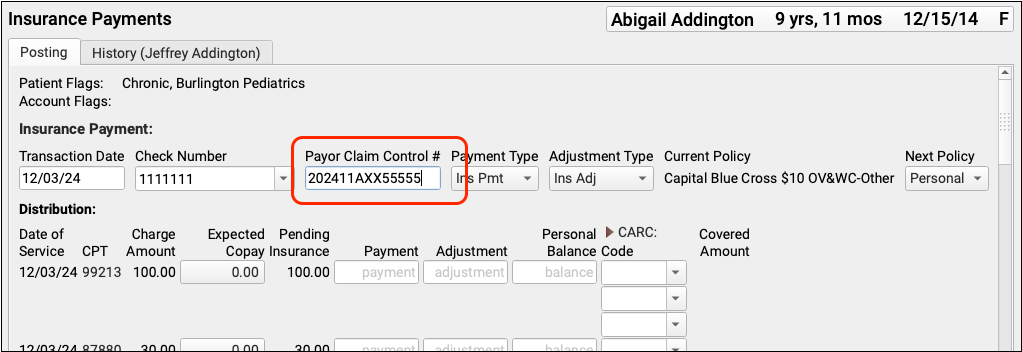
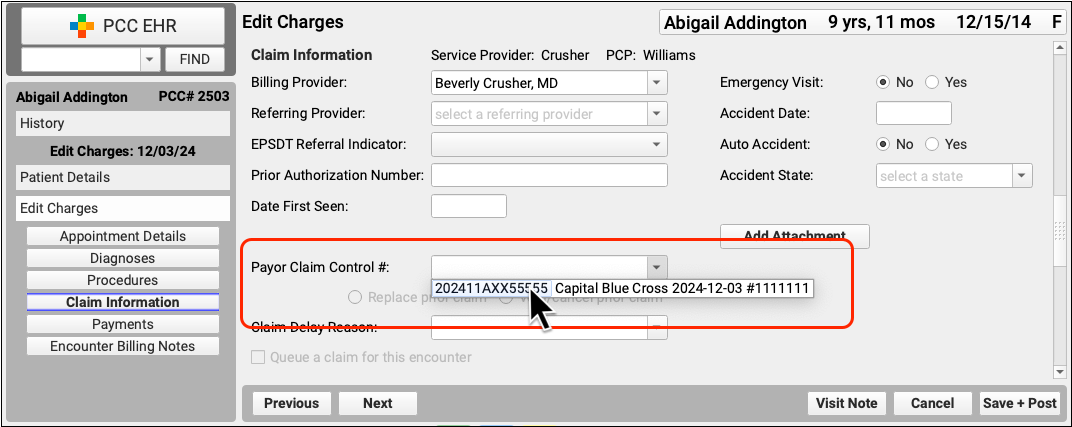
Enter a Check Number, Payor Claim Control Number, And Other Details
Whenever you post payments, enter a check number and (if available) the payor claim control number. If your PCC system already knows these values, the fields may be filled out for you.

You can also use the fields at the top of the screen to: review patient and account flags, adjust the transaction date, change the payment or adjustment types, double-check that the payment came from the current policy, and change the next responsible party for any remaining amount due.
PCC EHR will remember and automatically select your most recent transaction date, check number, and (if you select a custom type) payment and adjustment types.
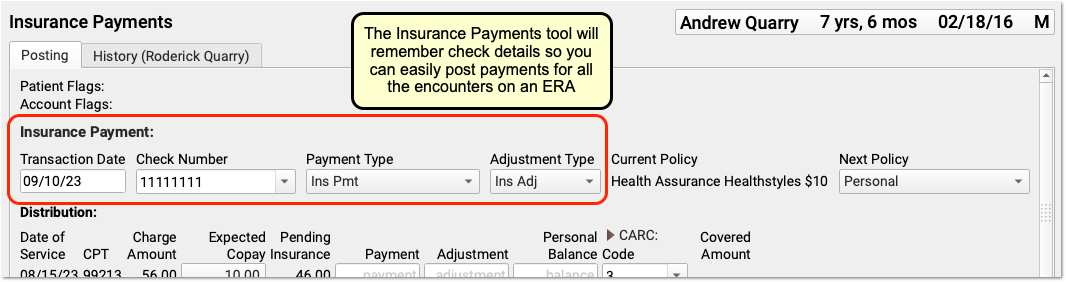
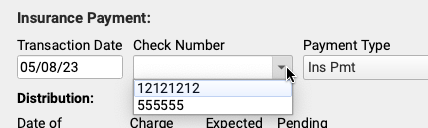
If you close and reopen the Insurance Payments tool, it will reset these values to their defaults. You can also select from your ten most recent check numbers.
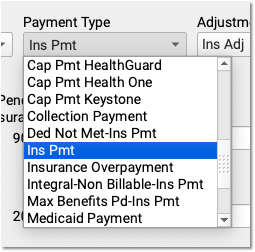
By default, PCC EHR posts payments and adjustments as “Ins Pmt” or “Ins Adj”. You can optionally select from your practice’s custom payment and adjustment types.
Enter Payment and Adjustment Amounts
For each charge on the encounter, enter the payment or adjustment amount found on the payor’s response.
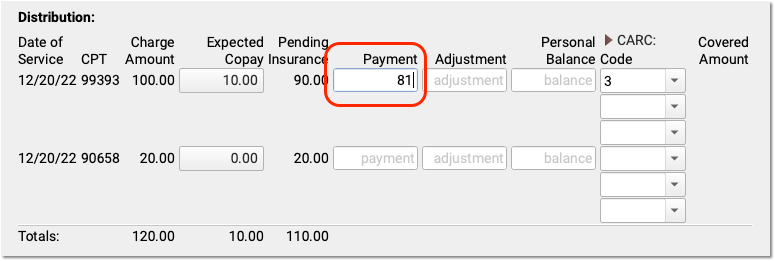
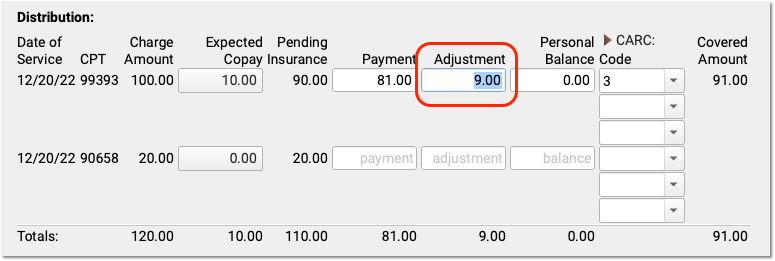
When you enter a payment amount and press Tab or Enter, PCC EHR automatically calculates the likely adjustment amount. If the payor’s communication indicates that the remaining balance is not adjusted off, you can make changes. You can also enter a remaining balance amount and PCC EHR will recalculate the amounts for each field.
View the Name of Procedures: Click on a procedure billing code to see your practice’s name for the code.


Optional: Change the Expected Copay Amount
Sometimes a claim is submitted with the wrong copay amount. The payor may respond with less or more than expected, and indicate the correct copay amount. You can change the expected copay for any charge as you enter payments and adjustments.
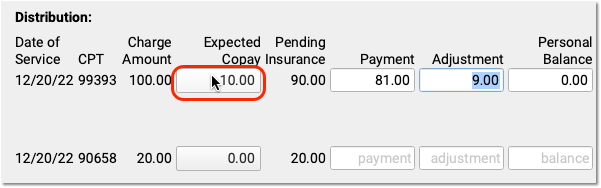
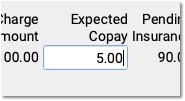

Automatic Calculation and Payment Relinking: When you change the expected copay, PCC EHR recalculates the adjustment amount on the screen for you. Also, if the family already paid the copay, then when you save and post, PCC EHR will automatically apply that payment correctly and (if appropriate) credit the account. For example, if a parent already paid $10 and now only $5 is expected, the remaining $5 will be a credit on their account.
Enter CARC Codes, Groups, and Amounts
As you enter payments and adjustments, you can also add Claim Adjustment Reason Code (CARC) information.
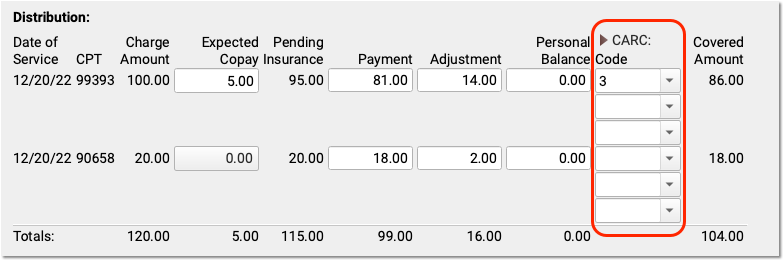
Payors use CARC codes, groups, and amounts to explain the adjudication of a claim. This information can be important for families as well as when you need to submit a secondary (or tertiary, etc.) claim.
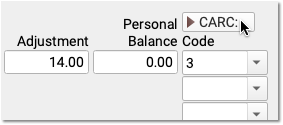
When the next responsible policy is “Personal”, PCC EHR displays only the first CARC field by default, as shown above. If the patient has additional policies, however, then three Code, Group, and Amount columns will appear by default. You can click the CARC field label disclosure arrow to show or hide these extra CARC fields at any time.
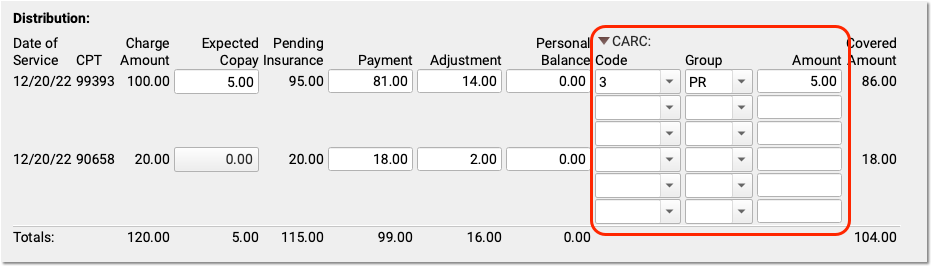
Automatic Copay CARC: If a copay is expected for a charge, PCC EHR automatically adds the CARC code “3” for “Co-payment amount”, with a Group code of “PR” and the amount of the expected copay as the adjustment amount.
You can enter additional CARCs, and even search for a CARC adjustment using text from the adjustment reason, which typically appears in the payor’s response.
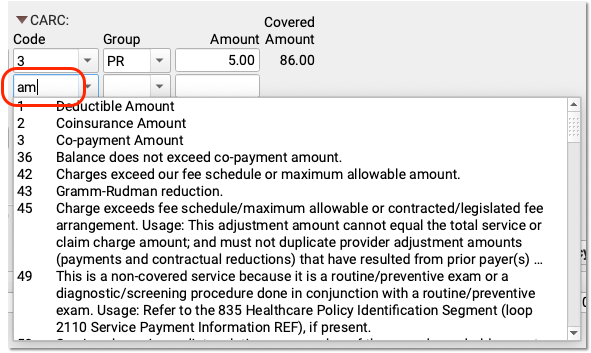
CARC Adjustments and Insurance Payments May Not Exceed the Charge Amount: CARCs explain adjustments. For that reason, the CARC amounts for a charge cannot exceed the original charge amount minus payments. PCC EHR will prevent you from entering more than the total possible amount, as that could result in a rejected claim from a secondary payor.
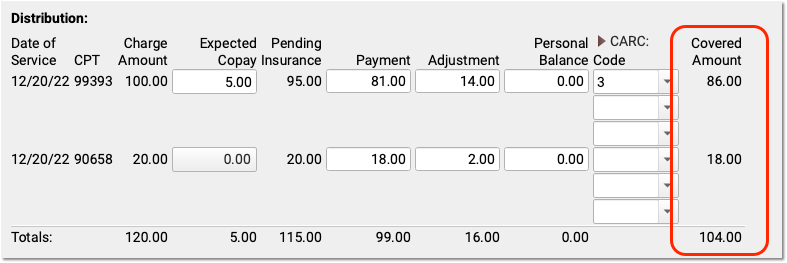
Optional: Review Covered Amount and Negotiated Rate
After you enter payments and adjustments, you can see the amount of the charge that the payor adjudicated as “covered” in the Covered Amount column. This displays the original charge amount minus adjustments.
If your practice tracks insurance contracts in PCC, and you’ve entered allowable amounts for these procedures for this insurance, then you will also see a “Negotiated Rate” column to the right.
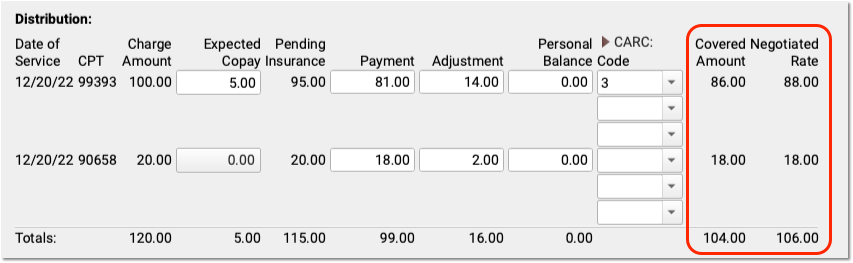
You can quickly compare the Covered Amount with your practice’s Negotiated Rate.
Optional: Review and Update Policies, Account Demographics, and More
As you enter payments and adjustments, you can scroll down to review patient policies, patient and account demographics, account balances, and account notes.
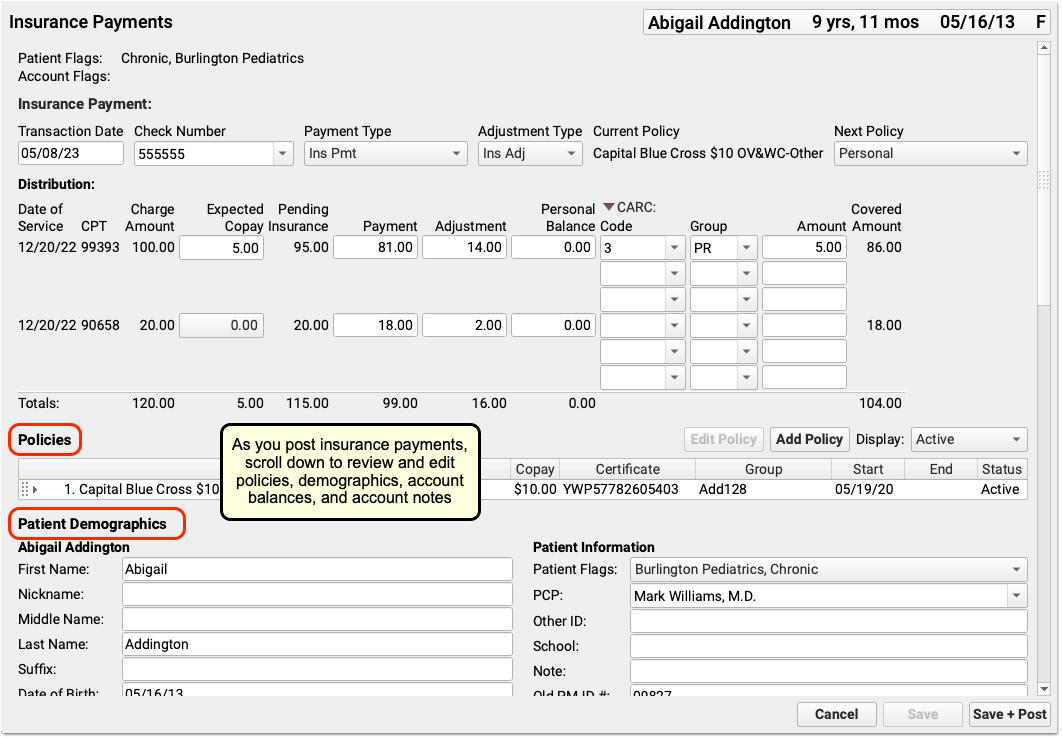
Use these components to update the patient’s policies, contact the family, or add a note explaining issues with the encounter.

As you work, click “Save” to save patient and account demographics. Policy changes and Account Notes save automatically, but changes to other fields won’t be saved until you click “Save” or “Save + Post”.
Double-Check the Next Policy
Is there a remaining amount due on the charges for this encounter? Before you save and post payments and adjustments, PCC recommends you double-check the next policy, which indicates the next responsible party for these charges.
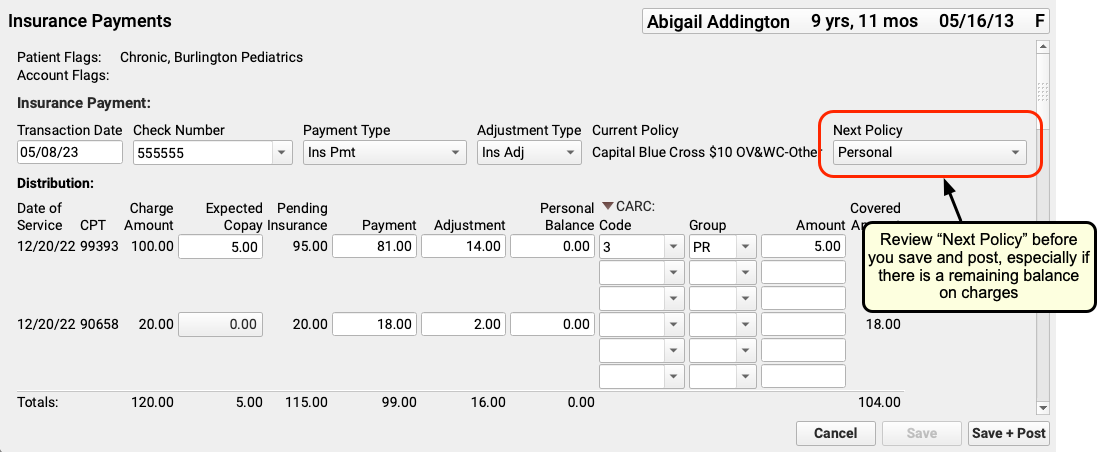
If the next policy is a payor, then PCC will automatically queue up a claim when you save and post your payments and adjustments. If it is “Personal”, then the remaining amount will become a personal balance.
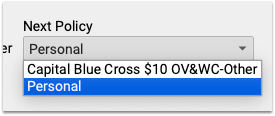
You can change the next policy. For example, if you added a new patient policy to the Policies component, you can select that new policy. When you save and post, PCC EHR will queue up a claim for the remaining encounter balances.
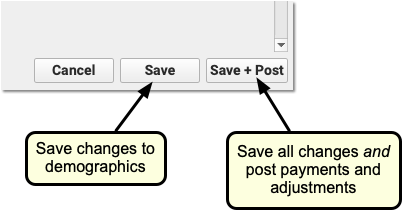
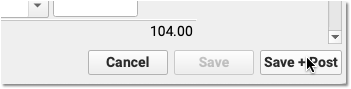
Click “Save + Post”
When you click “Save + Post”, PCC enters the payments and adjustments into your system, saves any changes you made to demographics, updates balances, and queues up a claim for the next insurance if appropriate.
You will be returned to the first screen of the Insurance Payments tool so you can continue on to the next encounter.
Review Posted Insurance Payments and Adjustments
After you process incoming ERAs and post insurance payments and adjustments, how can you review totals and take a closer look? Where do the payments show up in records?
Review Special Cases on Posted ERAs
After autoposting your ERAs, and addressing posting exceptions on the Posting Exceptions worklist, your practice may still have specific issues you wish to review on an ERA. For example, you may wish to review situations where the payor adjusted off the entire charge, or other special cases.
Open a Posted ERA
An ERA opens immediately after autoposting. You can also return to the Electronic Remittance Advice tool and open any ERA at any time.
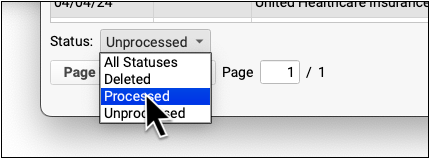
To find posted ERAs, use the status filter.
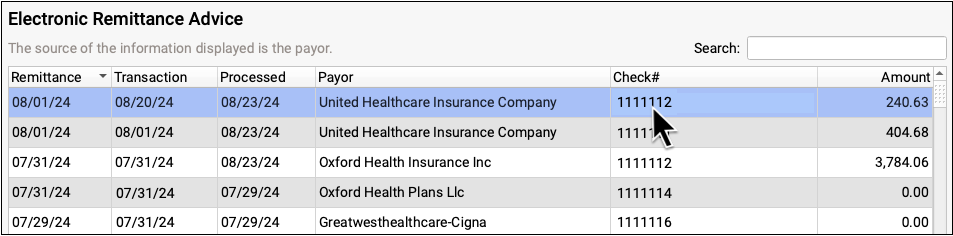
Double-click on a processed ERA to review processing details. For more information, see Read ERA 835s from Payors.
Filter the ERA to Specific Encounters
To work on specific payor responses, you can use the filters at the bottom of the screen to change which encounters appear.
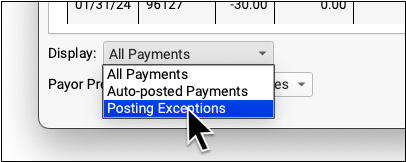
Use the Display filter to view encounters with a posting exception.
Use the Posting Exceptions filter to view encounter responses that have specific exceptions.
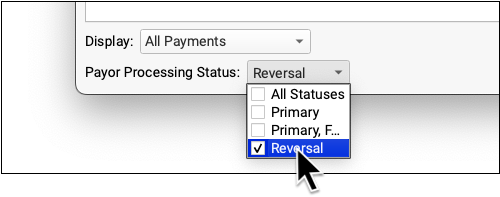
Use the Payor Processing Status filter to view encounters with specific statuses, such as Reversals or Denials.
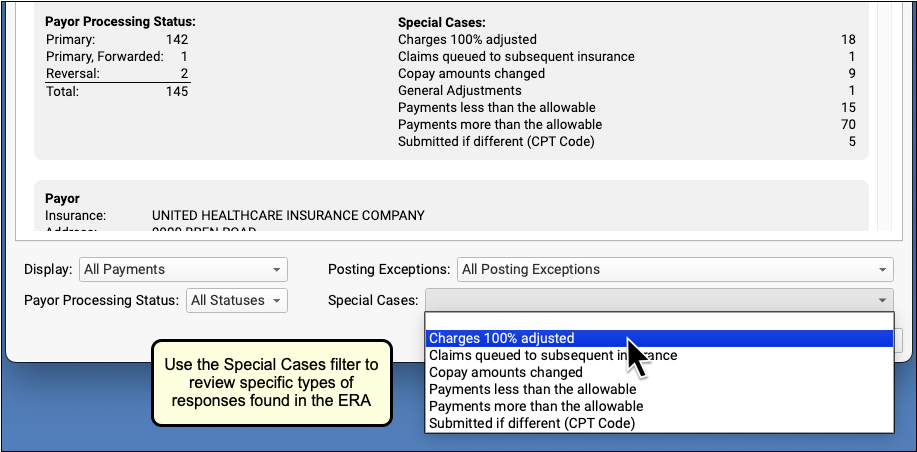
Use the Special Cases filter to view encounters that have payor responses with certain conditions.
Edit Payments and Adjustments and Post Responses Manually
As you review the details on an ERA, use the Insurance Payments tool to edit posted insurance payments and post payments and adjustments manually.
The Insurance Payments tool includes one or more History tabs where you can review the complete history of payments for an account, edit payments and adjustments, reverse payments, and more.

Review an Autoposted ERA For Specific Adjustment Reasons
Use the Adjustment Reasons special case to review all the responses on an ERA that included specific CARCs and RARCs.
First, click “Adjustment Reasons Selector” to select adjustment reasons.
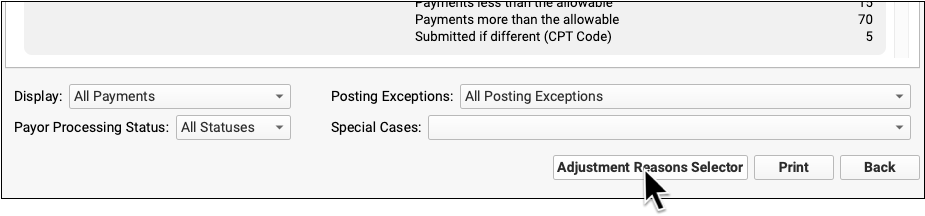

Find and select the adjustment reasons you are looking for.
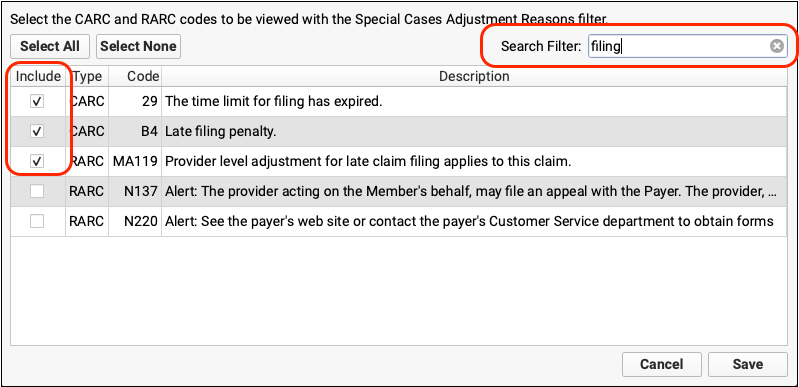
Click “Save”, then select the Adjustment Reasons special case.
The ERA will be filtered to display only encounters that include your selected adjustment reasons.
Prove Out and Audit Insurance Payments By Check
After posting all of the adjudications on an ERA, you can use the Payment Totals by Check Number and Payment Details by Check Number reports in the report library to ensure that posted amounts match the total check amounts and troubleshoot any discrepancies.
Read Review and Prove Out Insurance Payments by Check Number in the Report Library to learn more.
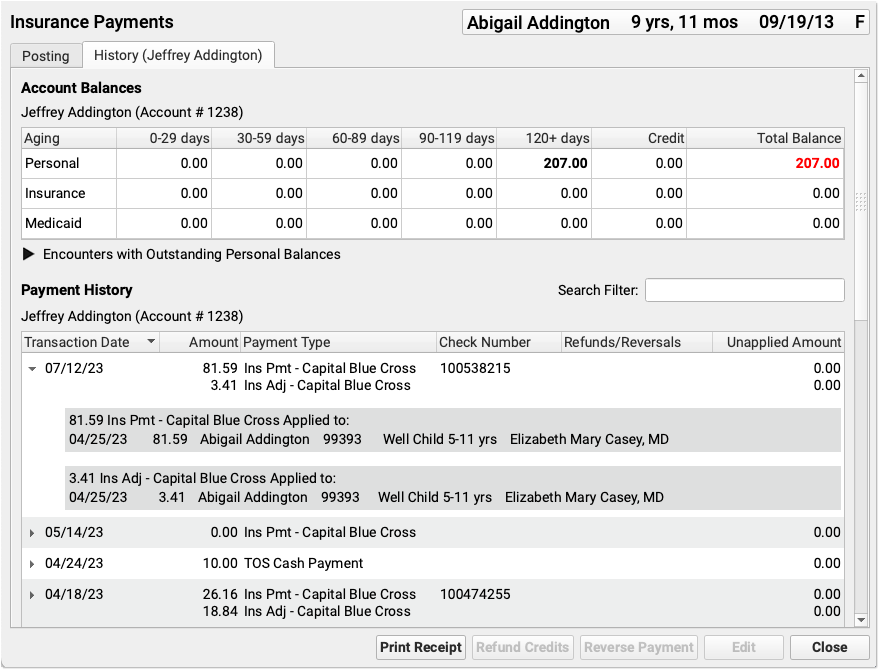
Review an Account’s Payment History
Click on the History tab in the Insurance Payments tool to review the complete payment history for the patient’s billing account.
If a patient has had more than one billing account, you may see more than one History tab.
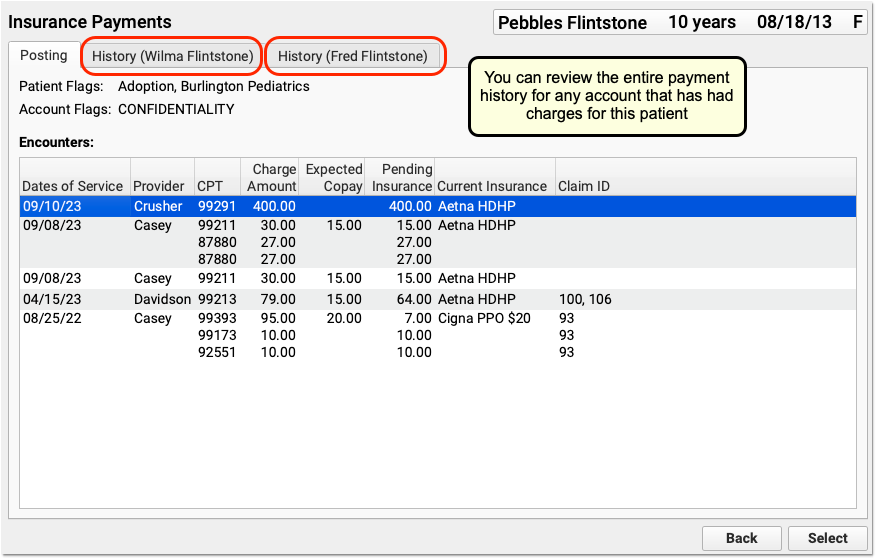
You can review the entire payment history for any account that has had charges for this patient.
The History tab is also available in the Payments tool:
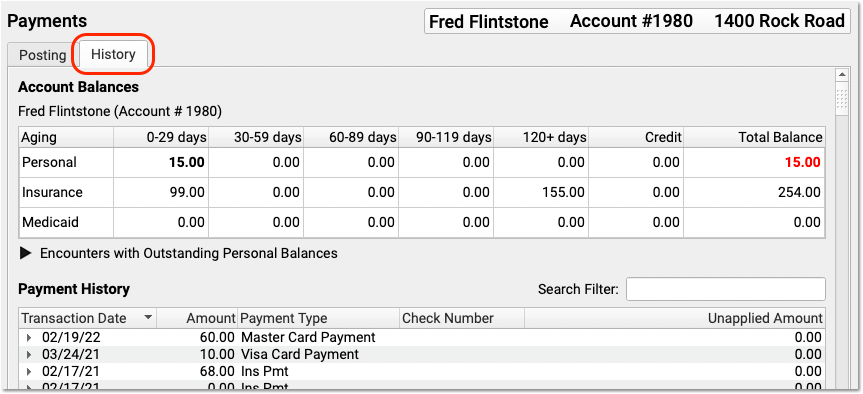
PCC EHR groups insurance payments and adjustments together, making it easier to review and work with payment history.
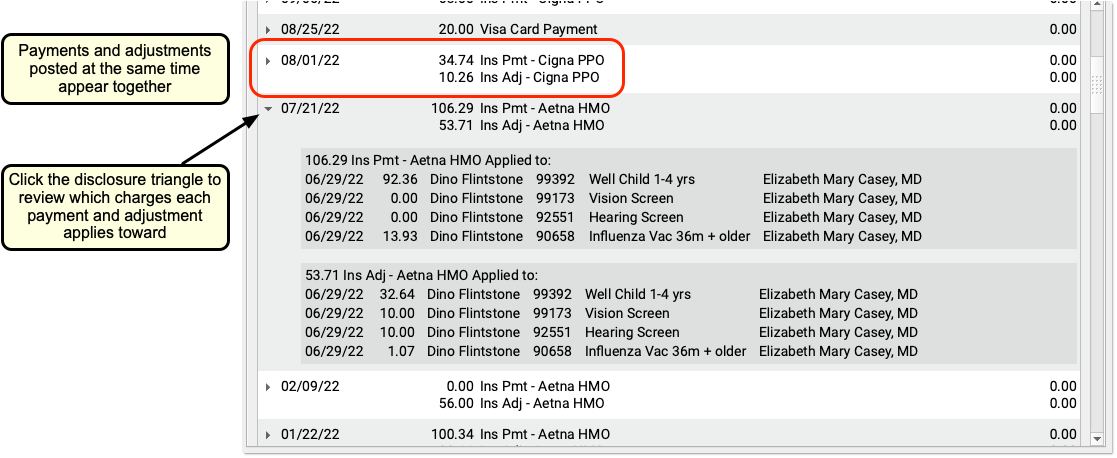
Note that if you unlink or delete parts of a payment or adjustment, the Payment History may display items on multiple lines.
Review an Encounter’s Payment History
You can review the history of all charges for an encounter in the Billing History section of a patient’s chart.
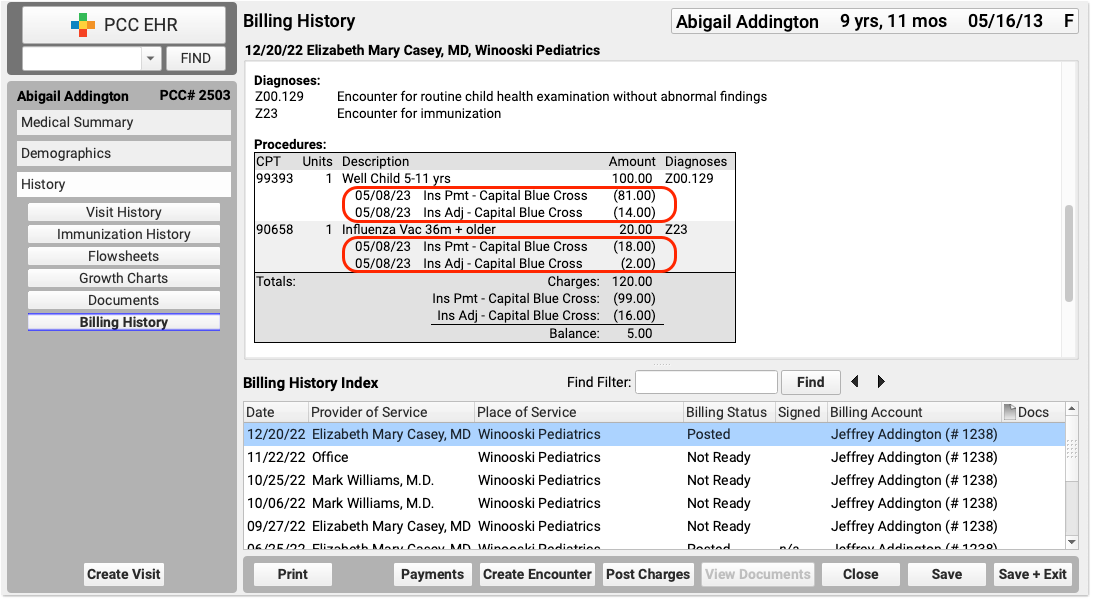
The encounter’s billing history includes more information about what diagnoses and procedures were posted and how claims were sent.
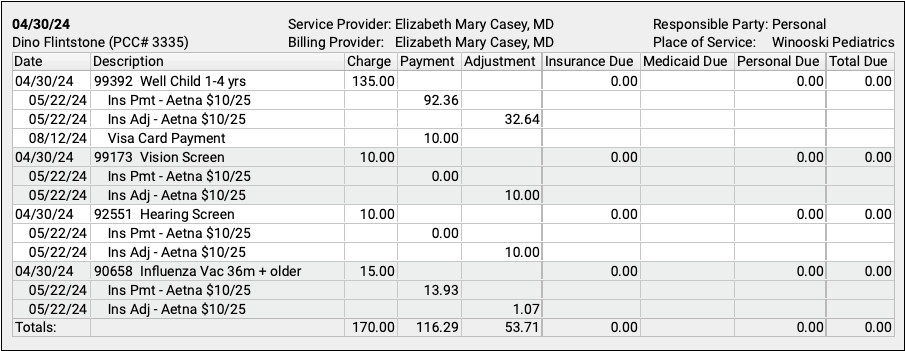
Review a Complete Account History for a Family
Use the Account History in a patient’s chart to review a family’s complete account record, including all payments and adjustments for all encounters.
Review Insurance Payment Totals and Other Trends
PCC includes reports for reviewing what your practice posted, examining insurance reimbursement trends, and more. Visit your Practice Vitals Dashboard to get started. To learn more about reporting on adjustment trends, read Report on Adjustment Trends in PCC EHR. You can always contact PCC Support for help with specific reporting needs.
Edit Posted Insurance Payments and Adjustments
When you need to edit an insurance payment or adjustment, select them in the Payment History and click “Edit”.
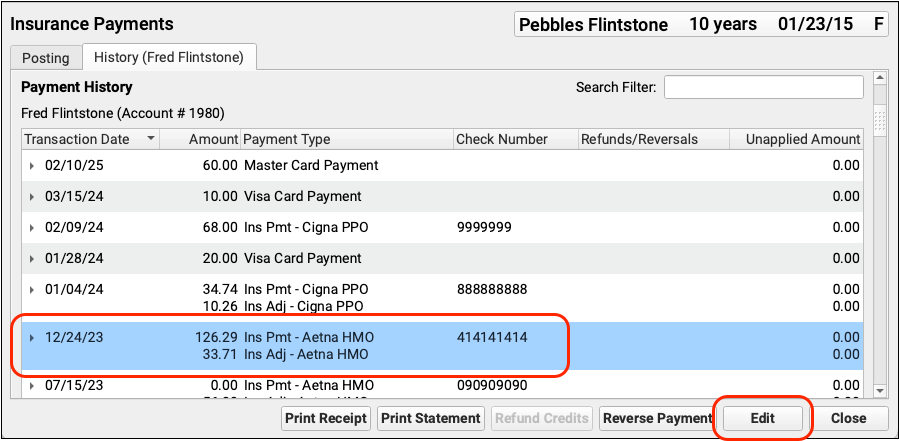
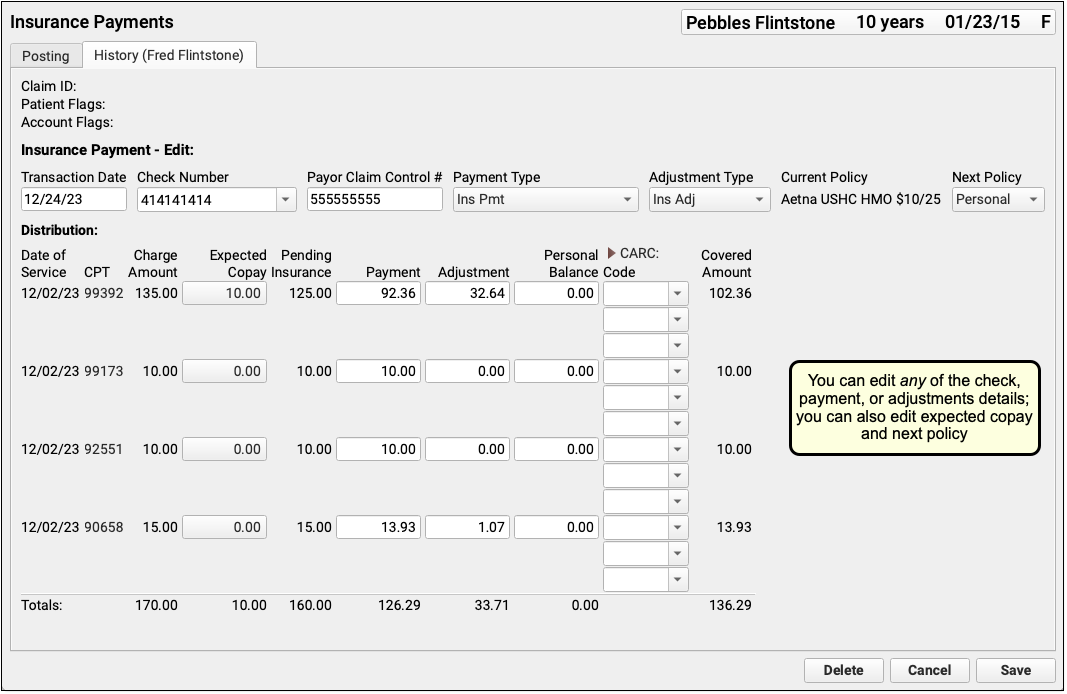
You can edit any aspect of the insurance payments and adjustments, including the transaction date and other payment information, amounts, and CARC information. You can also change the expected copay amount for a procedure. If you’ve learned the patient had another policy for the date of service, you can also update the Next Policy field to change the responsible party for the charges.
'Pending Insurance' Column When Editing a Payment: When you post an insurance payment, the Pending Insurance column displays the expected sum of the payment and adjustment, as the charges are still pending insurance. When you edit an insurance payment, however, the Pending Insurance column displays the amount due on the charge (which may be affected by other payments on the account), minus any unpaid copay amount, plus the amount of the edited payment as originally entered. Personal payments on the account can interfere with your ability to increase the payment amount if (for example) it was entered incorrectly.
As you update payment amounts, PCC EHR will provide calculation support, filling out the adjustment and balance fields based on what you enter. You can edit and override those amounts.
You can click “Delete” to delete the entire payment and adjustment, removing them from the patient and account records.
When you have completed your edits, click “Save”. PCC will update the insurance payment and adjustment amounts and return you to the Payment History screen.
Back on the Payment History screen, you can review the changes you made and then use the buttons or the Posting tab to take additional action on the account.
Need to Queue Up a New Claim?: After you edit an insurance payment, you can use the Edit Charges feature in the patient’s Billing History to revise the current responsible party and queue up a new claim or file a corrected claim. See Edit Encounter Charges and Other Claim Information and Resubmit a Claim.
Insurance Posting Reference
Read the sections below to understand more about how PCC automatically posts insurance payments and adjustments, and how you can use the Electronic Remittance Advice tool to find and deal with unusual situations on ERAs.
Record the Payor Claim Control Number for Claim Responses from Payers
Whether autoposting an ERA or posting an EOB manually, PCC EHR can store the Payor Claim Control Number for easy access when you need to resubmit claims or communicate with the payer.
-
Record the PCN Automatically: When you process an ERA in the Electronic Remittance Advice tool, PCC EHR will automatically record the Payor Claim Control number for each response to each encounter.
-
Enter a PCN Manually: When you manually post the payer’s response in the Insurance Payments tool, you can enter the Payor Claim Control number along with the check number.
Recording the Payor Claim Control Number for every claim response makes it available when you need to contact the payer to discuss an issue or resubmit a claim, void a claim, or file a corrected claim.
For example, when you use Edit Charges to resubmit a claim, you can quickly pick from a list of claim control numbers recorded for the encounter.
What's a Payor Claim Control Number?: A Payor Claim Control Number (PCN) is a unique identifier assigned by payers to a given claim for a given encounter. Your practice uses the PCN when communicating with the payer about the claim. Insurance payers issue a PCN when they adjudicate a claim and send you an ERA or EOB. The number is also known as the Claim Control Number (CCN) and is called the Original Reference Number (ORN) on a paper claim. Medicare claims refer instead to an Internal Control Number (ICN) or Document Control Number (DCN).
Understand How PCC EHR Automatically Processes ERAs
PCC EHR can automatically post most payor responses found on an ERA. Read below to understand how PCC EHR handles adjustments, denials, and other less-common situations.
-
Adjustments: PCC EHR can automatically post all adjustment reasons. You can review specific CARC and RARC information on each ERA if you need more details about a payor’s adjudication.
-
Reversals (Takebacks): When you process an ERA that includes a reversal, PCC EHR applies an adjustment to the original payment and pends the charges back to the original policy. PCC EHR can only do this if it finds the original payment on the account. Your practice must also define a default reversal type in Practice Preferences.
-
Mismatched Copay Amounts and Medicaid: When you autopost a payor’s ERA, PCC EHR will update the expected copay on the visit charge to match the amount specified by the payor as it posts the adjudication. If the family already paid a copay, your PCC system will automatically unlink the payment and relink the appropriate copay amount to the charge, leaving any remaining payment amount as a credit on the account.
If a patient has a Medicaid plan active for the date of service, when you autopost the primary payor’s ERA your PCC system will set the expected copay to $0, as any personal balance due should be billed to Medicaid. Autoposting in PCC EHR will only set the copay to $0 when a patient has a policy configured as a Medicaid plan, with the Medicaid setting set to “Yes”. PCC also supports custom configuration for other types of plans, such as Medicaid HMOs. Contact PCC Support if you need help. You can edit payments, adjustments, and expected copays on the History tab of the Insurance Payments tool. -
Negotiated Contract Rate (Allowable) Not Met: PCC supports the tracking of payor contract rates or “allowed” amounts, though many practices do not use this feature. When you autopost an ERA, PCC EHR posts all payments and adjustments regardless of the allowed amounts. It then indicates the number of charge responses that were greater or less than the allowed amount in the Special Cases section of the Autopost Processing Summary. You can review the encounters that underpaid the allowed amount (for example) by filtering the ERA. You can also use reporting to determine when payors are not paying your negotiated contract rate. PCC Support can help you load a contract fee schedule into your PCC system.
-
Charge Not Pending Insurance: If an ERA includes payments for encounter charges that are not pending an insurance policy, your PCC system will look to see if the patient has a policy active for the encounter’s date of service. If it finds an appropriate active policy, it will post the payments and adjustments. If it is unable to locate an appropriate encounter, the number of unposted responses will be listed as a posting exceptions.
-
Claim ID Not Matching: If a payor’s claim ID does not match a Claim ID in your PCC system, PCC will attempt to match the claim to your records in other ways, such as matching the date of service and other encounter information. PCC will be unable to post payments and adjustments when encounter procedures do not match charges found on your system.
-
Secondary (or Tertiary, etc) Coverage: If a payor indicates that a claim was “Processed as Primary and Forwarded to Additional Payors” or similar, and/or the patient has additional coverage, PCC EHR automatically posts the payments and adjustments and then queues up a claim for the next active policy on the patient’s account.
-
Payor Changes to Billing Codes: When a payor changes a code modifier or removes a modifier, PCC EHR can still automatically post the payment and adjustment indicated on the ERA. If the payor’s base code does not match the code found on your system, however (for example, if they changed a 99214 to a 99213), the payor’s response will not post. You can review these and other payment exceptions on the ERA.
-
Payments For No Specific Charge (Interest, Incentive, and Other Communication): PCC will post payments and adjustments that match charges on your system. If a payor sends payment or adjustment information that is not attributed to a specific charge that your practice billed, PCC will ignore it. The most common example of this is an insurance interest payment. ERAs can also include discount and tax information. You can review these communications from the payor on the ERA and then record them if appropriate. See Post Capitation Checks, Incentive Payments, Interest Payments, Overpayments, and Withhold Payments for examples.
Understand Posting Exceptions
If PCC EHR cannot automatically post a payor’s response on an ERA, it is marked as a “Posting Exception”.
Read below to understand each of PCC EHR’s default posting exception. When you find a posting exception on an ERA, you can review the payor’s response and use the Insurance Payments tool to take appropriate action.
-
Claim Denials: PCC EHR will not automatically post claim denials. When an insurance payor sends a denial on an ERA, autoposting that ERA will mark the response as a Posting Exception for your review. PCC EHR will not autopost adjustments indicated in the payor’s denial as sometimes the claim must be resubmitted or else other action may be needed. You can review denials in the Electronic Remittance Advice tool.
-
Claim Status 'Not Our Claim' cannot be auto-posted: If your PCC system cannot match the encounter on an ERA to an encounter on your system, it will be unable to automatically post the ERA’s adjudication for the claim.
-
Claim Status 'Predetermination' cannot be auto-posted: If the payor’s response is a predetermination, which indicates an adjudication without any actual payment or adjustment, there is nothing for PCC EHR to automatically post.
-
Claim Status 'Reversal' cannot be auto-posted (if not configured): If your practice has not configured a reversal type for automatic posting in Practice Preferences, PCC EHR cannot post reversals.
-
Adjustment total is negative: If an ERA sends a negative adjustment total or negative payment for some reason, PCC EHR cannot automatically post the information.
-
Payment amount is negative: If an ERA sends a negative adjustment total or negative payment for some reason, PCC EHR cannot automatically post the information.
-
Procedure code not found in the charge history for this claim: If the base procedure code on the ERA is not found in your practice’s billing history for the claim, PCC EHR cannot post payments or adjustments. (PCC EHR can automatically post the payment if the payor only changed the modifier.)
-
Charge date listed did not match charge history: If the date of the charge on the ERA does not match the date of the encounter in your practice’s billing history, PCC EHR cannot post payments or adjustments.
-
Charge amount listed did not match charge history: If the charge amount on the payor’s ERA does not match how much was billed by your practice on the claim, PCC EHR will not automatically post the payments or adjustments for the charge.
-
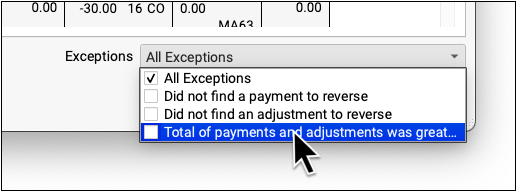
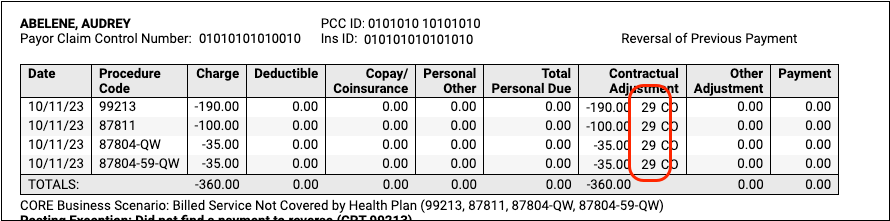
Did not find a payment to reverse: If the ERA includes a reversal, but the payment is not present on the billing record, PCC cannot post the reversal.
-
Total of payments and adjustments was greater than the pending amount: If a payor’s response to a claim includes a greater amount than the pending amount, PCC EHR will not automatically post payments and adjustments for the encounter. As PCC EHR automatically posts adjustments and most reversals, problems with totals should be uncommon. This may occur in cases where the payor makes a mistake or when you have submitted charges using a different billing system.
If your practice used PCC’s previous autopost tool (autopip), you may see additional posting exception types when you review ERAs. PCC EHR can post more types of responses than the previous system.
Custom Posting Exceptions
If you have a special situation with a payor, or a particular adjustment reason that deserves extra scrutiny, your practice can create a custom posting exception.
Then you can autopost all ERAs and then work on those exceptions manually on the Posting Exceptions worklist.
Read Prevent Certain Claim Responses from Autoposting to learn how to set up a custom posting exception.
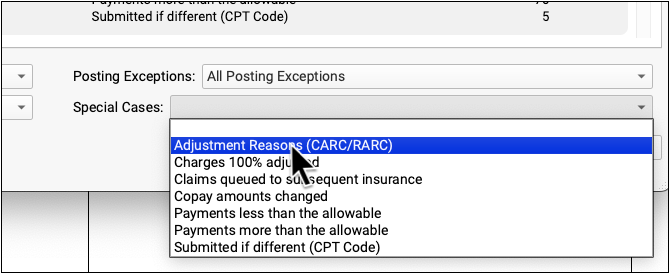
Understand Special Cases
In addition to Posting Exceptions, which indicate a charge or issue that could not be posted automatically, you may wish to review other unusual circumstances on an ERA. For example, if a charge on a claim was 100% adjusted by the payor’s response, it may be normal or it may require an appeal. You can use the Special Cases summary and filter, as describe above, to review unusual situations on an ERA that may require additional action.
Read below to understand the special cases that PCC EHR will identify after you autopost. When needed, you can use the Insurance Payments tool to edit any payments or adjustments that were posted and take additional action.
-
Adjustment Reasons (CARC/RARC): Depending on challenges you are experiencing with a payor, one or more specific CARC or RARC codes on an ERA may require attention. You can use the Adjustment Reasons special case filter to review all encounters with specific CARC and RARCs. See the section below to learn more.
-
Charges 100% Adjusted: You may wish to review any charge on an encounter that the payor completely adjusted off. In some circumstances, this indicates a claim that was partially denied that you may need to review and resubmit.
-
Charges Made Fully Personal: You may wish to review any charge on an encounter that the payor paid $0.00 towards and did not adjust, making the charges become personally due to the patient. In some circumstances, this indicates a claim that was partially denied that you may need to review and resubmit.
-
Charges Queued to a Subsequent Insurance: When autoposting, PCC EHR automatically pends remaining balances to a patient’s secondary coverage. You may wish to review the primary payor’s response when this occurs.
-
Copay Amounts Changed: When autoposting, PCC EHR can automatically adjust the expected copay for the charge (see above). You may wish to review the payor’s response when this occurs.
-
General Adjustments: Insurance payors sometimes include payments and adjustments on ERAs that are not associated with specific claims. These might include overpayment recovery notices, which may be reflected elsewhere on the ERA. If an ERA contains one or more of these “General Adjustments”, which are also known as “Provider Level Adjustments”, you can identify it in the Autopost Processing Summary. The full details from the payor will be in a General Adjustments section at the bottom of the ERA. As general adjustments are not associated with an encounter, there is nothing for PCC to autopost. You may wish to review the information and use the Insurance Payments tool to post amounts indicated. You can use the Special Cases feature to quickly filter an ERA to only the General Adjustments section(s). To see examples, read Read ERA 835s from Payors.
-
Payments Less Than/More Than the Allowable: If your practice enters contract fee schedules into your PCC system, autoposting will automatically compare the payor’s response with the allowed amount. If they under pay or over pay on a charge, you can review the encounters as a special case.
-
Submitted If Different (CPT Code): If a payor changes a billing code’s modifier in their ERA, autoposting will still post the payor’s response. You may wish to review the encounter to understand why they changed the billed code and possibly appeal that decision.
Configure Your Autopost Payment and Adjustment Types
When you automatically process ERAs in PCC EHR, what payment and adjustment types will PCC use?
You can review and update these types in Practice Preferences. By default, PCC will post payment types named “Ins Pmt” and “Ins Adj”. To post an insurance reversal, it will use an accounting procedure named “Insurance Takeback”.
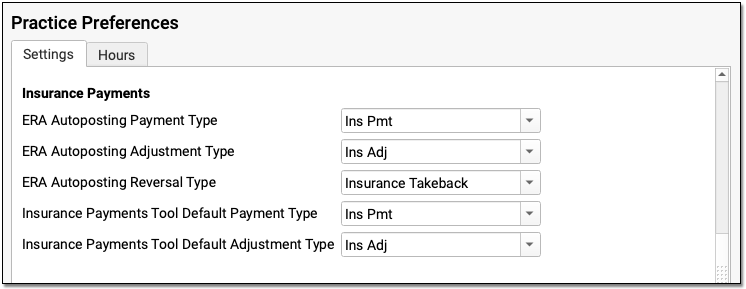
If you need to edit or adjust your available payment and adjustment types, you can do so in the Payment Types and Procedures tables in the Tables tool. Contact PCC for assistance.