PCC June COVID-19 Release
PCC has launched a series of rapid updates in response to the COVID-19 pandemic. We are beta testing and rolling out new functionality in direct response to the situation as it evolves. Read below to learn about new features and updates planned for our June 2020 release. Contact PCC Support for information about these new features or about any PCC product or service.
PCC COVID-19 Release Feature Videos: You can watch a video playlist which covers the major features PCC has developed during the COVID-19 pandemic and includes tutorials on related topics.
Migration Considerations for Your Practice: The PCC June COVID-19 update includes features that may require configuration and user-specific software training. Read about the features below and then review the PCC June COVID-19 Release Migration Considerations article.
Contents
- 1 Chat With Your Practice Inside PCC EHR
- 2 Use Snap Text to Chart Faster and More Consistently
- 3 Send a Text Message Directly to the Patient or Family in PCC EHR
- 4 Families Can Use a Phone Number or Email Address to Sign In to the Patient Portal
- 5 Families Can Choose to Receive Portal Notifications via Email or Text Message
- 6 Families Can Opt-In or Out for Broadcast Messaging
- 7 Select Which Phone Numbers To Use For Broadcast Messaging
- 8 See All Broadcast Messaging Replies on Inbound Messages Report
- 9 See More Information on the “Blacklist” Column in Broadcast Message Details Report
- 10 Check Eligibility for Phone Note and Portal Message Encounters
- 11 Analyze and Respond to COVID-19’s Financial Impact on Your Practice
- 12 Change an Encounter’s Billing Place of Service After Posting Charges
- 13 Attach Documents to Future Appointments
- 14 Identify Missed and Canceled Visits in a Patient’s Visit History
- 15 Pilot Test: Send CHADIS Screenings Automatically by Visit Reason
- 16 Coming Soon: Print from PCC SecureConnect to Your Home Printer
- 17 Improved Portal Payment Processing
- 18 Other Updates and Bug Fixes
Chat With Your Practice Inside PCC EHR
PCC EHR includes a chat/instant messaging tool that lets you chat and send messages to other PCC EHR users.
Chat allows you to communicate quickly with the rest of the staff and clinicians at your office without having to log in to another program.
Send a New Message
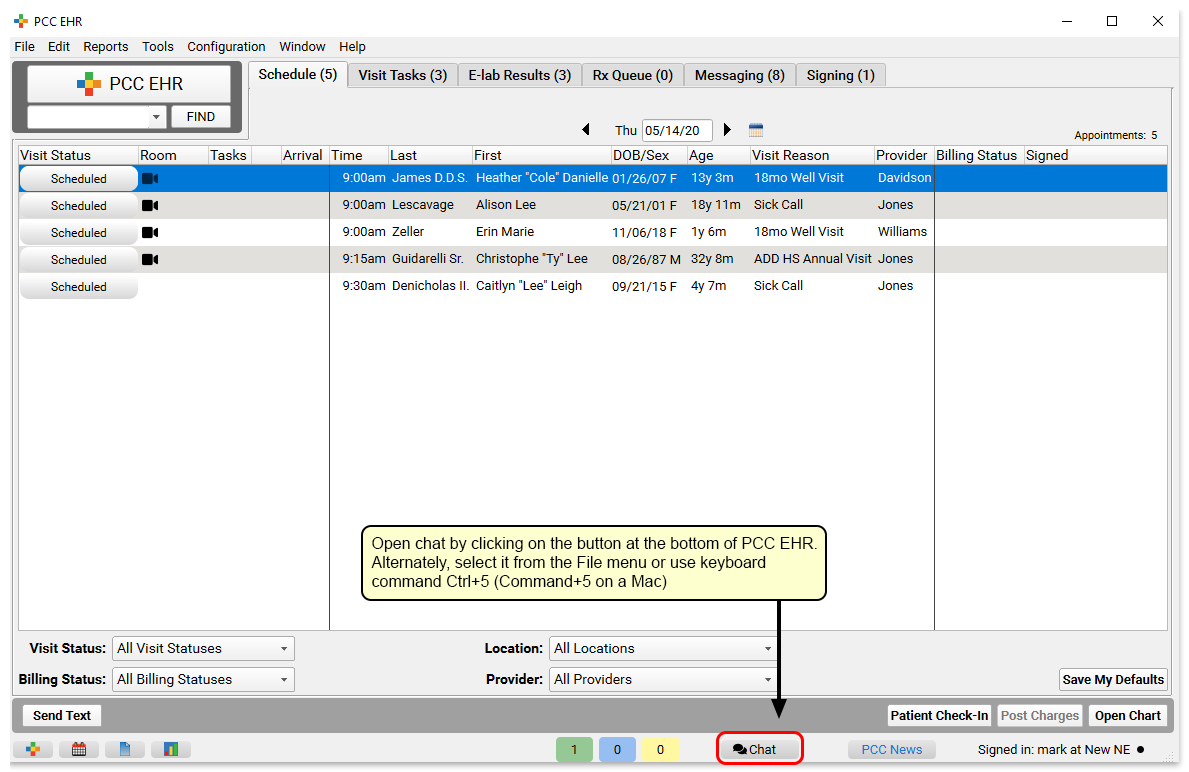
To send a message, click on the “Chat” icon at the bottom of the EHR window.
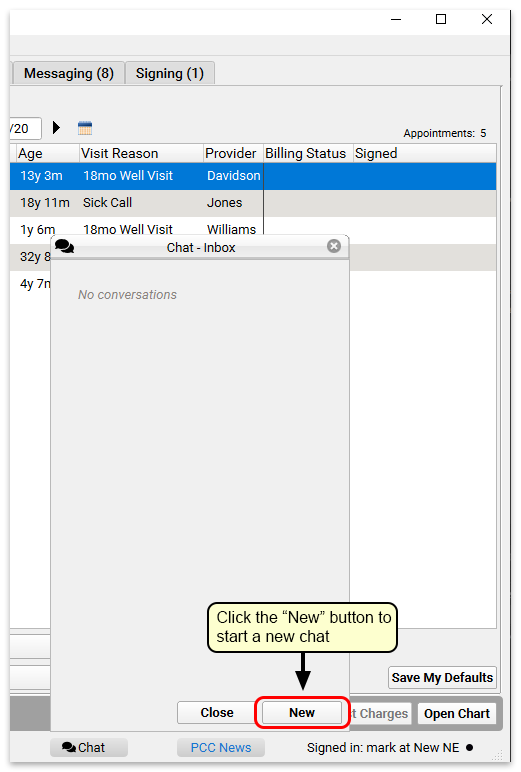
If you have any existing message threads you can find and open them here. Or, simply click on the “New” button to find any PCC EHR user at your practice.
Use the “To:” field to search for the user you want, or select a user using the drop-down menu.

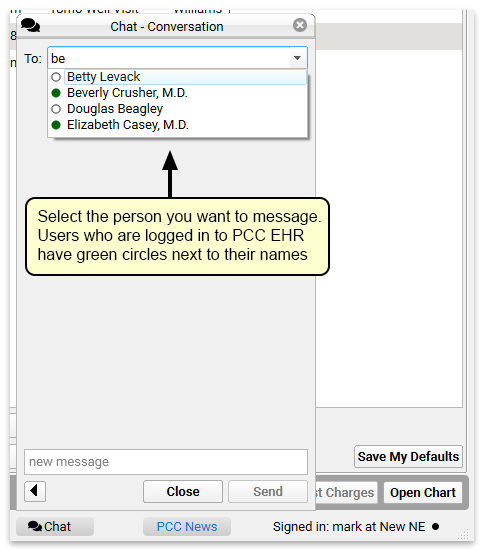
Who is on Chat?: The user list in Chat includes all active PCC EHR users. The order in which they appear is controlled by the settings in the User Selection List in the User Administration tool. If your practice uses Care Center functionality, users from your Care Center will always appear at the top of the list.
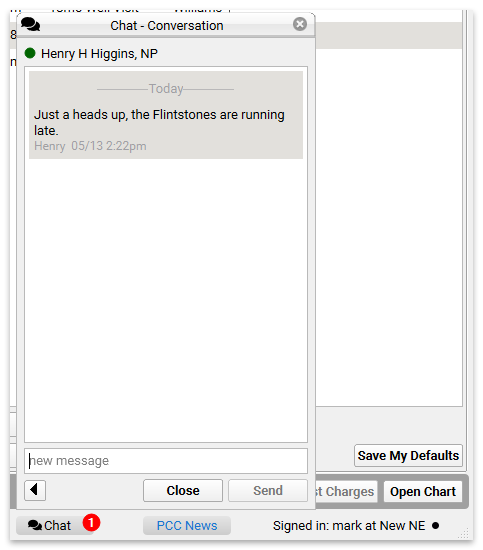
Then simply begin typing. Other users will be notified that they have a new chat message, and can respond. If you have the chat window open, it will automatically refresh as the conversation continues.
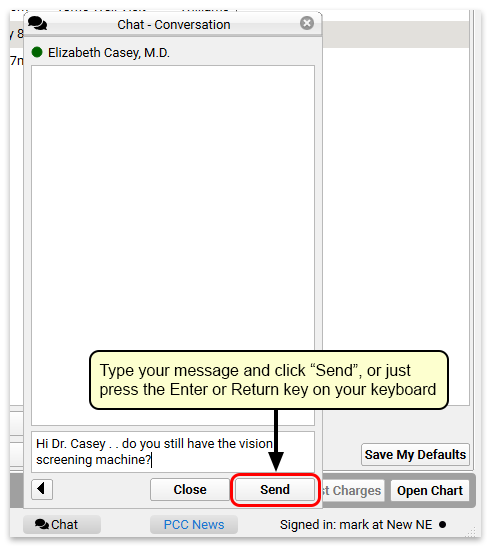
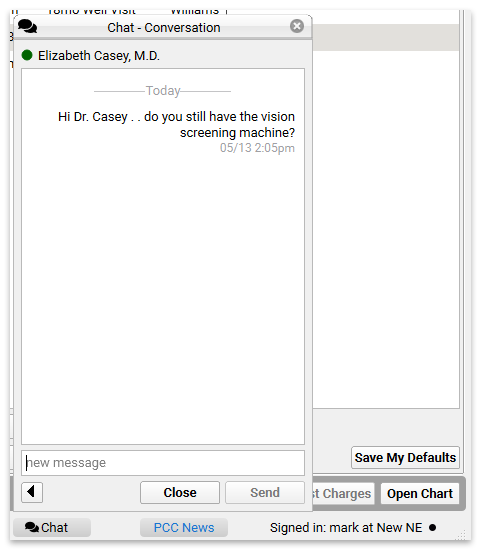
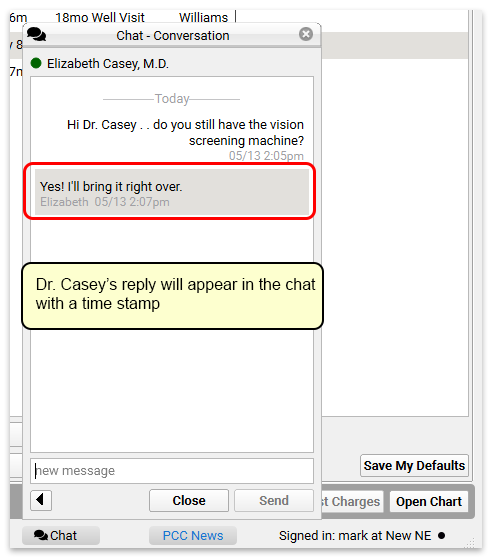
When you get a reply, it will appear instantly in the chat window. All chat messages are time stamped, so you can see exactly when they arrived.
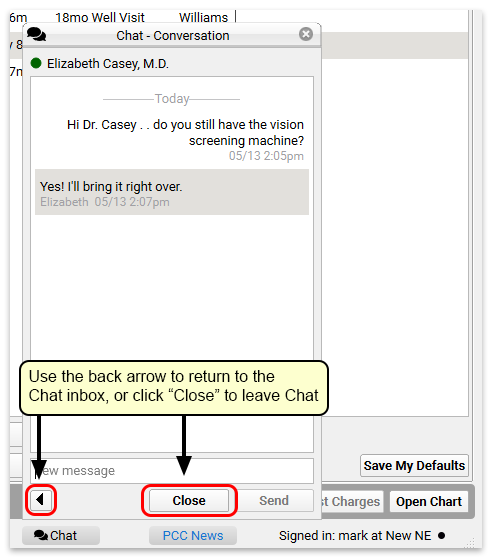
Close the chat using the “Close” button, or use the back arrow to return to the Chat inbox.
Receiving Messages and Message Notifications
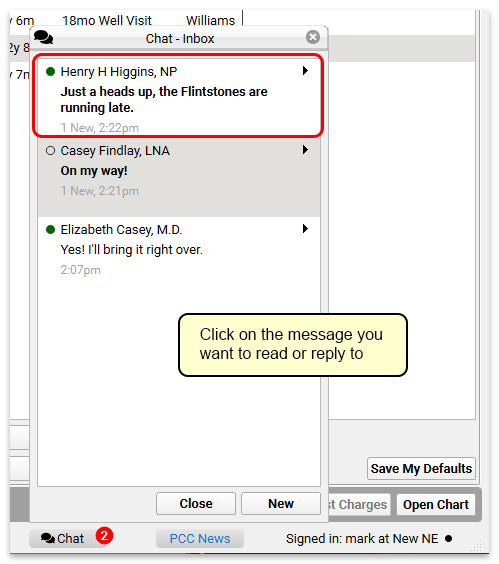
When you have new messages, the Chat icon at the bottom of the PCC EHR window will indicate that you have messages waiting with a red circle.
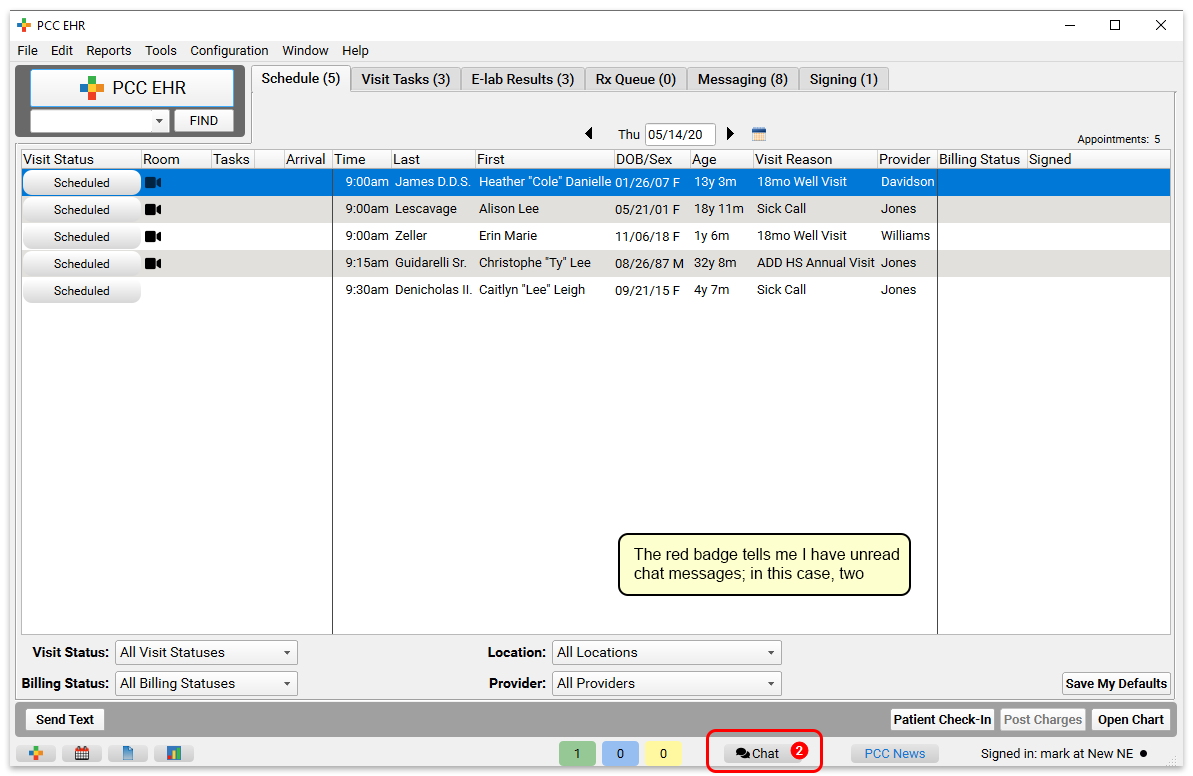
When you open Chat, you will see unread messages at the top of the of your Chat inbox in bold. Click a message to open the conversation and reply.
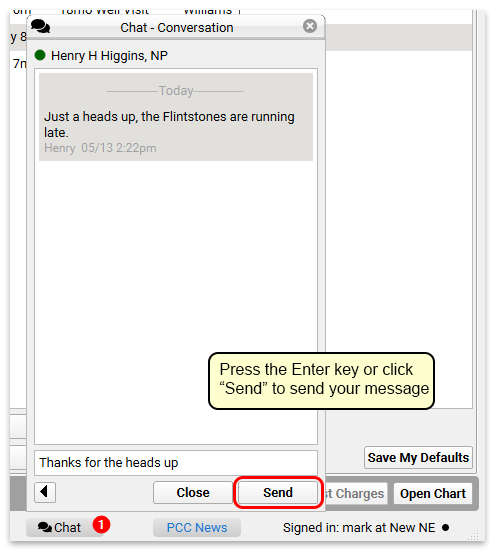
Reply to the message, and then either return to the Chat inbox, or close Chat and continue with your work.
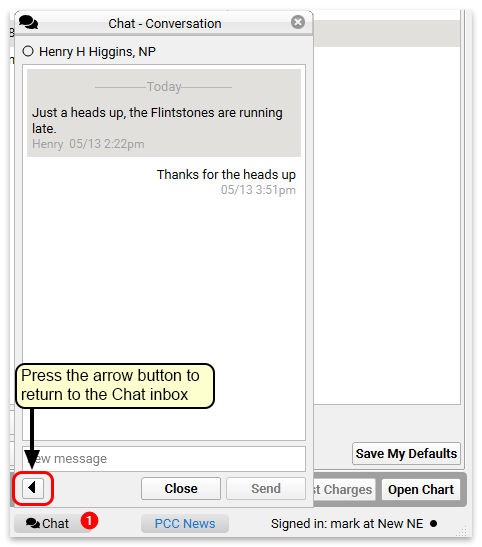
Chat History is saved in PCC EHR: All chat messages are saved in PCC EHR. Scrolling back through a conversation will reveal the entire chat history between two users.
Use Snap Text to Chart Faster and More Consistently
PCC EHR’s Snap Text automatically expands a short typed text into a full word or phrase, reducing your typing and saving you time.


Each user can customize their own personal Snap Text and your office can set practice-wide entries for all users.
Create Snap Text
To begin creating your own Snap Text, open My Account within PCC EHR’s File menu and select the Snap Text tab.
![]()
Each user is listed in the drop down menu on the upper right. Select yourself, or, if you have access, Practice Defaults.
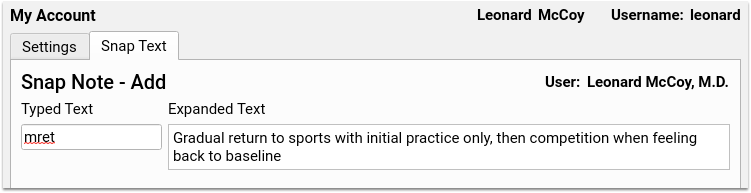
Here, you’ll find two fields, one for your typed text, and one for the expanded text. Enter your short text in the first field, and the full, expanded, text in the second. The short text should be a few characters long, and the expanded text can be as long as you need.
Typed text can be any combination of characters. It is case sensitive, so the expanded text will only be triggered if the letter case matches, that also means that “ABC” and “abc” can both be used to trigger different expanded texts.
Click Save, and you’ll be returned to the Snap Text tab, where you can add another or Save and Exit.
Avoid Common Words, Use a Prefix Character: Whatever short codes you enter will be automatically replaced by the expanded text when you press space, or in the case of multi-line text fields, enter, or return. You should avoid real words that might be used in a different context. Consider using a special character prefix before your code. For example, “.adhd” to expand to “Attention Deficit Hyperactivity Disorder” while still leaving “adhd” available to be used without being expanded.
Copy And Edit Snap Texts
Each user can view, but not edit, the snap texts of other users. When reviewing another user’s entries, any user can copy entries to their own list by using the copy button at the bottom of the tab.

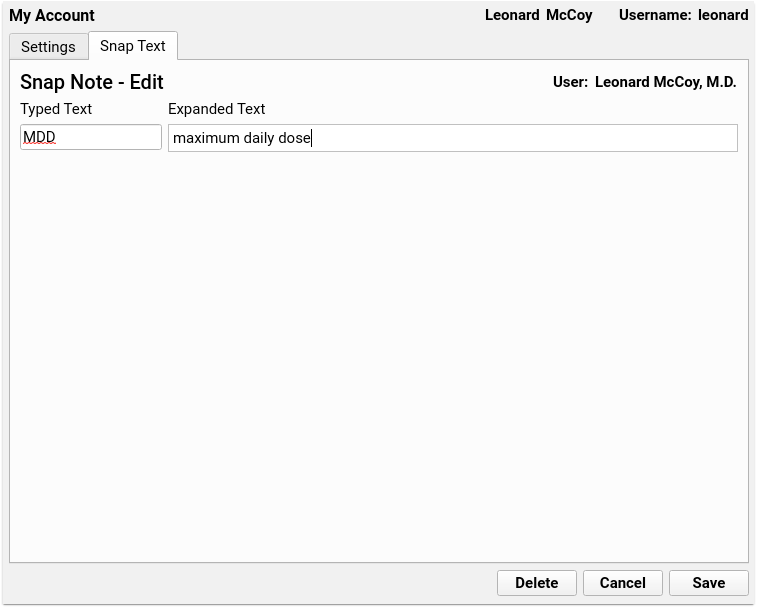
Any of your snap texts can be edited by selecting it from your list, and clicking the edit button. Simply change the text, or if it’s no longer needed, click the delete button to delete it from your list.
Set User Permissions for Editing Practice Wide Snap Texts
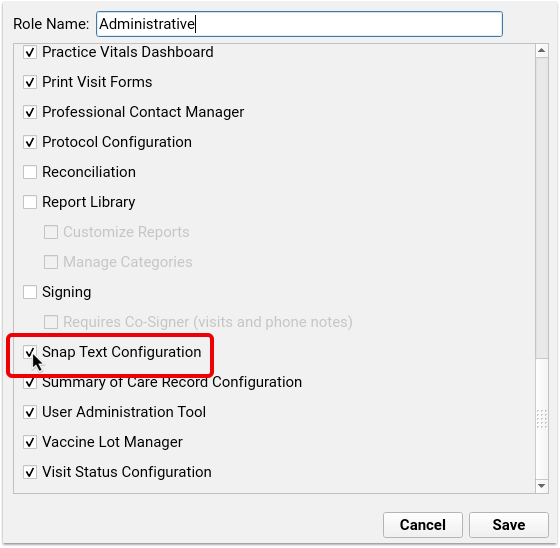
Each user can manage their own Snap Text, but managing the practice-wide defaults is accessible via the User Administration tool. Give users access to manage your practice-wide defaults by adding permission to a user role, or creating a new role exclusively for Snap Text Configuration.
Open the User Administration tool and visit the Roles tab, select a role, and check the Snap Text Configuration box.
For a more detailed guide to setting up roles and configuring user permissions, read Set User Roles for Permissions and Security.
Send a Text Message Directly to the Patient or Family in PCC EHR
Is a family waiting in the car before their appointment? Do you need to send a family a link for telemedicine? You can now send a text message directly to a patient.
When you need to send a quick text message, select an appointment on the Schedule screen and then click “Send Text”.
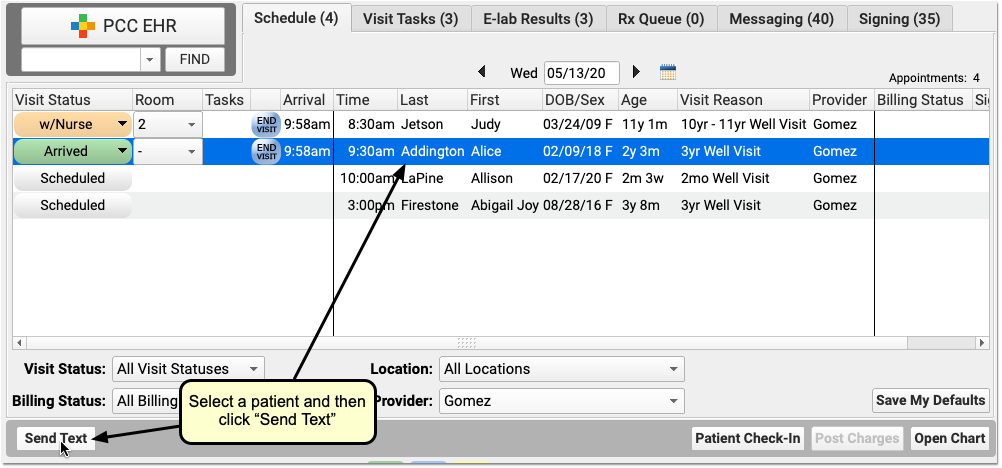
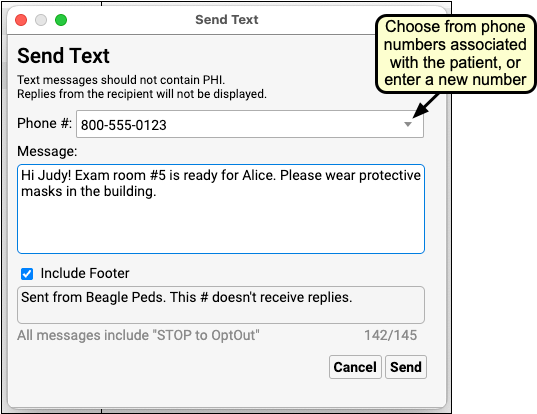
Select a phone number from the patient’s records or enter a new phone number. Then type your message and optionally turn on/off your practice’s default message footer. Messages are limited to a total of 160 characters and should not contain PHI.
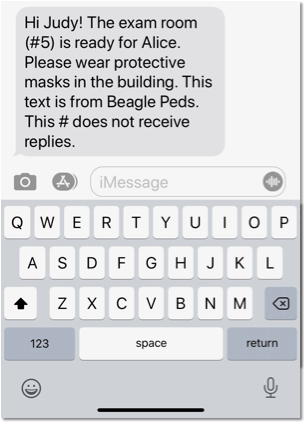
Click “Send” to send the message. The family will receive the message in a few seconds.
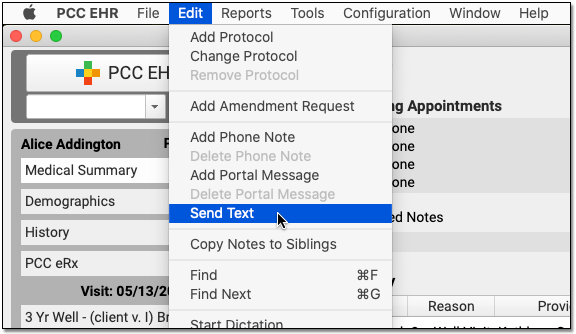
In addition to sending a text from the Schedule screen, you can also open any patient’s chart and choose “Send Text” from the Edit menu.
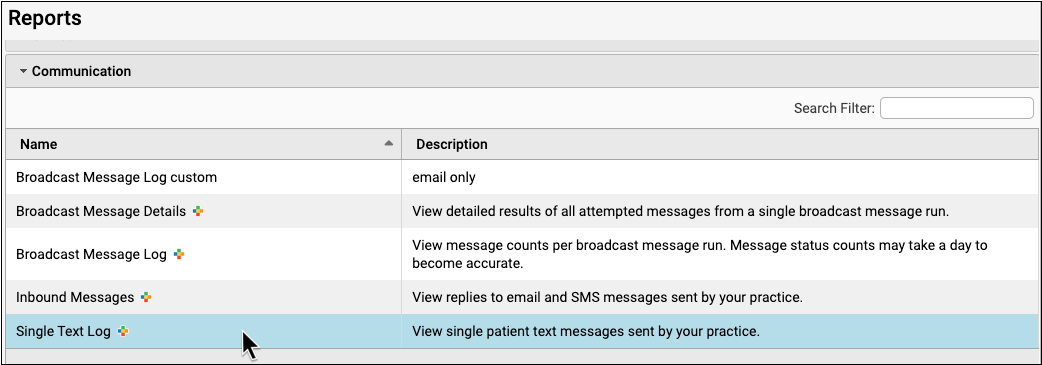
Did They Get My Text? Did We Text That Family Already?: After you click send, PCC EHR will display a brief status window, which will usually tell you that the text was successfully delivered. If the text is stalled for some reason, PCC EHR will close the window to allow you to return to work. Use the Single Text Log report in the PCC EHR Report Library to review what text messages went out (and if any bounced or couldn’t be sent). PCC EHR does not log text messages in patient charts.
What Phone Numbers Appear in the Drop-Down When I Send a Text?: When you create a text message, you can pick from phone numbers that PCC has linked to the patient, including home account phone numbers, the patient’s confidential communication preference, and patient portal numbers. If instead you enter a number manually, PCC EHR will remember that number for later use. The most recent number used by your practice will appear at the top. Any numbers previously identified as invalid will not appear.
Review Your Practice’s Outbound Single Text Messages to Patients and Families
Your practice can use PCC EHR to send a text message to any patient or family member. How can you review what texts were sent and find out if a text was delivered successfully?
Run the Single Text Log report in the PCC EHR Report Library to see your outbound text records.
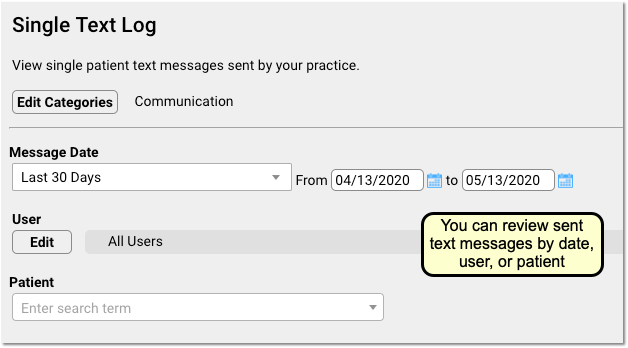
You can optionally filter the report based on date, user, or patient–or see all messages.
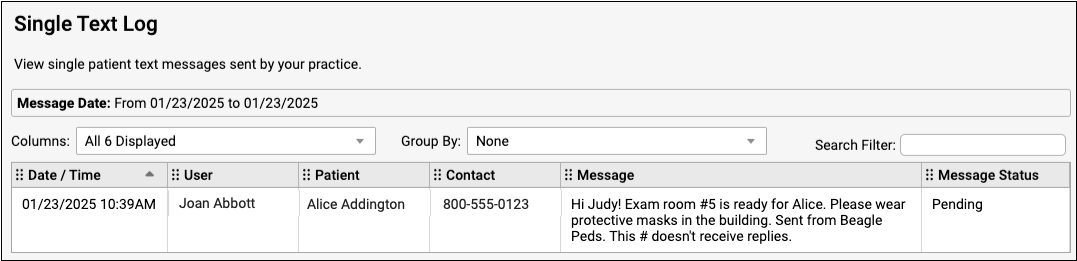
On the report, you can see the date and time, the user at your practice who sent the text, and the patient who the message was sent in regards to. Next, the report displays the phone number that was used. When known, the report will display where the number comes from (i.e., from a parent account). If your practice typed in a number when they sent the text, the number’s origin may not be known.
Finally, the report will display the Message and the Message Status. You can use the Message Status to understand whether a message was successfully delivered, bounced by the cell phone carrier, or if something else happened.
Families Can Use a Phone Number or Email Address to Sign In to the Patient Portal
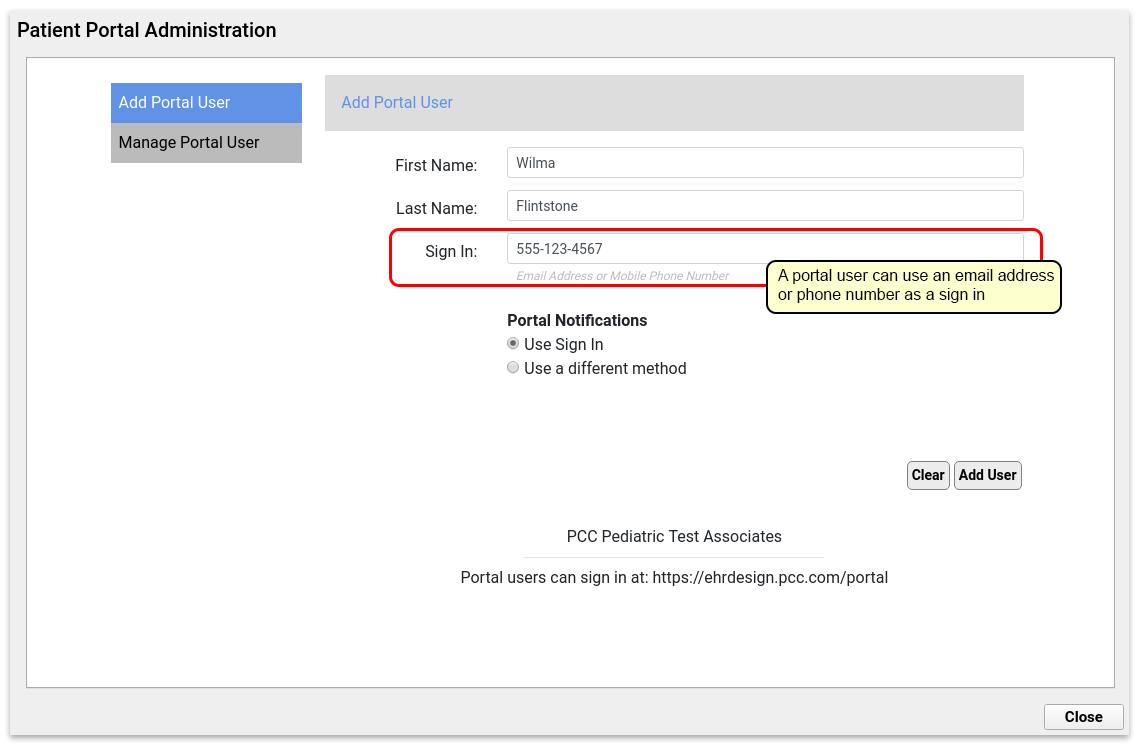
Families can now sign in to the patient portal using either an email address or phone number as a username.
When you sign families up for the portal, their sign in will be the default choice for portal notifications.
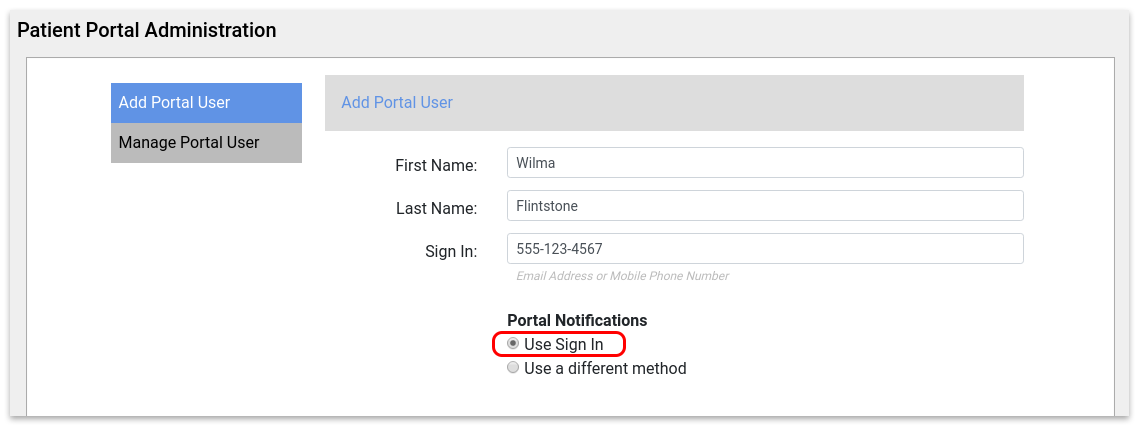
Families Can Choose to Receive Portal Notifications via Email or Text Message
When a portal user is being registered for the portal, they can choose whether or not to use their sign in as a communication method. By default, they will receive portal notifications at the number or email they are using as a sign in.
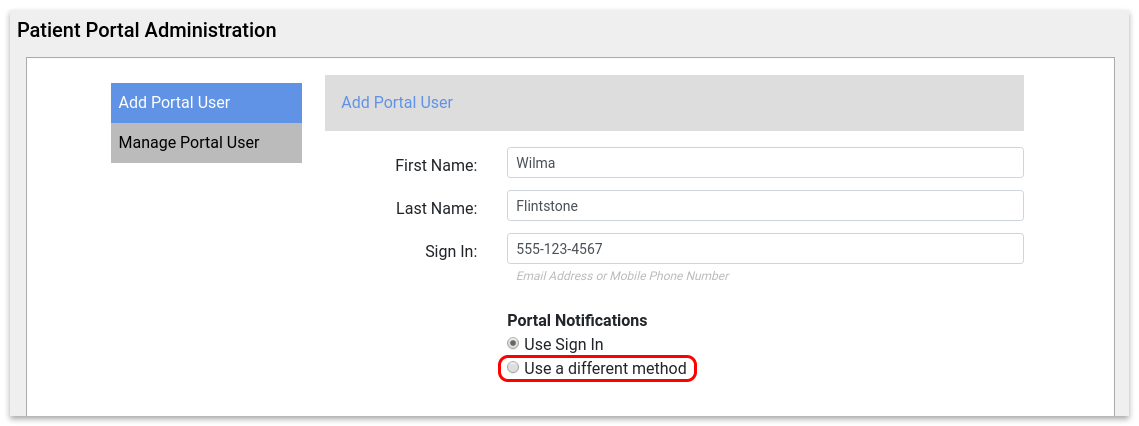
If the portal user wants to use a different method to receive portal notifications, select the “Use a different method” option.
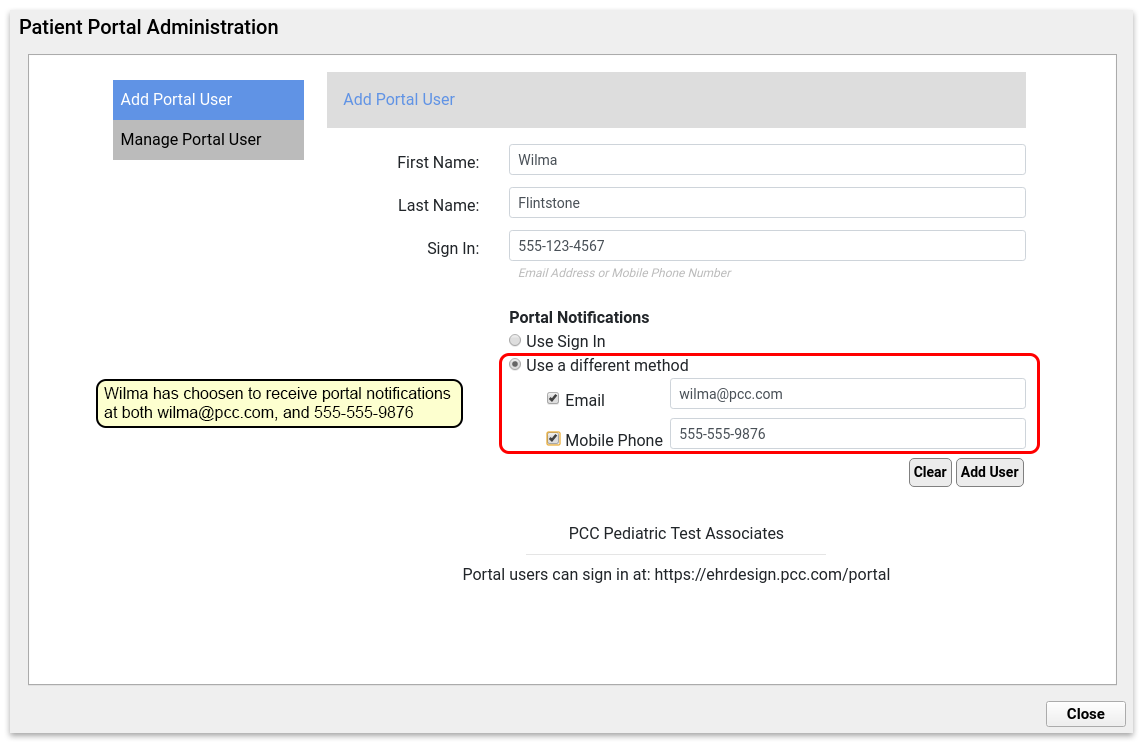
Portal users can choose a phone number, an email, or both as a portal notification preference. They will receive portal notifications by either email or text messages, depending on the method(s) they choose.
Check the Box: In order to choose a method for portal notifications, you must enter the information, and click the check box to activate it.
Changing Portal Notification Preferences
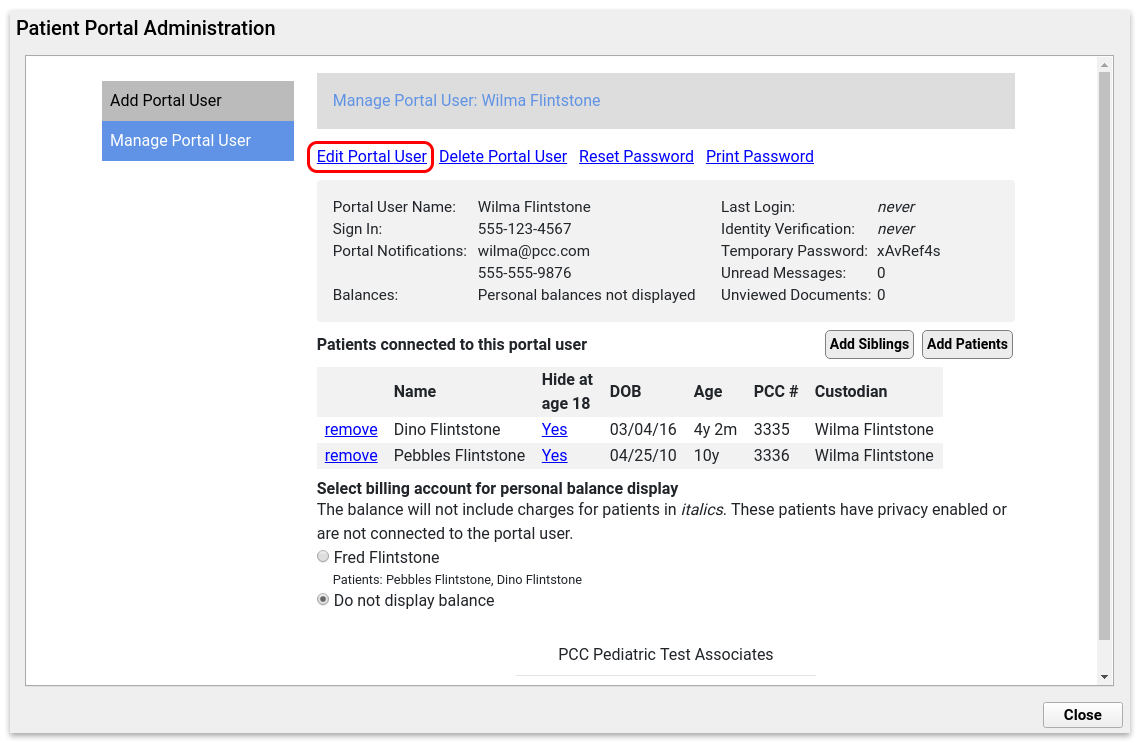
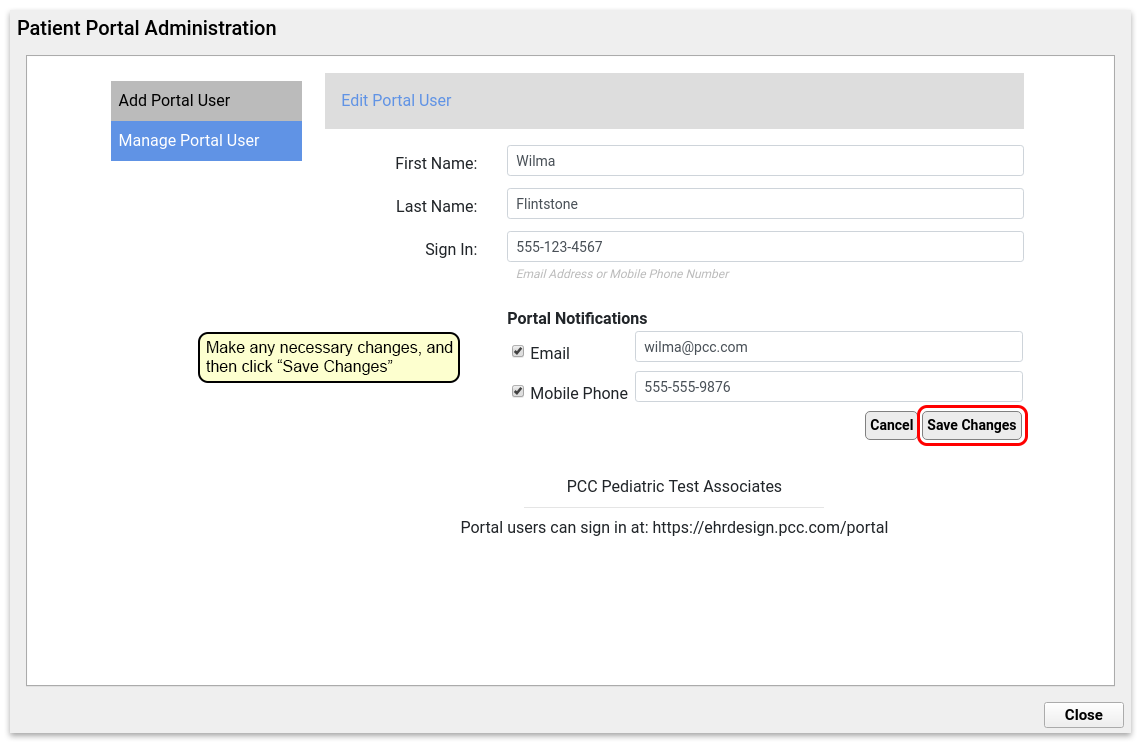
You can change a portal user’s notification preferences on the Manage Portal User screen by clicking “Edit Portal User”.
Portal Users can Change Their Own Preferences
Portal Users can change their notification preferences on the “Edit Account” screen of the patient portal.
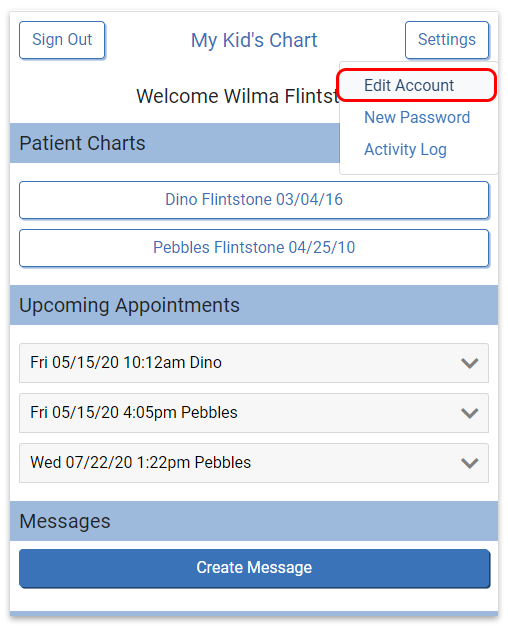
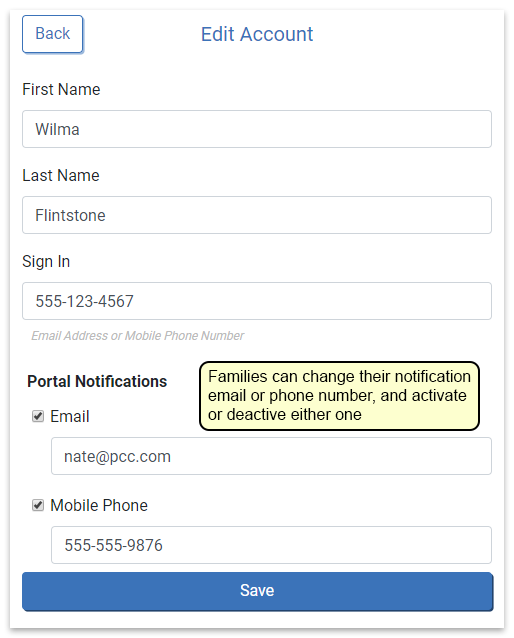
They can change their notification email or phone number, as well as choose to activate or deactivate portal notifications on either method.
Patient Portal Users Component: The Patient Portal Users component, which appears both in pocketPCC and in PCC EHR, has been updated to display users’ portal user name, sign in, and portal notification methods.
Families Can Opt-In or Out for Broadcast Messaging
If a patient or family does not wish to receive text (SMS) messages from your practice, responding “stop” or “unsubscribe” will prevent that number from receiving future texts sent through Broadcast Messaging. Likewise, each email sent via Broadcast Messaging includes an unsubscribe link, that will remove the recipient’s email address from future mailings. These addresses and numbers will be moved to your blacklist, and appear there in the Broadcast Messaging Log Report
If a patient or account has unsubscribed from Broadcast Messaging texts, and would like to begin receiving your practice’s text messages again, they can respond to a previous message with “unstop”. Their number will be removed from the blacklist and they’ll begin receiving your text messages again.
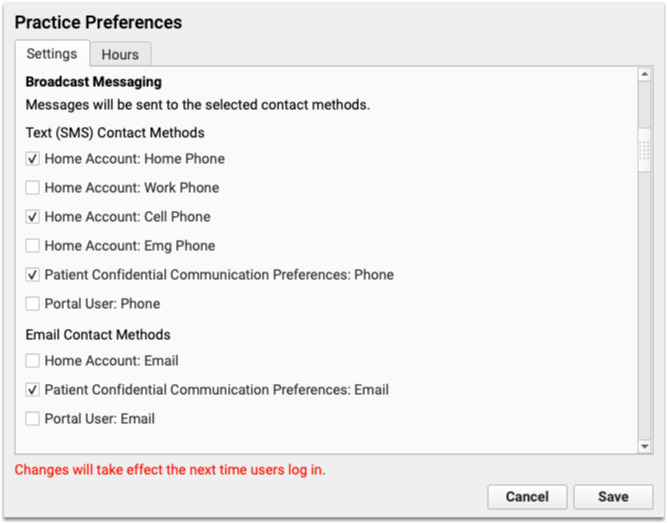
Select Which Phone Numbers To Use For Broadcast Messaging
By default, Broadcast Messaging sends text (SMS) messages to all available phone numbers and email addresses in the patient’s home account, confidential communication preference, and patient portal information. If you prefer to limit which contact methods Broadcast Messaging uses, you can now select which fields should be included in the Practice Preferences menu.
See All Broadcast Messaging Replies on Inbound Messages Report
When a recipient of a Broadcast Message replies via email or text, you can review those replies in a new Inbound Messages report in the Report Library’s Communication category.
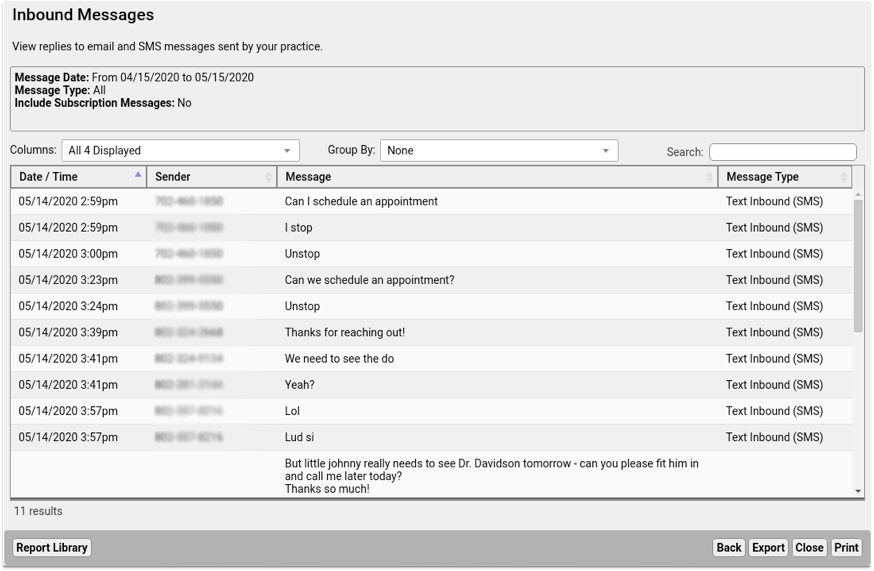
Here you’ll see all replies, including automatic responses from emails, and direct replies from users. You can use these results to keep your user’s contact information updated, or follow-up with users who need additional help or answers.
Replies to Broadcast Messages will no longer appear in the Broadcast Message Details Report.
See More Information on the “Blacklist” Column in Broadcast Message Details Report
When a broadcast message can’t be delivered via text to a phone number or via email to an email address, the Broadcast Message Details report will now give you a reason why that contact method was blacklisted and more detail of the message’s status.
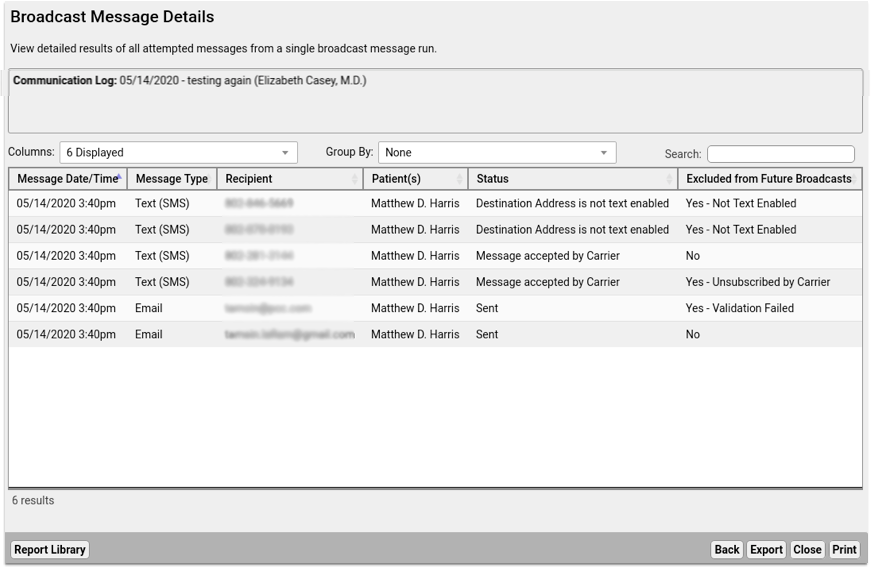
The Message Status column now lists if a phone number is not able to receive text messages, or if the message has been accepted by the carrier for delivery, in addition to the statuses or Sent and Not Sent.
If an email or phone number is added to the blacklist, the Excluded from Future Broadcasts column now includes a reason why a contact method has been added. If a text message is sent to a landline, that number is added to the blacklist with the reason “Not Text Enabled”. “Validation Failed” indicates an email address that is invalid or no longer exists.
Check Eligibility for Phone Note and Portal Message Encounters
When you bill for services rendered over the phone or in a portal message, it’s important to verify that the patient’s insurance policy was active during the date of the encounter.
Now you can check insurance eligibility for billed phone notes and portal messages when you post charges in PCC EHR.
As long as the patient’s policy is configured for eligibility, the most recent eligibility information for the date of the encounter appears in the Insurance Eligibility component in the Patient Details section of the Post Charges workflow.

You cannot record notes or statuses in the Insurance Eligibility component when verifying eligibility for phone or portal encounters.
Not all insurance plans offer eligibility, and those that do must be configured on your PCC system. To configure insurance plans for eligibility, contact PCC Support.
Live Eligibility, Not the Batch Eligibility Tool: Phone note and portal message encounters do not appear in the batch Insurance Eligibility viewer under the Tools menu in PCC EHR, nor do they appear in the insurance eligibility (elig) tool in Practice Management. You may only check eligibility for phone and portal encounters in the Post Charges workflow in PCC EHR.
Analyze and Respond to COVID-19’s Financial Impact on Your Practice
Use the new COVID-19 section in your Practice Vitals Dashboard to see how the crisis is impacting your practice and what you can do to respond.
To log into your Practice Vitals Dashboard, select “Practice Vitals Dashboard” from the Reports menu.
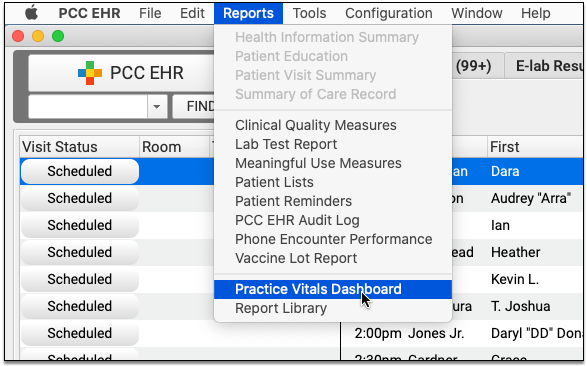
Click on the new COVID-19 tab to review trends and metrics specific to your practice.
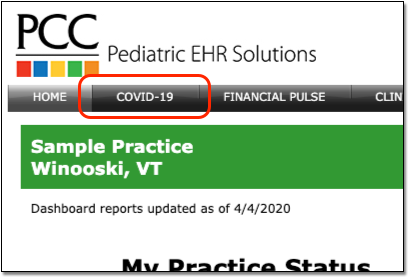
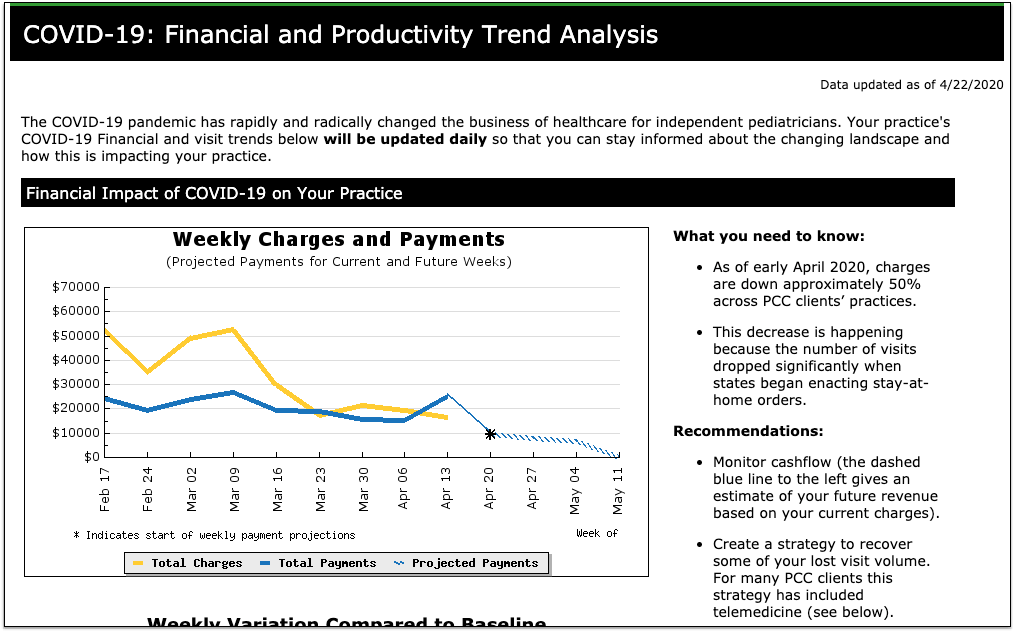
Graphs are based on weeks, going back to 2/17 as a pre-coronavirus baseline. Data points are updated live from your practice every morning.
COVID-19 has an effect on your practice’s charges and payments (cashflow), your visit volume, and how you see patients. The new dashboard section visualizes those impacts based on data from your PCC system, and it also provides explanations and ways to take action.
To see graphs and analysis based on data from pediatric practices around the country, visit The Business Impact of COVID-19 on Pediatric Practices.
Visit Categorization Update
As part of this update, PCC adjusted the default categorization of visits for many reports. Just as you can now see data on your Telemedicine and Phone visit rates in your Practice Vitals Dashboard, you may also see those categories in financial and charge-based reports in the Smart Report Suite in the Practice Management window.
If your practice previously used a custom visit category configuration (in order to break out mental health visits, for example), we did not adjust your configuration for reports in your Practice Management window. Contact PCC Support to make changes to report configuration for visit categories or any other configuration needs.
Change an Encounter’s Billing Place of Service After Posting Charges
Adjust the billing place of service of phone note, portal message, and visit encounters after the charges have already been posted in the Correct Mistakes (oops) program in the Practice Management window in PCC EHR.
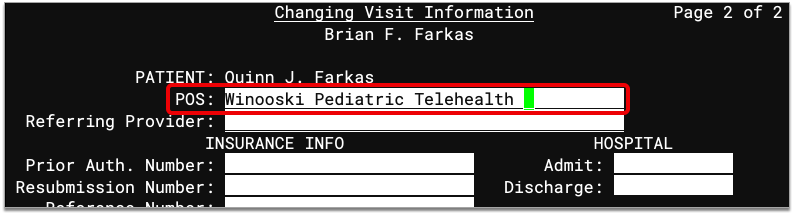
In Correct Mistakes (oops), press F5-Visit Status, select an encounter, adjust the billing place of service on the last page of settings, and save. Then, from the same window, resubmit the charges to insurance.
Read step-by-step instructions in Change an Encounter’s Billing Place of Service After Posting Charges.
Attach Documents to Future Appointments
Future appointments now appear in the Attach Document drop-down in Import Documents and wherever else you can edit documents in PCC EHR, allowing you to link forms, questionnaires, and images to patients’ upcoming visits.

Once you attach documents to a future appointment, that appointment will appear in the patient’s Visit History.
You can view document attachments in the patient’s Visit History by selecting the encounter and clicking “View Documents”. Attachments open in a Document Viewer window, where you can edit their titles, create tasks, move them to different visits, or remove them from the patient’s chart.
You can also view document attachments within the visit ribbon. Select the encounter in the patient’s Visit History Index, click “Edit”, and navigate to the Documents component. There you can see the document’s settings and manage its related tasks.
For more information about how to import and manage documents in PCC EHR, read Import Documents to a Patient Chart.
Identify Missed and Canceled Visits in a Patient’s Visit History
Sometimes a visit that contains notes or documents ends up being missed or canceled by the patient or your practice. Now, visit ribbons and the patient Visit History display a missed or canceled appointment status when an encounter containing notes or documents has been missed or canceled.

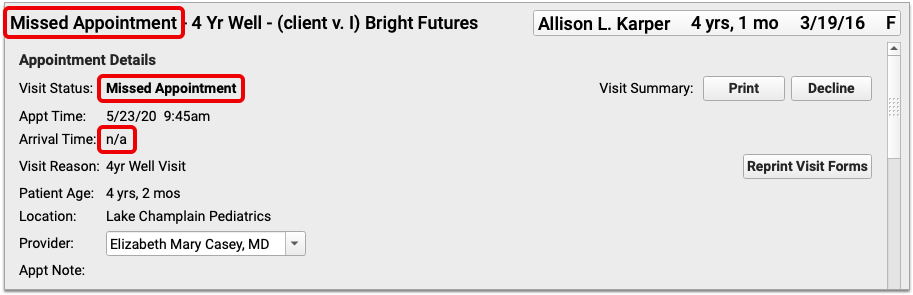
Cancelation information in the Visit History or visit ribbon can help you determine if documents were attached to a visit that never occurred, or if a visit that did occur was charted under the wrong encounter.
When you cancel a visit or mark it missed, related notes, orders, tasks, and document attachments remain intact until someone at your practice manually chooses to edit or delete them.
Pilot Test: Send CHADIS Screenings Automatically by Visit Reason
PCC is developing a stronger integration with CHADIS, making it easier to get the proper screenings to the patients you want. As part of this release, we will be pilot testing the first phase of that integration; PCC EHR can automatically register patients with CHADIS and have CHADIS assign those patients screenings based on the scheduled visit reason in PCC EHR.
Coming Soon: Print from PCC SecureConnect to Your Home Printer
Users who connect remotely to their PCC systems using SecureConnect now have the option to print out of PCC EHR and the Practice Management window wherever they are working.
To print a file while working in SecureConnect, choose the printer named “SecureConnect” as your destination.
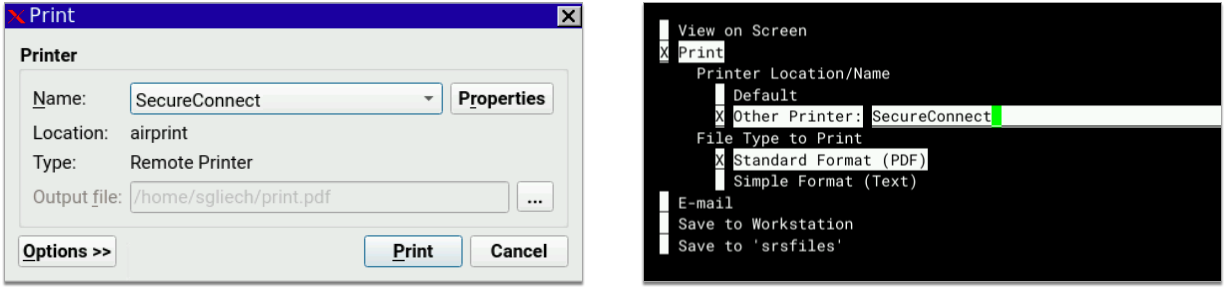
When you print, the file will download to your local workstation, where you can open it from your downloads folder and send it to your local printer.
For step-by-step instructions about how to print out of SecureConnect, read Print from PCC SecureConnect to Your Home Printer.
Improved Portal Payment Processing
Under certain circumstances, such as when a family closed their patient portal window before the payment transaction completed, portal payments occasionally did not appear in your PCC database. Additionally, in April and May of 2020, the BluePay payment network experienced processing delays which exacerbated the problem.
In April, PCC distributed patches to all practice systems to address this problem. Now the patient portal can validate a payment even if the user has prematurely closed their window. Your PCC system also looks for any stuck payments and makes sure they arrive.
As payments may occasionally take several minutes to arrive on your PCC system, a family might submit a duplicate payment by mistake. Your practice can identify and resolve duplicate payments and other payment issues by reviewing the Portal Payments report in the PCC EHR Report Library.
Other Updates and Bug Fixes
-
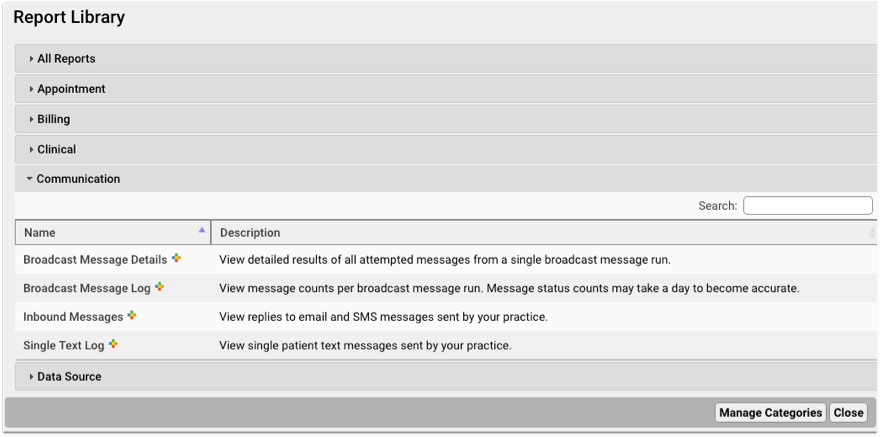
Review Communication Reports in New Report Library Category: When your office needs to review your sent Broadcast Messages, texts, and related details, you can now find those reports in a new Communications section in the PCC EHR Report Library.
-
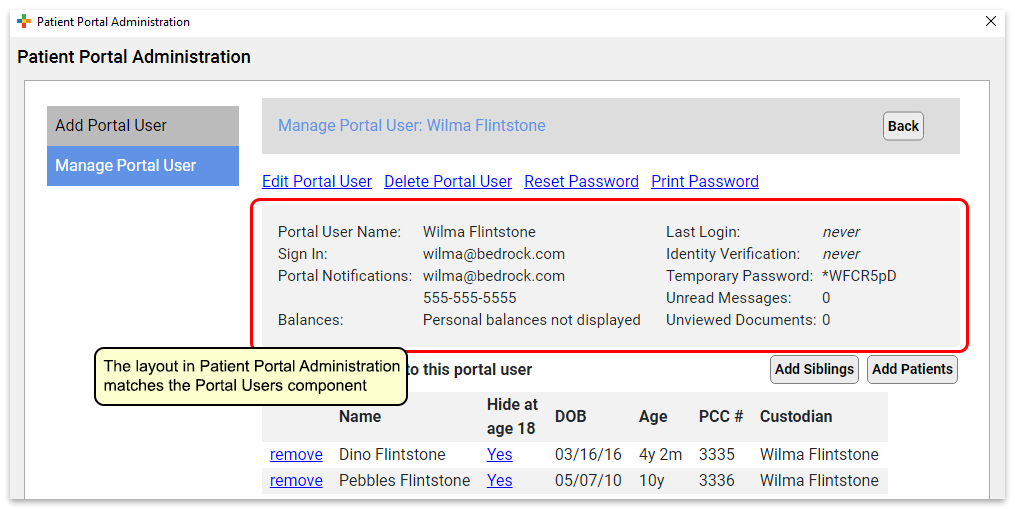
Patient Portal Administration is Easier to Read: When you manage a patient portal account, the interface that displays user details is easier to read, mirroring what your front desk sees during Patient Checkin or in the patient chart.
-
Telemedicine Component Will Display Portal Username: The Telemedicine component, which appears at the top of telemedicine chart notes, will now display the portal user name(s) for the patient, and not the user’s email address. Prior to the PCC June COVID-19 release, the portal’s username was also their email address for portal notifications.

-
One Less Click for Selection and Drop-Down: When you select a bullet item, and then choose from a drop-down, PCC EHR is now smart enough to not require the extra click to select the drop-down. You’ll notice this improvement in various places in PCC EHR, including the Export menu of the PCC EHR Report Library.
-
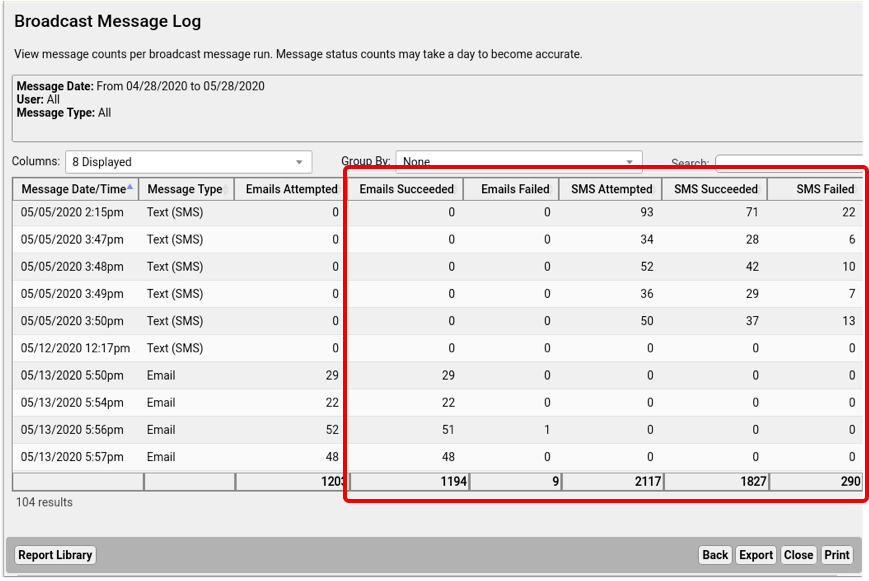
See Failed Messages Per Broadcast Run in Broadcast Messaging Log: Use the new “Failed Messages” column in the Broadcast Messaging Log to see if your broadcast messages are getting through.
-
Improve Patient Recall Reporting By Excluding Cancelled Appointments: If a practice used a patient-based report to perform a patient recall, under certain circumstances the output could include cancelled appointments and orders. The PCC June COVID-19 update tweaks the criteria behavior for patient list reports so that when you wish to include patients by appointment and orders, they will not include cancelled appointments or orders.
-
Send Fewer Rejected/Bounced Broadcast Messages With Improved Email Validation: In April, PCC updated all practices to improve email validation. If your practice records an invalid email address in an email field, Broadcast Messaging excludes it when it sends messages. We’ve improved this validation with new standards to reduce email errors.
-
Post Charges While Editing the Chart: Under certain circumstances, when a user edited a chart while another user simultaneously saved new posted charges, the charges would not enter the system. This has been resolved.
-
Continue Transmitting Broadcast Messages After Internet Connection Failure: Under certain circumstances, such as when an internet connection failed while transmitting Broadcast Messages, some messages would go out to families and others would not. PCC has added error capturing to the process so that messages will recommence once the connection is restored.