PCC 10.5 Release Manual
Contents
- 1 Scheduling & Front Desk
- 2 Clinical
- 2.1 Calculate Mid-Parental Height Where You Need It
- 2.2 Import Files While Working Remotely
- 2.3 See Visit Statuses in pocketPCC
- 2.4 Leap from a Patient’s Chart to a Sibling’s Chart in pocketPCC
- 2.5 Approve pocketPCC Prescriptions Using Your Authy Soft Token
- 2.6 See “Mark as Reviewed” Attribution Throughout the Patient Chart
- 3 Billing
- 3.1 Prevent Certain Claim Responses from Autoposting
- 3.2 Organize Your Insurance A/R By Status
- 3.3 Find the Unpaid Encounters Assigned to You
- 3.4 Edit Billing Notes Without Leaving Your Worklist
- 3.5 Quickly Switch the Responsible Party for All Charges on an Encounter
- 3.6 Specify Which Procedures Appear on a Claim
- 3.7 Print a Paper HCFA Claim Form for an Encounter
- 3.8 Delete Refunds, Write-Offs, and Reversals Posted By Mistake
- 3.9 Check the Current Status on a Claim in PCC EHR
- 3.10 See Date of Birth and Member ID While Working on a Rejection
- 4 Practice Administration & Oversight
- 4.1 Report on Clinical Quality Measures (CQMs) in the Report Library
- 4.2 Optimize Your Providers’ Schedules
- 4.3 Report on VFC Eligibility Status in the Report Library
- 4.4 New Layout and Button Name Change in the Report Library
- 4.5 Export Large Data Sets from the Report Library
- 4.6 Export Reports to Your Browser While Working Remotely
- 4.7 Reveal or Hide Disabled EHR Accounts
- 4.8 EHR Chat Improvements
- 4.9 Assign the Right User in pocketPCC Messaging
- 5 Bug Fixes
Scheduling & Front Desk
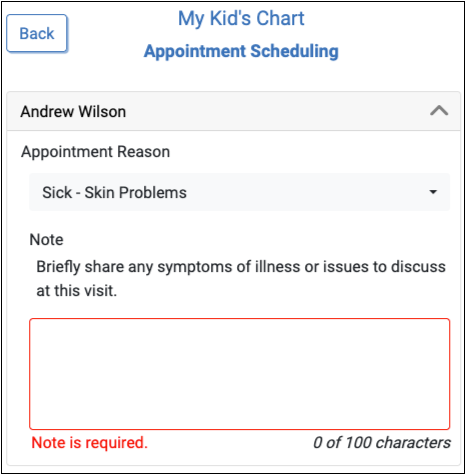
Require an Appointment Note While Scheduling through the Patient Portal
Get information about your upcoming appointments when the appointments are scheduled through PCC’s patient portal. When configuring Portal Scheduling, you can require an Appointment Note for each scheduling category, so patients and families must add an appointment note to complete scheduling.
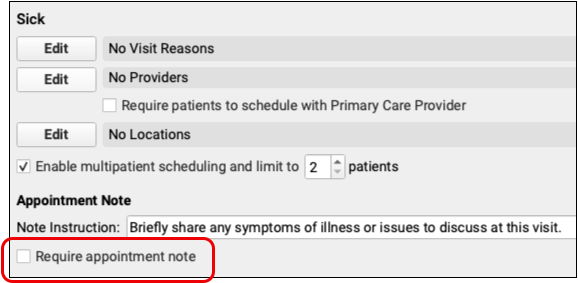
Each category includes a “Require appointment note” option below the appointment note instruction field. Check the box to force users to enter text within the appointment note field before they can continue to schedule the appointment.
Your practice can optionally configure the note instruction text, which appears above the appointment note field.
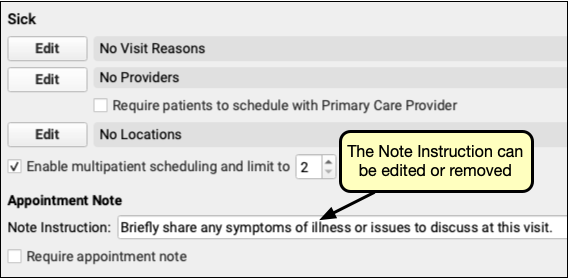
Edit the Note Instruction text field to provide instructions or request specific information from portal users, or remove the text entirely.
Review your Appointment Note Instructions.: Review your Note Instruction for each category to let patients and families know what information you need in an appointment note. For example, the Vaccine category’s Note Instruction field is blank by default, so consider adding an instruction to include which vaccines are needed in the Appointment Note.
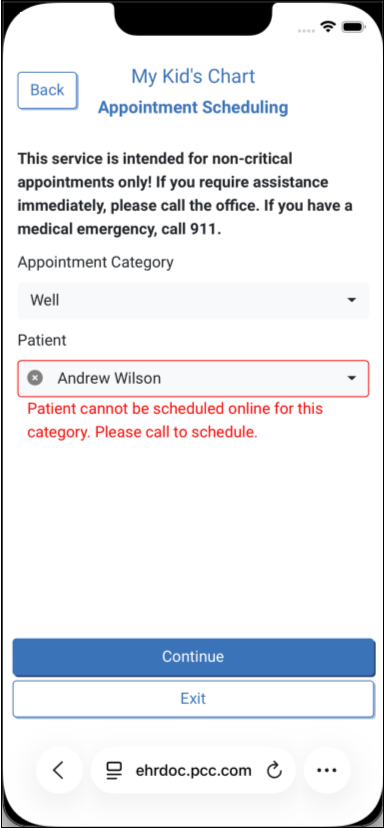
Require Patients to be Scheduled with their PCP when Scheduling in the Patient Portal
For each scheduling category you can optionally require patient portal users to schedule appointments only with their assigned primary care provider.
In a given category Check the box labeled “Require patients to schedule with Primary Care Provider”.
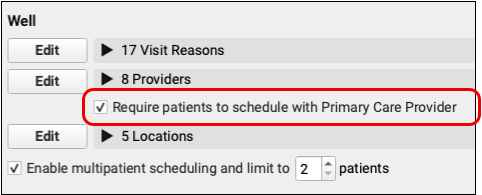
When checked, families can only schedule their patients with their primary care providers.
Patients without a PCP, or with a PCP not configured for patient portal scheduling, will appear in gray text on the Choose a Patient menu.
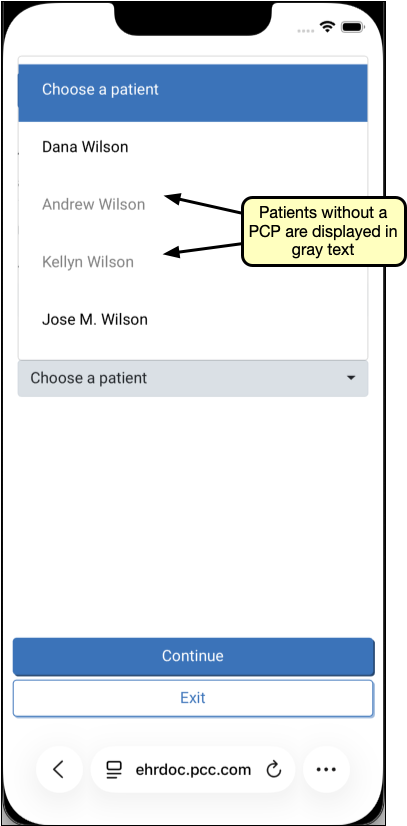
If a portal user attempts to select a patient without a PCP, they will be prompted to call to schedule.
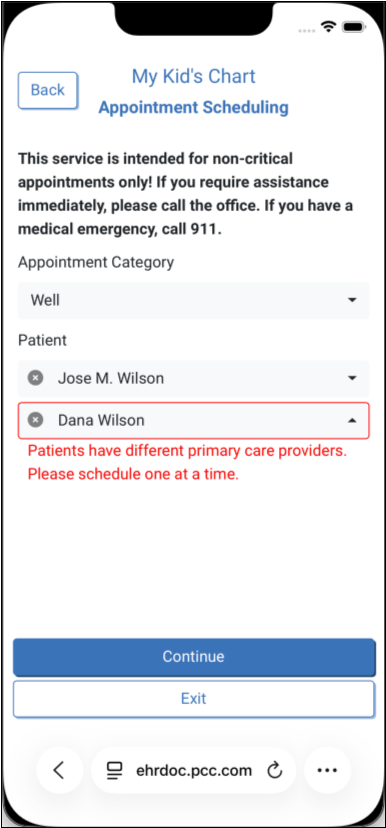
When scheduling multiple patients, all patients must have the same PCP.
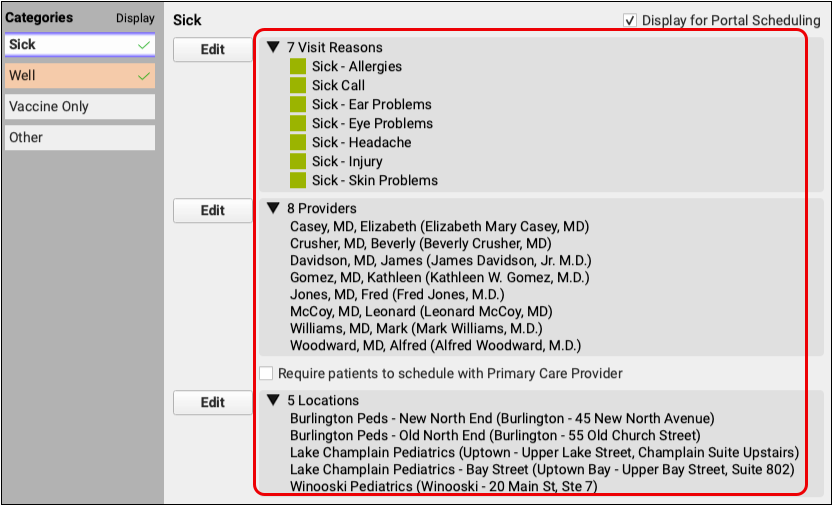
Streamlined Patient Portal Scheduling Configuration
Set up and manage patient portal scheduling more efficiently. PCC EHR’s scheduling configuration tool has been improved to help your practice manage your portal configuration.
Portal Scheduling Categories have been divided into their own sections. To manage each category, click on the category’s button on the left side of the portal scheduling configuration tab.
Categories with “Display for Portal Scheduling” checked are indicated by a green check mark on each category’s button. If configuration is not complete in any category set to display for portal scheduling, that button will appear in orange. The edit button for Visit Reasons, Providers, or Locations will also appear in orange where no selection has been made.
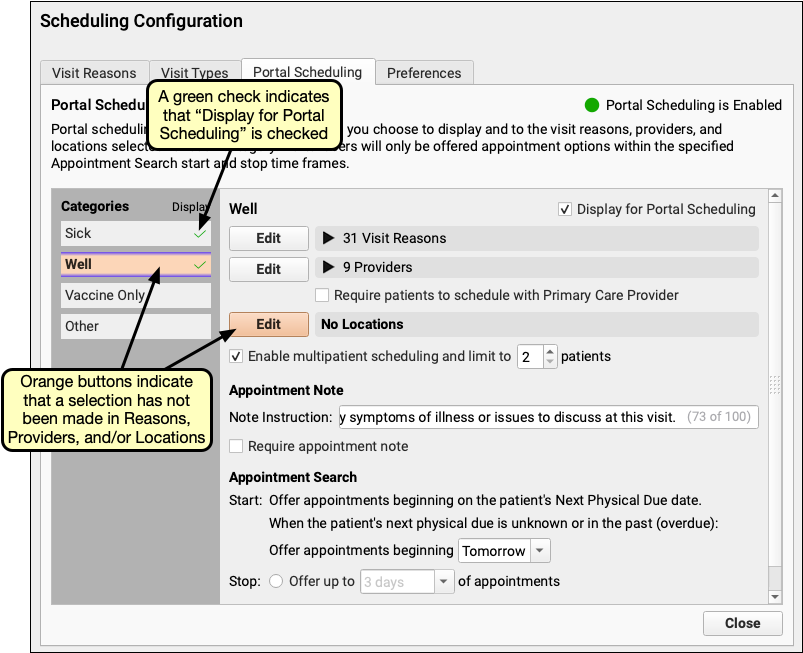
When reviewing selections for each category, additional information is available: visit reasons now display the visit type color, a provider’s portal display name appears in parentheses when different, and each location’s portal display name also appears in parentheses.
Clinical
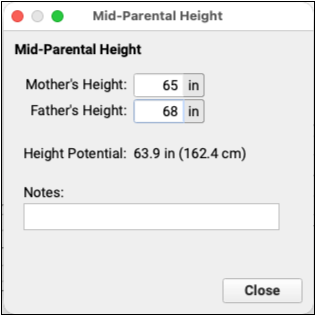
Calculate Mid-Parental Height Where You Need It
Make sure you have all the data you need to track and assess a patient’s growth by recording parental heights and calculating a patient’s height potential directly within each patient’s growth charts.
Two growth charts, 2 to 5 Years: Stature for Age (WHO), and 2 to 20 Years: Stature for Age (CDC) now include the option to enter a patient’s parents’ height and calculate a Mid-Parental Height. Click the “Mid-Parental Height” button in each of the above charts to enter parental heights and any relevant notes.
The 2 to 20 Years: Stature for Age (CDC) uses Mid-Parental Height to generate a height potential, percentile, and Z-score.
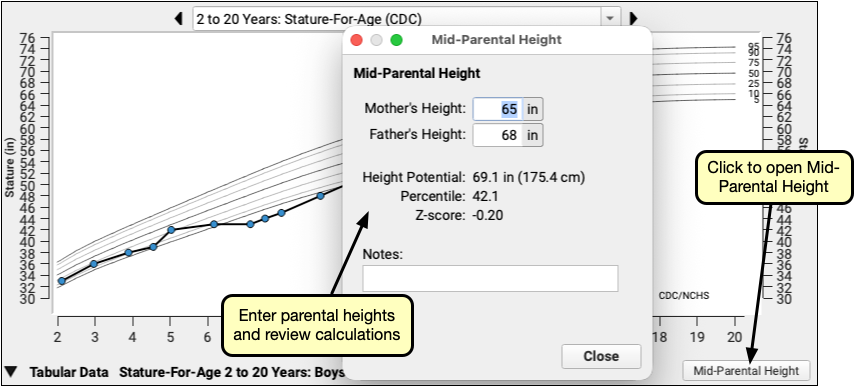
Height Potential is displayed in inches and centimeters.
Because the data used in the 2 to 5 Years: Stature-For-Age (WHO) chart does not include fully grown patients, it cannot calculate a Percentile or Z-score.
Import Files While Working Remotely
When you are logged in remotely via SecureConnect and you need to get a file from your workstation into PCC EHR, simply drag your file over the SecureConnect window. Locate and manage the document as usual in the Import Documents window.
Drag and Drop the File
While logged in via SecureConnect, open to any screen, drag the file icon from your workstation over to the SecureConnect window and drop it in. The window will highlight in blue when your icon is over the SecureConnect window.
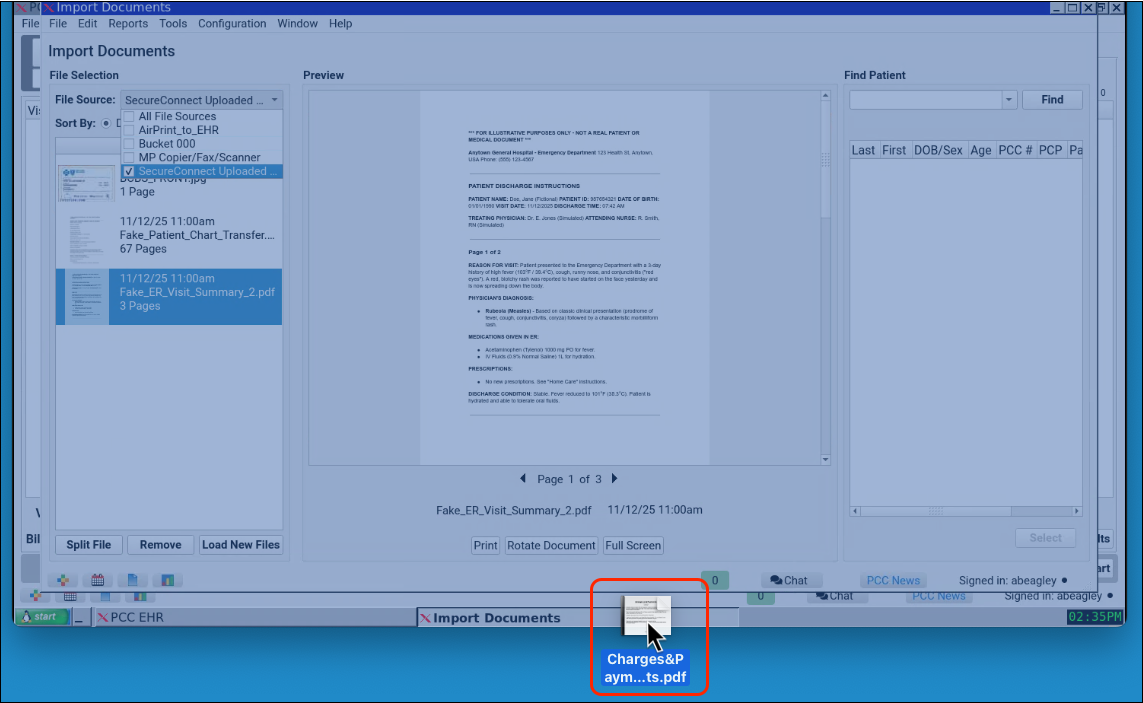
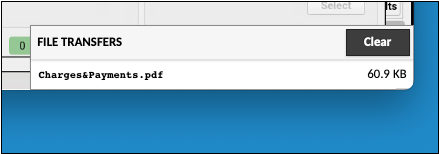
Your upload progress displays at the bottom of your screen.
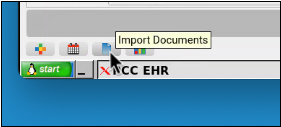
Open Import Documents
If you are not already in the Import Documents window, open Import Documents to find the file.
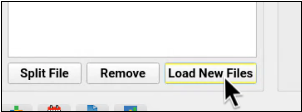
Load New Files
When the Load New Files button turns yellow, your upload is complete. Click the “Load New Files” button to load all new files into Import Documents.
Locate the File
Select the SecureConnect Uploaded Files bucket from the File Source drop-down, and select your file.
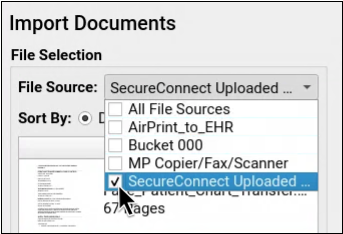
Files uploaded via SecureConnect will only appear in the SecureConnect Uploaded Files bucket. Content in this bucket is visible to all users with Import Documents permissions.
Check Your File Type: Some file types, such as MP4s, are not supported in PCC EHR. PCC EHR can receive the following file extension types: jpg, jpeg, mng, png, pbn, pgm, ppm, xbm, xpm, gif, bmp, tif, tiff, and pdf. SecureConnect will not recognize unsupported files.
Work with Your Document
Choose a patient or account to associate with your document, and work with the document as you normally would.
To learn more about working with documents, read Import Documents to a Patient’s Chart.
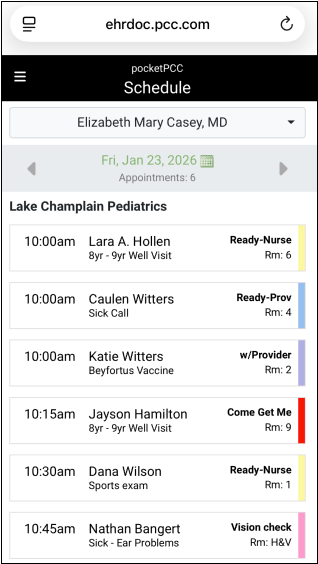
See Visit Statuses in pocketPCC
Track what’s going on in your office from anywhere using your phone. The Schedule screen in pocketPCC now displays the status of each visit. Changes to visit statuses update when you refresh the page in your phone’s browser.
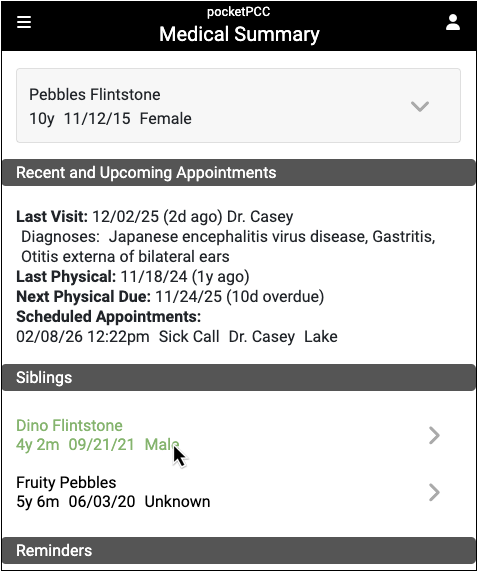
Leap from a Patient’s Chart to a Sibling’s Chart in pocketPCC
Jump from one sibling to another with a single click. The siblings component in pocketPCC now links directly to each sibling. Click a sibling’s name to open the sibling’s chart.
Approve pocketPCC Prescriptions Using Your Authy Soft Token
When you prepare and send controlled substance prescriptions from pocketPCC, you have the option to approve them using the Authy app.
Log into pocketPCC and prepare your controlled substance prescription. When it’s time to send the prescription, select your soft token as the authentication method and use the Authy app on a different device to approve it.
For example, if you are logged into pocketPCC on your smartphone, you can approve controlled substance prescriptions using the Authy app on your smartwatch, your tablet, or a different phone.
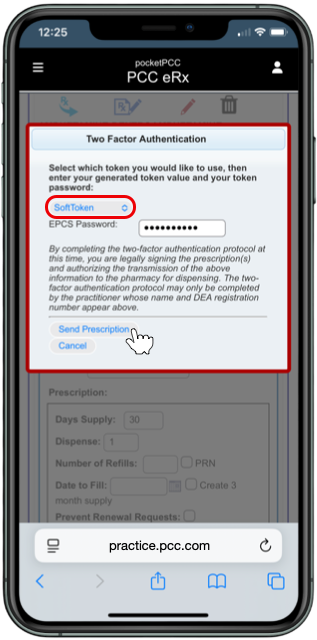
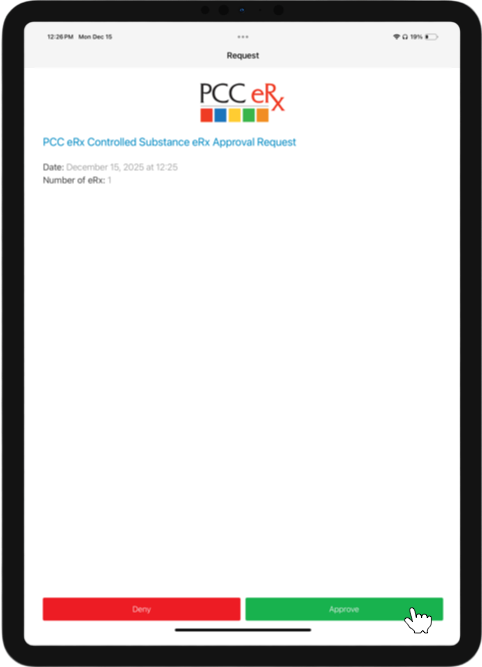
You can also use your hard token (physical fob) to approve controlled substance prescriptions sent from pocketPCC.
In order to comply with DEA requirements:
- Always use different devices to prescribe and approve controlled substance prescriptions.
- Never use the same device to prescribe and approve controlled substance prescriptions, even if prompted by the Authy app to do so.
Set Up Authy on a Second Device
Open Authy on Your Primary Device
Open the Authy app on the device you normally use to approve controlled substance prescriptions.

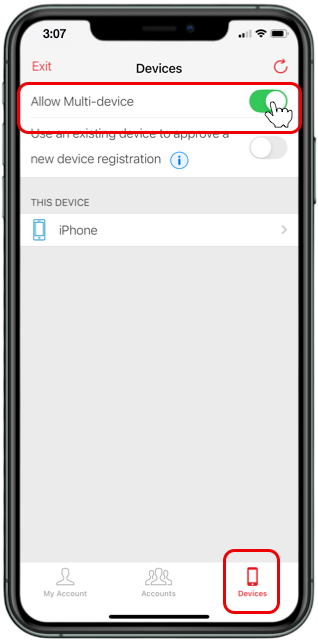
Enable Multi-Device in Your Authy Account
Tap the cog icon to open your Authy account settings.
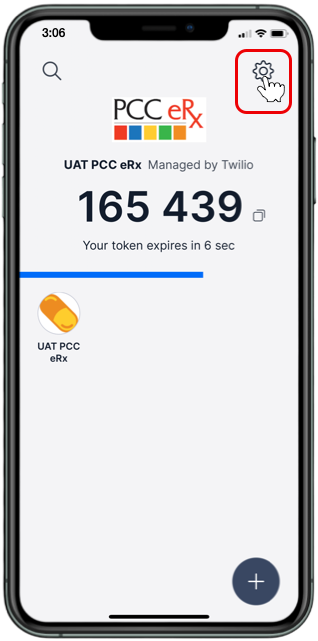
Go to your Devices, then turn on the “Allow Multi-device” switch.
Download Authy on a Second Device
Download the Authy app on a second device, like your tablet or a second smartphone, if you have one.
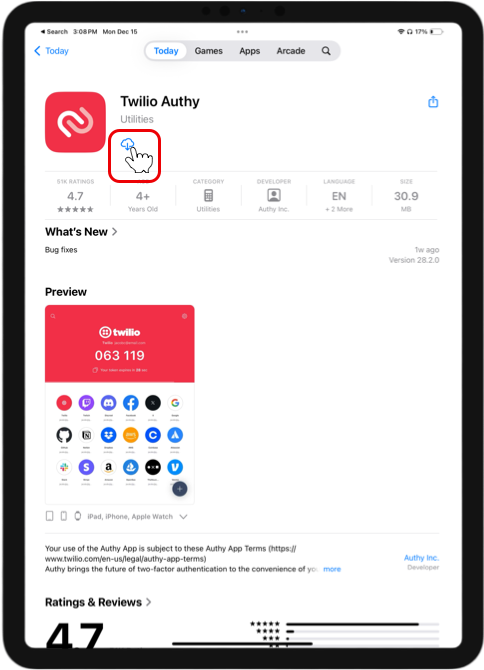
Step-by-Step Installation Instructions: Not sure how to install the Authy app? Follow our step-by-step instructions.
Want to Use Your Apple Watch?: Setting up Authy to work with your Apple Watch is easy and practical. Learn how.
Sign into Authy on Your Second Device
Open the Authy app on your second device, then sign into your account.
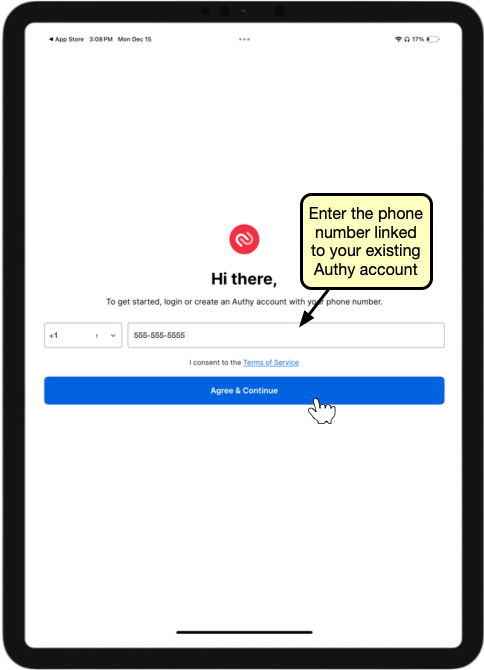

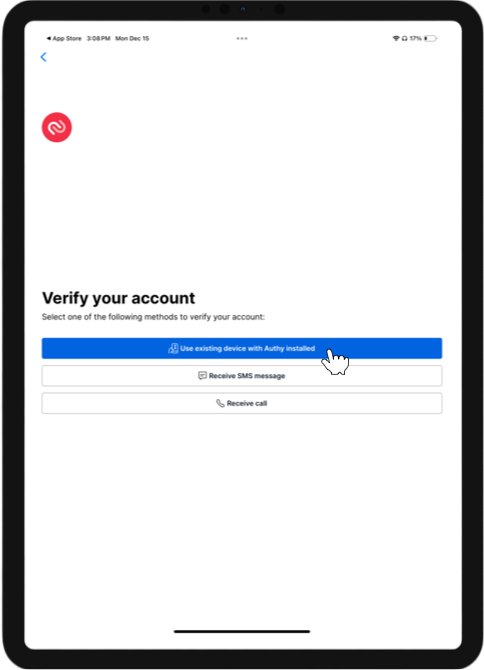
Verify Your Account
Choose a verification method for your account. If you choose “Use existing device with Authy installed”, Authy will send a notification to your primary device requesting approval to add a new device to your account.
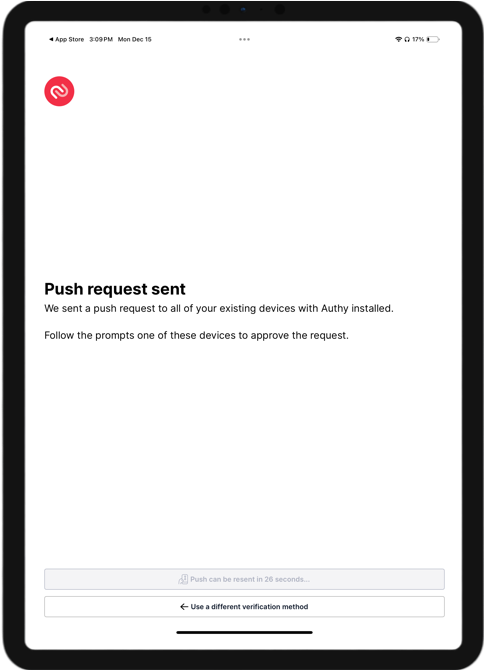
Approve the Second Device
On your primary device, approve the request from the Authy app to add a second device to your account.

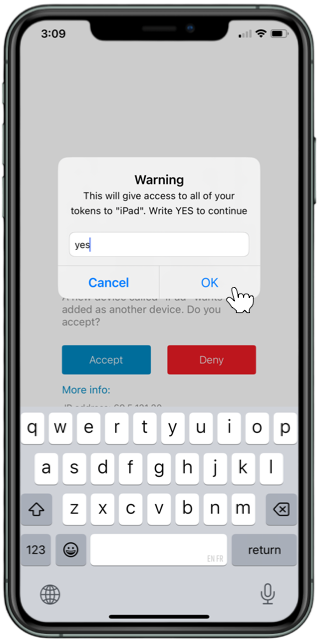
To prevent additional devices from accidentally being added to your account, Authy recommends turning off the multi-device switch in your account settings until the next time you want to add a device. You can continue to use Authy on all of your approved devices when the multi-device switch is off.
See “Mark as Reviewed” Attribution Throughout the Patient Chart
Regardless of where in the chart you are reviewing your patient’s medication history and medication allergies, when you click “Mark as Reviewed”, you can see evidence of that action everywhere medication history and medication allergies display.

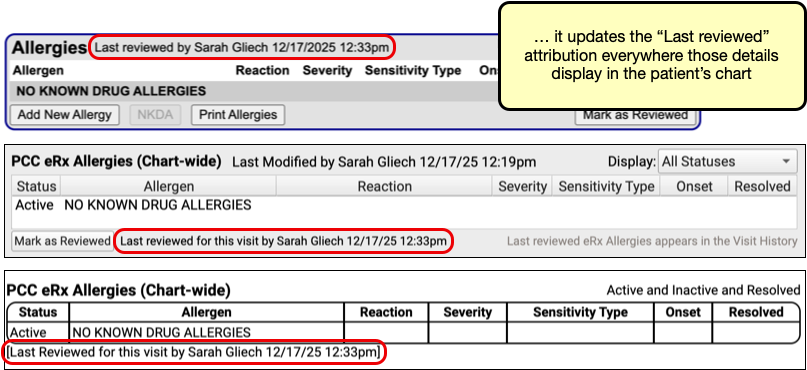
The “Patient takes no Meds” button in PCC eRx also counts as reviewing Medication History, and will update the last reviewed attribution everywhere medication history displays in the patient’s chart.
Billing
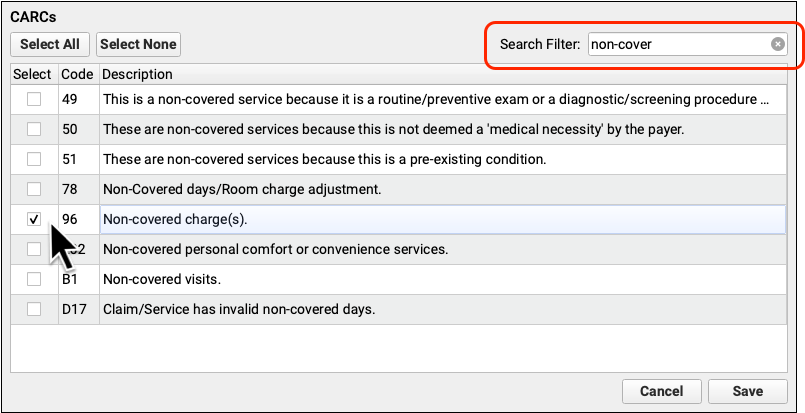
Prevent Certain Claim Responses from Autoposting
You can autopost most incoming payments and adjustments on your ERAs. But what if you have a special situation with a payor? Or a particular adjustment reason that deserves extra scrutiny?
You can create a custom rule that prevents autoposting, based on payor and CARC. Then you can autopost all ERAs and work on your exceptions manually on the Posting Exceptions worklist.
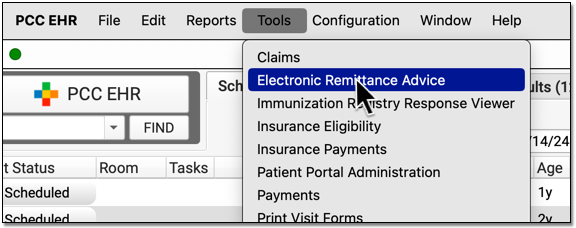
Open Electronic Remittance Advice
Open the Electronic Remittance Advice tool from the Tools menu.
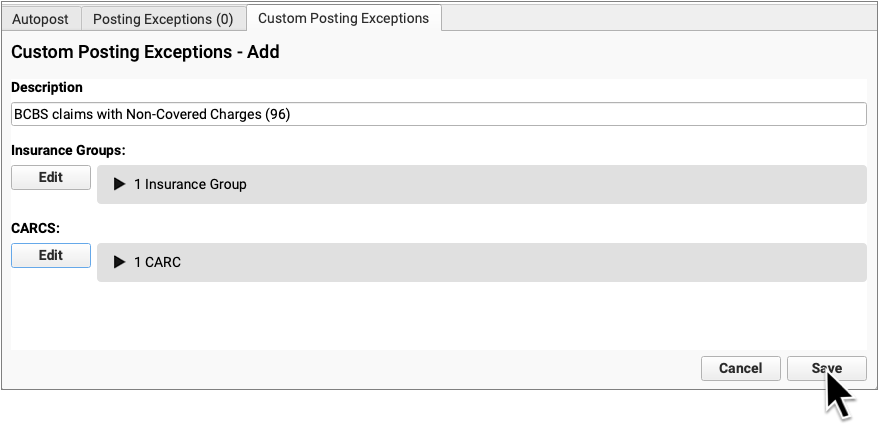
Click “Custom Posting Exceptions”
Visit the Custom Posting Exceptions tab.
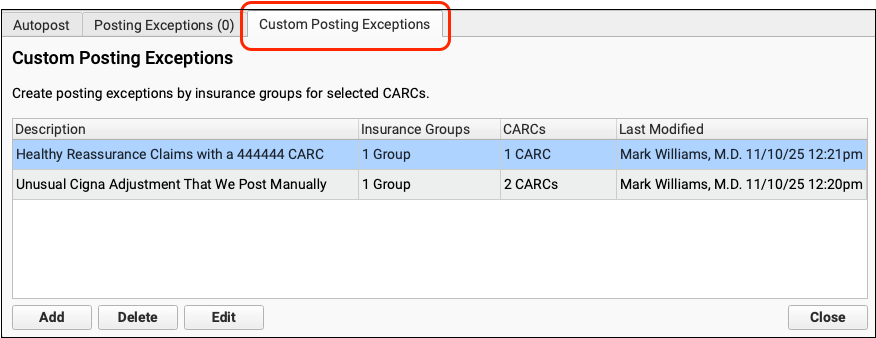
The Configure Posting Exceptions tab displays all of your practice’s custom posting exceptions. Whenever you autopost ERAs, PCC EHR checks each of these rules for each encounter before it posts the adjudication.
Click “Add” To Create a New Exception
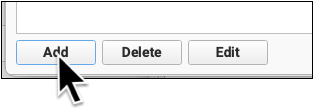
Name Your New Posting Exception
Enter a description for your exception rule.
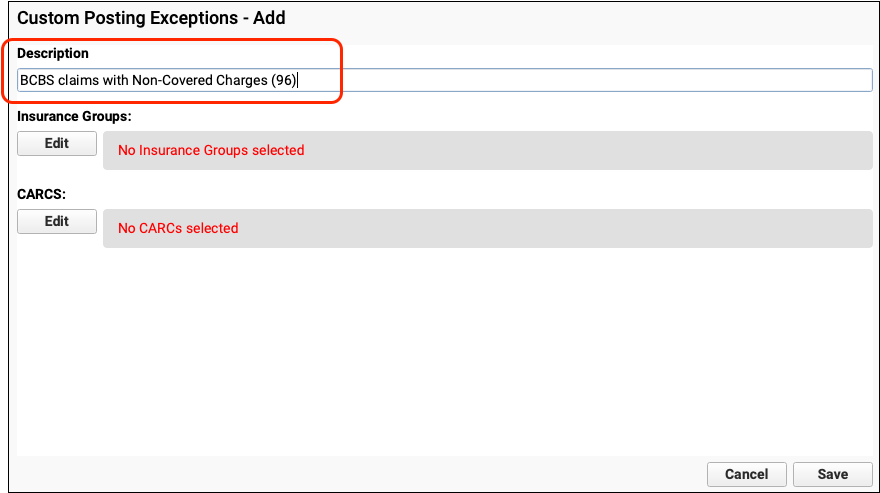
Use a name that will help your practice quickly understand which ERA responses will be held back for manual posting.
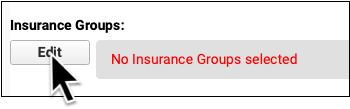
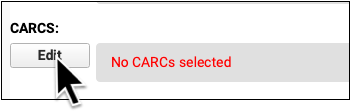
Select Payors and CARCs
Select the payors and CARCs that will cause an ERA response to be held for manual attention.
You can use the search filter to quickly jump to the CARC you need.
Save Your New Rule
Click “Save” to save your new rule and review it on your list of Custom Posting Exceptions.
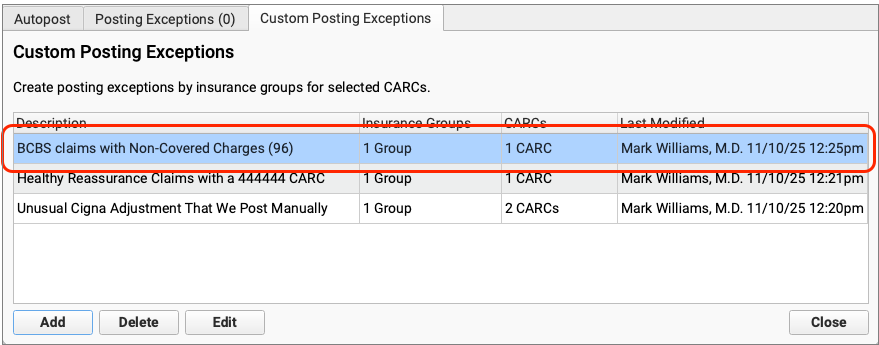
When you autopost ERAs, PCC EHR will hold back any claim responses that match the criteria in your custom posting exceptions. On the Posting Exceptions worklist, you can sort and filter the responses that need manual attention, double-click to open one up, read the details, and post manually.
Organize Your Insurance A/R By Status
As you work on the Unpaid Encounters worklist in the Insurance Balances tool, you can mark encounters with a status, such as “Waiting on Payor” or “Under Review”. Then you can track, organize, and filter your A/R by that status.
While viewing an encounter’s details, use the Encounter Status menu to set the status for an unpaid encounter.
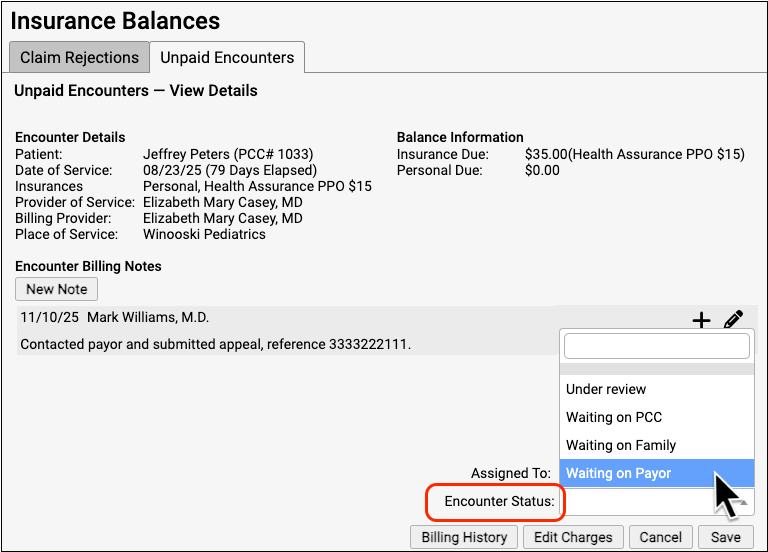
Back on the worklist, you can use filters, column sorting, and search to organize the Unpaid Encounters worklist by status.
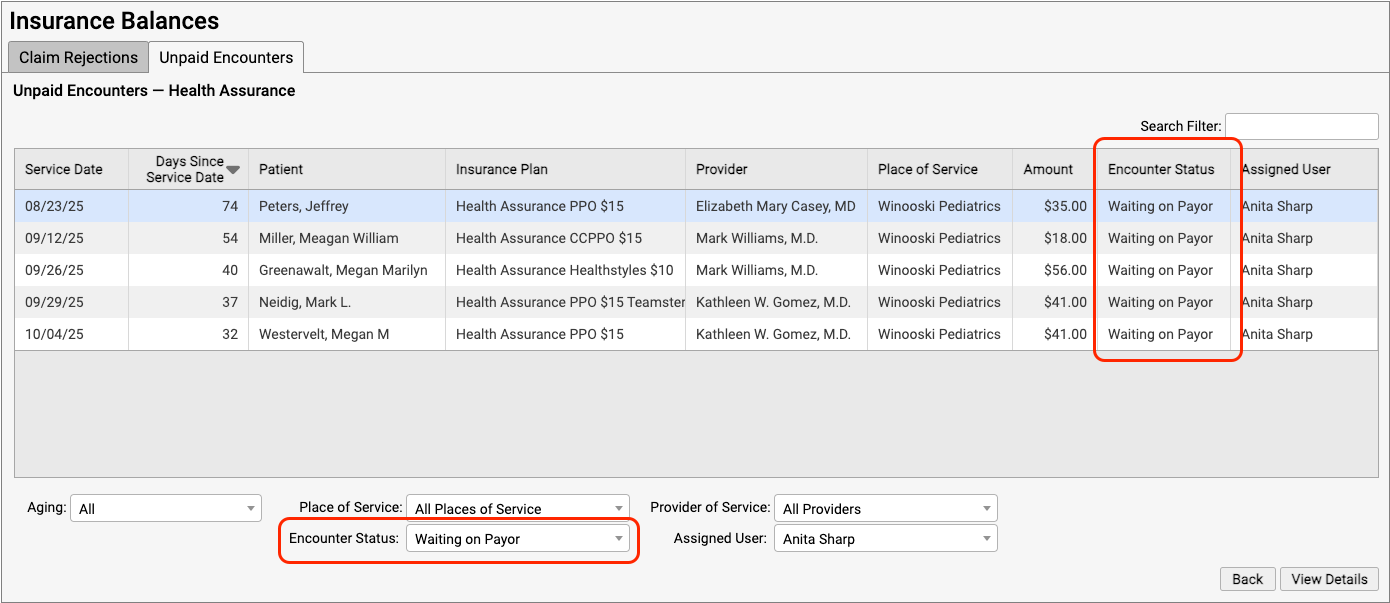
Statuses make it easier to track, organize, and filter your insurance A/R so you can address the needs of every unpaid claim. For a complete guide to the Unpaid Encounters worklist, read Follow Up on Unpaid Encounters with Insurance Balances.
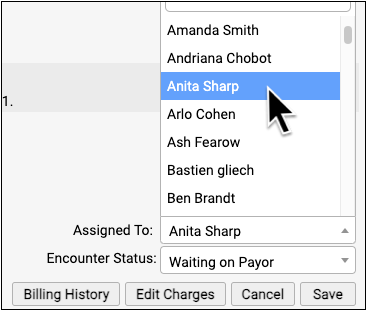
Find the Unpaid Encounters Assigned to You
Do you need to make sure you followup on an encounter? You can assign it to yourself or another biller at your practice.
Click on the Assigned To menu to assign an unpaid encounter to someone at your practice.
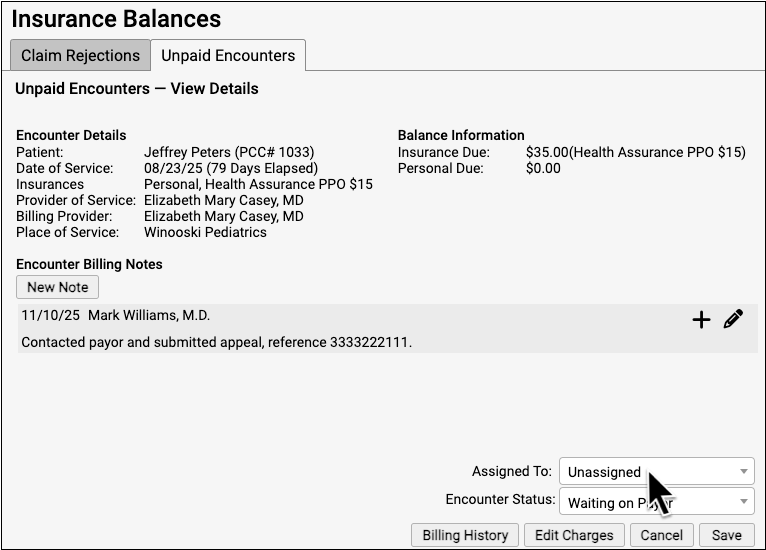
You can then use filters, column sorting, and search to organize the Unpaid Encounters worklist by assigned user.
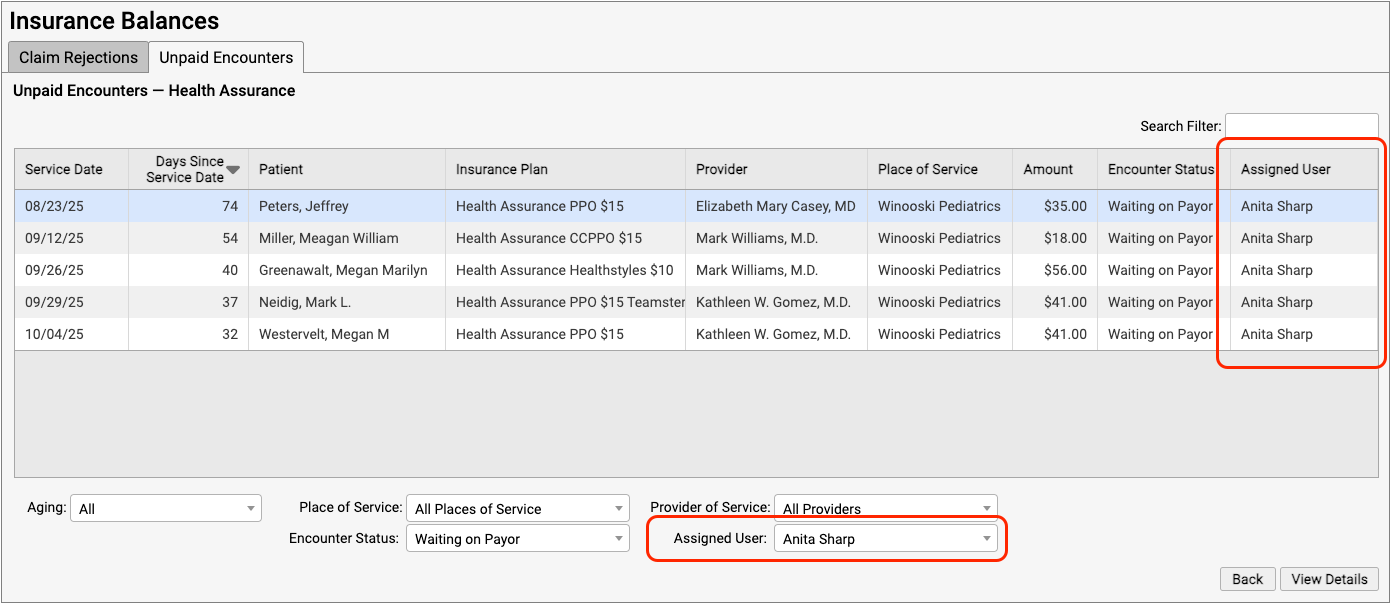
Assigning a user helps ensure your practice will followup on every unpaid claim. For a complete guide to the Unpaid Encounters worklist, read Follow Up on Unpaid Encounters with Insurance Balances.
Edit Billing Notes Without Leaving Your Worklist
You can update the encounter billing notes for an unpaid encounter without leaving the Rejections and Unpaid Encounters worklists.
As you work on an encounter, billing notes appear on the detailed view.
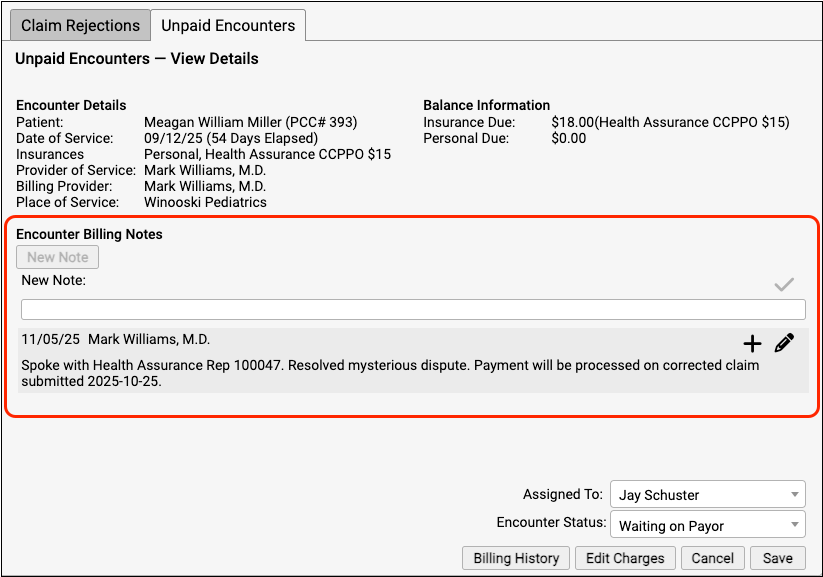
You can add a new note or followup note or edit an existing note.

When you respond to a rejection or follow up on an appeal, the encounter billing notes help you understand what’s been done so far and record your actions as your practice seeks payment for the encounter. For a complete guide to the Unpaid Encounters worklist, read Follow Up on Unpaid Encounters with Insurance Balances.
Quickly Switch the Responsible Party for All Charges on an Encounter
Do you need to pend an encounter back to the family’s primary policy? Or switch all the charges on an encounter to “Self Pay”?
In Edit Charges, use the “Insurance” menu at the top of the Procedures section.
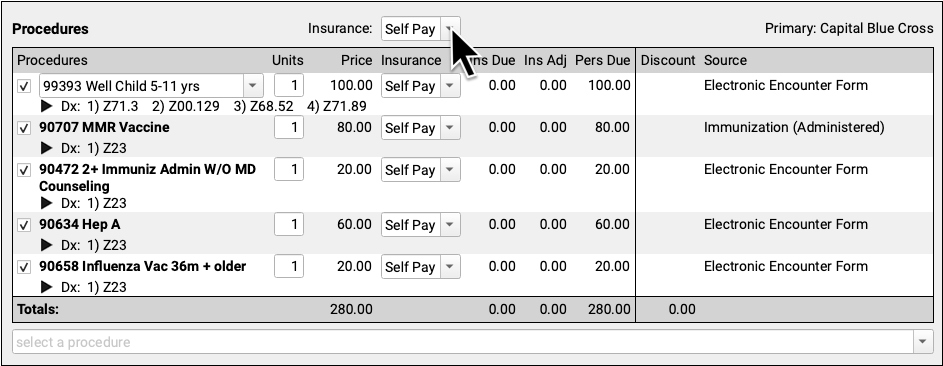
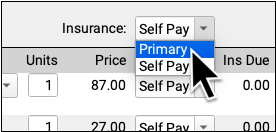
All of the charges for the encounter will be set to your selection. You can then optionally change individual charges that have a different responsible party.
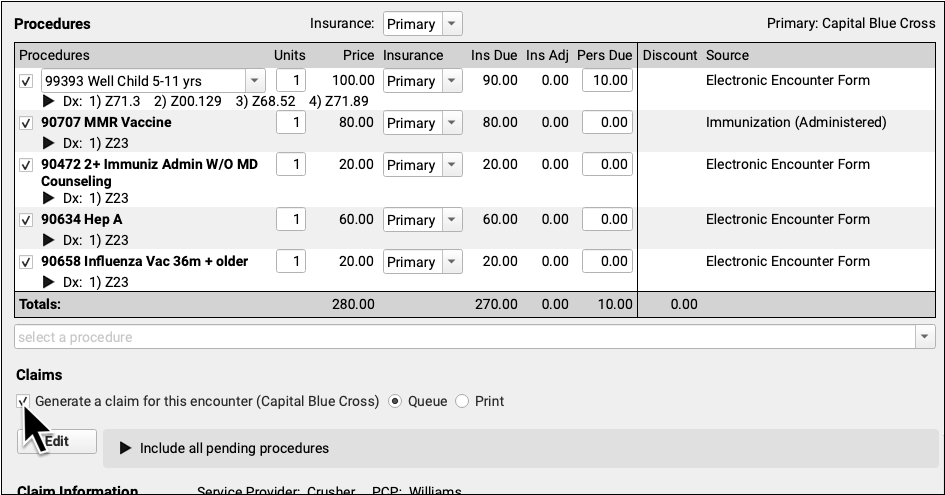
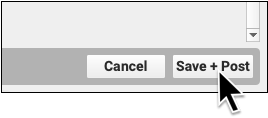
After you make changes, click “Generate a claim for this encounter” to queue up a claim when you save. You may also want to use “Select Procedures” to specify which charges will appear on the claim, double-check Claim Information (like the Payor Claim Control number), or make other changes in Edit Charges. Then click “Save + Post” to save your changes and queue or print a new claim.
For a complete guide to editing encounter charges and queuing up claims, read Edit Encounter Charges and Other Claim Information and Resubmit a Claim.
Specify Which Procedures Appear on a Claim
Do you deal with administrative fees, unusual insurance claim requirements, or ear piercings and other non-insurance charges? Sometimes you need to send a claim that shows only some of the charges from an encounter.
In the Claims section of Edit Charges, click “Edit” to adjust which procedures will appear on the claim.
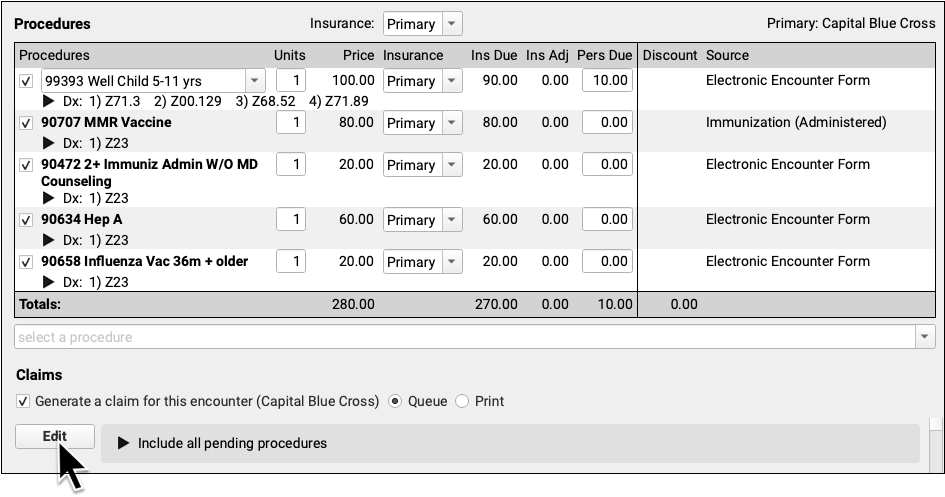
Deselect any charges that shouldn’t appear, and click “Save”.
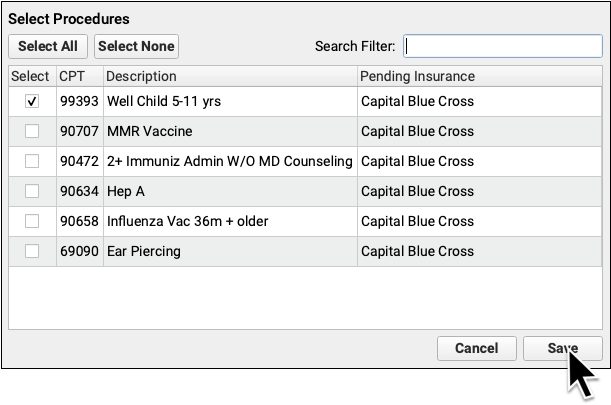

You can review how many charges will be included, and make changes at any time.
After selecting procedures, double-check that “Generate a claim for this encounter” is selected. You may also want to adjust the responsible party for charges, double-check Claim Information (like the Payor Claim Control number), or make other changes in Edit Charges. Then click “Save + Post” to save your changes and queue or print a new claim. The new claim will include only the selected charges.
For a complete guide to editing encounter charges and queuing up claims, read Edit Encounter Charges and Other Claim Information and Resubmit a Claim.
Print a Paper HCFA Claim Form for an Encounter
In those rare cases when you need a paper claim, you can print one from the Edit Charges screen.
When you are ready to print a claim, select “Generate a claim for this encounter” and then click “Print”.
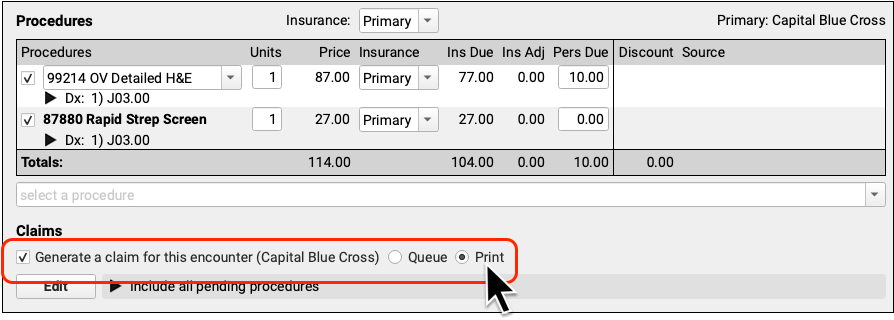
When you click “Save + Post”, you’ll be prompted to print the claim form from your workstation.

Delete Refunds, Write-Offs, and Reversals Posted By Mistake
Have you ever posted a takeback to the wrong account? Or written off an account credit, only to realize it was intended for another charge? PCC 10.5 makes it easy to quickly edit and delete accounting adjustments like insurance reversals, write-offs, and more.
First, find the credit refund, write-off, or reversal in the History tab of the Payments tool.
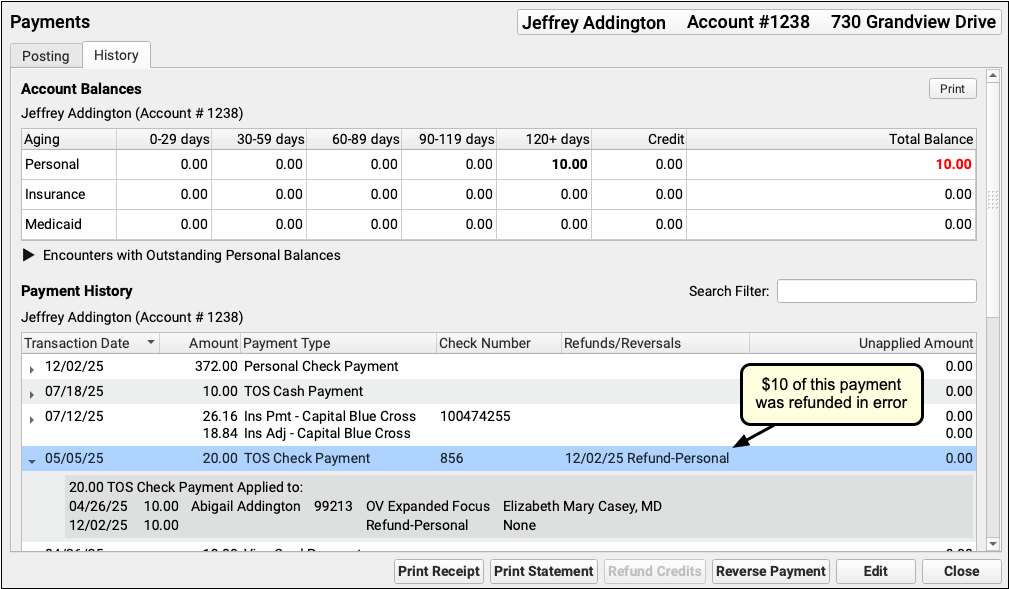
Double-click or click “Edit” to make changes.
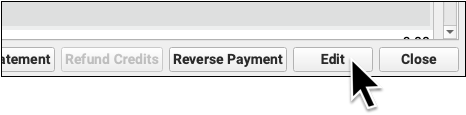
Then click “Delete” to remove it from the account record.

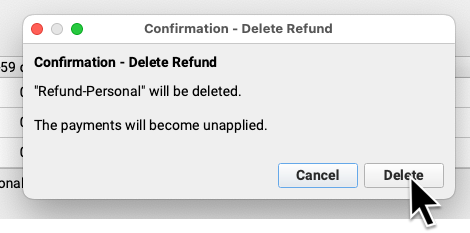
You can then link the payment to charges or repost the correct refund amount, for example.
Insurance Reversals Need an Amount Due: If you delete an insurance reversal, what happens to the insurance payment? PCC EHR will reapply the insurance payment towards the original charges for which it was posted.
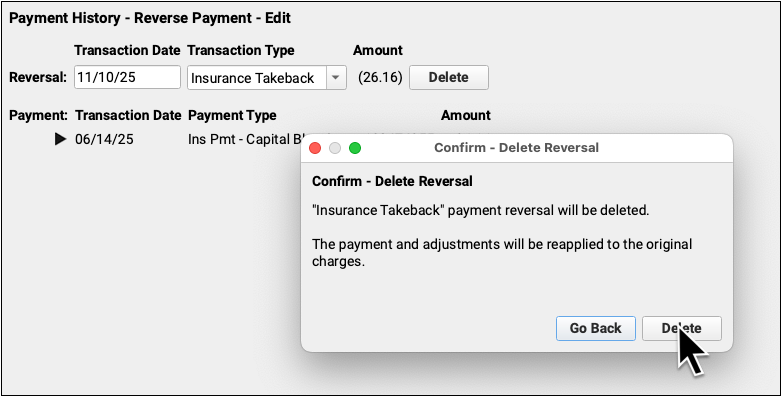
If the original charges have been paid off or deleted, you will not be able to delete the reversal. First edit the encounter’s payments and make charges due again, and then you will be able to delete the reversal.
Check the Current Status on a Claim in PCC EHR
Has your claim been received by the payor? Have they adjudicated it yet? What’s the status? Instead of opening the payor’s website or calling them, you can read the payor’s latest claim status right in PCC EHR.
PCC EHR Only: In order to check the status on a claim for an encounter, the claim must have been submitted using PCC EHR’s Claims tool. The Claims tool includes additional database requirements which are unavailable in Partner. If you use PCC’s previous Practice Management suite, check out Submit Claims and get in touch if you’d like help making the transition.
To ask the payor for status on a claim, open the encounter in the Unpaid Encounters. Then click “Request Claim Status” to query the payor.
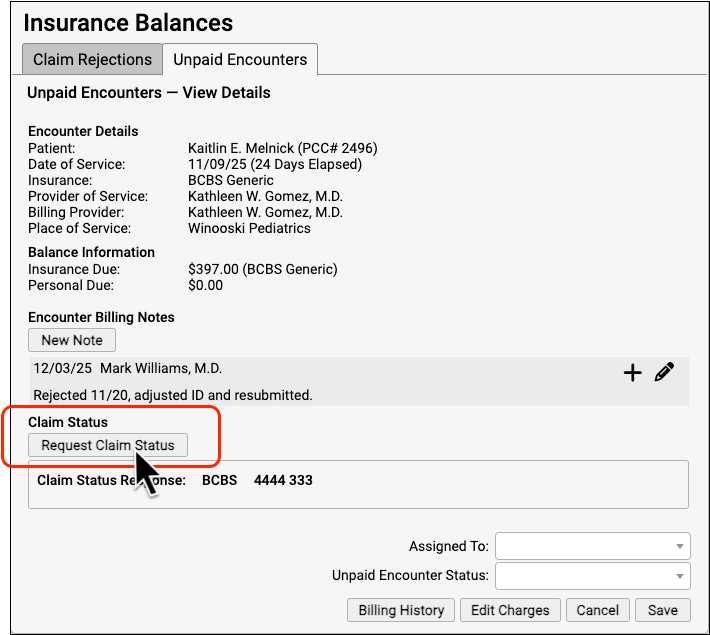
If the payor is in compliance with real time claim status standards, they will return a result for that encounter, and PCC will format and display the result.
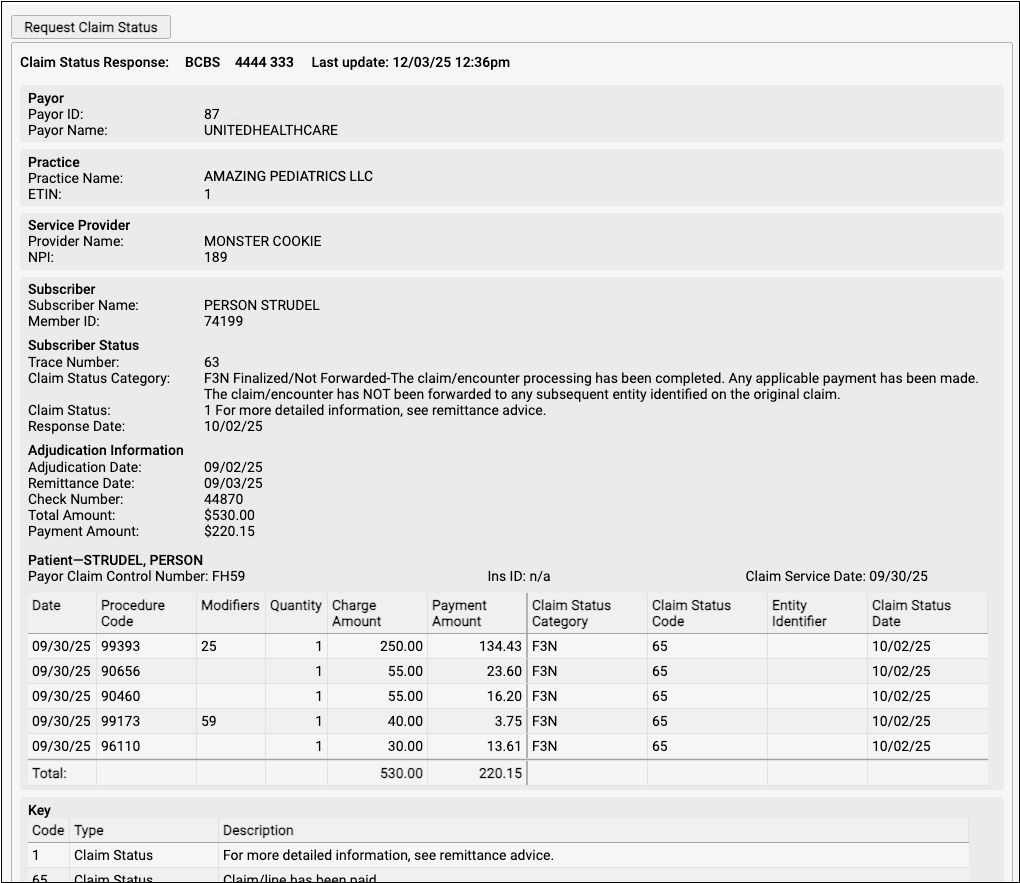
Payor Usage Limits: Most payors do not provide claim status information until seven days after a claim has been submitted. Some payors will not respond to a second query within twenty-four hours. PCC can’t control whether a payor will respond, but you can follow these general guidelines to prevent disappointment when you are seeking information on an unpaid claim.
PCC 10.5 introduces real time claim status, and we hope to expand and support more features in the future. If you have ideas and feedback, please get in touch.
See Date of Birth and Member ID While Working on a Rejection
As you review and respond to a claim rejection, the patient’s date of birth and insurance member ID appear with other encounter information.
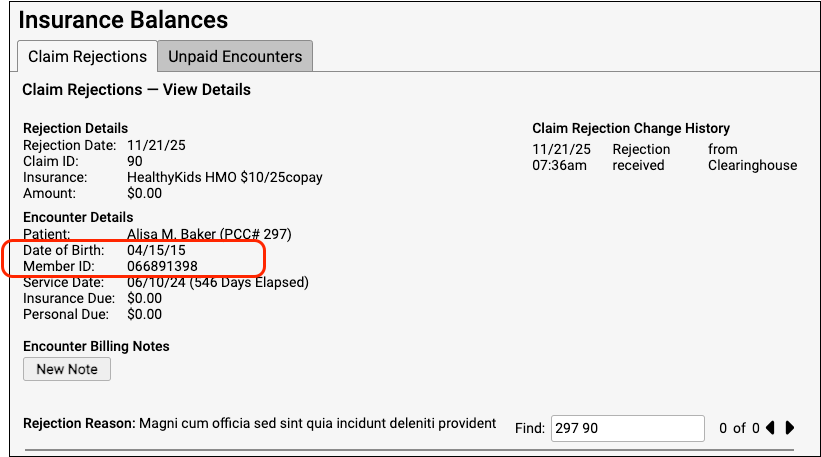
These details make it easier to followup, especially if you are speaking with a payor.
Practice Administration & Oversight
Report on Clinical Quality Measures (CQMs) in the Report Library
When you need to collect data for your PCMH certification or other external clinical quality measure, use these three new reports in the Report Library to find the information you need.
Report on Depression Screenings and Follow-up CQMs
The CQM – Screening for Depression and Follow-Up Plan report in the Report Library follows the CMS2v14 specification, and tracks patients over twelve years old who had a positive screening and follow-up action within a set period of time. You can run this report with the default criteria settings to get your numerator, denominator, and exclusions.
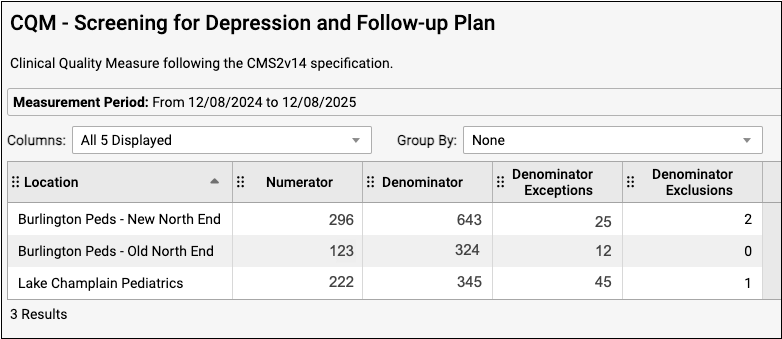
Check Your Configuration: To be counted, depression screening orders must have a linked LOINC code and a documented in-order positive or negative result. All measured orders, including depression screening follow-up orders, should have linked SNOMED and LOINC codes. For details on how to configure your orders, read How to Chart for Clinical Quality Measures. Reach out to PCC Support for assistance with order mapping and configuration.
Report on Childhood Immunization Status CQMs
The CQM – Childhood Immunization Report in the Report Library follows the CMS117v13 specification and tracks patients turning two years old who have had specific immunizations. You can run the report with the default criteria settings to get your numerator, denominator, and exclusions.
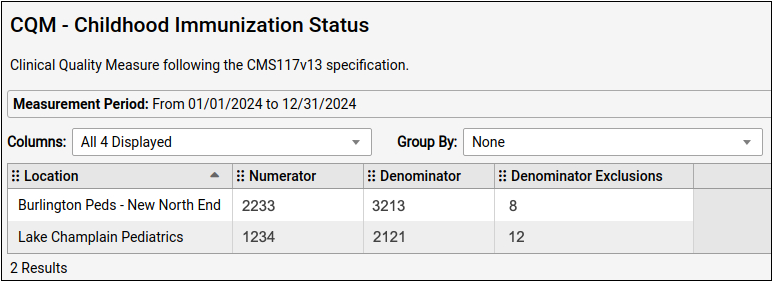
Check Your Configuration: To make sure your patients’ immunizations are counted, configure your immunization orders with the recommended SNOMED and LOINC codes. For details on how to configure your orders, read How to Chart for Clinical Quality Measures. Reach out to PCC Support for assistance with order mapping and configuration.
Report on Weight Assessment and Counseling CQMs
The CQM – Weight Assessment and Counseling report follows the CMS155v13 specification, and tracks patients ages three through seventeen with a documented BMI who received nutrition or exercise counseling. You can run the report with the default criteria settings to get your numerators, denominator, and exclusions.
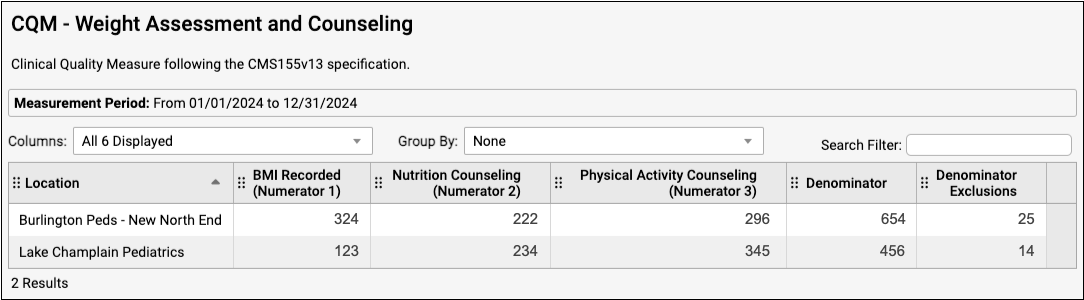
The results display three numerators: BMI Recorded, Nutrition Counseling, and Physical Activity Counseling, which can be entered into your PCMH paperwork.
Check Your Configuration: To be counted, make sure that you’ve configured your orders with the recommended SNOMED and LOINC codes. For details on how to configure your orders, read How to Chart for Clinical Quality Measures. Reach out to PCC Support for assistance with order mapping and configuration.
For general instructions on how to run CQM reports in the Report Library, read Report on Clinical Quality Measures.
To find out more about configuration best practices for specific measures, check out How to Chart for Clinical Quality Measures.
Optimize Your Providers’ Schedules
PCC 10.5 includes several bug fixes and under-the-hood improvements to the Provider Schedule Utilization report, as well as new best practices documentation and advice on how to use this report. With this highly-granular report, you can report on schedule usage by time of day, season, provider, location, visit reason, template, and more.
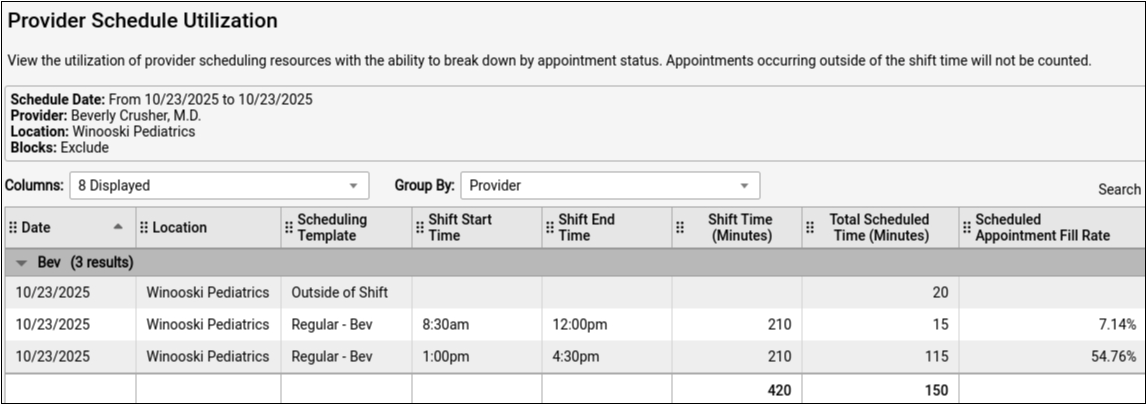
Read Report on Schedule Usage to learn how to get the most out of this report, whether to include or exclude blocks, and how to know if your schedule needs adjustment. To find out details on the related bugs that we squashed, read the Bug Fixes section below.
Report on VFC Eligibility Status in the Report Library
When you need to report on the VFC eligibility status of your patient population for annual VFC paperwork, or for financial oversight, use the VFC Patient Population report in the Report Library.
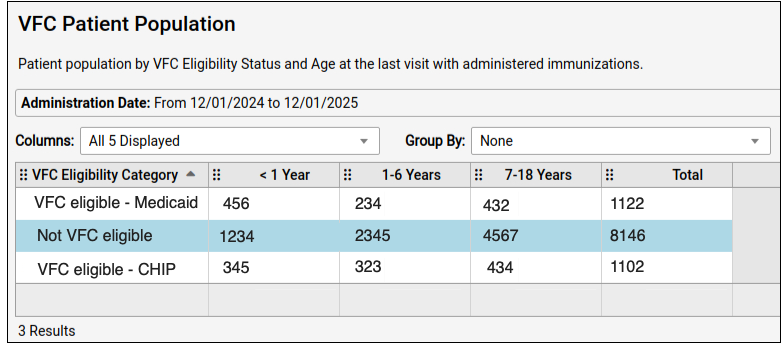
To learn more about how to use this report, read Report on VFC Eligibility Status in the Report Library.
New Layout and Button Name Change in the Report Library
No more accidentally closing the Report Library! PCC 10.5 includes button reorganization in the Report Library for a more intuitive workflow. The “Back” button has moved to replace “Close” in the Report Library’s navigation area. The “Schedule” button is now “Schedule Report”, and the “Generate” button is now called “View Results”.

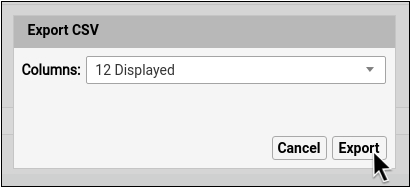
Export Large Data Sets from the Report Library
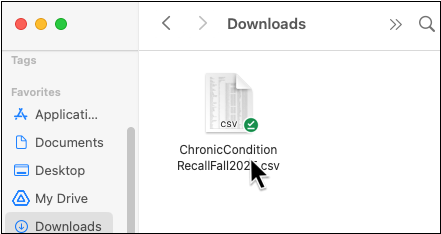
When your practice needs to export and work with the data from a large report, you can export it to your workstation from the Criteria page with one click. While any report can be exported using the Export Results button, report results that contain more than 20,000 rows should always be run and exported using this method.
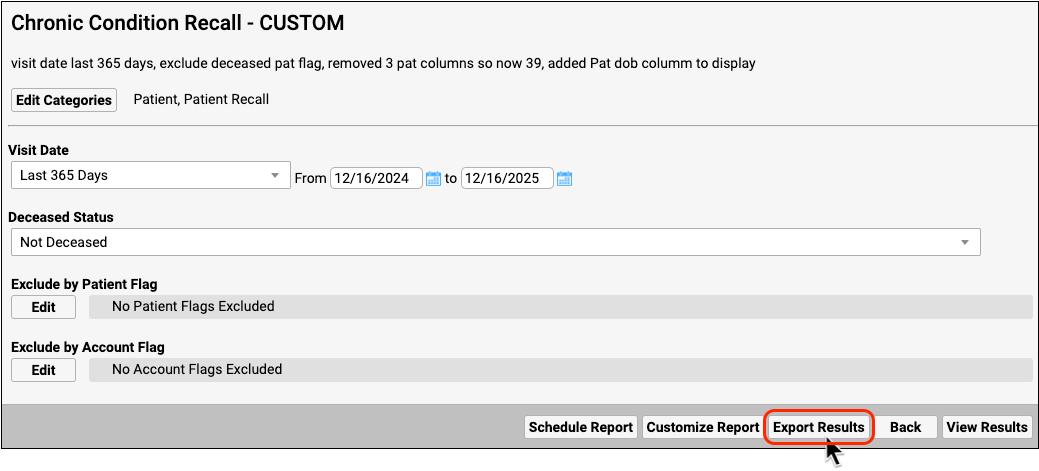
The exported file will save to your Downloads folder regardless of whether you are logged in at the office or working remotely.
Which Export To Pick?: If you want to download a large report (over 20,000 rows) with all criteria and work with it in a spreadsheet, use the “Export Results” button. If you want to send a Broadcast Message, print a PFD, or refine the layout of a report before exporting, click “View Results” to view the generated report results and then click “Export” from the View Results page.
Read Export Large Data Sets from the Report Library to learn more.
Export Reports to Your Browser While Working Remotely
When you are working remotely through SecureConnect and you need to export a report, click any “Export” button in the Report Library. You can retrieve the exported file in your browser’s download area, and in your Downloads folder.

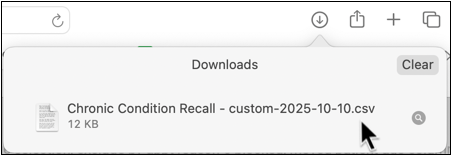
Though rare, there may be situations where you are logged in to PCC EHR via SecureConnect and PCC EHR on your workstation at the same time. In these situations, the download will be routed to the SecureConnect instance.
Log Out of PCC EHR Every Time You Use SecureConnect: Always log out of PCC EHR before closing the SecureConnect browser window. If you were working remotely via SecureConnect and you closed the browser window without logging your user out of PCC EHR, your SecureConnect instance may remain open in the browser session. If you then export a file (with a SecureConnect session still open), the downloaded file will be sent to the open SecureConnect instance. To log out of PCC EHR via SecureConnect, select the Sign Out option in the File menu or Logout option in the Start menu.
If, instead of a CSV, you would like to export a PDF from the Report Library while working remotely, click “Print” and use the Print to SecureConnect workflow. For more information on Print to SecureConnect, read Print from PCC SecureConnect to Your Home Printer.
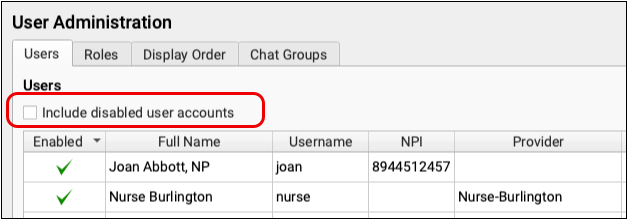
Reveal or Hide Disabled EHR Accounts
Users who have left your practice or no longer need access to PCC EHR will not appear in the user list in User Administration. To find disabled accounts, check the box labeled “Include disabled user accounts”. Inactive users will then appear and can be managed like any other account.
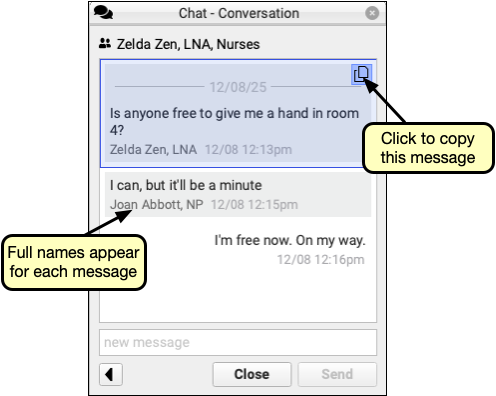
EHR Chat Improvements
Copying text from the EHR Chat window now has its own dedicated button. Click the message, then the copy icon at the upper right and paste wherever the text is needed.
PCC EHR Chat shows each user’s full name, so if your office has multiple people with the same first name, you can see who’s who at a glance. Users with longer names may be partially truncated in favor of the date and time stamp.
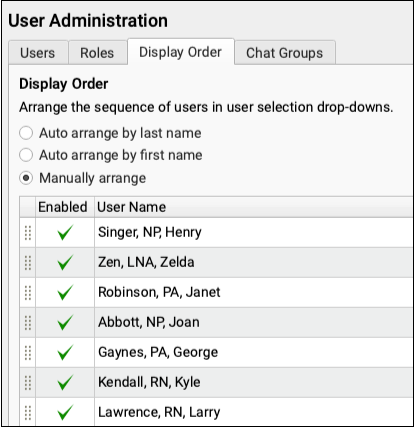
Assign the Right User in pocketPCC Messaging
Find the users you’re looking for exactly where you expect them in pocketPCC Messaging. When assigning a portal message to a PCC EHR user, the Portal Messaging component now lists your practice’s users in the order set within PCC EHR’s User Configuration tool, instead of alphabetically.
Bug Fixes
PCC 10.5 includes some notable squashed bugs.
-
Provider Schedule Utilization Report - Filled Rate Percentage Incorrect: In the Provider Schedule Utilization Report, the Scheduled Appointment Filled Rate percentage displayed an incorrect result. The percentage displays correctly and working as designed.
-
Provider Schedule Utilization Report - Visit Length of 0 Caused an Error: When a visit length had no associated length of time, the report displayed an error in the Provider Schedule Utilization Report. This has been fixed and the report now displays 0 minutes.
-
Provider Schedule Utilization Report - Certain Templates Not Displayed: Certain templates in the Provider Schedule Utilization Report did not display when the report was set to display all templates. This has been addressed in PCC 10.5 and is working as designed.
-
Provider Schedule Utilization Report - Incorrect Shift Times: In the Provider Schedule Utilization Report, some provider rows displayed shift times that did not match their schedule templates. This has been fixed and shift times now match provider templates.
-
PCC EHR Chat Crash: In certain situations, sending a message resulted in PCC EHR crashing. Improvements to PCC EHR Chat included in PCC 10.5 have resolved this bug.
-
PCC EHR Chat Window Variability: Intermittently, the PCC EHR Chat window would move or resize itself without a user’s action. The Chat window will now remain at its set size and position unless intentionally moved by the user.
-
Better Handling of Capitalization in Portal User Pre-Check-In: Patient names that were recorded in PCC EHR in all capital letters, are displayed during Pre-Check-In in title case. This resulted in the option to import the display capitalization, even though the name had not changed. Capitalization will now be maintained during Pre-Check-In.
-
Patient Portal Weight-For-Length Growth Chart Incorrectly Reported Alternate Length: The alternate length in the Patient Portal Weight-For-Length chart was displayed incorrectly. This has been resolved and the alternate length is now correct.
-
Saving a Blank Portal Message Creates a Blank Draft in pocketPCC: Clicking “Save” without typing anything in a pocketPCC portal message saves a blank draft portal message. This has been corrected.
-
Protocols Load Slowly When Components are Populated and Refreshed: PCC 10.5 resolves a performance issue that was causing protocols that include generic orders and immunizations to load noticeably slower in certain situations.
-
CHADIS Questions Display Out of Sequence: Vanderbilt questionnaires, completed through CHADIS, displayed results in PCC EHR in a different order than the questionnaire itself. Questionnaires now appear in the same order in PCC EHR as they do in CHADIS. Vanderbilt questionnaires received prior to this update have been corrected.
-
Cursor Did Not Return to Patient Search in Import Documents: After attaching a document to a patient in Import Documents, the cursor would not appear in patient search. In PCC 10.5 the cursor now returns to the patient search field automatically, so you can search again without additional action.
-
Appointment Book Caused EHR Lagging: Densely scheduled appointments in the Appointment Book could cause delays and lagging in PCC EHR. PCC 10.5 improves the efficiency of Appointment Book and eliminates any lag.
-
Care Center Dashboard Limited to One Location: Users at care centers were not able to switch between locations in the Practice Vitals Dashboard. PCC 10.5 fixed this issue and users at care centers, with access, can now switch between multiple locations in the Practice Vitals Dashboard.
-
Blank Insurance Coverage Status Column: In some circumstances, Appointment Reminder reports displayed no data in the Insurance Coverage Status column. This is now fixed, and the column displays insurance coverage status as designed.
-
Hidden Column Data Included in Searches: When working with report output, hiding a column did not remove its data from search results. In PCC 10.5, the Search field only searches data that is selected to be visible.
-
Some E-lab Results Could Not Be Deleted: Due to underlying data structure issues, some e-lab results could not be deleted, even when users had permission to do so. PCC 10.5 fixes the underlying issue and any e-lab result may be deleted by permitted users as appropriate.
-
Inability to Add or Remove Direct Secure Messaging Users: Due to an underlying data structure issue and third-party settings, practices were unable to add or remove Direct Secure Messaging users in PCC EHR. PCC has fixed the data structure issue and continues to work with Updox, the vendor who supports Direct Secure Messaging, to restore user administration functionality.
-
Incorrect Result When Recalculating Weight-Based Dose for Different Strength While Renewing or Editing a Prescription: When you change the medication strength on a weight-based prescription, the dose quantity also updates to ensure that the patient takes the right amount of medication for their weight and the prescribed strength. If, while renewing or editing a prescription, users clicked the “Calc Dose for Weight” button after calculating the new dose quantity and strength, the button would erroneously revert the strength to original value without changing the dose quantity, resulting in an incorrect dose calculation. This issue has been fixed.
-
Inconsistencies When Choosing Ordering or Supervising Provider on Prescriptions: Prescriptions sometimes prompted users to select an ordering or supervising provider at unexpected times, or failed to reflect the supervising or ordering provider selected by the user. PCC 10.5 corrects inconsistencies in behavior for prescriptions that require an ordering or supervising provider.
-
Incorrect Code When Voiding a Prior Claim: In some circumstances, voiding a claim could send a frequency code of 7 (replacement of prior claim) instead of an 8 (void claim). Voiding a claim now works as expected and sends the correct claim code.
-
Missing 'Other' Plans: The Unpaid Encounters worklist did not always display payors categorized in the “Other” group. PCC fixed this for all offices in a mid-release patch in October of 2025.
-
Inaccurate 'Claim Queued to Subsequent Insurance' Message: In some situations, an ERA could inaccurately indicate that a subsequent claim was queued. This message now only appears when true.
-
Inaccurate 'Subscriber's Date of Birth Missing' Message: In some cases, after correcting a problem with a claim, the Needs Correction tool could erroneously indicate that the subscriber’s date of birth was missing or inaccurate. This no longer occurs.
-
Incorrect Payment Provider Attribution: When unlinking and relinking payments in a way that changed the provider linked to the payment, PCC EHR sometimes failed to identify the new provider. This has been fixed.
-
Personal Totals Listed in the Insurance Balances Tool: In some situations, personal balances could appear in the Unpaid Encounters worklist in the Insurance Balances tool. This no longer occurs.