Track Personal Balances (persview)
Use the Personal Money Tracking Assistant, or persview program, to manage your practice’s “personal” accounts receivable. It creates an interactive list of accounts with personal balances. The list can contain all outstanding accounts or just a portion, depending on your custom criteria.
Billers can use persview to work down unpaid balances. By specifying different criteria, a user can focus on a certain portion of your practice’s personal A/R. For example, some offices split up overdue accounts by last name, while others work on the accounts based on the age or amount of the balance. Regardless of how your office works, persview can help you hone in on the accounts you need to contact.
The report’s results can be printed or saved in your e-mail box, but the real power of persview comes from working with the list on your screen. By pressing different function keys, you can send out form letters, review account histories, generate bills, enter notes, post payments, post late fees, and even write off bad debt… all from the same interface.
Contents
Run persview and Select Options
You can find persview in your Practice Management windows.
When you first run persview, you are presented with a criteria screen:
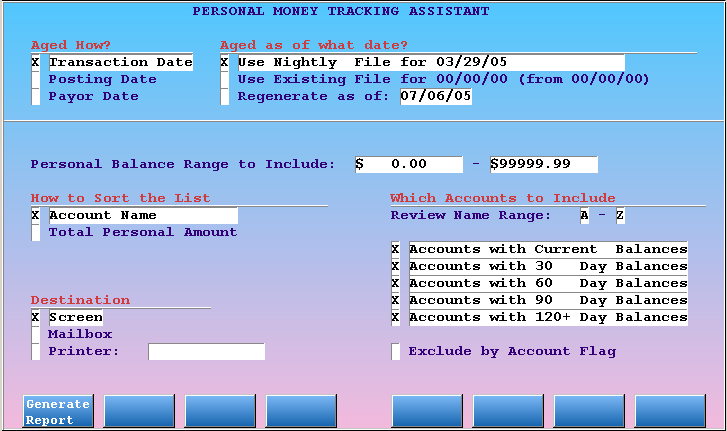
Press F1 – Generate Report to view a list of all accounts with personal balances.
Before you press F1, you can use the criteria options on the screen to limit which accounts will appear.
Criteria Options in persview
-
Aged How
You can choose how outstanding charges should be aged. Account totals appear in aging categories on the report, and they can be aged by transaction date (when the service occurred), by posting date (when the service was entered onto the system), or by payor date (the date the balance became the account’s responsibility).
-
Aged as of…
Select a date to base the report on. Use the last “Nightly File” for a quick report, as the aging data is automatically prepared the previous night. Use the Existing File to quickly review the last report you manually aged. Or, ask
persviewto manually regenerate to a particular date. In most situations, you should stick with the Nightly File. If you have just finished entering dozens of payments, you may want to “Regenerate” the aging information for today. -
Personal Balance Range
You may not want to work with an account unless they owe over ten dollars. If you only want to list accounts that have a certain balance, enter a dollar amount range in the fields provided.
-
Name Range
The Name Range question allows you to select a specific range of the alphabet. Enter the starting and ending letters of your alphabet range in place of the A and Z. Use this option if your office’s billers divide their responsibilities by account last names.
-
Which Accounts to Include
By default, all of the categories shown are selected. If you wish to limit the accounts based on how long they have owed you money, you can remove or add X’s in front of each category. The “Exclude by Account Flag” option can be useful if you don’t wish to view certain account types.
-
How to Sort the List
You can sort the printed report or
persview’sinteractive on-screen report in alphabetical order or by the total balance owed by the account. To indicate your selection, place an X in front of one of the two choices. You may find it useful to sort accounts by who owes you the most. -
Destination
Finally, you must decide where to send the report output. To indicate your selection, just place an X in front of your choice.
-
If you specify the “Screen” as your destination, the results will appear on your computer screen in an interactive report. You will be able to scroll through the list and easily access information about the various accounts that are listed. It is also easy to generate a form letter or bill for some or all of the accounts. See below for more information.
-
If you send the output to your “Mailbox”, you will receive an e-mail that you can review at a later time. You can also save the e-mail in a folder for archival purposes.
-
If you opt to print the report, it will be printed on your default PCC printer unless you enter the name of a different printer. Enter an asterisk (*) to view and select from a list of available printers.
While printing or sending the list as an e-mail may be useful, you will find the interactive list (Screen) the most powerful choice. The remaining sections in this chapter explain how to take full advantage of the “Screen” option.
-
After making your criteria selections, press F1 – Generate Report to run the report. persview may take a few minutes to gather the information about accounts with personal balances.
Work with Individual Accounts
After you select criteria and press F1, persview will show you a list of accounts with aged balances and a balance total.
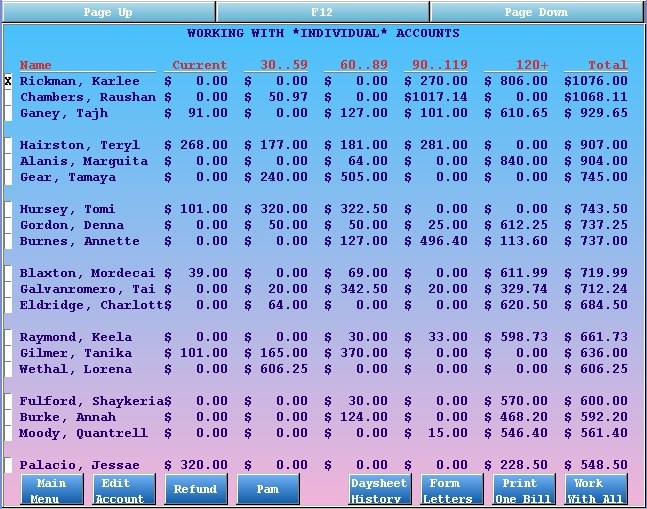
The accounts are grouped in sets of three, making the list easier to read. Press Page Down and Page Up to scroll through the list and view all accounts.
In the example shown, the user set the criteria option to sort the list by “Total Personal Amount” owed. As shown in the “Total” column, the accounts with the largest outstanding balances appear first.
The “Work With Individual Accounts” screen allows you to work with a specific account. Select an account by placing an X in the box in front of the account name. Once you have selected an account, you can do a variety of different operations by pressing different function keys. For example, press F2 – Edit Account to run the Family Editor (fame) for the selected account. From fame you can check the account’s insurance companies and run the coll report to review the reasons for the balance.
Actions From the Individual Account Screen
F1 – Main Menu
Press F1 to return to the Main Menu, where you can enter a different set of criteria.
F2 – Edit Account
Press F2 to access fame for the selected account. In fame you can review demographic information, run the collection report, view a complete account history, review insurance information, enter account notes, and more.
F3 – Refund
Press F3 to run refund for the selected account. In refund you can quickly refund a credit, print a bill, and post late charges and other fees.
F4 – Pam
Press F4 to post payments or adjustments in pam. This is useful when the selected account agrees to pay with a credit card over the phone. You can also write off debt by using an appropriate payment type.
F5 – Daysheet History
Press F5 to scan through the daysheets and view all transactions related to the selected account. If you suspect a payment or charge has been deleted, the daysheet history can show you the amount and which user deleted it.
F6 – Form Letters
Press F6 to print one or more form letters for the selected account.
F7 – Print One Bill
Press F7 to print a bill for the selected account. When you press this function key, you will be asked to enter a date range for the bill.
F8 – Work With All
Press F8 to switch to working with all accounts listed. See the section below for more information.
Work with All Accounts
When you press F8 – Work With All, persview shows you new function keys for performing batch functions on all listed accounts:
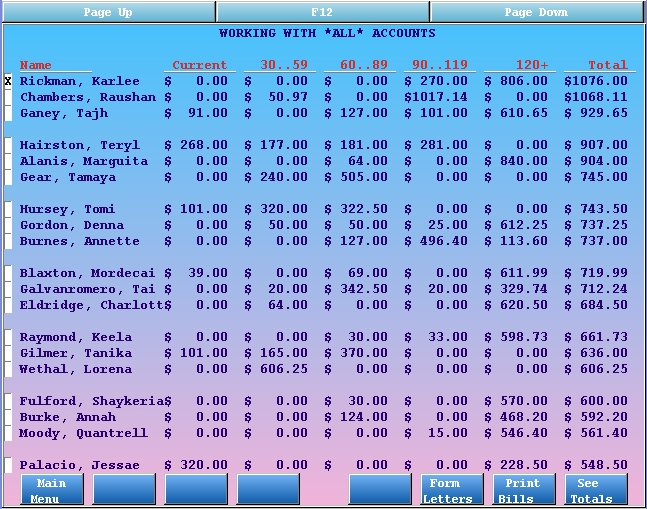
The new function keys will perform actions upon all the accounts in the list.
Actions for All Accounts
F1 – Main Menu
Press F1 to return to the Main Menu, where you can enter a different set of criteria to change the list of accounts.
F6 – Form Letters
Press F6 to select one or more form letters and print them for every account in the list. By using persview‘s criteria options and this function, you could generate a form letter for all accounts with specific overdue balances amounts or a specific account flag.
F7 – Print Bills
Press F7 to print bills for all accounts on the list. You will be prompted for a date range.
F8 – See Totals
Press F8 to view the Personal Totals screen, described below.
Review Personal Totals
Press F8 – See Totals from the “Working With All” screen in persview to view a summary for the accounts.
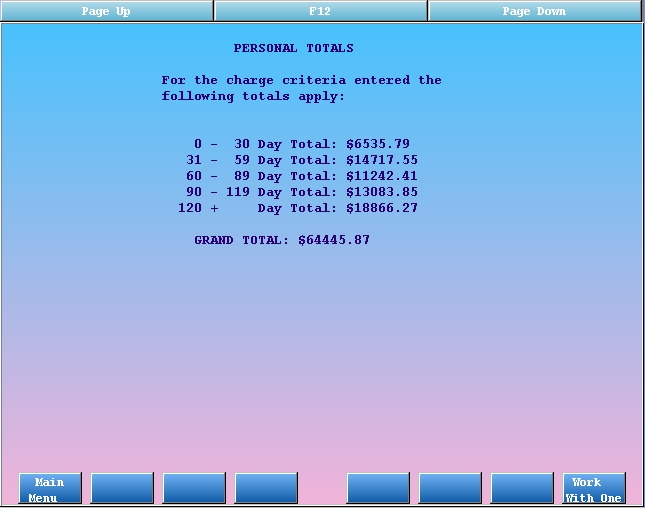
When you press F8, persview tallies up the personal money owed to your practice by everyone on the list. It then presents the totals to you, broken down by the age of the balance.
As long as you run the reports with similar criteria (same alphabet range, same aging categories, same aging types, etc) the totals on this persview screen should match those from the aging and insaging reports.
Press F8 – Work With One to cycle back to the other persview screens.