PCC 10.2 Migration Considerations
The PCC 10.2 release includes new features that may need configuration and for which you may want to do extra planning or training. Read below to learn more, and share relevant details with your physicians and staff.
Read the PCC 10.2 Release article for complete details on these features.
Contact PCC Support for help implementing features in PCC 10.2.
Contents
- 1 Configure Self Scheduling in the Patient Portal
- 2 Give Prescribers Permission to Access pocketPCC
- 3 Remind Prescribers to Find Their Hard Tokens for EPCS in pocketPCC
- 4 PCC eRx Activities You Can’t Do (Yet) in pocketPCC
- 5 Transition Away from the Correct Mistakes (oops) Program
- 6 Implement the Encounter Billing Notes Feature
- 7 Understand Reporting of Adjustments and Credit Write-Offs
- 8 Old Saved Results Only Export in CSV Format
Configure Self Scheduling in the Patient Portal
Patient Portal Scheduling configuration options are available immediately upon updating to PCC 10.2. Your practice can complete configuration of Portal Scheduling then make it available to your patients and families.
Portal Scheduling Requires Visit Types: Self scheduling uses PCC EHR’s Visit Types feature to link patient portal scheduling to Appointment Book. If your practice has not set up visit types, configure visit types before continuing.
Configure Visit Reasons for Portal Self Scheduling
Configure the visit reasons, providers, and locations that portal users can select during portal scheduling.
Open the Visit Reason Tool
Open the Visit Reason tool in PCC EHR’s Configuration menu, and select the Portal Scheduling tab.
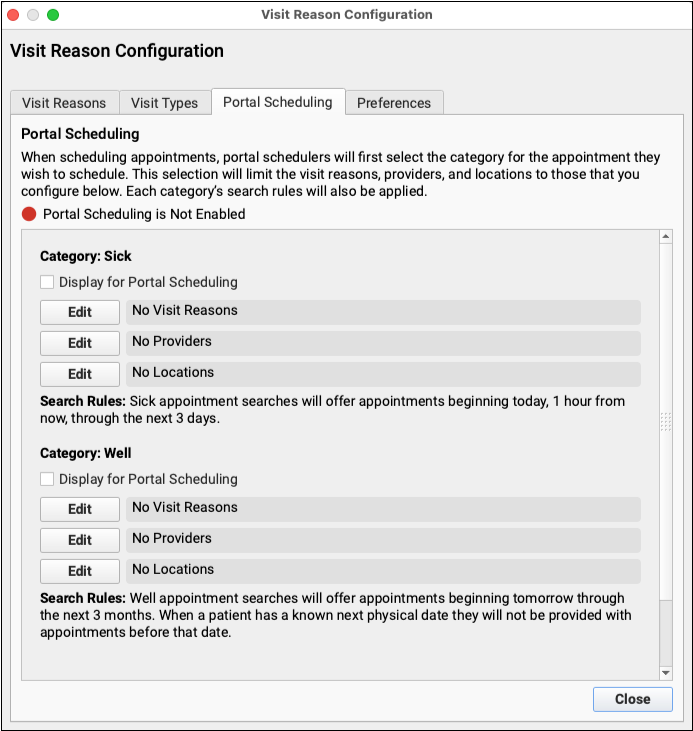
To allow patients and families to schedule sick visits, check the “Display for Portal Scheduling” box under “Category: Sick”.

Select Sick Category Visit Reasons
Click “Edit” next on the Visit Reasons line.
Visit reasons you select here will be available for scheduling through the patient portal.
Portal Scheduling only searches for open sick visit time-slots one hour in the future through the next three days. Appointment types that may need to be scheduled more than three days in the future should not be added to the Sick category.
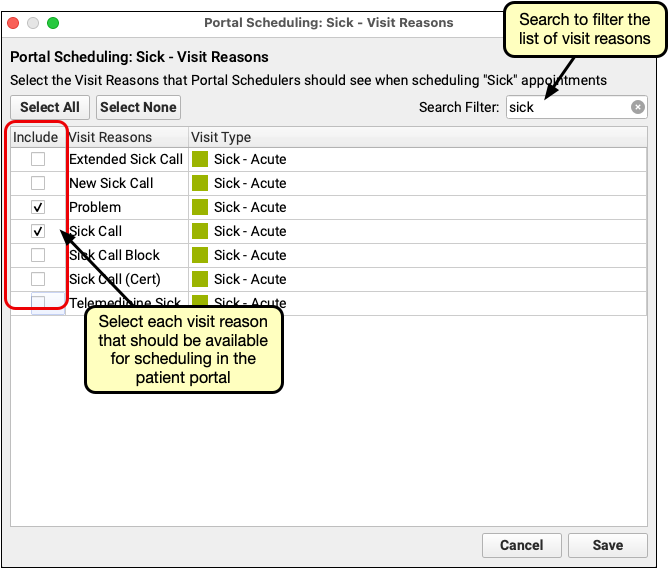
When you’ve made your selection, click “Save”.
Select Sick Category Providers
Click the “Edit” button on the Providers line to select providers for the Sick category.
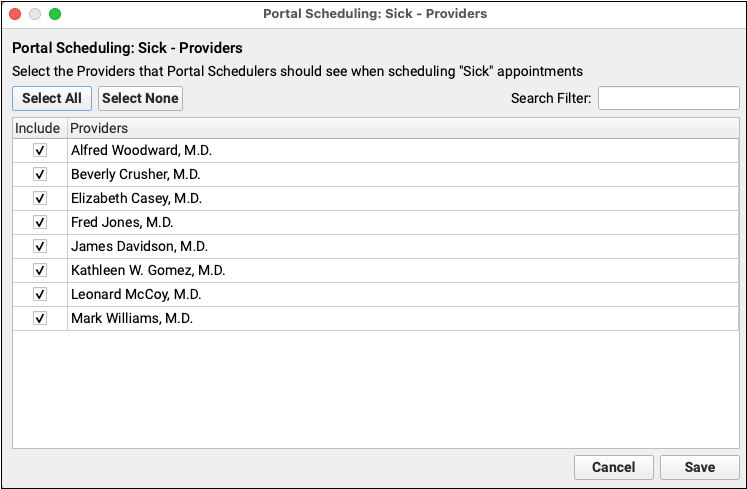
Select the providers that handle the visit reasons you selected above. You may wish to exclude providers that are placeholders for scheduling, such as an “Office” or “Flu” provider, or specialists who you would prefer to schedule over the phone.
Click “Save”.
Select Sick Category Locations
Click the “Edit” button on the Locations line to select providers for the Sick category.
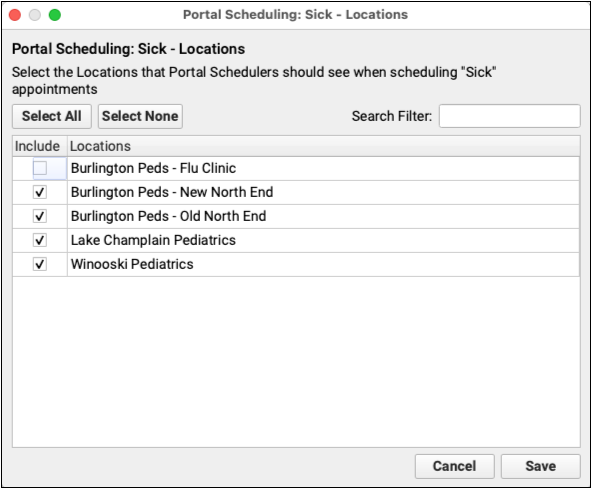
As with Visit Reasons and Providers, select which locations should be available for portal scheduling. If you have locations that have odd hours or need more attention when scheduling, such as a pop-up flu clinic, you may wish to uncheck those.
Click “Save”
Do the Same for the Well Category
Complete the same steps for the Well category. Give the same consideration to well visit reasons, providers and locations.
When selecting well visit reasons, keep in mind that the Well visit category searches for available appointments one day in the future through the next three months. If the patient has a next physical due date in their chart, portal scheduling will jump to that date to begin searching for a matching appointment slot. You may find it best to add only physical exam visits to the Well category.
Click “Save” in each section as you go.
Configure Portal Scheduling Preferences
Use the Preferences tab in the Visit Reasons Configuration tool to determine what available, matching appointment time slots Portal Scheduling offers to your portal users.
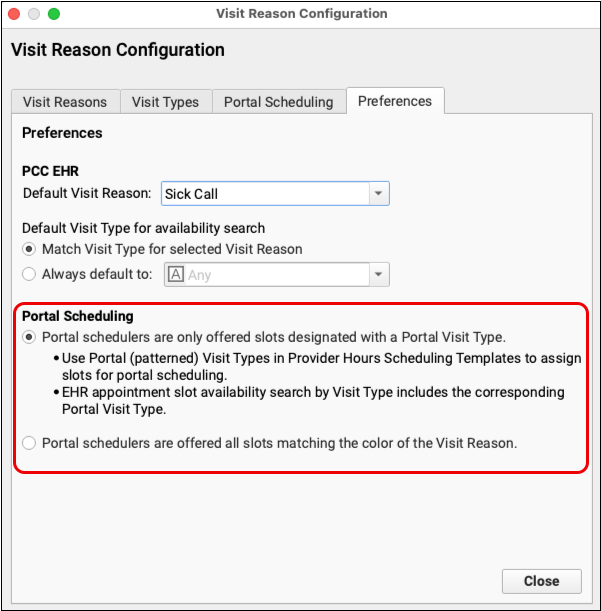
The first option “Portal schedulers are only offered slots designated with a Portal Visit Type” allows your practice to designate specific time slots in a provider’s Scheduling Template as available to Patient Portal Scheduling. This does not prevent Appointment Book users from scheduling within those slots, it simply opens the selected time slots to the Portal Scheduling tool.
The second option “Portal schedulers are offered all slots matching the color of the Visit Reason” maximizes the available slots. Any open time slot color coded as a sick visit or a well visit is available to Portal Schedulers, provided they match the visit types, providers and locations you specified in the Portal Scheduling tab. With this option, no other configuration is needed. Just enable patient portal scheduling in Patient Portal Configuration, and you portal users can begin scheduling themselves.
Update Your Scheduling Templates for Portal Scheduling
Select “Portal schedulers are only offered slots designated with a Portal Visit Type” if your practice wants to limit portal scheduling to certain time slots.
Open the Provider Hours tool from PCC EHR’s Tools menu. Click the Scheduling Templates tab.
The Visit Type menu includes Portal Sick and Portal Well. Mark time slots as Portal Sick or Portal Well just as you do when setting up scheduling templates.
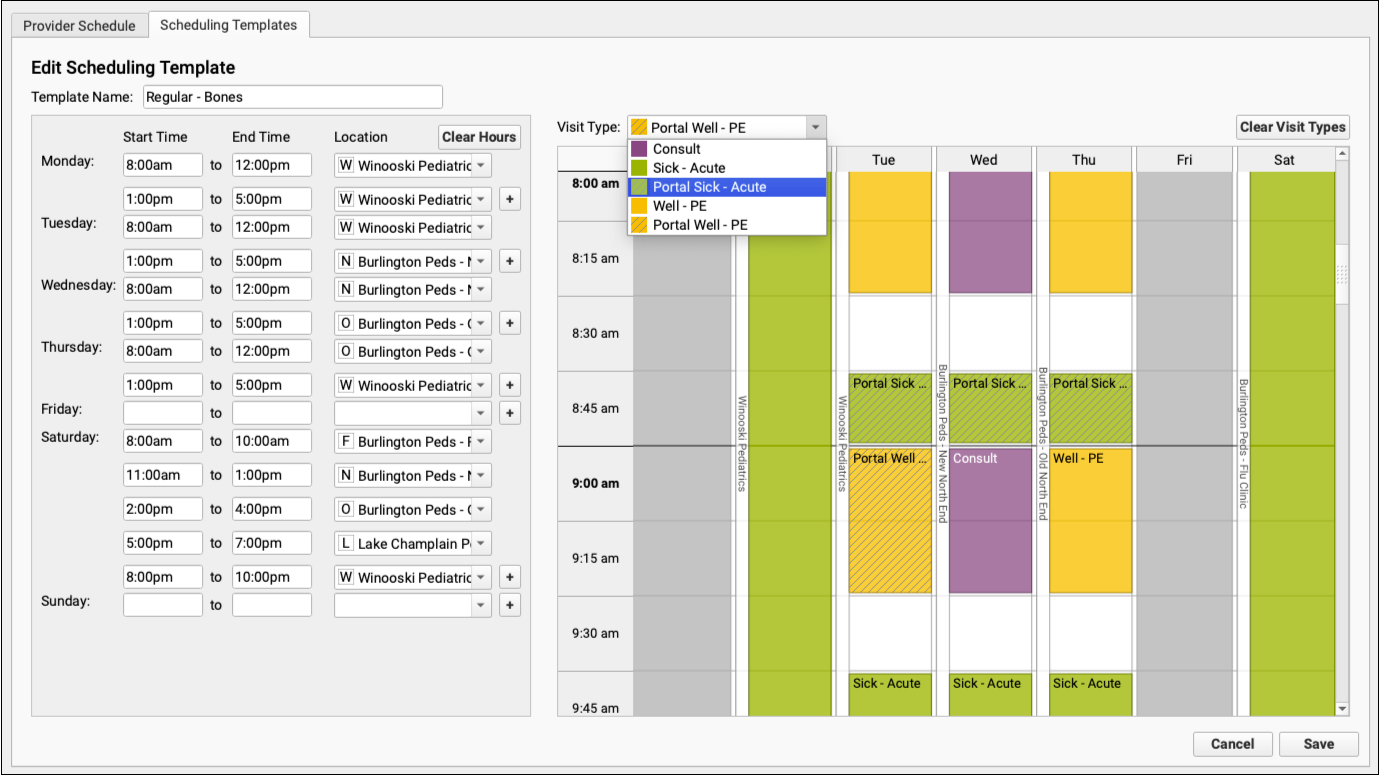
Time slots marked as Portal Sick or Portal Well will appear with a striped pattern over the color you selected for sick or well visits in your schedule.
Portal Sick and Portal Well function the same as the Sick and Well visit types, it only indicates that those time slots slots are available to the Portal Scheduling tool. This has no effect on scheduling through Appointment Book.
Review Your Visit Reasons
The Visit Reasons tab indicates a Portal Scheduling column, which displays the category of each visit reason: Sick, Well or not enabled.
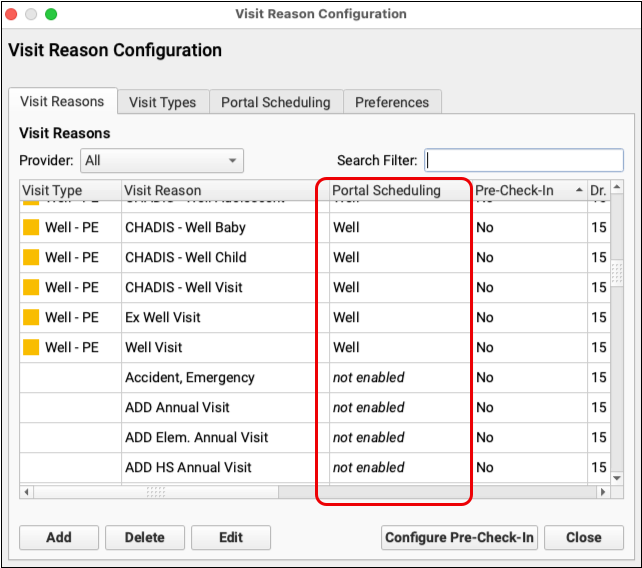
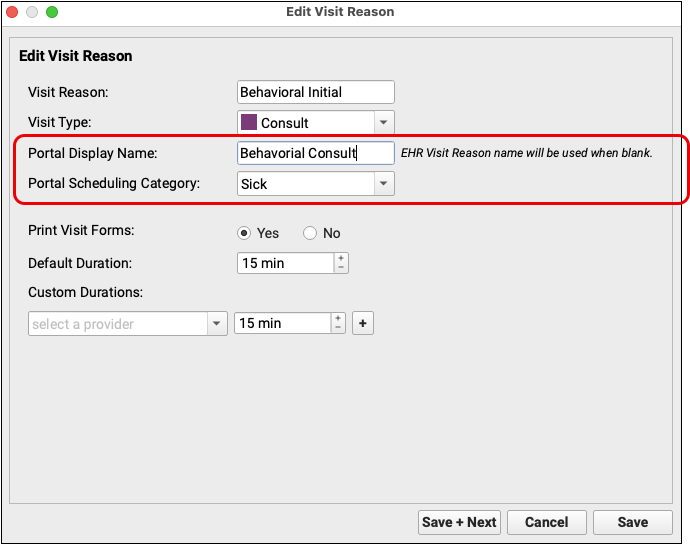
Click “Edit” to open any visit reason, and manage that visit reason’s Portal Scheduling options. You can set an alternative Portal Display Name to appear in the patient portal instead of the Visit Reason name.. You can also change the Portal Scheduling Category for the visit using the drop-down menu.
Enable Portal Scheduling
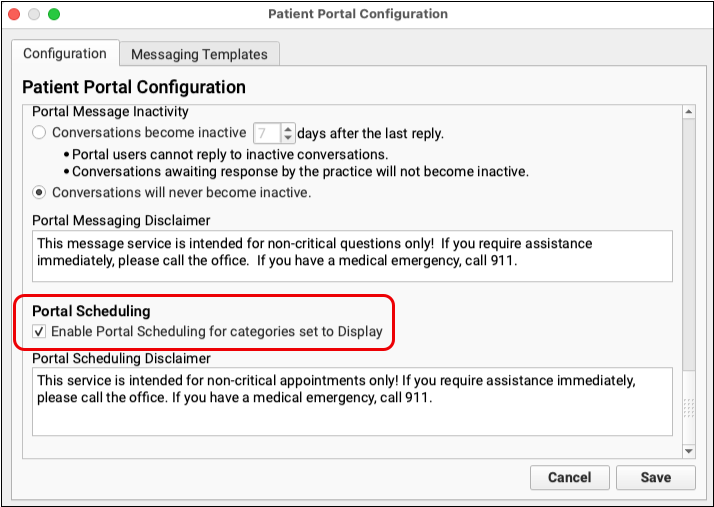
Finally, open Patient Portal Configuration from PCC EHR’s Configuration menu, and check “Enable Portal Scheduling for categories set to Display”. With that box checked, Portal Self Scheduling is available to all your patient portal users.
Give Prescribers Permission to Access pocketPCC
In PCC 10.2, prescribers can use pocketPCC to prescribe from a smartphone or tablet. You can control user access to pocketPCC in the User Administration tool in PCC EHR.
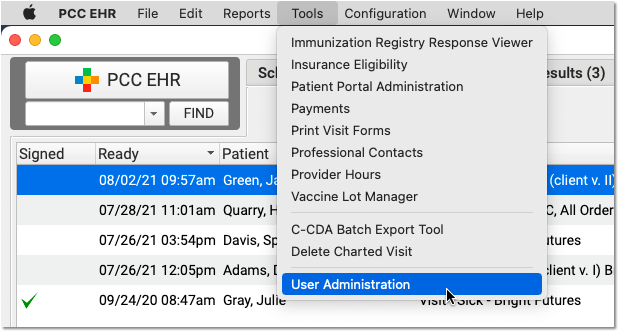
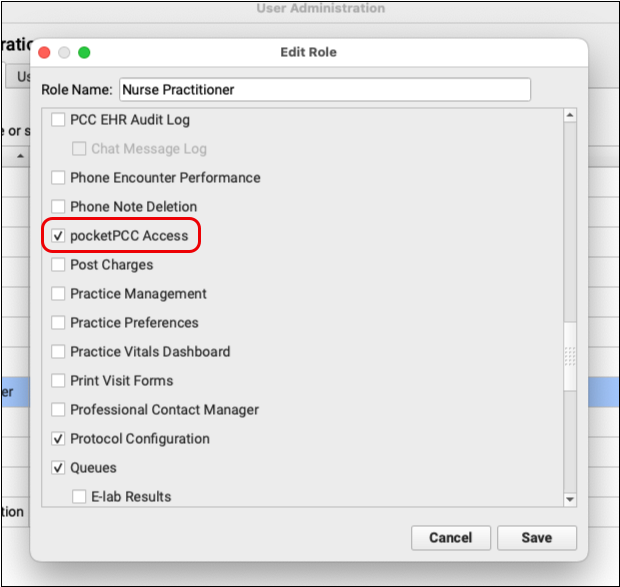
It is completely up to your practice to decide who has access to pocketPCC. Users with access to pocketPCC will have the same prescribing permissions there as they do in PCC EHR.
For more details about how to modify user permissions, read Set User Roles for Permission and Security.
Remind Prescribers to Find Their Hard Tokens for EPCS in pocketPCC
When a prescriber sends electronic prescriptions for controlled substances (EPCS) from pocketPCC, they must use their hard token as a second factor of authentication. They cannot use their soft token (the Authy app).
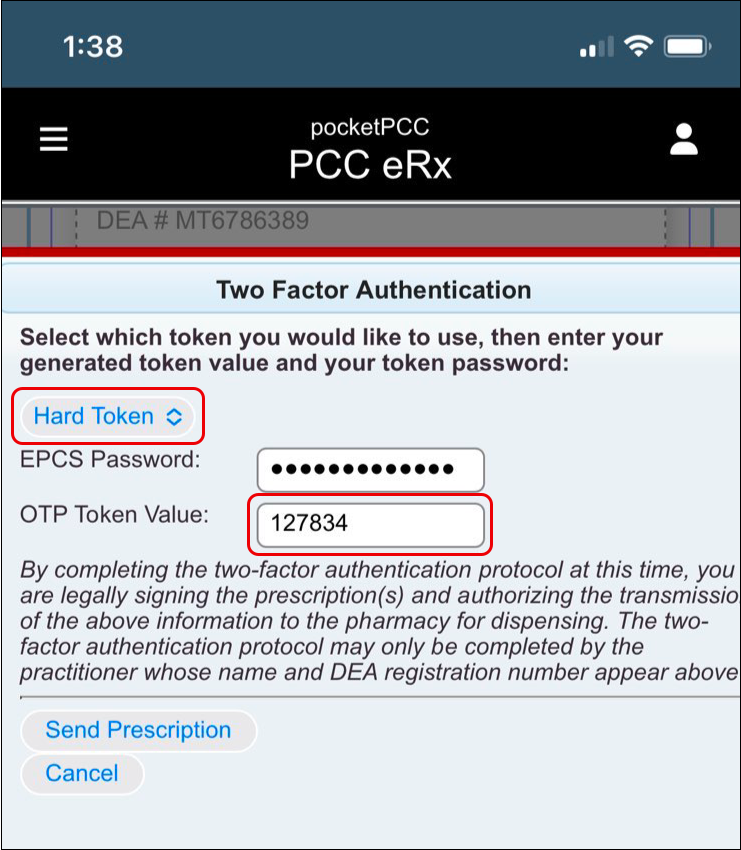
A hard token is the physical fob that PCC provides to every prescriber when they first register for EPCS. Each one has a unique serial number and is registered to a sole prescriber. Hard tokens generate one-time passwords that prescribers can use to finalize and send controlled substance prescriptions.
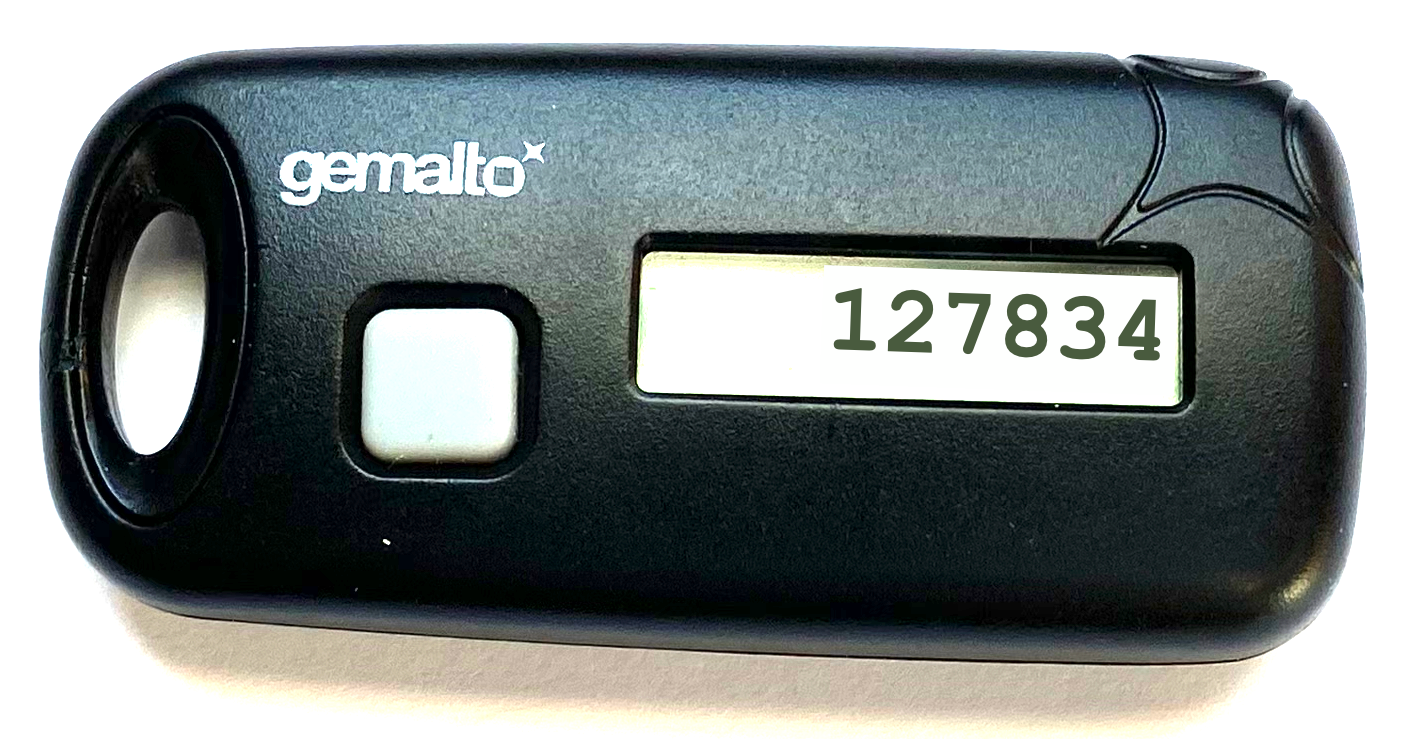
If there are prescribers at your practice who wish to be able to send prescriptions for controlled substances from pocketPCC but cannot find their hard tokens, contact PCC Support to request replacements.
Expect Delays for Replacement Token Orders: Exostar is experiencing a token shortage. If you need a replacement token, please notify PCC immediately but expect a long delay between your order and actual receipt of the token. Exostar has not communicated how long of a delay to expect.
Why Can’t Prescribers Use Their Soft Token (Authy)?: The DEA requires prescribers to generate one-time passwords on a different device than the one being used to prescribe. In order to ensure that our prescribers meet this requirement, PCC mandates use of a hard token for EPCS in pocketPCC.
PCC eRx Activities You Can’t Do (Yet) in pocketPCC
pocketPCC offers a lot of prescribing functionality, but there are still some things you have to log in to PCC EHR to do.
Use PCC eRx in PCC EHR if you want to:
- See and respond to renewal and change requests from the pharmacy
- See and resolve prescription errors
- Sign off on agent prescriptions
- Print PCC eRx content
- Access the My Settings, Rx Logs, Audit Logs, and Administration pages
- Use a soft token (the Authy app) to send electronic prescriptions for controlled substances
- Use the “Clean Up MedHx” button to retire multiple entries at once in your patient’s Medication History
- Sort your patient’s Medication History by status, medication name, or indication
- See active prescription details in Medication History
- Query the Surescripts network for your patient’s Retail Prescription History
- View Medication Care Guidance and Medication History details for drugs in the patient’s history
- See additional Real-Time Pricing and On-Demand Formulary details sent by the patient’s prescription benefit manager
- View additional details of the Safety Checking Warnings that appear when searching for medications to prescribe
Transition Away from the Correct Mistakes (oops) Program
Before PCC 10.2, billers used a tool named Correct Mistakes (oops) to make changes to charges, edit claim information, and resubmit claims.
PCC EHR’s new Edit Charges feature, found in the Billing History in the patient’s chart, is easier to learn and use than the previous Correct Mistakes tool. It includes better built-in validation and safeguards to prevent claim errors.
Edit Charges replaces all functionality in oops and adds new capabilities. While long-time users of PCC’s products and services may prefer the account history available in oops, helping your practice’s billers shift to the Edit Charges features in PCC EHR will improve your billing process.
For example, in PCC EHR, billers can change the date and provider of service for an encounter, add additional diagnoses and procedures, more easily work with encounter-specific billing notes, and use helpful tools when resubmitting a claim.
For help making the transition, reach out to PCC Support.
Implement the Encounter Billing Notes Feature
Encounter Billing Notes is a new encounter-specific notes component. All encounter visit notes entered in Practice Management will appear in Encounter Billing Notes in PCC EHR. The PCC 10.2 update automatically adds the new component to Post Charges, Patient Check-In, and the new Edit Charges workflow.
PCC EHR also has a general Account Notes component for tracking concerns with a family.
Your practice may want to discuss which component you will use for different circumstances. For example, the Encounter Billing Notes component is ideal for recording ongoing struggles around a particular claim problem. The Account Notes component is better suited for billing concerns that stretch across multiple encounters and patients.
Use the Protocol Configuration tool to configure on which encounter protocols, chart sections, and other PCC EHR screens the two components appear.
Understand Reporting of Adjustments and Credit Write-Offs
In order to better preserve each payment’s association with a provider, PCC tracks both unlinking and relinking when you post refunds or write off credits.
This means that in certain under-the-hood proving out reports, like the Daysheet report, you will see the original revenue from a credit write-off and the unlinking and relinking for the provider.
If seeing the unlinking and relinking makes your Daysheet report difficult to understand, you can select “Omit relinks = “Yes”” on the report criteria screen.
Old Saved Results Only Export in CSV Format
Scheduled results in the Report Library will be in the new format when they run after the 10.2 update. You do not need to reschedule your reports.
Old saved results that were run and saved before PCC 10.2 can only be exported to CSV.

If you need to export to PDF or print one of your saved results, generate a new version with the same criteria from the Report Library landing page, or wait for the scheduled report to run.
