PCC 8.9 Release
In June of 2019, PCC will release version 8.9 of our electronic charting and practice management software to all PCC users.
The PCC 8.9 release includes new navigation tools, finding appointment slots by visit type, payment reconciliation in PCC EHR, new features for sending attachments and sharing medical information securely, and more.
Watch a Video: Want to see a video summary of everything in this release? Watch the PCC 8.9 Release Video.
Implementation: PCC 8.9 includes features that require configuration and user-specific software training. Read about the features below and then review the PCC 8.9 Migration Considerations article.
Read below to learn more, and contact PCC Support for information about these new features or about any PCC product or service.
Contents
- 1 Switch Easily Among PCC EHR Windows
- 2 Perform End-of-Day Payment Reconciliation in PCC EHR
- 3 Parents Can See and Pay Balances for Privacy-Enabled Patients in the Patient Portal
- 4 Families Can Request Appointments, Refills, Referrals and More with Customizable Patient Portal Message Templates
- 5 Attach a Document Directly to a Patient Portal Message
- 6 New “Add Portal Message” Button
- 7 Access Recent Documents Quickly
- 8 View Schedules Only for Providers Who Are Working on a Single Day
- 9 Find Available Appointment Slots By Visit Type
- 10 Find Siblings When You Schedule
- 11 Improved Appointment Reporting
- 12 Attach a Document to a Direct Secure Message
- 13 Evaluate Your Well Visit Rates With HEDIS Benchmarks
- 14 Pilot Test of Clinical Document Exchange Responder Role
- 15 C-CDA Improved For Better Record Portability
- 16 Recent Updates to PCC eRx
- 17 New and Updated Interfaces Available in PCC 8.9
- 18 Other Feature Improvements and Bug Fixes in PCC 8.9
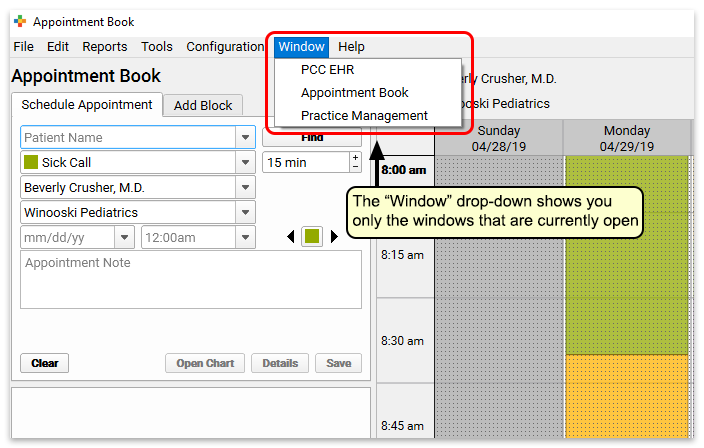
Switch Easily Among PCC EHR Windows
PCC 8.9 makes it easier to open and find the various windows you may be working with. The EHR, Appointment Book, Practice Management window, and Import Documents window are all available at any time with new icons at the bottom of your windows.
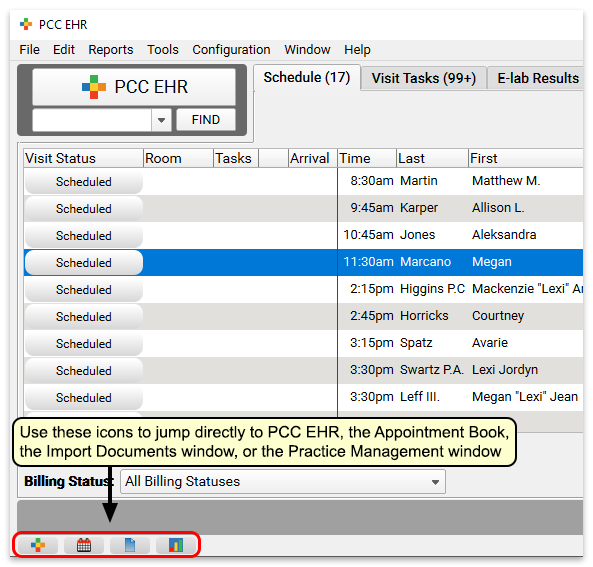
Click on any of these icons to open or bring its respective window to the front.
Also, you can use the new “Window” drop-down to go to any currently open window.
Perform End-of-Day Payment Reconciliation in PCC EHR
You can now reconcile posted payments that have been posted in PCC EHR. Run the Payment Reconciliation report in order to prove out.
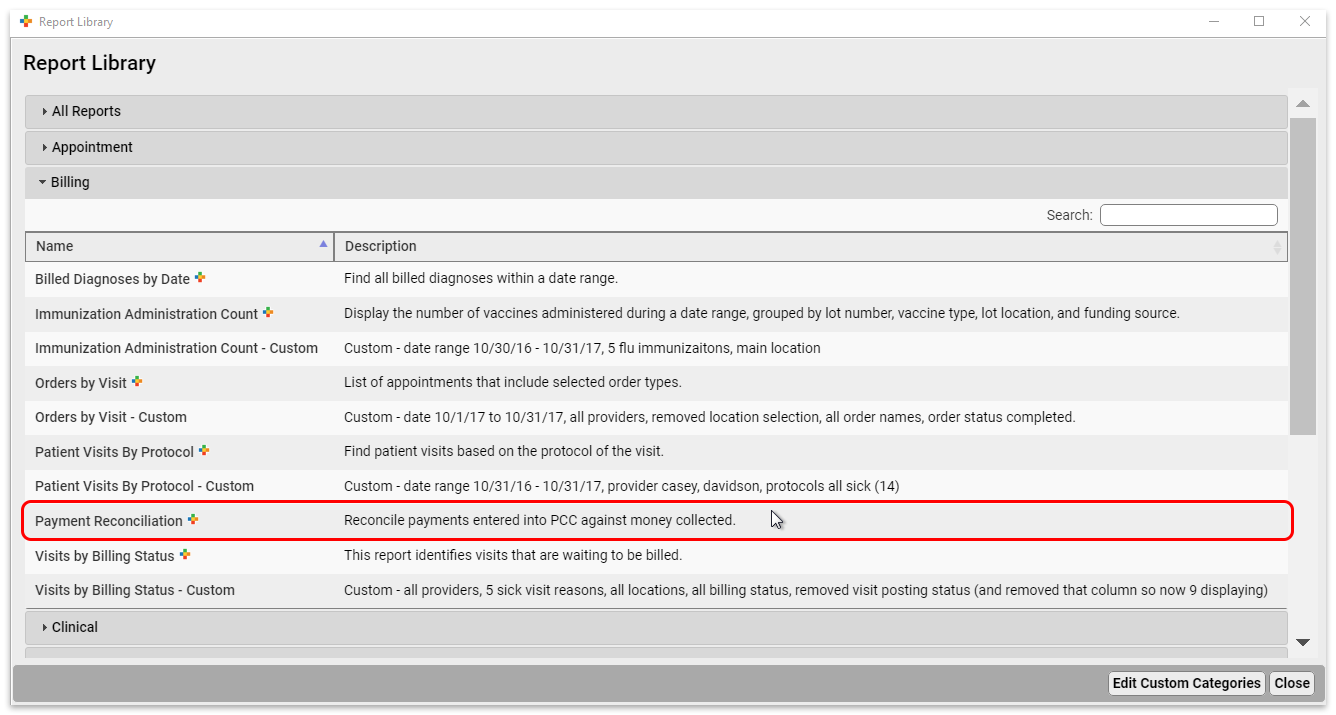
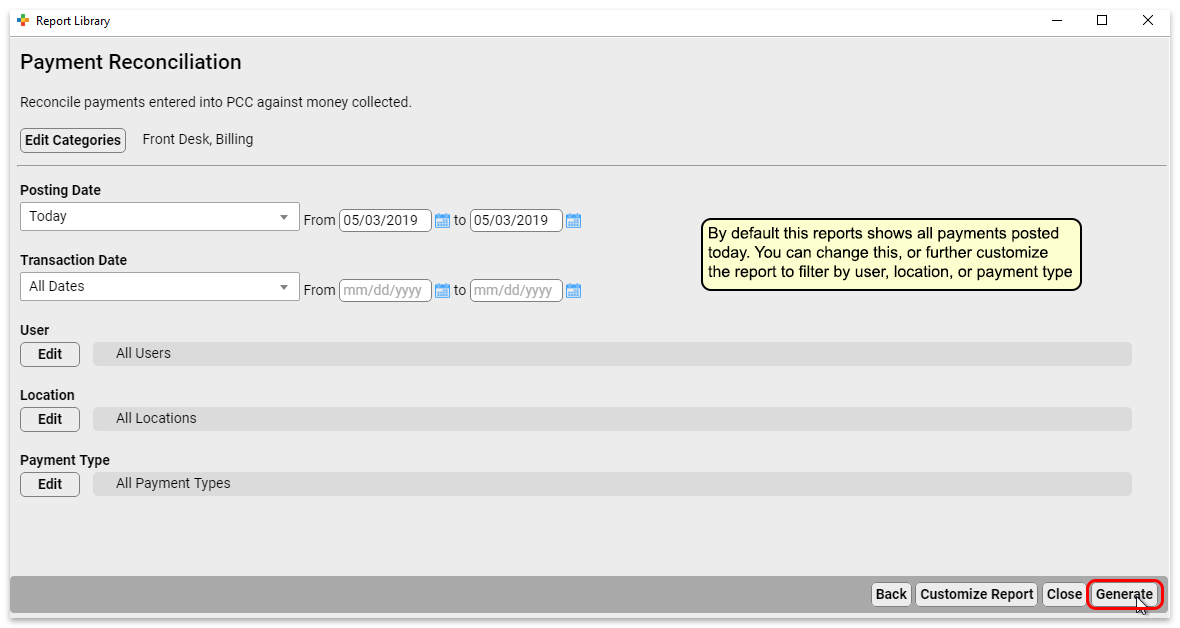
You can customize the Payment Reconciliation report to filter your results by date, user, location, and payment type.
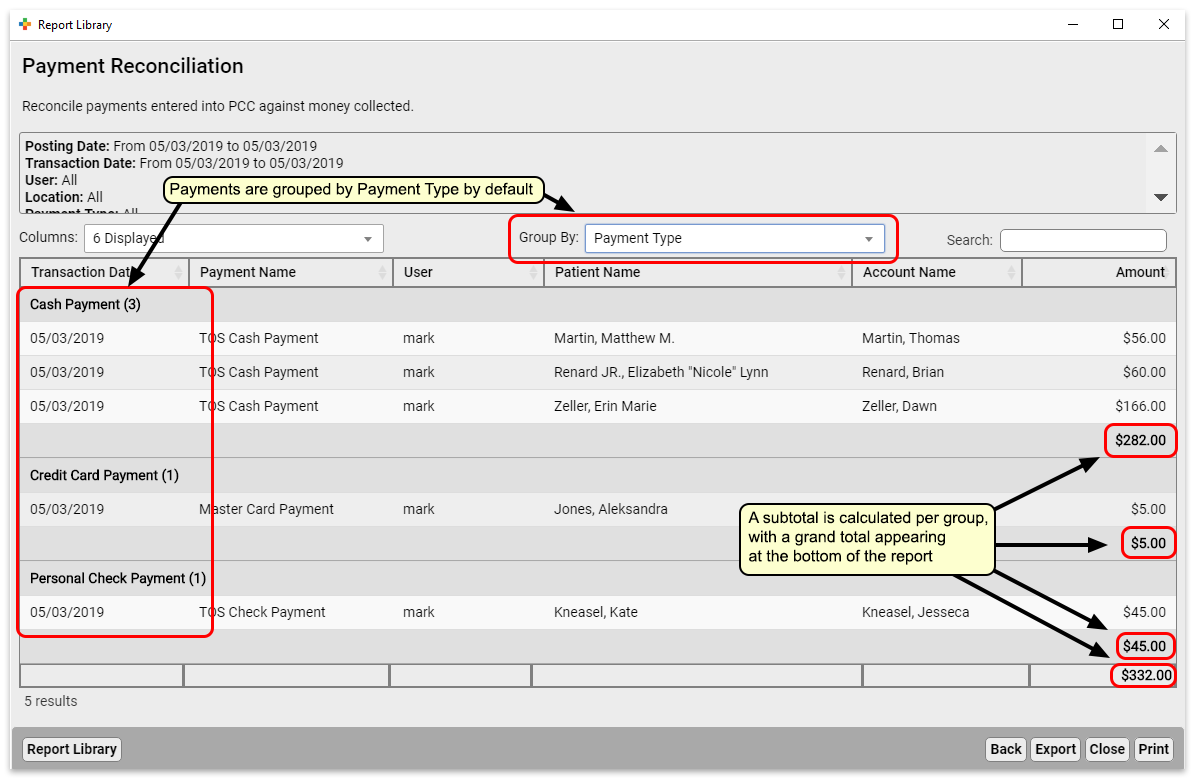
Subtotals and Grouping in Reports: As you can see in this report, PCC EHR now shows subtotals when appropriate. You can also use the new “Group By” drop-down to select which column to group by. Subtotals and groupings will not appear in .csv exports.
Parents Can See and Pay Balances for Privacy-Enabled Patients in the Patient Portal
When a patient is a teenager with private records, it is still often the case that their parents pay their medical bills.
PCC 8.9 solves the dilemma of how to allow parents to see and pay for outstanding balances through the patient portal, without compromising patient privacy.
Now when a portal user logs into their portal account, they can see balance totals for all their linked patients whether they have privacy enabled or not.
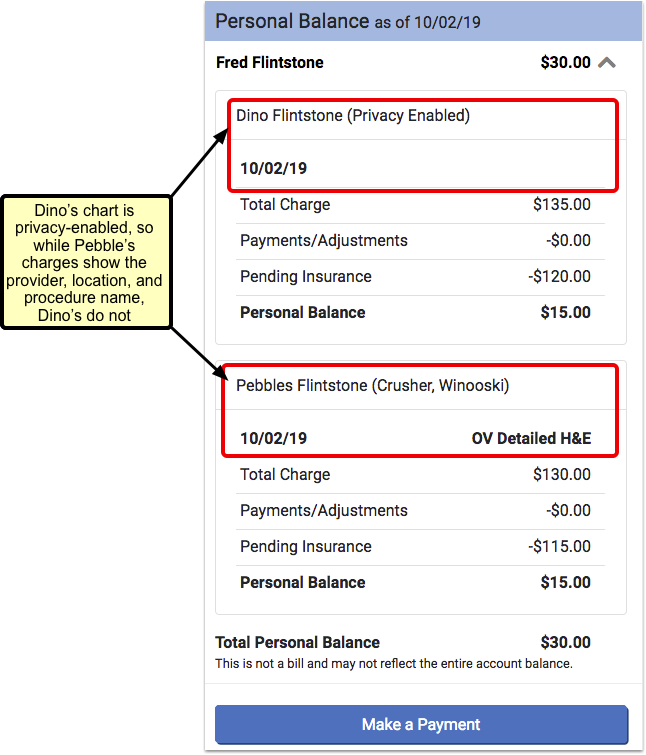
Personal balances for privacy-enabled patients display the date and charge only – not the provider, location or procedure name.
Families Can Request Appointments, Refills, Referrals and More with Customizable Patient Portal Message Templates
Busy parents want a way to communicate effectively with your practice when it’s convenient for them, without having to play phone tag.
PCC 8.9 includes three new optional patient portal message templates that you can use to customize how your families send you messages, and ensure that you receive the information you need.
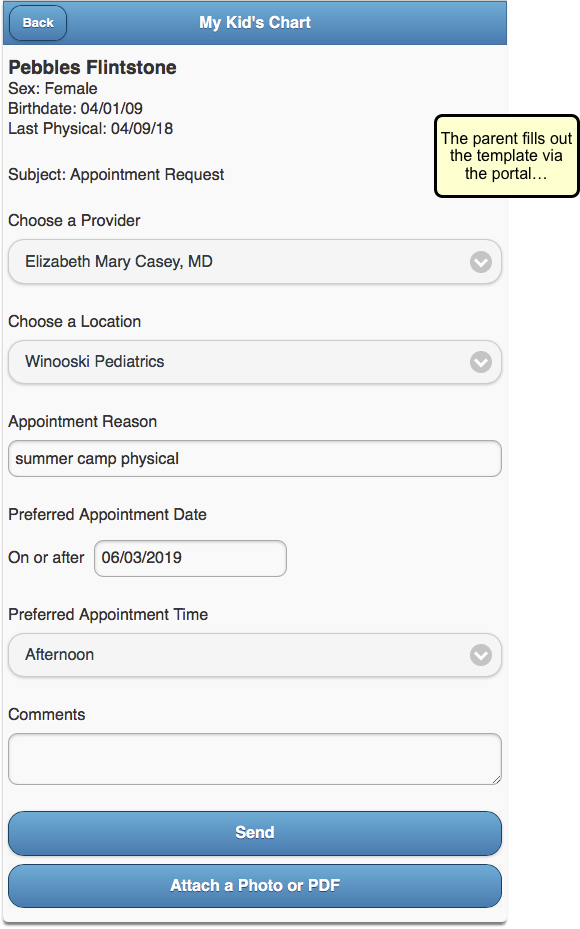
You can use these templates as-is, or customize them to work better for your office.
In order to use portal messaging templates, your practice must have Secure Messaging enabled. For more information about configuring your patient portal, read Patient Portal Practice Settings and Configuration.
How to Turn On and Customize Portal Message Templates
If your practice wants to use the optional patient portal message templates, you will first need to enable them.
Navigate to the Patient Portal Configuration screen, and click on the new Messaging Templates tab.
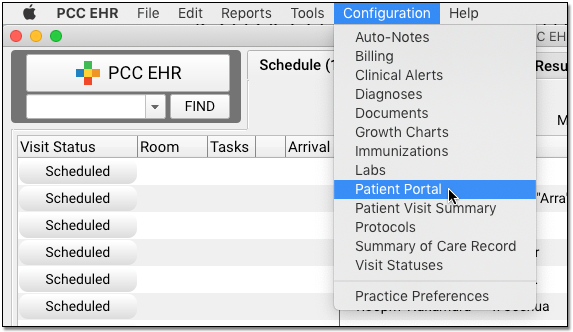
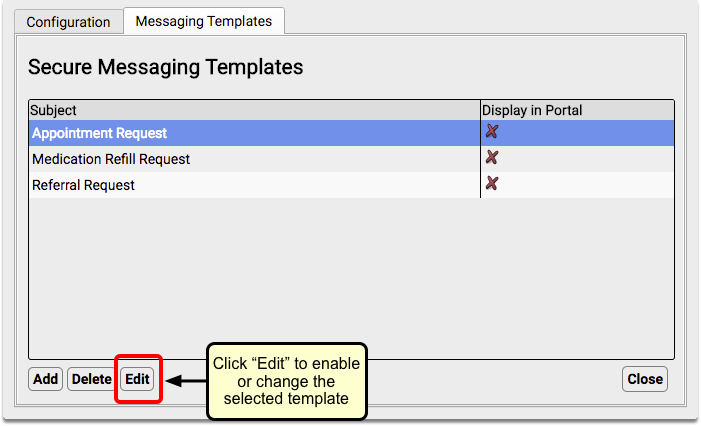
Highlight the template you want to turn on, click “Edit”, and then select the “Display in Portal” checkbox.
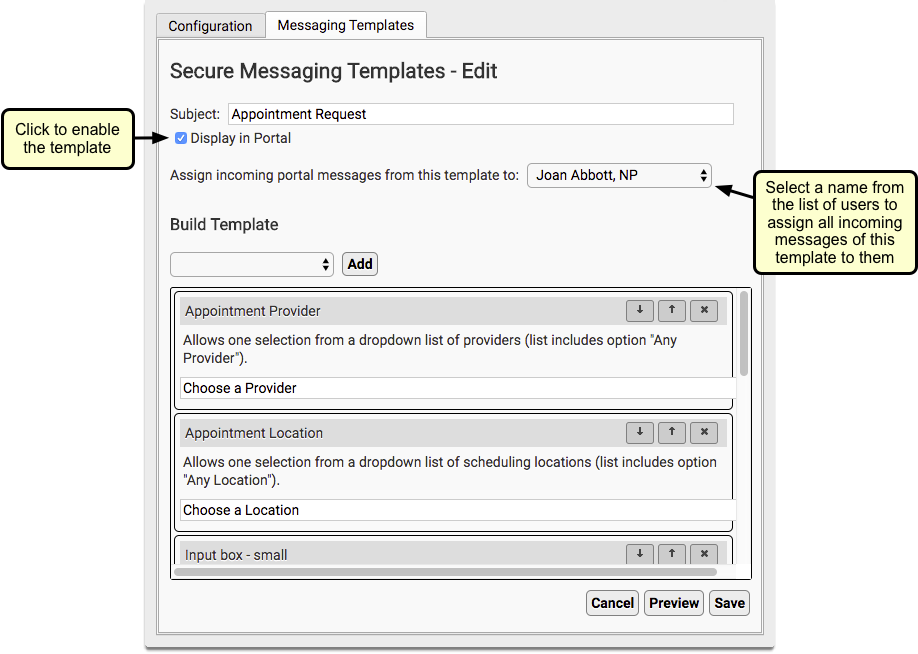
You can also choose to automatically assign incoming messages of a certain template to a specific person at your practice.
Edits are Permanent: When you edit a default template, the original template will be lost. You will need to recreate it from scratch if you wish to use it again.
What Families Will See
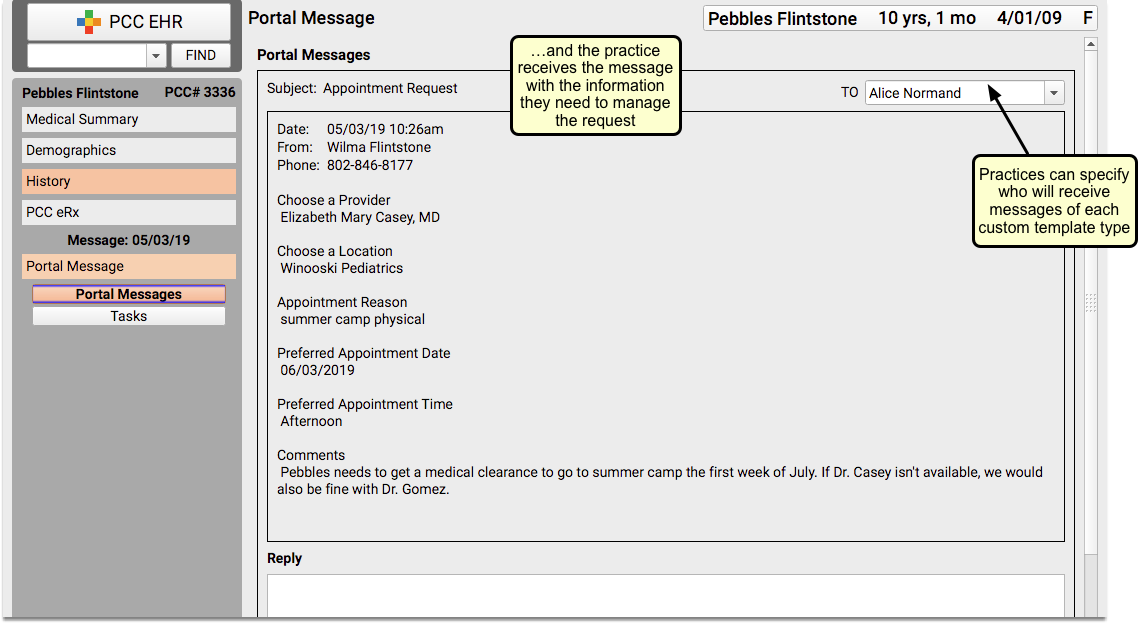
If your practice chooses to enable patient portal messaging templates, your portal users will see a new Subject drop-down option when they choose to create a message:
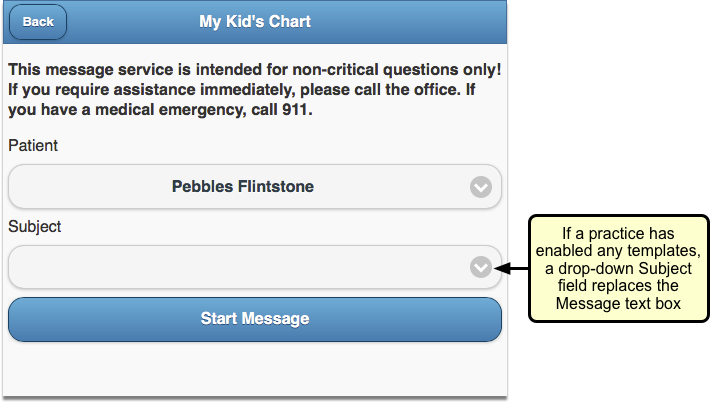
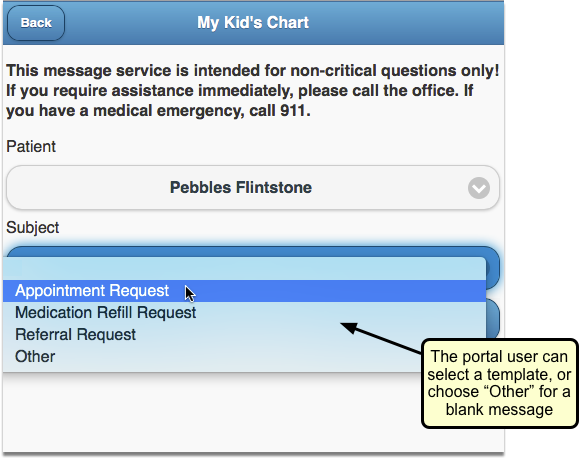
When the portal user selects a message subject, they will see a list of information to fill out, depending on which subject they select.
Appointment Request
The Appointment Request default portal message allows the portal user to select a desired provider and location on a specified date at a preferred time of day.
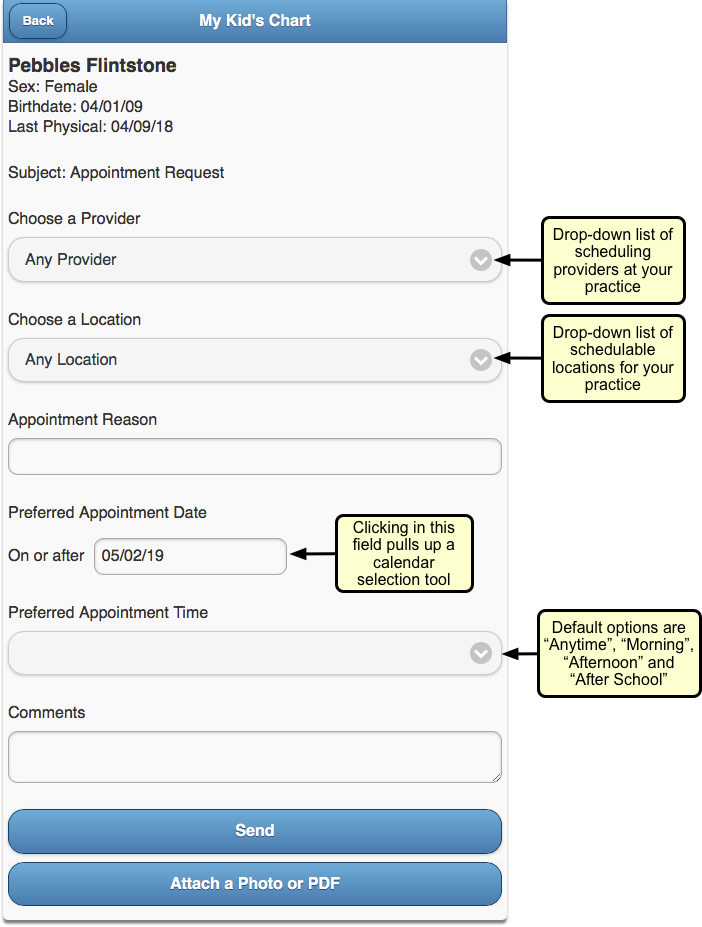
The portal user can write a short note about the type of appointment they need and can include a longer note with comments. They can even attach a related photo if they choose.
Your practice can edit the Appointment Request default template to better suit your needs.
Medication Refill Request
The Medication Refill Request default portal message includes a list of the patient’s medication allergies, with a request to confirm them. There are entry fields for the portal user to record the prescription they want refilled and the name and location of the pharmacy they want to use.
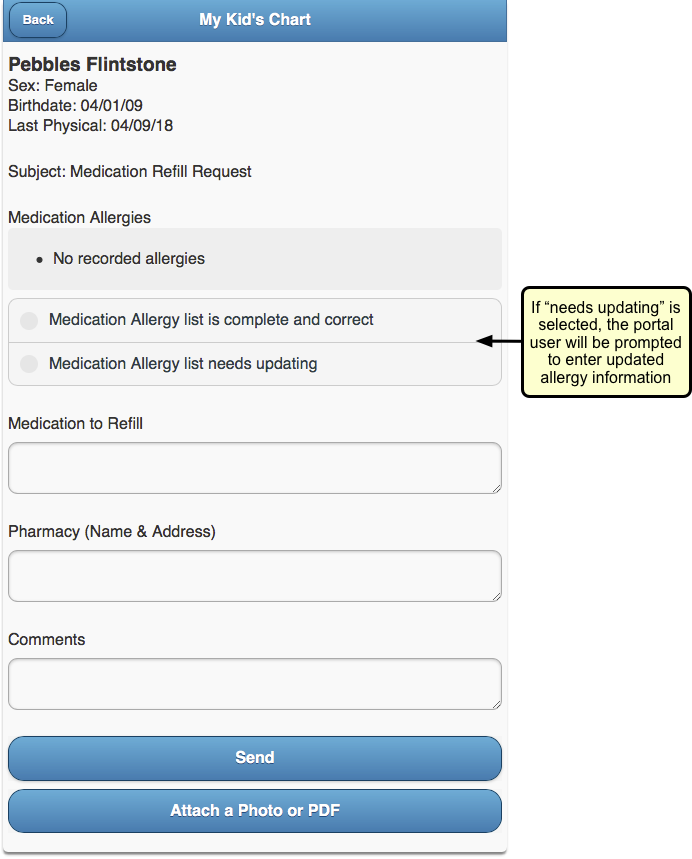
The portal user can add comments if they need to, and can attach a photo as well, if applicable.
Your practice can edit the Medication Refill Request default template to better suit your needs.
Referral Request
The Referral Request default portal message includes entry fields for the portal user to describe why they want a referral, who they wish to see and what the provider’s speciality is, along with the provider’s phone, fax, and office name and address.
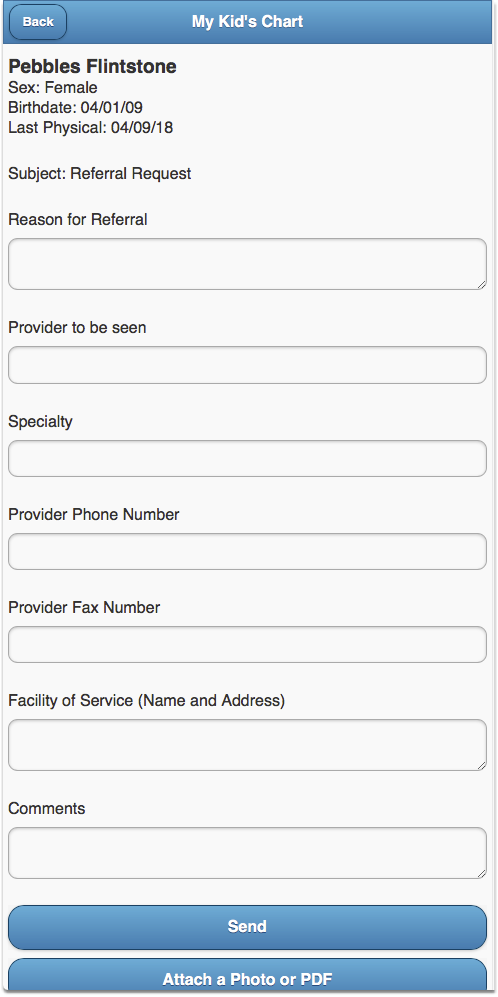
The portal user can add comments if they need to, and can attach a photo as well, if applicable.
Your practice can edit the Referral Request default template to better suit your needs.
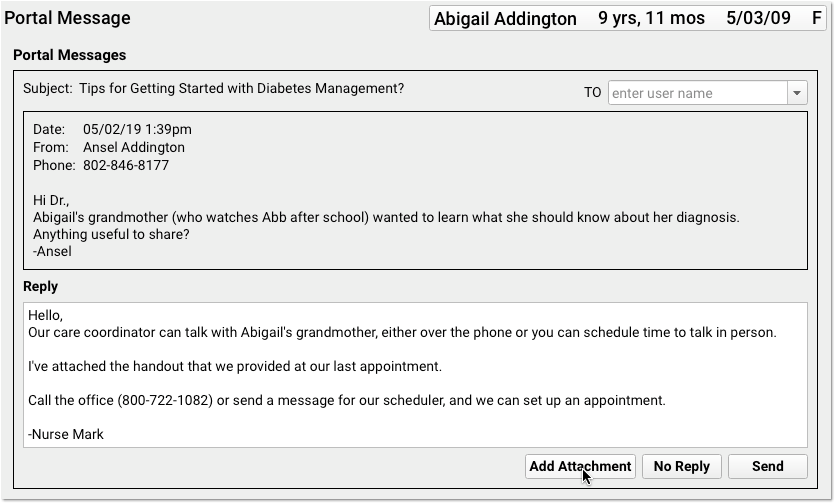
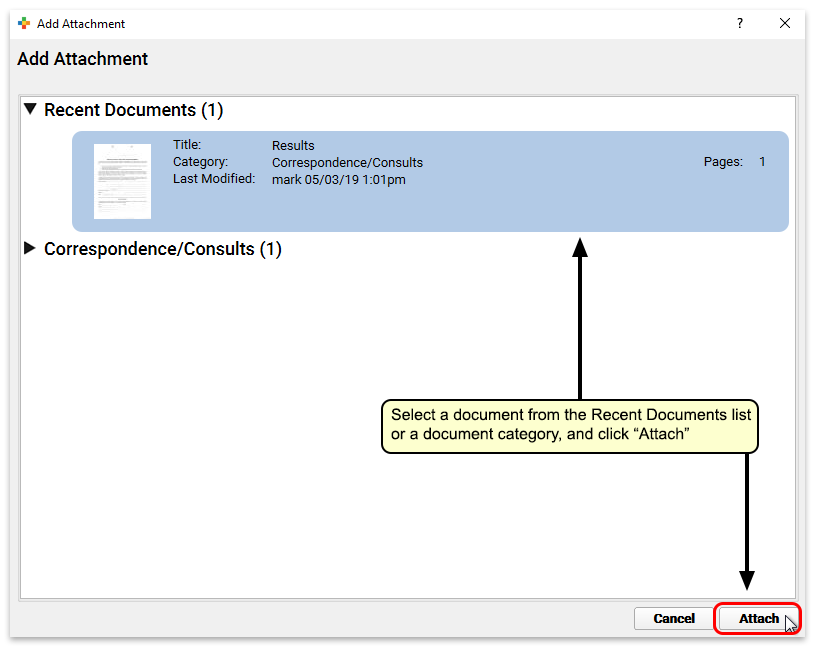
Attach a Document Directly to a Patient Portal Message
With PCC 8.9, you can send portal messages with attachments. You can send a lab result or important handout in a portal message with an accompanying explanation, and your families will never lose their copy. Families will see your attachment within the portal message, which makes the document much easier to find.
When you are working on a portal message, click “Add Attachment” to add a document.
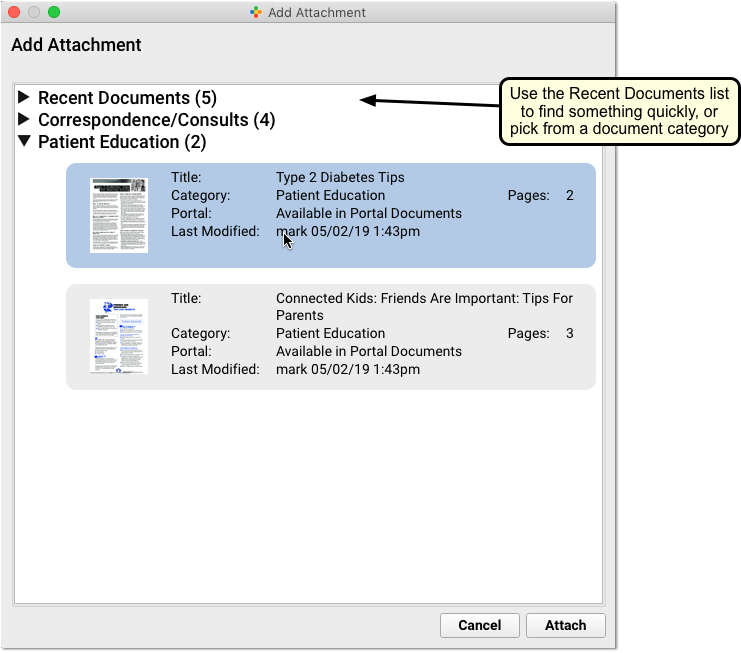
You can select from the Recent Documents section, or choose a document from another category. Click “Attach” to attach the document.
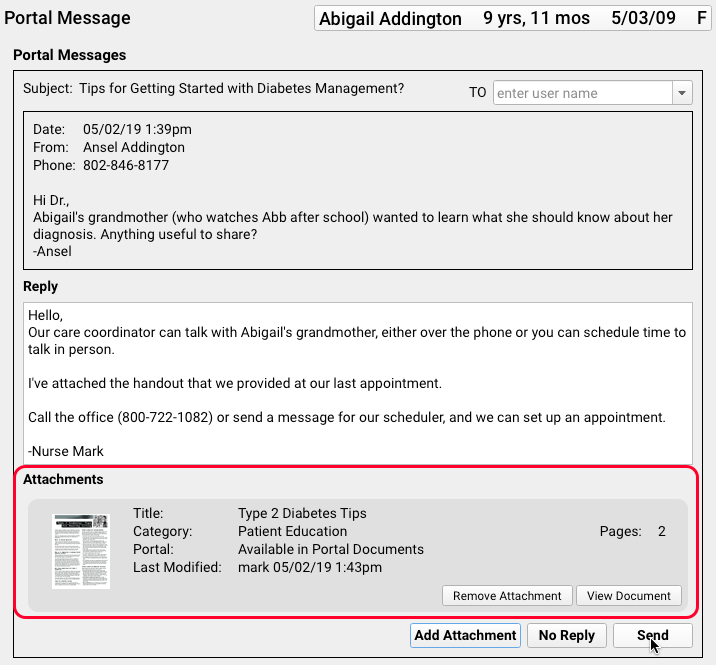
As you compose your portal message, you can see information about the attachment, and click “Send” to send the message and attachment together.
What will the family see in the patient portal? The attachment will appear in line with the discussion.
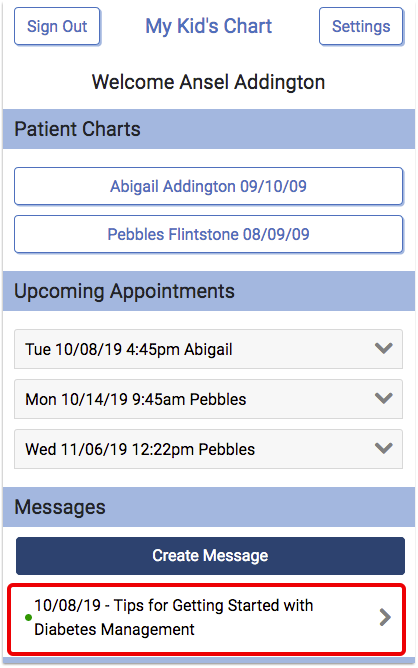
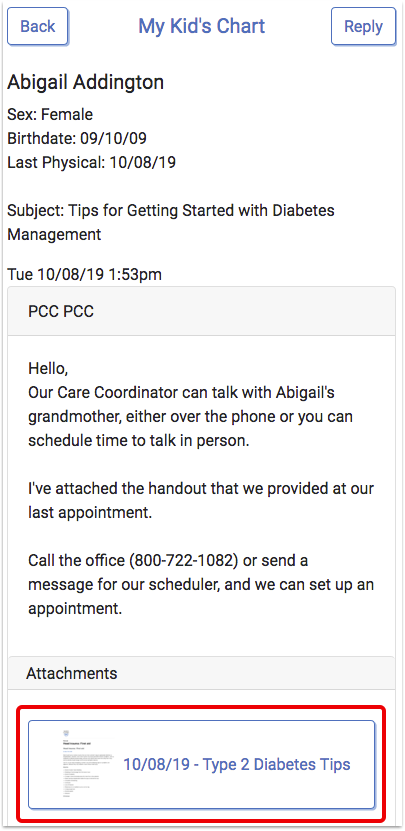
The family can click on the attachment to download and view the document.
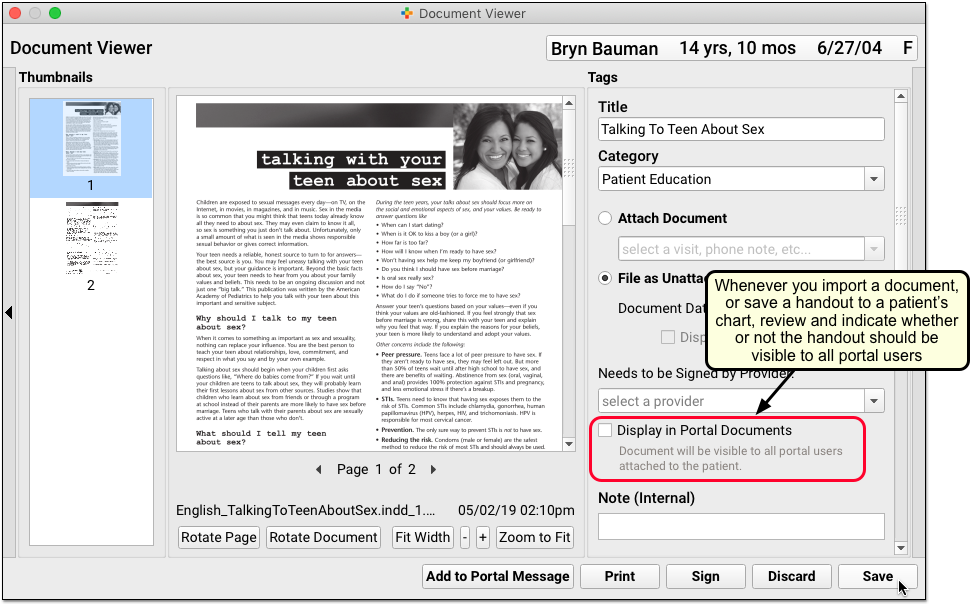
Send a Private Document Directly to One Portal User
Portal messages are always sent to one, specific portal user. When you attach a document to a message, it will be sent only to that portal user. However, your practice can also make documents visible to all portal users, as part of the patient portal record. What workflow should you follow to ensure that a document is only shared with one user?
For example, if you’re sending contraceptive information to a teenage patient, or a form intended only for a parent, you want to attach a document to a portal message but not have it appear elsewhere on the patient portal.
When you add a private handout or document to a patient’s chart in PCC EHR, make sure that the “Display in Portal Documents” checkbox is not checked.
Next, reply to or create a portal message and attach the document.
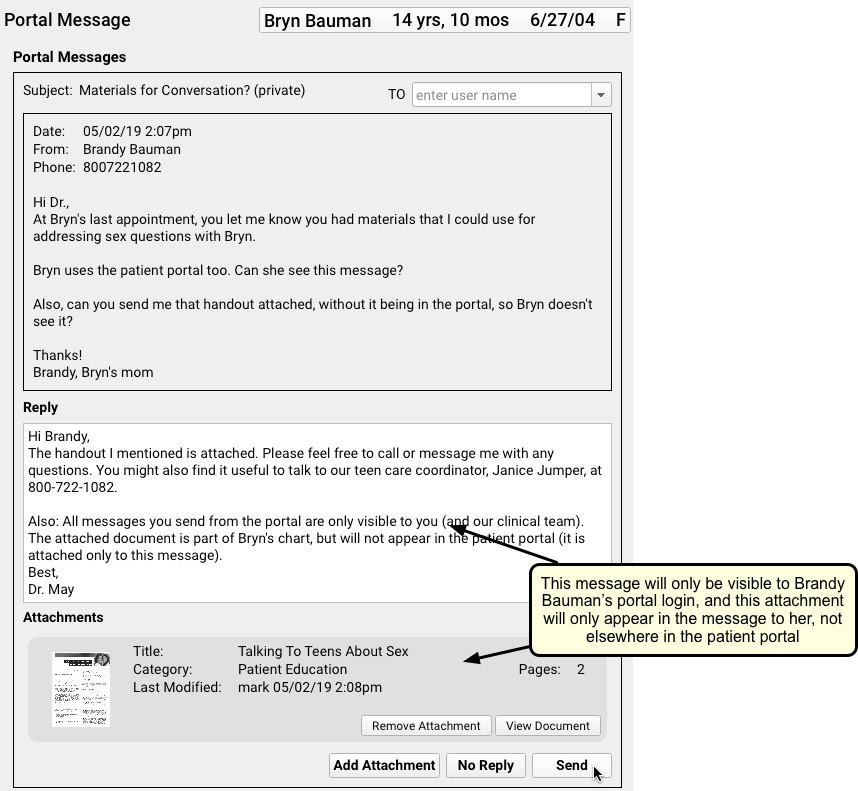
Since the attachment is not visible in portal documents, you can be sure that the document will only be seen by the specific portal message recipient. (If you’d like to make changes you can click “View Document” and then “Edit” to change whether or not it is available to all portal users.)
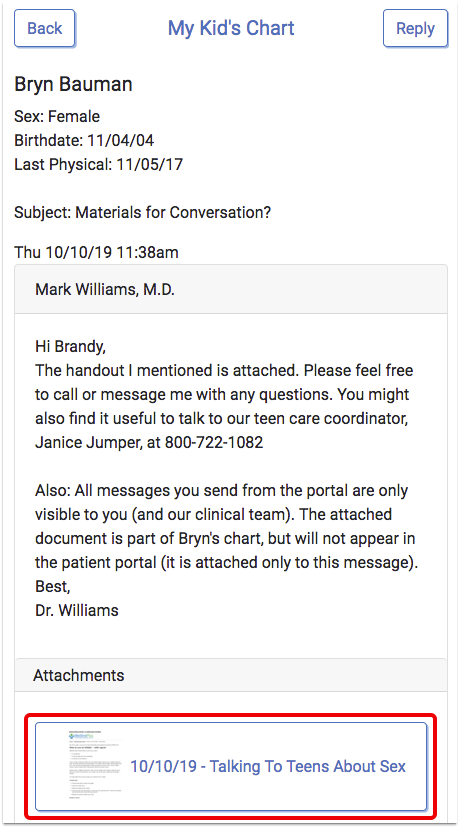
The document will only appear as a message attachment for the specific portal user.
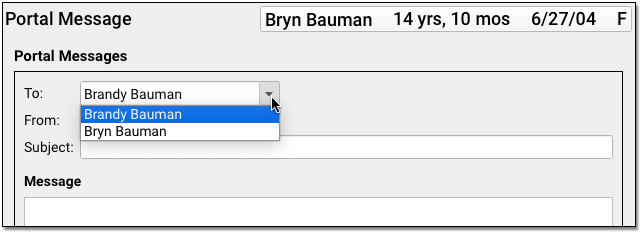
New “Add Portal Message” Button
You can now click “Add Portal Message” to compose a new message to a portal user associated with a patient.
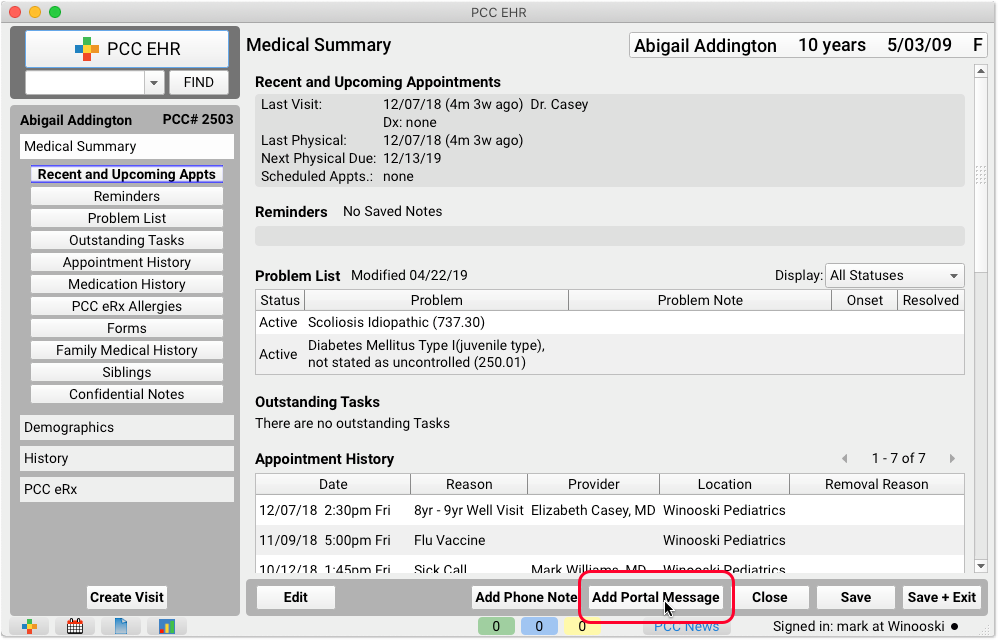
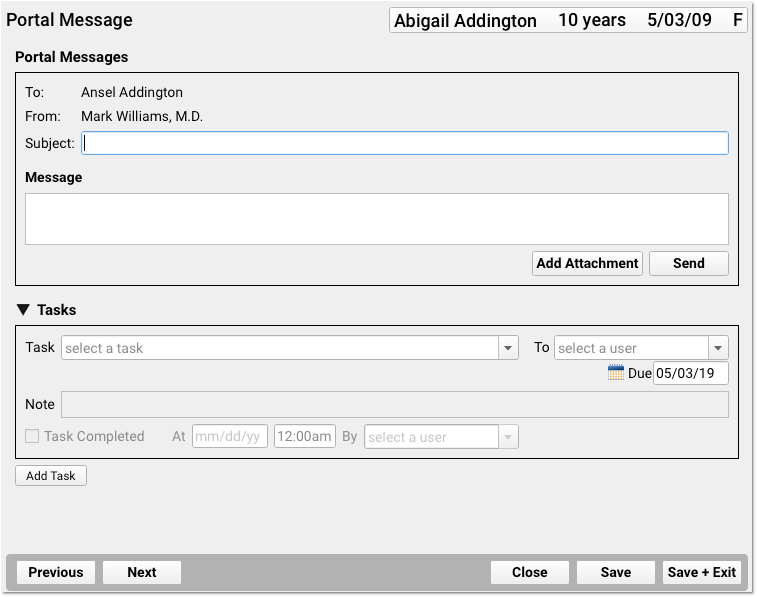
The “Add Portal Message” button appears on the Medical Summary, Demographics, and History chart sections, next to the “Add Phone Note” button.
Send to Who?: If a patient has more than one portal user, such as more than one parent and/or a patient, you can select the intended recipient as you compose the message.
Access Recent Documents Quickly
The Documents section of the patient’s chart now includes a “Recent Documents” list, which displays the five most recent documents in a patient’s chart.
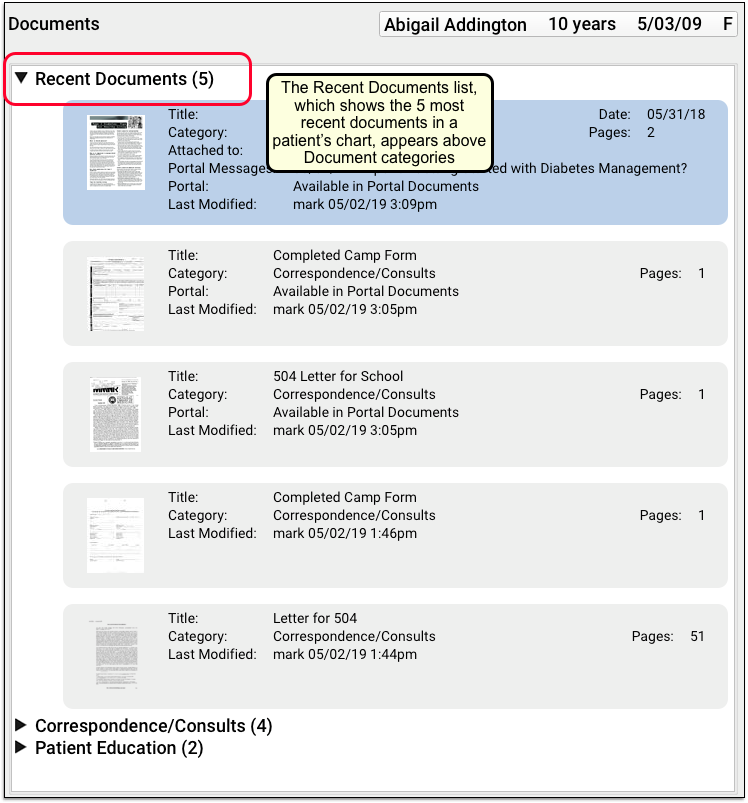
You can quickly find the most recently imported or modified documents in the patient’s chart. When you are hunting for a lab result, or attaching the latest handout to a patient portal message, you’ll be able to grab the document you need without having to browse the categories.
View Schedules Only for Providers Who Are Working on a Single Day
When you’re trying to schedule a visit, but your practice has several providers who work in different locations, it can be frustrating to find an available provider.
In PCC 8.9, you can use the new “Day Working” view to see only providers who are scheduled to work for the selected day and location.
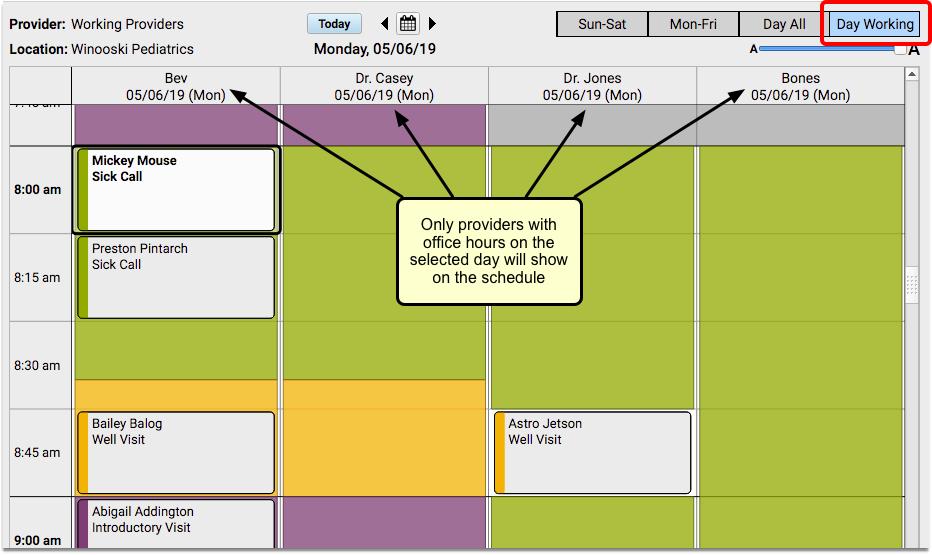
You can navigate through the calendar day by day and you will still see only the providers who are available at that location on the given day.
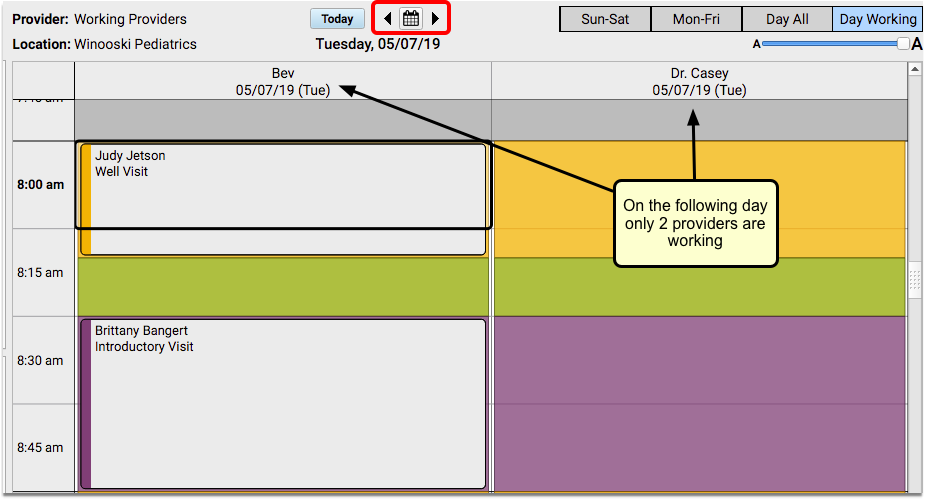
If you prefer to see all providers, regardless of their availability, use the “Day All” view.
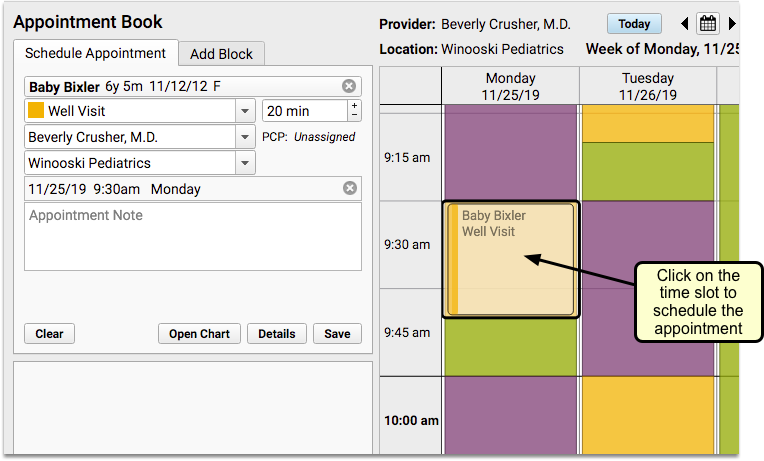
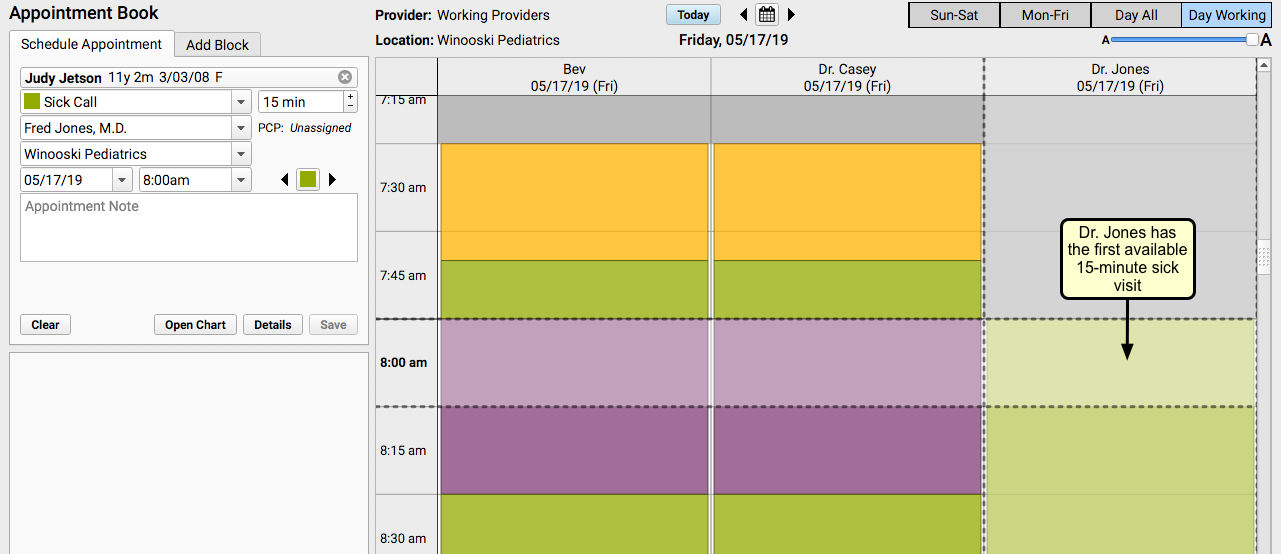
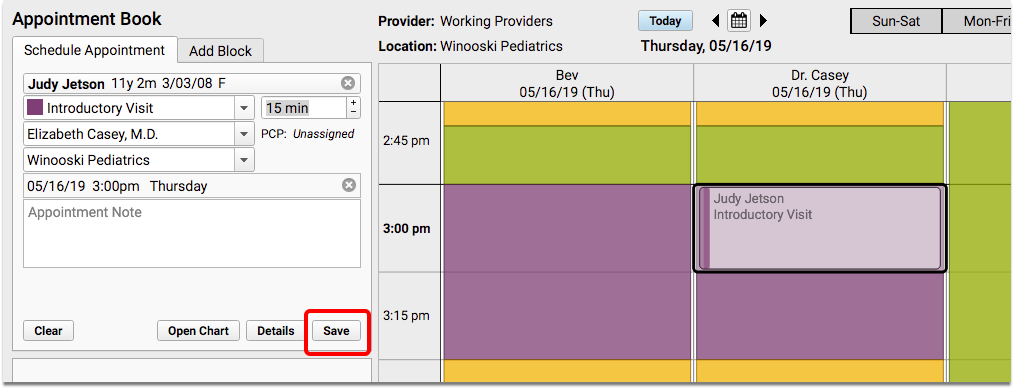
Find Available Appointment Slots By Visit Type
What time is the first available sick visit for Dr. Casey today? When is the first available well visit slot after the patient’s well visit due date?
In PCC 8.9, the Appointment Book introduces an Availability Finder tool that you can use to find find the next open time slot for a specific Visit Type.

You can also use the Select Appointment Date & Time window for a more visual approach.
Search for the Next Open Time Slot for a Specific Visit Type by Color
When you select a visit reason in the Schedule Appointment panel, the Availability Finder color swatch will display the same visit type color.
Note: Your practice can choose to ignore the selected Visit Type and default to another Visit Type if you wish. See the PCC 8.9 Migration Considerations article.
You can use the Availability Finder arrows to jump to the next open time slot for that visit type.
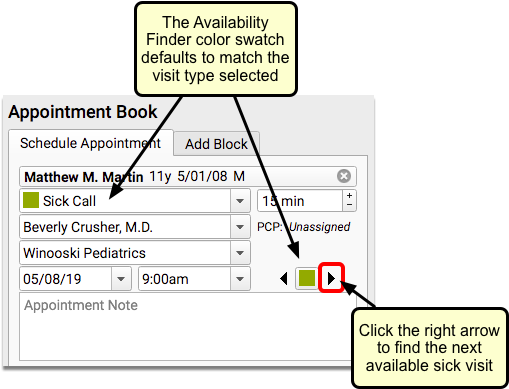
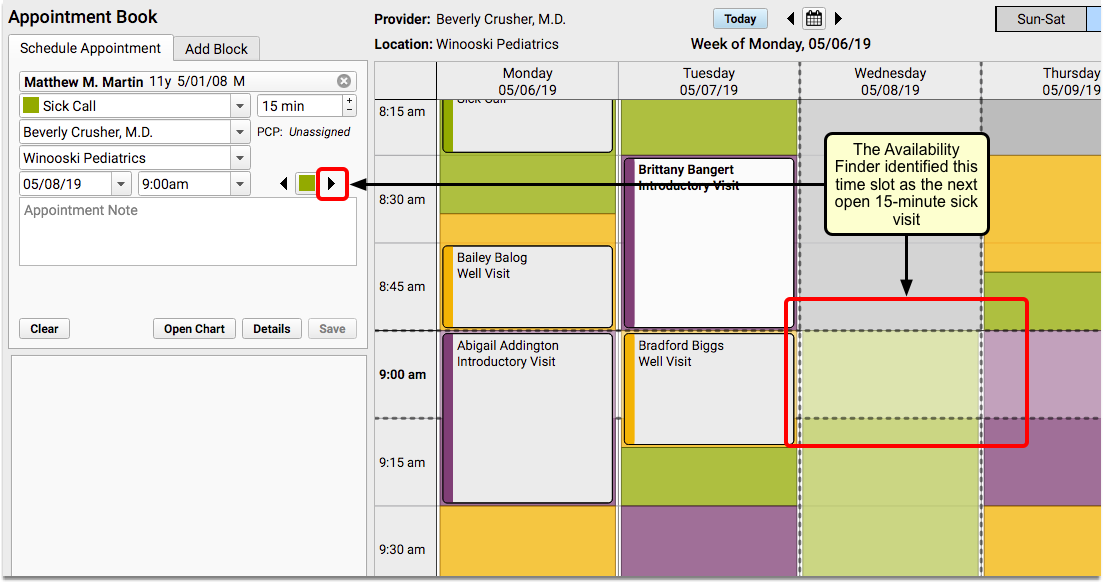
In the above image, the user clicked the right arrow, and the Appointment Book automatically selected the next available sick time.
You can click to select that slot, enter an Appointment Note, and click “Save” to schedule. Or, you can continue clicking the right arrow to see additional open time slots with that visit type.
What about well visits? When you schedule a well visit, you typically start looking after the patient’s next physical due date, or whatever date in the future you want to begin the search.
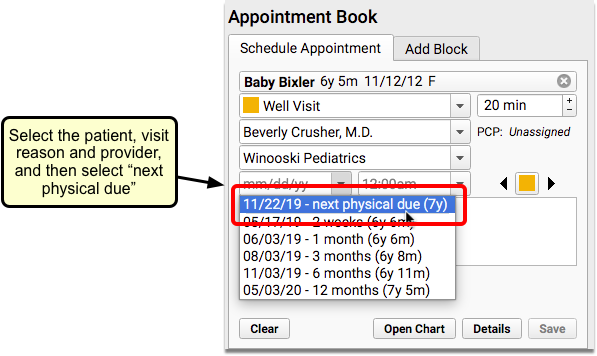
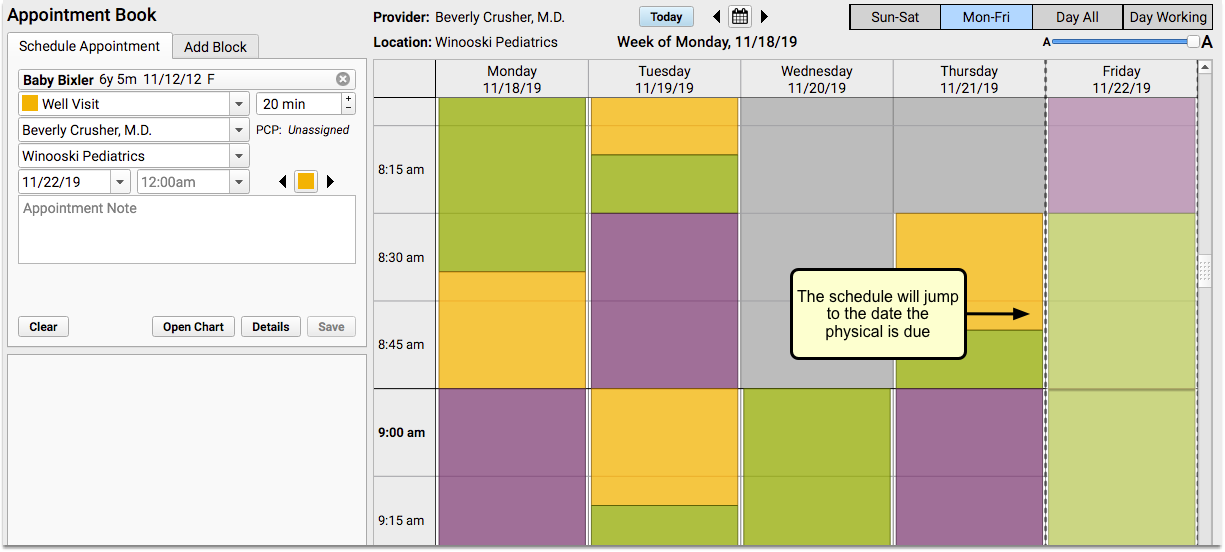
The Appointment Book will jump to that date. Then you can use the right arrow to find the first open Well Visit time.
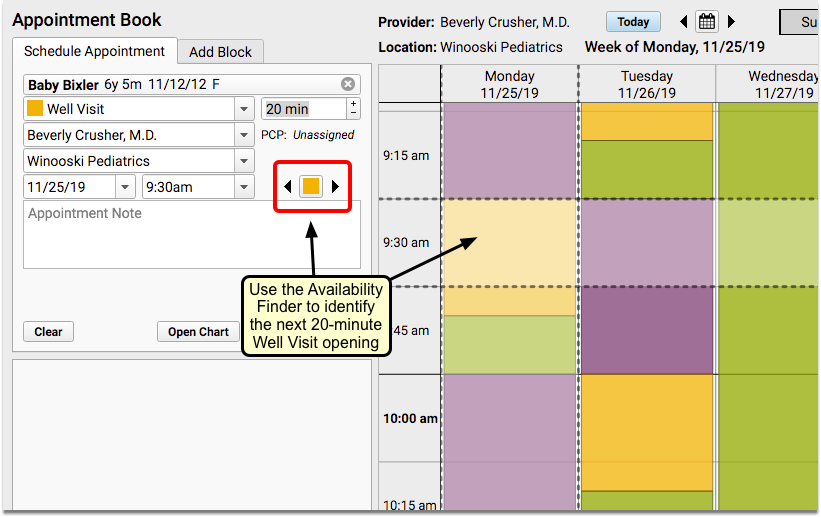
If you don’t want the first appointment found, continue to click the right arrow to find the next opening. The Appointment Book will continue on to the next day and scroll the screen for you, or even flip to the next week. You can use the left arrow if you want to go back to the last offered time slot.
When you find the date and time you want, click on the time slot to begin scheduling.
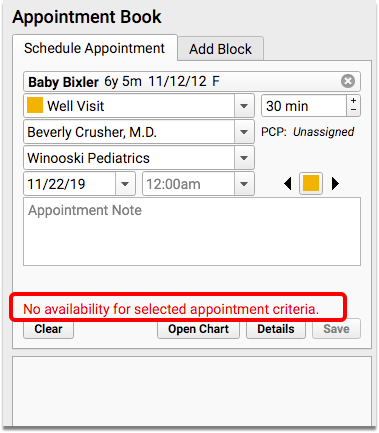
None Available: If there are no available appointments for the selected criteria, you’ll see a temporary message in the scheduling panel, which will disappear after a few seconds.
If you need to open up the search to include other visit types, you can click on the color swatch to reveal a drop-down selection of other visit types.
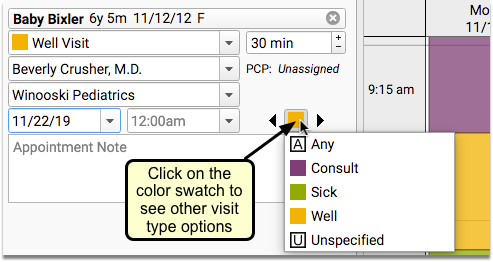
What Are Those Weird Looking Visit Types?: Use the “A” visit type to ignore the color swatch and find the next open slot for any of your visit types. Select “U” to look only for open time on the schedule with no assigned visit type.
Find Next Available Time With Any Provider: Work in the Day View
When you want to search for an available appointment with any provider, use one of the Day views in the Appointment book. As you use the right arrow to find an open slot for the selected Visit Type, the Appointment Book will search each provider’s availability.
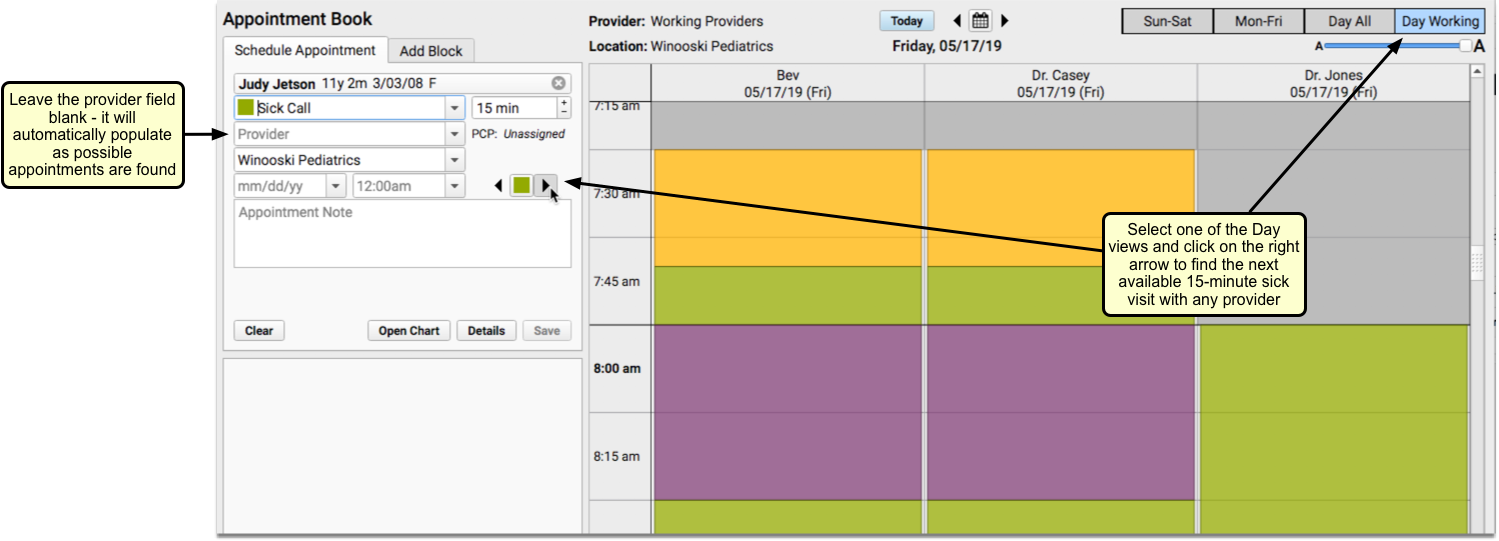
As you continue to click the right arrow and move through each available time slot, the Provider field will populate with the available provider’s name, and the open time on their schedule will be highlighted with crosshairs.
Click on a time slot to select a provider and time.
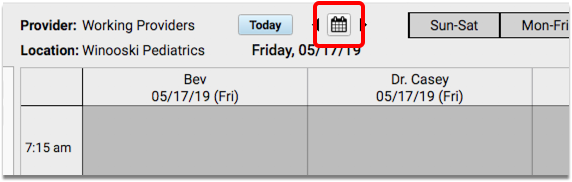
Use the Select Appointment Date & Time Window to See All Available Visit Slots For Any Day
While clicking arrows to jump to the next available time slot can be handy, sometimes you want to see a broader view of open slots on your practice calendar.
Use the Select Appointment Date & Time window to see available time slots for a selected Visit Type, over the next six months.
Click on the Calendar icon to open the Select Appointment Date & Time window.
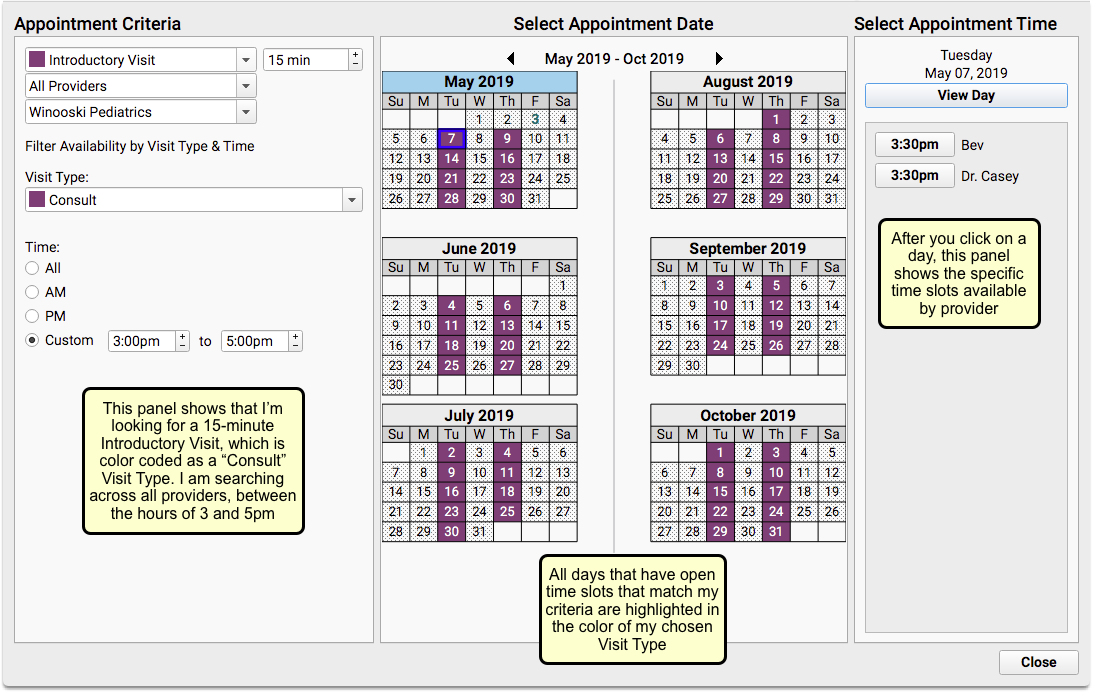
When you need to find an opening for a sick or well visit (or any visit type), you can adjust the criteria within the Appointment Criteria panel on the left. You can set a different provider, location, or visit type.
The Select Appointment Date panel in the center will show every day that includes availability matching your selected criteria. Days with availability will be highlighted in the color matching the Visit Type you selected. Days that are shaded with a dotted pattern have no time slots that match your criteria.
Click on a day within one of the calendars to see appointment availability, by provider, in the Select Appointment Time panel on the right.
When you find an open time slot that works for you, click the time button to return to your schedule.
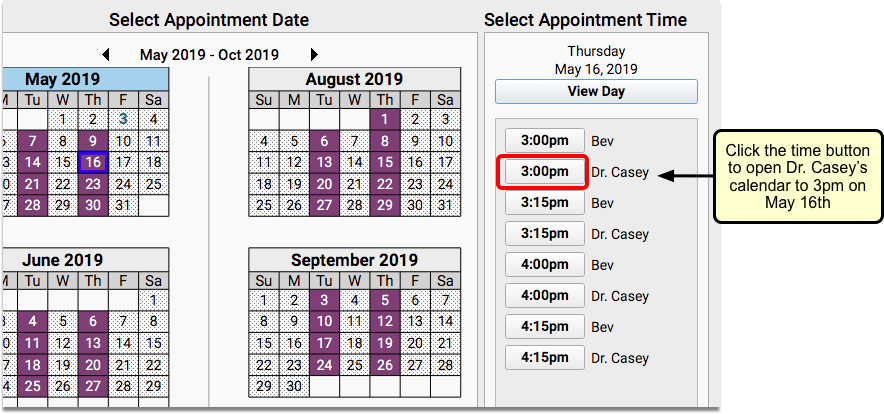
The Appointment Book will open to your chosen date and time for the provider selected.
You can make changes in the scheduling panel if you need to, and then click “Save” to confirm the appointment.
Find Siblings When You Schedule
How often do parents ask to schedule siblings for back-to-back appointments? PCC 8.9 makes it faster and easier to schedule multiple family members simultaneously.
The Appointment Book now includes a sibling list for the most recently searched for patient. The list will be indented beneath the patient’s name, and can include up to ten siblings, sorted by age – youngest to oldest.
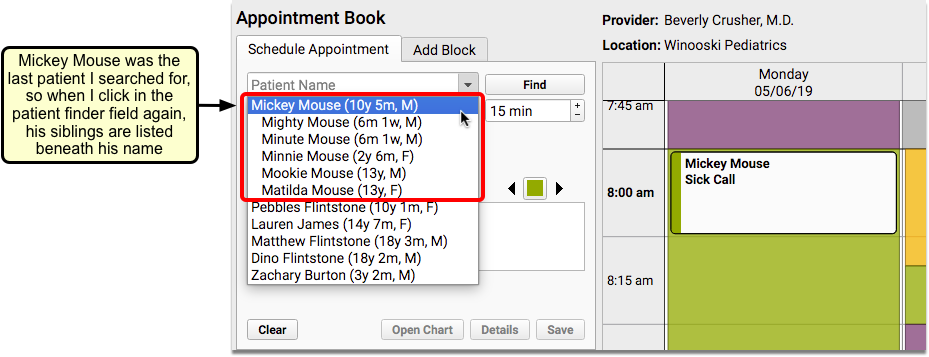
Siblings are defined as patients who share either a home or billing account.
Workflow Tip: Using this new feature combined with the new visit type availability search described above can help streamline your family scheduling process. For example, if you are scheduling two siblings for a sick visit, and your sick visit time slot is 15 minutes, you can search for the next available 30-minute sick visit. When you find one that works for the family, change the appointment to 15 minutes, and schedule one sibling right after the other.
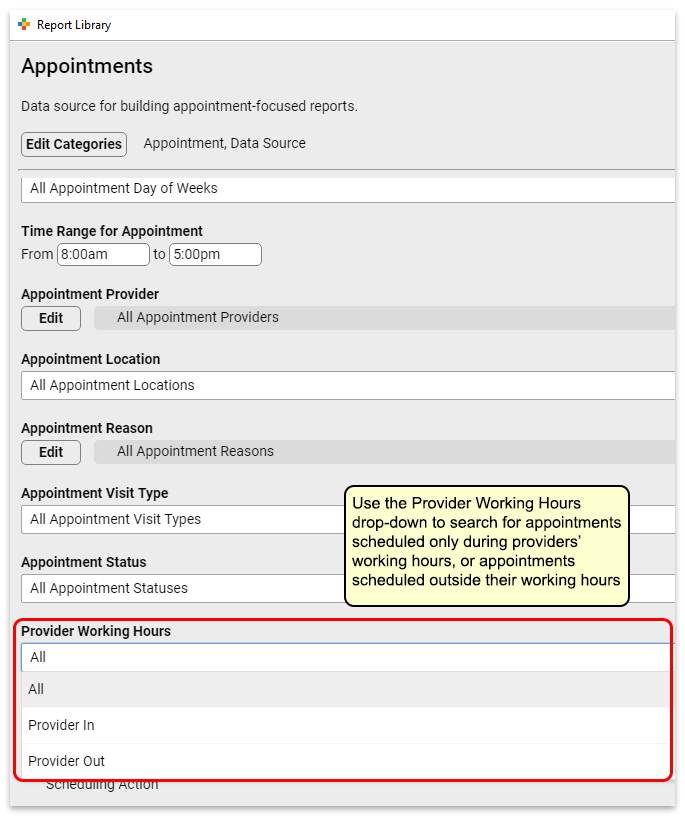
Improved Appointment Reporting
PCC 8.9 includes improvement to appointment reporting in the PCC EHR Report Library.
Filter Appointment Reports Based on Provider Availability
The Report Library will now allow you to filter reports by provider availability. You can use this to report on all appointments scheduled for a provider that are outside their regular working hours.
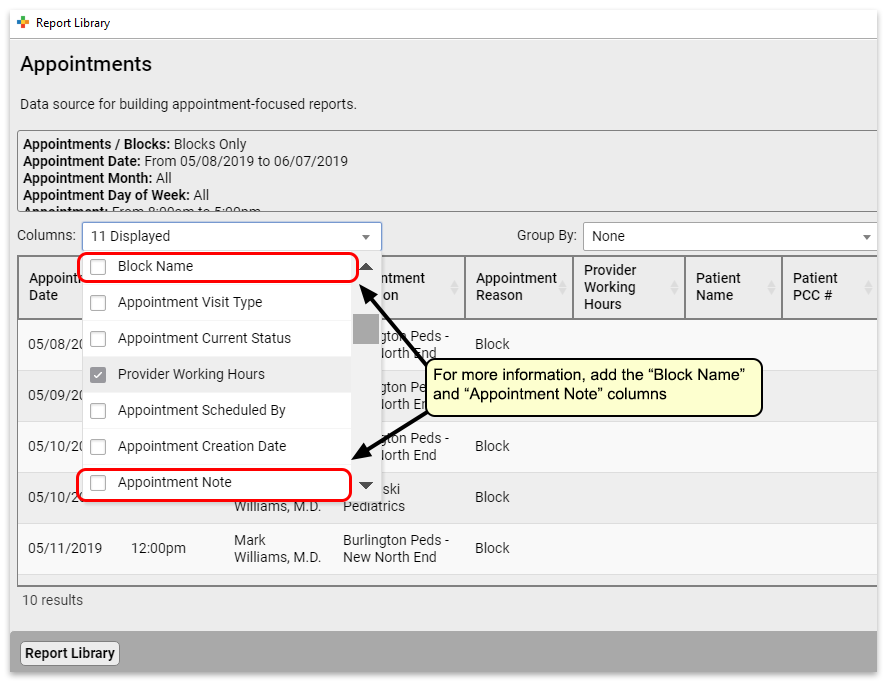
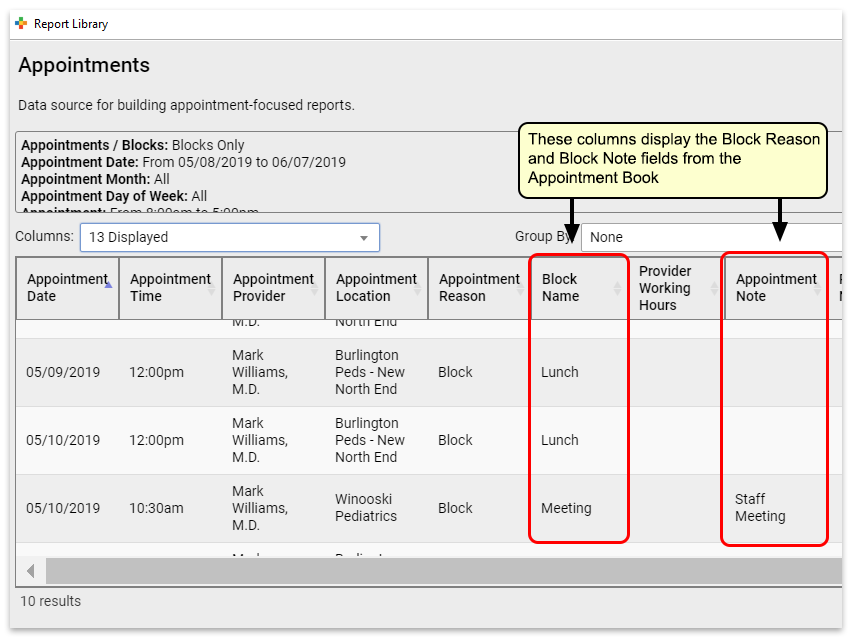
Report on Blocks in the Appointment Book
When creating appointment-based reports, you can now filter your results to look at blocks, appointments, or both.
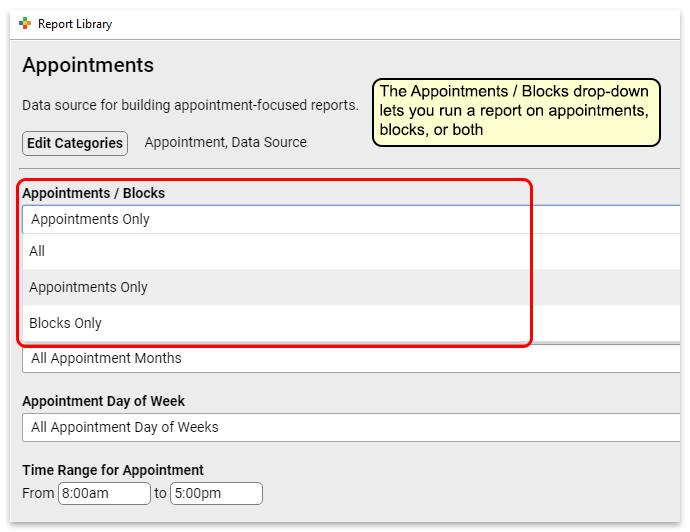
For more information, add the ‘Block Name’ columns and ‘Appointment Note’ columns.
Attach a Document to a Direct Secure Message
You can now attach documents to Direct Secure Messages.

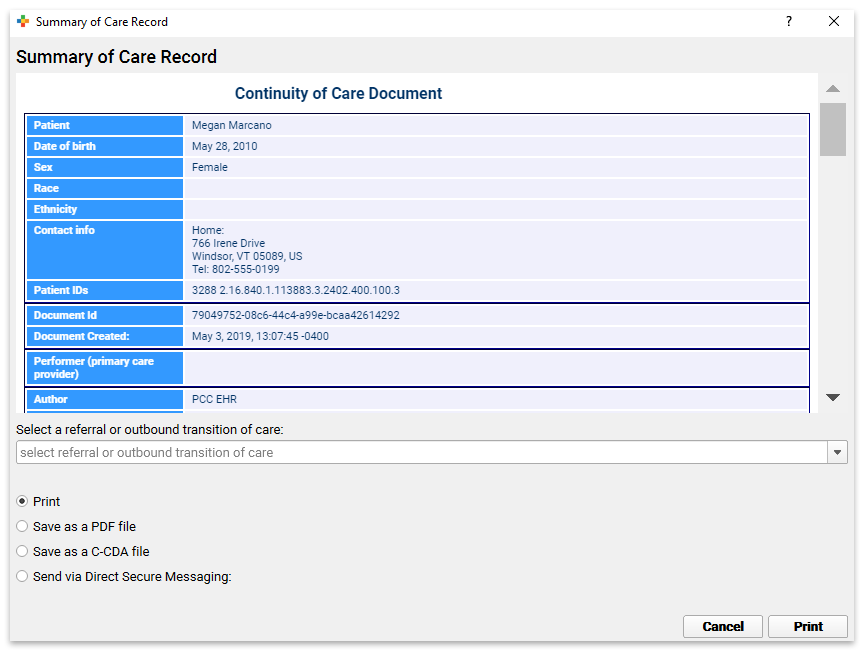
When sending a Summary of Care Record, select a referral or outbound transition of care, then select “Send via Direct Secure Messaging.” Clicking the “Send to…” button will open a new Direct Secure Message dialogue.

The Direct Secure Message dialogue contains the Direct Address, subject, and message fields you are used to. In PCC 8.9, you can now use the “Attach Document” button to attach any documents associated with the patient to this Direct Secure Message.
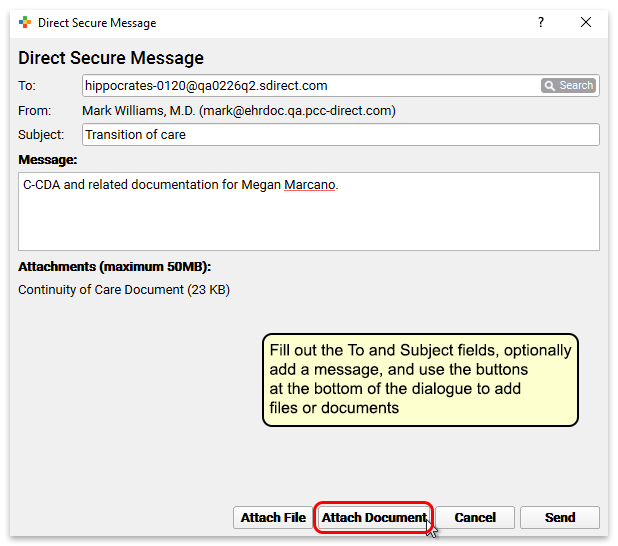
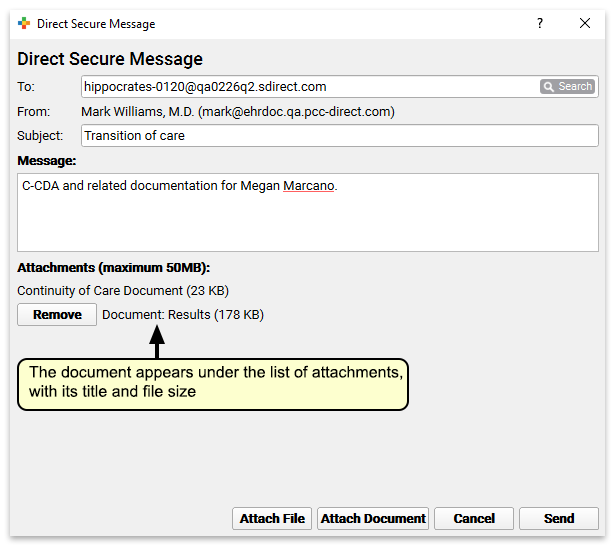
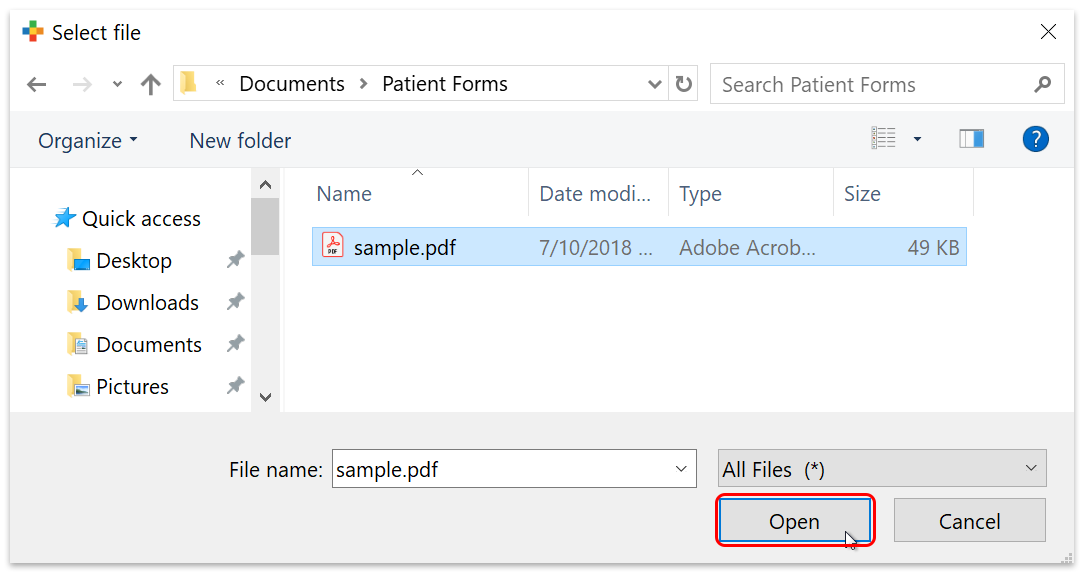
Use the “Attach File” button to attach any file from your workstation to the message.
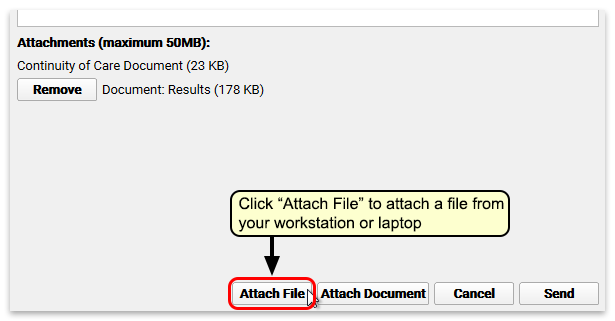
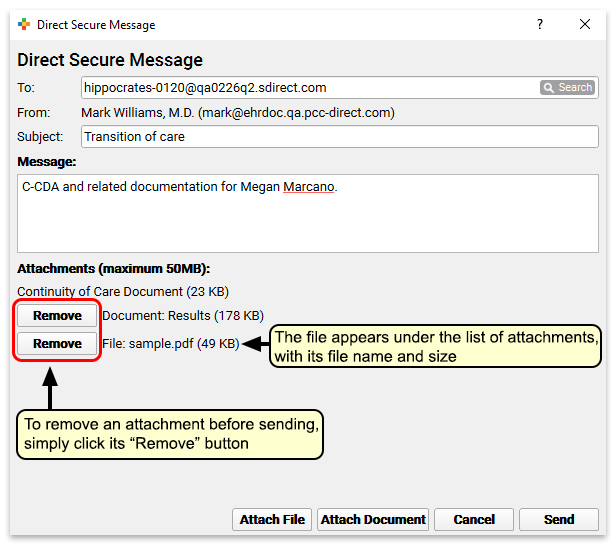
Size Limit and Removing Attachments: Before you send the document you have the option to remove any attachments you may have selected. Direct Secure Messages have a 50MB size limit; if you try to send a message that is too big, you will be prompted to remove attachments.
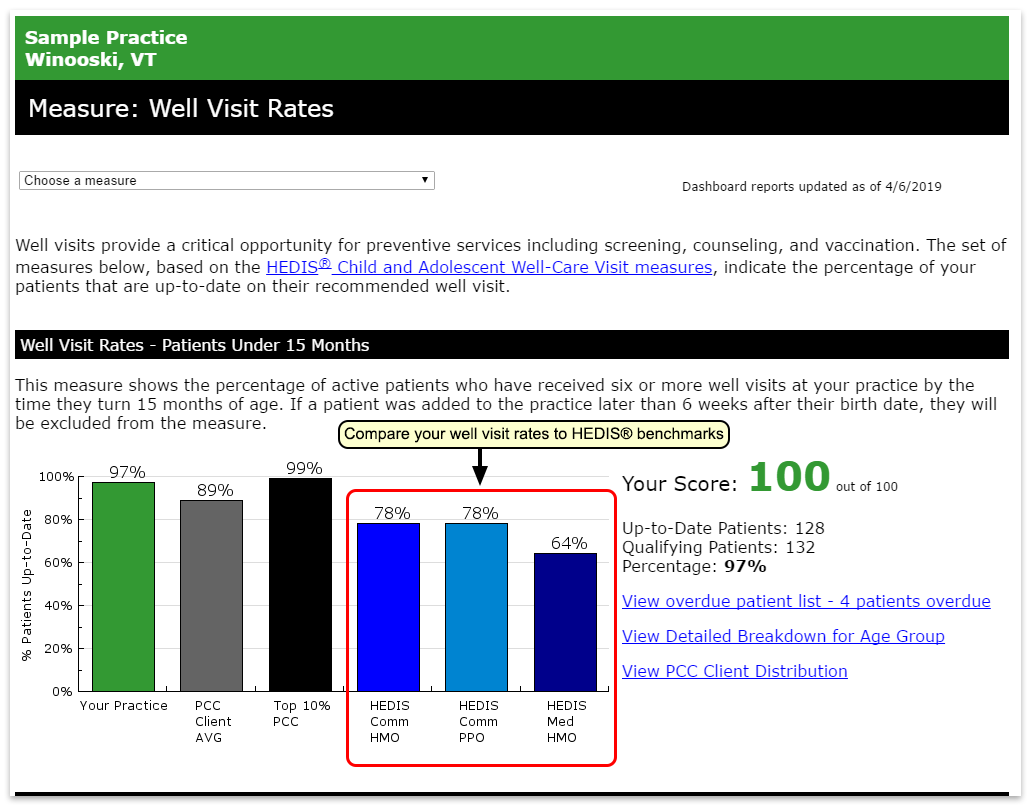
Evaluate Your Well Visit Rates With HEDIS Benchmarks
Well visit measures on your Dashboard now reflect HEDIS measure definitions, and the HEDIS benchmarks are included on a new Well Visit Rates dashboard page that includes a summary of all of your well visit measures in one place.
Pilot Test of Clinical Document Exchange Responder Role
Starting this spring, PCC has begun pilot testing a new interoperability framework that will allow your practice to automatically and securely exchange clinical and demographic information with other providers in other organizations who participate in the Carequality interoperability framework. This includes many hospitals, specialists, and other networks who may serve your patients.
What is Clinical Document Exchange?
Clinical Document Exchange allows different healthcare organizations to exchange patient records. Your participation would allow other providers who see your patients to obtain your patients’ records for treatment purposes.
What is the Responder Role?
There are two sides to Clinical Document Exchange; an organization in the Initiator Role makes record requests, and an organization in the Responder Role responds to record requests. PCC is pilot testing the Responder Role only. In 2020, we will be introducing the ability for your practice to make record requests over this framework.
What Data will be Shared?
If your practice participates in Clinical Document Exchange, the patient’s most up-to-date Summary of Care record is made available and contains information including:
- Demographic data (Name, D.O.B., Address)
- Clinical data
- Diagnoses
- Allergies
- Medications
- History of Procedures
- Diagnostic and Laboratory Test Results
- History of Immunizations
- Insurance Policies
Who has Access to Patient Data?
Only providers at healthcare organizations that participate in Clinical Document Exchange through the interoperability framework Carequality are able to retrieve your records. They may retrieve your records for treatment purposes only.
Is Clinical Document Exchange Safe and Secure?
Yes. Many layers of security protect patient data both in storage and when it is transmitted to a different healthcare organization.
How do I Participate?
If you are interested in pilot testing Clinical Document Exchange, contact your Client Advocate.
C-CDA Improved For Better Record Portability
PCC 8.9 includes some updates to the C-CDA export to facilitate compliance with any Health Information Exchange (HIE) or Clinically Integrated Network (CIN) you may interact with.
- The custodial (home) phone number associated with a patient, which had been included in the XML version of the C-CDA, is now also included in the human-readable C-CDA.
- The custodial (home) email address has been added to both the XML and human readable version of the C-CDA.
- PCC EHR can now send longitudinal C-CDA documents to those HIEs and CINs that require them.
Recent Updates to PCC eRx
PCC updates and improves PCC eRx, the suite of prescription tools in PCC EHR, throughout our product release cycle. For more information about recent PCC eRx updates, check out PCC 8.8 Release: Prescribe Better!.
New and Updated Interfaces Available in PCC 8.9
With each release, PCC’s Interoperability team expands and updates PCC’s direct connections, partnerships, and integrations with insurance payers, immunization registries, and more. Here are the clinical and financial interoperability updates for PCC 8.9:
-
New and Updated Immunization Interfaces: As part of the PCC 8.9 release, PCC updated our immunization registry interfaces for Connecticut, Kansas, and Tennessee.
-
Updated Clinical Interfaces in PCC EHR: PCC updated clinical data interfaces with MedLabs Diagnostics and created new connections to Diagnostic Laboratory of Oklahoma, Orchard Harvest, and Diatherix Eurofins Laboratories.
-
New Insurance Eligibility and Financial Interfaces: PCC improved or developed new claim or eligibility interfaces with Community Health Plan of Washington, Simply Healthcare, Cigna, Texas Children’s Health Plan, Horizon New Jersey Health, and Magnacare.
If your practice would like to take advantage of these connections, or you have another interface need, contact your PCC Client Advocate.
Other Feature Improvements and Bug Fixes in PCC 8.9
In addition to the features described above, PCC 8.9 includes these smaller improvements and squashed bugs.
-
Time Fields Sort on Huddle Report: The Appointment Book reports in PCC EHR’s Report Library, which include the “Huddle” report that helps you review today’s appointments, are now better able to sort by time.
-
Code Set Standards Updates: PCC 8.9 includes updates to the standardized lab list (LOINC), clinical terms (SNOMED-CT), and drug codes (NDC), keeping your practice’s reports and other software tools up-to-date with the latest standards.
-
Improved Support for First and Middle Name Fields for Providers and Referring Providers: The provider and referring provider tables in the Partner Practice Management system now include first and middle name fields. You can use those fields in form letters and other forms you generate.
-
Provider and Location Moved to Appointment Panel: When you schedule an appointment, you can now select provider and location in the same panel as other appointment information.
-
Better Payment Syncing from Patient Portal Will Prevent Accidental Double-Posting: PCC has improved how payment information is synced between the patient portal and Partner, which will eliminate a problem where a payment might end up appearing twice.
-
Faster Balance Reporting: PCC’s databases now do a better job storing and retrieving financial data. You may notice a performance improvement when you run complex practice oversight and other balance-based reports.
-
Reprint Encounter Form Error: Under certain circumstances, users of Partner’s
checkinprogram could not reprint encounter forms. PCC fixed this error with a mid-release patch to all practices. -
Partner Checkout Wrap Up Screen Error: After the PCC 8.7 update, the Wrap Up screen in Partner checkout would not appear under certain circumstances. PCC fixed this error with a mid-release patch to all practices.