Print Paper HCFA Claim Forms
Hopefully your practice can submit almost all of your claims electronically. Some claims must still be printed on paper, however.
Read the Submit Claims article to review the basic steps of submitting both electronic and paper claims.
This reference article will help you better understand your paper claims, and provides details and options available in the under-the-hood hcfa program, found in Practice Management.
Contents
What Claims Require a Paper HCFA 1500 Form?
Why would you need to print a paper claim?
-
Secondary Claims That Require EOB: In some cases, a secondary claim requires a copy of the EOB from the primary payer, and therefore can not be submitted electronically. You will need to print out the claim and staple a copy of the EOB to it.
-
Unusual Rendering Provider Situations: When a charge is posted to a non-provider, such as the “Office” provider or a nurse, you may encounter a situation where a claim can not be submitted electronically. You should speak with PCC Support for help configuring which providers are valid for electronic submission. Whenever you add a new provider, inform PCC Support so they can properly configure your provider for electronic claim submission.
How to Print a Paper HCFA Claim Form in PCC
There are three ways to generate a paper claim form in PCC’s software:
-
Use the HCFA Form Generation Program: Use the
hcfaprogram, described below, to print batches of claims that need to be printed on paper. -
Generate a Single Claim: Press F2 – Generate Claim in the Correct Mistakes (
oopsprogram and then select charges to appear on the claim. You can print single paper claims from many Practice Management screens, includingcheckout,pip, oroops. You would use this same key to generate or regenerate either a paper or electronic claim.
For more information, read Correct a Claim: How to Fix and Resubmit… -
Force Print Claims Based on Criteria: Contact PCC for help using
maketagsto find and force claims to print, based on criteria, and override your payor-specific configuration settings. This is not a common need. For more information, read Resubmit Batches of Claims.
Generate HCFA 1500 Forms
Run the hcfa program when you need to print an entire batch of paper claims. As hcfa runs, you will see a number of messages on the screen. Review the steps below to learn more about each step.
Open the HCFA Program
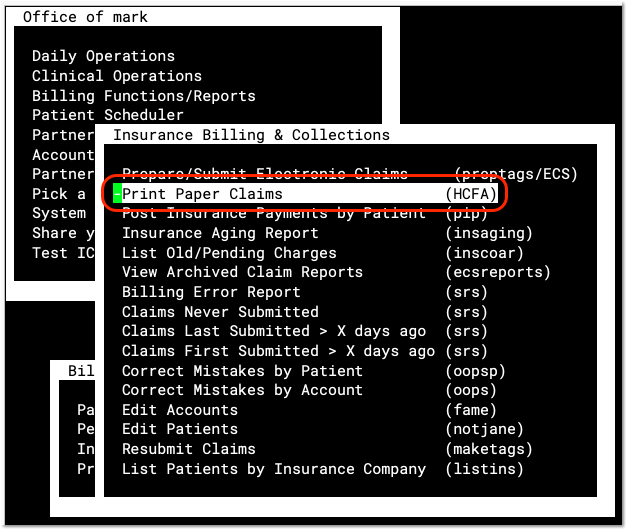
Select the Print Paper Claims (hcfa) program in the Insurance Billing & Collections section of your Practice Management window.
Review and Select Claim Batches
When you run hcfa, you are first presented with a list of batches.
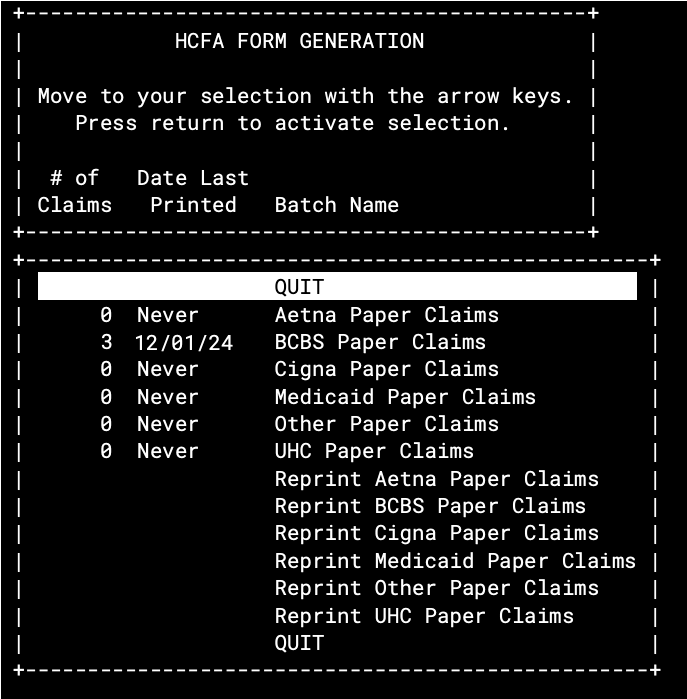
On this screen, you can review the number of waiting claims, the date the batch was last printed, and the name of each batch. Select any batch and press Enter to begin printing.
Is that the Number of Claims that Will Print?: The number of claims in this list does not represent the exact number of claims that will print. When you select a batch and press Enter, PCC processes the claims and may discover that some of the claims no longer exist, were printed and submitted earlier, reference charges that have been deleted, or reference charges that have been corrected and regenerated (creating an unneeded duplicate tag).
What are the ECS Batch Lines For?: The hcfa program can generate paper claims for any set of claims waiting to be submitted. You can even print out claims that are supposed to be submitted electronically by selecting one of the “Z_ECS” lines listed in hcfa. This is not recommended and should only be done in an emergency (i.e., your internet connection is down and a timely filing limit is approaching). Even then, it is probably preferable to run oops and print the claims you need one at a time.
Review Claims as They Are Prepared
The hcfa program processes all of the tags waiting in the batch you chose. You will see a message listing the claims:
        I am getting ready to process the claims.

        I am now processing the claims.

        Flinstone, Pebbles        07/01/04  $  50.00  B   MEDICAID

        Flinstone, Bam Bam        04/02/04  $  50.00  C   MEDICAID

          Canning, John           03/03/04  $  26.00  C   MEDICAID

        I am done processing the claims, and am ready to print them.
Optionally Print a Test HCFA 1500
Next, hcfa gives you the option to print a sample form to make sure your paper is properly aligned. This is especially important if you print HCFA 1500 forms on a pin-fed printer.
        I can print a test form for you, so that you

        can check the alignment of the paper.

        Do you want a test MEDICAID form printed (yes or no)? Yes

        Do you want another test MEDICAID printed (yes or no):
You can print as many test forms as you need.
Confirm You Are Ready to Print
The hcfa program double-checks that you are ready to print your claims. You can type “No” and then follow the prompts to quit, or type “Yes” to print out your claims.
        I am all ready to print these MEDICAID forms.  Are you?

        If you say yes, I will print them, otherwise I won’t:
Confirm Printing Was Successful
In case there was an error while printing, hcfa asks if the claims printed successfully. You should wait until the claims finish printing and review them before answering “Yes” to this question.
        Here Goes…  I am printing the forms.

        Are you satisfied with the MEDICAID forms printed?  If you are,

        I shall clear out the queue for this type of form.  If you are

        not, I will give you another chance to print them.

        Are you satisfied with the MEDICAID forms?
Print a Log of Which HCFA Forms You Printed: A log of all the HCFAs generated will automatically print out when you quit the HCFA program.
Reprinting Batches
Your PCC system stores a record of the last printing of each HCFA Batch so you can easily reprint it. At the bottom of the list of batches, you will find options to reprint the last run of each batch:
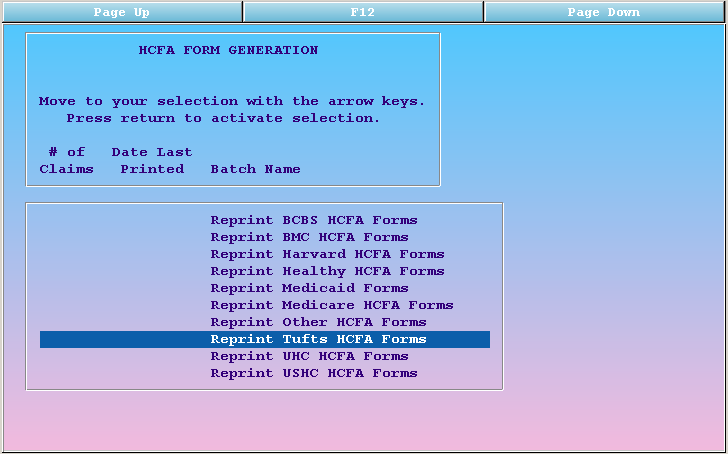
If you need just a log of the last batch printed, but do not need to print the batch itself, simply select the “Reprint…” option for the needed log, and then answer “No” to the subsequent questions (do not print any claims). Upon quitting the hcfa program, the log will reprint.