Generate Personal Bills
Use the Bills program in Practice Management to generate personal bills.
Generate Bills
Follow this procedure to print or generate your practice’s outstanding personal bills.
Run Bills
Select bills or ebs from the “Personal Billing” section of the “Billing Functions” window in Partner’s windows. You can also type bills or ebs at a command prompt.
Review and Edit Criteria
When you first run bills or ebs, you will see the settings that were used the last time you ran the program.
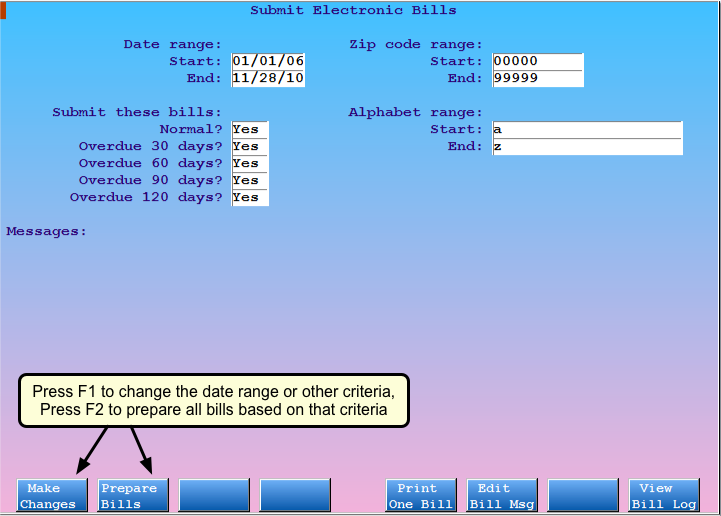
Press F1 – Make Changes to updated your criteria for the current bill run.
Update the Start and End Date for Balance Details
Change the “End” date so it indicates today’s date. Otherwise, your bills will not take into account the most recent charges and payments. The start date will indicate how far back you wish to display detail about the account’s balance. Anything prior to that date will appear on the bill as a “Previous Balance.”
Optional: Add Other Bill Criteria
If you wish, use the other fields on the screen to limit what bills will be generated. Read the Use Cycle Billing to Generate Some Bills article for more details.
Save Criteria Changes
After you make criteria changes, press F1 – Save Changes.
Prepare Bills
Next, press F2 – Prepare Bills.
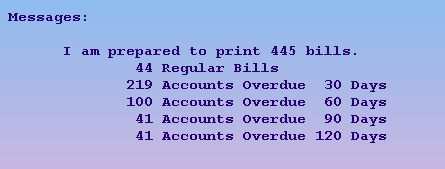
Partner will gather charge and payment information and prepare the bills. This may take a while, as Partner must review the balances for all outstanding accounts.
Work With Accounts That Will Get a Bill
When you are returned to the billing screen, you will see a “Messages” section on the bottom telling you how many bills are in the batch waiting to be generated:
Press F7 – Show BillList to review a list of accounts waiting in this current batch of bills. Read the section below for more information.
Press F4 – Work w/ Accounts to visit an interactive screen to work with those accounts.
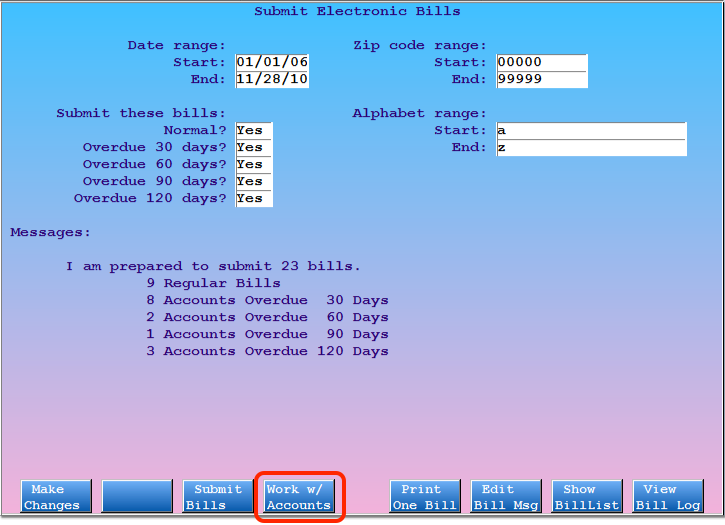
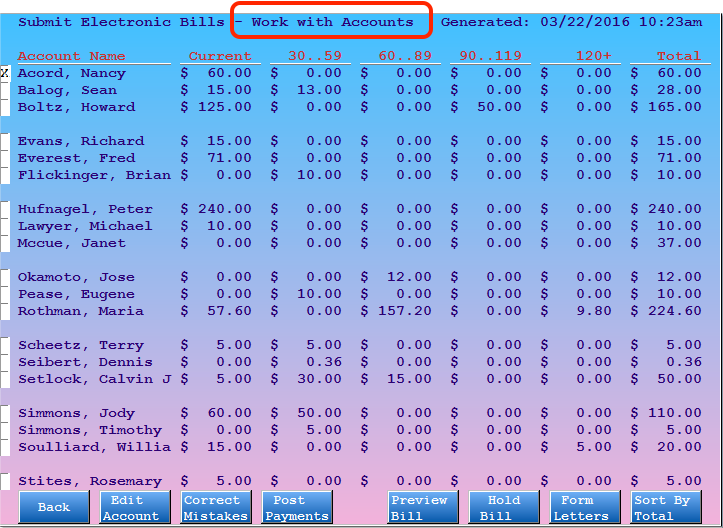
The Bills program will display the “Work with Accounts” screen. You can review the list of accounts that will receive a bill, see their account balance by age, and use interactive tools to work with the accounts.
Select an account and use the function keys at the bottom of the screen to learn more about the account or perform various billing-related actions.
Re-Prepare Bills: If you leave the main bills screen to work on accounts, you should press F2 – Prepare Bills to re-prepare the bills when you return. That will ensure that any changes you made to account balances are reflected in the bills you generate. If you don’t re-prepare, you will generate the same batch of bills you originally prepared.
Generate Bills
When you are ready to generate your bills, press F3 – Print/Submit Bills.
Special Features of the Bills Program
The bills program generates personal bills for your accounts quickly and efficiently. It has many configurable options and can be run in several different ways. From within the bills program you can also add a customized billing message to your bills and review the list of bills waiting to be generated.
Customize the Messages that Appear on a Personal Bill
Your practice can customize what general messages and family-specific messages will appear on your bills. Read Customize the Messages on Personal Bills to learn how.
Electronic Bills vs. Paper Bills
If you print your bills on paper and mail them in-house, you run the bills program. If you have Partner send your personal bills out electronically, printed and mailed by a third party, you use the ebills (ebs) program. Both of these programs work the same way. PCC encourages all clients to consider electronic personal billing. When printing, packaging, and mailing costs are considered, many practices discover that electronic billing saves both time and money while producing bills of a more professional quality.
What Sized Envelope Should I Use?: If you are printing bills on to paper, you can use #10 envelopes. The window placement will align with the default paper bill so the addressee is visible when you fold and place the bill in the envelope.
Generate One Bill
In addition to the “batch” bill printing, you can also generate a single bill for any family:
Run the Bills Program
Press F5 – Print One Bill.
Find the Family that Needs a Bill
Enter a Date Range for the Bill
Press F1 – Print Bills to Print the Bill
Review and Work with Prepared Bills Before You Send Them
After you prepare personal bills for accounts, you can use an interactive screen to work on the list of accounts that will receive bills.
When you are ready to prepare, review, and submit personal bills, run either the Print Personal Bill (bills) or Submit Electronic Bills (ebills) programs. After you select bill run options and press F2 – Prepare Bills to prepare your bills, press F4 – Work w/ Accounts.
The Bills program will display the “Work with Accounts” screen. You can review the list of accounts that will receive a bill, see their account balance by age, and use interactive tools to work with the accounts.
Select an account and use the function keys at the bottom of the screen to learn more about the account or perform various billing-related actions.

F1 – Back
bills screen. From there you can re-prepare bills and send or print them.F2 – Edit Account
fame) to review account history or make demographic changes.F3 – Correct Mistakes
oops) to review and edit charges on the account.F4 – Post Payments
pam) to post personal payments or adjustments for the account.F5 – Preview Bill
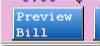
Previewing a bill will not count as generating the bill for the account. Even if you print or save the preview on your screen, Partner will still prepare a bill for the account when you re-prepare your bills.
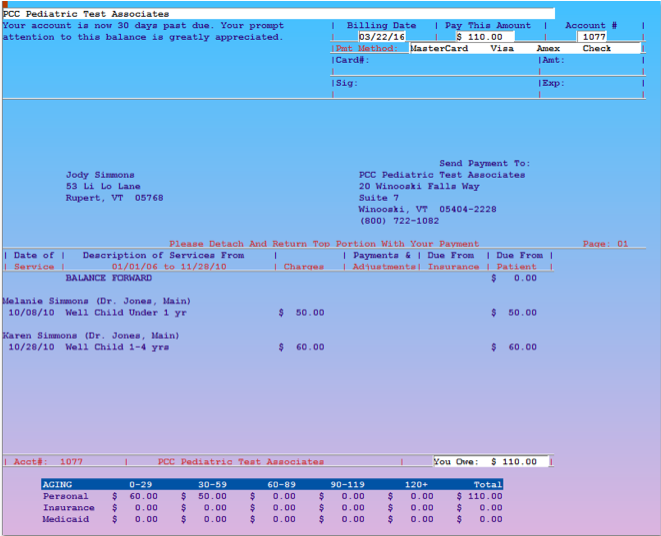
F6 – Hold Bill

Your practice can customize the default Hold Bill Till date in the Personal Bill section of the Configuration Editor (ced) to make the process faster.
F7 – Form Letters
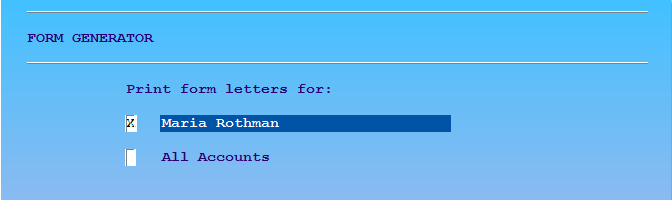
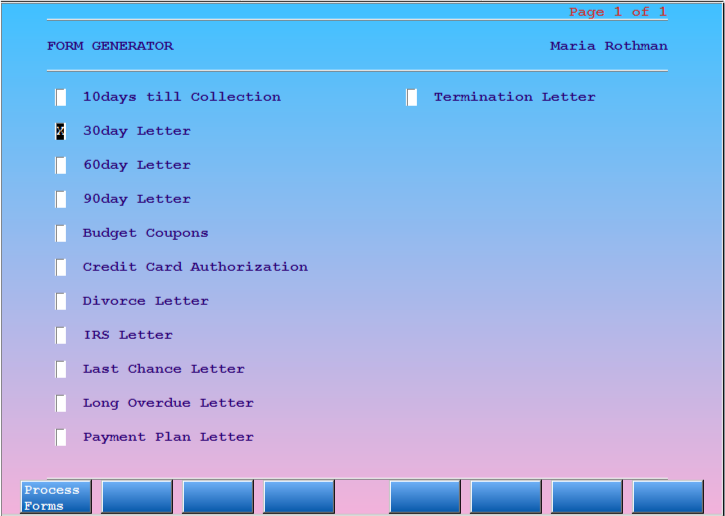
First, Partner will ask you if you wish to generate a form letter for one account or all accounts. Then it will offer you your Practice’s list of custom form letters.
F8 – Sort By Total/Sort By Account
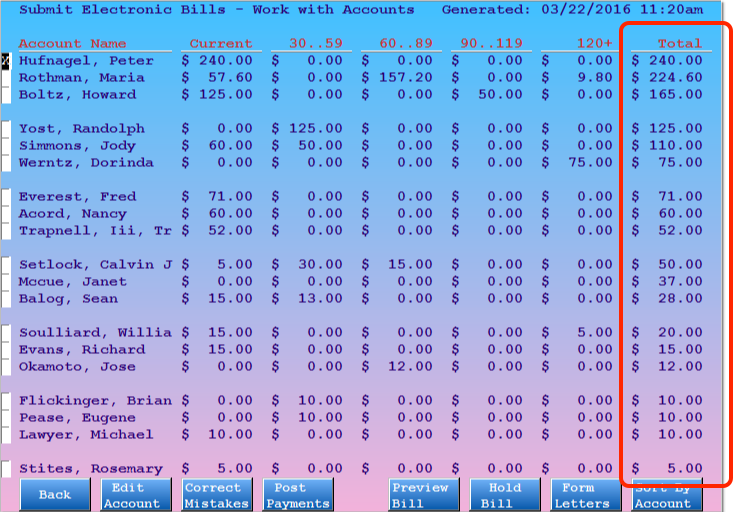
Your practice could sort by total in order to review and contact accounts with a total above a certain threshold before sending a bill, for example.
When you finish reviewing the accounts that will receive a bill and make any changes, press F12 or F1 to return to the first screen of the bills program. Since you may have made changes, payments, or held bills for accounts, you must now press F2 – Prepare Bills to re-prepare your bills.
This Looks Familiar...: Your office may be familiar with the Personal Money Tracking Assistant (persview) program, which works in a very similar way to the Work With Accounts screen. Your office can use persview to review and work with any account that has an outstanding balance. The persview program includes a criteria screen that lets you filter which accounts you will work with. The Bills program, on the other hand, shows you all accounts in the bill run that you just prepared.
Review a List of Accounts that Will Be Billed
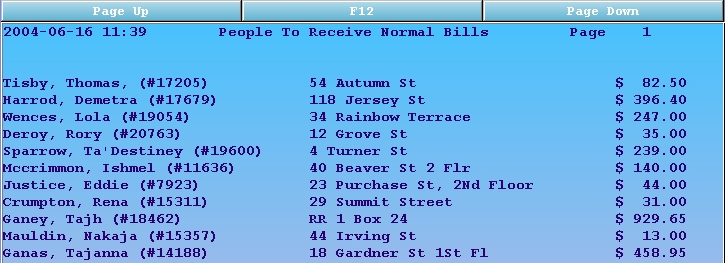
After preparing your bills, you might press F7 – Bill List to review the list of every account about to get a bill. This report, which can be sent to the screen or a printer, lists accounts grouped by billing category.
To use billlist successfully, you must consider when you are running it. If you run billlist before you prepare your bills, the list will be empty (or based on the last time bills were prepared). If you print billlist, make changes to the accounts, and then re-prepare your bills, the list you printed will be out of date. Finally, if you wait until after you print bills, your list will be blank because no accounts will need bills. For these reasons, you should follow this procedure:
Run the bills Program
Set Billing Criteria
Press F1 – Make Changes and update the “End” date as described in the bills procedure.
Press
F2 – Prepare Bills
There will be a pause as Partner prepares the bills.
Press F7 – Bill List to Review the Accounts
You will be asked if you want the list sent to your screen or to the printer.
Once you have the list, you can exit the bills program and make changes to various accounts or write off faulty balances. Remember to repeat the steps above to re-prepare your bills when you return.
Press F3 – Print Bills.
Here is a sample billlist report:
Review a Log of Bills
You can review a log of all bill submissions. Read Review the Bill Log to learn more.