PCC 8.6 Migration Considerations
The PCC 8.6 release includes new features that may need extra planning, training, or configuration. Read below to learn more, and share relevant details with your physicians and staff.
Read the PCC 8.6 Release article for complete details on these features.
Contact PCC Support at 1-800-722-1082 for information about these or any features in PCC 8.6.
Contents
- 1 Help Your Schedulers Automatically Open the New Appointment Book Window
- 2 Implement Scheduling Templates and Open Your Calendar
- 3 Get Ready for Eligibility in PCC EHR
- 4 Configure Growth Charts in the Patient Portal
- 5 Remind Practice Vitals Dashboard Users that Clinical Pulse Will Change
- 6 Create Custom Categories in the Report Library
- 7 Configure Auto-Posting Portal Payments, Or Get Started with Portal Payments
- 8 Adjust OB/Gyn Referrals and Other Orders for the LOINC Fall 2018 Update
Help Your Schedulers Automatically Open the New Appointment Book Window
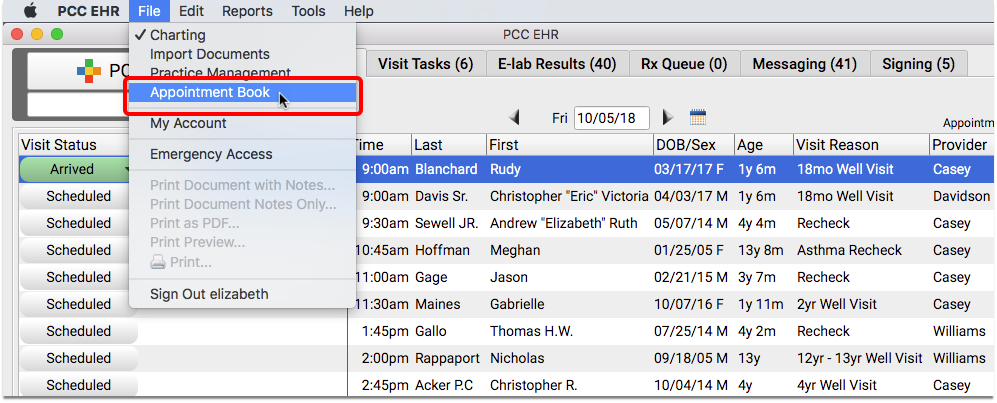
The Appointment Book in PCC EHR now appears in its own window for quicker access, more hours on the screen, and an improved workflow. On the Monday after your PCC 8.6 update, you may need to review the new Appointment Book command under the File menu.
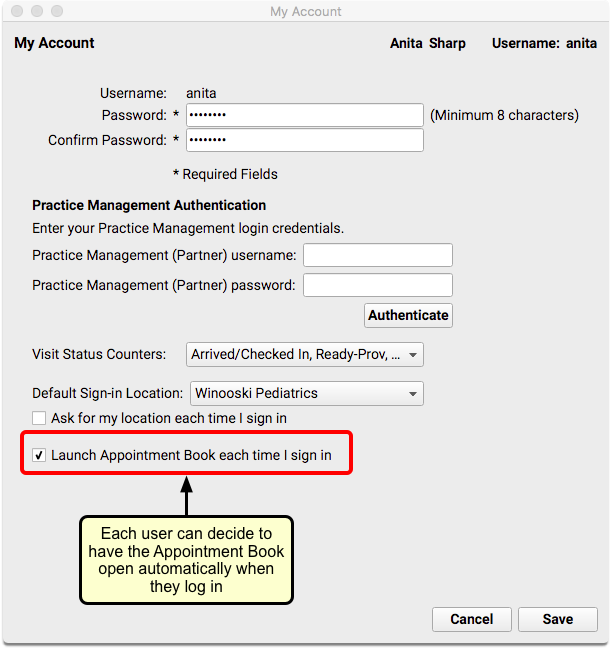
Each user at your practice can decide to have the Appointment Book open automatically, every time they log in. After your PCC 8.6 update, help your users set these individual preferences by reviewing the My Account tool from the File menu.
Additionally, you may find it helpful to review the quick keyboard commands to switch between windows within an application. On Apple Macintosh computers, you can press command + ~ to toggle between windows. On Microsoft Windows machines, press Alt + Tab.
Implement Scheduling Templates and Open Your Calendar
With PCC 8.6, practices can now set up multiple scheduling templates to use with changing seasons, on-call schedule variations, or any other scheduling challenges they may encounter from day to day.
Default Provider Regular Hours Templates: If your practice already uses the Appointment Book, the PCC 8.6 update will create a “Regular” template for each provider with their previously assigned hours. These templates have been auto-assigned out one year, but you can easily make changes as described below. If your providers already had “custom” or “off” times scheduled beyond a year, those dates are also preserved.
After your PCC 8.6 update, you can create new templates and assign them to months and weeks to open up your calendar.
Configure Templates for Provider Hours and Visit Types
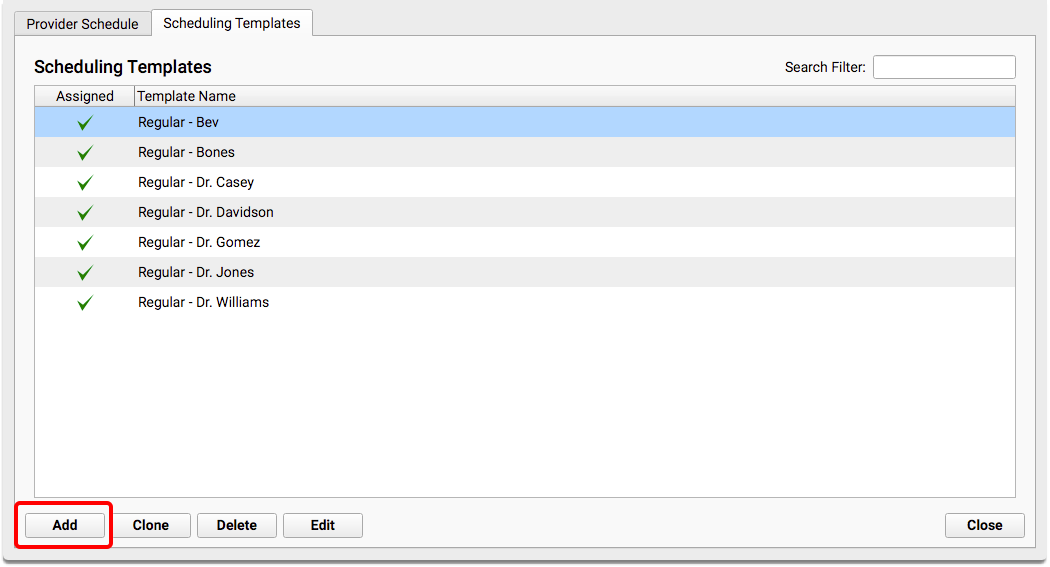
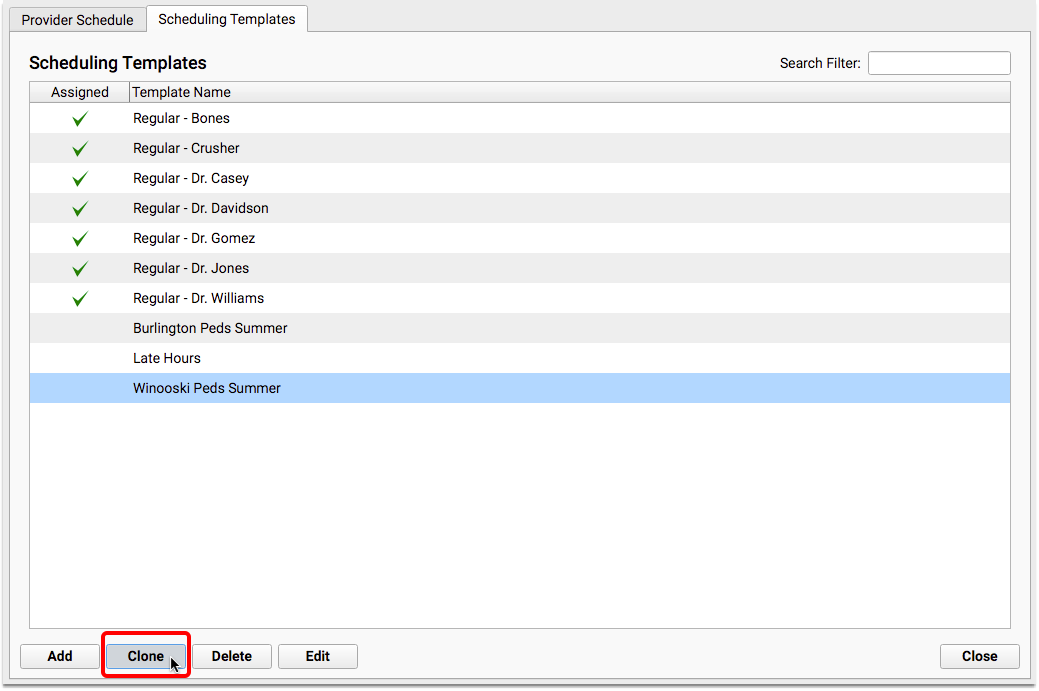
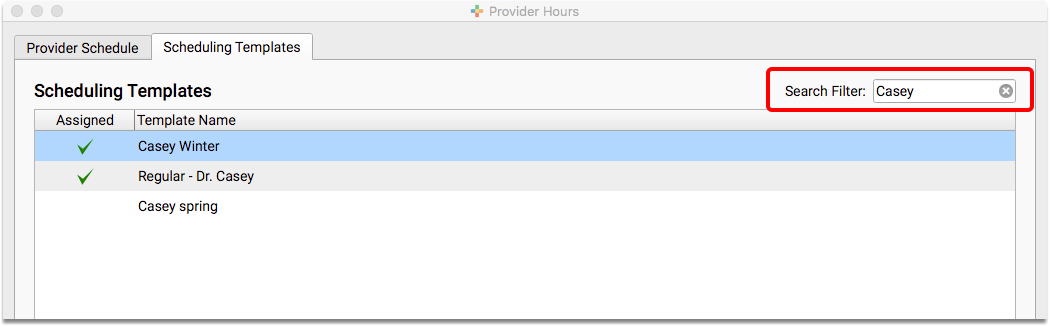
Open the “Scheduling Templates” tab of the Provider Hours tool to create, clone, edit and delete templates for provider hours and visit types.
Click the “Add” button to create a new template.

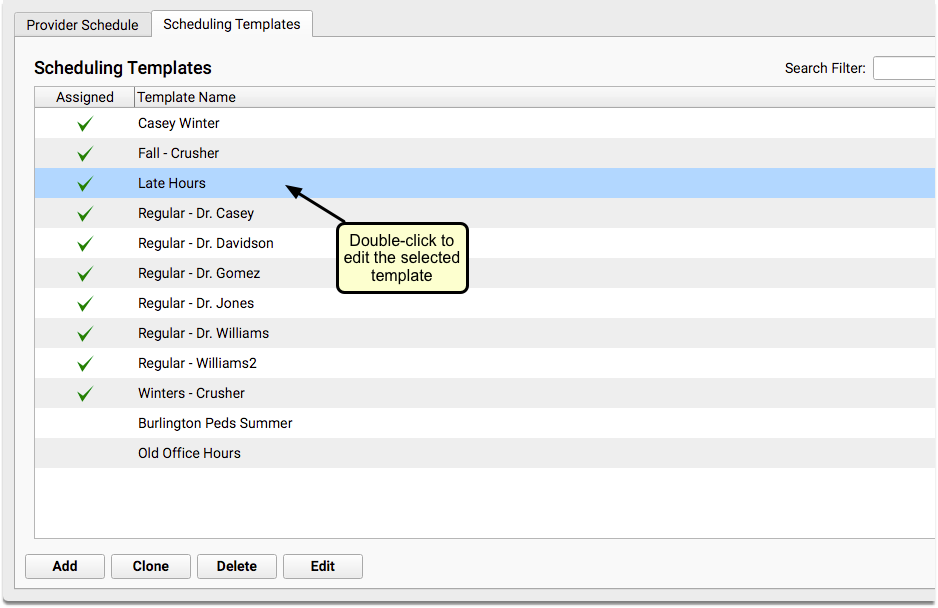
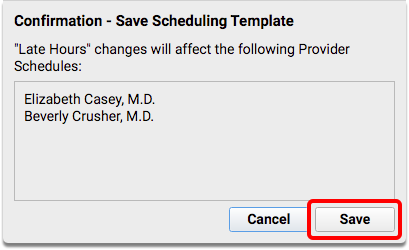
You can set up the template the same way you would have set up the provider’s Regular Hours, in the past. Double-click on a template to edit it. Changes will be reflected in all future dates in the affected providers’ calendars.
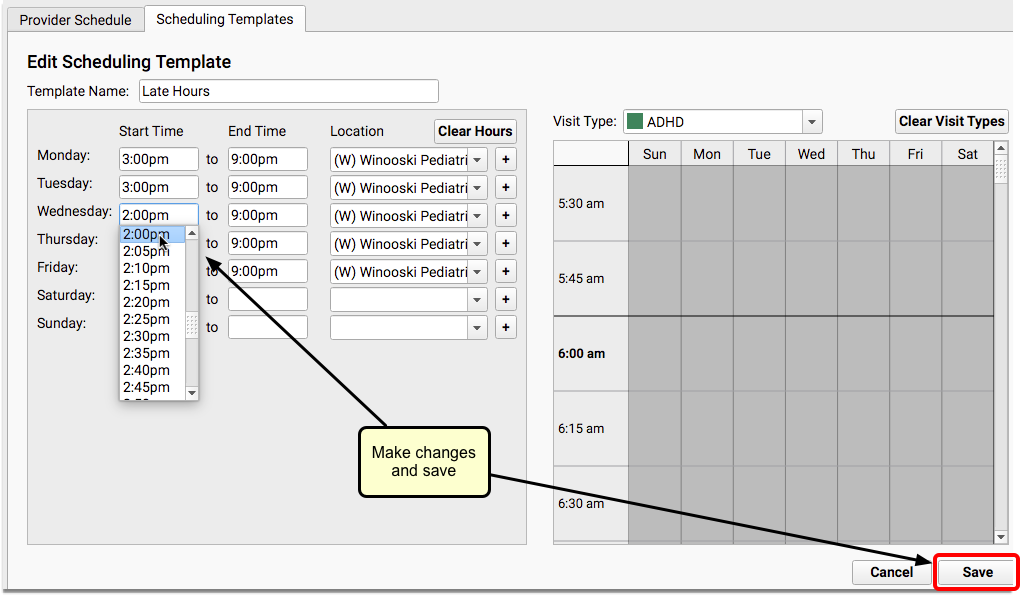
If you want to build off of an existing template, you can clone it and save yourself from having to create a new template from scratch.
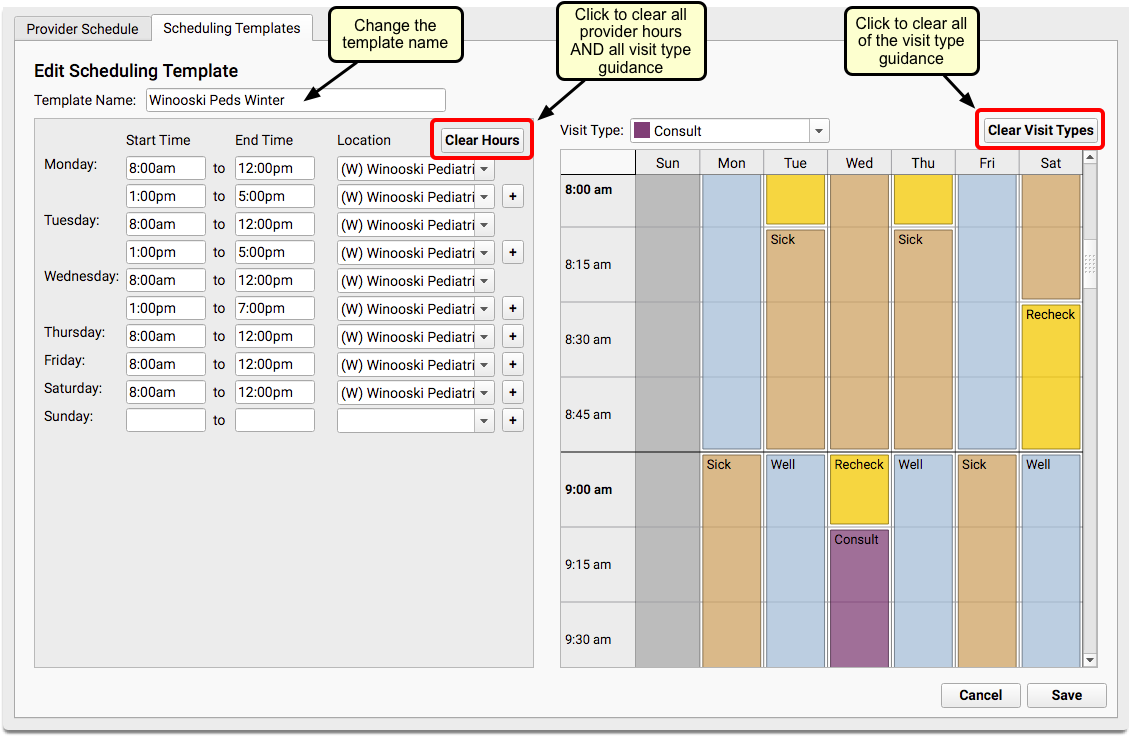
You can use the new “Clear Hours” button to clear the entire template, with the exception of the template name, or the new “Clear Visit Types” button to keep the same hours for the new template, but change the visit type guidance. You can also just make changes to any part of the schedule.
You can also delete templates that are not currently assigned to a provider’s calendar.
A Search Filter field allows you to filter templates, if your practice uses a large number of them.
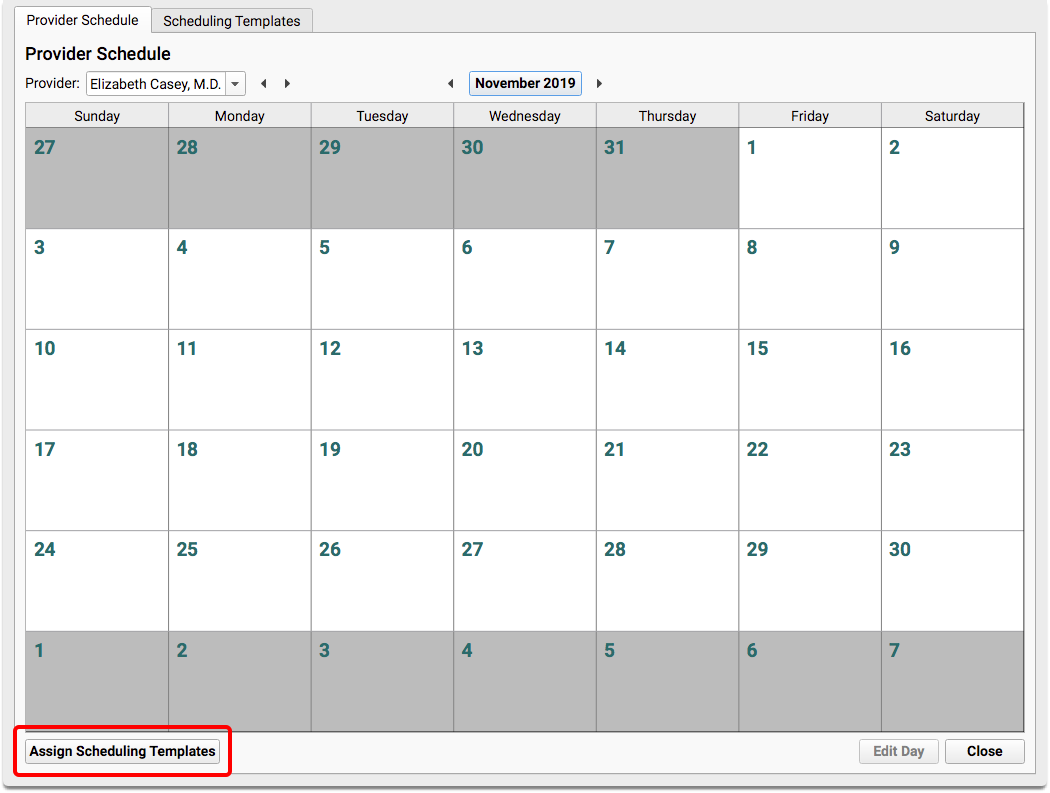
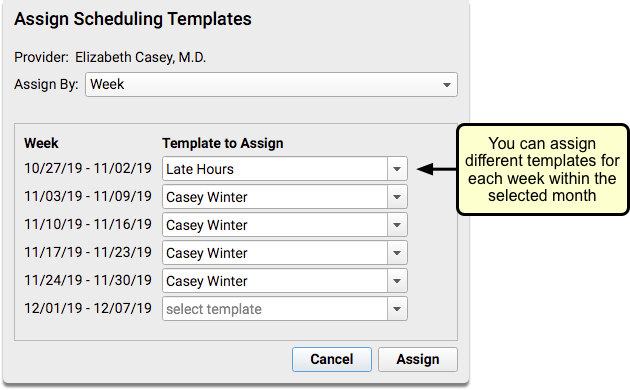
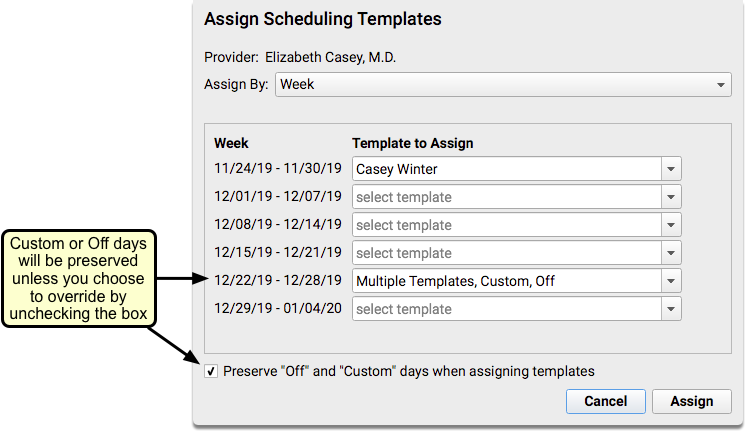
Assign Templates to a Provider’s Calendar
After you update your provider’s Scheduling Templates, use the new “Assign Scheduling Templates” button on the Provider Schedule tab. You can open up a provider’s calendar for scheduling by assigning templates by month or by week.
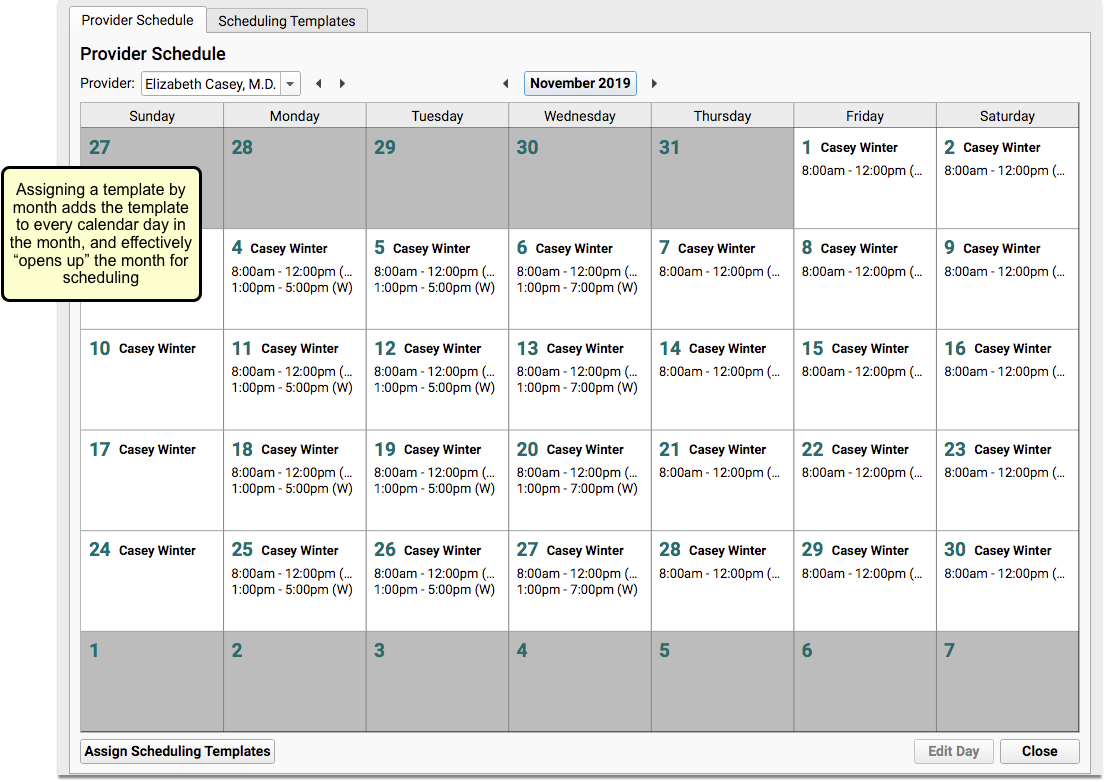
If you choose the monthly option, the template will be assigned to all calendar days within the selected month.
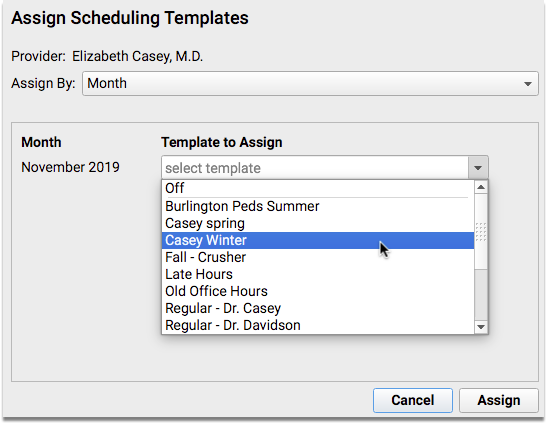
If you choose the weekly option, you can set templates for any week that is displayed on the screen.
Edit One Day on the Calendar
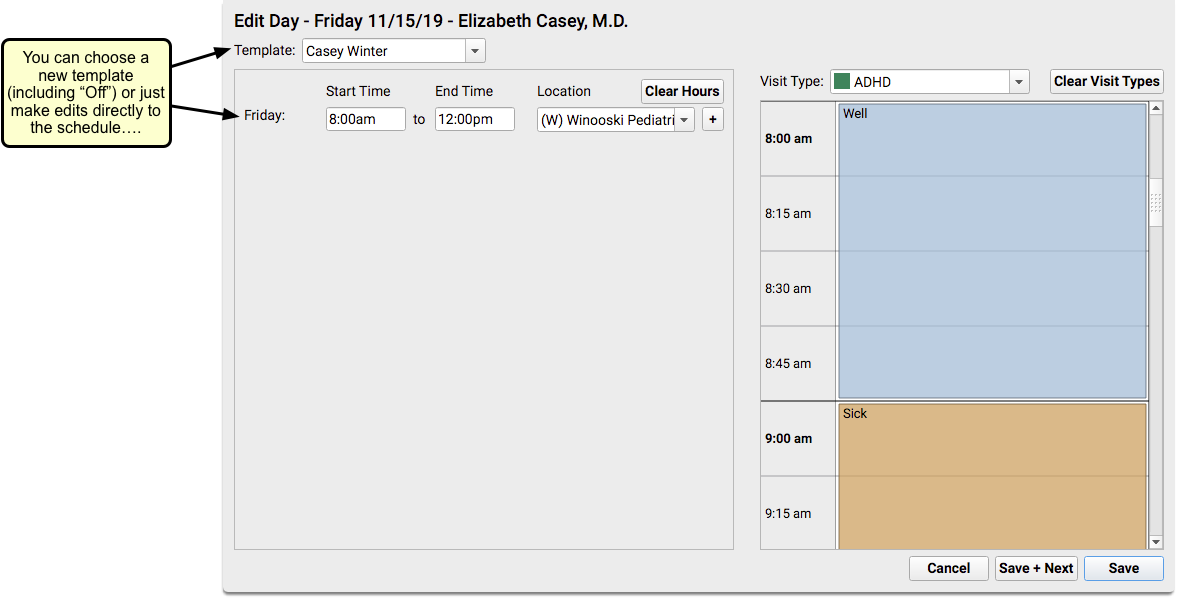
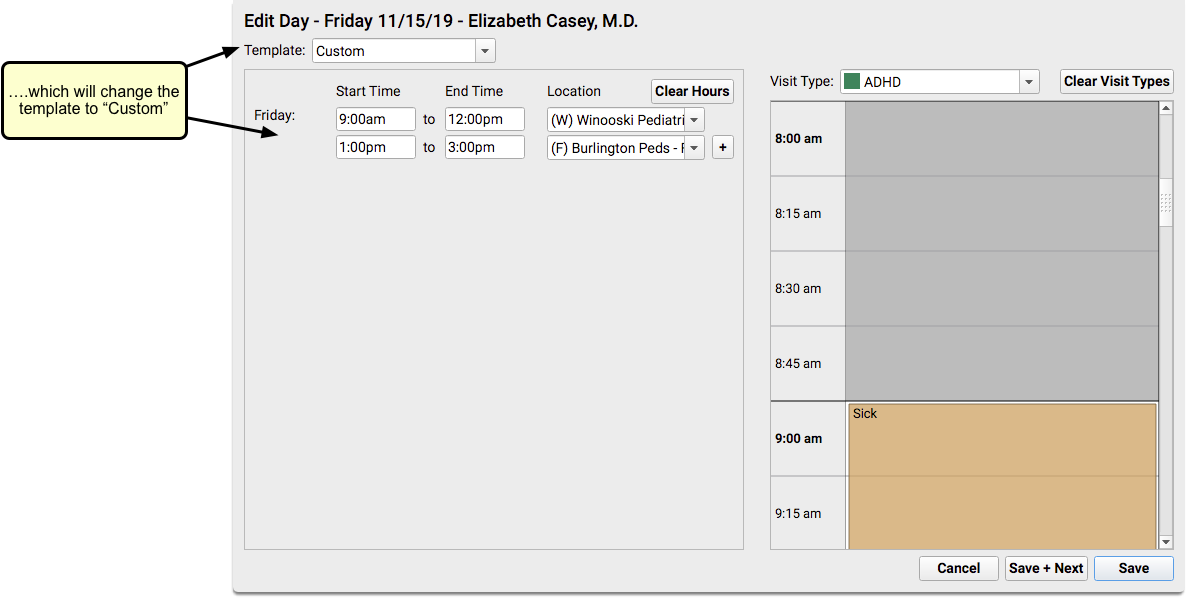
You can edit individual days on a provider’s calendar to select a different template, change the hours for that day, or indicate that the provider is off.
Double-click on a single day, or select a day and click the “Edit Day” button.
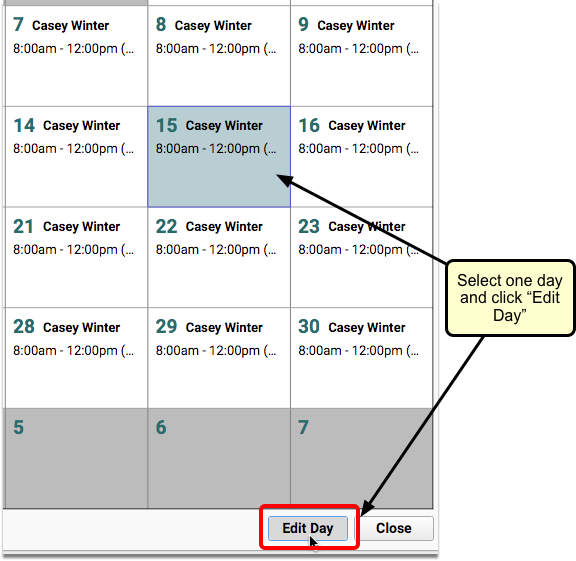
If you assign templates after creating individual “Custom” or “Off” days, those days will not be changed unless you uncheck the “Preserve off and custom” checkbox. You can uncheck the box if you want to override previously scheduled “Custom” or “Off” days.
Get Ready for Eligibility in PCC EHR
In PCC 8.6, you can use the new Insurance Eligibility tool to review and confirm the status of insurance eligibility for upcoming patient visits.
Move from Partner Elig to PCC EHR Insurance Eligibility?: Your practice may formerly have used the Eligibility (elig) program in Partner, PCC’s Practice Management system. You can continue to use Partner’s Eligibility if you wish, but the new Insurance Eligibility tool includes more features and is easier to learn and use.
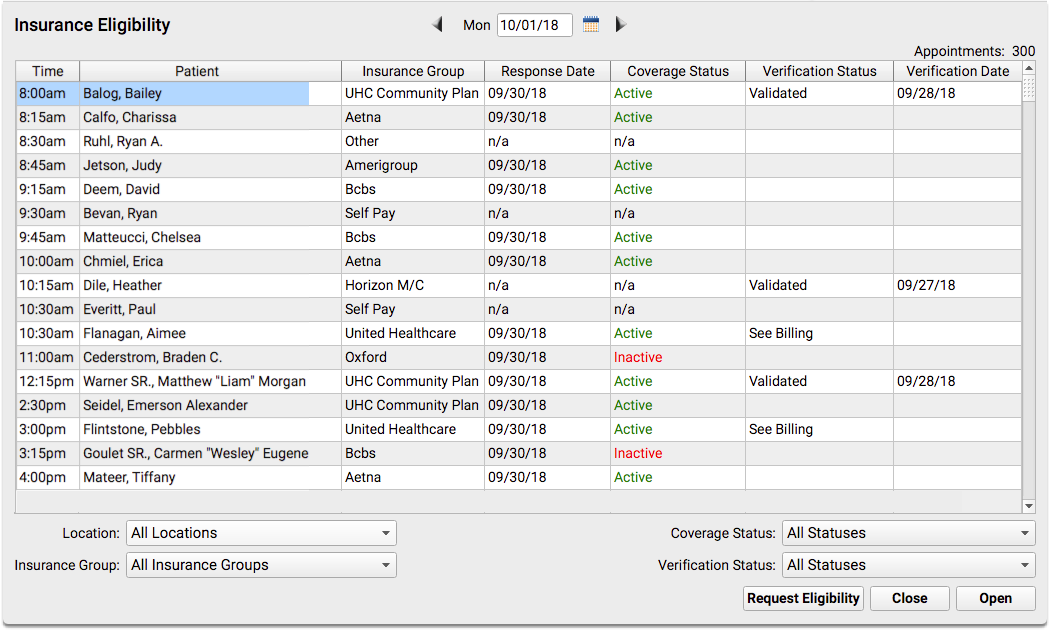
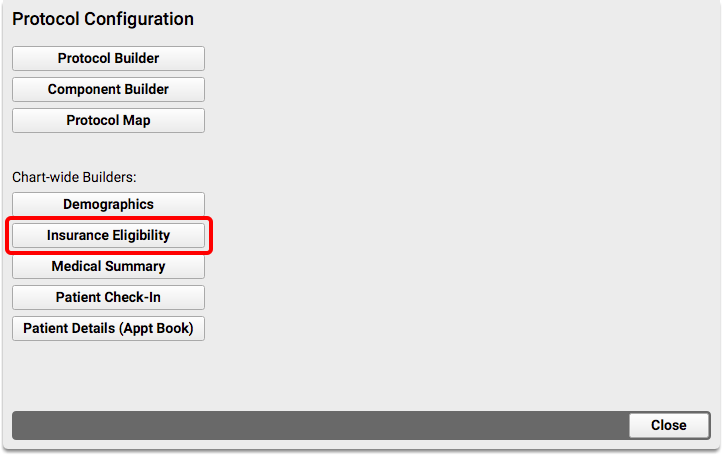
Configure Your Custom Review and Verify Ribbon: The Insurance Eligibility – Review and Verify ribbon includes the Insurance Eligibility component, Policies, and other useful components. You can add other components to this ribbon in the new Insurance Eligibility Builder within the Protocol Configuration tool.
This might be useful if you want staff to update demographic or account information as they check eligibility for each patient.
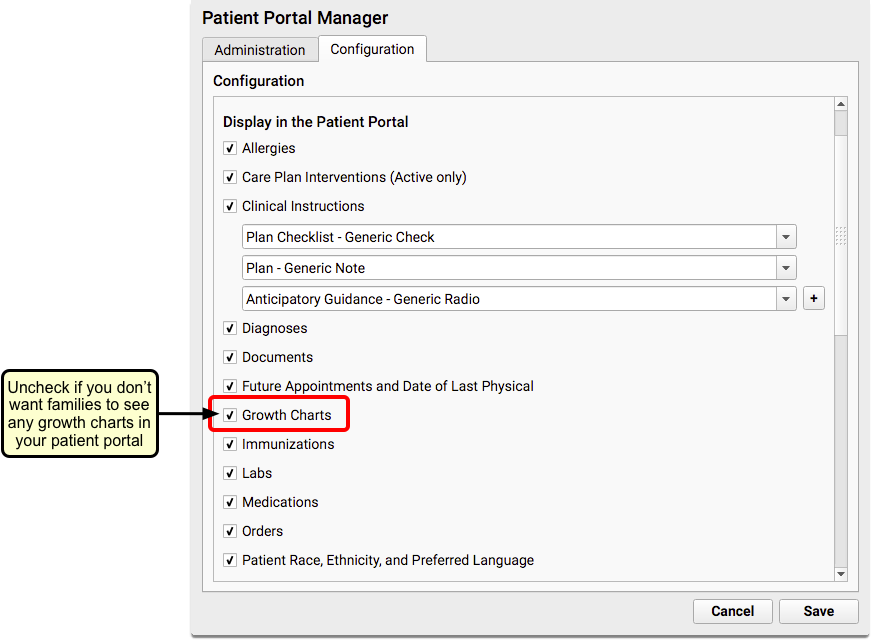
Configure Growth Charts in the Patient Portal
PCC 8.6 includes the addition of Growth Charts to My Kid’s Chart, PCC’s patient portal. Families and patients will be able to look at their different growth charts at any time, right on their mobile device.
Your practice can control which charts are available for patient portal access by checking the box within the new Portal Display column in the Growth Chart Configuration tool.
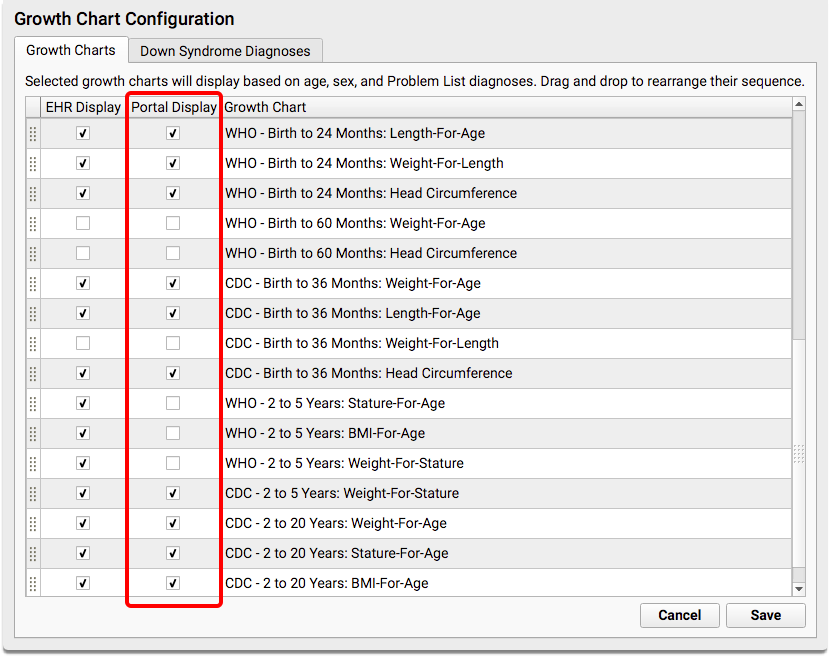
With PCC 8.6, all growth charts that are used by your practice in PCC EHR will be migrated into the patient portal. You can uncheck the box in the Portal Display column for any chart that should not be shared with families in the portal.
You can decide to disable growth charts in the portal entirely by unchecking the box in the Configuration tab of the Patient Portal Manager tool.
Do You Hide Vitals Now? Growth Charts Displays Them:
Your practice can specifically set whether or not to display patient vitals from each encounter in the patient portal. Growth Charts also display vitals collected by your practice. If you prefer to hide vitals information on chart notes and patient summaries, you may also wish to turn of Growth Charts.
Remind Practice Vitals Dashboard Users that Clinical Pulse Will Change
The new “Immunization Rates – Adolescents” measure in your PCC Dashboard is a great tool for tracking your practice’s rates on important immunizations.
This new measure will change the rate of your practice’s overall “Clinical Pulse” score, so if you have a Practice Vitals Dashboard user at your practice who tracks this score carefully, you may want to let them know about the score change.
Create Custom Categories in the Report Library
Your practice can create its own custom categories in PCC EHR’s Report Library to organize the reports you use every day. Full documentation is in the PCC 8.6 release article.
Configure Auto-Posting Portal Payments, Or Get Started with Portal Payments
Did you know families can pay their bill right in the patient portal? And, in PCC 8.6, you can choose to have portal payments immediately post against balances on your PCC system.
If your practice wants to enable auto-posting for payments through your patient portal, visit the Configuration tab in the Patient Portal Manager. Check the box for “Automatically Post Portal Payments”, and select a payment type for each type of card displayed.
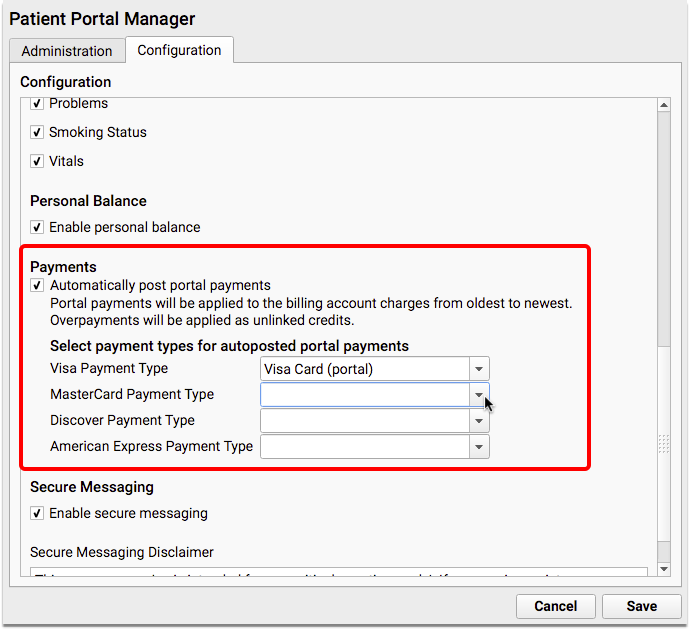
These fields are all required. If you do not have an appropriate payment type, you can add one in the Payment Types table in the Table Editor (ted) or speak with your Client Advocate.
To learn about getting started with portal payments, read Get Started with Patient Portal Payments.
Adjust OB/Gyn Referrals and Other Orders for the LOINC Fall 2018 Update
After your PCC 8.6 update, you should review orders on your system affected by the LOINC update. PCC recommends that your practice review orders related to OB/Gyn orders, as well as LOINC 52496-7 “Behavioral Signs and Symptoms” and 52482-7 “Laboratory”.
For more information read the PCC 8.6 Release article.