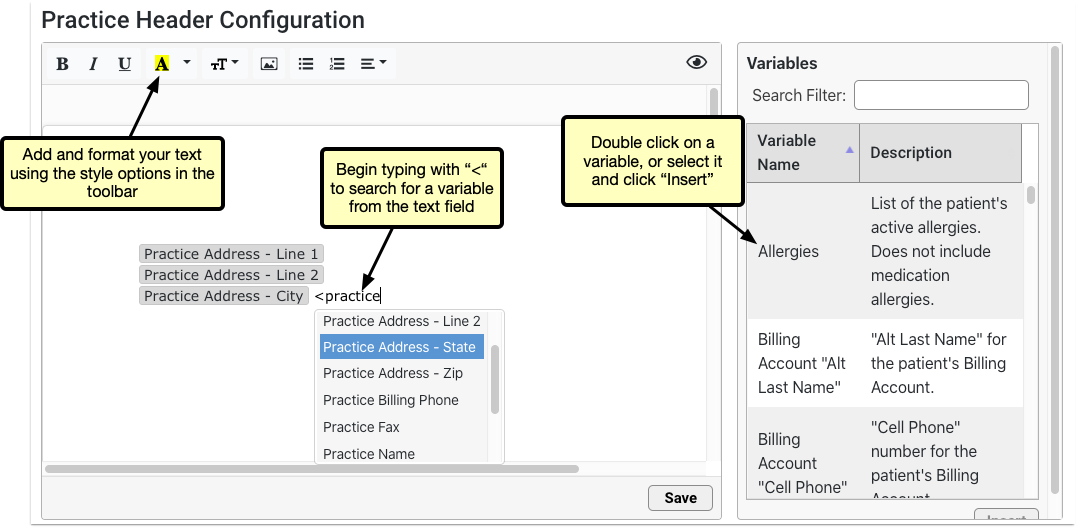
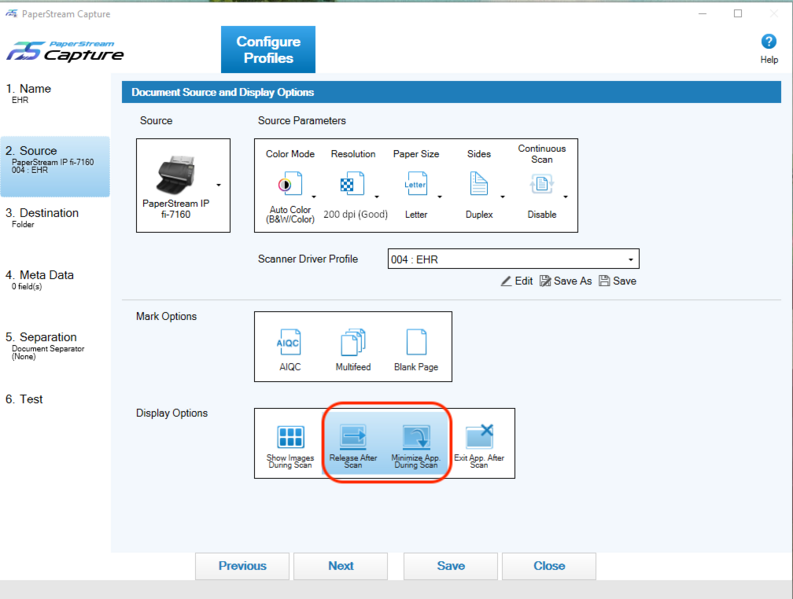
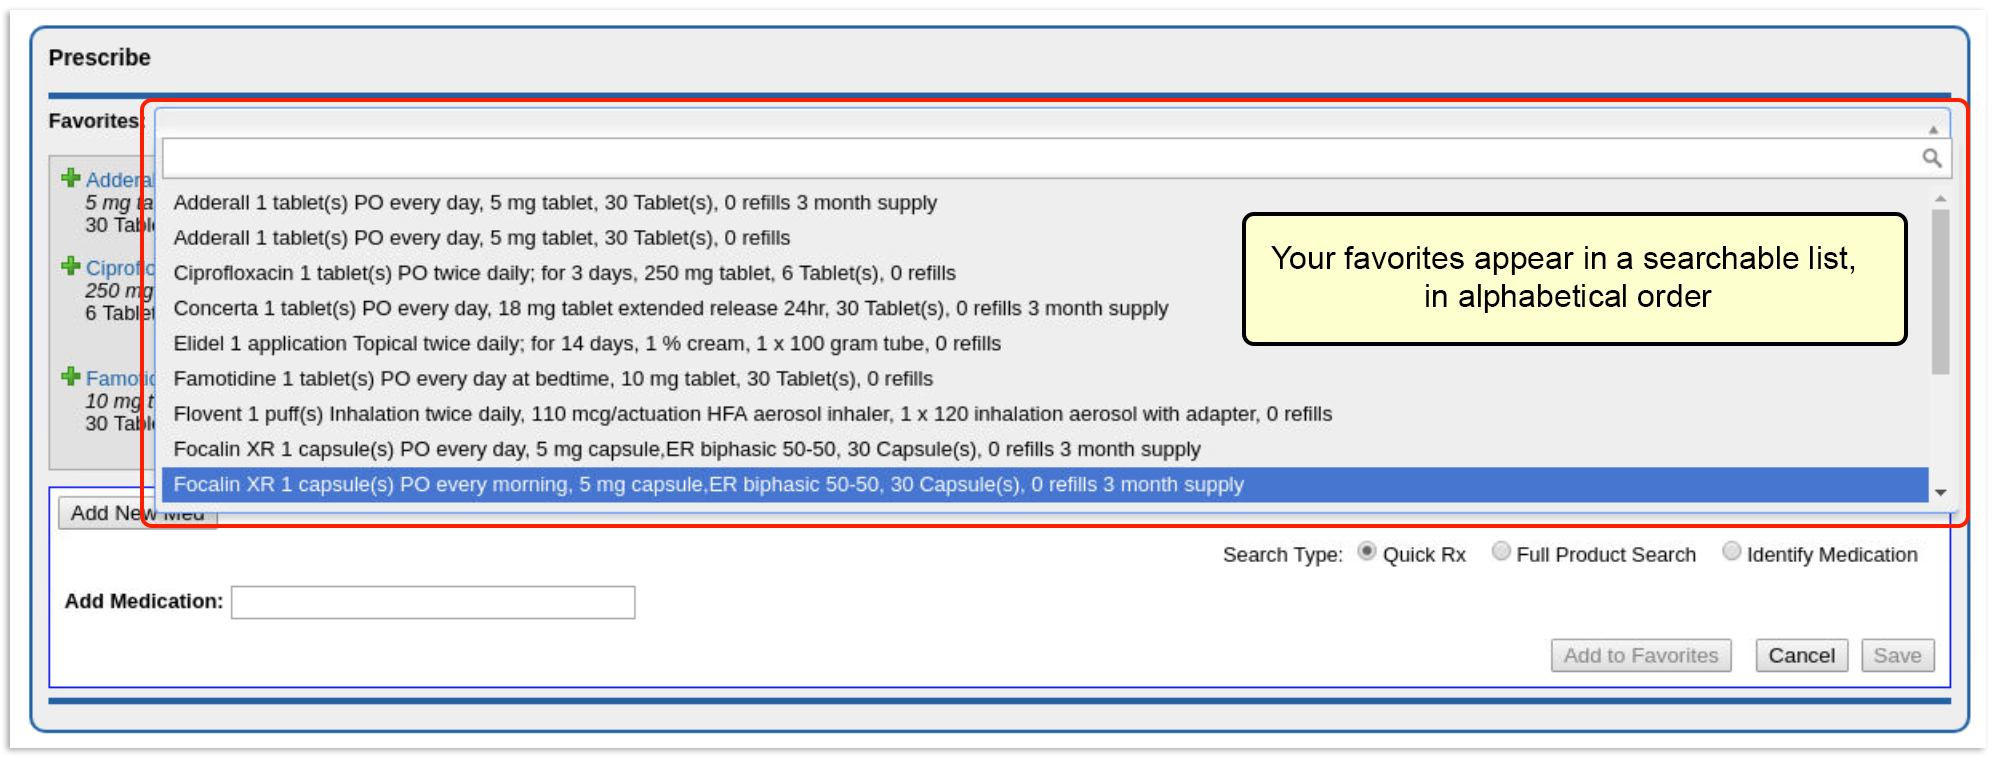
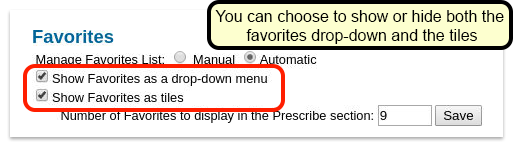
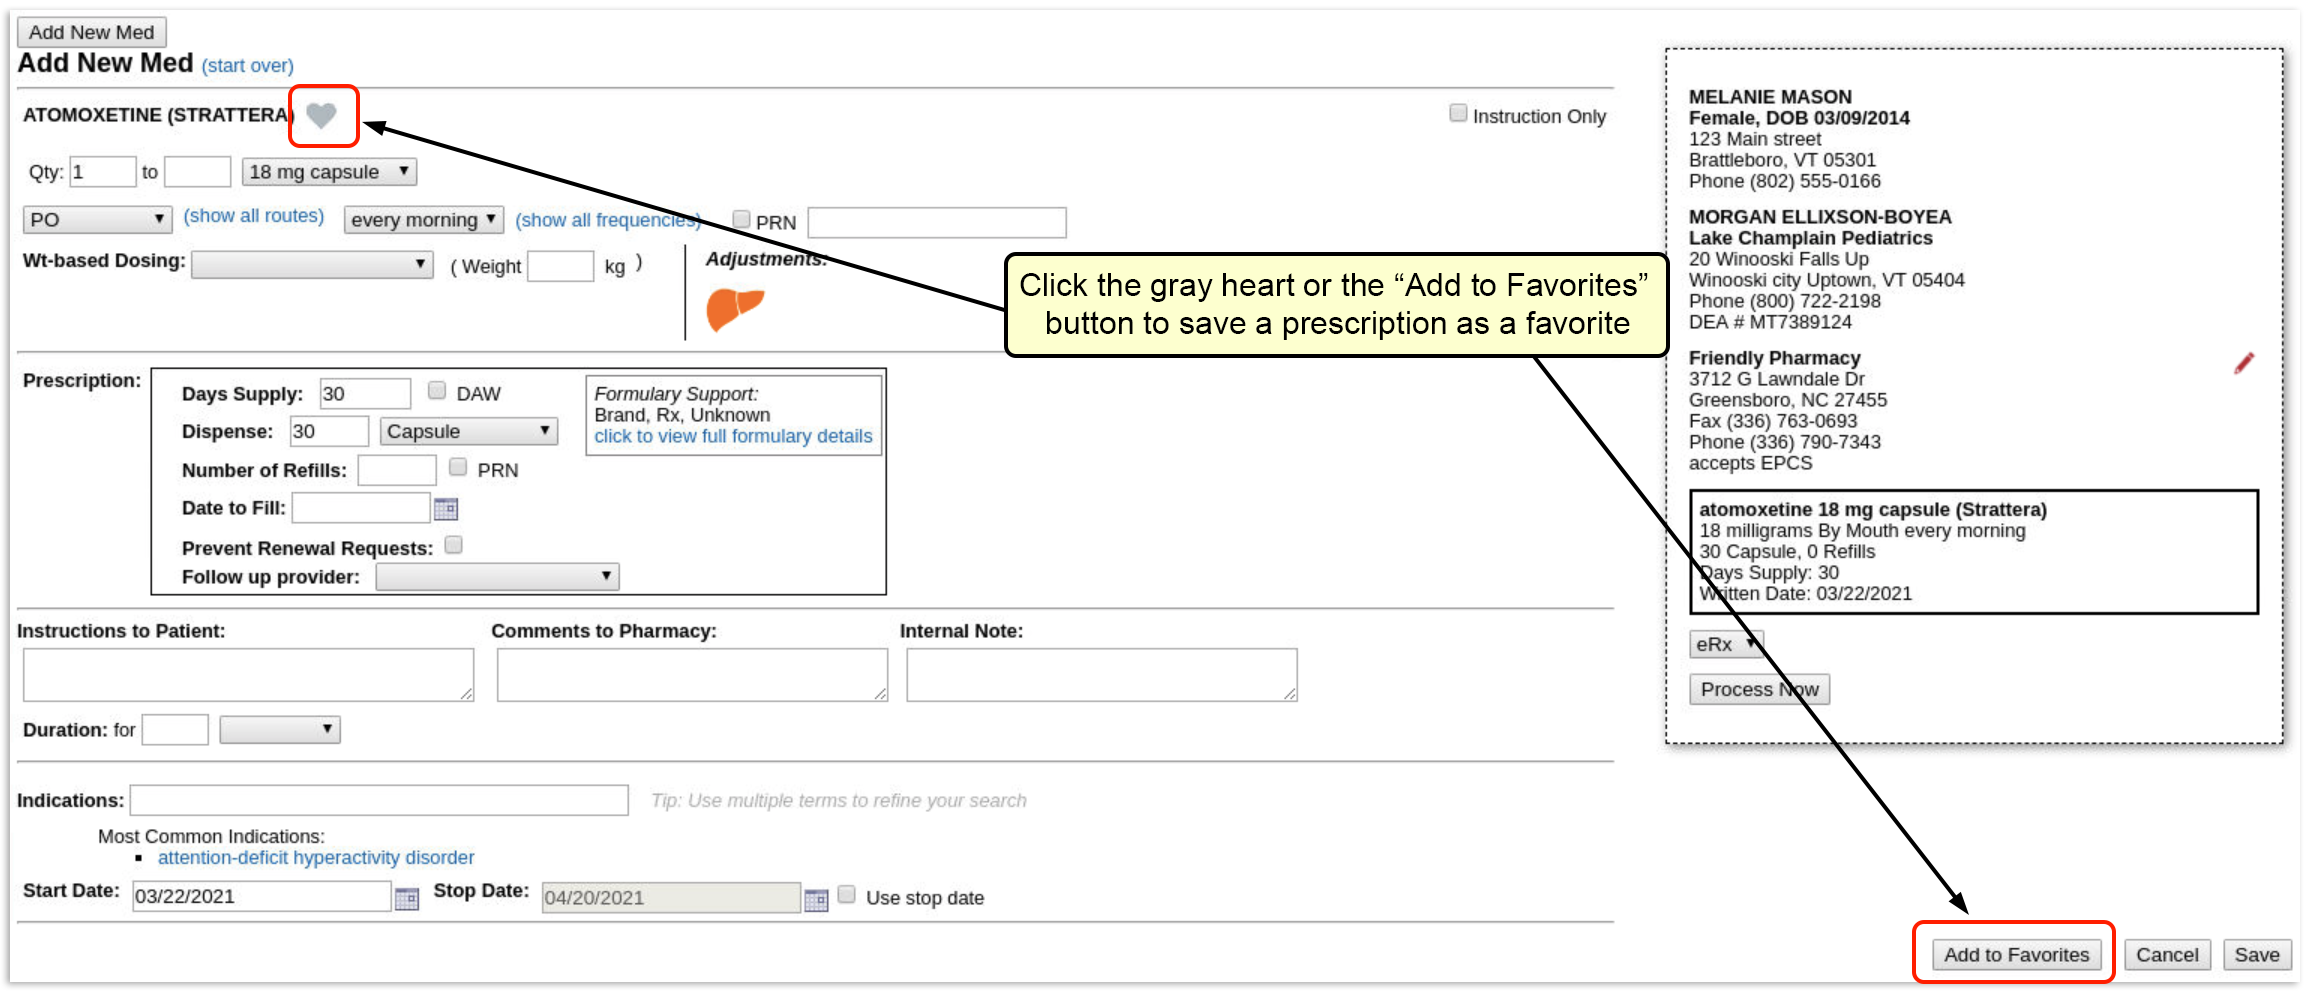
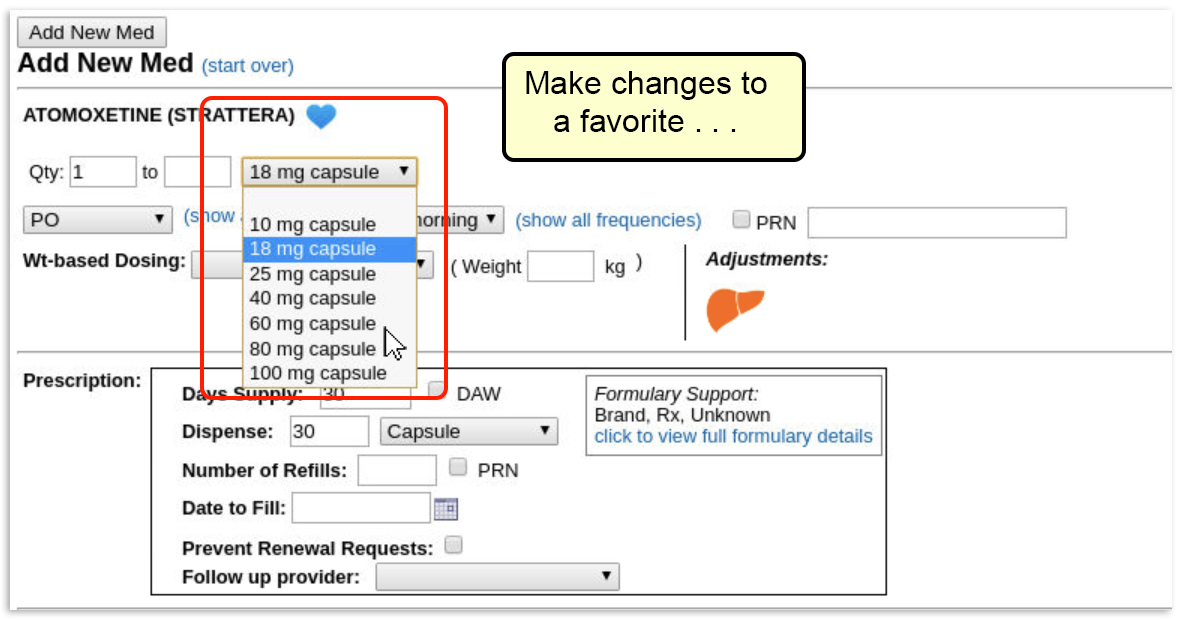
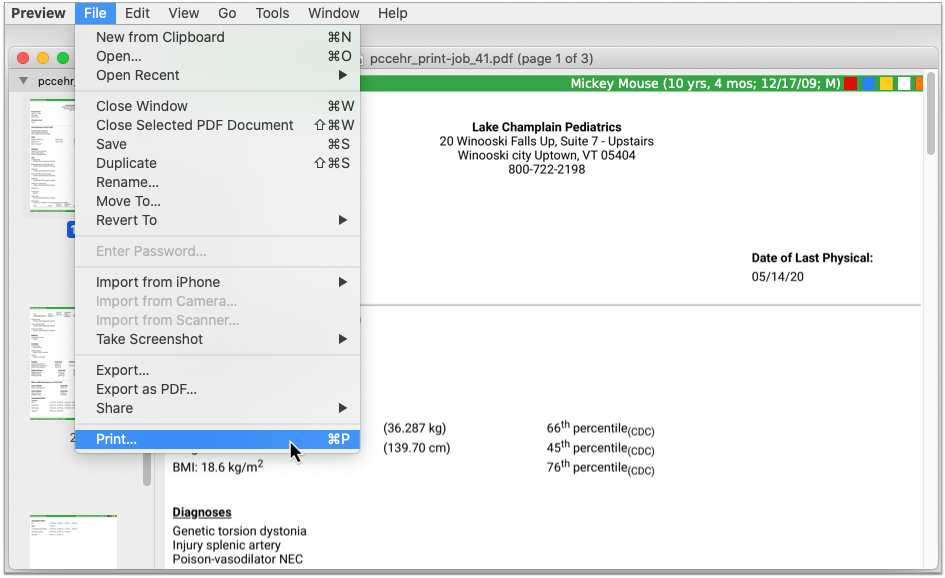
In the third quarter of 2020, PCC will release version 8.13 of our electronic charting and practice management software to all PCC users.
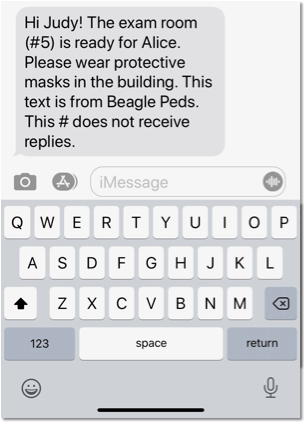
PCC 8.13 includes new and improved lab and radiology requisition forms, sibling scheduling, additions to the new charge-posting tool in PCC EHR, signing in pocketPCC, and more. We are also pilot testing the initiator or “query” side of Clinical Document Exchange, which means your practice will soon be able to retrieve your patients’ records from other healthcare providers on demand within PCC EHR.
Watch a Video Series: Want to see videos about the updates in this release? Watch the Release Video Playlist.
Implementation: PCC 8.13 includes features that require configuration and user-specific software training. Read about the features below and then review the PCC 8.13 Migration Considerations article.
Read below to learn more, and contact PCC Support for information about these new features or about any PCC product or service.
Generate Outbound Lab and Radiology Requisitions in PCC EHR
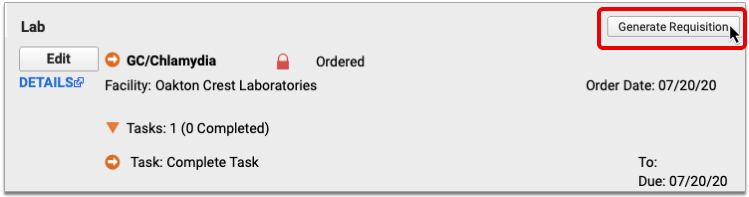
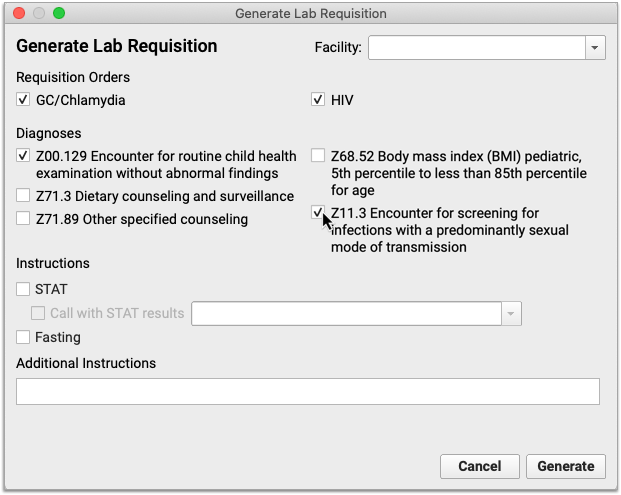
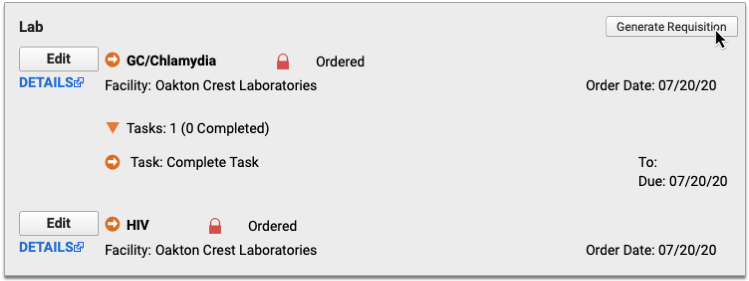
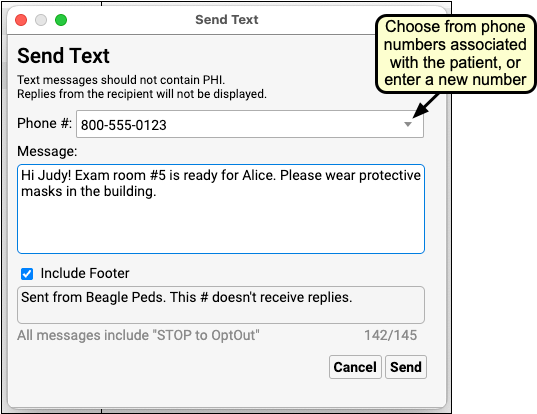
You’ve ordered your patient to get labs or x-rays, and it’s time to generate a requisition that they can take to the facility. Beginning with Release 8.13, you can generate that requisition right from the patient’s chart note in PCC EHR!
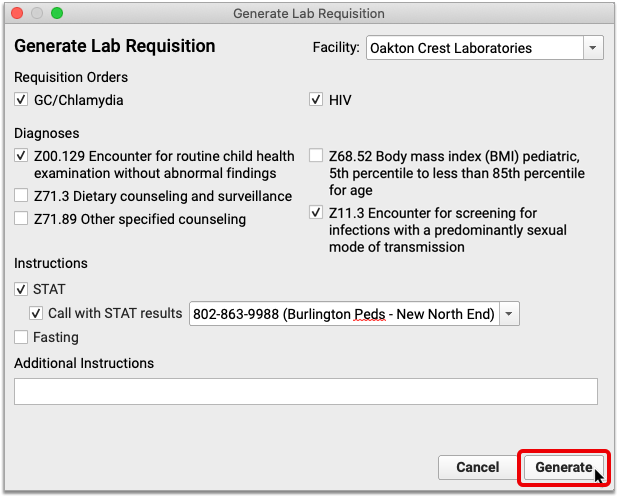
First, make sure the chart note contains whichever orders and diagnoses you want to be able to include on the requisition.
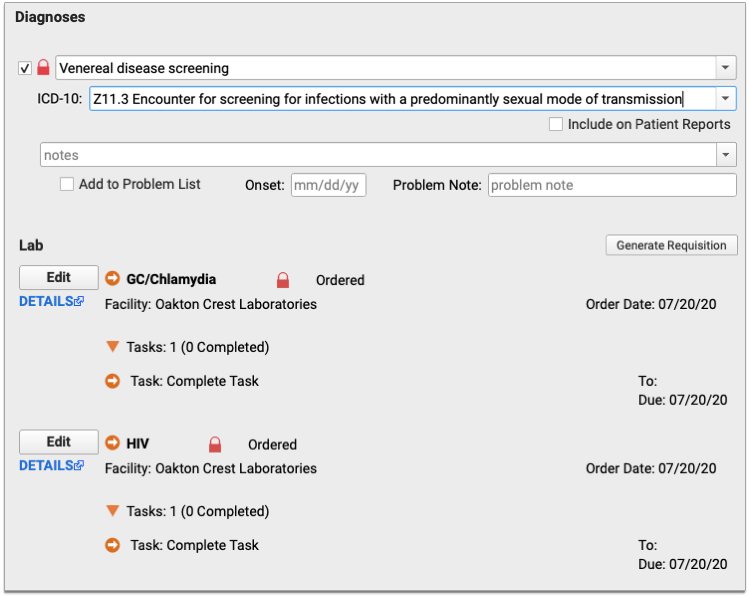
Next, click the “Generate Requisition” button within the lab or radiology orders component. This opens the Generate Requisition window.
Check off the orders and diagnoses you want to include on the requisition. The orders and diagnoses presented in this window come from the chart note.
You can also optionally indicate whether the orders are STAT or fasting, specify a phone number for STAT results, and write out any special instructions you have for the lab or radiologist.
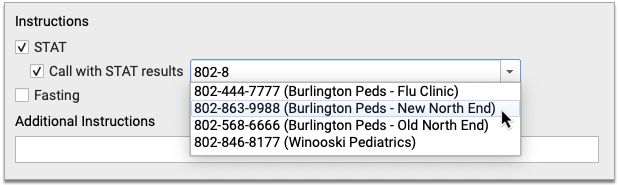
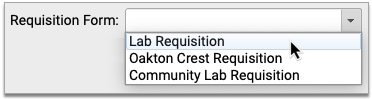
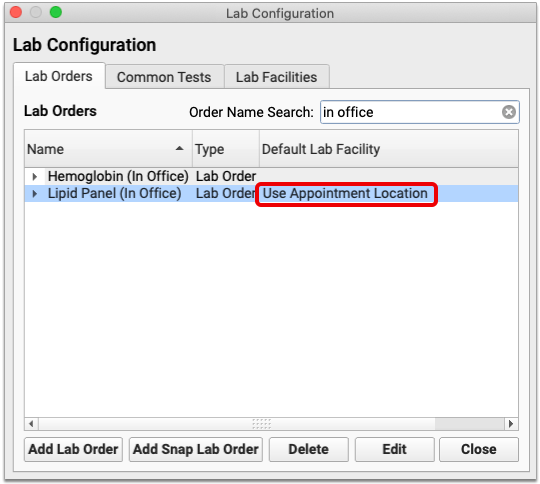
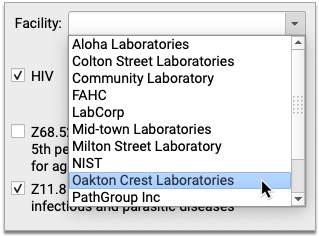
If this is a lab requisition, you can optionally pick which facility the requisition is for. If you pick a facility, its name, address, and contact information print on the requisition. You can also leave the Facility field blank. You cannot pick a facility for radiology requisitions.
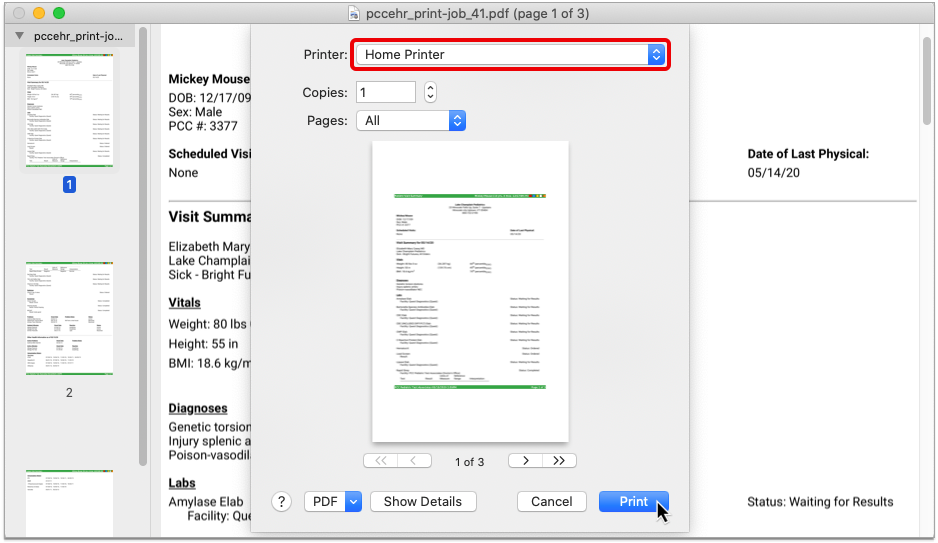
After filling out the options in the Generate Requisition window, click “Generate” to preview the requisition.
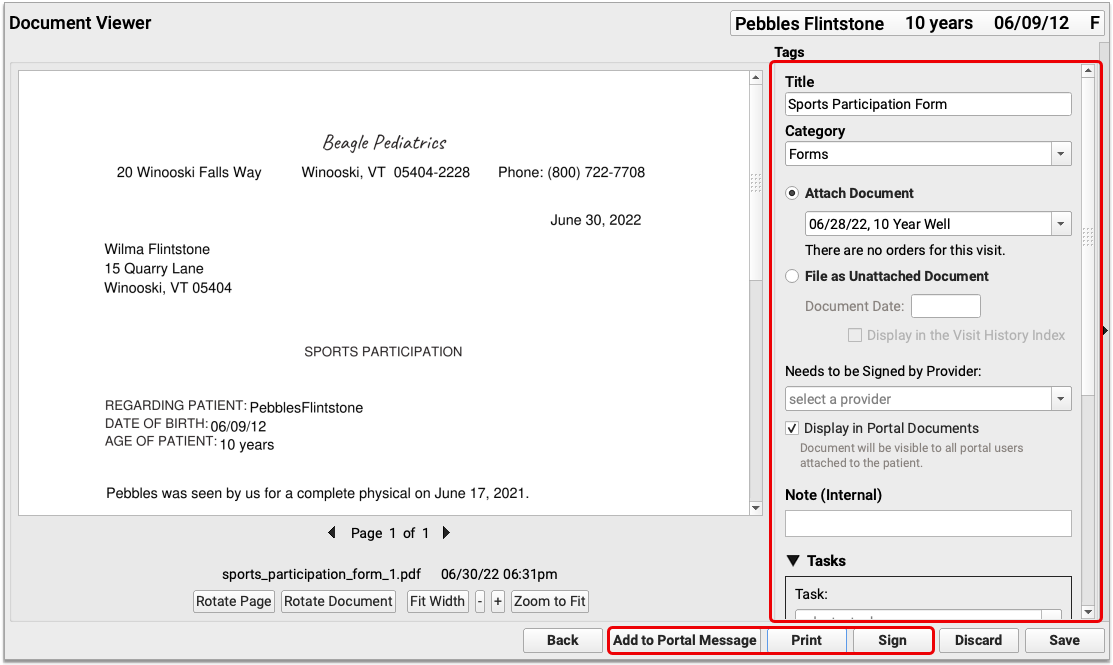
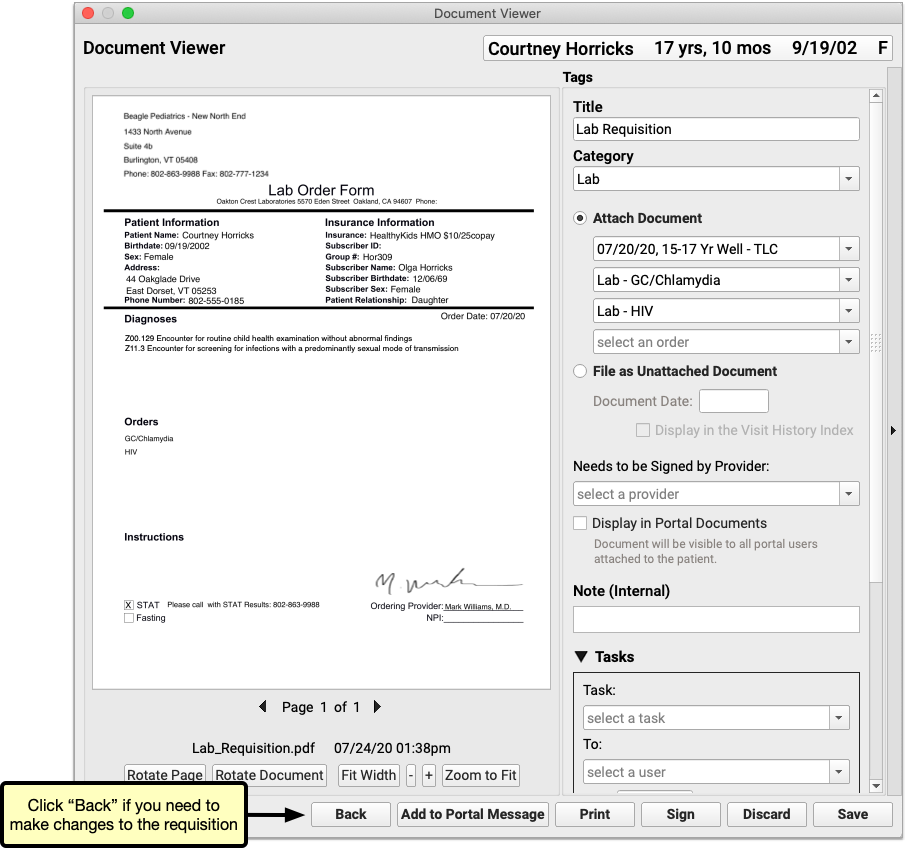
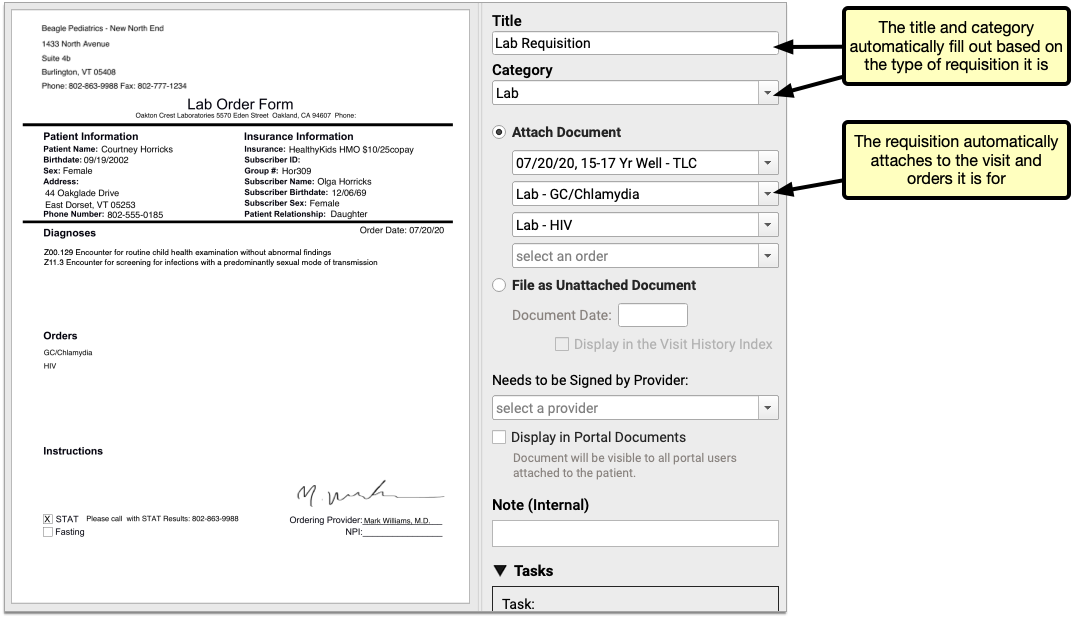
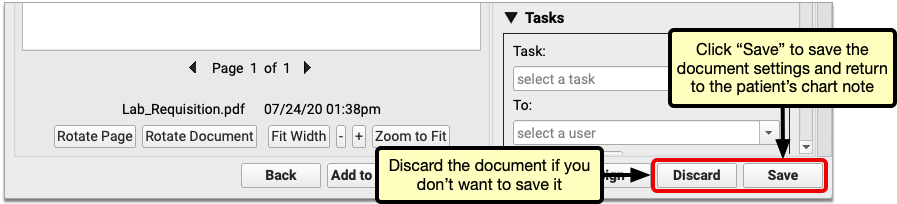
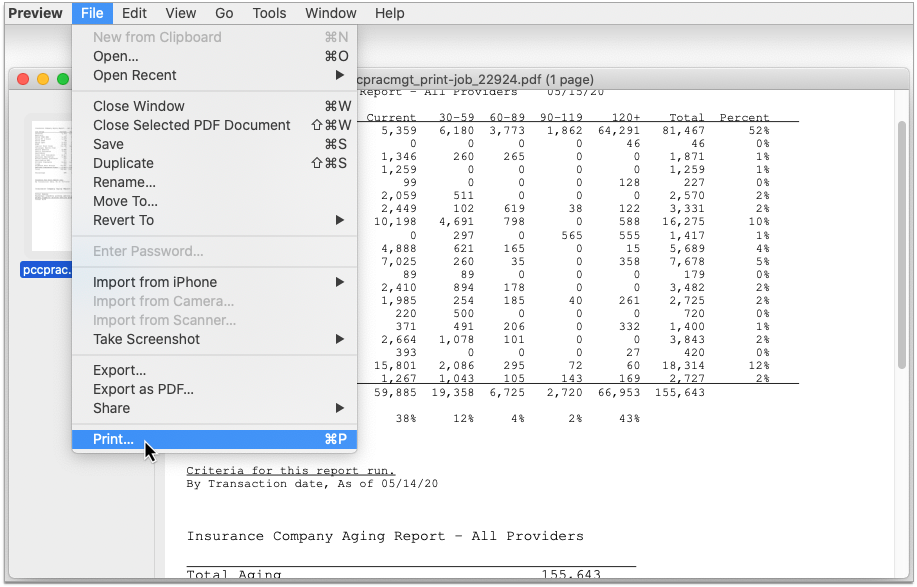
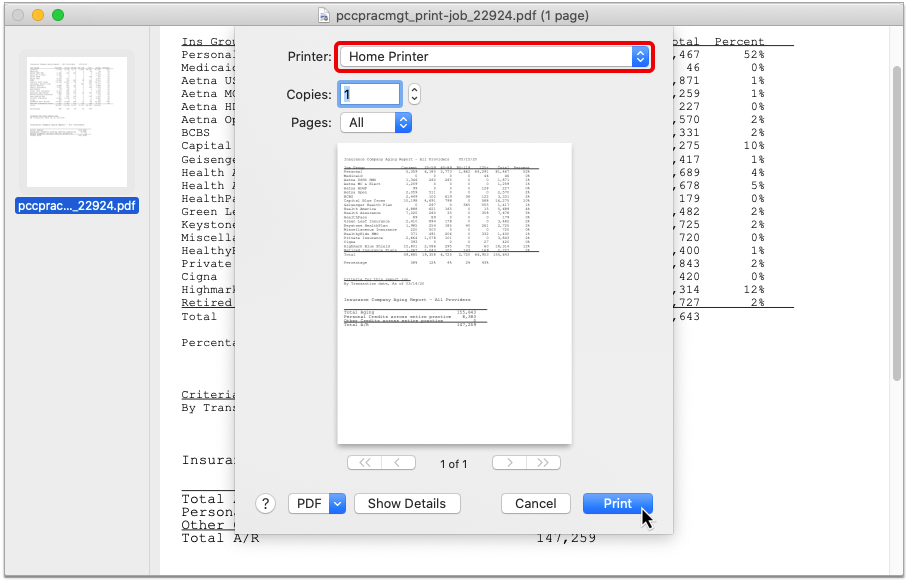
The requisition opens in a Document Viewer window. From here you can to print the requisition, attach it to a portal message, or share it to the patient’s portal documents.
Click the “Back” button if you need to modify the requisition before printing or sharing it.

When you are done, click “Save” to save the requisition and return to the patient’s chart note.
You can create multiple requisitions from the same chart note, each with its own unique options. For a more in-depth look at lab and radiology requisitions in PCC EHR, read Generate Lab and Radiology Requisitions within PCC EHR
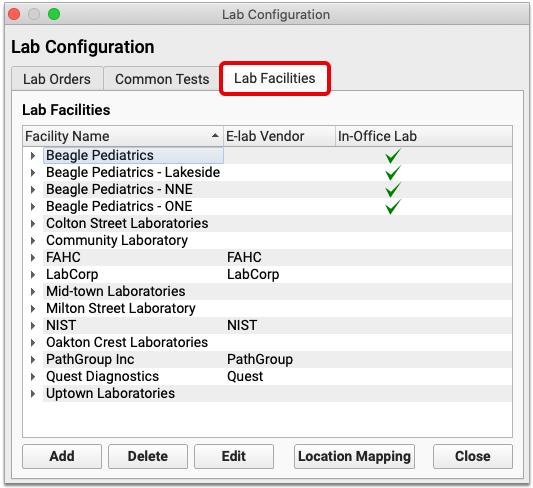
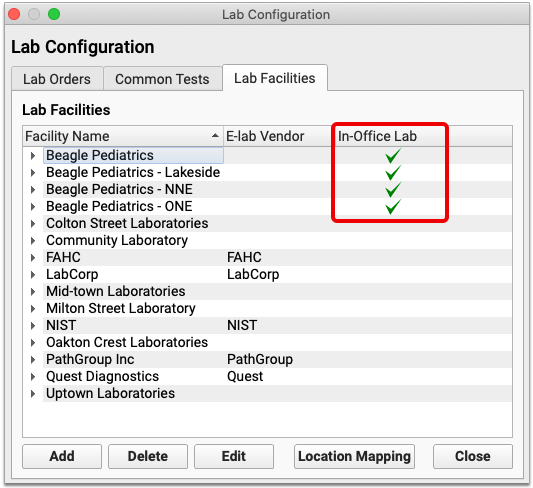
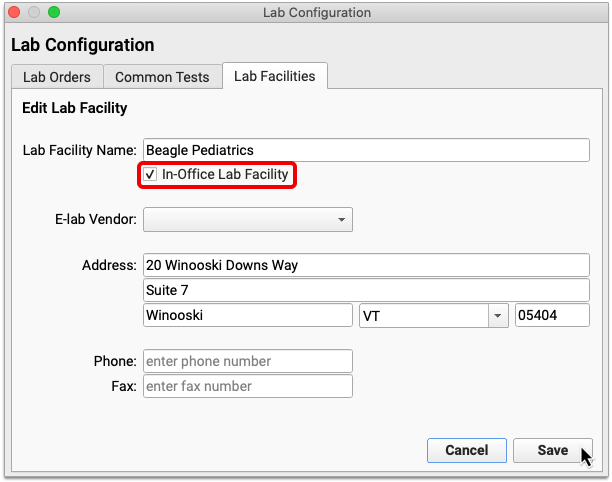
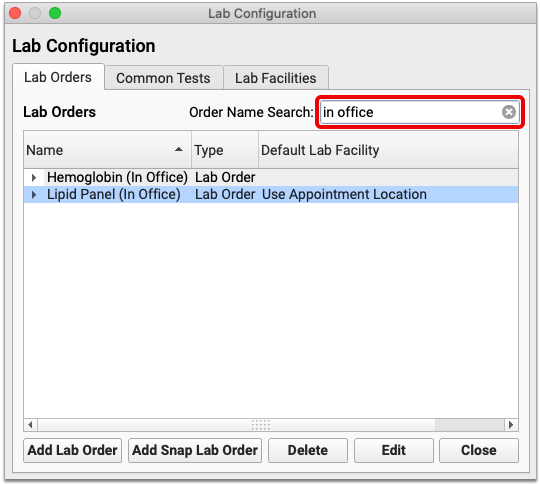
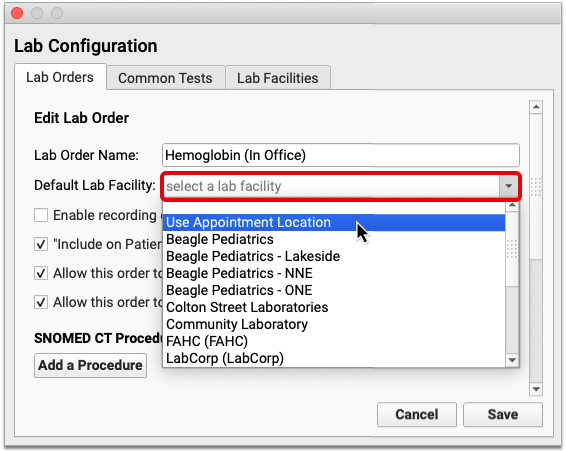
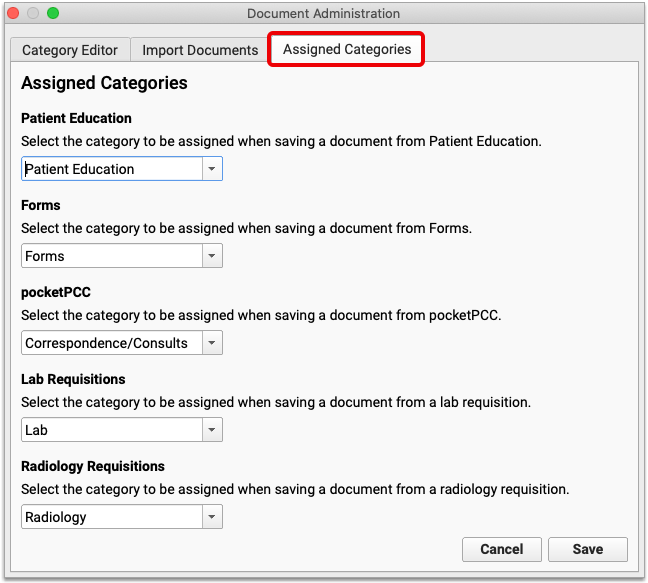
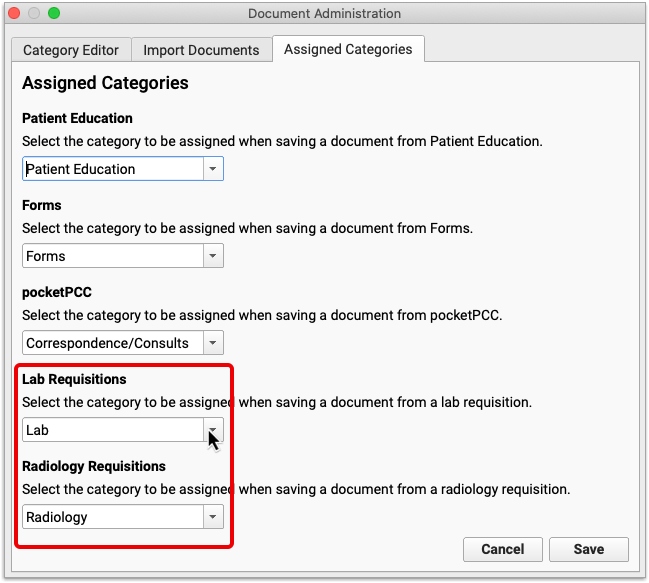
In-Office Labs Don’t Appear on Requisitions: Lab orders which list an in-office facility are prevented from appearing on requisitions. If you need help configuring in-office lab facilities and orders, contact PCC Support.
Configure Custom Requisition Forms: PCC provides a stock lab and radiology requisition template to all practices, but offers the option to upload custom templates by special request. Contact PCC Support to learn more about custom requisition forms.
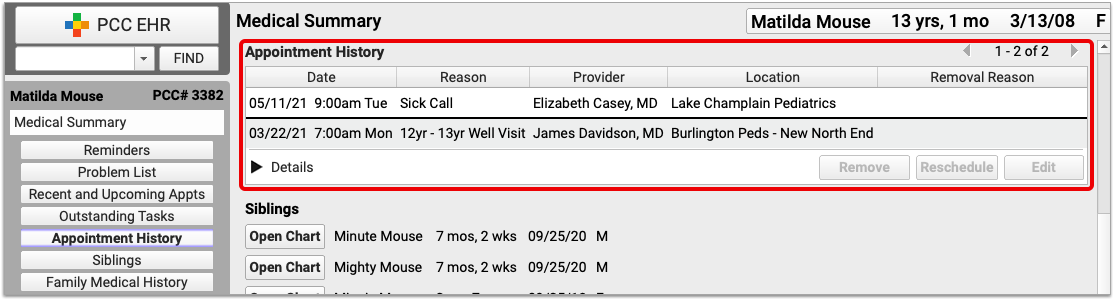
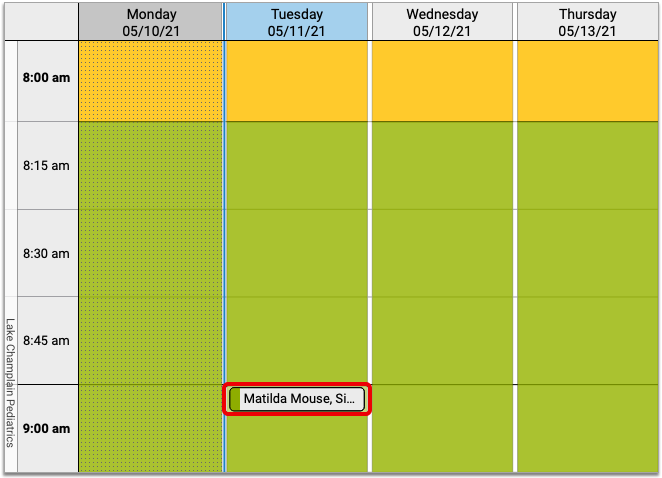
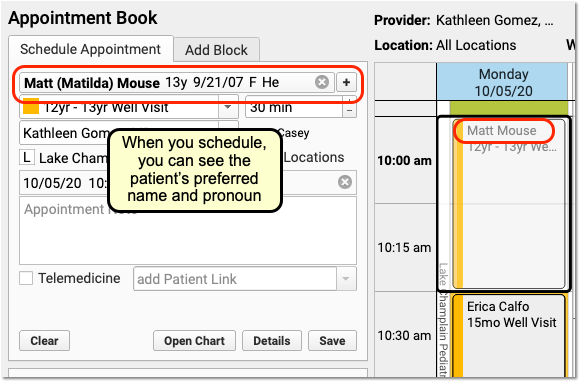
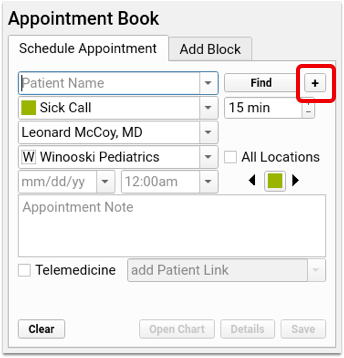
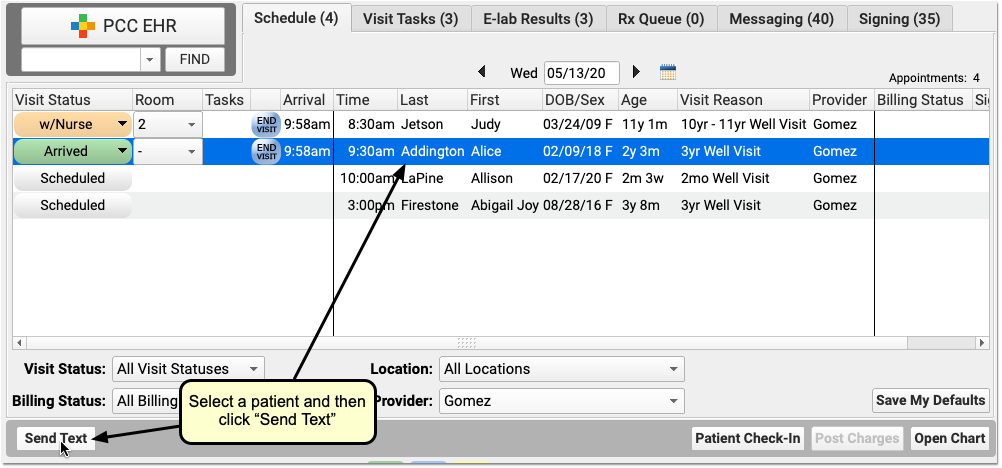
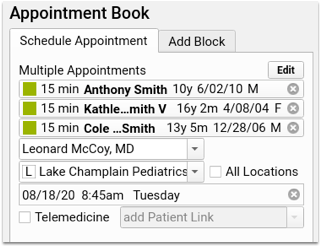
Schedule Siblings in the Appointment Book
PCC EHR’s Appointment Book now includes the option to select multiple patients and schedule for all of them at the same time, making scheduling siblings quicker and easier.
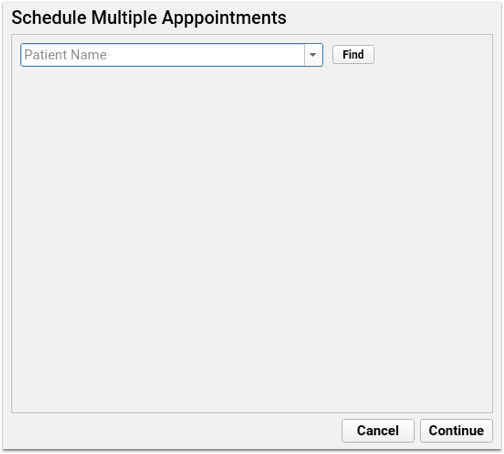
When searching for a patient, click the plus button to the right of the search box to open the Schedule Multiple Appointments window.
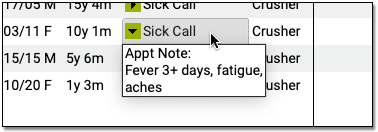
The Schedule Multiple Appointments window works like the Schedule Appointment, except you’ll have the option to add additional patients: find your first patient, select your visit reason, and enter any appointment notes. As soon as you select your first patient, another patient name search box will appear below, and you can then search for another patient—either a sibling of the first patient, or any other patient.
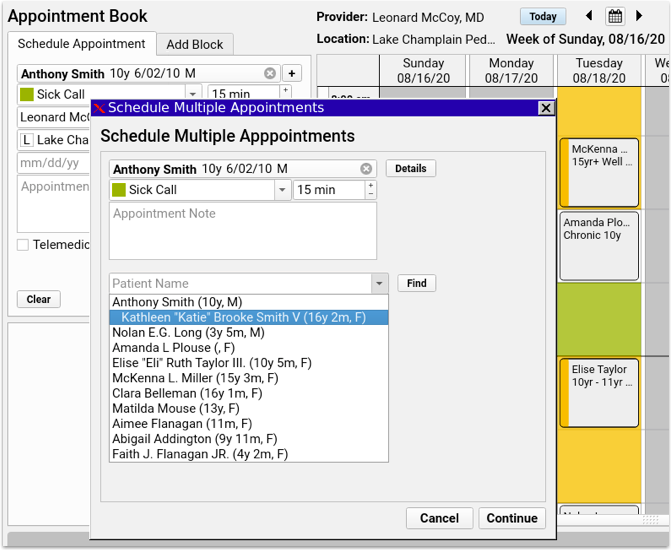
Every time you add a patient, a new patient name search box will appear below for the next patient. Enter as many patients as you need, then click “Continue”.
The patient details appear in the schedule appointment panel, and you can review the calendar and select an available time slot exactly as you would with a single patient. If there’s not enough space available for all appointments, the block of appointments appear with a red border, indicating the overlap with existing appointments.
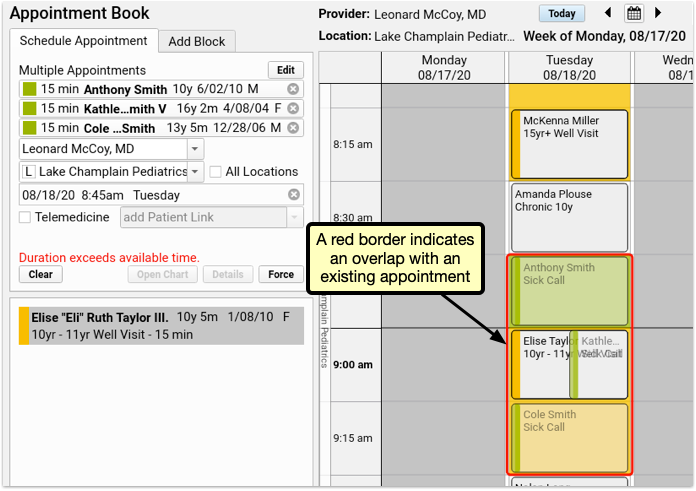
If your user account has permission to force in appointments, you can click Force to save all appointments despite the overlap.
Select a different time slot, where all the appointments fit, and you’ll be able to save without forcing in the appointments.
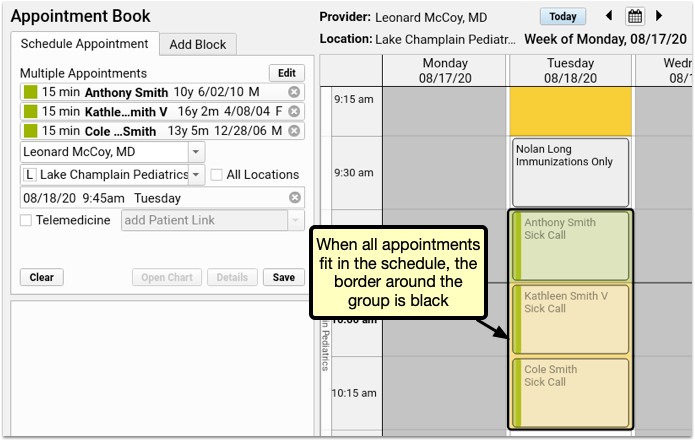
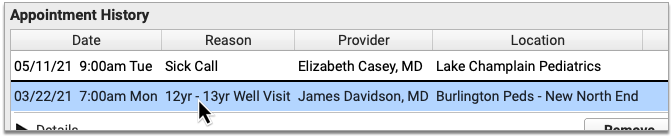
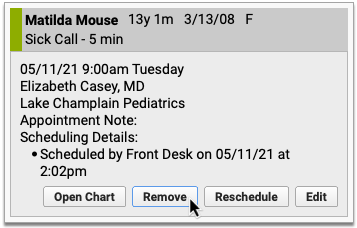
After scheduling multiple appointments, each can be edited, rescheduled, or canceled individually, just like any other appointment.
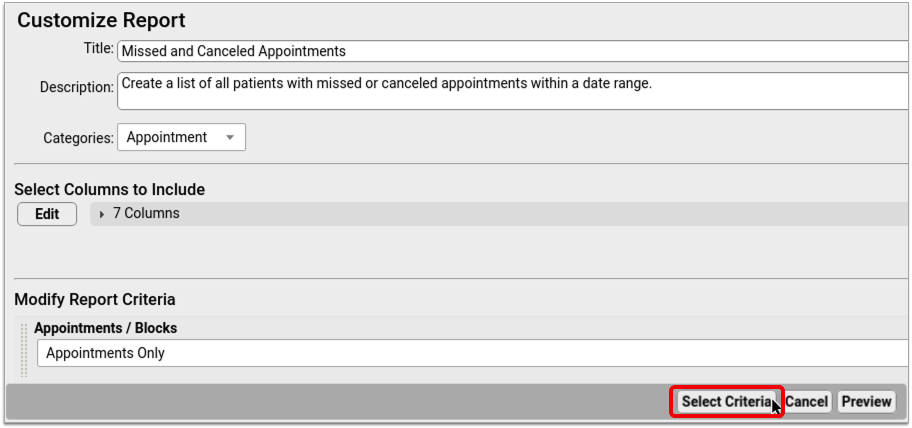
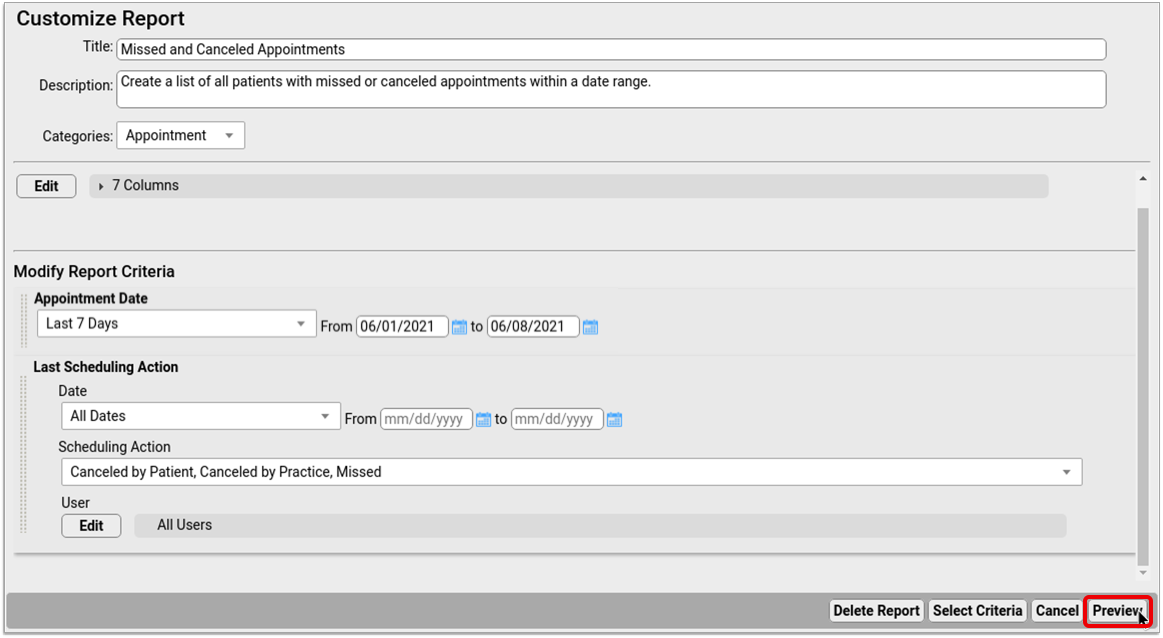
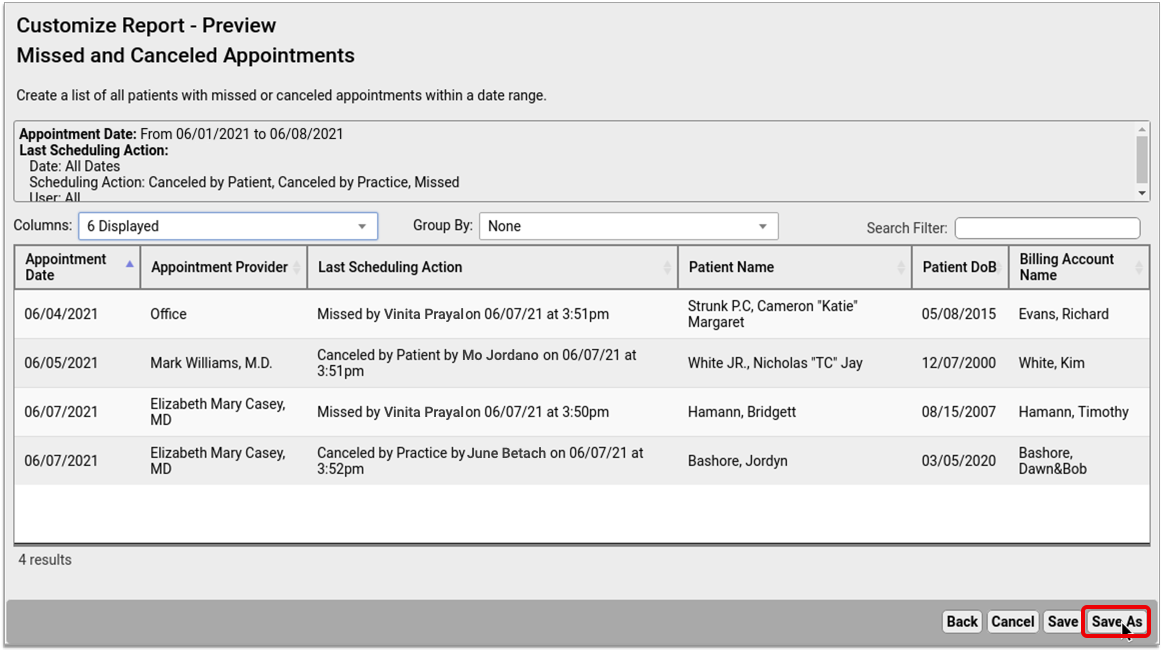
Schedule Reports to Automatically Run in the Future
Coming Soon: Originally scheduled for August’s PCC 8.13 update, we held back this feature due to some outstanding issues. The feature is now available and will be updated in a patch scheduled for Wednesday evening, September 2nd.
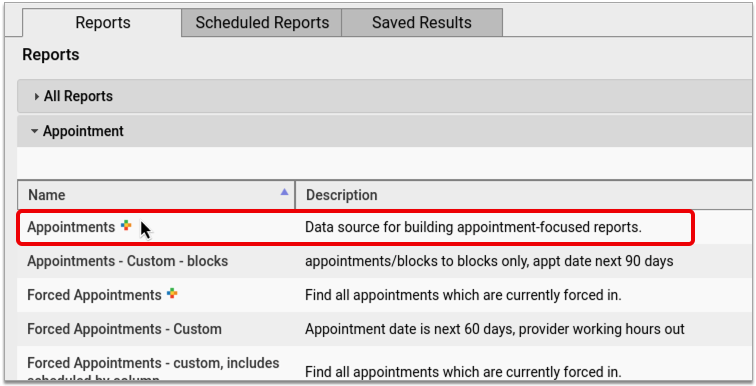
Do you have reports you want to schedule to run at a specific date? Maybe end of month reporting for billing purposes?
You can now schedule reports to run in the future in PCC EHR.
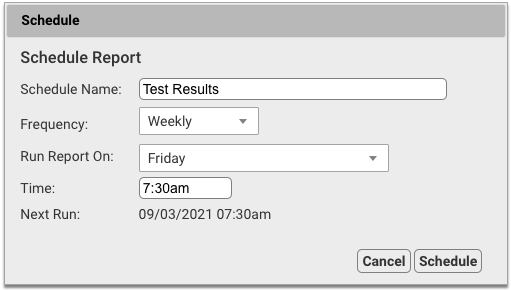
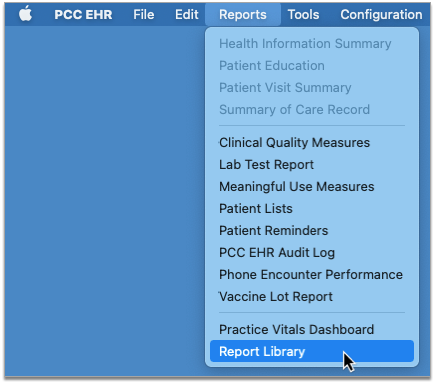
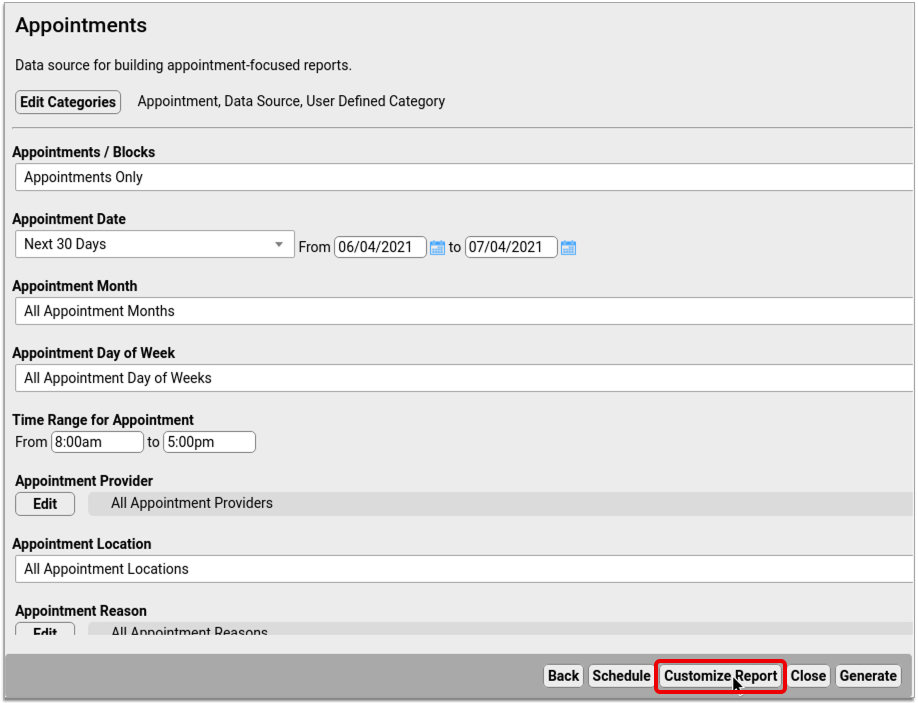
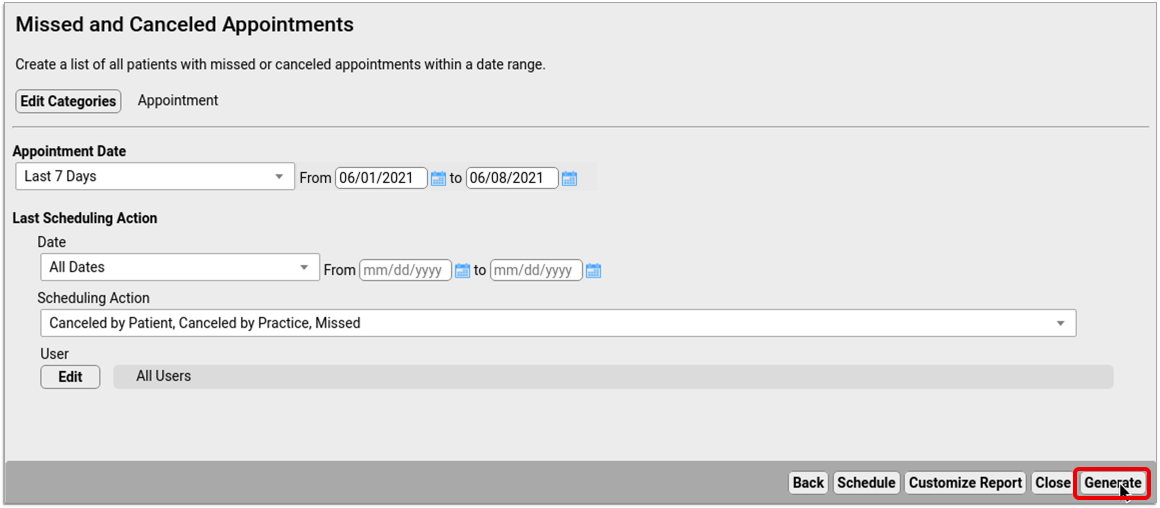
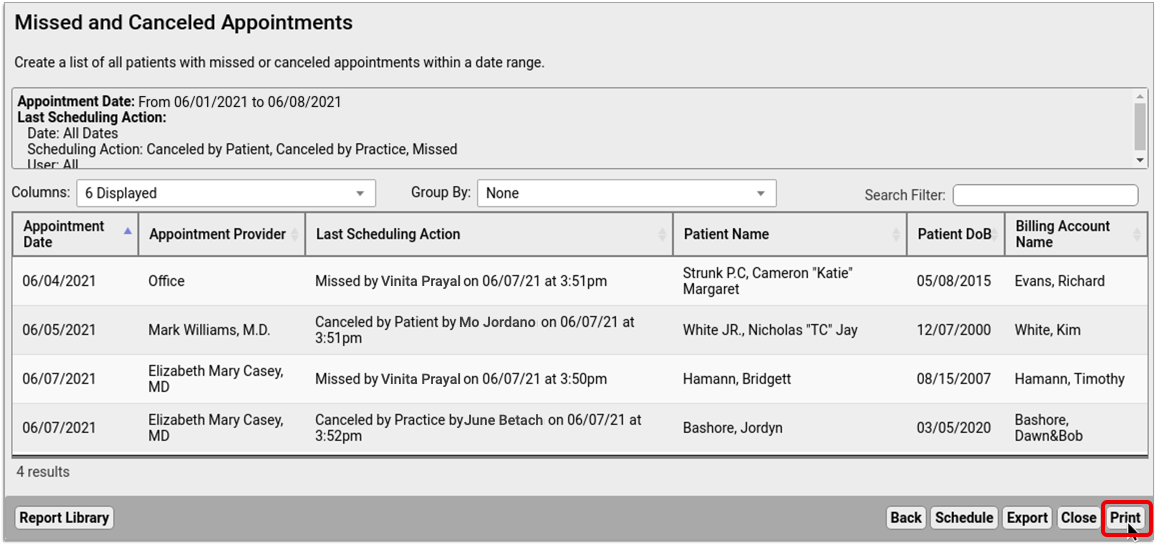
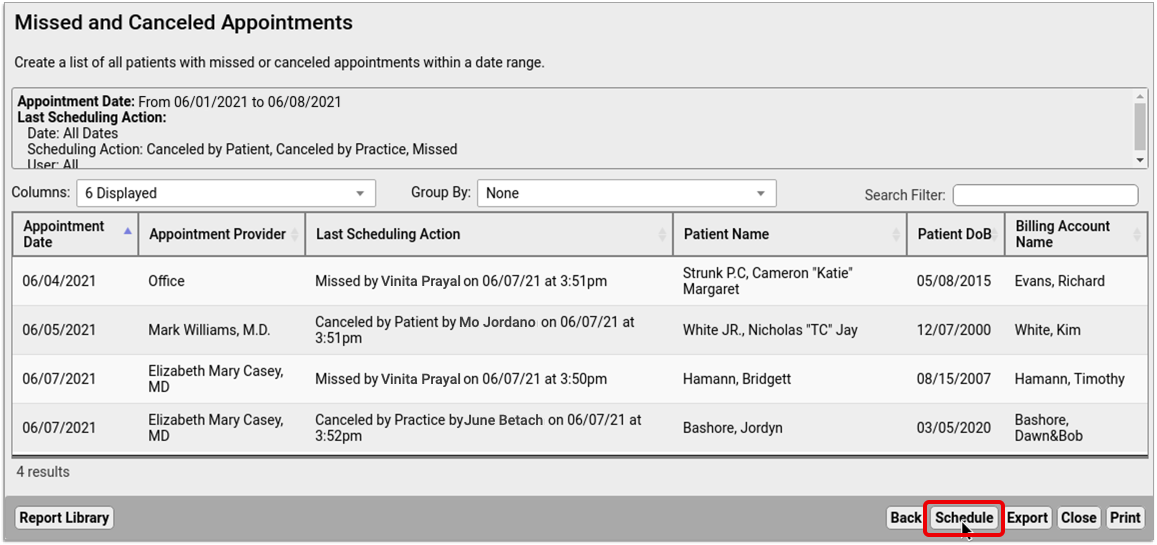
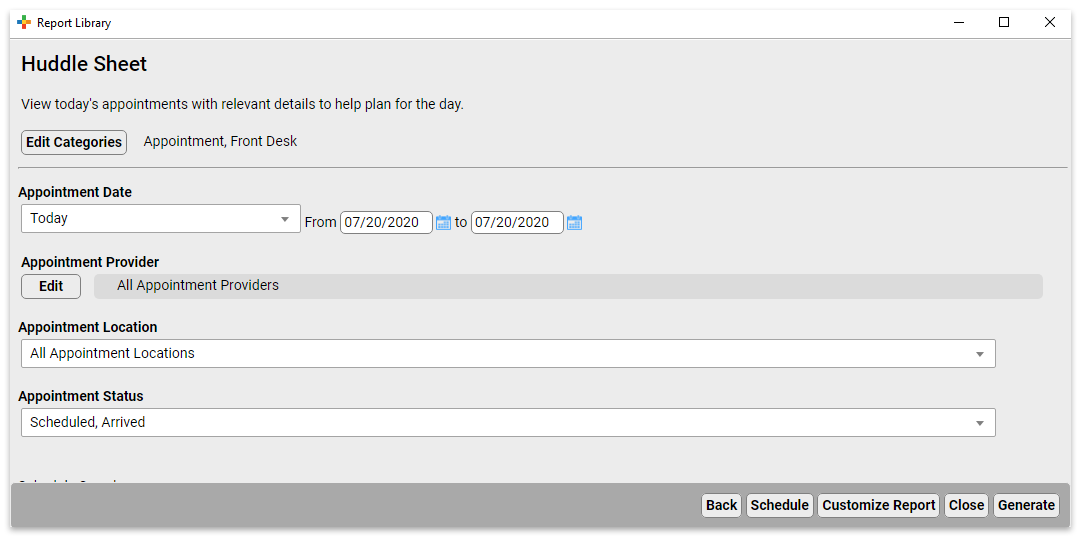
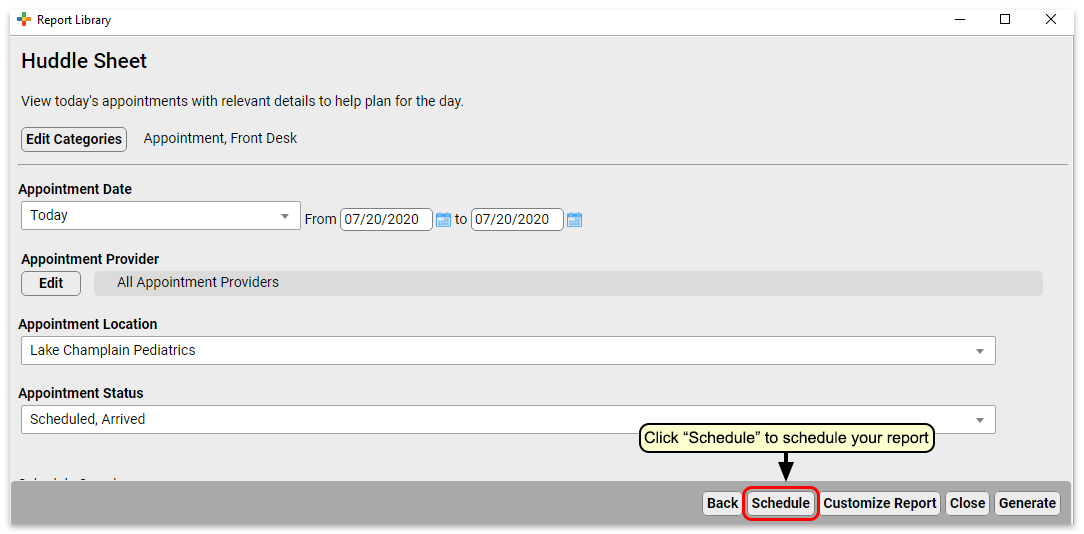
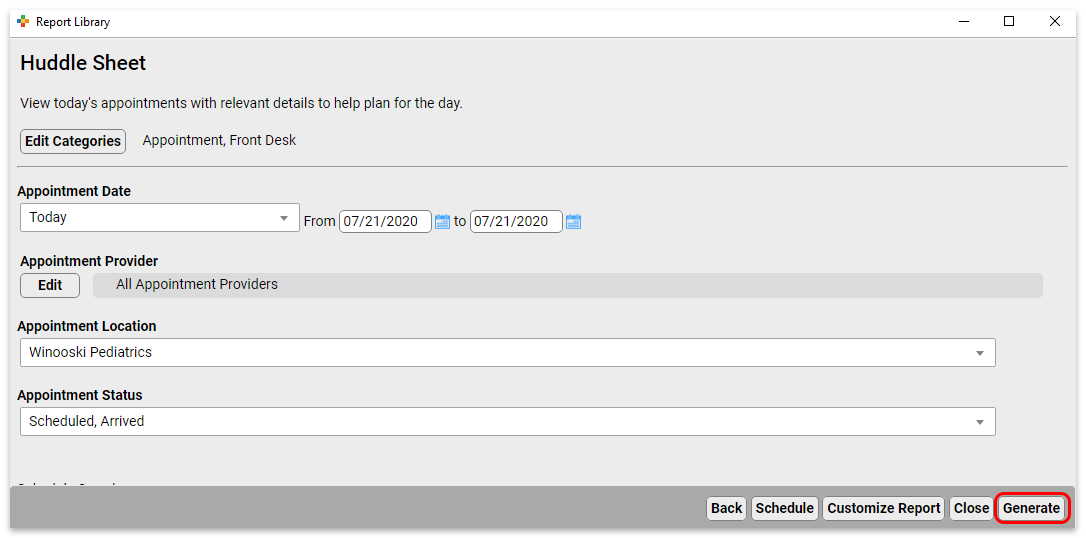
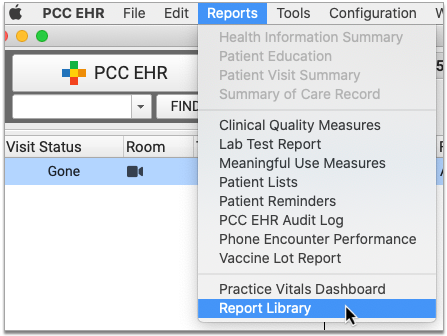
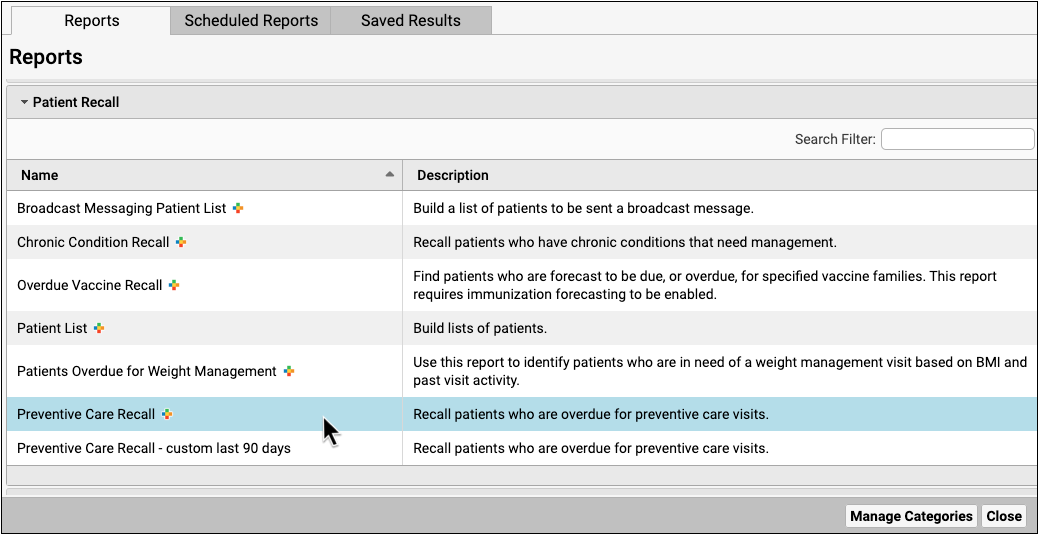
To schedule a report, open the report library and select a report you’d like to run.
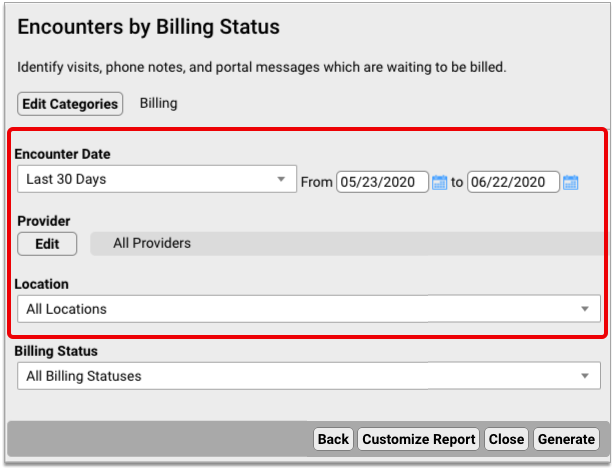
Set the filters for the report as you’d like them, and then click “Schedule”
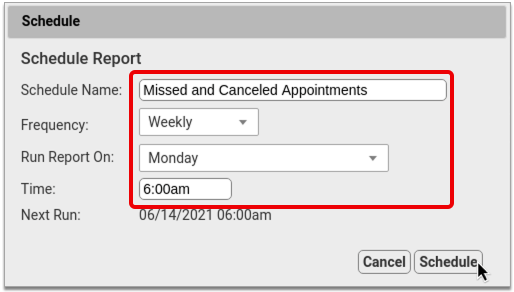
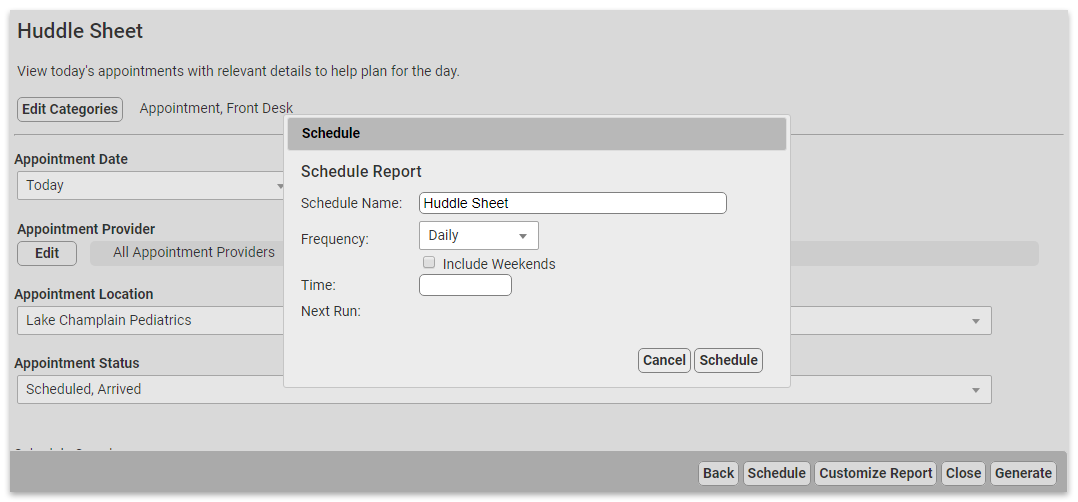
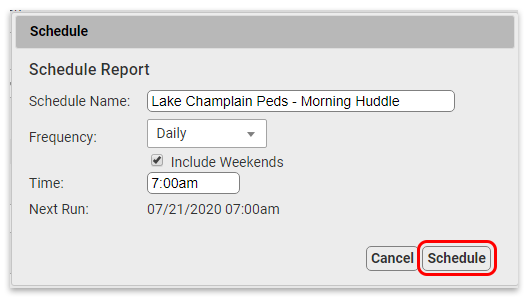
Next, choose a name for this scheduled report, and the frequency at which you want it to run. You may want to schedule multiple instances of the same report with different filter settings, or to run on different schedules. Choose a name that will help identify which instance of a report this is.
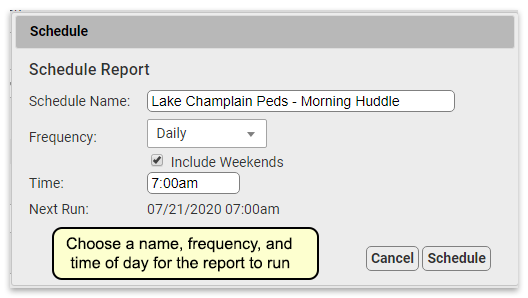
When you’re done, click “Schedule”.
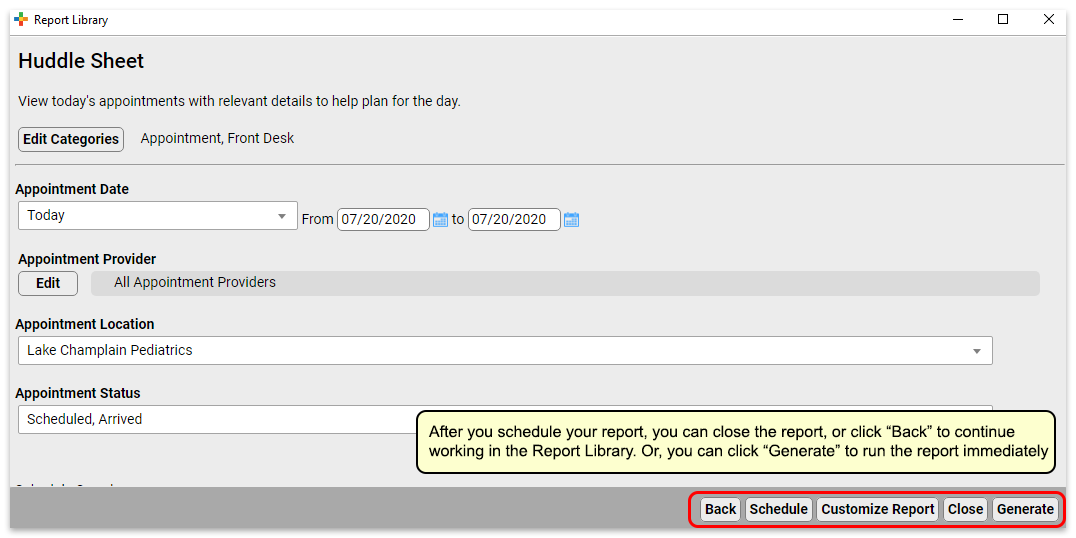
Your report is scheduled. If you’d like, you can generate the report immediately by clicking “Generate”, or move on to other tasks.
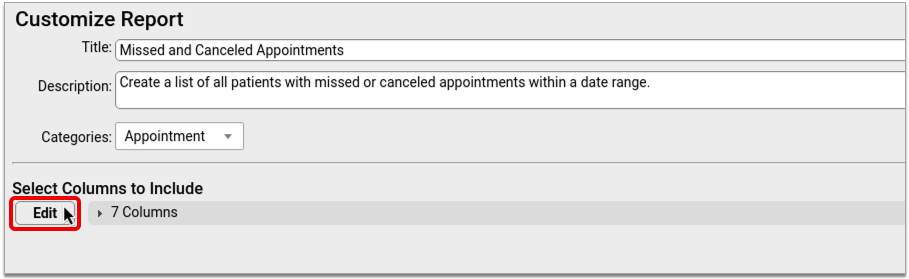
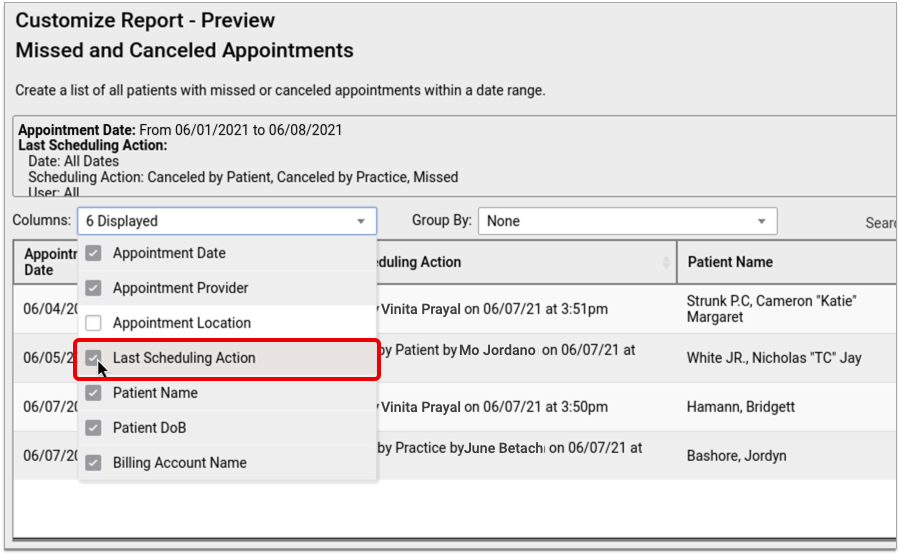
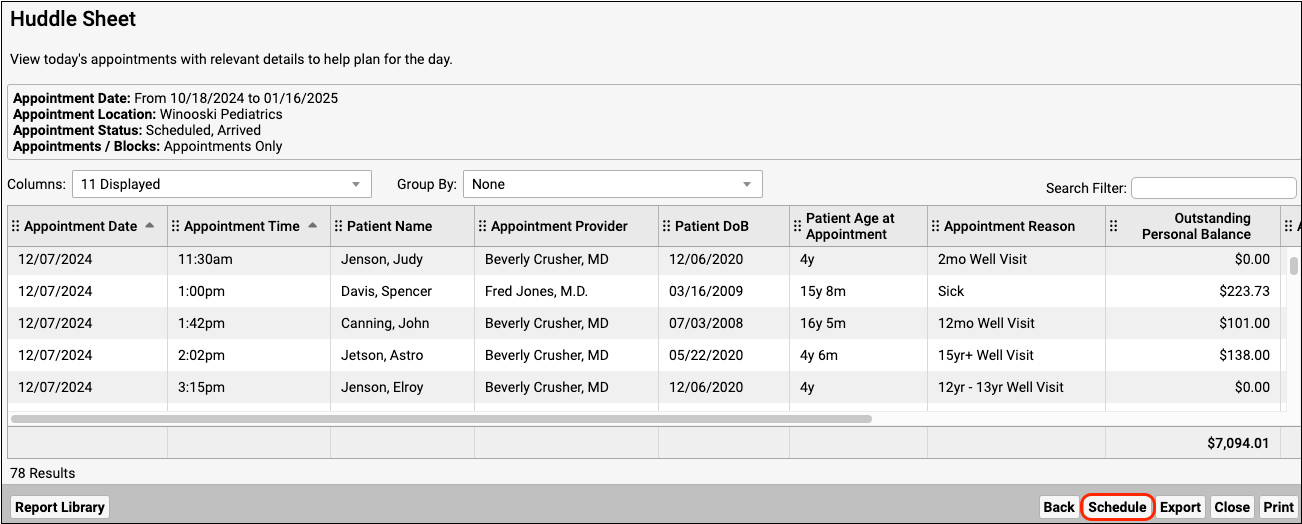
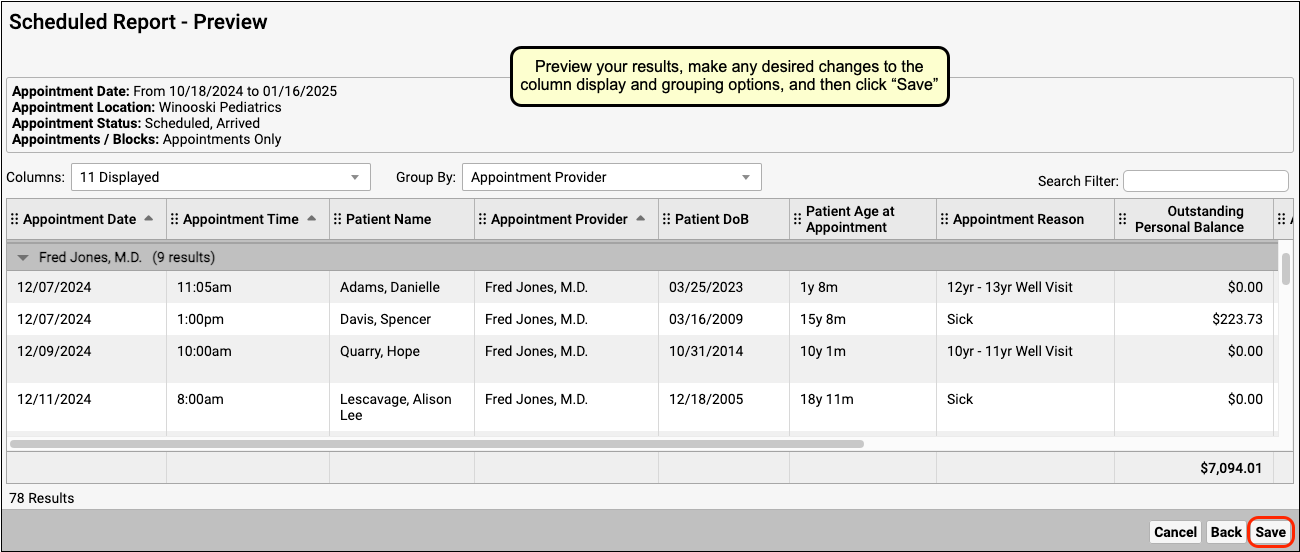
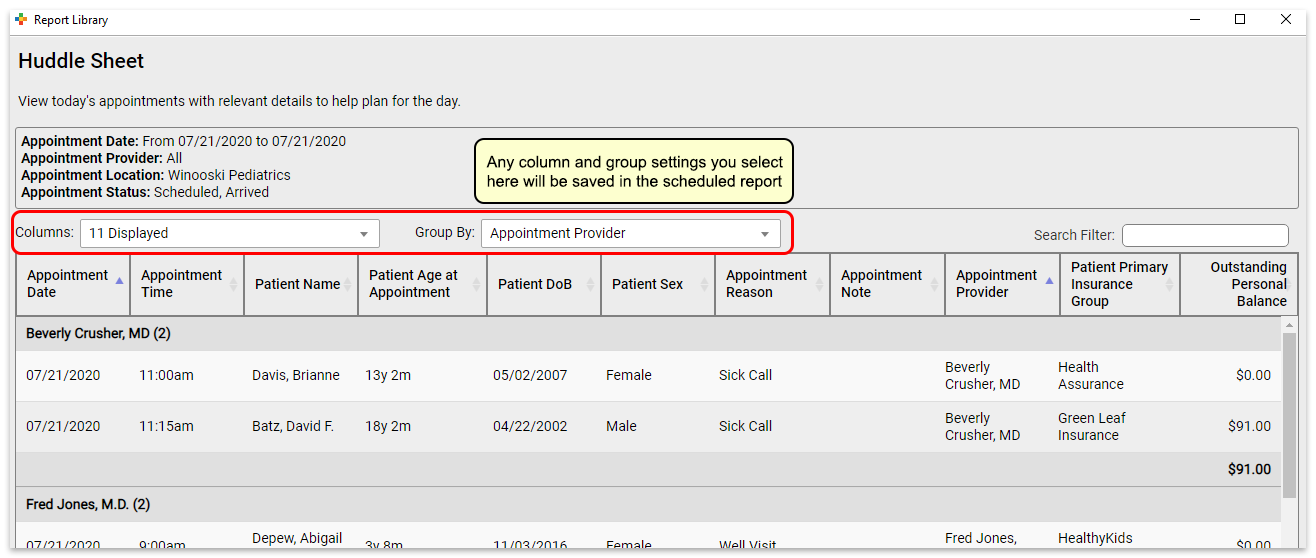
Preview Results and Save Output Settings
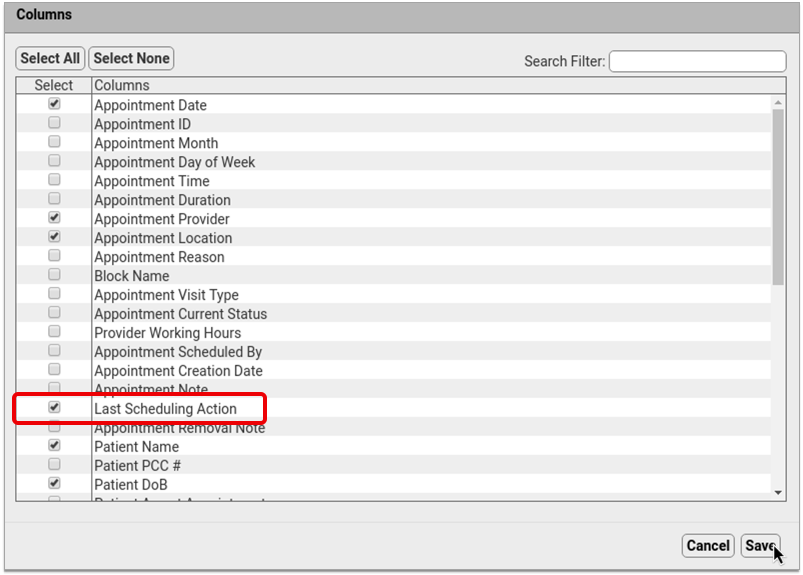
What if you want to check the output of the report before you schedule it, or you want to save column and group by (subtotaling) settings with your output? You can schedule from the results page of a report, which will retain any column and group settings you configure.
Reports scheduled in this manner will retain any column and group settings you configure here.
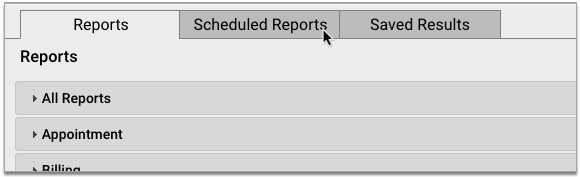
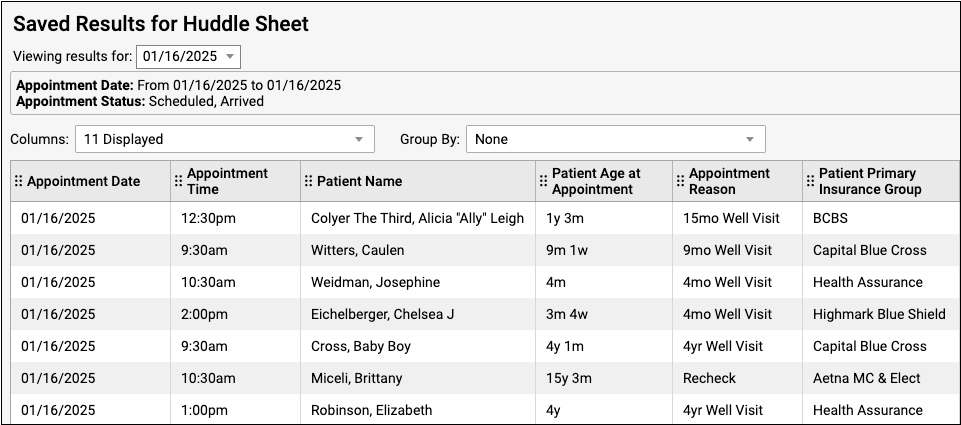
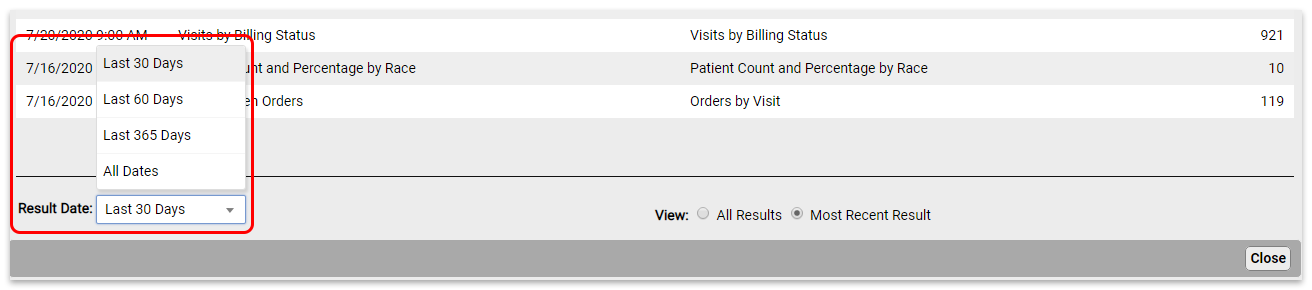
View Report Results
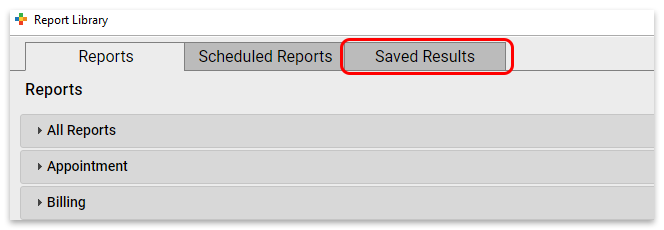
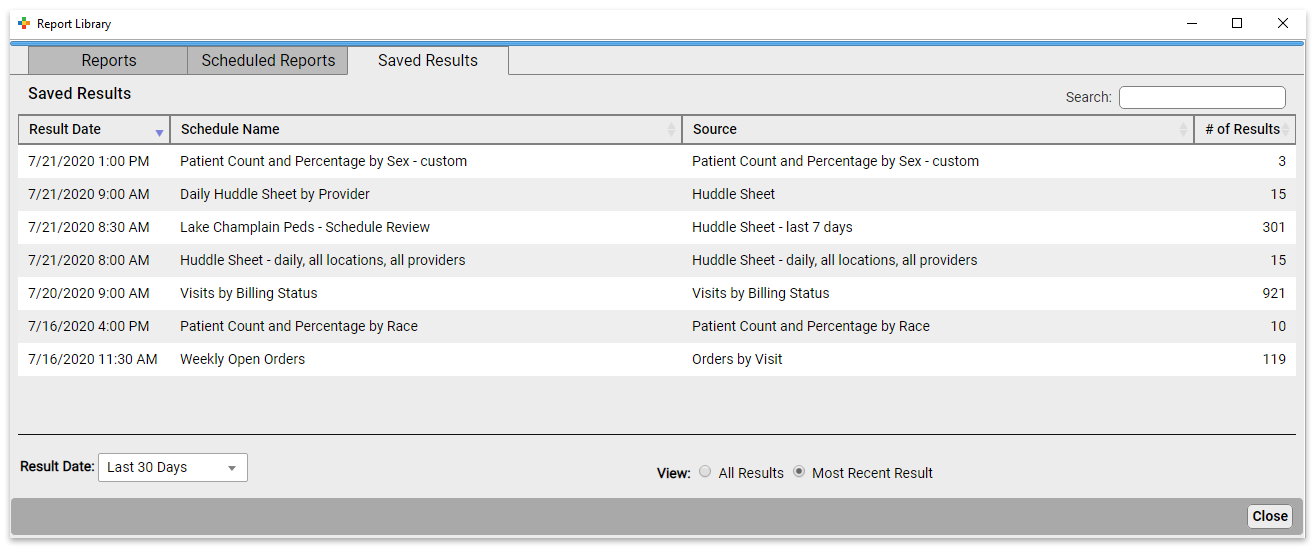
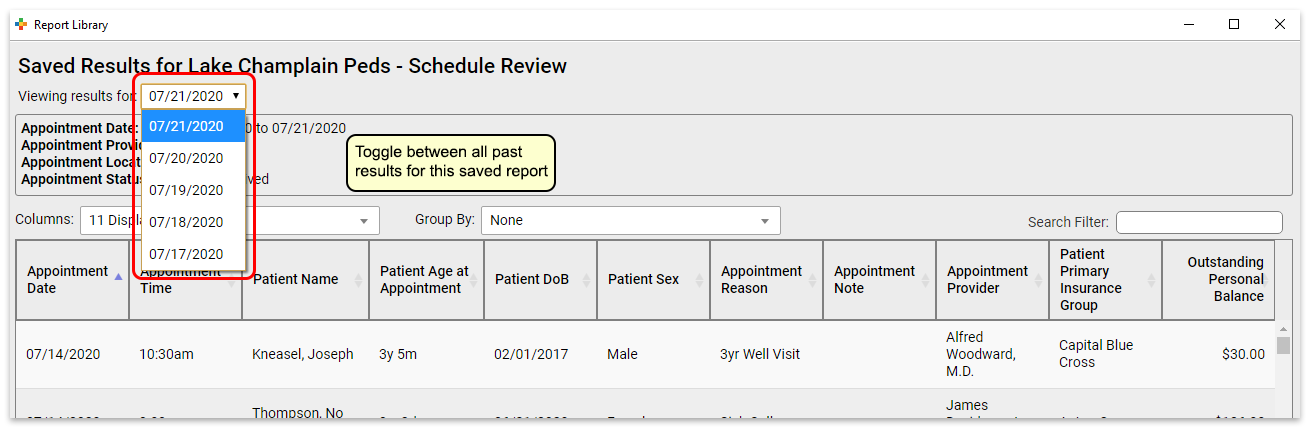
You can view report results in the Saved Results tab.
Here you can see the results for all scheduled reports.
You can see the date the report was run, the name of the schedule, the name of the source report the scheduled report was based on, and the number of results in the report.
To see reports that last ran more than 30 days ago, change the “Result Date” filter setting.
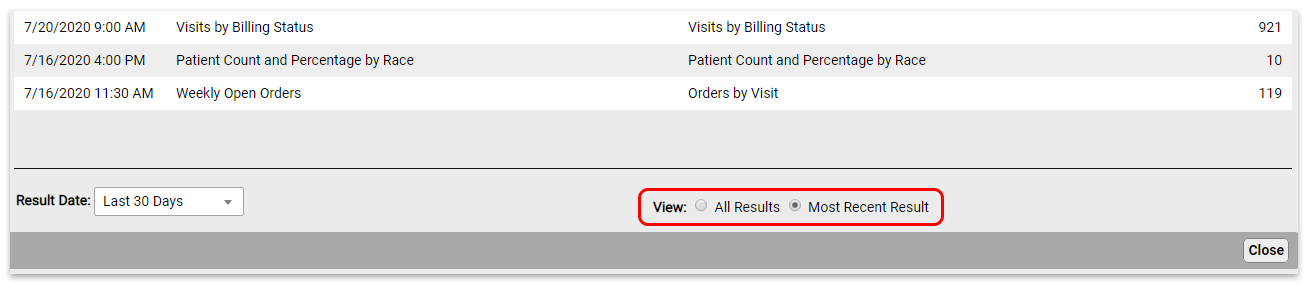
By default, you will see all report results in this view. To see only the most recent results for each scheduled report, change the “View” filter setting.
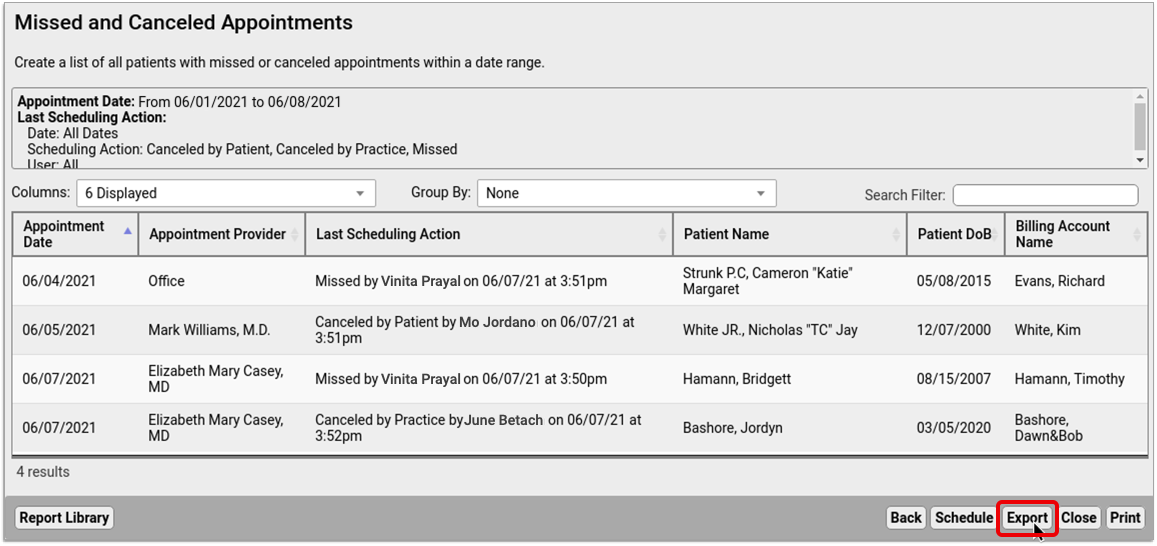
Click on the report you want to view to open the results.
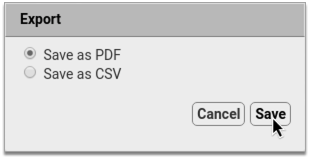
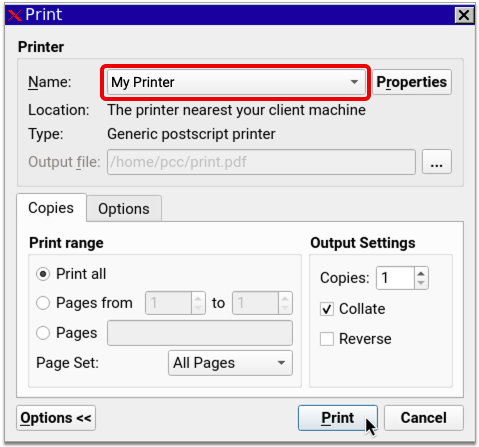
From here, you can export or print the results.
If a report has been run more than once, you can use the drop-down at the top of the report results to switch between results without going back to the Results tab.
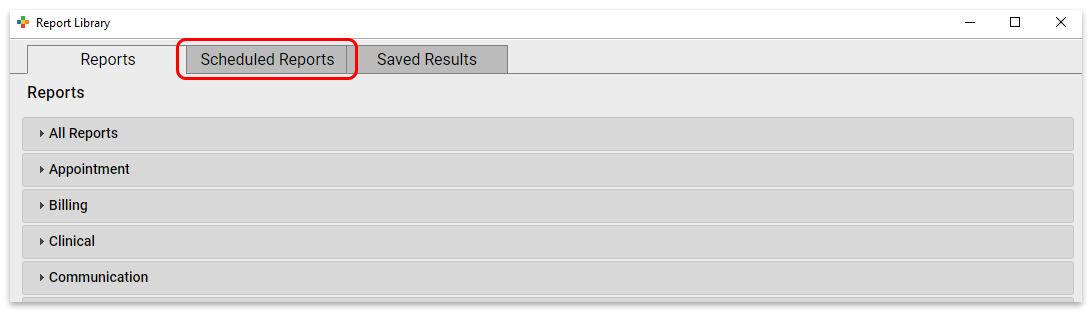
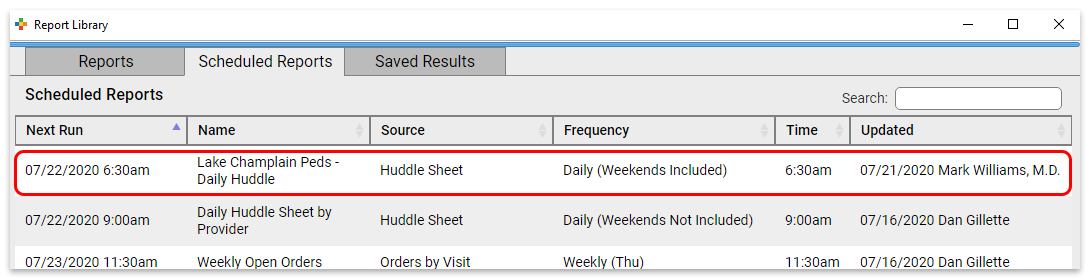
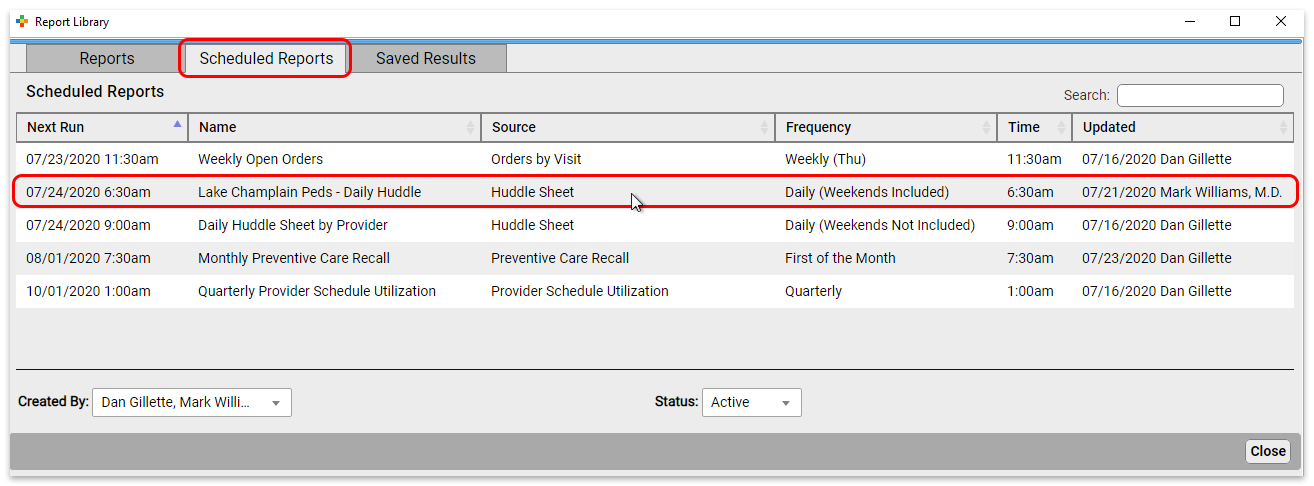
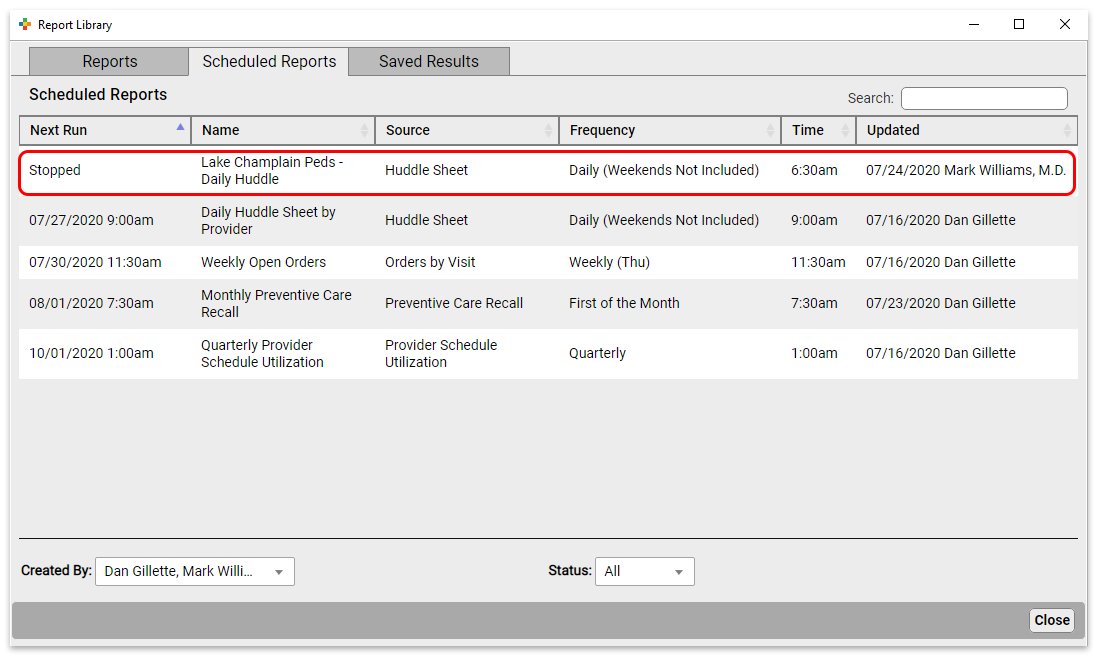
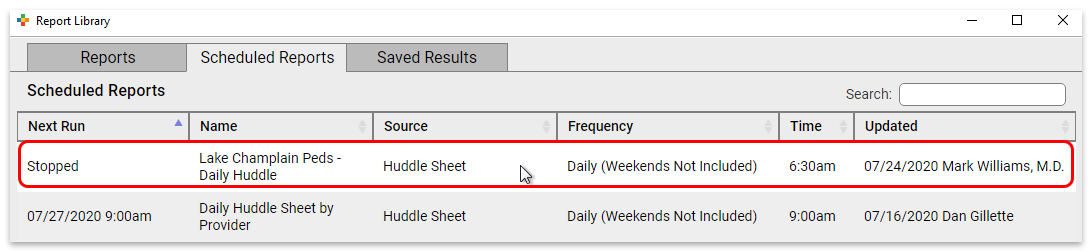
Edit Scheduled Reports
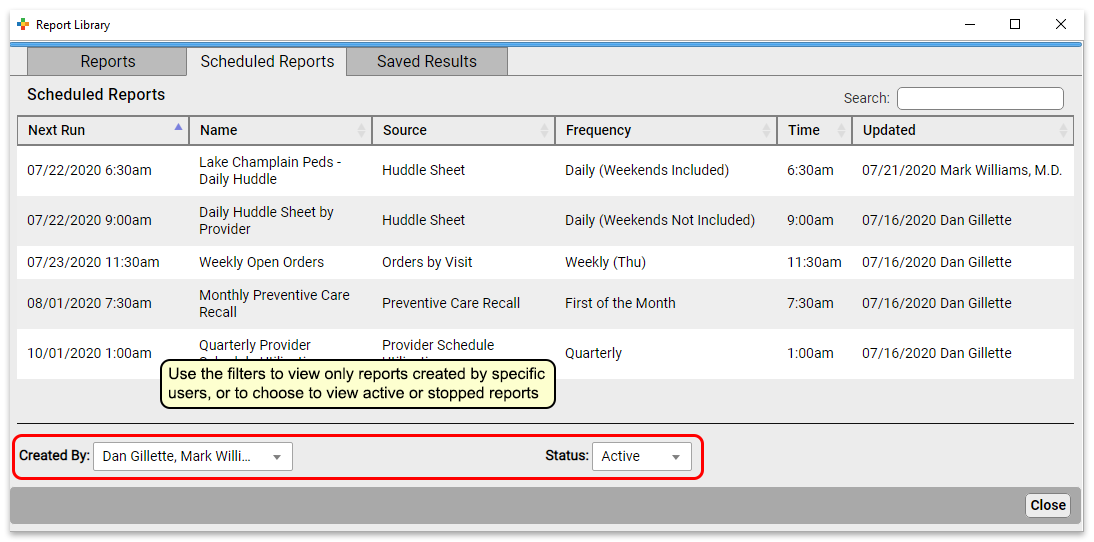
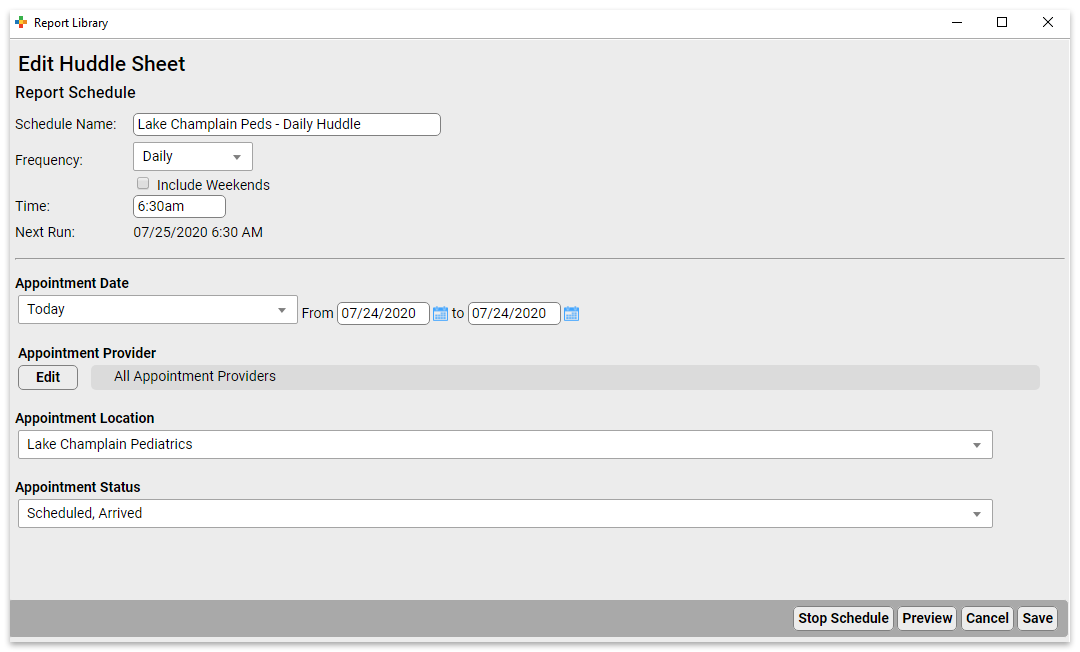
To edit a report, click the Scheduled Reports tab. Here you can see all scheduled reports.
Click a report to edit it.
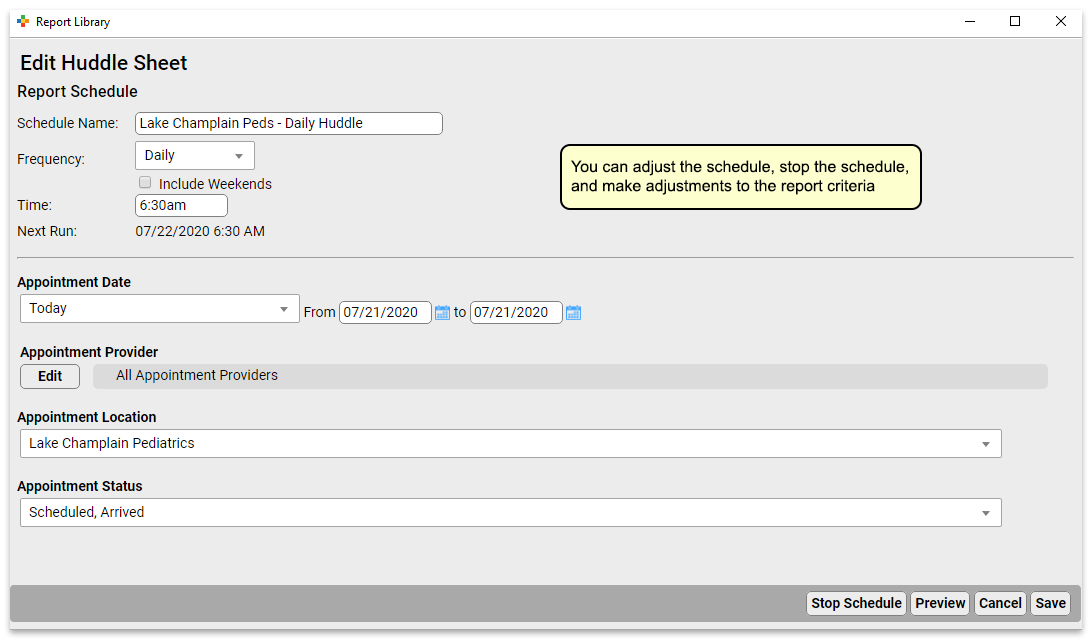
At the top of the report, you can change the schedule name, and the frequency and time the report will run. Below that, you can adjust the filter settings for all future runs of this report.
Click “Save” to save your edits. Or, if you’d like to make edits to the output formatting or to preview your report, click “Preview” to view report results.
Previewing Reports Takes Time: Previewing a report will run an instance of the report. If it’s a report that takes a long time to generate, this will take a while.
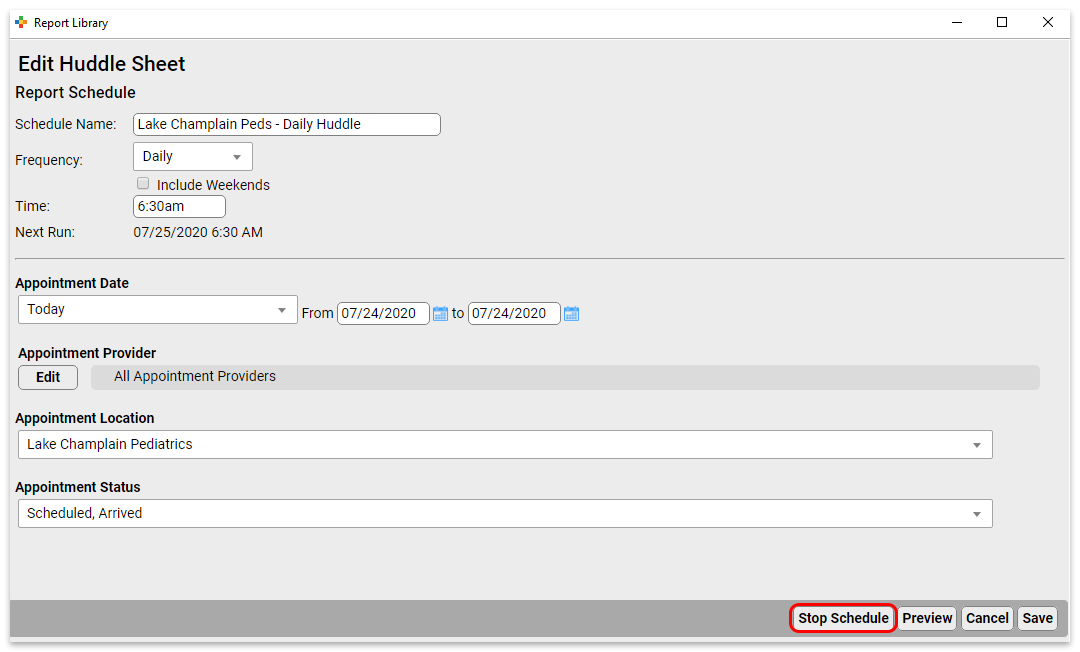
Stop and Start Reports
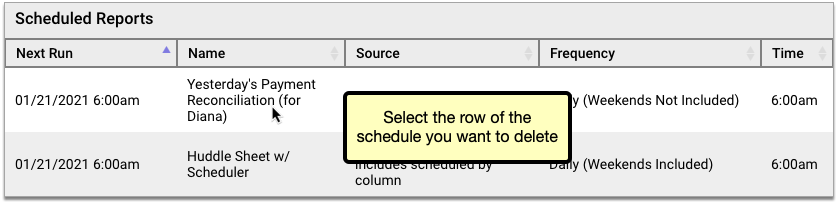
To stop a scheduled report from running, open it from the Scheduled Reports tab.
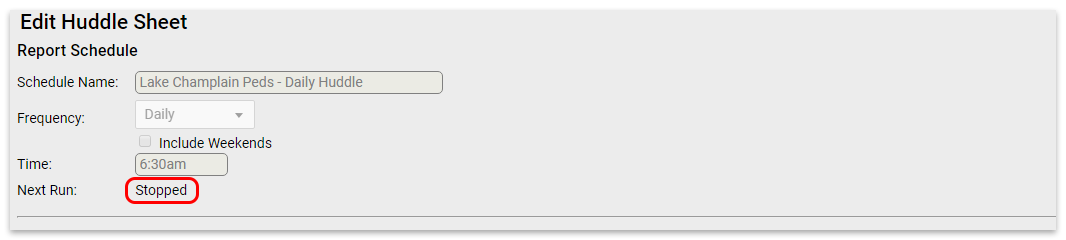
Click “Stop Schedule” to stop running the report.
Click “Save” to commit the change.
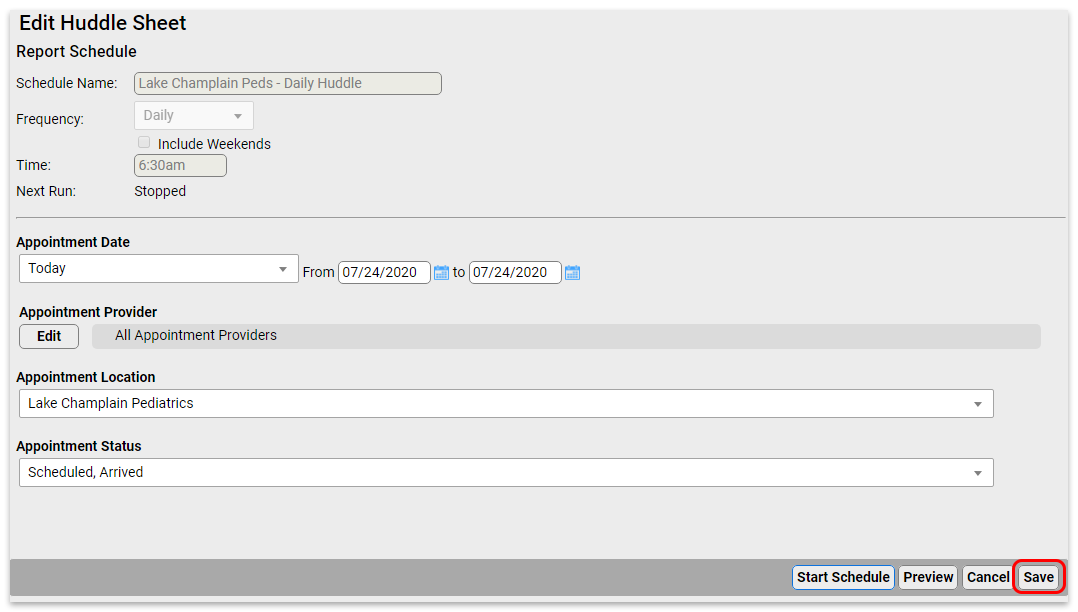
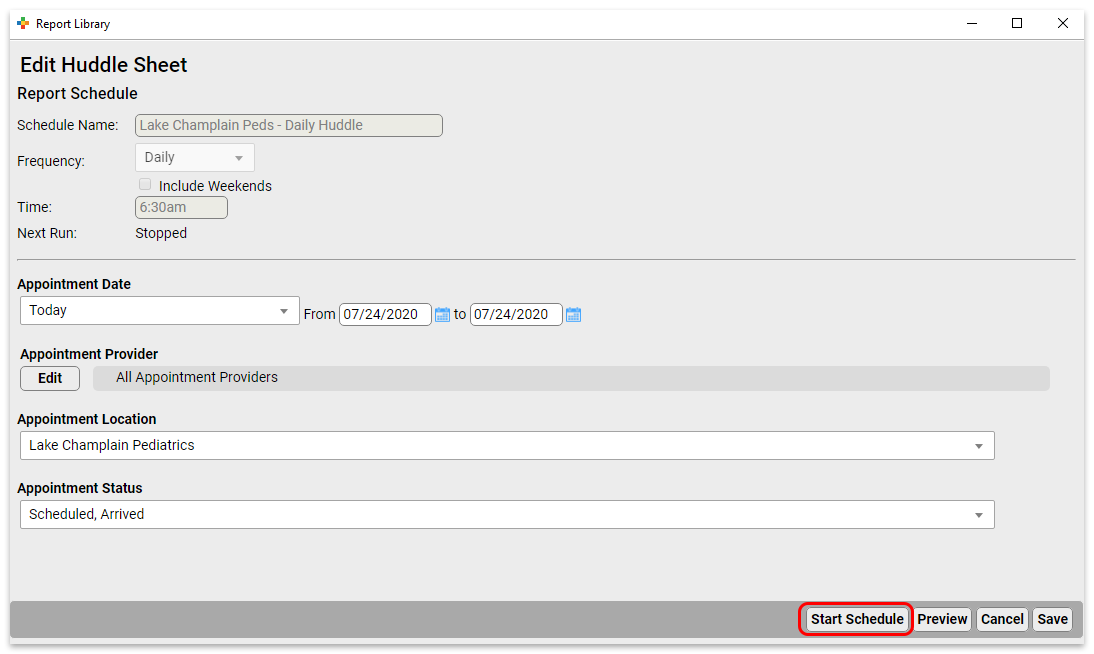
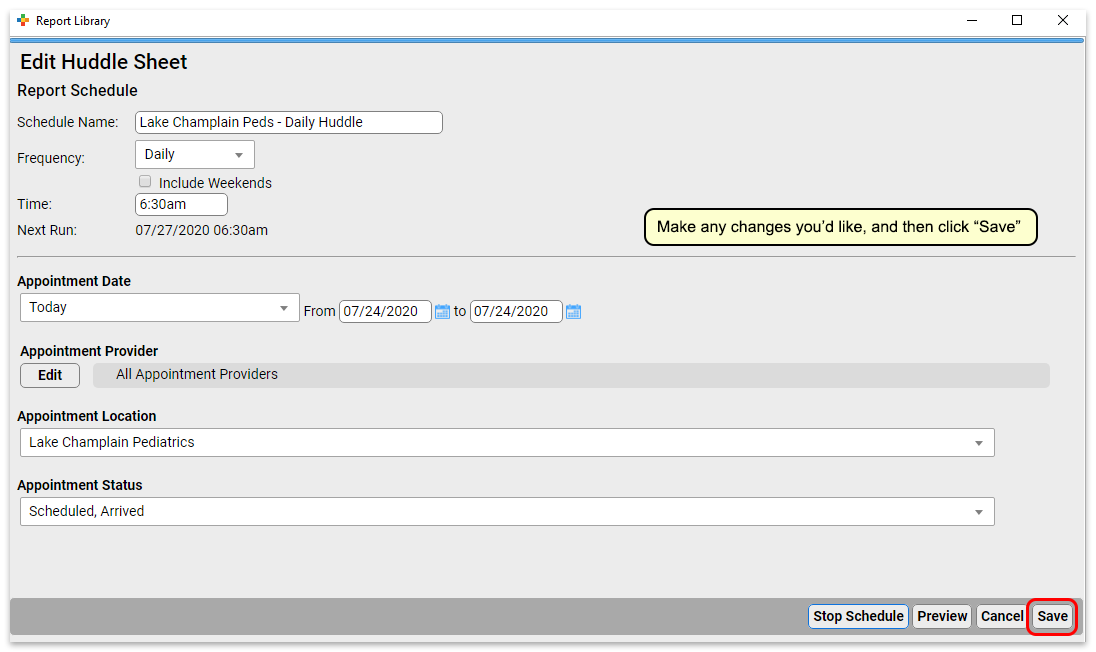
To start a previously stopped report, open it from the Scheduled Reports tab.
Click “Start Schedule” to activate the report.
Make any adjustments you want to the name, frequency, and filters, and then save (or preview and save) the report.
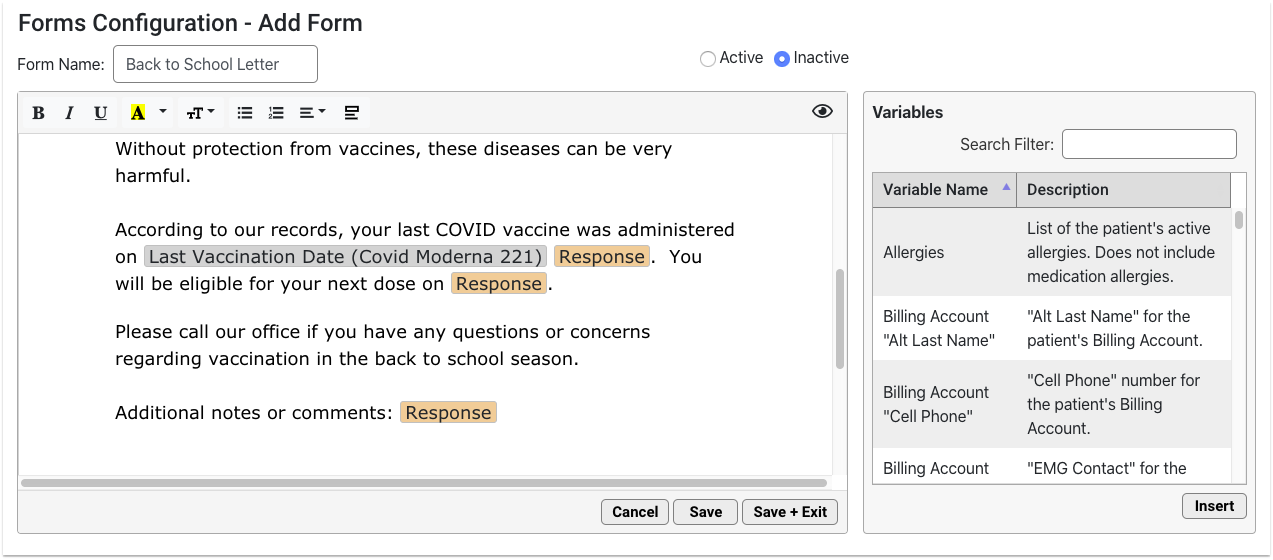
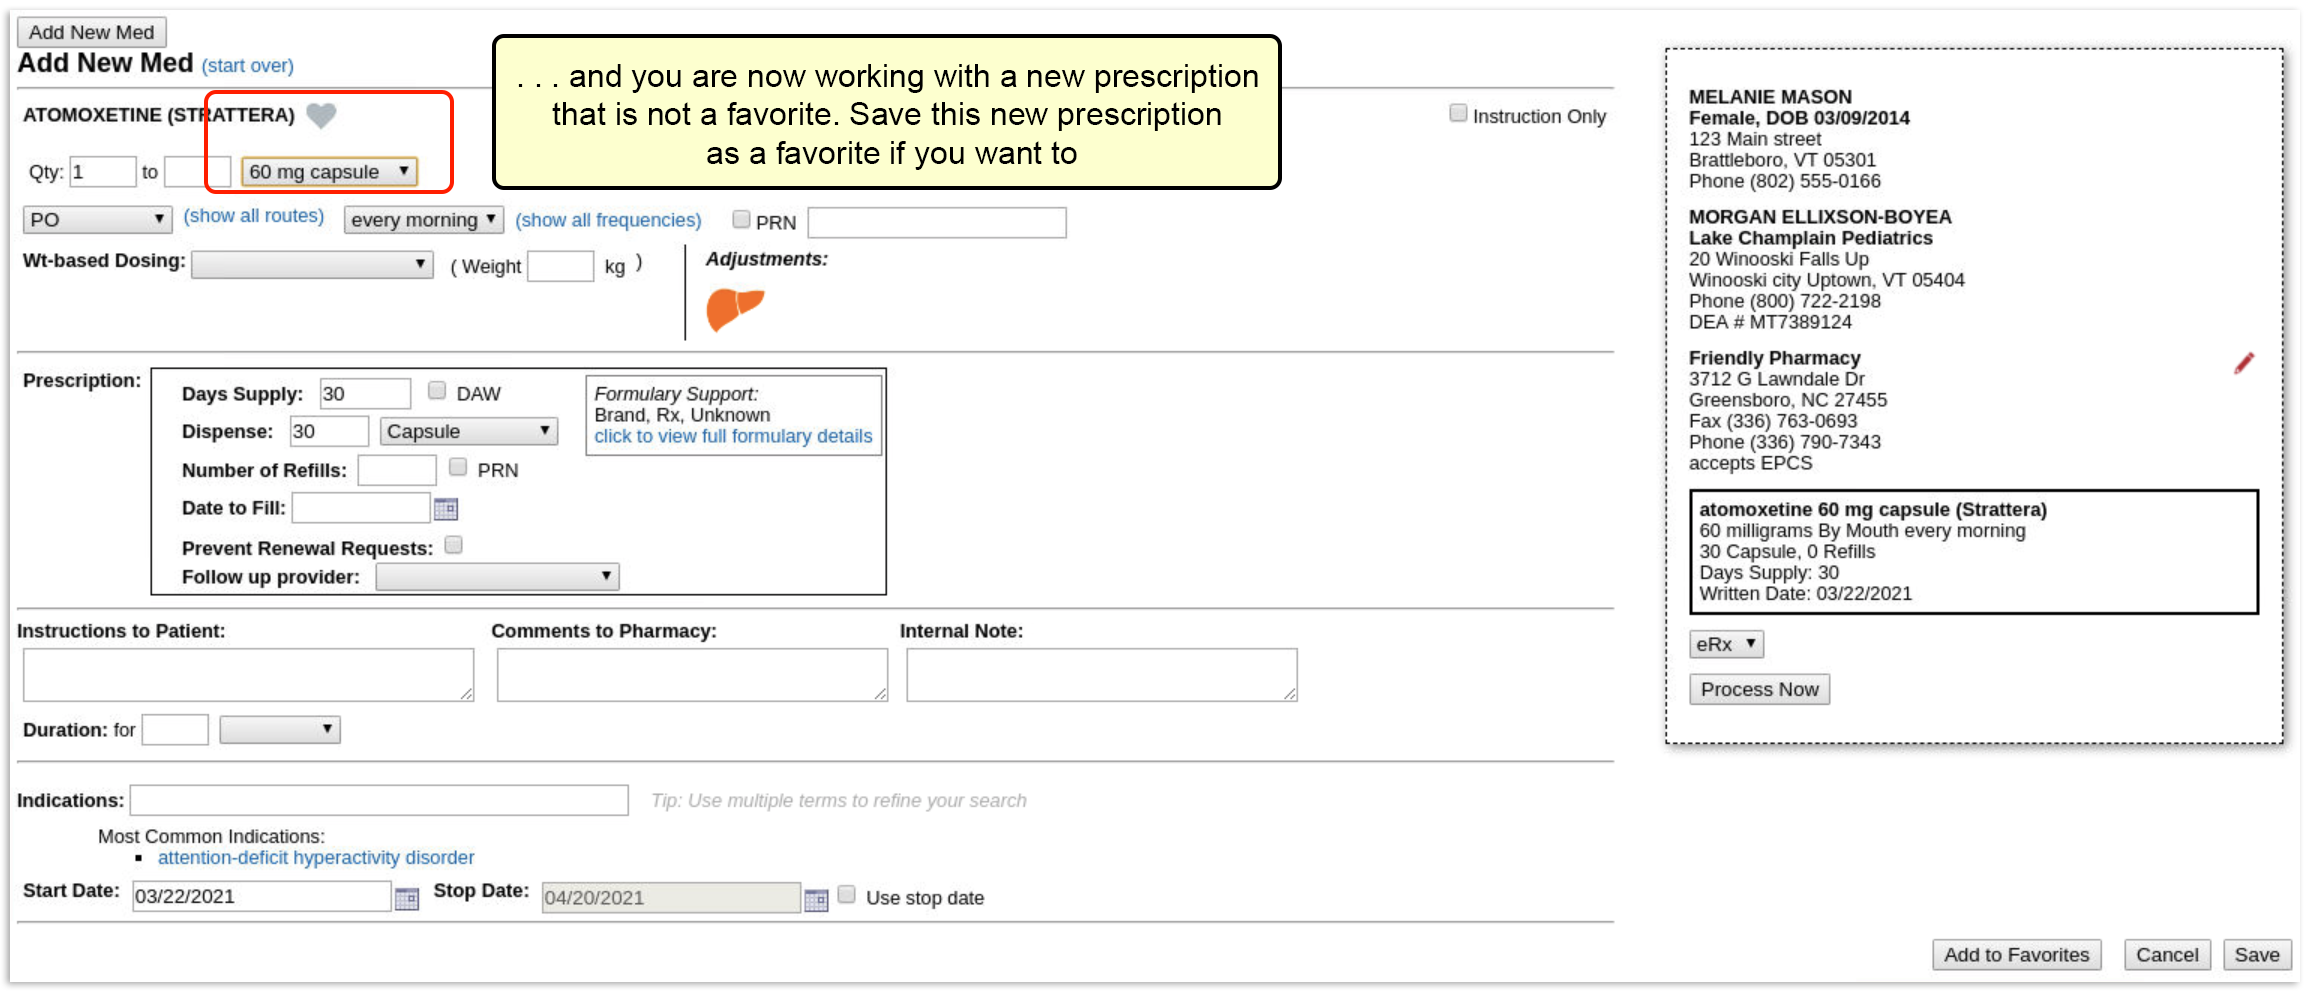
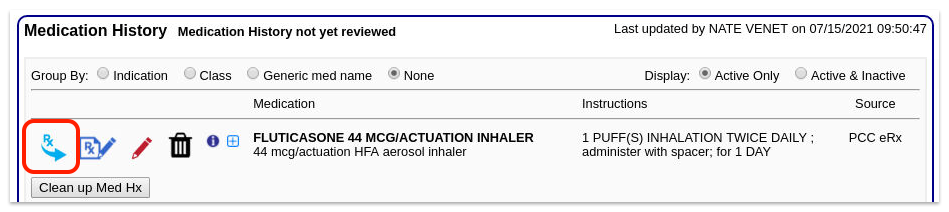
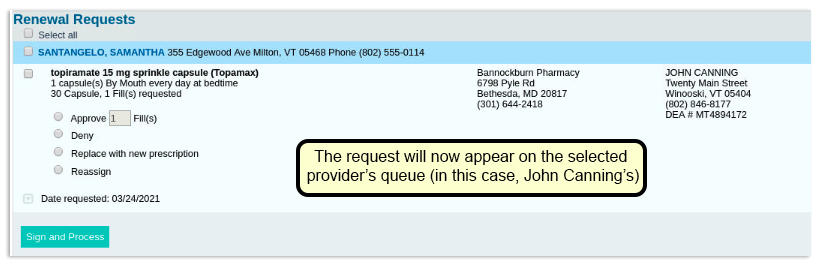
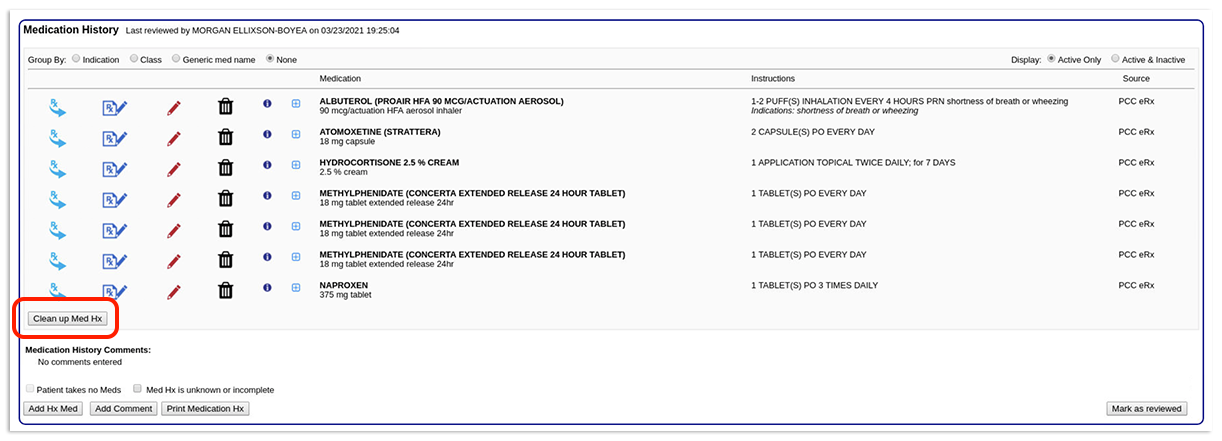
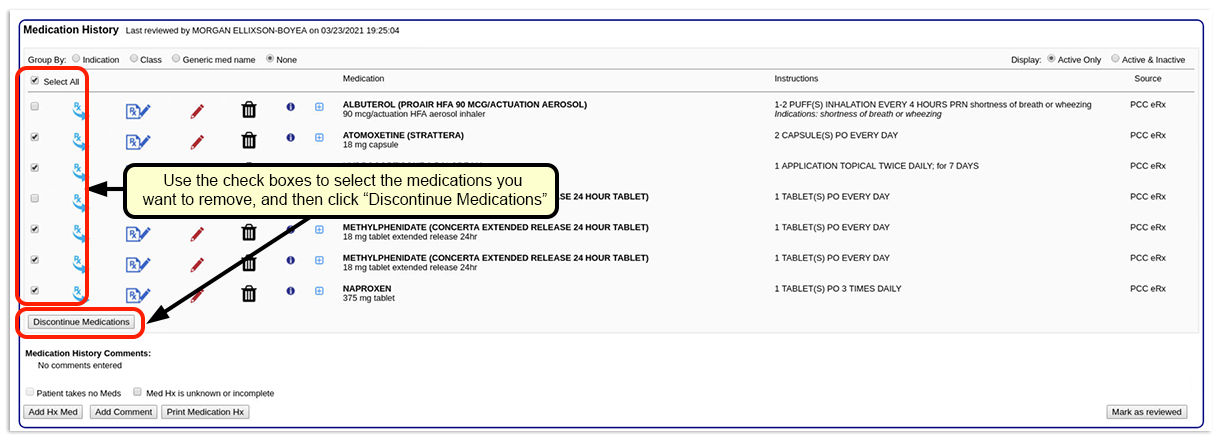
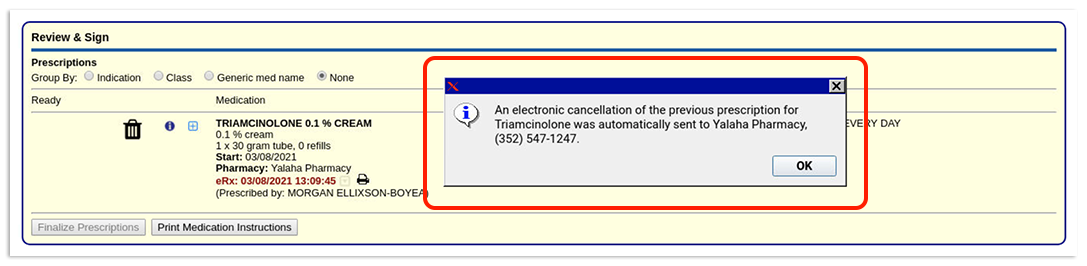
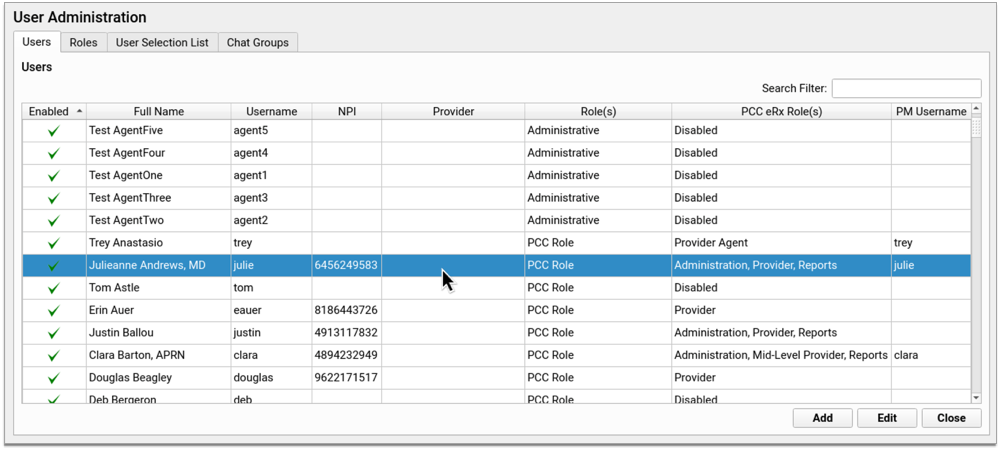
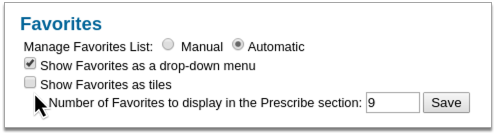
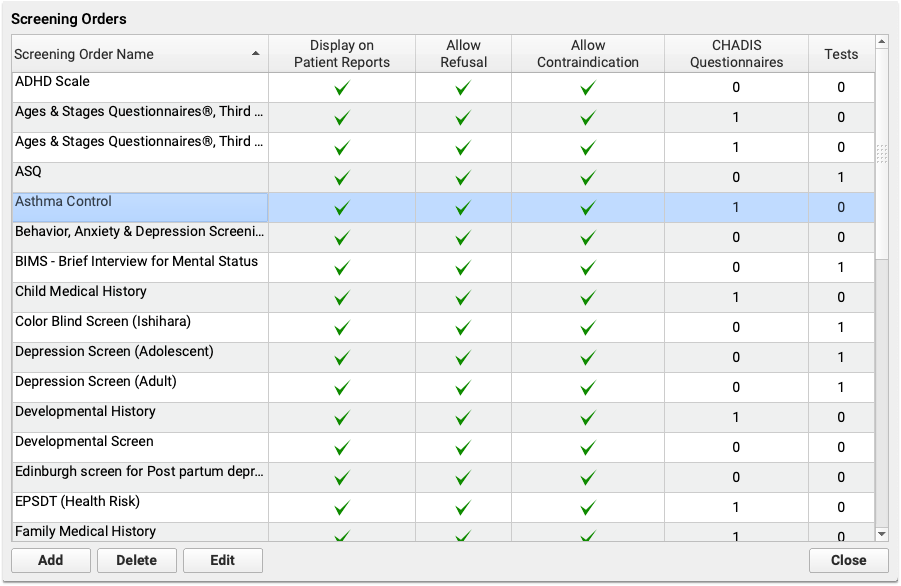
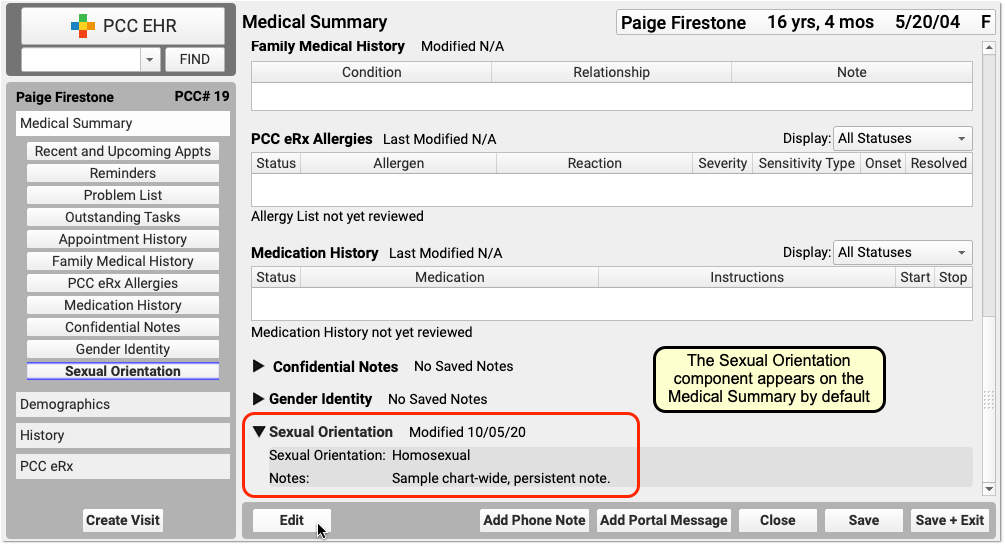
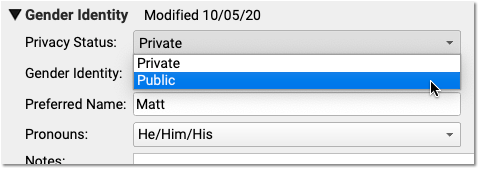
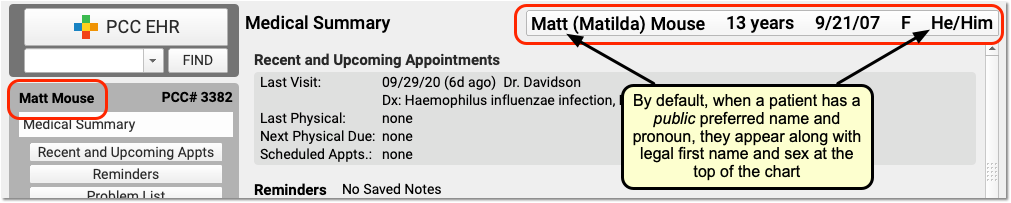
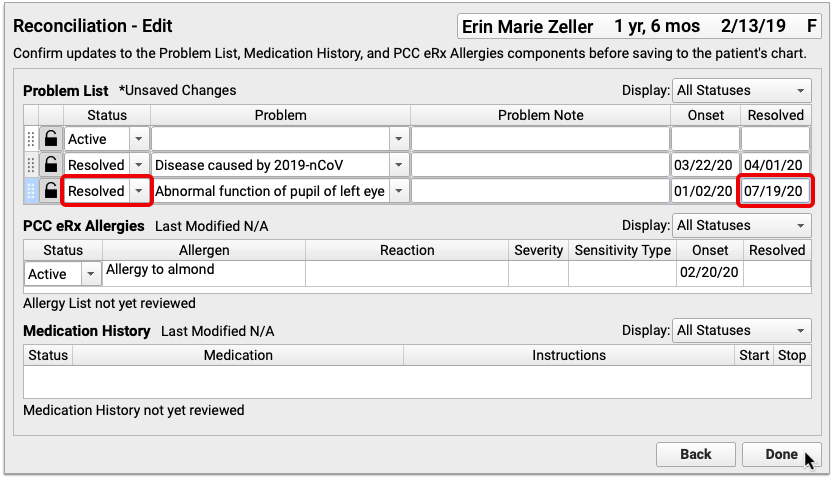
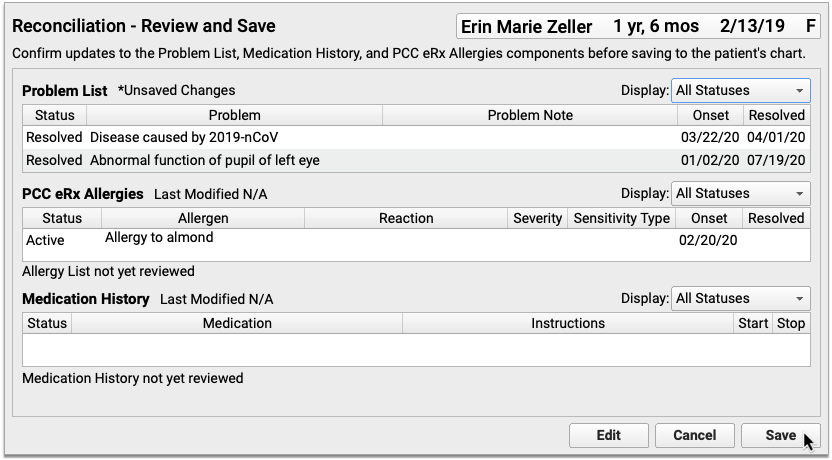
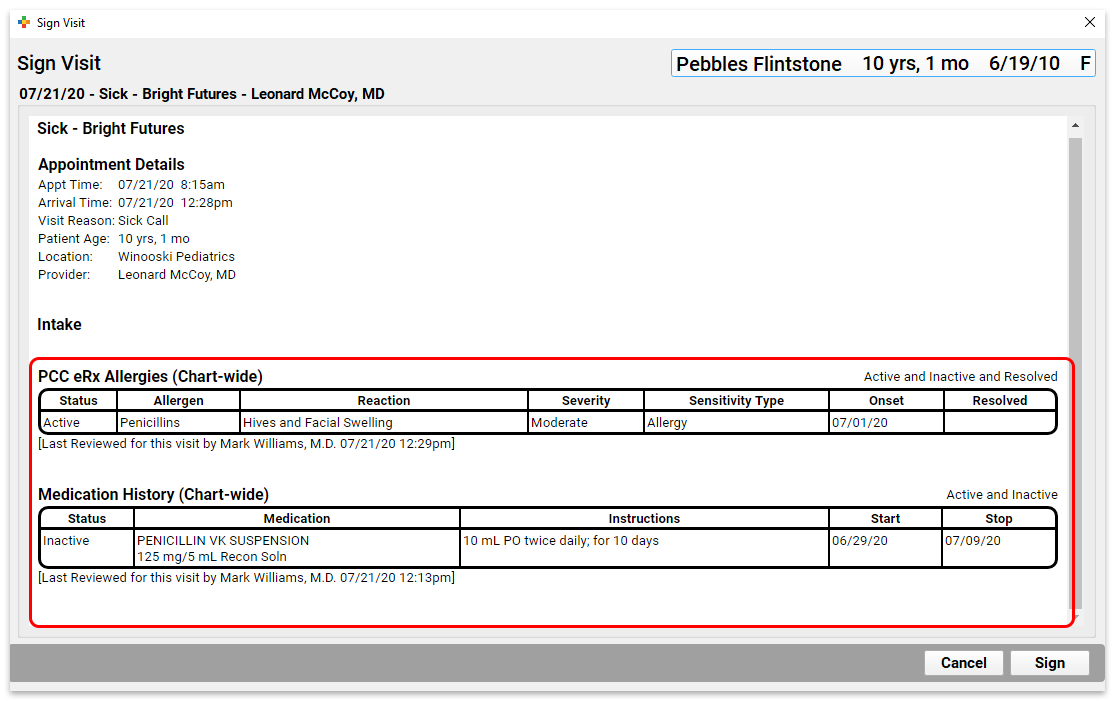
Review Medications and Allergies While Charting in PCC EHR
In PCC 8.13, you can mark a patient’s Medication History and eRx Allergies as reviewed right on the chart note in PCC EHR, avoiding the need to open PCC eRx just for this purpose.

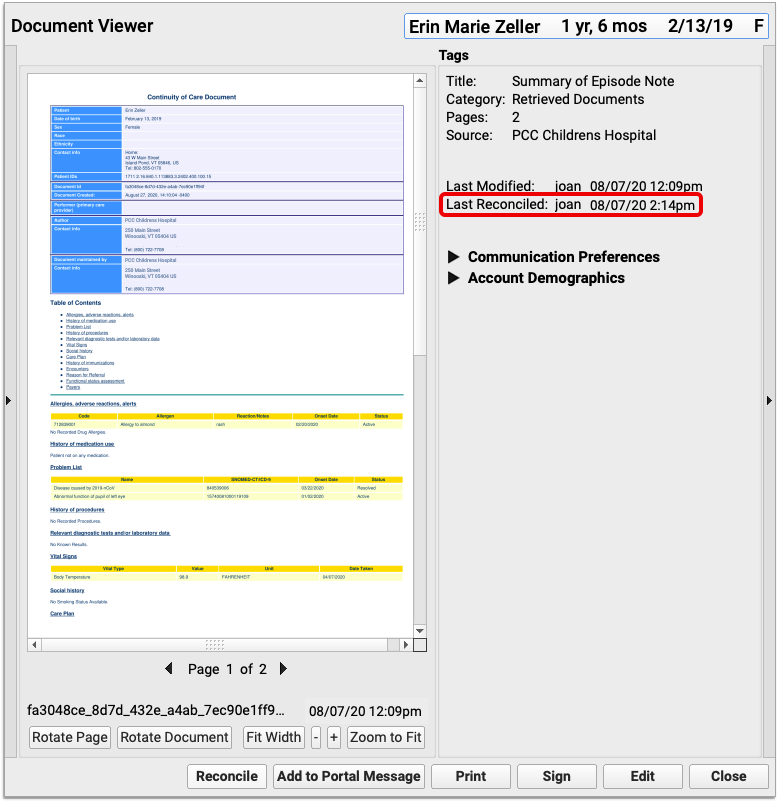
Once a component has been reviewed, the date and attribution for the most recent review will appear below the component.

The last reviewed date on the Medication History and eRx Allergies components in the patient’s chart note only updates when the patient’s medication history or eRx allergies are reviewed from within the chart note. Reviewing them from within PCC eRx will not change the reviewed date in the chart note.
If changes are made to the patient’s medications or allergies after you review them, PCC EHR will indicate that there have been changes, prompting a new review.

The final visit note and the visit history will show eRx Allergies and Medication History items that were reviewed in the context of the chart note. Allergies and medications that have not been marked as reviewed from within the chart note will not appear in the visit history.
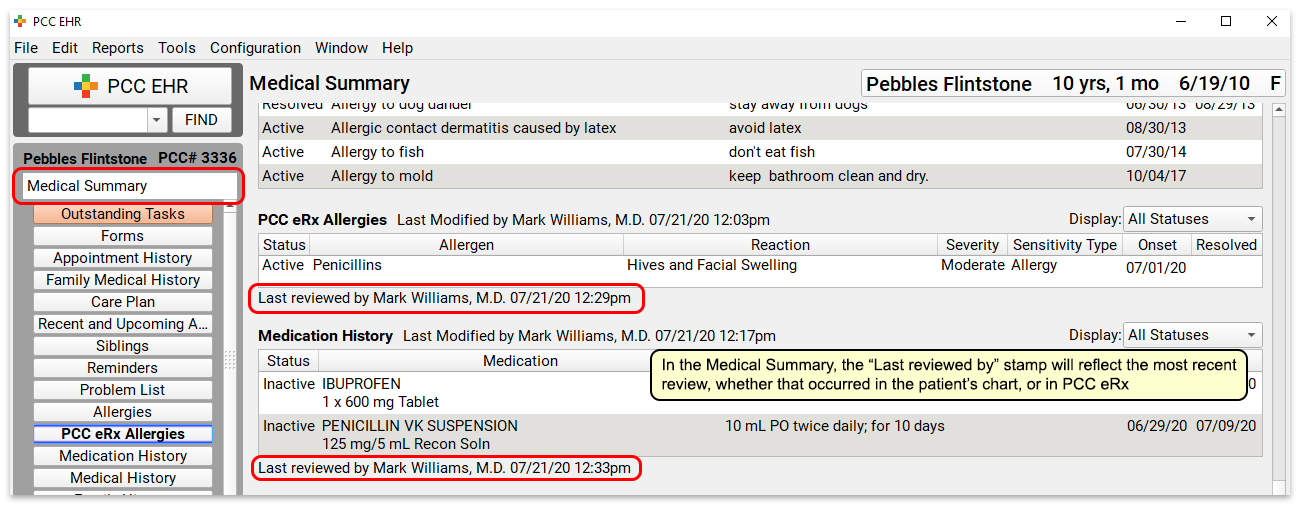
You can see all historical medications and eRx allergies, regardless of their associated visit, in the Medical Summary. The last reviewed date in the Medical Summary reflects the latest review, whether it occurred in PCC eRx or in the patient’s chart note.
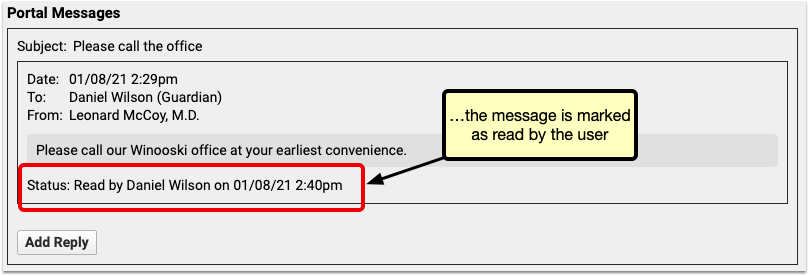
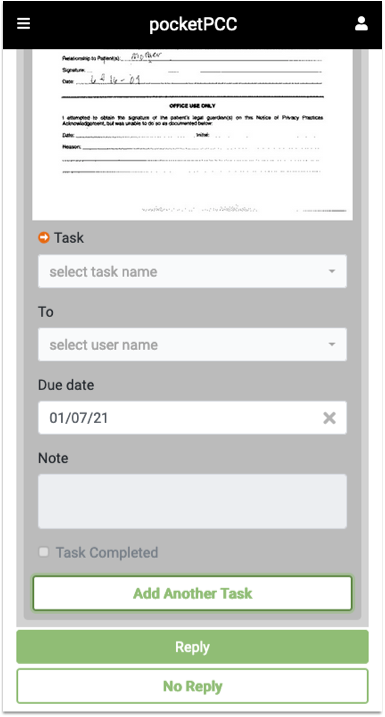
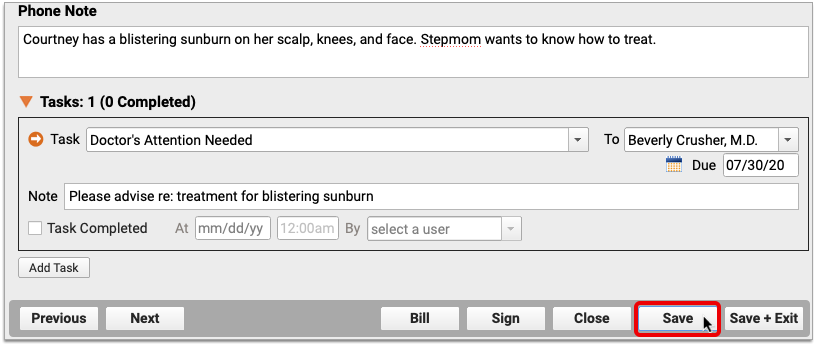
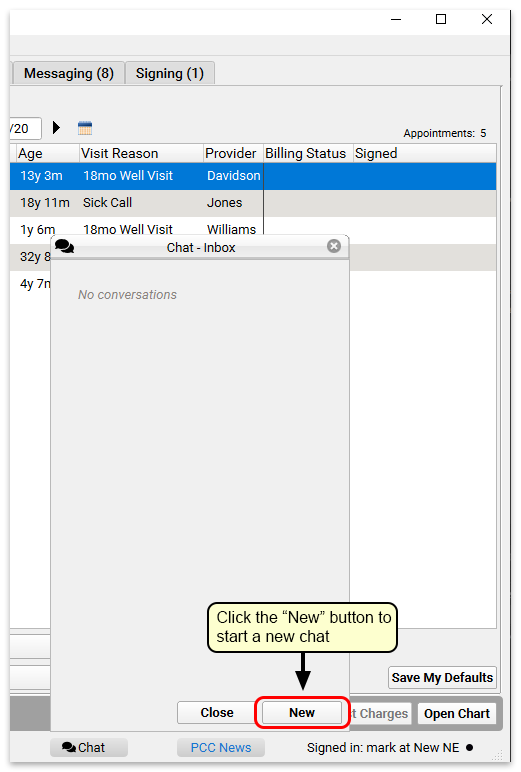
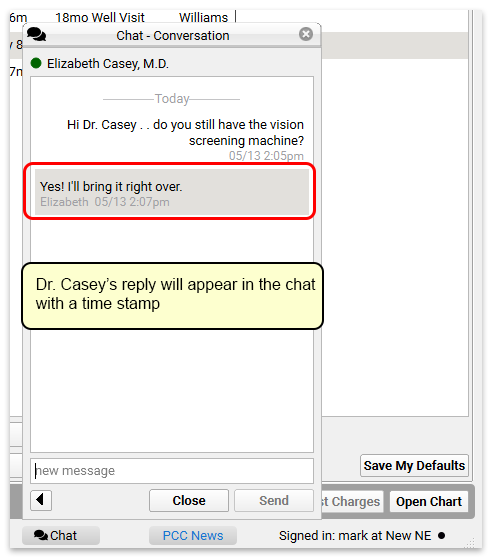
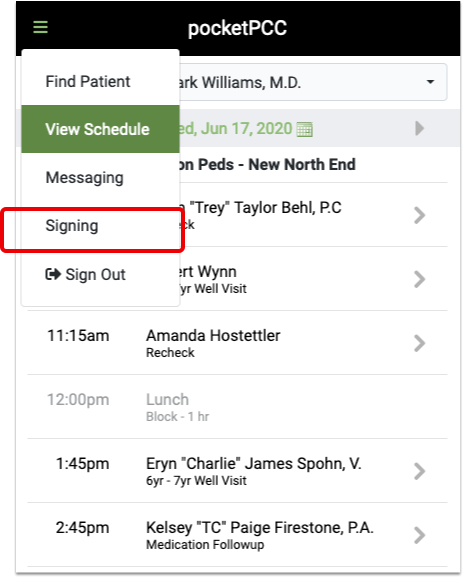
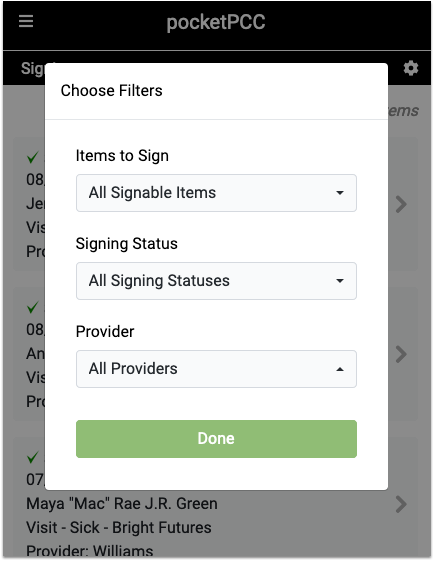
Sign Visit Chart Notes, Phone Notes, and Documents in pocketPCC
PocketPCC includes the option to sign visits, phone notes, and documents, so you can complete your signing tasks conveniently, from anywhere.
Sign in to pocketPCC from your phone or other mobile device. If your PCC EHR user account has permission to sign, even with a co-signer, you’ll have the option to sign under pocketPCC’s menu.
The signing window lists all items in the signing queue. Green checks indicate the item has been signed, and the orange icon indicates that a co-signer is needed.
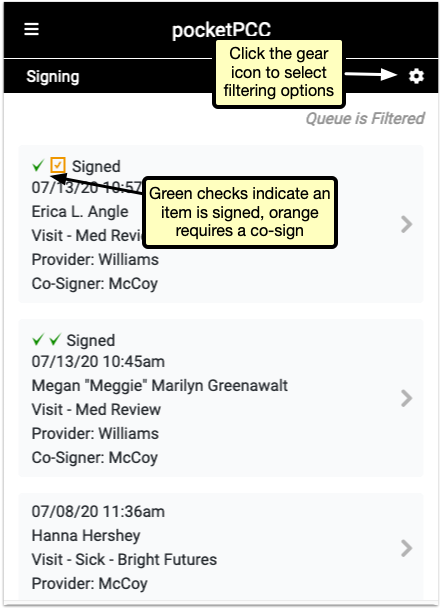
Click the gear icon in the upper right to open the filter options. You can limit by the type of item, the current signed status, or by provider. Select filters and click “Done” to refresh the list to match your selection.
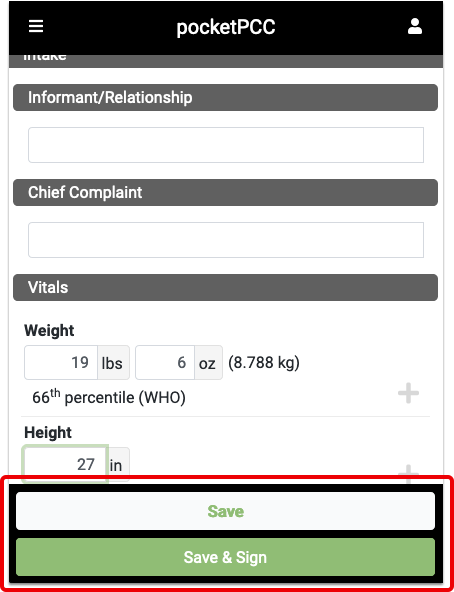
Select a signable item to open the visit, note, or document for you to review. At the bottom of the window, after you’ve reviewed the item, you can sign or co-sign with a single click.
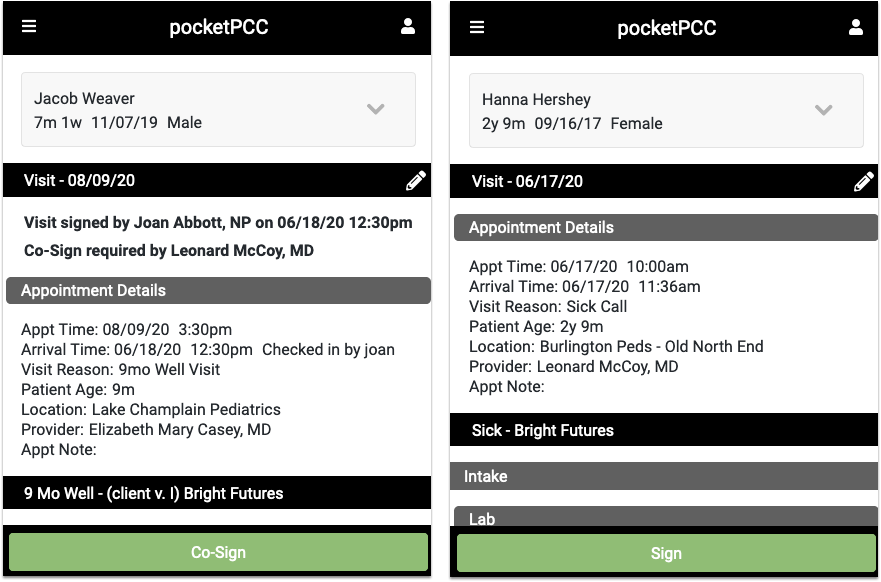
While reviewing a visit, document, or phone note, you can click any of the edit buttons and make additional notes, assign tasks, or any other edit to the item. Then, you’ll have the option to simply save your changes, or both save and sign the item in one click by selecting “Save & Sign”.
When you’ve saved, or saved and signed, you’ll be returned to the signing queue, where you can select another item to sign.
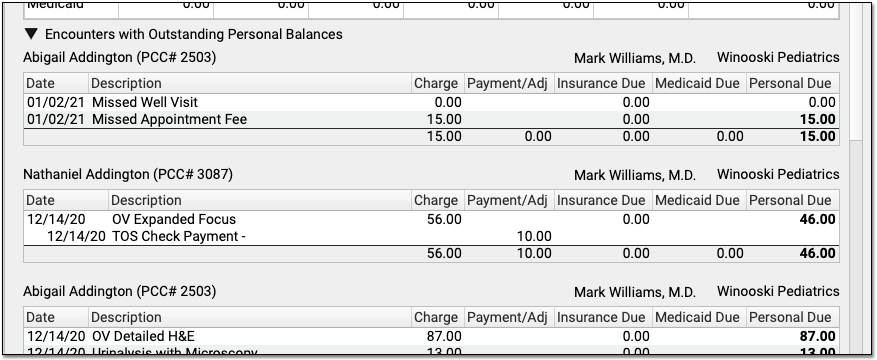
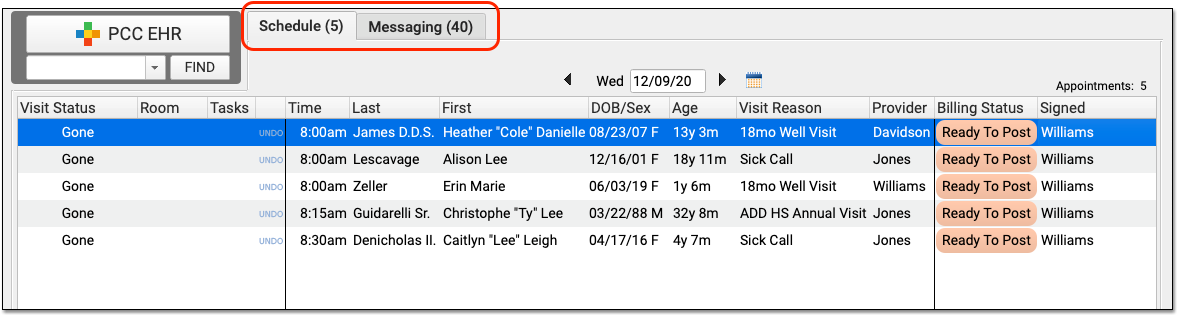
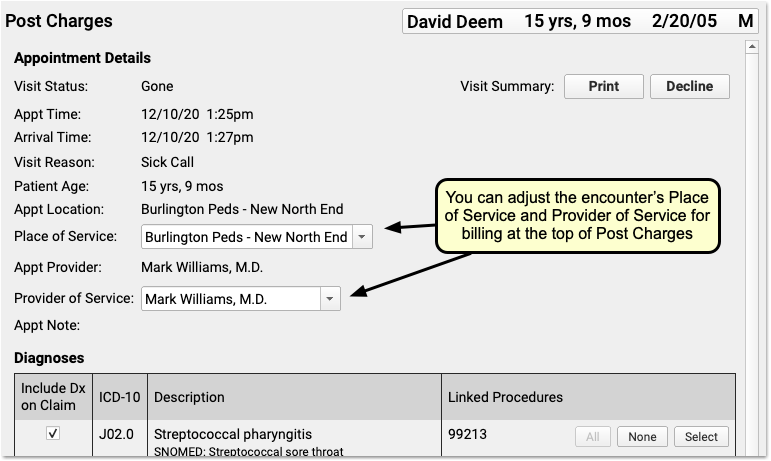
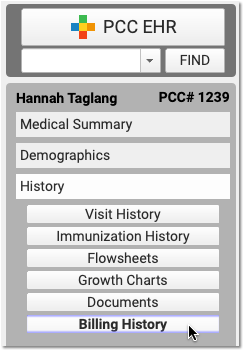
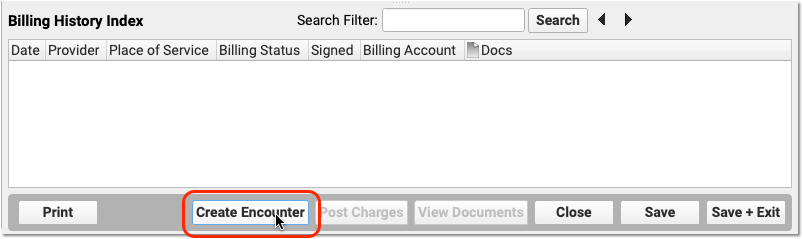
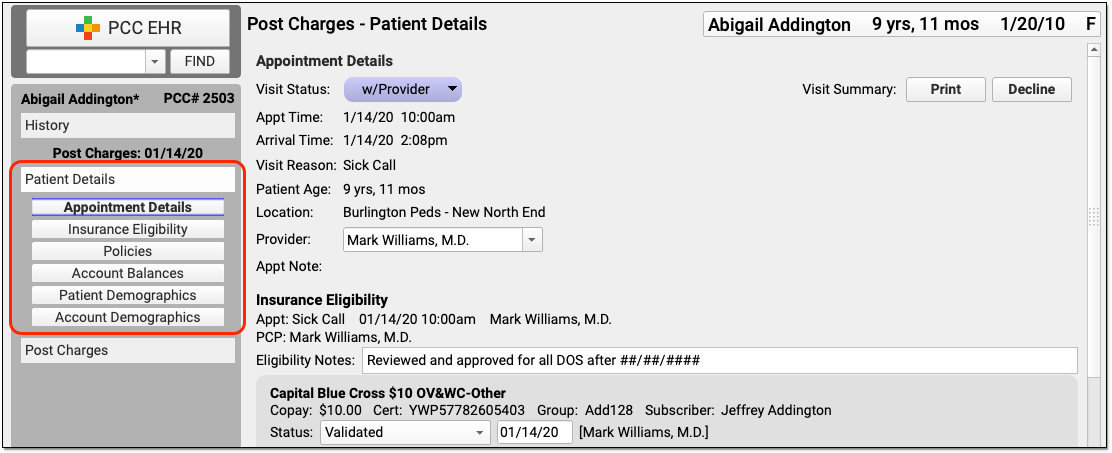
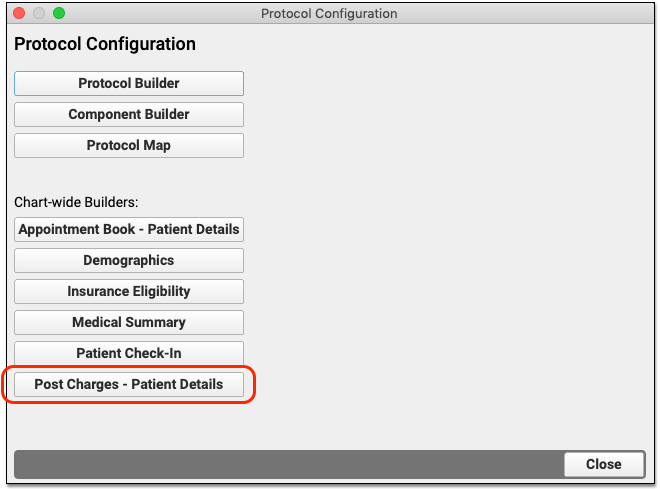
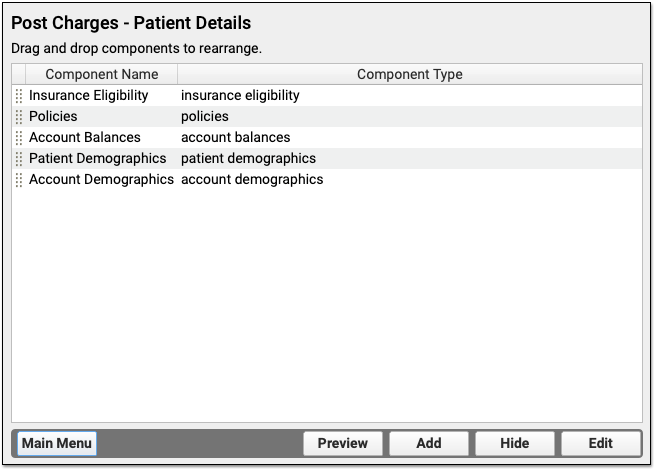
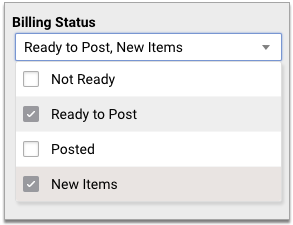
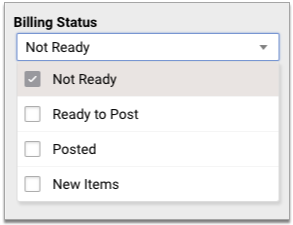
View and Work With a Patient’s Billing History in the Chart
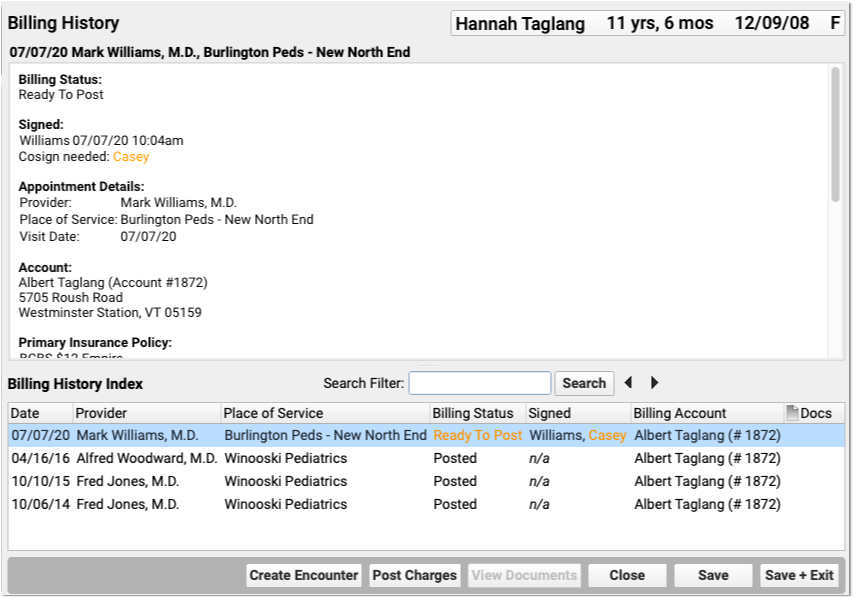
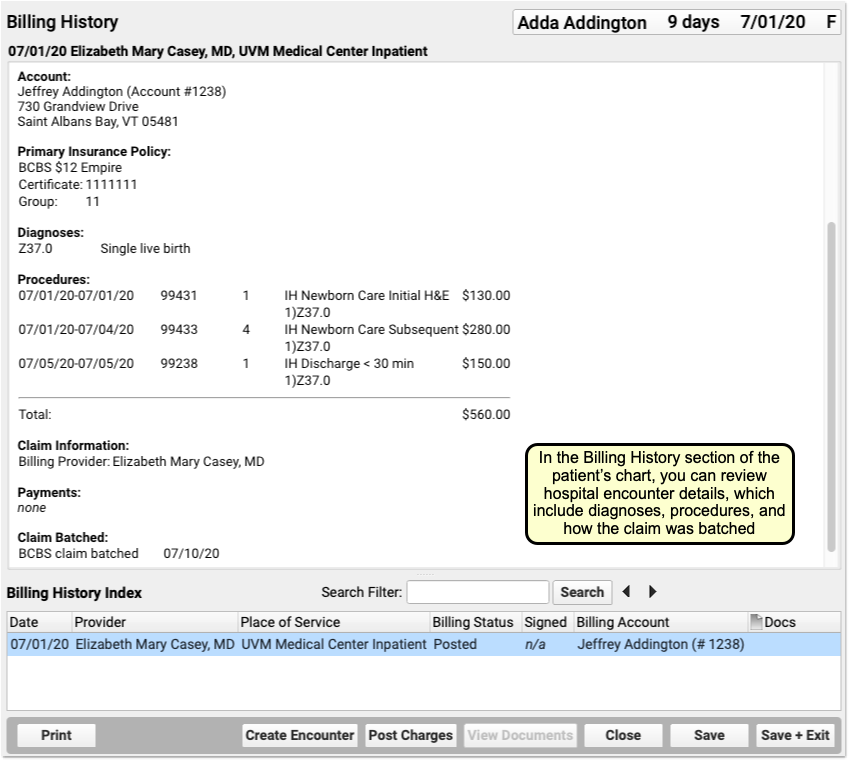
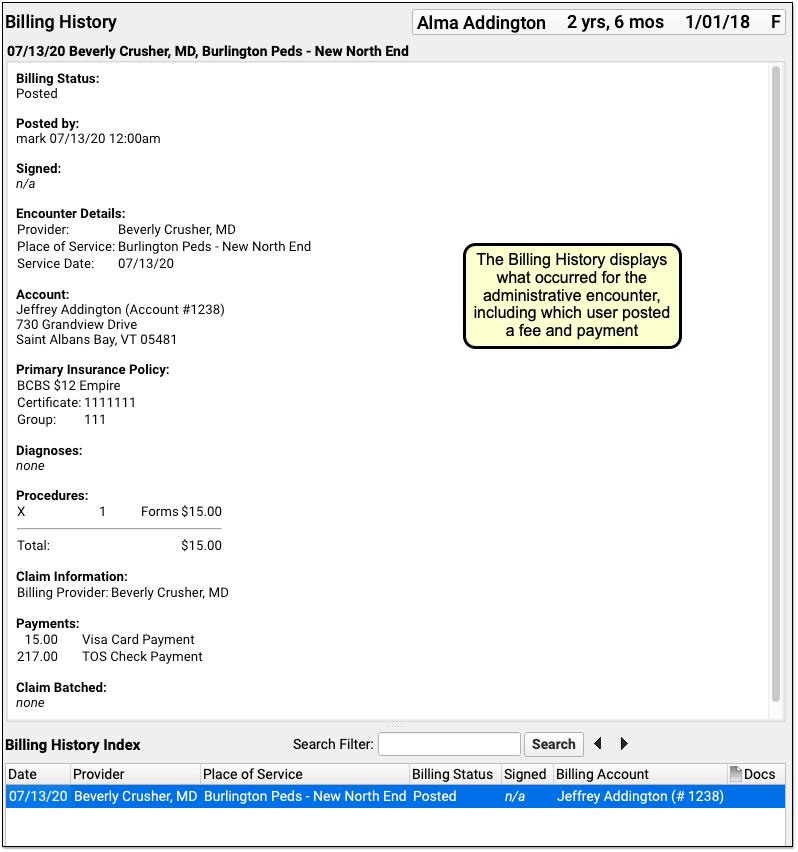
In PCC 8.13, you can review all of a patient’s billable encounters in the Billing History section of the chart.
Office visits, telemedicine encounters, phone notes, portal messages, hospital charges, and administrative encounters that have been billed or may be billable appear in the index at the bottom. Appointments appear when the chart note is “arrived” or the patient is checked in, phone notes and portal messages appear if a clinician marks them as “Ready for Billing”. Hospital and administrative encounters appear after a user creates an encounter and posts the charges.
Click on an encounter in the index to see details in the window above.

You can review encounter and charge details, such as the date the charges were posted and how a claim was batched.
If there is an encounter that has the Ready to Post status, or an encounter with new items to post, you can work with those encounters on this screen. Select an encounter and click “Post Charges” (or double-click on an encounter) to open up Post Charges.

You can also click “Create Encounter” to post charges of any kind.
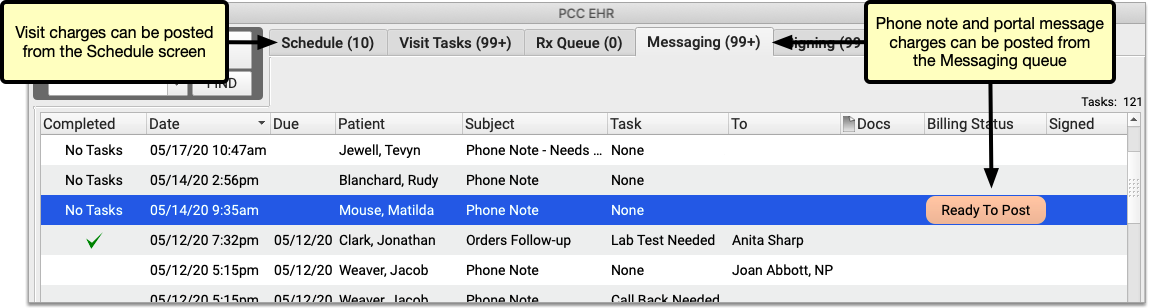
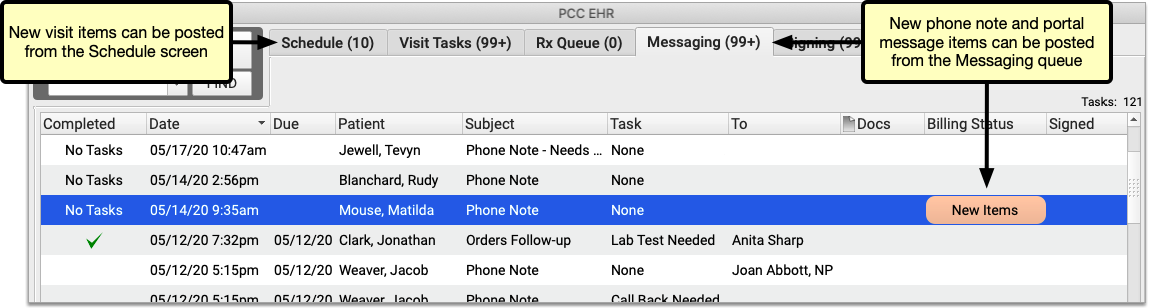
Post Any Type of Charge: You can post charges for appointments directly from the Schedule screen and post charges for phone notes and portal messages from the Messaging queue. You can also post those charges from the Billing History in the patient’s chart, and you can create encounters to post other types of charges, such as hospital visits or administrative charges.
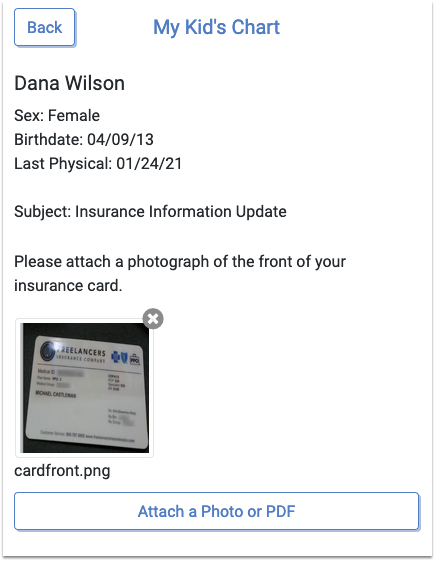
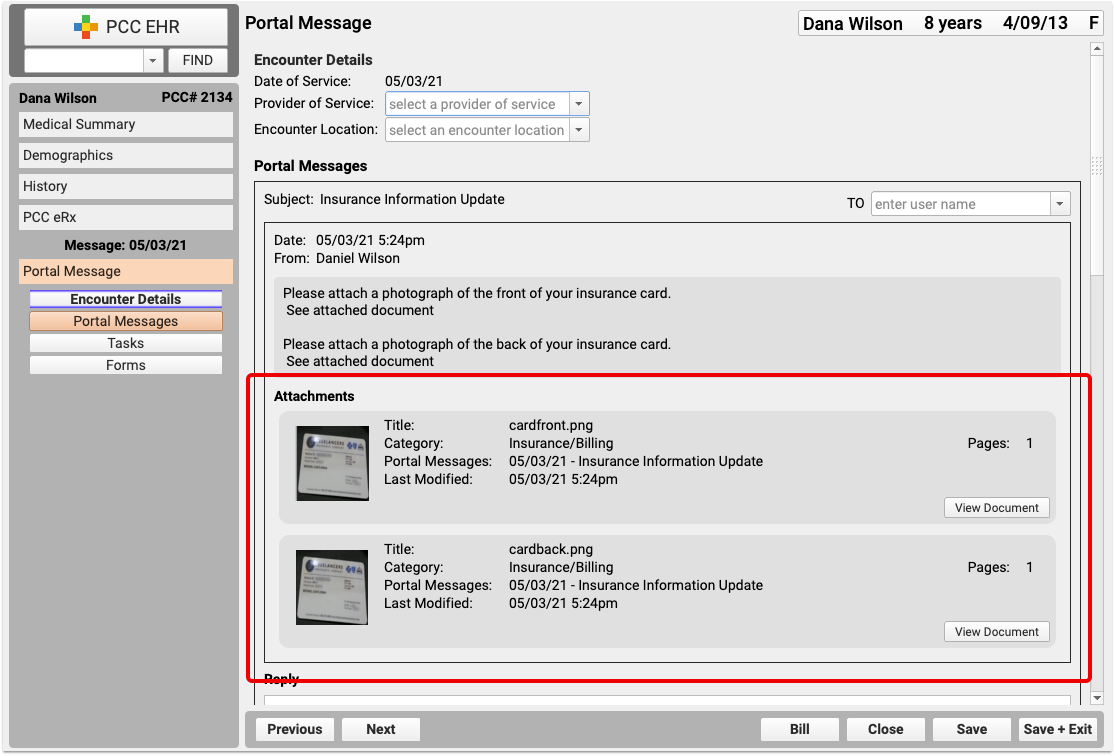
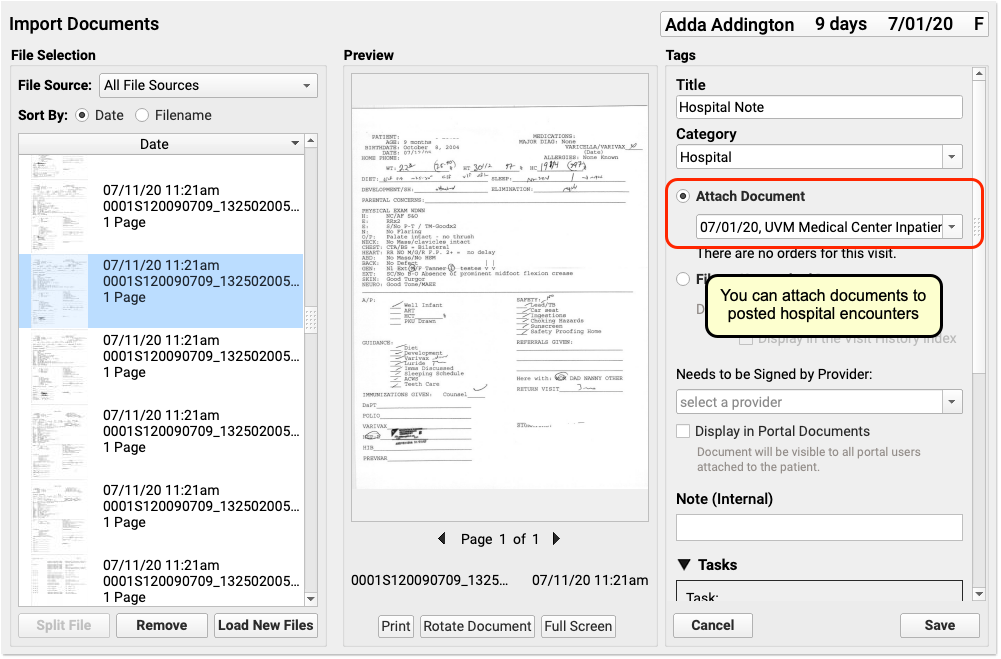
Attached Documents: You can review any documents attached to an encounter on the Billing History section of the chart. For example, if a user attached a scanned insurance card, a hospital note, or other document to an encounter, you can double-click to open it.
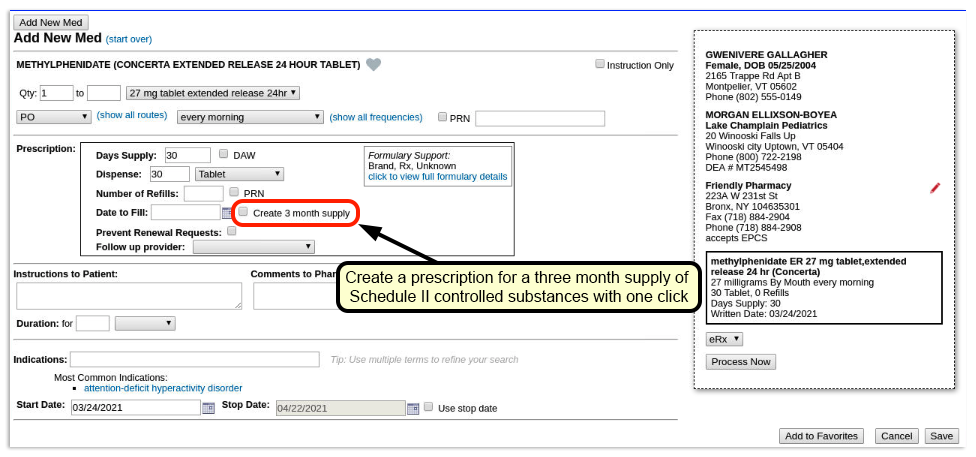
Post Hospital Charges in PCC EHR
If your practice bills for hospital visits, you can now post the charges in PCC EHR and queue up a claim.
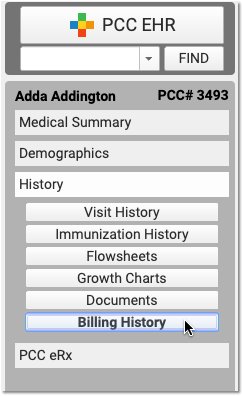
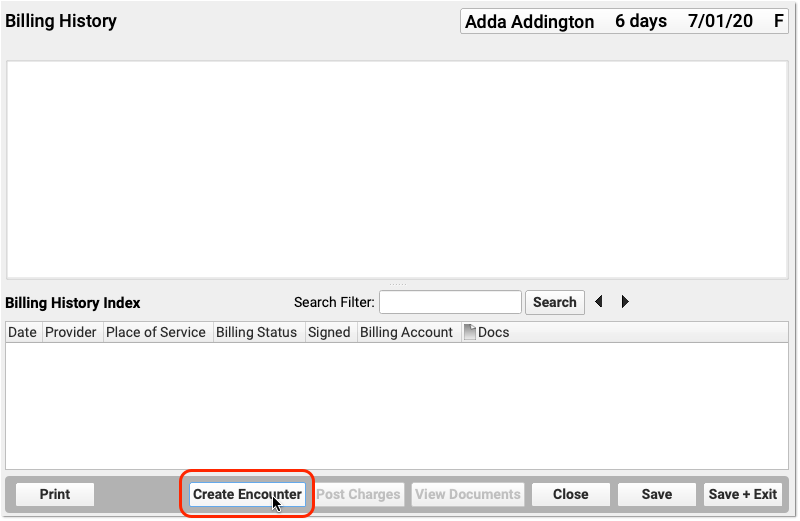
Open the Patient’s Chart and Navigate to Their Billing History
When you are ready to post hospital charges for a patient, open their billing history and create a new encounter.
Select the Provider, Location, and Service Dates
PCC EHR will create a blank Post Charges encounter for billing. In the Encounter Details section, select a provider, a hospital location, and enter dates of service.
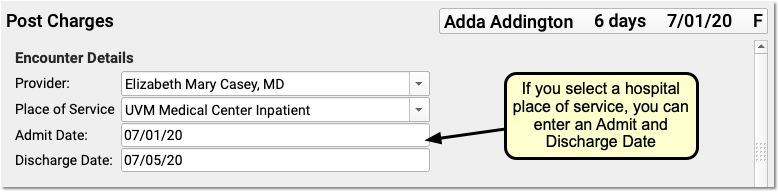
If you select an inpatient hospital location, PCC EHR will display Admit and Discharge fields for the encounter instead of a Service Date field. If the hospital visit was only a single day, you can leave the discharge field blank or enter the same date in both fields.
What If I Don't See the Location I Need, or I Don't See the Admit and Discharge Date Fields?: Your practice can customize your location list and specify which locations are for inpatient visits. Contact PCC Support for help customizing your billing locations.
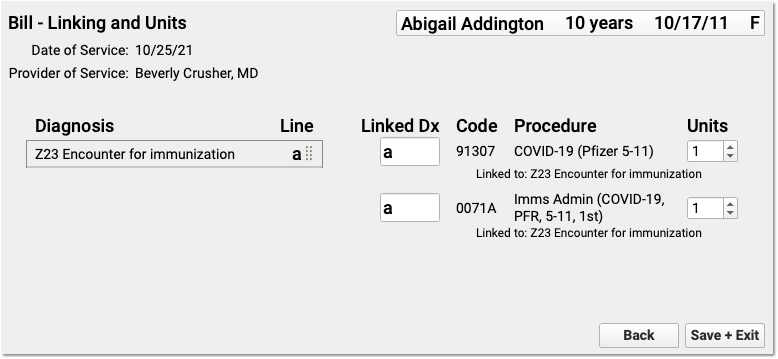
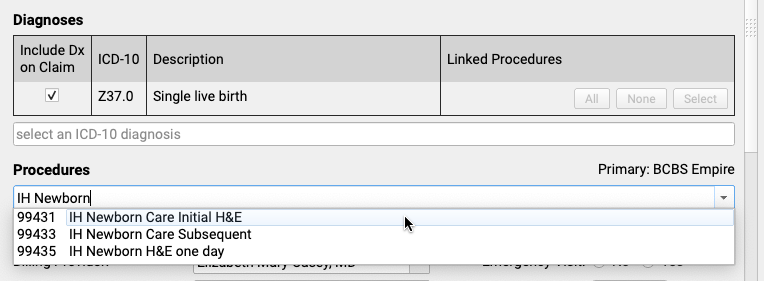
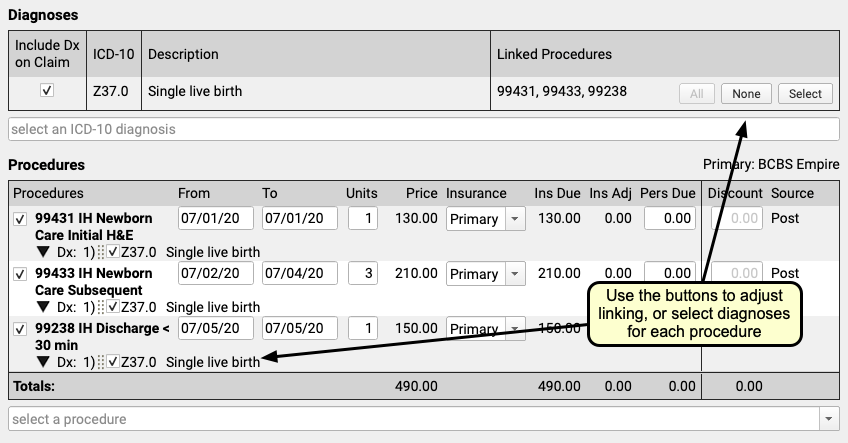
Select Hospital Diagnoses and Procedures
Use the Diagnoses and Procedures components to search for and select charge information for the hospital encounter.
You can optionally enter from and to dates for procedures, or simply use a single date in the From field. You can set units, select insurance or self pay, adjust the personal due amount, and optionally add a discount. If a procedure has no defined price at your practice, you can edit the price field.
Remember to link the appropriate diagnoses with each procedure using the tools in either the Diagnoses or Procedures component.
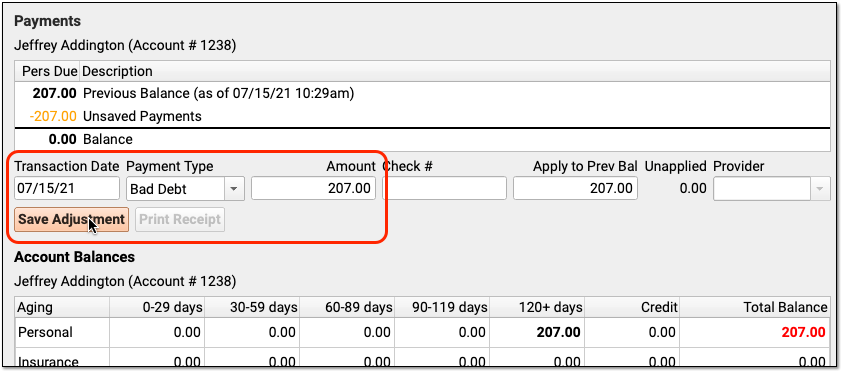
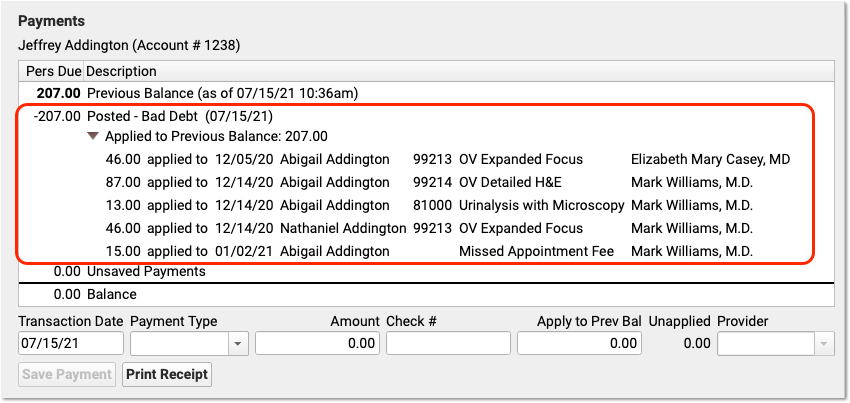
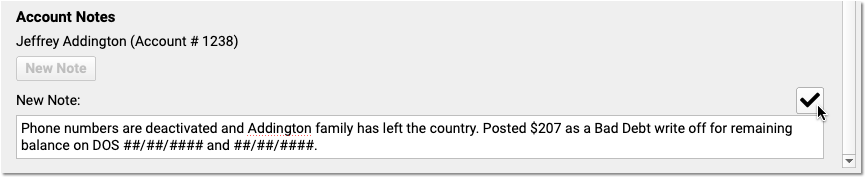
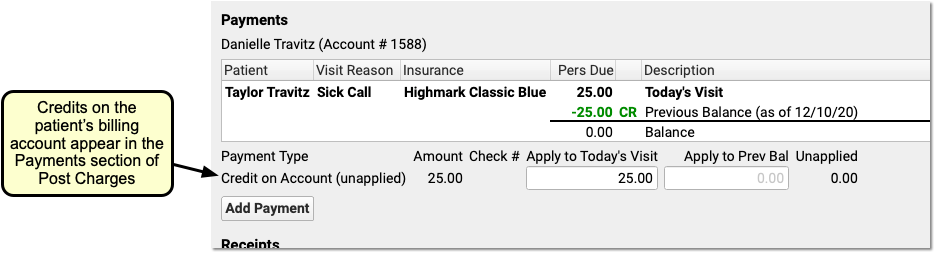
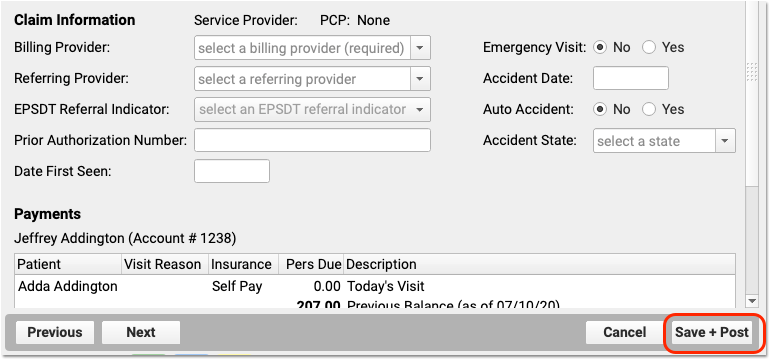
Optional: Adjust Claim Information, Work w/ Personal Balances and Payments
You can use the Claim Information component to adjust the billing provider or other claim details. While you probably don’t have a personal payment on hand for a hospital visit, you can use the Payments component to review personal balances and enter discounts as well, if needed.
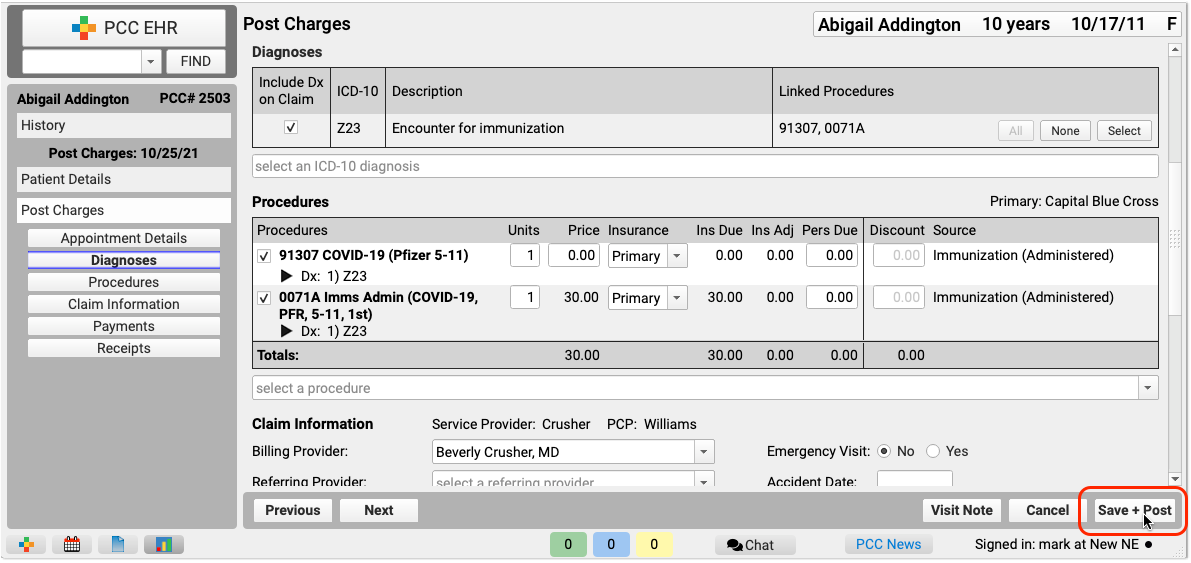
Click “Save + Post” and Review the Encounter
When you are finished entering hospital encounter and charge information, click “Save + Post” to save your work and queue up a claim.
You can review hospital charges in the Billing History. They also appear in the patient’s Visit History.
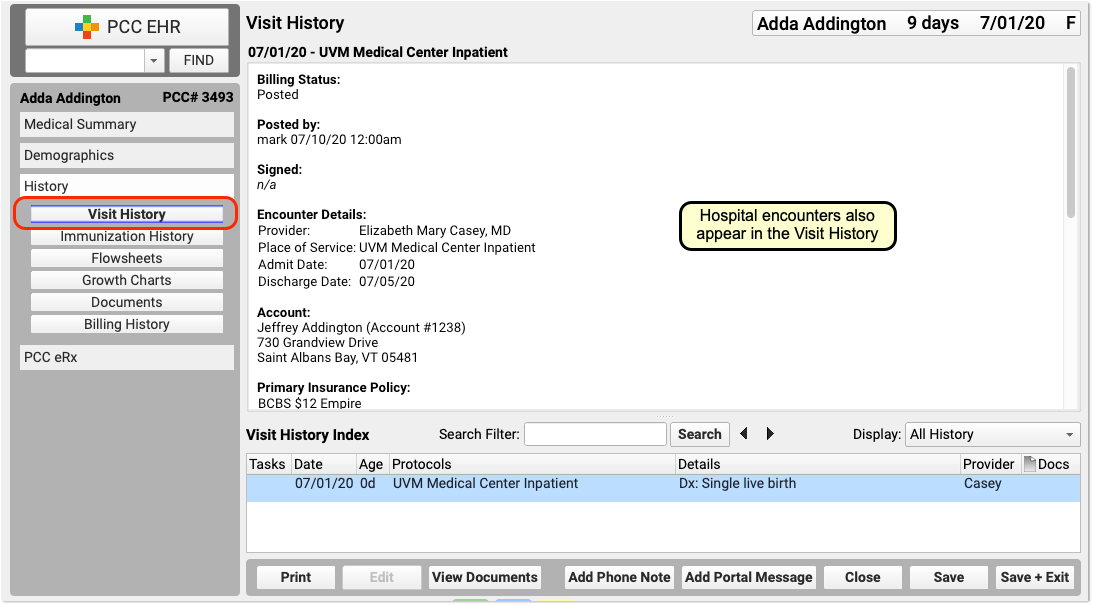
You can use the Search Filter field and the Display Filter drop-down menu in either History chart section to quickly find and review details about hospital encounters.
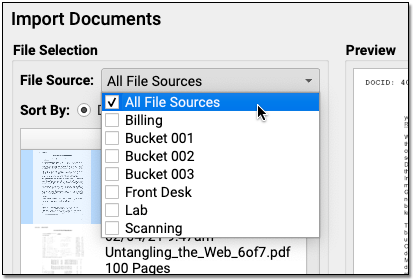
Optional: Import and Attach Documents
After you post a hospital encounter, you can attach a hospital note or other document to the encounter. Just select the hospital encounter when you import or edit a document.
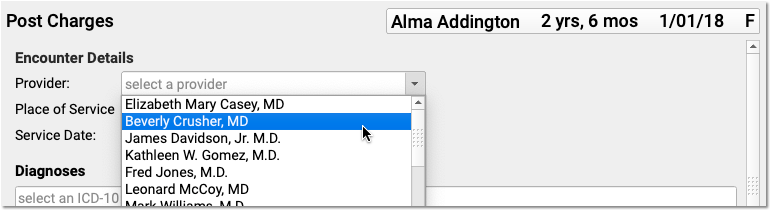
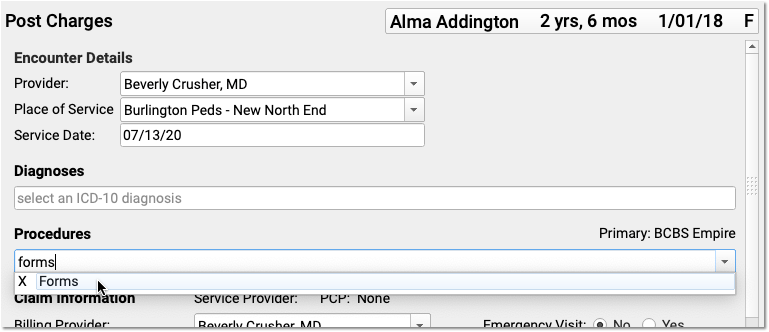
Post an Administrative Fee Without an Appointment in PCC EHR
When you post charges for an appointment, you can also add fees. But what if there is no appointment? You may need to collect a fee or post other charges that do not have an encounter.
To bill for a fee of any kind, visit the Billing History in the patient’s chart and click Create Encounter.
Select a provider and optionally adjust location and service date. Then add the fee in the Procedures component of Post Charges.
You can optionally enter payments and review the account’s new balance.
Click “Save + Post” to save the fees and payments.
You will see administrative fees without appointments as their own line in the Billing History index. As they are not encounters and have no clinical element, they do not appear in the patient’s Visit History.
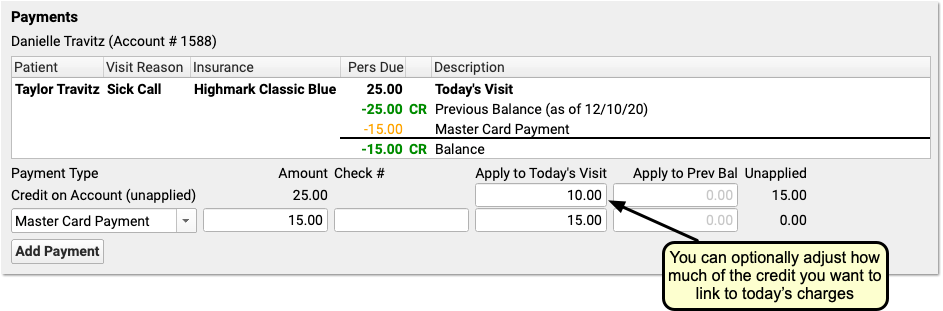
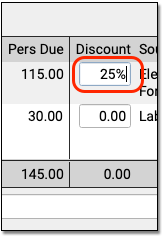
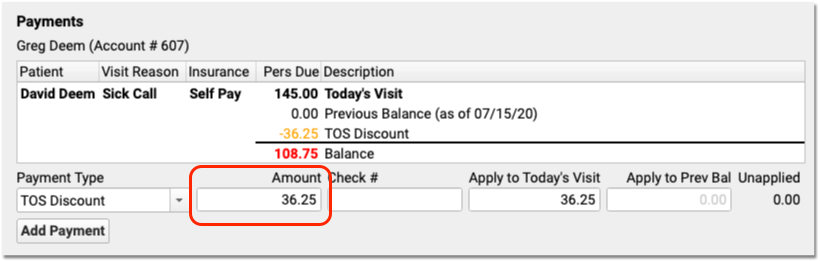
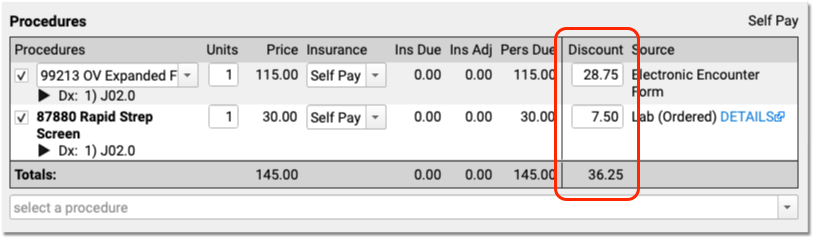
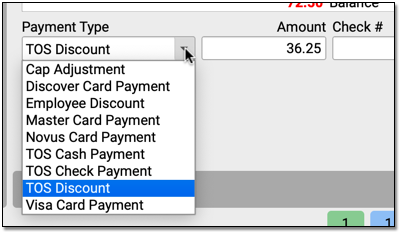
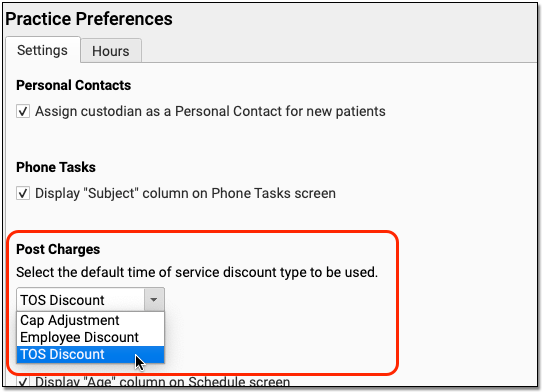
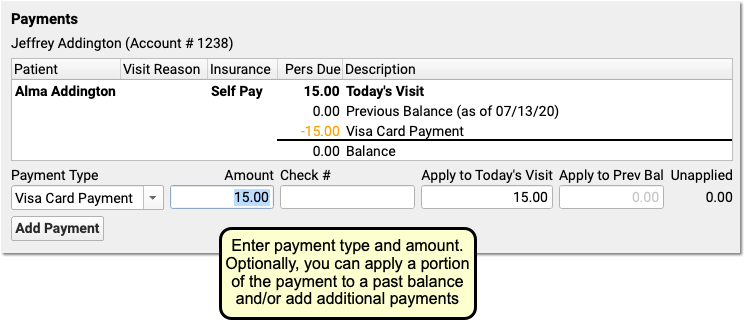
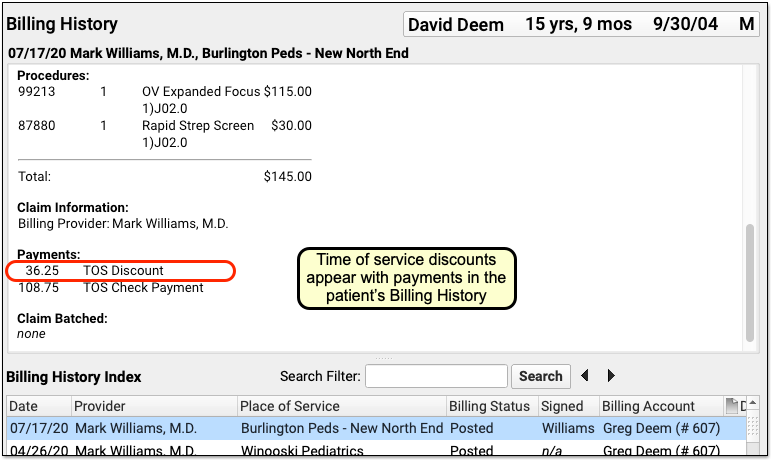
Enter Time-of-Service Discounts As You Post Charges in PCC EHR
When you post charges in PCC EHR, you can now enter a discount amount or discount percentage. To enter a discount for a charge, use the Discount column in the Procedures component.
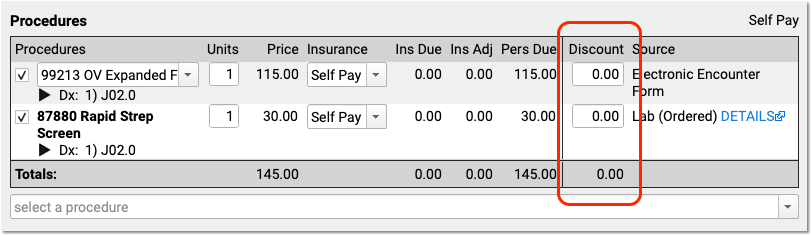
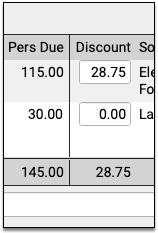
If you type a percentage, PCC EHR will automatically calculate the discount amount.
The Payments component below will automatically fill out the details of the discount for you.
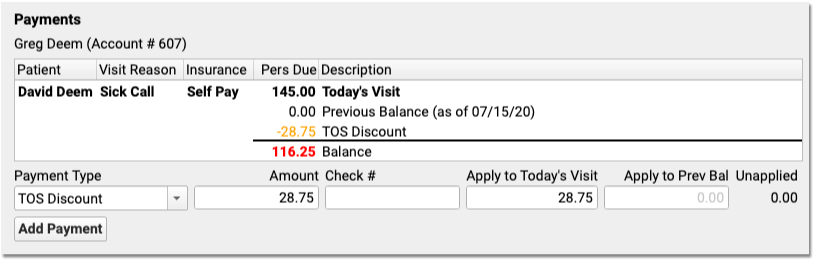
Alternatively, if you want to apply a discount towards all charges in the encounter, you can skip the Procedures component. In the Payments component, select a discount as the “Payment Type” and enter a percent or an amount.
The Discounts column in the Procedures component will automatically update with the discounted amounts. If you enter an exact discount amount instead of a percentage, PCC EHR will apply the discount to the procedures in order, starting from the top.
You can adjust discount amounts in either component, make other changes to the charges, or add additional payments for the remaining balance. Click “Save + Post” to finish posting the charges, payments, and discounts.
The Billing History section of the patient’s chart will display the discount along with other time-of-service payments or adjustments.
How Much Can I Adjust Off With a Time-Of-Service Discount?: Time-of-service discounts are for the amount due to the personal billing account of the patient, not for charges pending an insurance payer. You can only discount up to the total amount due personal on a charge.
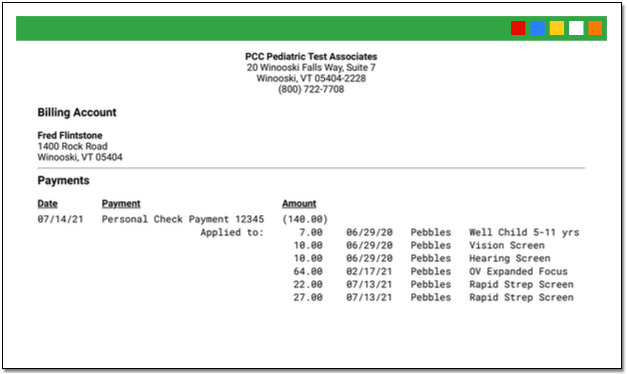
Receipts Display Only Services and Payments: Discounts occur for a variety of reasons, some of which involve PHI or administrative decisions. Therefore Time-of-service discounts do not appear on the printed receipt. The Post Charges receipt only displays the billed services and any payments. To create a complete account history (including discounts), use the Account History (tater) report in Practice Management.
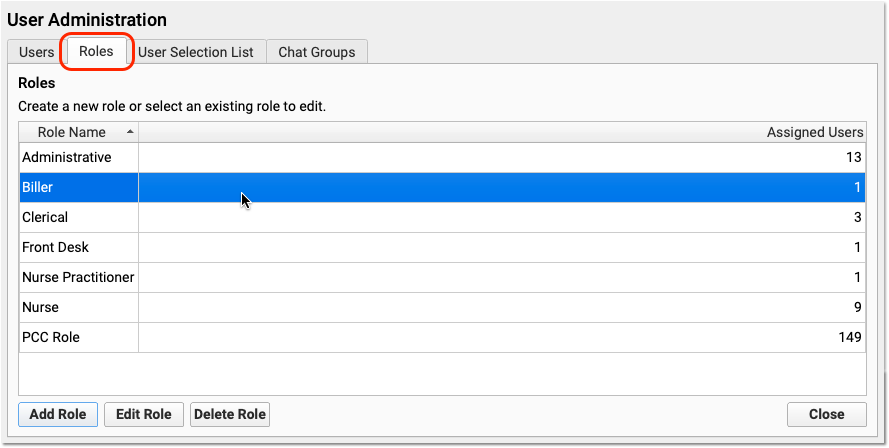
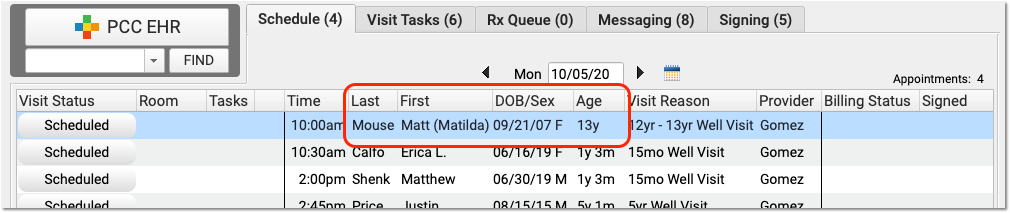
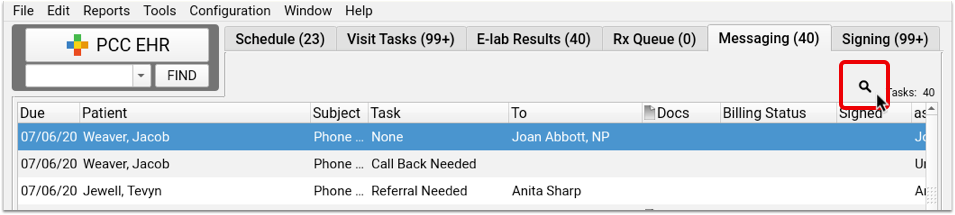
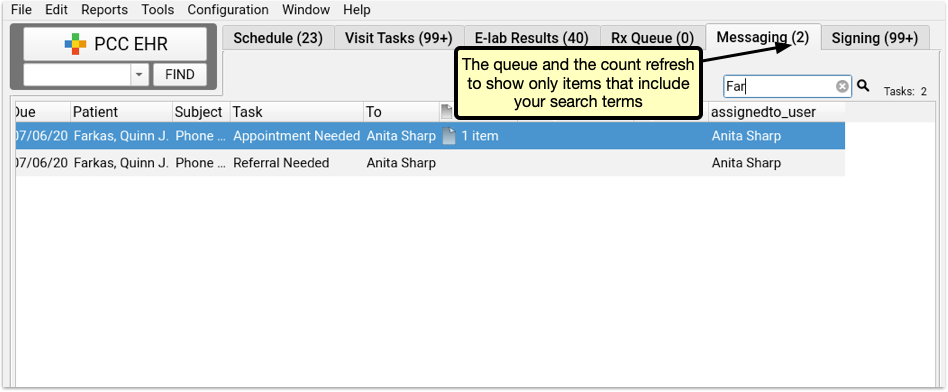
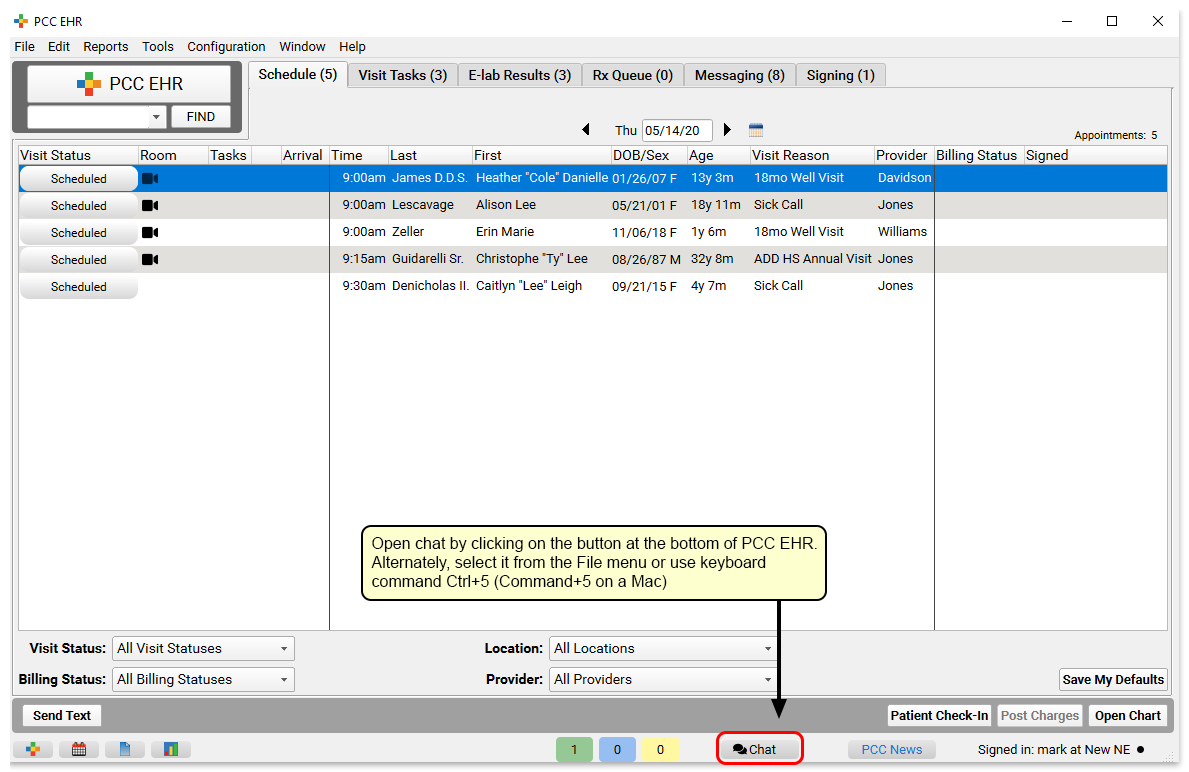
Search Your Task Queues (Visit Tasks, E-lab Results, Messaging, and Signing)
Search PCC EHR’s Visit Tasks, E-Lab Results, Messaging, and Signing queues to quickly find the task you’re looking for, no matter how many items are on your queues.
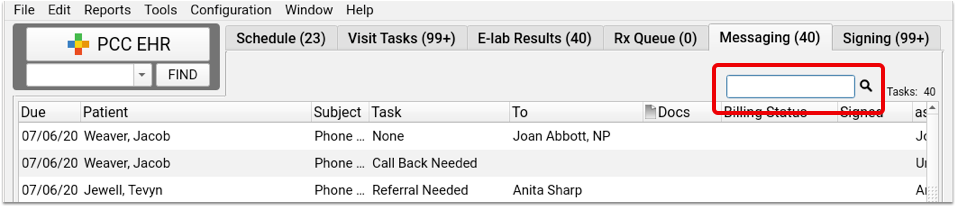
Click the magnifying glass icon above each queue to reveal the search box. PCC EHR will automatically search when you finish typing, and the queue will refresh and show only items that include your search term.
Search looks through the details of each task in the queue, more than just the column headings. You can search for specific names, orders, subject lines, e-lab result, or phone note to find exactly what you’re looking for.
Don't Forget the Queue Filters: Search only includes items in your current view. If the queue filters at the bottom of the PCC EHR window are set to limit your view to a certain task type, provider, or other option, the search will only include items from the filtered list. To search all items on a queue, reset your filters to “all”.
To return to the full list, just delete your searched text and the queue will reset to the complete list of items.
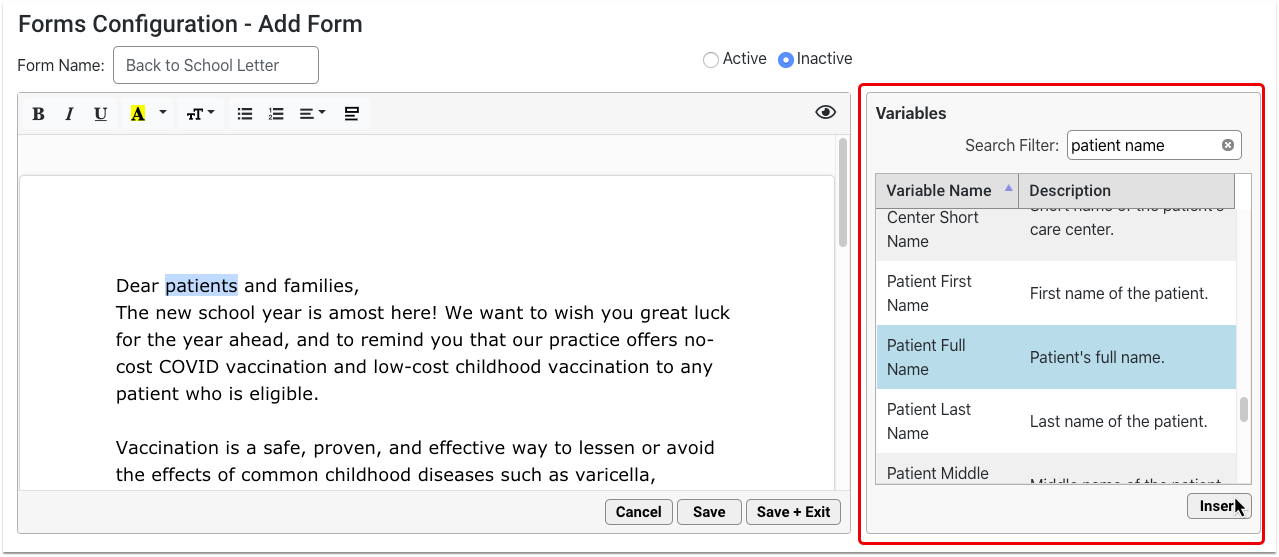
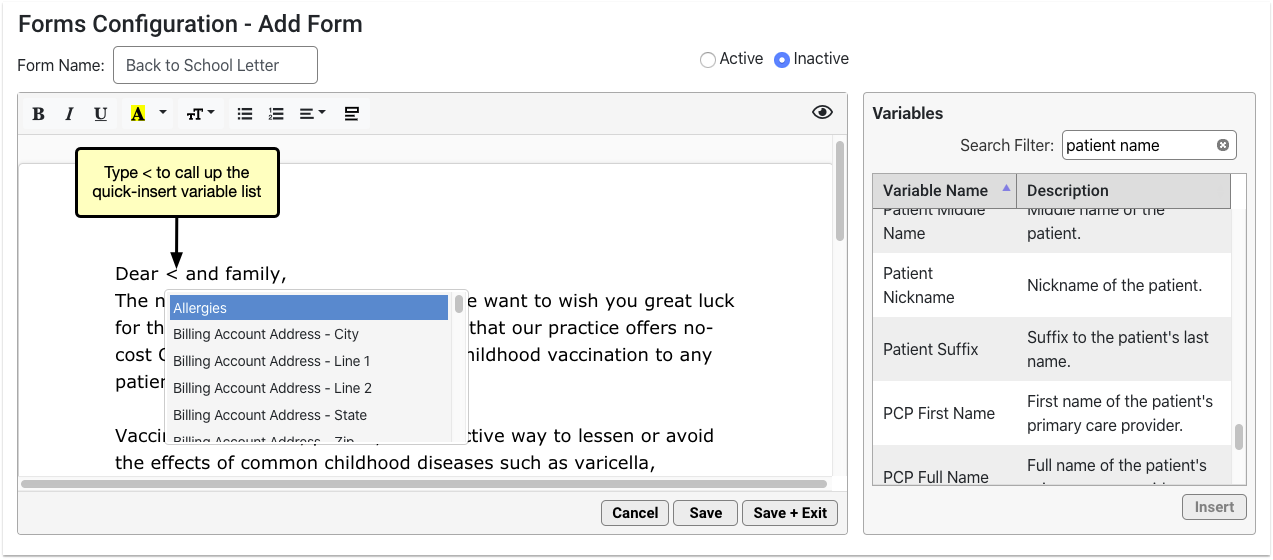
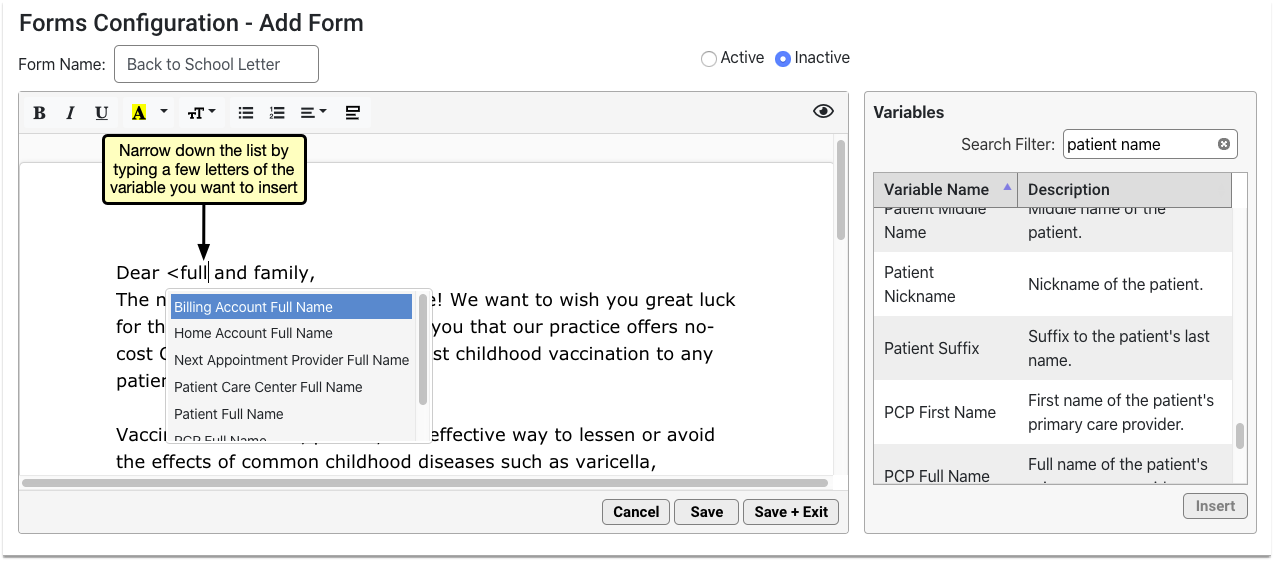
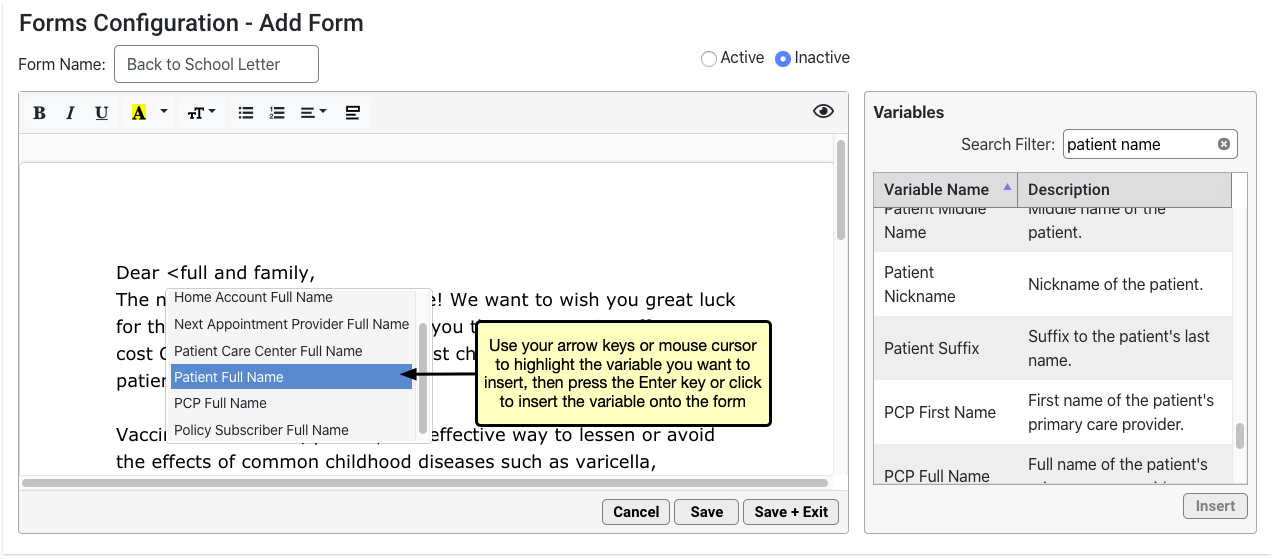
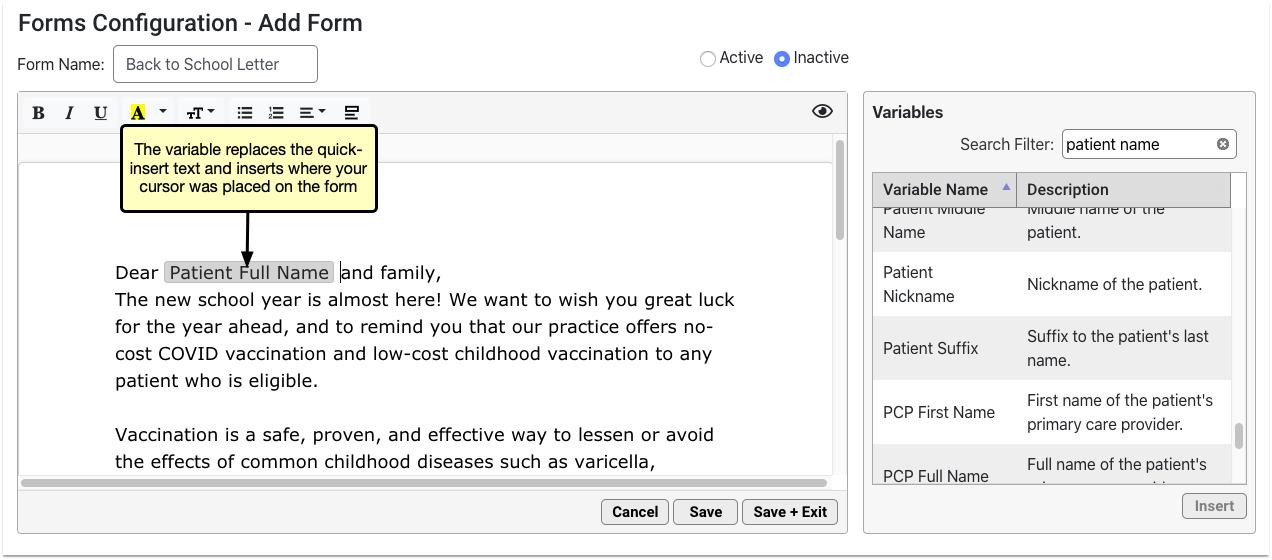
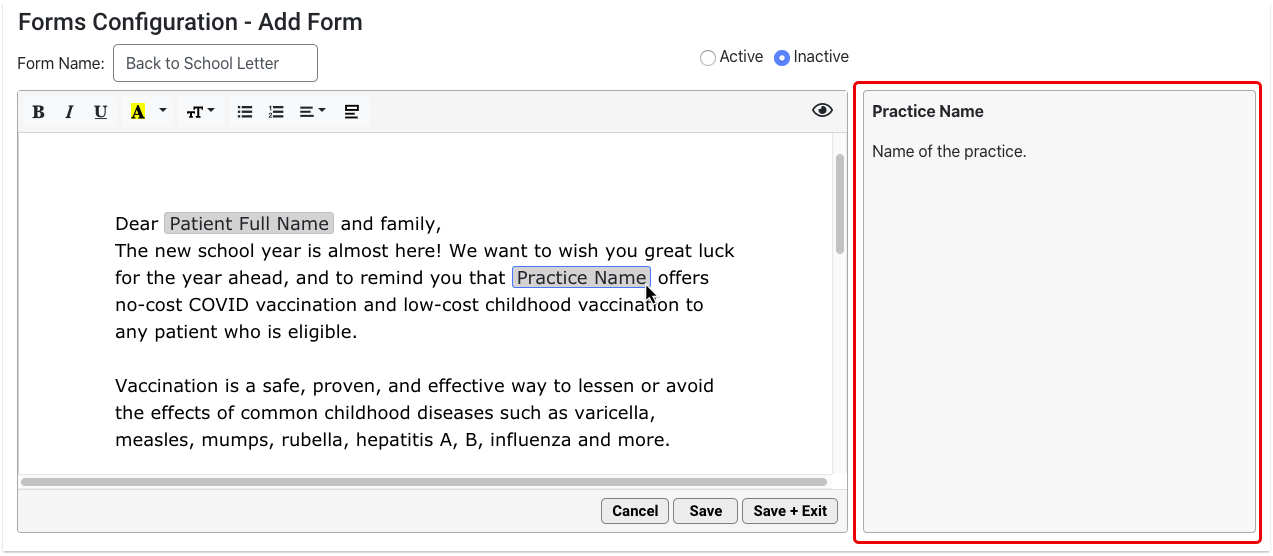
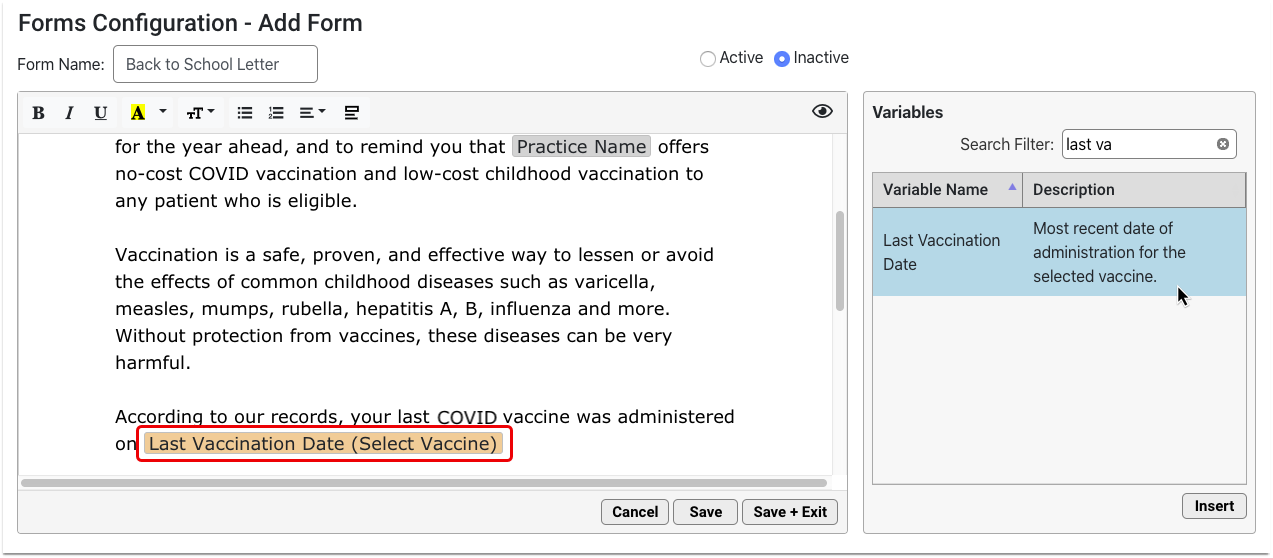
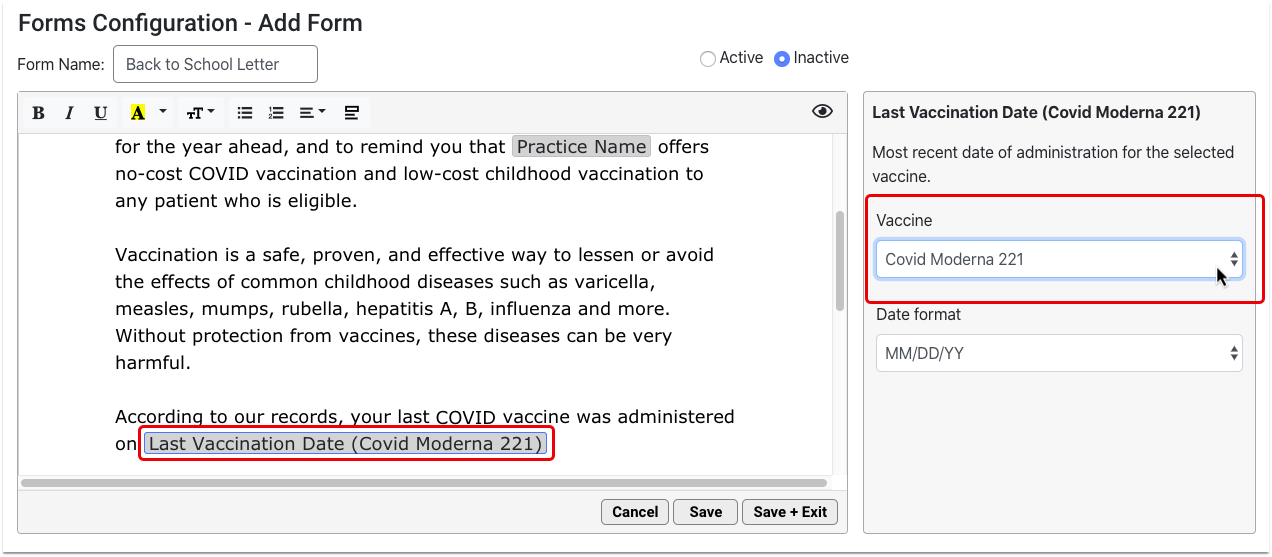
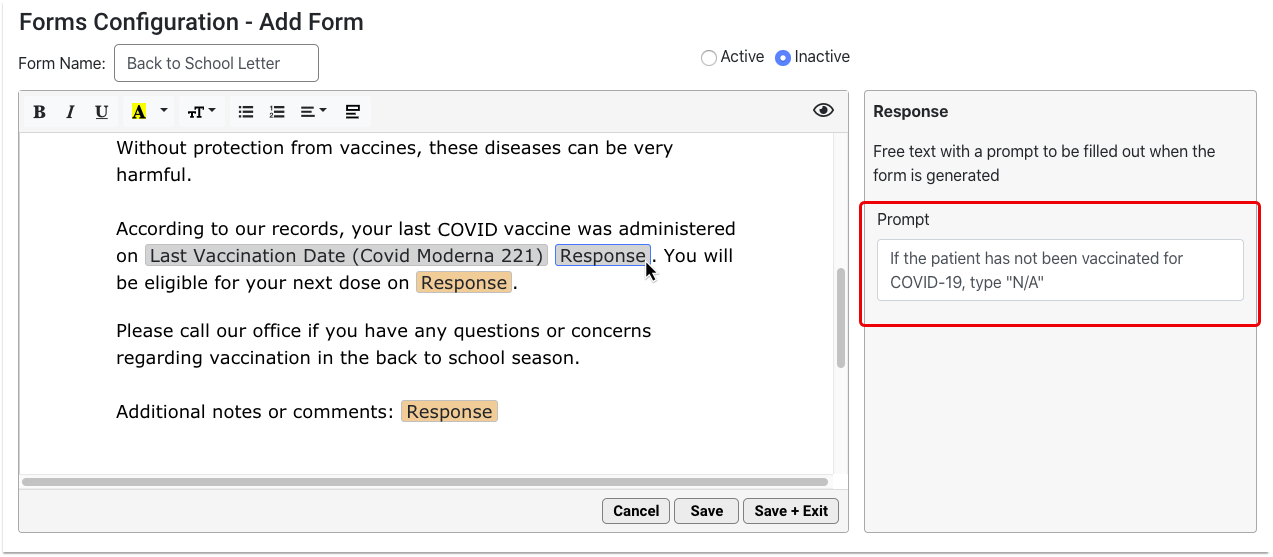
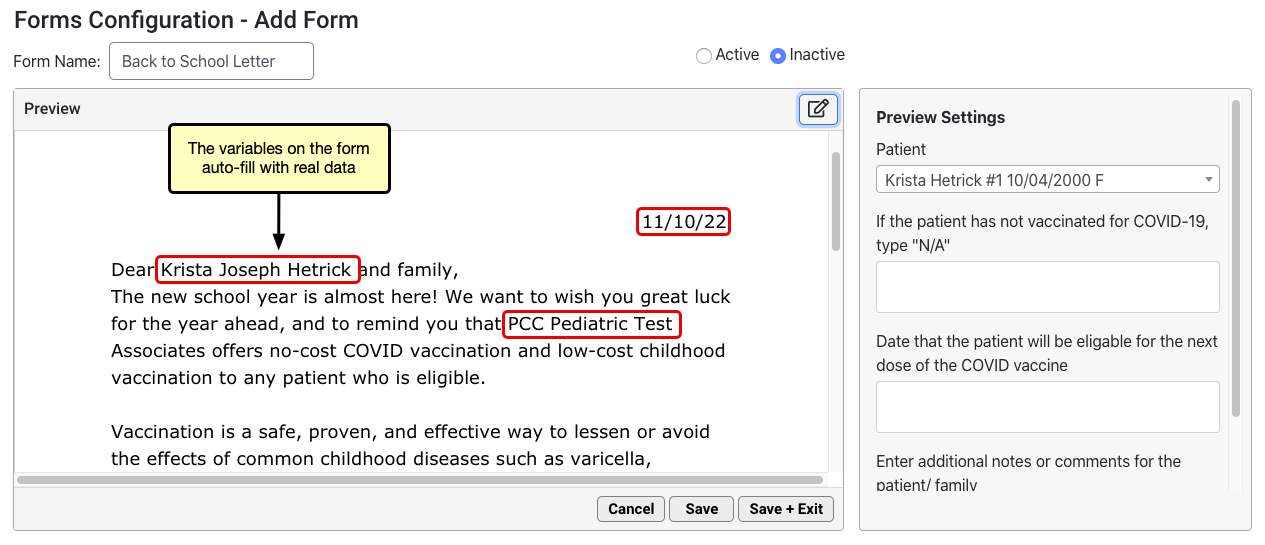
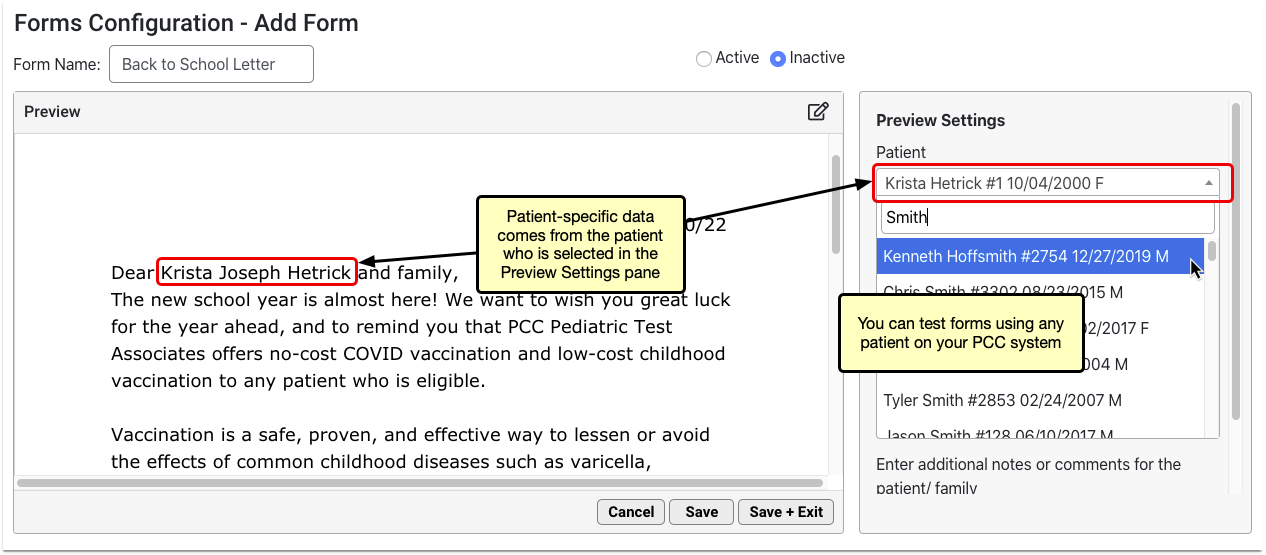
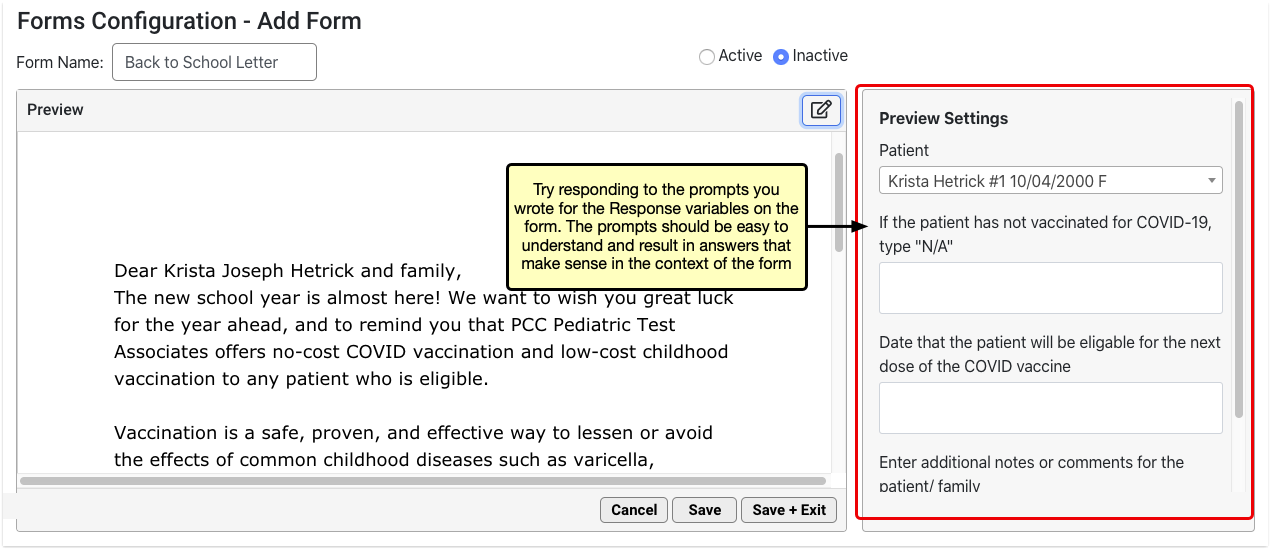
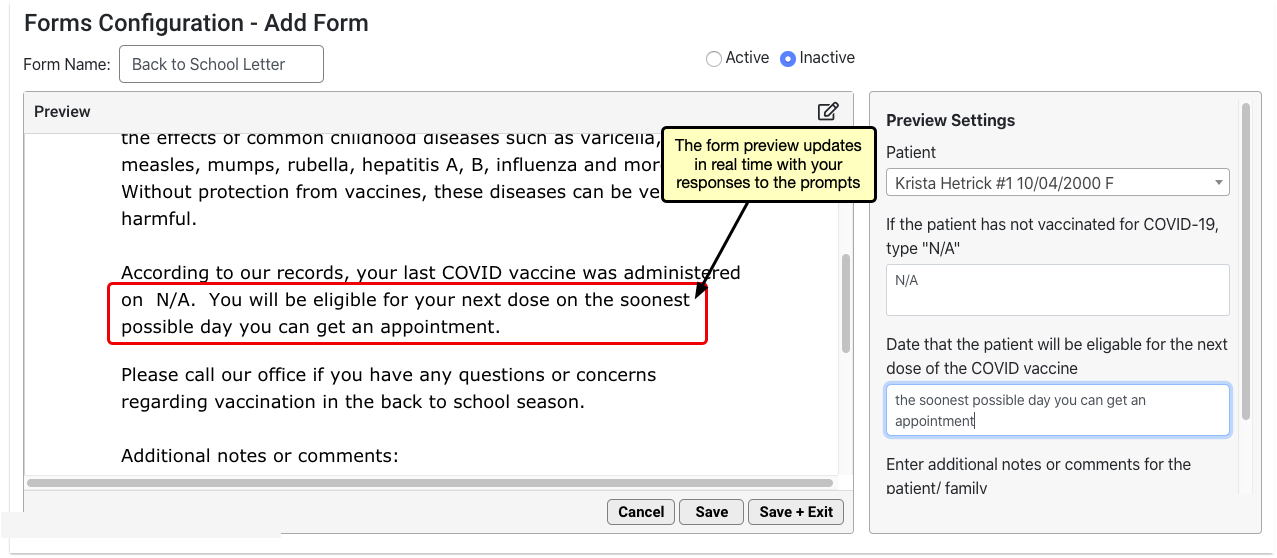
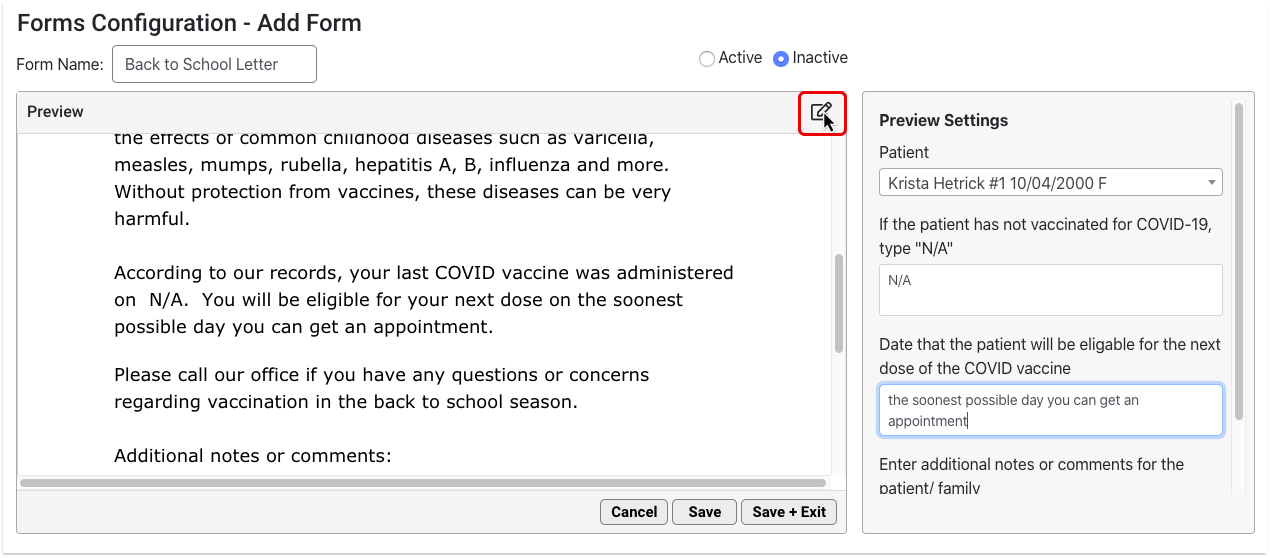
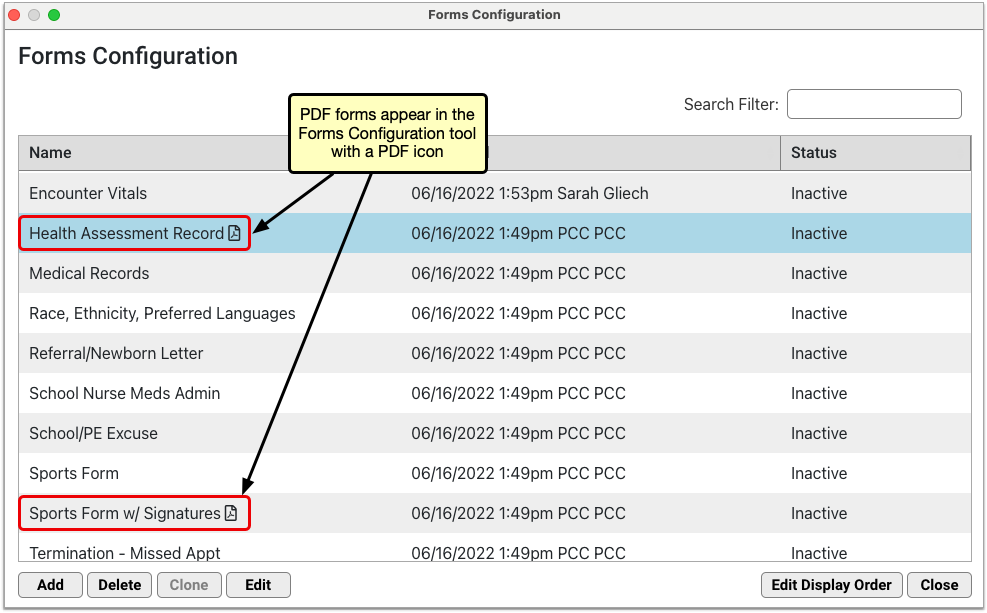
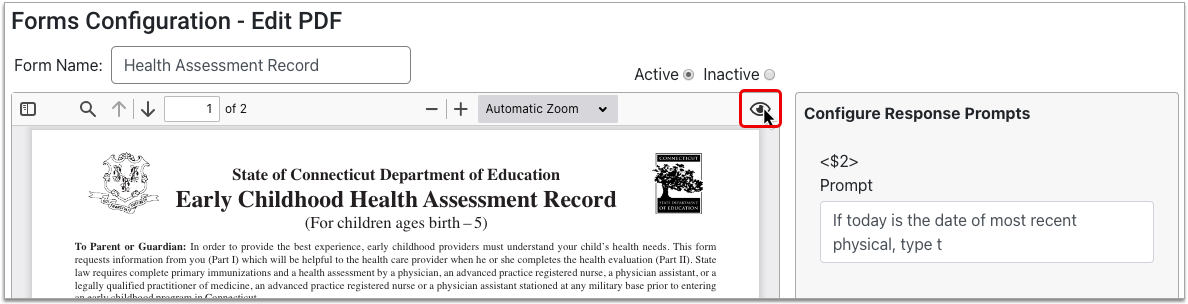
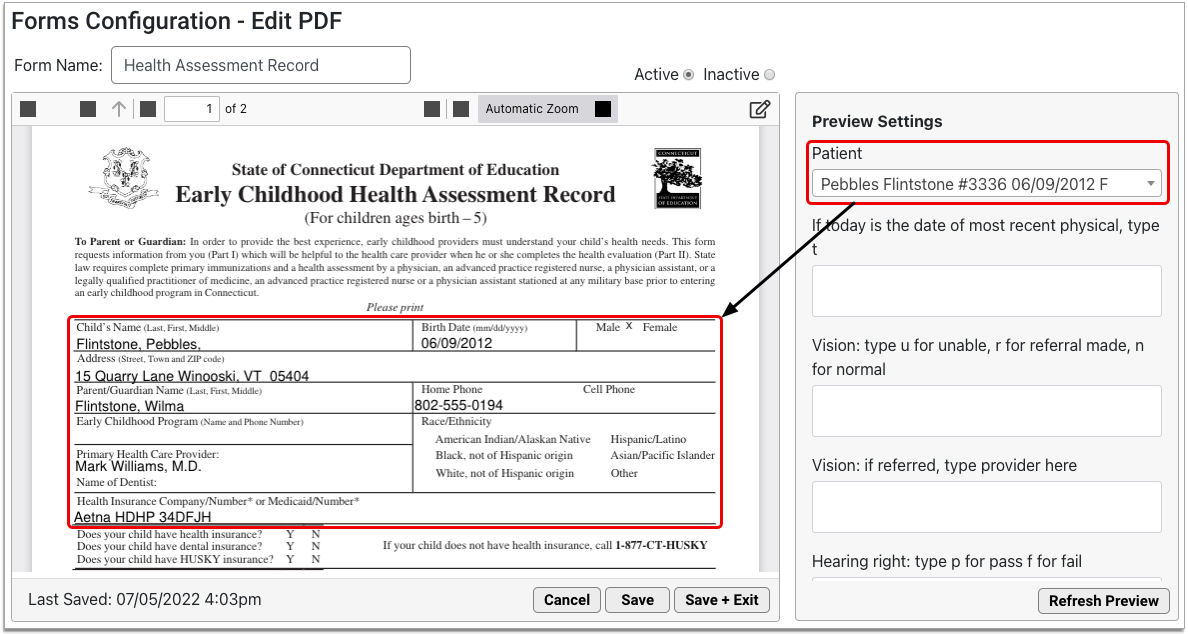
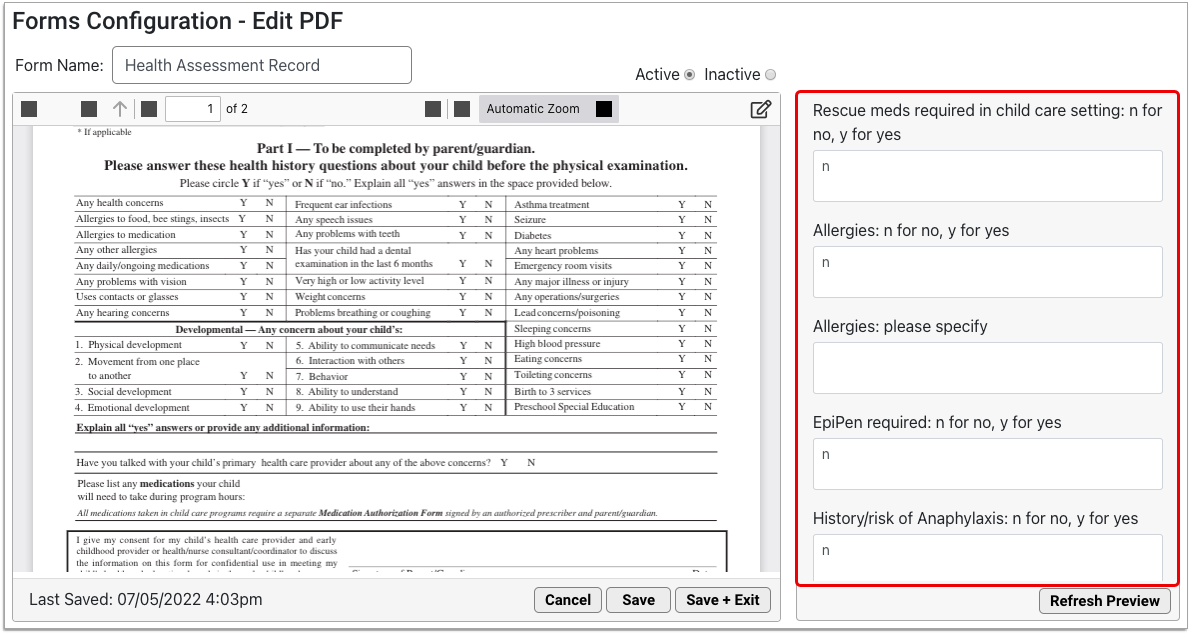
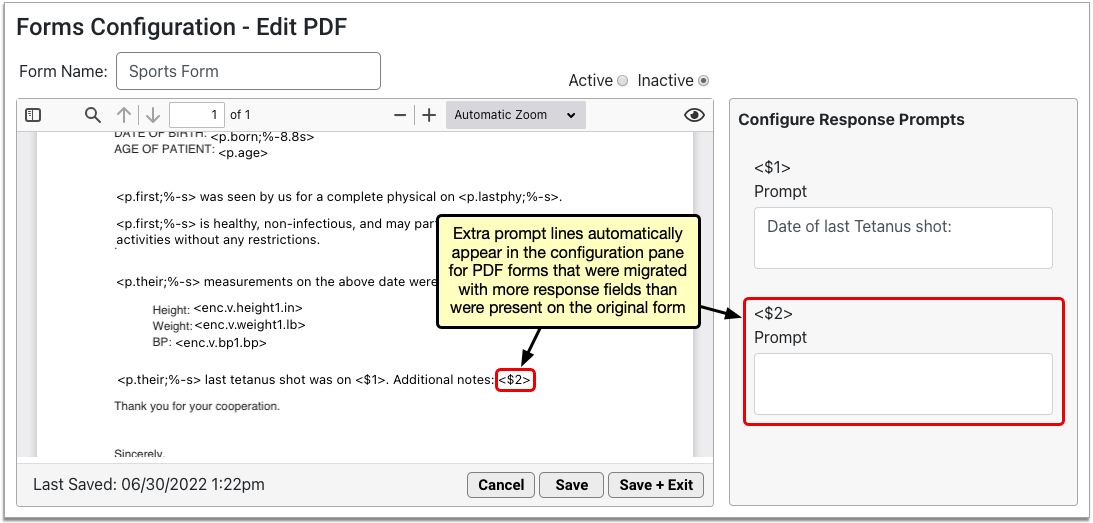
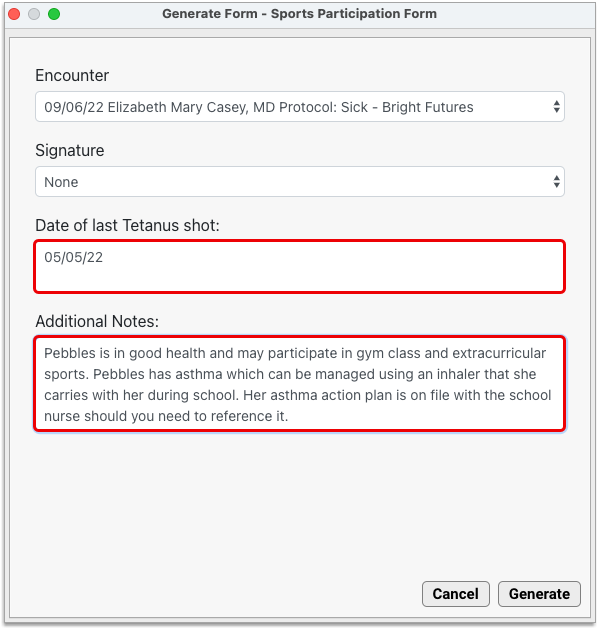
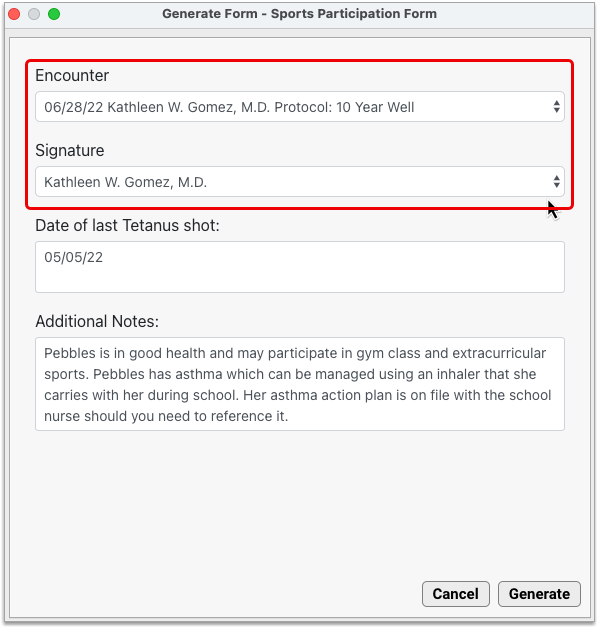
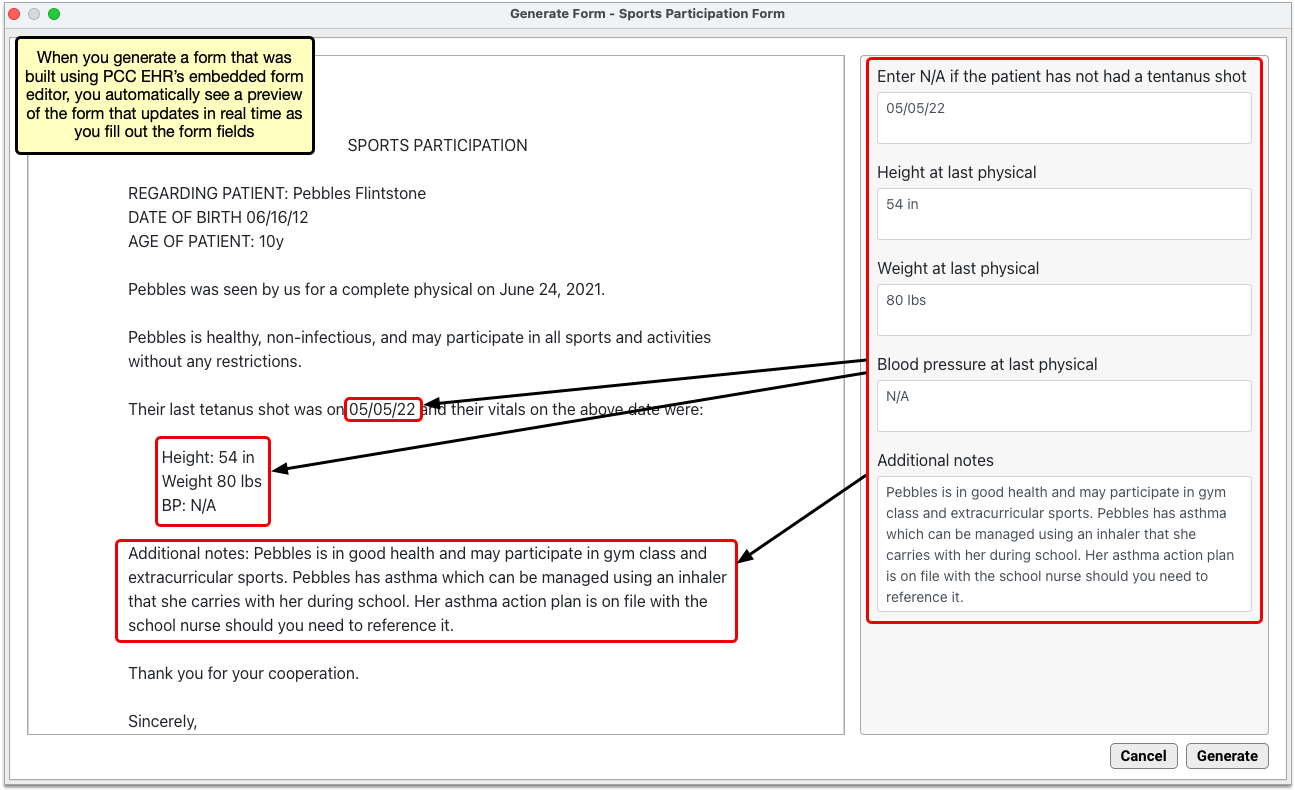
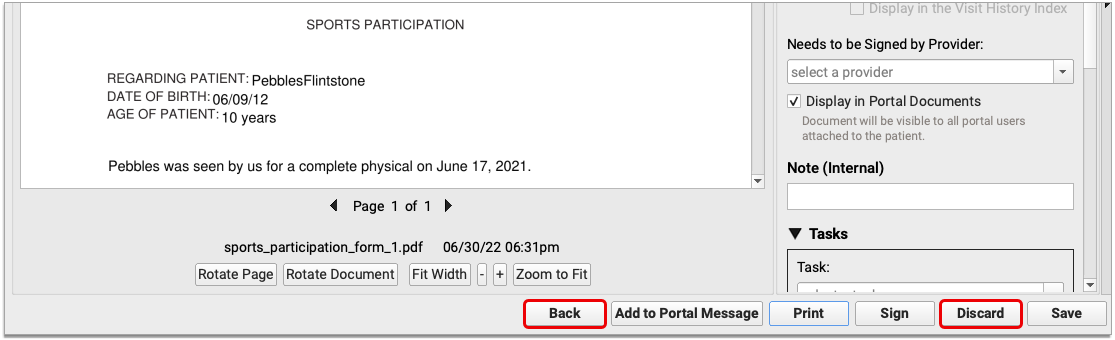
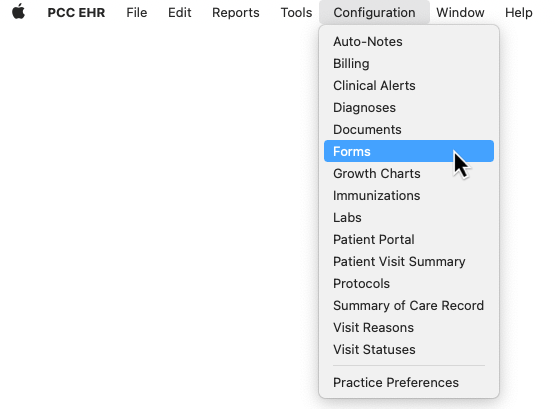
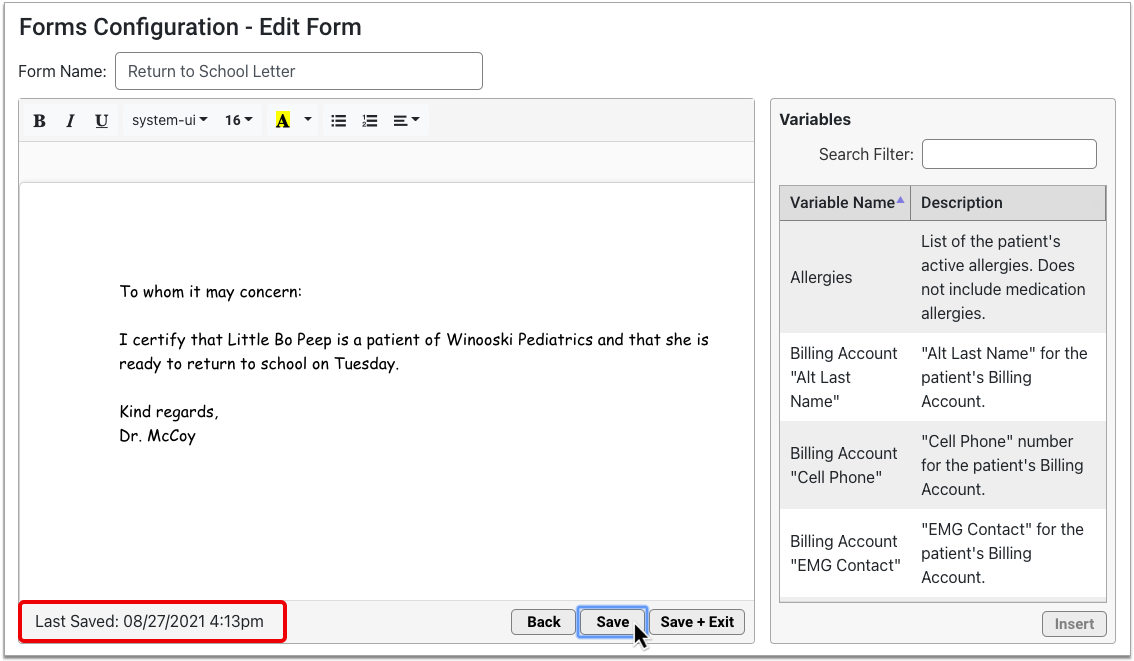
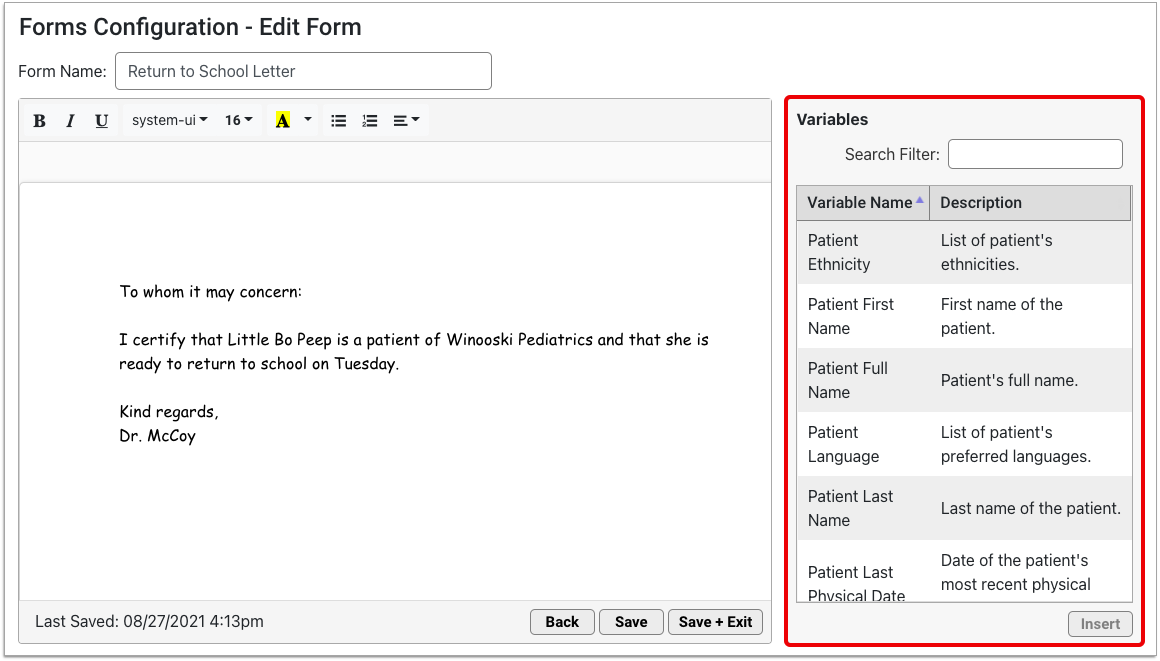
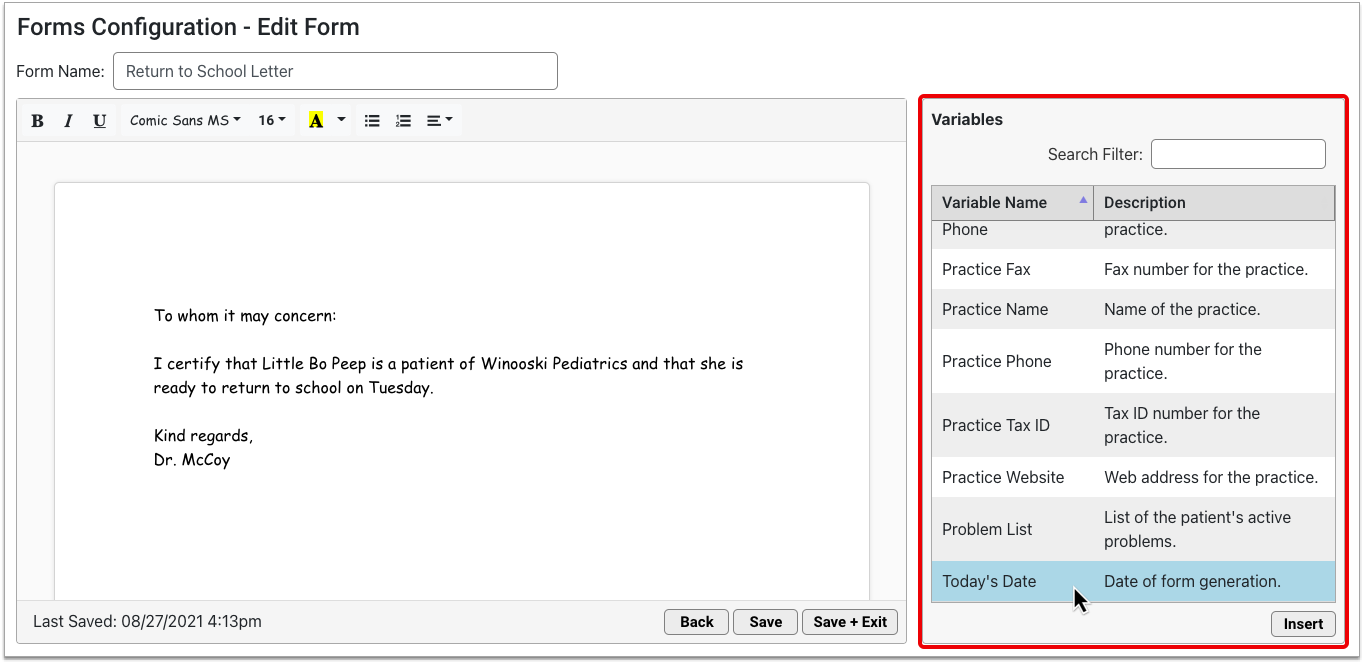
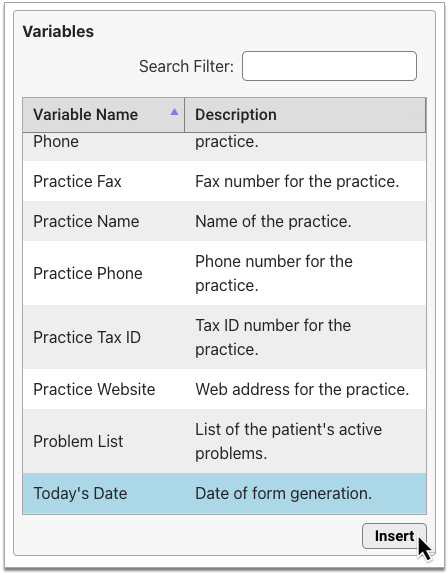
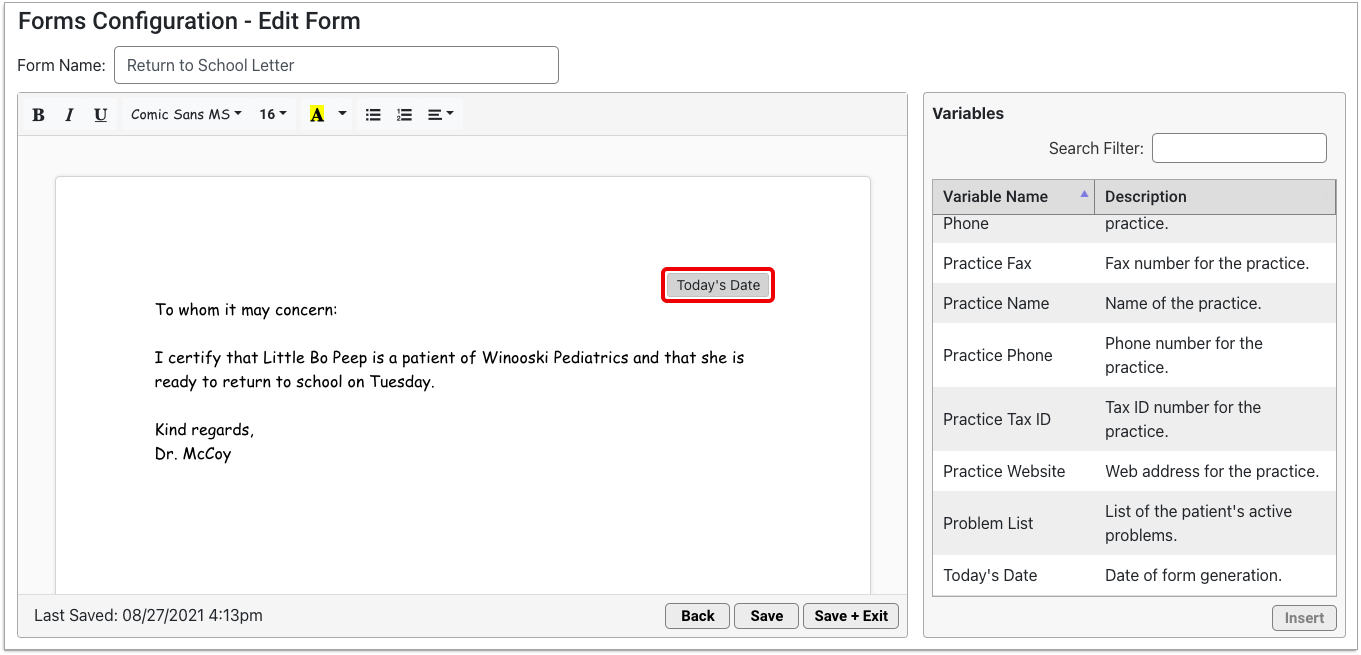
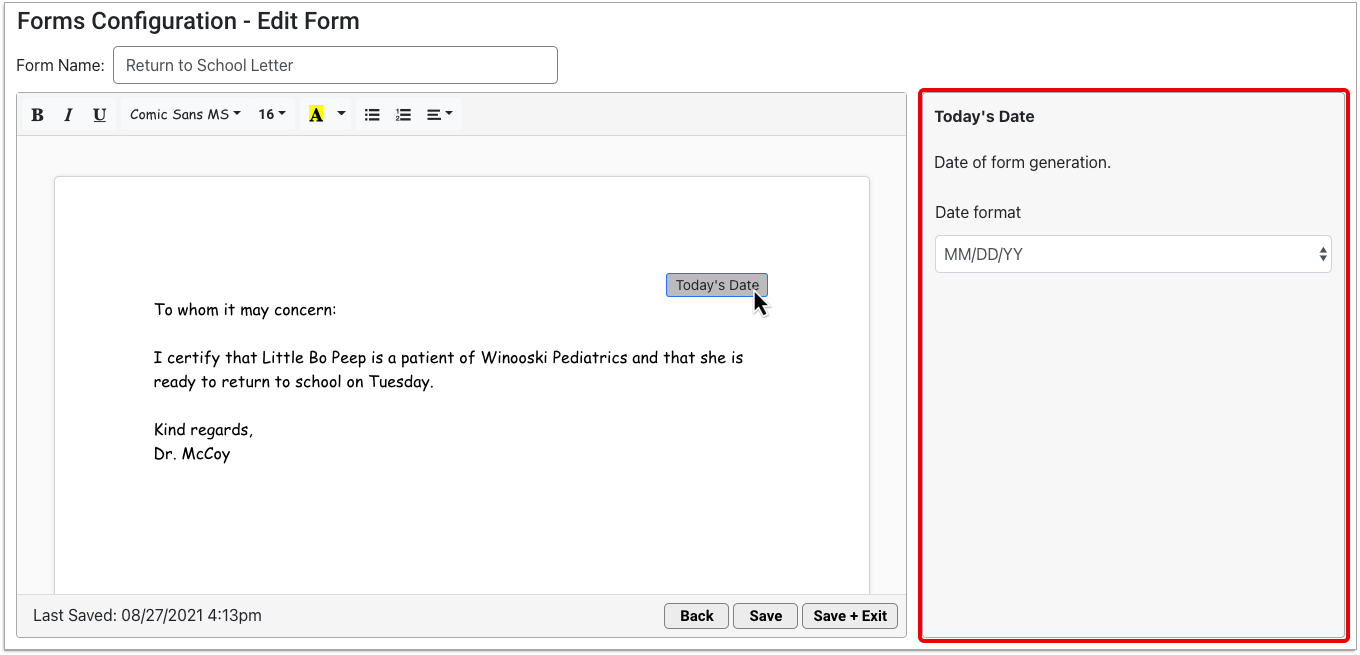
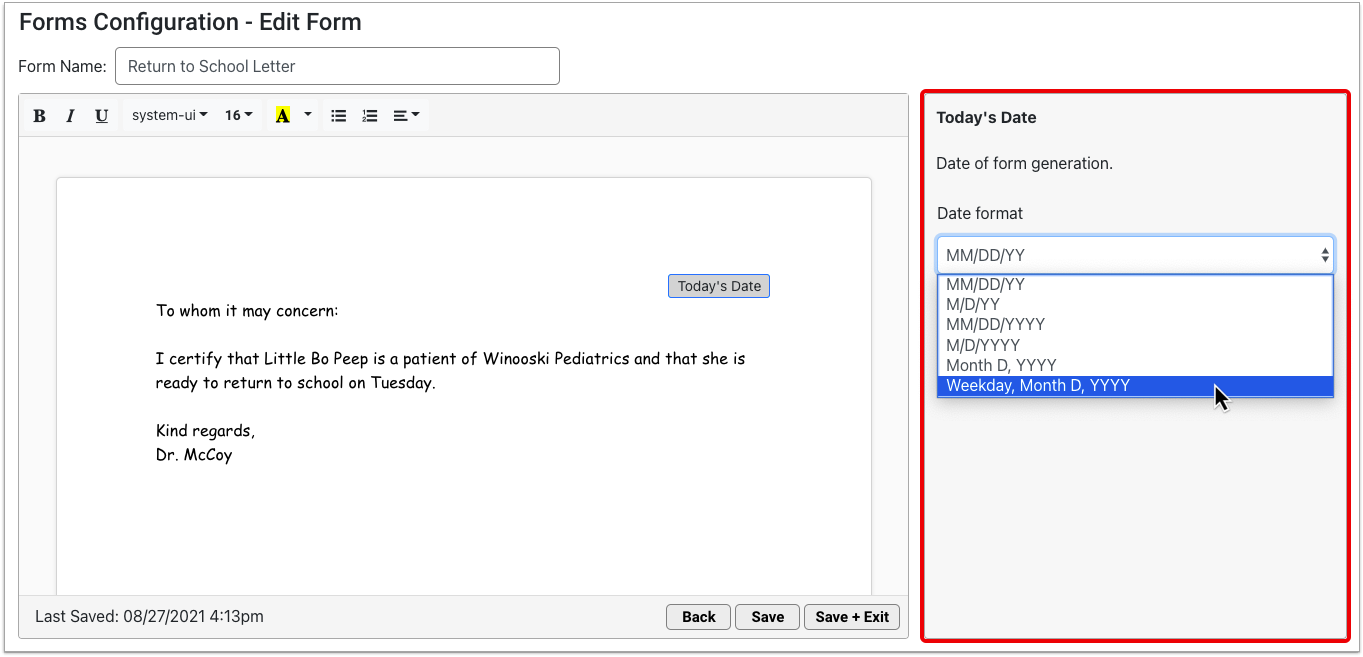
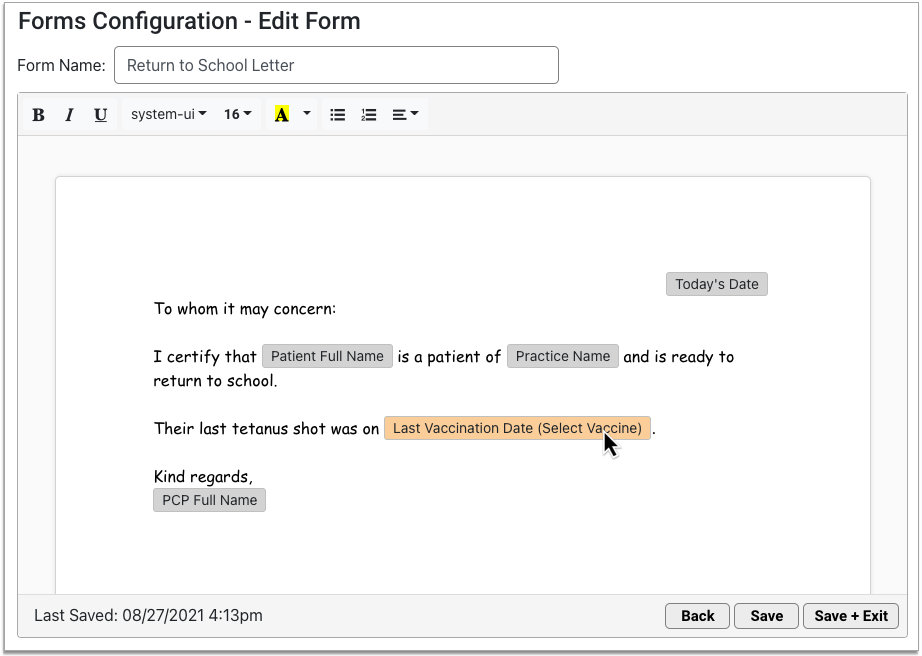
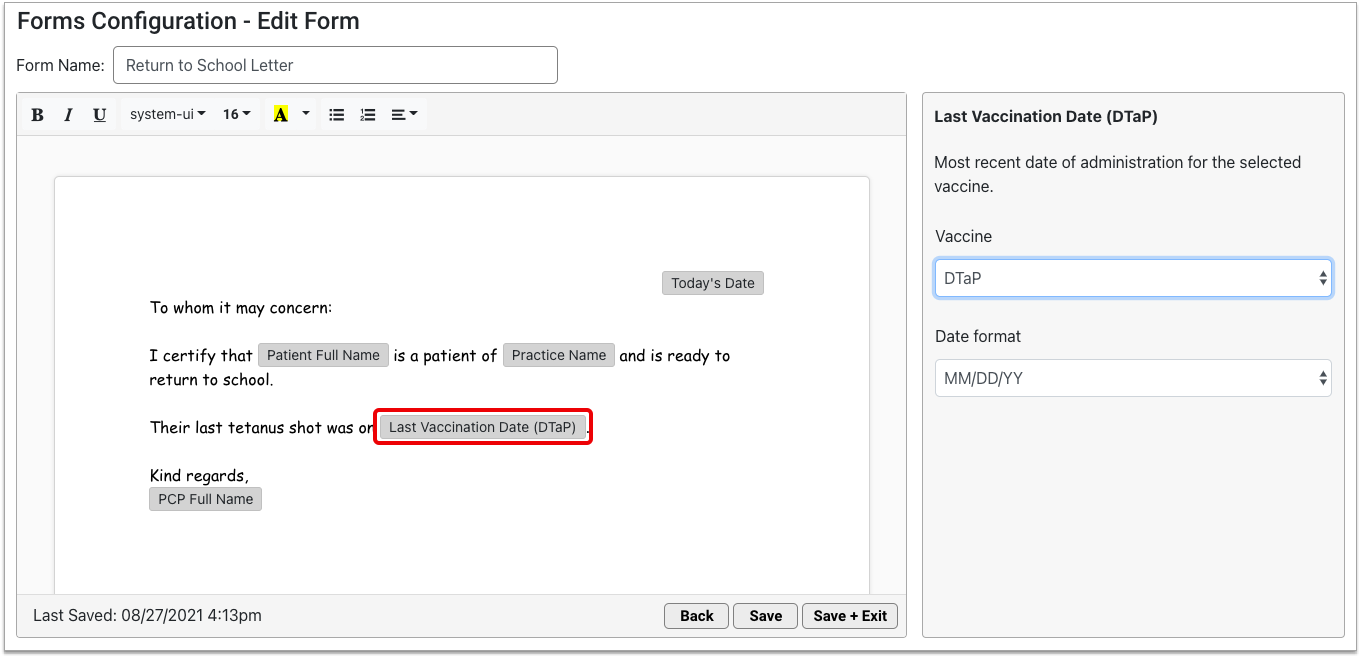
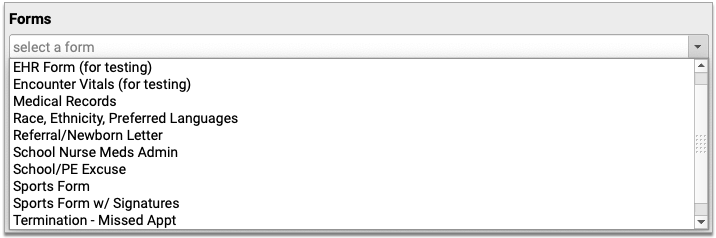
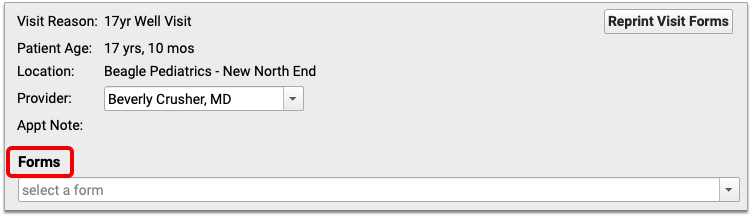
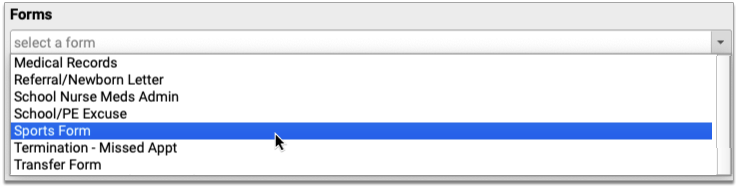
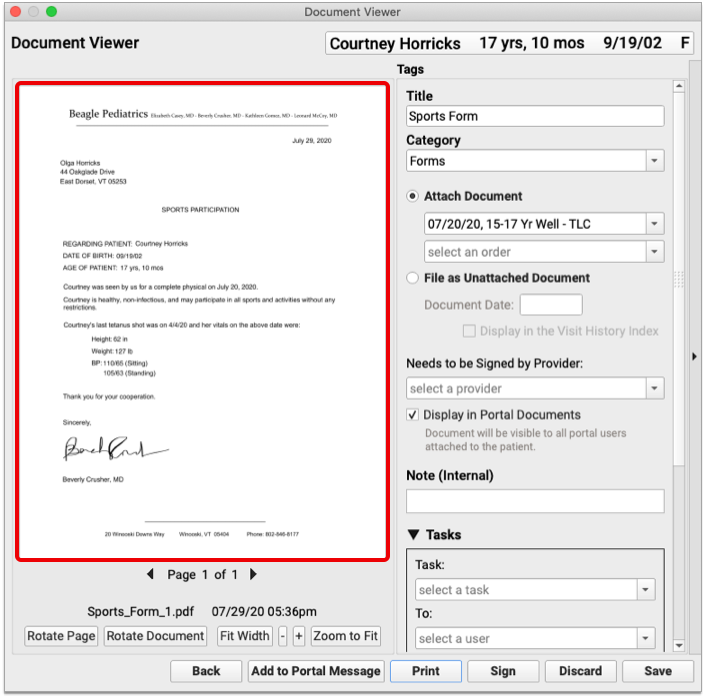
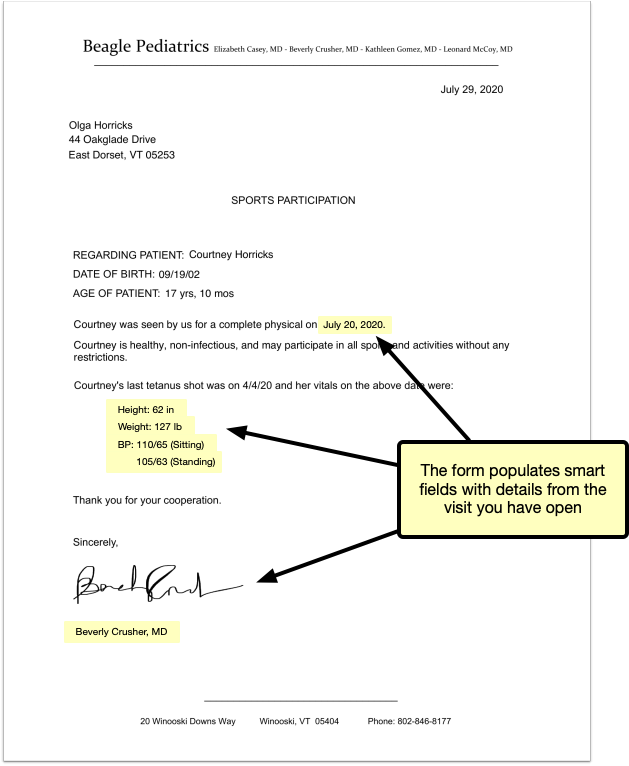
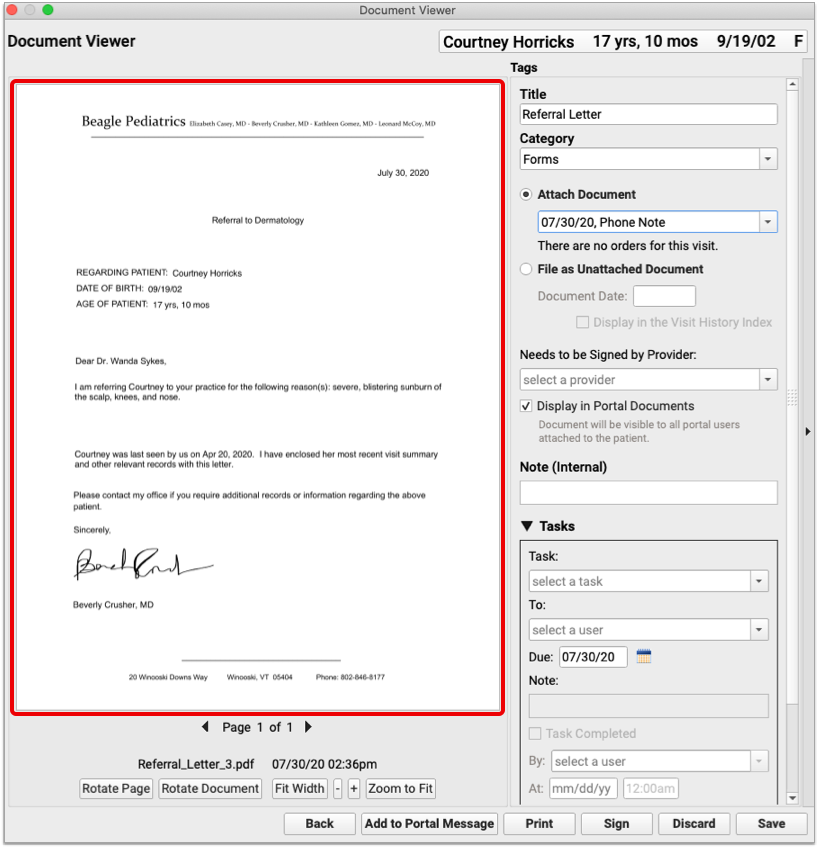
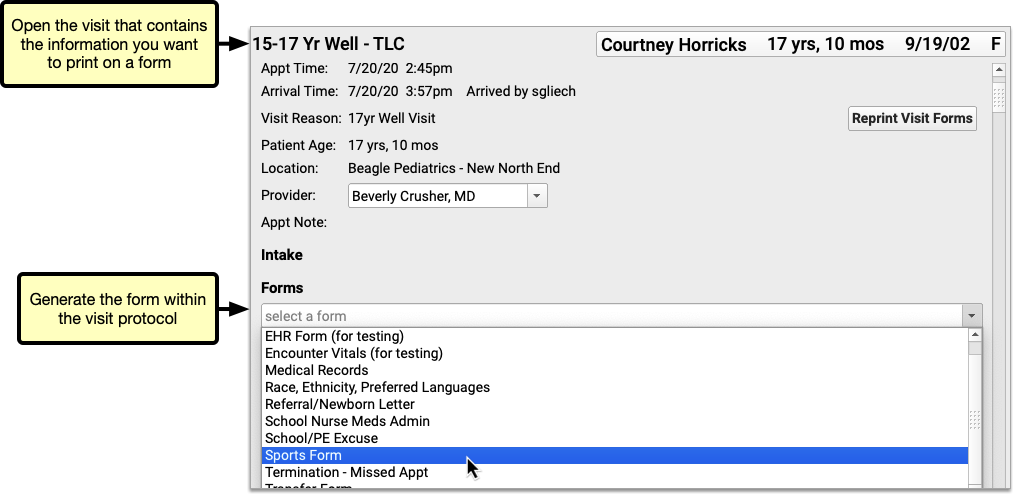
Include Information from a Specific Encounter on Patient Forms in PCC EHR
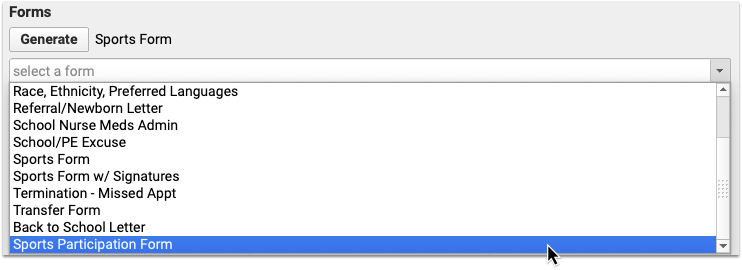
Need to pull details from a specific visit onto a patient form? Now, you can!
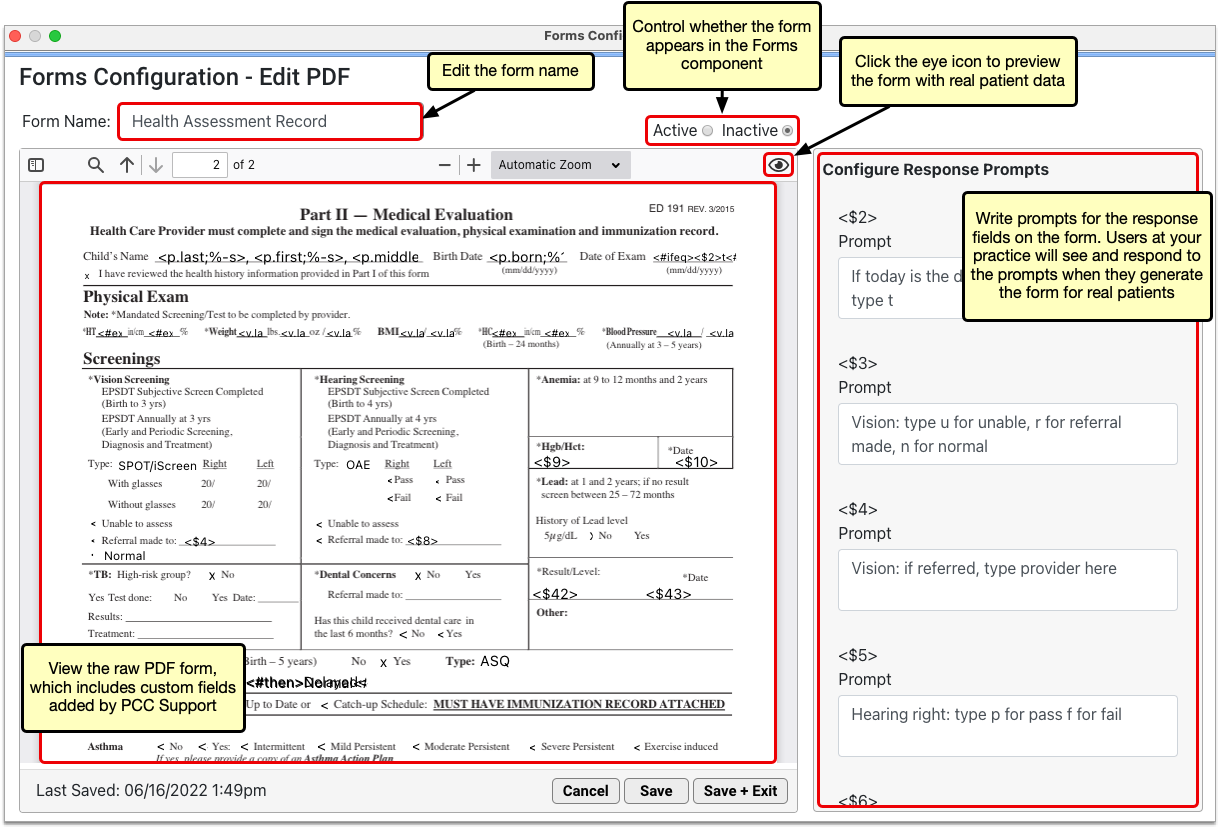
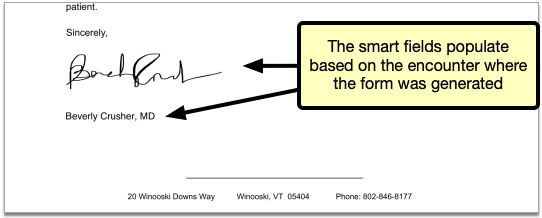
As of Release 8.13, PCC Support can help you create forms with smart fields that populate based on the encounter where they are generated.
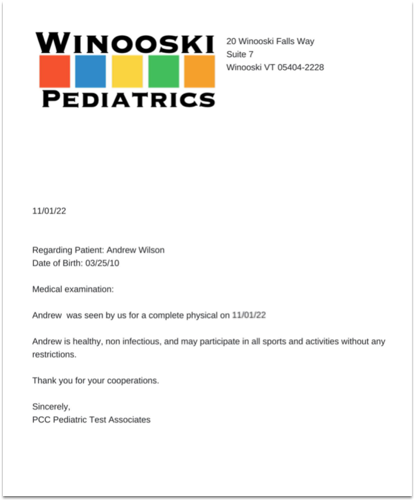
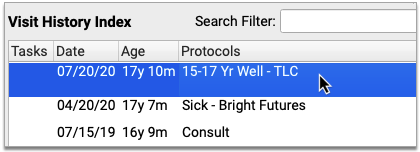
Say your patient needs a sports form with details from last month’s physical. You can open that physical from the patient’s visit history and generate the sports form inside the visit protocol. The smart form fields will populate with details from that specific encounter.
There are smart form fields for patient vitals, the provider of the encounter, and the location of the encounter.
If you generate smart form fields outside a specific encounter, they populate with information from the patient’s most recent visit.
Read more about how to Generate Patient Forms with Encounter-Specific Information in PCC EHR.
Convert Your Existing Forms Into Smart Forms: If you want to put smart fields onto an existing form in PCC EHR, contact PCC Support.
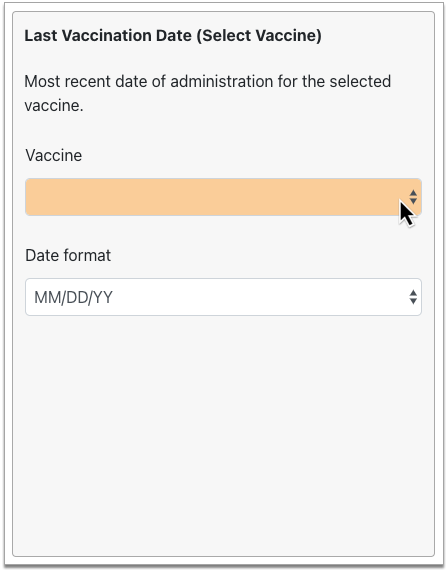
Include Multiple Vitals Measurements Per-Visit on Patient Forms
You can now include multiple vitals measurements per-visit on patient forms in PCC EHR. For example, if you take multiple blood pressures during a visit, you can include some or all of those measurements on a form.
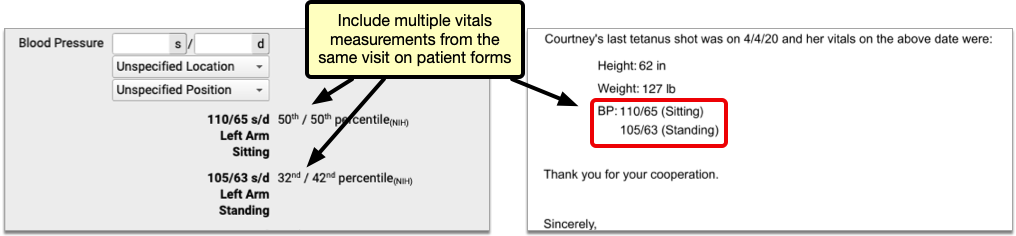
If you would like to create form templates which allow you to include multiple vitals measurements per-visit, contact PCC Support.
You can print multiple measurements of any vital:
- length
- height
- weight
- body mass index
- blood pressure
- head circumference
- oxygen saturation
- pulse
- respiration
- temperature
To print the vitals from a particular visit on a patient form, generate the form within the visit protocol. If you generate the form outside a visit protocol, it will populate with information from the patient’s most recent visit.
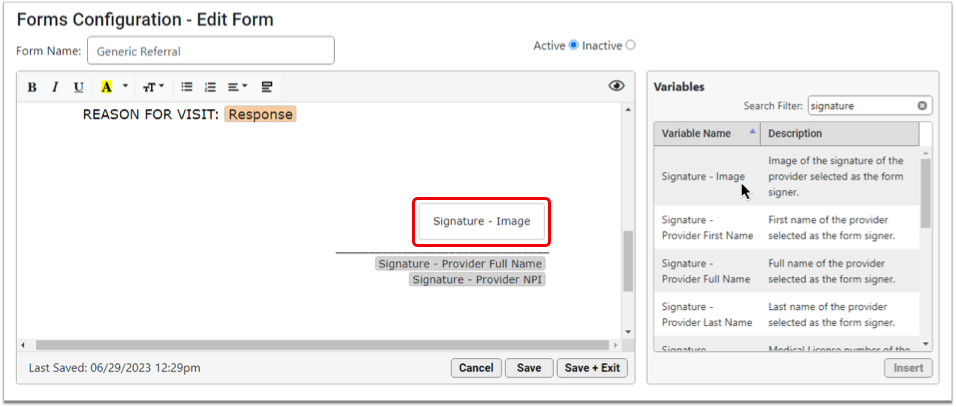
Automatically Add Provider Signatures to Forms and Requisitions
You can now automatically add provider signatures to forms in PCC EHR. Automatic signatures can either be based on the provider who sees a patient, or a patient’s primary care provider.
Automated signatures can be configured to work with any form you generate within PCC EHR, including lab and radiology requisitions.
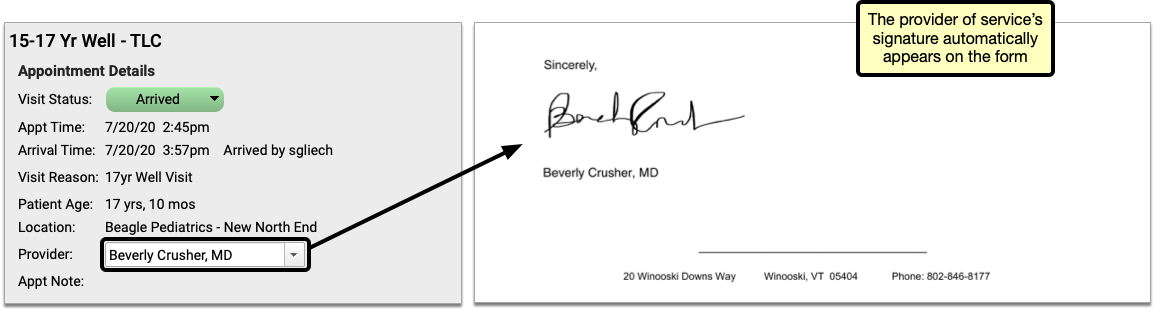
Contact PCC Support for help configuring forms and requisitions which automatically generate with a provider signature.
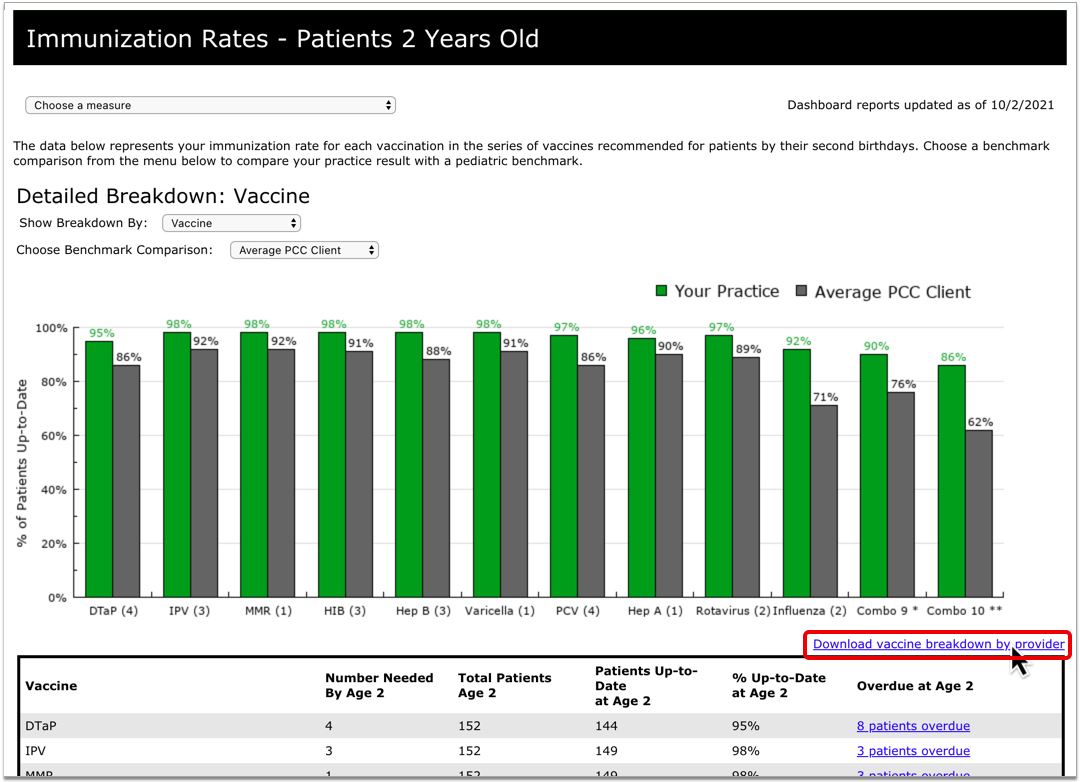
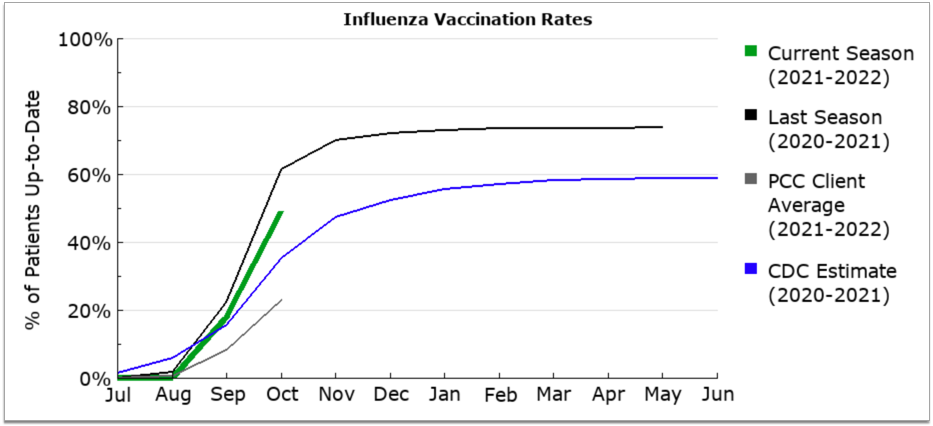
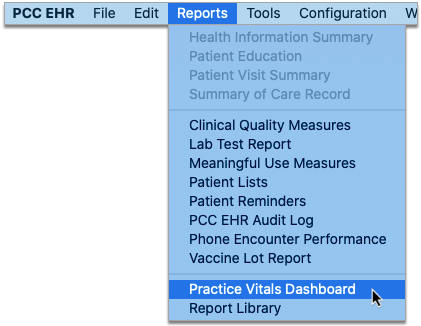
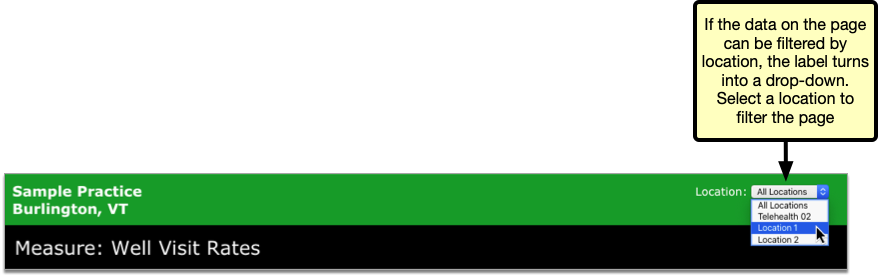
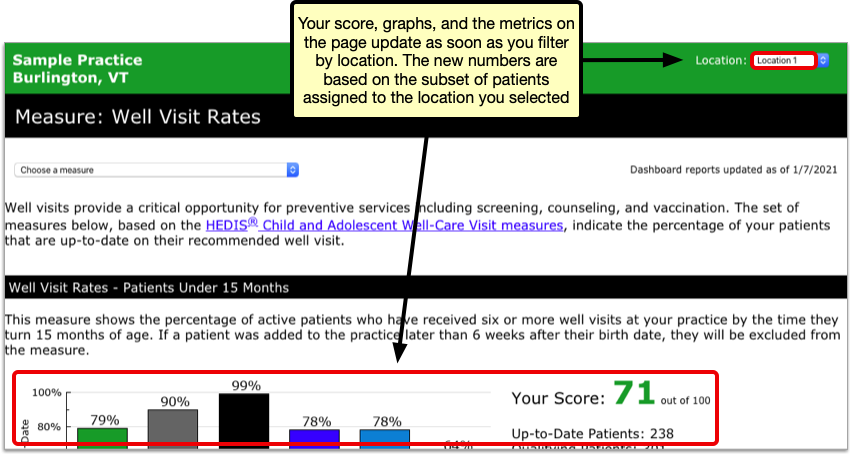
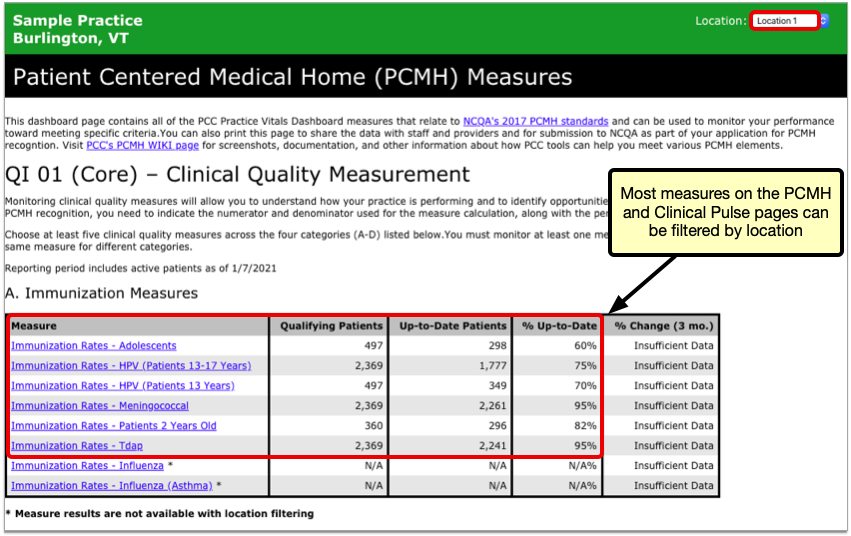
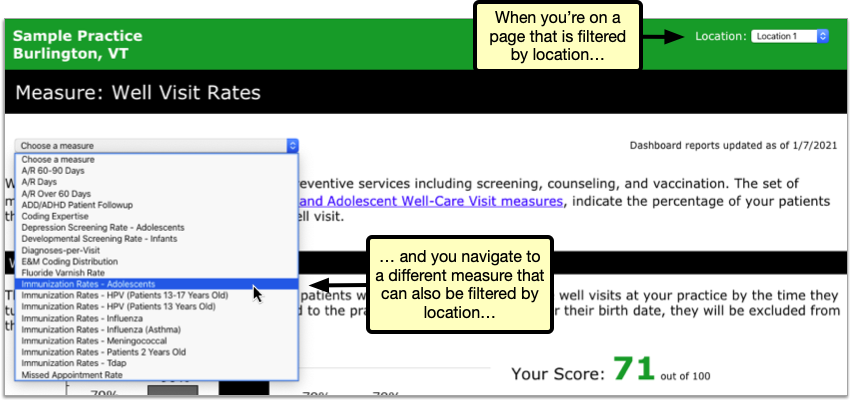
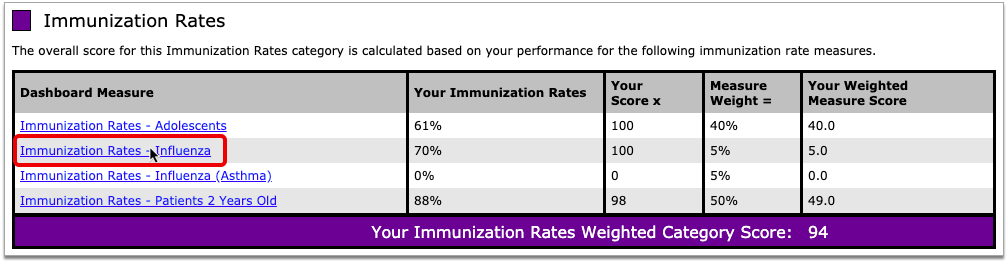
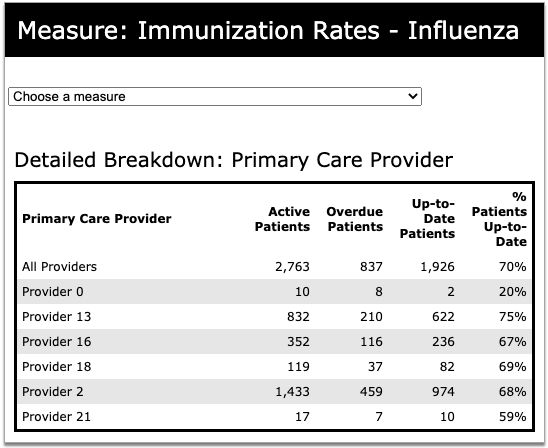
Review Flu Shot Rates by Provider
You can now review seasonal influenza vaccine rates per provider in your Practice Vitals Dashboard.
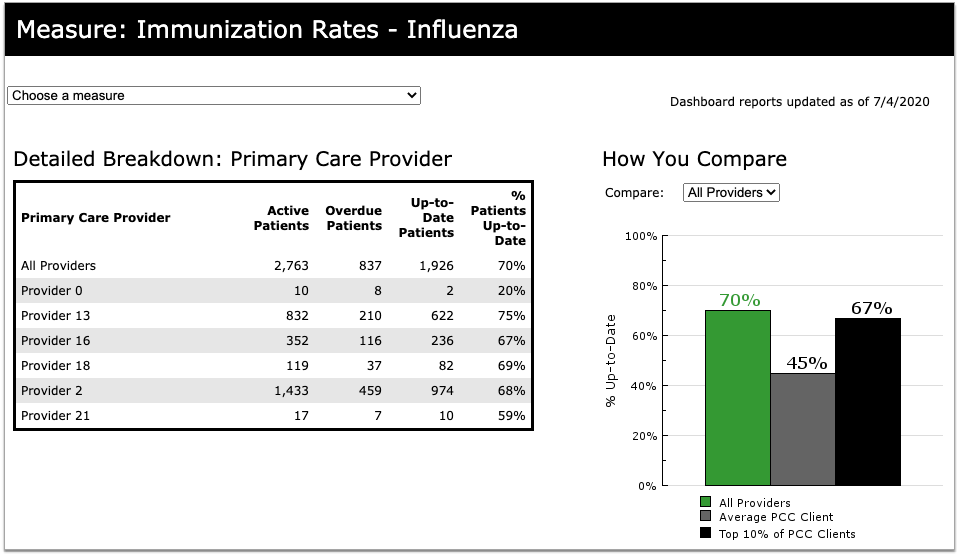
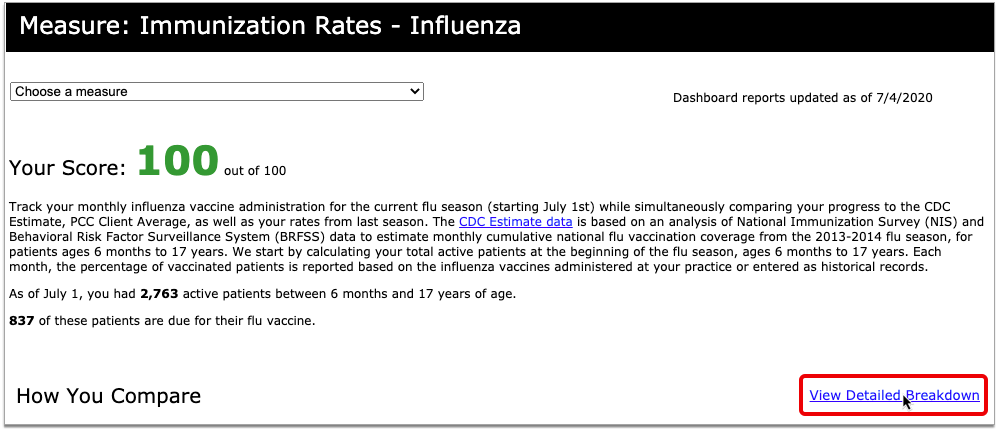
Open the Dashboard from the Reports menu in PCC EHR, then click the Clinical Pulse tab to view your practice’s clinical measures. Scroll to the Immunization Rates section of the page and click on the “Immunization Rates – Influenza” hyperlink.
The Immunization Rates – Influenza page offers a snapshot of your whole practice’s flu shot rates. Click “View Detailed Breakdown” in the How You Compare section to see how each primary care provider at your practice performs.
The detailed breakdown shows the number of active patients assigned to each provider, how many are overdue for a flu shot, and how many are up-to-date. You can compare providers to one another, as well as other PCC and industry benchmarks, and use this information to tailor your patient recall efforts to the providers and populations who need them most.
Review Provider Flu Shot Rates by Care Center: If your office belongs to a Care Center, the detailed breakdown of influenza immunization rates only includes providers assigned to the Care Center whose Dashboard you are viewing.
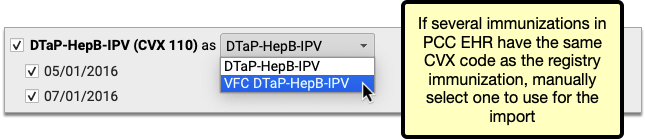
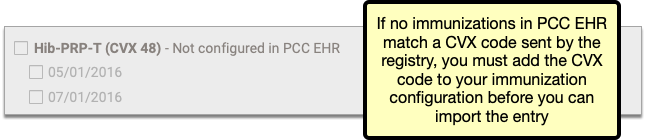
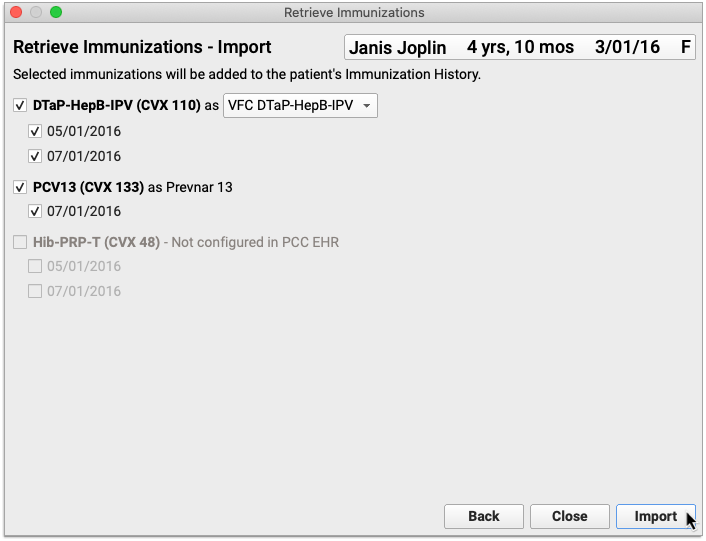
Configure CVX Codes For All Influenza Immunizations: CVX codes are codes published and maintained by the Centers for Disease Control which indicate the product used in a vaccination. The immunization rate measures in your Practice Vitals Dashboard expect a CVX code to be configured for each vaccine your practice administers. Vaccine administrations which are not linked to a CVX code are excluded from the Dashboard measure immunization rates. If you need help evaluating or updating your immunization configuration, contact PCC Support.
See How Well Your Payors are Paying for Telemedicine Sick Visits
Do your payers pay you for telemedicine sick visits, and do they do so on par with payment for in-person sick visits? Use the new Telemedicine Payment Parity section of your Practice Vitals Dashboard to find out. This section was added to all practice dashboards during the 8.13 release cycle in June of 2020.
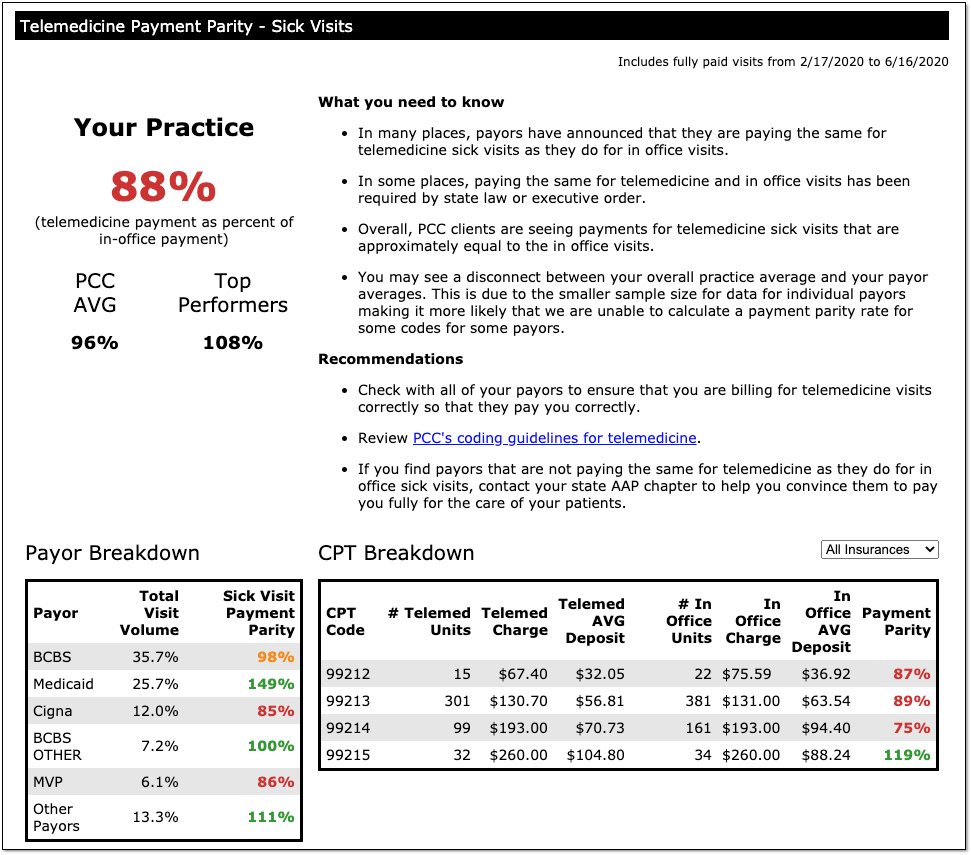
The overall practice percentage summarizes how well you are being paid for telemedicine sick visits versus in-person visits, and compares your payment parity rate to other PCC practices.
The Dashboard also displays a breakdown of your top five payors: You can see what their percentage is of your total visit volume, and then see how well they are paying for telemedicine sick visits versus in-person sick visits.
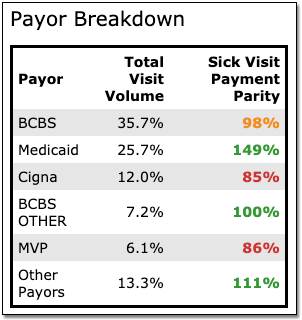
Is a specific payor paying you on par for 99214s, but paying you less for 99213s? The CPT Breakdown section shows which visit codes are being paid on par and which are falling short. You can choose to look at all insurances or just one specific payor.

PCC updates the Telemedicine Payment Parity numbers, along with the rest of the data on the COVID-19 dashboard, every day. For questions or help interpreting your numbers, contact PCC.
100% Parity or Greater Doesn't Always Mean Telemedicine Pays Better: You might notice that your overall score, or that of a certain payor, exceeds 100%. This usually does not indicate that telemedicine sick visits pay better than those conducted in-person. It is more commonly a reflection of how many telemedicine visits you are billing to each payor, and what proportion of your overall visit volume they represent. If you have questions about your payment parity score, please contact PCC.
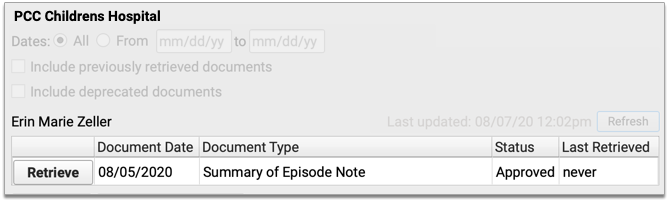
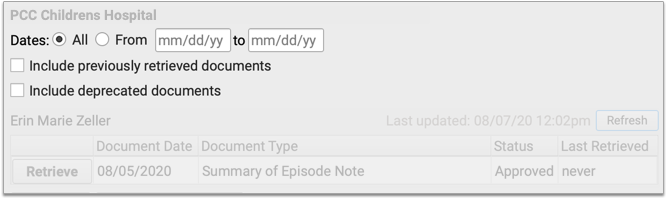
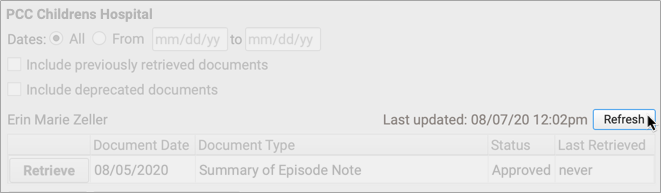
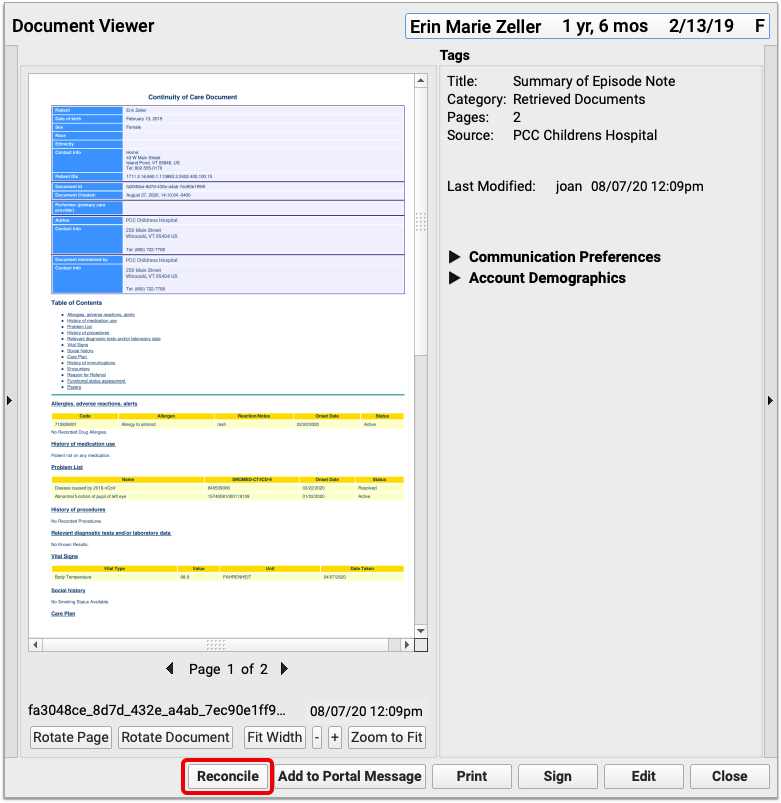
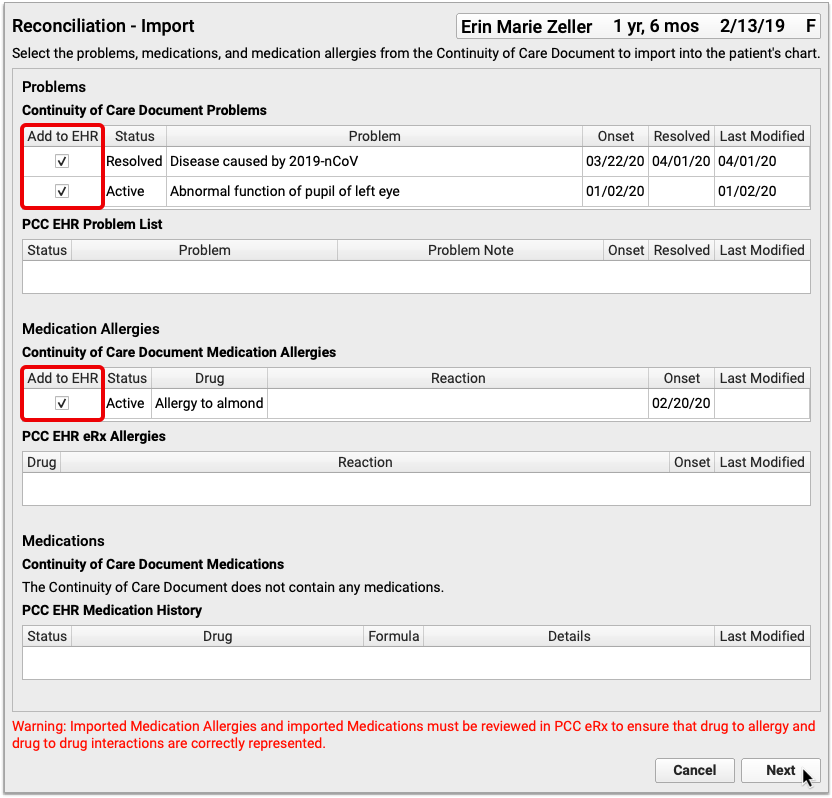
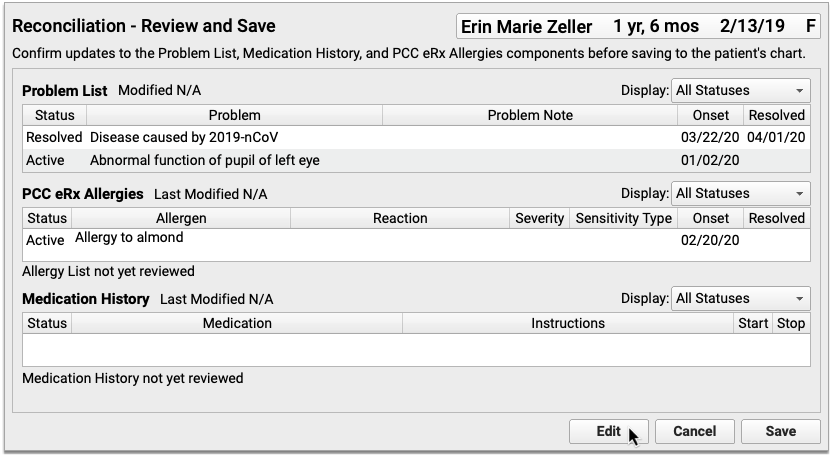
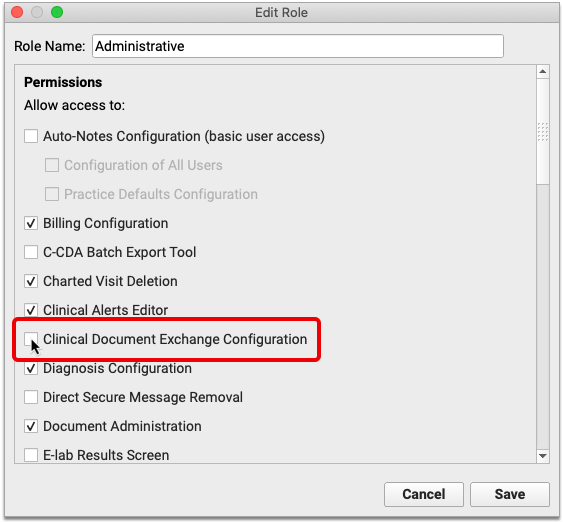
Pilot Test: Securely Retrieve Patient Information from Hospitals and Other Practices
Do your patients see other doctors? Do you wish you could retrieve records from those providers on demand?
As of Release 8.13, pilot testers will be able to request and securely retrieve their patients’ records from other healthcare organizations right within PCC EHR. This is the latest addition to PCC’s Clinical Document Exchange functionality.
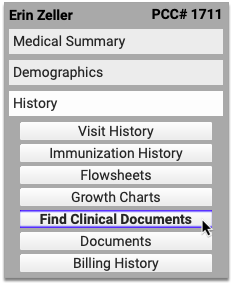
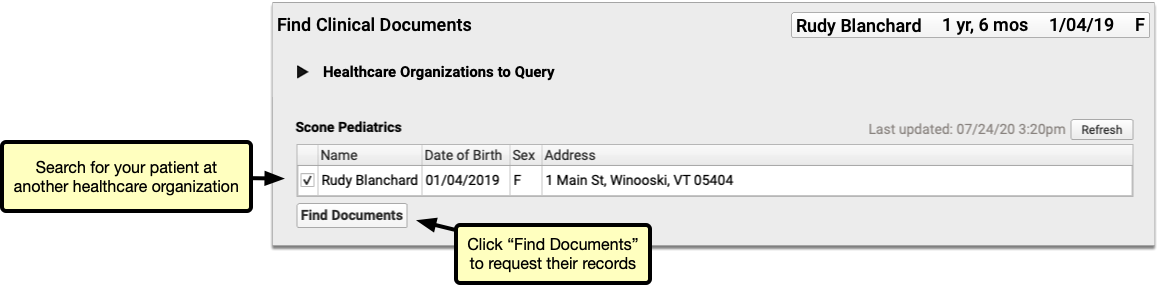
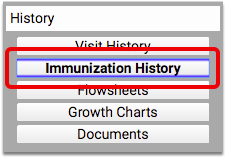
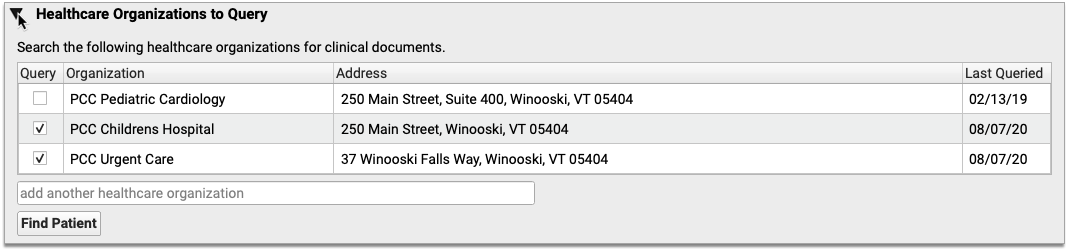
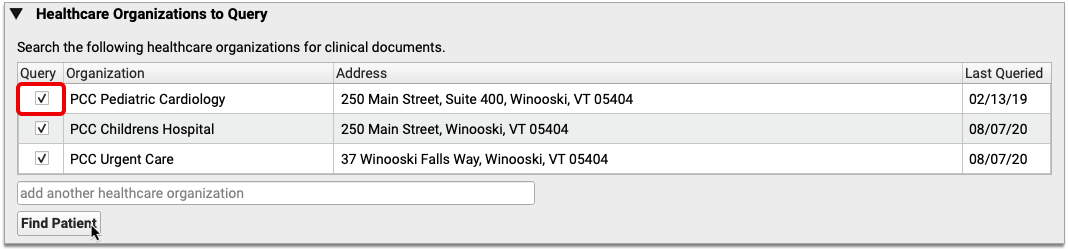
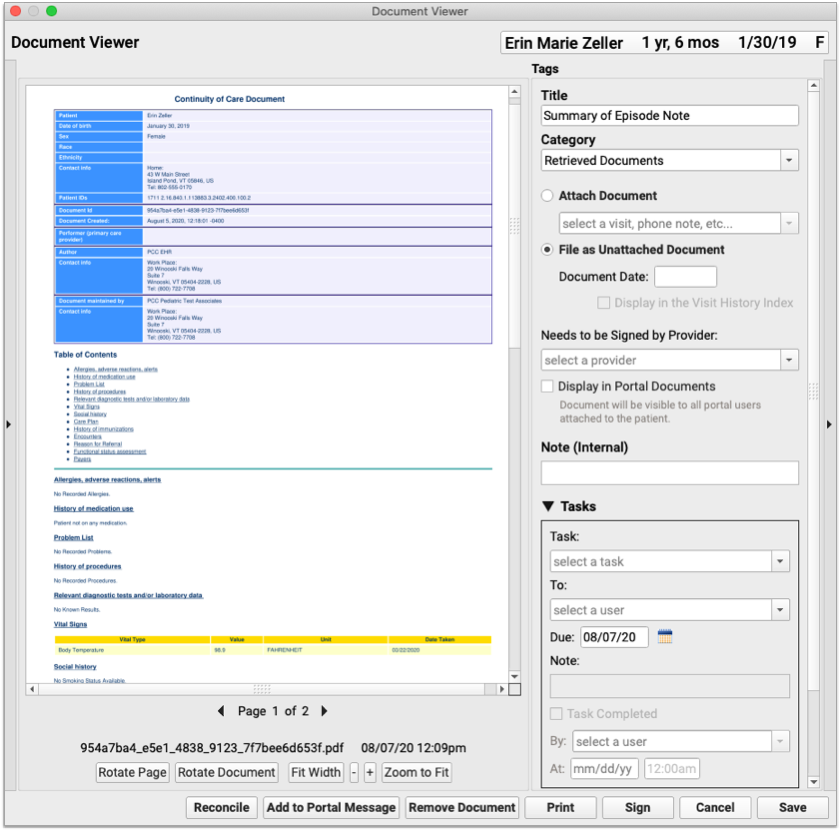
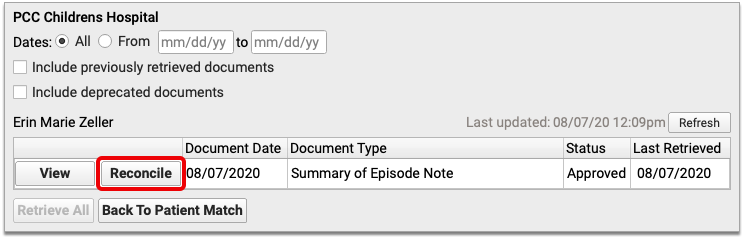
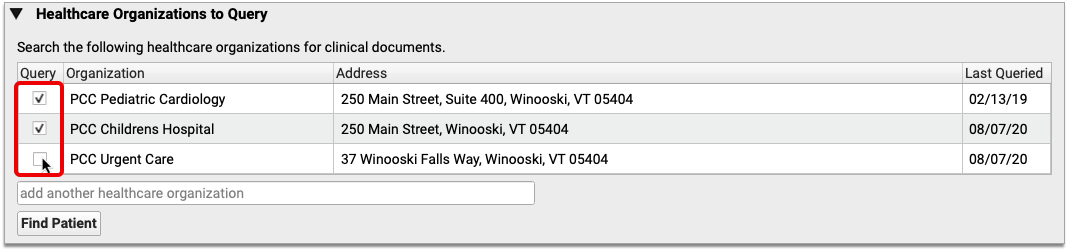
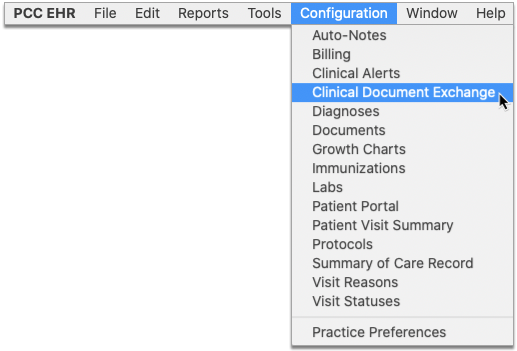
To retrieve a document, click “Find Clinical Documents” within the History section of the patient’s chart.
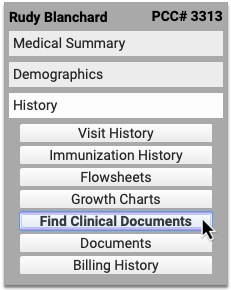
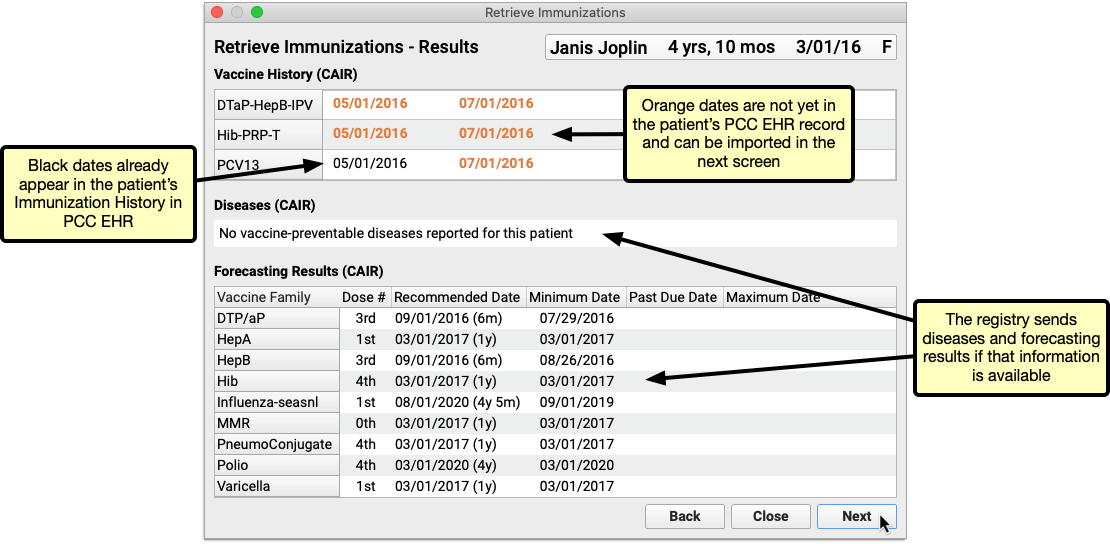
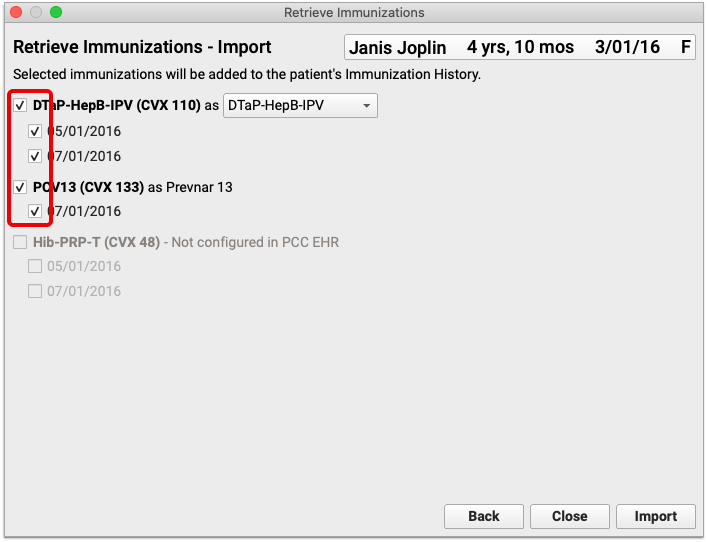
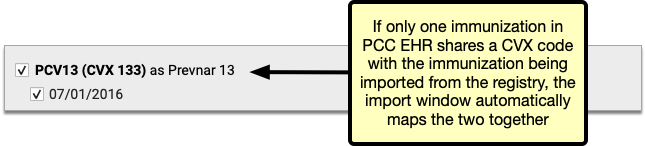
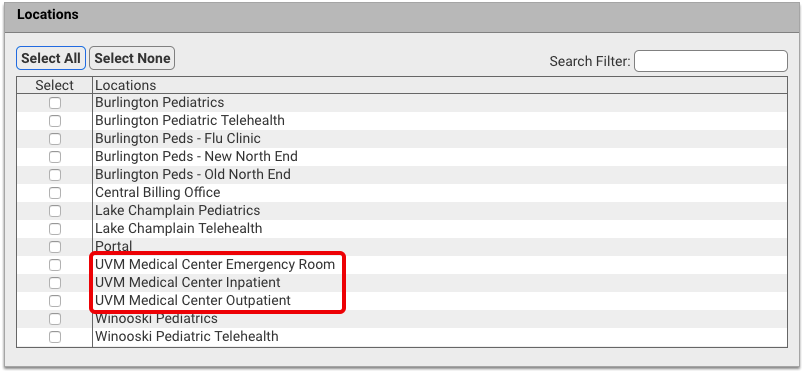
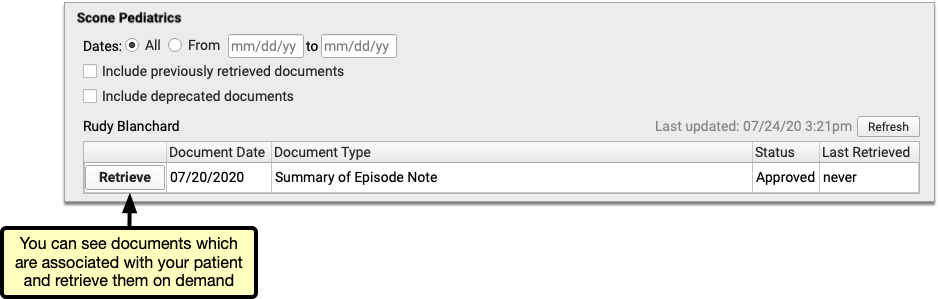
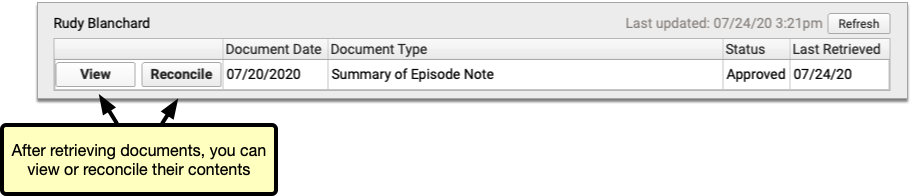
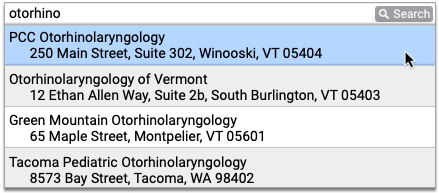
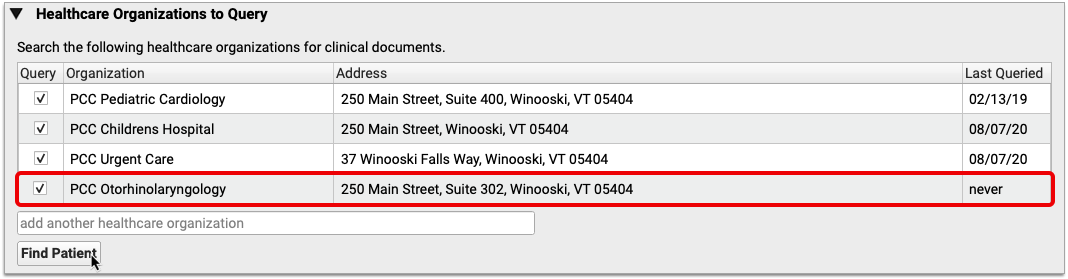
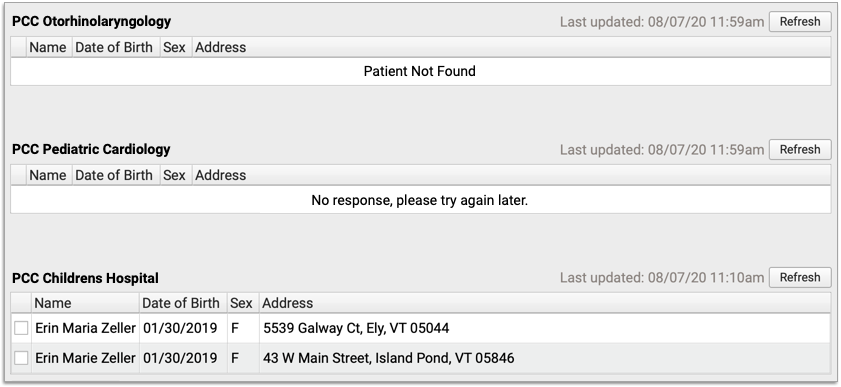
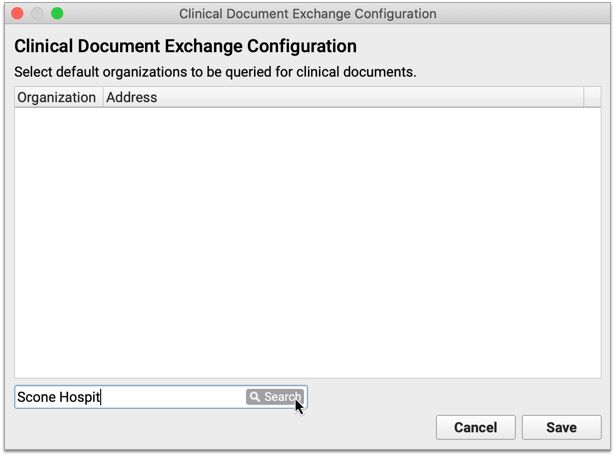
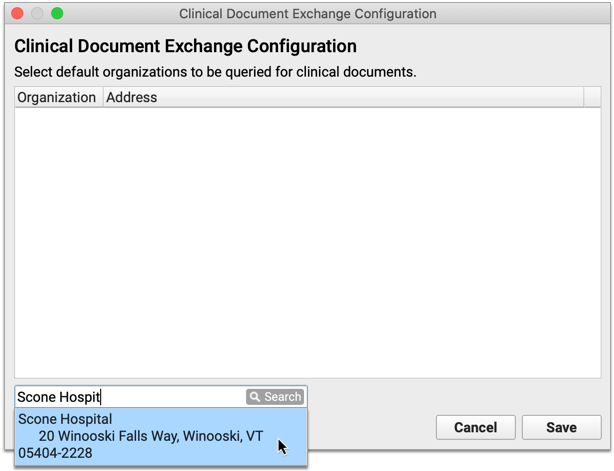
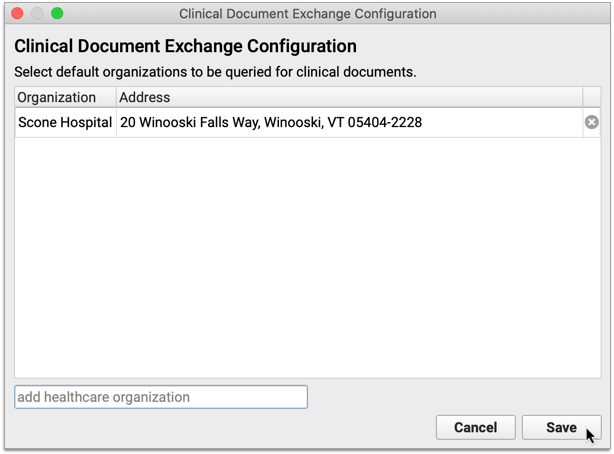
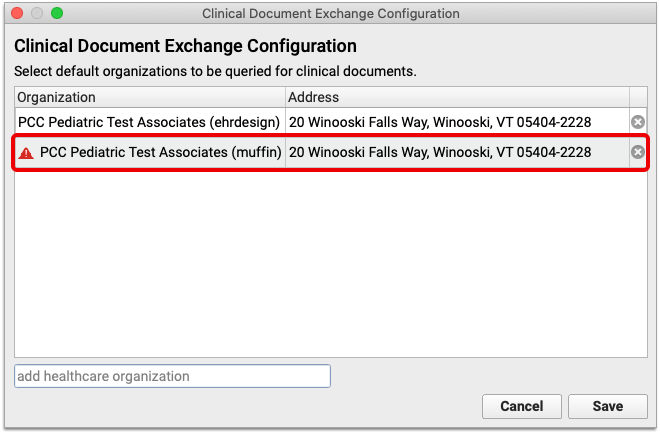
Select one or several healthcare organizations to query, then search for your patient within their records. If you find matches for your patient, you can then see if the organizations have clinical documents to share, and retrieve any you wish to view and save to PCC EHR.
You can set up default healthcare organizations to query for each of your patients, and also decide if certain organizations (such as local hospitals or urgent care clinics) should be queried for all patients.
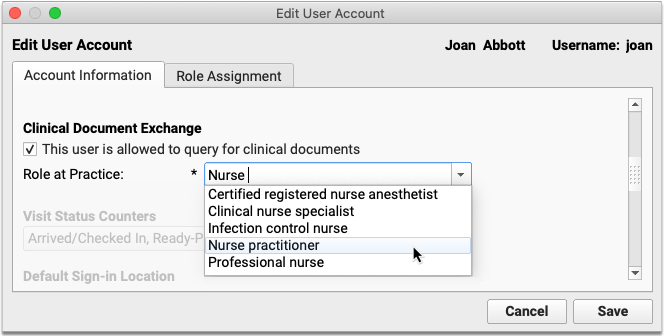
Users need special permissions in PCC EHR in order to request patient records from other organizations. All PCC EHR users can view retrieved documents after they have been saved in patients’ charts.
How do I Participate?
Although it is not yet possible to sign up to securely retrieve your patients’ records from other healthcare providers, you can prepare for the feature by becoming a Clinical Document Exchange Responder.
Clinical Document Exchange Responders allow other healthcare organizations who participate in the Carequality interoperability framework to retrieve their patients’ records for treatment purposes. In order to eventually be able to initiate records requests, you must first enroll to respond to requests from others.
To become a Clinical Document Exchange Responder, contact PCC Support.
Learn About Clinical Document Exchange
Is Clinical Document Exchange secure? How does it work? Which organizations can I query for my patients’ records? Find answers to all of these questions and more in the PCC Learn article about Clinical Document Exchange.
New and Updated Interfaces Available in PCC 8.13
With each release, PCC’s Interoperability team expands and updates PCC’s direct connections, partnerships, and integrations with insurance payers, immunization registries, and more. Here are the clinical and financial interoperability updates for PCC 8.13:
-
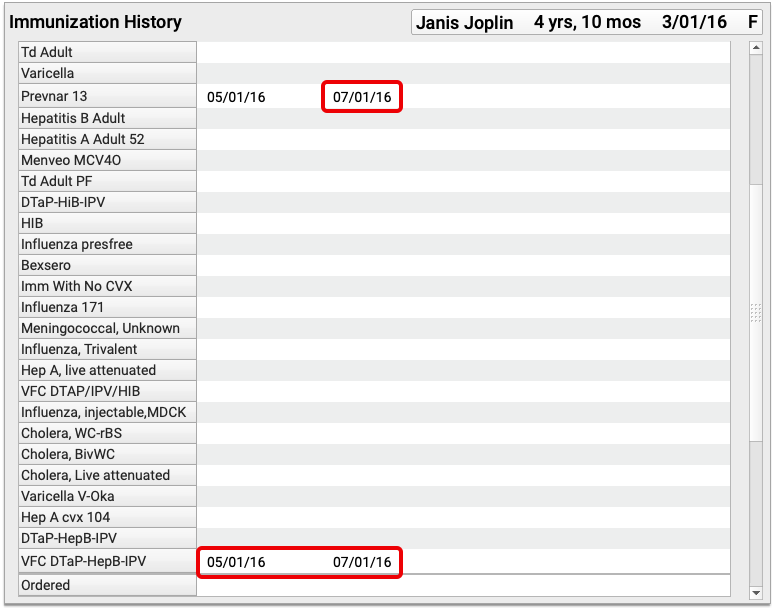
New and Updated Immunization Interfaces: During the PCC 8.13 release cycle, PCC updated our immunization registry interfaces with WAIIS (Washington State), DOCIIS (Washington DC), TennIIS (Tennessee) and ImmTrac VXU (Texas).
-
Updated Clinical Interfaces in PCC EHR: PCC added or updated clinical interfaces with Delaware Health Information Network (DHIN), Affinia Health Network, Multicare Labs Northwest, Kent General Hospital, Christiana Care, Bayhealth, Nemours, and American Esoteric Laboratories.
-
New Insurance Eligibility and Financial Interfaces: PCC also added or improved interfaces with Nemours Healthy Planet, Illinois Medicaid, Alabama Medicaid, CHAMPVA, Bright, Highmark Health, Vivida Health, and BCBS Louisiana.
If your practice would like to take advantage of these connections, or you have another interface need, contact PCC Support.
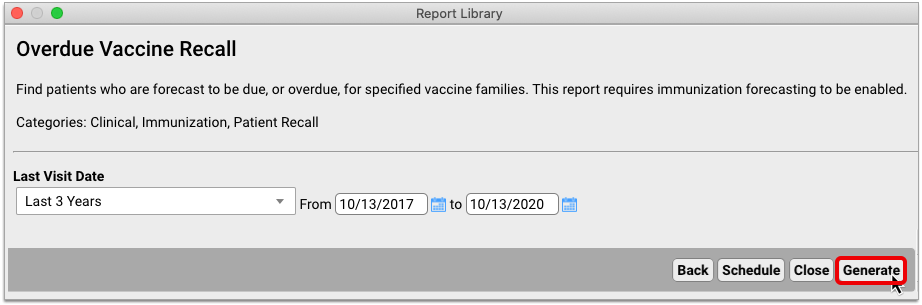
Immunization Forecasting is Up to Date
During the PCC 8.13 release cycle, PCC updated your immunization forecasting schedules to meet the latest CDC ACIP schedules and to correct unusual schedule scenarios or errors in forecasting.
PCC EHR automatically reviews each patient’s immunization record and provides a table showing any immunizations that were missed, are recommended soon, or that occurred outside of the CDC’s ACIP schedule.
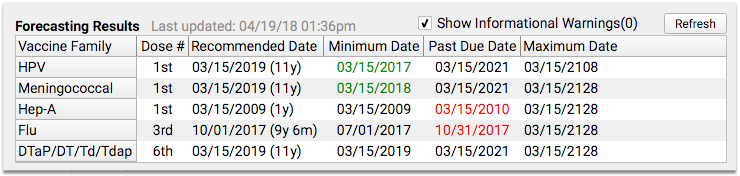
PCC uses immunization logic and calculation services provided by Immucast by STC. During the PCC 8.13 release cycle, STC applied their latest patch (5.22.3), updating and correcting immunization schedules and bringing your system’s Immunization Forecasting in line with the latest ACIP recommendations.
Here’s a summary of the most notable improvements:
-
Polio: Prior to the 5.22.3 update, a 4th dose of polio vaccine, with an immunization date where the patient was <= 48 months – 4 days old, that was administered prior to 08/07/2009 (when ACIP changed their Polio guideline), would be incorrectly marked as Invalid. This no longer occurs.
-
Hepatitis B: When the 3rd dose of Hepatitis B vaccine is administered too early to satisfy the guidelines for the last dose in a Hepatitis B series, immunization forecasting will now calculate the next recommended dose based on a Hepatitis B 4-dose schedule.
-
DTaP: Under certain circumstances, a compromised DTaP vaccination at >= 4 years was counting as valid when evaluating for Pertussis and forecasting the Tdap adolescent dose. This will no longer occur.
-
DTaP: When a patient received the 4th dose of DTaP when they were >= 4 years old and just prior to 7 years, they have not completed the primary series. A Td vaccine given at age 7 will now be considered valid to complete the primary series. (An additional Tdap following that Td will continue to be correctly marked as Inadvertent.)
PCC tests all adjustments to the immunization schedules. Please get in touch if you’d like to learn more about the updates, or if you observe a forecasting result or warning that doesn’t match your expectation. You can review the full list of updates by reading the STC ImmuCast 5.22.3 release notes.
To learn more, read the guide to PCC’s Immunization Forecasting features.
Other Feature Improvements and Bug Fixes in PCC 8.13
In addition to the features described above, PCC 8.13 includes these smaller improvements and squashed bugs.
-
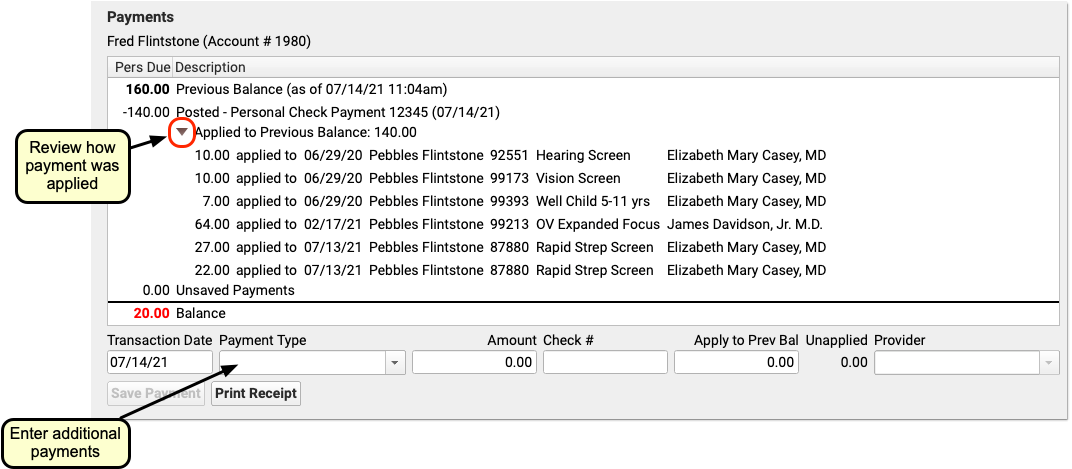
Better Posting of Payments for Sibling Visits: When you post time-of-service payments for multiple patients who share a billing account (such as siblings) who are visiting on the same day, the Post Charges screen will leave the remaining payment amount unapplied until you post the final sibling’s charges.
-
Automatically Remove Flags: PCC Support can configure your system to automatically remove flags from patients or accounts based on your practice’s custom criteria.
-
For In-Home Encounters, Claim Processing Will Now Check For a 9-Digit Zip Code: If you see a patient in their home, and your practice creates a claim with the patient’s home as the place of service, PCC’s claim processor will now pause and prompt the biller if the home address lacks the required “Zip+4” zip code. This will prevent possible claim rejections, as payers generally require the full 9-digit zip code for places of service.
-
Four Digit Years on Immunization Forms: PCC Support can now customize PCC’s immunization form generator to produce four digit years for immunization administration dates.
-
Claim Processing Will Check the NPI of a Claim's Place of Service: PCC’s claim scrubber will now validate the NPI of each claim’s place of service instead of the place of service’s insurance code.
-
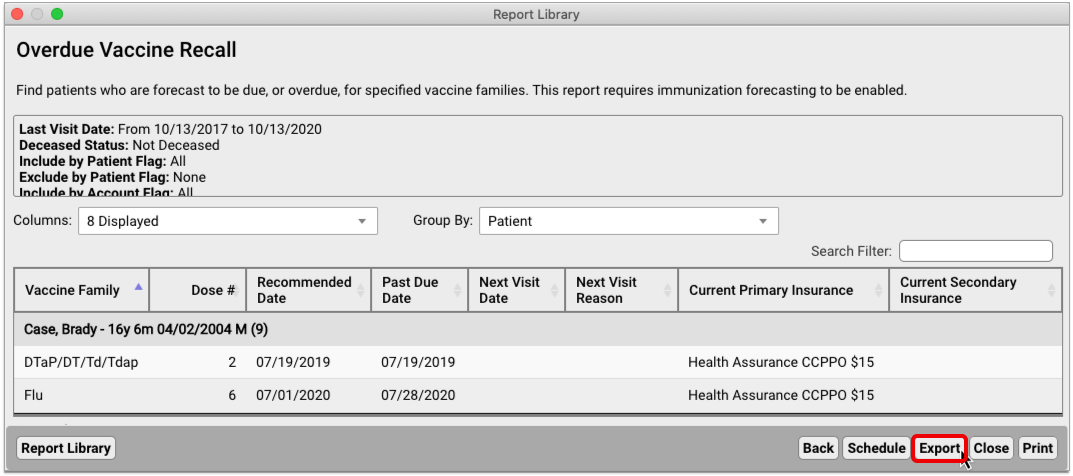
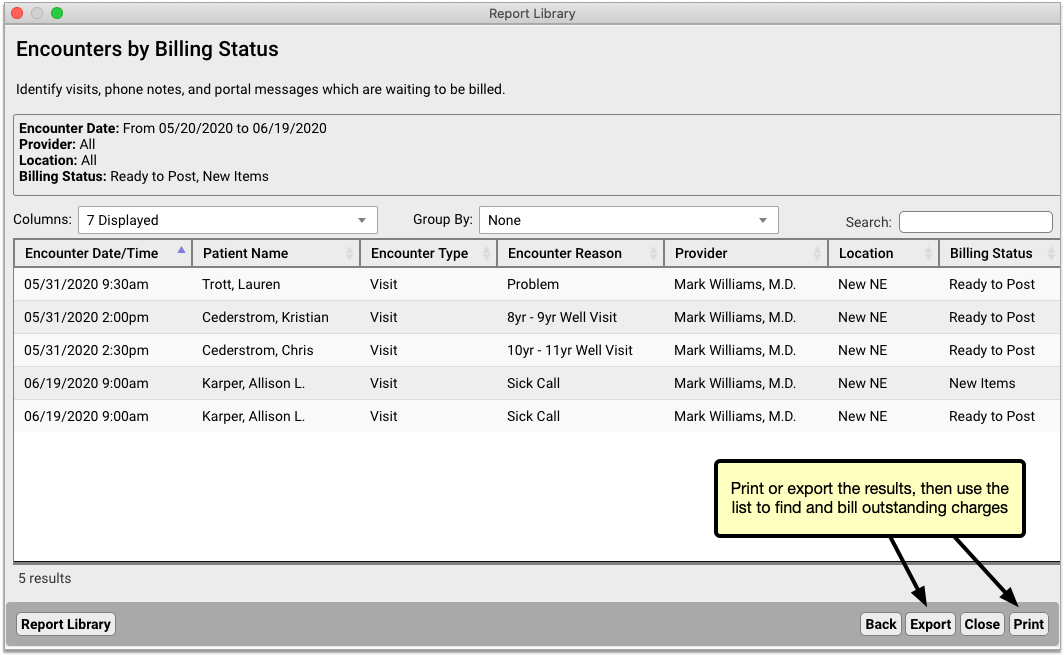
'Generating...' Message When You Export from the Report Library: When you generate a report in the PCC EHR Report Library, a new ‘Generating…’ pop-up window will decrease confusion when you are working with a large, complex report.
-
Changing the Provider on a Phone Note: If a user created a phone note, and then later changed the “Provider of Encounter”, depending on filters the phone note could appear on both the original provider and new provider’s signing queues. This issue has been resolved.
-
View Who Posted Each Charge in PCC EHR: During the development of PCC 8.12 and the two COVID-19 releases in the spring of 2020, the ability to review who posted encounter charges was removed from PCC EHR. In PCC 8.13, you can now again review who posted any billed encounter in the new Billing History chart section, as described above.
-
Posting TOS Payments on Back-Posted Visits: When you post charges that occurred on a previous date, and you post time-of-service payments (or discounts) at the same time, the payment or discount will now be linked to that past date. Receipts and the Billing History will display the amounts.