Order a Lab, Procedure, Supply, or Other Order
As you review a chart note, take a phone call, or perform an exam, you may create orders. For example, the patient may need referrals, shots, a nebulizer treatment, a handout, or a lab. Click “Order” to create an order.
The procedure below shows some of the details and tools you might use when you create orders.
Open a Patient Chart and Today’s Chart Note, a Phone Note, or a Portal Message
First, open the patient’s chart. Double-click on the patient’s name on the Schedule, the Messaging queue, or use the Find field.
If the patient has a visit today, a chart note will open for you. Otherwise, you might review a portal message, create a new Phone Note, or review another encounter in the Visit History.
No Appointment?: If the patient has no appointment and no chart note for today, you can click “Create Visit” and select a visit reason in order to start a chart note and request a lab or other order. You can also open a previous encounter in the Visit History section of the chart.
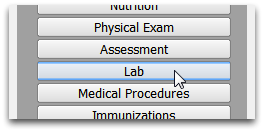
Jump to the Desired Section of the Protocol (Referrals, Lab Orders, Medical Procedures, etc.)
The navigation buttons for the protocol often include a direct link to “Labs”, or other orders components. (You can also scroll down to find what you need.)
Common orders components include Follow-Up Orders, Handout Orders, Lab Orders, Medical Procedure Orders, Medical Test Orders, Radiology Orders, Referral Orders, Screening Orders, Supply Orders, and Surgical Procedure Orders. Immunizations is a special orders component that includes a history and other features.
Add a Visit Protocol for More Order Options: If today’s chart note does not include the type of orders you need, you can select “Add Protocol” from the Edit menu and add a visit protocol that will include the orders you need. Your practice can customize protocols for each of your visit reasons and other encounters.
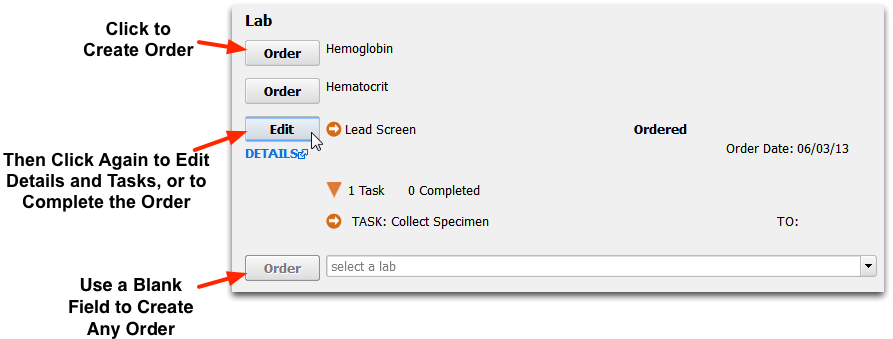
Click Order
Click “Order” next to the order you need. Or, begin typing in the blank pull-down and then select the order and click “Order”.
You can work with PCC Support to customize the list of labs and other orders available for each chart note protocol.
Snap Labs: Some orders may be “Snap” orders, which pop in several orders with a single click. For more information, read the Lab Configuration guide.
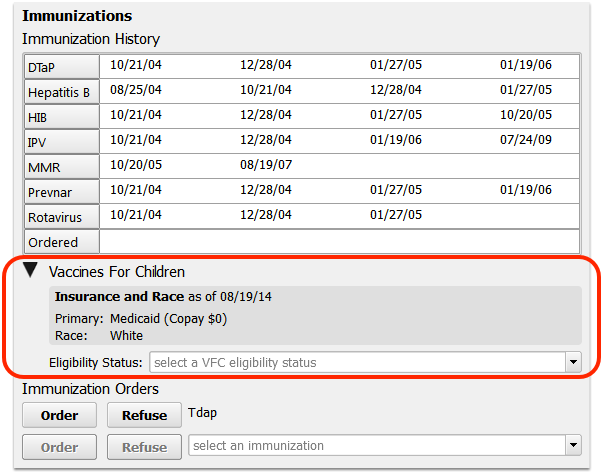
Immunizations: You can order immunizations just as you would any order. The patient’s immunization record, and optionally an Immunization Forecasting section, appear inline to help you determine what immunizations are needed. Your custom chart note may list common immunizations for today’s visit. Also, a special VFC section will provide patient information and let you enter the patient’s VFC eligibility for all the immunizations in this visit.
Click “Edit” to Edit Order Details
Click “Edit” to change your order defaults, add details or make the order more specific.
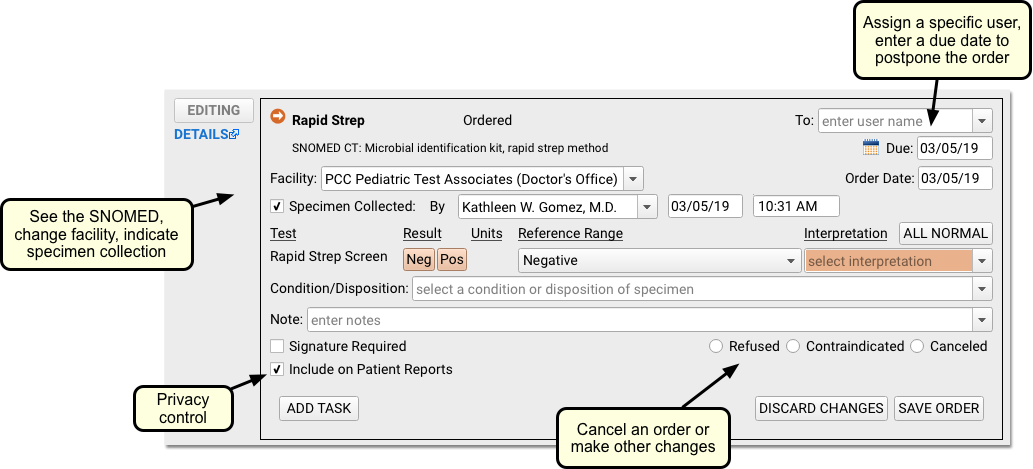
You can change the order date and enter notes. You can assign a specific user or user group to complete the order, and enter a “Due” date so the order will appear as “not due today”, and will become due after a specific date.
Depending on the order type, you can also enter other information (such as specimen collection information, lab facility, or results) immediately, if applicable. For example, immunization orders include details about VFC, VIS, whether a shot was administered or refused, and other options.
For each order, you can also turn on or off three important status items.
-
Signature Required: The order will appear on the signing queue for clinician review.
-
Refused, Contraindicated, and Canceled: Select one of these items when an order will not be completed. It will not appear on any task queue or the Edit Orders window. The order will still appear on the chart note, but be marked appropriately.
-
Privacy: Include on Patient Reports: If this box is selected, the order will appear on patient reports and will be available in the patient portal. Deselect this box to make the order “confidential”, and only visible within PCC EHR.
Optional: Add or Edit an Order Task
Labs and other orders may include tasks. Click “Add Task” to create a task for an order.
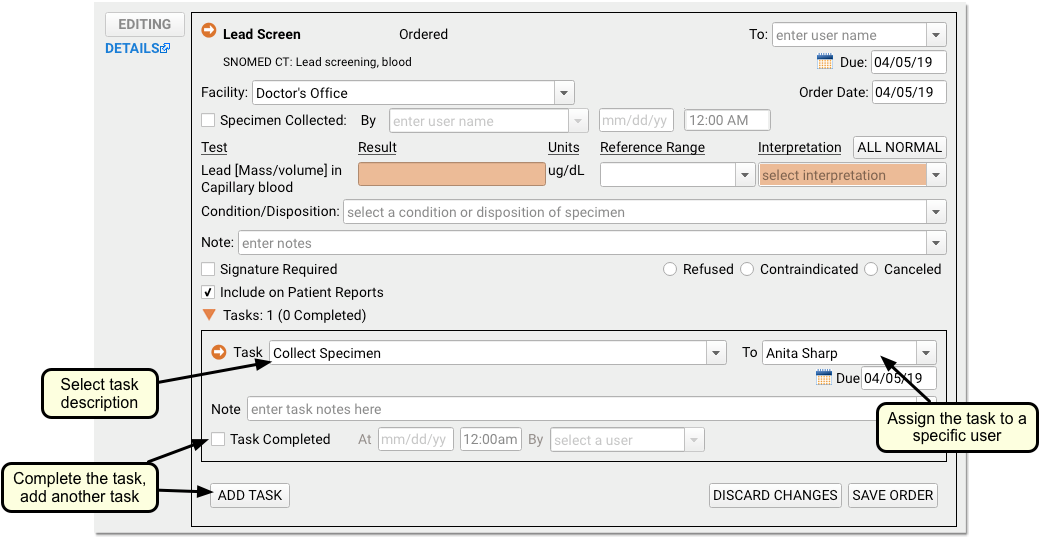
Choose a task name from the customizable drop-down list, and optionally assign the task to a specific user. (All tasks must have a task name, a user, or both.)
Tasks appear wherever the order appears, and your practice can track and complete tasks in many ways: from the orange orders indicator on the Schedule queue, the Visit Tasks, or the Outstanding Tasks component in a patient’s chart.
Tasks are optional. Your practice can use them to indicate that a nurse should collect a specimen, a physician should review results, or a staff member should prepare a handout. However, labs with discrete test results have a built-in Lab Order task that appears on the Visit Tasks queue automatically. Your office may decide it doesn’t need an additional task to know that labs are complete.
Default or "Sticky" Task: When you add a task to an order, PCC EHR remembers it. The next time you create the same order, that task will appear automatically. This is called a “sticky” task. PCC EHR remembers the first sticky task per order, per user. If your office is using a new type of order for the first time, each clinician may need to add the Collect Specimen task (for example) the first time they create that order.
Remove a Task, Remove a Sticky Task: You can remove any task by blanking out the “TASK” field and the “TO” field and saving the order. If your office decides to no longer use tasks for a particular order, each ordering clinician can blank out those fields and save the order. The next time they place that order, the task will not appear.
Who Can Be Assigned Tasks?: You can customize whether a user can be assigned tasks on the Account Information tab in the User Administration tool. For example, you may want to grant all nurses the “Tasks can be assigned to this user” attribution, or you may want to remove the attribute for nurses who do not complete orders.
Optional: Use Multiple Tasks, Add Due Dates to Tasks
You can add multiple tasks to an order. For some orders, you might create a single task and assign it to someone in your office. When they are done, they might create an additional task and assign it back to you, or to someone else at your practice. In this way, work that needs to be done for a single order (such as a lab test), is all kept within the order itself.
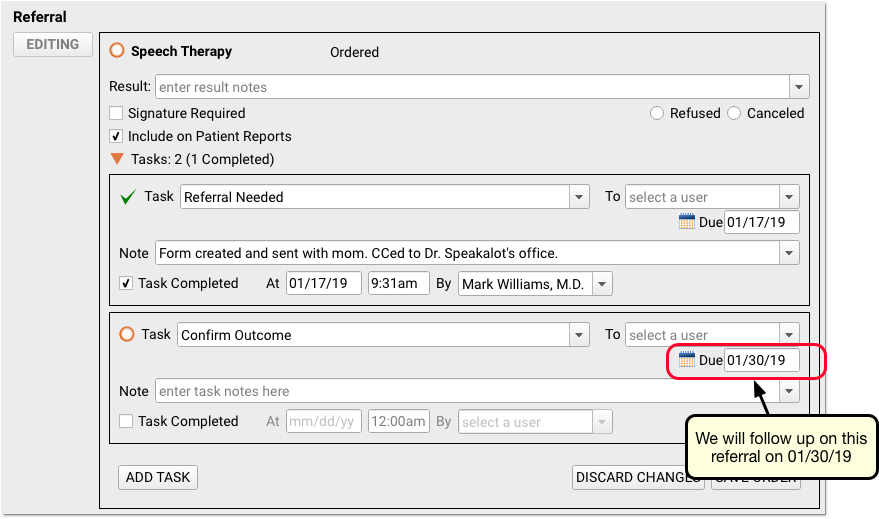
You can optionally give any task a due date. You might complete a task today, but create an additional task that will be done in the future.
When a task is not due today, the order will appear with the orange ring indicator, so you can tell at a glance that it is task for the future, and not due today.
Optional: Add Other Information You Need for the Order
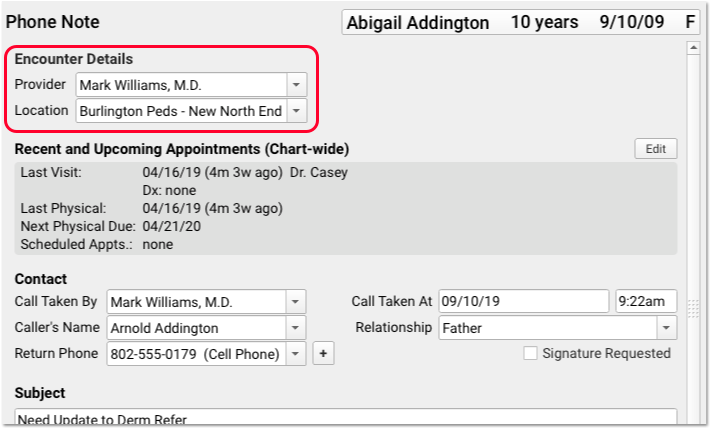
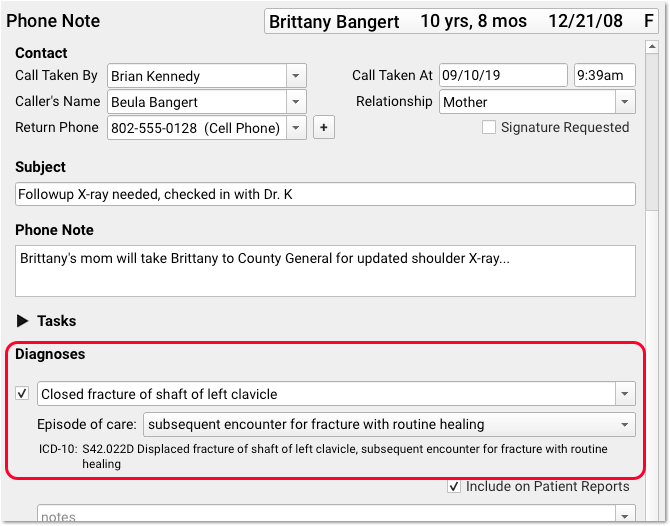
Labs or referrals may require a diagnosis. If you are creating an order on a Phone Note, you may need to enter location and provider information. After you create orders, you may need to enter other information that supports the order.
Optional: Fulfill the Order Immediately, Send Out the Order, and More
You can click “Edit” and complete an order (by entering test results or completing order tasks) immediately, as soon as you order it.
You can also find and complete order tasks later on the Visit Tasks queue, from the orange task indicator in the Tasks column on the Schedule queue, or from the Outstanding Tasks component in a patient’s chart. To learn more, read Fulfill Orders and Complete Tasks.
Send Order Information Out to a Lab, Hospital, or Other Third-Party: For some orders, you might need to send a form, contact a referral provider, print a lab requisition, or similar. Your practice can use PCC EHR’s Forms component, Direct Secure Messaging, the Patient Visit Summary, the Health Information Summary, or generate a requisition to get information out about an order.