Fulfill Orders and Complete Tasks
The sections below explain how to fulfill orders in PCC EHR. Orders include labs, immunizations, referrals, screenings, radiology, and medical procedures.
Read below to learn how to find and manage open orders, how to edit them, and how to enter results and create follow-up tasks.
Contents
Find and Manage Open Orders
Before you can work on an order, you must find it. PCC EHR includes several different ways to find the orders you need to work on:
- Open the Patient Chart
- Use the Tasks Column on the Schedule Screen
- Use the Visit Tasks Queue (or the Messaging Queue)
- Run Reports in the Report Library
Read the descriptions below to learn about the features of each method.
Method 1: Review Outstanding Tasks as You Review a Patient’s Chart
When you are on the phone with a family or working in their chart for another reason, you can use the following methods to identify incomplete tasks and work on them.
Outstanding Tasks Component
The Outstanding Tasks component, which appears on the Medical Summary by default, shows you all outstanding tasks for the patient. Icons indicate if the task is attached to an order, phone note or document. You can add this component to other sections of the chart or protocols as well.
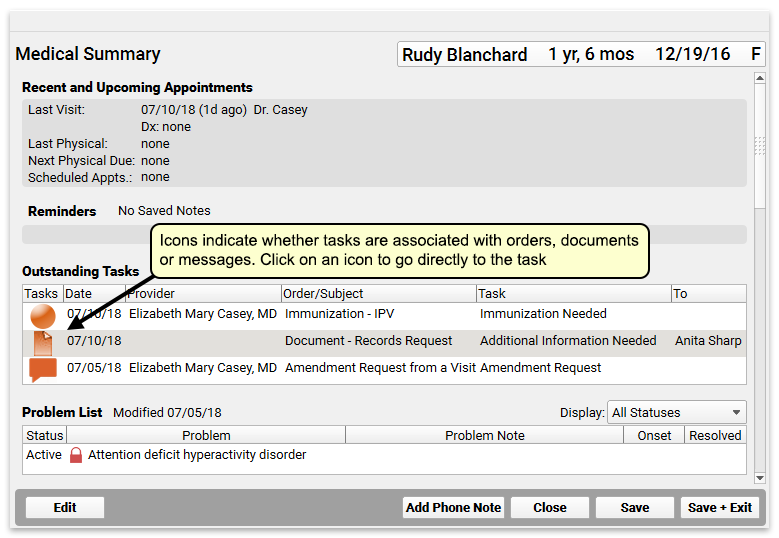
Click on a task icon to go directly to the task.
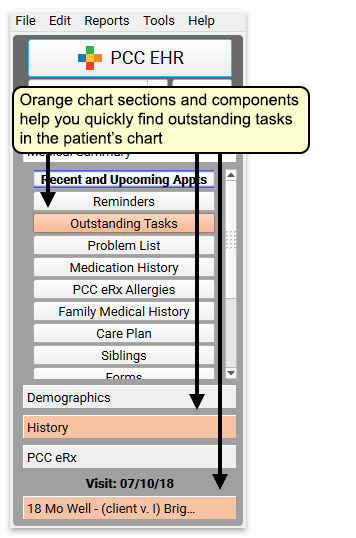
Highlighted Components Contain Outstanding Tasks
The anchor button for any component, protocol or section in a patient’s chart that has an outstanding task displays in orange. Click on the anchor button to open the chart section or component that contains the outstanding task.
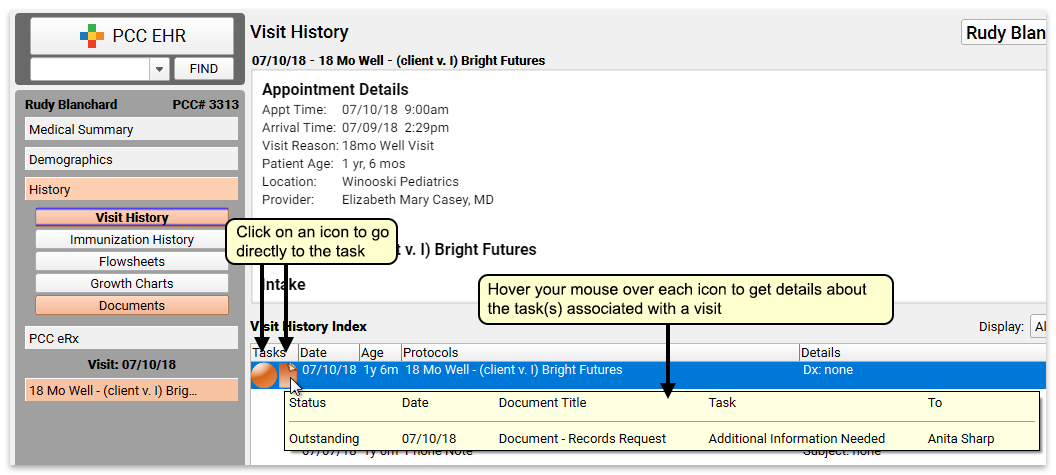
Tasks in the Visit History Index
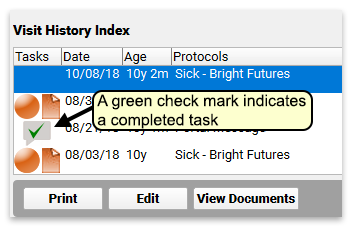
The Tasks column in the Visit History component uses icons to indicate which encounters contain outstanding tasks. Hover your mouse over each icon to view a summary of the tasks, or click on the icon to go directly to the task. Visits with completed tasks will show icons with green check marks.
Method 2: Use the Tasks Column on the Schedule Screen to Fulfill Orders
You can use the Tasks column on the Schedule screen to locate and work on any orders for a visit.
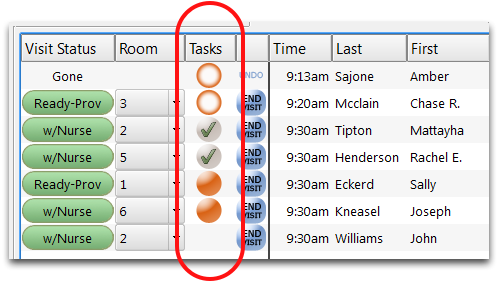
The indicators tell you if the visit has any incomplete orders.
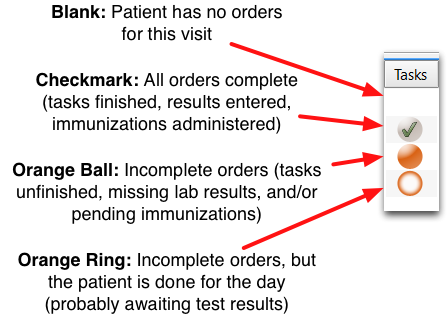
An incomplete order could be an incomplete task, a missing lab result, or an immunization that needs to be administered.
Click on the tasks indicator to access the orders and work on them.
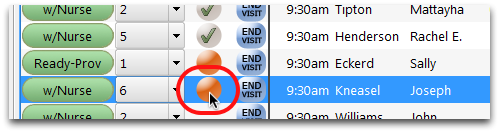
Click “Edit” to work on any order. See below for an example.
Twice in One Day, or Multiple Days: The Schedule screen, Tasks column, and Edit Orders window deal with each appointment separately. Therefore, if a patient has multiple visits on a single day or across several days, you should look at each appointment entry to check their Task column. Or, use the Visit Tasks queue to review and work with all incomplete orders.
Method 3: Use the Visit Tasks Queue to Fulfill Orders
The Visit Tasks queue is a robust, powerful tool that makes managing your outstanding tasks a snap. You can set up defaults that let you watch just the providers or assigned users you wish, and you can switch quickly between a list of all orders, all incomplete orders, or other display criteria.
Click on the “Visit Tasks” tab to view the Visit Tasks Queue. You can see various order tasks, including immunizations, lab orders, and medical procedures. By default, you will only see tasks that are past their “Due” date, meaning that they are ready to be completed now.
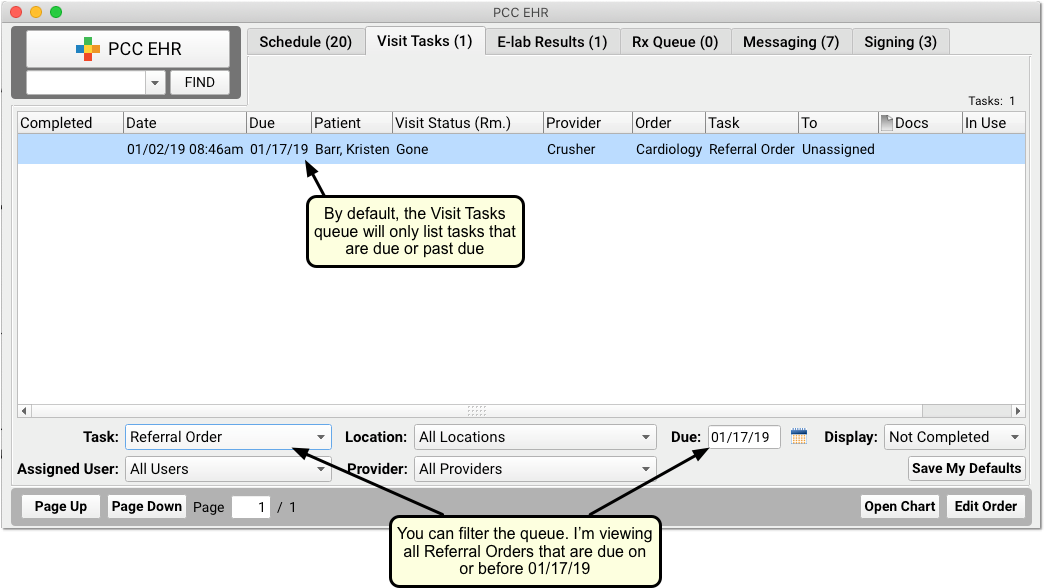
Double-click on any order to open it and work on the tasks, enter lab results, or administer immunizations. (For examples, read the “Edit and Fulfill Different Kinds of Orders” section below.)
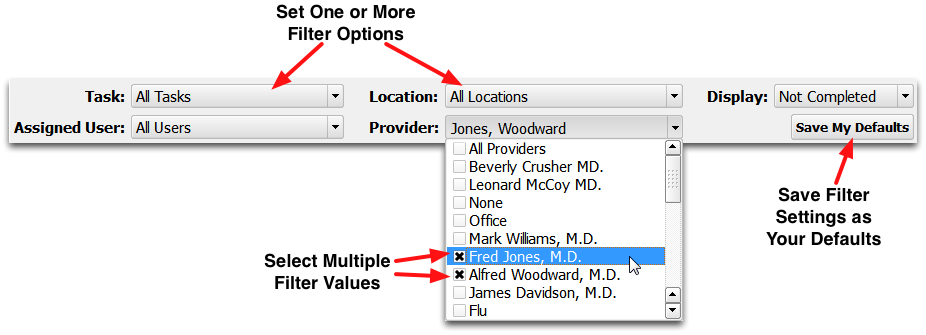
Filter the List of Tasks/Orders: As you review the list of incomplete tasks, use the filters at the bottom to limit which tasks appear. You can see tasks of specific types, locations, assigned users, provider of encounter, or of certain statuses (Not Complete, Complete).
After setting your preferences, click “Save My Defaults” and PCC EHR will remember how you like to use the Visit Tasks queue.
Run a Report to Find Open Orders
In addition to the features and tools described above, you can also use PCC EHR’s Report Library to find and manage patient labs, referrals, and other orders.
For example, to create a list of all open orders of a specific type (such as referrals), run the Orders By Visit report.
You can create custom orders in the Report Library to work with any kind of order, complete or incomplete.
Edit and Fulfill Different Kinds of Orders
After you find and open an order, you can make changes, enter results, and complete tasks. Read the sections below to learn more.
Generate and Send Information to a Third-Party Health Care Provider
For some orders, you might need to send a form, contact a referral provider, or perform similar actions. How do you get information about an encounter to another health care provider?
Tailor the information to your audience! Generate a lab or radiology requisition, send a Direct Secure Message, or use the Patient Visit Summary, the Health Information Summary, or a custom form to get information out about an order.
Enter Required Results
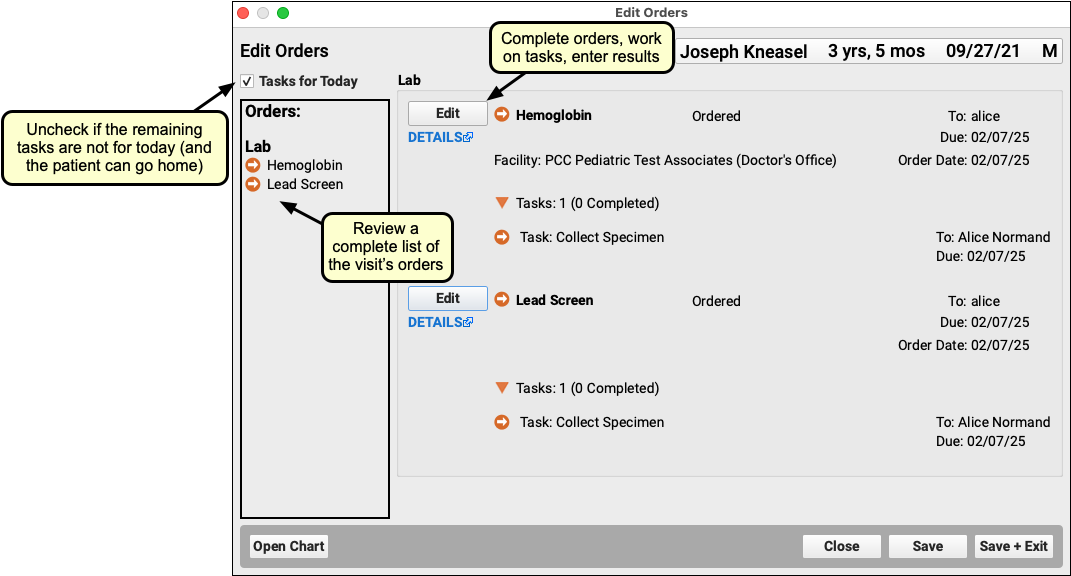
When you work on some orders, you will notice some fields that are required for completion. Required fields are highlighted in orange.
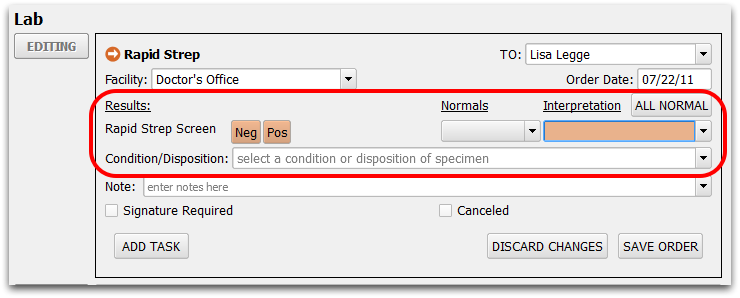
A typical lab order will contain one or more tests, with may require results as shown above. The order will be listed as incomplete until the required fields are filled. Many orders have no required results.
Complete and Create Tasks
For an order to be complete, all tasks must be complete. If an order has tasks, they appear below (or instead of) result fields.
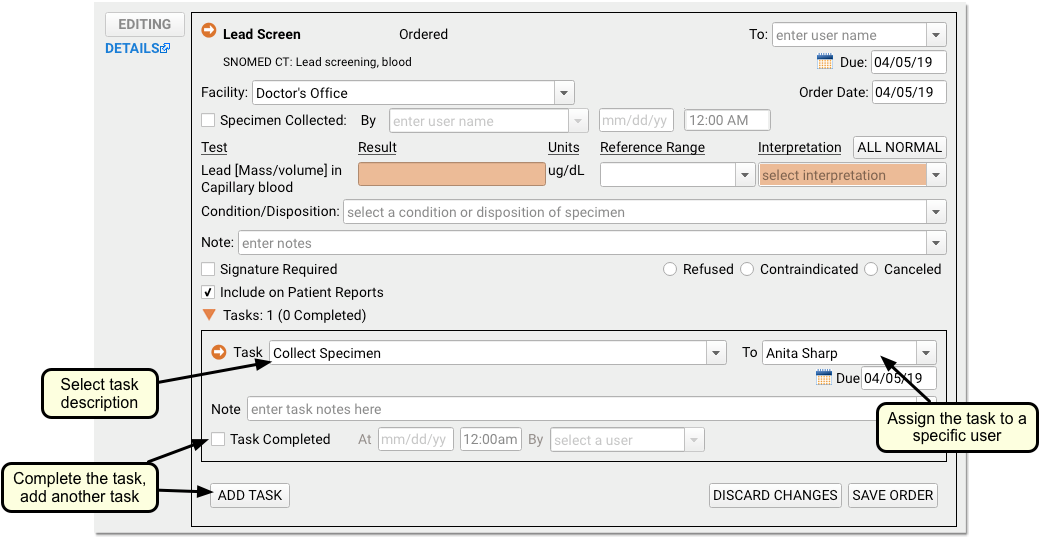
Click “Task Completed” to mark a task as done. You can also create additional follow-up tasks and assign them back to the provider or another user. (Your practice can customize which users can be assigned tasks in the User Administration tool.)
Tasks are optional. Your practice can use them to indicate that a nurse should collect a specimen, a physician should review results, or a staff member should prepare a handout. However, labs with discrete test results have a built-in Lab Order task that appears on the Visit Tasks queue automatically. Your office may decide it doesn’t need an additional task to know that labs are complete.
Due Dates: You can optionally give any task a due date. You might complete a task today, but create an additional task that will be done in the future. When a task is not due today, the order will appear with the orange ring indicator, so you can tell at a glance that it is task for the future, and not due today.
Default or "Sticky" Tasks: When you add a task to an order, PCC EHR remembers it. The next time you create the same order, that task will appear automatically. This is called a “sticky” task. PCC EHR remembers sticky tasks per order, per user, so if your office is using a new type of order for the first time, each clinician may need to add the Collect Specimen task (for example) the first time they create that order.
Remove a Task, Remove a Sticky Task: You can remove any task by blanking out the “TASK” field and the “TO” field and saving the order. If your office decides to no longer use tasks for a particular order, each ordering clinician can blank out those fields the next time they place that order to remove the default sticky task.
Lab Specimen Collection Information
Lab orders include optional specimen collection information.
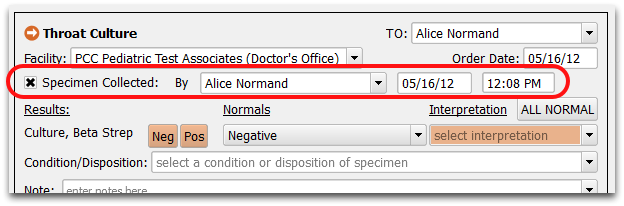
Click the checkbox to automatically enter your name and the current date and time. You can then adjust or update the information with the correct user, date, or time.
When recorded, specimen collection information appears on the Edit Orders window, on the View Details lab report, in the Visit History, and in the Sign Orders window. Specimen collection information is part of the CLIA lab standard and will support PCC’s future integration with lab services.
Configuration: By default, the specimen collection feature appears in all of your labs. You can use the Lab Configuration Tool to turn the specimen collection fields off for any lab order.
Require a Signature, Cancel an Order, Make Other Changes
As you edit an order, you can make other changes that effect the order.
Needs Review and Signature?: Click the “Signature Required” checkbox to indicate that an order needs to be signed. It will then appear on the Signing queue. From there, clinicians can review and sign the results, and optionally create order follow-up tasks.
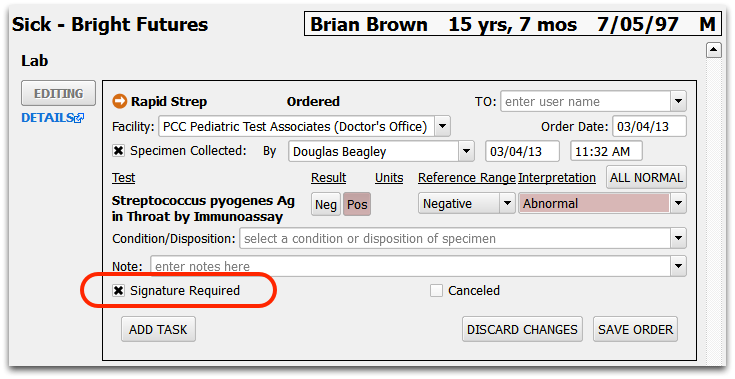
Cancel an Order: After grabbing an order, either from the Visit Tasks queue or the chart, you can click “Canceled” to cancel it.
Hide an Order from Public Reports and the Patient Portal: At any time, you can deselect the “Visible on Patient Reports” checkbox to hide the order from the Patient Visit Summary, the Health Information Summary, and the Patient Portal.
Click Save Order or Save: After you make changes, click the Save Order button, or (if the chart is open) the Save button, to save your changes.
Fulfill Immunization Orders
Immunization Workflow Guides: In addition to the reference materials below, you can read or watch Review, Order, and Administer Immunizations (Article, Video).
When you fulfill immunization orders, you can enter detailed information related to an immunization, including the patient’s VFC eligibility, the dose, lot, VIS information, as well as the route and site of administration.
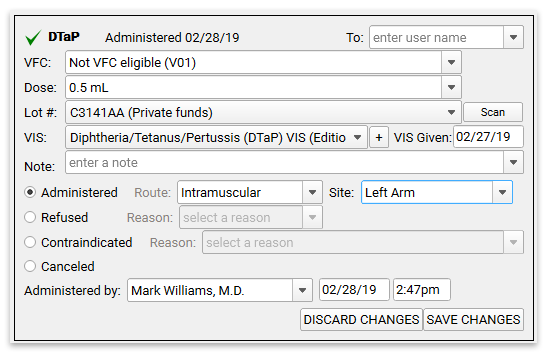
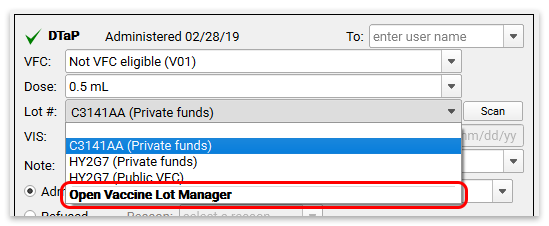
Lots in PCC EHR: By selecting a lot number, you enter all information about the lot, including expiration date and manufacturer. If you need to add or deplete an immunization lot, you can open the Vaccine Lot Manager right from the Lot # pull-down menu.
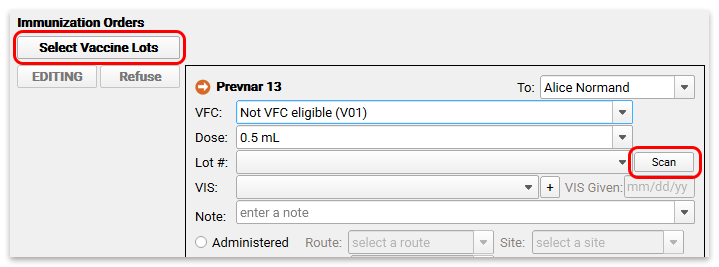
Using Barcode Scanners to Select Lots:
If you use barcode scanners to track inventory, you can use the Scan Vaccine Lots button in the Immunization Orders component, or the “Scan” button within each order to scan your vaccines. Read more about using barcode scanners to manage your vaccine inventory.
Wherever possible, PCC EHR will remember your practice’s defaults, current lot number, and previous answers and help you. For example, once someone in your office selects a specific VIS for a shot…
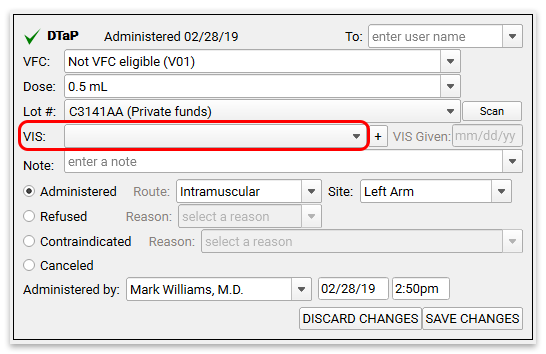
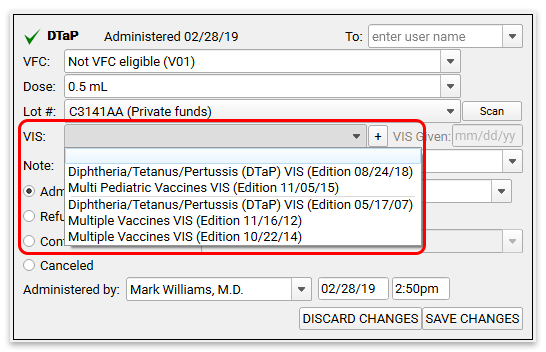
…PCC EHR will remember your office location’s standard VIS form for that shot and you won’t have to select it each time. One user can select the VIS forms the first time, and from then on each user at your office can simply confirm that the VIS is given.
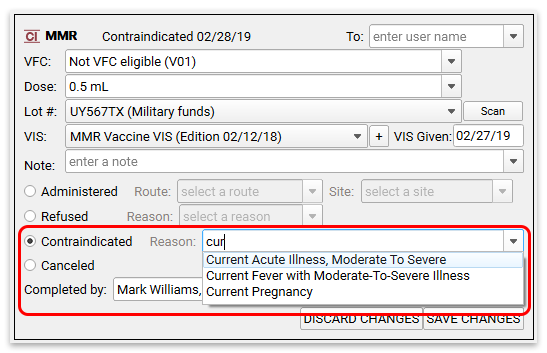
After entering details, you can click Administered, Refused, Contraindicated, or Canceled to complete the order.
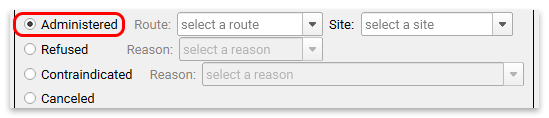

If you click in error, you can click a different choice or click again to deselect your choice. The “Completed/Administered by” fields will be filled out automatically with your username and the current date and time, but you can change them if you are entering information later.
If you mark an order as Refused or Contraindicated, you can enter a reason.
Read the Configure Immunizations in PCC EHR help article to learn more about immunization lots.
Complete Order Follow-up Tasks
If a physician creates a task on an order in the Sign Orders window, the nurse or other clinician will find it on the Messaging queue along with phone notes and other messages. They can double-click to open up the Order Follow-Up task.

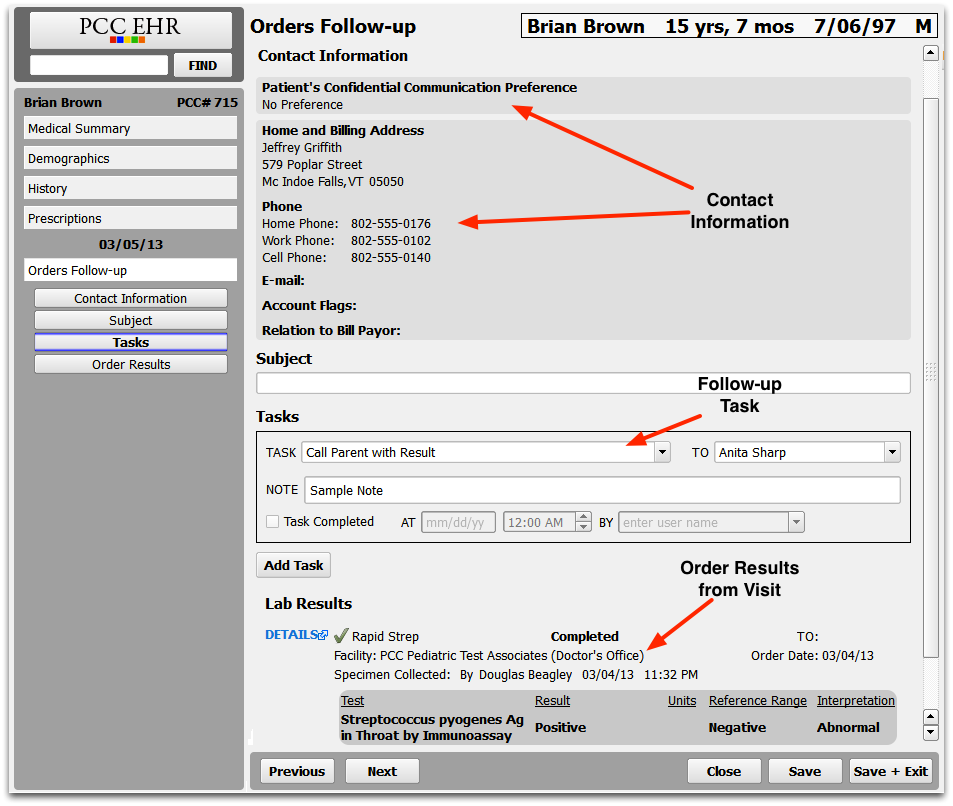
Just like phone notes, an Orders Follow-up note is a customizable ribbon. By default, it contains the lab test results and all the information needed to call the patient or family, discuss the results, or perform other actions related to the order.
Order Follow-up notes also appear in the patient’s Visit History, for later review.