Edit HCFA Form Output (hedfe)
The hedfe program is a HCFA/CMS 1500 form editor. It can configure both the layout and the content of claim forms. You can use the program to move form data around or change how it is filled out. Simple errors on claim forms can delay payment and cost your practice both time and money. Therefore it is important to understand how Partner fills out HCFA forms and how to make changes to your forms when necessary.
Remember that PCC can also help you configure and modify your HCFA form layout. Contact us with any questions before you start (support@pcc.com, 800-722-1082).
Contents
Start hedfe
To start the HCFA editor, go to a command prompt and type hedfe. You will be presented with a menu similar to your HCFA program. Select the batch you wish to edit and press Enter.
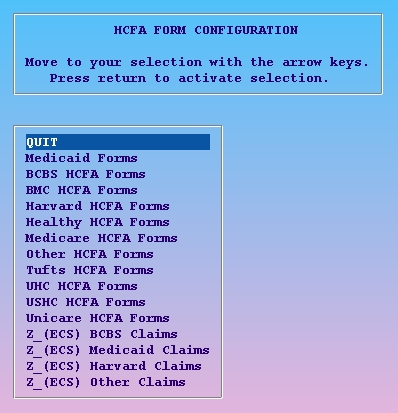
After you have selected a batch of forms to edit, you must decide whether you want to configure the form’s layout or its content. The program will ask if you wish to modify, “Where the boxes are” or “What goes in the boxes.” Highlight your choice and press Enter.
-
Layout: By selecting “Where the boxes are,” you can reposition the boxes which print on the HCFA form. Boxes can be moved up, down, left or right, and can be made larger or smaller. New boxes can be added and existing boxes can be removed. See the section below entitled, “The
hedfeEditing Screen” for complete details. -
Content: By selecting “What goes in the boxes,” you can select any box on the claim form and then edit questions which control what data should appear. These same questions are available in the Configuration Editor (
ced), but some users find thathedfemakes it easier to understand the settings. See “ThehedfeConfiguring Screen” for complete details.
Layout and Content: HCFA form configuration is determined by two setups: layout and content. The layout of a HCFA refers to the positioning of data on the form. For example, you may need to move the box containing the insurance ID# to the left so it fits the box on your form. The content of a HCFA refers to the actual information printing on the form. For example, some of the carriers that receive HCFA forms expect to find slashes when reading a date, while others may expect the date to be formatted differently.
Change Form Layout For Multiple Insurance Batches
Sometimes several batches use the same form layout. That means that any changes to the batch you selected will change the layout for the other batches as well. This is advantageous as it means you do not have to fix a layout problem on a dozen different batches.
If layout changes to a selected batch will affect other batches, you will see a message similar to this:
WARNING: The following batches share this form layout.  Changing it
for this batch may also affect these batches:
Alta Bates Forms        Heals Forms         Cigna Forms
Old Alta Bates Forms    Old Heals Forms
Are you sure you want to do this?
If you only wanted to change a single batch’s forms, and not all the forms printed from the other batches listed, you can answer “No” and hedfe will return you to the main screen. PCC can help you set up a separate form layout for a specific insurance batch.
If you answer “Yes”, hedfe will take you to the editing screen.
The hedfe Edit Screen
The Edit screen in hedfe looks like a HCFA form that has been filled out in code. Boxes are shown on the screen relative to one another as they would print out on a HCFA form. Each box contains a word or an abbreviation indicating what data is to appear.
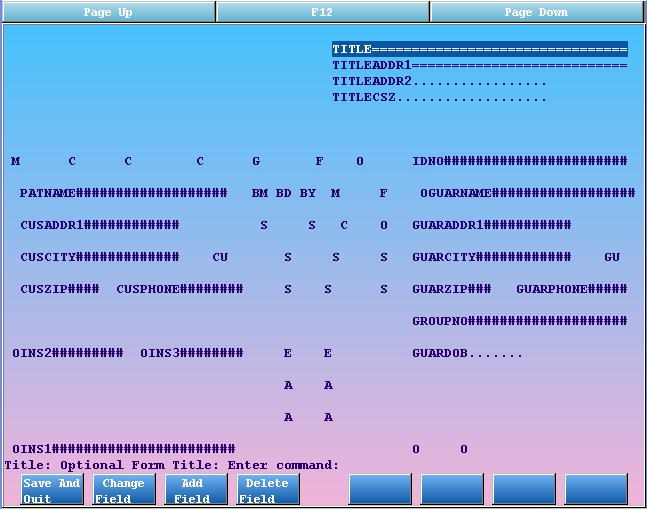
Box names on the screen may be followed by pound signs (#) or other characters which show you how large the field is and what the font size is. Very small fields may only show one or two characters on the screen.
The message line at the bottom of the screen always gives you information about the box currently highlighted.
Move Around, Select Fields
You may use the Tab, Page Up, Page Down and arrow keys to move the cursor to various boxes on the screen. Watch the message line at the bottom of your screen to see more information about the highlighted box.
The function keys along the bottom of the screen allow you to change, add, or delete fields.
Change the Settings for an Existing Field
To change a field on your HCFA form, simply select the desired field box and press F2 – Change Field. hedfe will change the purpose of the function keys, allowing you to work with the selected field.
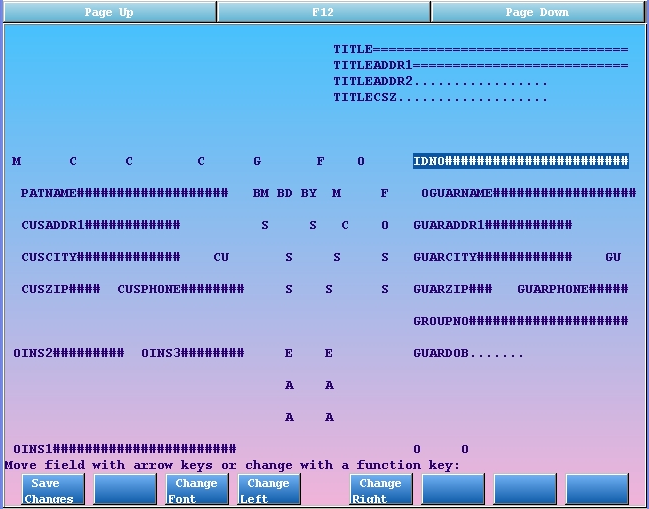
You now have the ability to change the field in several ways. Once you are done changing this field, you must save your changes by pressing F1 – Save Changes, or you can throw them away by pressing F12. Before you can start working on another field you must save or discard the changes made to the current field. Otherwise hedfe will think you are still working on the currently selected field and will continue to change it as you press keys.
Here are some of the changes you can make to a selected field:
Reposition a field
By using the arrow keys, you can move the selected field around the form. The screen may get ugly as a result–as the chosen field is moved past other fields, some will seem to disappear. The screen will fix itself once you save or throw away your new changes.
Making a field wider or narrower
You change the width of the selected field by moving either the left or right edge. By moving just one edge, you effectively make the field larger or smaller.
Select which edge you want to move by pressing F4 – Change Left or F5 – Change Right. When you press either of these keys, your function key labels will change once again. Use your left and right arrow keys to move the selected edge. As you move just one edge at a time, the field will become wider or narrower on your screen. When you are done adjusting the size of the field, press F1 – Save Changes to save the new size or press F12 to go back to the original size.
Using smaller or larger print
You can even change the print size of the text in a field. Some fields expect lot of text in a small space. To accomplish this, you can change the font size by using the F3 – Change Font key. When you press this key, your function keys will change again offering you three different font sizes to choose from.
“10 cpi” means the form will print 10 characters per inch. To fit more text in the same width field, you can select “12 cpi” or “17 cpi.” The smaller the font size number, the larger the text will print.
Selecting different font sizes will change the appearance of that field on the screen.
| The symbol: | Means this font size: |
|---|---|
| # | 10 CPI |
| = | 12 CPI |
| . | 17 CPI |
Add a New Field
To add a new field to the form press F3 – Add Field. You may need to do this if an insurance company requires more information than was previously on the form.
You will be presented with an exhaustive menu of all of the different kinds of data that can be put on the form. Each item may only be used once on a particular form, except for “User-Defined” fields described below.
Each item on this list represents a specific piece of visit information which you may want to appear on your HCFA forms. Additionally you may want to add customized text to your forms. You can add a “User-Defined” field to your form, and configure it to print any text you desire.
You can PAGE UP and PAGE DOWN through this list to select the field you want to add. Highlight your choice and press ENTER.
Once you have selected a field, you are thrown into “Change Field” mode so you can move the field around, make it wider and set its font.
If you are adding a “User-Defined” field, then there is another function key choice, F2 – Change Text, which allows you to specify the text that should appear in that field.
Delete a Field
To remove a field from your HCFA form, first select the unwanted field and then press F4 – Delete Field.
If you accidentally delete a field and you want it back, you can exit hedfe without saving the changes by pressing F12.
The hedfe Configuring Screen
The configuring screen in hedfe is identical to the editing screen except for the function keys. You will see a HCFA form layout with field names in place of each HCFA box. In some places you may see only one or two characters of a box name (for narrow boxes).
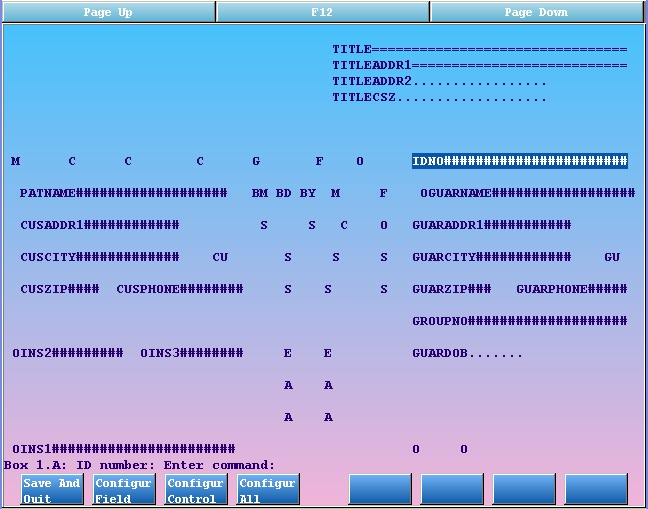
Moving Around, Selecting Fields
You may use the Tab, Page Up, Page Down and arrow keys to move the cursor to various fields on the screen. Watch the message line at the bottom of your screen to see more information about the highlighted field.
The function keys along the bottom of the screen allow you to configure individual fields or the entire form.
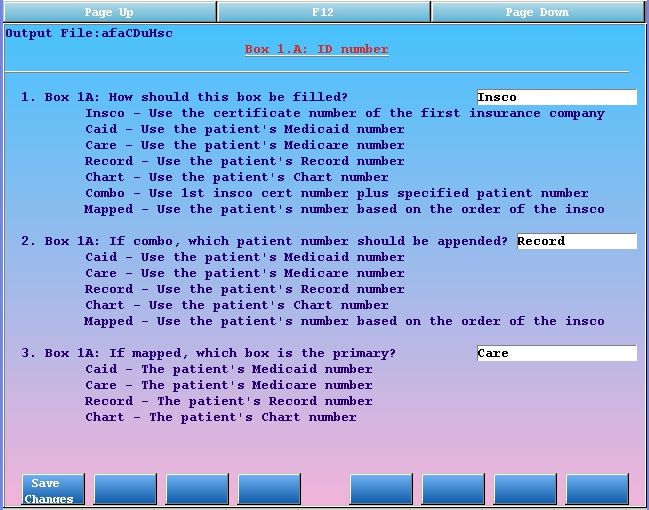
Configuring a Field
To configure a specific field, highlight the field and press F2 – Configure Field. You will be taken into a limited version of the Configuration Editor (ced) that asks you only the questions that affect the selected field.
Configuring the Entire Form
Press F3 – Configure Control to view a limited version of ced which only displays questions that affect the entire form.
If you tire of making changes to individual boxes, you can press F4 – Configure All, which takes you into all of the ced questions.