Correct a Claim: How to Fix and Resubmit an Insurance Claim
When you receive a rejection, or you have a claim or billing problem, how do you correct the encounter information and then resubmit the corrected claim? Read this article to learn how to update and resubmit a claim.
Make Changes, Add Reference/Resubmission Numbers, and Then Resubmit: To resolve a claim problem, typically you will edit the charges or the patient record, add the payer claim control number, and then resubmit or “rebatch” the claim. Make sure you always perform that final step–otherwise the changes you made to the charges won’t make a difference.
Contents
- 1 How to Resubmit a Single Claim
- 2 Find the Payer Claim Control Number
- 3 Payments Already Posted? Unlink and Adjust Them Off
- 4 Make Account and Charge Corrections For the Claim
- 4.1 Fix Incorrect Demographic and Insurance Information
- 4.2 Change the Responsible Party or Copay Amount for a Claim’s Charges
- 4.3 Change or Add a Diagnoses Code, Claim Reference Numbers, or Attachments
- 4.4 Change the Place of Service for Charges on an Encounter
- 4.5 Add a Procedure Modifier to a Code (-25, etc.)
- 4.6 Remove an Incorrect Billing Procedure Code From a Visit
- 4.7 Add a New (or Corrected) Procedure Code to a Visit
- 5 Rebatch and Resubmit the Claim
How to Resubmit a Single Claim
Read the procedure below to learn the basics of how to resubmit a single claim.
Update and Fix Charge, Encounter, Patient and Account Information
Confirm that patient and account information is correct and that the charges are now pending the correct insurance plan. Correct whatever errors lead to either a claim rejection, or that relate to why you need to resubmit the claim. For example, you may have needed to add an attachment, fix a procedure code, or similar.
To learn more, check out:
Run oops For the Account
You can find the oops program in the Daily Operations window or reach it by pressing the Correct Mistakes function key in many Partner programs, such as Checkout or Interactive Inscoar.
Identify Charges You Wish to Resubmit
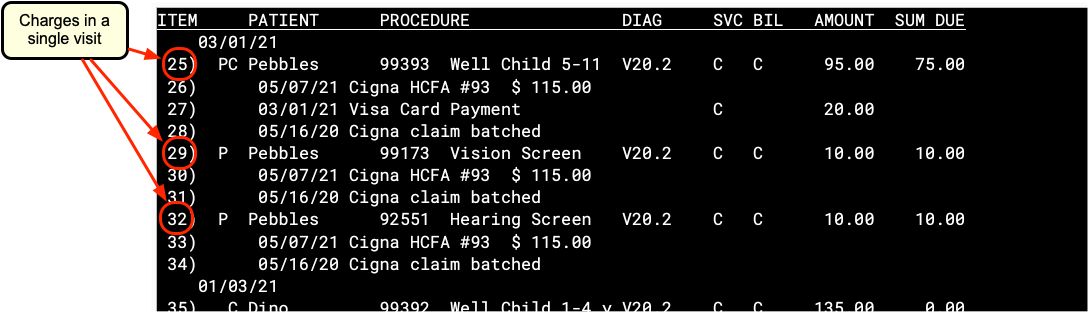
Page down and find the charges that need to be resubmitted. You can use the F4 – Insurance Status or F5 – Visit Status function keys to review or change details about the charges. In most cases, you should identify all the charges from a visit date.
Usually: Enter a Claim Delay Reason and Payer Claim Control Number
For most resubmissions, you need to enter a Claim Delay Reason and a claim Reference Number from the payer (the Payer Claim Control Number).
Press F5 – Visit Status and select all charges in the visit, or enter the claim ID. Then press Page Down to visit the Changing Visit Information screen and enter a Claim Delay Reason and Reference Number.
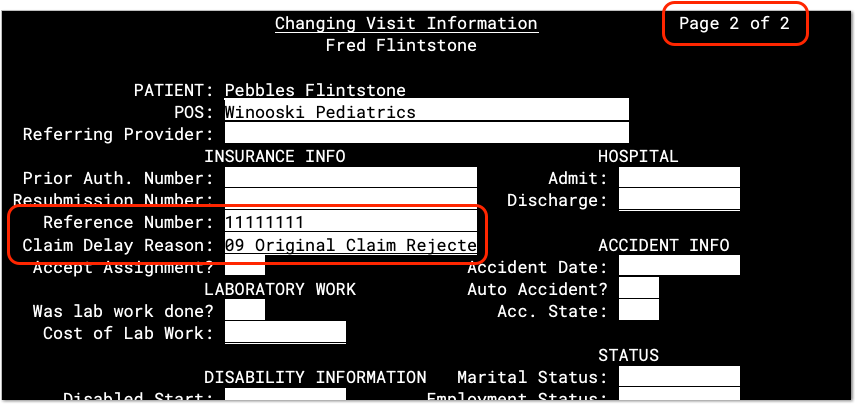
In most situations, the Claim Delay Reason will be “09 Original Claim Rejected or Denied Due to a Reason Unrelated to the Billing Limitation Rules”. The correct claim Reference Number must be supplied by the payer–you can find it on an EOB or on an acknowledgement from the payer.
To learn how to find the claim Reference number, read the sections below. To learn more about Claim Delay Reason, Reference Number, and other claim information attached to charges, see Edit Accident Information Authorization Numbers and Other Visit Status Information for the Claim.
Press [F2 — Generate Claim]
Press F2 – Generate Claim. Do this for either a paper or electronic claim, as F3 prepares a claim for either HCFA printing or electronic submission.

Select Charges to Rebatch
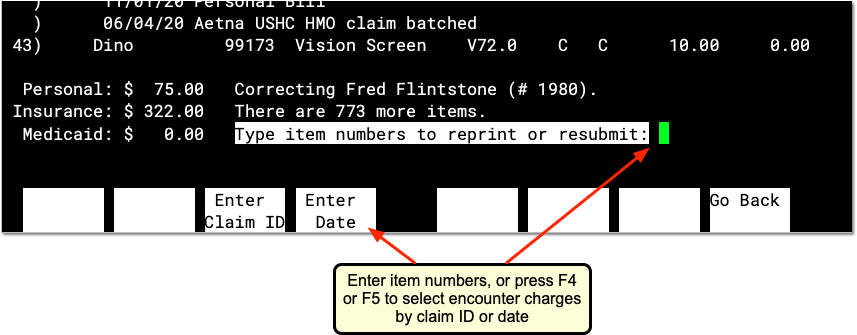
Enter the item numbers of the charges that need to be resubmitted and press Enter. Alternatively, press F3 – Enter Claim ID or F4 – Enter Date to quickly select all charges for a given encounter.
Print a HCFA or Batch an Electronic Claim
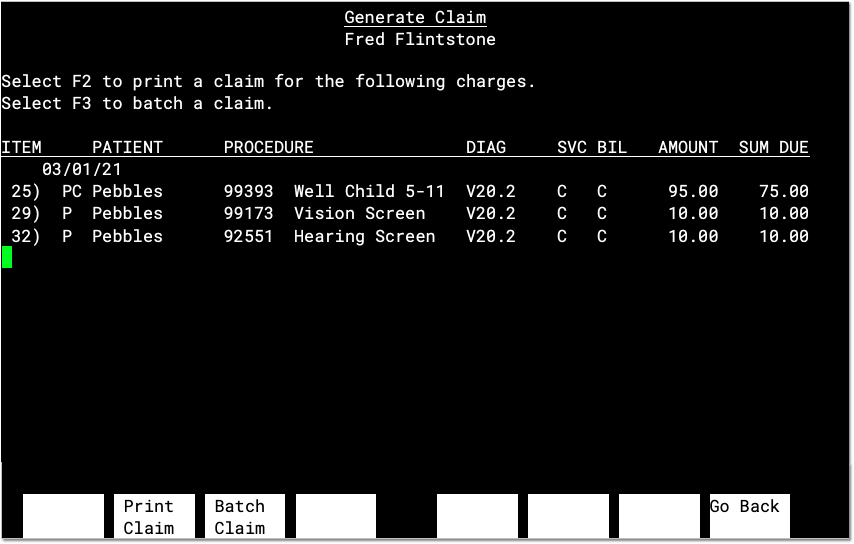
Review the charges and press F3 – Print Claim or F4 – Batch Claim.
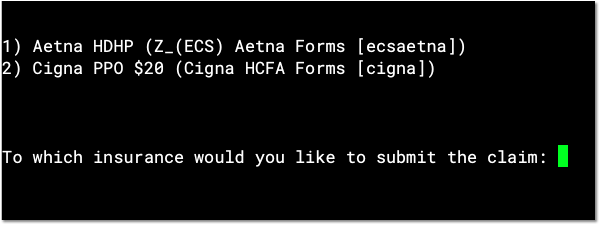
If More Than One Policy is Available, Select an Insurance Batch
If multiple insurance policies are available for the charges, PCC will ask you which one to use for the claim. Claim batches are used for claim configuration. Select an option and press Enter.
Review the Billing Message in the History
Whenever you generate a claim, PCC records how and when it was done in the account’s billing history.
Optionally, Enter an Account Note
If you’ve made changes to charges, payments, or the patient or family record, you may want to record your action so you can understand it later when you review billing history.
You can create a note in oops, or in PCC EHR.
Submit Claims
The next time you process claims, any newly batched electronic claims will be reprocessed and submitted.
Find the Payer Claim Control Number
The first step for any claim correction job is to find out if a claim went out already. If it did, you’ll need to find out the Payer Claim Control Number in order to resubmit the claim.
Open Correct Mistakes (oops) For Account
First, run the oops program for the patient or insurance subscriber.
Find Out if a Claim Went Out
Page down until you find the charges for the date of service. You can see all billing and claim history on the main charge history screen.
If a claim has been submitted, you will see “Aetna HCFA CLAIM ID” or “Aetna ECS CLAIM ID” or similar. After the CLAIM billing message, you will see one or more clearinghouse or payer response reports.
If a Claim Went Out, Look Up the Payer Claim Control Number
You will need the Payer Claim Control Number in order to submit a corrected claim. Press F3 – See Claim Report or Bill and enter the number next to the payer response report.
Payer response reports look different depending on the payer, but with practice you can learn to quickly identify the Payer Claim Control Number. (It may also be called the “Payer Trace Number”).
Write down the Payer Claim Control Number. You’ll need it when you resubmit.
Payments Already Posted? Unlink and Adjust Them Off
If payments and/or adjustments have already been posted against the charges, you may need to unlink the payments and post an accounting adjustment. The insurance payer will likely ask for the money refunded back as a “take back” on future ERAs. That means that a future check, for an unrelated encounter, may be reduced for the amount of a payment sent to you in error.
Follow the procedure below to post a temporary refund to hold the payments or adjustments for a claim you need to resubmit.
Open the refund Program
Run the Post Accounting Adjustments By Patient (refund) program and find the appropriate account.
Post a “Ins May Request Refund” Adjustment
Post an accounting adjustment equal to the dollar amount that is currently linked to the claim’s charges.
Can't Find the Procedure?: Your practice can have its own custom set of accounting adjustments, with names that match your usual workflow. Contact PCC Support if you need help creating new adjustment types.
Link the Payment to Your Adjustment
Open Correct Mistakes (oops) for the account and press F6 – Unlink & Relink to relink the payment to your new adjustment. To see an example, read Relink a Payment.
Record Your Actions
After you make these changes, you should record what you did on the account. You can add a visit-level note from the Insurance Status or Visit Status screens, or use the Family Editor (fame).
Later, Change to a Take-Back or Other Account Adjustment
If the insurance company requests a refund because of the claim correction, you can post a different accounting adjustment, such as “Insurance Take-Back” and relink the payment to that adjustment.
What About Adjustments From the Insurance Company?: If you are correcting a claim and there are already adjustments linked to charges you need to delete, you can safely delete them. Payments need to be accounted for later in your balance and reports, but adjustments do not.
Make Account and Charge Corrections For the Claim
After the above considerations, you are ready to update actual information that appears on a claim. Read the sections below for some examples.
Fix Incorrect Demographic and Insurance Information
Many common claim errors are due to incorrect demographic or insurance information.
You can fix patient birth date and other demographic information in PCC EHR or in the Patient Editor (notjane).
You can fix policy information in the Policies component in PCC EHR or the Insurance Policies program (policy).
Relationship to Insured: One common mistake that leads to claim rejections is an incorrect “Relationship to Insured”. For any medicaid-type plan, the relationship should be “Self”. Otherwise, in a pediatric environment PCC recommends you use the “Child” relationship.
Change the Responsible Party or Copay Amount for a Claim’s Charges
You may need to change the responsible party (an insurance policy, Medicaid, or personal) for some or all of the charges on a claim. You may also need to change the copay amount connected with the office visit charge.
You can make these changes in Correct Mistakes (oops), using F4 – Insurance Status.
Read the Change the Responsible Party for Charges article to learn more.
Change or Add a Diagnoses Code, Claim Reference Numbers, or Attachments
You may need to edit the ICD-10, claim reference numbers, or add attachments to a claim and then resubmit it.
You can make these changes in Correct Mistakes (oops), using F3 – Visit Status.
Read the Edit Diagnoses, Billing Provider, and Other Visit and Claim Information article to learn how to change encounter and claim information for charges.
Read Send Attachment Codes on PCC Claims to learn how to create and add attachment codes to a claim.
Change the Place of Service for Charges on an Encounter
You can adjust the place of service for charges on an encounter without deleting and reposting charges.
In Correct Mistakes (oops), press F5 – Visit Status and select all charges for the encounter. Then page down to the claim information screen. Update the place of service in the POS field, and press F1 to save your changes.
To learn more about this procedure, read Change an Encounter’s Billing Place of Service After Posting Charges.
Add a Procedure Modifier to a Code (-25, etc.)
Sometimes you may need to add a modifier, such as -25, to a charge. You can do that in Correct Mistakes (oops) using F5 – Visit Status.
Read the Change Procedure Code Modifiers After Posting Charges article section to learn how.
Code Missing?: If you can’t find the modified code that you need, then your practice has not set up that procedure for billing in your Procedures table. Ask your practice’s billing administrator to add the modified code as a procedure in the Table Editor (ted), with appropriate code and price.
Remove an Incorrect Billing Procedure Code From a Visit
If a visit has the wrong charge on it, you must delete the incorrect procedure in oops. You may need to first handle any payments or adjustments attached to the charge as described above. Then you can delete the incorrect charges and post the correct charges. (As noted above, if the claim has already been sent, you’ll need to include the Payer Claim Control Number for resubmission.)
Find the Charges and Note Important Claim Information
First, open the oops program for the patient or insured family member. Page down to review the charge history. Make note of the charge date, diagnoses, provider, and location. You can press F5 – Visit Status to review more detailed information about any charge. You can also use the Account History report (tater).
Claim Already Received By Payer?: As discussed in the procedures above, if the claim has already been received by the payer, you’ll need to look up the Payer Claim Control Number before proceeding. If payments and adjustments were posted, you’ll need to unlink them from the invalid charge as well. See the procedures above to learn how.
Delete the Incorrect Charges
Next, use F8 – Delete Items to delete the incorrect charges.
Post the Correct Charges in Checkout
See the procedure below.
Add a New (or Corrected) Procedure Code to a Visit
If you need to add a new procedure code to a claim, perhaps after you delete the incorrect one, follow this procedure.
Find the Visit and Note Important Claim Information
First, open the oops program for the patient or insured family member. Page down to review the charge history. Make note of the charge date. You can press F5 – Visit Status to review more detailed information about any charge. You can also use the Account History report (tater).
Claim Already Received By Payer?: As discussed in the procedures above, if the claim has already been received by the payer, you’ll also need to identify the Payer Claim Control Number before proceeding, in order to file a corrected claim. If any payments and adjustments are already posted against the charges, you’ll need to unlink them from the invalid charge as well. See the procedures above to learn how.
Post New Charges for the Visit
In the Billing History section of the patient’s chart, double-click on the encounter to edit it. Verify that you are working with the correct encounter using the information you noted above. Enter the new charges. Be sure and link procedures to the appropriate diagnoses.
Alternatively, you can post new charges in the Post Charges (chuck) program, but you will need to manually enter the encounter date, diagnoses, provider, and location.
If Already Submitted and Acknowledged By the Payer, Enter the Payer Claim Control Number
If the claim has already been acknowledged by the payer, you must add a Claim Delay Reason and the Payer Claim Control Number to all charges for the encounter. In oops, press F5 – Visit Status, select all charges, and page down to adjust the Reference Number and Claim Delay Reason fields.

See the procedure above to learn more.
Rebatch and Resubmit the Claim
After you make changes to a visit’s charges, such as adding a missing diagnosis code, deleting an incorrect procedure code, or changing the responsible party, you must re-batch the claim so it can be submitted. You should also record what happened in the account record.
If a claim was already sent, you should first add a payer claim control number to all charges.
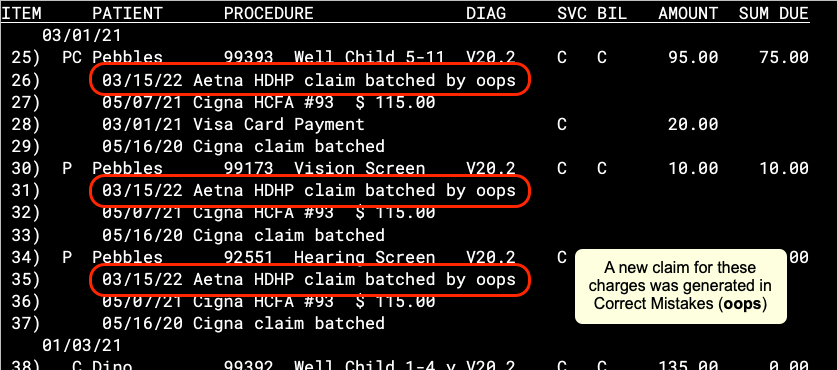
Then you can press F2 – Generate Claim and select charges or enter a claim ID or date. The charges will be “rebatched” on your system, and the claim will be processed and submitted the next time you Submit Claims.
If you select charges from multiple encounters, PCC will create separate claims based on patient, provider, and (as of PCC 9.4) place of service.
To see additional details, read the procedure above.